
Обновление не удалось. Ответ не является допустимым ответом JSON. Как оказалось, с такой ошибкой сталкиваются многие вебмастеры при обновлении или публикации записей в WordPress.
С ней же столкнулся и я при переносе сайта своего клиента с хостинга Beget на Namecheap. Кстати, консоль у меня была на английском языке, и эта ошибка звучала так: Updating failed. The response is not a valid JSON response.
В этом материале я расскажу о всех возможных способах решить эту проблему, и какой помог лично мне.
Навигация по статье
Почему возникает эта ошибка?
Причин возникновения этой ошибки множество, но самая распространенная — отключение событий REST API. Но мы не будем останавливаться только на ней и рассмотрим все возможные способы решения этой проблемы.
Кстати, так выглядит сама ошибка обновления, возникающая при публикации или обновлении записи в WordPress.

Как я решил эту проблему? Изначально я создавал сайт на хостинге Beget, после завершения работы требовалось выгрузить сайт на хостинг Namecheap. И сразу после публикации сайта я обнаружил, что больше могу обновлять или создавать новые записи/страницы. Особо никаких действий предпринимать мне не хотелось, поэтому я просто написал в техподдержку, и там решили мою проблему.
Если же техподдержка вашего хостинга не очень отзывчивая, то я рекомендую перейти на Beget и обязательно указать мой код партнера 1486766 при регистрации! 😀
А если серьезно, то попробуйте каждый из описанных ниже методов, и один из них вам наверняка поможет!
Способ 1. Обновите постоянные ссылки
Перейдите в консоль вашего сайта, затем в Настройки и найдите там пункт Постоянные ссылки.

Здесь вам требуется просто нажать на кнопку Обновить. После этого можно проверить изменения.
Способ 2. Установка классического редактора WordPress
Далеко не самый идеальный способ решения проблемы, потому что вам придется отказаться от удобного современного блочного редактора и начать пользоваться его давно устаревшей версией.

Скачайте плагин Классический редактор с официального репозитория WordPress. Затем перейдите в Настройки — Написание. Здесь вам нужно найти параметр Классический редактор для всех пользователей и выбрать значение Для всех.
Можно проверить изменения. Если не помогло, переходим к следующему способу!
Способ 3. Отсутствие SSL сертификата или его некорректная настройка
Зачастую многие регистраторы и хостинг-провайдеры предлагают слишком дорогие SSL-сертификаты, цена на которые порой превышает 5 000 рублей за год. Далеко не все готовы платить столько денег и ищут возможность подключить бесплатный SSL-сертификат.
Зачастую эти попытки заканчиваются неудачами, некорректными настройками сайта, что приводит к ряду ошибок.
Если вы новичок, то крайне рекомендую использовать хостинг Beget в своей работе. Он не только предоставляет бесплатный пробный период на 30 дней для любого тарифа, но и выдает бесплатные рабочие SSL-сертификаты. Я уже как-то писал обзор на хостинг Beget, рекомендую к прочтению!
Способ 4. Устранение ошибки смешанного содержимого
Данное решение поможет, если ошибка возникла после подключения SSL-сертификата. Для начала перейдите в раздел настроек вашего сайта и проверьте, чтобы URL WordPress Address (Адрес WordPress) и URL Site Address (Адрес сайта) начинались с протокола безопасного соединения https.

Затем перейдите в раздел плагинов, скачайте и установите Really Simple SSL. После активации плагина появится уведомление Almost Ready to migrate SSL. Нажмите на синюю кнопку Activate SSL.

Затем идем в Настройки, находим раздел SSL. Проконтролируйте, чтобы первые три пункта (Mixed content fixer, Enable WordPress 301 Redirection to SSL, Enable 301 .htaccess redirect) были активны. По окончанию настройки проверяем изменения.
Способ 5. Проверка тем и плагинов
Если ошибка «Обновление не удалось. Ответ не является допустимым ответом JSON» появилась после установки какой-то темы или плагина, то не сложно догадаться, в чем может быть причина ее возникновения.
Попробуйте переключиться на другую тему и проверить изменения. Затем отключите все плагины и снова проверьте изменения. Если же проблема решена, то остается только выяснить, какой из плагинов вызывает эту ошибку. Включайте их по очереди и проверяйте, появилась ли снова эта проблема.
Способ 6. Удостоверьтесь, что вы не отключили Rest API и wp-json
В самом начале этого материала я сказал, что это одна из самых частых причин возникновения ошибки обновления записей и страниц.
Перейдите в редактор вашей темы и найдите файл functions.php. А теперь внимательно изучите его содержимое. Если проблема кроется в отключении REST API и wp-json вы найдете примерно следующее:
// Отключаем сам REST API
add_filter('rest_enabled', '__return_false');

// Отключаем фильтры REST API
remove_action( 'xmlrpc_rsd_apis',            'rest_output_rsd' );
remove_action( 'wp_head',                    'rest_output_link_wp_head', 10, 0 );
remove_action( 'template_redirect',          'rest_output_link_header', 11, 0 );
remove_action( 'auth_cookie_malformed',      'rest_cookie_collect_status' );
remove_action( 'auth_cookie_expired',        'rest_cookie_collect_status' );
remove_action( 'auth_cookie_bad_username',   'rest_cookie_collect_status' );
remove_action( 'auth_cookie_bad_hash',       'rest_cookie_collect_status' );
remove_action( 'auth_cookie_valid',          'rest_cookie_collect_status' );
remove_filter( 'rest_authentication_errors', 'rest_cookie_check_errors', 100 );

// Отключаем события REST API
remove_action( 'init',          'rest_api_init' );
remove_action( 'rest_api_init', 'rest_api_default_filters', 10, 1 );
remove_action( 'parse_request', 'rest_api_loaded' );

// Отключаем Embeds связанные с REST API
remove_action( 'rest_api_init',          'wp_oembed_register_route'              );
remove_filter( 'rest_pre_serve_request', '_oembed_rest_pre_serve_request', 10, 4 );
remove_action( 'wp_head', 'wp_oembed_add_discovery_links' );
// Отключаем wp-json
add_filter('rest_enabled', '__return_false');
remove_action( 'xmlrpc_rsd_apis', 'rest_output_rsd' );
remove_action( 'wp_head', 'rest_output_link_wp_head', 10, 0 );
remove_action( 'template_redirect', 'rest_output_link_header', 11, 0 );
remove_action( 'auth_cookie_malformed', 'rest_cookie_collect_status' );
remove_action( 'auth_cookie_expired', 'rest_cookie_collect_status' );
remove_action( 'auth_cookie_bad_username', 'rest_cookie_collect_status' );
remove_action( 'auth_cookie_bad_hash', 'rest_cookie_collect_status' );
remove_action( 'auth_cookie_valid', 'rest_cookie_collect_status' );
remove_filter( 'rest_authentication_errors', 'rest_cookie_check_errors', 100 );
remove_action( 'init', 'rest_api_init' );
remove_action( 'rest_api_init', 'rest_api_default_filters', 10, 1 );
remove_action( 'parse_request', 'rest_api_loaded' );
remove_action( 'rest_api_init', 'wp_oembed_register_route' );
remove_filter( 'rest_pre_serve_request', '_oembed_rest_pre_serve_request', 10, 4 );
remove_action( 'wp_head', 'wp_oembed_add_discovery_links' );
remove_action( 'wp_head', 'wp_oembed_add_host_js' );Если у вас есть похожий код, то удаляем его. Затем переходим в Настройки, находим раздел «Постоянные ссылки» и нажимаем «обновить».
Способ 7. Узнать ответ у техподдержки вашего хостинга
Иногда проблема может возникнуть не из-за вашего сайта, а некорректных настроек сервера. Попробуйте обратиться в техподдержку вашего хостинга с просьбой решить вашу проблему.
Кстати, а вам рассказать, у какого хостинга самая лучшая техподдержка? 😀 Конечно же у Beget! А вы думали, я какой-то другой хостинг здесь посоветую? (Не забывайте при регистрации указывать мой партнерский код 1486766, так я заработаю много денег и больше не буду писать статьи).
Вам понравился материал? Интересует разработка сайтов? Тогда обязательно подпишитесь на нашу группу ВКонтакте! Так вы всегда будете в курсе событий и никогда не пропустите новые материалы. А еще у нас есть беседа с активными участниками, где мы бесплатно помогаем новичкам с решением любых вопросов! 🙂
Добрый день.
Столкнулась с той же проблемой, что и некоторое кол-во пользователей пару месяцев назад, однако среди имеющихся в поиске постов ответа не нашла.
Проблема:
Open Server 5.2.2; WordPress 5.3.2.
Чистая установка в новую папку + новая бд.
Голый WordPress, тема стандартная TwentyTwenty.
Предустановленные плагины не активировались и сразу удалены.
Лишние темы удалены.
Ничего в системе не менялось и не настраивалось, кроме одного: «Настройки -> Постоянные ссылки» переключены со стандартных на «Название записи».
При попытке изменить или добавить пост или страницу появляется сообщение об ошибке:
«Ошибка обновления. Сообщение об ошибке: Ответ не является допустимым ответом JSON.»
«Здоровье сайта» пишет 2 проблемы — отсутствие https и «REST API выдал неожиданный результат».
Rest APi не подключала и не отключала, напомню: сайт голый. Создан полчаса назад.
В чем может быть проблема?
UPD: переключение «Постоянных ссылок» обратно к стандартному варианту чинит проблему.
Но такое решение, к сожалению, совсем не вариант.
Т.е. проблему нужно искать в файлах самого WordPress’a… Но где?
И почему она вообще возникает, ведь вид ссылок — это стандартная системная функция..?
-
Тема изменена 2 года, 11 месяцев назад пользователем
Avriel.
Приветствую вас на сайте Impuls-web!
Если ваш сайт работает на WordPress, то данная статья будет для вас очень полезна, так как в последних версиях данной CMS есть один небольшой недостаток, и если оставить его без внимания, то в дальнейшем это может привести к тому, что ваш сайт будет постепенно терять позиции в поисковой выдаче.
Данный недостаток связан с новым интерфейсом REST API, и заключается он в том, что на вашем сайте создается новая папка WP-JSON, в которой размещаются страницы с кодом.
На первый взгляд ничего страшного. Однако все эти страницы попадают в поисковую выдачу, и представляют собой вспомогательный код, не содержащий какого-то уникального контента. Как известно, поисковые системы как Яндекс, так и Google очень негативно относятся к подобным мусорным страницам. Причем, со временем этих страниц становится все больше и в конечном итоге, это может привести к тому, что поисковые системы начнут понижать ваш сайт в поисковой выдаче.

К счастью данная проблема решается довольно просто. Однако перед тем как перейти к ее решению, давайте сначала проверим, есть ли она на вашем сайте.
Для того, что бы понять, есть ли данная папка с ненужными страницами на вашем сайте или нет, достаточно к адресу вашего сайт через слэш приписать wp-json.
Например, так:
impuls-web.ru/wp-json
Если вы попадаете на страницу с непонятным кодом – это говорить о том, что на вашем сайте данная проблема есть. Именно вот такие вот страницы засоряют вашу поисковую выдачу.
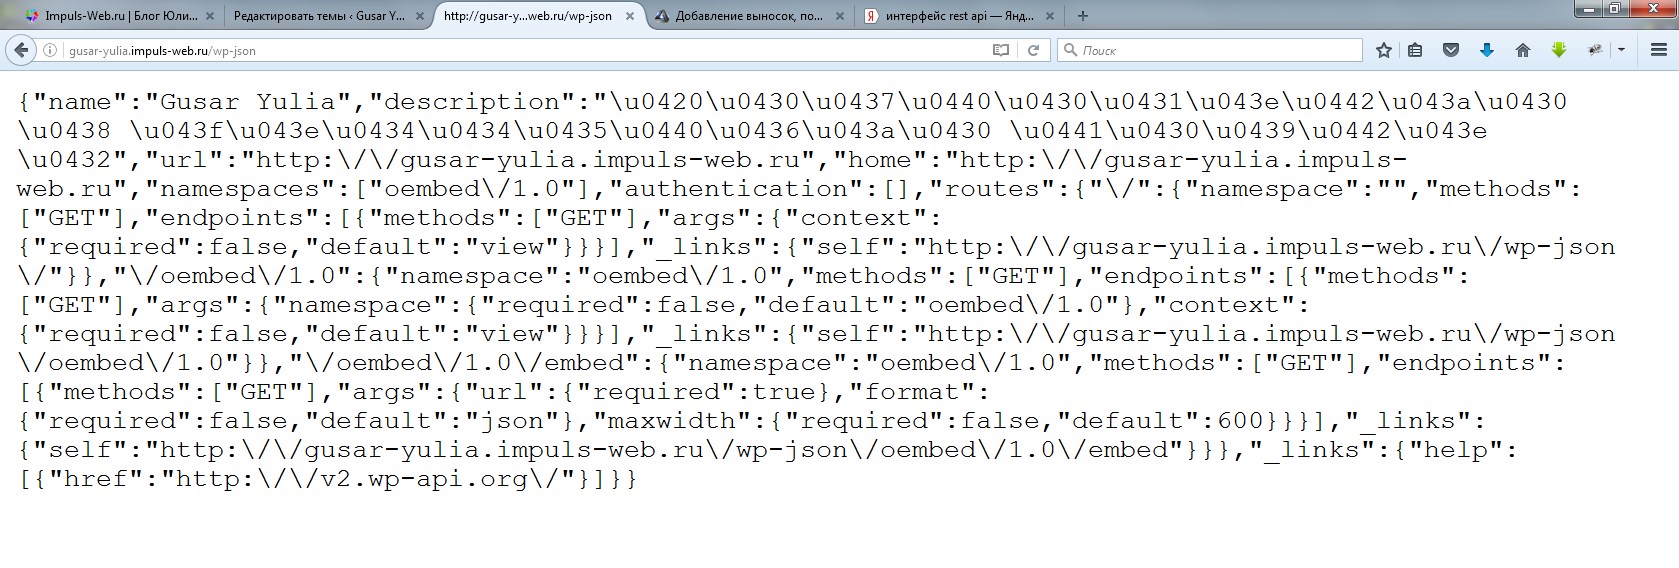
Помимо этого данный компонент так же может создавать дубли страниц на вашем сайте, которые тоже очень негативно воспринимаются поисковыми системами.
Актуальное решение
- 1. Открываем файл Robots.txt, который должен находится в папке с файлами вашего сайта на хостинге. Найти и открыть его можно при помощи FTP клиента или програмы Notepad++ или аналогов, а так же через файловый менеджер на Вашем хостинге.
- 2. Убедитесь в том, что у вас в этом файле есть такая строка
Выглядеть это должно так:
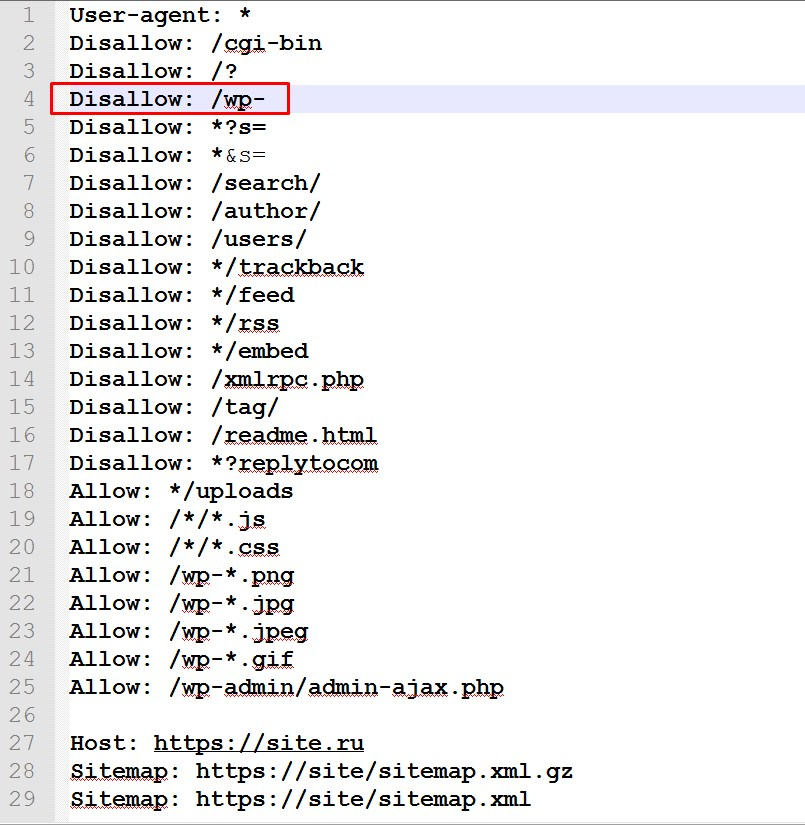
- 3. Если такой строки нет, ножно её добавитьт. С её помощью мы задаем поисковым системам запрет на индексировнаия всех файлов, расположенных по пути: домен сайта/wp-…
Сюда будут входить файлы /wp-json/, /wp-includes, /wp-content/plugins - 4. Если вы редактировали файл прямо на хостинге, то нужно его просто сохранить. Если вы загружали этот файл с хостинга, то нужно его сохранить, а потом выгрузить обратно на хостинг с заменой существующего файла.
Устаревшее решение
Обращаю ваше внимание на то, что данная статья и видео записывались почти 5 лет назад! За это время многое обновилось и изменилось. На сегодняшний день я не рекомендую вам использовать устаревшее решение, так как оно может привести к проблемам в работе некоторых плагинов! Используйте первый вариант решения через файл Robots.txt.
Тем не менее, я все же оставлю описание устаревшего метода, так как вы можете найти его на других сайтах и должны знать что это решение в современных реалиях не подходит!
Итак, для решения данной проблемы можно воспользоваться таким алгоритмом:
- 1.Вставить небольшой фрагмент кода в файл функций вашей темы functions.php. Открыть данный файл вы можете при помощи стандартного редактора WordPress, который находится в разделе «Внешний вид» => «Редактор».
- 2.Находим здесь файл functions.php он же «Функции темы».
- 3.Далее, мы переходим в самый конец данного файла. А дальше внимание, в идеале файл functions.php должен заканчиваться вот такими символами: ? >
Если в вашем файле такие символы есть, то предложенный фрагмент кода вы будете вставлять перед этим вот символом:
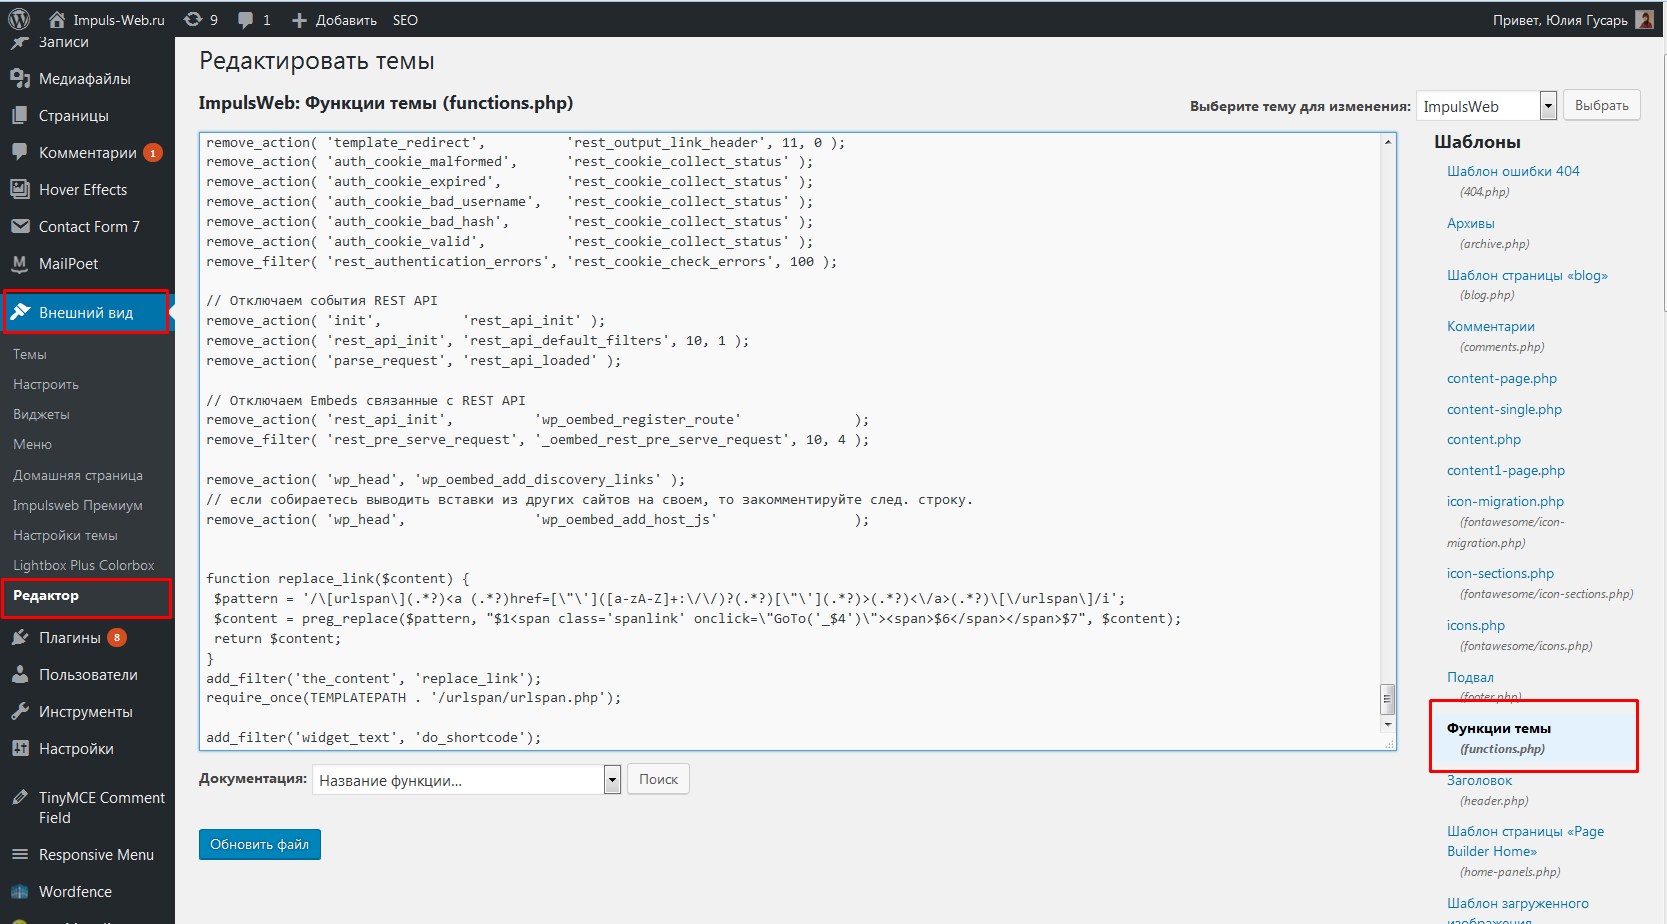
Если же в вашем файле функций этих символов нет, то вы просто вставляете в самом конце файла functions.php. Специально дописывать эти символы здесь не нужно!
Перед внесением любых правок в файл функций или любой другой файл темы, не забудьте сделать его резервную копию. То есть, просто, скопируйте данный фрагмент кода куда-нибудь себе в текстовый документ, что бы он у вас сохранился в качестве резервной копии.
- 4.Так же можно подключиться к сайту при помощи FTP-клиента, далее зайти в папку с доменом. Далее перейти в папку wp-content/themes/папка_с _названием_вашей_темы/ и здесь найти файл functions.php, а затем, точно так же спуститься в самый конец файла, и либо в самом конце, либо же перед символами ? > вставить данный фрагмент кода.
Код будет выглядеть следующим образом:
1
2
3
4
5
6
7
8
9
10
11
12
13
14
15
16
17
18
19
20
21
22
23
24
// Отключаем сам REST API
add_filter(‘rest_enabled’, ‘__return_false’);
// Отключаем фильтры REST API
remove_action( ‘xmlrpc_rsd_apis’, ‘rest_output_rsd’ );
remove_action( ‘wp_head’, ‘rest_output_link_wp_head’, 10, 0 );
remove_action( ‘template_redirect’, ‘rest_output_link_header’, 11, 0 );
remove_action( ‘auth_cookie_malformed’, ‘rest_cookie_collect_status’ );
remove_action( ‘auth_cookie_expired’, ‘rest_cookie_collect_status’ );
remove_action( ‘auth_cookie_bad_username’, ‘rest_cookie_collect_status’ );
remove_action( ‘auth_cookie_bad_hash’, ‘rest_cookie_collect_status’ );
remove_action( ‘auth_cookie_valid’, ‘rest_cookie_collect_status’ );
remove_filter( ‘rest_authentication_errors’, ‘rest_cookie_check_errors’, 100 );
// Отключаем события REST API
remove_action( ‘init’, ‘rest_api_init’ );
remove_action( ‘rest_api_init’, ‘rest_api_default_filters’, 10, 1 );
remove_action( ‘parse_request’, ‘rest_api_loaded’ );
// Отключаем Embeds связанные с REST API
remove_action( ‘rest_api_init’, ‘wp_oembed_register_route’);
remove_filter( ‘rest_pre_serve_request’, ‘_oembed_rest_pre_serve_request’, 10, 4 );
remove_action( ‘wp_head’, ‘wp_oembed_add_discovery_links’ );
В данном фрагменте кола мы отключаем компоненты REST API, которые приводят к данной прблеме.
Вставляя код так же, обращайте внимание на то, что бы в конце данного файла у вас не стояли лишние пробелы и Enter-ы.
- 5.После вставки кода нажимаем на кнопку «Обновить файл».
- 6.Переходим на страницу сайта, обновляем ее, и теперь пробуем осуществить туже проверку, которую мы делали в самом начале. Ставим в адресной строке, после адреса сайта /wp-json.

Если вы всё сделали правильно, то вас должно перенаправить на страницу с ошибкой 404 «страница не найдена» или на главную страницу сайта. Здесь всё зависит от темы оформления.
Видеоинструкция
Как видите, это решение очень простое, но на самом деле, оно позволит уберечь ваш сайт от очень серьезных проблем в будущем. Потому, как уже есть много примеров, и среди моих знакомых в том числе, у которых сайты начали терять свои позиции именно из-за того, что у них в выдаче появлялось очень много мусорных страниц и дублей, связанных с элементом WP-JSON.
Если данная статья была для вас полезна – не забудьте написать комментарий и поделиться статьей в социальных сетях. А на этом у меня все, подписывайтесь на мою рассылку и мой канал на YouTube. До встречи в следующих статьях и видео!
С уважением Юлия Гусарь
Fix the annoying WordPress error Publishing failed. The response is not a valid JSON response., Updating failed. The response is not a valid JSON response., or The response is not a valid JSON response.
You may have seen these errors when trying to publish or update your WordPress posts or pages. You may even have see this error when trying to upload an image in your WordPress website.
If you don’t deal with this error right away, you may lose all the changes that you have made for the past few hours (yes, we humans still go by hours without saving our work). This article is about rescuing you from that.
There are many reasons for why these errors can occur to your WordPress site. It can be related to your web server, .htaccess file, SSL certificate, a plugin, a theme, or for another reason. So depending on your specific scenario, a different solution may work for you.
Here, I have outlined all the methods that will help you solve this error. Be it Publishing failed. Error message: The response is not a valid JSON response., Updating failed. Error message: The response is not a valid JSON response., or just The response is not a valid JSON response.
Try using the following methods one by one and you should find the one that works for you. But in order not to lose your work progress, open your WordPress dashboard in a new window and try the solutions there.
Update Permalink
Warning: Updating permalink structure may change the URL of all your website pages and posts so the previous URLs to access your pages and posts won’t work. Your website’s SEO will also be affected by this. Therefore, if keeping your original URL is important, you may either not want to try this one or revert back to the original permalink structure as soon as the test is completed. But if your website is brand new, you don’t have to worry about it.
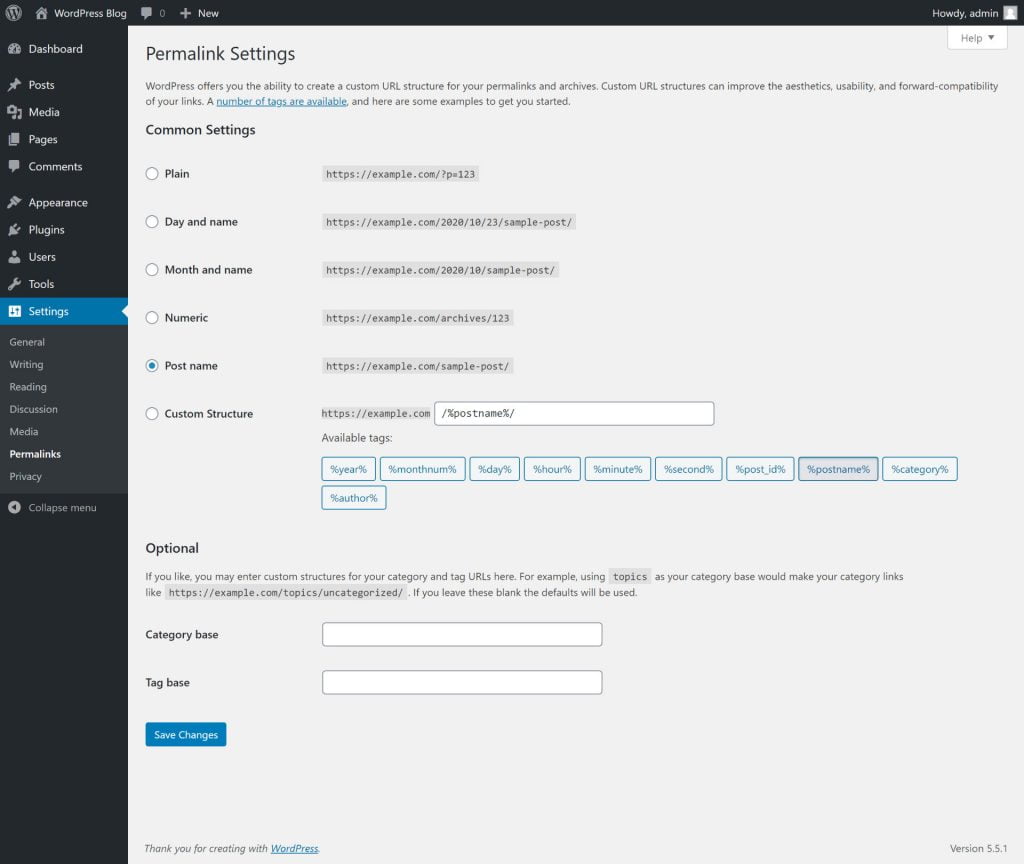
The most common solution for publishing or updating failed the response is not a valid JSON response error is to update your permalink structure.
From your WordPress dashboard, go to Settings and then Permalinks. Then you can click on the Save Changes button to re-save or update the current permalink structure. Then check to see if the error is fixed.
If it doesn’t fix the error then you can go back to the permalink page and then select Plain from under the Custom Settings heading to change the permalink structure. Then click on Save Changes. Now check again to see if the error has been solved.
If the error hasn’t resolved, then you can try changing to all the other permalink structures and check if the error gets solved for any of them.
If this solution doesn’t work for you try the next one.
Use Classic Editor
In December 2018 WordPress updated their Classic Editor with the new Gutenberg/Block Editor. And since then many have faced this “Publishing failed. The response is not a valid JSON response.” and “Updating failed. The response is not a valid JSON response.” error.
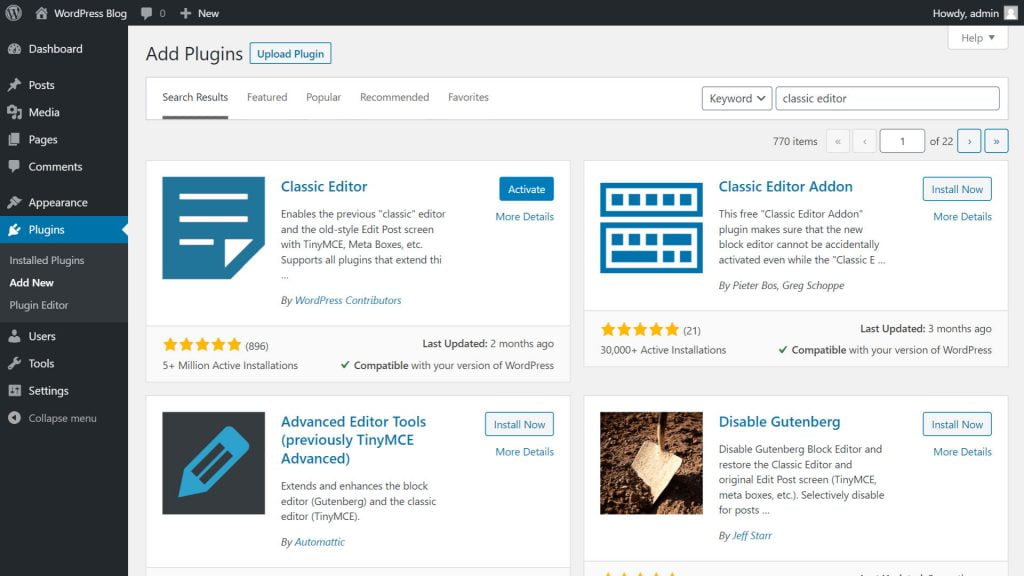
So, by going back to the Classic Editor many have been able to solve the error. In order to use Classic Editor, you will need to install and activate the Classic Editor plugin on your WordPress website.
However, if you use Classic Editor, this will replace the new Block Editor of WordPress with its old Classic Editor. This will change how you are used to editing your pages and posts. This may also affect the formatting and layout of your existing pages and posts that have been previously edited using the Block editor. So, you should safeguard your site first by changing a setting in the Classic Editor before you start using it.
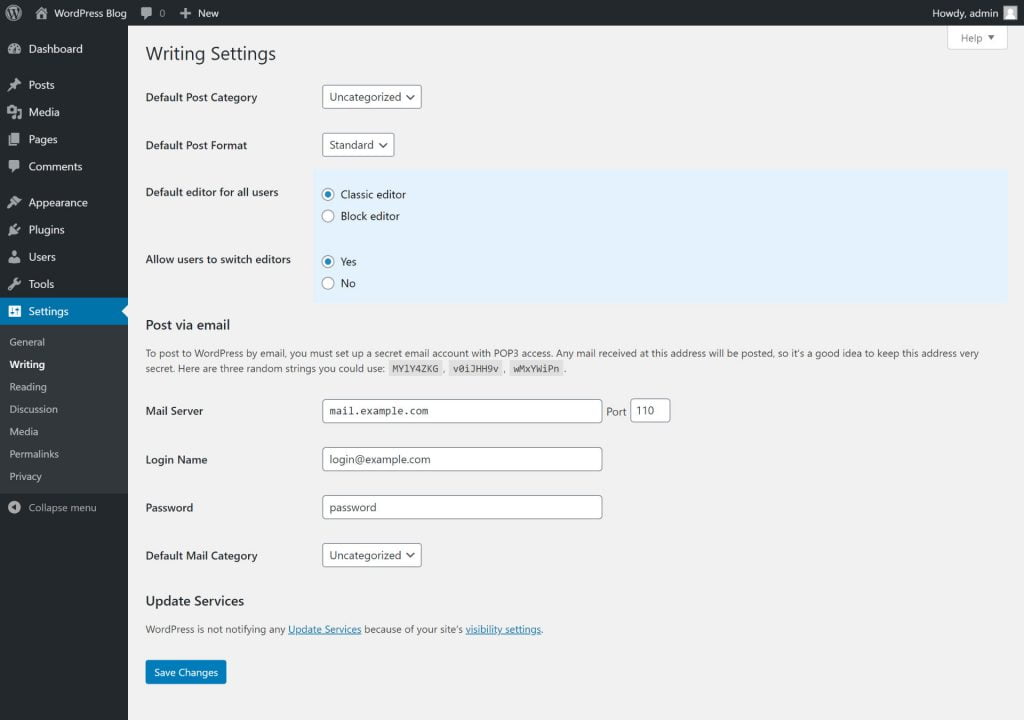
So, to safeguard from affecting your existing pages, after you activate the Classic Editor plugin, go to Settings and then Writing from the WordPress dashboard. This will show you the settings for the Classic Editor plugin. From here, select “Yes” for the option “Allow users to switch editors”. Then click on Save Changes. This will let you use the Gutenberg/Block editor for your existing pages and posts so you won’t have to be concerned about losing existing work in case you want to edit any existing pages or posts on your site. This will also give you the option to edit any new pages or posts with either Block editor or the Classic editor.
Then try creating a new page or post using the Classic Editor and check if the JSON response error has been fixed.
From the plugin’s settings page, you can also select “Block Editor” as the option for “Default editor for all users” if you would like to make the Block Editor your default WordPress editor while using the Classic Editor plugin.
Using the Classic Editor might solve the JSON response error for you while updating or publishing your pages and posts. But if it doesn’t solve the error, then you can just deactivate the plugin and try out the next solution.
Configure SSL
Your website always needs to have TLS/SSL enabled or web browsers will show a warning message whenever someone tries to visit your website. That warning will make your site look dangerous so you will lose lots of your website visitors. That’s why properly setting up SSL certificate for your website is an important thing to do regardless of it solving “The response is not a valid JSON response” error.
In this part, I will tell you how you can properly set up your WordPress website to use SSL certificate which is also a very common solution to the JSON response error.
Use SSL Certificate
You can check if your site is using SSL certificate by looking at the URL of your website. After your website is loaded in a web browser, you can click on your website’s URL to see if the URL starts with HTTPS or HTTP. If it starts with HTTPS and if you see a padlock icon without a cross sign beside the URL, then your site is already configured with SSL certificate. So, you will just need to ensure that your website is using it properly.
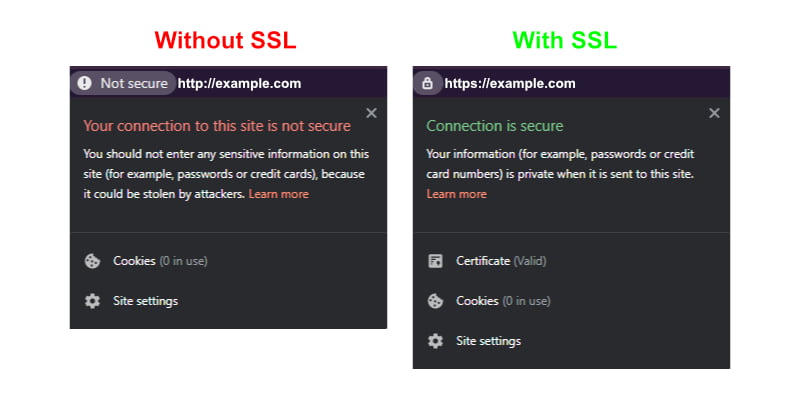
For instance, if your website is example.com then it will look like https://example.com and it will be marked with a padlock icon after it loads in your web browser if it is properly set up with SSL certificate.
However, having no padlock icon doesn’t always mean that an SSL certificate hasn’t been issued or your website. Instead, the reason might be that your website hasn’t been configured to automatically redirect all HTTP traffic to the HTTPS version of your website. To check if that is the case, change your website URL’s HTTP to HTTPS on the web browser and press enter. If the browser now shows a padlock icon beside the URL, then an SSL certificate has been issued for your site but it isn’t configured properly. So, we will need to configure it properly.
But if changing HTTP to HTTPS doesn’t work, then that it is probably because an SSL certificate hasn’t been issued for your website. And if that is the case, then you will first need to issue an SSL certificate for your website. If you are using cPanel, Plesk, DirectAdmin, CyberPanel or any other web hosting control panel, then you can easily issue an SSL certificate for your website from that web hosting control panel. See their guide on how to do that.
Additionally, the validity of SSL certificates expires after a certain period so you may also check if your SSL certificate is still valid. If it is not valid then you should first renew the SSL certificate to fix the SSL related issues. Once a valid SSL certificate is installed on your WordPress site, you can follow the next steps here to solve Publishing failed. The response is not a valid JSON response. or Updating failed. The response is not a valid JSON response. error.
Force HTTPS Redirect
Using your web hosting control panel like cPanel, Plesk, CyberPanel, etc., you can easily redirect all HTTP traffic to the HTTPS version of your website. The process of doing this will differ based on the hosting control panel you are using but you should easily find an option to do that in the SSL settings or in the domain settings option on the control panel. Look for settings that say something like force HTTPS redirect, redirect HTTP to HTTPS, and so on. See their guide on how to do that.
If you aren’t using a hosting control panel or if this doesn’t work for you then you can use the Really Simple SSL plugin to do that. I have described it further in the next step «Solve Mixed Content Error» which is also very important to solve SSL related issues for your WordPress site. So, even if this step solves the error, you should still follow the next step to solve the mixed content error on your website.
Solve Mixed Content Error
Your webpages will generally require linking multiple files like CSS, JS, images, etc. to display and function properly. And the links for these files may contain HTTP or HTTPS. If your website is configured to use HTTPS but if some of those links are using HTTP instead of HTTPS, there will be a mixed content error.
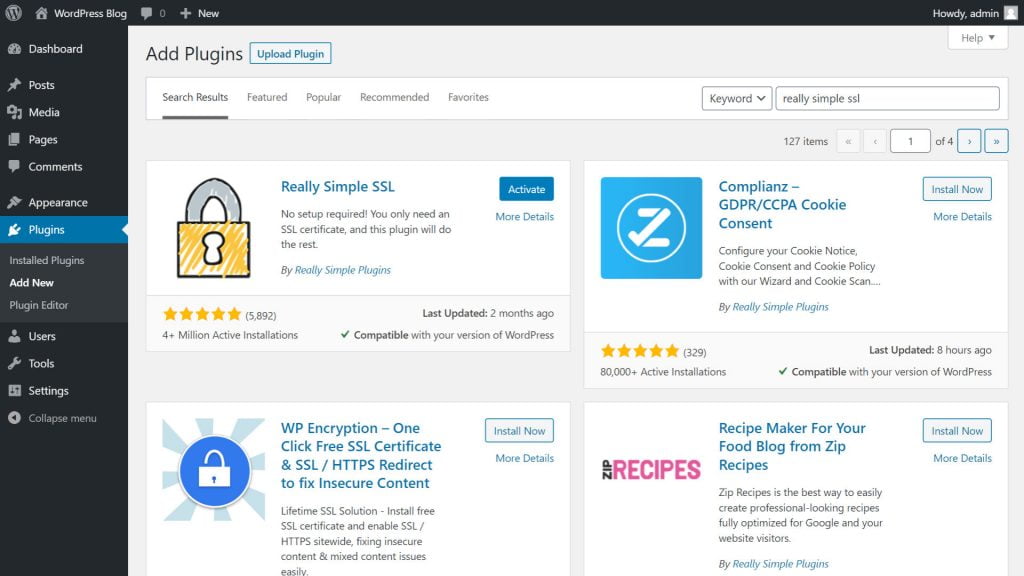
To solve this problem you can install the Really Simple SSL plugin on your WordPress site. It will modify all links on your website to use HTTPS and therefore solve the mixed content error.
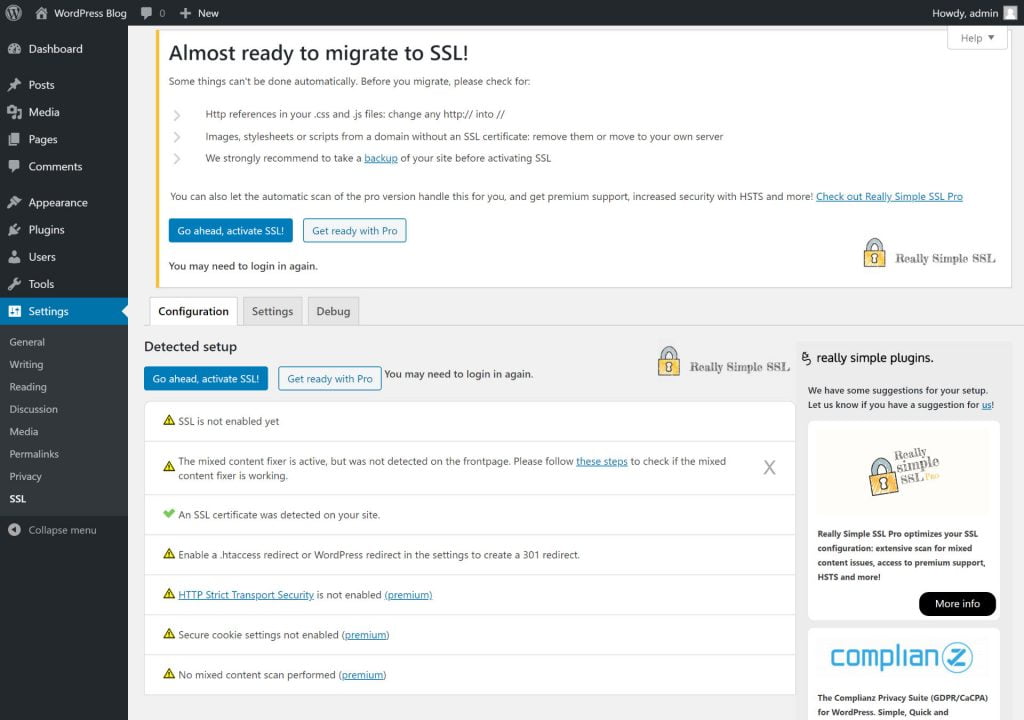
After you install and activate the Really Simple SSL plugin, you will get a notification to activate SSL. So, click on the “Go ahead, activate SSL!” button on the notification. But if you don’t see the notification then from your WordPress dashboard, go to Settings and select SSL.
Then you will see the same button saying “Go ahead, activate SSL!”. Once you click on the button it will activate SSL and set HTTPS redirect for your website.
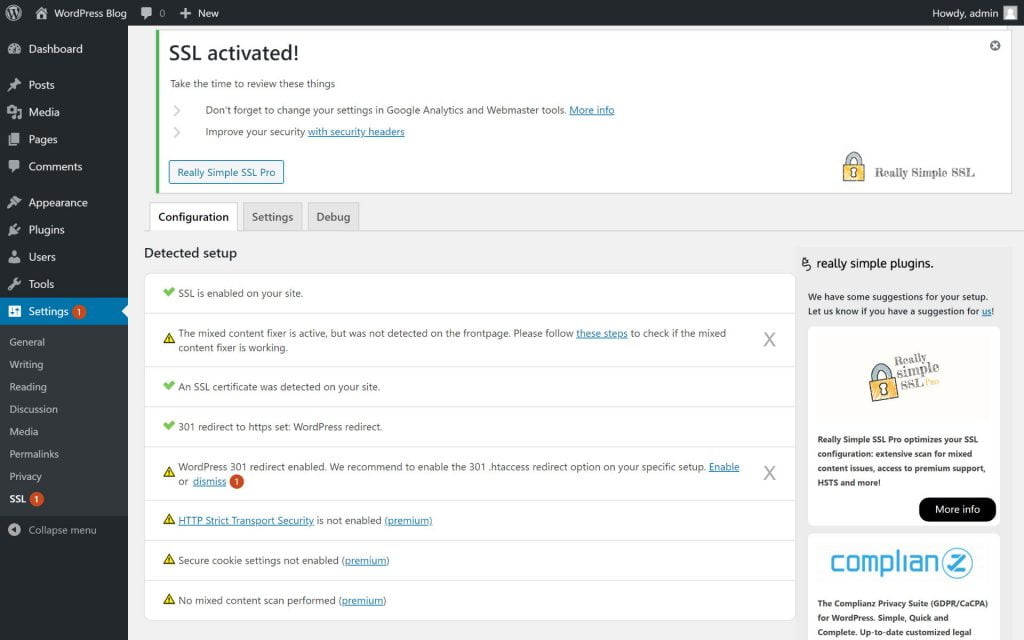
Then it will give you will see a warning that says “WordPress 301 redirect enabled. We recommend to enable the 301 .htaccess redirect option on your specific setup”. Beside that warning, you will see a link saying “Enable”. Clicking on the link will take you to the Settings tab on the plugin. You can also go to the same page from your WordPress dashboard by going to Settings then SSL and then by selecting the Settings tab.
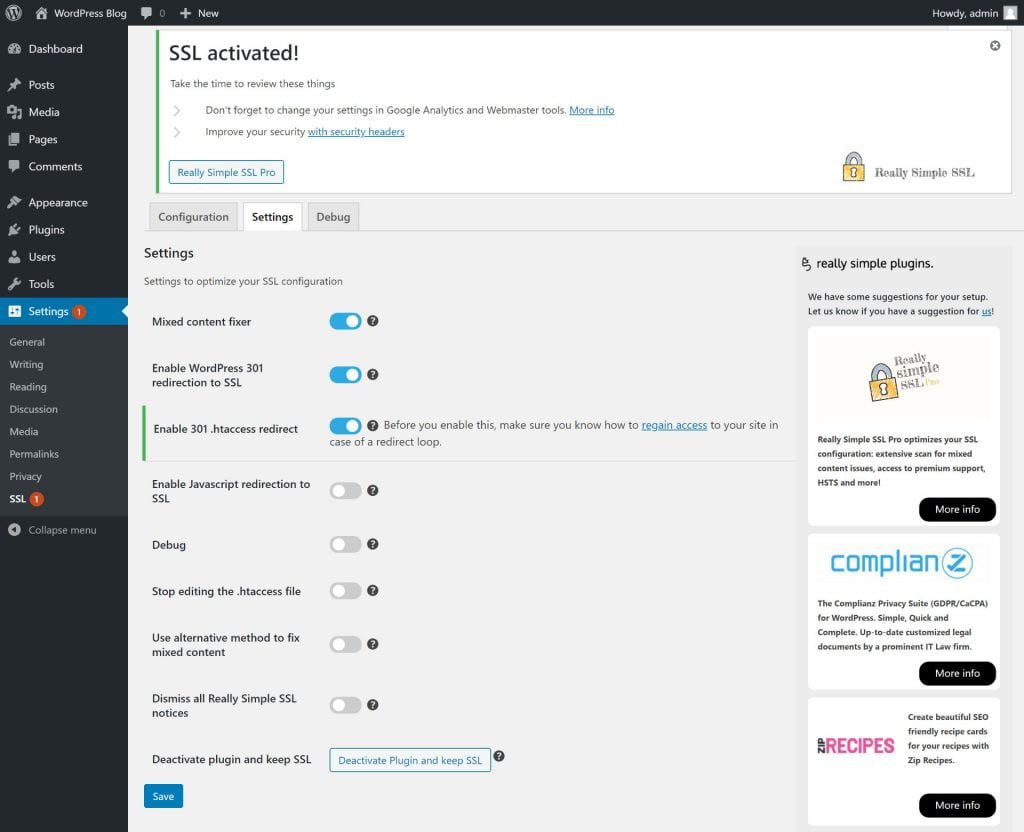
Here, you will see an option saying “Enable 301 .htaccess redirect”. Turn on the button beside that to activate HTTPS redirect from your .htaccess file. Before enabling the button you can also read the warning on how to regain access to your site in case of a redirect loop issue. Then after enabling the button click on Save.
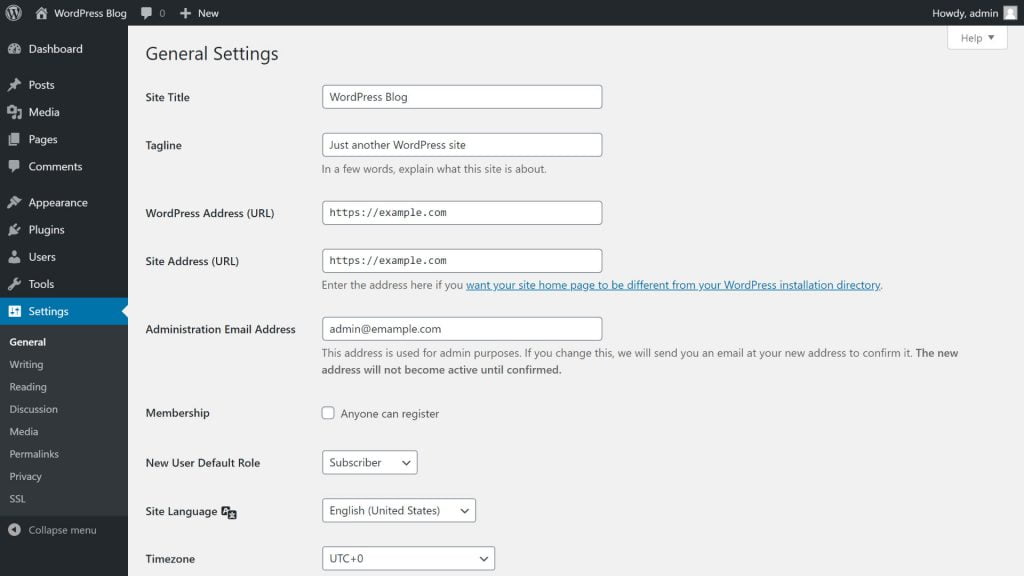
Also, from your WordPress dashboard, you can go to Settings then General. This will show you “WordPress Address (URL)” and “Site Address (URL)”. Make sure that these URLs are using HTTPS and not HTTP.
After doing this, check if the JSON response error has been fixed. If it doesn’t get fixed, you can also go to Settings > SSL > Settings and then turn on the button beside the “Use alternative method to fix mixed content” option and then save the change.
Now, check if the JSON response error has been fixed. If it hasn’t, then turn off the button beside the “Use alternative method to fix mixed content” option and save the change again then follow the next solution.
Check Themes and Plugins
If the previous methods don’t work for you then you can try to find out if it is any theme or plugin that is causing the problem. So, first, go to Appearance and then Themes from your WordPress dashboard. Then activate the default WordPress theme (as of now it is Twenty Twenty) and check if the error is fixed. If not, then revert back to your original theme.
The error may also cause by a plugin and in that case you can deactivate all the plugins on your website and then check again to see if the error occurs. If the error doesn’t occur then it is probably a plugin that is causing the issue. So, to find out which plugin is causing the problem, turn on one plugin at a time and check if the error occurs. And if the error occurs after enabling a certain plugin, then you will know that is the one causing the problem. So, you can just deactivate that plugin and activate the rest of the plugins that you need.
Restart OpenLiteSpeed
If you are using OpenLiteSpeed web server, then there is a very high chance that a restart will solve your problem.
OpenLiteSpeed is the open source or free version of the LiteSpeed Web Server (also known as LIteSpeed Enterprise). One of the major differences between LiteSpeed Enterprise and OpenLiteSpeed is that LiteSpeed Enterprise autodetects changes in .htaccess file and adjusts as necessary in realtime but OpenLiteSpeed can’t do that so it requires restarting for any changes in the .htaccess file to take place. And because WordPress uses the .htaccess file for many operations, those inactive .htaccess changes in the OpenLiteSpeed server may also cause The response is not a valid JSON response error. If you see this error after adding a new website on your OpenLiteSpeed server, this may also be the reason.
So, if you are using OpenLiteSpeed web server, a restart of the OpenLiteSpeed server can solve the error for you.
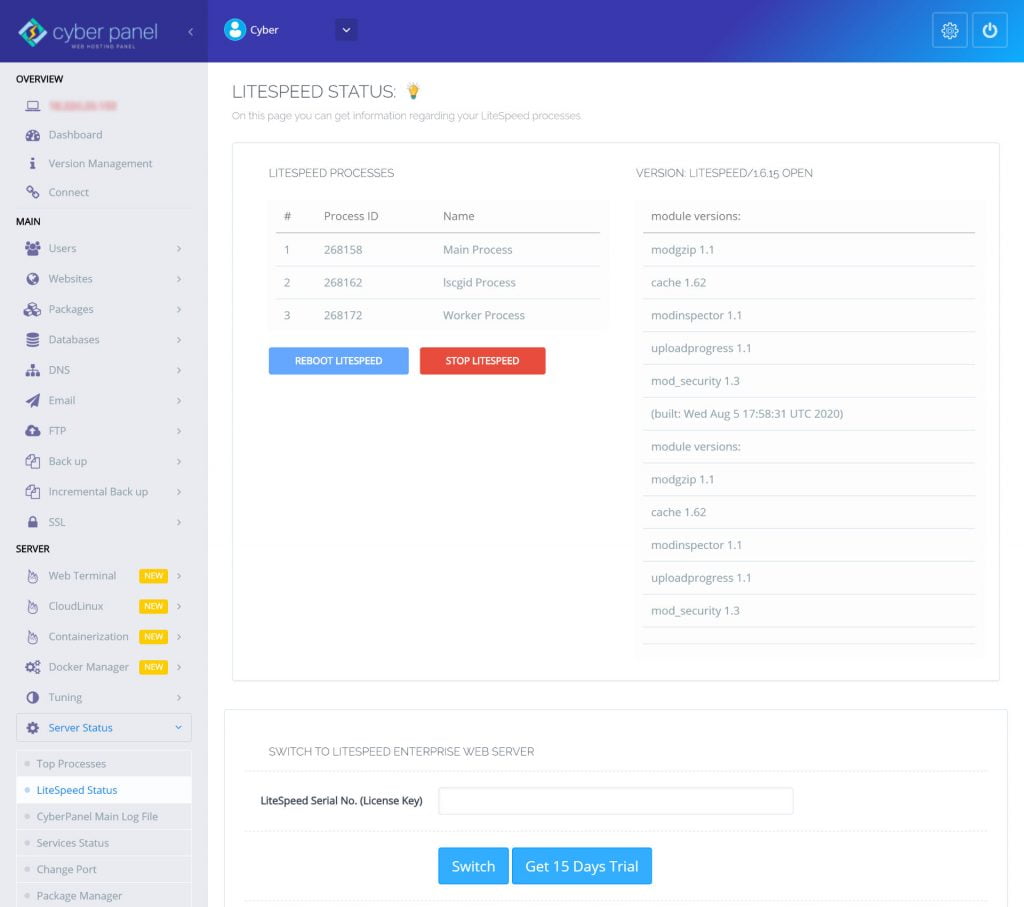
If you are using CyberPanel web hosting panel with OpenLiteSpeed, then you can open your CyberPanel dashboard then go to Server Status then LiteSpeed Status. Then you can click on the Reboot LiteSpeed button to restart your OpenLIteSpeed server.
But if you are using a different web hosting panel or if you aren’t using any web hosting panel at all, then you will need to find out how to restart the OpenLIteSpeed server for your specific setup.
Update .htaccess
If none of the previous methods work then you can try configuring your .htaccess file.
In order to ensure that you can revert back to your original .htaccess file in case anything goes wrong, you can keep a backup of it by downloading it in your computer. If you know how to use an FTP client or the file manager of your web hosting control panel like cPanel, CyberPanel, etc., then you can download the .htaccess file from your website’s “public_html” folder.
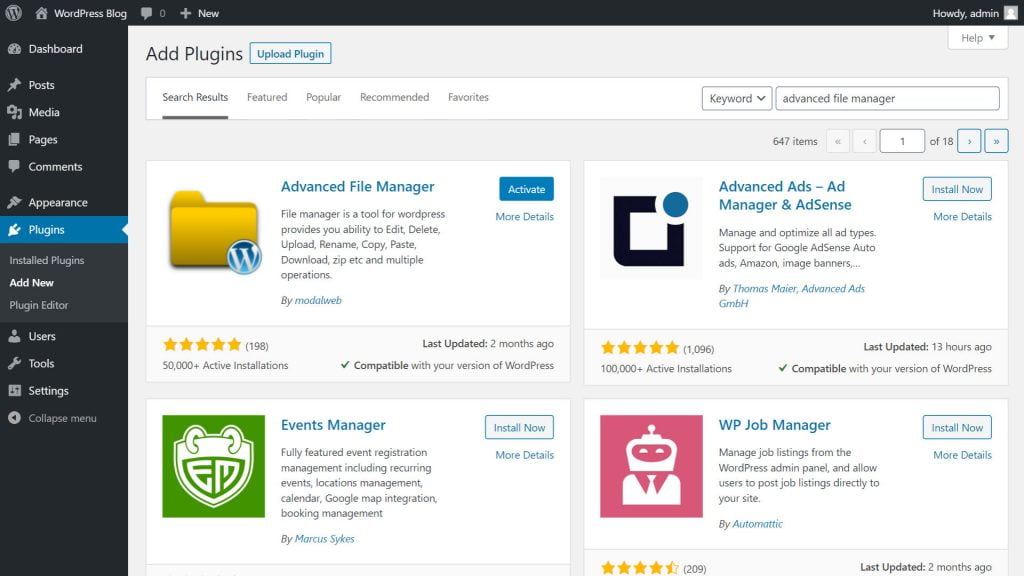
If you want an easy solution and want to do everything from WordPress dashboard then install and activate a file manager plugin like Advanced File Manager on your WordPress website.
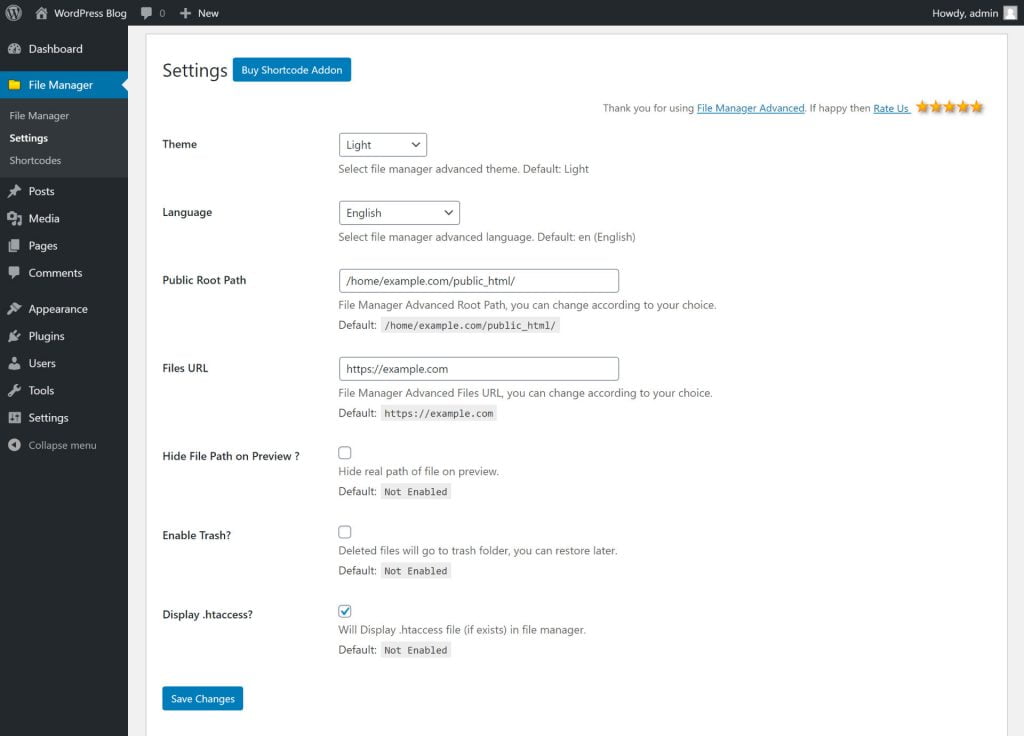
Then from your WordPress dashboard, go to File Manager then Settings. From here put a checkmark beside the Display .htaccess? option then click on Save Changes.
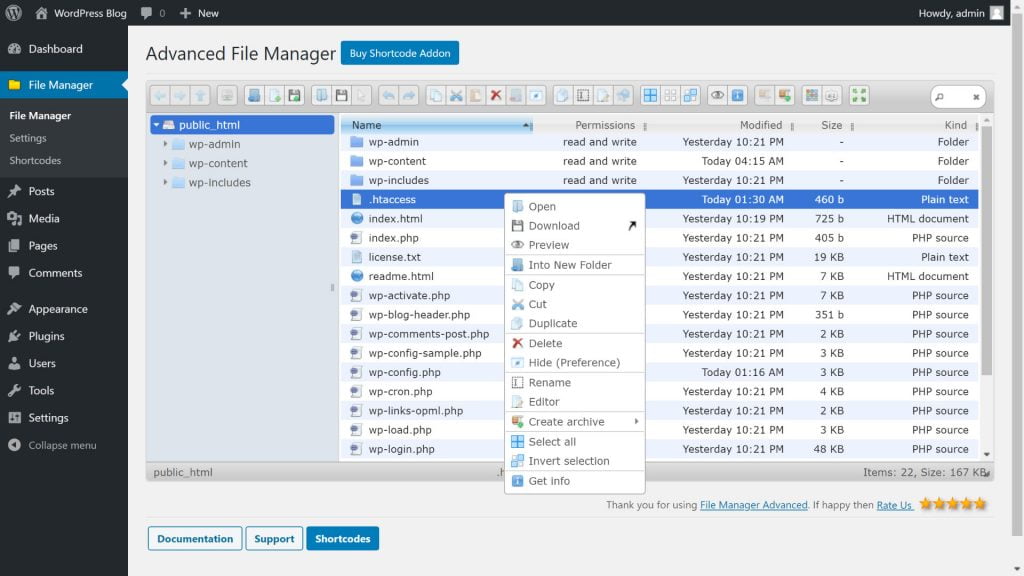
Now click on File Manager to see all the folders and files for your website. Here, in the “public_html” folder of your website, you will see the “.htaccess” file. Right-click on the file and click Download to keep a backup of it.
So, now you will be able to easily re-upload the original .htaccess file to the same location in case anything goes wrong.
Now, disable all the plugins on your WordPress site. Then delete the .htaccess file so that we can start from the beginning.
Now, go to Settings and then Permalinks from your WordPress dashboard. Then, make sure the permalink option of your choice is selected and then click on Save Changes. This will create a new .htaccess file for your website.
Now you need to check if “The response is not a valid JSON response” error is fixed or not.
If the error has been fixed, then you can turn on one plugin at a time and check if the error occurs again. If the error occurs after enabling a certain plugin then you can just deactivate that one and activate the other plugins as you need.
But if the error isn’t fixed after saving your permalink, then you can select the other permalink structures one after another and check if the JSON response has been fixed. Remember to change your permalink structure to the original one after your testing with different permalink structures is finished if you want to keep your previous URL structure.
But if that doesn’t fix “The response is not a valid JSON response” error, then you will need to follow the previously mentioned steps for Force HTTPS Redirect and Solve Mixed Content Error one more time. Do these steps while all your plugins are still deactivated.
This should solve the error for your website. And if the problem is solved, then activate all your plugins again one by one and check if any of them cause any problem. If the error doesn’t occur again, then the problem has been fixed but if the problem occurs after installing any specific plugin then just deactivate that plugin and activate the other ones.
After you activate the plugins, the .htaccess rules associated with the plugins should automatically be created to your new .htaccess file based on the existing plugin settings. So, you shouldn’t lose any configurations this way. But if something doesn’t work properly, then you can open both the .htaccess files in the editor or in a text document and compare the rules in both the .htaccess files. Then you can update the new .htaccess file with the changes you found. You can even delete the new .htaccess file and then upload the original one to go back to the previous state.
Check Site Health
From your WordPress dashboard, if you go to Tools and then select Site Health, then under the Status tab on that page, WordPress will show you any improvement recommendations that could help your website.
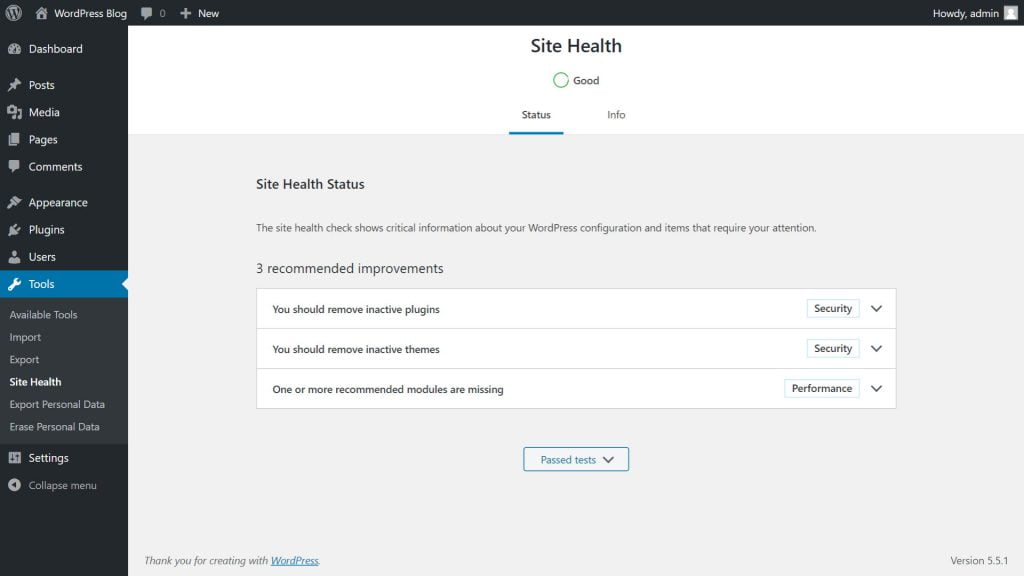
An issue related to Rest API could also cause the JSON response error on your website. Moreover, if you find any issue there, solving the issue might also fix the JSON response error for your website.
Fix Image Upload Error
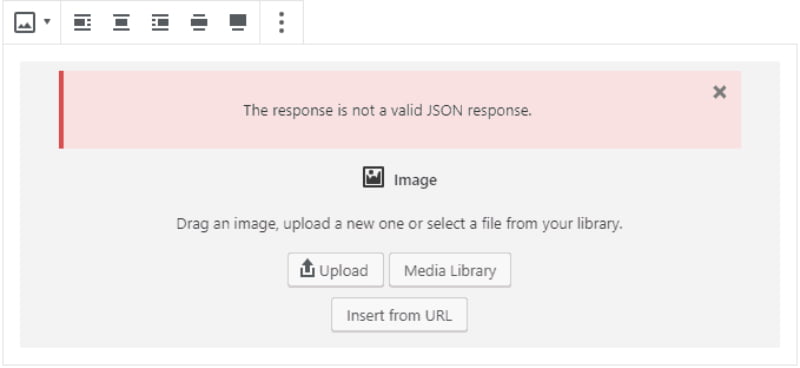
If you have tried the previous methods but “The response is not a valid JSON response” error still occurs when you try to upload images on your WordPress website, then you can follow the instructions in this section.
Use Media Library Instead of Direct Upload
If you are trying to upload images in an Image block using the Upload button, then you might get the JSON response error but surprisingly many people have found that if they first select Media Library then go to the Upload Files tab and then upload images from there then the error doesn’t occur.

This might be a temporary workaround but it can be helpful if you are in the middle of writing a post or if any other methods don’t work for you.
Remove Invalid Characters
You may also get “The response is not a valid JSON response” error if you try to upload images with unsupported characters in the image name. So, you can rename your image using only English letters, numbers, and supported symbols like hyphens. Then you can upload that renamed image to see if the error has been fixed.
Use Default to GD plugin
Some people were also able to solve The response is not a valid JSON response error by using the Default to GD plugin. This plugin isn’t available on WordPress so you will need to download it from the Default to GD GitHub link.
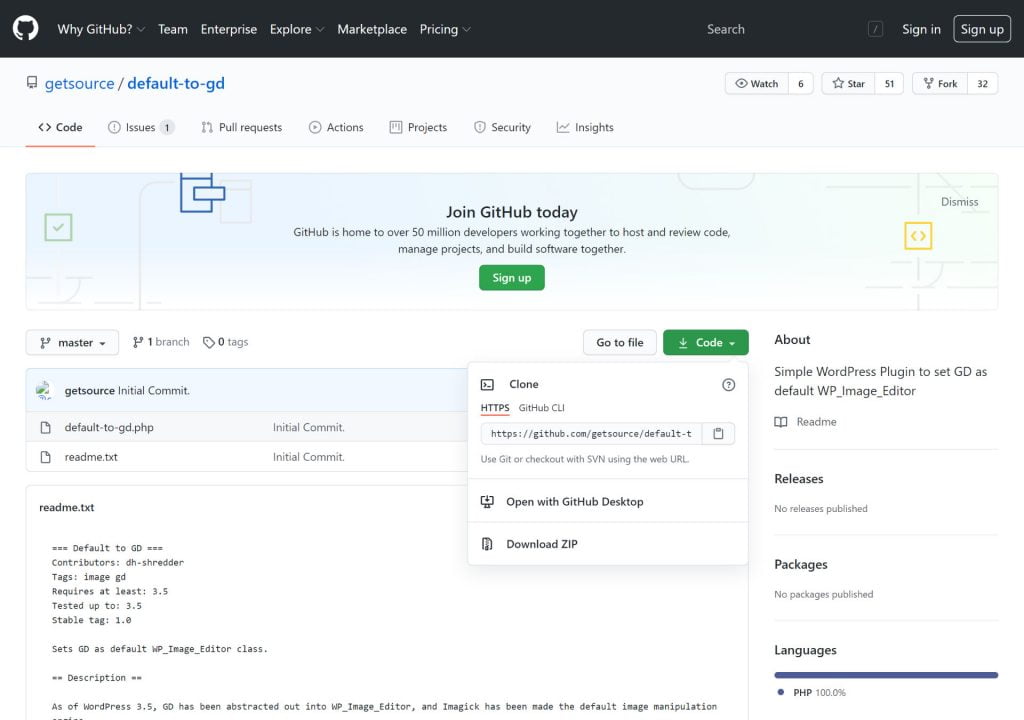
To download the plugin click on the «Code” button on the page. Then select Download ZIP. This will download the plugin on your computer.
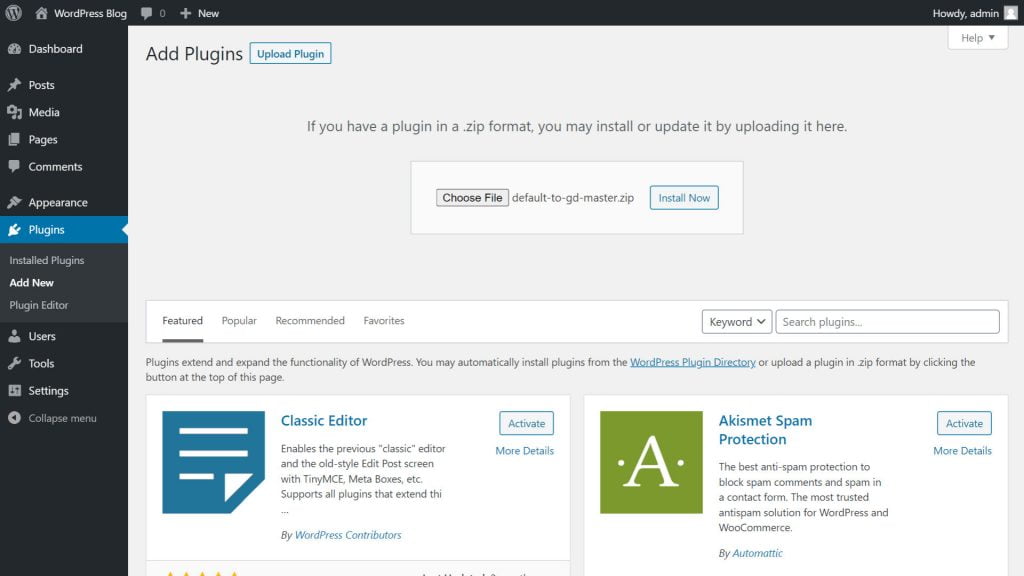
Then go to your WordPress dashboard then Plugins then Add New. Now click on Upload Plugin button then upload the plugin you just downloaded by clicking on the Choose File button. Then click on Install Now. After the installation is completed, click on Activate Plugin. It doesn’t require any set up so you can now check if the JSON response error occurs while uploading images to your WordPress site. And if the error still occurs, then you can just deactivate and then delete the plugin.
These methods for solving “The response is not a valid JSON response” error works for most people but if it doesn’t work for you then you may have a specific problem in your WordPress settings or in your web server setup. This error can also cause because of an issue related to the REST API, misconfiguration in NGINX server, security plugins like Wordfence or for security rules like WAF or Web Application Firewall. In these cases, you can look for solutions specific to those areas.
I hope one of these methods works for you and if works let me and others know which one worked for you. And if you found any other solution tell us in the comments section so that it can help others.
Грёбаная ошибка, которая отняла весь вечер. Уточню, ошибка выскакивала когда я пытался включить/разрешить комментарии к странице. При простом обновлении WordPress, данная ошибка не выскакивала.

Гугл и Яндекс молчит по этому поводу, нигде никакой информации по «Ошибка обновления ответ не является допустимым ответом json».
Обновление страницы начало работать, только после того как я выполнил несколько действий, которые напишу ниже. Причину исправления я таки не понял. Так как мне было надо вывести собаку на улицу.
Гуляли около часа. Вернулся, решил повторить процесс, поставил галочку на «разрешить комментарии», и о чудо, страница обновилась без ошибок. Такой же процесс повторил ещё на пяти страницах, всё работает без сбоев.
Перед этим, делал несколько манипуляций, какая из них помогла, могу только догадываться. Уточню мои некоторые параметры моего хостинга и сайта: WordPress 5.4.2–ru_RU, CPanel, PHP 7.2, бесплатный сертификат Let’s Encrypt SSL.
- Искал ответ в поисковых системах, нашел ряд рекомендаций.
- Переобновил версию WP
- Включал выключал настройки постоянных ссылок в админке, с ?p=123 на читабельные ЧПУ
- Поставил плагин Really Simple SSL
- Менял версии PHP на 7.3, 7.0. Вернулся PHP к 7.2
- Деактивировал плагин для ЧПУ Webcraftic Cyrlitera. И активировал снова.
- Переустановил сертификат Let’s Encrypt SSL в Cpanel. Сработало на один раз, страница корректно обновилась, но на других страницах снова ошибка.
- Погулял с собакой, около часа, пришёл, и всё заработало.
Скорее всего, проблема была в сертификате Let’s Encrypt SSL, только надо было дать некоторое время. Посмотрим что будет дальше.

Забыл. Ставил и удалял код в файле functions.php, который рекомендовали в сети.
// ОТКЛЮЧАЕМ САМ REST API
add_filter(‘rest_enabled’, ‘__return_false’);
// ОТКЛЮЧАЕМ ФИЛЬТРЫ REST API
remove_action( ‘xmlrpc_rsd_apis’, ‘rest_output_rsd’ );
remove_action( ‘wp_head’, ‘rest_output_link_wp_head’, 10, 0 );
remove_action( ‘template_redirect’, ‘rest_output_link_header’, 11, 0 );
remove_action( ‘auth_cookie_malformed’, ‘rest_cookie_collect_status’ );
remove_action( ‘auth_cookie_expired’, ‘rest_cookie_collect_status’ );
remove_action( ‘auth_cookie_bad_username’, ‘rest_cookie_collect_status’ );
remove_action( ‘auth_cookie_bad_hash’, ‘rest_cookie_collect_status’ );
remove_action( ‘auth_cookie_valid’, ‘rest_cookie_collect_status’ );
remove_filter( ‘rest_authentication_errors’, ‘rest_cookie_check_errors’, 100 );
// ОТКЛЮЧАЕМ СОБЫТИЯ REST API
remove_action( ‘init’, ‘rest_api_init’ );
remove_action( ‘rest_api_init’, ‘rest_api_default_filters’, 10, 1 );
remove_action( ‘parse_request’, ‘rest_api_loaded’ );
// ОТКЛЮЧАЕМ EMBEDS СВЯЗАННЫЕ С REST API
remove_action( ‘rest_api_init’, ‘wp_oembed_register_route’);
remove_filter( ‘rest_pre_serve_request’, ‘_oembed_rest_pre_serve_request’, 10, 4 );
remove_action( ‘wp_head’, ‘wp_oembed_add_discovery_links’ );
You are creating content in the WordPress editor but the document fails to update. In fact, you see an error message that says “Updating failed. Error message: The response is not a valid JSON response.” Before you panic, let me assure you that this error can be resolved easily so you don’t lose your hard work.
This error is one of the common WordPress errors that users encounter on their sites.
Why does “the response is not a valid JSON response” error occur?
There could be multiple reasons why this error occurs. This post delves into each reason and offers multiple solutions to solve the problem.
1. Reset the permalinks
Before you try anything else, you should try resetting your permalinks to resolve the invalid JSON response error. Navigate to Settings > Permalinks in your WordPress dashboard. Then ensure that the correct permalink setting is selected and click the Save Changes button.
Now try updating a page. The error should be fixed but if it still occurs, try out the solutions below.
2. Disable the Block editor and switch back to Classic editor

The error “Updating failed. Error message: The response is not a valid JSON response.” is overwhelmingly seen in the new Block editor called Gutenberg.
The easiest way to resolve the updating error is by disabling Gutenberg and switching back to the Classic editor. As they say, old is Gold.
You can install the Classic Editor plugin for this. Once you have activated the plugin, try to save your posts. You should not see any error message now.
But what if you still want to use the block editor?
Nice question. It could be that reverting to the classic editor is not an option for you. In that case, you should follow what we are doing on PassionWP. With the classic editor plugin installed and activated, navigate to Settings>Writing.
Now select the Classic Editor as the “default editor for all users” option, save your changes, and clear your website cache. Right after this, select the Block Editor as the default editor and again save the changes.
Now try editing an existing post or create a new post with the block editor. You should not encounter the JSON response error. However, it could be that the editor fails to automatically save your changes.
In this event, press Ctrl + S (Cmd + S for Mac) to manually save your changes. This solution works for us and we are using the block editor without encountering the JSON response error.

3. Mixed content error due to the use of SSL certificate
Another common reason for this error is the use of a secure socket layer (SSL) certificate (HTTPS) on your WordPress site. Using an SSL certificate can result in some content being delivered non-securely on HTTP protocol even while the rest of the content is delivered in a secure manner over HTTPS protocol.
This results in a mixed content error in which both https and https content is transmitted at the same time to the web browser, usually Google Chrome.
How to solve the Mixed Content Error in WordPress?
We investigated the mixed content error and noticed that it is linked to the use of the Really Simple SSL plugin that is used by over 3 million WordPress users to configure HTTPS on their websites.
To resolve the “the response is not a valid JSON response” or mixed content error, navigate to Settings > SSL. This will open the plugin’s settings. Now click on the Settings tab.
You should do the following two things here:
- Ensure that the “Mixed content fixer” option is turned on. This prevents mixed content problems on your website that we discussed above.
- Next, you should turn on the “Use an alternative method to fix the mixed content” option. This will ensure that “the response is not a valid JSON response” error does not erupt abruptly while editing.

After saving the changes, go back to the post you were working on and try saving your post or page. You should no longer experience the response is not a valid JSON response error.
ad
4. Plugin conflict
The more plugins you use on your WordPress site, the higher the chances of conflict between plugins. Some of these conflicts can result in invalid JSON response errors as well.
I have witnessed this issue on websites running a high number of plugins, say more than 40. But it’s not just the number of plugins that matter. Rather, some plugin files might be causing the JSON bug on your website.
For instance, on a client’s site, the Yoast SEO plugin was causing the JSON response error.
So, in order to rule out any plugin conflict, you should deactivate all the plugins on your website. If required, use the Health Check and Troubleshooting plugin to deactivate the plugins in the backend while the front end remains the same for your visitors.
If the JSON response error disappears when you deactivate all the plugins means that one of the plugins was causing the error. Now, you should activate the plugins one by one. If the error recurs on activating a particular plugin implies that this plugin was the culprit.
5. WordPress REST API conflict
The WordPress admin backend uses the REST API to communicate with the server. If there is any conflict with this API, WordPress won’t be able to connect with the server and will instead display the JSON response error.
In order to identify if the REST API problem is indeed causing the problem, try editing one of your posts and saving it. Once the invalid JSON error is displayed, right-click the mouse button and then click Inspect to open Chrome’s dev tools.
Now under the Console tab, check whether any REST API error is displayed. If it is, then the REST API conflict is indeed the cause.
The best solution to this is to contact your web host since REST API errors are mostly caused at the server level. If you’re using a cache plugin like LiteSpeed Cache, you should disable the setting to cache the REST API and try saving the post again.
Finding this solution required considerable effort and time. Consider rewarding me with a coffee!
6. Alternative solutions to the response is not a valid JSON response error
Deactivate all the plugins on your site and edit the content normally. If you’re using the Really Simple SSL plugin then deactivate this plugin first. Subsequently, try saving the document. If you are able to save it without facing any errors, re-activate the plugins one by one to check which plugin was causing the error.
There is another solution you can try to fix the response is not a valid JSON response error in WordPress.
Navigate to Settings > Permalinks. Change the permalink structure from post-name or the current structure to Plain i.e. https://yoursite.com/?p=123. Now try saving your post/page. The problem should have been resolved.

But try this solution if all other methods fail as changing the permalinks will result in huge SEO issues on a live website and you will also need to add multiple redirects.
We discussed 6 possible solutions to the response is not a valid JSON response error in WordPress. I hope one of these methods worked for you. If it did, let me know in the comments below. If it didn’t, post your specific problem so others can suggest different solutions.
You can also check out our WordPress Error Fixing Service to fix the invalid JSON response error for you.
Download the WordPress SEO eBook
Go from WordPress SEO Zero to Hero in no time. Also receive 2 Bonus PDFs with this free eBook.
Give it a try. You will thank yourself later.
Перейти к содержимому
Однажды я установил WordPress в операционной системе Ubuntu Server с веб сервером Nginx и при попытке добавить новую статью увидел ошибку:
Ошибка публикации. Сообщение об ошибке: Ответ не является допустимым ответом JSON.
При обновлении существующей статьи тоже отображалась ошибка:
Ошибка обновления. Сообщение об ошибке: Ответ не является допустимым ответом JSON.
Если посмотреть инструмент «Здоровье сайта» (/wp-admin/site-health.php), то можно было увидеть ошибку:
REST API выдал неожиданный результат
404 Not Found
nginx/1.14.0 (Ubuntu)
Чтобы решить эти ошибки, а также чтобы работали произвольные ссылки (как на apache с rewrite), я открыл файл конфигурации сайта в nginx (например /etc/nginx/sites-enabled/ixnfo-com.conf) и нашел стандартные строки:
       location / {
                # First attempt to serve request as file, then
                # as directory, then fall back to displaying a 404.
               try_files $uri $uri/ =404;
       }
И заменил их на:
location / {
    try_files $uri $uri/ /index.php$is_args$args;
}
Потом проверил корректность конфигурации Nginx и перезапустил его чтобы применить изменения:
sudo nginx -t
sudo service nginx restart
После этого ошибки исчезли.
Смотрите также мою статью:
Установка WordPress и Nginx
Are you trying to fix the invalid JSON error in WordPress?
This error appears when editing WordPress posts or pages on your website. You’ll see a message saying ‘The response is not a valid JSON response’ and updating that page would fail.
In this article, we’ll show you how to easily fix the invalid JSON error in WordPress. We’ll also talk about why this error occurs and how to avoid it in the future.
What causes ‘Not a Valid JSON Response’ Error in WordPress?
Failure to receive an expected response from the server causes the ‘Not a valid JSON response’ error in WordPress.
Basically, WordPress needs to communicate with the server while you are editing a blog post. It relies on getting responses from the web hosting server in the background. This response is usually in JSON format which is used to quickly transport data using JavaScript.
If for some reason, WordPress fails to get the response, or the response is not in JSON format, then you’ll see the ‘Not a valid JSON response’ error.
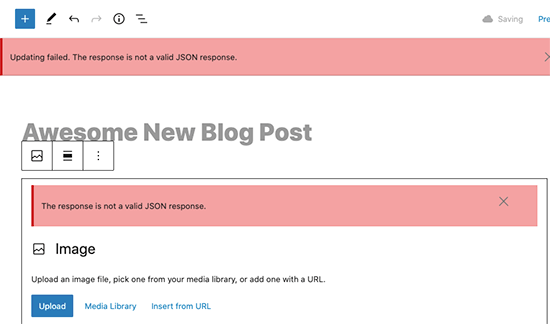
This error could appear for a number of reasons. However, the most likely cause of it to occur is incorrect URL settings in WordPress or broken permalinks.
That being said, let’s take a look at how to easily fix the invalid JSON error in WordPress.
Important: Please make a complete WordPress backup before making any big changes to your website. This allows you to easily restore your website to the previous state.
1. Check WordPress URLs in Settings
First, you need to make sure that your WordPress Address and Site Address settings are correct.
Simply, go to Settings » General page. From here, you need to review the WordPress Address (URL) and Site Address (URL) fields.
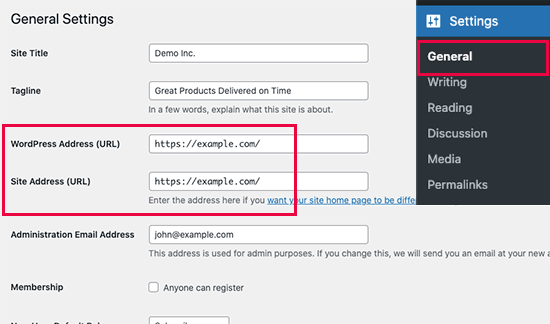
For most websites, this setting needs to have the same URL in both fields.
However, rarely, some users may have given WordPress its own directory and serve the website on a different address. In that case, they can have different URLs here.
However, if your Site Address is incorrect then that would trigger the invalid JSON error in WordPress.
If you made any changes to the settings, then don’t forget to click on the Save Changes button to store your settings. You can now edit a blog post and see if adding any new blocks or saving that post triggers the ‘Not valid JSON response’ error.
If you are still seeing the error, then continue reading.
2. Fix WordPress Permalink Structure
WordPress comes with SEO friendly URL structure that allows you to use human-readable URLs for your posts and pages.
However, sometimes a user may mess up the permalinks settings. This would make it impossible for the WordPress editor to get a valid JSON response and cause the error to show up.
To fix this, you need to simply visit Settings » Permalinks page. From here, you need to carefully review the permalink options.
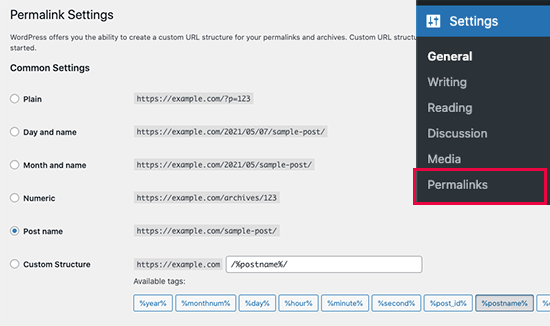
If you are unsure whether you are using the right settings, then simply select one of the default formats available.
After that, go ahead and click on the Save Changes button to store your settings.
You can now try editing a blog post or page to see if the error has disappeared. If it hasn’t, then you can try this next step.
3. Regenerate WordPress .htaccess File
The .htaccess file in WordPress is used as a configuration file to manage SEO-friendly URLs (permalinks).
Normally, WordPress can automatically regenerate and update it. You can also trigger that update by simply clicking on the Save Changes button at the bottom of Settings » Permalinks page.
However, sometimes it may not get updated or has incorrect settings. This would affect your WordPress permalinks and may also cause an invalid JSON response error.
To fix this, you need to connect to your website using an FTP client or the file manager app in your WordPress hosting account dashboard.
Once connected, you need to locate the .htaccess file in the root folder of your website and download it as a backup to your computer.
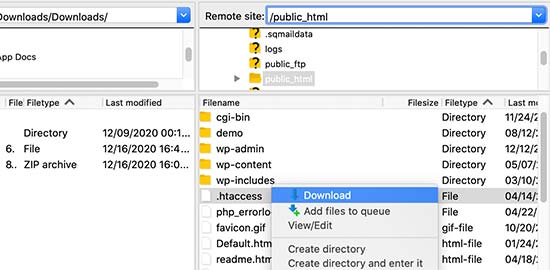
Tip: Can’t locate .htaccess file? See this quick article on how to find .htaccess file.
After that, you need to edit the .htaccess file using FTP client or the file manager app.
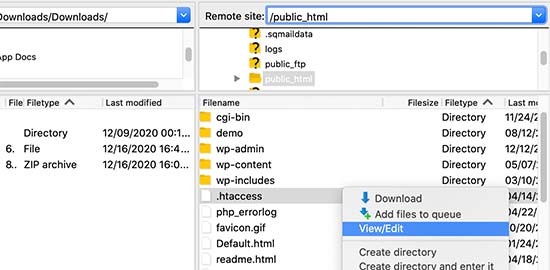
Once the file opens, you need to delete all the code inside it and replace it with the following code:
# BEGIN WordPress

RewriteEngine On
RewriteRule .* - [E=HTTP_AUTHORIZATION:%{HTTP:Authorization}]
RewriteBase /
RewriteRule ^index.php$ - [L]
RewriteCond %{REQUEST_FILENAME} !-f
RewriteCond %{REQUEST_FILENAME} !-d
RewriteRule . /index.php [L]

# END WordPress
Don’t forget to save your changes and upload the file back to your website.
You can now visit your website and edit and post or page to see if you can reproduce the invalid JSON response error.
If you are still seeing the error, then there are a few more steps you can take.
4. View The Rest API Debug Log
The invalid JSON response error would also mean that WordPress REST API on your website encountered an error.
The REST API is the set of techniques WordPress uses to communicate with the server as you work on your website.
You can see details of this error in the WordPress Site Health tool. Visit the Tools » Site Health page.
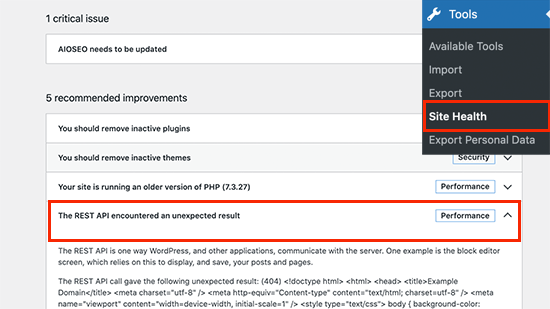
From here, you may see an issue labeled ‘The REST API encountered an unexpected result’.
Clicking on it will show you more details which may give you some clues about which plugin or third-party service may be causing the issue.
If this doesn’t provide any clue, then you can move on to the next step.
5. Deactivate All WordPress Plugins
Occasionally, WordPress plugins may conflict with each other or the WordPress core. This could result in unexpected behavior and could be a potential reason for the invalid JSON error.
Simply go to the Plugins » Installed Plugins page. From here, select all your WordPress plugins and then choose ‘Deactivate’ under the Bulk Actions drop down menu. Now, click the Apply button to continue.
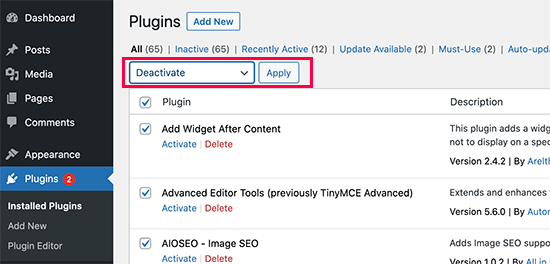
WordPress will now deactivate all your installed plugins.
You can now try again to reproduce the error. If the error disappears, then this means one of the plugins installed on your website was causing it.
To figure out which plugin, you need to activate them one by one and then try to reproduce the error. Repeat this until you find the culprit.
After that, you can reach out to the plugin author for support or find an alternative plugin.
6. Temporarily Switch to the Classic Editor
If all the above steps fail, then you can temporarily switch to the Classic Editor for WordPress.
This older version of WordPress editor uses a simpler text editor and doesn’t rely heavily on REST API to get JSON response.
To use it, you need to install and activate the Classic Editor plugin. For more details, see our step by step guide on how to install a WordPress plugin.
The plugin works out of the box, and it will disable the Gutenberg editor upon activation.
You can now continue working on your website and get back to the troubleshooting later.
7. Further Troubleshooting
A number of things can block WordPress REST API or make it return an invalid JSON response. We have addressed the most likely culprits above, but if that didn’t fix it for you then here are some more steps that you can try.
Switching to a Default WordPress Theme
Sometimes a conflict between your WordPress theme and a plugin or the WordPress core may result in unexpected behavior.
You can test this, by simply switching to a default WordPress theme like TwentyTwentyOne or Twenty-Twenty.
Temporarily Turn off Website Application Firewall
If you are using a WordPress firewall like Sucuri, Cloudflare, or a plugin, then it is possible that they may sometimes block legitimate requests too.
The easiest way to figure this out is by temporarily disabling your WordPress firewall plugin or service.
Some application-level WordPress firewalls can be disabled by simply deactivating the plugin. For DNS level firewalls like Sucuri and Cloudflare, you can disable them from your account dashboard.
Turn on Debugging in WordPress
WordPress comes with a built-in feature that allows you to keep a log of errors. However, it is not enabled by default.
To turn it on, you need to add the following code to your wp-config.php file:
define( 'WP_DEBUG', true );
define( 'WP_DEBUG_LOG', true );
After that, WordPress will keep a log of all errors in a debug.log file located inside /wp-content/ folder. You can access this file by using an FTP client.
The error log may provide you a clue about what may be causing the invalid JSON error on your website. For more details, see our guide on setting up WordPress error logs and using them for debugging errors.
Seek Expert Help
Finally, if all else fails, then this could be due to a misconfiguration on your WordPress hosting server. Most reliable WordPress hosting companies are able to help users with common WordPress issues like that.
Simply reach out to them via live chat or support ticket and they may be able to help you fix it.
We hope this article helped you learn how to fix the invalid JSON error in WordPress. Let us know which solution worked for you in the comments below.
You may also want to see our complete handbook of the most common WordPress errors and how to fix them.
If you liked this article, then please subscribe to our YouTube Channel for WordPress video tutorials. You can also find us on Twitter and Facebook.
Disclosure: Our content is reader-supported. This means if you click on some of our links, then we may earn a commission. See how WPBeginner is funded, why it matters, and how you can support us.

Editorial Staff at WPBeginner is a team of WordPress experts led by Syed Balkhi. We have been creating WordPress tutorials since 2009, and WPBeginner has become the largest free WordPress resource site in the industry.
Ошибка публикации. Ответ не является допустимым ответом JSON в wordpress одна из популярных проблем последнего времени. Сперва проверьте модуль Apache, возможно он просто не запускается. Если сервер работает исправлено и все необходимые подули включены, то могу посоветовать вам несколько вариантов как можно исправить ошибку публикации. Ответ не является допустимым ответом JSON в wordpress.
В вашем случаи возможно некоторые устаревшие сообщения отладки были выведены до фактических данных JSON и испортили ответ. После исправления устаревшая публикация сообщения снова должны заработать. Исправить их можно просто пере сохранив настройки постоянных ссылок. Она находятся на вкладки «Настройки/постоянные ссылки».
Так же проблема может быть с файлом .htaccess, а именно проблемы разрешения 755.
Ещё способ, это установить классический плагин редактора сообщений. Обычно это помогает.
Вообще обычно ошибка публикации. Ответ не является допустимым ответом JSON в wordpress появляется в результате ответа на ответ данных JSON. Отсюда возникает эта неприятная проблема.
P.S. если вы всё же не смогли решить проблему моими советами, то можете описать свою проблему в комментариях и я постараюсь вам помочь.