Active alarm: the alarm condition persists, alarm delay has elapsed.
Inactive alarm: the alarm condition has disappeared, but the alarm has not been confirmed.
Confirmed alarm: the alarm condition persists, but the alarm has already been confirmed.
6.14.3 Alarm types – Yellow level
The yellow alarm indicates that a value or parameter is out of normal limits, but has still not reached
critical level. Obviously it is indicated by a yellow colour. This alarm does not cause any actions
regarding the gen-set control.
Warning (WRN)
The Warning alarm does not perform any actions regarding gen-set control.
6.14.4 Alarm types – Red level
The red level alarm indicates that a critical level of the respective value or parameter has been
reached. Obviously it is indicated by red colour. The controller will take one of the following actions:
Breaker open and cool down (BOC)
The BOC (electric trip) alarm category is used above all for built-in alarms assigned to the generator
electric values (voltage, current, power, etc.). The GCB is opened immediately, but after that the
engine will perform the standard stop procedure including cooling.
Slow stop (STP)
The Slow stop alarm differs from the BOC in that the gen-set will perform a soft unload before opening
the GCB (if possible). After that the standard stop procedure including cooling follows.
N
:
OTE
In the MINT application if the
will wait until another gen-set is started (if there is at least one available) before unloading and
stopping the gen-set. The maximum time the controller will wait is given by the setpoint #SlowStopDel.
Shutdown (SD)
The Shutdown alarm opens the GCB immediately and stops the engine immediately without cooling.
N
:
OTE
It is not possible to start the engine if any red level protection is active or not confirmed.
C
!
AUTION
The gen-set can start by itself after acknowledging the alarms if there is no longer an active red alarm
and the controller is in AUT or TEST mode!
6.14.5 Sensor fail detection (FLS)
If the measured resistance (or voltage or current in case of IGS-PTM module) on an analog input
exceeds the valid range, a sensor fail will be detected and a sensor fail message will appear in the
Alarmlist. The valid range is defined by the most-left (R
characteristic ±12.5% from R
NT
InteliCompact
, SW version 2.1
InteliCompact-NT-2.1-Reference Guide.pdf, ©ComAp – May 2015
power management
is active and a slow stop alarm occurs, the controller
-R
.
H
L
) and most-right (R
) points of the sensor
L
H
115

-
Contents
-
Table of Contents
-
Bookmarks
Quick Links
NT®
InteliCompact
Paralelling gen-set controller
SW version 1.3.1, December 2011
Operator Guide
Copyright © 2011 ComAp s.r.o.
ComAp, spol. s r.o.
Kundratka 17, 180 00 Praha 8, Czech Republic
Tel: +420 246 012 111, Fax: +420 266 316 647
E-mail: info@comap.cz, www.comap.cz
Related Manuals for ComAp INTELICOMPACT-NT
Summary of Contents for ComAp INTELICOMPACT-NT
-
Page 1
InteliCompact Paralelling gen-set controller SW version 1.3.1, December 2011 Operator Guide Copyright © 2011 ComAp s.r.o. ComAp, spol. s r.o. Kundratka 17, 180 00 Praha 8, Czech Republic Tel: +420 246 012 111, Fax: +420 266 316 647 E-mail: info@comap.cz, www.comap.cz… -
Page 2: Table Of Contents
Table of contents Document information ……………………3 Clarification of notation ………………….. 3 Conformity Declaration ………………….. 3 Operator guide ……………………..4 Front panel elements……………………4 User interface modes ……………………. 6 Display screens and pages structure ………………6 View measured values ………………….. 8 Setpoints — view and change ………………….
-
Page 3: Document Information
OMANDL AND EVISED BY ONAT ©2011 C 17, P 8, C UNDRATKA RAHA ZECH EPUBLIC : +420246012111, : +420266316647 HONE : http://www.comap.cz, MAIL INFO COMAP OCUMENT HISTORY EVISION NUMBER ELATED SW VERSION 30.05.2008 28.02.2009 1.3.1 12.12.2011 1.1 Clarification of notation This type of paragraph calls readers attention to a notice or related theme.
-
Page 4: Operator Guide
2 Operator guide 2.1 Front panel elements SET CONTROL BUTTONS OSITION ESCRIPTION START button. Works in MAN mode only. Press this button to initiate the start sequence of the engine. See the Reference Guide – “Engine start” chapter to learn more about start sequence. STOP button.
-
Page 5
MODE RIGHT button. Use this button to change the mode. The button works only if the main screen with the indicator of currently selected mode is displayed. This button will not work if the controller mode is forced by one of binary inputs listed in the Reference Guide –… -
Page 6: User Interface Modes
OSITION ESCRIPTION Graphic B/W display, 128×64 pixels PAGE button. Use this button to switch over display pages. See next chapter for details about display pages and screens structure UP button. Use this button to move up or increase value. DOWN button. Use this button to move down or decrease value. ENTER button.
-
Page 7
TRUCTURE OF THE DISPLAYED DATA BASIC -NT, SW 1.3, ©C – S 2011 NTELI OMPACT VERSION EPTEMBER EFERENCE UIDE… -
Page 8: View Measured Values
2.4 View measured values Press button repeatedly until you see the main screen with the kW meter and mode selector. Then press to select a requested screen within the measurement page. AIN SCREEN 2.5 Setpoints — view and change 1. Press button repeatedly until you see a screen with a list of setpoint groups.
-
Page 9: Browsing The History Log
IST OF SETPOINTS WITHIN SELECTED GROUP DITING A SETPOINT 2.6 Browsing the history log 1. Press button repeatedly until you see the main history log screen with the reason column and the latest record. The records are numbered in reverse order, i.e. the latest (newest) record is «0» and older records have «-1», «-2″…
-
Page 10: Browsing Alarms
2.7 Browsing alarms The Alarmlist and ECU Alarmlist are displayed on the last two screens in the measurement page. If the main screen is displayed then the Alarmlist screen will appear automatically always when a new alarm occurs. It can be also displayed manually as described in the chapter “View measured values” Reference Guide.
-
Page 11: Controller Information Screen
Lost password? Display the information screen which contains the serial number and a password decode number as is described in the chapter below. Write down both numbers and send a request to retrieve the passord to your local distributor containing these two numbers. You can also save and send an archive instead.
-
Page 12
TRUCTURE OF THE DISPLAYED DATA ADVANCE The information screen contains following information: • Controller Name • Firmware identification string • Serial number of the controller • ESF version • Firmware version, application version • Application type • Branch name ESF version is shown only when electronic engine is configured. -NT, SW 1.3, ©C –… -
Page 13: Controller Language Selection
2.10 Controller language selection There are two languages available in the controller. Default languages are English and Chinese. The languages can be changed or modified during the configuration in LiteEdit. Please see the LiteEdit documentation for details. To switch the controller language: 1.
-
Contents
-
Table of Contents
-
Bookmarks
Quick Links
NT®
InteliCompact
Paralelling gen-set controller
SW version 1.3.1, December 2011
Operator Guide
Copyright © 2011 ComAp s.r.o.
ComAp, spol. s r.o.
Kundratka 17, 180 00 Praha 8, Czech Republic
Tel: +420 246 012 111, Fax: +420 266 316 647
E-mail: info@comap.cz, www.comap.cz
Related Manuals for ComAp INTELICOMPACT-NT
Summary of Contents for ComAp INTELICOMPACT-NT
-
Page 1
InteliCompact Paralelling gen-set controller SW version 1.3.1, December 2011 Operator Guide Copyright © 2011 ComAp s.r.o. ComAp, spol. s r.o. Kundratka 17, 180 00 Praha 8, Czech Republic Tel: +420 246 012 111, Fax: +420 266 316 647 E-mail: info@comap.cz, www.comap.cz… -
Page 2: Table Of Contents
Table of contents Document information ……………………3 Clarification of notation ………………….. 3 Conformity Declaration ………………….. 3 Operator guide ……………………..4 Front panel elements……………………4 User interface modes ……………………. 6 Display screens and pages structure ………………6 View measured values ………………….. 8 Setpoints — view and change ………………….
-
Page 3: Document Information
OMANDL AND EVISED BY ONAT ©2011 C 17, P 8, C UNDRATKA RAHA ZECH EPUBLIC : +420246012111, : +420266316647 HONE : http://www.comap.cz, MAIL INFO COMAP OCUMENT HISTORY EVISION NUMBER ELATED SW VERSION 30.05.2008 28.02.2009 1.3.1 12.12.2011 1.1 Clarification of notation This type of paragraph calls readers attention to a notice or related theme.
-
Page 4: Operator Guide
2 Operator guide 2.1 Front panel elements SET CONTROL BUTTONS OSITION ESCRIPTION START button. Works in MAN mode only. Press this button to initiate the start sequence of the engine. See the Reference Guide – “Engine start” chapter to learn more about start sequence. STOP button.
-
Page 5
MODE RIGHT button. Use this button to change the mode. The button works only if the main screen with the indicator of currently selected mode is displayed. This button will not work if the controller mode is forced by one of binary inputs listed in the Reference Guide –… -
Page 6: User Interface Modes
OSITION ESCRIPTION Graphic B/W display, 128×64 pixels PAGE button. Use this button to switch over display pages. See next chapter for details about display pages and screens structure UP button. Use this button to move up or increase value. DOWN button. Use this button to move down or decrease value. ENTER button.
-
Page 7
TRUCTURE OF THE DISPLAYED DATA BASIC -NT, SW 1.3, ©C – S 2011 NTELI OMPACT VERSION EPTEMBER EFERENCE UIDE… -
Page 8: View Measured Values
2.4 View measured values Press button repeatedly until you see the main screen with the kW meter and mode selector. Then press to select a requested screen within the measurement page. AIN SCREEN 2.5 Setpoints — view and change 1. Press button repeatedly until you see a screen with a list of setpoint groups.
-
Page 9: Browsing The History Log
IST OF SETPOINTS WITHIN SELECTED GROUP DITING A SETPOINT 2.6 Browsing the history log 1. Press button repeatedly until you see the main history log screen with the reason column and the latest record. The records are numbered in reverse order, i.e. the latest (newest) record is «0» and older records have «-1», «-2″…
-
Page 10: Browsing Alarms
2.7 Browsing alarms The Alarmlist and ECU Alarmlist are displayed on the last two screens in the measurement page. If the main screen is displayed then the Alarmlist screen will appear automatically always when a new alarm occurs. It can be also displayed manually as described in the chapter “View measured values” Reference Guide.
-
Page 11: Controller Information Screen
Lost password? Display the information screen which contains the serial number and a password decode number as is described in the chapter below. Write down both numbers and send a request to retrieve the passord to your local distributor containing these two numbers. You can also save and send an archive instead.
-
Page 12
TRUCTURE OF THE DISPLAYED DATA ADVANCE The information screen contains following information: • Controller Name • Firmware identification string • Serial number of the controller • ESF version • Firmware version, application version • Application type • Branch name ESF version is shown only when electronic engine is configured. -NT, SW 1.3, ©C –… -
Page 13: Controller Language Selection
2.10 Controller language selection There are two languages available in the controller. Default languages are English and Chinese. The languages can be changed or modified during the configuration in LiteEdit. Please see the LiteEdit documentation for details. To switch the controller language: 1.
В избранноеСравнить
Цену и наличие уточняйте у менеджеров
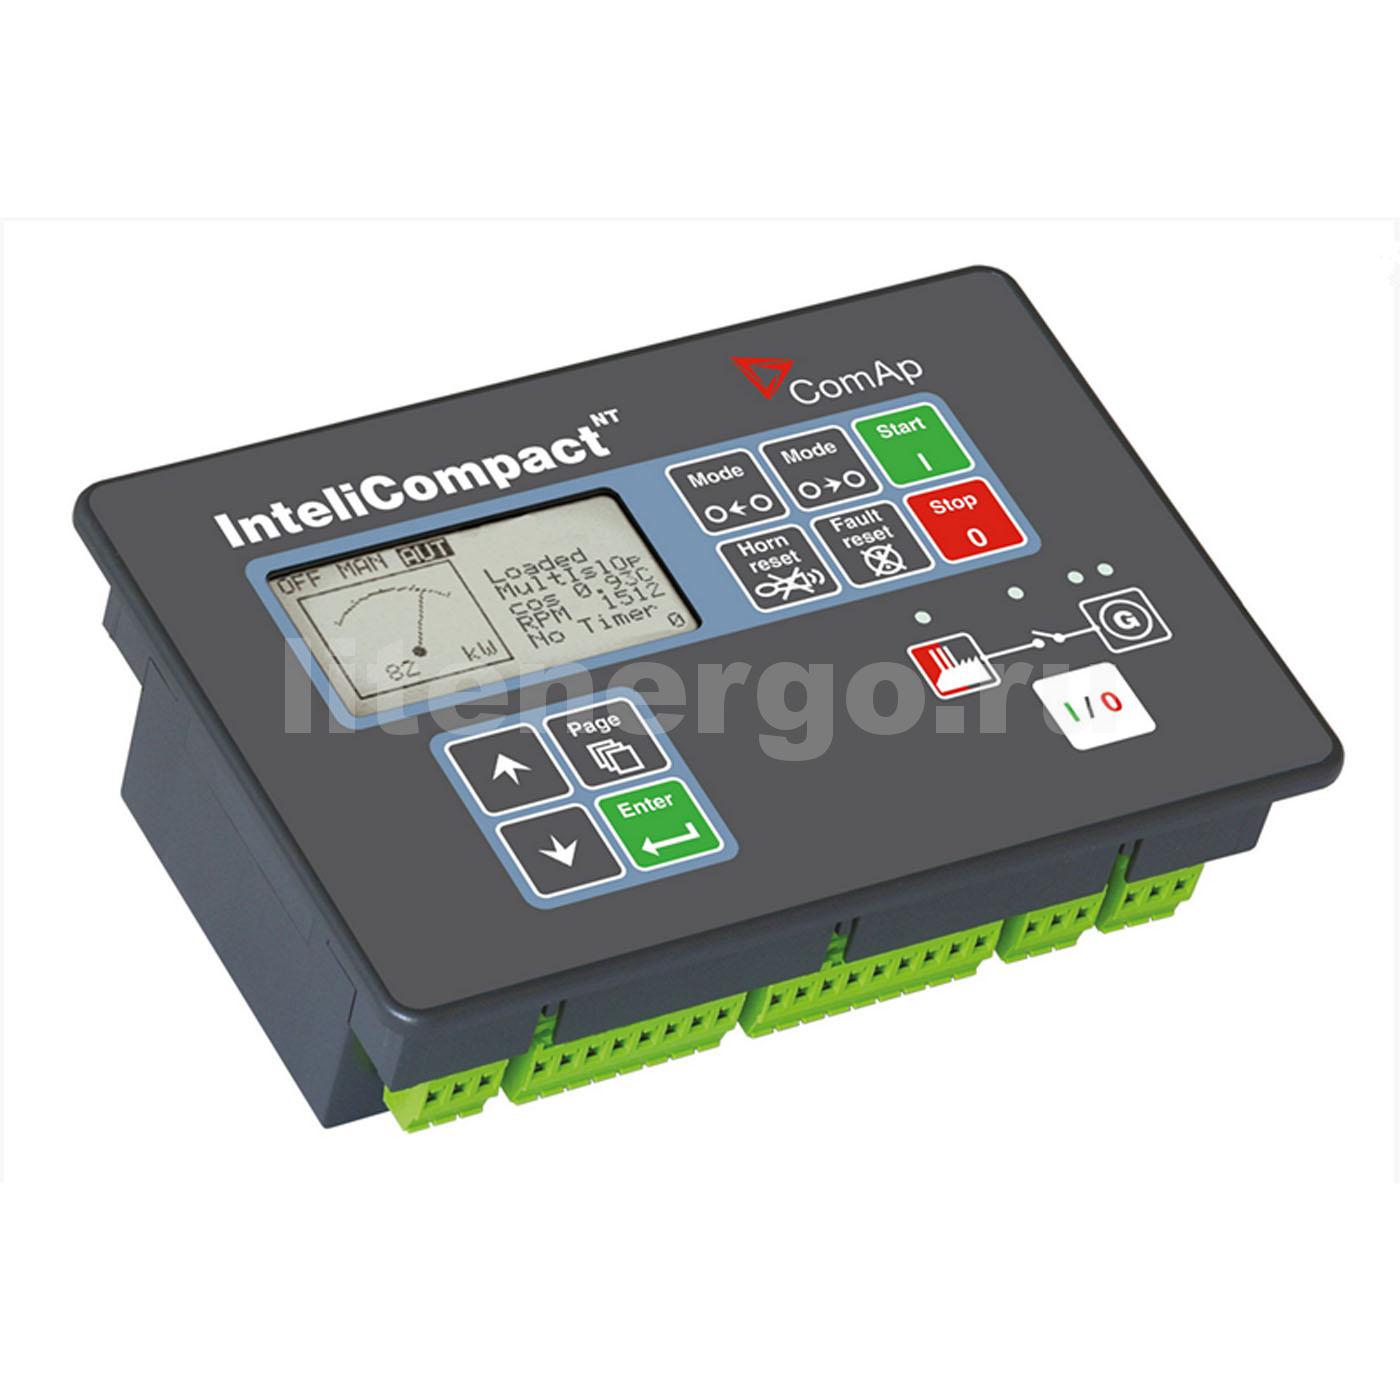
InteliCompact MINT являются встраиваемыми контроллерами генераторных установок для применения в дежурном режиме и режиме параллельной работы.Оптимизированы для простого использования, установки и настройки; включают в себя встроенный синхронизатор и цифровое изохронное разделение нагрузки. Контроллеры обеспечивают работу до 32 генераторных установок в параллель.
Для подключения к ПК нужен дополнительный модуль — IL-NT S-USB.
Купить в 1 клик
- Описание
- Характеристики
- Фотографии
- Инструкция
- Доставка
- Другие товары данной категории
- Отзывы
InteliCompact IC-NT-MINT являются встраиваемыми контроллерами генераторных установок для применения в дежурном режиме и режиме параллельной работы.Оптимизированы для простого использования, установки и настройки; включают в себя встроенный синхронизатор и цифровое изохронное разделение нагрузки. Контроллеры обеспечивают работу до 32 генераторных установок в параллель.
Основные технические параметры InteliCompac NT MINT, IC-NT-MINT:
- Функции АВР и параллельной работы;
- Срез пиков, Сетевой экспорт/импорт;
- Поддержка по работе с двигателем с электронным впрыском топлива (стандарт J1939, Modbus); отражение кодов тревог в текстовой форме;
- Базовая нагрузка, деление нагрузки;
- Оптимизирование количества работающих генераторных установок в режиме параллельной работы;
- Конфигурируемые входы/выходы для различных нужд потребителя;
- Файл истории.
| Размеры ДxШxВ, мм | 180x120x55 |
| Вес, г | 450 |
Самовывоз
Офис: г. Санкт-Петербург, ул. Литовская, д. 10.
Режим работы: Пн — Пт с 9:00 до 18:00.
Склад: г. Санкт-Петербург, ул. Латышских стрелков, д. 31
Режим работы: Пн — Пт с 10:00 до 17:00.
Доставка по России
Осуществляется транспортными компаниями и курьерскими службами.
Рассчитать стоимость доставки
Отзывы о Контроллер ComAp InteliCompact NT MINT (IC-NT MINT)
Отзывов еще нет.
Будьте первым, кто оставить отзыв!
ComAp News

Get the latest ComAp news by email
Sent out monthly, our newsletter gives you a summary of all the exciting news from ComAp and the smart power control industry.

Give us feedback
We want to make the ComAp website suit your needs. Whether you’re missing something or enjoying a recent improvement, let us know.
Our website uses cookies and similar technologies to provide you the best experience and to understand how you use our site.
You may either „Accept all“ by which you agree with using functional, analytical and marketing cookies. By pressing „Revoke“ only necessary cookies shall be allowed to enable the website and applications function correctly. To revoke your consent you can do it from footer menu in Change cookie preferences section.
You can find more information on the Cookie page and the Privacy section .