Предлагаем вашему вниманию все коды ошибок посудомоечных машин наиболее известных производителей Smeg.
Мы расскажем про посудомоечные машины Smeg всё
Профессиональный сервис
Для нашего удобства все современные посудомоечные машины включают в себя систему диагностики и снабжены многочисленными функциями, среди которых и сообщение прибора о неисправностях. Она постоянно контролирует все критические ситуации и сообщает о них на плату индикации в виде кода ошибки. Но надо не забывать, что код ошибки далеко не всегда совпадает с первопричиной проблемы: чтобы её установить, необходимо специальное диагностическое оборудование – если сразу не удалось разобраться в проблеме, звоните в сервис.

Рекомендация для всех посудомоечных машин
- Если панель индикации не светиться, то это не обязательно неисправность. Это может быть связанно напряжением в сети. Например не рабочая розетка и посудомоечная машина Ardo не включается.
- Когда моргают или засветились одновременно лампочки, тогда нужно начать проверку с блока управления (модуля), а уже затем проверять всю остальную периферию посудомоечной машины.
- Бывает, что ошибка может появится только один раз и для сброса будет достаточно просто перегрузить машинку. Но если код не исчез, тогда придётся его устранить.
-
Мы работаем каждый день с 09:00 до 22:00 и поэтому вы всегда можете вызвать нашего мастеря для ремонта вашей техники.
Если вам нужен ремонт холодильника, и вы бы хотели ознакомиться с нашими ценами и узнать как мы работаем, тогда вам нужно перейти по этой ссылке “Ремонт посудомоечной машины в Самаре“.
Расшифровка кодов ошибок посудомоечных машин Smeg
E1, E2 – Сбой в работе системы acquastop. Включена защита от протечки воды.
В посудомоечный машину поступает очень много воды и срабатывает система перелива.

Как устранить:
- Требуется заменить прессостат.
- Правильно подключить к канализации.
- Требуется замена клапана подачи воды (кэн).
- Ремонт модуля управления.
E3 – Ошибка нагревательной системы. Превышено допустимое время нагревания воды.
Посудомоечная машина не может нагреть воду.

Как устранить:
- Требуется заменить нагревательный элемент (тэн).
- Починить модуль управления.
- Заменить датчик температуры NTC.
E4 – Сбой работы термодатчика воды. Короткое замыкание или размыкание в цепи.
Требуется замена температурного датчика.

Как устранить:
- Требуется заменить датчик температуры NTC.
- Требуется ремонт модуля управления.
E5 – Нарушение процесса наполнения водой. Вода не наливается или наливается неверно. Слабый напор либо отсутствие холодной воды, неисправность клапана залива.
В посудомоечную машину постоянно наливается вода.
Как устранить:
- Требуется замена клапана подачи воды.
- Требуется замена прессостата.
- Не правильное подключение ппм к канализации.
E6 – Ошибка в процессе слива воды. Вода не сливается или сливается со сбоями. Проверьте правильно ли расположен сливной шланг, возможно произошло его пережатие.
Техника не может слить воду за отведенное время.

Как устранить:
- Требуется замена сливного насоса (помпа).
- Ремонт модуля управления.
- Устранить засор сливной системы.
E7 – Дефект турбины (при наличии данного оборудования в вашей модели). Измерение количества налитой воды происходит неточно.
Требуется ремонт или замена турбины.

E8 – Неполадки в работе системы попеременной мойки. Обратитесь в сервисный центр по ремонту посудомоечных машин.
Требуется диагностика посудомоечной машины.

E9 – Дефект в работе системы наполнения посудомоечной машины водой. Проверьте наличие холодной воды и силу напора.
Долго поступает вода в посудомоечную машину.

Как устранить:
- Требуется замена клапана подачи воды (кэн).
- Восстановить работу модуля управления (плата).


Ремонт посудомоечных машин Smeg
 Посудомоечные машины Smeg выпускаются одноименной итальянской компанией Smeg (аббревиатура Smalteria Metallurgica Emiliana Guastalla). История компании Smeg начинается с 1948 года. В 1963 году компания выпустила первую свою стиральную и посудомоечную машину. Производство сосредоточено в Италии на трех заводах. Высокое качество и неповторимый дизайн продукции, над которым работали такие известные дизайнеры Гуидо Канали, Марк Ньюсон, Марио Беллини, Джанкарло Кандеаго и студия Piano Design.
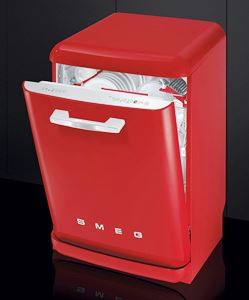
Посудомоечные машины и другая бытовая техника компании Smeg относится к премиум-классу и достаточно высокому ценовому сегменту это дорогая и эксклюзивная техника. Компания изготавливает как встраиваемые модели посудомоечных машин так и отдельно стоящие модели, они отлично вписываются в любой интерьер. Посудомоечные машины Smeg не отстают от остальной дизайнерской бытовой техники. Среди посудомоечных машин Smeg, можно встретить модельный ряд, выполненный в стиле XX века середины 50-х годов.
Даже машина от именитого производителя может дать сбой или выйти из строя!
Не тяните с ремонтом!
Посудомоечная машина представляет собой целостную систему, где неправильная работа или повреждение одного агрегата или детали, влечет за собой последовательное нарушение в работе остальных узлов.
Оперативные и качественные работы, проведенные профессиональным мастером, гарантируют исправность вашей посудомоечной машины на долгие годы!
Мы предлагаем:
- Выезд по всей Москве в удобное для вас время;
- Большинство неисправностей устраняются за один приезд мастера;
- Обсуждение стоимости возможных вариантов ремонта;
- Оригинальные запчасти от производителя, а также помощь по подбору аналогов;
- Доступные цены на ремонт (См. таблицу);
- Рассказываем и показываем то, что делаем;
- Консультации по правильной эксплуатации машины;
- Оформляем квитанцию с договором, актом сдачи-приемки работ и гарантию (Бланк строгой отчетности), в которой будут указаны ваши данные, марка и модель посудомоечной машины, выполненные работы и гарантийный срок.
Возможные варианты неисправности, ориентировочную стоимость ремонта и время — можно узнать у мастера, но следует отметить, что точный диагноз по телефону не сможет поставить даже самый лучший специалист.
Цены на ремонт
| Тип работ | Стоимость работы мастера*, руб. | Гарантийный срок, мес. |
|---|---|---|
| Выезд мастера, диагностика неисправности | 1 000* | — |
| Демонтаж и монтаж встроенной посудомоечной машины | 1 300 | — |
| Простой ремонт | ||
| Чистка заливного фильтра | 1 600 | — |
| Чистка фильтров | 2 100 | — |
| Чистка разбрызгивателя (один) | 1 600 | 6 мес. |
| Регулировка, чистка реле уровня воды | 2 100 | 3 мес. |
| Замена сетевого кабеля | 1 900 | 1 год |
| Замена заливного шланга | 1 600 | 1 год |
| Замена сливного шланга | 2 400 | от 1 до 2 лет |
| Замена заливного шланга с Аквастопом | 2 100 | 1 год |
| Замена кнопки | 1 600 | 6 мес. |
| Ремонт или замена колесиков (держателей) корзины (один) | 200 | 6 мес. |
| Ремонт или замена пружин дверцы (одна) | 2 200 | 6 мес. |
| Ремонт механизма замка | 2 200 | 1 год |
| Ремонт или замена петли двери (одна) | 1 900 | 6 мес. |
| Замена разбрызгивателя (один) | 1 400 | 3 мес. |
| Замена нижнего уплотнителя дверцы | 1 900 | 6 мес. |
| Замена П-образного уплотнителя | 2 900 | 6 мес. |
| Ремонт или замена дозатора моющих средств | 2 200 | 1 год |
| Замена датчика соли | 2 100 | 3 мес. |
| Замена сенсора управления | 2 100 | 6 мес. |
| Средний ремонт | ||
| Поиск и чистка засора в системе слива | 2 400 | — |
| Разблокировка циркуляционного насоса | 3 200 | — |
| Ремонт или замена патрубка | 2 900 | 1 год |
| Ремонт теплообменника | 3 700 | 6 мес. |
| Ремонт стакана моечного бака (ремкомплект) | 2 900 | 1 год |
| Ремонт электропроводки | 2 400 | 2 года |
| Ремонт или замена системы защиты от протечек Аквастоп | 3 200 | 1 год |
| Замена ТЭНа | 3 000 | 6 мес |
| Замена проточного нагревательного элемента | 3 500 | 1 год |
| Замена термостата или датчика температуры | 2 700 | 6 мес. |
| Замена пускового конденсатора циркуляционного насоса | 2 600 | 1 год |
| Замена датчика мутности | 3 400 | 6 мес. |
| Замена бачка для соли | 3 400 | 1 год |
| Замена датчика протока воды | 2 900 | 6 мес. |
| Замена устройства блокировки двери | 2 900 | 1 год |
| Замена датчика уровня воды | 2 700 | 6 мес. |
| Замена заливного клапана | 2 600 | 6 мес. |
| Ремонт или замена циркуляционного насоса | 3 800 | 3 мес. |
| Замена сливного насоса | 2 700 | 6 мес. |
| Замена платы управления (индикации) | 3 700 | 1 год |
| Ремонт платы управления (индикации) | от 4 300 | 6 мес. |
| Замена панели управления | 2 600 | 2 года |
| Сложный ремонт | ||
| Замена стакана-отстойника циркуляционного насоса | 5 600 | 1 год |
| Замена водоприемника | 4 000 | 1 год |
| Замена моечного бака | 5 600 | 1 год |
| * Указанные цены за ремонтные работы (без стоимости запчастей и комплектующих), запчасти и комплектующие оплачиваются дополнительно. * Бесплатных услуг нет, выезд мастера и диагностика 1000 руб. При согласии на ремонт, оплата за выезд и диагностику не берется. Ложный вызов, оплата 1000 руб. Итоговая стоимость ремонта зависит от трудоемкости работ и стоимости запасных частей, комплектующих и материалов. |
Звоните, пишите нам, и мы всегда будем рады помочь!
Консультации и заявки на ремонт принимаются ежедневно, с 8 утра до 22 часов вечера по телефону
8 (985) 181 – 02 – 88
8 (985) 181 – 02 – 88 ( WhatsApp )
или при помощи online заявки.
Оставьте заявку на ремонт
Быстрая онлайн-диагностика неисправностей посудомоечных машин (Просто выберите проблему из списка и узнайте примерную поломку)
Посудомоечные машины Smeg имеют функцию отображения кода ошибки при возникновении некоторых неисправностей и сбоев в работе. Довольно часто, понимая, что означает код ошибки, вы в состоянии сами устранить неисправность или поломку.
Для вашего удобства представлено перечисление кодов ошибок посудомоечных машин Smeg с расшифровкой каждого конкретного кода. Так же в таблицу включены описание ошибки, причины ее возникновения и возможные способы устранения.
Расшифровка кодов ошибок посудомоечных машин Smeg
| Код ошибки |
Описание ошибки | Причины возникновения и устранение |
|---|---|---|
| Машина сообщает о ряде неисправностей путем одновременного включения нескольких светодиодов, кроме того, на дисплее появляется код. 0 — светодиод выключен, 1 — светодиод горит, 2 — светодиод мигает. Аварийные сигналы E1, E2, E3, E4, E8, E9 вызывают немедленное |
||
| E1 20001 |
Неисправность системы Аква Стоп. | Сработала защитная система от разлива воды (только для оборудованных ею моделей). Срабатывает в случае утечек воды. |
| E2 02001 |
Сработала система ограничения уровня воды. | Сработала система, ограничивающая уровень воды в посудомоечной машине. Остановите выполняющуюся программу, выключите посудомоечную машину. Включите и перепрограммируйте посудомоечную машину, запустите цикл мойки. Вероятная причина возникновения — неполадки со сливом или с датчиком уровня воды. |
| E3 22001 |
Неисправность системы нагрева воды. | Нагрев воды не выполняется, или выполняется неправильно. Снова выполните программу мойки. |
| E4 00201 |
Сбой работы термодатчика воды. | Остановите выполняющуюся программу, выключите посудомоечную машину. Включите и перепрограммируйте посудомоечную машину, запустите цикл мойки. Короткое замыкание или размыкание в цепи. |
| E5 20201 |
Нарушение процесса наполнения водой. Вода не наливается или наливается неверно. | Налив воды не выполняется, или выполняется неправильно. Убедитесь, что гидравлические подключения правильные, что наливной кран воды открыт, и что фильтр на засорен. Слабый напор либо отсутствие холодной воды, неисправность клапана залива. |
| E6 02201 |
Ошибка в процессе слива воды. Вода не сливается или сливается со сбоями. | Слив воды не выполняется, или неправильно выполняется. Проверьте, что сливная труба не перегнута и не зажата, и что сифон или фильтры не засорены. |
| E7 22201 |
Неисправность турбины (только для оборудованных ею моделей) |
Неточно измеряется количество налитой воды. Остановите выполняющуюся программу, выключите посудомоечную машину. Включите и перепрограммируйте посудомоечную машину, запустите цикл мойки. |
| E8 00021 |
Неисправная работа системы поочередной мойки. | Остановите выполняющуюся программу, выключите посудомоечную машину. Включите и перепрограммируйте посудомоечную машину, запустите цикл мойки. |
| E9 20021 |
Дефект в работе системы наполнения посудомоечной машины водой. | Проверьте наличие холодной воды и силу напора. |
Посудомоечная машина представлена сложными по конструкции агрегатами, и если они выходят из строя, лучше и не пытаться починить их самостоятельно, если ранее вы не проводили ремонт посудомоечных машин своими руками и не знакомы с техникой безопасности при ремонте электрооборудования. Тем более, что это связано с высоким напряжением и возможностью затопления соседей, живущих на этаж, а то и на два-три этажа ниже и лишним финансовым тратам.
Проводя ремонт своими руками помните о своей безопасности!
Разборку производите с отключением техники от сети!
Оптимально воспользоваться услугами опытного мастера, который знаком с любыми неполадками и может устранить неисправность. Если сломалась посудомоечная машина, доверьте ремонт профессионалу: он сможет выполнить все действия быстро, качественно и безопасно.
Как вызвать мастера?
Заявки на ремонт принимаются ежедневно, с 8 утра до 22 часов вечера по телефону или при помощи online заявки.
8 (985) 181 – 02 – 88
8 (985) 181 – 02 – 88 ( WhatsApp )
Оставьте заявку на ремонт
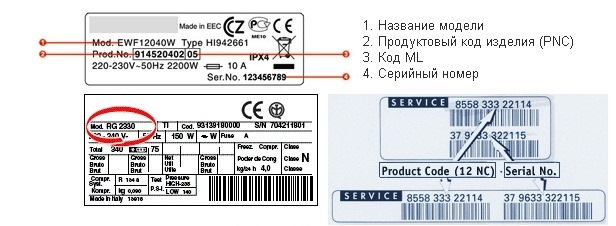
Важно! При обращении укажите, пожалуйста, следующую информацию: Ваши контактные данные: имя, телефон и адрес, марку машины, по возможности пришлите бирку с серийным номером и продуктовым кодом машины и подходящие вам день и час приезда мастера.
для проведения ремонта и подбора запасных частей посудомоечной машины необходимо знать ее модель и серийный номер.
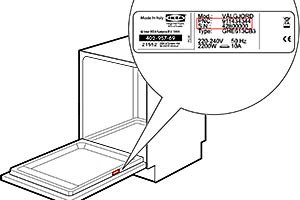
Точная модель машины указана на бирке на корпусе посудомоечной машины или наклейках-стикерах, а также в инструкции по эксплуатации. Если вы уже самостоятельно приобрели запчасти для замены, укажите только марку машины. Например, SMEG STP364T.
места, где в посудомоечных машинах, может находиться наклейка-стикер со всей необходимой сервисной информацией.
1. Под дверцей на корпусе. Чаще всего на посудомоечных машинах серийный номер находится на наклейке под дверцей. Либо на самой дверце, либо на корпусе. В большинстве случаев номер состоит из цифр, реже из цифр и букв.
2. На задней стенке. Задняя стенка посудомоечной машины — это традиционное место для всевозможной сервисной информации. Если не удалось найти наклейку с номером на передней части, то на задней стенке она наверняка сохранилась.
3. В паспорте или руководстве по эксплуатации. И наконец, серийный номер иногда можно найти в документах, которые выдаются в комплекте, при покупке посудомоечной машины. Как правило номер находится в паспорте или гарантийном талоне.
Стрелками показано расположение бирок
производители посудомоечных машин в бирке (наклейке-стикере) кодируют, что они производили, когда, где и из каких деталей. Закодирована эта информация в двух последовательностях цифр (букв) продуктовом и серийном номерах. Их сочетание уникально, и относится только к одному конкретному экземпляру посудомоечной машины.
Сфотографируйте пожалуйста эти бирки
Чтобы максимально продлить срок эксплуатации вашей посудомоечной машины, нужно внимательно прочитать инструкцию по эксплуатации. Если вы ее потеряли, здесь вы можете выбрать свою модель и скачать в формате pdf.
Инструкции по эксплуатации посудомоечных машин Smeg
| SMEG BLV 2X-2 | SMEG LP 364 XT | SMEG LSA 6439 X2 |
| SMEG LVS 367 SX | SMEG PLA 4525 X | SMEG ST321-1 |
| SMEG ST 733 TL | SMEG STA 6145 | SMEG STLA 825 B-1 |
| SMEG STP 364 T |
Посудомоечные машины производителей, которые мы ремонтируем


























































Большинство современных посудомоечных машин Smeg имеют функцию отображения кода ошибки при возникновении некоторых неисправностей и сбоев в работе. Довольно часто, понимая, что означает код ошибки, вы в состоянии сами устранить неисправность или поломку.
Для вашего удобства представлено перечисление кодов ошибок посудомоечных машин Smeg с расшифровкой каждого конкретного кода. Так же в таблицу включены описание ошибки, причины ее возникновения и возможные способы устранения.
Внимание!
Пожалуйста перезайдите на данную страницу с компьютера.
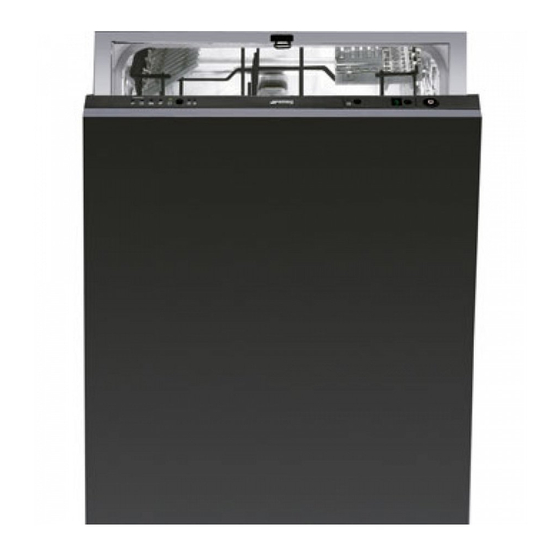
Требуется руководство для вашей Smeg STA4645 Посудомоечная машина? Ниже вы можете просмотреть и загрузить бесплатно руководство в формате PDF. Кроме того, приведены часто задаваемые вопросы, рейтинг изделия и отзывы пользователей, что позволит оптимально использовать ваше изделие. Если это не то руководство, которое вы искали, – свяжитесь с нами.
Ваше устройство неисправно, и в руководстве отсутствует решение? Перейдите в Repair Café для получения бесплатных ремонтных услуг.
Руководство

Рейтинг
Сообщите нам, что вы думаете о Smeg STA4645 Посудомоечная машина, оставив оценку продукта. Хотите поделиться вашими впечатлениями от данного изделия или задать вопрос? Вы можете оставить комментарий в нижней части страницы.
Довольны ли вы данным изделием Smeg?
Да Нет
Будьте первым, кто оценит это изделие
0 голоса
Часто задаваемые вопросы
Наша служба поддержки выполняет поиск полезной информации по изделиям и отвечает на часто задаваемые вопросы. Если вы заметили неточность в наших часто задаваемых вопросах, сообщите нам об этом с помощью нашей контактной формы.
После завершения цикла посудомоечной машины отсек с моющим средством не открылся. Почему? Проверенный
Данная проблема часто возникает, когда посуда блокирует отсек. Прежде, чем запускать машину, убедитесь, что отсек не заблокирован.
Это было полезно (7241)
Почему посудомоечная машина перестала нагревать воду? Проверенный
Скорее всего, нагревательный элемент неисправен. Его следует заменить. В случае сомнений обратитесь к производителю.
Это было полезно (6218)
Можно ли в посудомоечной машине использовать обычную соль? Проверенный
Нет, поваренная соль может содержать вещества, которые споcобны повредить ваше устройство.
Это было полезно (2823)
Нужно ли ополаскивать посуду, прежде чем поместить ее в посудомоечную машину? Проверенный
Ополаскивать посуду необязательно, однако следует удалить все крупные, твердые и жирные остатки пищи. Со временем они могут засорить слив.
Это было полезно (1087)
Могу ли я открыть посудомоечную машину во время ее работы? Проверенный
Большинство посудомоечных машин оснащены устройством остановки подачи воды, благодаря чему программа останавливается сразу же при открытии дверцы, что означает, что вода не будет вытекать. С некоторыми моделями со временем это может вызвать проблемы. При использовании встраиваемых посудомоечных машин частое открывание посудомоечной машины во время работы может привести к повреждению окружающих шкафов водой из-за выделяющегося пара.
Это было полезно (780)
Следует ли открывать посудомоечную машину после того, как она закончила работу, чтобы посуда высохла быстрее? Проверенный
Это зависит от типа посудомоечной машины и ее расположения. Некоторые посудомоечные машины оснащены функцией сушки посуды после программы мойки. В этом случае открытие посудомоечной машины не принесет никакой пользы. При использовании встраиваемых посудомоечных машин частое открывание посудомоечной машины во время работы может привести к повреждению окружающих шкафов водой из-за выделяющегося пара.
Это было полезно (618)
После того, как посудомоечная машина завершит свой цикл, пластиковая посуда еще влажная, а остальная — нет. Это почему? Проверенный
Пластик — плохой проводник тепла, позволяющий продуктам быстро остывать. Влага, которая остается на нем, испаряется гораздо меньше, чем, например, на керамике или металле.
Это было полезно (541)
Можно ли подключить посудомоечную машину к удлинителю? Проверенный
Технику, требующую большого количества энергии, например посудомоечную машину, нельзя подключать ко всем удлинителям. Посмотрите, какова потребляемая мощность посудомоечной машины, которая указывается в ваттах, и проверьте, справится ли с этим удлинитель. Существуют удлинители с более толстыми кабелями, предназначенные для работы с более крупными приборами.
Это было полезно (475)
Можно ли мыть в посудомоечной машине деревянные предметы, например, шпатели и разделочные доски? Проверенный
Нет. Деревянные предметы можно повредить или покоробить в посудомоечной машине. Кроме того, высвобождающиеся древесные волокна могут повредить посудомоечную машину. Деревянные разделочные доски часто изготавливаются с использованием клея, который может отслоиться после нескольких раз мытья в посудомоечной машине.
Это было полезно (475)
Царапины на металле внутри посудомоечной машины — это проблема? Проверенный
Внутренняя часть большинства посудомоечных машин изготовлена из нержавеющей стали и не подвержена царапинам.
Это было полезно (474)
Можно ли мыть посуду с тефлоном в посудомоечной машине? Проверенный
Да, ты можешь. Однако сковорода изнашивается быстрее, чем при ручной очистке. При чистке сковороды тефлоном вручную никогда не используйте мочалку, а используйте мягкую губку или ткань.
Это было полезно (474)
Подходит ли моя посудомоечная машина Smeg для мытья хрусталя? Проверенный
Некоторые посудомоечные машины Smeg оснащены специальной программой для хрусталя. В этом случае вы можете смело использовать его для очистки кристалла.
Это было полезно (8)
-
Contents
-
Table of Contents
-
Troubleshooting
-
Bookmarks
Quick Links
INSTRUCTION MANUAL
G
U
I
D
E
F
O
R
U
S
I
N
G
T
H
E
D
I
S
H
W
A
S
H
E
R
A
N
D
T
H
E
W
A
S
H
I
N
G
P
R
O
G
R
A
M
S
G
U
I
D
E
F
O
R
U
S
I
N
G
T
H
E
D
I
S
H
W
A
S
H
E
R
A
N
D
T
H
E
W
A
S
H
I
N
G
P
R
O
G
R
A
M
S
Related Manuals for Smeg STA4645
Summary of Contents for Smeg STA4645
-
Page 1
INSTRUCTION MANUAL… -
Page 2: Table Of Contents
CONTENTS CONTENTS INTRODUCTION … 3 DESCRIPTION AND USE OF THE CONTROLS … 5 Upper panel … 5 Setting the washing program and switching on and off… 6 2.2.1 Switching on … 8 2.2.2 Selecting and starting the program … 8 2.2.3 End of program …
-
Page 3
Rev 0.0… -
Page 4: Introduction
INTRODUCTION INTRODUCTION Thank you for choosing one of our products. To use this dishwasher correctly and safely, please read this manual carefully. The manual is divided into sections giving you a step-by-step guide to all your ap- pliance’s functions. The texts are easy to understand and are com- plete with detailed illustrations.
-
Page 5
Symbols used in this manual (see tab. 1-01) DANGER. This symbol highlights information and warnings which, if not observed, may compromise personal safety or damage the appliance. This symbol highlights general information and warnings. INTRODUCTION Tab. 1-01 Rev 0.0… -
Page 6: Description And Use Of The Controls
USER INSTRUCTIONS DESCRIPTION AND USE OF THE CONTROLS Upper panel All the dishwasher controls are grouped on the upper panel (see fi g. 2-01). The dishwasher can only be switched on, programmed, switched off, etc. with the door open. A brief description (see tab. 2-01) of the various controls on the upper panel is given below.
-
Page 7: Setting The Washing Program And Switching On And Off
Setting the washing program and switching on and off The dishwasher is equipped with a control panel (see fi g. 2-02) which is used to program the appliance and switch it on and off. To select the most suitable program for the dishes to wash, consult the fol- lowing table which specifi…
-
Page 8
— Only “EXTREME WASH” program conform to NSF std 184 and is certifi ed by INTERTEK with the ETL SANITATION LISTED. — When the “Sanitized” light shine it means that the dishwasher and its contents have been sani- tized according to the requirements of the National Sanitation Foundation (NSF). -
Page 9: Switching On
The dishwasher door is securely closed. 2.2.1 Switching on Press the on/off button (ref. 1 fi g. 2-02) to start the dishwasher. Then wait for one of the program indicator lights to turn on (ref. 2 fi g. 2-02). 2.2.2 Selecting and starting the program •…
-
Page 10: Interrupting A Program
USER INSTRUCTIONS 2.2.4 Interrupting a program To interrupt the current program simply open the door of the dishwasher; to restart the program, simply close the door again. The program restarts from where it was interrupted. If it is necessary to open the door during the washing cycle, the program will be interrupted, the relative indicator light will continue to fl…
-
Page 11: Options
The “Program delay” function delays the beginning of the washing program up to 9 hours from the moment in which programming takes place. This makes it possible to use the dishwasher at a certain time of day. Before programming a delay, open the door of the dishwasher, select the required washing program (see para 2.2 “Setting the washing program and…
-
Page 12: Switching Off
2.2.8 Switching off At the end of the program, the dishwasher emits a short beep and the indica- tor lights of the fourth and fi fth program (ref. pr. 4, pr. 5 fi g. 2-04) fl ash. Turn off the appliance by opening the door and pressing the on/off button (ref.
-
Page 13
N.B.: the display indicates the water hardness adjustment and the program delay. A dot (.) after the number means that the water hard- ness adjustment is being displayed. If no dot (.) appears, the pro- gram delay is being displayed. Water hardness table (see tab. -
Page 14: Energy Saving And Environmental Respect
Use the most suitable washing program for each type of load. • Do not pre-rinse. • If available, connect the dishwasher to a hot water system with a tempera- ture of up to 60°C (140°F). • When possible, skip the drying cycle by opening the door after washing: the air and the residue heat will dry the dishes to perfection.
-
Page 15: Removing The Dishes
REMOVING THE DISHES At the end of the washing program, wait at least 20 minute before removing the dishes in order to allow them to cool. To prevent any water droplets on the upper rack from falling onto the dishes in the lower rack, empty the lower rack fi…
-
Page 16: Troubleshooting
USER INSTRUCTIONS TROUBLESHOOTING The dishwasher can to signal a number of malfunctions by turning on various indicator lights, as described below (see following table): FAULT Light off Rev 0.0 DESCRIPTION Acquastop failure The anti-fl ooding system has tripped (only for models fi…
-
Page 17
If an alarm situation occurs, the dishwasher interrupts the current program and signals the fault. • Alarms E1, E3, E4, immediately terminate the current program. • Alarms E5, E6 interrupt the current program and, after the problem has been eliminated, resume the cycle. -
Page 18
CONTENTS Contents INTRODUCTION … 3 IMPORTANT SAFETY INSTRUCTION … 5 INSTALLATION AND HOOK-UP … 11 OPERATING INSTRUCTIONS … 14 Using the water softening system … 15 Using the rinse-aid and detergent dispensers … 17 4.2.1 Adding the rinse-aid … 18 4.2.2 Adjusting the rinse-aid dispenser system … -
Page 19
Rev 0.0… -
Page 20: Introduction
INTRODUCTION INTRODUCTION Thank you for choosing one of our products. To use this dishwasher correctly and safely, please read this manual carefully. The manual is divided into sections giving you a step-by-step guide to all your appliance’s functions. The texts are easy to understand and are complete with detailed illustrations.
-
Page 21
Symbols used in this manual (see tab. 1-01) DANGER. This symbol highlights information and warnings which, if not observed, may compromise personal safety or damage the appliance. DANGER OF ELECTROCUTION. This symbol highlights information and warnings of an electrical nature which, if not observed, may compromise personal safety or damage the appliance. -
Page 22: Important Safety Instruction
THIS MANUAL FORMS AN INTEGRAL PART OF THE APPLI- ANCE: IT MUST ALWAYS BE KEPT INTACT TOGETHER WITH THE DISHWASHER (INCLUDING THE “INSTALLATION” AND “DESCRIP- TION OF CONTROLS” MANUALS, IF ATTACHED). BEFORE USING THE APPLIANCE, CAREFULLY READ ALL THE INSTRUCTIONS CONTAINED IN THIS MANUAL.
-
Page 23
DAMAGE TO PERSONS OR PROPERTY RESULTING FROM THE FAILURE TO EARTH THE APPLIANCE OR FROM A DE- FECTIVE EARTH CONNECTION. ALWAYS SWITCH OFF THE DISHWASHER AFTER EACH USE TO AVOID WASTING ELECTRICITY. IN THE EVENT OF A FAULT, DISCONNECT THE DISHWASHER FROM THE ELECTRICAL POWER SUPPLY AND SHUT OFF THE WATER TAP. -
Page 24
THE WORK PROGRAM AND THEN KEEP THE DETERGENT OUT OF THE REACH OF CHILDREN. THIS DISHWASHER MUST BE USED BY ADULTS. USE BY PER- SONS WITH REDUCED MENTAL AND/OR PHYSICAL CAPABILI- TIES IS ONLY PERMITTED UNDER THE SUPERVISION OF A PER- SON RESPONSIBLE FOR THEIR SAFETY. -
Page 25
SUCH AS DISPOSABLE CUTLERY OR PLATES, AS THESE MAY BECOME DEFORMED. DO NOT WASH OBJECTS IN PLASTIC UN- LESS THEY ARE MARKED “DISHWASHER PROOF” OR THE LIKE. FOR UNMARKED OBJECTS, FOLLOW THE INSTRUCTIONS OF THE MANUFACTURER; IF NO INFORMATION IS AVAILABLE, DO NOT WASH THESE OBJECTS IN THE DISHWASHER. -
Page 26
THE RACK. POSITION SHARP/POINTED OBJECTS SO AS TO PREVENT THEM FROM DAMAGING THE DOOR GASKETS. DO NOT OPERATE THE DISHWASHER UNLESS ALL THE OUTER PANELS HAVE BEEN POSITIONED CORRECTLY. DO NOT TAMPER WITH THE DISHWASHER CONTROLS. AQUASTOP MODELS; THE AQUASTOP DEVICE PREVENTS FLOODING IN THE EVENT OF A WATER LEAK. -
Page 27
THE PLUG OR TURN OFF THE MULTI-POLE SWITCH. REMOVE THE WASHING COMPARTMENT DOOR AND DISCON- NECT THE MAINS POWER SUPPLY WHEN REMOVING THE OLD DISHWASHER FOR MAINTENANCE OR DISPOSAL. THE SYMBOL ON THE PRODUCT, OR ON THE DOCUMENTS ACCOMPANYING THE PRODUCT, INDICATES THAT THIS APPLI- ANCE MAY NOT BE TREATED AS HOUSEHOLD WASTE. -
Page 28: Installation And Hook-Up
NATIONAL ELECTRIC CODE; IN CANADA THE CANADIAN ELEC- TRIC CODE C22.1 — LATEST EDITION/PROVINCIAL AND MUNICI- PAL CODES AND/OR LOCAL CODES. BUILDING-IN A DISHWASHER UNDERNEATH A CERAMIC HOB IS ABSOLUTELY FORBIDDEN. A DISHWASHER CAN BE BUILT-IN UNDERNEATH A CONVENTIONAL HOB PROVIDED THERE IS NO…
-
Page 29
INSTALLATION INSTRUCTIONS CHECK THAT THE VOLTAGE AND THE FREQUENCY OF THE MAINS MATCH THE RATINGS ON THE NAME PLATE OF THE AP- PLIANCE POSITIONED ON THE INNER EDGE OF THE DOOR. IN THE EVENT OF DAMAGE TO THE SUPPLY CORD, HAVE IT REPLACED BY THE MANUFACTURER OR AN AUTHORIZED TECH- NICAL SERVICE CENTRE. -
Page 30
INSTALLATION INSTRUCTIONS DO NOT USE EXTENSION CORDS, ADAPTORS OR SHUNT CON- NECTIONS IN ORDER TO AVOID THE POSSIBILITY OF OVERHEAT- ING OR BURNING, WITH CONSEQUENT FIRE HAZARD. Rev 0.0… -
Page 31: Operating Instructions
BEFORE STARTING TO USE THE APPLIANCE, MAKE SURE YOU HAVE READ AND UNDERSTOOD ALL THE WARNINGS CONTAI- NED IN CHAPTER 2 “IMPORTANT SAFETY INSTRUCTION”. Once the dishwasher has been correctly installed, prepare for use as follows: • adjust the water softening system;…
-
Page 32: Using The Water Softening System
(ref. A fi g. 4-01) by turning it anticlockwise and pour in the salt using the funnel (ref. A fi g. 4-02) supplied with the dishwasher. Before replacing the cap (ref. A fi g. 4-01), remove any salt residues from around the opening.
-
Page 33
• When using the dishwasher for the fi rst time, in addition to the salt it is also necessary to add one liter of water to the container. • Each time the salt container is refi lled, make sure that the cap (ref. A fi g. -
Page 34: Using The Rinse-Aid And Detergent Dispensers
USER INSTRUCTIONS Using the rinse-aid and detergent dispensers The detergent and rinse aid dispensers are situated on the inner part of the door: the detergent dispenser (ref. A fi g. 4-03) is on the left, and the rinse- aid dispenser (ref. B fi g. 4-03) is on the right. WITH THE EXCEPTION OF THE SOAK PROGRAM, BEFORE EV- ERY WASHING CYCLE IT IS NECESSARY TO ADD THE REQUIRED AMOUNT OF DETERGENT TO THE DETERGENT DISPENSER.
-
Page 35: Adding The Rinse-Aid
4.2.2 Adjusting the rinse-aid dispenser setting The rinse-aid dispenser can be set to one of 6 different levels. The dishwasher is factory set for medium water hardness (selector set to “3”). To change the setting, turn the dispenser selector (ref. c fi g. 4-04) to the desired position: the amount of rinse-aid dispensed is proportional to the position of this selector.
-
Page 36: Adding The Detergent
ATIONS OCCURS, SEEK MEDICAL ASSISTANCE IMMEDIATELY. PREVENT CHILDREN FROM COMING INTO CONTACT WITH DE- TERGENT; KEEP THEM AWAY FROM THE DISHWASHER WHEN THE DOOR IS OPEN AS IT MAY CONTAIN DETERGENT RESIDUES. FILL THE DISHWASHER JUST BEFORE STARTING THE WASHING CYCLE AND THEN KEEP THE DETERGENT OUT OF THE REACH OF CHILDREN.
-
Page 37
Controls” manual), extra detergent must be placed in the cavity (ref. A or B fi g. 4-06, depending on models). • Only use dishwasher-specifi c detergents. For optimal washing results it is important to use a good quality detergent. •… -
Page 38: General Warnings And Recommendations
WASHER. General warnings and recommendations Before using the dishwasher for the fi rst time, it is advisable to read the follow- ing recommendations concerning dish types to be washed and their loading. There are generally no constraints on the washing of domestic dishes, but in certain cases it is necessary to take their characteristics into account.
-
Page 39
• Decorated items: the decorated objects available on the market are gener- ally able to withstand washing in the dishwasher, although the colors may fade after a great many washes. If in doubt as to the fastness of the col- ors, it is advisable to wash just a few items at a time for approximately one month. -
Page 40: Using The Racks
USER INSTRUCTIONS Using the racks The dishwasher has a capacity of 10 place-settings, including serving dishes. Examples of loading 10 place-settings in the upper rack (see fi g. 4-07) and in the lower rack (see fi g. 4-08) are shown below; move the upper rack to its bottom position when loading in this way.
-
Page 41: Lower Rack
USER INSTRUCTIONS 4.4.1 Lower rack The lower rack receives the full force of the lower spray arm, and should there- fore be used for the “toughest” items with a heavier degree of soiling. All types and combinations of loads are permitted, provided that the dishes, pots and pans are arranged with all the soiled surfaces exposed to the water jets coming from the bottom.
-
Page 42
USER INSTRUCTIONS Loading the lower rack (see fi g. 4-10) Carefully load fl at plates, soup plates, dessert and serving dishes, position- ing them vertically. Pots, pans and their covers must be loaded upside down. When loading soup plates and dessert bowls, be sure to leave a gap between them. -
Page 43: Cutlery Basket
The dishwasher is complete with two cutlery baskets, which means that one of them can be removed, freeing space in the bottom rack, if there is not much cutlery to be washed.
-
Page 44: Upper Rack
USER INSTRUCTIONS 4.4.3 Upper rack (vedi fi g. 4-12, 4-13) It is recommended to load the upper rack with small- or medium-sized items such as glasses, small plates, tea or coffee cups, shallow bowls and light objects made from heat resistant plastic. If the upper rack is used in the lowermost position, it can also be loaded with serving dishes, provided they are only slightly soiled.
-
Page 45
USER INSTRUCTIONS Loading the upper rack (vedi fi g. 4-14) Load plates facing forward; cups, bowls etc. must always be facing downwar- ds. The left-hand side of the rack can be loaded with two layers of cups and glasses. The right-hand side can be fi lled with plates and side-plates, fi tted upright into the supports provided. -
Page 46: Adjusting The Upper Rack
• pull out the right-hand rack guide. Release the corresponding stop (ref. A fi g. 4-15) by turning it 90° towards the outside of the dishwasher; • pull out the left-hand rack guide and release the corresponding stop, just as you did for the right-hand rack guide;…
-
Page 47: Cleaning And User-Maintenance
NEVER USE ABRASIVE AND/OR CORROSIVE DETERGENTS TO CLEAN THE APPLIANCE. Clean the outer surfaces and door-lining of the dishwasher regularly using a soft cloth moistened with a neutral detergent (not abrasive and/or corrosive) suitable for painted surfaces. Clean the door gaskets with a damp sponge.
-
Page 48: Cleaning The Water Intake Fi Lter (Only Some Models)
USER INSTRUCTIONS Cleaning the water intake fi lter (only some models) The water intake fi lter (ref. B fi g. 5-01) located at the outlet of the water supply tap needs to be cleaned periodically. After having closed the water supply tap, unscrew the end (ref.
-
Page 49
• • • • • • • USER INSTRUCTIONS Fig. 5-02 Fig. 5-03 Fig. 5-04 Rev 0.0… -
Page 50: Cleaning The Fi Lter Unit
USER INSTRUCTIONS Cleaning the fi lter unit • Periodically inspect the fi lter unit (ref. A fi g. 5-05) and, if necessary, clean it under running water (at room temperature), using a stiff brush. To remove the fi lter, grip the handle, turn anticlockwise and lift upwards; •…
-
Page 51
• It is essential to thoroughly clean the fi lters according to the above in- structions: the dishwasher cannot function if the fi lters are clogged. • Carefully replace the fi lters in their seats, to avoid damaging the wash pump. -
Page 52: Troubleshooting Minor Problems
In some cases it is possible to remedy minor problems by referring to the fol- lowing instructions: If the program fails to start, check that: • the dishwasher is connected to the electrical power supply; • there is no power failure; •…
-
Page 53
If the dishes fail to dry or remain dull, check that: • there is rinse aid inside the special container; • the rinse-aid dispenser setting is correct; • the detergent used is of good quality and has not lost its effectiveness (for example, through incorrect storage, with the box left open). -
Page 54: Technical Data
USER INSTRUCTIONS TECHNICAL DATA (SEE TAB. 6-01) Width Depth measured fl ush with the outer edge of the control panel Height Capacity Water supply pressure Electrical characteristics Rev 0.0 44.7 cm ÷ 44.9 cm (17 — 19/32” ÷ 17 — 43/64”) 55 cm (21 — 21/32”) from 82 to 87 cm (from 32 — 9/32”…
-
Page 55
Contents INTRODUCTION … 3 SAFETY INFORMATION … 5 INSTALLATION MATERIAL … 8 Kit supplied with dishwasher (models sta_4645/sta_8743) … 9 Kit supplied with dishwasher (models pla_8743) … 10 DIMENSIONS OF DISHWASHER … 11 INSTALLATION AND HOOK-UP … 12 Leveling … 13 5.1.1… -
Page 56
Rev 0.0… -
Page 57: Introduction
INTRODUCTION INTRODUCTION Thank you for choosing one of our products. To install this dish- washer correctly and safely, please read this manual carefully. The manual is divided into sections giving you a step-by-step guide to installation of the appliance. The texts are easy to understand and are complete with detailed illustrations.
-
Page 58
Symbols used in this manual DANGER. This symbol highlights information and warnings which, if not observed, may compromise personal safety or damage the appliance. DANGER OF ELECTROCUTION. This symbol highlights information and warnings of an electrical nature which, if not observed, may compromise personal safety or damage the appliance. -
Page 59: Safety Information
WARNINGS SAFETY INFORMATION THIS MANUAL FORMS AN INTEGRAL PART OF THE APPLIANCE AND MUST THEREFORE BE KEPT INTACT TOGETHER WITH THE MACHINE. BEFORE USING THE APPLIANCE, CAREFULLY READ ALL THE INSTRUCTIONS CONTAINED IN THIS MANUAL. INSTAL- LATION MUST BE PERFORMED BY A QUALIFIED TECHNICIAN, IN COMPLIANCE WITH THE REGULATIONS IN FORCE.
-
Page 60
ANCE MUST BE INSTALLED AND CONNECTED IN ACCORDANCE WITH THE INSTRUCTIONS PROVIDED BY THE MANUFACTURER OR BY A QUALIFIED TECHNICIAN. DO NOT OPERATE THE DISHWASHER UNLESS ALL THE OUTER PANELS HAVE BEEN POSITIONED CORRECTLY. IMMEDIATELY AFTER INSTALLATION, BRIEFLY TEST THE APPLI- ANCE FOLLOWING THE INSTRUCTIONS INDICATED BELOW. -
Page 61
WARNINGS DO NOT USE EXTENSION CORDS, ADAPTORS OR SHUNT CON- NECTIONS IN ORDER TO AVOID THE POSSIBILITY OF OVERHEAT- ING OR BURNING, WITH CONSEQUENT FIRE HAZARD. MANUFACTURER DECLINES RESPONSIBIL- ITY FOR DAMAGE TO PERSONS, ANIMALS OR PROPER- TY RESULTING FROM FAILURE TO OBSERVE THE ABOVE PRECAUTIONS, FROM TAMPERING WITH EVEN A SINGLE COMPONENT OF THE APPLIANCE, OR FROM THE USE OF UNORIGINAL SPARE PARTS. -
Page 62: Installation Material
INSTALLATION MATERIAL To install the dishwasher correctly, the following materials are required: • Phillips screwdriver (ref. A fi g. 3-01); • spirit level (ref. B fi g. 3-01); • tape measure (ref. C fi g. 3-01); • compass saw (ref. D fi g. 3-01);…
-
Page 63: Kit Supplied With Dishwasher (Models Sta_4645/Sta_8743)
8 screws for securing the door panel hooks (ref. E fi g. 3-02); • 2 screws for securing the door (ref. F fi g. 3-02); • 2 screws for fi xing the dishwasher to the adjacent walls (ref. G fi g. 3-02); • 2 screw caps (ref. H fi g. 3-02). •…
-
Page 64: Kit Supplied With Dishwasher (Models Pla_8743)
8 screws for securing the door panel hooks (ref. E fi g. 3-03); • 2 screws for securing the door (ref. F fi g. 3-03); • 2 screws for fi xing the dishwasher to the adjacent walls (ref. G fi g. 3-03); • 2 screw caps (ref. H fi g. 3-03). •…
-
Page 65: Installation Instructions
STA8743 33-55/64” ÷ 35- 55/64” 86 cm ÷ 91 cm STA8614X 33-55/64” ÷ 35- 55/64” 82 cm ÷ 87 cm STA4645 32-9/32” ÷ 34-1/4” 86 cm ÷ 91 cm PLA8743X 33-55/64” ÷ 35- 55/64” 86 cm ÷ 91 cm PLA68XU 33-55/64”…
-
Page 66: Installation And Hook-Up
The sides and rear of the appliance can lie against kitchen units or walls. If the dishwasher is installed next to a heat source, separate it with a heat insulating panel in order to prevent overheating and malfunctions.
-
Page 67: Leveling
(cutting hazard). Covers are available as accessories from specialized retailers or from the Technical Service Centre. • To build in the dishwasher, purchase the ers or from the Technical Service Centre. Leveling 5.1.1 Mounting the feet (only for some models) Turn the appliance upside-down (see fi…
-
Page 68: 5.1.2 Levelling The Appliance
5.1.2 Levelling the appliance Level the appliance using the relative adjustable feet (e.g.: ref. A fi g. 5-02); use an open-ended wrench to rotate the feet until the dishwasher is perfectly level. Some models are fi tted with just one rear foot which can be adjusted with a screw located at the bottom front of the appliance (ref.
-
Page 69: Connections
INSTALLATION INSTRUCTIONS Connections Install the dishwasher so as to allow ease of access to the electrical and hy- draulic connections through the adjacent unit. These connections must never be behind the dishwasher. The inlet and drain hoses can be pointed in all directions. make sure that they are not bent, crushed or too tight.
-
Page 70: Connecting To The Water Supply
Make sure there area no rough edges that could damage the power cord or hoses. If the dishwasher is installed in a metal unit protect the edge of the through hole for the hoses and power cord with a gasket. Do not use exten- sion cords when making the electrical connection as these do not guarantee safety.
-
Page 71: 5.2.1.1 Connecting To The Water Tap
For models fi tted with ACQUASTOP (ref. C fi g. 5-06) the fi lter is already present in the threaded ring nut. The dishwasher can be fi lled with water at a temperature of less than 60°C (140°F).
-
Page 72
INSTALLATION INSTRUCTIONS Do not cut the inlet hose (see fi g. 5-07). If the hose is cut, the dishwasher will not work, water will leak and you may be injured. If the hose is too long, wind it up tidily and place it behind the appliance. -
Page 73: 5 .2.1.2 Connecting The Drain Hose
INSTALLATION INSTRUCTIONS 5 .2.1.2 Connecting the drain hose Connecting to a drain Insert the relative hose into a drain with a minimum diameter of 4 cm (1-37/64”) (ref. A fi g. 5-09); alternatively, place the hose on the sink (ref. B fi g. 5-09) using the supplied hose support (see fi…
-
Page 74
ON WHICH THE DISHWASHER WILL BE INSTALLED. Connect the dishwasher drain hose (ref. A fi g. 5-11) to the “T” union (ref. B fi g. 5-11) of the drain circuit using a 38 to 50 mm (1-1/2 to 2”) screw clamp* (ref. -
Page 75
Remove the cover of the waste disposal unit (ref. A fi g. 5-12). Connect the dishwasher drain hose (ref. B fi g. 5-12) to the air gap (ref. C fi g. 5-12) using the wide spring clamp (ref. D fi g. 5-12); if necessary, cut the end of the dishwasher drain hose (ref. -
Page 76
ON WHICH THE DISHWASHER WILL BE INSTALLED. Connect the dishwasher drain hose (ref. A fi g. 5-13) to the air gap (ref. B fi g. 5-13) using the wide spring clamp (ref. C fi g. 5-13); if necessary, cut the end of the dishwasher drain hose (ref. -
Page 77
Remove the cover of the waste disposal unit (ref. A fi g. 5-14). Connect the dishwasher drain hose (ref. B fi g. 5-14) to the waste disposal unit inlet (ref. C fi g. 5-14), using the wide spring clamp (ref. D fi g. 5-14). -
Page 78: Electrical Connections And Warnings
5 .2.2 Electrical connections and warnings CHECK THAT THE VOLTAGE AND THE FREQUENCY OF THE MAINS MATCH THE RATINGS ON THE NAME PLATE OF THE AP- PLIANCE POSITIONED ON THE INNER EDGE OF THE DOOR. IN THE EVENT OF DAMAGE TO THE SUPPLY CORD, HAVE IT REPLACED BY THE MANUFACTURER OR AN AUTHORIZED TECHNICAL SERVICE CENTRE.
-
Page 79: Commissioning
5.3.1 Installation procedure Clean the underneath of the worktop lying over the dishwasher door (see fi g. 5-15) and apply the steam guard, as shown in fi g. 5-16 adhesive guard is applied; see fi g. 5-17 if the steel guard is protects the worktop from steam and condensation when the door of the dish- washer is opened at the end of the washing cycle.
-
Page 80
Push the dishwasher into position, taking care not to twist or crush the power cord or hoses (see fi g. 5-18). TWO PEOPLE WEARING SAFETY GLOVES ARE NEEDED TO PUSH THE DISHWASHER INTO PLACE. INSTALLATION INSTRUCTIONS Fig. 5-16 Fig. 5-17 Fig. -
Page 81: Procedure For Mounting The Door Panel (Models Sta_4645/Sta_8743)
INSTALLATION INSTRUCTIONS 5.3.2 Procedure for mounting the door panel (models sta_4645/sta_8743) Mount the door panel. Place the template on the inner surface of the panel, centering it along the up- per side and matching up the reference locators (ref. A fi g. 5-19); mark the po- sition of the door hooks with a pencil (see fi…
-
Page 82
Drill holes for the panel handle using a drill with a suitable bit. Use the screw- driver to secure the door handle before hooking the panel to the dishwasher (see fi g. 5-21). N.B.: the screws are not supplied. Insert the door spacers contained in the accessory bag (see fi g. 5-22). -
Page 83
INSTALLATION INSTRUCTIONS Attach the door panel: fi t the hooks into their slots on the dishwasher and allow the panel to slide downwards and slip in to place (see fi g. 5-23). Secure the door to the panel with the supplied screws. The panel must have a minimum thickness of 20 mm (25/32”) (see fi… -
Page 84
Make sure the dishwasher door, complete with panel, opens comfortably and that the base plate (ref. A fi g. 5-25) does not prevent it from opening fully. If the base plate prevents the door from opening, mark out the section to remove (see fi… -
Page 85: Procedure For Mounting The Door Panel (Models Pla_8743)
INSTALLATION INSTRUCTIONS 5.3.3 Procedure for mounting the door panel (models pla_8743) Mount the door panel. Place the template on the inner surface of the panel, centering it along the up- per side and matching up the reference locators (ref. A fi g. 5-27); mark the po- sition of the door hooks with a pencil (see fi…
-
Page 86
If a gap is created between the control panel and the door panel (ref. A fi g. 5-29), use the supplied strips (ref. B fi g. 5-29) to fi ll it. The number of strips depends on the size of the gap. Position the strips between the control panel and the door panel of the dish- washer (ref. -
Page 87
INSTALLATION INSTRUCTIONS Attach the door panel: fi t the hooks into their slots on the dishwasher and allow the panel to slide upwards and slip into place (see fi g. 5-31). Secure the door to the panel with the supplied screws. The panel must have a minimum thickness of 20 mm (25/32”) (see fi… -
Page 88
Make sure the dishwasher door, complete with panel, opens comfortably and that the base plate (ref. A fi g. 5-33) does not prevent it from opening fully. If the base plate prevents the door from opening, mark out the section to remove (see fi… -
Page 89: Completion Of Installation (All Models)
INSTALLATION INSTRUCTIONS 5.3.4 Completion of installation (all models) Finish the cut with a fi le (see fi g. 5-35) in order to remove any burrs and/or imperfections. Put back the base plate (see fi g. 5-36) and try to open the dish- washer door fully;…
-
Page 90
Remove the adhesive band on the gasket (see fi g. 5-37). Fig. 5-37 Fix the gasket to the dishwasher, inserting it in the seat on the sides towards the front (see fi g. 5-38), and making sure that the long side of the gasket, the one with the hole for inserting the screw, is attached to the outside of the dish- washer;… -
Page 91
INSTALLATION INSTRUCTIONS Fig. 5-40 shows the state of the dishwasher after the above operations are performed. Rev 0.0 Fig. 5-39 Fig. 5-40… -
Page 92: Testing
INSTALLATION INSTRUCTIONS Tighten the supplied screws with a screwdriver; this operation defi nitively fi xes the dishwasher to the adjacent units; cover the side holes using the supplied plugs (ref. A fi g. 5-41). Fig. 5-41 Testing After installation, test the dishwasher by starting a work cycle. Check for leaks and make sure the appliance does not malfunction.
-
Page 93
444mm (17-15/32) Align with the top edge of the door panel. Aligner au bord supérieur du panneau de la porte. Alinear respecto del borde superior del panel puerta. Alinhe com a borda superior do painel da porta. 444mm (17-15/32) Align with the top edge of the door panel. Aligner au bord supérieur du panneau de la porte.
This manual is also suitable for:
Sta4645u
-
Contents
-
Table of Contents
-
Troubleshooting
-
Bookmarks
Quick Links
INSTRUCTION MANUAL
G
U
I
D
E
F
O
R
U
S
I
N
G
T
H
E
D
I
S
H
W
A
S
H
E
R
A
N
D
T
H
E
W
A
S
H
I
N
G
P
R
O
G
R
A
M
S
G
U
I
D
E
F
O
R
U
S
I
N
G
T
H
E
D
I
S
H
W
A
S
H
E
R
A
N
D
T
H
E
W
A
S
H
I
N
G
P
R
O
G
R
A
M
S
Related Manuals for Smeg STA4645
Summary of Contents for Smeg STA4645
-
Page 1
INSTRUCTION MANUAL… -
Page 2: Table Of Contents
CONTENTS CONTENTS INTRODUCTION … 3 DESCRIPTION AND USE OF THE CONTROLS … 5 Upper panel … 5 Setting the washing program and switching on and off… 6 2.2.1 Switching on … 8 2.2.2 Selecting and starting the program … 8 2.2.3 End of program …
-
Page 3
Rev 0.0… -
Page 4: Introduction
INTRODUCTION INTRODUCTION Thank you for choosing one of our products. To use this dishwasher correctly and safely, please read this manual carefully. The manual is divided into sections giving you a step-by-step guide to all your ap- pliance’s functions. The texts are easy to understand and are com- plete with detailed illustrations.
-
Page 5
Symbols used in this manual (see tab. 1-01) DANGER. This symbol highlights information and warnings which, if not observed, may compromise personal safety or damage the appliance. This symbol highlights general information and warnings. INTRODUCTION Tab. 1-01 Rev 0.0… -
Page 6: Description And Use Of The Controls
USER INSTRUCTIONS DESCRIPTION AND USE OF THE CONTROLS Upper panel All the dishwasher controls are grouped on the upper panel (see fi g. 2-01). The dishwasher can only be switched on, programmed, switched off, etc. with the door open. A brief description (see tab. 2-01) of the various controls on the upper panel is given below.
-
Page 7: Setting The Washing Program And Switching On And Off
Setting the washing program and switching on and off The dishwasher is equipped with a control panel (see fi g. 2-02) which is used to program the appliance and switch it on and off. To select the most suitable program for the dishes to wash, consult the fol- lowing table which specifi…
-
Page 8
— Only “EXTREME WASH” program conform to NSF std 184 and is certifi ed by INTERTEK with the ETL SANITATION LISTED. — When the “Sanitized” light shine it means that the dishwasher and its contents have been sani- tized according to the requirements of the National Sanitation Foundation (NSF). -
Page 9: Switching On
The dishwasher door is securely closed. 2.2.1 Switching on Press the on/off button (ref. 1 fi g. 2-02) to start the dishwasher. Then wait for one of the program indicator lights to turn on (ref. 2 fi g. 2-02). 2.2.2 Selecting and starting the program •…
-
Page 10: Interrupting A Program
USER INSTRUCTIONS 2.2.4 Interrupting a program To interrupt the current program simply open the door of the dishwasher; to restart the program, simply close the door again. The program restarts from where it was interrupted. If it is necessary to open the door during the washing cycle, the program will be interrupted, the relative indicator light will continue to fl…
-
Page 11: Options
The “Program delay” function delays the beginning of the washing program up to 9 hours from the moment in which programming takes place. This makes it possible to use the dishwasher at a certain time of day. Before programming a delay, open the door of the dishwasher, select the required washing program (see para 2.2 “Setting the washing program and…
-
Page 12: Switching Off
2.2.8 Switching off At the end of the program, the dishwasher emits a short beep and the indica- tor lights of the fourth and fi fth program (ref. pr. 4, pr. 5 fi g. 2-04) fl ash. Turn off the appliance by opening the door and pressing the on/off button (ref.
-
Page 13
N.B.: the display indicates the water hardness adjustment and the program delay. A dot (.) after the number means that the water hard- ness adjustment is being displayed. If no dot (.) appears, the pro- gram delay is being displayed. Water hardness table (see tab. -
Page 14: Energy Saving And Environmental Respect
Use the most suitable washing program for each type of load. • Do not pre-rinse. • If available, connect the dishwasher to a hot water system with a tempera- ture of up to 60°C (140°F). • When possible, skip the drying cycle by opening the door after washing: the air and the residue heat will dry the dishes to perfection.
-
Page 15: Removing The Dishes
REMOVING THE DISHES At the end of the washing program, wait at least 20 minute before removing the dishes in order to allow them to cool. To prevent any water droplets on the upper rack from falling onto the dishes in the lower rack, empty the lower rack fi…
-
Page 16: Troubleshooting
USER INSTRUCTIONS TROUBLESHOOTING The dishwasher can to signal a number of malfunctions by turning on various indicator lights, as described below (see following table): FAULT Light off Rev 0.0 DESCRIPTION Acquastop failure The anti-fl ooding system has tripped (only for models fi…
-
Page 17
If an alarm situation occurs, the dishwasher interrupts the current program and signals the fault. • Alarms E1, E3, E4, immediately terminate the current program. • Alarms E5, E6 interrupt the current program and, after the problem has been eliminated, resume the cycle. -
Page 18
CONTENTS Contents INTRODUCTION … 3 IMPORTANT SAFETY INSTRUCTION … 5 INSTALLATION AND HOOK-UP … 11 OPERATING INSTRUCTIONS … 14 Using the water softening system … 15 Using the rinse-aid and detergent dispensers … 17 4.2.1 Adding the rinse-aid … 18 4.2.2 Adjusting the rinse-aid dispenser system … -
Page 19
Rev 0.0… -
Page 20: Introduction
INTRODUCTION INTRODUCTION Thank you for choosing one of our products. To use this dishwasher correctly and safely, please read this manual carefully. The manual is divided into sections giving you a step-by-step guide to all your appliance’s functions. The texts are easy to understand and are complete with detailed illustrations.
-
Page 21
Symbols used in this manual (see tab. 1-01) DANGER. This symbol highlights information and warnings which, if not observed, may compromise personal safety or damage the appliance. DANGER OF ELECTROCUTION. This symbol highlights information and warnings of an electrical nature which, if not observed, may compromise personal safety or damage the appliance. -
Page 22: Important Safety Instruction
THIS MANUAL FORMS AN INTEGRAL PART OF THE APPLI- ANCE: IT MUST ALWAYS BE KEPT INTACT TOGETHER WITH THE DISHWASHER (INCLUDING THE “INSTALLATION” AND “DESCRIP- TION OF CONTROLS” MANUALS, IF ATTACHED). BEFORE USING THE APPLIANCE, CAREFULLY READ ALL THE INSTRUCTIONS CONTAINED IN THIS MANUAL.
-
Page 23
DAMAGE TO PERSONS OR PROPERTY RESULTING FROM THE FAILURE TO EARTH THE APPLIANCE OR FROM A DE- FECTIVE EARTH CONNECTION. ALWAYS SWITCH OFF THE DISHWASHER AFTER EACH USE TO AVOID WASTING ELECTRICITY. IN THE EVENT OF A FAULT, DISCONNECT THE DISHWASHER FROM THE ELECTRICAL POWER SUPPLY AND SHUT OFF THE WATER TAP. -
Page 24
THE WORK PROGRAM AND THEN KEEP THE DETERGENT OUT OF THE REACH OF CHILDREN. THIS DISHWASHER MUST BE USED BY ADULTS. USE BY PER- SONS WITH REDUCED MENTAL AND/OR PHYSICAL CAPABILI- TIES IS ONLY PERMITTED UNDER THE SUPERVISION OF A PER- SON RESPONSIBLE FOR THEIR SAFETY. -
Page 25
SUCH AS DISPOSABLE CUTLERY OR PLATES, AS THESE MAY BECOME DEFORMED. DO NOT WASH OBJECTS IN PLASTIC UN- LESS THEY ARE MARKED “DISHWASHER PROOF” OR THE LIKE. FOR UNMARKED OBJECTS, FOLLOW THE INSTRUCTIONS OF THE MANUFACTURER; IF NO INFORMATION IS AVAILABLE, DO NOT WASH THESE OBJECTS IN THE DISHWASHER. -
Page 26
THE RACK. POSITION SHARP/POINTED OBJECTS SO AS TO PREVENT THEM FROM DAMAGING THE DOOR GASKETS. DO NOT OPERATE THE DISHWASHER UNLESS ALL THE OUTER PANELS HAVE BEEN POSITIONED CORRECTLY. DO NOT TAMPER WITH THE DISHWASHER CONTROLS. AQUASTOP MODELS; THE AQUASTOP DEVICE PREVENTS FLOODING IN THE EVENT OF A WATER LEAK. -
Page 27
THE PLUG OR TURN OFF THE MULTI-POLE SWITCH. REMOVE THE WASHING COMPARTMENT DOOR AND DISCON- NECT THE MAINS POWER SUPPLY WHEN REMOVING THE OLD DISHWASHER FOR MAINTENANCE OR DISPOSAL. THE SYMBOL ON THE PRODUCT, OR ON THE DOCUMENTS ACCOMPANYING THE PRODUCT, INDICATES THAT THIS APPLI- ANCE MAY NOT BE TREATED AS HOUSEHOLD WASTE. -
Page 28: Installation And Hook-Up
NATIONAL ELECTRIC CODE; IN CANADA THE CANADIAN ELEC- TRIC CODE C22.1 — LATEST EDITION/PROVINCIAL AND MUNICI- PAL CODES AND/OR LOCAL CODES. BUILDING-IN A DISHWASHER UNDERNEATH A CERAMIC HOB IS ABSOLUTELY FORBIDDEN. A DISHWASHER CAN BE BUILT-IN UNDERNEATH A CONVENTIONAL HOB PROVIDED THERE IS NO…
-
Page 29
INSTALLATION INSTRUCTIONS CHECK THAT THE VOLTAGE AND THE FREQUENCY OF THE MAINS MATCH THE RATINGS ON THE NAME PLATE OF THE AP- PLIANCE POSITIONED ON THE INNER EDGE OF THE DOOR. IN THE EVENT OF DAMAGE TO THE SUPPLY CORD, HAVE IT REPLACED BY THE MANUFACTURER OR AN AUTHORIZED TECH- NICAL SERVICE CENTRE. -
Page 30
INSTALLATION INSTRUCTIONS DO NOT USE EXTENSION CORDS, ADAPTORS OR SHUNT CON- NECTIONS IN ORDER TO AVOID THE POSSIBILITY OF OVERHEAT- ING OR BURNING, WITH CONSEQUENT FIRE HAZARD. Rev 0.0… -
Page 31: Operating Instructions
BEFORE STARTING TO USE THE APPLIANCE, MAKE SURE YOU HAVE READ AND UNDERSTOOD ALL THE WARNINGS CONTAI- NED IN CHAPTER 2 “IMPORTANT SAFETY INSTRUCTION”. Once the dishwasher has been correctly installed, prepare for use as follows: • adjust the water softening system;…
-
Page 32: Using The Water Softening System
(ref. A fi g. 4-01) by turning it anticlockwise and pour in the salt using the funnel (ref. A fi g. 4-02) supplied with the dishwasher. Before replacing the cap (ref. A fi g. 4-01), remove any salt residues from around the opening.
-
Page 33
• When using the dishwasher for the fi rst time, in addition to the salt it is also necessary to add one liter of water to the container. • Each time the salt container is refi lled, make sure that the cap (ref. A fi g. -
Page 34: Using The Rinse-Aid And Detergent Dispensers
USER INSTRUCTIONS Using the rinse-aid and detergent dispensers The detergent and rinse aid dispensers are situated on the inner part of the door: the detergent dispenser (ref. A fi g. 4-03) is on the left, and the rinse- aid dispenser (ref. B fi g. 4-03) is on the right. WITH THE EXCEPTION OF THE SOAK PROGRAM, BEFORE EV- ERY WASHING CYCLE IT IS NECESSARY TO ADD THE REQUIRED AMOUNT OF DETERGENT TO THE DETERGENT DISPENSER.
-
Page 35: Adding The Rinse-Aid
4.2.2 Adjusting the rinse-aid dispenser setting The rinse-aid dispenser can be set to one of 6 different levels. The dishwasher is factory set for medium water hardness (selector set to “3”). To change the setting, turn the dispenser selector (ref. c fi g. 4-04) to the desired position: the amount of rinse-aid dispensed is proportional to the position of this selector.
-
Page 36: Adding The Detergent
ATIONS OCCURS, SEEK MEDICAL ASSISTANCE IMMEDIATELY. PREVENT CHILDREN FROM COMING INTO CONTACT WITH DE- TERGENT; KEEP THEM AWAY FROM THE DISHWASHER WHEN THE DOOR IS OPEN AS IT MAY CONTAIN DETERGENT RESIDUES. FILL THE DISHWASHER JUST BEFORE STARTING THE WASHING CYCLE AND THEN KEEP THE DETERGENT OUT OF THE REACH OF CHILDREN.
-
Page 37
Controls” manual), extra detergent must be placed in the cavity (ref. A or B fi g. 4-06, depending on models). • Only use dishwasher-specifi c detergents. For optimal washing results it is important to use a good quality detergent. •… -
Page 38: General Warnings And Recommendations
WASHER. General warnings and recommendations Before using the dishwasher for the fi rst time, it is advisable to read the follow- ing recommendations concerning dish types to be washed and their loading. There are generally no constraints on the washing of domestic dishes, but in certain cases it is necessary to take their characteristics into account.
-
Page 39
• Decorated items: the decorated objects available on the market are gener- ally able to withstand washing in the dishwasher, although the colors may fade after a great many washes. If in doubt as to the fastness of the col- ors, it is advisable to wash just a few items at a time for approximately one month. -
Page 40: Using The Racks
USER INSTRUCTIONS Using the racks The dishwasher has a capacity of 10 place-settings, including serving dishes. Examples of loading 10 place-settings in the upper rack (see fi g. 4-07) and in the lower rack (see fi g. 4-08) are shown below; move the upper rack to its bottom position when loading in this way.
-
Page 41: Lower Rack
USER INSTRUCTIONS 4.4.1 Lower rack The lower rack receives the full force of the lower spray arm, and should there- fore be used for the “toughest” items with a heavier degree of soiling. All types and combinations of loads are permitted, provided that the dishes, pots and pans are arranged with all the soiled surfaces exposed to the water jets coming from the bottom.
-
Page 42
USER INSTRUCTIONS Loading the lower rack (see fi g. 4-10) Carefully load fl at plates, soup plates, dessert and serving dishes, position- ing them vertically. Pots, pans and their covers must be loaded upside down. When loading soup plates and dessert bowls, be sure to leave a gap between them. -
Page 43: Cutlery Basket
The dishwasher is complete with two cutlery baskets, which means that one of them can be removed, freeing space in the bottom rack, if there is not much cutlery to be washed.
-
Page 44: Upper Rack
USER INSTRUCTIONS 4.4.3 Upper rack (vedi fi g. 4-12, 4-13) It is recommended to load the upper rack with small- or medium-sized items such as glasses, small plates, tea or coffee cups, shallow bowls and light objects made from heat resistant plastic. If the upper rack is used in the lowermost position, it can also be loaded with serving dishes, provided they are only slightly soiled.
-
Page 45
USER INSTRUCTIONS Loading the upper rack (vedi fi g. 4-14) Load plates facing forward; cups, bowls etc. must always be facing downwar- ds. The left-hand side of the rack can be loaded with two layers of cups and glasses. The right-hand side can be fi lled with plates and side-plates, fi tted upright into the supports provided. -
Page 46: Adjusting The Upper Rack
• pull out the right-hand rack guide. Release the corresponding stop (ref. A fi g. 4-15) by turning it 90° towards the outside of the dishwasher; • pull out the left-hand rack guide and release the corresponding stop, just as you did for the right-hand rack guide;…
-
Page 47: Cleaning And User-Maintenance
NEVER USE ABRASIVE AND/OR CORROSIVE DETERGENTS TO CLEAN THE APPLIANCE. Clean the outer surfaces and door-lining of the dishwasher regularly using a soft cloth moistened with a neutral detergent (not abrasive and/or corrosive) suitable for painted surfaces. Clean the door gaskets with a damp sponge.
-
Page 48: Cleaning The Water Intake Fi Lter (Only Some Models)
USER INSTRUCTIONS Cleaning the water intake fi lter (only some models) The water intake fi lter (ref. B fi g. 5-01) located at the outlet of the water supply tap needs to be cleaned periodically. After having closed the water supply tap, unscrew the end (ref.
-
Page 49
• • • • • • • USER INSTRUCTIONS Fig. 5-02 Fig. 5-03 Fig. 5-04 Rev 0.0… -
Page 50: Cleaning The Fi Lter Unit
USER INSTRUCTIONS Cleaning the fi lter unit • Periodically inspect the fi lter unit (ref. A fi g. 5-05) and, if necessary, clean it under running water (at room temperature), using a stiff brush. To remove the fi lter, grip the handle, turn anticlockwise and lift upwards; •…
-
Page 51
• It is essential to thoroughly clean the fi lters according to the above in- structions: the dishwasher cannot function if the fi lters are clogged. • Carefully replace the fi lters in their seats, to avoid damaging the wash pump. -
Page 52: Troubleshooting Minor Problems
In some cases it is possible to remedy minor problems by referring to the fol- lowing instructions: If the program fails to start, check that: • the dishwasher is connected to the electrical power supply; • there is no power failure; •…
-
Page 53
If the dishes fail to dry or remain dull, check that: • there is rinse aid inside the special container; • the rinse-aid dispenser setting is correct; • the detergent used is of good quality and has not lost its effectiveness (for example, through incorrect storage, with the box left open). -
Page 54: Technical Data
USER INSTRUCTIONS TECHNICAL DATA (SEE TAB. 6-01) Width Depth measured fl ush with the outer edge of the control panel Height Capacity Water supply pressure Electrical characteristics Rev 0.0 44.7 cm ÷ 44.9 cm (17 — 19/32” ÷ 17 — 43/64”) 55 cm (21 — 21/32”) from 82 to 87 cm (from 32 — 9/32”…
-
Page 55
Contents INTRODUCTION … 3 SAFETY INFORMATION … 5 INSTALLATION MATERIAL … 8 Kit supplied with dishwasher (models sta_4645/sta_8743) … 9 Kit supplied with dishwasher (models pla_8743) … 10 DIMENSIONS OF DISHWASHER … 11 INSTALLATION AND HOOK-UP … 12 Leveling … 13 5.1.1… -
Page 56
Rev 0.0… -
Page 57: Introduction
INTRODUCTION INTRODUCTION Thank you for choosing one of our products. To install this dish- washer correctly and safely, please read this manual carefully. The manual is divided into sections giving you a step-by-step guide to installation of the appliance. The texts are easy to understand and are complete with detailed illustrations.
-
Page 58
Symbols used in this manual DANGER. This symbol highlights information and warnings which, if not observed, may compromise personal safety or damage the appliance. DANGER OF ELECTROCUTION. This symbol highlights information and warnings of an electrical nature which, if not observed, may compromise personal safety or damage the appliance. -
Page 59: Safety Information
WARNINGS SAFETY INFORMATION THIS MANUAL FORMS AN INTEGRAL PART OF THE APPLIANCE AND MUST THEREFORE BE KEPT INTACT TOGETHER WITH THE MACHINE. BEFORE USING THE APPLIANCE, CAREFULLY READ ALL THE INSTRUCTIONS CONTAINED IN THIS MANUAL. INSTAL- LATION MUST BE PERFORMED BY A QUALIFIED TECHNICIAN, IN COMPLIANCE WITH THE REGULATIONS IN FORCE.
-
Page 60
ANCE MUST BE INSTALLED AND CONNECTED IN ACCORDANCE WITH THE INSTRUCTIONS PROVIDED BY THE MANUFACTURER OR BY A QUALIFIED TECHNICIAN. DO NOT OPERATE THE DISHWASHER UNLESS ALL THE OUTER PANELS HAVE BEEN POSITIONED CORRECTLY. IMMEDIATELY AFTER INSTALLATION, BRIEFLY TEST THE APPLI- ANCE FOLLOWING THE INSTRUCTIONS INDICATED BELOW. -
Page 61
WARNINGS DO NOT USE EXTENSION CORDS, ADAPTORS OR SHUNT CON- NECTIONS IN ORDER TO AVOID THE POSSIBILITY OF OVERHEAT- ING OR BURNING, WITH CONSEQUENT FIRE HAZARD. MANUFACTURER DECLINES RESPONSIBIL- ITY FOR DAMAGE TO PERSONS, ANIMALS OR PROPER- TY RESULTING FROM FAILURE TO OBSERVE THE ABOVE PRECAUTIONS, FROM TAMPERING WITH EVEN A SINGLE COMPONENT OF THE APPLIANCE, OR FROM THE USE OF UNORIGINAL SPARE PARTS. -
Page 62: Installation Material
INSTALLATION MATERIAL To install the dishwasher correctly, the following materials are required: • Phillips screwdriver (ref. A fi g. 3-01); • spirit level (ref. B fi g. 3-01); • tape measure (ref. C fi g. 3-01); • compass saw (ref. D fi g. 3-01);…
-
Page 63: Kit Supplied With Dishwasher (Models Sta_4645/Sta_8743)
8 screws for securing the door panel hooks (ref. E fi g. 3-02); • 2 screws for securing the door (ref. F fi g. 3-02); • 2 screws for fi xing the dishwasher to the adjacent walls (ref. G fi g. 3-02); • 2 screw caps (ref. H fi g. 3-02). •…
-
Page 64: Kit Supplied With Dishwasher (Models Pla_8743)
8 screws for securing the door panel hooks (ref. E fi g. 3-03); • 2 screws for securing the door (ref. F fi g. 3-03); • 2 screws for fi xing the dishwasher to the adjacent walls (ref. G fi g. 3-03); • 2 screw caps (ref. H fi g. 3-03). •…
-
Page 65: Installation Instructions
STA8743 33-55/64” ÷ 35- 55/64” 86 cm ÷ 91 cm STA8614X 33-55/64” ÷ 35- 55/64” 82 cm ÷ 87 cm STA4645 32-9/32” ÷ 34-1/4” 86 cm ÷ 91 cm PLA8743X 33-55/64” ÷ 35- 55/64” 86 cm ÷ 91 cm PLA68XU 33-55/64”…
-
Page 66: Installation And Hook-Up
The sides and rear of the appliance can lie against kitchen units or walls. If the dishwasher is installed next to a heat source, separate it with a heat insulating panel in order to prevent overheating and malfunctions.
-
Page 67: Leveling
(cutting hazard). Covers are available as accessories from specialized retailers or from the Technical Service Centre. • To build in the dishwasher, purchase the ers or from the Technical Service Centre. Leveling 5.1.1 Mounting the feet (only for some models) Turn the appliance upside-down (see fi…
-
Page 68: 5.1.2 Levelling The Appliance
5.1.2 Levelling the appliance Level the appliance using the relative adjustable feet (e.g.: ref. A fi g. 5-02); use an open-ended wrench to rotate the feet until the dishwasher is perfectly level. Some models are fi tted with just one rear foot which can be adjusted with a screw located at the bottom front of the appliance (ref.
-
Page 69: Connections
INSTALLATION INSTRUCTIONS Connections Install the dishwasher so as to allow ease of access to the electrical and hy- draulic connections through the adjacent unit. These connections must never be behind the dishwasher. The inlet and drain hoses can be pointed in all directions. make sure that they are not bent, crushed or too tight.
-
Page 70: Connecting To The Water Supply
Make sure there area no rough edges that could damage the power cord or hoses. If the dishwasher is installed in a metal unit protect the edge of the through hole for the hoses and power cord with a gasket. Do not use exten- sion cords when making the electrical connection as these do not guarantee safety.
-
Page 71: 5.2.1.1 Connecting To The Water Tap
For models fi tted with ACQUASTOP (ref. C fi g. 5-06) the fi lter is already present in the threaded ring nut. The dishwasher can be fi lled with water at a temperature of less than 60°C (140°F).
-
Page 72
INSTALLATION INSTRUCTIONS Do not cut the inlet hose (see fi g. 5-07). If the hose is cut, the dishwasher will not work, water will leak and you may be injured. If the hose is too long, wind it up tidily and place it behind the appliance. -
Page 73: 5 .2.1.2 Connecting The Drain Hose
INSTALLATION INSTRUCTIONS 5 .2.1.2 Connecting the drain hose Connecting to a drain Insert the relative hose into a drain with a minimum diameter of 4 cm (1-37/64”) (ref. A fi g. 5-09); alternatively, place the hose on the sink (ref. B fi g. 5-09) using the supplied hose support (see fi…
-
Page 74
ON WHICH THE DISHWASHER WILL BE INSTALLED. Connect the dishwasher drain hose (ref. A fi g. 5-11) to the “T” union (ref. B fi g. 5-11) of the drain circuit using a 38 to 50 mm (1-1/2 to 2”) screw clamp* (ref. -
Page 75
Remove the cover of the waste disposal unit (ref. A fi g. 5-12). Connect the dishwasher drain hose (ref. B fi g. 5-12) to the air gap (ref. C fi g. 5-12) using the wide spring clamp (ref. D fi g. 5-12); if necessary, cut the end of the dishwasher drain hose (ref. -
Page 76
ON WHICH THE DISHWASHER WILL BE INSTALLED. Connect the dishwasher drain hose (ref. A fi g. 5-13) to the air gap (ref. B fi g. 5-13) using the wide spring clamp (ref. C fi g. 5-13); if necessary, cut the end of the dishwasher drain hose (ref. -
Page 77
Remove the cover of the waste disposal unit (ref. A fi g. 5-14). Connect the dishwasher drain hose (ref. B fi g. 5-14) to the waste disposal unit inlet (ref. C fi g. 5-14), using the wide spring clamp (ref. D fi g. 5-14). -
Page 78: Electrical Connections And Warnings
5 .2.2 Electrical connections and warnings CHECK THAT THE VOLTAGE AND THE FREQUENCY OF THE MAINS MATCH THE RATINGS ON THE NAME PLATE OF THE AP- PLIANCE POSITIONED ON THE INNER EDGE OF THE DOOR. IN THE EVENT OF DAMAGE TO THE SUPPLY CORD, HAVE IT REPLACED BY THE MANUFACTURER OR AN AUTHORIZED TECHNICAL SERVICE CENTRE.
-
Page 79: Commissioning
5.3.1 Installation procedure Clean the underneath of the worktop lying over the dishwasher door (see fi g. 5-15) and apply the steam guard, as shown in fi g. 5-16 adhesive guard is applied; see fi g. 5-17 if the steel guard is protects the worktop from steam and condensation when the door of the dish- washer is opened at the end of the washing cycle.
-
Page 80
Push the dishwasher into position, taking care not to twist or crush the power cord or hoses (see fi g. 5-18). TWO PEOPLE WEARING SAFETY GLOVES ARE NEEDED TO PUSH THE DISHWASHER INTO PLACE. INSTALLATION INSTRUCTIONS Fig. 5-16 Fig. 5-17 Fig. -
Page 81: Procedure For Mounting The Door Panel (Models Sta_4645/Sta_8743)
INSTALLATION INSTRUCTIONS 5.3.2 Procedure for mounting the door panel (models sta_4645/sta_8743) Mount the door panel. Place the template on the inner surface of the panel, centering it along the up- per side and matching up the reference locators (ref. A fi g. 5-19); mark the po- sition of the door hooks with a pencil (see fi…
-
Page 82
Drill holes for the panel handle using a drill with a suitable bit. Use the screw- driver to secure the door handle before hooking the panel to the dishwasher (see fi g. 5-21). N.B.: the screws are not supplied. Insert the door spacers contained in the accessory bag (see fi g. 5-22). -
Page 83
INSTALLATION INSTRUCTIONS Attach the door panel: fi t the hooks into their slots on the dishwasher and allow the panel to slide downwards and slip in to place (see fi g. 5-23). Secure the door to the panel with the supplied screws. The panel must have a minimum thickness of 20 mm (25/32”) (see fi… -
Page 84
Make sure the dishwasher door, complete with panel, opens comfortably and that the base plate (ref. A fi g. 5-25) does not prevent it from opening fully. If the base plate prevents the door from opening, mark out the section to remove (see fi… -
Page 85: Procedure For Mounting The Door Panel (Models Pla_8743)
INSTALLATION INSTRUCTIONS 5.3.3 Procedure for mounting the door panel (models pla_8743) Mount the door panel. Place the template on the inner surface of the panel, centering it along the up- per side and matching up the reference locators (ref. A fi g. 5-27); mark the po- sition of the door hooks with a pencil (see fi…
-
Page 86
If a gap is created between the control panel and the door panel (ref. A fi g. 5-29), use the supplied strips (ref. B fi g. 5-29) to fi ll it. The number of strips depends on the size of the gap. Position the strips between the control panel and the door panel of the dish- washer (ref. -
Page 87
INSTALLATION INSTRUCTIONS Attach the door panel: fi t the hooks into their slots on the dishwasher and allow the panel to slide upwards and slip into place (see fi g. 5-31). Secure the door to the panel with the supplied screws. The panel must have a minimum thickness of 20 mm (25/32”) (see fi… -
Page 88
Make sure the dishwasher door, complete with panel, opens comfortably and that the base plate (ref. A fi g. 5-33) does not prevent it from opening fully. If the base plate prevents the door from opening, mark out the section to remove (see fi… -
Page 89: Completion Of Installation (All Models)
INSTALLATION INSTRUCTIONS 5.3.4 Completion of installation (all models) Finish the cut with a fi le (see fi g. 5-35) in order to remove any burrs and/or imperfections. Put back the base plate (see fi g. 5-36) and try to open the dish- washer door fully;…
-
Page 90
Remove the adhesive band on the gasket (see fi g. 5-37). Fig. 5-37 Fix the gasket to the dishwasher, inserting it in the seat on the sides towards the front (see fi g. 5-38), and making sure that the long side of the gasket, the one with the hole for inserting the screw, is attached to the outside of the dish- washer;… -
Page 91
INSTALLATION INSTRUCTIONS Fig. 5-40 shows the state of the dishwasher after the above operations are performed. Rev 0.0 Fig. 5-39 Fig. 5-40… -
Page 92: Testing
INSTALLATION INSTRUCTIONS Tighten the supplied screws with a screwdriver; this operation defi nitively fi xes the dishwasher to the adjacent units; cover the side holes using the supplied plugs (ref. A fi g. 5-41). Fig. 5-41 Testing After installation, test the dishwasher by starting a work cycle. Check for leaks and make sure the appliance does not malfunction.
-
Page 93
444mm (17-15/32) Align with the top edge of the door panel. Aligner au bord supérieur du panneau de la porte. Alinear respecto del borde superior del panel puerta. Alinhe com a borda superior do painel da porta. 444mm (17-15/32) Align with the top edge of the door panel. Aligner au bord supérieur du panneau de la porte.
This manual is also suitable for:
Sta4645u
- Коды ошибок стиральных машин Смег
- E1
- E2
- E4
- E5
- E6
- E10
- E11
- E12
- E13
- E14
- E-
Коды ошибок стиральных машин Смег

О возникающих неисправностях, стиральные машины сообщают пользователю посредством индикации на электронном дисплее, и выдают соответствующие коды. Это помогает не только вовремя обратить внимание на неисправность, но и предотвратить порой дорогостоящий ремонт.
E1
Протечка стиральной машинки:
- Не исключено, что ослабли резиновые уплотнителя на входе или выходе машинки. Поменять изношенные детали.
- Если протечка по сварным швам – потребуется новый бак. Экономически выгодней, в таком случае, купить новую машину.
E2
Проблема с прессостатом:
- Сломан датчик воды.
- Неисправен клапан впуска воды.

Впускной клапан стиральной машины Smeg
E4
Ошибка термистора:
- Скорее всего, обрыв в термисторной цепи. Проверить проводку.
- Не исключено, что вышел из строя термистор. Прозвонить и поменять, при необходимости.
E5
Ошибка загрузки белья:
- Неравномерно загружены вещи в барабан. Перераспределить белье.
- Вещей или больше, чем возможно, или меньше. Исправить ситуацию, в соответствии с рекомендацией изготовителя.
- Неисправность модуля. Проверка/замена.

E6
Не сливается вода:
- Засор или обрыв в системе дренажа. Поправить шланги. Починить, при обрыве.
- Не работает сливной насос. Проверка помпы. Поменять на новую, если ремонт невозможен.
E10
Поломка главного модуля электронного или двигателя:
- Двигатель неисправен. Проверка двигателя и его ремонт или замена.
- Сбой работы платы. Прозвонить плату, если сгорела – заменить новой.

E11
Проблема с приводным мотором:
- Возможно замыкание в электродвигателе. Прозвонить проводку.
- Могли подгореть щетки. Заменить при необходимости.
E12
Неисправен тахогенератор. Наверняка вышел из строя тахогенератор. Отремонтировать, если удастся, либо поменять на новую деталь.
E13
Загрузочный люк не блокируется:
- Крючок дверцы соскочил со своего места. Исправить и поправить его.
- Дверца не закрыта. Закрыть.

- Нарушена целостность проводки блокиратора. Исправить.
E14
Проблема с датчиком, отвечающим за сушку белья. Вероятно, датчик сломался. Заменить его новым.
E-
Сбой работы электронного управляющего модуля. Обратиться в сервисный центр для ремонта или замены узла. Наверное, потребуется перепрошивка.
USER INSTRUCTIONS
Prolonged disuse
•
Run the soak program twice in succession.
•
Unplug the power cord from the socket.
•
Leave the door slightly open in order to prevent the formation of unpleas-
ant odors inside the washing tank.
•
Fill the rinse-aid dispenser.
•
Shut off the water supply tap.
Before starting the dishwasher after prolonged disuse
•
Check that there are no deposits of sludge or rust inside the water pipe: if
there are, allow the water to run from the water supply tap for a few min-
utes.
•
Plug the power cord back into the socket.
•
Reconnect the water intake hose and open the tap again .
5.6
In some cases it is possible to remedy minor problems by referring to the fol-
lowing instructions:
If the program fails to start, check that:
•
the dishwasher is connected to the electrical power supply;
•
there is no power failure;
•
the water tap is open;
•
the dishwasher door is properly closed.
If water remains inside the dishwasher, check that:
•
the drain hose is not kinked
•
the drain siphon is not obstructed;
•
the dishwasher fi lters are not clogged.
If the dishes do not come out clean, check that:
•
the correct amount of detergent has been added;
•
there is regenerating salt inside the special container;
•
the dishes are being loaded correctly;
•
the selected program is suitable for the dish types and their degree of soil-
ing;
•
all the fi lters are clean and positioned correctly;
•
the spray arm nozzles are not obstructed;
•
there is no object obstructing the rotation of the spray arms.
Rev 0.0
EN
35