Коды ошибок, актуальные для Canon imagePROGRAF iPF670, iPF605, iPF770, iPF750, iPF710, iPF650, iPF700, iPF785, iPF610, iPF765, iPF680, iPF760, iPF510, iPF780, iPF600, iPF500, iPF685, iPF720, iPF670e, iPF671, iPF671e (для картриджей PFI-102, PFI-104, PFI-107).
Check printing results
Call for service.
Call for service.
После проверки датчика деталей в сервисном меню, замените деталь, указанную в ошибке.
Проверьте загруженные данные перед повтором печати.
Проверьте количество бумаги.
Exchange for the compatible paper to HP-GL/2.
The memory is full.
Check if there is the non-image area of the print. Verify the transmitted data before reprinting.
The memory is full.
The memory is full.
The parameter is out of range.
Verify the transmitted data before reprinting.
This command is not supported.
Delete unwanted data
Delete unneeded jobs stored in Personal Boxes.
Now printing without saving data.
Delete unneeded jobs stored in Personal Boxs.
Prepare to replace the ink.
Renew the C ink tank
Prepare to replace the ink.
Renew the M ink tank.
Prepare to replace the ink.
Renew the Y ink tank.
Prepare to replace the ink.
Renew the MBK ink tank.
Prepare to replace the ink.
Renew the BK ink tank.
Replace the ink tank.
Renew the C ink tank.
Replace the ink tank.
Renew the M ink tank.
Replace the ink tank.
Renew the Y ink tank.
Replace the ink tank.
Renew the MBK ink tank.
Replace the ink tank.
Renew the BK ink tank.
Check ink tank.
Attach the C ink tank.
Check ink tank.
Attach the M ink tank.
Check ink tank.
Attach the Y ink tank.
Check ink tank.
Attach the MBK ink tank.
Check ink tank.
Attach the BK ink tank.
Check the media size check. Change the media size.
Delete unwanted data.
Press the stop button to cancel the print job. Delete print jobs from the queue.
Delete unneeded jobs stored on the hard disk.
Press Online to clear error.
Clean the printhead. Identify the nozzles in a nozzle check pattern. Replace the printhead.
Lift the release lever and reload the paper.
Check the leading end of paper. Reload the paper.
Lift the release lever and align leading edge with orange line.
Check the sheet length. Check to see if paper has not jammed.
Lift the release lever and reload the paper.
Check the right edge of paper. Check the paper type.
Lift the release lever and reload the paper.
Check the left edge of paper.
Check the paper type.
Press Online to clear the error and readjust printhead.
Check the paper on which a pattern is printed for smears. Check the environment for interferences from outside light.
Clean the printhead.
Press Online to clear the error and readjust printhead.
Check the paper on which a pattern is printed for smears. Check the environment for interferences from outside light.
Clean the printhead.
Lift the release lever and replace paper with A4/ LTR (vertical) or larger.
Replace with A4/Letter or any larger-sized paper.
Lift the release lever and replace paper with A3/ Ledger (vertical) or larger.
Replace with A3/11″x17″ or any larger-sized paper.
Lift the release lever and replace roll with 10 in. wide or larger roll.
Replace with roll media at least 10 inches in width.
Remove paper and press Load/Eject.
Remove the paper jam and reload the paper.
Lift the release lever and reload paper.
Reload the paper.
Check supported paper sizes.
Replace with larger-sized paper.
Check supported paper sizes.
Replace with smaller-sized paper.
Press Online to clear the error.
Replace with adjustable media.
Lift the release lever.
Correct the skew in the paper and reload it.
Reload paper.
Reload the paper
Press Load/Eject and reload the paper.
Reload the paper
Lift the release lever and reload the paper.
Reload the roll media.
Press Online to clear the error.
Check to see if paper has not jammed.
Press Load/Eject and load sheets.
Load cut sheets at the paper tray port.
Press OK, remove the sheets, and load a roll.
Replace with roll media.
Press Load/Eject and load a roll.
Load roll media.
Turn printer off and install roll feed unit.
Install the roll media unit.
Lift the release lever and replace the roll.
Renew the supply of roll media.
Press Load/Eject and reload the paper.
Check the type of paper that can be fed and reload the paper.
Press Load/Eject and remove the roll.
Load cut sheets at the paper tray port.
03130031-2E23
Turn off printer, wait, then turn on again.
Check the cutter unit.
03130031-2E14
Turn off printer, wait, then turn on again.
Replace the main controller PCB
03130031-2E16
Turn off printer, wait, then turn on again.
Check the mist fan.
03130031-2E17
Turn off printer, wait, then turn on again.
Check the suction fan.
03130031-2E20
Turn off printer, wait, then turn on again.
Check the purge unit.
03130031-2E22
Turn off printer, wait, then turn on again.
Check the purge unit.
03130031-2E23
Turn off printer, wait, then turn on again.
Check the purge unit.
03130031-2E25
Turn off printer, wait, then turn on again.
Check the carriage unit. Check the linear encoder for smears.
03130031-2E26
Turn off printer, wait, then turn on again.
Check the carriage unit and surrounding parts.
03130031-2E27
Turn off printer, wait, then turn on again.
Check the carriage unit and surrounding parts.
03130031-2E1F
Turn off printer, wait, then turn on again.
Check the purge unit.
03130031-2E2A
Turn off printer, wait, then turn on again.
Check the feed roller encoder and surrounding part. Check to see if paper has not jammed.
03130031-2E29
Turn off printer, wait, then turn on again.
Check the roll feed unit. Check roll media. Check to see if paper has not jammed in the printer.
03130031-2E2E
Turn off printer, wait, then turn on again.
Check the roll feed unit.
03130031-4027
Turn off printer, wait, then turn on again.
Check the carriage unit and surrounding parts.
03130031-2E13
Turn off printer, wait, then turn on again.
03130031-2F32
Turn off printer, wait, then turn on again.
Replace the multi sensor unit.
03130031-2F3A
Turn off printer, wait, then turn on again.
Check the ink supply unit.
03130031-2F3B
Turn off printer, wait, then turn on again.
Remove the ink tanks and then reload them. Check the main controller PCB.
03130031-2F70
Turn off printer, wait, then turn on again.
03130031-2F71
Turn off printer, wait, then turn on again.
03130031-2F72
Turn off printer, wait, then turn on again.
03130031-260E
Turn off printer, wait, then turn on again.
Check the carriage unit and surrounding parts. Replace the main controller PCB.
03130031-2618
Turn off printer, wait, then turn on again.
Check the power supply unit.
03130031-260F
Turn off printer, wait, then turn on again.
Turn off printer and check roll feed unit
Replace the roll feed unit.
Turn off printer, wait a while, then turn it on again.
Transmit valid ROM data.
Turn off printer, wait a while, then turn it on again.
Verify the validity of MID data before transferring it.
03130031-2F2B
Turn off printer, wait, then turn on again.
Open top cover and replace the printhead.
Replace printhead
Open top cover and replace the right printhead.
Replace printhead
Open top cover and replace the right printhead.
Replace printhead
03800500-2F40
Turn off printer, wait, then turn on again.
Проверьте блок очистки печатающей головки и окружающие детали.
Проверьте датчик управления головкой и окружающие детали.
Убедитесь, что печатающая головка установлена правильно.
Если визуально все чисто и корректно подключено, нужно пробовать:
Заменить датчик управления головкой.
Заменить главную плату контроллера.
Замените печатающую головку.
Замените каретку.
03800500-2F2F
Turn off printer, wait, then turn on again.
Замените датчик управления печатающей головкой.
Замените печатающую головку.
Identify the head management sensor unit
Replace the head management sensor unit
Replace the printhead
03800500-2F30
Turn off printer, wait, then turn on again.
Замените датчик управления печатающей головкой.
Замените печатающую головку.
Identify the head management sensor unit
Replace the head management sensor unit
Replace the printhead
Press OK and replace ink tank.
Renew the Bk ink tank
Press OK and replace ink tank.
Renew the Y ink tank
Press OK and replace ink tank.
Renew the M ink tank
Press OK and replace ink tank.
Renew the C ink tank
Press OK and replace ink tank.
Renew the MBk ink tank
Press OK and replace ink tank.
Renew the MBk ink tank
Press OK and replace ink tank.
Replace with a fully replenished Bk ink tank
Press OK and replace ink tank.
Replace with a fully replenished Y ink tank
Press OK and replace ink tank.
Replace with a fully replenished M ink tank
Press OK and replace ink tank.
Replace with a fully replenished C ink tank
Press OK and replace ink tank.
Replace with a fully replenished MBk ink tank
Press OK and replace ink tank.
Replace with a fully replenished Bk ink tank
Press OK and replace ink tank.
Replace with a fully replenished Y ink tank
Press OK and replace ink tank.
Replace with a fully replenished M ink tank
Press OK and replace ink tank.
Replace with a fully replenished C ink tank
Press OK and replace ink tank.
Replace with a fully replenished MBk ink tank
Press OK and replace ink tank.
Replace with a valid Bk ink tank
Press OK and replace ink tank.
Replace with a valid Y ink tank
Press OK and replace ink tank.
Replace with a valid M ink tank
Press OK and replace ink tank.
Replace with a valid C ink tank
Press OK and replace ink tank.
Replace with a valid MBk ink tank
Press OK and replace ink tank.
Replace with a valid MBk ink tank
Press OK and check ink tank.
Install a Bk ink tank
Press OK and check ink tank.
Install a Y ink tank
Press OK and check ink tank.
Install a M ink tank
Press OK and check ink tank.
Install a C ink tank
Press OK and check ink tank.
Install a MBk ink tank
Press OK and check ink tank.
Install a MBk ink tank
Turn off printer, wait a while, and turn it on again.
Close the top cover and turn on the printer again.
Turn off printer, wait a while, and turn it on again.
Close the ink tank cover and turn on the printer again.
Replace the maintenance cartridge.
Renew the maintenance cartridge.
Cartridge capacity.
Replace the maintenance cartridge.
Replace the maintenance cartridge.
Replace the maintenance cartridge.
Renew the maintenance cartridge.
Replace the maintenance cartridge.
Renew the maintenance cartridge.
Check roll position.
Online: Print Load/Eject:
Change Paper
Check to see if a borderless printing spacer is installed. Reload the paper.
Check paper size setting.
Online: Print
Load/Eject: Change Paper
Check the paper size. Change the paper size.
Online: Print
Stop: Stop Printing
Load/Eject: Change Paper
Renew the supply of roll media.
Lift the release lever and reload the paper.
Cut paper manually. Check the cutter.
Press Online to clear the error.
Check the multi sensor.
Check the head management sensor.
Online: Print
Stop: Stop Printing
Load/Eject: Change Paper
Exchange for the compatible paper to HP-GL/2 before reprinting.
Delete unwanted data on your computer to resume printing.
Press Stop to cancel printing.
Delete unneeded jobs stored in Personal Boxes.
Cannot save. Delete unwanted data on your computer to resume printing.
Press Stop to cancel printing.
Press OK to reformat
Press the [OK] button to start reformatting the hard disk. When formatting is finished, the printer automatically restarts.
Turn off printer, wait a while, and turn it on again.
Invalid files will be deleted.
Restart the printer. Only the corrupted files will be deleted, and the printer will restart.
Turn off printer, wait, then turn on again.
Check the head management sensor. Replace the head management sensor. Replace the printhead.
Turn off printer, wait, then turn on again.
Check the pinch roller and surrounding part. Replace the pinch roller pressure drive unit.
Install printhead.
Install the printhead.
Replace the printhead.
Check the maintenance cartridge.
Install the maintenance cartridge.
Lift the release lever and reload the paper.
Check the cutter unit and surrounding part. Replace the cutter.
Renew the supply of roll media.
Manually rewind roll all the way and press OK.
Check the pick-up unit and roll media. Check to see if paper has not jammed.
Load cut sheets at the paper tray port.
Check the media size. Change the media size.
Confirm usage cond. of the paper.
Reload the paper.
Reload the roll media.
-
12-26-2019
#1

Senior Tech
100+ Posts

- Rep Power
- 20
canon ipf 680 03800500-2f47 error
Canons not usually my thing, but asked to look at it anyway. Originally had ‘printhead error’ after installing new printhead, no error code. Didn’t know what else to think, so had customer get another one in case it was bad out of the box. He put in another one & came up with 03800500-2f47. I cleaned out the head management sensor & around it the best I could & reseated connection. Did nozzle check in service mode & it got a 03800500-2f30 error. Manual didn’t enlighten me too much about it. Power cycled it again in regular mode, & it went to ‘printhead error again with no error code.
First, I’m thinking of replacing the head mgmt. sensor. Is there anything else I should worry about checking ? Second is, since it said ph error again, did it get spoiled & now it needs another one ? Or hopefully it’s only because of what ever error they have already ? I hope I don’t need another one.
Thanks to all who have expert insight to this potential problem.
-
12-26-2019
#2
Re: canon ipf 680 03800500-2f47 error
 Originally Posted by tmw

Canons not usually my thing, but asked to look at it anyway. Originally had ‘printhead error’ after installing new printhead, no error code. Didn’t know what else to think, so had customer get another one in case it was bad out of the box. He put in another one & came up with 03800500-2f47. I cleaned out the head management sensor & around it the best I could & reseated connection. Did nozzle check in service mode & it got a 03800500-2f30 error. Manual didn’t enlighten me too much about it. Power cycled it again in regular mode, & it went to ‘printhead error again with no error code.
First, I’m thinking of replacing the head mgmt. sensor. Is there anything else I should worry about checking ? Second is, since it said ph error again, did it get spoiled & now it needs another one ? Or hopefully it’s only because of what ever error they have already ? I hope I don’t need another one.
Thanks to all who have expert insight to this potential problem.hello in service mode you must delete the spindle error history, also check the firmware version if it is an old firmware try to update to the latest firmware version

-
12-26-2019
#3
Re: canon ipf 680 03800500-2f47 error
if the problem persists rule out with carriage pcb or main board
-
12-26-2019
#4
Senior Tech
100+ Posts
- Rep Power
- 20
Re: canon ipf 680 03800500-2f47 error
Thank you for replying so quickly. I still wonder though, do I have to worry about a spoiled print head ?
-
12-26-2019
#5
Re: canon ipf 680 03800500-2f47 error
Originally Posted by tmw
Thank you for replying so quickly. I still wonder though, do I have to worry about a spoiled print head ?
the ink cartridges are original?
-
12-27-2019
#6
Senior Tech
100+ Posts
- Rep Power
- 20
Re: canon ipf 680 03800500-2f47 error
The cartridges are original.
Also, have looked for spindle error history in the manual under service mode. Haven’t spotted it yet. Could it be called something else ?
-
09-15-2022
#7
Technician
- Rep Power
- 30
Re: canon ipf 680 03800500-2f47 error
Originally Posted by wcanonw
if the problem persists rule out with carriage pcb or main board
I am able to print in Service mode. Firmware on my IPF785 is up to date at Version 1.5 Cleaned the print head, any other suggestions?? Thanks for your help in advance.
Mark
Check printing results
Call for service.
Call for service.
The memory is full.
The memory is full.
The memory is full.
The parameter is out of range.
This command is not supported.
Delete unwanted data
Now printing without saving data.
Prepare to replace the ink.
Prepare to replace the ink.
Prepare to replace the ink.
Prepare to replace the ink.
Prepare to replace the ink.
Replace the ink tank.
Replace the ink tank.
Replace the ink tank.
Replace the ink tank.
Replace the ink tank.
Check ink tank.
Check ink tank.
Check ink tank.
Check ink tank.
Check ink tank.
Delete unwanted data.
Delete unneeded jobs stored on the hard disk.
Press Online to clear error.
Lift the release lever and reload the paper.
Lift the release lever and align leading edge with orange line.
Lift the release lever and reload the paper.
Lift the release lever and reload the paper.
Check the paper type.
Press Online to clear the error and readjust printhead.
Clean the printhead.
Press Online to clear the error and readjust printhead.
Clean the printhead.
Lift the release lever and replace paper with A4/ LTR (vertical) or larger.
Lift the release lever and replace paper with A3/ Ledger (vertical) or larger.
Lift the release lever and replace roll with 10 in. wide or larger roll.
Remove paper and press Load/Eject.
Lift the release lever and reload paper.
Check supported paper sizes.
Check supported paper sizes.
Press Online to clear the error.
Lift the release lever.
Reload paper.
Press Load/Eject and reload the paper.
Lift the release lever and reload the paper.
Press Online to clear the error.
Press Load/Eject and load sheets.
Press OK, remove the sheets, and load a roll.
Press Load/Eject and load a roll.
Turn printer off and install roll feed unit.
Lift the release lever and replace the roll.
Press Load/Eject and reload the paper.
Press Load/Eject and remove the roll.
03130031-2E23
Turn off printer, wait, then turn on again.
03130031-2E14
Turn off printer, wait, then turn on again.
03130031-2E16
Turn off printer, wait, then turn on again.
03130031-2E17
Turn off printer, wait, then turn on again.
03130031-2E20
Turn off printer, wait, then turn on again.
03130031-2E22
Turn off printer, wait, then turn on again.
03130031-2E23
Turn off printer, wait, then turn on again.
03130031-2E25
Turn off printer, wait, then turn on again.
03130031-2E26
Turn off printer, wait, then turn on again.
03130031-2E27
Turn off printer, wait, then turn on again.
03130031-2E1F
Turn off printer, wait, then turn on again.
03130031-2E2A
Turn off printer, wait, then turn on again.
03130031-2E29
Turn off printer, wait, then turn on again.
03130031-2E2E
Turn off printer, wait, then turn on again.
03130031-4027
Turn off printer, wait, then turn on again.
03130031-2E13
Turn off printer, wait, then turn on again.
03130031-2F32
Turn off printer, wait, then turn on again.
Replace the multi sensor unit.
03130031-2F3A
Turn off printer, wait, then turn on again.
03130031-2F3B
Turn off printer, wait, then turn on again.
03130031-260E
Turn off printer, wait, then turn on again.
03130031-2618
Turn off printer, wait, then turn on again.
03130031-260F
Turn off printer, wait, then turn on again.
Turn off printer and check roll feed unit
Turn off printer, wait a while, then turn it on again.
Turn off printer, wait a while, then turn it on again.
03130031-2F2B
Turn off printer, wait, then turn on again.
Open top cover and replace the printhead.
Open top cover and replace the right printhead.
Open top cover and replace the right printhead.
03800500-2F2F
Turn off printer, wait, then turn on again.
Replace the head management sensor unit
Replace the printhead
03800500-2F30
Turn off printer, wait, then turn on again.
Replace the head management sensor unit
Replace the printhead
Press OK and replace ink tank.
Press OK and replace ink tank.
Press OK and replace ink tank.
Press OK and replace ink tank.
Press OK and replace ink tank.
Press OK and replace ink tank.
Press OK and replace ink tank.
Press OK and replace ink tank.
Press OK and replace ink tank.
Press OK and replace ink tank.
Press OK and replace ink tank.
Press OK and replace ink tank.
Press OK and replace ink tank.
Press OK and replace ink tank.
Press OK and replace ink tank.
Press OK and replace ink tank.
Press OK and replace ink tank.
Press OK and replace ink tank.
Press OK and replace ink tank.
Press OK and replace ink tank.
Press OK and replace ink tank.
Press OK and replace ink tank.
Press OK and check ink tank.
Press OK and check ink tank.
Press OK and check ink tank.
Press OK and check ink tank.
Press OK and check ink tank.
Press OK and check ink tank.
Turn off printer, wait a while, and turn it on again.
Turn off printer, wait a while, and turn it on again.
Replace the maintenance cartridge.
Cartridge capacity.
Replace the maintenance cartridge.
Replace the maintenance cartridge.
Replace the maintenance cartridge.
Check roll position.
Online: Print Load/Eject:
Change Paper
Check paper size setting.
Online: Print
Load/Eject: Change Paper
Online: Print
Stop: Stop Printing
Load/Eject: Change Paper
Lift the release lever and reload the paper.
Press Online to clear the error.
Check the head management sensor.
Online: Print
Stop: Stop Printing
Load/Eject: Change Paper
Delete unwanted data on your computer to resume printing.
Press Stop to cancel printing.
Cannot save. Delete unwanted data on your computer to resume printing.
Press Stop to cancel printing.
Press OK to reformat
Turn off printer, wait a while, and turn it on again.
Invalid files will be deleted.
Turn off printer, wait, then turn on again.
Turn off printer, wait, then turn on again.
Install printhead.
Check the maintenance cartridge.
Lift the release lever and reload the paper.
Manually rewind roll all the way and press OK.
Confirm usage cond. of the paper.
Panel display
Code
(last 4
Large LCD
digits)
2F42
Hardware error.
03800500-2F42
Turn off printer,wait,
then turn on again.
2F43
Hardware error.
03800500-2F43
Turn off printer,wait,
then turn on again.
2F44
Hardware error.
03800500-2F44
Turn off printer,wait,
then turn on again.
2F46
Hardware error.
03130031-2F46
Turn off printer,wait,
then turn on again.
2F47
Hardware error.
3800500-2F47
Turn off printer,wait,
then turn on again.
Troubleshooting Guide
Small
Small
LCD 1
LCD 2
Explanation/Detection sequence
When the result of non-ejection detection is
as follows:
Complete non-ejection of one line in 1
chip.
(In either A line or B line, a complete
non-ejection of 1280 nozzles)
・Error code assuming broken flexible cable
or contact failure (heat enable line).
When the result of non-ejection detection is
as follows:
Complete non-ejection (640 nozzles) of
EVEN line or ODD line.
・Error code assuming broken flexible cable
or contact failure (data line).
When the result of non-ejection detection is
as follows:
More than half of 640 nozzles in EVEN line
or ODD line have non-ejection (more than
320 nozzles).
・Error code assuming a head failure such as
broken heater board of head.
The shutter HP sensor did not respond at
startup and at switching of platen shutter at
printing.
The optical axis of the head management
sensor unit has been intercepted for some
reasons.
The amount of LED luminescence and the
level of detection signal of diode light
receiving sensitivity has gone beyond the
predefined range. (determines the level of
APCCHK)(It’s not a problem of printhead or
ink supply system.)
2-50
Remedial Action
(★: Reference fault
isolation procedure
or tool)
Go to ★
2F2F/2F30 (P3-6).
See 2F2F for the
priority of error
detection.
Go to ★
2F2F/2F30 (P3-6).
See 2F2F for the
priority of error
detection.
Go to ★
2F2F/2F30 (P3-6).
See 2F2F for the
priority of error
detection.
Check the platen
shutter HP sensor
(I/O Display).
Check/ replace the
platen shutter
drive unit or
sensor
①Check whether
any foreign
matter such as
paper slip
exists on the
head
management
sensor optical
axis.
②Light
interception
due to ink
accumulation.
⇒Remove the
ink/ Replace
the unit.
③Check
connection of
the head
management
sensor’s
connector.
④Main PCB
(Check the fuse/
Replace the
PCB.)
⑤A large amount
of ink mist has
been attached
to optical
element.
⑥Replace the
head
management
sensor.
Go to ★
2F2F/2F30
(P3-6).
See 2F2F for
the priority of
error detection.
Содержание
- 1 CANON IPF770 ПИШЕТ: ОШИБКА ПЕЧАТАЮЩИХ ГОЛОВОК E161-403E/E144-4048?
- 2 ПРОИЗВЕДИТЕ СМЕНУ ПЕЧАТАЮЩЕЙ ГОЛОВКИ?
- 3 ПРОЧИСТИТЕ ПЕЧАТАЮЩУЮ ГОЛОВКУ, ЛИБО ЗАМЕНИТЕ ЕЕ?
- 4 ЧТО ДЕЛАТЬ? ЕСТЬ РЕШЕНИЕ!
- 5 НАШИ МАСТЕРА ПО РЕМОНТУ ПЛОТТЕРОВ ПОДСКАЖУТ:
- 6 ПРИЧИНЫ, ВАРИАНТЫ РЕШЕНИЯ ПРОБЛЕМЫ, СРОКИ, СТОИМОСТЬ.
- 7 ЗА ПЛЕЧАМИ БОЛЕЕ 10 ЛЕТ УСПЕШНОГО ОПЫТА РЕМОНТА ДАННОЙ ТЕХНИКИ!
- 8 ЗВОНИТЕ, ПИШЕТЕ, ПОМОЖЕМ!
- 9 Варианты кода ошибки печатающей головки Canon ipf 770:
- 10 СКОЛЬКО БУДЕТ СТОИТЬ РЕМОНТ, ПРОФИЛАКТИКА, ОБСЛУЖИВАНИЕ ПЛОТТЕРА CANON?
-
- 10.0.1 География ремонта и обслуживания плоттеров Canon
-
Коды ошибок, актуальные для Canon imagePROGRAF iPF670, iPF605, iPF770, iPF750, iPF710, iPF650, iPF700, iPF785, iPF610, iPF765, iPF680, iPF760, iPF510, iPF780, iPF600, iPF500, iPF685, iPF720, iPF670e, iPF671, iPF671e (для картриджей PFI-102, PFI-104, PFI-107).

CANON IPF770 ПИШЕТ: ОШИБКА ПЕЧАТАЮЩИХ ГОЛОВОК E161-403E/E144-4048?
ПРОИЗВЕДИТЕ СМЕНУ ПЕЧАТАЮЩЕЙ ГОЛОВКИ?
ПРОЧИСТИТЕ ПЕЧАТАЮЩУЮ ГОЛОВКУ, ЛИБО ЗАМЕНИТЕ ЕЕ?
ЧТО ДЕЛАТЬ? ЕСТЬ РЕШЕНИЕ!
НАШИ МАСТЕРА ПО РЕМОНТУ ПЛОТТЕРОВ ПОДСКАЖУТ:
ПРИЧИНЫ, ВАРИАНТЫ РЕШЕНИЯ ПРОБЛЕМЫ, СРОКИ, СТОИМОСТЬ.
ЗА ПЛЕЧАМИ БОЛЕЕ 10 ЛЕТ УСПЕШНОГО ОПЫТА РЕМОНТА ДАННОЙ ТЕХНИКИ!
ЗВОНИТЕ, ПИШЕТЕ, ПОМОЖЕМ!
Варианты кода ошибки печатающей головки Canon ipf 770:
E161-403E E144-4048 01800500-1010 03800500-280C 03863000-2820 03863000-2821 03130031-2F13 03800200-2802
03800300-2801 03800400-2803 03800500-2F2F 03800500-2F30 03800500-2F31 03800100-2800 03800200-2811
СКОЛЬКО БУДЕТ СТОИТЬ РЕМОНТ, ПРОФИЛАКТИКА, ОБСЛУЖИВАНИЕ ПЛОТТЕРА CANON?
Разовое обслуживание,
профилактика, ремонт плоттера
Договорное обслуживание, профилактика, ремонт плоттера на постоянной основе
+ экстренные выезды
1 шт.
5 шт.
10 шт.
20 шт.
более 20 шт.

АКЦИЯ!
Отремонтируйте один плоттер и получите 20% скидку на ремонт второй единицы печатающей техники!
*Стоимость в каждом конкретном случае может отличаться от указанной в меньшую или большую сторону. Чтобы получить предварительную оценку стоимости обслуживания плоттера просто позвоните нам: добавочный номер мастера «1».

География ремонта и обслуживания плоттеров Canon
Таганско-Краснопресненская
Баррикадная,, Беговая, Волгоградский проспект, Выхино, Жулебино, Китай-город, Кузнецкий мост, Кузьминки, Лермонтовски проспект, Октябрьское поле, Планерная, Полежаевская, Пролетарская, Пушкинская, Рязанский проспект, Сходненская, Таганская, Текстильщики, Тушинская, Улица 1905 года, Щукинская
Калининская
Авиамоторная, Марксистская, Новогиреево, Новокосино, Перово, Площадь Ильича, Шоссе Энтузиастов
Замоскворецкая
Автозаводская, Алма-Атинская, Аэропорт, Белорусская, Водный стадион, Войковская, Динамо, Домодедовская, Кантемировская, Каширская, Коломенская, Красногвардейская, Маяковская, Новокузнецкая, Орехово, Павелецкая, Речной вокзал, Сокол, Тверская, Театральная, Царицыно
Серпуховско-Тимирязевская
Алтуфьево, Аннино, Бибирево, Боровицкая, Бульвар Дмитрия Донского, Владыкино, Дмитровская, Менделеевская, Нагатинская, Нагорная, Нахимовский проспект, Отрадное, Петровско-Разумовская, Полянка, Пражская, Савёловская, Севастопольская, Серпуховская, Тимирязевская, Тульская, Улица Академика Янгеля, Цветной бульвар, Чертановская, Чеховская, Южная
Калужско-Рижская
Академическая, Алексеевская, Бабушкинская, Беляево, Ботанический сад, ВДНХ, Калужская, Китай-город, Коньково, Ленинский проспект, Медведково, Новоясеневская, Новые Черёмушки, Октябрьская, Проспект Мира, Профсоюзная, Рижская, Свиблово, Сухаревская, Тёплый Стан, Тургеневская, Третьяковская, Шаболовская, Ясенево
Арбатско-Покровская
Арбатская, Бауманская, Волоколамская, Измайловская, Киевская, Крылатское, Кунцевская, Курская, Митино, Молодёжная, Мякинино, Парк Победы, Партизанская, Первомайская, Площадь Революции, Пятницкое шоссе, Семёновская, Славянский бульвар, Смоленская, Строгино, Щёлковская, Электрозаводская
Люблинская
Борисово, Братиславская, Волжская, Достоевская, Дубровка, Зябликово, Кожуховская, Крестьянская застава, Люблино, Марьина Роща, Марьино, Печатники, Римская, Сретенский бульвар, Трубная, Шипиловская, Чкаловская
Сокольническая
Библиотека имени Ленина, Воробьёвы горы, Комсомольская, Красносельская, Красные ворота, Кропоткинская, Лубянка, Охотный ряд, Парк культуры, Преображенская площадь, Проспект Вернадского, Сокольники, Спортивная, Улица Подбельского, Университет, Фрунзенская, Черкизовская, Чистые пруды, Юго-Западная
Филевская
Александровский сад, Арбатская, Багратионовская, Выставочная, Киевская, Кутузовская, Международная, Пионерская, Смоленская, Студенческая, Филёвский парк, Фили
Кольцевая
Добрынинская, Киевская, Комсомольская, Краснопресненская, Курская, Марксистская, Новослободская, Октябрьская, Павелецкая, Парк культуры, Проспект Мира, Таганская
Бутовская
Бульвар адмирала, Ушакова Бунинская аллея, Улица Горчакова, Улица Скобелевская, Улица Старокачаловская
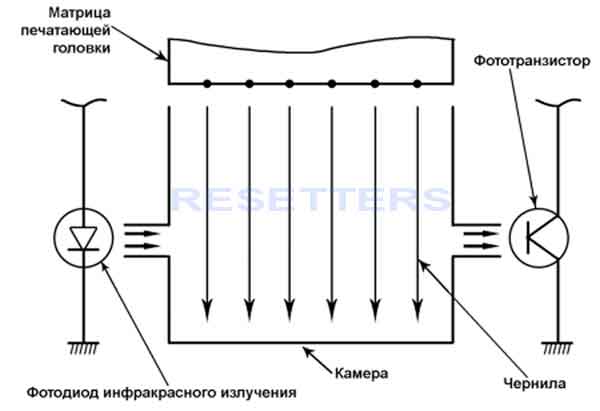
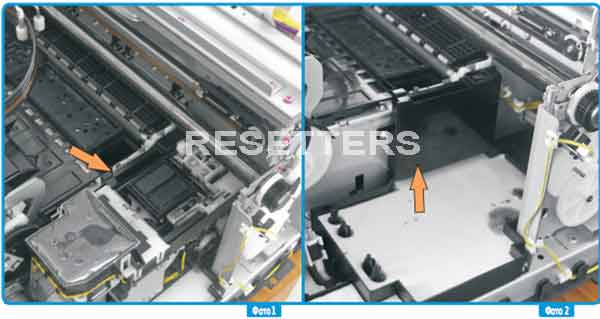
Работоспособность печатающей головки плоттеров серии iPF500, iPF600, iPF700 и других определяется плотером с помощью оптопары, установленной в специальной камере Фото 1, 2, 3, через которую при тестировании поочерёдно подаются чернила из матрицы каждого цвета.
На Фото 1 и 2 стрелочками указано расположение камеры с оптопарой.
Если печатающая головка исправна, то при начальной самодиагностике чернила перекрывают световой поток оптопары, фототранзистор “закрывается”. Контроллер плоттера получает разрешающий сигнал для завершения тестирования остальных узлов. В противном случае на дисплее появляется сообщение: “Прочистите печатающую головку. Если вы ещё видите это сообщение, то замените её. ”
Но не всегда причиной этому сообщению бывает неисправность печатающей головки. Очень часто такая ситуация возникает из-за неисправности одного из элементов оптопары, чаще всего фототранзистор. Принтер «думает» что нет сигнала из-за того, что чернила не проходят через дюзы печатающей головки, но на самом деле неисправен фототранзистор, который необходимо заменить ( Фото 4 ).
Установить истину можно следующим образом: войти в сервисный режим (в этом режиме отключается тестирование с помощью оптопары), задать опцию проверки дюз, сделать распечатку. Если дюзы всех цветов печатают — печатающая головка абсолютно исправна, а сообщение о необходимости замены ПГ возникает по вине неисправной оптопары!
После замены фототранзистора плоттер будет работать в прежнем режиме без ошибок.
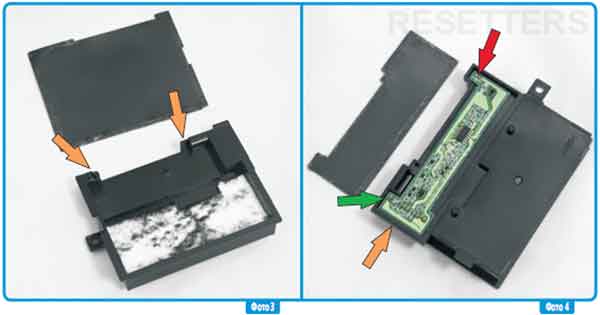
На Фото 3 стрелками указана оптопара.
На Фото 4 Красной стрелкой показано расположение Фототранзистора, Зеленой стрелкой — Инфракрасный
светодиод, и Оранжевой стрелкой — Разъём.
Если у вас остались вопросы или вы хотите поделиться своим опытом решения данной проблемы — добро пожаловать в Форум RESETTERS — все про СНПЧ и струйную технику.