Check the System for Swap Information
Before we begin, we will take a look at our operating system to see if we already have some swap space available. We can have multiple swap files or swap partitions, but generally one should be enough.
We can see if the system has any configured swap by typing:
sudo swapon -s
Filename Type Size Used Priority
If you only get back the header of the table, as I’ve shown above, you do not currently have any swap space enabled.
Another, more familiar way of checking for swap space is with the free utility, which shows us system memory usage. We can see our current memory and swap usage in Megabytes by typing:
free -m
total used free shared buffers cached
Mem: 3953 154 3799 0 8 83
-/+ buffers/cache: 62 3890
Swap: 0 0 0
As you can see above, our total swap space in the system is «0». This matches what we saw with the previous command.
Check Available Space on the Hard Drive Partition
The typical way of allocating space for swap is to use a separate partition devoted to the task. However, altering the partitioning scheme is not always possible. We can just as easily create a swap file that resides on an existing partition.
Before we do this, we should be aware of our current disk usage. We can get this information by typing:
df -h
Filesystem Size Used Avail Use% Mounted on
/dev/sda 70G 5.3G 64G 4% /
none 4.0K 0 4.0K 0% /sys/fs/cgroup
udev 2.0G 12K 2.0G 1% /dev
tmpfs 396M 312K 396M 1% /run
none 5.0M 0 5.0M 0% /run/lock
none 2.0G 0 2.0G 0% /run/shm
none 100M 0 100M 0% /run/user
As you can see on the first line, our hard drive partition has 70 Gigabytes available, so we have a huge amount of space to work with.
Although there are many opinions about the appropriate size of a swap space, it really depends on your personal preferences and your application requirements. Generally, an amount equal to or double the amount of RAM on your system is a good starting point.
Since our system has 8 Gigabytes of RAM, so we will create a swap space of 8 Gigabytes to match my system’s RAM.
Create a Swap File
Now that we know our available hard drive space, we can go about creating a swap file within our filesystem.
We will create a file called swapfile in our root (/) directory. The file must allocate the amount of space we want for our swap file. There are two main methods of doing this:
The Slower Method
Traditionally, we would create a file with preallocated space by using the dd command. This versatile disk utility writes from one location to another location.
We can use this to write zeros to the file from a special device in Linux systems located at /dev/zero that just spits out as many zeros as requested.
We specify the file size by using a combination of bs for block size and count for the number of blocks. What we assign to each parameter is almost entirely arbitrary. What matters is what the product of multiplying them turns out to be.
For instance, in our example, we’re looking to create a 4 Gigabyte file. We can do this by specifying a block size of 1 Gigabyte and a count of 4:
sudo dd if=/dev/zero of=/swapfile bs=1G count=8
8+0 records in
8+0 records out
8589934592 bytes (8.3 GB) copied, 18.6227 s, 231 MB/s
Check your command before pressing ENTER because this has the potential to destroy data if you point the of (which stands for output file) to the wrong location.
We can see that 8 Gigabytes have been allocated by typing:
ls -lh /swapfile
-rw-r—r— 1 root root 8.0G Nov 22 10:08 /swapfile
If you’ve completed the command above, you may notice that it took quite a while. In fact, you can see in the output that it took my system 36 seconds to create the file. That is because it has to write 8 Gigabytes of zeros to the disk.
If you want to learn how to create the file faster, remove the file and follow along below:
sudo rm /swapfile
The Faster Method
The quicker way of getting the same file is by using the fallocate program. This command creates a file of a preallocated size instantly, without actually having to write dummy contents.
We can create a 8 Gigabyte file by typing:
sudo fallocate -l 8G /swapfile
The prompt will be returned to you almost immediately. We can verify that the correct amount of space was reserved by typing:
ls -lh /swapfile
-rw-r—r— 1 root root 8.0G Nov 22 10:10 /swapfile
As you can see, our file is created with the correct amount of space set aside.
Enabling the Swap File
Right now, our file is created, but our system does not know that this is supposed to be used for swap. We need to tell our system to format this file as swap and then enable it.
Before we do that though, we need to adjust the permissions on our file so that it isn’t readable by anyone besides root. Allowing other users to read or write to this file would be a huge security risk. We can lock down the permissions by typing:
sudo chmod 600 /swapfile
Verify that the file has the correct permissions by typing:
ls -lh /swapfile
-rw——- 1 root root 8.0G Nov 22 10:11 /swapfile
As you can see, only the columns for the root user have the read and write flags enabled.
Now that our file is more secure, we can tell our system to set up the swap space by typing:
sudo mkswap /swapfile
Setting up swapspace version 1, size = 8388600 KiB
no label, UUID=e3f2e7cf-b0a9-4cd4-b9ab-814b8a7d6933
Our file is now ready to be used as a swap space. We can enable this by typing:
sudo swapon /swapfile
We can verify that the procedure was successful by checking whether our system reports swap space now:
sudo swapon -s
Filename Type Size Used Priority
/swapfile file 8388600 0 -1
We have a new swap file here. We can use the free utility again to corroborate our findings:
free -m
total used free shared buffers cached
Mem: 7906 202 7704 0 5 30
-/+ buffers/cache: 66 7446
Swap: 8190 0 8190
Our swap has been set up successfully and our operating system will begin to use it as necessary.
Make the Swap File Permanent
We have our swap file enabled, but when we reboot, the server will not automatically enable the file. We can change that though by modifying the fstab file.
Edit the file with root privileges in your text editor:
sudo nano /etc/fstab
At the bottom of the file, you need to add a line that will tell the operating system to automatically use the file you created:
/swapfile none swap sw 0 0
Save and close the file when you are finished.
Swap Settings
There are a few options that you can configure that will have an impact on your system’s performance when dealing with swap.
The swappiness parameter configures how often your system swaps data out of RAM to the swap space. This is a value between 0 and 100 that represents a percentage.
With values close to zero, the kernel will not swap data to the disk unless absolutely necessary. Remember, interactions with the swap file are «expensive» in that they take a lot longer than interactions with RAM and they can cause a significant reduction in performance. Telling the system not to rely on the swap much will generally make your system faster.
Values that are closer to 100 will try to put more data into swap in an effort to keep more RAM space free. Depending on your applications’ memory profile or what you are using your server for, this might be better in some cases.
We can see the current swappiness value by typing:
cat /proc/sys/vm/swappiness
60
For a Desktop, a swappiness setting of 60 is not a bad value. For a Server, we’d probably want to move it closer to 0.
We can set the swappiness to a different value by using the sysctl command.
For instance, to set the swappiness to 10, we could type:
sudo sysctl vm.swappiness=10
vm.swappiness = 10
This setting will persist until the next reboot. We can set this value automatically at restart by adding the line to our /etc/sysctl.conf file:
sudo nano /etc/sysctl.conf
At the bottom, you can add:
vm.swappiness=10
Save and close the file when you are finished.
Another related value that you might want to modify is the vfs_cache_pressure. This setting configures how much the system will choose to cache inode and dentry information over other data.
Basically, this is access data about the filesystem. This is generally very costly to look up and very frequently requested, so it’s an excellent thing for your system to cache. You can see the current value by querying the proc filesystem again:
cat /proc/sys/vm/vfs_cache_pressure
100
As it is currently configured, our system removes inode information from the cache too quickly. We can set this to a more conservative setting like 50 by typing:
sudo sysctl vm.vfs_cache_pressure=50
vm.vfs_cache_pressure = 50
Again, this is only valid for our current session. We can change that by adding it to our configuration file like we did with our swappiness setting:
sudo nano /etc/sysctl.conf
At the bottom, add the line that specifies your new value:
vm.vfs_cache_pressure = 50
Save and close the file when you are finished.
Conclusion
If you are running into OOM (out of memory) errors, or if you find that your system is unable to use the applications you need, the best solution is to optimize your application configurations or upgrade your server. Configuring swap space, however, can give you more flexibility and can help buy you time on a less powerful server.
- Печать
Страницы: [1] Вниз

Тема: После выбора пункта меню в Grub возникает ошибка (Прочитано 1070 раз)
0 Пользователей и 1 Гость просматривают эту тему.

Лесная Тишина
Здравствуйте, записал на флешку дистрибутив бетки 22.04, флешка запускается, и при выборе Ubuntu появляется надпись Out of memory, когда продолжаю, то загрузка установщика прекращается.
mahinist
Out of memory, когда продолжаю, то загрузка установщика прекращается.
Рекомендуемые системные требования, если вы хотите установить Ubuntu x64: Процессор: 2 ГГц x2; ОЗУ: 4 Гб
На какое железо устанавливаете?
« Последнее редактирование: 04 Апреля 2022, 09:36:45 от mahinist »
31-регион
БТР
записал на флешку дистрибутив бетки 22.04
Как и чем записывали флешку? На другом компьютере грузится?
Ставьте текущий LTS 20.04 или дождитесь релиза 22.04, когда основные баги будут исправлены.
Лесная Тишина
Рекомендуемые системные требования, если вы хотите установить Ubuntu x64: Процессор: 2 ГГц x2; ОЗУ: 4 Гб
На какое железо устанавливаете?
Проц с памятью новые (названия не помню), памяти 8 гигов, грешу на видяху, так как она внутренняя, а не внешняя.
Как и чем записывали флешку? На другом компьютере грузится?
Ставьте текущий LTS 20.04 или дождитесь релиза 22.04, когда основные баги будут исправлены.
Записывал и руфусом и win32diskimage, одно и тоже. Да, придется все же релиза дождаться.
jurganov
читал немного по теме. люди грешили на своп
вован1
Может железо не тянет? Для проверки можно установить версию постарше. Я например пробовал 17 версию (Пикантный полутушканчик)
Ndre
jurganov
17 версию
у убнуту вообще нет номерных версий.
Там год и месяц выхода. и в год выходят две очень разных версии
- Печать
Страницы: [1] Вверх
[Workaround]
Some workarounds have been suggested in https://bugs.launchpad.net/ubuntu/+source/linux/+bug/1842320/comments/125
[Impact]
* In some cases, if the users’ initramfs grow bigger, then it’ll likely not be able to be loaded by grub2.
* Some real cases from OEM projects:
In many built-in 4k monitor laptops with nvidia drivers, the u-d-c puts the nvidia*.ko to initramfs which grows the initramfs to ~120M. Also the gfxpayload=auto will remain to use 4K resolution since it’s what EFI POST passed.
In this case, the grub isn’t able to load initramfs because the grub_memalign() won’t be able to get suitable memory for the larger file:
«`
#0 grub_memalign (align=1, size=592214020) at ../../../grub-core/kern/mm.c:376
#1 0x000000007dd7b074 in grub_malloc (size=592214020) at ../../../grub-core/kern/mm.c:408
#2 0x000000007dd7a2c8 in grub_verifiers_open (io=0x7bc02d80, type=131076)
at ../../../grub-core/kern/verifiers.c:150
#3 0x000000007dd801d4 in grub_file_open (name=0x7bc02f00 «/boot/initrd.img-5.17.0-1011-oem»,
type=131076) at ../../../grub-core/kern/file.c:121
#4 0x000000007bcd5a30 in ?? ()
#5 0x000000007fe21247 in ?? ()
#6 0x000000007bc030c8 in ?? ()
#7 0x000000017fe21238 in ?? ()
#8 0x000000007bcd5320 in ?? ()
#9 0x000000007fe21250 in ?? ()
#10 0x0000000000000000 in ?? ()
«`
Based on grub_mm_dump, we can see the memory region starvation in <1G addresses:
Type Start End # Pages Attributes
Available 0000000000000000-0000000000086FFF 0000000000000087 000000000000000F
BS_Data 0000000000087000-0000000000087FFF 0000000000000001 000000000000000F
Available 0000000000088000-000000000009EFFF 0000000000000017 000000000000000F
Reserved 000000000009F000-000000000009FFFF 0000000000000001 000000000000000F
Available 0000000000100000-0000000000FFFFFF 0000000000000F00 000000000000000F
LoaderCode 0000000001000000-0000000001021FFF 0000000000000022 000000000000000F
Available 0000000001022000-00000000238A7FFF 0000000000022886 000000000000000F
BS_Data 00000000238A8000-0000000023927FFF 0000000000000080 000000000000000F
Available 0000000023928000-0000000028860FFF 0000000000004F39 000000000000000F
BS_Data 0000000028861000-000000002AB09FFF 00000000000022A9 000000000000000F
LoaderCode 000000002AB0A000-000000002ACF8FFF 00000000000001EF 000000000000000F
BS_Data 000000002ACF9000-000000002B2FAFFF 0000000000000602 000000000000000F
Available 000000002B2FB000-000000002B611FFF 0000000000000317 000000000000000F
BS_Data 000000002B612000-000000002B630FFF 000000000000001F 000000000000000F
Available 000000002B631000-000000002B632FFF 0000000000000002 000000000000000F
BS_Data 000000002B633000-000000002B63CFFF 000000000000000A 000000000000000F
Available 000000002B63D000-000000002B649FFF 000000000000000D 000000000000000F
BS_Data 000000002B64A000-000000002B64EFFF 0000000000000005 000000000000000F
Available 000000002B64F000-000000002B666FFF 0000000000000018 000000000000000F
BS_Data 000000002B667000-000000002D8D5FFF 000000000000226F 000000000000000F
LoaderCode 000000002D8D6000-000000002D8E9FFF 0000000000000014 000000000000000F
BS_Data 000000002D8EA000-000000002D925FFF 000000000000003C 000000000000000F
LoaderCode 000000002D926000-000000002D932FFF 000000000000000D 000000000000000F
BS_Data 000000002D933000-000000002D969FFF 0000000000000037 000000000000000F
BS_Code 000000002D96A000-000000002D973FFF 000000000000000A 000000000000000F
BS_Data 000000002D974000-000000002E377FFF 0000000000000A04 000000000000000F
Available 000000002E378000-000000002E37AFFF 0000000000000003 000000000000000F
…
Reserved 000000003C08B000-000000004192FFFF 00000000000058A5 000000000000000F
ACPI_NVS 0000000041930000-0000000041B2FFFF 0000000000000200 000000000000000F
ACPI_Recl 0000000041B30000-0000000041BFEFFF 00000000000000CF 000000000000000F
BS_Data 0000000041BFF000-0000000041BFFFFF 0000000000000001 000000000000000F
Available 0000000100000000-00000002AB7FFFFF 00000000001AB800 000000000000000F
Reserved 00000000000A0000-00000000000FFFFF 0000000000000060 0000000000000000
Reserved 0000000041C00000-0000000043FFFFFF 0000000000002400 0000000000000000
Reserved 0000000044000000-0000000047FFFFFF 0000000000004000 000000000000000F
Reserved 0000000049400000-00000000495FFFFF 0000000000000200 000000000000000F
Reserved 000000004C000000-000000004FFFFFFF 0000000000004000 0000000000000009
Reserved 0000000050000000-00000000547FFFFF 0000000000004800 0000000000000000
MMIO 00000000C0000000-00000000CFFFFFFF 0000000000010000 8000000000000001
Reserved 00000000FED20000-00000000FED7FFFF 0000000000000060 0000000000000000
MMIO 00000000FF800000-00000000FFFFFFFF 0000000000000800 8000000000001000
…
LoaderCode: 562 Pages (2,301,952 Bytes)
LoaderData: 0 Pages (0 Bytes)
…
Available : 1,917,598 Pages (7,854,481,408 Bytes)
Based on UEFI Specification Section 7.2[1] and UEFI driver writers’ guide 4.2.3[2], we can ask 32bits+ on AllocatePages().
As most X86_64 platforms should support 64 bits addressing, we should extend GRUB_EFI_MAX_USABLE_ADDRESS to 64 bits to get more available memory.
* When users grown the initramfs, then probably will get initramfs not found which really annoyed and impact the user experience (system not able to boot).
[Test Plan]
* detailed instructions how to reproduce the bug:
1. Any method to grow the initramfs, such as install nvidia-driver.
2. If developers would like to reproduce, then could dd if=/dev/random of=… bs=1M count=500, something like:
«`
$ cat /usr/share/initramfs-tools/hooks/zzz-touch-a-file
#!/bin/sh
PREREQ=»»
prereqs()
{
echo «$PREREQ»
}
case $1 in
# get pre-requisites
prereqs)
prereqs
exit 0
;;
esac
. /usr/share/initramfs-tools/hook-functions
dd if=/dev/random of=${DESTDIR}/test-500M bs=1M count=500
«`
And then update-initramfs
* After cloning grub2 (2.06-2ubuntu16) from lunar-proposed and built, the results as following:
421M /boot/initrd.img-5.17.0-1021-oem # pass
453M /boot/initrd.img-5.17.0-1024-oem # pass
471M /boot/initrd.img-5.17.0-1024-oem # fail
Only 453M is because verifier will consume the same memory size of initrd in <1G memories.
The loadable initrd will locate at >4G if machine/kernel support it.
[Where problems could occur]
* The changes almost in i386/efi, thus the impact will be in the i386 / x86_64 EFI system.
The other change is to modify the “grub-core/kern/efi/mm.c” but it use the original addressing for “arm/arm64/ia64/riscv32/riscv64”.
Thus it should not impact them.
* There are some “#if defined(__x86_64__)” which intent to limit the > 32bits code in i386 system.
If everything works as expected, then i386 should working good.
If not lucky, based on “UEFI writers’ guide”[2], the i386 will get > 4GB memory region and never be able to access.
[Other Info]
* The package grub2 (2.06-2ubuntu16) is now in lunar-proposed.
—
Upgraded from 19.04 to current 19.10 using «do-release-upgrade -d». Can still boot using the previous 5.0.0-25-generic kernel, but the 5.2.0-15-generic fails to start.
On selecting Ubuntu from Grub, the message «error: out of memory.» is immediately shown. Pressing a key attempts to start boot-up but fails to mount root fs.
Machine is HP Spectre X360 with 8GB RAM. Under kernel 5.0.0, free shows the following (run from Gnome terminal):
total used free shared buff/cache available
Mem: 7906564 1761196 3833240 1020216 2312128 4849224
Swap: 1003516 0 1003516
Kernel packages installed:
linux-generic 5.2.0.15.16 amd64
linux-headers-5.2.0-15 5.2.0-15.16 all
linux-headers-5.2.0-15-generic 5.2.0-15.16 amd64
linux-headers-generic 5.2.0.15.16 amd64
linux-image-5.0.0-25-generic 5.0.0-25.26 amd64
linux-image-5.2.0-15-generic 5.2.0-15.16+signed1 amd64
linux-image-generic 5.2.0.15.16 amd64
linux-modules-5.0.0-25-generic 5.0.0-25.26 amd64
linux-modules-5.2.0-15-generic 5.2.0-15.16 amd64
linux-modules-extra-5.0.0-25-generic 5.0.0-25.26 amd64
linux-modules-extra-5.2.0-15-generic 5.2.0-15.16 amd64
Photo of kernel panic attached.
NVMe drive partition layout (GPT):
Device Start End Sectors Size Type
/dev/nvme0n1p1 2048 1050623 1048576 512M EFI System
/dev/nvme0n1p2 1050624 2549759 1499136 732M Linux filesystem
/dev/nvme0n1p3 2549760 1000214527 997664768 475.7G Linux filesystem
$ sudo pvs
PV VG Fmt Attr PSize PFree
/dev/mapper/nvme0n1p3_crypt ubuntu-vg lvm2 a— <475.71g 0
$ sudo lvs
LV VG Attr LSize Pool Origin Data% Meta% Move Log Cpy%Sync Convert
root ubuntu-vg -wi-ao—- 474.75g
swap_1 ubuntu-vg -wi-ao—- 980.00m
Partition 3 is LUKS encrypted. Root LV is ext4.
—
ProblemType: Bug
ApportVersion: 2.20.11-0ubuntu7
Architecture: amd64
AudioDevicesInUse:
USER PID ACCESS COMMAND
/dev/snd/controlC0: gmckeown 1647 F…. pulseaudio
CurrentDesktop: ubuntu:GNOMEDistroRelease: Ubuntu 19.10
InstallationDate: Installed on 2019-08-15 (18 days ago)
InstallationMedia: Ubuntu 19.04 «Disco Dingo» — Release amd64 (20190416)
Lsusb:
Bus 002 Device 001: ID 1d6b:0003 Linux Foundation 3.0 root hub
Bus 001 Device 003: ID 8087:0a2b Intel Corp.
Bus 001 Device 002: ID 04f2:b593 Chicony Electronics Co., Ltd HP Wide Vision FHD Camera
Bus 001 Device 004: ID 046d:c52b Logitech, Inc. Unifying Receiver
Bus 001 Device 001: ID 1d6b:0002 Linux Foundation 2.0 root hub
MachineType: HP HP Spectre x360 Convertible 13-ae0xx
Package: linux (not installed)
ProcFB: 0 inteldrmfb
ProcKernelCmdLine: BOOT_IMAGE=/vmlinuz-5.0.0-25-generic root=/dev/mapper/ubuntu—vg-root ro quiet splash
ProcVersionSignature: Ubuntu 5.0.0-25.26-generic 5.0.18
RelatedPackageVersions:
linux-restricted-modules-5.0.0-25-generic N/A
linux-backports-modules-5.0.0-25-generic N/A
linux-firmware 1.181
Tags: eoan
Uname: Linux 5.0.0-25-generic x86_64
UpgradeStatus: Upgraded to eoan on 2019-09-02 (0 days ago)
UserGroups: adm cdrom dip lpadmin plugdev sambashare sudo
_MarkForUpload: True
dmi.bios.date: 05/17/2019
dmi.bios.vendor: AMI
dmi.bios.version: F.25
dmi.board.asset.tag: Base Board Asset Tag
dmi.board.name: 83B9
dmi.board.vendor: HP
dmi.board.version: 56.43
dmi.chassis.type: 31
dmi.chassis.vendor: HP
dmi.chassis.version: Chassis Version
dmi.modalias: dmi:bvnAMI:bvrF.25:bd05/17/2019:svnHP:pnHPSpectrex360Convertible13-ae0xx:pvr:rvnHP:rn83B9:rvr56.43:cvnHP:ct31:cvrChassisVersion:
dmi.product.family: 103C_5335KV HP Spectre
dmi.product.name: HP Spectre x360 Convertible 13-ae0xx
dmi.product.sku: 2QH38EA#ABU
dmi.sys.vendor: HP
Out-of-memory (OOM) errors take place when the Linux kernel can’t provide enough memory to run all of its user-space processes, causing at least one process to exit without warning. Without a comprehensive monitoring solution, OOM errors can be tricky to diagnose.
In this post, you will learn how to diagnose OOM errors in Linux kernels by:
- Analyzing different types of OOM error logs
- Choosing the most revealing metrics to explain low-memory situations on your hosts
- Using a profiler to understand memory-heavy processes
- Setting up automated alerts to troubleshoot OOM error messages more easily
Identify the error message
OOM error logs are normally available in your host’s syslog (in the file /var/log/syslog). In a dynamic environment with a large number of ephemeral hosts, it’s not realistic to comb through system logs manually—you should forward your logs to a monitoring platform for search and analysis. This way, you can configure your monitoring platform to parse these logs so you can query them and set automated alerts. Your monitoring platform should enrich your logs with metadata, including the host and application that produced them, so you can localize issues for further troubleshooting.
There are two major types of OOM error, and you should be prepared to identify each of these when diagnosing OOM issues:
- Error messages from user-space processes that handle OOM errors themselves
- Error messages from the kernel-space OOM Killer
Error messages from user-space processes
User-space processes receive access to system memory by making requests to the kernel, which returns a set of memory addresses (virtual memory) that the kernel will later assign to pages in physical RAM. When a user-space process first requests a virtual memory mapping, the kernel usually grants the request regardless of how many free pages are available. The kernel only allocates free pages to that mapping when it attempts to access memory with no corresponding page in RAM.
When an application fails to obtain a virtual memory mapping from the kernel, it will often handle the OOM error itself, emit a log message, then exit. If you know that certain hosts will be dedicated to memory-intensive processes, you should determine in advance what OOM logs these processes output, then set up alerts on these logs. Consider running game days to see what logs your system generates when it runs out of memory, and consult the documentation or source of your critical applications to ensure that your log management system can ingest and parse OOM logs.
The information you can obtain from error logs differs by application. For example, if a Go program attempts to request more memory than is available on the system, it will print a log that resembles the following, print a stack trace, then exit.
fatal error: runtime: out of memory
In this case, the log prints a detailed stack trace for each goroutine running at the time of the error, enabling you to figure out what the process was attempting to do before exiting. In this stack trace, we can see that our demo application was requesting memory while calling the *ImageProcessor.IdentifyImage() method.
goroutine 1 [running]:
runtime.systemstack_switch()
/usr/local/go/src/runtime/asm_amd64.s:330 fp=0xc0000b9d10 sp=0xc0000b9d08 pc=0x461570
runtime.mallocgc(0x278f3774, 0x695400, 0x1, 0xc00007e070)
/usr/local/go/src/runtime/malloc.go:1046 +0x895 fp=0xc0000b9db0 sp=0xc0000b9d10 pc=0x40c575
runtime.makeslice(0x695400, 0x278f3774, 0x278f3774, 0x38)
/usr/local/go/src/runtime/slice.go:49 +0x6c fp=0xc0000b9de0 sp=0xc0000b9db0 pc=0x44a9ec
demo_app/imageproc.(*ImageProcessor).IdentifyImage(0xc00000c320, 0x278f3774, 0xc0278f3774)
demo_app/imageproc/imageproc.go:36 +0xb5 fp=0xc0000b9e38 sp=0xc0000b9de0 pc=0x5163f5
demo_app/imageproc.(*ImageProcessor).IdentifyImage-fm(0x278f3774, 0x36710769)
demo_app/imageproc/imageproc.go:34 +0x34 fp=0xc0000b9e60 sp=0xc0000b9e38 pc=0x5168b4
demo_app/imageproc.(*ImageProcessor).Activate(0xc00000c320, 0x36710769, 0xc000064f68, 0x1)
demo_app/imageproc/imageproc.go:88 +0x169 fp=0xc0000b9ee8 sp=0xc0000b9e60 pc=0x516779
main.main()
demo_app/main.go:39 +0x270 fp=0xc0000b9f88 sp=0xc0000b9ee8 pc=0x66cd50
runtime.main()
/usr/local/go/src/runtime/proc.go:203 +0x212 fp=0xc0000b9fe0 sp=0xc0000b9f88 pc=0x435e72
runtime.goexit()
/usr/local/go/src/runtime/asm_amd64.s:1373 +0x1 fp=0xc0000b9fe8 sp=0xc0000b9fe0 pc=0x463501
Since this behavior is baked into the Go runtime, Go-based infrastructure tools like Consul and Docker will output similar messages in low-memory conditions.
In addition to error messages from user-space processes, you’ll want to watch for OOM messages produced by the Linux kernel’s OOM Killer.
Error messages from the OOM Killer
If a Linux machine is seriously low on memory, the kernel invokes the OOM Killer to terminate a process. As with user-space OOM error logs, you should treat OOM Killer logs as indications of overall memory saturation.
How the OOM Killer works
To understand when the kernel produces OOM errors, it helps to know how the OOM Killer works. The OOM Killer terminates a process using heuristics. It assigns each process on your system an OOM score between 0 and 1000, based on its memory consumption as well as a user-configurable adjustment score. It then terminates the process with the highest score. This means that, by default, the OOM Killer may end up killing processes you don’t expect. (You will see different behavior if you configure the kernel to panic on OOM without invoking the OOM Killer, or to always kill the task that invoked the OOM Killer instead of assigning OOM scores.)
The kernel invokes the OOM Killer when it tries—but fails—to allocate free pages. When the kernel fails to retrieve a page from any memory zone in the system, it attempts to obtain free pages by other means, including memory compaction, direct reclaim, and searching again for free pages in case the OOM Killer had terminated a process during the initial search. If no free pages are available, the kernel triggers the OOM Killer. In other words, the kernel does not “see” that there are too few pages to satisfy a memory mapping until it is too late.
OOM Killer logs
You can use the OOM Killer logs both to identify which hosts in your system have run out of memory and to get detailed information on how much memory different processes were using at the time of the error. You can find an annotated example in the git commit that added this logging information to the Linux kernel. For example, the OOM Killer logs provide data on the system’s memory conditions at the time of the error.
Mem-Info:
active_anon:895388 inactive_anon:43 isolated_anon:0
active_file:13 inactive_file:9 isolated_file:1
unevictable:0 dirty:0 writeback:0 unstable:0
slab_reclaimable:4352 slab_unreclaimable:7352
mapped:4 shmem:226 pagetables:3101 bounce:0
free:21196 free_pcp:150 free_cma:0
As you can see, the system had 21,196 pages of free memory when it threw the OOM error. With each page on the system holding up to 4 kB of memory, we can assume that the kernel needed to allocate at least 84.784 MB of physical memory to meet the requirements of currently running processes.
Understand the problem
If your monitoring platform has applied the appropriate metadata to your logs, you should be able to tell from a wave of OOM error messages which hosts are facing critically low memory conditions. The next step is to understand how frequently your hosts reach these conditions—and when memory utilization has spiked anomalously—by monitoring system memory metrics. In this section, we’ll review some key memory metrics and how to get more context around OOM errors.
Choose the right metrics
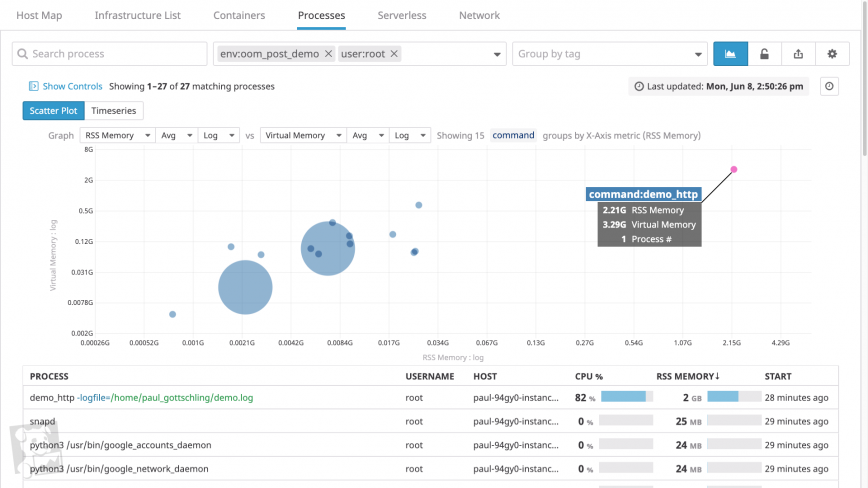
As we’ve seen, it’s difficult for the Linux kernel to determine when low-memory conditions will produce OOM errors. To make matters worse, the kernel is notoriously imprecise at measuring its own memory utilization, as a process can be allocated virtual memory but not actually use the physical RAM that those addresses map to. Since absolute measures of memory utilization can be unreliable, you should use another approach: determine what levels of memory utilization correlate with OOM errors in your hosts and what levels indicate a healthy baseline (e.g. by running game days).
When monitoring overall memory utilization in relation to a healthy baseline, you should track both how much virtual memory the kernel has mapped for your processes and how much physical memory your processes are using (called the resident set size). If you’ve configured your system to use a significant amount of swap space—space on disk where the kernel stores inactive pages—you can also track this in order to monitor total memory utilization across your system.
Determine the scope
Your monitoring platform should tag your memory metrics with useful metadata about where those metrics came from—or at least the name of the associated host and process. The host tag is useful for determining if any one host is consuming an unusual amount of memory, whether in comparison to other hosts or to its baseline memory consumption.
You should also be able to group and filter your timeseries data either by process within a single host, or across all hosts in a cluster. This will help you determine whether any one process is using an unusual amount of memory. You’ll want to know which processes are running on each system and how long they’ve been running—in short, how recently your system has demanded an unsustainable amount of memory.
Find aggravating factors
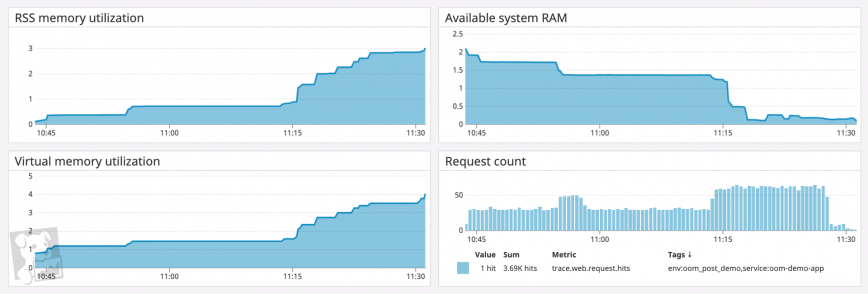
If certain processes seem unusually memory-intensive, you’ll want to investigate them further by tracking metrics for other parts of your system that may be contributing to the issue.
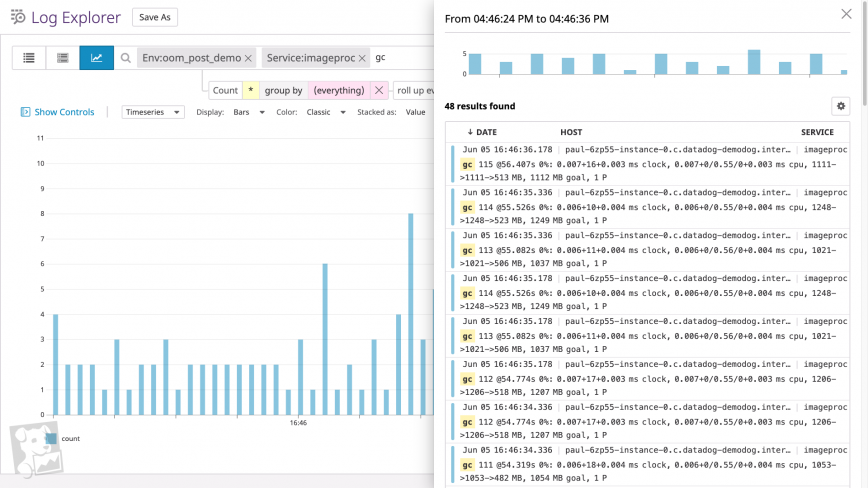
For processes with garbage-collected runtimes, you can investigate garbage collection as one source of higher-than-usual memory utilization. On a timeseries graph of heap memory utilization for a single process, garbage collection forms a sawtooth pattern (e.g. the JVM)—if the sawtooth does not return to a steady baseline, you likely have a memory leak. To see if your process’s runtime is garbage collecting as expected, graph the count of garbage collection events alongside heap memory usage.
Alternatively, you can search your logs for messages accompanying the “cliffs” of the sawtooth pattern. If you run a Go program with the GODEBUG environment variable assigned to gctrace=1, for example, the Go runtime will output a log every time it runs a garbage collection. (The screenshot below shows a graph of garbage collection log frequency over time, plus a typical list of garbage collection logs.)
Another factor has to do with the work that a process is performing. If an application is managing memory in a healthy way (i.e. without memory leaks) but still using more than expected, the application may be handling unusual levels of work. You’ll want to graph work metrics for memory-heavy applications, such as request rates for a web application, query throughput for a database, and so on.
Find unnecessary allocations
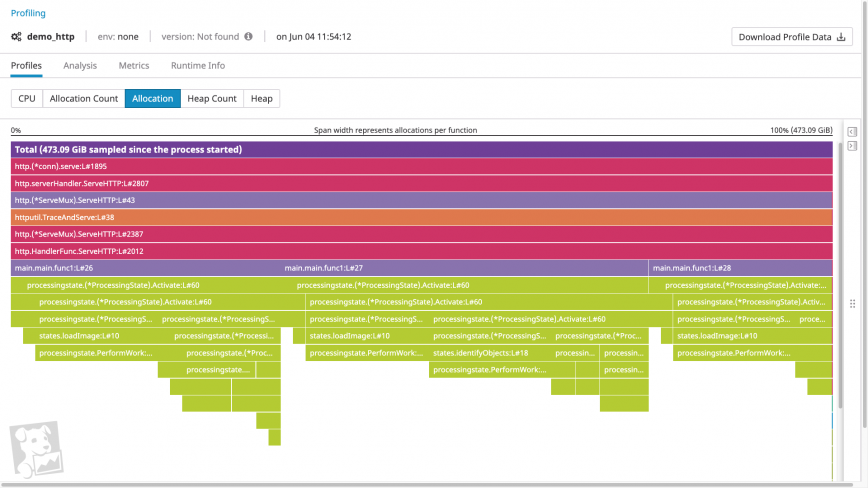
If a process doesn’t seem to be subject to any aggravating factors, it’s likely that the process is requesting more memory than you anticipate. One tool that helps you identify these memory requests is a memory profile.
Memory profiles visualize both the order of function calls within a call stack and how much heap memory each function call allocates. Using a memory profiler, you can quickly determine whether a given call is particularly memory intensive. And by examining the call’s parents and children, you can determine why a heavy allocation is taking place. For example, a profile could include a memory-intensive code path introduced by a recent feature release, suggesting that you should optimize the new code for memory utilization.
Get notified on OOM errors
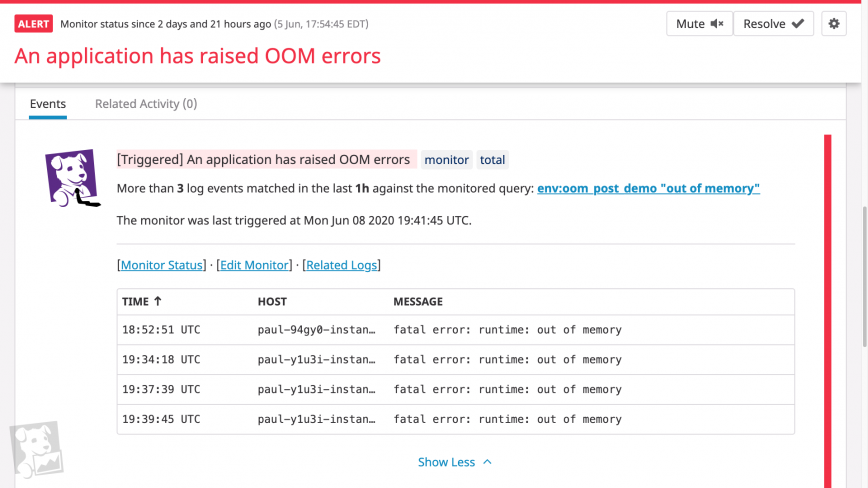
The most direct way to find out about OOM errors is to set alerts on OOM log messages: whenever your system detects a certain number of OOM errors in a particular interval, your monitoring platform can alert your team. But to prevent OOM errors from impacting your system, you’ll want to be notified before OOM errors begin to terminate processes. Here again, knowing the healthy baseline usage of virtual memory and RSS utilization allows you to set alerts when memory utilization approaches unhealthy levels. Ideally, you should be using a monitoring platform that can forecast resource usage and alert your team based on expected trends, and flag anomalies in system metrics automatically.
Investigate OOM errors in a single platform
Since the Linux kernel provides an imprecise view of its own memory usage and relies on page allocation failures to raise OOM errors, you need to monitor a combination of OOM error logs, memory utilization metrics, and memory profiles.
A monitoring service like Datadog unifies all of these sources of data in a single platform, so you get comprehensive visibility into your system’s memory usage—whether at the level of the process or across every host in your environment. To stay on top of memory saturation issues, you can also set up alerts to automatically notify you about OOM logs or projected memory usage. By getting notified when OOM errors are likely, you’ll know which parts of your system you need to investigate to prevent application downtime. If you’re curious about using Datadog to monitor your infrastructure and applications, sign up for a free trial.
About Datadog
Datadog is a SaaS-based monitoring and analytics platform for cloud-scale infrastructure, applications, logs, and more. Datadog delivers complete visibility into the performance of modern applications in one place through its fully unified platform. By reducing the number of tools needed to troubleshoot performance problems, Datadog reduces the time needed to detect and resolve issues. With vendor-backed integrations for 400+ technologies, a world-class enterprise customer base, and focus on ease of use, Datadog is the leading choice for infrastructure and software engineering teams looking to improve cross-team collaboration, accelerate development cycles, and reduce operational and development costs.
Tags: devops, linux, memory, sysadmins

- Forum
- The Ubuntu Forum Community
- Ubuntu Official Flavours Support
- General Help
- [SOLVED] Need help regarding Grub2 error: out of memory
-
 Need help regarding Grub2 error: out of memory
Hello everyone!
I am new to this forum and quite new to linux itself. I was running Ubuntu 18.4.3 LTS alongside windows 10 and Mac OS Mojave with grub2 EFI as default bootloader and the experience was quite nice. Then, I decided to try out the new 19.10 release. So, I backed up the grub config files and installed 19.10. After setting things up, I finally copied over the grub config files (basically, just /boot/grub/themes, /etc/grub.d/40_custom and 00_header files) and ran update-grub. After doing all this, when I tried to boot into the ISOs in the menuentry using loopback (TAILS and systemrescuecd), I always get the «error: out of memory» message during boot. Unlike several cases which I came across while searching for a solution, I am not taken to grub rescue shell. Instead, the system kicks me back to grub menu screen. They were both working fine on 18.4.3 though. Also, this doesn’t happen with operating systems that are already extracted or installed the normal way (eg., Bliss OS). I checked to see which version of grub was installed in synaptic manager and saw both grub-pc and grub EFI listed as installed. Is this normal? I tried to troubleshoot the issue myself but with my limited knowledge, I wasn’t getting anywhere I am perplexed at the moment. Is this a bug associated with 19.10 or am I doing something wrong? Any kind of help is appreciated. Thanks.
My 40_custom file:Code:
#!/bin/sh
exec tail -n +3 $0
# This file provides an easy way to add custom menu entries.  Simply type the
# menu entries you want to add after this comment.  Be careful not to change
# the 'exec tail' line above.

menuentry "Kali Linux - Live"{
    insmod linux
       set isofile="/Boot/Distros/kali-linux-64.iso"
       set bootoptions="findiso=$isofile boot=live username=root hostname=kali"
       loopback loop (hd1,gpt4)$isofile
      linux (loop)/live/vmlinuz $bootoptions
       initrd (loop)/live/initrd.img
}

menuentry "Tails"{
    insmod linux
        set isofile="/Boot/Distros/tails-amd64.iso"
        search --no-floppy -f --set=root $isofile
        loopback loop (hd1,gpt4)$isofile
        linux (loop)/live/vmlinuz boot=live iso-scan/filename=${isofile} findiso=${isofile} apparmor=1 nopersistence noprompt timezone=Etc/UTC block.events_dfl_poll_msecs=1000 splash noautologin module=Tails slab_nomerge slub_debug=FZP mce=0 vsyscall=none page_poison=1 union=aufs  quiet
        initrd (loop)/live/initrd.img
}

menuentry "Bliss OS" {
    insmod part_gpt
    set root='(hd1,gpt6)'
    linux /AndroidOS/kernel root=/dev/ram0 androidboot.selinux=permissive buildvariant=userdebug SRC=/AndroidOS
     initrd /AndroidOS/initrd.img
}

menuentry "SystemRescueCd" {
        load_video
        insmod gzio
        insmod part_gpt
        insmod part_msdos
        insmod ext2
        search --no-floppy --label boot --set=root
        loopback loop (hd1,gpt4)/Boot/Tools/systemrescuecd-6-0-3.iso
        echo   'Loading kernel ...'
        linux  (loop)/sysresccd/boot/x86_64/vmlinuz img_label=boot img_loop=(hd1,gpt4)/Boot/Tools/systemrescuecd-6-0-3.iso archisobasedir=sysresccd copytoram setkmap=us
        echo   'Loading initramfs ...'
        initrd (loop)/sysresccd/boot/x86_64/sysresccd.img
}
-
Re: Need help regarding Grub2 error: out of memory
Grub2 with 19.10 and later has changed from 2.02 to 2.04.
https://launchpad.net/ubuntu/+source/grub2So putting 00_header files back may be the issue. Some change in the script.
I would expect 40_custom & themes to work, but have not tested myself.
-
Re: Need help regarding Grub2 error: out of memory
Thanks for the input oldfred, but unfortunately, that didn’t solve the problem. I tried replacing the 00_header file with the one from the latest grub 2.04 binary but it didn’t help. The issue persists. Heck, I even tried reinstalling the system to no effect. I think I should also mention about the recent issue I’ve been facing with the boot process getting stuck at the oem logo (the bios post screen, before getting the grub menu). Could that be affecting the grub booting process by any chance? I tried resetting the bios, but I don’t think it improved anything. Right now, my only options are to downgrade grub or to switch back to 18 LTS release. Or, is there any other way around this scenario?
-
Re: Need help regarding Grub2 error: out of memory
If getting stuck at UEFI/BIOS that is a separate issue.
But have seen others with grub issues.
I always keep the latest LTS version as my main working install.
My newer test installs boot with that grub currently, or I use a configfile to load the grub menu from a newer test install. but have not regularly booted them.If you do not need the very newest 9 month version of Ubuntu because you have very new hardware, better to stay with latest LTS version.
-
Re: Need help regarding Grub2 error: out of memory
Those are some wise words, oldfred. I’ll keep it in mind for the next time I decide to try out a new release. For the time being, I have decided to go back to 18 LTS which has solved the problem; which makes grub 2.04 the clear culprit. Just a little bit of clarification needed regarding booting into older grub config file. Does this simply involve chainloading the LTS grub config through a 40_custom edit or are there any additional steps involved. BTW, this thread can be marked as solved. Thanks for the help!
-
Re: Need help regarding Grub2 error: out of memory
Grub will automatically find another install & add boot entry. Issue is that when that install updates, you have to also update main working install.
If you use configfile to boot into other install’s grub, then you do not have to make changes.
With Ubuntu, it also creates links to the most current kernel & you can create boot entries to boot the links. So those do not have to change.How to: Create a Customized GRUB2 Screen that is Maintenance Free.- Cavsfan
https://help.ubuntu.com/community/Ma…tomGrub2Screen
https://www.gnu.org/software/grub/ma…-manual-config
https://help.ubuntu.com/community/Grub2/CustomMenus
http://ubuntuforums.org/showthread.php?t=2076205
Configfile & use of labels of partition to boot.
https://ubuntuforums.org/showthread….5#post13787835
-
Re: Need help regarding Grub2 error: out of memory
Thank you. I’ll check out those links. It’s a relief because I do use a separate config file to boot into other grub(s). I am still trying to understand the basics when it comes to linux systems. So, thanks for your patience and help towards this newbie. May you have a fine day!
-
Re: Need help regarding Grub2 error: out of memory
Opened bug report.
If you like add to it as the more that report, the more likely someone will look at it.2.04 Out of memory error
https://bugs.launchpad.net/ubuntu/+s…2/+bug/1851311Installed 2.04 to flash drive and got out of memory error on loopmount.
Installed 2.02 to same flash drive and same boot stanza booted without issue.
Bookmarks
Bookmarks

Posting Permissions
Я уверен, что каждый пользователь в своей жизни хоть раз сталкивался с явлением переполнения оперативной памяти или OOM (Out Of Memory). Все помнят как это происходит: система встаёт раком колом, ядро начинает грузить свопом жёсткий диск на 100%, хорошо если можно хоть курсором двигать, хотя это уже делу не поможет. В этом случае помогает только перезагрузка. А ведь мы же только Libre Office с Chromium на 2 ГБ ОЗУ запустили! Не понятно, почему ядро Linux так плохо справляется с переполнением оперативки, но с этим явлением можно успешно бороться своими силами и при минимуме накладных затрат.
В борьбе с явлением OOM нам поможет Nohang — демон для GNU/Linux, предотвращающий наступление явления переполнения оперативной памяти устройства путём принудительного завершения «прожорливого» процесса.
Принцип работы
Nohang в виде демона постоянно находится в оперативной памяти устройства (потребляет ~10 Мб ОЗУ) и следит за свободным количеством оперативной памяти и своп-раздела. Как только наступает условие явной нехватки ОЗУ и свопа (эти параметры указываются в конфигурационном файле приложения) Nohang принудительно завершает «жирное» приложение, вызвавшее нехватку оперативной памяти устройства.
В качестве примера — скриншот окна монитора ресурсов KDE, на котором отображена работа демона Nohang.
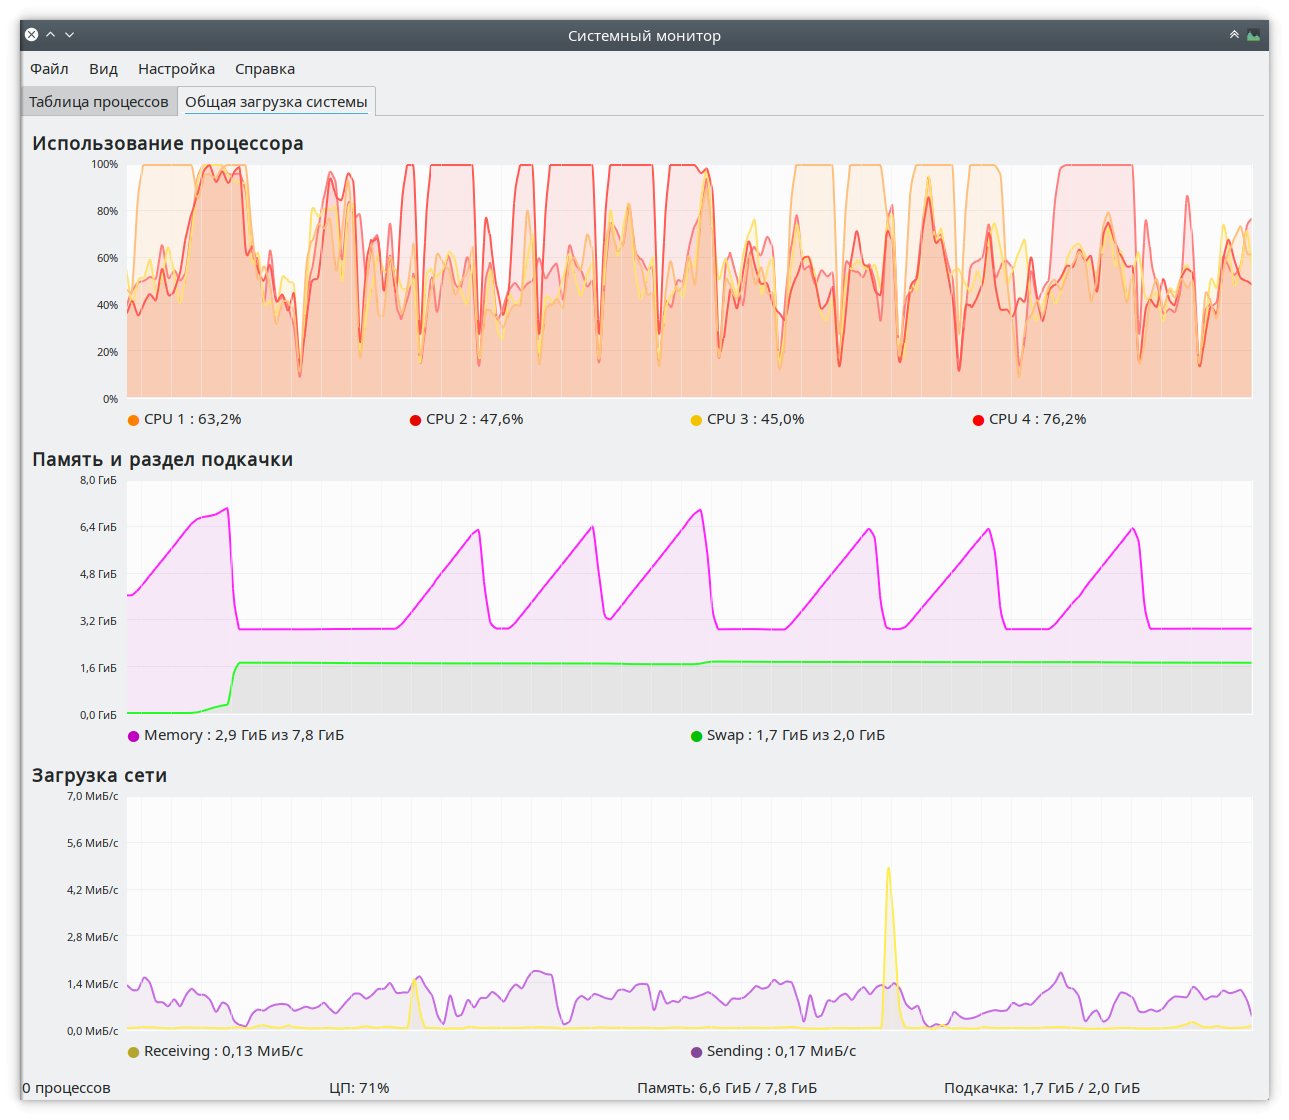
На среднем графике видны факты наступления состояния OOM (переполнения памяти) ОЗУ компьютера, на котором производился эксперимент. Оперативная память накачивалась бесполезными пустыми данными с помощью команды:
Осторожно! Выполнение данной команды может привести (и без установленных утилит вроде Nohang — 100% приведёт) к переполнению оперативной памяти устройства и его зависанию, сколько бы ОЗУ в нём не было установлено!
Как видно, после первой попытки своп заполнился на 100% (в качестве свопа использовался раздел zRam) так же, как и ОЗУ, после чего Nohang прибивает процесс tail и оперативная память снова освобождается, возвращаясь к значению свободного места, которое имела до начала эксперимента. Интересно то, что своп остаётся заполненным практически на 100%, но при следующих попытках исчерпать всю доступную ОЗУ это не приводит к зависанию всей системы, и Nohang снова завершает прожорливый процесс tail, освобождаю ОЗУ. По субъективным ощущениям для пользователя, происходит кратковременное подтормаживание системы на пару секунд, после чего контроль над системой возвращается без каких-либо проблем. В общем — сказка!
Установка Nohang в различных дистрибутивах Linux
Так как не все, как я, используют в своей работе Arch Linux, рассмотрим процесс установки Nohang для всех самых популярных дистрибутивов.
Arch Linux, Manjaro Linux
pacaur -S nohang-git
sudo systemctl enable --now nohang
Debian GNU/Linux, Ubuntu, Linux Mint
Устанавливаем из Github:
git clone https://github.com/hakavlad/nohang.git
cd nohang
sudo make install-desktop
sudo make systemd
Если уведомления на рабочем столе не нужны, заменяем «sudo make install-desktop» на «sudo make install»
Fedora, RHEL, openSUSE
sudo dnf copr enable atim/nohang
sudo dnf install nohang
sudo systemctl enable --now nohang
Настройка
Все параметры Nohang настраиваются в конфигурационном файле
/etc/nohang/nohang.confВ принципе, всё можно оставить как есть, параметры по-умолчанию там оптимальны для любой конфигурации железа.
Включение оповещений на рабочем столе
Чтобы включить всплывающие оповещения о нехватке ОЗУ и завершении приложений Nohang, нужно в файле конфигурации изменить следующие параметры на значение «True» чтобы получилось вот так:
post_action_gui_notifications = True
low_memory_warnings_enabled = True
После чего сохранить изменения в конфигурационном файле и перезапустить Nohang для применения новой конфигурации:
sudo systemctl restart nohang.serviceПроверка
Проверяем состояние демона Nohang:
sudo systemctl status nohang.serviceСтатус работы должен быть указан зелёным цветом:
Active: active (running)Если так — Nohang запущен и работает нормально, можно приступать к экспериментам.
Сохраняем все несохранённые данные во всех приложениях, делаем резервные копии важных данных!
Это я на всякий случай 😏 Что ж, инициируем процесс накачки оперативной памяти пустыми данными:
И смотрим что из этого получится 😀 По идее, вы можете почувтвовать непродолжительный дискомфорт, проявляющийся в зависании системы на несколько секунд, после чего Nohang должен отработать по tail и управление системы вернётся в ваши руки. А точнее, скорее всего так и произойдёт, что можно будет считать успешным достижением поставленной цели.
Так же можно установить более легковесный менеджер OOM — Earlyoom.