I try to send curl request with my correct APP_ID, APP_SECRET etc. to the
https://oauth.vk.com/access_token?client_id=APP_ID&client_secret=APP_SECRET&code=7a6fa4dff77a228eeda56603b8f53806c883f011c40b72630bb50df056f6479e52a&redirect_uri=REDIRECT_URI
I need to get access_token from it, but get a FALSE and curl_error() print next message otherwise:
60: SSL certificate problem: self signed certificate in certificate chain
My code is:
    // create curl resource
    $ch = curl_init();

    // set url
    curl_setopt($ch, CURLOPT_URL, $url);
    //return the transfer as a string
    curl_setopt($ch, CURLOPT_RETURNTRANSFER, 1);

    // $output contains the output string
    $output = curl_exec($ch);
    if ( ! $output) {
        print curl_errno($ch) .': '. curl_error($ch);
    }

    // close curl resource to free up system resources
    curl_close($ch);

    return $output;
When I move manually to the link above, I get access_token well. Why it doesn’t work with curl? Help, please.

James MV
8,46916 gold badges63 silver badges94 bronze badges
asked Jan 17, 2014 at 14:15

Victor BocharskyVictor Bocharsky
11.6k13 gold badges57 silver badges88 bronze badges
3
Answers suggesting to disable CURLOPT_SSL_VERIFYPEER should not be accepted. The question is «Why doesn’t it work with cURL», and as correctly pointed out by Martijn Hols, it is dangerous.
The error is probably caused by not having an up-to-date bundle of CA root certificates. This is typically a text file with a bunch of cryptographic signatures that curl uses to verify a host’s SSL certificate.
You need to make sure that your installation of PHP has one of these files, and that it’s up to date (otherwise download one here: http://curl.haxx.se/docs/caextract.html).
Then set in php.ini:
curl.cainfo = <absolute_path_to> cacert.pem
If you are setting it at runtime, use (where $ch = curl_init();):
curl_setopt ($ch, CURLOPT_CAINFO, dirname(__FILE__)."/cacert.pem");
answered May 10, 2014 at 19:40

14
This workaround is dangerous and not recommended:
curl_setopt($ch, CURLOPT_SSL_VERIFYPEER, false);
It’s not a good idea to disable SSL peer verification. Doing so might expose your requests to MITM attackers.
In fact, you just need an up-to-date CA root certificate bundle. Installing an updated one is as easy as:
-
Downloading up-to-date
cacert.pemfile from cURL website and -
Setting a path to it in your php.ini file, e.g. on Windows:
curl.cainfo=c:phpcacert.pem
That’s it!
Stay safe and secure.

answered Sep 27, 2015 at 20:39

zxcmehranzxcmehran
1,37513 silver badges24 bronze badges
10
If the SSL certificates are not properly installed in your system, you may get this error:
cURL error 60: SSL certificate problem: unable to get local issuer
certificate.
You can solve this issue as follows:
Download a file with the updated list of certificates from https://curl.haxx.se/ca/cacert.pem
Move the downloaded cacert.pem file to some safe location in your system
Update your php.ini file and configure the path to that file:

VPK
3,0121 gold badge27 silver badges35 bronze badges
answered Sep 29, 2017 at 6:59

sunilsunil
391 bronze badge
1
Important: This issue drove me crazy for a couple days and I couldn’t figure out what was going on with my curl & openssl installations. I finally figured out that it was my intermediate certificate (in my case, GoDaddy) which was out of date. I went back to my godaddy SSL admin panel, downloaded the new intermediate certificate, and the issue disappeared.
I’m sure this is the issue for some of you.
Apparently, GoDaddy had changed their intermediate certificate at some point, due to scurity issues, as they now display this warning:
«Please be sure to use the new SHA-2 intermediate certificates included in your downloaded bundle.»
Hope this helps some of you, because I was going nuts and this cleaned up the issue on ALL my servers.

peterh
11.3k17 gold badges84 silver badges103 bronze badges
answered Nov 13, 2014 at 7:25

2
To add a more specific answer, I ran into this when using Guzzle v7, the PHP HTTP request package. Guzzle allows you to bypass this like so:
use GuzzleHttpClient;

$this->client = new Client([
    'verify' => false,
]);
Original source comment: https://github.com/guzzle/guzzle/issues/1490#issuecomment-375667460
answered Feb 4, 2022 at 20:11

Aaron KraussAaron Krauss
7,2261 gold badge14 silver badges19 bronze badges
Error: SSL certificate problem: self signed certificate in certificate
chain
Solution:
curl_setopt($ch, CURLOPT_URL, $url);
curl_setopt($ch, CURLOPT_HTTPHEADER, $headers);
curl_setopt($ch, CURLOPT_SSL_VERIFYHOST, 0);
curl_setopt($ch, CURLOPT_SSL_VERIFYPEER, 0);
curl_setopt($ch, CURLOPT_FAILONERROR, 1);
curl_setopt($ch, CURLOPT_RETURNTRANSFER, 1);
curl_setopt($ch, CURLOPT_POST, 1);
curl_setopt($ch, CURLOPT_POSTFIELDS, $data);
answered May 19, 2020 at 4:35

SundarSundar
2432 silver badges5 bronze badges
1
If you’re using a self-signed certificate on your Bitbucket server, you may receive SSL certificate errors when you try to perform certain actions. This page will help you resolve these errors.
Problem
When trying to perform a clone using instructions stated in Debug logging for Git operations on the client the following error is reported:
$ export GIT_CURL_VERBOSE=1

$ git clone https://username@git.example.com/scm/repository.git
Cloning into 'repository'...
* Couldn't find host git.example.com in the _netrc file; using defaults

* Adding handle: conn: 0x22a7568
* Adding handle: send: 0
* Adding handle: recv: 0
* Curl_addHandleToPipeline: length: 1
* - Conn 0 (0x22a7568) send_pipe: 1, recv_pipe: 0
* About to connect() to git.example.com port 443 (#0)
*   Trying 10.253.136.142...
* Connected to git.example.com (10.253.136.142) port 443 (#0)
* successfully set certificate verify locations:
*   CAfile: C:Program Files (x86)Git/bin/curl-ca-bundle.crt
  CApath: c:/Users/username/Downloads
* SSL certificate problem: self signed certificate in certificate chain
* Closing connection 0
fatal: unable to access 'https://username@git.example.com/scm/repository.git': SSL certificate problem: self signed certificate in certificate chain
Cause
This is caused by git not trusting the certificate provided by your server.
Workaround
One possible workaround is to temporary disable SSL check for your git command in case you only need to perform a one time clone:
GIT_SSL_NO_VERIFY=true git clone https://username@git.example.com/scm/repository.git

or

git remote add origin <gitrepo>
git config --global http.sslVerify false
The workaround is intended to be used for one-time only operations and not to be used frequently. Removing the SSL verification disproves the whole concept of having SSL implemented.
Resolution
Step1: Get a self-signed certificate of the remote server
There is multiple ways of exporting the certificate, Either from the Browser or using the OpenSSL command
Get Certificate using OpenSSL
Get Certificate using OpenSSL
$ echo | openssl s_client -servername NAME -connect HOST:PORT |
  sed -ne '/-BEGIN CERTIFICATE-/,/-END CERTIFICATE-/p' > certificate.pem
Get Certificate using the Web browser
Export Certificate in MAC
Trust Certificate in your browser
To trust a self-signed certificate, you need to add it to your Keychain.
The easiest way to do that is to open the site in question in Safari, upon which you should get this dialog box:
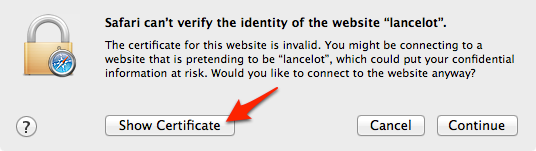
Click ‘Show Certificate’ to reveal the full details:
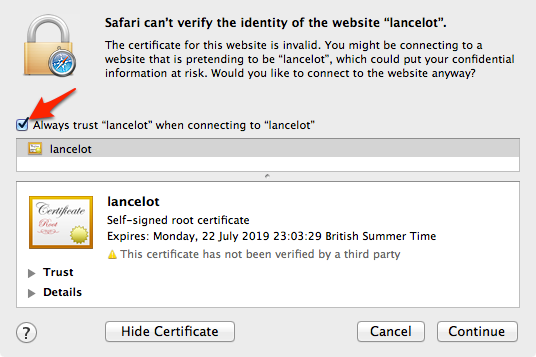
Export Certificate in .pem format
Git doesn’t use the Mac OS X keychain to resolve this, so you need to trust the certificate explicitly.
- If you haven’t done so already, follow the steps in ‘Trust certificate in your browser, above
- Open Applications > Keychain Access and select ‘Certificates’ in the lower-left pane
- Type the website into the Search field in the top-right
- Select the certificate entry for the website, then in the menu click File > Export Items
- In the Save dialog, change ‘File Format’ to ‘Privacy Enhanced Mail (.pem)’ and save the file somewhere on your drive
Export Certificate From Firefox
- Access the URL of the remote server
- Click the Open padlock in the address bar.

- Click the arrow beside OpenConnection Secure.

- Click More Information. The OpenPage Info dialog box opens.

- Click View Certificate.
- The Certificate page opens.
- Scroll down to the Miscellaneous section.
- In the Download row, click the PEM (cert) link.
- In the dialog box that opens, click OK to save the certificate file to a known location.
- Navigate to the location for saving the file, and then click Save.
Step 2: Configure Git to trust the Certificate
For MAC/Linux:
Once the certificate is saved on the client you can instruct your git client to use it to trust the remote repository by updating the local git config:
# Initial clone
GIT_SSL_CAINFO=/path/to/certificate.pem
git clone https://username@git.example.com/scm/repository.git

# Ensure all future interactions with origin remote also work
cd repository
git config http.sslCAInfo /path/to/certificate.pem
For Windows Client:
Step 1: Import the certificate into the window trust store
Import a signed certificate into the local machine certificate store
- Enter Start | Run | MMC.
- Click File | Add/Remove Snap-in.

- In the Add or Remove Snap-ins window, select Certificates and click Add.

- Select the Computer account radio button when prompted and click Next

- Select Local computer (selected by default) and click Finish.

- Back in the Add or Remove Snap-ins window, click OK.

- In the MMC main console, click on the plus (+) symbol to expand the Certificate snap-in.
- To import the CA certificate, navigate to Trusted Root Certification Authorities | Certificates pane.

- Right-click within the Certificates panel and click All Tasks | Import to start the Certificate Import wizard.


- On successfully importing the CA certificate the wizard will bring you back to the MMC main console.

- Close the MMC console.
Step 2: Configure git to use the certificate in the windows Trust store
When using Windows, the problem resides that git by default uses the «Linux» crypto backend. Starting with Git for Windows 2.14, you can configure Git to use SChannel, the built-in Windows networking layer as the crypto backend. To do that, just run the following command in the GIT client:
git config --global http.sslbackend schannelThis means that it will use the Windows certificate storage mechanism and you don’t need to explicitly configure the curl CA storage (http.sslCAInfo) mechanism. Once you have updated the git config, Git will use the Certificate in the Windows certificate store and should not require http.sslCAInfo setting.
openssl s_client  -connect www.github.com:443
CONNECTED(000001E4)
depth=1 O = AO Kaspersky Lab, CN = Kaspersky Anti-Virus Personal Root Certificate
verify error:num=19:self signed certificate in certificate chain
---
Certificate chain
 0 s:/businessCategory=Private Organization/jurisdictionC=US/jurisdictionST=Delaware/serialNumber=5157550/C=US/ST=California/L=San Francisco/O=GitHub, Inc./CN=github.com
   i:/O=AO Kaspersky Lab/CN=Kaspersky Anti-Virus Personal Root Certificate
 1 s:/O=AO Kaspersky Lab/CN=Kaspersky Anti-Virus Personal Root Certificate
   i:/O=AO Kaspersky Lab/CN=Kaspersky Anti-Virus Personal Root Certificate
---
Server certificate
-----BEGIN CERTIFICATE-----
….
-----END CERTIFICATE-----
subject=/businessCategory=Private Organization/jurisdictionC=US/jurisdictionST=Delaware/serialNumber=5157550/C=US/ST=California/L=San Francisco/O=GitHub, Inc./CN=github.com
issuer=/O=AO Kaspersky Lab/CN=Kaspersky Anti-Virus Personal Root Certificate
---
No client certificate CA names sent
Peer signing digest: SHA512
Server Temp Key: ECDH, P-256, 256 bits
---
SSL handshake has read 2418 bytes and written 434 bytes
---
New, TLSv1/SSLv3, Cipher is ECDHE-RSA-AES256-GCM-SHA384
Server public key is 2048 bit
Secure Renegotiation IS supported
Compression: NONE
Expansion: NONE
No ALPN negotiated
SSL-Session:
    Protocol  : TLSv1.2
    Cipher    : ECDHE-RSA-AES256-GCM-SHA384
    Session-ID: A1BCEE841D4DBF172402BAF63BC9A80D560ED0FBC8F66B89E692206D3613FD7E
    Session-ID-ctx:
    Master-Key: ************************************************************************
    Key-Arg   : None
    PSK identity: None
    PSK identity hint: None
    SRP username: None
    Start Time: 1527649383
    Timeout   : 300 (sec)
    Verify return code: 19 (self signed certificate in certificate chain)
---
closed`
by Vlad Turiceanu
Passionate about technology, Windows, and everything that has a power button, he spent most of his time developing new skills and learning more about the tech world. Coming… read more
Updated on January 17, 2023
- Since npm stopped automatically accepting self-signed certificates, users have started to report errors while trying to publish some packages in certain applications.
- The error can be fixed, usually, by upgrading the package manager or use the known registrars.

XINSTALL BY CLICKING THE DOWNLOAD FILE
This software will repair common computer errors, protect you from file loss, malware, hardware failure and optimize your PC for maximum performance. Fix PC issues and remove viruses now in 3 easy steps:
- Download Restoro PC Repair Tool that comes with Patented Technologies (patent available here).
- Click Start Scan to find Windows issues that could be causing PC problems.
- Click Repair All to fix issues affecting your computer’s security and performance
- Restoro has been downloaded by 0 readers this month.
For some time now, developers encountered a SELF_SIGNED_CERT_IN_CHAIN error during installing and publishing packages in certain applications and developer tools such as Node.js, npm, or Git.
Until a few years ago, when npm for instance announced that they would no longer support self-signed certificates.
This means that the certificate verification process was no longer automatic. So developers now have to set up their application to see the self-signed certificates.
How do I fix self-signed certificate in the certificate chain?

Depending on the tool you’re using, there are a few recommendations. Some are risky, some are safe. One thing is clear, though: you should not attempt to disable the certification verification process altogether.
For Node.js
You can insert an environment variable to allow untrusted certificates using the following command at the beginning of the code:
process.env['NODE_TLS_REJECT_UNAUTHORIZED'] = 0;This is risky and it’s not recommended to be used in production. Alternatively, use npm config set strict-ssl=false if you have to do this for many applications and you want to save repeating the process.
Users also suggest upgrading your version of Node, to fixes any existing bugs and vulnerabilities.
For npm
The recommended solution is, again, to upgrade your version of npm running one of the following:
npm install npm -g --ca=null
npm update npm -g
Or, tell your current version of npm to use known registrars, and after installing, stop using them:
npm config set ca ""
npm install npm -g
npm config delete ca
Some users mentioned that they only switched the registry URL from https to http:
npm config set registry="http://registry.npmjs.org/"We hope that one of these suggestions helped you fix the problem. Should you have any recommendations, please use the comments section below.