Learn how to quickly resolve scratch disk full error in Photoshop.
If you encounter a ‘Scratch disk full’ error, it often means that your hard drive (or drives) used as scratch disk is (are) running out of storage space required to perform a task.
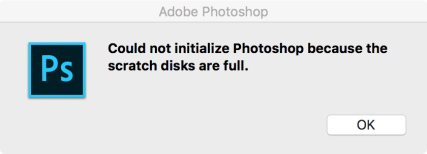
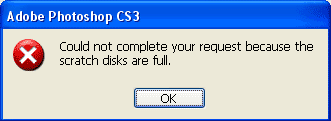
Issue: ‘scratch disks are full’ error
Solution
To troubleshoot scratch disk full errors, do one or more actions listed below:
Free up additional disk space
It is recommended to have minimum 20 GB of free space on your OS hard drive while working with Photoshop. Additional free space may be required based on the file type you’re working with.
Free up additional hard drive space by deleting unnecessary files from the scratch disk, or by moving your files off the scratch disk to another storage location.
For example, if your assigned scratch disk on your Windows machine is drive C:, you can simply clean up and delete the files you no longer need. You can also move your files to a new location on your machine, let’s say drive D:. This will clear some space on your drive C: and you can continue using it as your scratch disk.
Similarly, if your assigned scratch disk on your macOS machine is Macintosh HD, you can simply clean up and delete the files you no longer need. You can also move your files to an external drive, if required.
Specify appropriate drives for scratch disk
By default, Photoshop uses your internal OS drive as the scratch disk. If you have more than one drive or partition, make sure to select the fastest drives with maximum free space as your scratch disk(s). You can also resolve a ‘scratch disk full’ condition by selecting additional drives for use as scratch disks.
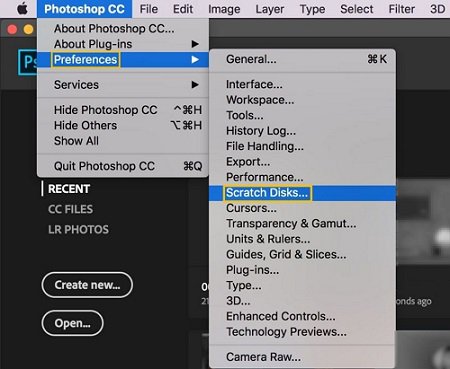
Hold down the Cmd + Option keys (macOS) or Ctrl + Alt keys (Windows) during app launch and set a new scratch disk for your system under the Scratch Disk Preferences dialog that opens.
Supported drive formats for Scratch Disks
- macOS: macOS extended, APFS
- Windows: NTFS, exFAT, FAT32
Set correct units while creating or resizing your document
Sometimes you might get the ‘scratch disk full’ error due to discrepancies in the document units. To avoid such instances, set correct units while creating or resizing your document Also, check your unit settings while you’re cropping your documents or adjusting the canvas size.
Optimize the space Photoshop uses
- Disable auto-recovery saving: You can reduce the size of Photoshop’s temporary file (scratch) at the risk of having no auto-recovery by disabling the ‘Automatically Save Recovery Information’ option: Edit (Win) / Photoshop (Mac) > Preferences > File Handling > Automatically Save Recovery Information Every [N Minutes].
- Limit history states: Photoshop can save up to 1,000 history states; the default number is 50. To reduce that number, go to the Performance preference dialog. In the History & Cache section, set the the number of History States to a lower value.
To learn more about how to fine-tune Photoshop features for optimized performance, see Optimize Photoshop Performance.
Reset Photoshop preferences
On rare occasions when Photoshop or the system crashes, Photoshop’s preference file can get corrupted and this can affect Photoshop’s handling of scratch disks. Resetting Photoshop’s preferences and then reconfiguring the scratch disk preferences may help resolve ‘scratch disk full’ errors.
To learn more, see Reset preferences in Photoshop.
![]()

Данная ошибка была описана и разобрана в предыдущей статье (из-за чего она возникает и способы её устранения). В данной статье мы разберем, как в корне (навсегда) избавиться от этой ошибки. Итак, начнем, запускаем фотошоп, если при запуске ошибка — чистим локальный диск. Затем выбираем “Edit (Редактирование)>>>Preferences (Установки)>>>General…(Основные…)” или (Ctrl+K).

В появившемся окне переходим во вкладку “Performance (Выполнение)” и дополнительно ставим галочку (в колонке “Active?”(Активный?)) напротив одного или нескольких локальных дисков, для того, чтобы фотошоп для временных файлов использовал не только место локального диска (на котором установлена программа), но и другие. Колонка “Free Space (Свободное место)” проинформирует Вас о свободном пространстве на каждом из локальных дисков.

В случае если у Вас все локальные диски забиты под завязку и это не помогло, единственный выход — освобождать место на локальных дисках. По крайней мере не на системном диске это сделать проще и безопаснее, нежели на нем.
Скажи СПАСИБО — этим ТЫ отблагодаришь автора!
Ошибка «царапины на дисках заполнены» в Photoshop обычно происходит, когда на вашем компьютере недостаточно места для хранения временных файлов Photoshop. Когда появляется эта ошибка, Photoshop либо вылетает, либо не загружается вообще.
Есть несколько вещей, которые вы можете сделать, чтобы исправить эту ошибку в Photoshop. Это включает в себя разрешение Photoshop использовать больше оперативной памяти и удаление временных файлов, чтобы восстановить пространство памяти.
Свободное пространство на вашем компьютере
Когда вышеупомянутая ошибка происходит, первое, что нужно сделать, это очистить все ненужные файлы с вашего компьютера. Это освободит пространство памяти, которое Photoshop сможет использовать для хранения временных файлов.
Проверьте свое хранилище в Windows
- Откройте приложение «Настройки».
- Нажмите Система на следующем экране.
- Выберите «Хранилище», чтобы просмотреть сведения о хранилище вашего компьютера.

- Вы увидите, что занимает объем памяти. Это поможет вам решить, что удалять.

Проверьте свое хранилище на Mac
- Нажмите логотип Apple в верхнем левом углу и выберите «Об этом Mac».
- Нажмите Storage вверху и выберите Manage.
- Он покажет, какой контент использует какой объем пространства, а также предложит рекомендации по освобождению памяти.
Photoshop создает и хранит временные файлы в вашем хранилище. Эти файлы можно безопасно удалить после закрытия Photoshop. Это поможет вам восстановить часть памяти.
- Одновременно нажмите клавиши Windows + R, чтобы открыть «Выполнить», введите в него следующее и нажмите Enter.% Temp%
- Когда временная папка откроется, найдите файлы с именем Photoshop или PST.
- Щелкните правой кнопкой мыши эти файлы и выберите «Удалить».
- Щелкните правой кнопкой мыши Корзину на рабочем столе и выберите «Очистить корзину».
- На Mac используйте Spotlight для поиска временных файлов и их удаления.
Поменяйте рабочий диск при запуске
Если вы назначили несколько чистых дисков в Photoshop, вы можете переключаться между ними при запуске Photoshop. Это решение прекрасно работает, когда Photoshop не открывается из-за ошибки «чистые диски заполнены».
- В Windows запустите Photoshop, одновременно нажмите и удерживайте клавиши Ctrl и Alt.
- На Mac откройте Photoshop и одновременно нажмите и удерживайте клавиши «Command» и «Option».
- Выберите новый рабочий диск из выпадающего меню «Пуск» и нажмите «ОК».
Измените скретч-диск в фотошопе
По умолчанию Photoshop использует только диск операционной системы в качестве рабочего диска. Если у вас есть несколько дисков или разделов, вы можете заставить их использовать Photoshop и избежать ошибки «чистые диски заполнены».
- Запустите Photoshop на вашем компьютере.
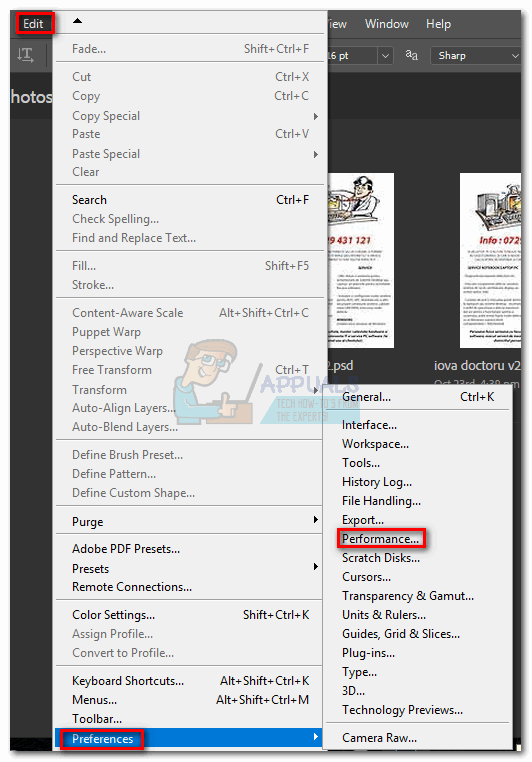
- Нажмите меню Photoshop вверху, выберите «Настройки» и выберите «Производительность».

- Включите и отключите чистые диски в разделе Scratch Disks.
Отключить функцию автоматического восстановления в Photoshop
Photoshop автоматически сохраняет ваши файлы при работе с ними, но это увеличивает объем памяти, который он использует на вашем компьютере. Если автоматическое восстановление, сохранение он вам не очень полезен, вы можете отключить его, чтобы сэкономить место на своих рабочих дисках.
- Запустите Photoshop на своей машине.
- Нажмите Photoshop вверху, выберите «Настройки» и выберите «Обработка файлов».
- Снимите флажок «Автоматически сохранять информацию для восстановления каждые.
Пусть Photoshop использует больше оперативной памяти
Один из способов исправить проблемы с рабочим диском в Photoshop — разрешить Photoshop использовать больше оперативной памяти. Это позволит ему хранить больше временных файлов в оперативной памяти на рабочих дисках.
- Откройте Photoshop на вашем компьютере.
- Нажмите опцию Photoshop вверху, выберите «Настройки» и выберите «Производительность».

- В правой части окна вы увидите поле с надписью «Использовать Photoshop». В поле рядом с этим параметром введите объем оперативной памяти, который вы хотите использовать в Photoshop. Затем нажмите ОК.
Удалить файлы кеша Photoshop
Каждый раз, когда вы вносите изменения в изображение в Photoshop, старая неизмененная версия вашего изображения сохраняется в виде файла кэша на вашем компьютере. Эти файлы со временем растут и начинают занимать слишком много места в памяти.
Вы можете очистить эти файлы кэша, чтобы, возможно, исправить ошибку «чистых дисков», но за счет невозможности отменить изменения для вашего образа.
- Получите доступ к Photoshop на своем компьютере.
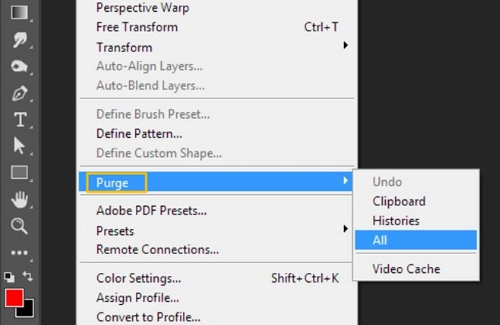
- Нажмите меню «Редактировать» вверху, выберите «Очистить» и выберите «Все». Это приведет к удалению всех файлов кэша Photoshop.
Сбросить значения для инструмента Crop
Инструмент обрезки в Photoshop позволяет вам обрезать ваши фотографии по указанному вами размеру, Если вы укажете неправильные единицы при указании размера, скажем, выбрав сантиметры вместо пикселей, вы в конечном итоге сделаете ваше изображение очень большим.
Этот образ занимает большой объем памяти, что приводит к ошибке «чистые диски переполнены» в Photoshop.
- Откройте инструмент кадрирования в Photoshop и удалите все значения из указанных полей.
- Когда вы вводите какие-либо значения, всегда используйте пиксели в качестве единицы измерения.
Дефрагментируйте свой жесткий диск
Это стоит дефрагментация вашего рабочего диска в Windows чтобы получить некоторое пространство памяти для использования Photoshop. Это должно помочь вам избавиться от ошибки скретч-дисков в приложении.
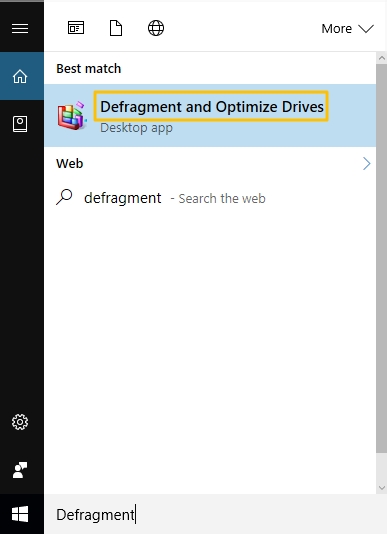
- Найдите Defrag в меню «Пуск» и нажмите «Дефрагментировать и оптимизировать диски».
- Вы увидите разделы жесткого диска, перечисленные на следующем экране. Выберите тот, который вы используете в качестве рабочего диска, и нажмите кнопку «Оптимизировать».
Сброс настроек Photoshop
Если вы внесли множество изменений в настройки Photoshop, одна или несколько из этих опций могут быть причиной проблемы. Сброс настроек Photoshop к настройкам по умолчанию должен исправить это для вас.
- Выйдите из Photoshop на вашем компьютере.
- Нажмите и удерживайте Shift + Ctrl + Alt (Windows) или Shift + Command + Option (Mac) и запустите Photoshop.
- Вы получите запрос на удаление файла настроек Photoshop. Нажмите Да, чтобы удалить файлы.
Как вы исправили ошибку «царапины на дисках заполнены» в Photoshop? Дайте нам и нашим читателям знать в комментариях ниже.
Photoshop’s “scratch disks are full” problem commonly arises when your computer’s memory space is insufficient to hold Photoshop’s temporary files. Photoshop either fails or doesn’t load at all when this error occurs.
Clearing “scratch disks are full” on your Mac isn’t a problem you’ll encounter often, but people who work with tools like Photoshop should know how to deal with it if it arises. This issue frequently appears in intensive programs like Photoshop, Premiere Pro, and Final Cut Pro, which can be confusing.
")
I will lead you on how to solve the “scratch disks are full” error on your Mac and why Photoshop scratch disks are full. How to better manage memory to lessen or eliminate the frequency with which these pop-ups appear.
Virtual memory, often known as cache memory, is required when running Photoshop or Final Cut Pro programs. This is where you’ll find and access temporary project files.
When there isn’t enough RAM to perform a task, Photoshop uses scratch disk space as virtual memory. Photoshop allows you to assign multiple scratch disks, giving it additional room to work with.
Photoshop covertly eats up your hard disk space when you work with large photos and many layers by swiftly building a mountain of project temp files. It’s worth citing that when you first install Photoshop, you’ll have the option of assigning the scratch CDs to whichever drive you like.
Why Currently Selected Scratch Disks Are Full Error Occur?
The most common cause of the “scratch disks are full” issue is temporary files. They frequently congregate in your drive and leave no trace of their existence.
If you frequently force-quit Photoshop, you may have many temporary files on your computer. Photoshop maintains such files on your machine since it can’t adequately shut all projects once you exit it so quickly.
Here are some more possible causes for the message mentioned above:
- There isn’t enough room in the drive to store the scratch disk.
- The disk partition that Photoshop is using is full.
- Photoshop could only use a limited amount of RAM.
What Do You Do When Scratch Disks Are Full?
Don’t panic when you see the message ‘Photoshop scratch disks are full,’ don’t panic. Mac machines have no way of resolving the problem. It won’t automatically free up disk space or build a separate partition to avoid the problem.
You’ll need to learn how to clear a scratch disk on your own.
How Much Scratch Disk Space Do I Need?
For all users, there is no standard scratch disk space. The amount of scratch space you’ll require is determined by how much you alter documents in Photoshop and how many temporary files you keep in memory.
For Photoshop, you’ll need at least 1.5 GB of scratch disk space (with default patterns, preferences, brushes, etc.). You may additionally require disk space equal to twice the combined size of all the files you’ve opened simultaneously.
If you’re a ‘heavy’ Photoshop user, you’ll probably require a lot more storage space than the original file sizes. Having dozens of brushes or patterns loaded increases the amount of scratch space required for your Photoshop app to launch.
Best Methods To Fix Scratch Disks Are Full Error In Adobe Photoshop (Windows And Mac)
- Change The Scratch Disk On Startup
- Free-Up Memory Space On Computer
- Delete Photoshop Temporary Files
- Remove Photoshop Cache Files
- Reset Values For Crop Tool
- Change The Scratch Disk In Photoshop
- Disable The Auto Recovery In Photoshop
- Let Photoshop Use Ram
- Defrag Hard Drive
- Reset Adobe Photoshop Preferences
1. Change The Scratch Disk On Startup
If the disk is nearly full, move the directory to one with more space. When you run Photoshop, press Command + Option to modify the Scratch Disk location.
Changing your scratch disk to another drive in your system may be a smart option. If you don’t have another drive, you can buy one, with a solid-state drive (SSD) being the best option for Mac OS X scratch disks.
To replace your scratch disk in Photoshop, follow these steps:
- Select Photoshop from the drop-down option.
- Scratch Disk can be found under Preferences.

- Select or delete a drive as the scratch disk by checking or unchecking the checkbox.

- Click the OK button.
- Restart Photoshop if necessary.
2. Free-Up Memory Space On Computer
Examine the drive’ to see if you don’t need anything. There usually is, so go ahead and delete your old files to make room.
You can also easily copy files to external devices, DVDs, or cloud storage services such as Dropbox and iCloud. Apple has added additional tools to “assist” users in managing storage space in macOS Sierra.
On Windows, Check Your Storage.
- Open the Settings app on your device.
- On the next screen, select System.

- To see the storage details on your computer, go to Storage.
- You’ll be able to monitor what’s using up how much RAM. This will aid you in determining what to eliminate.
Check Your Mac’s Storage
- Choose About This Mac from the Apple logo in the top-left corner.
- At the top of the page, choose Storage and then Manage.
- It’ll show you what information takes up how much space and make suggestions for freeing up memory.
3. Delete Photoshop Temporary Files
Photoshop generates and saves temporary files on your computer’s hard drive. After you’ve closed Photoshop, you can safely remove these files. It permits you to reclaim some memory space.
- To launch Run, hit the Windows + R keys together, then type %temp% the following into it and press Enter.

- Locate the files called Photoshop or PST when the temporary folder opens.
- Select Delete from the context menu when you right-click those files.

- Empty the Recycle Bin on your desktop by right-clicking it and selecting Empty Recycle Bin.
- On a Mac, utilize Spotlight to look for and delete temporary files.
4. Remove Photoshop Cache Files
Photoshop includes a feature that allows you to delete individual Photoshop caches. These troublesome caches can grow and take up a lot of space on your scratch drive if the program doesn’t automatically erase them.
To utilize this feature, open Photoshop on your Mac and open an image:
- Select Edit from the menu bar.
- Hover your cursor over “purge” to see four options appear.
- Undo, Clipboard, Histories, and All are all options. If an item is grayed out, it has been removed from the list.
- To erase all of your caches, pick “all” and select the individual item you wish to delete.
- You’ll be informed that the purge is irreversible, so double-check that you don’t need an earlier version of one of your projects before clicking OK.
5. Reset Values For Crop Tool
Photoshop’s crop tool allows you to crop your photos to a specific size. If you specify the size in the wrong units, such as centimeters instead of pixels, you will end up with an incredibly huge image.
The image takes up a lot of memory, resulting in the “scratch disks are full” error in Photoshop.
- In Photoshop, utilize the crop tool to eliminate any values from the supplied boxes.
- When entering values, whenever possible, use pixels as the unit.
6. Change The Scratch Disk In Photoshop
If your device’s scratch disks are full and the Photoshop 2019 app or older cannot run, you can create a new scratch disk by:
- During the launch on macOS, hold down the Cmd + Option keys.
- During the launch process on Windows, hold down the Ctrl + Alt keys.
Alternatively, you can change the scratch disk settings in Photoshop’s software by following these steps:
- Go to Preferences, then Scratch Disks after starting Photoshop.
- Select Edit, then Preferences, then Scratch Disks on Windows.
- Choose Photoshop, then Preferences, then Scratch Disks on macOS.
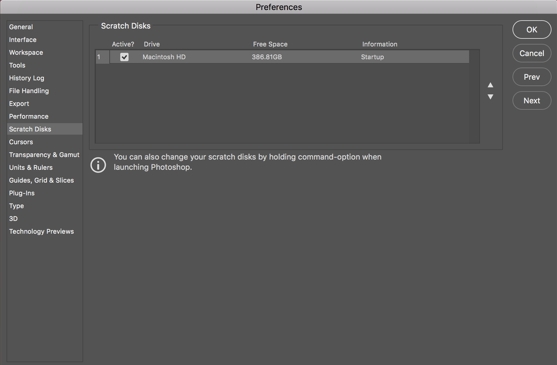
- To disable or enable a scratch disk, deselect or pick the active check box in the Preferences dialogue.
- To modify the scratch disk order, click the arrow buttons.
- To save your changes, click OK.
- Restart Photoshop and see if the error still exists.
7. Disable The Auto Recovery In Photoshop
In most cases, if you exit the Photoshop software unexpectedly, Photoshop will attempt to auto-recover your project. This can result in the Photoshop error “scratch drives are full.”
You can turn off auto-recovery to save memory by reducing the size of temporary files on scratch disks. It’s worth noting that you’ll run the risk of not being able to recover.
In The Windows OS,
- Open the Photoshop application.
- Select Edit then Preferences File Handling, Automatically save recovery information.
- Turn off the procedure.
On A Mac,
- Open the Photoshop application.
- Select File Handling from the Preferences menu in Photoshop, then save recovery information automatically.
8. Let Photoshop Use RAM
Allowing Photoshop to use additional RAM is one technique to resolve the scratch disk are full issues. This will allow it to store more temporary files on your scratch disks’ RAM space.
- On your computer, launch Photoshop.
- At the top of the screen, click Photoshop, Preferences, and Performance.

- A box entitled Let Photoshop Use can be seen on the right-hand side pane.

- Enter the amount of RAM you want Photoshop to use in the box next to this choice. Then press OK.
- It will fix the “Scratch Disks Are Full” error.
9. Defrag Hard Drive
Defragmenting Macs isn’t necessary, and if you have a contemporary Mac with an SSD, defragmenting it can damage it. Macs with SSD drives store files differently than Macs with HDD drives; therefore, defragmenting them can be harmful.
Backing up files is a good idea because there will be occasions when clearing up an app’s cache or files mistakenly delete or destroy files you wish to save. Having a backup plan is like having a safety net.
Located in windows, It’s a good idea to defrag your scratch disk drive in Windows to free up some memory for Photoshop. This should help you resolve the app’s scratch disks problem.
- Defragment and Optimize Drives can be found by searching for Defrag in the Start Menu.

- You’ll get a list of your hard disk partitions on the next screen.

- Click the Optimize button next to the one you use as a scratch disk.
- It will fix the “Scratch Disks Are Full” error.
10. Reset Adobe Photoshop Preferences
Scratch disks are full can occur by an error or a corrupted preferences file in Photoshop. On launch, you can reset the preferences in the same way you can reset the scratch disk drive.
- Hold CTRL+ALT+SHIFT (Windows) or CMD+OPTION+SHIFT (Mac) while Photoshop is starting to reset your preferences.
- This will reset the preferences; if at all feasible, back up your preferences before resetting them.
- If you want to remove the Photoshop settings file, you’ll get a prompt. To delete the files, select Yes.
- Ensure Photoshop has enough RAM to work smoothly and properly configure your scratch disks.
- All Photoshop users should keep an eye on efficiency and know where their scratch disks are situated.
- It will fix the “Scratch Disks Are Full” error.
Conclusion
One of the typical problems encountered while using Photoshop is the “Scratch disks are Full” error. Delete the temporary folders in the drive regularly to avoid such situations in the future. This will ensure that Photoshop has adequate space on the scratch disk to run its applications. All the methods above will help to solve “Scratch Disks Are Full” error.
FAQs
Can I Empty My Scratch Disk?
If you wish to completely remove a scratch drive of past data, you’ll have to locate and vacate the files manually. Look for the file Photoshop Temp, observed by a series of numbers. This file includes all of Photoshop’s temporary data when it starts up. To clear this file, delete it. It will fix the “Scratch Disks Are Full” error.
How Do I Empty My Scratch Disk?
To begin, open Photoshop and select Photoshop from the menu bar. Scratch Disks can be found under Preferences then Scratch Disks. Choose the external drive you want to use as the scratch disk in the Scratch Disk Preferences box, and deselect the built-in hard disk with insufficient storage space. To continue, click OK.
How Do You Make Another Scratch Disk?
Scratch disks are saved on your system drive by default, but you can alter this by going to Edit > Preferences then Scratch Disks, and assigning a new drive or many drives. Scratch space can be assigned to up to four hard drives or SSD drives.
Why Does It Say My Scratch Disks Are Full, But I Have Space?
You get a ‘Scratch disks are full’ error, which means that the hard drive (or drives) you’re using as a scratch disk is running out of capacity. In that case, you could not initialize photoshop because the scratch disks are full.
You may wonder what scratch disk is when you can’t open Photoshop because of the scratch disk error. The error says «*could not initialize photoshop because the scratch disks are full*«.
Also, similar errors such as «could not complete your request because the scratch disks are full«, «could not use the type tool because the scratch disks are full» are also bothering Photoshop users when they are trying to crop an image or make another editing in Photoshop.
In this post, you’ll learn what scratch disk really is and how to fix the Photoshop scratch disk full on Windows and Mac. There are permanent fixes to make the error gone for good.
Content
- Why Is Photoshop Saying My Scratch Disks Are Full?
- Change/Increase Scratch Disks
- Clear your Photoshop cache
- Delete temp files
- Clear disk space
- Defragment hard disk
- Increase the RAM allowed by Photoshop
Why Is Photoshop Saying My Scratch Disks Are Full?
What is a scratch disk? A scratch disk on PC/Mac is the hard drive that Photoshop use as virtual memory to store temporary files when there is not enough RAM for the temp files. When you are opening or working on a huge project in Photoshop, there could be lots of temp files. When there is no room in both the RAM and the scratch disk for the Photoshop temporary files, the «scratch disk full» error is triggered.
Some of you may notice that Photoshop shows scratch disk is full even when there is a lot of free space on your computer. That’s because not all of your free space on a hard drive is assigned as scratch disks for Photoshop.
To fix the Photoshop scratch disk full error on Windows or Mac, there are mainly 2 kinds of solutions: one is to clear scratch disk to free up more space; the other is to assign more scratch disk space for Photoshop. Read on for the specific steps to fix the errors.
1. Change/Increase Scratch Disks
Since the drive that is used as the scratch disk of Photoshop is currently full, you can change the scratch disk settings to allow Photoshop to use more memory space. You can either change the scratch disk to a drive with more space or select multiple drives as scratch disks. Here is what you should do.
If Photoshop is running right now, go to Preferences > Scratch Disk. You will see all the drives that are available on your computer. Select another drive with more space or tick multiple drives for scratch disks. Click OK to save the change.
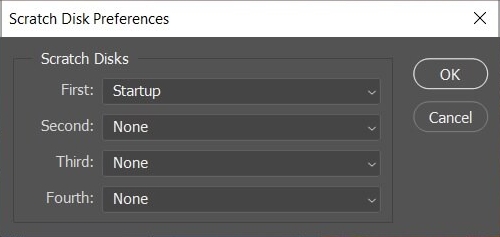
If Photoshop can’t open, start Photoshop and at the same time, hold down CMD + OPTION keys on Mac(CTRL + ALT keys on Windows), which will bring up the following Scratch Disks Preference menu. Select another disk for the First scratch disk or add another drive as the second/third/forth scratch disk. Click OK.
Tips
-
You should not use a removable or network drive for a scratch disk.
-
To ensure the best performance of Photoshop on your computer, you are recommended to select a fast drive as a scratch disk and avoid using the system drive of your Windows or Mac OS.
Now restart Photoshop and the program should be able to initiate without error.
2. Clear your Photoshop cache
Some users found that clearing caches of Photoshop help to fix the scratch disk full error. Photoshop allows you to purge cached data from the Edit menu.
Step 1: On Photoshop, click Edit > Purge.
Step 2: There are 4 types of caches you can clean.
Step 3: Select one of the caches(undo, clipboard, histories, video cache) to clean or click All to remove all caches.
Tip: If a cache item is greyed out, it means that there is no such kind of cache files on your computer.
You should know that after clearing caches of Photoshop, you are unable to restore to the previous version of your project.
If Photoshop can’t open because the scratch disks are full, you can clean up Photoshop cache with a cleanup tool.
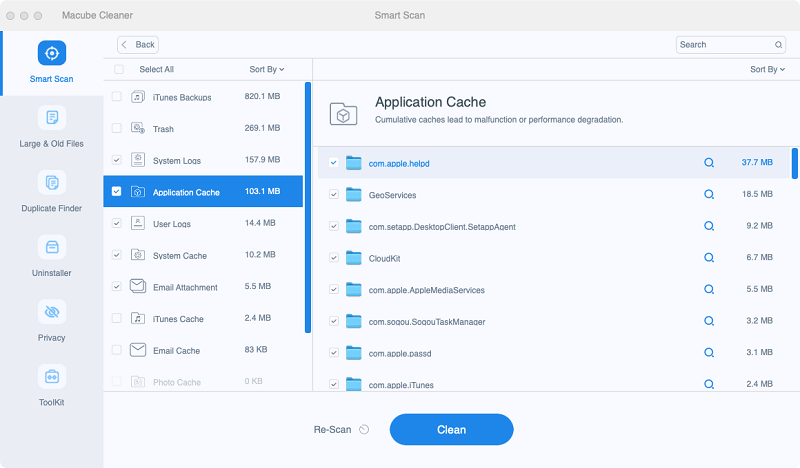
If you are using Photoshop on a Mac, Macube Cleaner (opens new window)can help you clear app caches without opening Photoshop.
-
Run Macube. Click System Junk > Scan. Select App Cache > Photoshop and clean its cache.
3. Delete temp files
Photoshop may create massive temp files on your Windows or Mac, which is the culprit why the scratch disks are full. You can manually delete temporary files of Photoshop to empty the scratch disk.
On Mac
Method 1: Open Spotlight and enter «Photoshop Temp» to search for the temp files in the entire hard drive. The Photoshop temporary files are started with «~PST» or «Photoshop Temp» and ended with the file extension «.tmp».
Method 2: Launch Terminal, enter the command «open /tmp» and hit Enter, which will open the temp folder. Now find the temp files of Photoshop and delete them.
On Windows
You can navigate to the location of temp files on Photoshop in the following path:
-
C:/ > Users > «YourUser» > AppData > Local > Temp.
After the temp files are removed, run Photoshop to check if the scratch disks full error is gone.
4. Clear disk space
If your hard drive has low disk space, it is time for you to clean up the drive to reclaim more free space so that Photoshop can run smoothly without a problem.
If you have a Mac computer, Macube Cleaner can help you clear disk space (opens new window)by cleaning the following files.
-
System caches, logs, user logs;
-
Duplicate photos and files;
-
Large and old files;
-
iTunes junk files;
-
Unneeded apps and app data; …
You can restore lots of free space on Mac by simply clicking the Clean button on Macube.
Once there is enough free space on your computer, scratch disks should have enough room to run Photoshop without errors.
5. Defragment hard disk
Some users fix the scratch disks full error by defragmenting the hard disk. If Photoshop is telling the scratch disks are full while there is still enough free space on your computer, you can defragment the hard disk to get contiguous, unfragmented space for Photoshop. However, you don’t need to defragment your computer if the computer is using an SSD. Only the mechanical drive needs to be defragmented.
Windows provides a built-in disk optimization tool — Defragment and Optimize Drives for you to easily defragment your drives. You usually don’t need to defrag a Mac as most of them run on SSD drive.
6. Increase the RAM allowed by Photoshop
After you have fixed the scratch disks full error in Photoshop, you can stop the error from happening again by assigning more RAM for the program. Here is how to do that.
Step 1: Click Edit > Preferences > Performance.
Step 2: Move the sliders to increase the RAM memory that you let Photoshop use, although the RAM the Photoshop can use should not be over 80%.
One more tip: Fix «scratch disk full» error when cropping an image
If you get the «scratch disk full» error when cropping an image in Photoshop, it is likely that you have entered the wrong values for the size and resolution, for example, enter 1080 x 1920 when the unit is set as inches, which force Photoshop to create a file that is too large in size, thus the «scratch disk full» error is triggered.
Photoshop requires massive storage space to run smoothly. To ensure the best performance of Photoshop, clean your Mac (opens new window)or PC on a regular basis is a good way to go.
Подготовили: Евгений Рыжков и Егор Скорняков
Дата публикации: 17.09.2010
Веб сайты становятся все красивее, все сложнее, а это зачастую ведет к более объемным psd макетам. Сейчас мало кого удивишь макетом весом в 100 с лишним мегабайт. Помимо повышенного требования к ресурсам твоего компа, при открытии подобного макета ты можешь столкнуться вот с таким сообщением:
Что это значит
Photoshop использует жесткий диск для хранения временных файлов, если не хватает для этих целей оперативной. Данная ошибка возникает когда этого самого места на жестком диске недостаточно.
Что делать
Первое, что стоит сделать — это проверить достаточно ли места на диске, который использует Фотошоп для хранения временных файлов (по умолчанию это диск C). Если места мало (меньше 2 Гб — это уже мало) надо чистить диск. Иногда бывает достаточно почистить временные файлы системы (C:Documents and Settings[User]Local SettingsTemp).
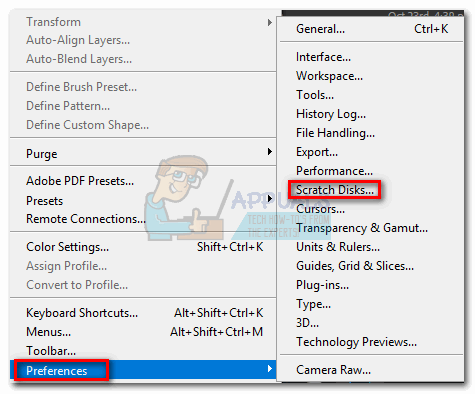
Если первого пункта оказалось недостаточно, изменим настройки хранения временных файлов Photoshop: идем Edit -> Preferences -> General (Ctrl + K) -> Perfomance:
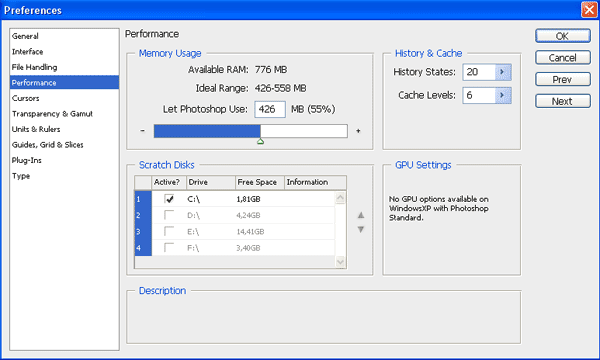
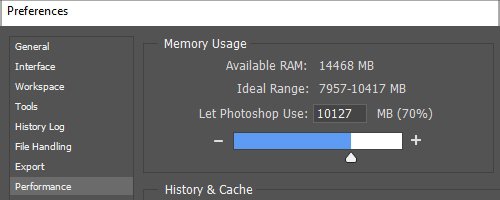
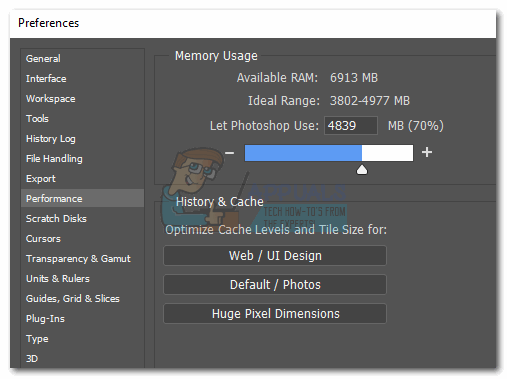
Тут интересен блок Memory Usage (Используемая память):
- Available RAM — доступная фотошопу оперативная память. Чем больше оперативки, тем большие макеты ты сможешь загружать и фотошоп будет быстрее работать (да и не только фотошоп). Если вставишь еще одну RAM планочку, скорей всего проблема решиться;
- Ideal Range — идеальный диапазон с точки зрения самого Photoshop для его работы;
- Let Photoshop Use — насильственно задаем сколько Фотошопу использовать оперативной памяти. Чем больше значение, тем лучше он быстрее он работает, но при этом все остальное ПО будет страдать. Увеличение этого параметра иногда помогает избавится от ошибки переполненного диска.
Scratch Disks: самый действенный способ — это указать диск, где больше всего свободного места, который будет использовать Фотошоп для хранения временных файлов.
Если не помогло вышепредложенное
Тогда еще варианты:
- сделать дефрагментацию диска;
- попросить дизайнера уменьшить количество слоев (объем psd-файла);
- докупить оперативной памяти;
- увеличить объем жесткого диска.
Материалы
- Настройка Photoshop
Troubleshooting steps and fast fixes to free up space for photo editing
Updated on January 22, 2022
Sometimes when you try to perform an action in Adobe Photoshop, you might get an error message that reads, «Could not complete your request because the scratch disk is full.»
To prevent the Photoshop scratch disk is full error, you need to change how Photoshop uses your computer’s memory.
Information in this article applies to Adobe Photoshop CC for Windows and macOS.
What Causes the Photoshop Scratch Disk Is Full Error?
The Photoshop scratch disk refers to your hard drive. Photoshop uses the hard drive as temporary swap space, or virtual memory, when your system doesn’t have enough RAM to perform an operation. If you only have one hard drive or partition in your computer, the scratch disk is the drive where the operating system is installed (for example, the C: drive on a Windows system).
When that drive runs out of space, it prevents Photoshop from working properly. For example, if Photoshop crashes in the middle of an editing session, this improper shutdown may leave large temporary files on the scratch disk. Consequently, Photoshop may not be able to reopen, so you must perform some troubleshooting on the hard drive.
For more on how Photoshop CC uses RAM and scratch disk space, search for assigning scratch disks in the online help for your version of Photoshop.
How to Fix the Photoshop Scratch Disk Full Error
Follow these steps in the order presented to troubleshoot the scratch disk is full error in Photoshop:
-
Free up disk space. Clear some space on the Mac or Windows drive that is defined as the scratch disk in Photoshop Preferences. For best results, use a free disk space analyzer tool like Disk Cleanup.
-
Delete Photoshop temporary files. You can safely delete temporary files associated with Photoshop to free up scratch disk space. Photoshop temp files are typically named ~PST####.tmp on Windows and Temp#### on Mac (where #### is a series of numbers).
-
Defragment the hard disk. It’s possible to get the scratch disk is full error when the scratch disk drive has free space. This is because Photoshop requires contiguous, unfragmented free space on the scratch disk drive. If you get the error message when the scratch disk drive shows a good amount of free space, run a disk defragmentation utility.
-
Clear the Photoshop cache. If you can open Photoshop, delete temporary files from within the program by going to Edit > Purge > All (on Windows) or Photoshop CC > Purge > All (on Mac).
Purging the cache prevents you from undoing recent changes you made to images.
-
Clear Crop tool values. If you get the error when cropping an image in Photoshop, it could be because the values in the options bar for the Crop tool are in the wrong units. For example, entering dimensions of 1200×1600 when the units are set to inches instead of pixels creates a large file that could trigger the scratch disk is full message. To prevent this problem, select Clear in the options bar after you select the Crop tool.
-
Change the Photoshop performance settings. Go to Edit > Preferences > Performance (on Windows) or Photoshop CC > Preferences > Performance (on Mac), then adjust the sliders under Memory Usage to increase the amount of RAM that Photoshop is allowed to utilize.
Setting the memory usage above 80% can cause the computer to run slow.
-
Change or add additional scratch disks. If possible, create a new hard drive partition for the Photoshop scratch disk. Although Photoshop functions with a single scratch disk on the system partition, you can improve performance by setting the scratch disk to be the fastest drive in your system.
To change the scratch disk location and establish additional scratch disks from Photoshop Preferences:
- On Windows, select Edit > Preferences > Scratch Disks, or press Ctrl+Alt.
- On macOS, select Photoshop CC > Preferences > Scratch Disks, or press Command+Option.
If your computer has a fast solid-state disk drive (SSD), use the SSD as the scratch disk. Don’t use the same hard disk drive (HDD) where the operating system is installed or where the files you edit are stored. Also, don’t use a network or removable drive.
FAQ
-
How do I remove a background from a photo in Photoshop?
To remove the background, first, unlock the primary layer of the image. Use the Magic Wand, Lasso, or Quick Mask tool to select the background > Delete. Or use Magic Eraser to remove large sections of the background with a similar color or use Background Eraser to manually remove the background.
-
How do I resize an image in Photoshop?
The easiest way to resize an image is to go to Image > Image Size and enter your desired dimensions. Or select the image layer then press Ctrl/Command+T and drag the handles to resize. You can also crop your image by dragging the Crop tool and pressing Enter to remove unwanted space.
Thanks for letting us know!
Get the Latest Tech News Delivered Every Day
Subscribe
Photoshop is an incredibly powerful application. Even if you’re a die-hard fan of Corel Draw, you’ll probably admit that some Photoshop features are simply superior. But while the UI of Photoshop is overly intuitive, the same cannot be said about dealing with Photoshop errors.
By far, the most common Photoshop error is “scratch disk is full“. Some users get it when they try to start Photoshop, others when trying to complete a certain action. But why does this happen and how can we fix this issue?
What causes the Scratch Disk Error?
Before we get to the potential fixes that will remove photoshop scratch disk full error, it’s important to understand what a scratch disk actually is.
All Adobe programs like Photoshop or After Effects need a working space to store temporary project files. If Photoshop, (or another program) doesn’t have enough RAM memory to store something temporarily, it uses hard drive space as a temporary virtual memory holder. This hard drive space is referred to as a scratch disk.
Photoshop is more than capable of creating a mountain of temp files if you’re working with large elements, so don’t be quick to put the blame on your computer. If both the RAM and the scratch disk become full with temporary files, you will get a “Scratch Disk is full” error which might also prevent you from creating new files.
If you get “scratch disk is full” errors when you start Photoshop or when performing certain actions, there are a few potential fixes that proved to be effective. Below you have a collection of methods that proved to be effective in removing the “scratch disk is full” error. Please follow each guide in order until you find a fix that works in your situation.
Before You Continue: Make sure that you don’t set the blank page/image resolution to something unreasonable like 1920×1080 inches. Sometimes users confuse inches and pixels and set the resolution in inches instead of setting it in pixels which is a very unreasonable length. Make sure to set the resolution in pixels and not in inches.
1. Free up enough disk space
Before you do anything else, make sure that you have enough space in the drive partition where the scratch disk is located. The most common cause of the “scratch disk is full” error is the lack of free space in the drive that accommodates the scratch disk. If you don’t set it yourself, the C:/ drive is automatically chosen to serve as a scratch disk. If you’re unsure which drive is used as a scratch disk, open Photoshop and go to Edit > Preferences >Scratch disks.
Once you’re into the Preferences menu, confirm which storage drives serve as a scratch disk and make sure it has at least 40 GB of free space. If it doesn’t, access your drive and start removing unwanted files until you free enough space.

2. Delete temporary files
If you have the habit of force-closing Photoshop without giving it enough time to properly close down projects, it will leave a large chunk of temporary files behind. If you do this enough times, your temp folder will become full of Photoshop related files.
The good news is, Photoshop files can be easily identified and deleted. Usually, their name starts with ~PST or Photoshop Temp (in newer versions). You can delete them safely without any risk of affecting your system. Your temp folder is located in C:/ > Users > “YourUser” > AppData > Local > Temp.

3. Changing the scratch disk location
In the event that your photoshop shows you, the “scratch disk is full” error before you manage to get into the settings, there’s a neat shortcut that you can use to change Scratch Disk Preferences. To use it, launch Photoshop and as soon as the window pops up press and hold CTRL + Alt or press Cmd + OPT on a Mac. You will shortly see a Scratch Disk Preferences menu.

Select another partition from the drop-down menu near First and hit Ok. Your Photoshop should know restart without showing the “scratch disk is full” error.
4. Increasing the RAM allowed by Photoshop
Another fix that might make the error message go away is to allow Photoshop more RAM. By default, Photoshop is programmed to draw 60% of your total RAM, but you can make it use even more. Here’s how:
- Open Photoshop and go to Edit > Preferences and click on Performance.

- Once you’re in the performance menu, adjust the sliders in Memory Usage to increase the RAM memory that Photoshop is allowed to access. Do not set it about the 80% threshold, as it can make your PC run slower.
5. Adjusting your scratch disks
Experienced “photoshopers” will sometimes set up a dedicated hard drive partition specifically to prevent an issue like this from happening. Although Photoshop is capable of functioning perfectly well with the default scratch disk configuration, you might get rid of the error by allowing Photoshop to use other partitions.
By default, only your C:/ drive is selected to serve as a scratch disk, but you can allow all your partitions to share this burden. To do this, go to Edit > Preferences and click on Scratch Disks.
Once you reach the Scratch Disks tab, check the box near each partition to enable them as scratch disks. Then click Ok and restart Photoshop.

6. Purging Cache
While working on projects you might have added a lot of layers to an image or done a lot of editing, as we all know you can easily undo your previous steps and experiment with the image. But the storage of these steps that you perform takes up a lot of space on the scratch disks and if you are working with a huge project these steps can take up gigabytes of space. Therefore, in this step, we will be purging this cache but keep in mind that the undo steps will be gone and you won’t be able to revert back to an older version of the image. In order to do that, follow the steps below.
- Open the Photoshop window in which you are currently working.
- In the top tray, click on the “Edit” option and select the “Purge” button.

Clicking on the “Purge” button - There are a couple of options here. These are explained as follows.
Undo: Clears the record of your changes and by deleting you won't be able to undo your changes.
Clipboard: Clears the clipboard of the things that you might have copied. You won't be able to paste anything that you have copied so far if you clear this.
History: Deletes the history of your changes to the image. The changes stay but you won't be able to lookup the changes that you have made to an image.
All: Deletes all cache.
Video Cache: Deletes all video cache that you might have in store. Deleting this won't allow you to revert changes made to a video.
- Click on the option which you want to clear and confirm the warning prompt.
- Check to see if the issue persists.
7. Creating Partition for Scratch Disks
Creating a partition has also been reported by users as a possible workaround. Please follow this method only if you are already familiar with the functioning of disk management. Incorrectly, removing or creating a partition may result in data loss.
1. Open Run by Pressing the “Windows + R” keys together.
2. Once Run is opened type “diskmgmt.msc” and press enter.
3. Now select a disk that you were using as a Scratch Disk before. Right-click on it and press Shrink Volume.
4. Now Select the Size you want your Scratch Disk to be.
5. After creating a new partition, Open Photoshop and press “CTRL + ALT” then select the new Partition you just created.