Системные ошибки плоттеров HP DesignJet T610 | T620 | T1100 | T1120
В этом разделе описывается каждый из кодов системных ошибок и предупреждений, которые могут возникнуть при использовании плоттеров серий HP DesignJet T610 | T620 | T1100 | T1120 и указываются причины, вызвавшие данную ошибку. Заменяйте только один компонент за раз перед заменой другого компонента проверьте, не исчезла ли предыдущая ошибка. Используя эту процедуру, вы сможете точно определить, какой компонент не исправен.
|
Системная ошибка |
Описание проблемы |
|
01.0:YZ |
Нет связи с главной платой |
|
01.1:YZ |
Ошибка главной платы |
|
01.2:YZ |
Нет связи между главной платой и системой чернил |
|
02.1:YZ |
Ошибка платы каретки |
|
03:YZ |
Проблема с блоком питания |
|
03.0:10 |
Замените батарейку в главной плате |
|
06:YZ |
Сбой чтения / записи NVM на жесткий диск |
|
08:YZ |
Нет связи между главной платой и передней панелью |
|
11:YZ |
Ошибка кабеля (шлейфа) каретки |
|
21:YZ |
Ошибка сервисной станции |
|
21.1:YZ |
Ошибка сервисной станции (мотор салазки) |
|
22.0:YZ |
Ошибка станции подачи чернил |
|
22.1:YZ |
Ошибка станции подачи чернил |
|
24:YZ |
Сбой настройки чернил |
|
31:02 |
Обнаружена ошибка с резаком. |
|
31:03 |
Бумага загружена. При испытании резака бумага не должна загружаться |
|
41:03 |
Отказ мотора протяжки рулона (вероятно, из-за трения или препятствия на пути носителя) |
|
41:YZ |
Элетрическая неисправность в моторе протяжки бумаги |
|
41.1:YZ |
Элетрическая неисправность в моторе протяжки бумаги |
|
42:03 |
Неисправность мотора привода каретки (вероятно, из-за препятствий на пути движения каретки или электрической ошибки) |
|
42:YZ |
Отказ мотора привода каретки (вероятно, из-за трения или препятствий на пути движения носителя) |
|
44:YZ |
Системная ошибка 44: 10 означает электрическую ошибку с аэрозольным вентилятором или ошибку подключения. Обратите внимание, что только плоттеры T1100/T1100ps/T610, изготовленные ранее середины февраля 2008 года, имеют аэрозольные вентиляторы |
|
45:YZ |
Обнаружена ошибка в системе перемотки рулона |
|
47:03 |
Ошибка мотора маховика |
|
47:YZ |
Ошибка мотора маховика |
|
48:YZ |
Ошибка системы PPS (соленоид) |
|
51:YZ |
Ошибка датчика верхней крышки |
|
52:10 |
Принтер обнаружил сбой в Drop Detector |
|
55:YZ |
Проблема с датчиком каретки (Line Sensor) |
|
56:YZ |
Сбой приводного ролика аналогового энкодера. Проблема с диском или датчиком энкодера |
|
58:YZ |
Линейный датчик принтера работает неправильно. Либо затвор линейного датчика не открывается, либо происходит сбой связи с линейным датчиком, либо линейный датчик не откалиброван правильно, либо встроенное ПО несовместимо с линейным датчиком (Line Sensor) |
|
61:YZ |
Неверный формат файла, и принтер не может обработать задание |
|
63:YZ |
Проблема ввода-вывода через сетевой интерфейс модуля форматирования |
|
64:YZ |
Проблема ввода-вывода через USB-порт |
|
65:YZ |
Ошибка Memory Driver Internal I/O error, I/O Socket Manager Internal I/O |
|
68:YZ |
Потеря данных счетчиков слежения |
|
71:YZ |
Нехватка памяти |
|
71:04 |
Нехватка памяти |
|
71:19 |
Серийный номер по умолчанию найден в основном и резервном NVM. Похоже, что и PrintMech PCA, и жесткий диск были заменены вместе |
|
72:YZ |
Необходимо выполнить сервисную калибровку. Проверьте внутренний код ошибки, чтобы увидеть, какая калибровка должна быть выполнена. Чтобы проверить внутренний код ошибки, нажмите вверх и отмена одновременно, пока не отобразится код ошибки |
|
73:YZ |
Ошибка привода. Обновить прошивку, проверить привод узла каретки и привод протяжки |
|
74:YZ |
Ошибка загрузки файла обновления прошивки |
|
74.1:YZ |
Ошибка загрузки файла обновления профиля бумаги |
|
75.21:YZ |
Бункеры отработки (левая плевательница(Left Spittoon) и сервисная станция) достигли 80% износа |
|
75.22:YZ |
Бункеры отработки (левая плевательница(Left Spittoon) и сервисная станция) достигли полного заполнения |
|
76:YZ |
Переполнен жесткий диск |
|
77:YZ |
Приложение для веб-доступа. Веб-сервер работает неправильно |
|
78:08 |
Полученное задание не может быть напечатано без границ на этой бумаге |
|
78.1:YZ |
Отсутствует область настроек носителя в файле настроек бумаги |
|
79:YZ |
Общая ошибка прошивки |
|
79.1:YZ |
Восстанавливаемая ошибка прошивки, которая не останавливает процесс печати |
|
81:YZ |
Эта ошибка может возникнуть из-за того, что принтер упал во время транспортировки, что привело к повреждению конструкции. Прежде чем продолжить поиск неисправностей 81: YZ, сначала обратите внимание на структурные повреждения |
|
84:YZ |
Выключение привода заднего натяжения (подача рулона) |
|
85:YZ |
Проблема нахождения нулевой точки между диском и платой энкодера |
|
86:YZ |
Ошибка замятия бумаги |
|
87:YZ |
Проблема с показаниями датчика энкодера узла каретки |
|
93:YZ |
Невозможно создать давление в системе подачи чернил |
|
94:YZ |
Ошибка калибровки цвета |
|
94.1:YZ |
Сбой алгоритмов профиля |
|
98:YZ |
Включен режим автоматической печати резервных копий |
Чтение кода системной ошибки
Коды системных ошибок объясняют, какой компонент/система вышли из строя и какие действия следует предпринять для устранения проблемы.
Коды системных ошибок отображаются непосредственно на лицевой панели (но также могут быть видны на информационной странице) и определены в формате XX.YZ. или XX. n: YZ.м.
● XX: Подсистема или процесс (2 цифры).
● n: индекс подсистемы или процесса (если в продукте используется более одного) – необязательно — например, определить источник чернил (цвет и номер)
.● Y: кто должен выполнить действие (1 цифра) – (0 для пользователя или 1 для сервисного инженера).
● Z: Действие для выполнения (1 цифра).
.
HP LJ 1100
Индикация ошибок в данной модели определяется при помощи 3 индикаторов состояния, по-порядку слева на право:
1. Большая левая «Продолжить печать» — обозначим «1«.
2. Средняя «Процесс/данные» — обозначим «2«.
3. Самая правая «Замятие бумаги» — обозначим «3«
Фатальная ошибка в данной модели определяется зажиганием всех 3 индикаторов. Чтобы увидеть подкод неисправности необходимо зажать
кропку 1 и посмотреть какая индикация осталась:
1 ошибка:
1 — горит
2 — горит
3 — горит
ROM/RAM Error: ошибка распределения и чтения данных с компьютера. Заменить дополнительно установленную память принтера, заменить форматтер принтера.
2 ошибка:
1 — горит
2 — горит
3 — не горит
Fuser Error: ошибка термоэлемента принтера. Проверить контакты термоузла и термистора термоузла, заменить термоузел
3 ошибка:
1 — горит
2 — не горит
3 — не горит
Beam Error: общая неисправность принтера. Выключить-включить принтер, проверить подключение шлейфов лазер-сканера, проверить лазер-сканер, заменить DC-контроллер.
4 ошибка:
1 — не горит
2 — не горит
3 — горит
Print Engine Error: общая ошибка вывода на печать. Отключить интерфейсный кабель LPT («Центроникс»), снять-поставить форматтер принтера, заменить форматтер, заменить DC-контроллер.
5 ошибка:
1 — не горит
2 — горит
3 — не горит
Printer Laser/Scanner Error: ошибка лазер-сканера. Почти всегда — замена лазер-сканера.
6 ошибка:
1 — горит
2 — не горит
3 — горит
Firmware Error: фатальная ошибка форматтера. Замена форматтера.
7 ошибка:
1 — не горит
2 — мигает
3 — мигает
DIMM Error: ошибка дополнительно установленной памяти. Заменить дополнительно установленную память.
8 ошибка:
1 — не горит
2 — не горит
3 — мигает
Document Scan Engine Error: ошибка сканирования документа через дополнительно установленную опцию сканера.
9 ошибка:
1 — не горит
2 — мигает
3 — горит
В зависимости от того, оснащен ли принтер дополнительной опцией сканера, неисправность относится:
1) если оснащен — неисправен дополнительно установленный сканер;
2) если не оснащен — ошибка датчиков подачи-выхода бумаги, шторки лазер-сканера, контакта фотобарабана картриджа, неисправность микровыключателя крышки принтера.
 Loading…
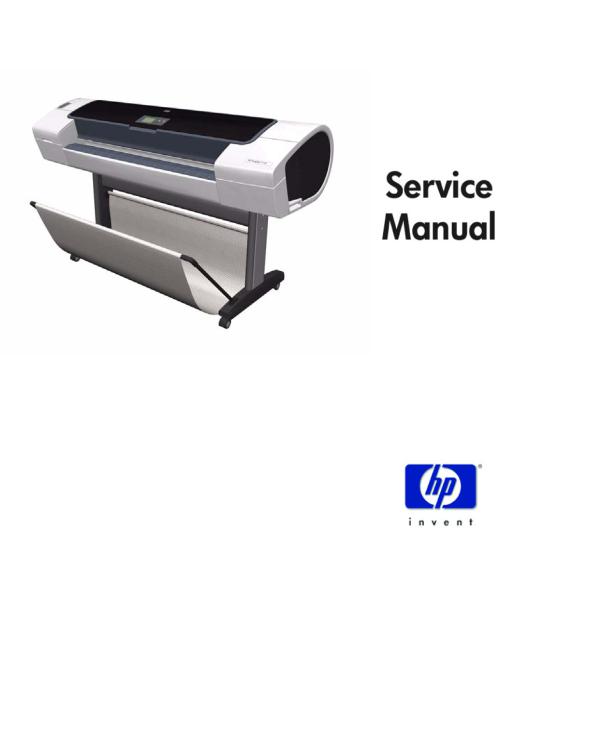
HP Designjet
T1100/T1100ps/T610/
T1120/T1120ps
Printer Series
Version 6
March 19, 2009

For HP Internal Use Only Warranty
©Copyright Hewlett-Packard Company 2009
This document contains proprietary information that is protected by copyright. All rights are reserved. No part of this document may be photocopied, reproduced, or translated to another language without the prior written consent of Hewlett-Packard Company.
Version 6: March 19, 2009
The information contained in this document is subject to change without notice.
Hewlett-Packard makes no warranty of any kind with regard to this material, including, but not limited to, the implied warranties of merchantability and fitness for a particular purpose.
Hewlett-Packard shall not be liable for errors contained herein or for incidental or consequential damages in connection with the furnishing, performance, or use of this material.
Content Management Department, Barcelona Division, Hewlett-Packard Espanola, S.A. Avda. Graells, 501
08190 Sant Cugat del Valles Spain
WARNING
The procedures described in this manual are to be performed by HP-qualified service personnel only.
Electrical Shock Hazard
Serious shock hazard leading to death or injury may result if you do not take the following precautions:
—Ensure that the ac power outlet (mains) has a protective earth (ground) terminal.
—Disconnect the Printer from the power source prior to performing any maintenance.
—Prevent water or any other liquids from running onto electrical components or circuits, or through openings in the enclosure.
Electrostatic Discharge
Refer to the beginning of Chapter 4of this manual, for precautions you should take to prevent damage to the Printer circuits from electrostatic discharge.
Safety Symbols
General definitions of safety symbols are given immediately after the table of contents.
WARNING
The Warning symbol calls attention to a procedure, practice, or the like, which, if not correctly performed or adhered to, could result in personal injury. Do not proceed beyond a Warning symbol until the indicated conditions are fully understood and met.
CAUTION
The Caution symbol calls attention to an operating procedure, practice, or the like, which, if not correctly performed or adhered to, could result in damage to or destruction of part or all of the product. Do not proceed beyond a Caution symbol until the indicated conditions are fully understood and met.

1Troubleshooting
2System Error Codes
3Service Tests and Utilities
4Service Calibrations
5Parts and Diagrams
6Removal and Installation
7Preventive Maintenance
For information about Using this Manual, please refer to the next page.
|
HP Designjet T Series — Service Manual |
-1 |

Table of Contents
Using this Manual
Purpose
This Service Manual contains information necessary to test, calibrate and service:
HP designjet T1100 Printer 24 inch (Model Q6683A)
HP designjet T1100 Printer 44 inch (Model Q6687A)
HP designjet T1100ps Printer 24 inch (Model Q6684A)
HP designjet T1100ps Printer 44 inch (Model Q6688A)
HP designjet T610 Printer 24 inch (Model Q6711A)
HP designjet T610 Printer 44 inch (Model Q6712A)
HP designjet T1120 Printer 24 inch (Model CK837A)
HP designjet T1120 Printer 44 inch (Model CK839A)
HP designjet T1120ps Printer 24 inch (Model CK838A)
HP designjet T1120ps Printer 44 inch (Model CK840A)
For information about using these printers, refer to the corresponding User and Quick Reference Guides.
Readership
The procedures described in this Service Manual are to be performed by HP Certified service personnel only.
Part Numbers
Part Numbers for Printer options, accessories and service parts are located in Chapter 5 Parts and Diagrams on page 5-1.
Conventions
Any text that uses the blue underlined format (except this one) is a link that directs you to the page number of the reference. If you are viewing the document as a pdf, you can click on that link to be taken there directly.
|
-2 |
HP Designjet T Series — Service Manual |

Using the Front Panel 1-3
General Troubleshooting 1-4 Introduction 1-4
Troubleshooting System Error Codes 1-4 Performing a Service Test on a failed Assembly 1-4 Performing the Necessary Service Calibrations 1-4 The Front Panel is blank 1-5
Solving Print Quality Problems 1-5 The Printer does not Power ON 1-5
The Printer Continuously Rejects Printheads 1-5 Cover Sensors are not Working 1-5
The Line Sensor has Problems Detecting Media 1-5 Banding at variable extreme environmental conditions 1-6 Worm marks on HP Coated media with light area fills 1-6 Solving Media-Handling Problems 1-7
Print quality troubleshooting 1-9
Print Quality Troubleshooting Actions 1-9
The Service Image Quality Diagnostic Print 1-9 Reading the Diagnostic Print Results 1-11
Diagnostic Part 1: Printhead Reliability 1-11
Diagnostic Part 2: Printhead Alignment 1-12 Diagnostic Part 3: Printheads & Paper Advance 1-13
The Advanced Diagnostic Prints 1-15
Reading the Advanced diagnostic Print Results 1-16 Troubleshooting Print Quality Problems 1-24
Print Quality General Advice 1-24
Horizontal Lines Across the Image (Banding) 1-25 Lines are Missing, Too Thin, or Too Thick 1-26 Problems with Stepped Lines 1-27
Lines are Printed Double or in Wrong Colors 1-27 Lines are discontinuous 1-28
Lines are Blurred (Ink Bleeds from Lines) 1-28 Problems with Graininess 1-29
Paper is not Flat 1-29
Ink marks on the paper 1-30
Horizontal smears on the front of coated paper 1-31 Ink marks on the back of the paper 1-31
Problems with the Edges of objects 1-32 Stepped or not sharp 1-32
Darker than expected 1-32
Black and white prints do not look neutral 1-32 Horizontal lines at the end of a cut sheet print 1-32 Vertical lines of different colors 1-32
White spots on the print 1-33
|
HP Designjet T Series — Service Manual |
1-1 |

Problems with Color Accuracy 1-33 Output Only Contains a Partial Print 1-34 Problems with Image Clipping 1-34
Some objects are missing from the printed image 1-35 A PDF file is clipped or objects are missing 1-35
Print Quality Troubleshooting Wizard 1-35 Ink Supplies Troubleshooting 1-39
Introduction to ink supplies 1-39 What are Ink Supplies? 1-39 Ink Cartridges 1-39 Available Ink Cartridges 1-40 Printheads 1-40
Available Printheads 1-41
General Information About the Ink Supplies 1-41 General Precautions When Handling Ink Supplies 1-41 When Should You Replace the Ink Supplies? 1-42
Ink Cartridge Levels, Information, and Replacement 1-42 Ink Cartridge Levels 1-42
“View Ink Levels” Direct Access Key 1-42 “View Ink Levels” from the ink menu 1-42 Obtaining Ink Cartridge Information 1-42
The printer consumes more gray ink ink than M, C, or Y 1-44 Changing an Ink Cartridge 1-44
Printhead Information, Replacement and Alignment 1-46 Obtaining Printhead Information 1-46
Changing a Printhead 1-47 Aligning Printheads 1-49
Reinsert Printheads Procedure 1-49
Image Quality Maintenance Procedure 1-49 Scanning errors during alignment 1-50
Ink Cartridge and Printhead Status Messages 1-50 Ink Cartridge Status Messages 1-50
Printhead status messages 1-51 Printhead Error Codes 1-51
Solving Ink Supplies Problems 1-53
You Cannot Insert the Ink Cartridge Into the Printer 1-53 You Cannot Insert the Printhead Into the Printer 1-53 The front panel says to reset or replace a printhead 1-53
Maintaining and Cleaning the Printheads 1-54
Clean the printheads 1-54
Flex Contacts Cleaning Tool 1-55
|
HP Designjet T Series — Service Manual |
1-2 |
Using the Front Panel |
||||||
|
Using the Front Panel |
||||||
|
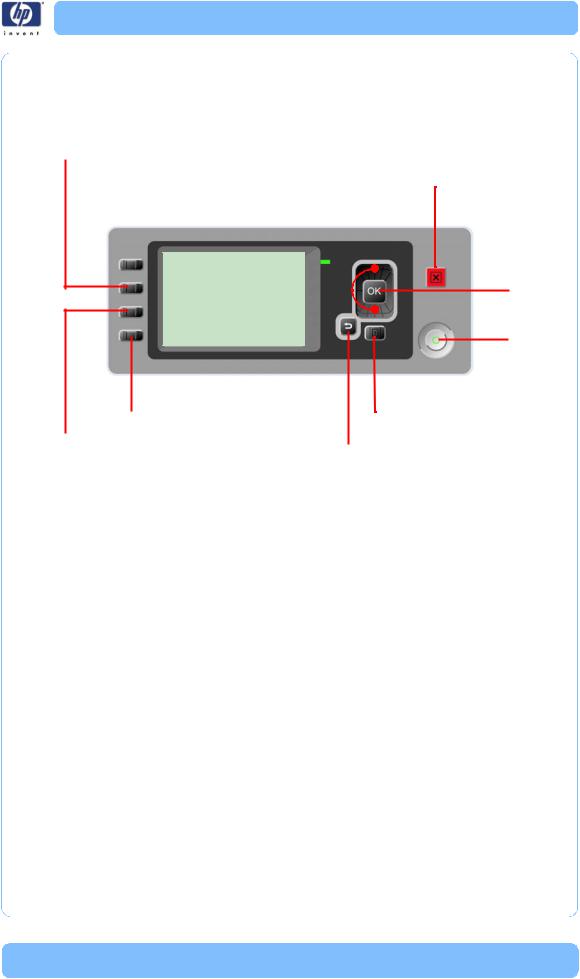
Below is a diagram of the front panel. |
||||||
|
View Loaded Paper |
Up and Down |
|||||
|
View Ink Levels |
Cancel |
|||||
OK
Power
|
Form Feed and Cut |
Menu |
|||||
|
Unload Paper |
Back |
|||||
Key Function
Arrow Keys
Use the Arrow keys to scroll through a menu or toggle between YES or NO when prompted.
Cancel
Use the Cancel key to abort or stop a procedure or reject test results.
OK
Use the OK key to select a menu option.
Power
Use the Power key to turn the printer ON and OFF.
Menu
Use the Menu key to enter the main menu.
Back
Use the Back key to go back to the previous menu or reject test results.
Service Key Combinations
Diagnostic mode
With the printer OFF, press and hold the UP and OK keys. While holding the Up and OK keys down, press and hold the Power key to turn on the printer. Hold all three keys until the Power key stops flashing, usually about 5 seconds.
Service Menu (Service Engineers Only)
From the main menu, press and hold the Up and Cancel keys.
Service Menu (For users)
From the main menu, press and hold the Down and Cancel keys.
|
HP Designjet T Series — Service Manual |
1-3 |
Troubleshooting
General Troubleshooting
Introduction
This chapter will guide you through the relevant steps to take when
troubleshooting the printer.
Troubleshooting System Error Codes
Chapter 2 System Error Codes on page 2-1 contains a list of system error codes and their respective descriptions and recommended corrective actions. Only try one recommended action at a time and check if the error code has disappeared.
If you have an error code which is not documented in this Service Manual or you have an error which you cannot resolve, then report the error to the HP Response Center or the nearest HP Support Office. When reporting the error, have the following information ready:
Model and Serial Number of the printer.
Which firmware revision the printer is using (See Note below). Check firmware in Utilities / Statistics / Code rev.
The complete error number (See Note below).
The Service Configuration Print.
The Current configuration sheet.
Which software application the customer is using (name, version, etc.).
When reporting the System Error Code, make sure that you supply the full Error Code and the firmware version. Without this information, HP Support Personnel cannot help you.
Performing a Service Test on a failed Assembly
If possible, always perform a Service Test on the component/assembly that you are about to replace, just to make sure that is the component/assembly that has failed.
If the test on that component/assembly passes, you should NOT replace it.
For information on the Service Tests and how to use them see Chapter 3
Service Tests and Utilities on page 3-1.
Performing the Necessary Service Calibrations
Is the printer calibrated correctly after replacing a component? For information on the Service Calibrations and how to use them see Chapter 4 Service Calibrations on page 4-1.
Remember that certain Calibrations are required even if an Assembly has been disassembled to gain access to another Assembly or Component.
|
1-4 |
HP Designjet T Series — Service Manual |

General Troubleshooting
Solving Print Quality Problems
Whenever a Print Quality problem appears, it is advisable to print the Diagnostic Print to help diagnose the problem. The Diagnostic Print will help you differentiate between possible printhead errors and other problems such as incorrect front-panel selection, driver or RIP configuration or mechanical problems.
The Front Panel is blank
1 See What to do if the Front Panel is blank on page 2-3.
The Printer does not Power ON
1Check that the power cord is connected correctly to the Printer and to the Power Socket.
2Check that the Power Switch on the BACK of the Printer is in the ON position.
3Check to see the LED on the Front Panel Power Switch are On.
4Check that the Front-Panel Cable is correctly connected to the Electronics Module. Also make sure that the Front-Panel cable is not damaged.
5Replace the Power Supply Unit. See Starwheel Assembly on page 6-208.
The Printer Continuously Rejects Printheads
1Clean the flex contacts on the Printhead and in the Carriage Assembly using the Carriage Interconnect Wiper and try again. See Flex Contacts Cleaning Tool on page 3-20.
2If ALL the Printheads are rejected (the status message on the Front Panel does NOT show «OK» for ALL the Printheads) then perform the Electronic Module Test. See 3. Electronics Module on page 3-21.
Cover Sensors are not Working
1Perform the Sensors Test. See 5. Sensors on page 3-31.
2Check if the cable for the faulty sensor is not damaged and is connected correctly.
3Replace the faulty Sensor.
The Line Sensor has Problems Detecting Media
1Check the type of media that is being used since the Line sensor may have problems detecting transparent media or some types of Non-HP media. Try loading white HP media in to the Printer and check if the Line sensor detects it.
2The Line Sensor is not calibrated correctly. Perform the Line Sensor Calibration. See Line Sensor Calibration on page 4-15.
3The Line Sensor is damaged or faulty. Replace the Line Sensor. See Line Sensor (T1120/T1120ps) on page 6-157.
|
HP Designjet T Series — Service Manual |
1-5 |
Troubleshooting
Troubleshooting Media Jams/Printhead Crashes
The failure modes «media jam» and «head crash» are grouped together because in many cases a media jam causes the media to lift up into the Carriage path and cause a Printhead crash, thus causing many media jam failures to be reported as head crashes.
1Did the media jam occur when loading media?
If the client has had media jams, it is common for pieces of media to get stuck in the media path. Clear the media path.
When clearing a media jam, sometimes media is stuck in the paper path. To clear this, you must lift the Media Lever and insert thicker media into the paper path to push out the media that is still stuck there.
2Is the customer using non-HP media?
The use of non-HP media can easily be the cause of media jams and head crashes (especially head crashes because HP media is specially formulated to avoid cockle, one of the primary causes of head crashes). If the media is not HP approved, advise the customer to use HP media and check to see if the problem is now solved.
Banding at variable extreme environmental conditions
Since the Accuracy Calibration has been done at normal environmental conditions, printing in extreme environmental conditions will cause banding because the advance of the Media Advance Roller does not correspond to the same conditions that the calibration was done in. To solve the problem, try the following:
Perform the Accuracy Calibration in the new environmental conditions (Refer to the User’s Guide).
Worm marks on HP Coated media with light area fills
Light bands (S-shaped) in Paper axis direction where light area fills are printed, causing unacceptable Image Quality defect.
Print the Service Configuration Print and check if the level of Humidity is very low (below 30%). Increasing humidity may help in reducing the severity of the problem.
The media is causing the problem and NOT the Printer. Do not attempt to try and replace Printer parts to solve this problem.
|
1-6 |
HP Designjet T Series — Service Manual |

The Media Basket was damaged during printer setup
The Media Basket was damaged during printer setup
1There are three plastic parts that could break during printer installation and need replacing.
2Check the parts table and graphics in Parts and Diagrams to identify what service parts you must order. See Printer Support on page 5-2.
3Replace the component. See Bin Assembly on page 6-10.
Solving Media-Handling Problems
The Front Panel indicates that media is misaligned or incorrectly positioned
|
Roll media |
The roll may be loaded the wrong way. The paper should load over the |
|
roll toward you. |
|
|
Check that the paper is correctly loaded onto the spindle. |
|
|
The paper may be loaded at an angle. The right-hand edge must be |
|
|
aligned with the blue line on the Print Platen. |
|
|
With 24 inch printers, ensure that the paper is wrapped |
|
|
tightly on the roll. This is a very important step to remember |
|
|
because if this is not done, the media may be loaded at an |
|
|
angle, causing the media to be rejected. |
|
|
Check that the Right Spindle Holder (rewinder included) is properly |
|
|
attached and screwed to the printer. |
|
|
For 44 inch printers, the Rewinder, located on the Right Spindle Holder |
|
|
(rewinder included), should maintain proper back tension. If the Right |
|
|
Spindle Holder (rewinder included) is misaligned or not properly |
|
|
attached to the printer, the Rewinder will not function properly. |
|
|
For a graphic of a properly installed Rewinder, see Right Spindle Holder |
|
|
and Rewinder (T1120/T1120ps) on page 6-87. To further diagnose |
|
|
problems with the Rewinder, see 6. Rewinder on page 3-34. |
Sheet media Always load sheet media using the Rear Input Tray. Do NOT load the media as you would load roll media.
It must be loaded with the right-hand edge against the blue line on the Print Platen.
The media may be crumpled or warped or may have irregular edges.
If hand-cut media is used, the edges may not form a right-angle or they may be rough. If possible, hand-cut media should not be used. Only purchased sheet media should be used in the Printer.
If you have problems with paper jams, check that the Overdrive is not obstructed by bits of paper or using the Turn Drive Roller Service Utility. See 1. Turn Drive Roller on page 3-58.
Check that the Right Spindle Holder (rewinder included) is properly attached and screwed to the printer.
For 44 inch printers, the Rewinder, located on the Right Spindle Holder (rewinder included), should maintain proper back tension. If the Right
|
HP Designjet T Series — Service Manual |
1-7 |

The Media Basket was damaged during printer setup
Spindle Holder (rewinder included) is misaligned or not properly attached to the printer, the Rewinder will not function properly.
To further diagnose problems with the Rewinder, See 6. Rewinder on page 3-34.
|
HP Designjet T Series — Service Manual |
1-8 |

Print quality troubleshooting
Print quality troubleshooting
Print Quality Troubleshooting Actions
For some Print Quality problems, a Call Agent can try and troubleshoot the Printer by requesting the Customer to perform certain actions. Using this process, most problems can resolved without the need of an on-site visit.
Use the Print Quality Troubleshooting Wizard to help customers with their print quality or color problems. For information about how to use the Print Quality Troubleshooting Wizard, see Print Quality Troubleshooting Wizard on page 1-35.
When faced with a Print Quality problem, perform the following actions in order to resolve the problem:
1Printer Configuration:
Check that the paper type loaded corresponds to the paper type selected in the front panel and in the software. You can verify the paper type selected through the Front Panel (Main Menu/Paper menu/View loaded paper).
Make sure that the correct Print Quality settings are used for different types of print content. See Print Quality Troubleshooting Actions on page 1-9 for further information.
Dry time should be set to “Optimal”.
2Perform Printhead recovery (Main Menu/Image Quality Maintenance/ Clean Printheads).
3Media:
Select the correct media type through the front panel when loading it.
Make sure that HP or HP-approved media is being used.
4Perform the Printhead Alignment (Main Menu/Image Quality Maintenance/ Align Printheads), using the same paper type with which you were experiencing unacceptable image quality, if feasible (some paper types are not suitable for Printhead Alignment).
5Check if the latest version of the firmware is installed. If not, install the latest firmware revision.
The Service Image Quality Diagnostic Print
What is the Service Image Quality Diagnostic Print?
The Printer contains an internal Image Quality Test which helps you to diagnose the possible source of any image quality defects. The Service IQ Diagnostic Print is available in the following options:
1Image Quality Service Best Plot. This plot helps you to diagnose in more detail the possible source of any image quality defects. It is accessible through the Service Utility Menu.
|
HP Designjet T Series — Service Manual |
1-9 |

Print quality troubleshooting
The Image Quality Service Best Plot uses the Best Print Mode and is divided in to three parts as follows:
Diagnostic Part 1: Printhead Reliability Test. The purpose of this test is to identify which Printhead is faulty.
Diagnostic Part 2: Printhead Alignment Test. This test is designed to check any color-to-color and bi-directional misalignment the printer may have.
Diagnostic Part 3: Printheads and Paper Advance test. This test is designed to check whether the Printheads and the Media Advance Mechanism are working correctly.
2Image Quality Service Normal Plot. This plot is the same as the Image Quality Service Best Plot but uses the Normal Print Mode.
3Advanced Diagnostic Plot. These tests provide more information of the IQ defects that we could find in the Image Quality Service plot. For more information, see The Advanced Diagnostic Prints on page 1-15.
Considerations for Printing the Diagnostic Print
1The IQ Diagnostic Print prints in A3 and B sizes so you must have media loaded (roll or sheet) that is this size or larger.
2Use the same type of media that the customer was using when they found the image quality problem.
3If the customer is using non-HP media and after the Image Quality Test you still have the same image quality problems, change to genuine HP media and repeat the Image Quality Test.
If you do see problems with the Image Quality Test, continue with the Advanced Diagnostic procedures which will help you diagnose the problem.
Printing the Diagnostic Print
1In the Service Utilities submenu, scroll to “Diagnostic Print” and press OK.
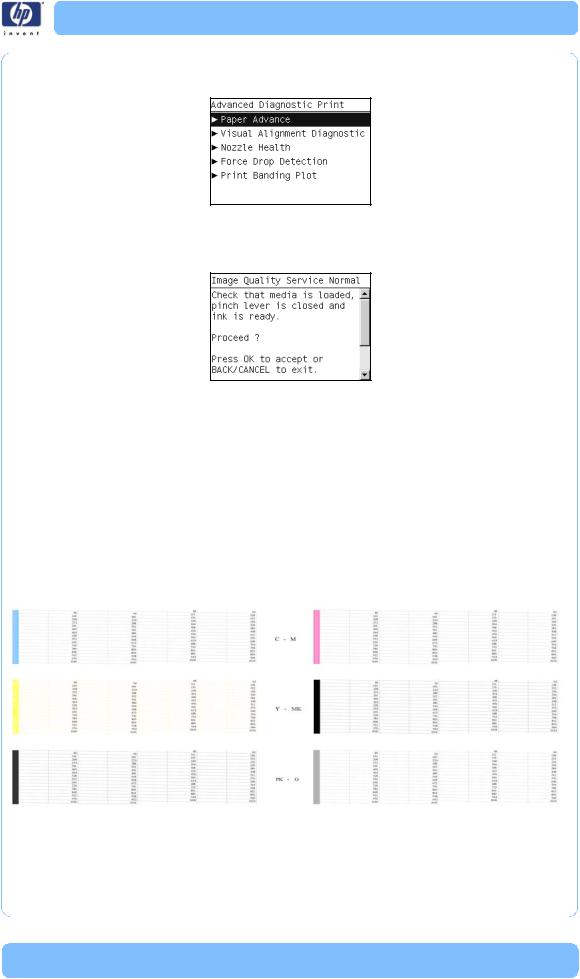
2You will be given three options. Use the Arrow keys to make the selection and press the OK key to start printing the required Diagnostic Print or to enter the Advanced Diagnostics menu.
3If you selected the Advanced Diagnostics Prints in the previous step, use the Arrow keys to make the required selection Paper Advance, Printhead
|
HP Designjet T Series — Service Manual |
1-10 |
Print quality troubleshooting
Alignment Diagnostic, Nozzle Health, Force Drop Detection or Print Banding Plot, and press the Enter key to start printing.
4Make sure media is loaded, the Media Lever is lowered and that the Ink System is correctly installed. Press the OK key to print the Diagnostic Print or press Back/Cancel to exit without printing the Diagnostic Print.
5The selected Diagnostic Print will now be printed.
Reading the Diagnostic Print Results
Diagnostic Part 1: Printhead Reliability
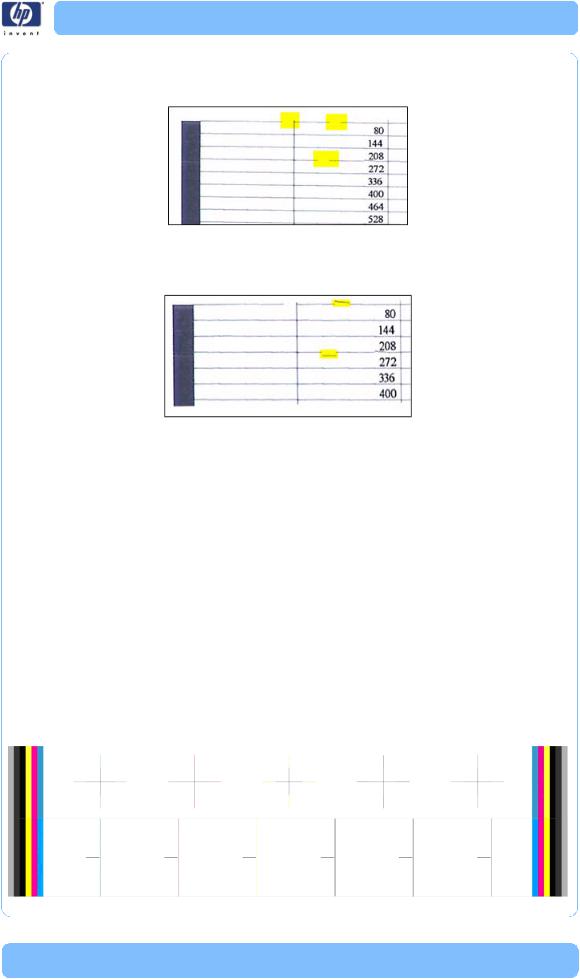
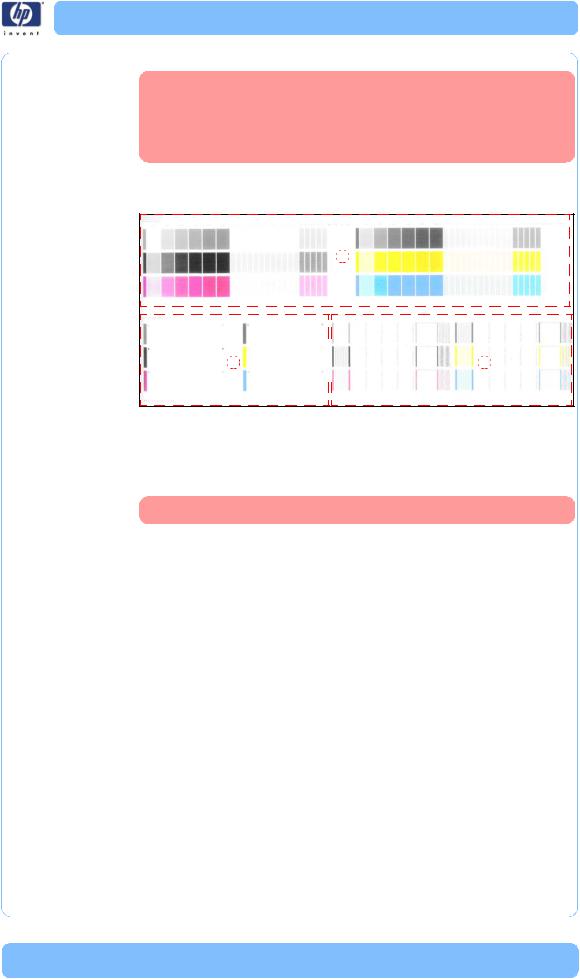
The Nozzle Print Test test is designed to check if the Printhead nozzles print correctly.
The nozzles check (top of the plot) is printed in a one-pass full swath mode. The diagnostics test prints out every single nozzle of each Printhead without applying an error hiding or alignment algorithm.
For each Printhead, you can see both the adjacent and the consecutive nozzles.
If any nozzles are not printing correctly they will be shown on the right of each Printhead Nozzle test. There is a series of numbered stepped diagonal lines. If one or more of the nozzles are clogged, malfunctioning or mispositioned, you will see that the stepped lines are broken or misdirected in one or more places.
|
HP Designjet T Series — Service Manual |
1-11 |
Print quality troubleshooting
Below, the stepped lines highlighted in yellow are broken. When the line is completely broken, this means the nozzle is out.
Below, the stepped lines highlighted in yellow are misdirected. When the line is misdirected, this means the nozzle is malfunctioning or out of position.
On the left of each Printhead Nozzle test, there is a series of horizontal straight lines. If one or more nozzles are misdirected there will be unequal spaces between the corresponding lines.
Corrective Action
If the printer has nozzle defects, you can still get perfect print quality results. The printer can automatically compensate for nozzle defects, so there is no need to replace the Printhead.
The method of improving Nozzle Defects is to:
1Recover the Printheads, using the Front Panel Main Menu/Image Quality Maintenance/Clean Printheads option.
2Reprint the Printhead Nozzles Test Plot to verify that the defective nozzles have been corrected.
3If the problem continues, replace the defective Printhead.
Diagnostic Part 2: Printhead Alignment
This test is designed to check any color-to-color and bi-directional misalignment the printer may have.
|
HP Designjet T Series — Service Manual |
1-12 |

Print quality troubleshooting
1If the Printer is experiencing horizontal misalignment problems, the Alignment Test will show something like this:
2If the Printer is experiencing vertical misalignment problems, the Alignment Test will show something like this:
3If the Printer is experiencing bi-directional misalignment problems, the Alignment Test will show something like this:
Corrective Action
Perform the Printhead Alignment (Main Menu/Image Quality Maintenance/ Align Printheads), using the same paper type with which you were experiencing unacceptable image quality, if feasible (some paper types are not suitable for Printhead Alignment).
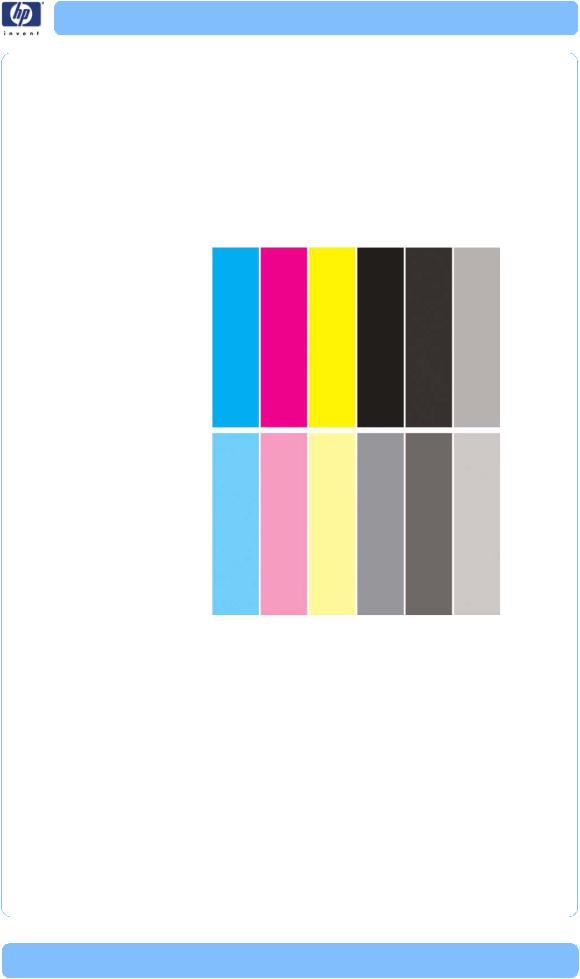
Diagnostic Part 3: Printheads & Paper Advance
This test is designed to check whether the Printheads and the Paper Advance Mechanism are working correctly. This part of the Image Quality Test should NOT be used to check for color consistency or accuracy.
|
HP Designjet T Series — Service Manual |
1-13 |
Print quality troubleshooting
Banding
If the Printer is experiencing a banding problem, you will see repetitive horizontal bands within the printed image.
Darker horizontal bands or lines repeated along the vertical band (from top to bottom at the same distance).
Whiter horizontal bands or lines along the vertical band (from top to bottom at the same distance).
The plot is printed in Best or Normal mode (according to the menu option selected) with Error Hiding ON. The top band has 100% ink density patches
while the bottom band has 50% ink density patches.
Troubleshooting Banding Problems
If banding does NOT occur in ALL the colors, then it is more than likely a
Printhead problem. In this case, try the following:
1Check that the appropriate print quality settings are being used (refer to the User’s Guide for more information).
2Recover the printheads using the option through the Front Panel (Main Menu/Image Quality Maintenance/Clean Printheads). Reprint the Diagnostic Print or the print file and if the problem persists, replace the faulty Printhead.
If banding does occur in ALL the colors, then it is more than likely a Paper Advance problem:
If the bands are light, it means that the paper has advanced too much.
If the bands are dark, it means that the paper hasn’t advanced enough.
|
HP Designjet T Series — Service Manual |
1-14 |

Print quality troubleshooting
In high quality modes, graininess in ALL colors can indicate problems either with alignment or Paper Advance.
Corrective Action
In order to solve problems that result in banding, try the following:
1Check that the appropriate print quality settings are being used (refer to the User’s Guide for more information).
2Check that the loaded media is the same type as selected in the printer. You can verify the media type selected through the Front Panel (Main Menu/ Paper menu/View loaded paper).
3If the customer is using low quality paper, try recommending better quality paper (preferably HP paper). Printer performance can only be guaranteed by using recommended papers.
4Perform the Paper Advance Calibration using the same type of paper that will be used for the final print (Main Menu/Image Quality Maintenance/ Paper Advance Calibration/Calibrate Paper Advance).
If there is white point banding in only one color band and the problem cannot be fixed using the Printhead recoveries, in some cases using the force a drop detection option can fix this issue. See Force Drop Detection on page 1-24.
No Printing Defects Found in the Diagnostic Print
If all the test patterns from the Diagnostic Print are correct and you still experience Image Quality problems, you can use the following procedures to resolve the problem.
Reading the Advanced diagnostic Print Results
Printhead Alignment
Nozzle Health
Force Drop Detection
The Advanced Diagnostic Prints
What are the Advanced Diagnostic Prints?
Advanced Diagnostic Plot. These tests provide more information of the IQ defects found in the Image Quality Service plot.
The Advanced Diagnostic Plot is divided into the following parts:
Visual Media Advanced Diagnostic. Used to check advance reliability.
Printhead Alignment Diagnostic. Used to check pen alignment reliability.
Visual Nozzle health Diagnostic. Used to check nozzle health reliability.
Force Drop Detection. Used to reset the nozzle health historic data base and force new drop detection.
|
HP Designjet T Series — Service Manual |
1-15 |
Print quality troubleshooting
Printing the Advanced Diagnostics Print
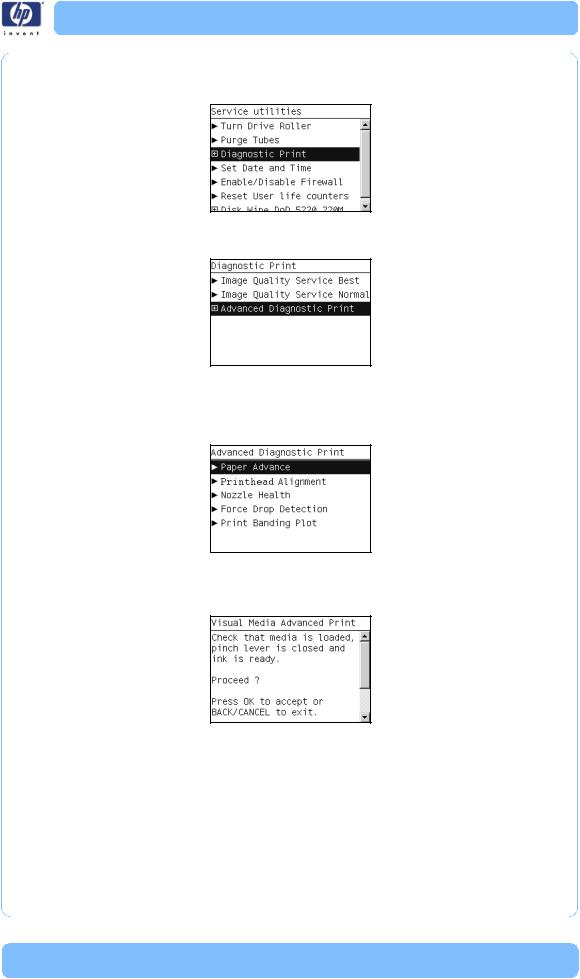
1In the Service Utilities submenu, scroll to “Diagnostic Print” and press OK.
2You will be given three options. Use the Arrow keys to select the Advanced Diagnostics menu.
3From the displayed options, use the Arrow keys to make the required selection Paper Advance, Printhead Alignment Diagnostic, Nozzle Health, Force Drop Detection or Print Banding Plot, and press the OK key to start printing.
4Make sure media is loaded, the Media Lever is lowered and that the Ink System is correctly installed. Press the OK key to print the Diagnostic Print or press Back/Cancel to exit without printing the Diagnostic Print.
5The selected Advanced Diagnostic Print will now be printed and, if necessary, automatically scanned.
Reading the Advanced diagnostic Print Results
Paper Advance
This plot helps you to visually check any alignment problems of the printer. You use it to precisely measure the media advance error with a one dot row accuracy, and to verify the stability of the media advance.
|
HP Designjet T Series — Service Manual |
1-16 |

Print quality troubleshooting
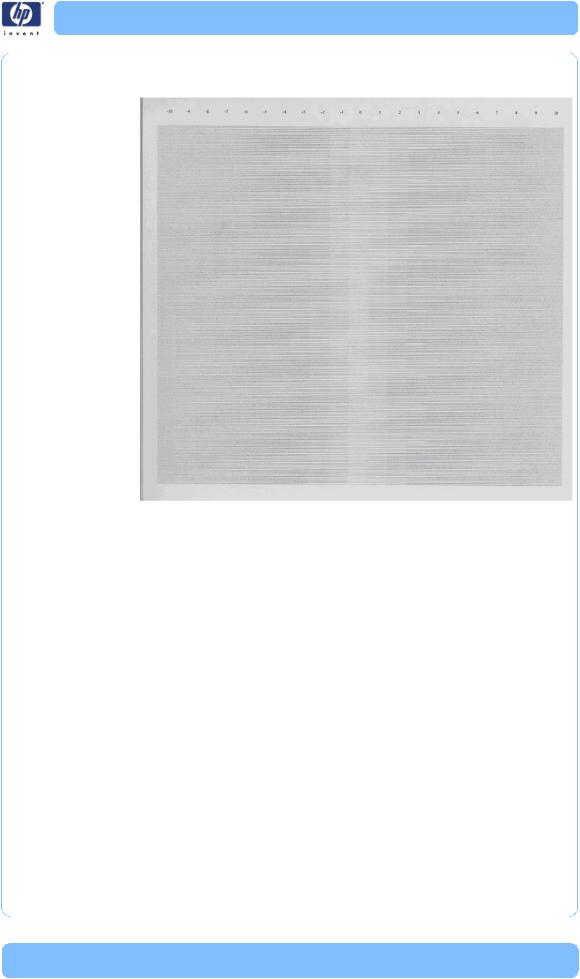
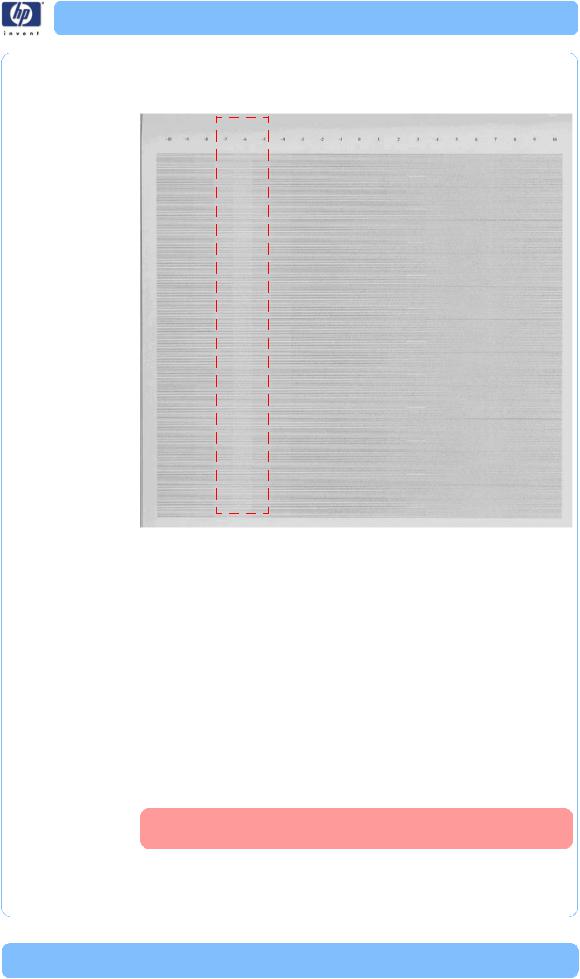
The whitest vertical line should be positioned in the 0 offset column with minor variations between +2 and -2 columns. If the offset is not positioned on the 0 column or between +2 and -2 columns and the whitest vertical
varies greatly, the printer requires Paper Advance Calibration (Main Menu/ Image Quality Maintenance/Paper Advance Calibration/Calibrate Paper Advance).
It is very important to verify that the loaded media is the same media type as selected in the front panel. You can verify the media type selected through the Front Panel (Main Menu/Paper menu/View loaded paper). The wrong type of paper selected will produce an offset error in the Paper Advance.
|
HP Designjet T Series — Service Manual |
1-17 |
Print quality troubleshooting
The following plot shows correct media advance, there is a straight white line positioned close to the 0 column for the majority of the points.
|
HP Designjet T Series — Service Manual |
1-18 |
Print quality troubleshooting
The following plot shows a bad media advance, there is a straight white line positioned close to the -6 column, instead of the 0 column for the majority of the points.
Corrective Action
To fix Paper Advance problems, try the following:
1Check the Paper Advance Calibration Status. This can be done by going to Main Menu/Paper/View Loaded Paper. At the bottom, the Front Panel displays the Paper Advance Calibration status. There are three status messages:
DEFAULT. The paper loaded is recognized as HP paper, which is already optimized and calibrated for the printer. Do Not calibrate the Paper Advance for this paper.
RECOMMENDED. The paper loaded is NOT recognized as HP paper, and Paper Advance values have NOT been customized for this paper type. In this case, calibrate the Paper Advance from the user menu.
OK. This indicates that the paper loaded has been calibrated before. If the printer continues to have banding and graininess problems, calibrate the Paper Advance from the user menu.
Whenever the printer’s firmware is upgraded, the paper advance calibration values will be reset to factory default.
|
HP Designjet T Series — Service Manual |
1-19 |

Print quality troubleshooting
2To calibrate the Paper Advance from the user menu, go to Main Menu/ Image Quality Maintenance/Paper Advance Calibration/Calibrate Paper Advance.
It is very important to verify that the loaded media is the same media type as selected in the front panel. You can verify the media type selected through the Front Panel (Main Menu/Paper menu/View loaded paper). The wrong type of paper selected will produce an offset error in the Paper Advance.
Some paper types are not suitable for Paper Advance Calibration. Do NOT use colored papers or transparent materials such as translucent bond, clear film, matte film, tracing paper, or vellum.
Paper Advance calibration from the user menu will only calibrate the Paper
Advance for the paper type loaded in the printer at that moment.
3If Calibrate Paper Advance has mostly solved the problem, try Adjust Paper Advance to fine tune the Paper Advance (Main Menu/Image Quality Maintenance/Paper Advance Calibration/Adjust Paper Advance).
Select the percentage of change from -100% to 100%. To correct light banding, decrease the percentage. To correct dark banding, increase the percentage.
4The Paper Advance calibration from the service menu will calibrate the Paper Advance for ALL paper types. This action is recommended when:
The Paper Advance calibration from the user menu does NOT solve the problem.
The Paper Advance problems affect ALL paper types.
The procedure for Paper Advance Calibration from the service menu is documented in Chapter 5, Service Calibrations. See Paper Advance Calibration on page 4-6.
Printhead Alignment
To ensure you obtain meaningful results, use the same type of media that the customer was using when they encountered the image quality problem.
This plot helps you to visually check any alignment problems of the printer. You use it to precisely measure the alignment error with a 3 dot row accuracy. For the printer to be considered correctly aligned, the results must be within ±3 dot row.
|
HP Designjet T Series — Service Manual |
1-20 |
Print quality troubleshooting
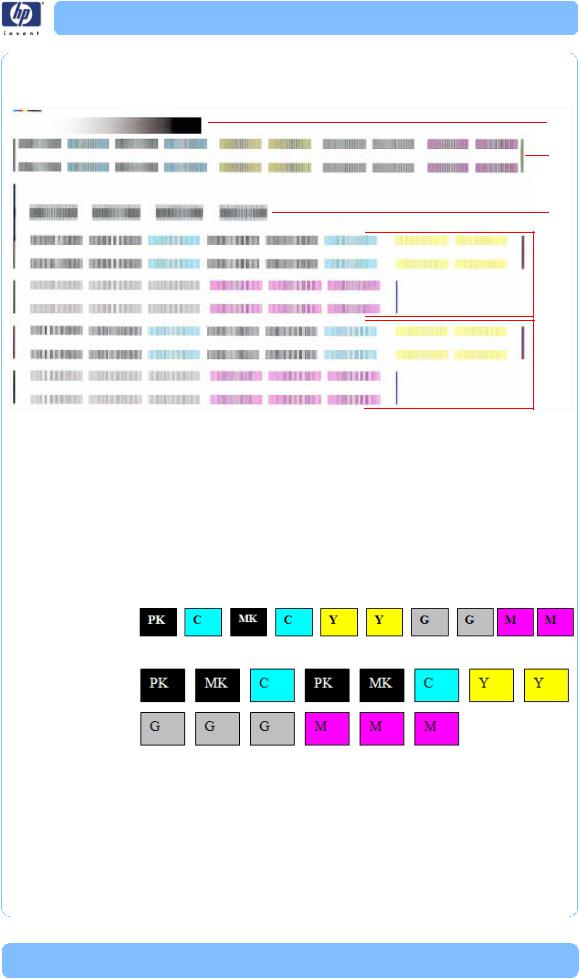
The illustration shows the complete Printhead Alignment that identifies each of the specific alignment test results covered.
a b
c
d
e
The Printhead Alignment Diagnostic print shows the following diagnostic test results:
aLine Sensor Calibration
bPen to Pen Align
cCarriage thetaZ
dBidirectional align (high)
eBidirectional align (Low)
For tests a, b, and c, the order of the color band is:
For tests e and f, the order of the color band is:
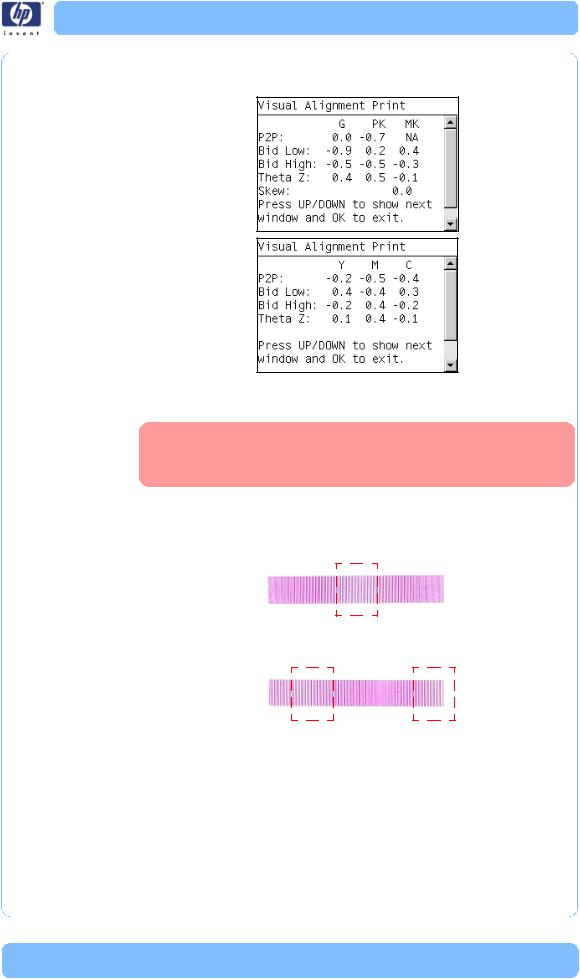
Once the printer has correctly printed and scanned the Printhead Alignment Diagnostic print, the Front Panel displays the results. The top row displays the printhead, and the left column displays the test.
|
HP Designjet T Series — Service Manual |
1-21 |
Print quality troubleshooting
The results are seperated onto two screens. Use the Arrow keys to display the second results screen.
Any printhead with a test result containing a number that is not within the ±3 dot row range is misaligned.
The mK printhead is used as a reference to test the other printheads. If all the printheads fail the Pen to Pen tests, it is the mK printhead that is misaligned.
Reading the Printhead Alignment Diagnostic Print
The following plot shows correct printhead alignment for all patterns. The clear band is in the center of the pattern.
The following plot shows bad printhead alignment. The clear band is not in the center of the pattern.
Corrective Action
If any of the printheads are misaligned beyond the ±3 dot row range, perform a Printhead Alignment. See Aligning Printheads on page 3-14.
If a Printhead Alignment does not correct the problem, replace the bad printhead.
|
HP Designjet T Series — Service Manual |
1-22 |
Print quality troubleshooting
If the customer is using non-HP media and after the Image Quality Test you still have the same image quality problems, change to genuine HP media and repeat the Image Quality Test. The best alignment calibration is obtained using HP Photo Paper.
Nozzle Health
The print contains three separate parts.
a
|
b |
c |
|||
aThe Variable Frequency Nozzle health plot with odd/even nozzles separation. This is used to detect misdirected nozzles, weak nozzles, or nozzles not working correctly at all frequencies.
bInspector measuring tool test plot.
Test b should NOT be used by Service Engineers.
cNozzle Print Test which is also part of the Image Quality Service Plot. This test is designed to check that the Printhead nozzles print correctly. The test prints out every single nozzle of each Printhead. No error hiding or Printhead Alignment algorithm is applied. For each Printhead, you can see both the adjacent and the consecutive nozzles.
This is what you would see in the Nozzle Print Test part if there are nozzles not printing correctly:
1On the right of each Printhead Nozzle test, there is a series of numbered stepped diagonal lines. If one or more of the nozzles are malfunctioning or mis-positioned, you will see that the stepped lines are broken or misdirected in one or more places.
2On the left of each Printhead Nozzle test, there is a series of horizontal straight lines. If one or more nozzles are misdirected there will be unequal spaces between the corresponding lines.
Corrective Action for Nozzle Defects
If the printer has nozzle defects, it does not mean that you will not get perfect print quality results. The printer has automatic procedures to hide many nozzle defects.
1Recover the Printheads using the option through the Front Panel (Main menu/Image quality maintenance/clean printheads).
|
HP Designjet T Series — Service Manual |
1-23 |

Print quality troubleshooting
2Reprint the Nozzle Print test to check that the defective nozzles have been corrected.
3If the problem continues, replace the defective Printhead.
Force Drop Detection
If the Nozzle Print Test plot has persistent white point banding in only one color that cannot be fixed with a printhead recovery, you can use this option to resolve the problem by resetting the nozzle health data base so that all nozzles are assumed to be correct.
Once the nozzle health data base has been reset drop detection is forced.
The normal cause of this white point banding in a single color is the incorrect detection of failed nozzles by the drop detector.
Troubleshooting Print Quality Problems
Print Quality General Advice
1To achieve the best performance from the printer, only genuine HP accessories and supplies should be used.
2Make sure that the paper type selected in the Front Panel is the same as the paper type loaded into the Printer.
3Make sure to use the most appropriate print quality settings for your purposes. A lower print quality is likely to be seen if the print quality slider has been moved to the Speed end of the scale, or the custom quality level set to Fast.
4Check that the environmental conditions (temperature, humidity) are within the temperature/humidity range as specified for the Printer (refer to the User’s Guide for more information).
5Check that the ink cartridges and printheads have not exceeded their expiration dates.
|
HP Designjet T Series — Service Manual |
1-24 |
Print quality troubleshooting
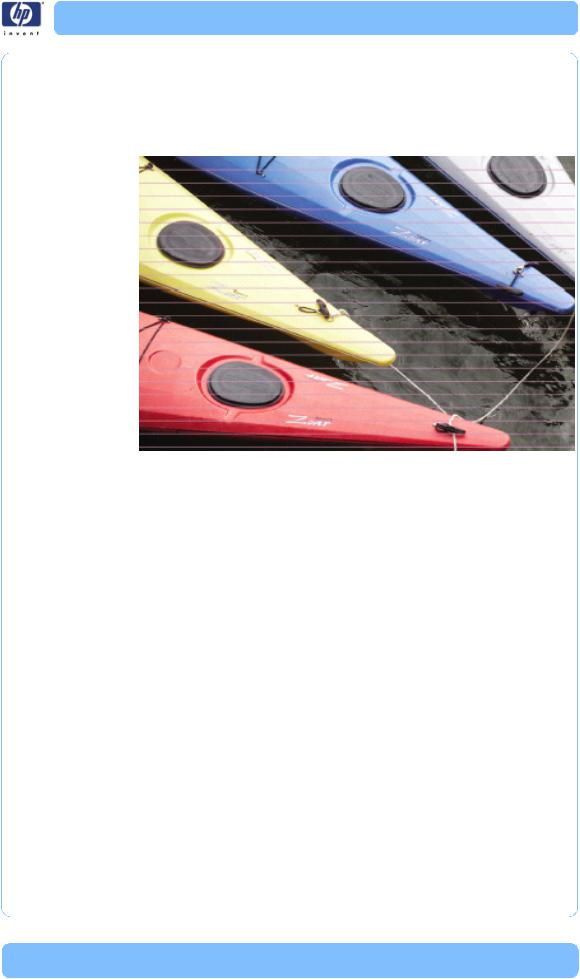
Horizontal Lines Across the Image (Banding) Description of problem
When you look at the image you have printed, there are horizontal lines across the image. Shown below is an example of what you might see if you have this problem:
Corrective Action
1Check that the paper type loaded corresponds to the paper type selected in the front panel and in the software. You can verify the paper type selected through the Front Panel (Main Menu/Paper menu/View loaded paper).
2Check that the appropriate print quality settings are being used (refer to the User’s Guide for more information) and reprint the image. In some cases print quality problems can be resolved by selecting a higher print quality level.
3Print the Service Image Diagnostics Print, and clean any printheads that need cleaning. Reprint the job in case the problem has been solved.
4Check the paper advance calibration status. If the status is PENDING, perform the Paper Advance Calibration (Main Menu/Image Quality Maintenance/Paper Advance Calibration/Calibrate Paper Advance).
5After calibration reprint the job.
6Watch the printer carriage when it reaches the end of its swath. If there is an unexpected delay, this may cause the banding.
This delay is possibly the result of the following:
The user is performing tasks with other applications while printing (particularly image processing applications). These applications are using too many computer resources, and the computer cannot effectively process the print job.
The file to be printed is complex, and the computer does not have the capacity to print such complex files.
|
HP Designjet T Series — Service Manual |
1-25 |
Print quality troubleshooting
If printing over a LAN, it is possible that the LAN is too slow to meet the requirements of the print job.
If this is the case, the following corrective measures can be taken:
1Do not use the computer while printing. Close applications that use a large amount of computer resources.
2Convert the file PDF. Formats like PDF require less resources to print, which may solve your banding problem.
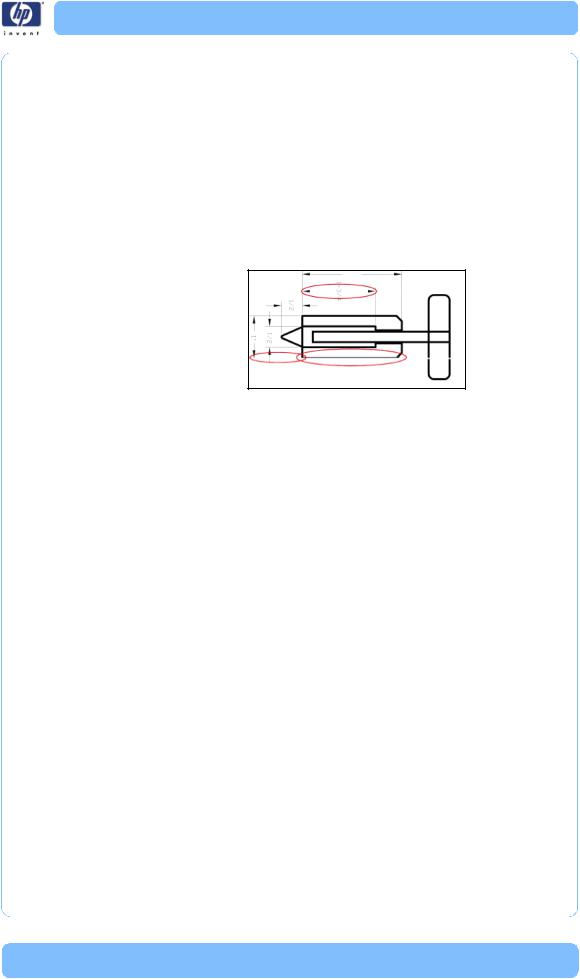
Lines are Missing, Too Thin, or Too Thick Description of problem
Shown below is an example of what you might see if you have this problem:
Corrective Action
1Check that the paper type loaded corresponds to the paper type selected in the front panel and in the software. You can verify the paper type selected through the Front Panel (Main Menu/Paper menu/View loaded paper).
2Check that the appropriate print quality settings are being used (refer to the User’s Guide for more information). Select the custom print quality options in the Print dialog, and if you are using best quality and glossy paper, try turning on the Maximum detail option. Reprint the job in case the problem has been solved.
3If the resolution of the image is greater than the printing resolution, a loss of line quality may be seen. You can find the Max. Application Resolution option in the Windows driver dialog’s Advanced tab, under Document Options > Printer Features. Reprint the job in case the problem has been solved.
4Check the Printhead alignment status. If the status is PENDING, perform the Printhead Alignment (Main Menu/Image Quality Maintenance/Align Printheads). After alignment reprint the job.
5Check the paper advance calibration status. If the status is PENDING, perform the paper advance calibration (Main Menu/Image Quality Maintenance/Paper Advance Calibration/Calibrate Paper Advance). After calibration reprint the job.
6Use Part 3 of the Image Quality Diagnostic Print, check if there are a significant amount of nozzles out in the color that is actually causing the problem (if see you a problem with the Black color in the customer print, then only check the Black printhead in the Image Quality Diagnostic Print). If there is a significant amount of nozzles out then replace the defective Printhead.
|
HP Designjet T Series — Service Manual |
1-26 |

Print quality troubleshooting
Problems with Stepped Lines
Description of problem
When you look at the image you have printed there are ‘stepped lines’ in the borders of arrows and diagonal lines. The lines should be straight with no stepping.
Shown below is an example of what you might see if you have problems with Stepped Lines:
Corrective Action
1The problems may be inherent in the image that you are trying to print. Try to improve the image with the application that generated the file.
2Check that the appropriate print quality settings are being used (refer to the User’s Guide for more information).
3Select the custom print quality options in your Print dialog, and if you are using Glossy media and BEST quality, turn on the Maximum Detail option.
4Change the image rendering resolution to 300 dpi (only in EconoMode Printmode) or 600 dpi depending on the printing needs. You can find the Max. Application Resolution option in the Windows driver dialog’s Advanced tab, under Document Options > Printer Features.
Lines are Printed Double or in Wrong Colors Description of problem
This problem can have various visible symptoms, as shown below:
Colored lines are printed double, in different colors
Borders of colored blocks are wrongly colored
|
HP Designjet T Series — Service Manual |
1-27 |

Print quality troubleshooting
Corrective Action
1 Reseat the Printheads by removing them and then reinserting them.
As you reseat the printheads, the printer will automatically align the printheads. It is important that the alignment is completed properly. See Aligning Printheads on page 3-14.
Lines are discontinuous
If the lines are broken in the following way:
1Check that the appropriate print quality settings are being used (refer to the User’s Guide for more information).
2Reseat the Printheads by removing them and then reinserting them.
As you reseat the printheads, the printer will automatically align the printheads. It is important that the alignment is completed properly. Aligning Printheads on page 3-14
Lines are Blurred (Ink Bleeds from Lines) Description of problem
This problem is often caused by the ink soaking into the paper, making the lines blurred and fuzzy. This could be because of the humidity in the air.
Corrective Action
1Check that the environmental conditions (temperature, humidity) are suitable for high-quality printing.
2Make sure that the paper type selected in the Front Panel is the same as the paper type loaded into the Printer.
|
HP Designjet T Series — Service Manual |
1-28 |

Print quality troubleshooting
3Try using a heavier paper type. When printing dense colors, it is recommended to use HP Heavyweight Coated Paper or HP Super Heavyweight Coated Paper.
4If glossy paper is being used, try changing to a different type of glossy paper.
5Align the printheads. See Image Quality Maintenance Procedure on page 1-49.
Problems with Graininess Description of problem
Shown below is an example of what you might see if you have problems with graininess:
Corrective Action
1Check that the paper type loaded corresponds to the paper type selected in the front panel and in the software. You can verify the paper type selected through the Front Panel (Main Menu/Paper menu/View loaded paper).
2Check that printing is on the correct side of the paper.
3Check that the appropriate print quality settings are being used (refer to the User’s Guide for more information). In many cases, you can correct grainy printing by raising the print quality settings. Reprint the job in case the problem has been solved.
4Check the Printhead alignment status. If the status is PENDING, perform the Printhead Alignment (Main Menu/Image Quality Maintenance/Align Printheads). After alignment reprint the job.
5Check the paper advance calibration status. If the status is PENDING, perform the paper advance calibration (Main Menu/Image Quality Maintenance/Paper Advance Calibration/Calibrate Paper Advance).
6After Paper Advance Calibration, reprint the job.
Paper is not Flat Description of problem
If the paper does not lie flat when it comes out of the Printer, but has shallow waves in it, you are likely to see visible defects in the printed image, such as vertical stripes. This can happen when you use thin paper that becomes saturated with ink.
|
HP Designjet T Series — Service Manual |
1-29 |

Print quality troubleshooting
Shown below is an example of what you might see if you have problems with the paper not being flat:
Corrective Action
1Check that the paper type loaded corresponds to the paper type selected in the front panel and in the software. You can verify the paper type selected through the Front Panel (Main Menu/Paper menu/View loaded paper).
2Try using a heavier paper type. When printing dense colors, it is recommended to use HP Heavyweight Coated Paper or HP Super Heavyweight Coated Paper.
Ink marks on the paper
This problem may occur for several different reasons.
|
HP Designjet T Series — Service Manual |
1-30 |

Print quality troubleshooting
Horizontal smears on the front of coated paper
If a lot of ink is used on plain or coated paper, the paper absorbs the ink quickly and expands. As the printheads move over the paper, the printheads may come into contact with the paper and smear the printed image. This problem is normally seen only on cut sheets of paper (not on roll paper).
Corrective Action
1Check that the paper type loaded corresponds to the paper type selected in the front panel and in the software. You can verify the paper type selected through the Front Panel (Main Menu/Paper menu/View loaded paper).
2Use a recommended paper type and the correct print settings.
3If using sheet paper, try rotating the sheet 90 degrees. The orientation of the paper fibers may affect performance.
4Try using a heavier paper type. When printing dense colors, it is recommended to use HP Heavyweight Coated Paper or HP Super Heavyweight Coated Paper.
5Try to increase the margins by relocating the image to the center of the page with the software application being used.
Ink marks on the back of the paper
This can happen after a lot of border less printing, especially with nonstandard paper sizes. Ink residues on the platen are likely to mark the back of the paper.
Corrective Action
Clean the platen with a soft cloth. Clean each rib separately without touching the foam between the ribs.
|
HP Designjet T Series — Service Manual |
1-31 |

Print quality troubleshooting
Problems with the Edges of objects Stepped or not sharp
The edges of objects or lines appear to be poorly defined or lighter in density than expected.
Corrective Action
If the print quality slider has already been set to Quality in the Print dialog, select the custom print quality options, and try setting the quality level to Normal (refer to the User’s Guide for more information).
Darker than expected
The edges of objects seem darker than expected.
Corrective Action
If the print quality slider has already been set to Quality in the Print dialog, select the custom print quality options, and try setting the quality level to Normal.
Black and white prints do not look neutral
Consider printing in grayscale (color options submenu inside the printing preference menu). See the User´s Guide for more information.
Horizontal lines at the end of a cut sheet print
There is a type of defect that only affects the end of a print, within approximately 30 mm of the trailing edge of the paper. Some very thin horizontal lines may be seen across the print.
Corrective Action
1Print the Service Image Diagnostics Print, and clean any printheads that need cleaning. Reprint the job in case the problem has been solved.
2Try printing with roll paper.
3Try using larger margins around the image.
Vertical lines of different colors
The print has vertical bands of different colors along it.
|
HP Designjet T Series — Service Manual |
1-32 |

Print quality troubleshooting
Corrective Action
1Try using a heavier paper type. When printing dense colors, it is recommended to use HP Heavyweight Coated Paper or HP Super Heavyweight Coated Paper.
2Use higher print quality settings (refer to the User’s Guide for more information).
White spots on the print
White spots are seen on the print. This is probably due to paper fibers, dust, or loose coating material.
Corrective Action
1Clean the paper manually with a brush before printing, to remove any loose fibers or particles.
2Always keep the cover of the printer closed.
3Protect paper rolls and sheets by storing them in bags or boxes.
Problems with Color Accuracy
Corrective Action
1Ensure that the paper type being used has been color calibrated, which will give color consistency from print to print, and from Printer to Printer.
2Check that printing is on the correct side of the paper.
3Check that the appropriate print quality settings are being used (refer to the User’s Guide for more information). Reprint the job in case the problem has been solved.
4If the problem consists of color differences between your print and your monitor, please follow the instructions in the «How to calibrate your monitor» section of the HP Color Center. At this point, you may wish to reprint your job in case the problem has been solved.
5Select suitable options in the application (refer to the User’s Guide for more information).
|
HP Designjet T Series — Service Manual |
1-33 |

Print quality troubleshooting
6Print the Service Image Diagnostics Print, and clean any printheads that need cleaning. Reprint the job in case the problem has been solved.
Color accuracy using EPS or PDF images in page layout applications
Page layout applications such as Adobe InDesign and QuarkXPress do not support color management of EPS, PDF, or grayscale files.
If these types of files have to be used, try to ensure that the EPS, PDF, or grayscale images are already in the same color space that is intended to be used later on in Adobe InDesign or QuarkXPress. For instance, if the final objective is to print the job in a press that follows the SWOP standard, at the time of creating the EPS, PDF or grayscale the image should be converted into SWOP.
Output Only Contains a Partial Print
If the output that was expected only contains a partial image, then try the following to resolve the problem:
1Was the Cancel key pressed before all the data was received by the Printer? If so, send the file again and make sure that the Cancel key is not pressed.
2The I/O Timeout setting may be too short. Increase the I/O timeout setting (Setup Menu/I/O Setup/IO Timeout) and then send the file again.
3There might be a communications problem between the Printer and Computer. Check the USB or network cable between the computer and the Printer to make sure it is not damaged and is connected correctly.
4Make sure that the software settings are correct for the current page size (e.g. long-axis prints).
5If network software is being used, make sure it has not timed out.
Problems with Image Clipping
This normally indicates a discrepancy between the actual printable area on the loaded paper and the printable area as understood by the software. This kind of problem can often be identified before printing by previewing the print.
Check the actual printable area for the paper size that is loaded. printable area = paper size – margins
Check what the software understands to be the printable area (which it may call “printing area” or “imageable area”). For example, some software applications assume standard printable areas that are larger than those used in this Printer.
If a custom page size with very narrow margins has been defined, the printer may impose its own minimal margins, clipping the image slightly. Consider using a larger paper size, or border less printing.
If the image contains its own margins, it may be possible to print it successfully by using the Clip Contents by Margins option.
If a very long image needs to be printed on a roll, check that the software is capable of printing an image of that size.
The page may have been rotated from portrait to landscape on a paper size that is not wide enough.
|
HP Designjet T Series — Service Manual |
1-34 |

Print quality troubleshooting
If necessary, change the printable area in the software.
If necessary, reduce the size of the image or document in your software application, so it fits between the margins
Another Possible Explanation
Some applications, such as Adobe Photoshop, Adobe Illustrator, and CorelDRAW, use an internal 16–bit coordinate system which means that they cannot handle an image of more than 32,768 pixels. If you try to print an image larger than this from these applications, the bottom of the image will be clipped. In this case, the only way to print the whole image is to reduce the resolution so that the whole image requires fewer than 32,768 pixels. The HP-GL/2 printer driver contains an option called Compatibility with 16–bit applications, which can be used to reduce the resolution of such images automatically. This option can be found option in the Advanced tab, under Document Options > Printer Features.
Some objects are missing from the printed image
Large quantities of data may be necessary to print a high-quality largeformat print job, and in some specific workflow there may be issues that can lead to some objects missing from the output.
Corrective Action
In the Advanced tab, select Document options, Printer features, and set Send job as bitmap to Enabled (HP-GL/2 driver only).
In the Advanced tab, select Document options, Printer features, and set 16-bit App. Compatibility to Enabled.
In the Advanced tab, select Document options, Printer features, and set Max. Application resolution to 300.
The above settings are mentioned for troubleshooting purposes and may adversely affect the final output quality or the time necessary to generate the print job. Therefore, they should be restored to their default values if they do not help to solve the problem.
When working under Mac OS, the above settings are not available. Instead, try reducing the resolution of bitmap images in the application software being used.
A PDF file is clipped or objects are missing
In older versions of Adobe Acrobat or Adobe Reader, large PDF files could be clipped or lose some objects when printing with the HP-GL/2 driver at high resolution. Upgrade the Adobe Acrobat or Adobe Reader software to the latest version. From version 7 onwards, these problems should be solved.
Print Quality Troubleshooting Wizard
Here we describe the main guidelines that a customer can follow to troubleshoot print quality and/or color issues, whenever a customer calls HP Support complaining about having any kind of printing quality problems or artifacts.
The Print Quality (PQ) troubleshooting Wizard is a set of processes and corrective actions that the customer can trigger in the printer whenever the print quality of the printer does not meet their expectations.
|
HP Designjet T Series — Service Manual |
1-35 |

Print quality troubleshooting
Some of these corrective actions that the customer can perform to enhance the print and/or color quality are: printhead cleaning, media advance calibration, printhead alignment, and color calibration.
The main benefits of this Print Quality Troubleshooting Wizard tool are that it creates a better customer experience, solving customer PQ issues fast, efficiently, and with a minimum cost for them and also for HP Support.
Customers can perform PQ/color troubleshooting through the Printer Utility (PU), the Embedded Web Server (EWS) or by following the steps described in the User’s Manual or the HP Knowledge Center.
Print Quality Troubleshooting Wizard main window
When to use the Print Quality troubleshooting tool:
The Print Quality Troubleshooting Wizard can help customers solve their PQ/color problems without the need to call to HP Support. Some of the problems for which it can help are the following:
Troubleshooting area fill uniformity issues such as:
–Horizontal lines across the image (banding)
–The entire image is blurry or grainy (graininess)
Troubleshooting line and text quality issues such as:
–Lines are too thick, too thin, or missing
–Lines appear stepped or jagged
–Lines print double or in the wrong colors
–Lines are discontinuous
–Lines are blurred
|
HP Designjet T Series — Service Manual |
1-36 |

Print quality troubleshooting
Troubleshooting color issues such as:
– Colors are inaccurate
Troubleshooting printhead reliability issues
Corrective actions a customer can perform:
The corrective actions on the printer’s systems that the customer can perform to enhanced the print and/or color quality are:
Clean Printheads is recommended only if the customer is experiencing problems with print quality where we know that printhead cleaning will help.
Calibrate Paper Advance is used to adjust the printer’s parameters for use with different types of print media. This only affects the physical movement of paper and does not affect the color calibration profiles.
Align Printheads is recommended only if the customer is experiencing problems with print quality where we know that proper printhead alignment will help (i.e. graininess).
Calibrate Color is recommended only if the customer is experiencing problems with color print quality where we know that proper color calibration with help (i.e. color accuracy).
Troubleshooting for banding issues
How to start the Print Quality Troubleshooting Wizard
1 From the HP Printer Utility under Windows: go to the Support tab, and
|
HP Designjet T Series — Service Manual |
1-37 |

Print quality troubleshooting
select Print quality troubleshooting.
2From the Embedded Web Server: go to the Support tab, then select Print quality troubleshooting.
For Mac OS
1From the HP Printer Utility under Mac OS: select Support, and then Print quality troubleshooting.
2From the Mac OS Print dialog: go to the Services panel, select Device Maintenance, then select Print quality troubleshooting from the list of maintenance tasks.
|
HP Designjet T Series — Service Manual |
1-38 |

Ink Supplies Troubleshooting
Ink Supplies Troubleshooting
Introduction to ink supplies
What are Ink Supplies?
For each of the ink colors used in the printer, there are two components, the Printhead and Ink Cartridge. These components are called Ink Supplies.
Ink Cartridges |
Printheads |
||||
Ink Cartridges
The printer’s six Ink Cartridges provide matte black, magenta, yeloow, cyan, gray and photo black ink to the Printheads. The color Ink Cartridges supplied with the printer have a capacity of 69ml but optional 130 ml are
also available.l
All these Ink cartridges are physically the same size. Only the internal capacity varies.
The Ink Cartridges for the T printer series require no maintenance or cleaning. As long as each Ink Cartridge is inserted correctly into its slot, the ink will flow to the Printheads. Because the Printheads control the amount of ink transferred to the page, you will continue to see high-quality printing results even when the ink levels are getting low.
|
HP Designjet T Series — Service Manual |
1-39 |

Ink Supplies Troubleshooting
The front panel displays the status of the Ink Cartridge. Using the front panel, detailed information can be checked on the Ink Cartridges.
Available Ink Cartridges
|
T Printer Series Cartridges |
Part |
|
|
number |
||
|
HP 72 69 ml Photo Black Ink |
Ink Cartridge |
C9397A |
|
Cartridge |
||
|
HP 72 69 ml Cyan Ink Cartridge |
Ink Cartridge |
C9398A |
|
HP 72 69 ml Magenta Ink |
Ink Cartridge |
C9399A |
|
Cartridge |
||
|
HP 72 69 ml Yellow Ink |
Ink Cartridge |
C9400A |
|
Cartridge |
||
|
HP 72 69 ml Gray Ink Cartridge |
Ink Cartridge |
C9401A |
|
HP 72 130 ml Matte Black Ink |
Ink Cartridge |
C9403A |
|
Cartridge |
||
|
HP 72 130 ml Photo Black Ink |
Ink Cartridge |
C9370A |
|
Cartridge |
||
|
HP 72 130 ml Cyan Ink |
Ink Cartridge |
C9371A |
|
Cartridge |
||
|
HP 72 130 ml Magenta Ink |
Ink Cartridge |
C9372A |
|
Cartridge |
||
|
HP 72 130 ml Yellow Ink |
Ink Cartridge |
C9373A |
|
Cartridge |
||
|
HP 72 130 ml Gray Ink |
Ink Cartridge |
C9374A |
|
Cartridge |
||
Printheads
The Printheads are extremely durable and do not need to be replaced every time an Ink Cartridge is replaced. They are independent of the Ink Cartridges and will continue giving excellent image quality results even if the
Ink Cartridges are low on ink.
If you notice a decline in print quality such as lines or dots missing from text/ graphics, go to Page Troubleshooting Print Quality Problems on page 6-22.
|
HP Designjet T Series — Service Manual |
1-40 |

Ink Supplies Troubleshooting
Available Printheads
|
Printhead Type |
Printer Model |
Part |
|
|
number |
|||
|
HP 72 |
Gray & Photo Black |
C9380A |
|
|
Printhead |
|||
|
HP 72 |
Magenta & Cyan Printhead |
All |
C9383A |
|
HP 72 |
Matte Black & Yellow |
C9384A |
|
|
Printhead |
|||
General Information About the Ink Supplies
For optimum results from the printer and modular ink delivery system always follow these guidelines when handling the ink supplies:
Always install the Ink Cartridges and Printheads before the expiration date, which is on the packaging.
Install Ink Cartridges and Printheads in their color-coded slots.
Follow the instructions on the front panel of the Printer during installation.
Avoid unnecessary removal of the Ink Cartridges and Printheads.
When turning off the Printer always use the power Off button on the front panel. The Printheads are then stored correctly which prevents them from drying out.
The Ink Cartridges should never be removed while the printer is printing. They should only be removed when the printer is ready for you to replace them. The front panel will guide you through the removal and installation procedure.
General Precautions When Handling Ink Supplies
Use the following precautions when handling Ink Supplies:
Do not touch, wipe or attempt to clean the printhead nozzles. This can damage the printhead.
Handle the ink supplies with care. In particular the Printhead, which is a high precision device and must be handled carefully.
Do not touch the Printhead nozzles.
Do not put the Printhead down on the nozzles.
Do not be rough when handling the Printheads. Always set them down gently.
Do not drop the Printheads.
Proper handling will assure optimum performance throughout the Printhead life.
Do not touch the end of the Ink Cartridge which is inserted into the printer as there may be a small amount of ink on the connection.
Avoid storing partially used Ink Cartridges on their ends.
|
HP Designjet T Series — Service Manual |
1-41 |

Ink Supplies Troubleshooting
When Should You Replace the Ink Supplies?
When to change the ink supplies is mostly determined by you with guidance from the front panel. In conjunction with the messages displayed in the front panel and the message explanations in this chapter, you will be able to choose for yourself when is the right time to change the ink supplies.
The Printer will also display the ink level and will tell you when the ink supply is low on ink. This means you have constantly updated information about the ink supplies.
Ink Cartridge Levels, Information, and Replacement
Ink Cartridge Levels
The front panel displays Ink Levels shown as level bars. These bars represent how much ink is remaining in the Ink Cartridges: as ink is used up the bars get shorter in length.
There are two methods for checking the ink levels of your Ink Cartridges.
“View Ink Levels” Direct Access Key
Pressing the “View ink levels” direct access key on the Front Panel will immediately show you the ink levels. For more information about direct access keys, see Using the Front Panel on page 1-3
“View Ink Levels” from the ink menu
Choosing the View ink levels option from the Ink menu will immediately show you the ink levels:
Obtaining Ink Cartridge Information 1 Scroll to the Ink Menu icon and press OK.
|
HP Designjet T Series — Service Manual |
1-42 |

Ink Supplies Troubleshooting
2In the Ink Menu submenu, scroll to Ink cartridge information and press
OK.
3In the Ink Cartridge Information submenu, scroll to the Ink Cartridge that you want information on and press OK.
4The front panel displays information on the selected Ink Cartridge. Use the Arrow keys to scroll through the information.
The information supplied is:
The color of the Ink Cartridge
The make of the Ink Cartridge (hp no.72 is recommended).
The product number of the Ink Cartridge.
The serial number of the Ink Cartridge.
The current status of the Ink Cartridge.
The current ink level of the ink cartridge in milliliters.
Original capacity of the ink cartridge in milliliters.
The Expiration Date of the ink cartridge.
The manufacturer of the Ink Cartridge (hp is recommended).
The current warranty status of the Ink Cartridge.
|
HP Designjet T Series — Service Manual |
1-43 |

Ink Supplies Troubleshooting
The printer consumes more gray ink ink than M, C, or Y
This is not a problem, and no action should be taken to “correct” this attribute of the printer.
In general the higher frequency of change is because Matte Black ink is the one that is used for lines and black objects in technical papers (bond, coated, HW coated, natural tracing paper, etc.), which are the types of contents that are more commonly printed with this type of printer.
About gray ink
The T Series Printers are the first HP Designjet technical products to include Gray ink. One thing that users may notice is that Gray ink is used in higher quantities than Cyan, Magenta and Yellow inks. This happens because of the following reasons:
1)Gray areas (which are very typical in technical drawings) can now be printed by using only Gray ink. In the past, these areas had to be printed by combining Cyan, Magenta and Yellow inks. This means that Gray ink is used more frequently than the rest of the inks (C, M, Y) which are now used less frequently, so the difference in consumption is noticeable. However overall the T Series Printers will actually need to use in total less ink to print gray areas than previous Designjet products.
2)Soft colors can now be printed by combining C, M and Y inks with Gray. The addition of Gray ink softens the color, improving transition areas. It also allows printing soft colors by using less C, M and Y. These two types of contents are very typical and make the consumption of Gray to increase and the consumption of C, M and Y to decrease.
Conclusion
However, no matter the combination of inks that are used, when the total cc’s of ink are added up, the T Series Printers will always have a lower ink consumption than the HP Designjet 500, 800 and 1000 series for equivalent contents with equivalent levels of print quality.
Changing an Ink Cartridge
There are two occasions when you need to remove an ink cartridge:
The ink cartridge is very low and you want to replace it with a full cartridge for unattended printing (you can use up the remaining ink in the first cartridge at a more convenient time).
The ink cartridge is empty or faulty, and you must replace it to continue printing.
Do not try to remove an ink cartridge while printing. Remove an ink cartridge only if you are ready to insert another one.
Make sure the printer wheels are locked (the brake lever is pressed down) to prevent the printer from moving.
Change an ink cartridge using the following procedure:
|
HP Designjet T Series — Service Manual |
1-44 |

Ink Supplies Troubleshooting
1Scroll to the Ink Menu icon and press OK.
2In the Ink Menu submenu, scroll to Replace ink cartridges and press
OK.
3The front panel displays the status of the Ink Cartridges.
4Press OK to continue.
5Open the relevant Ink Cartridge cover for the Ink Cartridge you want to replace.
6Pull the required Ink Cartridge straight up to remove it from the printer.
7The front panel indicates the missing Ink Cartridge.
8Before removing the cartridge from its wrapping, shake it vigorously.
9Unwrap the new ink cartridge, find the label identifying the ink color. Check that the letter or letters marking the empty slot, matches the letter or letters on the cartridge label.
10Insert the ink cartridge into its slot.
|
HP Designjet T Series — Service Manual |
1-45 |

Ink Supplies Troubleshooting
11Push the cartridge into the slot until it snaps into position. You should hear a beep and see confirmation that the cartridge has been inserted.
12When all cartridges have been inserted, close the cover.
Printhead Information, Replacement and Alignment
Obtaining Printhead Information
1Scroll to the Ink Menu icon and press OK.
2In the Ink Menu submenu, scroll to Printhead information and press
OK.
3In the Printhead Information submenu, scroll to the Printhead that you want information on and press OK.
4The front panel displays information on the selected Printhead.
The information supplied is:
|
HP Designjet T Series — Service Manual |
1-46 |
| Light status | Description  «light off» «light off»  «light on» «light on»  “light blinking» “light blinking» |
|---|---|
 |
PowerSave mode (or the printer is off) The printer uses PowerSave mode to conserve energy. |
 |
Ready The printer is ready to print. |
 |
Processing Self test page Form Feed The printer is receiving or processing data. |
 |
Buffered data The printer memory is retaining unprinted data. A file has been sent to the printer that does not contain a from feed at the end. |
 |
Manual feed The printer is in manual feed mode. The printer is waiting for a different size sheet of paper to be placed in the Single Sheet Input Slot or Paper Input Bin. |
 |
Door open, no Toner Cartridge, or paper jam The printer is in an error state. |
 |
Paper out The printer is out of paper. |
 |
Memory out The printer ran out of memory in the middle of a print job. |
 |
Reset/Printer initialization The printer memory is being reset and all previously sent print jobs are being purged. Or, a printer initialization is taking place. All lights blink for 1/2 of a second or longer if initializing. |
 |
Fatal error All lights are on. Press the Go key to see the secondary light pattern. |
| Fatal error | |
 |
ROM/RAM Error. An error was found with the ROM or RAM. The printer believes that the ROM is corrupted or an error has been found in the RAM. |
 |
Fuser Error. This indicates a fusing assembly malfunction. NOTE: Chronic fuser failures, fuser overheating, or both are indicators of an uninterruptible power supply or battery backup being used with the printer. Uninterruptible power supplies (UPSs) should not be used with the printer. |
 |
Beam Error. There are a number of causes for this error, and some of the causes may disappear. |
|
Print Engine Error. The formatter and engine are not communicating. |
|
Printer Laser/Scanner Error. Caused by a laser scanner malfunction. |
|
Firmware Error. Note the LED patterns on the BiTronics error code. Contact HP technical support with this information as well as a description of what data was sent, the errors encountered prior to the firmware error, the condition of the printer prior to the error, and any other information that may help isolate the error. |
 |
Incompatible DIMM Error (Accessory Error). |
|
Document Scan Engine Error. |
|
Document Scan Engine NVRAM Error. |