Содержание
- Cisco jabber не работает вызов
- Troubleshooting Cisco Jabber for iPhone
- Introduction
- Video: Registering Cisco Jabber for iPhone with CUCM
- Issues:
- Setup Issues
- 1. Unable to create Cisco Jabber device in Unified CM
- 2. Cisco Jabber registration fails or times out
- 3. Directory server handshake error
- 4. Device icon is missing
- Device Issues
- 1. Cannot complete calls
- 2. Unable to receive calls in Cisco Jabber
- 3. Battery drains faster during Cisco jabber calls
- Search Issues
- 1. No directory search
- 2. Incorrect or missing caller identification
- 3. Delayed caller identification
- 4. Searches are slow
- 5. Missing search results
- Voicemail issues
- ‘Use Mobile Network’ Failure
- Poor Audio Quality
- Port and Protocol List
Cisco jabber не работает вызов
Если не удается войти в систему, попробуйте воспользоваться приведенными ниже советами по устранению неисправностей:
- Убедитесь в использовании поддерживаемых устройства и операционной системы.
- Проверьте, есть ли у вас права доступа в вашу корпоративную сеть из некорпоративных сетей Wi-Fi.
- Если у вас есть права доступа в вашу корпоративную сеть из некорпоративных сетей Wi-Fi, обратитесь к системному администратору, чтобы он проверил правильность настроек граничной среды для совместной работы.
- Если у вас есть права доступа в вашу корпоративную сеть из некорпоративных сетей Wi-Fi, убедитесь, что установлено VPN-соединение (если оно требуется). Если VPN-соединение не установлено, обратитесь к системному администратору.
- В случае использования телефонных служб проверьте сетевое соединение между своим устройством и корпоративной сетью указанным ниже образом.
- Откройте веб-браузер.
- Попытайтесь открыть страницы управления корпоративной системой телефонии, введя в веб-браузере следующий URL-адрес: https://<адрес сервера Cisco Unified Communications Manager вашей компании>.
Обратитесь к системному администратору, если вы не знаете адрес сервера Cisco Unified Communications Manager своей компании.
- Если не удается открыть страницы управления корпоративной системой телефонии, повторите попытку, используя другую точку доступа к сети. Если все равно не удается открыть страницы управления корпоративной системой телефонии, обратитесь к системному администратору, чтобы узнать, нет ли сетевых неполадок.
- При использовании программы обмена мгновенными сообщениями Cisco Unified Communications Manager и службы Presence версии 9.1 или более ранней проверьте возможность входа в свою учетную запись пользователя, как описано ниже.
- Введите URL-адрес в следующем формате: https://<имя сервера Presence>/ccmuser.
- Войдите, используя свои имя пользователя и пароль.
- При использовании программы обмена мгновенными сообщениями Cisco Unified Communications Manager и службы Presence версии 10.0 проверьте возможность входа в свою учетную запись пользователя, как описано ниже.
- Введите URL-адрес в следующем формате: https://<имя сервера CCM>/ccmuser.
- Войдите, используя свои имя пользователя и пароль.
- При использовании программы обмена мгновенными сообщениями Cisco Unified Communications Manager и службы Presence проверьте сетевое соединение своего устройства и сервера, как описано ниже.
- Откройте служебную программу проверки связи, чтобы проверить связь с сервером программы обмена мгновенными сообщениями Cisco Unified Communications Manager и службы Presence.
- Введите полное доменное имя сервера в следующем формате: <имя сервера Presence>.<домен>.com
Если не удается войти в систему, попробуйте воспользоваться приведенными ниже советами по устранению неисправностей:
- Убедитесь в использовании поддерживаемых устройства и операционной системы. Сведения о поддерживаемых устройствах и операционных системах приведены в Примечаниях к выпуску Cisco Jabber для Android.
- Убедитесь в том, что используете подходящий выпуск Cisco Jabber для Android.
Источник
Troubleshooting Cisco Jabber for iPhone
» means nesting-related): — Failed at: @displayUserCertifications user_id [in template «custom.author-acclaim-certifications» at line 4, column 9] ——>
Introduction
This document describes the different possible causes and their possible solutions of the setup issues, device issues, search issues and voicemail issues of Cisco Jabber for iPhone. Cisco Jabber for iPhone provides users with VoIP calling, visual voicemail, and access to the corporate directory from an IOS device. Cisco Jabber is distinct from the Cisco Mobile application that runs in conjunction with a Cisco Unified Mobility Advantage server.
Features of Cisco Jabber for iPhone allow you to:
- Place and receive VoIP calls from a corporate phone number through Unified CM using your mobile device while Cisco Jabber is running and connected to the network.
- Receive calls at the standard mobile phone number when Cisco Jabber is not running or not connected to the corporate network
- Have multiple VoIP calls (call waiting, add new call, swap between active calls)
- Use many of the standard in-call features that Unified CM provides, including hold, transfer, and conference
- Connect automatically to the VPN if the corporate Wi-Fi network is not directly available
- Transfer an active Cisco Jabber VoIP call from your device to your desk phone and vice versa
- Transfer an active Cisco Jabber VoIP call to your mobile network
- Dial numbers by raising the iPhone to the ear and speaking the name of the person to call
- Search the corporate directory
- Access voicemail through a visual list
- Run the application in the background, and automatically register to Unified CM when available, and remain ready to receive calls to the work phone number.
- Transfer services from the Unified CM to another Unified CM or a router with Cisco Unified Survivable Remote Site Telephony (SRST).
- Open an IM session with Cisco Jabber contacts
- Use a Bluetooth headset on supported iPhone devices
Video: Registering Cisco Jabber for iPhone with CUCM
Issues:
Setup Issues
1. Unable to create Cisco Jabber device in Unified CM
The user’s device type is not available as an option.
Make sure that you have uploaded the device COP file and restarted Unified CM.
2. Cisco Jabber registration fails or times out
The following list describes different possible causes for and solutions to registration failure or timeout conditions:
Have the user check the troubleshooting tips in the FAQs for users at http://www.cisco.com/en/US/products/ps11596/products_user_guide_list.html .
- Verify that the phone can reach Unified CM: Try using the browser on the phone to connect to the Unified CM Administration portal.
- If registration is rejected with error 503, go to the Cisco Dual Mode for iPhone device page in Unified CM and select Reset, and then try again.
- Make sure your DNS server can resolve the hostname of the Unified CM server that is used as the TFTP server address.
- Enter the IP address instead of the hostname of the Unified CM server into the TFTP Server Address setting in Cisco Jabber.
- Registration failure with the error message «Verification Timed Out» indicates that you did not reboot all Unified CM servers in the cluster after you installed the device COP file. Make sure you reboot all Unified CM servers after you install the device COP file.
- Make sure you have enough licenses to accommodate your deployment.
- If you are attempting to connect over VPN:
- Verify that the phone can reach internal resources independently of Cisco Jabber: Try accessing an intranet web page or other resource behind the firewall.
- If your Cisco Jabber deployment includes Directory Services, try accessing the directory from within Cisco Jabber.
- If the phone is unable to connect over VPN, contact the provider of your VPN technology for assistance.
- If you enabled SIP digest authentication, make sure you entered the credentials correctly.
3. Directory server handshake error
When the client attempts to connect to the directory server, the connection fails with an SSL Handshake error. Do the below steps in order to resolve this problem:-
- Change the Enable LDAP SSL setting on the device page in Unified CM and re-launch the application.
- If you have allowed end-user configuration editing on the client, delete the directory account in Cisco Jabber and set it up again.
4. Device icon is missing
The device icon in the Unified CM Administration pages does not appear.
Try the following:
- Restart the Tomcat service as described in Install Cisco Options Package file for devices.
- Reload the device page in your browser.
- Clear the browser cache if necessary.
Device Issues
1. Cannot complete calls
Numbers that should be dialable cannot be connected. Users hear a network busy tone or error message.
Try the following:-
- If you made changes to the Application Dial Rules, make sure you ran the COP file to make the changes available to Cisco Jabber, and that you restarted the TFTP service.
- If you modified the dial rules and specified an alternate location for the dial rules in the Product Specific Configuration Layout section on the device page, make sure that you updated the custom file before you restarted the TFTP service.
- Make sure that you set the Call Forward Unregistered settings on the device page.
2. Unable to receive calls in Cisco Jabber
An incoming call arrives briefly in Cisco Jabber while it is running, but then the call is terminated and diverted to the native mobile phone number using Mobile Connect instead.
In Unified CM, set the SIP Dual Mode Alert Timer as described below:-
Step 1 Sign in to Unified CM Administration.
Step 2 Select System > Service Parameters.
Step 3 Select the server.
Step 4 Select the Cisco CallManager (Active) service.
Step 5 Scroll to the Cluster wide Parameters (System — Mobility) section.
Step 6 Increase the SIP Dual Mode Alert Time to 3000 milliseconds.
Step 7 Select Save.
Note:- If after you increase the SIP Dual Mode Alert Timer, incoming calls still arrive in Cisco Jabber, and are terminated and diverted using Mobile Connect, you can increase the SIP Dual Mode Alert Timer to 4000 or 5000 milliseconds. The 3000 millisecond value is the lowest recommended value.
3. Battery drains faster during Cisco jabber calls
The device battery seems to drain more quickly during Cisco Jabber calls than during standard mobile calls.
VoIP calls may use slightly more battery power than standard mobile calls. For actions the user can take, see the FAQs for users at http://www.cisco.com/en/US/customer/products/ps11596/products_user_guide_list.html.
Search Issues
1. No directory search
Directory search and caller identification are not available.
If you do not enter an IP address for a directory server in the device page in Unified CM, Cisco Jabber does not include Directory Services. Enter this information, save and reset the device, and then re-launch Cisco Jabber.
If you have allowed end-user configuration editing, delete the Directory account in Cisco Jabber, and then add it again.
2. Incorrect or missing caller identification
Some callers are not identified correctly.
Consider the following:
- When you add users or change user information in Microsoft Active Directory, correct identification of callers in recents or Voicemail in Cisco Jabber may take up to 24 hours. This delay minimizes synchronization activity that could affect performance.
- If a number does not match a contact using Directory Lookup Rules, Cisco Jabber displays the phone number as passed by Unified CM, unmodified by any Directory Lookup Rules.
- If you have made changes to the Directory Lookup Rules, make sure you have run the designated COP file to make those changes available to Cisco Jabber, and then restarted the TFTP service.
3. Delayed caller identification
Users experience delays in identifying callers, dialed numbers, and voice messages, when caller contact information comes from the corporate directory.
Verify that LDAP port settings are correct in the Product Specific Configuration Layout section of the Device page in Unified CM.
4. Searches are slow
Search results are returning slowly
Verify that LDAP port settings are correct in the Product Specific Configuration Layout section of the Device page in Unified CM.
5. Missing search results
Directory search does not find known employees.
If you have made changes to the Directory Lookup Rules, make sure you have run the designated COP file to make those changes available to Cisco Jabber, then restarted the TFTP service.
Voicemail issues
User repeatedly receives «Incorrect username or password» error when attempting to access voicemail.
Check the voicemail server to determine the user account is locked as a result of too many incorrect attempts to sign in.
‘Use Mobile Network’ Failure
The issue arises when call comes in to Jabber,answered on Jabber device and Jabber user press Mobility softkey «Transferring to mobile network» to transfer the call to cell phone number Mobile identity(the same iPhone device where Jabber is installed). Now, CUCM tries to transfer the call, but then call is back to Jabber and never gets transferred to mobile network.Mobile network transfer works if transferring the call from desk phone instead of Jabber client.
The workaround of this problem is to Use default user locale in TCT device. Go to Device > Phone and find your TCT device ,check User locale configuration, set it to default English US (not UK),reset the device so that the local can take effect.
Poor Audio Quality
What is causing the poor audio quality, sudden silence, or dropped calls?
Check the following:
- Weak wireless signal—Check the bars on your iOS device to verify that you have a strong Wi-Fi connection. If your signal is weak, consider moving the call to the mobile network. While on a call, tap Show Actions > Use Mobile Network.
- mobile data network connectivity—If you are using Cisco Jabber over the mobile data network, your connectivity and call quality can vary considerably. If the issues persist, disable mobile data network connectivity. Tap Settings > Internet Calling > Connect Over Mobile Data Network, and turn it off.
- Bluetooth and Wi-Fi interference—Even on the best-designed Wi-Fi network, you can experience interference from other devices (including your Bluetooth headset), which can cause dropped calls or poor audio quality on Cisco Jabber. Turn off the Bluetooth headset to see if that resolves the issue.
- Handoff between Wi-Fi access points—As you move around your workplace, your Wi-Fi connection might be transferred between different Wi-Fi access points. If you are in a call during one of these transitions, you might hear a few seconds of garbled audio or silence. This problem resolves itself after the handoff is completed.
- Lost connection to the Cisco Unified Communications Server—You might be experiencing network problems or the servers might be down temporarily. Contact your system administrator if this issue persists.
Port and Protocol List
The following table lists ports and protocols used in Cisco Jabber 8.6.2. The duration for each entry is “Ephemeral.”
Источник
Цитата:
Будто приложение засыпает внутрях мобильника.
Какая версия iOS? В предпоследнем релизе, ЕМНИП, Apple выпилил один из API, который использовал Jabber в бэкграунде.
После этого уведомления из звонки в свернутом и залоченном режиме в нем работают только через Apple Push Notification service, для этого нужно через дополнительные костыли регать на нем свой IM&P (по-моему, даже проксирования через Expressway еще нет).
Вот дока с описанием.
Цитата:
Cisco Jabber is considered to be running in suspended mode if any of the following conditions are true: • the Cisco Jabber application is running off-screen (i.e., in the background)
• the iPhone or iPad is locked
• the iPhone or iPad screen is turned off
Цитата:
Suspended mode
Voice or Video Calls
Standard communication channels are unavailable. Cisco Unified Communications Manager uses the Push Notifications channel.
Upon receiving the notification, the Jabber client re-enters foreground mode automatically and the client rings.
Instant Messaging
Standard communication channels are unavailable. IM and Presence Service uses the Push Notifications channel to send IM notifications as follows:
1. IM and Presence Service sends the IM notification to the Push REST service in the Cisco cloud, which forwards the notification to the Apple cloud.
2. The Apple cloud pushes the IM notification to the Jabber client and a notification appears on the Jabber client.
3. When the user clicks the notification, the Jabber client moves back the foreground. The Jabber client resumes the session with the IM and Presence Service and downloads the instant message.
За Андроид не скажу. На нем проблема воспроизводится идентично?
Cisco Jabber – обзор и преимущества
За последний десяток лет большую популярность приобрела голосовая и видеосвязь через глобальную сеть. Есть десятки мессенджеров, поддерживающих эту технологию. В этой статье мы рассмотрим такой популярный вариант связи как Cisco Jabber.
Вообще Сisco Jabber – это общее именование группы продуктов компании Cisco, предназначенное для связи посредством интернета. Это могут быть как текстовые сообщения, так и голосовая связь или видеозвонки.
Данная технология наиболее удобно для корпораций, поскольку достаточно проста в использовании и позволяет без проблем найти и установить связь с нужным человеком. При этом система определяет, доступен ли данный человек для контакта, устройство, с помощью которого осуществляется связь, а также имеется возможность ведения совместных проектов. Удобство в том, что используемое удаленным сотрудником устройство связи не имеет значения, поскольку данный продукт мультиплатформенный
Данная технология связи обеспечивает отличное взаимодействие с большинством программ, предназначенных для связи через интернет, благодаря использованию протокола передачи данных XMPP. Клиенты Cisco Jabber совместимы с приложениями от самых разных производителей, а это значит, что никаких проблем с обменом данными не будет, каким бы клиентским приложением ни пользовался абонент.
Очевидным плюсом данного решения является мобильность. Имеется возможность осуществлять связь с любого устройства, будь то ПК, ноутбук, планшет или смартфон. Операционная система в данном случае также не имеет значения. А возможность синхронизации данных позволяет спокойно переходить между устройствами связи. Интересное решение – обмен голосовыми сообщениями посредством сети Wi-Fi.
Кроме этого, программа позволяет не только совершать видеозвонки по всему миру, но и делает это с высокой четкостью. Также есть возможность устраивать видеоконференции с большим числом участников, при этом есть возможность видеть, кто присутствует в конференции, а кого на месте нет. Кроме того в рамках конференции пользователь может вывести на свой экран изображение одного или нескольких собеседников.
Если говорить о персональном использовании Jabber – это действительно удобное решение, поскольку в одной единственной программе заключается несколько способов связи – чат, электронная почта, телефонные и интернет-звонки, а также видеосвязь. Это позволяет сэкономить ресурсы системы и не запускать кучу разных приложений одновременно.
Но самым востребованным вариантом использования Cisco Jabber остается корпоративное применение. Решение от компании Cisco обеспечивает связь внутри рабочих групп с высокой степенью безопасности, позволяет организовывать удаленные рабочие совещания и своевременно доводить информацию до сотрудников. Кроме того, если у корпорации есть свои сервера, посредством Jabber можно осуществлять контроль за различным оборудованием.
Упомянем о мультиплатформенности. Поскольку данный продукт очень удобен в использовании и имеет открытый код, многие разработчики ПО стали интегрировать его в свои продукты (на стационарных платформах, к примеру, это Miranda, Psi, JAJC Tkabber). Даже такие гиганты как Google и Яндекс включают решения Jabber в свой функционал.
Источник
Краткое руководство по эксплуатации Cisco Jabber
1 ОБЛАСТНОЕ ГОСУДАРСТВЕННОЕ БЮДЖЕТНОЕ УЧРЕЖДЕНИЕ ДОПОЛНИТЕЛЬНОГО ПРОФЕССИОНАЛЬНОГО ОБРАЗОВАНИЯ «ТОМСКИЙ ОБЛАСТНОЙ ИНСТИТУТ ПОВЫШЕНИЯ КВАЛИФИКАЦИИ И ПЕРЕПОДГОТОВКИ РАБОТНИКОВ ОБРАЗОВАНИЯ» ОТДЕЛ СОПРОВОЖДЕНИЯ ИНФОРМАЦИОННЫХ СИСТЕМ В СФЕРЕ ОБРАЗОВАНИЯ Краткое руководство по эксплуатации Cisco Jabber Cisco Jabber — полнофункциональный клиент, поддерживающий видео и аудио звонки, сервисы отправки коротких сообщений, корпоративные и персональные адресные книги с отображением «присутствия» абонента. 1. Главное окно 1. Сообщение о состоянии; 2. Главное меню; 3. Строка поиска или вызова; 4. Контакты; 5. Недавние вызовы; 6. Контакты организации; 7. Группы пользователей; 8. Управление вызовами.
2 2. Настройка клиента Для настройки поведения клиента следует использовать функции Cisco Jabber 1. Выберите в Главном меню «Файл» — «Функции»: 2. Для настройки функций выберите нужную вкладку:
3 3. Добавление контактов Пользователей в список контактов можно добавлять из каталога «Контакты организации». После добавления пользователей в свой список контактов вы можете выполнить вызов или начать чат с нужным пользователем, выбрав соответствующее действие напротив имени пользователя. Как добавить контакты: 1. В строке поиска или вызова начните вводить имя человека для поиска в каталоге «Контакты организации» или введите имя пользователя полностью, если вы его знаете; 2. Нажмите на «+» для добавления контакта; 3. Выберите группу, в которую требуется добавить новый контакт, и нажмите «Добавить». 4. Работа с чатом Во время чата с пользователем, которого нет в вашем списке контактов, можно использовать элементы управления для выполнения следующих действий: Добавить контакт в свой список контактов [1]; Предоставить общий доступ к экрану своего компьютера [2]; Открыть параметры аудио [3]; Выполнить вызов [4].
4 В случае если пользователь включен в ваш список контактов действие [1] отображаться не будет Параметры чата В чате можно выполнить следующие действия: Отправить снимок экрана; Отправить файл; Вставить смайлик; Настроить размер и цвет шрифта; Добавить участников для организации группового чата; Отобразить чат в новом окне Групповой чат Групповой чат можно организовать с участием двух или более контактов. Как организовать групповой чат: 1. Выберите всех предполагаемых участников на вкладке «Контакты». Для выбора нескольких участников используйте клавишу CTRL; 2. Щелкните правой кнопкой мыши и выберите в открывшемся меню «Начать групповой чат»; 3. Введите тему группового чата; 4. Нажмите «Начать»; 5. Используя действие «Добавить участников», добавьте других участников.
5 5. Настройка аудиосигнала 1. Для настройки микрофона и динамиков: 1.1. В окне «Беседы» (открытое окно чата или вызова) нажмите значок «Открыть параметры аудио». Нажмите «Параметры звука»: 1.2. Выберите в Главном меню «Файл» — «Функции». Перейдите на вкладку «Аудио». 2. Выберите динамики и микрофон, которые вы хотите использовать для передачи и приема аудиосигнала. Вы также можете проверить работу динамиков; 3. Нажмите «Применить», затем «ОК».
6 6. Работа со звонками (вызовами) Во время звонка (вызова) можно использовать элементы управления для выполнения следующих действий: Показать/ скрыть элемент управления удаленной камерой [1]; Общий доступ к экрану [2]; Открыть параметры аудио [3]; Запустить/ остановить видео [4]; Показать этот вызов в новом окне [5].
7 6.1. Параметры звонка (вызова) В окне звонка (вызова) можно выполнить следующие действия: На весь экран/ Выйти из полноэкранного режима; Скрыть/показать свое изображение; Показать/ скрыть клавиатуру; Отключить/ включить звук; Регулятор громкости; Показать дополнительные функции; Завершить вызов Групповой конференц-вызов Групповой конференц-вызов можно организовать с участием двух или более контактов. Как организовать групповой конференц-вызов: 1. Выберите всех предполагаемых участников на вкладке «Контакты». Для выбора нескольких участников используйте клавишу CTRL; 2. Щелкните правой кнопкой мыши и выберите в открывшемся меню «Начать конференц-вызов». Как присоединиться к групповому конференц-вызову по номеру конференции: 1. В Главном окне в строке поиска и вызова введите номер конференции, например, 5005; 2. Нажмите кнопку вызова.
Источник
Неполадки со входом в Cisco Jabber
Проблемы со входом в Cisco Jabber
Если не удается войти в систему, попробуйте воспользоваться приведенными ниже советами по устранению неполадок:
- Убедитесь в использовании поддерживаемых устройства и операционной системы.
- Проверьте, есть ли у вас права доступа в вашу корпоративную сеть из некорпоративных сетей Wi-Fi.
- Если у вас есть права доступа в вашу корпоративную сеть из некорпоративных сетей Wi-Fi, обратитесь к системному администратору, чтобы он проверил правильность настроек граничной среды для совместной работы.
- Если у вас есть права доступа в вашу корпоративную сеть из некорпоративных сетей Wi-Fi, убедитесь, что установлено VPN-соединение (если оно требуется). Если VPN-соединение не установлено, обратитесь к системному администратору.
- В случае использования телефонных служб проверьте сетевое соединение между своим устройством и корпоративной сетью указанным ниже образом.
- Откройте веб-браузер.
- Попытайтесь открыть страницы управления корпоративной системой телефонии, введя в веб-браузере следующий URL-адрес: https://<адрес сервера Cisco Unified Communications Manager вашей компании>.
Обратитесь к системному администратору, если вы не знаете адрес сервера Cisco Unified Communications Manager своей компании.
- Если не удается открыть страницы управления корпоративной системой телефонии, повторите попытку, используя другую точку доступа к сети. Если все равно не удается открыть страницы управления корпоративной системой телефонии, обратитесь к системному администратору, чтобы узнать, нет ли сетевых неполадок.
- При использовании программы обмена мгновенными сообщениями Cisco Unified Communications Manager и службы Presence версии 9.1 или более ранней проверьте возможность входа в свою учетную запись пользователя, как описано ниже.
- Введите URL-адрес в следующем формате: https://<имя сервера Presence>/ccmuser.
- При использовании программы обмена мгновенными сообщениями Cisco Unified Communications Manager и службы Presence версии 10.0 проверьте возможность входа в свою учетную запись пользователя, как описано ниже.
- Введите URL-адрес в следующем формате: https://<имя сервера CCM>/ccmuser.
- При использовании программы обмена мгновенными сообщениями Cisco Unified Communications Manager и службы Presence проверьте сетевое соединение своего устройства и сервера, как описано ниже.
- Откройте служебную программу проверки связи, чтобы проверить связь с сервером программы обмена мгновенными сообщениями Cisco Unified Communications Manager и службы Presence.
- Введите полное доменное имя сервера в следующем формате: <имя сервера Presence>.<домен>.com
Если не удается войти в систему, попробуйте воспользоваться приведенными ниже советами по устранению неполадок:
- Убедитесь в использовании поддерживаемых устройства и операционной системы. Сведения о поддерживаемых устройствах и операционных системах приведены в Примечаниях к выпуску Cisco Jabber для Android.
- Убедитесь в том, что используете подходящий выпуск Cisco Jabber для Android.
Источник
CCIEME
my never ending journey to ccie
Troubleshoot Common Cisco Jabber Issues
This topic describes common end-user-related issues when using Cisco Jabber.
Common issues when working on trouble tickets for Cisco Jabber users include:
- The Cisco Unified IP phone of the end user cannot be selected.
- In softphone mode, telephony is not possible.
- Users are not shown as On a Call in the contact list during a call.
- End users cannot log in to Cisco Jabber.
- Search for contacts in Cisco Jabber returns no results.
- The end user cannot control the Cisco Unified IP Phone 9971.
The figure shows some examples of common issues that are reported by end users when end users are enabled for Cisco Jabber and presence functionality.
Cisco Unified IP Phone Cannot Be Selected
This topic describes an issue in which end users cannot select their Cisco Unified IP phone.
The end user reports that Cisco Jabber returns an error message when starting the client:
- Verify that the associated user devices are registered with the Cisco Unified Communications Manager.
- Verify that the end user is associated with Cisco Unified IP phones in the end-user configuration.
- Ensure that the CCMCIP profile in Cisco Unified Communications IM and Presence is applied to the end user.
- Verify in Cisco Unified Communications Manager that the device and directory number can be controlled by CTI.
- Verify that the user has the correct CTI access control groups assigned.

In this example, an end user reports that after logging in to Cisco Jabber, the client responds with the error message that the selected device is not available. Typically, each end user has only one IP phone. Therefore, the selection of another phone may not be possible. Cisco Jabber will fall back and use softphone functionality.
Common reasons for this problem include:
- The associated IP phone is not registered with Cisco Unified Communications Manager, which occurs because of a network, cabling, or phone issue.
- The IP phone is not associated in the end-user configuration in Cisco Unified Communications Manager.
- The end user has no Cisco Unified Communications Manager IP Phone (CCMCIP) profile that is assigned in Cisco Unified Communications IM and Presence Service.
- The IP phone or directory number cannot be controlled by CTI . This situation occurs when the Allow Control of Device from CTI check box is unchecked on the device or line.
- The user does not have the CTI Enabled and CTI Control of All Devices access control groups assigned.
In Softphone Mode, Telephony Is Not Possible
This topic describes an issue in which the end user cannot receive or place a call with Cisco Jabber.
When using softphone mode in Cisco Jabber, the end user cannot initiate or receive a call.
- In Cisco Unified Communications Manager, in the end user configuration, check if the Cisco Unified CSF device is associated with the end user.
- Verify that the Cisco Unified CSF device is registered with Cisco Unified Communications Manager.
- Ensure that the correct directory number, partition, and CSS are configured.

The softphone mode is typically used when an end user is not in the office. For example, an end user is currently at the airport or hotel and uses Cisco Jabber with a VPN connection or mobile and remote access. When the user reports that placing a call or receiving calls is not possible, verify the following configurations:
- Verify that the end user is associated with the Cisco Unified Client Services Framework (CSF) device in the end-user configuration in Cisco Unified Communications Manager.
- Ensure that the Cisco Unified CSF device is registered with Cisco Unified Communications Manager. If the device is not registered, the problem may occur because of an error in the services on Cisco Unified Communications Manager or the connectivity between the client and the call processing system.
- Check the configuration of the Cisco Unified CSF device. Ensure that the correct directory number, partition, and CSS are applied.
To verify that Cisco Jabber is registered with Cisco Unified Communications Manager, search for the Cisco Unified CSF device in Cisco Unified Communications Manager under the menu Device > Phone.
In softphone mode, the Cisco Unified CSF device should show that it is registered with Cisco Unified Communications Manager. When using hostnames or FQDN s for the TFTP server and Cisco Unified Communications Manager, the issue might be that the Cisco Unified CSF device cannot resolve the server name.
Users Are Not Shown as On a Call During an Active Call
This topic describes an issue in which a user reports that the presence status does not change to On a Call.
An end user reports that during an active call, the status is displayed as Available.
- Ensure that the SIP trunk between Cisco Unified Communications IM and Presence Service and Cisco Unified Communications Manager is set up correctly.
- Check on Cisco Unified Communications Manager that the line association of the end user directory number is configured.

If everything is configured correctly, a user is automatically shown as On a Call during an active call. When the end user reports that the presence status is not displayed correctly, perform the following tasks:
- Typically, this error occurs if the line association is not configured for any of the associated DN s. In Cisco Unified Communications Manager, check the IP phone, device profile, or Cisco Unified Client Services Framework (CSF) device directory number, and associate the end user with the line, as shown in the figure.
- Verify that the SIP trunk for presence subscription is configured correctly. Check the Cisco Unified Communications Manager and Cisco Unified Communications IM and Presence Service side of the SIP trunk for connectivity.
- Ensure that the SIP trunk security profile in Cisco Unified Communications Manager is configured correctly.
End User Cannot Log In to Cisco Jabber
This topic describes an issue in which end users cannot log in to Cisco Jabber.
An end user reports that logging in to Cisco Jabber does not work:
- Ensure that the user account is not locked because of password policies in the LDAP server or Cisco Unified Communications Manager.
- Check that the end user is using the correct server IP address or hostname.
- Make sure that service discovery is set up correctly and that the DNS SRVs can be resolved.
- Verify that the user is enabled for presence.

An end user tries logging in to Cisco Jabber and the client responds with a Login Failed message. Verify the following settings:
- Ensure that the end-user account is not locked because of password policies in Cisco Unified Communications Manager or LDAP —for example, when there were too many wrong login attempts and the account was locked by the LDAP server security policy.
- Sometimes, users change the server IP address or hostname by accident. Check that the user is trying to log in to the correct server. Setup of service discovery is recommended. Make sure that the login credentials are the same as the mail address, so that users know what to enter. End users may be confused, especially when subdomains are used for logins.
- When using the hostname of Cisco Unified Communications Manager in DNSSRV s, ensure that the DNS server is reachable and resolves the hostname to the correct IP address in the client device.
- On Cisco Unified Communications Manager, verify that the user is enabled for presence and that the correct service profile is selected.
Before starting troubleshooting and tracing, perform basic connectivity tests. Connectivity tests include the following: Check the network cable or Wi-Fi settings, try to ping Cisco Unified Communications Manager and Cisco Unified Communications IM and Presence Service nodes, and ensure that the user does not use Caps Lock when typing the password for the user account.
This topic describes an issue in which the end user reports that adding new contacts from the directory is not possible.
The end user reports that new contacts cannot be added to the contact list; the search does not return any results.
- Ensure that the directory UC Service is applied to the end user.
- Some clients require the jabber-config.xml file for directory access.
- When using Cisco Jabber with mobile and remote access, the LDAP server is not accessible from outside the enterprise network.
- LDAP directory is the preferred choice for contact search within the enterprise.

In this example, the end user reports that adding new contacts to the Cisco Jabber contact list is not possible because the directory search returns no results. Perform the following steps to troubleshoot the problem:
- Ensure that the end user is associated with the correct LDAP profile. A missing LDAP profile can also be indicated when the user ID in Cisco Jabber (at the top) cannot be resolved by the LDAP directory.
- Verify that the Search Context parameter in the LDAP profile configuration is correct.
- When connecting from outside the network, Cisco Jabber must use the Cisco User Data Service (UDS) directory because LDAP traversal is not supported in Cisco Jabber. Within the enterprise, however, LDAP is the preferred directory for contact searches.
End User Cannot Control the Cisco Unified IP Phone 9971
The topic describes an issue in which the end user cannot control the Cisco Unified IP Phone 9971.
An end user reports that a new Cisco Unified IP Phone 9971 cannot be controlled Cisco Jabber.
- Verify in Cisco Unified Communications Manager that the end user is associated with the Cisco Unified IP phone.
- Verify that the Allow Control of Device from CTI check box on the device and line is checked.
- Check in Cisco Unified Communications Manager that the correct groups and roles are defined:

The user reports that since the new Cisco Unified IP Phone 9971 was installed, CTI desk phone control of the device is not possible. With the previously used Cisco Unified IP Phone 7970, the user had no issues. Verify the following:
- On Cisco Unified Communications Manager, ensure that the new Cisco Unified IP phone was associated with the end user in the end-user configuration window.
- Verify that the Allow Control of Device from CTI check box on the device and the line configuration on Cisco Unified Communications Manager is enabled.
- Check the user groups in Cisco Unified Communications Manager. The Cisco Unified IP Phone 8900 and 9900 Series need an additional group. Add the end user to the Standard CTI Allow Control of Phones Supporting Connected Xfer and Conf group.
Источник
On-Premises Deployment for Cisco Jabber 12.1
Bias-Free Language
The documentation set for this product strives to use bias-free language. For the purposes of this documentation set, bias-free is defined as language that does not imply discrimination based on age, disability, gender, racial identity, ethnic identity, sexual orientation, socioeconomic status, and intersectionality. Exceptions may be present in the documentation due to language that is hardcoded in the user interfaces of the product software, language used based on RFP documentation, or language that is used by a referenced third-party product. Learn more about how Cisco is using Inclusive Language.
- New and Changed Information
- Introduction
- Cisco Jabber Overview
- Configuration and Installation Workflows
- Services
- Create Default Service Profile
- Contact Source
- Configure Instant Messaging and Presence Service
- Configure Voicemail
- Configure Webex Conferencing
- Configure CTI Service
- Users
- Configure Softphone
- Configure Deskphone Control
- Configure Extend and Connect
- Configuration
- Configure Service Discovery
- Configure Certificate Validation
- Configure the Clients
- Deploy Cisco Jabber Applications and Jabber Softphone for VDI
- Remote Access
- Quality of Service
- Integrate Cisco Jabber with Applications
- Troubleshooting
- Troubleshooting
Book Title
On-Premises Deployment for Cisco Jabber 12.1
Troubleshooting
View with Adobe Reader on a variety of devices
Results
Chapter: Troubleshooting
Troubleshooting
Windows and Mac
Cisco Unified Communications Manager Summary
Cisco Unified Communications Manager Configuration
To access the tool, users must bring the hub, call, or chat window into focus and select Ctrl + Shift + D .
Users can update the data by selecting Reload . Users can also save the information to an html file by selecting Save .
The tool is available by default. To disable this tool:
For Jabber for Windows set the DIAGNOSTICSTOOLENABLED installation parameter to FALSE.
For Jabber for Mac include the DiagnosticsToolEnabled parameter in the configuration URL with the value set to FALSE.
For more information about these parameters, see On-Premises Deployment for Cisco Jabber , or Cloud and Hybrid Deployments for Cisco Jabber , depending on your deployment.
Android, iPhone, and iPad
If users are unable to sign into Cisco Jabber or your Cisco Jabber IM and Phone services aren’t connected, they can use the Diagnose Error option to check what’s causing the issue.
Users can tap Diagnose Error option either from the Sign In page or from the warning notification they get when connecting to Cisco Jabber services. Cisco Jabber then verifies:
If there are any network issues
If Cisco Jabber servers are reachable
If Cisco Jabber can reconnect
Applies to Cisco Jabber for Windows.
The Contact Resolution tool provides information for the available directory sources and a search tool to display contact search results.
To access the Contact Resolution tool, users must bring the hub, call, or chat window into focus and select Ctrl + Shift + C .
The tool is available by default and can be disabled by setting the ContactsDiagnosticsToolEnabled installation parameter to FALSE.
The tool provides the following search options:
Predictive—The search takes the entered string and displays the matching records. This is the same search that is used when a user searches for a contact in the client.
The search will return the records matching the specified values.
For more information about the ContactsDiagnosticsToolEnabled installation parameter, see On-Premises Deployment for Cisco Jabber , or Cloud and Hybrid Deployments for Cisco Jabber , depending on your deployment.
Источник
К сожалению, не всегда удается подключиться к Jabber серверу без настройки клиента. Сначала необходимо определить, что мешает подключению.
Локальные проблемы[править]
Для определения характера проблемы надо выполнить следующие действия:
- Windows:
- Запустить консоль, щелкнув по кнопке Пуск (Start), затем выбрав Все программы->Стандартные->Командная строка.
- В открывшемся окне наберите telnet имя_сервера 5222 и нажмите Enter. Пример:
telnet jabber.ru 5222
- Unix-like:
- Запустить консоль, используя средства Вашего DE/WM. Если Вы не знаете, как это сделать — нажмите Ctrl-Alt-F1 и войдите от своего имени.
- В открывшемся окне наберите telnet имя_сервера 5222 и нажмите Enter. Пример:
telnet jabber.ru 5222
В Windows после этих действия окно должно стать полностью черным и только на верхней строке будет мигать курсор. Далее нажмите любую букву, но на экране вы ее не увидите (таковы особенности работы Telnet-клиента в Windows), а затем клавишу Enter. Появится текст, похожий на приведённый ниже.
<?xml version='1.0'?><stream:stream xmlns='jabber:client' xmlns:stream='http://etherx.jabber.org/streams'
id='none' from='jabber.ru' version='1.0'><stream:error><xml-not-well-formed
xmlns='urn:ietf:params:xml:ns:xmpp-streams'/></stream:error></stream:stream>
Connection to host lost.
С доступностью сервера всё в порядке и причина в неверной настройке клиента, либо проблемами, которые препятствуют самому подключению. Например, неверный пароль или попытка получить новую учетную запись, когда она уже существует на сервере.
Если же на экране отображается около минуты
Connecting To jabber.ru...
а затем
Could not open a connection to host on port 5222 : Connect failed
Это значит, что действительно по какой-то причине нет соединения с сервером. Попробуйте выполнить тоже самое, указав другой сервер. Например, telnet jabber.org 5222.
В случае неудачи вам следует поразмыслить, какие настройки вашей операционной системы могут препятствовать соединению на 5222 порт.
Это может быть следствие работы программного брандмауэера (firewall), в правилах которого указано запрещать соединения с интернет определенным программам (тому же Telnet).
Удаленные проблемы[править]
Если Вы точно уверены, что брандмауэр не запрещает Telnet доступ в Интернет, но соединения с сервером все ещё нет, то проблема связана со способом выхода в сеть. Чаще всего подобная проблема возникает при работе из сети предприятия. Возможные проблемы и способы их решения можно узнать ниже.
Прокси[править]

Пример настройки прокси в Psi
Довольно распространен способ выхода в Интернет через прокси. В первую очередь необходимо узнать настройки прокси. Самый простой вариант — посмотреть настройки браузера:
- в случае с Firefox они располагаются на странице «Дополнительно» настроек, вкладке «Сеть» в разделе «Соединение«
- в случае Internet Explorer 6 — «Сервис» — «Свойства обозревателя» — «Подключения» — «Настройка LAN» — «Прокси-сервер» — «Дополнительно«
Необходимы три параметра: тип, адрес и порт. Откройте настройки Вашего Jabber-клиента в разделе прокси (в случае Psi это «Меню«->»Аккаунты«->»Изменить«->»Соединение«->»Прокси-сервер«->»Изменить«-«Создать«), впишите туда адрес прокси-сервера и порт. Не забывайте правильно указать тип. Пример настройки можно увидеть справа, однако параметры, указанные на изображении, могут не совпадать с Вашими параметрами. После выполнения настройки можно подключаться.
Если ваш клиент не поддерживает работу через прокси-сервер[править]
или с подключением какие-либо проблемы, можно создать туннель через прокси, например с помощью утилиты socat (есть практически в любом дистрибутиве Linux, в Macports, также существуют бинарные сборки для Windows/Cygwin):
./socat TCP4-LISTEN:13666,reuseaddr,fork PROXY:your-proxy:allports.jabber.ru:443,proxyport=8080
В данном примере мы создаем туннель через прокси-сервер с адресом your-proxy:8080 с порта 13666 локальной машины на 443-й порт сервера allports.jabber.ru. Теперь в настройках аккаунта указываем нашему клиенту сервер подключения — localhost (127.0.0.1) и порт 13666.
Блокирование портов[править]
Иногда стандартные порты для соединения с Jabber сервером (5222 и 5223) закрыты. В этом случае можно попробовать использовать нестандартный порт. Не все сервера предоставляют доступ по нестандартным портам. Если Вы нашли свой сервер в этой таблице — введите настройках своего клиента указанные там хост (адрес для подключения) и один из перечисленных нестандартных портов. Если у вашего сервера есть несколько нестандартных портов, то сначала надо попробовать порт 443, при этом SSL должно быть включено. Как правило, этот порт открыт. Если этот порт закрыт, то нужно пробовать другие из списка.
Не нужно путать хост (адрес для подключения) и адрес сервера из JID. Адрес сервера из JID не зависит ни от хоста, ни от способа подключения. По этой причине JID’ы вида «someuser@allports.jabber.ru» не являются корректными и не следует его писать в соответствующее поле в настройках клиента. В данном примере в поле JID необходимо записать «someuser@jabber.ru», а «allports.jabber.ru» следует записать в поле «хост».
HTTP Polling/Binding[править]
Иногда выход в сеть разрешается только по протоколу HTTP. В таком случае необходимо использовать HTTP Polling/Binding. Как правило, настройки HTTP Polling располагаются там же, где и настройки прокси. В случае с Psi специально выделен тип HTTP Polling. В этом случае нужно узнать так называемый «URL для поллинга». Его можно посмотреть в этой таблице. Остальные поля нужно заполнять только в том случае, если используется прокси (см. выше).
Веб-клиент[править]
Если ничего из вышеперечисленного не помогает — то возможно использование веб-клиента. Это не так удобно, как обычный клиент, но в данной ситуации может быть решением. Выбрать наиболее подходящий веб-клиент можно на этой странице.

В данном материале подробно рассматривается настройка пользователя, имеющего стационарный телефон, а также мобильный телефон Samsung Galaxy, на который мы установим Cisco Jabber For Android.
Исходные параметры
CUCM Version 11.5
Имя Ivan
Фамилия Zolotov
Город Tyumen
Login izolotov
DN 1356
Настройка стационарного телефона
Заходим в свойства телефона и выставляем:
- Description: 1356 — Tyumen — Ivan Zolotov
- Device pool: Tyumen_pool
- Calling Search Space: Tyumen_Internal_css
- Owner User ID: izolotov
Жмем Save, затем для применения параметров Apply. При этом телефон перезагрузится.
На той же странице слева вверху щелкнем “Line 1” и зайдем в свойства линии и заполним следующие поля:
- Directory Number: 1356
- Route Partition: Oncluster_pt
- Description: 1356 — Tyumen — Ivan Zolotov
- Alerting name: 1356 Ivan Zolotov
- ASCII Alerting name: 1356 Ivan Zolotov
- Calling Search Space: Tyumen_Internal_css
- Выставляем CSS Tyumen_Internal_css для параметров Call Forward:
- Forward All
- Forward Busy Internal
- Forward Busy External
- Forward No Answer Internal
- Forward No Answer External
- Display (Internal Caller ID): 1356 Ivan Zolotov
- ASCII Display (Internal Caller ID): 1356 Ivan Zolotov
- Line Text Label: 1356 Ivan Zolotov
- ASCII Line Text Label: 1356 Ivan Zolotov
- Нажимаем Save (без этого не появится кнопка Associate end users)
- Users Associated with Line – выбираем заведенного пользователя
- Нажимаем Save – Apply
Настройка свойств пользователя
User Management -> End User
Controlled Devices, жмём Device Associations – находим стационарный телефон и добавляем его
Permissions Information, добавляем Standard CCM End Users.
Проверка
Стационарный телефон должен успешно звонить и принимать звонки.
Пользователь должен успешно заходить на Cisco Unified Communications Self Care Portal
Пробный логин Cisco Jabber
Даже без предварительных настроек на CUCM. Пользователь уже должен успешно логиниться в Cisco Jabber:
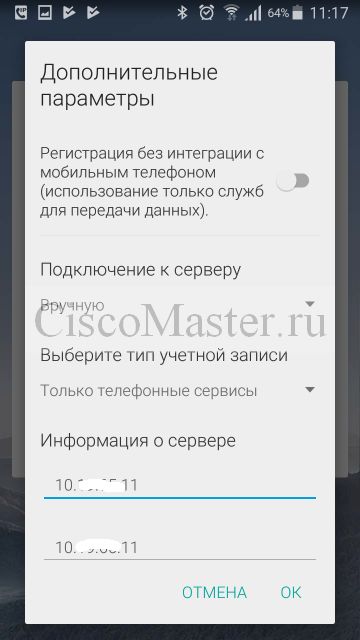
Для начала настроим параметры сервера: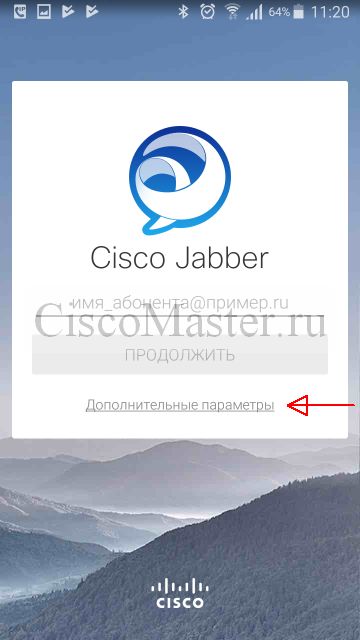
Далее логинимся пользователем в формате username@AD_domain_name_fqdn + доменный пароль этого пользователя.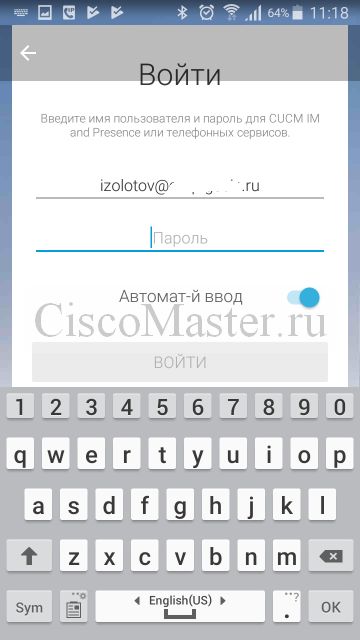
После успешного логина мы увидим: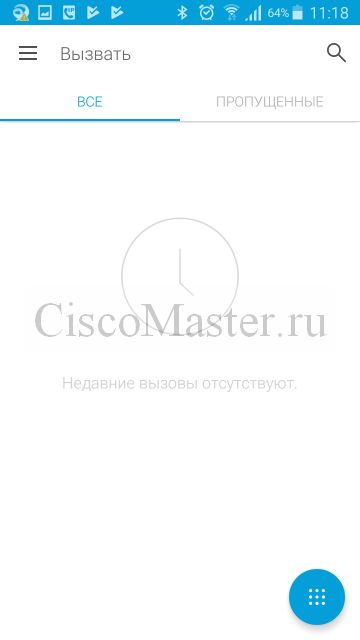
Но при попытке вызвать клавиатуру будет выдаваться ошибка: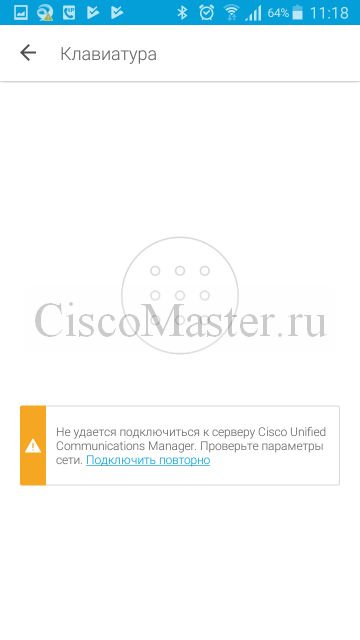
Настройка Cisco Jabber for Android на CUCM
Настроим теперь Cisco Jabber for Android в качестве второго аппарата.
Перед началом следует проверить что наш Device pool поддерживает кодек G.711.
Идём
Device > Phone > Add > Cisco Dual Mode for Android
Вводим параметры устройства:
- Device Name: BOTIZOLOTOV
- Имя Device Name должно быть UPPERCASE и должно начинаться с BOT
- Длина до 15 символов
- Может включать симвоолы A to Z, 0 to 9, dash (-), or underscore (_)
- Рекомендуется задавать в формате BOTUSERNAME
- Description: 1356 — Tyumen — Ivan Zolotov
- Device pool: Tyumen_pool
- Phone Button Template: Standard Dual Mode for Android
- Calling Search Space: Tyumen_Internal_css
- Owner User ID: izolotov
- Primary Phone: выбрать соответствующий desktop Phone
- Device Security Profile: Cisco Dual Mode for Android — Standard SIP Non-Secure Profile
- SIP Profile: Standard SIP Profile
- Нажимаем Save – Apply
На той же странице слева вверху щелкнем “Line 1” и зайдем в свойства линии и заполним следующие поля:
- Directory Number: 1356
- Route Partition: Oncluster_pt
Система автоматом «узнает» этот DN и подгрузит все параметры данного DN. - Нажимаем Save – Apply
После этого при логине в Jabber мы уже сможем принимать и отправлять звонки.
Настройка свойств пользователя
User Management -> End User
Controlled Devices, жмём Device Associations – находим Jabber телефон и добавляем его
Источники:
https://supportforums.cisco.com/document/98886/configuring-cisco-jabber-…