IPf 770 ошибка 2F51
2F51 и отказ печати теста дюз
| Сообщение #1
Отправлено 16 марта 2021 — 05:21
День добрый!
Небольшая вводная — есть Ipf 770, покупался новым для печати чертежей и иногда цветных плакатов, пробег за 4 с лишним года — 455 квадратов, но последние 2 года использовался как запасной с нечастой печатью пару чертежей и плакатов раз в 3 недели. Недавно начал ругаться на памперс, приобрели новый, заменили и продолжили дальше понемногу печатать.
Вчера напечатав пару чертежей, поставили новый рулон, бумага при выходе с печати начала сворачиваться в трубу и если первый чертеж придерживали, то второй уже нет. И после второго он выдал ошибку 03130031-2f51 и отказался печатать. В журнале ошибок затесалась еще 03800300-2832 перед ошибкой 2f51. Что пробовали делать — прочистка дюз способ А (при этом в конце проверки он выдавал ошибку), сброс через сервис меню памперса, сброс ошибок, сброс пг, при этом самое паршивое что плоттер не может запустить любую печать, даже проверки дюз, выдает ошибку 2F51. Покурив форум сложилось впечатление, что замена на новую ПГ очень вероятно не решит проблему, так как почти во всех темах связанных с этой ошибкой тест дюз из сервисного меню выполняется.
Просьба подсказать, может кто нибудь сталкивался с подобным…
- Наверх of the page up there ^
-
0
| Сообщение #2
Отправлено 31 марта 2021 — 20:01
Robinzon54
ошибка связана с утечкой чернил, зачастую вызвана хреновыми ПЗК или ушатаными картриджами — клапана текут. Решать вопрос с картриджами — и прошивать (сбрасывать) голову.
- Наверх of the page up there ^
-
0
| Сообщение #3
Отправлено 25 июля 2022 — 08:30
Po4
Столкнулся с такой же проблемой. Те же ошибки. 2 дня безуспешных попыток, менял голову (на старую), результат тот же. Плоттер постоял в выходные, в понедельник утром синий ПЗК был пуст под ноль, как-то раз уже было с ним такое, возможно в нем и дело. Голову не сбрасывал не прошивал, все заработало само собой. Может кому информация будет полезна.
- Наверх of the page up there ^
-
0
- ← Предыдущая тема
- Canon
- Следующая тема →
- Вы не можете создать новую тему
- Вы не можете ответить в тему
2 человек читают эту тему
0 пользователей, 2 гостей, 0 скрытых пользователей
По целому ряду причин в плоттерах Canon imagePROGRAF могут возникнуть ошибки связанные с заполнением промежуточных чернильных ёмкостей (субтанков):
- 03130031-2F70 (общая ошибка)
- 03130031-2F71 (левый блок подачи чернил)
- 03130031-2F72 (правый блок подачи чернил)
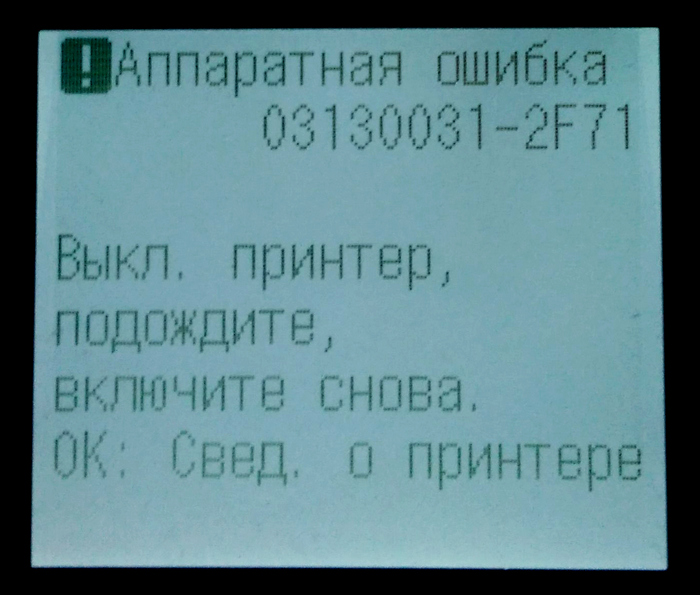
Одной из наиболее вероятных причин можно считать аппаратную ошибку работы циклов прокачки картриджей.
Устранить проблему можно исключительно установкой оригинального картриджа. Причём после того, как проблема будет устранена, стоит дать плоттеру какое-то время поработать на оригиналах, а спустя время — менять на ПЗК или перезаправленные картриджи (оригинальные или совместимые, не принципиально). В таких условиях комплект оригиналов можно будет растянуть на достаточно большое количество циклов перезарядки.
- Вставить новые оригинальные картриджи, либо ПЗК с чипами, снятыми с новых оригинальных картриджей.
- Печатающее устройство проверяет список использованных ранее картриджей и видит, что картридж оригинальный и новый.
- iPF проверяет с помощью давления полноту и проходимость чернил. Если всё в порядке, то принтер выходит в готовность практически без заполнения.
Следует контролировать время работы подкачки, чтобы препятствовать износу шестерней.
Можно также попробовать ещё один способ сбросить ошибку:
- Заправьте картриджи и установите в плоттер.
- Включите плоттер и зайдите в сервисное меню.
- Через сервисное меню заменить печатающую голову.
- Выключить плоттер и снова включить.
Также проблема может быть в некачественных чернилах. Если показатели текучести и электропроводности существенно отличаются от оригинальных, плоттер выдаст ошибку.
What If Print Head Replacement Doesn’t Work
In the event that a print head replacement does not clear the 2F51 error code, the next few steps can get pricey, and we recommend contacting Canon tech support to see if it’s cheaper and smarter to repair your printer or see if we are running any promotions that will make a brand new printer a better option.
In some cases, replacing the main controller is the next item on the list. For other models, the carriage relay PCB would be the right fix.
Lastly, other potential items to consider are the flat cables.
Final Notes
To recap, this error can be as simple as a reboot or can be as extensive as replacing 2 print heads, a carriage relay PCB, main controller, and a flat cable. There is much to consider when this error code comes into play, especially when thinking about the age of the printer. Older printers may not be compatible with computer operating systems now or in the future, meaning a few thousand dollar repair now may be meaningless in the very near future. In some cases, it may be better to replace the printer with a brand new model and get the accompanying warranty.
Related Error Codes
The 2F48, 2F49, and 2F50 error codes are all similar and apply to the print heads as well. The codes are active links here, so simply click whichever applies and you will be moved to that page.
2F51 isn’t my error code!
If 2F51 is not the error code displayed on your screen, please see our blog post that lists all the possible 03133310 error codes so you can learn more about your specific error.
Canon imagePROGRAF Hardware Error 03130031 Introduction
When your Canon imagePROGRAF Plotter is stuck with an on-screen hardware error 0313003, you need to call the service center to get assistance to get your Canon large format printer back into working state. In this printer service guide, we will give you some ideas to decode Hardware Error 03130031 and its subcodes of the 4 digits in the end. You can Buy Printer Spare Parts from here
Decoding the Error 03130031
Since we have detailed documentation about this error, it will be easier for you to diagnose the error. The hard part is, this error is closely related to the ‘print head’ and in most cases, you need to replace it to fix the plotter. To diagnose the error in the right way, we need subcode, which is the last four characters of the error code followed by 03130031, for example, ‘2F51’. The whole error code will look like this, 03130031-2F51. Ca’t find the subcode? Contact us for plotter repair in Dubai
Now you know how to find the sub error code, But how to understand the meaning of the 4-digit code followed by 03130031?
Fixing HP Designjet plotter error codes
Hardware Error 03130031 Codes and their Meaning
The 03130031-[Sub Code] error codes are about 45 variants. They all have different meanings and here is how to clear/fix them.
Below are the list of Hardware Error 03130031 Codes
03130031-260E – Gap detection failure
03130031-2618 – VH voltage error
03130031-290A – HDD not connected/not detected
03130031-291B – Lift shift timeout
03130031-291D – Spur cam sensor detector failure
03130031-2E23 – Cutter unit failure
03130031-2F13 – A/D converter external trigger output stop
03130031-2F14 – ASIC register not writable
03130031-2F16 – Mist fan error
03130031-2F17 – Platen fan lock detection error
03130031-2F1F – Purge sensor error
03130031-2F20 – Cap motor cam positioning error
03130031-2F22 – Pump shift timeout
03130031-2F23 – Purge motor error
03130031-2F24 – Cutter shift timeout error
03130031-2F25 – Carriage motor HP not detectable
03130031-2F26 – Carriage Motion Error
03130031-2F27 – Carriage shift timeout
03130031-2F28 – Lift shift timeout
03130031-2F2A – Cannot detect the LF home position
03130031-2F2B – LF operation failure
03130031-2F2C – Cassette shift timeout
03130031-2F2E – Roll shift timeout
03130031-2F3A – Ink supply valve open/close monitor timeout
03130031-2F3B – CS communication error
03130031-2F3C – LP nip sensor error
03130031-2F3D – HP pre-ejection pump motor overload error
03130031-2F3E – HP pre-ejection pump motor shift timeout
03130031-2F3F – An error other than overload error or shift timeout error
03130031-2F46 – The shutter HP sensor did not respond at startup
03130031-2F48 – VHT (heater drive power supply for printhead) error
03130031-2F49 – Left side printhead
03130031-2F4A – Main controller PCB error
03130031-2F4D – VHT leak detection error of left printhead
03130031-2F4E – VHT leak detection error of right printhead
03130031-2F4F – VHT leak detection error of left and right printhead or a single printhead
03130031-2F50 – Right side printhead
03130031-2F51 – Both printheads
03130031-2F52 – Detect that a carriage unit of a legacy model has been mounted
03130031-2F53 – Supply valve motor error of the left ink tank
03130031-2F54 – Supply valve motor error of the right ink tank
03130031-2F6C – Failed self-testing
03130031-2F70 – Indication at ink priming error in both sub tanks
03130031-2F71 – Indication at ink priming error in the left sub tank
03130031-2F72 – Indication at ink priming error in the right sub tank
03130031-4027 – Lift shift timeout error
How to fix Canon imagePROGRAF Hardware Error 03130031
Fixing Canon imagePROGRAF Hardware Error 03130031 can be a simple power-cycle or a replacement of very expensive spare parts. The first thing you need to do is to make sure there isn’t any paper stuck inside the Canon imagePROGRAF Plotter. And that the carriage assembly is in the docked state on the right side hand side of the plotter. You can verify this by opening the top cover or the Canon imagePROGRAF Plotter.
The second step is to turn off the Canon Plotter by pressing the power button. You should NEVER unplug the Plotter power code while it is ‘ON’. Once you turn the power off, turn the plotter ‘ON’ in the usual way. If it clears the error message, consider you are lucky and continue your print job as usual.
If the steps as mentioned above, don’t fix the error, you will need to may need to call Plotter Service Center in Dubai.
Cube’about Technology LLC. has been rated
4.5 out of
5 based on
4 reviews as of May 2018. —
Read all customer reviews.
-
Опубликовано: 10 августа 2017
-
Просмотров: 11196
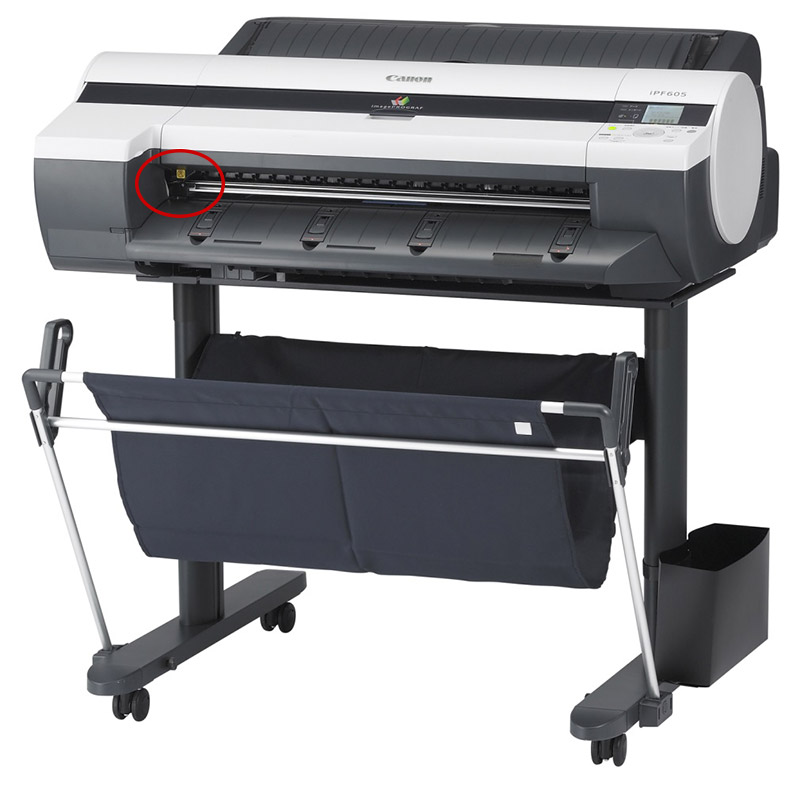
Сегодня меня позвали найти причину, почему плоттер Canon iPF-605 при включении выдаёт такое сообщение:
! Аппаратная ошибка 03130031-2E23
Выкл. принтер, подождите, включите снова.
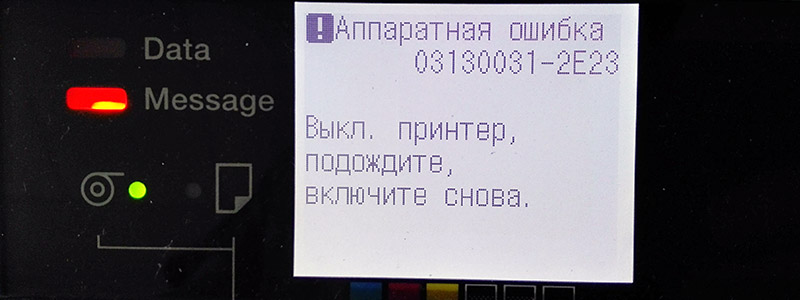
Дальше не загружается, до меню не доходит и не даёт ничего сделать. Выполнение совета выключить и включить устройство также эффекта не имеет.
Рунет ничего не подсказал по данной ошибке, пришлось покопаться по англоязычным форумам. Выяснилось, что эта ошибка означает проблемы с ножом для отрезания бумаги.
Нож при включении плоттера должен быть расположен в крайнем левом положении, со стороны передней части плоттера. Возьмите его и протяните немного вправо-влево. Он должен легко скользить на своих полозьях. Если нож двигается с трудом или со звуками – значит его где-то подклинивает. Именно в этом и причина ошибки.
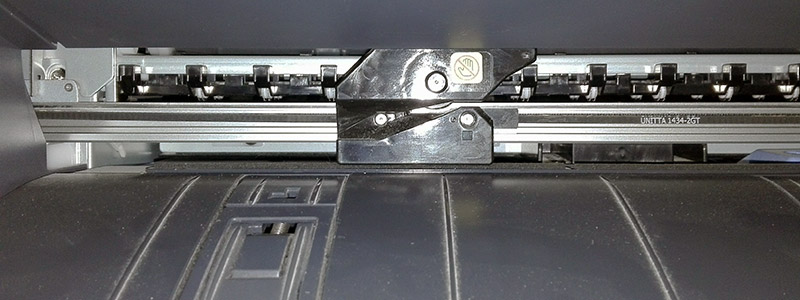
В моём случае – маленький кусочек бумаги застрял в полозьях и не давал ножу свободно перемещаться. Я его вытащил, проверил, что нож стал снова свободно скользить, сдвинул его до упора влево и включил питание.
Ура, проблема решена!
Check printing results
Call for service.
Call for service.
The memory is full.
The memory is full.
The memory is full.
The parameter is out of range.
This command is not supported.
Delete unwanted data
Now printing without saving data.
Prepare to replace the ink.
Prepare to replace the ink.
Prepare to replace the ink.
Prepare to replace the ink.
Prepare to replace the ink.
Replace the ink tank.
Replace the ink tank.
Replace the ink tank.
Replace the ink tank.
Replace the ink tank.
Check ink tank.
Check ink tank.
Check ink tank.
Check ink tank.
Check ink tank.
Delete unwanted data.
Delete unneeded jobs stored on the hard disk.
Press Online to clear error.
Lift the release lever and reload the paper.
Lift the release lever and align leading edge with orange line.
Lift the release lever and reload the paper.
Lift the release lever and reload the paper.
Check the paper type.
Press Online to clear the error and readjust printhead.
Clean the printhead.
Press Online to clear the error and readjust printhead.
Clean the printhead.
Lift the release lever and replace paper with A4/ LTR (vertical) or larger.
Lift the release lever and replace paper with A3/ Ledger (vertical) or larger.
Lift the release lever and replace roll with 10 in. wide or larger roll.
Remove paper and press Load/Eject.
Lift the release lever and reload paper.
Check supported paper sizes.
Check supported paper sizes.
Press Online to clear the error.
Lift the release lever.
Reload paper.
Press Load/Eject and reload the paper.
Lift the release lever and reload the paper.
Press Online to clear the error.
Press Load/Eject and load sheets.
Press OK, remove the sheets, and load a roll.
Press Load/Eject and load a roll.
Turn printer off and install roll feed unit.
Lift the release lever and replace the roll.
Press Load/Eject and reload the paper.
Press Load/Eject and remove the roll.
03130031-2E23
Turn off printer, wait, then turn on again.
03130031-2E14
Turn off printer, wait, then turn on again.
03130031-2E16
Turn off printer, wait, then turn on again.
03130031-2E17
Turn off printer, wait, then turn on again.
03130031-2E20
Turn off printer, wait, then turn on again.
03130031-2E22
Turn off printer, wait, then turn on again.
03130031-2E23
Turn off printer, wait, then turn on again.
03130031-2E25
Turn off printer, wait, then turn on again.
03130031-2E26
Turn off printer, wait, then turn on again.
03130031-2E27
Turn off printer, wait, then turn on again.
03130031-2E1F
Turn off printer, wait, then turn on again.
03130031-2E2A
Turn off printer, wait, then turn on again.
03130031-2E29
Turn off printer, wait, then turn on again.
03130031-2E2E
Turn off printer, wait, then turn on again.
03130031-4027
Turn off printer, wait, then turn on again.
03130031-2E13
Turn off printer, wait, then turn on again.
03130031-2F32
Turn off printer, wait, then turn on again.
Replace the multi sensor unit.
03130031-2F3A
Turn off printer, wait, then turn on again.
03130031-2F3B
Turn off printer, wait, then turn on again.
03130031-260E
Turn off printer, wait, then turn on again.
03130031-2618
Turn off printer, wait, then turn on again.
03130031-260F
Turn off printer, wait, then turn on again.
Turn off printer and check roll feed unit
Turn off printer, wait a while, then turn it on again.
Turn off printer, wait a while, then turn it on again.
03130031-2F2B
Turn off printer, wait, then turn on again.
Open top cover and replace the printhead.
Open top cover and replace the right printhead.
Open top cover and replace the right printhead.
03800500-2F2F
Turn off printer, wait, then turn on again.
Replace the head management sensor unit
Replace the printhead
03800500-2F30
Turn off printer, wait, then turn on again.
Replace the head management sensor unit
Replace the printhead
Press OK and replace ink tank.
Press OK and replace ink tank.
Press OK and replace ink tank.
Press OK and replace ink tank.
Press OK and replace ink tank.
Press OK and replace ink tank.
Press OK and replace ink tank.
Press OK and replace ink tank.
Press OK and replace ink tank.
Press OK and replace ink tank.
Press OK and replace ink tank.
Press OK and replace ink tank.
Press OK and replace ink tank.
Press OK and replace ink tank.
Press OK and replace ink tank.
Press OK and replace ink tank.
Press OK and replace ink tank.
Press OK and replace ink tank.
Press OK and replace ink tank.
Press OK and replace ink tank.
Press OK and replace ink tank.
Press OK and replace ink tank.
Press OK and check ink tank.
Press OK and check ink tank.
Press OK and check ink tank.
Press OK and check ink tank.
Press OK and check ink tank.
Press OK and check ink tank.
Turn off printer, wait a while, and turn it on again.
Turn off printer, wait a while, and turn it on again.
Replace the maintenance cartridge.
Cartridge capacity.
Replace the maintenance cartridge.
Replace the maintenance cartridge.
Replace the maintenance cartridge.
Check roll position.
Online: Print Load/Eject:
Change Paper
Check paper size setting.
Online: Print
Load/Eject: Change Paper
Online: Print
Stop: Stop Printing
Load/Eject: Change Paper
Lift the release lever and reload the paper.
Press Online to clear the error.
Check the head management sensor.
Online: Print
Stop: Stop Printing
Load/Eject: Change Paper
Delete unwanted data on your computer to resume printing.
Press Stop to cancel printing.
Cannot save. Delete unwanted data on your computer to resume printing.
Press Stop to cancel printing.
Press OK to reformat
Turn off printer, wait a while, and turn it on again.
Invalid files will be deleted.
Turn off printer, wait, then turn on again.
Turn off printer, wait, then turn on again.
Install printhead.
Check the maintenance cartridge.
Lift the release lever and reload the paper.
Manually rewind roll all the way and press OK.
Confirm usage cond. of the paper.