04.11.2016
Прошивка принтеров
155
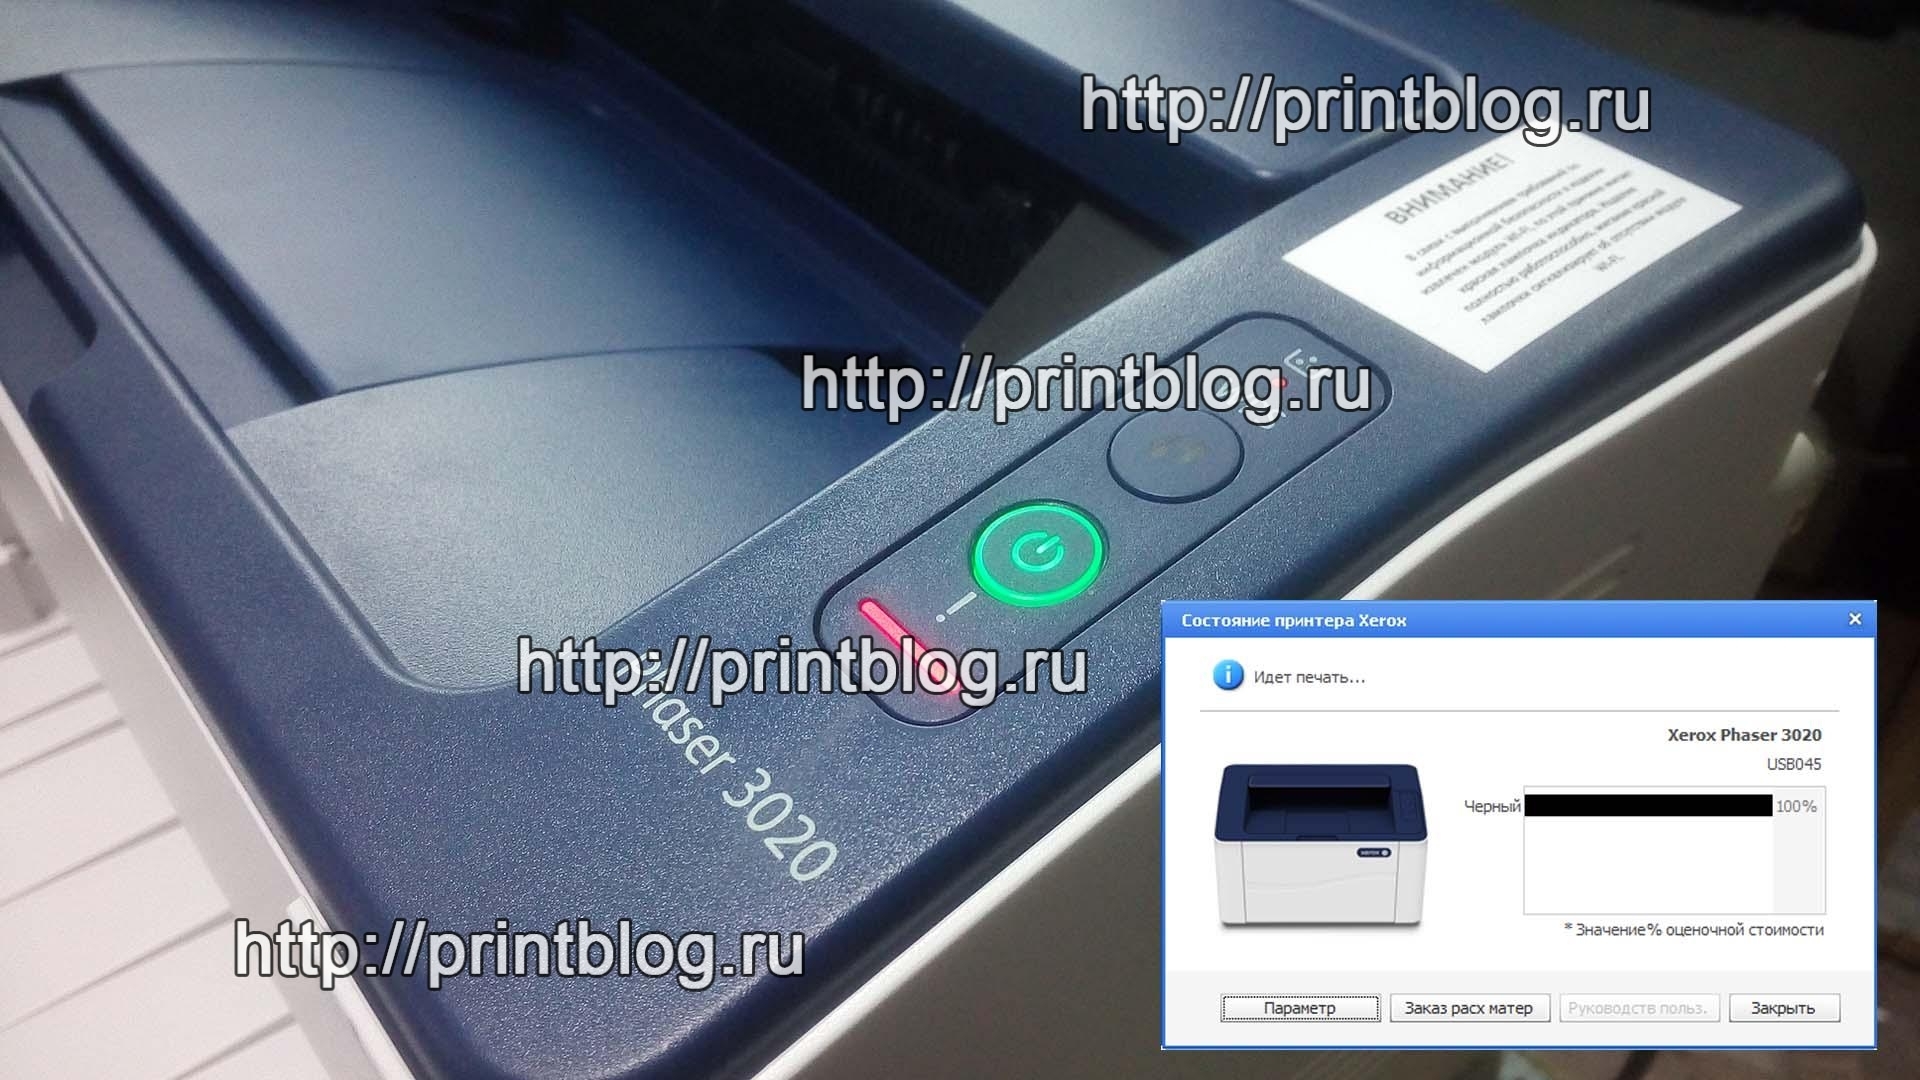
Прошивка принтера Xerox Phaser 3020 специальной модифицированной, так называемой, фикс-прошивкой (fix прошивка) не является необходимостью, но позволяет избавить пользователя от одной неприятной проблемы, которой обладает это устройство.
В этой записи рассмотрим следующие вопросы по прошивке принтера Xerox Phaser 3020:
1. Назначение фикс-прошивки принтера Xerox Phaser 3020
2. Плюсы и минусы фикс-прошивки Xerox Phaser 3020
3. Где взять фикс-прошивку Xerox Phaser 3020
4. Как прошить принтер Xerox Phaser 3020 фикс-прошивкой
1. Назначение фикс-прошивки принтера Xerox Phaser 3020
Осуществить ремонт или прошивку вашего принтера в г. Симферополь вы можете в сервисном центре по ул. Старозенитная, д.9 (вход со стороны забора). Обращайтесь пожалуйста в рабочее время с 9.00-18.00 по номеру +7 (978) 797-66-90
Прошивают Xerox Phaser 3020 специальной модифицированной фикс-прошивкой с одной единственной целью – это возможность работы принтера без чипов на картриджах. Зачем? Чип картриджа является средством защиты картриджа принтера от перезаправок, по изначальной задумке создателей Xerox Phaser 3020, вы не должны заправлять картриджи, вы должны все время покупать новые картриджи. Поэтому, вы сами решайте, как вам быть:
- покупать все время новые картриджи,
- один раз и на всегда прошить Xerox Phaser 3020 фикс-прошивкой
- каждую заправку покупать и менять чип на картриджи.
2. Плюсы и минусы фикс-прошивки Xerox Phaser 3020
Начнем с положительных моментов прошитого принтера Xerox Phaser 3020:
- несомненное преимущество – работа без каких-либо заморочек с покупкой неимоверно дорогого картриджа, никаких чипов картриджа, просто насыпал тонер в картридж и продолжил далее печать или быстро и дешево тебе его заправили.
- прошивка Xerox Phaser 3020 занимает около 5 минут
Минусы прошивки Xerox Phaser 3020 фиксом:
- если вы решили прошить Xerox Phaser 3020 фикс прошивкой, то имейте ввиду, что вы лишитесь гарантии на устройство. Но это не есть проблема, т.к. принтеру можно с легкостью вернуть заводскую прошивку, скачав ее без ограничений на официальном сайте.
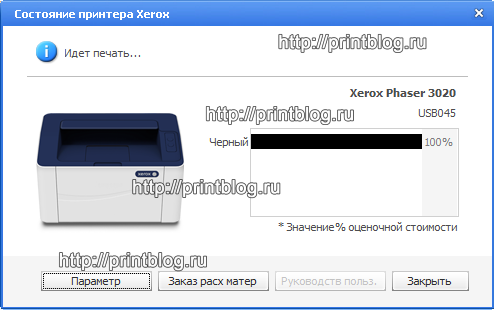
- после прошивки Xerox Phaser 3020 принтер перестанет отображать примерный уровень тонера в картридже, он будет всегда 100%, это немного не удобно, но также не проблема. Что бы понимать когда в картридже закончился тонер и его необходимо заправить, необходимо обращать внимание на качество отпечатков, если спустя 500-700 отпечатков после заправки начали проявляться белый пробелы на отпечатках, значит пора картридж заправить.
3. Где взять фикс-прошивку Xerox Phaser 3020?
Фикс-прошивка Xerox Phaser 3020 это платное удовольствие и стоит оно в среднем около 500руб. (200грн., 8$), но прошивается принтер один раз и на весь срок службы устройства. Не плохая экономия, не правда-ли? Или покупать каждые 3000стр. (на самом деле до 1000стр.) новый картридж за 5000руб. или чип для картриджа ценой около 600руб. Думаю, выгода очевидна, даже тем у кого была двойка по математике.
Для тех кто не в теме, отмечу, что прошивка для Xerox Phaser 3020 делается уникальной для каждого принтера, генерация фикс-прошивки происходит, зачастую, по серийному номеру принтера и серийному номеру чипа картриджа (CRUM). Поэтому, если у вас несколько принтеров Xerox Phaser 3020 и вы купите прошивку для одного принтера, оставшиеся принтеры у вас не получится успешно прошить этой купленной прошивкой, придется для каждого принтера покупать свою индивидуальную фикс прошивку. Почему это так, думаю, объяснять не стоит.
Продавцов на просторах интернета также хватает, но с вашего позволения отрекомендую возможность заказать и получить прошивку на нашем сайте.
Для заказа фикс-прошивки к принтеру Xerox Phaser 3020 необходимо:
1. Нажмите “Купить” под иконкой принтера ниже и вы попадете на страницу оформления заказа. Обработка вашего заказа происходит в автоматическом режиме, поэтому ваш заказ вы получите мгновенно после оплаты на ваш email (не ошибитесь с email адресом).
-
В наличии
Код: 99249
Прошивка для Xerox Phaser 3020
799.00 руб.
Купить
2. Данные, которыми необходимо заполнить поля Serial number, CRUM и версия прошивки, берутся из отчетов принтера. Отчеты печатает принтер при нажатии и удержании кнопки WPS около 10 сек. (отчет Конфигурации) и около 15 сек. (отчет расходных материалов).
Что бы не утруждать себя разглядыванием отчетов мы разработали специальную программу, которая умеет читать все необходимые для генерации прошивки данные. Поэтому, рекомендуем скачать программу и при необходимости ей воспользоваться.
Скачав программу Printblog Printer Info, извлекаете ее из архива и запускаете. Принтер Xerox Phaser 3020 при этом подключен к компьютеру, драйвер принтера может быть установлен, а можно и не устанавливать, но при этом не забыть отменить “Мастер установки нового оборудования”.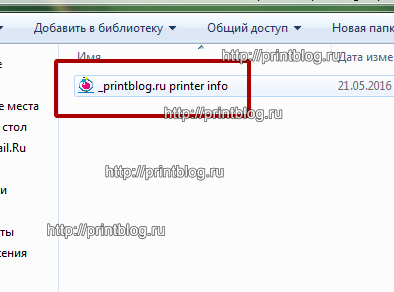 Запустив программу, необходимо нажать кнопку “Получить данные”, спустя несколько секунд, программа вам выдаст всю необходимую информацию о принтере, для генерации прошивки.
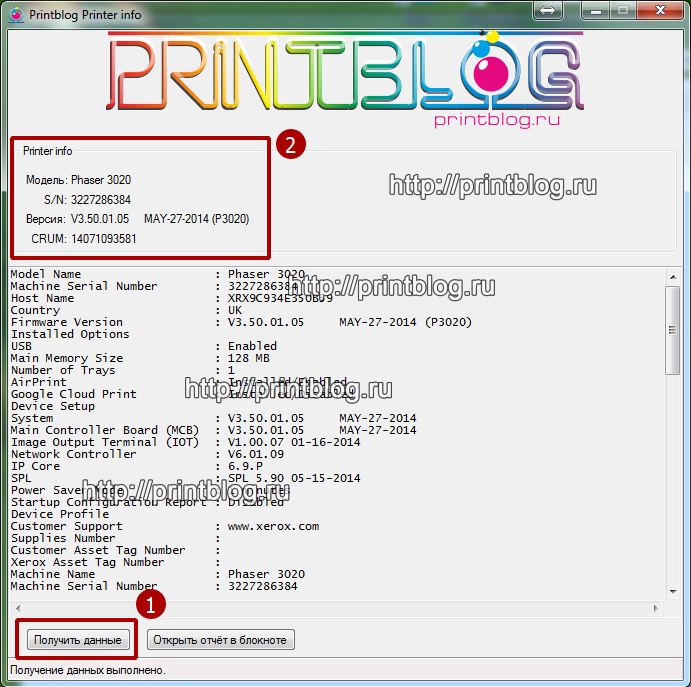 Полученные данные копируете в поля Serial number, CRUM и версия прошивки, добавляете заказ в корзину и переходите к оплате.
Выбрав подходящий вам способ оплаты и оплатив заказ, на ваш email придет письмо с сылкой на прошивку, скачиваете архив с прошивкой по ссылке Link for download ordered fix in ZIP archive: и приступаете к прошивке.
4. Как прошить принтер Xerox Phaser 3020 фикс-прошивкой
Получив после оплаты ссылку на прошивку, скачиваете архив с прошивкой и извлекаете из архива содержимое
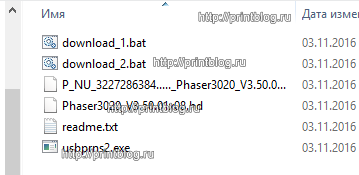 Вместе с ссылкой на прошивку, вы также получаете инструкцию по применению на русском языке и на английском языке в файле readme, в архиве с прошивкой.
Для прошивки Xerox Phaser 3020 фикс-прошивкой необходимо:
- Отключить все USB устройства за исключением прошиваемого принтера.
- Очистить очередь печати принтера, если драйвер принтера не установлен, отменить “Мастер настройки нового оборудования”, отключить антивирус, фаервол, брандмауэр. Самый идельный вариант это прошивка принтера на компьютере с свежей операционной системой. Прошивку можно осуществить только на компьютере под управлением ОС Windows
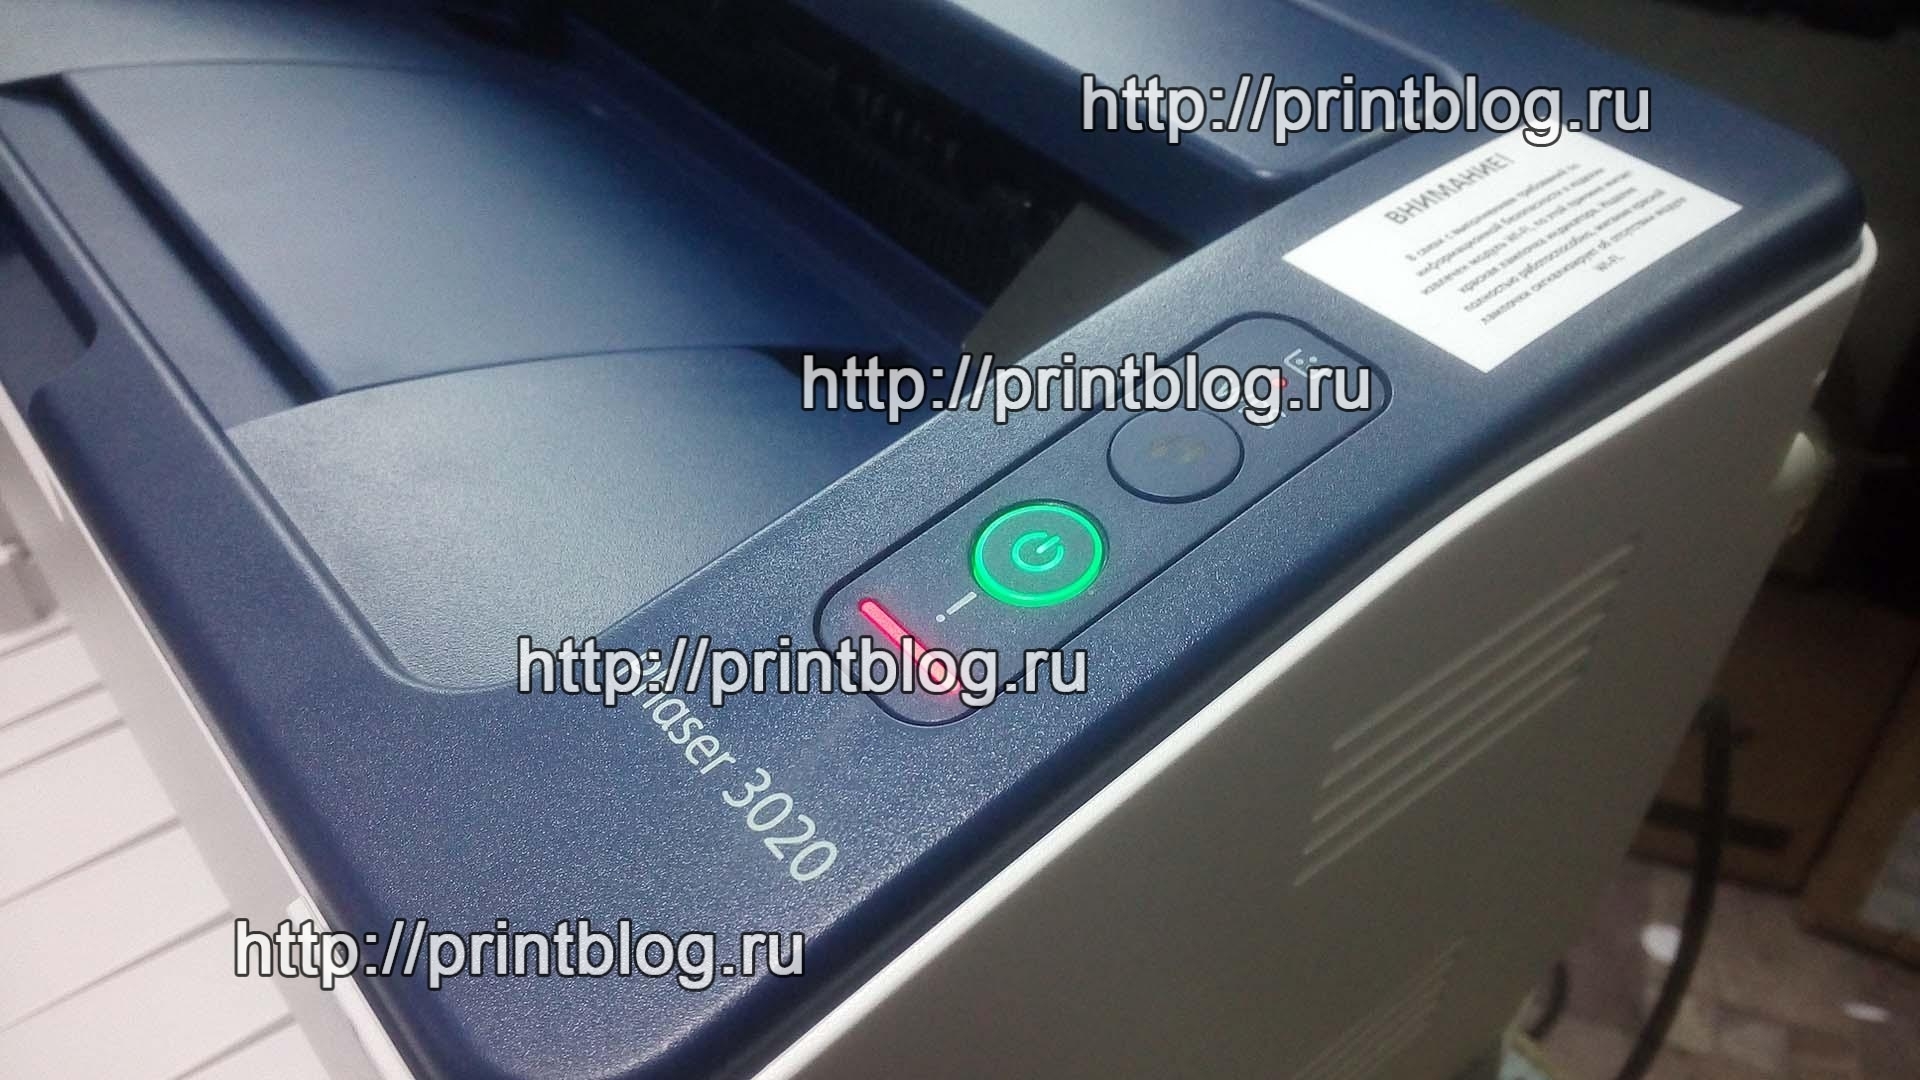
- Подключить прошиваемый принтер к компьютеру и включить его в режиме принудительной загрузки прошивки, для этого необходимо:
на выключенном принтере нажать и удерживать кнопку [ WPS ]. Нажать и удерживайть кнопку [ POWER ], через ~ 2 сек отпустить обе кнопки. При успешном входе в принудительный режим, индикатор на кнопке [ POWER ] должен загореться зелёным светом.
4. Распаковать полученный архив с прошивкой. Запустить двойным щелчком мыши download_1.bat
 5. Дождаться прошивки и перезагрузки устройства
6. Запускаете двойным щелчком мыши download_2.bat
 7. Принтер прошивается, ожидаете перезагрузки
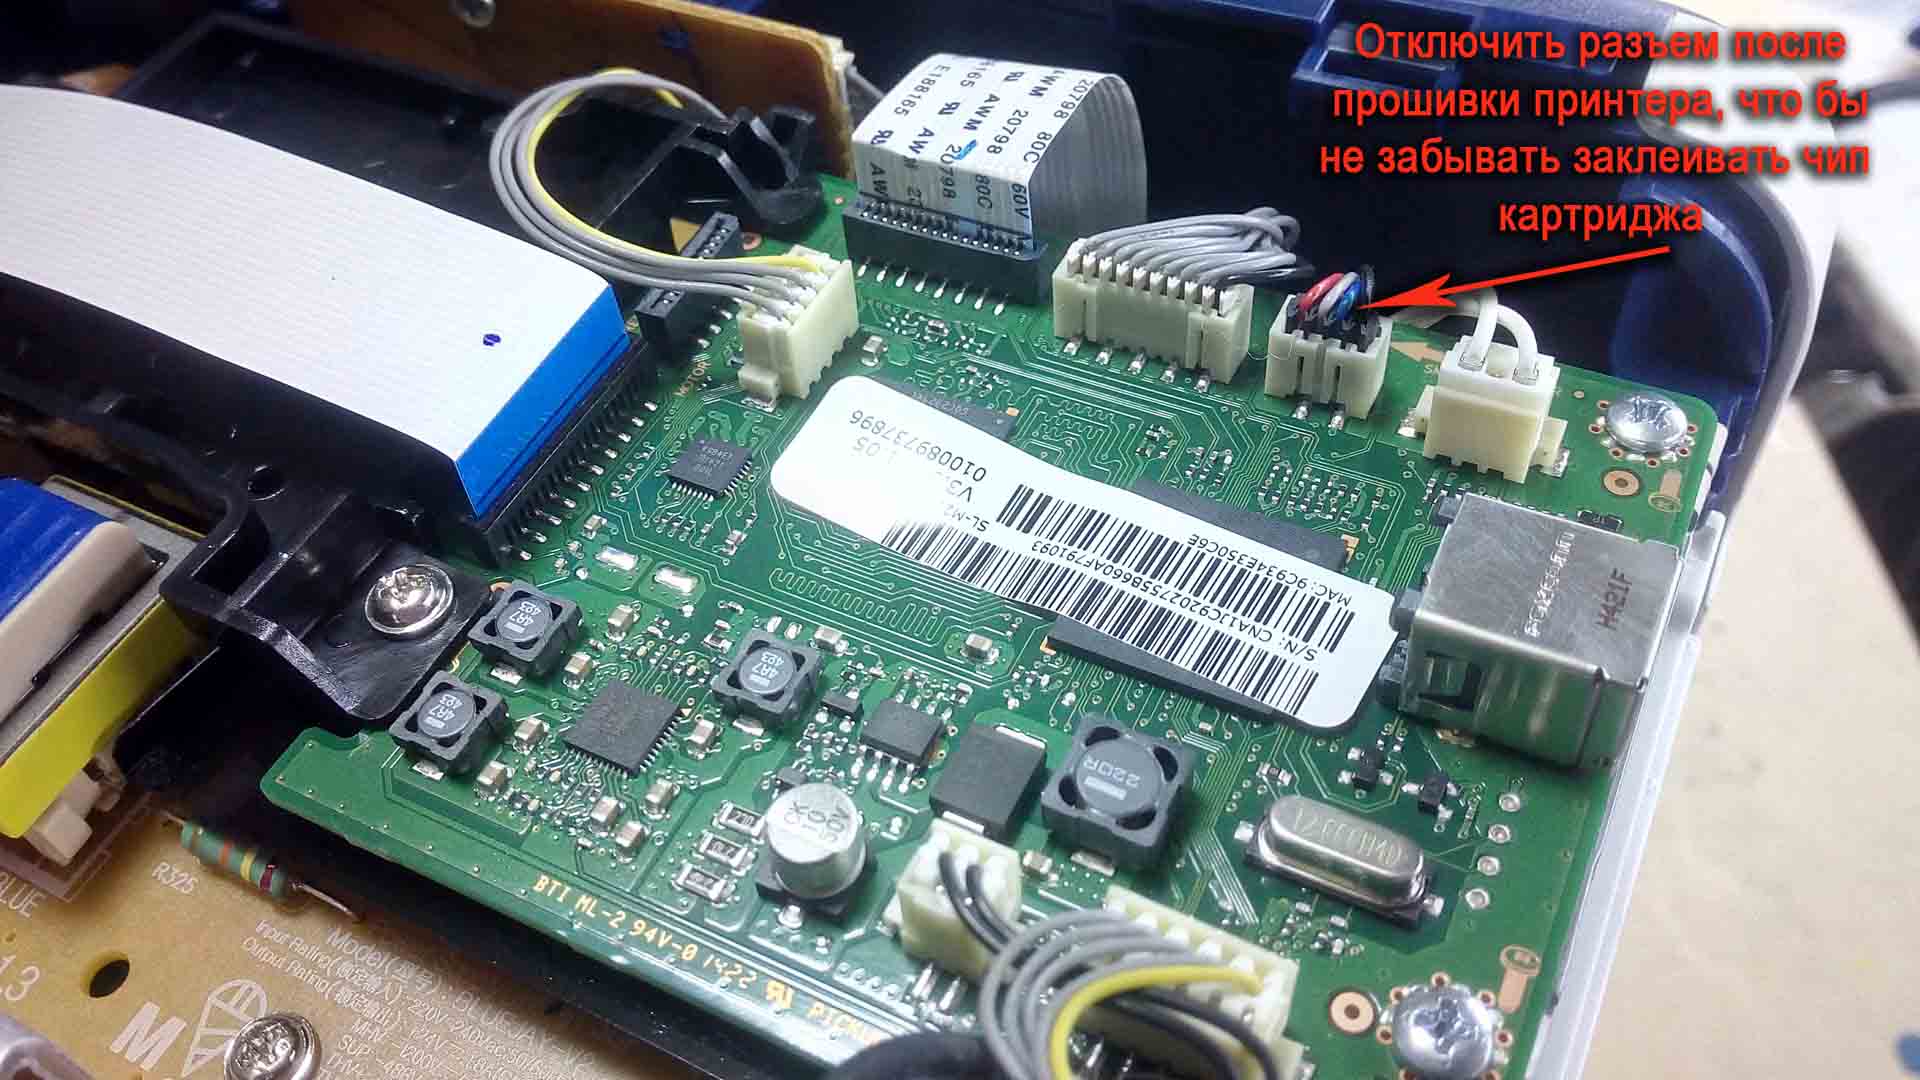
8. Заклеиваете чип картриджа скотчем, изолентой или вынимаете его из картриджа.

Самый идеальный вариант – это отключить контакты, которые идут на чип картриджа от принтера, что бы исключить контакт с чипами других картриджей, во избежание проблем с прошивкой. Снимаете боковую крышку со стороны USB порта и отключаете разъем, см. фото:
Прошивка окончена!
Осуществить ремонт или прошивку вашего принтера в г. Симферополь вы можете в сервисном центре по ул. Старозенитная, д.9 (вход со стороны забора). Обращайтесь пожалуйста в рабочее время с 9.00-18.00 по номеру +7 (978) 797-66-90
Не забывайте оценить запись и поделится ей с друзьями в социальных сетях, нажав специальные кнопки ниже.
Не забудь оставить комментарий и подписаться на наш канал Youtube 
Рекомендуемые товары:
-
В наличии
Код: 00015
Adjustment program для Epson XP-103 (XP-100), XP-203, XP-207, XP-303, XP-306, XP-33, XP-406 (сброс памперса)
811.20 руб.
Купить -
4 в наличии
Код: 50019
Микросхема MX29LV160AT для Canon i-SENSYS MF5940dn
599.00 руб.
Купить -

В наличии
Код: 00026
Canon iR 1133a дамп микросхемы MX29LV160DT MX29LV160AT
459.00 руб.
Купить -
5 в наличии
Код: 50021
Микросхема MX29LV160AT для Canon imageRUNNER 1133
599.00 руб.
Купить
Комментарии для сайта Cackle
Современные копировальные аппараты Xerox отличаются качество, надежностью и «быстрым» стартом. Также у них существует множество особенностей, которые отличают их от принтеров других производителей. Например, используется тефлоновый вал, а не термопленка.
Однако избегать различных поломок и ошибок пока не удается ни одному устройству. К самым частым неисправностям у принтеров Xerox относятся: залипание или повреждение датчика бумаги, повреждение роликов подачи, часто требуется перепрошивка программного обеспечения.
Если у вас возникнут вопросы насчет того, как исправить код ошибки копировального аппарата Xerox, то вы можете обратиться к специалистам нашего сервисного центра.

Основные коды ошибок копировальных аппаратов Xerox и способы их устранения:
- Коды ошибок Xerox 1012, 1012(RE)
- Коды ошибок Xerox 1020
- Коды ошибок Xerox 1025
- Коды ошибок Xerox 1035
- Коды ошибок Xerox 1038
- Коды ошибок Xerox 2830
- Коды ошибок Xerox 5011, 5012, 5014
- Коды ошибок Xerox 5016, 5017, 5316, 5317
- Коды ошибок Xerox 5018, 5028
- Коды ошибок Xerox 5312, 5313, 5314
- Коды ошибок Xerox 5318, 5320, 5322
- Коды ошибок Xerox 5328
- Коды ошибок Xerox 5330
- Коды ошибок Xerox 5340, 5343
- Коды ошибок Xerox 5345
- Коды ошибок Xerox 5350, 5352
- Коды ошибок Xerox 5355
- Коды ошибок Xerox 5622
- Коды ошибок Xerox XC520, 540, 560, 580
Xerox 1012, 1012(RE)
| Код ошибки | Описание |
|---|---|
| E1 | Jam between paper feed and fuser |
| E3 | Jam in fuser |
| E5 | Clam shell open |
| E6 | Paper feed section cover is open |
| J1 | Toner cartridge near empty |
| J3 | Drum cartridge not seated properly |
| J7 | Waste toner full (replace drum cartridge) |
| L6 | Key counter out |
| L8 | Exposure area overheat |
| U1 | No clock pulse (drive problem) |
| U2 | Scan problem |
| U3 | Lens/mirror problem (RE model only) |
| U4 | Heat problem |
| U8 | Exposure lamp control circuit problem |
| E1 | Jam between paper feed and fuser |
| E3 | Jam in fuser |
| E5 | Clam shell open |
| E6 | Paper feed section cover is open |
| J1 | Toner cartridge near empty |
| J3 | Drum cartridge not seated properly |
| J7 | Waste toner full (replace drum cartridge) |
| L6 | Key counter out |
| L8 | Exposure area overheat |
| U1 | No clock pulse (drive problem) |
| U2 | Scan problem |
| U3 | Lens/mirror problem (RE model only) |
| U4 | Heat problem |
| U8 | Exposure lamp control circuit problem |
Xerox 1020
| Код ошибки | Описание |
|---|---|
| LL | Probable bad heater lamp |
Xerox 1025
| Код ошибки | Описание |
|---|---|
| A1 | DF jam |
| C1 | PF jam cass. 1 |
| C2 | PF jam cass. 2 |
| C3 | PF jam cass. 3 |
| C9 | Bypass jam |
| E1-1 | Paper jam before exit switch |
| E1-2 | Paper jam |
| E1-5 | Paper jam |
| E1-6 | Paper jam |
| E3-3 | Paper jam at exit switch |
| E3-4 | Paper jam at exit switch |
| E5 | Front door open |
| F1 | Collator jam |
| F5 | Collator interlock |
| F8 | No power to collator |
| F9 | Collator bin home switch |
| J7 | 250 copies since toner waste was full |
| L5 | Original cass. not present after clearing interrupt |
| L6 | Key counter |
| L8 | Platen glass too hot |
| U1 | Main motor clock pulse |
| U2 | Scan problem |
| U3-1 | Lens problem |
| U4-1 | Open thermistor |
| U4-2 | Low temperature |
| U4-4 | Temperature |
| U4-5 | Main PWB |
| U6-1 | Main PWB |
| U6-2 | Main PWB |
| U6-3 | Main board battery |
| U6-4 | Initialization |
| U8 | Exposure lamp |
Xerox 1035
| Код ошибки | Описание |
|---|---|
| A9 | Scanner location |
| C1 | Paper feed — upper cassette |
| C2 | Paper feed — lower cassette |
| C9 | Bypass jam |
| E5 | Clam shell is open |
| L6 | Key counter |
| U1 | Off/On |
| U2 | Optics |
| U4 | Low fuser temperature |
Xerox 1038
| Код ошибки | Описание |
|---|---|
| A1 | DF jam |
| C1 | PF jam cass. 1 |
| C2 | PF jam cass. 2 |
| C3 | PF jam cass. 3 |
| C9 | Bypass jam |
| E1-1 | Paper jam before exit switch |
| E1-2 | Paper jam |
| E1-5 | Paper jam |
| E1-6 | Paper jam |
| E3-3 | Paper jam at exit switch |
| E3-4 | Paper jam at exit switch |
| E5 | Front door open |
| F1 | Collator jam |
| F5 | Collator interlock |
| F8 | No power to collator |
| F9 | Collator bin home switch |
| J7 | 250 copies since toner waste was full |
| L5 | Original cass. not present after clearing interrupt |
| L6 | Key counter |
| L8 | Platen glass too hot |
| U1 | Main motor clock pulse |
| U2 | Scan problem |
| U3-1 | Lens problem |
| U4-1 | Open thermistor |
| U4-2 | Low temperature |
| U4-4 | Temperature |
| U4-5 | Main PWB |
| U6-1 | Main PWB |
| U6-2 | Main PWB |
| U6-3 | Main board battery |
| U6-4 | Initialization |
| U8 | Exposure lamp |
Xerox 2830
| Код ошибки | Описание |
|---|---|
| A9 | Scanner location |
| C1 | Paper feed — upper cassette |
| C2 | Paper feed — lower cassette |
| C9 | Bypass jam |
| E5 | Clam shell is open |
| E5 | Clam shell open |
| L6 | Key counter |
| U1 | Off/On |
| U2 | Optics |
| U4 | Low fuser temperature |
Xerox 5011, 5012, 5014
| Код ошибки | Описание |
|---|---|
| C8 | Bypass jam/no paper |
| C9 | Bypass jam |
| E1 | Jam |
| E3 | Fuser jam |
| E5 | Clamshell open |
| E6 | PF section cover open |
| J1 | Toner cartridge amost empty |
| J3 | Copy cart (drum unit) missing/not seated right |
| J7 | Copy cartridge has run 18,000 copies |
| J8 | Copy cartridge. Improperly seated or possible only one of two fuses in the cartridge blew |
| L6 | Key counter |
| L8 | Exposure glass too hot |
| U1 | Drive problem |
| U2 | Scan problem |
| U3 | Lens or mirror drive problem |
| U4 | Fuser problem. Heat lamp, thermoswitch, SSR, thermistor |
| U6 | Battery on main board |
| U8 | Exposure lamp or exposure lamp circuit |
Xerox 5016, 5017, 5316, 5317
| Code | Description |
|---|---|
| A1-1 | Document feeder feed jam |
| A1-2 | Document feeder belt jam |
| A2-1 | Document feeder exit jam |
| A2-2 | Duplex jam |
| A3 | DAD interlock |
| A5 | Duplex and DAD right side interlock |
| A6 | Copier jams after |
| A9 | Document feed belt drive motor |
| C1-3 | Top cassette misfeed |
| C2-3 | Middle cassette misfeed |
| C3-3 | Bottom cassette misfeed |
| C9-3 | Bypass misfeed |
| E1-11 to E1-14 | Paper jam in machine. Did not reach exit switch soon enough |
| E1-6 | Paper path jam |
| E3-31 to E3-34 | Exit switch jam |
| E3-6 | Fuser jam |
| E5 | Front door interlock |
| E6 | Right side interlock or TTM interlock |
| F1 | Sorter jam |
| F5 | Sorter interlock |
| F8 | Sorter board to copier main board communication problem |
| F9 | Sorter bins |
Xerox 5018, 5028
| Code | Description |
|---|---|
| A1 | Document is ADF |
| A1-8 | Main board received reset signal |
| A2 | ADF jams |
| A6, A7 | ADF jams |
| A9 | ADF jams |
| C1 — C4 | Feed jam |
| C5-1 to C5-4 | Jams in various areas |
| C5-2 | Jams in various areas |
| C5-3 | Jams in various areas |
| C5-4 | Duplex jam |
| E0 | Machine has reset |
| E1 | Jam |
| E1-E0 | Registration jam |
| E1-E5 | Clamshell interlock |
| E1-E6 | Right side interlock |
| E1-E7 | Two tray interlock |
| E1-E8 | Sorter interlock |
| E1-E9 | Copy cartridge interlock |
| E2 | Reset signal happened |
| E3 | Jam |
| E4 | Exit jam |
| E4-10 | Exit jam |
| E4-5 | Clamshell interlock |
| E4-6 | Right side interlock |
| E4-7 | Two tray interlock. Duplex interlock |
| E4-8 | Sorter interlock |
| E4-9 | Copy cartridge interlock |
| E5 | Clamshell interlock |
| E6 | Right side interlock |
| E7 | Duplex interlock |
| E9 | Copy cartridge interlock |
| F3-1 | Sorter bin home switch |
| F3-2 | Sorter cam switch |
| F3-3 | Sorter cam switch |
| J1-1 | Add toner |
| J1-2 | Temporary low toner signal |
| J2-0 | Replace copy cartridge |
| L2 | 2000 copies left on copy cartridge |
| L3 | ADF to machine communication problem |
| L4 (flashing) | 1000 copies left on fuser web |
| rr | Bad EPROM on main board |
| U0 | Main board |
| U2 | Scan problem |
| U2-1 | Scan home |
| U3-00 | Cam drive problem |
| U3-01 | Cam movement slow |
| U3-04 | Main board to duplex communication |
| U3-09 | Cam problem |
| U3-12 | Jogger problem |
| U3-19 | Cam problem |
| U3-21 | Cam problem |
| U3-23 | Cam problem |
| U3-29 | Cam problem |
| U3-32 | Cam problem |
| U3-34 | Cam problem |
| U3-39 | Cam problem |
| U3-43 | Cam problem |
| U3-45 | Cam problem |
| U3-49 | Cam problem |
| U3-54 | Cam problem |
| U3-56 | Cam problem |
| U3-59 | Cam problem |
| U4-1 | Fuser problem. Long warm up |
| U4-2 | Low fuser temperature after warm up |
| U4-3 | High fuser temperature |
| U4-4 | Open fuser thermistor |
| U4-6 | Replace fuser web |
| U4-7 | Thermistor signal problem |
| U7-1 | Copy cartridge belt drive problem |
| U9-3 | Exposure lamp problem |
| U9-4 | Toner motor |
| U9-5 | Problem in warm up |
Xerox 5312, 5313, 5314
| Код ошибки | Описание |
|---|---|
| C1 | Upper paper feed problem. Did not reach feed sensor |
| C2 | Lower paper feed problem. Did not reach feed sensor |
| E1 | Exit jam. Paper did not reach exit sensor |
| E3 | Exit jam. Paper still on exit sensor |
| J1 | Add toner |
| J3 | Copy cartridge (drum unit) not installed |
| J7 | Copy cartridge (drum unit) must be replaced |
| J8 | Copy cartridge (drum unit) problem |
| L6 | Problem with an accessory. Installed but not initialized |
| U1 | Drive problem. Main motor, gear etc. |
| U2 | Scan problem |
| U3 | Main board dip switches wrong. Lens drive problem |
| U4 | Fuser problem. Heat lamp, thermal switch, overheat, thermistor. |
| U6 | EPROM error |
| U8 | Auto exposure sensor. No exposure lamp or weak lamp |
Xerox 5318, 5320, 5322
| Code | Description |
|---|---|
| A1-11 | Original ready switch |
| A1-12 | Feed sensor |
| A1-1 to A1-32 | All indicate a paper path problem, etc. in the ADF |
| A1-21 | Original ready switch and document registration sensor or both the document feed sensor and document registration sensor |
| A1-22 | ADF registration sensor |
| A1-23 | Original did not reach ADF registration sensor quickly enough |
| A1-24 | ADF sensor stuck down too long |
| A1-25 | ADF sensor actuated at the wrong time during single sheet feed |
| A1-26 | ADF sensor not actuated quickly enough in sheet feed mode |
| A1-31 | In reverse, ADF sensor is not actuated soon enough |
| A1-32 | In reverse, ADF sensor is actuated too long |
| A2 | ADF exit problems |
| A2-1 | Original ready sensor and ADF exit switch are actuated or ADF feed in sensor and ADF exit switch are both actuated |
| A2-2 | ADF exit switch |
| A2-3 | ADF exit switch is not actuated on time |
| A3 | Irregular size documents |
| A3-1 | Wrong size original sensed in 1:1 mode |
| A3-2 | Wrong size original sensed in the 2:1 mode |
| A5 | ADF interlock |
| A5 | ADF interlock |
| A6 | ADF single sheet document reset. |
| A6-1 | Reset original |
| A6-2 | Reset sheet feeder |
| A7 | Document cover interlock |
| A8 | ADF exit interlock |
| C1 | Tray 1 jam |
| C1-2 | Paper feed problem in tray 1 |
| C1-3 | Paper does not reach registration |
| C2 | Tray 2 jam |
| C3 | Tray 3 jam |
| C3-1 | Paper feed problem from tray 3 |
| C3-2 | Paper feed problem from tray 3 |
| C3-3 | Paper feed problem from tray 1 |
| C6-1 | Duplex paper feed problem |
| C6-2 | Duplex and/or tray 1 paper feed problem |
| C6-3 | Paper feed problem from tray 1 |
| C7-1 | Paper feed problem from HCF |
| C7-2 | Paper feed problem from HCF on tray 1 |
| C7-3 | Paper feed problem from tray 1 |
| C8 | Paper stays in tray or duplex or HCF |
| C8-1 | Paper on tray 1 feed sensor |
| C8-2 | Paper on tray 2 feed sensor |
| C8-3 | Paper on tray 3 feed sensor |
| C8-4 | Paper on HCF feed sensor |
| C8-5 | Paper in duplex section |
| C9 | Bypass feed problem |
| C9-3 | Paper from bypass did not reach registration sensor quickly enough |
| E1-10 to E1-25 | Internal jam |
| E1-6 | Paper on registration sensor |
| E2 | Reset signal happened. Might read E-2 something else. |
| E3-30 to E4-14 | Exit jam |
| E3-30 to E3-35 | Exit switch actuated too long |
| E3-6 | Exit jam |
| E3-6 | Paper on exit switch |
| E4-10 to E4-14 | Inverter sensor not actuated. |
| E4-10 to E4-45 | Paper did not reach inverter switch soon enough |
| E4-15 | Inverter sensor |
| E4-40 to E4-45 | Duplex entry sensor |
| E4-6 | Paper on inverter switch |
| E4-6 | Inverter sensor |
| E5 | Front door interlock |
| E6-1 | Tray 1 interlock |
| E6-2 | 2 tray or duplex interlock |
| E6-3 | HCF interlock |
| E7-2 | Duplex inverter interlock |
| E7-3 | Duplex interlock |
| E8-10 to E8-15 | Paper on duplex feed sensor is not actuated soon enough |
| E8-6 | Paper in duplex |
| E8-6 to E8-15 | Duplex entry sensor |
| F1-1 | Paper did not reach sorter |
| F1-2 | Paper stayed on sorter feed sensor |
| F1-6 | Sorter exit sensor |
| F3 | Paper size not available for sort/stack |
| F5 | Sorter interlock |
| H2-1 | Communication problem between main board and duplex board |
| H2-2 | Side guard sensor problem |
| H3-1 | Communication problem between main board and HCF |
| H3-2 | Upper limit sensor problem on HCF |
| H6-1 | ADF size sensor |
| H6-2 | ADF nudgeer sensor |
| H6-3 | Belt drive motor does not have 24 volts. Black toner is empty, but 100 copies have been run without changing toner |
| J1 | Black toner is empty, but 100 copies have been run without changing toner |
| J3 | Replace copy cartridge |
| J3 | No copy cartridge (drum unit) |
| J7 | Copy cartrige must be replaced |
| J8-1 | Wrong copy cartridge installed |
| J8-2 | Copy cartridge EEPROM must be changed |
| L6 | Auditron or other counter problem |
| L6 | Key counter not installed |
| L8 | Platen glass temperature is too high |
| L9 | Communication problem between interimage erase/edge lamps and main board |
| U1-1 | Main motor drive problem |
| U2-1 | Scan home problem |
| U2-1 to U2-4 | Scan home sensor |
| U2-2 | Scan home problem or optics problem |
| U2-3, U2-4 | Scan home problem |
| U3-1 | Lens sensor problem |
| U4-1 | Fuser thermistor open |
| U4-2 | Fuser did not warm up properly |
| U4-3 | Fuser temperature too high |
| U4-4 | Fuser problem. Staying on too long |
| U4-6 | High fuser temperature |
| U5-1 | Sorter bin home switch not activated |
| U5-2 | Sorter bin home switch stayed actuated |
| U5-3 | Sorter bin home switch |
| U5-4 | Sorter bin home switch |
| U6-1 | ROM problem |
| U6-2 | RAM problem |
| U6-3 | Low battery |
| U6-4 | Incorrect value in NVM. Reinitialize main board with code 20-96 |
| U8-1 | Exposure lamp problem |
| U8-2 | Communication problem main board and exposure board |
| U8-3 | Exposure lamp or exposure lamp board problem |
| U8-4 to U8-6 | Problem with exposure lamp, lamp sensor, lamp board |
Xerox 5328
| Code | Description |
|---|---|
| A1 | Document in ADF |
| A1-8 | Main board received reset signal |
| A2 | ADF jams |
| A6 | ADF registration jam |
| A7 | ADF interlock |
| A9 | Tray 1 jam |
| C1 | Tray 2 jam |
| C2 | Tray 3 jam |
| C3 | Bypass feed jams |
| C4 | Machine has reset |
| E1 | Jam |
| E1-5 | Clamshell interlock |
| E1-6 | Right side interlock |
| E1-7 | Two tray interlock, or duplex interlock |
| E1-8 | Sorter interlock |
| E1-9 | Copy cartridge interlock |
| E1 or E1-0 | Registration jam |
| E2 | Reset signal happened |
| E3 | Jam in transfer area |
| E4 | Exit jam |
| E4-0 | Exit jam |
| E4-5 | Clamshell interlock |
| E4-6 | Right side interlock |
| E4-7 | Two tray interlock |
| E4-8 | Sorter interlock |
| E4-9 | Copy cartridge interlock |
| E5 | Clamshell interlock |
| E6 | Right side interlock |
| E9 | Copy cartridge interlock |
| F3-1 | Sorter bin home switch |
| F3-2 | Sorter cam switch |
| F3-3 | Sorter cam switch |
| F5 | Sorter interlock |
| J1-1 | Add toner |
| J1-2 | Temporary low toner signal |
| J2-1, J2-2 | Replace copy cartridge |
| J5, J6 | ADF to machine communications problem |
| L2 | 2000 copies left on cartridge |
| L3 | ADF to machine communications problem |
| L4 | (flashing) 1000 copier left on fuser web |
| L6 | Auditron or other counter problem |
| LL | Main board. Try simulation 1.1 to initialize |
| rc | Wrong operation panel installed |
| rr | Bad EPROM on main board. Try 1.1 |
| U0 | Main board |
| U2 | Scan problem |
| U2-1 | Scan home |
| U2-2 | Scan home or scan encoder |
| U2-4 | Scan home or scan dual page sensor |
| U2-7 | Scan home |
| U4-1 | Fuser problem. Long warm up |
| U4-2 | Low fuser temperature after warm up |
| U4-3 | High fuser temperature |
| U4-4 | Open fuser thermistor |
| U4-6 | Replace fuser web. |
| U4-7 | Thermistor signal problem |
| U7-1 | Copy cartridge belt drive problem |
| U9-3 | Exposure lamp problem |
| U9-4 | Toner motor |
| U9-5 | Problem in warm-up |
Xerox 5330
| Code | Description |
|---|---|
| A1-1 to A1-32 | All indicate a paper path problem, etc. in the ADF. |
| A2 | ADF exit problems |
| A3 | Irregular size documents |
| A5 | ADF interlock |
| A6 | ADF single sheet document reset. |
| A7 | Platen interlock |
| A8 | ADF exit interlock |
| C1 | Tray 1 jam |
| C2 | Tray 2 jam |
| C3 | Tray 3 jam |
| C6-1, C6-2 | Jams related to duplex |
| C6-3 | Registration sensor, re tray 1 |
| C7-1, C7-2 | HCF feed problems |
| C7-3 | Tray 1 feed problem |
| C8 | Paper stays in tray or duplex or HCF |
| C9 | Bypass feed problem |
| E1-10 to E1-25 | Internal jam |
| E1-6 | Paper on registration sensor |
| E2 | Reset signal happened. Might read E-2 something else. |
| E3-30 to E4-14 | Exit jam |
| E3-6 | Exit jam |
| E4-10 to E4-14 | Inverter sensor not actuated. |
| E4-15 | Inverter sensor |
| E4-40 to E4-45 | Duplex entry sensor |
| E4-6 | Inverter sensor |
| E5 | Front door interlock |
| E6-1 | Tray 1 interlock |
| E6-2 | 2 tray or duplex interlock |
| E6-3 | HCF interlock |
| E7-2, E7-3 | Duplex interlock |
| E8-6 to E8-15 | Duplex entry sensor |
| F1-1 | Sorter entry sensor |
| F1-6 | Sorter exit sensor |
| F3 | Paper size not available for sort/stack |
| F5 | Sorter interlock |
| J1 | Add toner |
| J3 | Replace copy cartridge |
| J7 | Replace copy cartridge |
| J8-1 | Wrong copy cartridge installed |
| J8-2 | Copy cartridge EEPROM |
| L6 | Auditron or other counter problem |
| L8 | Platen glass temperature is too high |
| L9 | Communication problem between interimage erase/edge lamps and main board |
| U1-1 | Main motor drive problem |
| U2-1 to U2-4 | Scan home sensor |
| U3-1 | Lens sensor |
| U4-1 | Open fuser thermistor |
| U4-2 | Fuser did not warm up properly |
| U4-3 | Fuser temperature too high |
| U4-4 | Fuser problem. Staying on too long |
| U4-6 | High fuser temperature |
| U5-1 | Sorter bin home switch not activated |
| U5-2 | Sorter bin home switch stayed actuated |
| U5-3 | Sorter bin home switch |
| U5-4 | Sorter bin home switch |
| U6-1 | ROM problem |
| U6-2 | RAM problem |
| U6-3 | Low battery |
| U6-4 | Incorrect value in NVM. Reinitialize main board with code 20-96 |
| U8-1 to U8-6 | Problem with exposure lamp, lamp sensor, lamp board |
Xerox 5340, 5343
| Code | Description |
|---|---|
| 00-009; 030 to 033 | A door was opened while paper was being fed |
| 00-047 | Paper in duplex |
| 00-1 | Auditron |
| 00-2 | Diagnostic error |
| 00-3 | Faults error |
| 00-4 | Ric error |
| 00-5 | Job manager system error |
| 00-6 | LLM interface |
| 00-7 | Standby error |
| 00-8 | Communications error |
| 00-9 | Xerographic error |
| 01-300 | Front interlock |
| 01-310 | Right upper interlock |
| 01-315 | Left upper interlock |
| 01-320 | Left lower interlock |
| 01-325 | Fuser interlock |
| 02-910 | Key counter missing |
| 02-920 | Wrong combination of accessories |
| 03-321, 322, 326, 327 | LLM to ISIL communications problems |
| 03-328 | IOT communications problem with duplex or tray 4 |
| 03-330 | IOT communications problems with HCF |
| 03-335, 03-336 | LLM communications problems with edit |
| 03-340 | NVM memory |
| 03-341, 03-347 | Communications problems between IOT and sorter |
| 03-350, 03-354 | Communications problem with LLM and user interface |
| 03-363, 03-364 | Communications problem between LLM & optics |
| 03-370, 03-373 | Communications problem between LLM & DADF |
| 03-380, 384 | |
| 03-416, 03-422 | RAM memory problem |
| 03-424, 426 | NVM memory problem |
| 03-430, 432 | Billing problem |
| 03-439 | GRAIB communications problem |
| 03-440 | RIC communications problem |
| 03-441 | RIC NVM problem |
| 03-442 | Modem |
| 03-443, 03-458 | RIC problems |
| 03-460 | Serial communications processor problem |
| 04-300 | Main motor or drive problem |
| 05-100, 05-108 | DADF registration sensor |
| 05-110 | DADF exit sensor |
| 05-115, 120 | DADF jams |
| 05-305 | DADF document drive |
| 05-310, 312 | DADF document sensor |
| 05-316 | DADF registration sensor jam |
| 05-325 | DADF exit sensor |
| 05-335, 341, 345 | DADF interlock switches |
| 06-300, 06-310 | Scan problems |
| 06-315 | Scan drive |
| 06-320A, 320B, 320C, 325 | Scan problem |
| 06-330 | Lens drive |
| 06-340 | Exposure control problem |
| 06-342 | LLM CPU problem |
| 06-344, 06-350 | Exposure cvontrol problem |
| 06-352 | IOT CPU problem |
| 07-300, 315, 330, 345 | Tray faults |
| 07-360, 07-370 | HCF problems |
| 07-375, 380A, 380B | Duplex problems |
| 08-100, 08-110 | Feed problems. Lead edge of copy paper is late getting to feed sensor of tray 1 |
| 08-115, 08-162 | Feed problem. Lead edge of copy paper is late getting to registration sensor |
| 08-165 | Paper jam at registration sensor |
| 08-310, 08-370 | Paper at a sensor when power is turned on |
| 08-330 | DADF nudger sensor |
| 08-380 | Registration side to side problem with home position |
| 08-390 | Nip |
| 09-300 | Copy cartridge finished (drum unit) |
| 09-310 | Add black toner Add color toner |
| 09-320 | Add color toner |
| 09-330 | Wrong copy cartridge (wrong drum unit) |
| 09-340 | Drum cartridge not installed properly |
| 09-350 | Waste toner full |
| 100 | A fault has occurred |
| 10-100 | Exit jam |
| 10-105 | Exit jam |
| 10-110 | Vertical sensor jam |
| 10-120, 122, 125 | Duplex jam |
| 10-150, 155 | Too much or not enough paper in duplex tray |
| 10-300 | Fuser thermistor |
| 10-302 | Low fuser temperature |
| 10-304 | Bad fuser temp |
| 10-308 | High fuser temperature or open thermistor |
| 10-310 | High fuser temperature |
| 10-312 | Fuser not up to temperature after energy save |
| 10-314 | Fuser problem |
| 10-320 | Fuser web finished |
| 10-330, 335, 340 | Exit switch, vertical sensor switch actuated when power is turned on |
| 11-100, 11-116 | Sorter jam |
| 11-150, 11-176 | Sorter auto stapler jam |
| 11-310, 314, 316 | Sorter interlock |
| 11-325A, B, C, D, E, F, G | Sorter index |
| 11-352, 354, 356 | Sorter auto stapler interlocks |
| 11-365A, B, C, D, E | Sorter auto stapler bin |
| 11-370, 371, 372A, 373A, 373B, 374 | Sorter auto stapler staple failure, staple home problem or tamper home problem |
| 11-385A, 385B, 390A,B,C,D,E, 396A | Sorter auto stapler staple failure, staple home problem or tamper home problem |
| 301 | Fuser web must be replaced |
| 302 | Copy cartridge (drum unit) must be replaced |
| 501 | Tray 1 must be rebuilt |
| 502 | Tray 2 must be rebuilt |
| 503 | Tray 3 must be rebuilt |
| 504 | Tray 4 must be rebuilt |
| 505 | HCF must be rebuilt |
| 506 | Bypass must be rebuilt |
| 507 | Duplex unit must be rebuilt |
| 508 | Replace black developer |
| 509 | Replace red developer |
| 510 | Replace green developer |
| 512 | Replace brown developer |
| 513 | Copy cartridge (drum unit) will need replacing soon |
| 514 | Fuser web will need replacing soon |
| 515 | DADF belt should be replaced |
| 516 | DADF feed rollers should be replaced |
| 517 | Replace exposure lamp |
| 518 | Replace suction filter |
| 519 | Replace ozone filter |
| 520 | Replace optics filter |
| 521 | Replace particle filter |
| 522 | Replace upper fuser roller |
| 523 | Replace fuser pawls |
| 524 | Replace pressure roller |
| 525 | Replace pressure roller pawls |
| 900-905 | Key operator calls |
Xerox 5345
| Код ошибки | Описание |
|---|---|
| 01-01 | Frequency monitoring and zero cross problem |
| 01-02 | Interlock |
| 01-03 | AC power problem |
| 01-04 | Finisher interlock |
| 01-05 | 24v problem |
| 03-01 | Optics to main board communication problem |
| 03-02 | Software reset problem |
| 03-03 | Could be punched holes in the lead edge of the original |
| 03-04 | Software problem |
| 03-06 | Low battery |
| 03-07 | NVM not initialized or is missing or defective |
| 03-17 | Communication problem between main board and finisher board |
| 03-18 | Initializes one NVM counter to agree to others |
| 03-19 | All three NVM counter to agree with others |
| 03-20 | Main board/interface board problems |
| 03-21 | Problem with RIC NVM |
| 03-22 | RIC modem problem |
| 03-23 | RIC real time clock failure. |
| 03-25 | RIC NVM problem or not initialized |
| 03-27 | NVM problem |
| 03-28 | Watchdog software problem |
| 03-29 | Microprocessor crystal not at correct frequency |
| 03-30 | No software response from finisher after 20 seconds have elapsed |
| 06-01 | Lens did not reach 1.1 position |
| 06-02 | 1/2 rate scanner problem |
| 06-03 | Scan home problem |
| 06-04 | Scan home problem |
| 06-05 | Scan home problem |
| 06-06 | Scan encoder |
| 06-07 | Scan encoder |
| 06-08 | Scan drive boost |
| 06-09 | Scan encoder |
| 06-11 | Scan encoder pulse phases |
| 06-12 | Insufficient scan damping |
| 07-01 | Duplex tray not home during duplexing |
| 07-02 | Tray 2 not home when selected |
| 07-13 | Tray 2 height sensor problem |
| 07-15 | Tray 2 empty |
| 07-16 | Tray 1 door open |
| 07-18 | Tray 1 stack sensor |
| 07-22 | Tray 1 empty |
| 07-26 | Tray 1 bypass switch actuated too long |
| 07-27 | Tray 1 bypass switch deactuated too early |
| 07-30 | Paper in duplex |
| 07-31 | Paper in duplex |
| 07-32 | Duplex tray empty, when paper should be there |
| 08-10 | Paper did not reach tray 2 input tray sensor |
| 08-11 | Paper did not reach duplex input sensor |
| 08-12 | Paper did not reach tray 1 |
| 08-14 | Paper did not leave tray 2 input sensor quickly enough |
| 08-18 | Trail edge did not reach tray 2 input sensor quickly enough |
| 08-19 | Trail edge did not reach tray 1 input sensor quickly enough |
| 08-20 | Paper in duplex |
| 08-21 | Paper in tray 2 input |
| 08-22 | Paper in tray 2 or duplex at wrong time |
| 08-23 | Paper at tray 1 input at wrong time |
| 08-24 | Paper in tray 1 at wrong time |
| 08-28 | Upper and lower nips problem |
| 09-08 | Low toner condition |
| 09-12 | Drum signals are out of range |
| 09-13 | Unstable drum patch readings |
| 09-15 | Patch is too dark |
| 09-16 | Patch is too light |
| 09-17 | Open toner container access cover |
| 09-18 | Low toner level |
| 09-21 | Low toner sensor disconnected |
| 09-22 | Low toner condition, even after machine has been theoretically, adding toner |
| 10-02 | Low fuser temperature |
| 10-03 | High fuser temperature |
| 10-06 | Paper did not reach out put switch |
| 10-07 | Paper stayed on output switch |
| 10-10 | Paper did not reach decurler sensor |
| 10-11 | Paper did not reach decurler sensor |
| 10-12 | Paper on decurler sensor |
| 10-13 | Paper did not reach duplex entry sensor in time |
| 10-14 | Paper did not reach duplex entry sensor in time |
| 10-15 | Paper on entry sensor at wrong time |
| 10-17 | Fuser temperature is too high and fuser relay has deactuated |
| 12-01 | Paper at finisher input sensor |
| 12-02 | Paper did not reach finisher |
| 12-03 | Paper reached finisher too soon |
| 12-05 | Paper at stapler |
| 12-06 | Paper at stapler |
| 12-07 | Paper did not reach stapler |
| 12-08 | Paper did not reach stapler |
| 12-10 | Complied motor not working properly |
| 12-15 | Eject motor problem and/or eject encoder |
| 12-20 | Stacker motor problem |
| 12-21 | Stacker interlock |
| 12-22 | Stacker bottom sensor |
| 12-23 | Stacker bottom sensor |
| 12-24 | Stacker bottom sensor senses full |
| 12-25 | Stack height sensor |
| 12-26 | Stack height sensor |
| 12-27 | Stack height sensor |
| 12-30 | Offset home sensor |
| 12-31 | Offset home sensor |
| 12-32 | OCT switch |
| 12-35 | Eject nip carriage |
| 12-36 | Eject cam interlock |
| 12-37 | Eject nip carriage open timing |
| 12-38 | Eject cam interlock |
| 12-40 | Tamper motor |
| 12-41 | Tamper home problem |
| 12-42 | Tamper home sensor |
| 12-43 | Staple load sensor |
| 12-44 | Tamper home sensor |
| 12-45 | Tamper home sensor |
| 12-50 | Low on staples |
| 12-51 | Stapler home sensor |
| 12-52 | Stapler home sensor |
| 12-53 | Eject cam interlock |
| 33-37 | Too few documents |
| 55-01 | RDH interlock switch open during use |
| 55-04 | Paper on bypass sensor |
| 55-05 | Paper at vacuum timing sensor |
| 55-06 | Paper on output sensor |
| 55-10 | No paper reached S31 |
| 55-20 | Paper did not leave S31 at correct time |
| 55-24 | Set counter arm problem |
| 55-25 | Documents in input tray not detected |
| 55-27 | Lead edge did not reach S35 at correct time |
| 55-2955-30 | Trail edge did not reach S35 at correct time |
| 55-31 | S32, ADF registration sensor did not see paper at correct time |
| 55-32 | S32 did not see trail edge at correct time |
| 55-33 | S36 One too many documents |
| 55-36 | One too many documents |
| 55-39 | Hole count problem on document feeder belt |
| 55-40 | Document belt travel problem |
| 55-41 | Document belt mistracking or skewing |
| 55-45 | Paper at inverter sensor |
| 55-47 | Inverter sensor did not see paper lead edge at correct time |
| 55-49 | More than 50 sheets in input tray |
| 55-50 | Right side interlock |
| 55-51 | Left side interlock |
| 55-55 | Document on glass |
| 93-93 | NVM has to be initialized after new software installed |
Xerox 5350, 5352
| Code | Description |
|---|---|
| 00-009, 030, 031, 032, 033 | A door was opened while paper was being fed |
| 00-047 | Paper in duplex |
| 00-1 | Auditron |
| 00-2 | Diagnostic error |
| 00-3 | Faults error |
| 00-4 | Ric error |
| 00-5 | Job manager system error |
| 00-6 | LLM interface |
| 00-7 | Standby error |
| 00-8 | Communications error |
| 00-9 | Xerographic error |
| 01-300 | Front interlock |
| 01-310 | Right upper interlock |
| 01-315 | Left upper interlock |
| 01-320 | Left lower interlock |
| 01-325 | Fuser interlock |
| 02-910 | Key counter missing |
| 02-920 | Wrong combination of accessories |
| 03-321, 322, 326, 327 | LLM to ISIL communications problems |
| 03-328 | IOT communications problem with duplex or tray 4 |
| 03-330 | IOT communications problems with HCF |
| 03-335, 336 | LLM communications problems with edit |
| 03-340 | NVM memory |
| 03-341-347 | Communications problems between IOT and sorter |
| 03-350-354 | Communications problem with LLM and user interface |
| 03-363, 364 | Communications problem between LLM & optics |
| 03-370-03-373 | Communications problem between LLM & DADF |
| 03-380, 384 | |
| 03-416-422 | RAM memory problem |
| 03-424, 426 | NVM memory problem |
| 03-430, 432 | Billing problem |
| 03-439 | GRAIB communications problem |
| 03-440 | RIC communications problem |
| 03-441 | RIC NVM problem |
| 03-442 | Modem |
| 03-443-458 | RIC problems |
| 03-460 | Serial communications processor problem |
| 04-300 | Main motor or drive problem |
| 05-100-108 | DADF registration sensor |
| 05-110 | DADF exit sensor |
| 05-115, 120 | DADF jams |
| 05-305 | DADF document drive |
| 05-310, 312 | DADF document sensor |
| 05-316 | DADF registration sensor jam |
| 05-325 | DADF exit sensor |
| 05-335, 341, 345 | DADF interlock switches |
| 06-300-310 | Scan problems |
| 06-315 | Scan drive |
| 06-320A, 320B, 320C, 325 | Scan problem |
| 06-330 | Lens drive |
| 06-340 | Exposure control problem |
| 06-342 | LLM CPU problem |
| 06-344-350 | Exposure cvontrol problem |
| 06-352 | IOT CPU problem |
| 07-300, 315, 330, 345 | Tray faults |
| 07-360-370 | HCF problems |
| 07-375, 380A, 380B | Duplex problems |
| 08-100-110 | Feed problems. Lead edge of copy paper is late getting to feed sensor of tray 1 |
| 08-115-162 | Feed problem. Lead edge of copy paper is late getting to registration sensor |
| 08-165 | Paper jam at registration sensor |
| 08-310-370 | Paper at a sensor when power is turned on |
| 08-330 | DADF nudger sensor |
| 08-380 | Registration side to side problem with home position |
| 08-390 | Nip |
| 09-300 | Copy cartridge finished (drum unit) |
| 09-310 | Add black toner Add color toner |
| 09-320 | Add color toner |
| 09-330 | Wrong copy cartridge (wrong drum unit) |
| 09-340 | Drum cartridge not installed properly |
| 09-350 | Waste toner full |
| 100 | A fault has occurred |
| 10-100 | Exit jam |
| 10-105 | Exit jam |
| 10-110 | Vertical sensor jam |
| 10-120, 122, 125 | Duplex jam |
| 10-150, 155 | Too much or not enough paper in duplex tray |
| 10-300 | Fuser thermistor |
| 10-302 | Low fuser temperature |
| 10-304 | Bad fuser temp |
| 10-308 | High fuser temperature or open thermistor |
| 10-310 | High fuser temperature |
| 10-312 | Fuser not up to temperature after energy save |
| 10-314 | Fuser problem |
| 10-320 | Fuser web finished |
| 10-330, 335, 340 | Exit switch, vertical sensor switch actuated when power is turned on |
| 11-100-116 | Sorter jam |
| 11-150-176 | Sorter auto stapler jam |
| 11-310, 314, 316 | Sorter interlock |
| 11-325A,B,C,D,E,F,G | Sorter index |
| 11-352, 354, 356 | Sorter auto stapler interlocks |
| 11-365A,B,C,D,E | Sorter auto stapler bin |
| 11-370,371,372A,373A,373B,374 | Sorter auto stapler staple failure, staple home problem or tamper home problem |
| 11-385A,385B,390A,B,C,D,E,396A | Sorter auto stapler staple failure, staple home problem or tamper home problem |
| 301 | Fuser web must be replaced |
| 302 | Copy cartridge (drum unit) must be replaced |
| 501 | Tray 1 must be rebuilt |
| 502 | Tray 2 must be rebuilt |
| 503 | Tray 3 must be rebuilt |
| 504 | Tray 4 must be rebuilt |
| 505 | HCF must be rebuilt |
| 506 | Bypass must be rebuilt |
| 507 | Duplex unit must be rebuilt |
| 508 | Replace black developer |
| 509 | Replace red developer |
| 510 | Replace green developer |
| 512 | Replace brown developer |
| 513 | Copy cartridge (drum unit) will need replacing soon |
| 514 | Fuser web will need replacing soon |
| 515 | DADF belt should be replaced |
| 516 | DADF feed rollers should be replaced |
| 517 | Replace exposure lamp |
| 518 | Replace suction filter |
| 519 | Replace ozone filter |
| 520 | Replace optics filter |
| 521 | Replace particle filter |
| 522 | Replace upper fuser roller |
| 523 | Replace fuser pawls |
| 524 | Replace pressure roller |
| 525 | Replace pressure roller pawls |
| 900-905 | Key operator calls |
Xerox 5355
| Код ошибки | Описание |
|---|---|
| 01-01 | Frequency monitoring and zero cross problem |
| 01-02 | Interlock |
| 01-03 | AC power problem |
| 01-04 | Finisher interlock |
| 01-05 | 24v problem |
| 03-01 | Optics to main board communication problem |
| 03-02 | Software reset problem |
| 03-03 | Could be punched holes in the lead edge of the original |
| 03-04 | Software problem |
| 03-06 | Low battery |
| 03-07 | NVM not initialized or is missing or defective |
| 03-17 | Communication problem between main board and finisher board |
| 03-18 | Initializes one NVM counter to agree to others |
| 03-19 | All three NVM counter to agree with others |
| 03-20 | Main board/interface board problems |
| 03-21 | Problem with RIC NVM |
| 03-22 | RIC modem problem |
| 03-23 | RIC real time clock failure. |
| 03-25 | RIC NVM problem or not initialized |
| 03-27 | NVM problem |
| 03-28 | Watchdog software problem |
| 03-29 | Microprocessor crystal not at correct frequency |
| 03-30 | No software response from finisher after 20 seconds have elapsed |
| 06-01 | Lens did not reach 1.1 position |
| 06-02 | 1/2 rate scanner problem |
| 06-03 | Scan home problem |
| 06-04 | Scan home problem |
| 06-05 | Scan home problem |
| 06-06 | Scan encoder |
| 06-07 | Scan encoder |
| 06-08 | Scan drive boost |
| 06-09 | Scan encoder |
| 06-11 | Scan encoder pulse phases |
| 06-12 | Insufficient scan damping |
| 07-01 | Duplex tray not home during duplexing |
| 07-02 | Tray 2 not home when selected |
| 07-13 | Tray 2 height sensor problem |
| 07-15 | Tray 2 empty |
| 07-16 | Tray 1 door open |
| 07-18 | Tray 1 stack sensor |
| 07-22 | Tray 1 empty |
| 07-26 | Tray 1 bypass switch actuated too long |
| 07-27 | Tray 1 bypass switch deactuated too early |
| 07-30 | Paper in duplex |
| 07-31 | Paper in duplex |
| 07-32 | Duplex tray empty, when paper should be there |
| 08-10 | Paper did not reach tray 2 input tray sensor |
| 08-11 | Paper did not reach duplex input sensor |
| 08-12 | Paper did not reach tray 1 |
| 08-14 | Paper did not leave tray 2 input sensor quickly enough |
| 08-18 | Trail edge did not reach tray 2 input sensor quickly enough |
| 08-19 | Trail edge did not reach tray 1 input sensor quickly enough |
| 08-20 | Paper in duplex |
| 08-21 | Paper in tray 2 input |
| 08-22 | Paper in tray 2 or duplex at wrong time |
| 08-23 | Paper at tray 1 input at wrong time |
| 08-24 | Paper in tray 1 at wrong time |
| 08-28 | Upper and lower nips problem |
| 09-08 | Low toner condition |
| 09-12 | Drum signals are out of range |
| 09-13 | Unstable drum patch readings |
| 09-15 | Patch is too dark |
| 09-16 | Patch is too light |
| 09-17 | Open toner container access cover |
| 09-18 | Low toner level |
| 09-21 | Low toner sensor disconnected |
| 09-22 | Low toner condition, even after machine has been theoretically, adding toner |
| 10-02 | Low fuser temperature |
| 10-03 | High fuser temperature |
| 10-06 | Paper did not reach out put switch |
| 10-07 | Paper stayed on output switch |
| 10-10 | Paper did not reach decurler sensor |
| 10-11 | Paper did not reach decurler sensor |
| 10-12 | Paper on decurler sensor |
| 10-13 | Paper did not reach duplex entry sensor in time |
| 10-14 | Paper did not reach duplex entry sensor in time |
| 10-15 | Paper on entry sensor at wrong time |
| 10-17 | Fuser temperature is too high and fuser relay has deactuated |
| 12-01 | Paper at finisher input sensor |
| 12-02 | Paper did not reach finisher |
| 12-03 | Paper reached finisher too soon |
| 12-05 | Paper at stapler |
| 12-06 | Paper at stapler |
| 12-07 | Paper did not reach stapler |
| 12-08 | Paper did not reach stapler |
| 12-10 | Complied motor not working properly |
| 12-15 | Eject motor problem and/or eject encoder |
| 12-20 | Stacker motor problem |
| 12-21 | Stacker interlock |
| 12-22 | Stacker bottom sensor |
| 12-23 | Stacker bottom sensor |
| 12-24 | Stacker bottom sensor senses full |
| 12-25 | Stack height sensor |
| 12-26 | Stack height sensor |
| 12-27 | Stack height sensor |
| 12-30 | Offset home sensor |
| 12-31 | Offset home sensor |
| 12-32 | OCT switch |
| 12-35 | Eject nip carriage |
| 12-36 | Eject cam interlock |
| 12-37 | Eject nip carriage open timing |
| 12-38 | Eject cam interlock |
| 12-40 | Tamper motor |
| 12-41 | Tamper home problem |
| 12-42 | Tamper home sensor |
| 12-43 | Staple load sensor |
| 12-44 | Tamper home sensor |
| 12-45 | Tamper home sensor |
| 12-50 | Low on staples |
| 12-51 | Stapler home sensor |
| 12-52 | Stapler home sensor |
| 12-53 | Eject cam interlock |
| 33-37 | Too few documents |
| 55-01 | rdh interlock switch open during use |
| 55-04 | Paper on bypass sensor |
| 55-05 | Paper at vacuum timing sensor |
| 55-06 | Paper on output sensor |
| 55-10 | No paper reached S31 |
| 55-20 | Paper did not leave S31 at correct time |
| 55-24 | Set counter arm problem |
| 55-25 | Documents in input tray not detected |
| 55-27 | Lead edge did not reach S35 at correct time |
| 55-2955-30 | Trail edge did not reach S35 at correct time |
| 55-31 | S32, ADF registration sensor did not see paper at correct time |
| 55-32 | S32 did not see trail edge at correct time |
| 55-33 | S36 One too many documents |
| 55-36 | One too many documents |
| 55-39 | Hole count problem on document feeder belt |
| 55-40 | Document belt travel problem |
| 55-41 | Document belt mistracking or skewing |
| 55-45 | Paper at inverter sensor |
| 55-47 | Inverter sensor did not see paper lead edge at correct time |
| 55-49 | More than 50 sheets in input tray |
| 55-50 | Right side interlock |
| 55-51 | Left side interlock |
| 55-55 | Document on glass |
| 93-93 | NVM has to be initialized after new software installed |
Xerox XC520, 540, 560, 580
| Код ошибки | Описание |
|---|---|
| H2 | Fuser thermistor |
| H3 | Fuser temperature too high. Must be reset in diagnostics |
| H4 | Fuser temperature too low. Must be reset in diagnostics |
| L3 | Scan problem |
| L4 | Min motor drive problem |
| L8 | Exposure lamp not lightning or not enough light reaching auto exposure sensor |
| P | Paper did not feed |
Xerox 5622
| Code | Description |
|---|---|
| A1-1 to A1-32 | All indicate a paper path problem, etc. in the ADF |
| A2 | ADF exit problems |
| A3 | Irregular size documents |
| A5 | ADF interlock |
| A6 | ADF single sheet document reset |
| A7 | Platen interlock |
| A8 | ADF exit interlock |
| C1 | Tray 1 jam |
| C2 | Tray 2 jam |
| C3 | Tray 3 jam |
| C6-1, C6-2 | Jams related to duplex |
| C6-3 | Registration sensor, re tray 1 |
| C7-1, C7-2 | HCF feed problems |
| C7-3 | Tray 1 feed problem |
| C8 | Paper stays in tray or duplex or HCF |
| C9 | Bypass feed problem |
| E1-10 to E1-25 | Internal jam |
| E1-6 | Paper on registration sensor |
| E2 | Reset signal happened. Might read E-2 something else |
| E3-30 to E4-14 | Exit jam |
| E3-6 | Exit jam |
| E4-10 to E4-14 | Inverter sensor not actuated |
| E4-15 | Inverter sensor |
| E4-40 to E4-45 | Duplex entry sensor |
| E4-6 | Inverter sensor |
| E5 | Front door interlock |
| E6-1 | Tray 1 interlock |
| E6-2 | 2 tray or duplex interlock |
| E6-3 | HCF interlock |
| E7-2, E7-3 | Duplex interlock |
| E8-6 to E8-15 | Duplex entry sensor |
| F1-1 | Sorter entry sensor |
| F1-6 | Sorter exit sensor |
| F3 | Paper size not available for sort/stack |
| F5 | Sorter interlock |
| J1 | Add toner |
| J3 | Replace copy cartridge |
| J7 | Replace copy cartridge |
| J8-1 | Wrong copy cartridge installed |
| J8-2 | Copy cartridge EEPROM |
| L6 | Auditron or other counter problem |
| L8 | Platen glass temperature is too high |
| L9 | Communication problem between interimage erase/edge lamps and main board |
| U1-1 | Main motor drive problem |
| U2-1 to U2-4 | Scan home sensor |
| U3-1 | Lens sensor |
| U4-1 | Open fuser thermistor |
| U4-2 | Fuser did not warm up properly |
| U4-3 | Fuser temperature too high |
| U4-4 | Fuser problem. Staying on too long |
| U4-6 | High fuser temperature |
| U5-1 | Sorter bin home switch not activated |
| U5-2 | Sorter bin home switch stayed actuated |
| U5-3, U5-4 | Sorter bin home switch |
| U6-1 | ROM problem |
| U6-2 | RAM problem |
| U6-3 | Low battery |
| U6-4 | Incorrect value in NVM. Reinitialize main board with code 20-96 |
| U8-1 to U8-6 | Problem with exposure lamp, lamp sensor, lamp board |
Для этого на выключенном принтере нажмите и удерживайте кнопку [ WPS ]. Нажмите и удерживайте кнопку [ POWER ], через ~ 2 сек отпустите обе кнопки. При успешном входе в принудительный режим, индикатор на кнопке [ POWER ] должен загореться зелёным светом. Дождитесь, пока принтер перезагрузится.
Как включить принтер ксерокс?
Чтобы включить этот аппарат нужно нажать кнопку включение выключение. Предварительно нужно подсоединить принтер в сеть. Разъем для подсоединения в сеть и кнопка включения находятся на задней части принтера. Можете приступать к печати.
Как обнулить картридж ксерокс?
Принтеры Samsung и Xerox имеют встроенный счетчик страниц, блокирующий работу принтера после «предполагаемого окончания» тонера в картридже.
…
Выключите МФУ и включите через 5 сек., действуйте по инструкции:
- нажмите 10 раз кнопку «Меню», появится пункт «Настр. …
- выберите пункт «Сброс настроек», нажмите «ОК»;
Как научиться работать на ксероксе?
Основные шаги в следующем:
- Аппарат должен быть подключен к электросети.
- Оригинал положить под крышку на стекло. …
- На лоток для бумаги положить чистый лист.
- Дальше надо найти кнопку «пуск». …
- После запуска копирования проследите, чтобы ксерокс захватил лист бумаги и прокатил его через все устройство.
6.06.2016
Как обнулить чип на картридже Xerox Phaser 3020?
нажмите и удерживайте кнопку [ WPS ] около 10 секунд (индикатор статуса начнёт мигать, затем загорится постоянно, затем снова начнёт мигать). Отпустите кнопку.
Как подключиться к принтеру Xerox через wi fi?
В локальной сети
- Подключите устройство к компьютеру по USB.
- Установите драйверы с диска, что идет в комплекте.
- С помощью утилиты Xerox Easy Wireless Setup, устанавливаемой вместе с драйверами, запустите процесс установки. …
- Нажмите «Далее» и ожидайте, пока утилита представит окно «Выберите беспроводную сеть».
Как отключить печать пробной страницы Xerox b210?
В веб-интерфейсе выбрать вкладку “Свойства” – “Службы” – “Идёт печать” – “Титульный лист” – “Выключить” – “Применить”.
Как обнулить картридж Samsung SCX 3405?
Клавиши нужно нажимать без задержки, с равным интервалом:
- Нажать комбинацию ++ stop – – stop stop.
- Дождаться букв UC на дисплее.
- Кнопками «+ –» сменить значение на FC.
- Нажать start.
- Дождаться появления кода 07, повторно нажать start.
- Дождаться окончания автоматического процесса обнуления счетчика SCX 3200.
9.12.2020
Как обнулить чип на картридже Самсунг m4020nd?
Если на экране принтера отображается сообщение «Замените тонер картридж», то выполните следующие действия:
- нажмите 3 раза кнопку «Меню», появится пункт «Настр. сист.», нажмите «ОК»;
- нажмите 4 раза стрелку вправо, выбрав пункт «Обслуживание», нажмите «ОК»;
- появится сообщение «Уд. сообщ. тон.», нажмите «ОК»;
10.12.2020
Как обнулить чип на картридже Samsung SCX 3400?
Для доступа к настройкам принтера Samsung SCX-3400 нужно десятикратно нажать кнопку «меню». Когда на дисплее высветится «обслуживание», кнопкой «вправо» нужно пролистнуть сервис до команды «сброс настроек» и подтвердить ее кнопкой «ОК».
Как правильно пользоваться копиром?
При этом следует придерживаться следующих рекомендаций:
- устанавливать копир нужно на ровной поверхности подальше от комнатных растений, чтобы при их поливе на устройство не попала вода;
- копировальный аппарат не должен находиться под действием солнечных (прямых) лучей либо возле отопительных приборов;
Как правильно работать со сканером?
Как сканировать?
- Нажмите кнопку «Пуск». Выберите «Все программы». …
- Откроется новое окно. В нем следует нажать «Новое сканирование».
- Далее выберите тип изображения, с которого нужно сделать копию (цветное, серое или чёрно-белое). Также определитесь с нужным разрешением.
- В конце нужно нажать «Сканировать».
Как делать копии на ксероксе?
Нажать кнопку на панели принтера, предназначенную для цветной либо черно-белой ксерокопии. Задать требуемое количество копий. Это можно сделать при помощи кнопки, указанной в пункте 5 (нажав столько раз, сколько нужно сделать дубликатов файла), либо кнопки со значком «+» (если она есть), установив количество страниц.
Как сбросить счетчик картриджа Xerox Phaser 6020?
Выключите МФУ и включите через 5 сек., действуйте по инструкции:
- нажмите 10 раз кнопку «Меню», появится пункт «Настр. сист.», нажмите «ОК»;
- выберите пункт «Сброс настроек», нажмите «ОК»;
- выберите «Все настройки», нажмите «ОК»;
9.12.2020
Как перепрошить принтер Xerox Phaser 3020?
Инструкция по прошивке Xerox Phaser 3020 (по USB)
- нажмите и удерживайте кнопку [ WPS ] около 10 секунд …
- Распечатка отчётов возможна из утилиты Xerox Easy Printer Manager. …
- На выключенном принтере нажмите и удерживайте кнопку [ WPS ]
1.09.2016
Как перепрошить принтер Xerox?
Прошить принтеры можно как своими руками, так и при помощи специалистов сервисного центра Miraxprint.
…
Сделать это можно следующим образом:
- включить МФУ, зажав кнопку «Stop»;
- отпустить указанную клавишу и снова нажать на нее («Stop»);
- принтер готов к проведению процесса обновления ПО.
Обзор
Xerox
®
Phaser
®
3020
Руководство пользователя
96
Обзор
В этом разделе приводятся сведения о рекомендуемых действиях в случае возникновения
проблем с аппаратом. Выполните приведенный ниже порядок действий по решению проблем.
1.
При изменении индикатора статуса аппарата или возникновении ошибки выполните
действия, перечисленные в этом разделе, чтобы устранить проблему.
2.
Если проблему решить не удается, выключите и снова включите аппарат и повторите
попытку выполнения задания.
3.
Если неисправность устранить не удается, обратитесь в сервисную службу.
Индикатор статуса машины
Цвет светоиндикатора статуса, расположенного на панели управления, указывает на текущее
состояние аппарата. Описания различных индикаторов приведены в таблице ниже..
Цвет
Статус
Описание
Нет
Выкл.
Аппарат отключен ИЛИ
находится в режиме энергосбережения, если
индикатор статуса аппарата отключен, но кнопка
питания светится синим цветом.
Зеленый
Вкл.
Аппарат включен и готов к использованию.
Мигает
Аппарат получает или печатает данные.
Кр.
Мигает
Ожидание нажатия кнопки WPS для печати вручную.
Вкл.
• Открыта крышка. Закройте крышку.
• В лотке нет бумаги. Загрузите бумагу в лоток.
См. раздел
Бумага и материалы
.
• Аппарат прекратил работу из-за серьезной
ошибки.
• Выполняется задание ручной двусторонней
печати.
Оранжевый
Мигает
• Обновление микропрограммы.
Вкл.
• Возникло замятие бумаги (см. раздел
Извлечение застрявшей бумаги
)
.
Принтеры Xerox Phaser 3020 и 3020BI оснащены специальным программным обеспечением, которое блокирует работу устройств, если установить перезаправленный картридж. Естественно, можно купить новый картридж для принтера Xerox Phaser 3020 и не иметь каких-либо проблем (помимо колоссальных финансовых затрат на расходные материалы). Однако в целях экономии выгоднее заправить пустой расходник. К тому же блокирующее ПО можно обойти. Как правило, с этой проблемой борются двумя способами:
- Замена чипа картриджа. Если заправить и установить расходник в принтер, то ошибка отсутствия тонера никуда не исчезнет, так как чип не будет распознаваться. Чтобы сбросить ошибку, нужно купить и заменить чип картриджа Xerox. При этом такое действие нужно делать при каждой новой процедуре заправки расходного материала.
- Прошивка микропрограммы принтера. Делается всего один раз. После перепрошивки принтера можно использовать любые картриджи. Главное, убирать или заклеивать чип картриджа, до его установки.
В этой статье мы расскажем Вам, что нужно для прошивки принтеров Xerox Phaser 3020 и 3020BI, где скачать прошивку Xerox Phaser 3020/ 3020BI, а также предоставим подробную инструкцию по модернизации микропрограммы лазерной оргтехники Xerox.
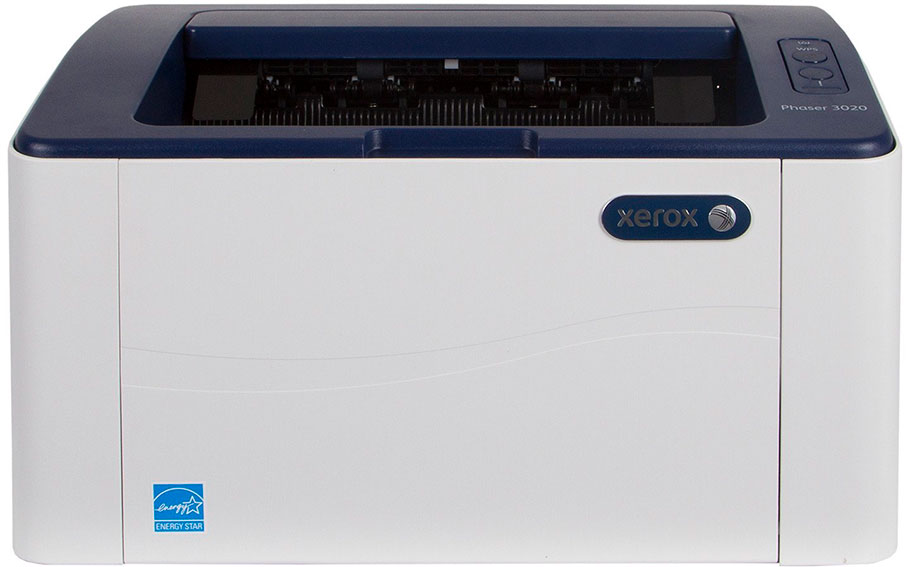
Как прошить принтер Xerox Phaser 3020BI и 3020
Процесс прошивки оргтехники не сложен и занимает около 10 минут. Однако на подготовку к перепрошивке принтера необходимо гораздо больше времени. К тому же требует более ответственного подхода. Ведь малейшая неточность может привести печатающее устройство к выходу из строя. Решившись самостоятельно перепрошить принтер, делайте все в соответствии с инструкцией. Тем не менее, если не уверены в своих силах лучше обратитесь за помощью к специалистам.
Инструкция по прошивке принтеров Xerox Phaser 3020 и 3020BI
Процесс прошивки Xerox Phaser 3020 состоит из нескольких важных этапов: поиска данных принтера и картриджа, генерирования и скачивания прошивки, подготовки печатающего устройства и компьютера, а также процесса инициализации микропрограммы. Далее о каждом пункте расскажем немного подробнее.
Внимание: Хоть серии оргтехники Xerox Phaser 3020 и Xerox WorkCentre 3025 выполнены по одному принципу, firmware у них не идентичная. Поэтому прошивки из данной инструкции не подходят к аппаратам WC-3025.
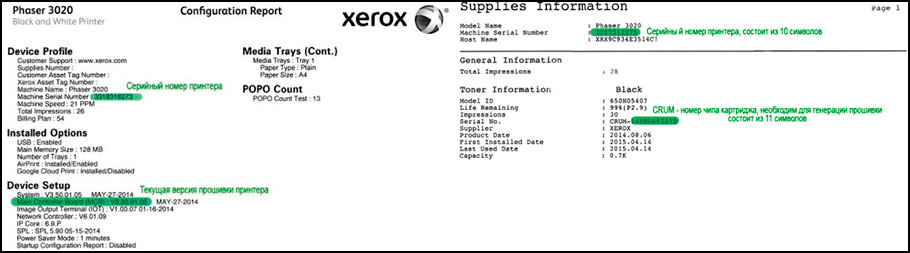
Печать отчета конфигурации принтера и информации о картридже
Найти нужные данные для прошивки Phaser 3020 можно в отчетах Сonfiguration и Supplies Information. Получить их можно следующими способами:
- Комбинация кнопок. На панели управления принтера найдите и зажмите кнопку «WPS». Удерживайте ее 10 секунд, чтобы получить отчет о конфигурации, 15 секунд – для печати информации о расходниках.
- Xerox Easy Printer Manager. В официальной утилите от производителя также можно найти и отпечатать нужные отчеты.
- Xerox CentreWare Internet Services. Отпечатать отчеты можно и через веб-интерфейс принтера. Войдите в него (прописав ID-принтера в браузере), введите логин и пароль (стандартно: admin и 1111), перейдите во вкладку «Состояние» и нажмите на кнопку «Печать информации».
- Постороннее ПО. На заблокирванном принтере необходимую информацию можно получить при помощи специальных компьютерных программ (например, PC INFO TOOL).
Из полученных отчетов Вам потребуются следующие данные:
- подробное наименование модели;
- серийный номер принтера;
- версия микропрограммы принтера;
- серийный номер чипа картриджа (CRUM).
Все, кроме последнего пункта, можно найти в отчете о конфигурации печатающего аппарата. Хотя помимо CRUM, в Supplies Information представлен и серийный номер устройства.
Скачивание прошивки Xerox Phaser 3020 и 3020BI
В интернете Вы можете найти и бесплатно скачать прошивку для принтера Xerox Phaser 3020. Однако по факту прошивочные файлы создаются в отдельности под каждый аппарат. Поэтому установка подобного ПО не принесет положительного результата. К тому же можно и вовсе вывести печатающее устройство из строя. Для примера мы предоставим несколько рабочих файлов прошивки принтеров Xerox Phaser 3020 и 3020BI. Тем не менее, обращаем внимание на то, что ими нельзя прошивать Ваш печатающий аппарат.
Скачать прошивку Xerox Phaser 3020 – V3.50.01.08
Скачать прошивку Xerox Phaser 3020 – V3.50.01.10
Внимание: Напоминаем, что прошивки предоставлены лишь для демонстрации. Они не подходят конкретно под Ваш принтер.
Где получить прошивку Xerox Phaser 3020 и 3020BI
Имея всю нужную информацию (CRUM картриджа, серийник, версию микропрограммы и модель принтера), прошивку для Xerox Phaser 3020 можно самостоятельно сгенерировать при помощи специального ПО (например, OnLineFIX). При этом придется заплатить немного денег (пополняется счет и с него списывается определенная сумма). Либо можете сразу купить прошивку Xerox Phaser 3020/ 3020BI у проверенного продавца. Для этого ему потребуется сообщить вышеуказанные данные. После чего он предоставит ссылку на готовую фикс-прошивку для Вашего принтера. Цена прошивки Xerox Phaser 3020 и 3020BI варьируется в пределах 500-600 рублей (бесплатных FIX-прошивок не бывает).
Подготовка принтера Xerox для перепрошивки микропрограммы
Перепрошивку firmware принтера нужно осуществлять через компьютер под управлением ОС Windows. От ПК необходимо отключить все USB-устройства, кроме мышки и клавиатуры. Далее следует подключить принтер к компьютеру в свободный USB-порт (по Wi-Fi принтер прошить нельзя). Также не будет лишним на компьютере очистить очередь печати и отключить антивирус (как стационарный, так и установленный отдельно), чтобы он не заблокировал файл прошивки. Заблаговременно установите на ПК программное обеспечение для печати. Скачать драйвер принтера Xerox Phaser 3020/ 3020BI можно с официального сайта производителя.
Процесс прошивки принтеров Xerox Phaser 3020 и 3020BI
Как только подготовите все необходимое, подключите принтер к ПК, и включите его в сервисном режиме. Чтобы это сделать, зажмите на две секунды кнопки «Вкл/Выкл» и «WPS» (только до этого момента печатающее устройство должно быть подключено к электросети, но выключено кнопкой). Если индикатор включения постоянно горит зеленым цветом, это указывает на то, что устройство успешно вошло в режим сервисного обслуживания. Теперь на ПК нужно разархивировать архив с прошивкой и запустить первый установочный файл.
Если файлы прошивки представлены в расширении .bat, тогда двойным кликом мыши запустите первый файл и дождитесь инициализации ПО, а также перезагрузки принтера. После чего запустите второй файл прошивки .bat. По завершению перепрошивки, Xerox Phaser 3020 снова перезагрузится. Если видите в архиве файлы расширением .hd и .exe, тогда вместо обычной инициализации перетащите первый файл .hd на .exe, затем второй (между процессами дождитесь установки прошивки и перезагрузки принтера). На этом процесс прошивки можно считать оконченным. Главное, не забудьте снять чип с картриджа Xerox Phaser 3020, либо заклеить его скотчем. Как вариант, можно разобрать принтер и отключить контакты считывания чипа картриджа.
Альтернативный способ прошивки принтера Xerox Phaser 3020 при помощи программатора
Ваше Имя:
Ваш вопрос:
Внимание: HTML не поддерживается! Используйте обычный текст.
Оценка:
Плохо
Хорошо
Введите код, указанный на картинке:

Лазерный принтер Phaser 3020 — одна из самых успешных моделей печатающих устройств компании Xerox. Благодаря доступной цене и надежности данный аппарат является долгожителем на рынке оргтехники.
Единственный недостаток Xerox 3020 сводится к тому, что совместимый с ним картридж 106R02773 требует замены чипа после каждой заправки тонером. Иначе счетчик отпечатков не сбросится, а принтер не заработает.
Эта проблема никак не касается тех пользователей, которые покупают оригинальные комплектующие, переплачивая десятки тысяч рублей в год за монохромную печать.
Однако большинство владельцев лазерной оргтехники Xerox из Москвы и Московской области предпочитают экономить, повторно заправляя отработанные расходники тонером.
Замена чипа повышает стоимость восстановительных работ, поэтому лучше единожды сбросить счетчик отпечатков с помощью прошивки Phaser 3020 модифицированным ПО.
На заметку!
Прошивать рекомендуется только те аппараты, у которых истек срок гарантийного обслуживания. Самостоятельное обновление программного обеспечения преждевременно оставит пользователя без гарантии производителя.
Несмотря на наличие подробных рекомендаций по прошивке Xerox 3020, будьте предельно осторожны. Несоблюдение инструкций непременно приведет к софтверной поломке вашего принтера.
Рабочие fix-прошивки бесплатными не бывают. Их генерируют профильные сервисы под каждое устройство индивидуально, опираясь на версию установленного ПО, серийный номер принтера и CRUM-номер картриджа.
На заметку!
Скачивать готовые fix-прошивки из интернета бесполезно. Они работать не будут из-за того, что серийные номера печатающих устройств и совместимых расходников уникальны.
Вам остается только выбрать необходимый сервис. Избегайте мошенников.
Этап №1. Печать конфигурационного отчета
Печать конфигурационного файла необходима, чтобы узнать версию официальной прошивки и серийный номер Xerox 3020.
Проделывать операцию нужно еще до окончания тонера в картридже. Если краска опустела, тогда придется менять чип или покупать новый расходник. Также позаботьтесь о наличии бумаги в лотке.
На панели управления аппарата держите зажатой кнопку WPS около 10 секунд, а затем отпустите ее. Индикация должна замигать, потом гореть непрерывно, под конец снова замигать.
Произойдет печать страницы с указанием конфигурационной информации. Найдите и выделите следующие записи:
- Machine Serial Number — xxxxxxxxxx;
- System (один из вариантов — v.3.50.01.05 / v.3.50.01.08 / v.3.50.01.10 / v.3.50.02.01).

Этап №2. Печать CRUM-номера
Зажмите WPS на 15 секунд. Индикация за такой промежуток времени поменяет несколько раз свое состояние, пока не переключится на продолжительное свечение.
В этом файле вам пригодится указатель CRUM-xxxxxxxxxxx.

Этап №3. Создание модифицированного ПО
Полученные данные передайте разработчику, который сгенерирует модифицированное программное обеспечение. Напоследок скачайте fix-прошивку и разархивируйте ее на ПК.

Прошейте Xerox 3020 вместе с ТонерДруг
Не рискуйте работоспособностью своего принтера, прошейте Xerox 3020 с гарантией от сервисного центра ТонерДруг!
Наши специалисты произведут установку ПО по указанному адресу в любом из районов Москвы — 24 / 7 [ознакомиться].
Внимание!
Оплата взимается только за 100% результат удобным для заказчика способом:
- безналичным расчетом;
- банковским переводом на карту;
- наличными.
Инструкция по прошивке Xerox 3020
Fix-прошивка уже на руках? Значит, половина дела сделано! Теперь просто следуйте данным рекомендациям, а при возникновении вопросов, лучше задавайте их издателю ПО или специалистам сервисного центра ТонерДруг (в комментариях под этой публикацией).
Шаг №1. Подключите принтер к ПК
Никаких беспроводных интерфейсов. Xerox 3020 следует соединить с компьютером по USB.
Отдельного внимания заслуживает силовой кабель, который должен быть подключен к розетке напрямую. Сетевые фильтры использовать не рекомендуется.
Если электросеть выключится в процессе обновления ПО, тогда аппарат превратится в кирпич, а его реанимация обойдется в круглую сумму.
Шаг №2. Переведите устройство в загрузочный режим
Переход в загрузочный режим:
- выключите принтер;
- зажмите и удерживайте кнопку WPS, не отпуская ее, нажмите еще и кнопку POWER;
- через пару секунд отпустите обе кнопки;
- индикация вокруг кнопки POWER загорится.
Шаг №3. Прошейте принтер
Перетяните первый файл прошивки 1_Phaser-3020_xx.xx.xx.xx.hd на ярлык установки usbprns2.ехе.

Xerox 3020 начнет обновлять ПО. Вам нужно дождаться перезагрузки устройства, а потом перетянуть на ярлык установки второй файл с прошивкой 2_FIX_xxxxxxxxxx_Phaser-3020_xx.xx.xx.xx.hd.
После очередного ожидания аппарат вновь перезагрузится и будет готов к работе как только вы удалите чип из картриджа.
Внимание!
В дальнейшем использовать как совместимые, так и оригинальные картриджи необходимо исключительно без чипов. Внимательно следите за этим. Защитную микросхему лучше заклеить скотчем или удалить плоской отверткой.
Теперь Xerox 3020 прошит. Работоспособность устройства не будет ограничена. Счетчик тонера не опустится ниже 100%. Регулировать количество краски придется самостоятельно.
Остались вопросы? Комментируйте инструкцию или пишите на электронный ящик сервисного центра ТонерДруг!
- Manuals
- Brands
- Xerox Manuals
- Printer
- Phaser 3020
- Service manual
-
Contents
-
Table of Contents
-
Bookmarks
Related Manuals for Xerox Phaser 3020
Summary of Contents for Xerox Phaser 3020
-
Page 1
Xerox Phaser 3020 ® ® Service Manual 702P02829 June 2014 Initial Issue… -
Page 3
Xerox service documentation is intended for use by certified, product-trained service per- sonnel only. Xerox does not warrant or represent that it will notify or provide to such customer any future change to this documentation. Customer performed service of equipment, or mod- ules, components, or parts of such equipment may affect whether Xerox is responsible to fix machine defects under the warranty offered by Xerox with respect to such equipment. -
Page 4
Initial Issue June 2014 Xerox® Phaser® 3020 Printer Service Manual… -
Page 5: Table Of Contents
How to Use this Manual ………………..Service Safety Summary………………..Reference Symbology………………… Voltage Specifications………………… Health and Safety Incident Reporting …………….viii Regulatory Specifications………………..Translation of Warnings ………………..Tag Usage……………………Phaser® 3020 Overview ………………..Additional Product Safety Information…………….Introduction June 2014 Xerox® Phaser® 3020 Printer Service Manual…
-
Page 6
Introduction June 2014 Xerox® Phaser® 3020 Printer Service Manual… -
Page 7: About This Documentation
This section contains general information, change tag information, and general proce- Introduction dures. The Xerox® Phaser® 3020 Service Manual is part of the multinational documentation for the Section 7 Wiring Data Xerox® Phaser® 3020 Printer. It is structured in standard Xerox service documentation format.
-
Page 8: How To Use This Manual
A caution is used whenever an operation or maintenance procedure, practice, condition or statement, if not strictly observed, could result in damage to the equipment. NOTE: A note is used where it is essential to highlight a procedure, practice, condition or state- ment. Introduction June 2014 Xerox® Phaser® 3020 Printer Service Manual…
-
Page 9: Service Safety Summary
Do not use aerosol cleaners. The use of supplies that are not approved may cause poor performance and could create a hazardous condition. • Do not burn any consumables or routine maintenance items. For information on Xerox supplies recycling programs, go to www.xerox.com/gwa. Introduction…
-
Page 10: Reference Symbology
Improper operation may result in injury to a person. Observe all ESD procedures to avoid component damage. CAUTION Improper operation may result in machine damage. The following reference symbols are used throughout the Xerox® Phaser® 3020 Service Man- ual. Flag •…
-
Page 11: Voltage Specifications
In this example, the red meter lead would be placed on TP21 and the black meter lead would be placed on TP33. If a second test point is not given, it is assumed that the black meter lead may be attached to the copier frame. Introduction June 2014 Voltage Specifications Xerox® Phaser® 3020 Printer Service Manual…
-
Page 12: Health And Safety Incident Reporting
Fund all field retrofits. Field Service Operations shall: II. Scope Preserve the Xerox product involved and the scene of the incident inclusive of any Xerox Corporation and subsidiaries worldwide. associated equipment located in the vicinity of the incident. Return any affected equipment/part(s) to the location designated by Xerox EH&S III.
-
Page 13: Regulatory Specifications
United States (FCC Regulations) The Xerox® Phaser® 3020 has been tested and found to comply with the limits for a Class A digital device pursuant to Part 15 of the FCC Rules. These limits are designed to provide rea- sonable protection against harmful interference in a commercial installation.
-
Page 14: Translation Of Warnings
GP 16. Das Modul ist sehr schwer. de las normas sobre incendios. AVISO: Utilice los procedimientos de seguridad cuando elimine el módulo. Consulte el GP 16. El módulo es pesado. Introduction June 2014 Translation of Warnings Xerox® Phaser® 3020 Printer Service Manual…
-
Page 15: Tag Usage
WARNING Tag Usage Use only Xerox materials and components. This product is safety certified using Xerox Tags materials and components. The use of non Xerox materials and components may invali- If different parts or actions exist because of a modification, the Tag number will identify the date the safety certificate.
-
Page 16: Phaser® 3020 Overview
AVISO: No toque ningún área marcada con etiquetas, mientras la máquina está en funci- onamiento. Podría sufrir lesiones en los dedos, causadas por los bordes del papel. Health and Safety Incident Reporting Go to GSN website, Library #1789 for reporting fires or other incidents involving a Xerox prod- uct. Introduction June 2014 Phaser®…
-
Page 17
Service Call Overview ………………… Safety Precautions ………………….SCP 01 Introduction to Service Call Procedures …………SCP 02 Initial Actions…………………. SCP 03 Corrective Actions………………..SCP 04 Final Actions …………………. HFSI’s ……………………..Service Call Procedures June 2014 Xerox® Phaser® 3020 Printer Service Manual… -
Page 18
Service Call Procedures June 2014 Xerox® Phaser® 3020 Printer Service Manual… -
Page 19: Service Call Overview
NVM access. The diagnostic tests are accessed through the Embedded Diagnostic Control (EDC) tool. Refer to the Xerox® Phaser® 3020 User Guide for detailed instructions on using the Control Panel buttons and menus. Refer to Section 6 for information regarding diag-…
-
Page 20: Scp 01 Introduction To Service Call Procedures
SCP 02 Initial Actions Purpose Purpose Service Call Procedures (SCP) are the guide to performing a service call on the Xerox® The purpose of the Initial Actions is to help organize the service call. Customer input, machine Phaser® 3020. observations and print samples are all used to gather information about the condition of the system.
-
Page 21: Scp 03 Corrective Actions
Troubleshoot fault codes with the lowest chain number first If the problem is IQ related, refer to Section 3 Image Quality Entry RAP. When the primary problem is resolved, proceed to Final Actions. Service Call Procedures June 2014 SCP 03, SCP 04 Xerox® Phaser® 3020 Printer Service Manual…
-
Page 22: Hfsi’s
As with other CSE actions, these actions should be performed according to customer run may cause a return service call. requirements. Some actions may be deferred to a Xerox Initiated activity, taking into consider- ation any risks with deferring those actions.
-
Page 23
17-310 Communication Error (Main PWB to Wireless PWB) Fault……… 2-10 17-700 / 710 BOOTP Error Fault ………………2-11 17-800 / 810 DHCP Error Fault ………………2-11 17-910 Firmware Upgrade Fault ………………2-12 Status Indicator RAPs June 2014 Xerox® Phaser® 3020 Printer Service Manual… -
Page 24
Status Indicator RAPs June 2014 Xerox® Phaser® 3020 Printer Service Manual… -
Page 25
Check that the connectors are secure and no contamination is present. • Check that there are no broken or defective wires. • Disconnect and securely reconnect the harness. Status Indicator RAPs June 2014 01-100 , 06-100 / 200 Xerox® Phaser® 3020 Printer Service Manual… -
Page 26
Ensure that no paper is loaded in the tray. Clear any jammed sheets. Refer to Section 7: Trou- bleshooting, in the Xerox® Phaser® 3020 User Guide for detailed instructions on clearing If the problem is intermittent, check all wiring for open or short circuit. -
Page 27
• Power Off the machine, then power On while holding the WPS button to reboot the Clear any jammed sheets. Refer to Section 7: Troubleshooting, in the Xerox® Phaser® 3020 machine. User Guide for detailed instructions on clearing paper jams. -
Page 28
Check the remaining life of the Print Cartridge by using one of the methods listed below: • Print a Supplies Information Report. Refer to the Phaser 3020 User Guide, Section • Print a Supplies Information Report. Refer to the Phaser 3020 User Guide, Section… -
Page 29
Check the CRUM contact area for contamination and clean if necessary. Reinstall the Print Cartridge. Check the connections on the HVPS for contamination. Clean as necessary. If the problem continues, install a new Print Cartridge. Status Indicator RAPs June 2014 09-450 , 09-550 Xerox® Phaser® 3020 Printer Service Manual… -
Page 30
Check the Print Cartridge information by using one of the methods listed below: • Print a Supplies Information Report. Refer to the Phaser 3020 User Guide, Section Initial Actions 1, Control Panel and Information Pages, for detailed information on using the Control Switch Off the power then switch On the power. -
Page 31
If problem is intermittent, check the circuit of the Fuser Assembly for one of the following: • All connectors are securely connected and no contamination is present • Short Circuit or damaged wire. Repair as necessary Status Indicator RAPs June 2014 09-800 , 10-100 Xerox® Phaser® 3020 Printer Service Manual… -
Page 32
If the problem persists, replace parts in the following order: • Flat Cable (Not Shown) • Wireless PWB (REP 1.8), 1.1. • Main PWB (REP 1.6), 1.1. Status Indicator RAPs June 2014 17-100 , 17-310 2-10 Xerox® Phaser® 3020 Printer Service Manual… -
Page 33
Switch Off the power then switch On the power. Switch Off the power then switch On the power. Check BOOTP and network configuration. Check DHCP and network configuration. Status Indicator RAPs June 2014 17-700 / 710 , 17-800 / 810 Xerox® Phaser® 3020 Printer Service Manual 2-11… -
Page 34
The firmware upgrade aborted due to an invalid file. BSD-Reference: None Initial Actions Check the USB connection. Verify that the correct firmware file is being used. Procedure Cycle the machine power and repeat upgrade procedure Status Indicator RAPs June 2014 17-910 2-12 Xerox® Phaser® 3020 Printer Service Manual… -
Page 35
IQ6 Black or Dark Image RAP ………………IQ7 Uneven Density RAP………………..IQ8 Background RAP …………………. IQ9 Residual Image (Ghosting) RAP …………….IQ10 Blank Page RAP………………… IQ11 Partial Image Deletions RAP……………… 3-10 Image Quality June 2014 Xerox® Phaser® 3020 Printer Service Manual… -
Page 36
Image Quality June 2014 Xerox® Phaser® 3020 Printer Service Manual… -
Page 37: Image Quality Overview
Areas of the printed image are light or missing entirely IQ11 • Ghosting tions on limited areas of the paper. • Vertical white lines • Vertical black line or band • Stains on the page back Image Quality June 2014 Image Quality Overview Xerox® Phaser® 3020 Printer Service Manual…
-
Page 38: Iq1 Vertical Black Line And Band Rap
Care, for detailed instructions on how to replace the Drum Cartridge. Switch Off the power. Replace the Print Cartridge. Refer to the Xerox® Phaser® 3020 User Guide, Section 6 Maintenance, General Care, for detailed instructions on how to replace the Print Cartridge.
-
Page 39: Iq3 Horizontal Black Bands Rap
Clean the voltage terminals for the Print Cartridges: • Refer to the Xerox® Phaser® 3020 User Guide, Section 6 Maintenance, General Care, Switch on the power and make a test print. The test print looks OK. for detailed instructions on how to replace the Print Cartridges.
-
Page 40: Iq5 Low Image Density Rap
(REP 1.5). • The Charge Roller is likely defective, replace the Print Cartridge. Refer to the Xerox® Phaser® 3020 User Guide, Section 6 Maintenance, General Care, for detailed instructions on how to replace the Print Cartridges. Figure 1 Light Image…
-
Page 41: Iq7 Uneven Density Rap
Switch Off the Power. Check the contacts on the Print Cartridge. The contacts are OK. Replace the Print Cartridge. Refer to the Xerox® Phaser® 3020 User Guide, Section 6 Maintenance, General Care, for detailed instructions on how to replace the Print Cartridges.
-
Page 42: Iq8 Background Rap
Switch on the power and make a test print. The test print looks OK. Replace the LVPS / HVPS PWB; (REP 1.5), 3.1. Go to SCP 04 Final Actions. Figure 1 Uneven Density Figure 1 Background Image Quality June 2014 IQ7, IQ8 Xerox® Phaser® 3020 Printer Service Manual…
-
Page 43: Iq9 Residual Image (Ghosting) Rap
General Care, for detailed instructions on how to replace the Print Cartridges. • Fuser; (REP 1.14), 3.2. Replace the Print Cartridge, refer to the Xerox® Phaser® 3020 User Guide, Section 6 Mainte- • LVPS / HVPS PWB; (REP 1.5), 3.1.
-
Page 44: Iq11 Partial Image Deletions Rap
Check the supplies life of the Print Cartridge, refer to GP 2 Machine Status and Reports. Replace the Print Cartridge if it has reached end of life. Image Quality June 2014 IQ10, IQ11 3-10 Xerox® Phaser® 3020 Printer Service Manual…
-
Page 45
Figure 1 Image Deletions Image Quality June 2014 IQ11 Xerox® Phaser® 3020 Printer Service Manual 3-11… -
Page 46
Image Quality June 2014 IQ11 3-12 Xerox® Phaser® 3020 Printer Service Manual… -
Page 47
REP 1.14 Fuser Module………………..4-20 REP 1.15 LSU Cables………………… 4-22 REP 1.16 Feed Clutch ………………..4-23 REP 1.17 Paper Drive Roll and Drive Gear …………..4-24 REP 1.18 Paper Tray …………………. 4-26 Repairs June 2014 Xerox® Phaser® 3020 Printer Service Manual… -
Page 48
Repairs June 2014 Xerox® Phaser® 3020 Printer Service Manual… -
Page 49: Rep 1.1 Front Cover
Make sure that the Plastic Screws go into plastic components and Machine Screws go into the metal frame. Install the components in the reverse of removal. Repairs June 2014 REP 1.1, REP 1.2 Xerox® Phaser® 3020 Printer Service Manual…
-
Page 50: Rep 1.3 Rear Cover
Make sure that the Plastic Screws go into plastic components and Machine Screws go into the metal frame. Install the components in the reverse of removal. Repairs June 2014 REP 1.2, REP 1.3 Xerox® Phaser® 3020 Printer Service Manual…
-
Page 51: Rep 1.4 Jam Clearance And Top Cover
Make sure that the Plastic Screws go into plastic components and Machine Screws go into the metal frame. Pivots Install the components in the reverse of removal. Figure 1 Jam Clearance Cover Support Arms and Pivots (Top View) Repairs June 2014 REP 1.4 Xerox® Phaser® 3020 Printer Service Manual…
-
Page 52: Rep 1.5 Lvps / Hvps Pwb
Rear Cover (REP 1.3). Open the Jam Clearance Cover. Remove the Main PWB (REP 1.6). Disconnect the Fuser connector and Main PWB ribbon cable (Figure Remove the Insulator Strip (Black). Repairs June 2014 REP 1.5 Xerox® Phaser® 3020 Printer Service Manual…
-
Page 53: Rep 1.6 Main Pwb
Make sure that the Plastic Screws go into plastic components and Machine Screws go into the metal frame. Install the components in the reverse of removal. Repairs June 2014 REP 1.5, REP 1.6 Xerox® Phaser® 3020 Printer Service Manual…
-
Page 54
PWS from the GSN website). Double-click the executable file and follow the steps listed in the USB Serial applica- tion window to write the machine serial number to the new Main PWB. (Figure Repairs June 2014 REP 1.6 Xerox® Phaser® 3020 Printer Service Manual… -
Page 55: Rep 1.7 Control Panel Pwb
Make sure that the Plastic Screws go into plastic components and Machine Screws go into the metal frame. Install the components in the reverse of removal. Figure 1 Control Panel PWB Connector Repairs June 2014 REP 1.7 Xerox® Phaser® 3020 Printer Service Manual…
-
Page 56: Rep 1.8 Wnpc (Wifi) Pwb
Figure 1 LVPS / HVPS PWB Connector frame. Make sure that the Plastic Screws go into plastic components and Machine Screws go into the metal frame. Install the components in the reverse of removal. Repairs June 2014 REP 1.8 4-10 Xerox® Phaser® 3020 Printer Service Manual…
-
Page 57: Rep 1.9 Left Frame And Drive Motor
Disconnect the Drive Motor connector (Figure Figure 2 Main Drive Unit Removal (Left View) Connector Figure 1 Drive Motor Connector (Front View) Remove the Fuser Module (REP 1.14). Repairs June 2014 REP 1.9 Xerox® Phaser® 3020 Printer Service Manual 4-11…
-
Page 58
Install, but do not tighten, the screws (7) (Figure Tighten the Frame screws from the center of the Frame: To the Front of the printer, then to the Rear of the Printer. Repairs June 2014 REP 1.9 4-12 Xerox® Phaser® 3020 Printer Service Manual… -
Page 59: Rep 1.10 Lsu
NOTE: The Flat Cable may be adhered to the LSU. Detach it from the LSU and rein- stall it on the new LSU in the same location. Remove the inside LSU cover screws (2). Repairs June 2014 REP 1.10 Xerox® Phaser® 3020 Printer Service Manual 4-13…
-
Page 60
NOTE: Tapered Plastic Screws and Round Machine Screws are used to hold the PWB to the frame. Make sure that the Plastic Screws go into plastic components and Machine Screws go into the metal frame. Install the components in the reverse of removal. Repairs June 2014 REP 1.10 4-14 Xerox® Phaser® 3020 Printer Service Manual… -
Page 61: Rep 1.11 Feed Rolls And Retard Pad
Figure 2 LSU Cover Top Screws (Top View) Remove the Feed Rolls Assembly screws (2) through the bottom of the Printer (Figure Connector Figure 1 Motor Connector and LSU Cover Screws (Front View) Repairs June 2014 REP 1.11 Xerox® Phaser® 3020 Printer Service Manual 4-15…
-
Page 62
Be careful not to lose the Retard Pad Spring. From the rear of the printer, release the Pivot Latches (2). Move the Retard Pad into the printer to remove it. Repairs June 2014 REP 1.11 4-16 Xerox® Phaser® 3020 Printer Service Manual… -
Page 63
When replacing the Feed Rolls Assembly make sure the Locating Pins are positioned in the frame holes before installing the screws (2) (Figure Spring Figure 5 Retard Pad Removal (Rear View) Locating Pins Figure 6 Feed Rolls Assembly Locating Pins (Top View) Repairs June 2014 REP 1.11 Xerox® Phaser® 3020 Printer Service Manual 4-17… -
Page 64: Rep 1.12 Feed Sensors Pwb And Actuators
Make sure that the Plastic Screws go into plastic components and Machine Screws go into the metal frame. NOTE: Make sure that the Actuator Spring is location in frame cutout (Figure Install the components in the reverse of removal. Repairs June 2014 REP 1.12 4-18 Xerox® Phaser® 3020 Printer Service Manual…
-
Page 65: Rep 1.13 Transfer Roll
From the rear of the printer, using a small screwdriver release the latches (2) and push the Transfer Roll Bushing into the printer (Figure Latches Transfer Roll Figure 2 Transfer Roll Removal (Top View) Figure 1 Transfer Roll Bushing Latches (Rear View) Repairs June 2014 REP 1.13 Xerox® Phaser® 3020 Printer Service Manual 4-19…
-
Page 66: Rep 1.14 Fuser Module
Remove the following covers: Left and Right Side Covers (REP 1.2). Rear Cover (REP 1.3). Front Cover (REP 1.1). Top Cover (REP 1.4). Remove the Main PWB (REP 1.6). Repairs June 2014 REP 1.13, REP 1.14 4-20 Xerox® Phaser® 3020 Printer Service Manual…
-
Page 67
Remove the screws (3) (Figure Wire Guides Connector Screws Figure 1 Fuser Connector and Wire Guides Figure 2 Fuser Screws (Top View) Repairs June 2014 REP 1.14 Xerox® Phaser® 3020 Printer Service Manual 4-21… -
Page 68: Rep 1.15 Lsu Cables
(Figure Figure 1 Insulator Strip Install the components in the reverse of removal. Repairs June 2014 REP 1.14, REP 1.15 4-22 Xerox® Phaser® 3020 Printer Service Manual…
-
Page 69: Rep 1.16 Feed Clutch
Make sure that the Plastic Screws go into plastic components and Machine Screws go into the metal frame. Connector Install the components in the reverse of removal. Figure 1 Feed Clutch Connector Remove the Left Frame (REP 1.9). Repairs June 2014 REP 1.15, REP 1.16 Xerox® Phaser® 3020 Printer Service Manual 4-23…
-
Page 70: Rep 1.17 Paper Drive Roll And Drive Gear
Install the components in the reverse of removal. NOTE: Make sure the Feed Drive Shaft engages the Feed Roll Assembly. Screws Figure 1 Main Drive Unit (Left View) Repairs June 2014 REP 1.16, REP 1.17 4-24 Xerox® Phaser® 3020 Printer Service Manual…
-
Page 71
Note the location of the Spring in the frame cutout for reinstallation. Unlatch and remove the actuator. Spring Gear Figure 2 Paper Drive Roll Gear (Left View) Latch Feed Sensor Actuator Figure 3 Feed Sensor Actuator (Rear View) Repairs June 2014 REP 1.17 Xerox® Phaser® 3020 Printer Service Manual 4-25… -
Page 72: Rep 1.18 Paper Tray
NOTE: When replacing the Main Drive Unit, the drive gears may need to be rotated to align them with the other drives. Install the components in the reverse of removal. Repairs June 2014 REP 1.17, REP 1.18 4-26 Xerox® Phaser® 3020 Printer Service Manual…
-
Page 73
Install the components in the reverse of removal. NOTE: Make sure the Locating Pins and Tabs on the Paper Tray align with the cutouts in the frame. Repairs June 2014 REP 1.18 Xerox® Phaser® 3020 Printer Service Manual 4-27… -
Page 74
Repairs June 2014 REP 1.18 4-28 Xerox® Phaser® 3020 Printer Service Manual… -
Page 75
PL 3.5 Main Frame Right ………………..Middle And Bottom Frame PL 3.6 Paper Tray And LSU Frame …………….5-10 Feed Idle Frame PL 3.7 Paper Feed Assembly ………………5-11 Part Number Index ………………….5-12 Parts List June 2014 Xerox® Phaser® 3020 Printer Service Manual… -
Page 76
Parts List June 2014 Xerox® Phaser® 3020 Printer Service Manual… -
Page 77: 1.1 Main
Wireless Cover 140N63727 WNPC (WIFI) PWB 002N03183 Right Cover – 002N03184 Right Cover (Black) 002N03178 Paper Support – 002N03179 Paper Support (Black) – Front Cover Assembly (Items 3, 11) Parts Lists June 2014 PL 1.1 Xerox® Phaser® 3020 Printer Service Manual…
-
Page 78: 2.1 Top Cover
Shaft Holder – Jam Clearance Cover – Trim Strip – Top Cover – WPS Key 140N63725 Control Panel PWB 002N03159 Top Cover Assembly – 002N03160 Top Cover Assembly (Black) Parts Lists June 2014 PL 2.1 Xerox® Phaser® 3020 Printer Service Manual…
-
Page 79: 3.1 Frame
Fuser Module (PL 3.2) – LSU Cover – Main Frame Right (PL 3.5) – HVPS Insulator – HVPS Contact 105N02303 LVPS/HVPS 220V – 105N02302 LVPS/HVPS 110V – Input Guide Parts Lists June 2014 PL 3.1 Xerox® Phaser® 3020 Printer Service Manual…
-
Page 80: 3.2 Fuser
Fuser Gear – Heat Roll – Guide – Spring – Thermostat – Thermistor – Fuser Cover – Bushing – Fuser Lamp – Jam Lever – Right Lamp Cover Parts Lists June 2014 PL 3.2 Xerox® Phaser® 3020 Printer Service Manual…
-
Page 81: 3.3 Paper Path Frame
Ground Clip – Paper Path Guide – Feed Roll Shaft 121N01246 Feed Clutch 007N01801 Feed Gear – Bushing – Spring – Bushing 001N00547 Retard Pad – Path Frame Parts Lists June 2014 PL 3.3 Xerox® Phaser® 3020 Printer Service Manual…
-
Page 82: 3.4 Main Left Frame
– RDCN Drive Gear – Drive In Gear – Fuser Drive Gear – RDCN Fuser Gear – RDCN A Gear – Drive Motor 001N00548 Left Main Frame Assembly Parts Lists June 2014 PL 3.4 Xerox® Phaser® 3020 Printer Service Manual…
-
Page 83: 3.5 Main Frame Right
CRUM Contact – Spring – Ground Clip – Washer – Tap Screw – CRUM Cover – Right Print Cartridge Guide – Right Main Frame (Items 1 — 8) Parts Lists June 2014 PL 3.5 Xerox® Phaser® 3020 Printer Service Manual…
-
Page 84: 3.6 Paper Tray And Lsu Frame
– Left Guide – Rubber Friction Pad – Bottom Plate – Pinion Gear – Sponge Damper 062N00293 – Motor Cover – LSU Frame 117N01970 LSU Flat Cable Parts Lists June 2014 PL 3.6 5-10 Xerox® Phaser® 3020 Printer Service Manual…
-
Page 85: 3.7 Paper Feed Assembly
Pick Up Clutch – Bushing – Pick Up Roller – Plain Washer – Bushing – Sleeve – Spring – Pick Up Gear – Feed Gear – Drive shaft Roller Parts Lists June 2014 PL 3.7 Xerox® Phaser® 3020 Printer Service Manual 5-11…
-
Page 86: Part Number Index
PL 3.2 126N00433 PL 3.2 130N01757 PL 3.7 130N01759 PL 3.3 140N63719 PL 1.1 140N63720 PL 1.1 140N63721 PL 1.1 140N63725 PL 2.1 140N63727 PL 1.1 Parts Lists June 2014 Part Number Index 5-12 Xerox® Phaser® 3020 Printer Service Manual…
-
Page 87
GP 7 Usage of the Electrostatic Discharge (ESD) Field Service Kit ……. 6-14 GP 8 Software ServiceTools ………………. 6-15 Diagnostics Diagnostic (EDC) Mode ………………..6-17 Machine Reports ………………….6-17 Glossary Glossary …………………….. 6-19 General Procedures and Information June 2014 Xerox® Phaser® 3020 Printer Service Manual… -
Page 88
General Procedures and Information June 2014 Xerox® Phaser® 3020 Printer Service Manual… -
Page 89
General Information System Overview The Xerox® Phaser® 3020 printer produces high quality prints from electronic documents with This section provides illustrations of the following systems: speeds of up to 21 ppm and an effective output resolution of up to 1200 x 1200 dpi. -
Page 90
The following diagrams display the path that the paper follows during the printing process. The figures below illustrates the mechanical parts of the printer. Figure 1 Paper Path Figure 2 System Layout General Procedures and Information June 2014 System Overview Xerox® Phaser® 3020 Printer Service Manual… -
Page 91
The Scanner Unit receives image data from the HVPS PWB and scans the surface of the pho- cess. toreceptor drum (OPC) with a laser to create a latent image. Figure 3 Print Process Figure 4 Laser Scanner Unit General Procedures and Information June 2014 System Overview Xerox® Phaser® 3020 Printer Service Manual… -
Page 92
Drum Cartridge (OPC), Fuser, Pick-up, Registration, Feed and Exit and developer units are contained within the Print Cartridge. Rollers. Figure 5 Integrated Toner System General Procedures and Information June 2014 System Overview Xerox® Phaser® 3020 Printer Service Manual… -
Page 93
Wired Network Wireless Network 802.11b/g/n Wireless LAN Applications Easy Printer Man- Windows® and Macintosh® OS Only ager Printer Status Windows® OS Only Smart Panel Linux Only General Procedures and Information June 2014 Product Specifications Xerox® Phaser® 3020 Printer Service Manual… -
Page 94
Plain, Light-weight, Recycled, Archive Media Weight 16 to 24 lb. (60 to 90 gsm) Non-printable Area 0.12 in (3 mm) From Edge (Top, Bottom, Right, Left) General Procedures and Information June 2014 Product Specifications Xerox® Phaser® 3020 Printer Service Manual… -
Page 95
13.7 x 8.5 x 7.0 in. 332 x 215 x 178 mm Weight SET (with Print Cartridge) M202X 8.75 lbs (3.97 Kg) M202XW 8.82 lbs (4.0 Kg) General Procedures and Information June 2014 Product Specifications Xerox® Phaser® 3020 Printer Service Manual… -
Page 96
General Procedures and Information June 2014 Product Specifications 6-10 Xerox® Phaser® 3020 Printer Service Manual… -
Page 97
Section 6 Maintenance: Checking the Status of Consumables. • Section 7 Troubleshooting, Machine Status Indicators, for: – LED color and status descriptions – Printing machine reports. General Procedures and Information June 2014 GP 1, GP 2 Xerox® Phaser® 3020 Printer Service Manual 6-11… -
Page 98
From CWIS: • Layout • Printer Open the Xerox Easy Printer Manager to launch the CentreWare Internet Services (CWIS) application. • Network Settings Log into CWIS: enter user name: admin and password: 1111. Select the [Support] Tab. The Firmware version is listed next to the Main Controller Board. -
Page 99
11. In the Firmware Upgrade link, select the Upgrade Wizard button. In the Firmware File area, select Browse. Locate and select the correct firmware upgrade .hd file. Select Open. General Procedures and Information June 2014 GP 5, GP 6 Xerox® Phaser® 3020 Printer Service Manual 6-13… -
Page 100
ESD Field Service Kit. During transfer from or to the packing material or container, the PWB should be placed on the static dissipative work surface mat. General Procedures and Information June 2014 GP 6, GP 7 6-14 Xerox® Phaser® 3020 Printer Service Manual… -
Page 101
• USB Serial Number Writing Tool — to write the machine serial number to the Main PWB. • EDC tool — to enter Diagnostic Mode General Procedures and Information June 2014 GP 8 Xerox® Phaser® 3020 Printer Service Manual 6-15… -
Page 102
General Procedures and Information June 2014 GP 8 6-16 Xerox® Phaser® 3020 Printer Service Manual… -
Page 103
K [THV] — Bias Status: [Off] 109 Fuser Temp A Status: [0] 110 LSU LSU Mot1 Run Status: [Low] LD Power4 Status: [Off] LSU HSync4 [Low] General Procedures and Information June 2014 Diagnostic (EDC) Mode, Xerox® Phaser® 3020 Printer Service Manual 6-17… -
Page 104
General Procedures and Information June 2014 Diagnostic (EDC) Mode, 6-18 Xerox® Phaser® 3020 Printer Service Manual… -
Page 105
Glossary Table 1 Glossary Term/Acronym Definition NOTE: For a comprehensive list of Xerox acronyms, refer to the Xerox Acronym database at: Intranet A private computer network that uses internet protocol technology to https://open.xerox.com/Services/acronym share information, operational systems, or computing services within an organization. -
Page 106
General Procedures and Information June 2014 Glossary 6-20 Xerox® Phaser® 3020 Printer Service Manual… -
Page 107
AC / LOW VOLTAGE and HIGH VOLTAGE POWER / INTERLOCKS CHAIN 3 COMMUNICATIONS PRINTER COMMUNICATIONS This document contains wiring and mechanical power data for the Xerox® Phaser® 3020 Printer. CHAIN 4 MAIN DRIVE These block schematic diagrams are supplemental to the diagnostic and troubleshooting information MAIN DRIVE found in the Xerox Phaser 3020 Service Manual. -
Page 108
THIS PAGE INTENTIONALLY BLANK BSDs ® ® June 2014 Xerox Phaser 3020 Printer Service Manual… -
Page 109
DC COM DC COM +5VDC +5 VDC +5 VDC +5 VDC DC COM +3.3 VDC +24 VDC POWER GENERATION DC COM +3.3 VDC +3.3 VDC +3.3 VDC +3.3 VDC ® ® Xerox Phaser 3020 Printer Service Manual June 2014 BSDs… -
Page 110
WPS KEY WIDTH SENSOR POWER KEY FEED SENSOR WPS LED POWER LED ERROR LED READY LED DC COM DC COM DC COM TONER LED +3.3 VDC +3.3 VDC +3.3 VDC BSDs ® ® June 2014 Xerox Phaser 3020 Printer Service Manual… -
Page 111
4.1 MAIN DRIVE MAIN PWB PL 1.1 +24 VDC DRIVE MOTOR PL 3.4 MOTOR DRIVER PHASE A PHASE B PHASE C PHASE D ® ® Xerox Phaser 3020 Printer Service Manual June 2014 BSDs… -
Page 112
LSU 1 MOTOR LSU ON DC COM DC COM DC COM V1 DN V1 DP DC COM DC COM DC COM SYNC SIGNAL 3.3 VDC +3.3 VDC +3.3 VDC BSDs ® ® June 2014 Xerox Phaser 3020 Printer Service Manual… -
Page 113
+3.3 VDC WIDTH SENSOR PAPER AT REG SENSOR (L) +3.3 VDC +3.3 VDC +3.3 VDC FEED CLUTCH PL 3.3 +24 VDC FEED CLUTCH ON (L) +24 VDC DC COM ® ® Xerox Phaser 3020 Printer Service Manual June 2014 BSDs… -
Page 114
DEVELOPER AC DEVELOPER DC TRANSFER ENABLED SUPPLY PR DRUM ROLL CHARGE ENABLED TRANSFER ROLL CHARGE ON CRUM +3 VDC +3.3 VDC CRUM SIGNAL CRUM SIGNAL DC COM DC COM BSDs ® ® June 2014 Xerox Phaser 3020 Printer Service Manual… -
Page 115
PL 3.2 FUSER THERMISTOR RT10-001 Fuser Temperature Enable Fuser FUSER Signal Relay Fuser Relay +3.3 VDC FUSER MODULE +3.3 VDC PL 3.2 OVERTEMPERATURE THERMOSTAT Heat Lamp On ACH HEAT LAMP ® ® Xerox Phaser 3020 Printer Service Manual June 2014 BSDs… -
Page 116
©2014 Xerox Corporation. All rights reserved. Xerox® and the sphere of connectivity design are trademarks of Xerox Corporation in the US and/or other countries.
Инструкция по прошивке Xerox Phaser 3020 (по USB)
 Внимание!
Прошивки Phaser 3020 и WC-3025 НЕСОВМЕСТИМЫ!
Убедитесь, что версия FIX прошивки, доступной для заказа в генераторе, совместима с текущей версией прошивки принтера. При заказе рекомендуется выбрать обновляемую версию FIX прошивки
Внимание!
Печать отчёта невозможна, если принтер заблокирован!

Печать отчёта Xerox Phaser 3020
Для печати отчёта Сonfiguration
нажмите и удерживайте кнопку [ WPS ] около 10 секунд
(индикатор статуса начнёт мигать, затем загорится постоянно, затем снова начнёт мигать), отпустите кнопку.
Для печати отчёта Supplies Information
нажмите и удерживайте кнопку [ WPS ] около 15 секунд
(до тех пор, пока индикатор статуса снова не начнёт гореть постоянно), отпустите кнопку.
Распечатка отчётов возможна из утилиты Xerox Easy Printer Manager
(устанавливается по умолчанию с драйвером принтера)
Вход в принудительный режим
На выключенном принтере нажмите и удерживайте кнопку [ WPS ]
Нажмите и удерживайте кнопку [ POWER ], через ~ 2 сек
отпустите обе кнопки.
При успешном входе в принудительный режим, индикатор на кнопке
[ POWER ] должен загореться зелёным светом.
Порядок действий для прошивки Xerox Phaser 3020
1. Подключаете принтер к компьютеру, ждете выхода в готовность (драйвера на принтер устанавливать не обязательно)
2. Введите принтер в принудительный режим загрузки прошивки. Для этого на выключенном принтере нажмите и удерживайте кнопку [ WPS ]. Нажмите и удерживайте кнопку [ POWER ], через ~ 2 сек отпустите обе кнопки. При успешном входе в принудительный режим, индикатор на кнопке [ POWER ] должен загореться зелёным светом.
3. Перенесите мышкой первый файл прошивки 1_Phaser-3020_V3.50.01.08.hd на usbprns2.ехе ( ссылка )
Появится черное окно с бегущими точками, которое закроется через несколько секунд. После этого, аппарат начнет прошиваться
Дождитесь, пока принтер перезагрузится. После перезагрузки принтера приступаем к второму этапу прошивки.
4. Перенесите мышкой второй файл прошивки 2_FIX_xxxxxxxxxx_Phaser-3020_V3.50.01.08.hd на usbprns2.ехе
Появится черное окно с бегущими точками, которое закроется через несколько секунд. После этого, аппарат начнет прошиваться
Дождитесь, пока принтер или МФУ перезагрузится.
5. После перезагрузки удаляем чип и не допускаем установки других чипов! Уровень тонера всегда будет показывать 100%.
После прошивки заклейте или извлеките чип. Не допускайте установки других чипов.
Посмотреть подробную инструкцию по прошивке
