
Параметры, обслуживание и устранение неисправностей сканера
108
Руководство пользователя сканера DocuMate 765
Счетчик листов – в этом разделе отображается число
отсканированных страниц. Используйте параметры в этом
окне для опредления необходимости облуживания сканера.
Система: отображает число страниц, отсканированных через
ADF после последнего обновления счетчика.
После чистки ролика: отображает число страниц,
отсканированных после последней очистки валиков и сброса
счетчика. Инструкции о контролю и изменению этой настройки
см. в разделе «Очистка внутренних частей сканера» на стр. 116.
После замены ролика: отображает число страниц,
отсканированных после замены валиков и сброса счетчика.
Перечень дополнительных принадлежностей для сканера и
инструкции см. на веб-сайте www.xeroxscanners.com.
Обнов. все счетчики: нажатие этой кнопки приводит к
обновлению значений всех трех счетчиков, описанных выше.
Счетчики не обновяются автоматически во время сканирования
документов, для отображения текущих данных следует нажимать
на эту кнопку.
Сбросить счетчик: нажатие любой из этих кнопок обновляет
значение соответствующего счетчика до 0.
Справка − нажатие на эту кнопку открывает файл справки в формате
Adobe
®
PDF.
Сохр. инф-цию − нажатие на эту кнопку открывает диалоговое окно
Windows «Сохранить как…» для сохранения текущих сведений
сканере и компьютере в файл .log.
Закрыть − нажатие этой кнопки закрывает утилиту пользователя.
Коды ошибок сканера
Если во время сканирования происходит ошибка, ее код отображается
на ЖК-дисплее, что позволяет найти неиспавность и разрешить
проблему с помощью утилиты пользователя. Утилита пользователя
отображает код ошибки соответствующее сообщение в поле
Состояние сканера. В таблице ниже приводятся коды, сообщения,
возможные причины ошибок и обычные способы их разрешения.
Если не удается разрешить проблему, применив инструкции из этой
таблицы, см. раздел «Поиск и устранение неисправностей» на стр. 130.
Код
ошибки
Сообщение
Причина
Разрешение
U11 — U18 Ошибки «Замятие
бумаги» и «Бумага
осталась в сканере».
Бумага смялась во
время
прохождения через
сканер.
Датчики документа
загрязнены.
Откройте ADF и выходную дверцу и удалите все
остатки бумаги из сканера. Дополнительную
информацию см. в раздле стр. 127.
Если проблема остается, очистите валики
и датчики бумаги, как описано в разделе
«Очистка внутренних частей сканера» на
стр. 116.
Модератор: kvg

 Panda » Ср апр 24, 2019 9:59 am
-

Panda
- Осматривается
-


Panda » Ср апр 24, 2019 5:34 pm
-
Panda
- Осматривается
-
Panda » Чт апр 25, 2019 12:14 pm
-
Panda
- Осматривается
-
-
-
Xerox Phaser 6600 «Invalid Yellow» / «Неверный желтый»
kotya-potya в форуме Принтеры, МФУ, факсы, копиры формата A4
- 5
- 5299
3100

Пн ноя 18, 2019 8:24 pm
-
Xerox Phaser 6600 «Invalid Yellow» / «Неверный желтый»
-
-
Xerox WC 3119: «Замятие 1»
kokubenko в форуме Принтеры, МФУ, факсы, копиры формата A4
- 22
- 38582
kokubenko
Ср ноя 23, 2011 4:47 pm
-
Xerox WC 3119: «Замятие 1»
-
-
Xerox WC 3119 без признаков «жизни»
MorZ в форуме Принтеры, МФУ, факсы, копиры формата A4
- 5
- 6699
Goldwater
Чт окт 08, 2020 11:34 pm
-
Xerox WC 3119 без признаков «жизни»
-
-
Xerox 3315 «слетела» FIX прошивка
tekknik в форуме Принтеры, МФУ, факсы, копиры формата A4
- 7
- 6834
tekknik
Пн июн 10, 2019 4:22 am
-
Xerox 3315 «слетела» FIX прошивка
-
-
Xerox WC3220 — Ложное замятие бумаги, Замятие 0
Romeo в форуме Принтеры, МФУ, факсы, копиры формата A4
- 25
- 10111
Romeo
Пн окт 12, 2020 7:13 pm
-
Xerox WC3220 — Ложное замятие бумаги, Замятие 0
Вернуться в Оргтехника — прочее оборудование
Кто сейчас на форуме
Сейчас этот форум просматривают: нет зарегистрированных пользователей и гости: 2
•
Sleep Mode: clicking on this button opens a window for you to set the time frame for your scanner
to go into power saving mode. Please see
•
Clean Imprinter: clicking on this button initiates an automatic cleaning of the print head on the
ink cartridge installed in the imprinter. When the imprinter is not installed this button is disabled.
•
Buzzer Setting: clicking this button opens a window for you to turn on or off the scanner beep
sounds.
•
User Shading: clicking on this button initiates the shading adjustment utility. The shading
adjustment helps to improve image quality of scanned documents. Please see
Adjustment
on page 178 for instructions.
•
Caution Setting: clicking this button opens a window for you to set when to receive a notice that
it is time to clean the rollers.
Scanner Counter—this section shows the number of pages scanned. Use the options in this window to
keep track of maintenance performed on the scanner.
•
System: displays the number of pages scanned through the ADF after the last counter update.
•
After Clean Roller: displays the number of pages scanned after the last time the rollers were
cleaned and the counter reset. Please see
instructions on monitoring and changing this setting.
•
After Replace Roller: displays the number of pages scanned after the rollers have been replaced
and the counter reset. Please refer to our website www.xeroxscanners.com for spare parts options
and instructions available for your scanner.
•
Update All Counters: clicking this button updates the current count display next to the 3 fields
described directly above. The counters do not update automatically during document scanning,
you must click on this button to display the current count information.
•
Clear Counter: clicking either of these buttons clears the counters back to 0 for the appropriate
section.
About—click on the About button to see more information about the application.
Help—clicking on this button opens the help file in the Adobe® PDF format.
Select Scanner—clicking on this button opens a window for you to select a different scanner if you
have multiple scanners installed.
Save Info—clicking on this button opens a Windows Save As dialogue for you to save the current
scanner and computer information into a .log file.
Close—clicking this button closes the User Utility.
If an error occurs during scanning the LCD will display an error code and you can use the User Utility to
troubleshoot and resolve the issue. The User Utility displays an error code and message in the Scanner
Status field. The following table lists the codes, messages, possible causes and common resolutions.
Setting Sleep Mode
on page 178 for instructions.
Cleaning the Inside of the Scanner
Shading
on page 183 for
Xerox DocuMate 4790
User’s Guide
175
 01:43
01:43
Xerox DocuMate 6400 Scanners Offer Best Value for Digital Capture at Scale
 03:11
03:11
Kurzvorstellung Xerox DocuMate 4799 Scanner
 01:25
01:25
XEROX 003R98776 Documate 765 A3/A4 Tarayıcı
 10:23
10:23
Xerox — Escáner Documate 6460
 01:50
01:50
Xerox Duplex Combo Scanner Offers Convenient Document Capture
 01:25
01:25
Xerox DocuMate 4790 — BMI Solutions Authorised Partner
 03:17
03:17
Xerox DocuMate 3220 Duplex Color Sheetfed and Flatbed Scanner
 01:23
01:23
Basic scanning PDF Pro Documate 4790
Параметры, обслуживание и устранение неисправностей сканера
104
Руководство пользователя сканера DocuMate 765
2. Загрузите одну страницу в загрузочный лоток лицевой стороной
вверх.
3. Установите направляющие бумаги в загрузочном лотке так,
чтобы расстояние между ними немного превышало ширину
страницы.
4. Теперь сканер полностью готов к работе в режиме ручной
подачи.
5. После окончания сканирования верните переключатель режимов
в положение AUTO, чтобы сканер работал в обычном режиме
подачи пакетов.

Руководство пользователя сканера DocuMate 765
105
Параметры, обслуживание и устранение неисправностей сканера
Утилита пользователя
Утилита пользователя – это программа, предназначенная для
помощи в обслуживании и поиске и устранении неисправностей
сканера Xerox DocuMate 765.
Чтобы открыть утилиту пользователя, выполните
действия, перечисленные ниже.
Во время установки был задан вопрос, следует ли разместить значок
программы на рабочем столе Windows. Если был дан
утвердительный ответ, дважды щелкните значок утилиты
пользователя, чтобы запустить ее.
В противном случае следуйте данным инструкциям, чтобы открыть
утилиту из списка программ Windows:
1. На панели задач Windows нажмите кнопку «Пуск».
2. Выберите пункт Все программы.
3. В списке программ выберите пункт Xerox.
4. Чтобы запустить программу, выберите пункт Утилита
пользователя.
Если при запуске предлагается выбрать сканер, выберите сканер
DocuMate 765 и нажмите кнопку ОК.

Параметры, обслуживание и устранение неисправностей сканера
106
Руководство пользователя сканера DocuMate 765
Параметры основного экрана
В этом разделе кратко описываются параметры основного
интерфейса утилиты пользователя. В следующих раздеах
содержатся подробные инструкции по использованию некоторых
параметров этой утилиты.
Состояние сканера − в этой области отображается состояние
подключенного сканера, а также сведения о кодах ошибок.
Код ошибки − в этом поле отображается числовой код ошибки, что
помогает в диагностике и устранении аппаратных ошибок. Полный
список кодов ошибок и способы разрешения проблем см. в разделе
«Коды ошибок сканера» на стр. 108.

Руководство пользователя сканера DocuMate 765
107
Параметры, обслуживание и устранение неисправностей сканера
Информация о сканере − в этой области отображаются текущие
характеристики оборудования сканера.
Модель: аппаратная модель сканера.
Версия м/программы.: текущая версия микропрограммы
сканера.
Память: объем памяти, в данный момент установленной в
сканере. Сканер поставляется с памятью 64 Мб на плате
интерфеса. Можно установить дополнительный модуль памяти
объемом до 512 Мб. См. руководство по установке запасных
частей, которое имеется на установочном диске.
Интерфейс: интерфейс подключения к компьютеру.
Впеч. блок пред-печ.: имеет значение «включить» или
«отключить», если установлен предварительный импринтер.
Предварительный ипринтер – это дополнительная принадлежность,
которую можно приобрести для сканера. Перечень дополнительых
принадлежностей для сканера см. на веб-сайте
www.xeroxscanners.com.
Состояние сканера – параметры этого раздела относятся
к настройкам ПО и обслуживанию сканера.
Режим «сна»: эта кнопка открывает окно, где можно установить
период, после которого сканер переходит в режим пониженноо
энергопотребления. См. инструкции в разделе «Настройка
спящего режима» на стр. 110.
Чистка впеч. блокаа: эта кнопка инициирует автоматическую
очистку печатающей головки в картридже с чернилами,
установленном в импринтере. Если импринтер не установлен,
эта кнопка отключена.
Реж. д-та/Зуммер: эта кнопка открывает окно, в котором можно
включить или отключить звуковые сигналы сканера и указать
размр страницы по умолчанию. См. инструкции в разделе
«Формат бумаги и настройка зуммера» на стр. 111.
Пользов. шейдинг: эта кнопка запускает утилиту корректировки
калибровки. Корректировка калибровки помогает улучшить
качество изображения отсканированых документов. См.
инструкции в разделе «Корректировка калибровки» на стр. 112.

Параметры, обслуживание и устранение неисправностей сканера
108
Руководство пользователя сканера DocuMate 765
Счетчик листов – в этом разделе отображается число
отсканированных страниц. Используйте параметры в этом
окне для опредления необходимости облуживания сканера.
Система: отображает число страниц, отсканированных через
ADF после последнего обновления счетчика.
После чистки ролика: отображает число страниц,
отсканированных после последней очистки валиков и сброса
счетчика. Инструкции о контролю и изменению этой настройки
см. в разделе «Очистка внутренних частей сканера» на стр. 116.
После замены ролика: отображает число страниц,
отсканированных после замены валиков и сброса счетчика.
Перечень дополнительных принадлежностей для сканера и
инструкции см. на веб-сайте www.xeroxscanners.com.
Обнов. все счетчики: нажатие этой кнопки приводит к
обновлению значений всех трех счетчиков, описанных выше.
Счетчики не обновяются автоматически во время сканирования
документов, для отображения текущих данных следует нажимать
на эту кнопку.
Сбросить счетчик: нажатие любой из этих кнопок обновляет
значение соответствующего счетчика до 0.
Справка − нажатие на эту кнопку открывает файл справки в формате
Adobe
®
PDF.
Сохр. инф-цию − нажатие на эту кнопку открывает диалоговое окно
Windows «Сохранить как…» для сохранения текущих сведений
сканере и компьютере в файл .log.
Закрыть − нажатие этой кнопки закрывает утилиту пользователя.
Коды ошибок сканера
Если во время сканирования происходит ошибка, ее код отображается
на ЖК-дисплее, что позволяет найти неиспавность и разрешить
проблему с помощью утилиты пользователя. Утилита пользователя
отображает код ошибки соответствующее сообщение в поле
Состояние сканера. В таблице ниже приводятся коды, сообщения,
возможные причины ошибок и обычные способы их разрешения.
Если не удается разрешить проблему, применив инструкции из этой
таблицы, см. раздел «Поиск и устранение неисправностей» на стр. 130.
Код
ошибки
Сообщение
Причина
Разрешение
U11 — U18 Ошибки «Замятие
бумаги» и «Бумага
осталась в сканере».
Бумага смялась во
время
прохождения через
сканер.
Датчики документа
загрязнены.
Откройте ADF и выходную дверцу и удалите все
остатки бумаги из сканера. Дополнительную
информацию см. в раздле стр. 127.
Если проблема остается, очистите валики
и датчики бумаги, как описано в разделе
«Очистка внутренних частей сканера» на
стр. 116.

Руководство пользователя сканера DocuMate 765
109
Параметры, обслуживание и устранение неисправностей сканера
U20
Произошла ошибка
перекоса.
Страница подана в
сканер под углом.
Откройте ADF и выходную дверцу и удалите всю
бумагу из сканера. Закройте дверцу, поместите
бумагу в сканер и нова запустите сканирование.
Если проблема остается, очистите валики
и датчики бумаги, как описано в разделе
«Очистка внутренних частей сканера» на
стр. 116.
U23
Произошла ошибка
двойной подачи
бумаги.
В сканер поданы
две страницы
одновременно.
Откройте ADF и выходную дверцу и удалите всю
бумагу из сканера. Закройте дверцы, убедитесь в
том, что листы не слиплись вместе, снова
поместите бумагу в сканер и запустите
сканирование.
Если проблема остается, очистите валики
и датчики бумаги, как описано в разделе
«Очистка внутренних частей сканера» на
стр. 116.
U30 — U34 Дверца сканера
открыта.
Крышка ADF или
выходная дверца
закрыта не
полностью.
Закройте ADF и выходные дверцы полностью,
зафиксировав их на месте. Не следует резко
отпускать дверцы.
Fxx
Произошла
системная ошибка.
Произошла
неизвестная
системная ошибка.
Перезапустите сканер и компьютер:
1. Выключите питание сканера.
2. Отсоедините USB-кабель и кабель питания
от сканера.
3. Перезагрузите компьютер.
4. Подключите USB-кабель и кабель питания к
сканеру.
5. Включите сканер.
Если сканирование по-прежнему невозможно,
обратитесь в службу технической поддержки
Xerox. Контактная инфорация имеется на
карточке технической поддержки, которая
прилагается к сканеру.
—
**Предупреждение**
Требуется очистка
валиков.
Число в поле
После очистки
валика: на главном
экране утилиты
пользователя
превысило
максимальное
значение.
Валики следует очищать после каждых 20 тыс.
сканирований или по необходимости, если в
сканере часто возникат проблемы с подачей
бумаги. После очистки валиков нажмите на
кнопку Сбросить счетчик, чтобы сбросить
значение счетчика очистки валика до 0. См.
раздел «Очистка внутренних частей сканера» на
стр. 116.
Код
ошибки
Сообщение
Причина
Разрешение

Параметры, обслуживание и устранение неисправностей сканера
110
Руководство пользователя сканера DocuMate 765
Настройка спящего режима
В сканере имеется встроенная функция энергосбережения, которая
переключает его в режим пониженного энергпотребления через
15 минут пребывания сканера в режиме ожидания. Эта настройка
по умолчанию позволяет экономить электроэнергию. Она отвечает
требованиям стандарта ENERGY STAR. Режим энергосбережения
удлиняет срок службы ламп, поскольку они отключаются, когда не
используются.
Можно изменить время пребывания в режиме ожидания перед
переходом в режим энергосбережения или полностью отключить
спящий режим.
1. Откройте утилиту пользователя сканера.
2. В главном окне нажмите кнопку Режим «сна».
—
**Предупреждение**
Требуется замена
валиков.
Число в поле
После замены
валика: на главном
экране утилиты
пользователя
превысило
максимальное
значение.
Модуль валика подачи бумаги и валик
замедления следует заменять после каждых 300
тыс. сканирований или по необходимости, если
очистка валиков не позволяет устранить
проблемы с подачей бумаги. После замены
валиков нажмите кнопку Сбросить счетчик,
чтобы сбросить до 0 значение счетчика замены
валика. Инструкции см. в руководстве по
установке запасных частей, которое имеется на
установочном диске.
—
**Предупреждение**
Ошибка
недостаточной
передней подсветки.
Ошибка
недостаточной
задней подсветки.
Лампа светит
недостаточно ярко
или сканирующий
датчик не
воспринимает силу
света.
Свяжитесь со службой технической поддержки
Xerox или авторизованным техническим
специалистом. Контактная иформация имеется
на карточке технической поддержки, которая
прилагается к сканеру.
—
**Предупреждение**
Передняя панель
разметки загрязнена.
Задняя панель
разметки загрязнена.
Передняя или
задняя фоновая
панель
сканирования
загрязнена.
Очистите фоновые панели разметки, как описано
в разделе «Очистка внутренних частей сканера»
на стр. 116.
—
**Предупреждение**
Сканер не
подключен.
Питание
отключено, кабель
питания или USB-
кабель
отсоединены.
Убедитесь в том, что кабели надежно
подключены к сканеру, компьютеру и розетке.
При необходимости перезагрзите компьютер.
Код
ошибки
Сообщение
Причина
Разрешение

Руководство пользователя сканера DocuMate 765
111
Параметры, обслуживание и устранение неисправностей сканера
3. В окне спящего режима выберите нужные параметры.
Режим «сна» – установите или снимите флажок, чтобы включить
или отключить спящий режим. Когда флажок установлен, спящй
режим включен и сканер будет переходить в режим
энергосбережения после истечения интервала, указанного в
поле Время ожидания. Если этот параметр не выбран, сканер
не будет переходить в спящий режим.
Время ожидания − стрелки вверх и вниз позволяют изменять
время ожидания перед переходом в спящий режим от 1 до 60
минут. Моно также ввести в текстовое поле числовое значение
от 1 до 60.
4. Нажмите кнопку «ОК», чтобы сохранить внесенные изменения
и закрыть окно спящего режима.
Формат бумаги и настройка зуммера
Можно ввести размер бумаги по умолчанию и включить или
отключить звуковые предупреждения сканера.
1. Откройте утилиту пользователя сканера.
2. В главном окне нажмите кнопку Реж. д-та/Зуммер.
3. В окне формата бумаги и настройки зуммера выберите нужные
параметры.
Реж. работы с док. − укажите A4 или Letter в качестве формата
бумаги по умолчанию для сканера.
Настройка зуммера − для звуковых сигналов сканера выберите
значение ВКЛ. или ВЫКЛ. Звуковые предупреждения сканера
предназачены для таких ситуаций, как обнаружение двойной
подачи, замятие бумаги, неполадки ламп и т.д.
4. Нажмите кнопку «ОК», чтобы сохранить изменения и закрыть
окно.

Параметры, обслуживание и устранение неисправностей сканера
112
Руководство пользователя сканера DocuMate 765
Корректировка калибровки
Корректировка калибровки помогает улучшить качество
изображения отсканированных документов. Если качество конечных
файлов с отсканированным изображением неудовлетворительно
(например, на изображении присутствуют перпендикулярные линии
или четкость различна на разных участках страницы), может
потребоваться корректировка калибровки сканера.
Подготовка к корректировке калибровки
•
Очистите валики сканера, датчики изображения, стекло и панели
разметки, как описано в разделе «Очистка внутренних частей
сканера» на стр. 116.
•
После очистки сканера проведите тестовое сканирование и
просмотрите итоговый файл изображения. Не выполнйте
корректировку калибровки до очистки сканера и тестового
сканирования. Корректировка калибровки, проведенная перед
очисткой, может привести к еще большему ухудшению качества
изображения.
•
Приготовьте Shading Paper (калибровочный лист), который
прилагается к сканеру, чтобы вставить его в сканер по комнде
программы.
•
Убедитесь в том, что калибровочный лист находится в отличном
состоянии (как новый).
Когда калибровочный лист не используется, храните его в
пластиковом пакете между листами негнущегося картона.
Если он согнут, помят, покрыт жирными пятнами или загрязнен,
то после корректировки калибровки качество избражения может
не улучшиться, а ухудшиться.
Если калибровочный лист находится не в надлежащем
состоянии, закажите новый на веб-сайте www.xeroxscanners.com
на странице «Parts & Accessories» для вашего сканера.
•
Поменяйте обе фоновые панели разметки на белые. См.
инструкции раздела «Изменение цвета фона» на стр. 99. Во
время корректировки калибровки понадобиться поменять
фоновый цвет на белый, а затем на черный. После звершения
корректировки калибровки установите требуемый фоновый цвет.
Чтобы выполнить корректировку калибровки,
потребуются действия, перечисленные ниже.
1. Откройте утилиту пользователя сканера.
2. В главном окне нажмите кнопку Пользов. шейдинг.

Руководство пользователя сканера DocuMate 765
113
Параметры, обслуживание и устранение неисправностей сканера
3. Нажмите кнопку Запуск шейдинга. Утилита калибровки
включает все дальнейшие действия.
4. В ответ предложение очистить сканер нажмите для продолжения
кнопку «ОК», только если очистка сканера уже была выполнена
при подготовке к калибровке. В противном случае следуйте
инструкциям на экране, чтобы очистить сканер.
5. Поменяйте фоновые панели на белые и нажмите кнопку «ОК»
для продолжения.
Если цвет панелей уже изменен на белый, это сообщение не
появится. Перейдите к следующему шагу.
6. Поместите калибровочный лист в загрузочный лоток сканера
в положении «альбомное» и нажмите кнопку «ОК».
7. Сканер будет протянет калибровочный лист по мере выполнения
калибровки для белой фоновой панели. Окно с сообщением
«Происходит процесс настройки. Подождите…» автоматически
закроется после завершения корректировки калибровки для
белого фона.

Комментарии
Table of Contents
Xerox DocuMate 4790
User’s Guide
5
Adding Image Editor Applications to One Touch . . . . . . . . . . . . . . . . . . . . . . . . . . . . . . . . . . . . 109
PDF Applications . . . . . . . . . . . . . . . . . . . . . . . . . . . . . . . . . . . . . . . . . . . . . . . . . . . . . . . . . . . . . . . . . . . . . . . 110
Send to Application . . . . . . . . . . . . . . . . . . . . . . . . . . . . . . . . . . . . . . . . . . . . . . . . . . . . . . . . . . . . . . . . . . . . 113
Scanning to Multiple Destinations . . . . . . . . . . . . . . . . . . . . . . . . . . . . . . . . . . . . . . . . . . . . . . . . . . . . . . 116
Scanning with Job Separation . . . . . . . . . . . . . . . . . . . . . . . . . . . . . . . . . . . . . . . . . . . . . . . . . . . . . . . . . . 119
Scanning with Optical Character Recognition (OCR) . . . . . . . . . . . . . . . . . . . . . . . . . . . . . . . . . . . . . . 122
Text Formats . . . . . . . . . . . . . . . . . . . . . . . . . . . . . . . . . . . . . . . . . . . . . . . . . . . . . . . . . . . . . . . . . . . . . 123
Selecting One Touch OmniPage OCR Options . . . . . . . . . . . . . . . . . . . . . . . . . . . . . . . . . . . . . . . . . . . . 126
The OCR Tab . . . . . . . . . . . . . . . . . . . . . . . . . . . . . . . . . . . . . . . . . . . . . . . . . . . . . . . . . . . . . . . . . . . . . 127
Creating Your Own Dictionaries . . . . . . . . . . . . . . . . . . . . . . . . . . . . . . . . . . . . . . . . . . . . . . . . . . . . 128
Editing User Dictionaries . . . . . . . . . . . . . . . . . . . . . . . . . . . . . . . . . . . . . . . . . . . . . . . . . . . . . . . . . . 130
The Format Tab . . . . . . . . . . . . . . . . . . . . . . . . . . . . . . . . . . . . . . . . . . . . . . . . . . . . . . . . . . . . . . . . . . 132
One Touch with Kofax VRS Technology . . . . . . . . . . . . . . . . . . . . . . . . . . . . . . . . . . . . . . . . . . . . . . . . . . 135
The Kofax VRS Settings . . . . . . . . . . . . . . . . . . . . . . . . . . . . . . . . . . . . . . . . . . . . . . . . . . . . . . . . . . . 135
The Professional Features . . . . . . . . . . . . . . . . . . . . . . . . . . . . . . . . . . . . . . . . . . . . . . . . . . . . . . . . . 137
7Scanning from TWAIN
Accessing the TWAIN Interface . . . . . . . . . . . . . . . . . . . . . . . . . . . . . . . . . . . . . . . . . . . . . . . . . . . . . . . . . 140
Configurations Tab . . . . . . . . . . . . . . . . . . . . . . . . . . . . . . . . . . . . . . . . . . . . . . . . . . . . . . . . . . . . . . . . . . . . 141
Scan Settings Tab . . . . . . . . . . . . . . . . . . . . . . . . . . . . . . . . . . . . . . . . . . . . . . . . . . . . . . . . . . . . . . . . . . . . . . 143
Document Settings Tab . . . . . . . . . . . . . . . . . . . . . . . . . . . . . . . . . . . . . . . . . . . . . . . . . . . . . . . . . . . . . . . . 146
Image Enhancements Tab . . . . . . . . . . . . . . . . . . . . . . . . . . . . . . . . . . . . . . . . . . . . . . . . . . . . . . . . . . . . . . 148
Imprinter(s) Tab . . . . . . . . . . . . . . . . . . . . . . . . . . . . . . . . . . . . . . . . . . . . . . . . . . . . . . . . . . . . . . . . . . . . . . . 152
About Tab . . . . . . . . . . . . . . . . . . . . . . . . . . . . . . . . . . . . . . . . . . . . . . . . . . . . . . . . . . . . . . . . . . . . . . . . . . . . . 155
8Scanning from WIA
Scan using WIA from Microsoft Paint . . . . . . . . . . . . . . . . . . . . . . . . . . . . . . . . . . . . . . . . . . . . . . . . . . . 158
Fine Tuning Your Scans . . . . . . . . . . . . . . . . . . . . . . . . . . . . . . . . . . . . . . . . . . . . . . . . . . . . . . . . . . . . . . . . . 160
9 Scanning from ISIS
Accessing the ISIS Interface in QuickScan . . . . . . . . . . . . . . . . . . . . . . . . . . . . . . . . . . . . . . . . . . . . . . . 162
10 Scanner Options, Maintenance and Troubleshooting
Changing the Background Color . . . . . . . . . . . . . . . . . . . . . . . . . . . . . . . . . . . . . . . . . . . . . . . . . . . . . . . . 164
Replacing the Rollers . . . . . . . . . . . . . . . . . . . . . . . . . . . . . . . . . . . . . . . . . . . . . . . . . . . . . . . . . . . . . . . . . . . 166
Replacing the Feed Roller Module . . . . . . . . . . . . . . . . . . . . . . . . . . . . . . . . . . . . . . . . . . . . . . . . . . 167
Replacing the Double Feed Prevention Roller . . . . . . . . . . . . . . . . . . . . . . . . . . . . . . . . . . . . . . . 168
Installing an Imprinter . . . . . . . . . . . . . . . . . . . . . . . . . . . . . . . . . . . . . . . . . . . . . . . . . . . . . . . . . . . . . . . . . 171
Installing an Ink Cartridge . . . . . . . . . . . . . . . . . . . . . . . . . . . . . . . . . . . . . . . . . . . . . . . . . . . . . . . . . . . . . . 172
Adjusting the Printing Position . . . . . . . . . . . . . . . . . . . . . . . . . . . . . . . . . . . . . . . . . . . . . . . . . . . . . . . . . . 173
User Utility . . . . . . . . . . . . . . . . . . . . . . . . . . . . . . . . . . . . . . . . . . . . . . . . . . . . . . . . . . . . . . . . . . . . . . . . . . . . 174
Main Screen Options . . . . . . . . . . . . . . . . . . . . . . . . . . . . . . . . . . . . . . . . . . . . . . . . . . . . . . . . . . . . . . 174
Scanner Error Codes . . . . . . . . . . . . . . . . . . . . . . . . . . . . . . . . . . . . . . . . . . . . . . . . . . . . . . . . . . . . . . 175
 Loading…

Xerox
®
DocuMate
®
4790
Руководство по эксплуатации сканера
Пользователям Windows
®
05-0820-200
О
КТЯБРЬ 2018

© 2018 Xerox Corporation. Все права защищены. Xerox
®
, Xerox and Design
®
и DocuMate
®
являются товарными знаками корпорации Xerox в США и других странах.
Документация© 2018 Visioneer, Inc. Все права защищены Название и логотип Visioneer
являются зарегистрированными товарными знаками Visioneer, Inc.
Воспроизведение, изменение или перевод без предварительного письменного разрешения
запрещены, за исключением случаев, разрешенных законом об авторских правах.
Положение о защите авторских прав распространяется на все формы материалов и
сведений, защита которых предусмотрена действующим статутным и судебным правом либо
настоящим документом, включая без ограничений материалы, созданные в программном
обеспечении и отображаемые на экране в виде стилей, шаблонов, значков, изображений,
дизайна и т. д.
Версия документа: 05-0820-200 (октябрь 2018)
ISIS
®
является зарегистрированной торговой маркой EMC
2®
Software Corporation.
Kofax® и Virtual ReScan® являются зарегистрированными товарными знаками, а VRS™
является товарным знаком Kofax Image Products, Inc.
Adobe
®
, Adobe
®
Acrobat
®
, Adobe
®
Reader
®
и логотип Adobe
®
PDF являются
зарегистрированным торговыми марками Adobe Systems Incorporated в США и в других
странах.
Post-It® является зарегистрированной торговой маркой 3M Corporation в США и в других
странах.
Microsoft является зарегистрированным товарным знаком Microsoft Corporation в США.
Windows и SharePoint
®
являются зарегистрированными товарными знаками Microsoft
Corporation.
Kensington® является зарегистрированной торговой маркой ACCO Brands Corporation в США
и в других странах.
ZyINDEX является зарегистрированным товарным знаком ZyLAB International, Inc. ZyINDEX
toolkit portions, ©ZyLAB International, Inc., 1990—1998. Все права защищены.
Настоящим подтверждается, что все остальные продукты, упомянутые в этом документе,
могут являться товарными знаками соответствующих компаний.
В данный документ периодически вносятся изменения. Изменения будут внесены, а
технические неточности и типографские ошибки исправлены в последующих изданиях.
Информация может быть изменена без предварительного уведомления и не налагает
никаких обязательств на Visioneer.
Описанное программное обеспечение предоставляется на основе лицензионного
соглашения. Использование и копирование описанного программного обеспечения может
осуществляться только в соответствии с этим соглашением. Создание копий программного
обеспечения на каком бы то ни было носителе является незаконным, если иное не оговорено
в лицензионном соглашении. В отсутствие письменного согласия Visioneer никакая часть
этого документа не может быть воспроизведена или передана в какой-либо форме или
какими-либо средствами, электронными или механическими, включая фотокопирование,
запись или системы хранения и поиска информации, а также не может быть переведена на

другой язык в каких-либо целях, за исключением личного использования лицензиатом и в
соответствии с особыми условиями лицензионного соглашения.
Уведомление об ограниченных правах
Использование, копирование или разглашение информации подпадает под ограничения
подраздела (c)(1)(ii) статьи 52.227-FAR14 соглашения о Правах на техническую информацию
и компьютерное программное обеспечение. Материалы, отсканированные этим продуктом,
могут быть защищены федеральным законодательством или другими нормативными актами,
например законом об авторском праве. Покупатель единолично несет всю ответственность
за несоблюдение этих законов и правил.

Руководство пользователя iv
Содержание
1-Техника безопасности…………..……………………………………………………………. 1-1
Введение в вопросы безопасности………………………………………………………………………………1-1
Информация о технике безопасности ………………………………………..………………………………1-1
Информация об электрооборудовании…………………………………………………………..…………1-2
Внимание! Информация об электробезопасности………………………………………1-2
Источник питания ……………………………………………..……………………………………..…………...1—3
Отключающее устройство ……..……………………………………………………………………………1-3
Экстренное отключение энергии ……….……………………………………..…………………………………1-3
Информация о техническом обслуживании……………………………………………………………..1-3
Сертификат безопасности изделия……………….……………..……………………………………………..1-4
Контактная информация по вопросам охраны окружающей среды,
здоровья и безопасности (EH&S) ………….……….……………………….……………………………………1-4
2-Поздравляем с покупкой! ……………………………………………………….…………. 2-1
Комплект поставки …..…………………………………..……………………………………..………………..…………2-1
Требования к системе …………………………………………..…………………………………..…………….………2-2
Документация……………………………………………………………………..……………………………..………………2-2
Компоненты сканера Xerox® DocuMate® 4790 …………………………………………………….2-3
3-Подготовка сканера к работе ….………………………………………………………. 3-1
Распаковка сканера ……………………………………………………………………………………………….………..3-1
Установите ролик контроля двойной подачи…………………………………………………………..3-2
Подключите сканер к сети ……………………………….…………………………………………………………….3-4
4-Установка программного обеспечения…………………..…………………….. 4-1
Подключение сканера и установка программного обеспечения ………………………4-1
Установка драйвера сканера …………………………………………………………………………….4-5
Подключение кабеля USB и включение питания …………………………………………4-6
Установка утилиты пользователя……………………………………………….…………………….4-8
Установка драйвера ISIS…………………………………………….……………………………………….4-9
Установка программы Visioneer OneTouch …………………………………………….……..4-9
Дополнительные приложения, поставляемые со сканером……………………………..4-10
Просмотр руководств пользователя …………….……………………………………………………..…..4-11
Регистрация сканера …….…………………………………..………………………………………………………….4-12
5-Загрузка докумнтов для сканирования ……………………….………….……. 5-1
Поддерживаемые типы документов……………………………………………………………………………5-1
Объекты, не подходящие для сканирования……………………………………………………….…..5-2
Неподдерживаемые типы документов…………….…………………………………………………………5-2
Сканирование из автоподатчика документов (АПД)…………………………………………….5-3
Подготовка документов к сканированию ………………………………………………………5-3

Xerox
®
DocuMate
®
4790 Содержание
v Руководство пользователя
Интерфейсы сканирования …..……………………………………..……………………………………..………...5—5
6-Обслуживание……….………………………………………………………………………………. 6-1
Информация о технике безопасности ………………………………………..………………………………6-1
Настроек оборудования ………..……………………………………..……………………………………..…….…..6-2
Аппаратные настройки ………………………………………………………………….…………………….6-2
Настройки драйвера ……………….…………………………………………………………………………...6-3
Изменение цвета фона ………………………………………………………..………………………………………….6-4
Устранение замятия бумаги…………………………………………………………..……………………………...6-5
Очистка сканера……………………………………………….……………………………………..………….…………….6-6
Очистка внешней поверхности сканера …….………………………………………..…………6-6
Очистка внутренних частей сканера ……………………………………………………………….6-7
Очистка валиков устройства автоматической подачи документов……….6-8
Сброс счетчика валиков в утилите пользователя………………………………………..6-9
Очистка стекла сканера и планшетов фона……………………………………..……………6-9
Очистка датчиков бумаги ………….……………………………………..………………………………6-10
Очистка датчиков устройства автоматической подачи…………………………..6-11
Замена валиков ………………………………………………………………………..…………………………………….6-13
Замена модуля валиков подачи………………..……………………………………………………6-14
Замена валика контроля двойной подачи ………………………………………………....6-15
Установка устройства надпечатки ………………..……………..…………………………………..………6-17
Установка картриджа с тонером……………………………………………….………………………………6-18
Настройка положения печати……………………………………..…………………………………..…………6-19
Пользовательская программа………………………..…………………………………..……………………..6-19
Параметры основного экрана…………………………………………………………………………6-20
Коды ошибок сканера ……………………………………………………………………………………....6-22
Настройка спящего режима …………………………..……………………………………..…………6-24
Формат бумаги и настройка зуммера………………………………………………..…………6-25
Корректировка калибровки …………………………………………….………………………………6-25
Поиск и устранение неисправностей……………………………………………………………………….6-28
Деинсталляция сканера…………………………………………………………………………………………….…6-32
Характеристики сканера Xerox® DocuMate® 4790 …….…………………………………….6-33
Список компонентов Xerox® DocuMate® 4790 ………………………………………..…………6-35
7-Приложение A: Информация о соответствии стандартам……….. 7-1
Соответствие основным стандартам………………………………….……………………………………….7-1
США (нормативные требования Федеральной комиссии по связи) ………7-1
Европейский Союз……………………………………………………………………..…………………………..7—1
Турция (директива RoHS)…………………………………………………………………………………….7-2
Ограничения на копирование …………….…………………………………..……………………………………7-3
США ……….…………………………………..…………………………………..…………………………..……………..7-3
Канада……………………………………………………………………..…………………………………..……………7-4

Содержание Xerox
®
DocuMate
®
4790
Руководство пользователя vi
Другие страны…………………………………………………………………………………………………………7-5
8-Информация о вопросах соответствия стандартам ………………….. 8-1
Переработка и утилизация продукции………………………………………….…………………………..8-1
США и Канада ………………………………………………………………..…………………………………..…..8-1
Европейский союз .……………………………………………………………………………..………………….8—1
Стандарт ENERGY STAR в США………………………………………………………………….………………….8-1

Xerox
®
DocuMate
®
4790 Содержание
vii Руководство пользователя

Руководство пользователя 1-1
1. Техника безопасности
Введение в вопросы безопасности
Предупреждения и безопасность
Перед началом работы с этим аппаратом внимательно прочтите следующие инструкции.
Обращайтесь к ним по мере необходимости для обеспечения продолжительной и
безопасной работы аппарата.
Аппарат Xerox
®
и все вспомогательные материалы созданы и протестированы в строжайшем
соответствии с требованиями техники безопасности. К ним относятся проверка и
сертификация безопасности, а также соответствие нормативным актам на
электромагнитные приборы и принятым стандартам охраны окружающей среды.
ВНИМАНИЕ!
Тестирование этой продукции на безопасность и производительность проводилось
только с использованием материалов Xerox
®
. Незаконная модификация оборудования, в
том числе добавление новых функций или присоединение внешних устройств, может
отрицательно повлиять на сертификацию продукции. За дополнительной информацией
обращайтесь к представителю Xerox.
Информация о технике безопасности
Аппарат Xerox
®
и все вспомогательные материалы созданы и протестированы в строжайшем
соответствии с требованиями техники безопасности. К ним относятся проверка и
сертификация безопасности, а также соответствие принятым стандартам охраны
окружающей среды.
Для того чтобы обеспечить продолжительную и безопасную работу оборудования Xerox
®
,
всегда соблюдайте указанные ниже принципы безопасности.
ЭТО НАДО ДЕЛАТЬ
• Всегда принимайте во внимание все предупреждения и следуйте инструкциям,
указанным на оборудовании или прилагаемым к нему.
• Всегда используйте материалы, созданные специально для этого продукта.
Использование других материалов может привести к снижению производительности и
возникновению опасной ситуации. Не используйте чистящие вещества в аэрозольной
упаковке: при определенных условиях они могут стать взрывоопасными и огнеопасными.
• При перемещении или транспортировке оборудования всегда соблюдайте
осторожность.
• Всегда ставьте аппарат на твердую и достаточно прочную поверхность, способную
выдержать вес аппарата.
• Всегда устанавливайте аппарат в помещении, имеющем хорошую вентиляцию и
достаточно пространства для проведения работ по его обслуживанию.
• Перед процедурой чистки обязательно отключайте данное оборудование от
электрической розетки.

Xerox
®
DocuMate
®
4790 Техника безопасности
1-2 Руководство пользователя
Примечание. Аппарат Xerox
®
оборудован энергосберегающим устройством, которое
сохраняет электроэнергию, когда аппарат не используется. Этот аппарат рассчитан на
постоянный режим работы.
ЭТОГО НЕ НАДО ДЕЛАТЬ
• Аппарат, оборудованный вилкой с заземляющим контактом, никогда не подключайте к
розетке, не имеющей заземляющего контакта.
• Никогда не пытайтесь выполнить какую бы то ни было операцию по техническому
обслуживанию, если она не упоминается и не описывается в настоящей документации.
• Никогда не снимайте крышки или защитные кожухи, которые закреплены винтами. Под
этими крышками нет деталей, обслуживание которых может осуществляться
оператором.
• Никогда не ставьте аппарат вблизи радиатора отопления или другого источника тепла.
• Никогда не обходите и не «обманывайте» какое бы то ни было электрическое или
механическое блокировочное устройство.
• Никогда не устанавливайте это оборудование в таком месте, где люди могут наступить
на электрический шнур или споткнуться об него.
Предупреждение. Это устройство не предназначено для использования в
пределах прямой видимости рабочих мест с дисплеями.
Чтобы избежать появления отражений на экранах дисплеев, располагайте это устройство
за пределами прямого поля зрения.
Информация об электрооборудовании
ВНИМАНИЕ! ИНФОРМАЦИЯ ОБ ЭЛЕКТРОБЕЗОПАСНОСТИ
1. Электрическая розетка для этого прибора должна соответствовать требованиям. Эти
требования указаны на табличке с основными техническими данными, которая
расположена на задней стенке аппарата. Если вы не уверены, что источник энергии
соответствует этим требованиям, обратитесь за консультацией к представителю
энергетической компании или электротехнику.
2. Розетка должна находиться рядом с оборудованием и должна быть легкодоступной.
3. Используйте электрический шнур, поставляемый совместно с аппаратом. Не пользуйтесь
удлинителем, не снимайте и не переделывайте вилку электрического шнура.
4. Подключайте электрический шнур непосредственно к исправной электрической розетке,
оснащенной заземляющим контактом. Если вы не уверены в том, что розетка заземлена
правильно, обратитесь за консультацией к электротехнику.
5. Никогда не используйте адаптер для подключения какого бы то ни было оборудования
Xerox
®
к электрической розетке, не оборудованной заземляющим контактом.
6. Никогда не устанавливайте это оборудование там, где люди могут наступить на
электрический шнур или споткнуться об него.
7. Не ставьте никаких предметов на электрический шнур.
8. Не обходите и не отключайте устройства электрической или механической блокировки.
Техника безопасности Xerox
®
DocuMate
®
4790
Руководство пользователя 1-3
9. Не засовывайте никакие предметы в пазы или в отверстия на корпусе аппарата. Это
может привести к поражению электрическим током или пожару.
ИСТОЧНИК ПИТАНИЯ
• Этот прибор должен получать питание от источника того типа, который указан на
табличке с основными техническими данными. Если вы не уверены в том, что источник
энергии соответствует этим требованиям, обратитесь за консультацией к представителю
энергетической компании.
• Всегда подключайте оборудование к правильно заземленной электрической розетке.
При возникновении каких-либо сомнений вызовите квалифицированного
электротехника для проверки розетки.
ВНИМАНИЕ! Это оборудование должно подключаться к защитному заземлению.
Электрический шнур этого оборудования содержит вилку с контактом защитного
заземления. Эта вилка подойдет только к электрической розетке с защитным
заземлением. Это деталь техники безопасности. Если вы не можете вставить вилку
в розетку, обратитесь к электротехнику для замены розетки.
ОТКЛЮЧАЮЩЕЕ УСТРОЙСТВО
Для этого оборудования отключающим устройством является электрический шнур. Он
присоединен к боковой панели аппарата в качестве съемного устройства. Для того чтобы
отключить оборудование от электроэнергии, отсоедините шнур(ы) питания от электрической
розетки.
Экстренное отключение энергии
При возникновении какой-либо из перечисленных ниже ситуаций немедленно выключите
аппарат и отсоедините шнуры питания от электрических розеток. Обратитесь к
квалифицированному представителю Службы технической поддержки Xerox
®
для решения
Указанных ниже проблем.
• Оборудование издает необычный запах или необычный шум.
• Электрический шнур поврежден или изношен.
• Настенное защитное устройство отключения, плавкий предохранитель или какое-либо
другое защитное устройство разъединило цепь.
• В аппарат попала жидкость.
• Аппарат оказался залит водой.
• Какая-либо деталь аппарата повреждена.
Информация о техническом обслуживании
1. Все процедуры по техническому обслуживанию оборудования, проводимые оператором,
будут описаны в пользовательской документации, которая поставляется в комплекте с
изделием.

Xerox
®
DocuMate
®
4790 Техника безопасности
1-4 Руководство пользователя
2. Не проводите никаких процедур по техническому обслуживанию этого изделия, если они
не описаны в пользовательской документации.
3. Не используйте чистящие вещества в аэрозольной упаковке. Использование чистящих
веществ, не имеющих специального разрешения, может привести к низкой
производительности оборудования, а также к возникновению опасной ситуации.
4. Используйте вспомогательные материалы и чистящие вещества только так, как указано
в этом руководстве.
5. Никогда не снимайте крышки или защитные кожухи, которые закреплены винтами. Под
этими крышками нет деталей, техническое обслуживание или ремонт которых вы
можете провести самостоятельно.
6. Не проводите никаких процедур по техническому обслуживанию, если вы не прошли
подготовку у ближайшего уполномоченного дилера или если эта процедура не описана
в этом руководстве.
Сертификат безопасности изделия
Это изделие аттестовано следующим агентством с использованием перечисленных ниже
стандартов.
Контактная информация по вопросам охраны окружающей среды,
здоровья и безопасности (EH&S)
Контактная информация
За дополнительной информацией по вопросам охраны окружающей среды, здоровья и
безопасности, касающейся этого продукта и компонентов Xerox
®
, обращайтесь в указанные
ниже службы поддержки покупателей.
Стандарт
UL60950-1 (США)
CSA 22.2 No. 60950-1 (Канада)
IEC 60950-1
США и Канада / Европа (телефонную): 1-800-ASK-XEROX
США и Канада / Европа (Факс): 1-585-422-8217
Руководство пользователя 2-1
2. Поздравляем с покупкой!
Новый сканер Xerox
®
способен быстро сканировать стопки односторонних и двусторонних
документов и отправлять полученные изображения на ПК.
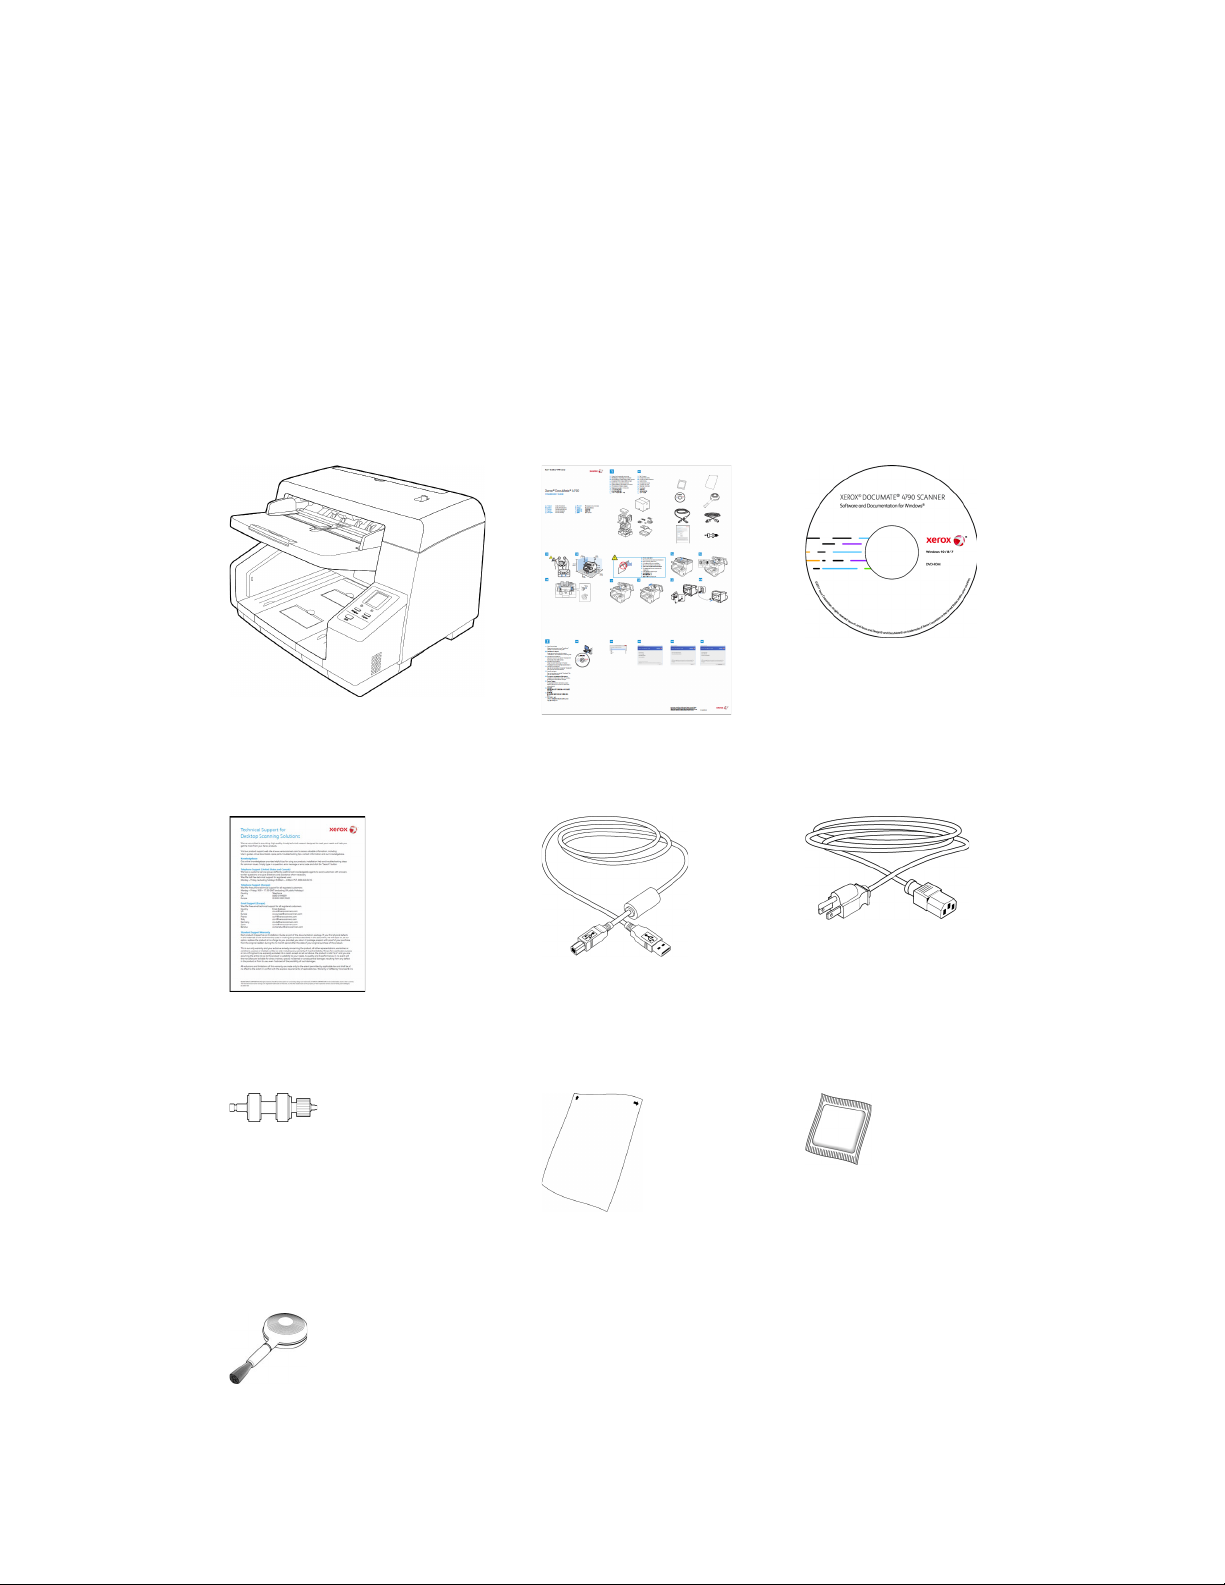
Комплект поставки
Перед тем, как продолжить, проверьте комплектность. Если какие-либо из частей
отсутствуют или повреждены, свяжитесь с продавцом, у которого был приобретен сканер.
Xerox® DocuMate® 4790 Краткое руководство по
установке
Установочный DVD
Карточка Службы технической
поддержки
USB-кабель Кабель питания
Ролик контроля двойной подачи Shading paper
(калибровочный лист)
Бумага для чистки валика
Кисточка для чистки

Xerox
®
DocuMate
®
4790 Поздравляем с покупкой!
2-2 Руководство пользователя
Требования к системе
• Компьютер с процессором Pentium 4 или его эквивалентом AMD;
• Дисковод для DVD-дисков (способный считывать двухслойные диски);
• Доступный порт USB;
• ОС Microsoft
®
Windows
®
:
– 32- или 64-разрядная версия 7 (с пакетами обновления 1);
– 32- или 64-разрядная версия 8/8.1;
– 32- или 64-разрядная версия 10.
• Не менее 2 Гб оперативной памяти (ОЗУ);
• Минимальное место на жестком диске:
– 350 МБ для драйвера сканера;
– 750 МБ для Visioneer OneTouch;
– 1–2 ГБ для каждого дополнительного приложения.
• Монитор (рекомендуемые настройки монитора):
– Глубина представления цвета: 16 бит или 32 бита;
– Разрешение не менее 800 х 600 пикселов.
Инструкции по настройке глубины представления цвета и разрешения для своего
монитора см. в документации ОС Windows.
Документация
В комплект поставки входят перечисленные ниже печатные версии документов:
• Руководство по установке: краткие инструкции по установке и настройке сканера;
• Карточка технической поддержки: контактная информация службы технической
поддержки и обслуживания клиентов, а также краткий обзор стандартной гарантии на
изделие;
На установочном диске также находятся перечисленные ниже файлы документации:
• Руководство пользователя сканера: Инструкции по настройке, установке,
эксплуатации, обслуживанию сканера, технике безопасности, а также гарантия;
• Руководство по сканированию OneTouch: Инструкции по настройке и сканированию с
использованием интерфейса OneTouch;
• Руководство по сканированию TWAIN: Инструкции по обращению к интерфейсу
TWAIN и сканированию с его помощью;
• Контрольные листы: листы для автоматической настройки параметров сканирования в
интерфейсе TWAIN. Этот файл содержит макеты для бумаги разных размеров по
стандарту ISO и американской классификации. Инструкции по использованию этих
листов приведены в разделе, посвященном сканированию через интерфейс TWAIN.
Размер листа следует выбирать по размеру документов в стопке. Кроме того, в
используемом вами приложении не должно быть настроено автоматическое
масштабирование страницы по размеру бумаги в принтере.
Поздравляем с покупкой! Xerox
®
DocuMate
®
4790
Руководство пользователя 2-3
• Листы для разделения файлов: листы для автоматического разделения стопки
документов, сканируемых через интерфейс TWAIN, на два или несколько файлов.
• Листы с кодами исправлений: предназначены для приложений, которые способны
распознавать коды исправлений при сканировании через интерфейс TWAIN. Макеты
страниц с кодами исправлений рассчитаны на конкретную модель сканера. Этот файл
содержит макеты исправлений 2, 3 и T для размера бумаги A4 и Letter (по американской
классификации). Размер страницы следует выбирать по размеру бумаги в принтере.
• Руководство пользователя Kofax Virtual ReScan (VRS™): подробное описание
возможностей и процедуры настройки этого программного продукта, включая
расширенные функции обработки для создания четких изображений на основе
документов низкого качества.
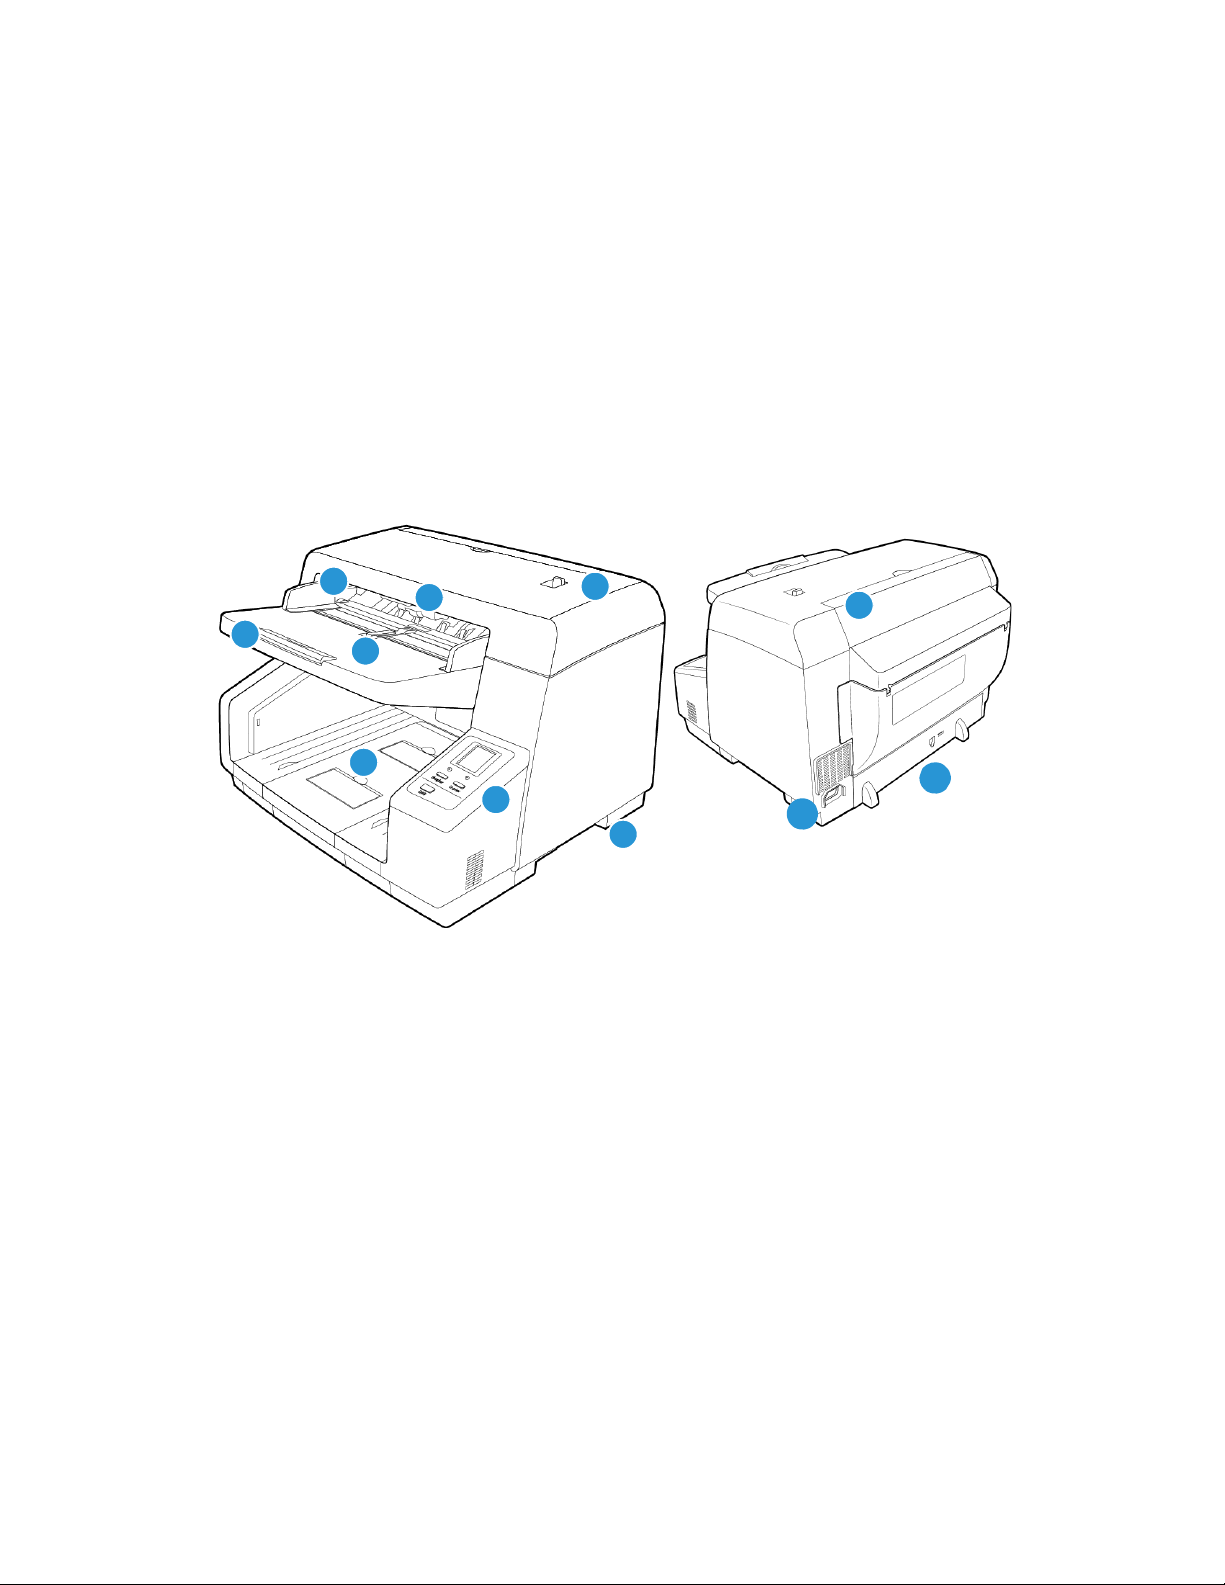
Компоненты сканера Xerox® DocuMate® 4790
1. Загрузочный лоток — позволяет фиксировать положение документов в устройстве
автоматической подачи для сканирования.
2. Направляющие для бумаги — сдвигаются и раздвигаются в соответствии с шириной
документа.
3. Переключатель направляющих для документов — переводит направляющие
загрузочного лотка из режима синхронизированной регулировки в режим
индивидуальной регулировки.
4. Переключатель разблокировки крышки ADF — потяните за фиксатор на крышке
ADF, чтобы открыть сканер.
5. Переключатель ручной подачи (MANUAL) — служит для регулировки валиков и
загрузочного лотка при переключении из автоматического режима подачи документов в
ручной.
6. Лоток выдачи — лоток, в который документы помещаются после сканирования.
Выдвиньте стопор вверх, чтобы документы оставались в лотке выдачи. Благодаря
выдвижному расширителю в лоток помещаются документы разного размера.
7. Панель управления — элементы управления сканированием с помощью OneTouch.
– ЖК-дисплей — отображает текущие настройки сканирования One Touch.

Xerox
®
DocuMate
®
4790 Поздравляем с покупкой!
2-4 Руководство пользователя
– Функциональные кнопки — выбор параметра сканирования для кнопок OneTouch.
Для переключения между параметрами нажимайте кнопку «вверх» или «вниз».
– Кнопка Simplex — нажмите для сканирования односторонних документов.
– Кнопка Duplex — нажмите для сканирования двусторонних документов.
– DFS («Пропустить подачу двух листов») — в случае обнаружения одновременной
подачи двух листов нажмите эту кнопку, чтобы продолжить сканирование без
исправления неполадки. Этот параметр доступен при сканировании с помощью
интерфейса TWAIN. Если сканирование производится путем нажатия кнопки Simplex
(«Односторонняя») или Duplex («Двусторонняя») на сканере, кнопка DFS при этом
отключается.
– Индикатор состояния — показывает текущее состояние сканера.
8. Выключатель питания — включение/выключение питания.
9. Дверца устройства предварительной надпечатки — приподнимите выходной лоток
для доступа к отсеку устройства предварительной надпечатки.
10. Порт USB (Universal Serial Bus) — подключение сканера к компьютеру с помощью
кабеля USB 2.0.
11. Разъем питания — подключение шнура питания к сканеру.
Руководство пользователя 3-1
3. Подготовка сканера к работе
Распаковка сканера
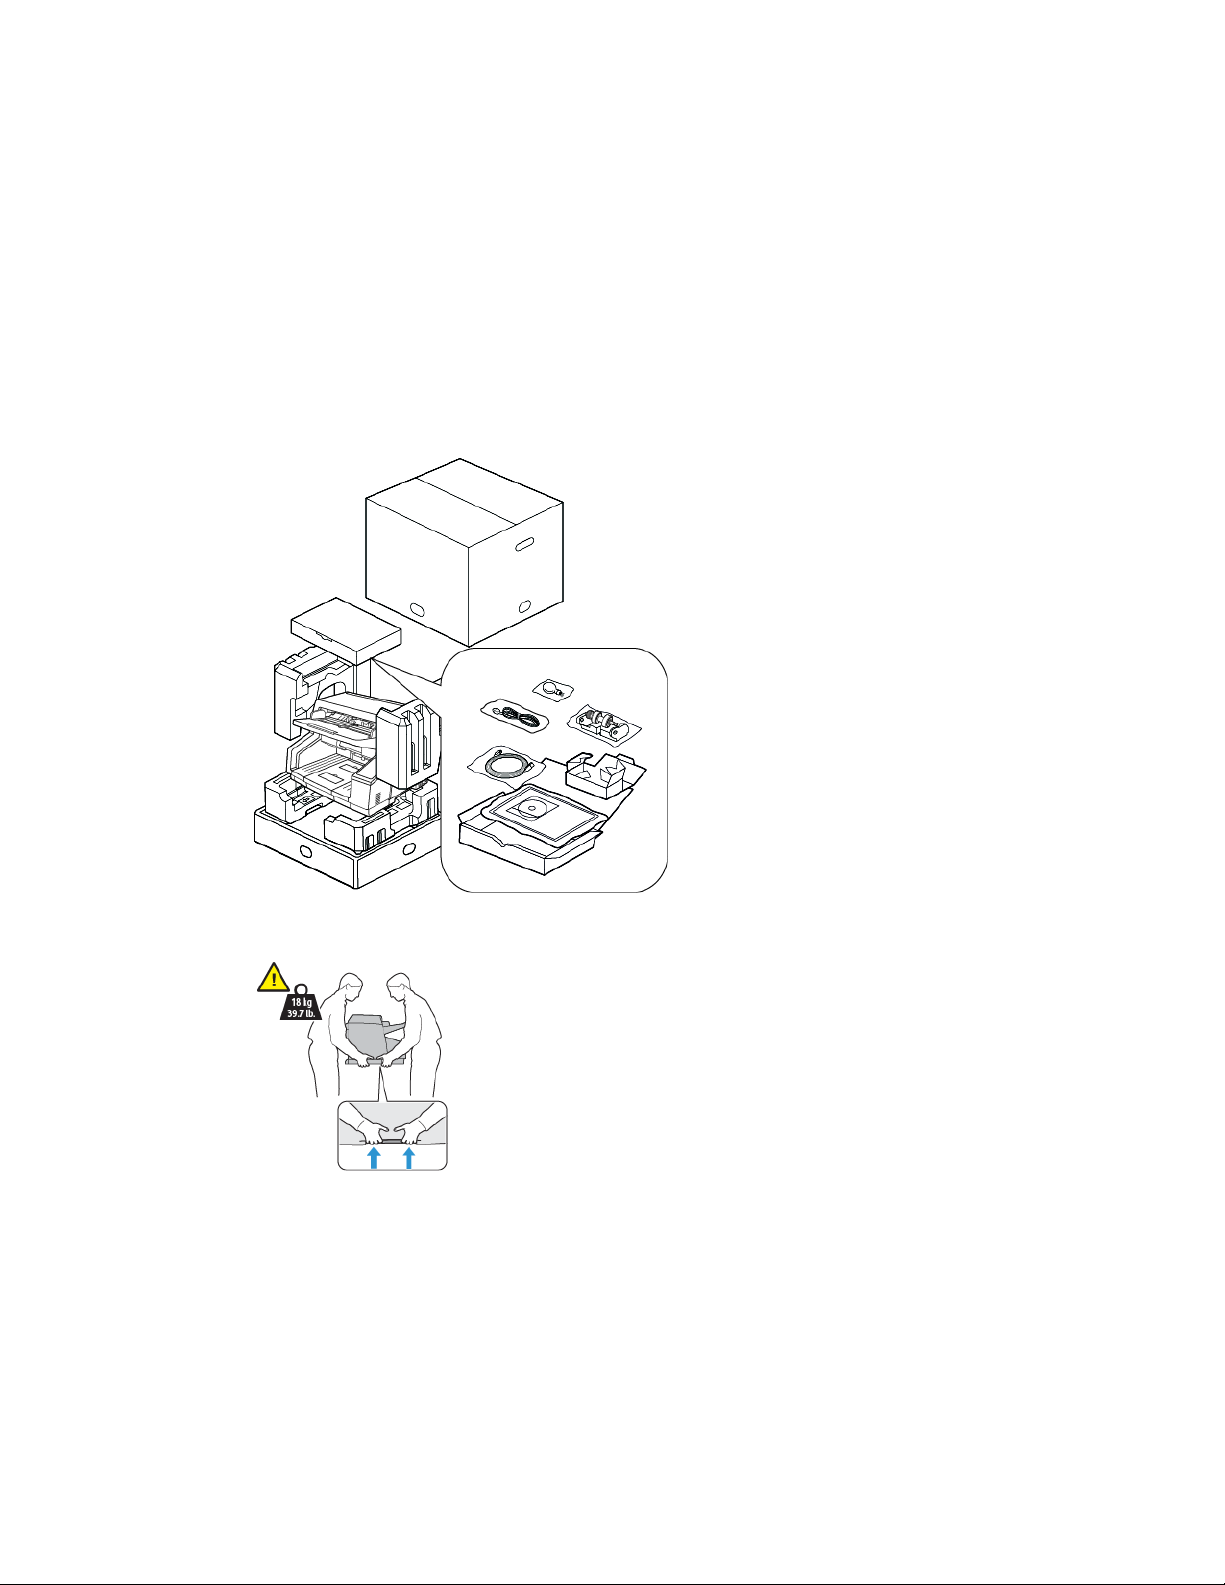
Соблюдайте осторожность при распаковке, перемещении и сборке сканера. Следуйте
инструкциям, чтобы не пораиться и избежать повреждений сканера.
1. Достаньте сканер из упаковочной коробки, проверьте наличие в коробке всех
элементов, приведенных в списке на стр. 2-1.
Рекомендуется сохранить оригинальную упаковку.
2. Поднимать и переносить сканер должны не менее двух человек.
3. Сканер должен стоять на основании, достаточном для его веса. Не ставьте сканер на
поверхность, покрытую тканью.
Xerox
®
DocuMate
®
4790 Подготовка сканера к работе
3-2 Руководство пользователя
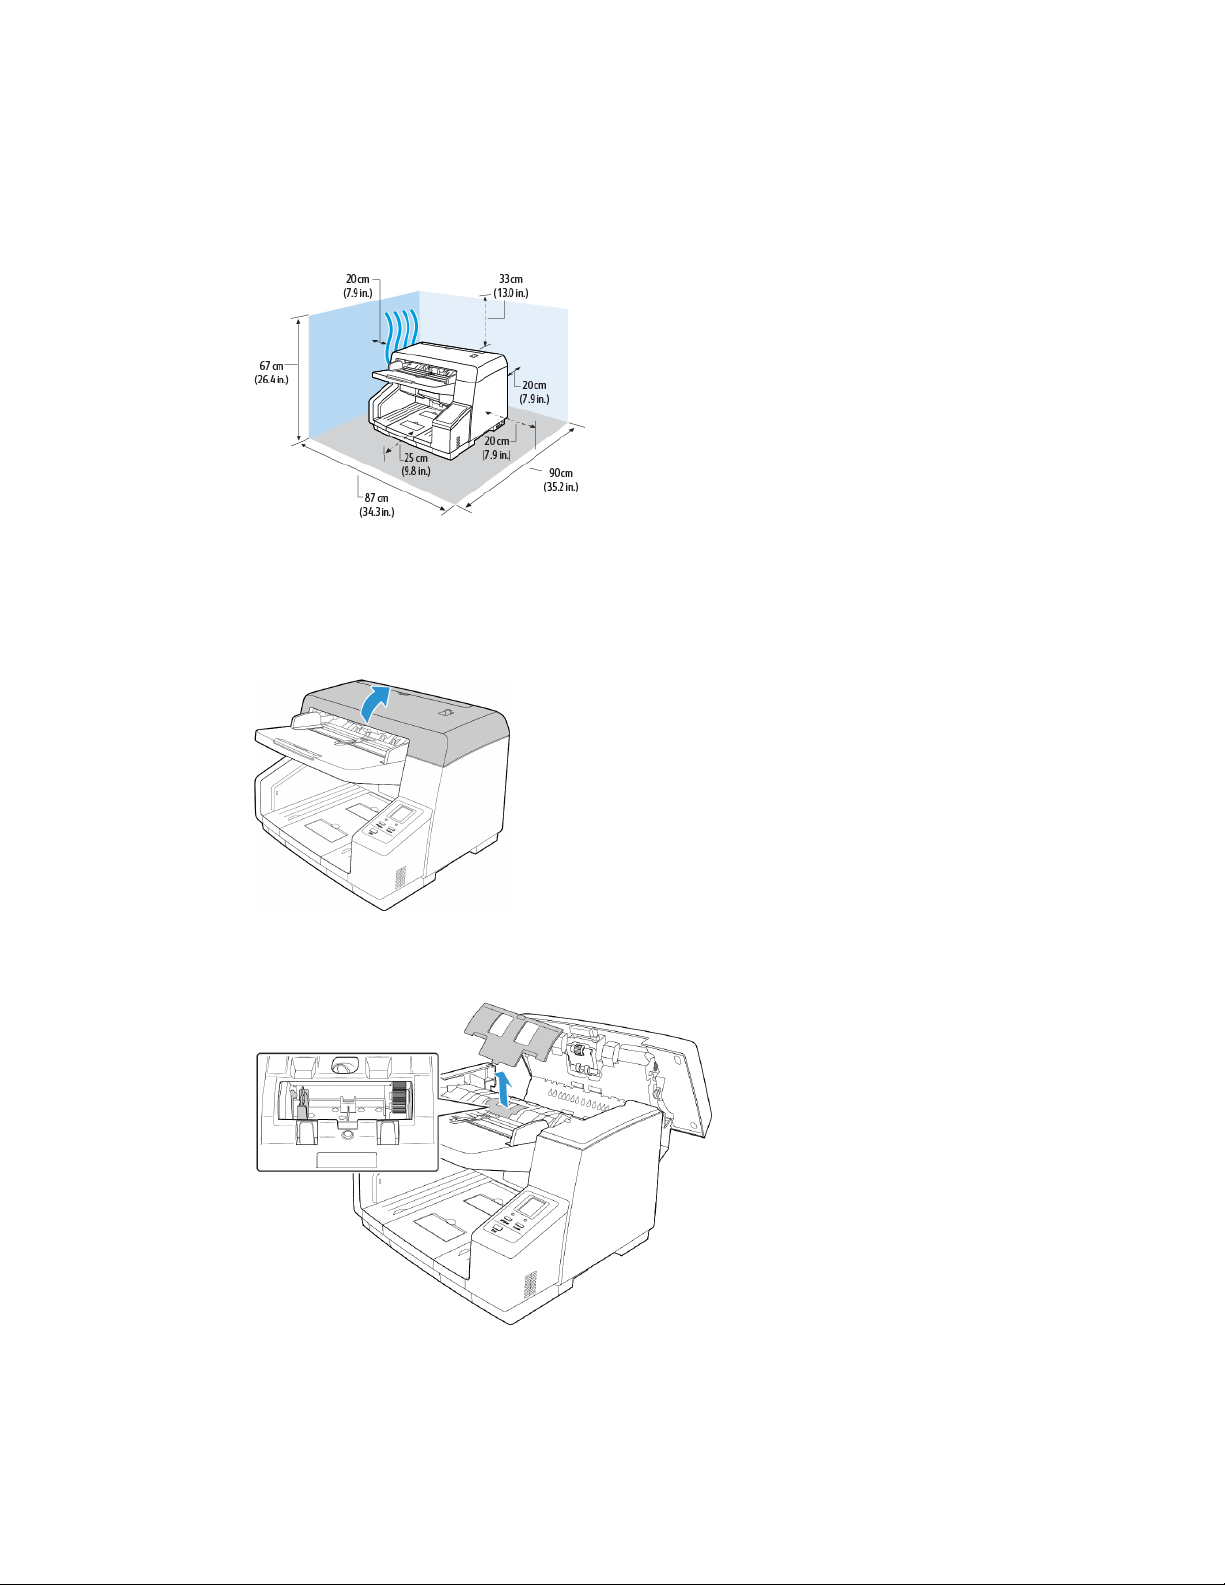
4. Поместите сканер на ровную поверхность рядом с компьютером.
С каждой стороны сканера должно оставаться не меньше 15 дюймов (38 см) свободного
места для удлинителей загрузочного и выходного лотков, технического обслуживания и
необходимой вентиляции.
0
5. Уберите все крепежные ленты с верхней и боковых частей сканера.
Установите ролик контроля двойной подачи
1. Потяните за защелку крышки сканера и поднимите ее, чтобы открыть сканер.
2. Снимите со сканера крышку валика контроля двойной подачи, потянув ее вверх.
Отложите крышку. Не кладите на нее никакие предметы, так как она может сломаться.
Подготовка сканера к работе Xerox
®
DocuMate
®
4790
Руководство пользователя 3-3
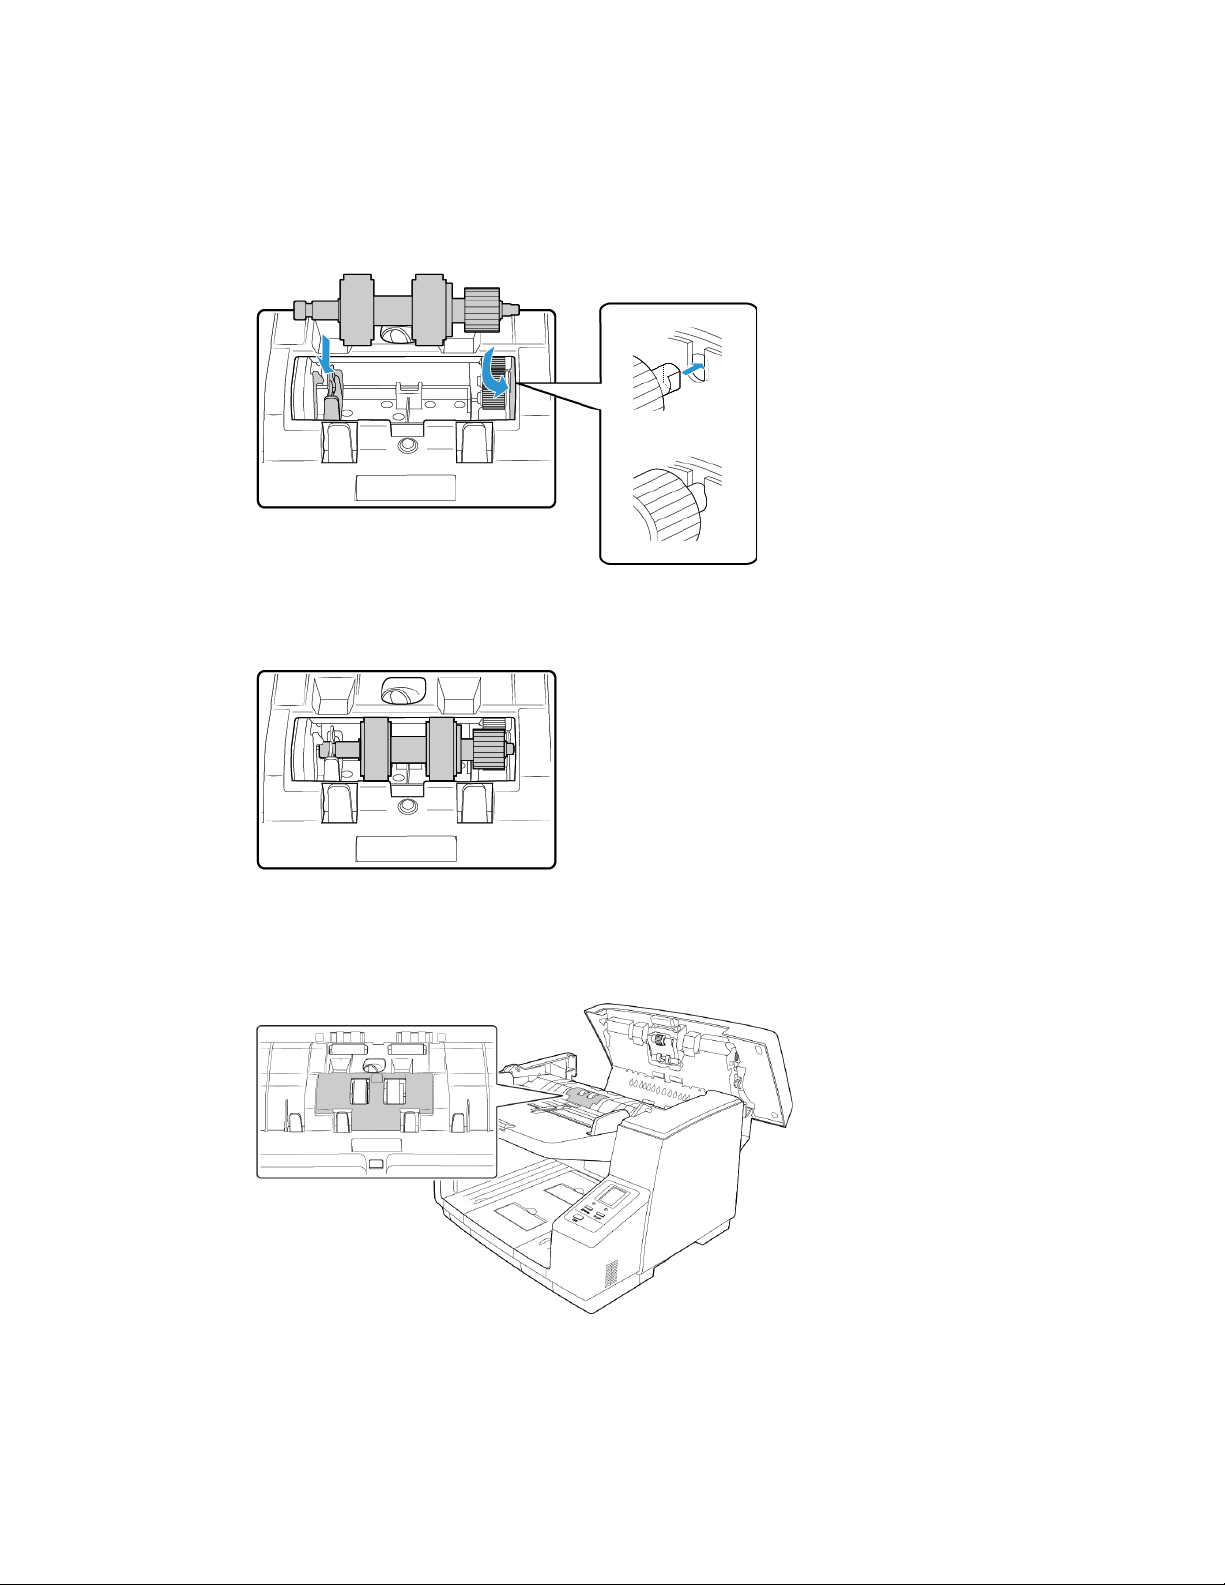
3. Совместите пластмассовую шестерню в правой части валика с шестернями в отсеке.
Убедитесь в том, что плоская сторона штырька валика точно совпадает с отверстием.
Осторожно вставьте конец с шестерней в сканер и наклоните валик по направлению
к
левому
нижнему углу отсека.
4. Осторожно нажмите на левый конец металлического стержня, чтобы закрепить валик
в
отсеке с помощью черного фиксатора.
5
. Поместите крышку отсека на место и опустите ее.
6. Осторожно надавите на крышку, чтобы защелкнуть ее. Убедитесь в том, чт
о крышка
плот
но закрыта. В противном случае она может сломаться и повредить сканер.
Xerox
®
DocuMate
®
4790 Подготовка сканера к работе
3-4 Руководство пользователя
7. После завершения работы осторожно закройте сканер.
Подключите сканер к сети
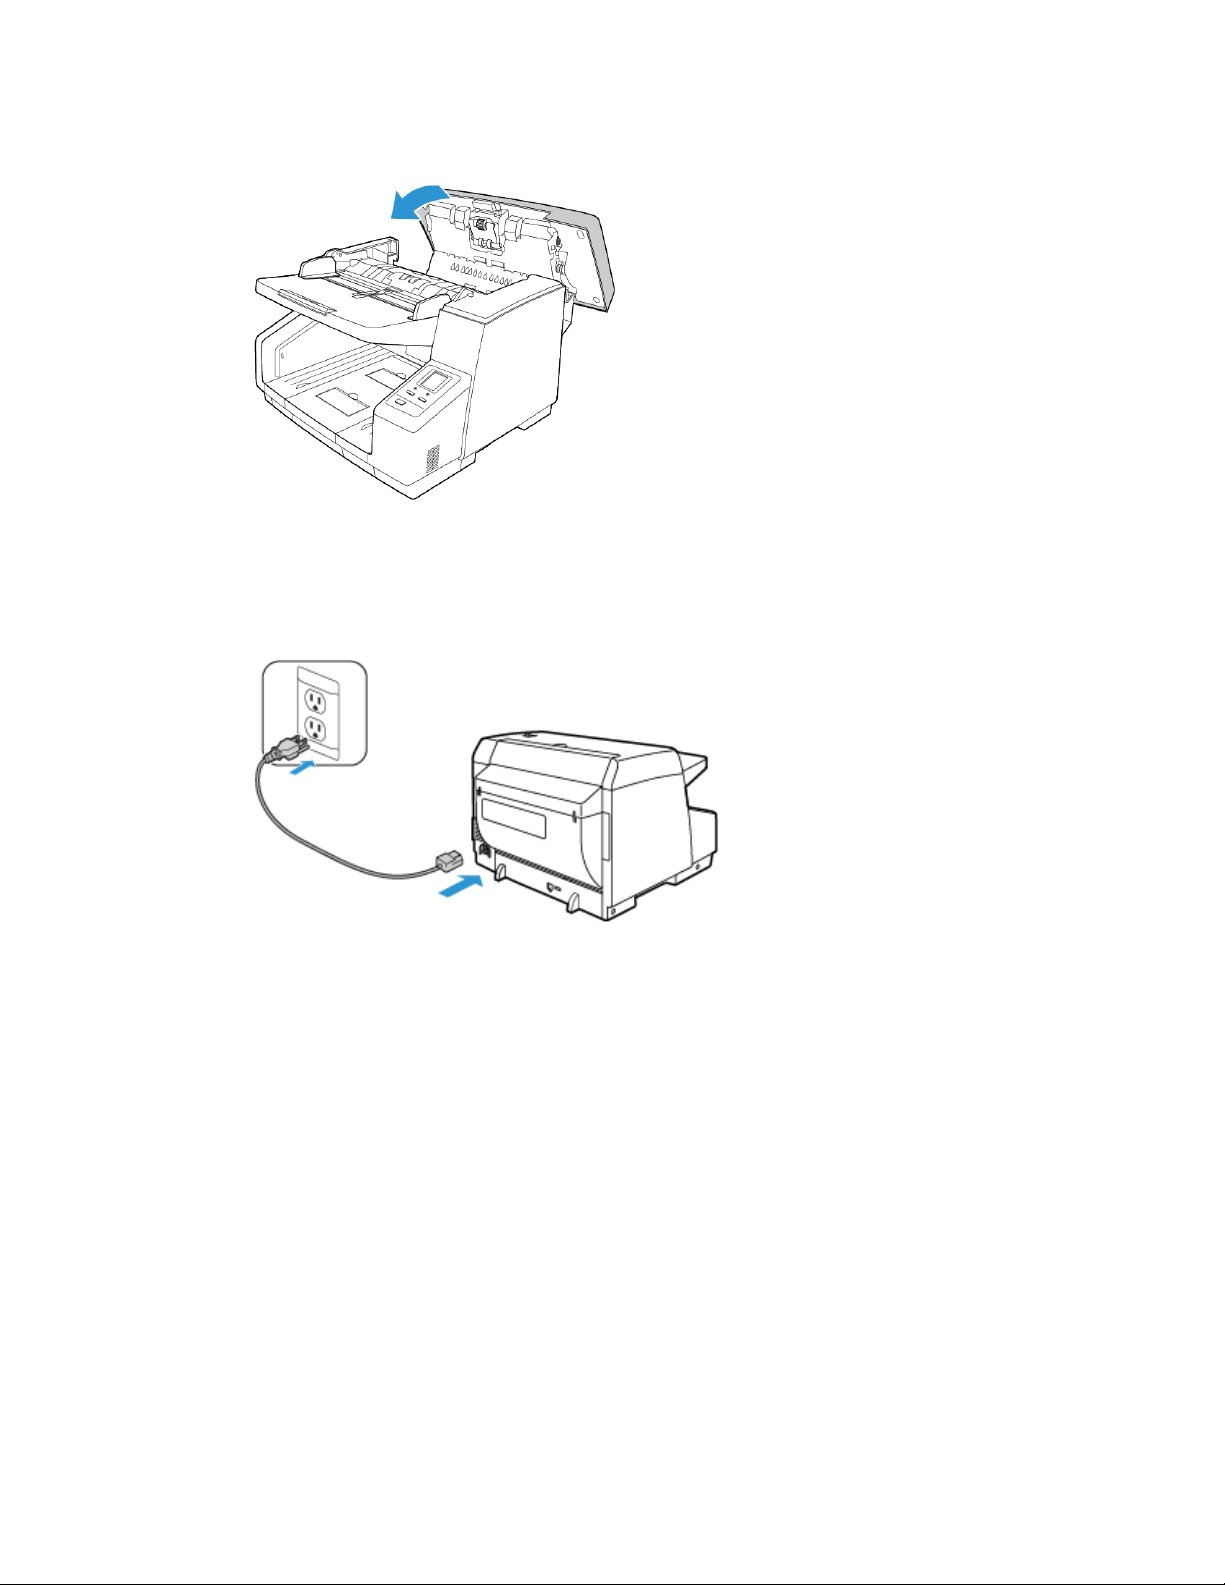
1. Используйте сетевой шнур, соответствующий местным стандартам.
2. Подключите блок питания к разъему питания на сканере и к сетевой розетке.
Примечание. Не включайте сканер, пока не будет установлено программное обеспечение.
Руководство пользователя 4-1
4. Установка программного
обеспечения
Перед началом установки ознакомьтесь с приведенной ниже информацией.
• Если во время установки Вам будет предложено перезагрузить компьютер, выберите
«Нет». Закончите установку остального программного обеспечения, затем закройте все
активные окна и перезагрузите компьютер.
• Информация в настоящем руководстве может описывать программное обеспечение,
которое не входит в комплект поставки данного сканера. Не обращайте внимания на
информацию о программном обеспечении, не относящемся к данному сканеру.
• Если на компьютере во время процедуры установки запущены приложения защиты от
вирусов и шпионских программ, на экране могут появляться предупреждения
и сообщения с запросом на продолжение установки. Эти сообщения зависят от
используемых программ, но в любом случае следует подтвердить продолжение
установки, если такое действие доступно. Также можно выключить приложения защиты
от вирусов и шпионских программ перед началом установки программного обеспечения
сканера. После установки не забудьте снова запустить эти приложения.
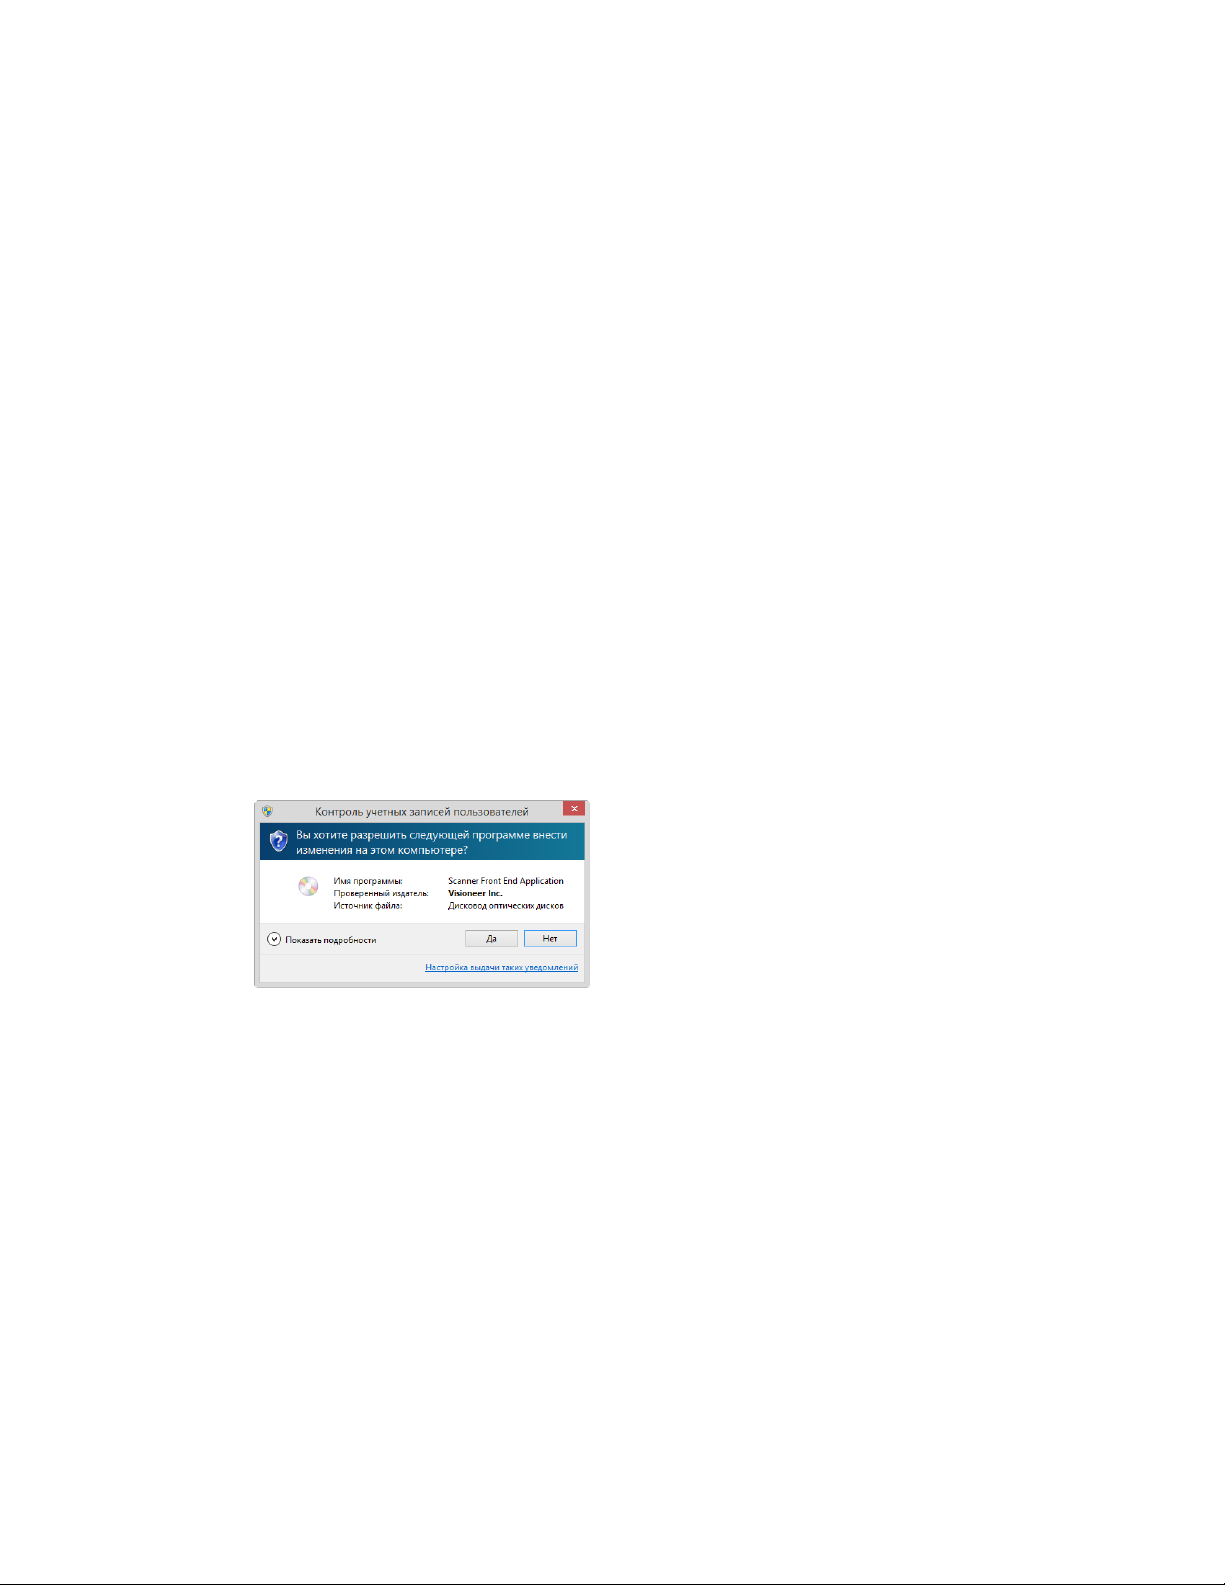
• На компьютере под управлением Windows 7 и более поздние версии может открыться
окно «Управление доступом на уровне пользователей Windows», предлагающее
подтвердить изменения в системе. Нажмите кнопку «Продолжить», чтобы начать
установку.
• Перед установкой ПО Kofax VRS или Kofax Scan Demo необходимо отключить средство
управления пользовательскими привилегиями и учетными записями Windows Vista User
Account Control (UAC). При установке Kofax VRS появится сообщение «Средство
управления пользовательскими привилегиями и учетными записями User Account Control
включено на этом компьютере«. Программа установки не сможет корректно установить
VRS, если эта опция включена. Пожалуйста, отключите эту опцию в диалоге «Учетные
записи пользователей» в панели управления. При установке Kofax Scan Demo появится
сообщение «Программа установки не может найти IC. Установите IC». Отключите
средство управления пользовательскими привилегиями и учетными записями (UAC),
чтобы завершить установку этих программных продуктов. После завершения установки
вы можете снова включить средство управления пользовательскими привилегиями и
учетными записями (UAC).
Подключение сканера и установка программного обеспечения
1. Запустите Microsoft Windows и убедитесь в том, что все остальные приложения закрыты.
Xerox
®
DocuMate
®
4790 Установка программного обеспечения
4-2 Руководство пользователя
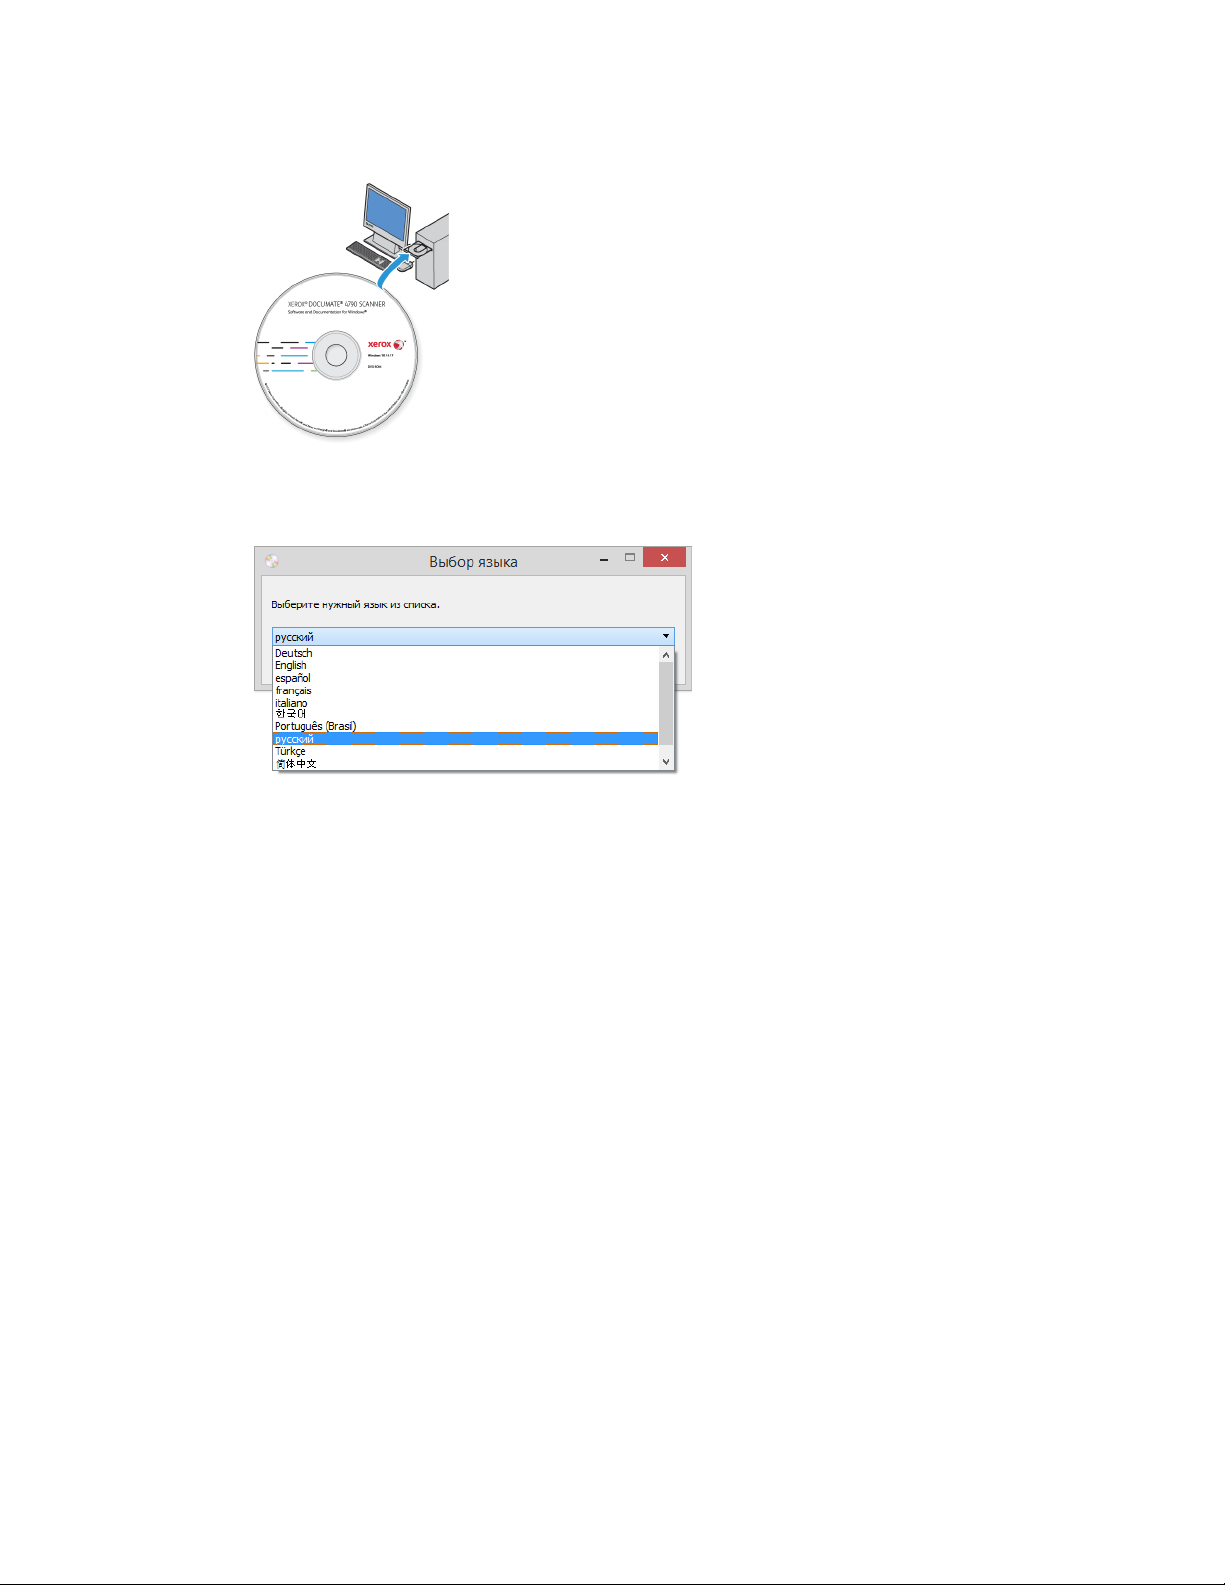
2. Вставьте установочный диск в дисковод DVD-дисков.
Диск запустится автоматически, и откроется окно выбора языка.
3. Выберите язык из списка доступных языков.
Главное меню диска откроется на выбранном языке.
Примечание. Если диск автоматически не запустился, выполните ниже приведенные
действия:
– Убедитесь, что лоток с диском полностью вошел в дисковод компакт-дисков;
– Проверьте, что компакт-диск вставлен в дисковод правильной стороной (рисунком
вверх).
Чтобы запустить компакт-диск вручную, выполните приведенные ниже действия:
– Откройте в Windows окно «Мой компьютер». Это можно сделать, дважды щелкнув
мышью по значку Мой компьютер, расположенному на рабочем столе;
– Двойным щелчком мыши нажмите значок дисковода компакт-дисков;
– После этого должно открыться меню установки компакт-диска.
Если меню не открылось, выполните приведенное ниже действие:
– В списке файлов, находящихся на компакт-диске, двойным щелчком мыши
нажмите файл setup.exe.
Установка программного обеспечения Xerox
®
DocuMate
®
4790
Руководство пользователя 4-3
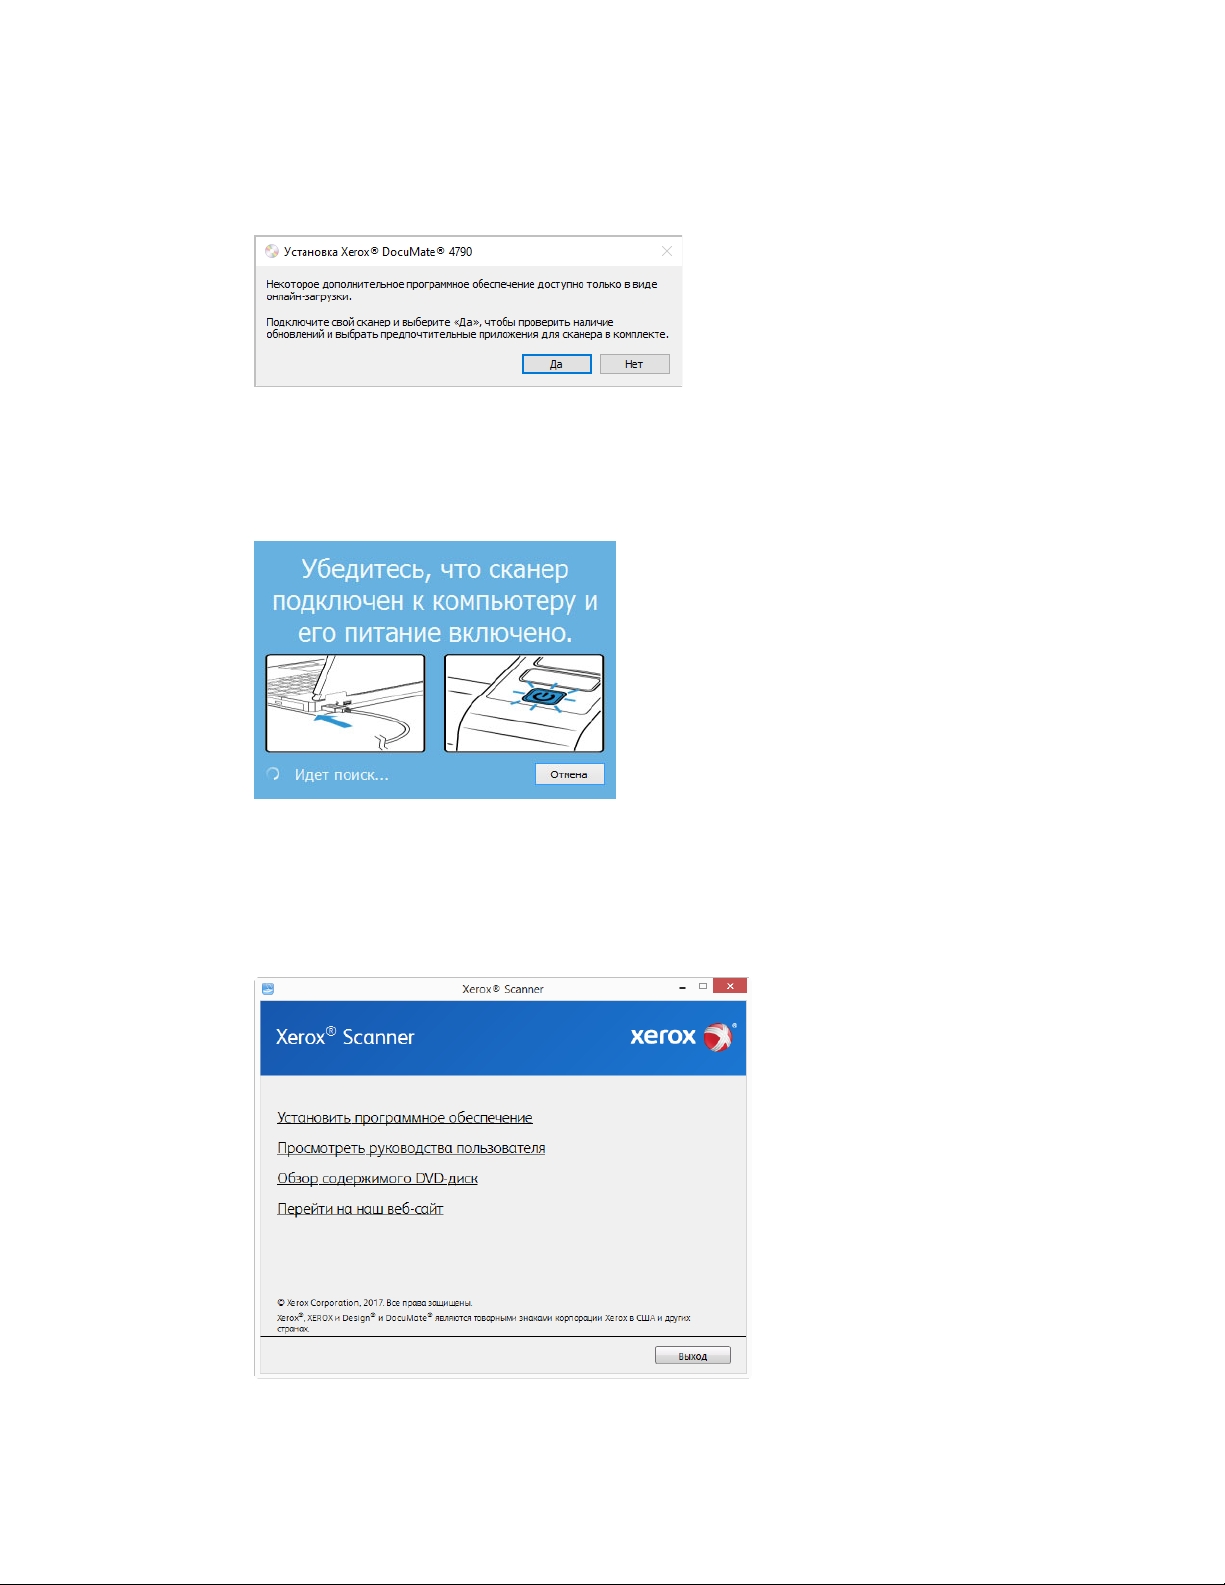
4. Появится запрос с предложением разрешить программе установки искать обновления
программного обеспечения в
Интернете. Чтобы установить прог
раммное обеспечение
только с диска, нажмит
е кнопку Нет.
5. Если обновления через Интернет разрешены, сначала проверяется наличие более новы
х
версий
программы установк
и.
6.
Подключите один конец USB-кабеля к USB-порту сканера, а другой — к USB-порт
у
компьютера.
Включи
те питание сканера.
Примечание.
Чтобы установить программное обеспечение только с диска, нажмите
кнопку Отмена.
7. По завершении этого процесса появится главное меню.
8. В главном меню выберите Установка программного обеспечения.
Xerox
®
DocuMate
®
4790 Установка программного обеспечения
4-4 Руководство пользователя
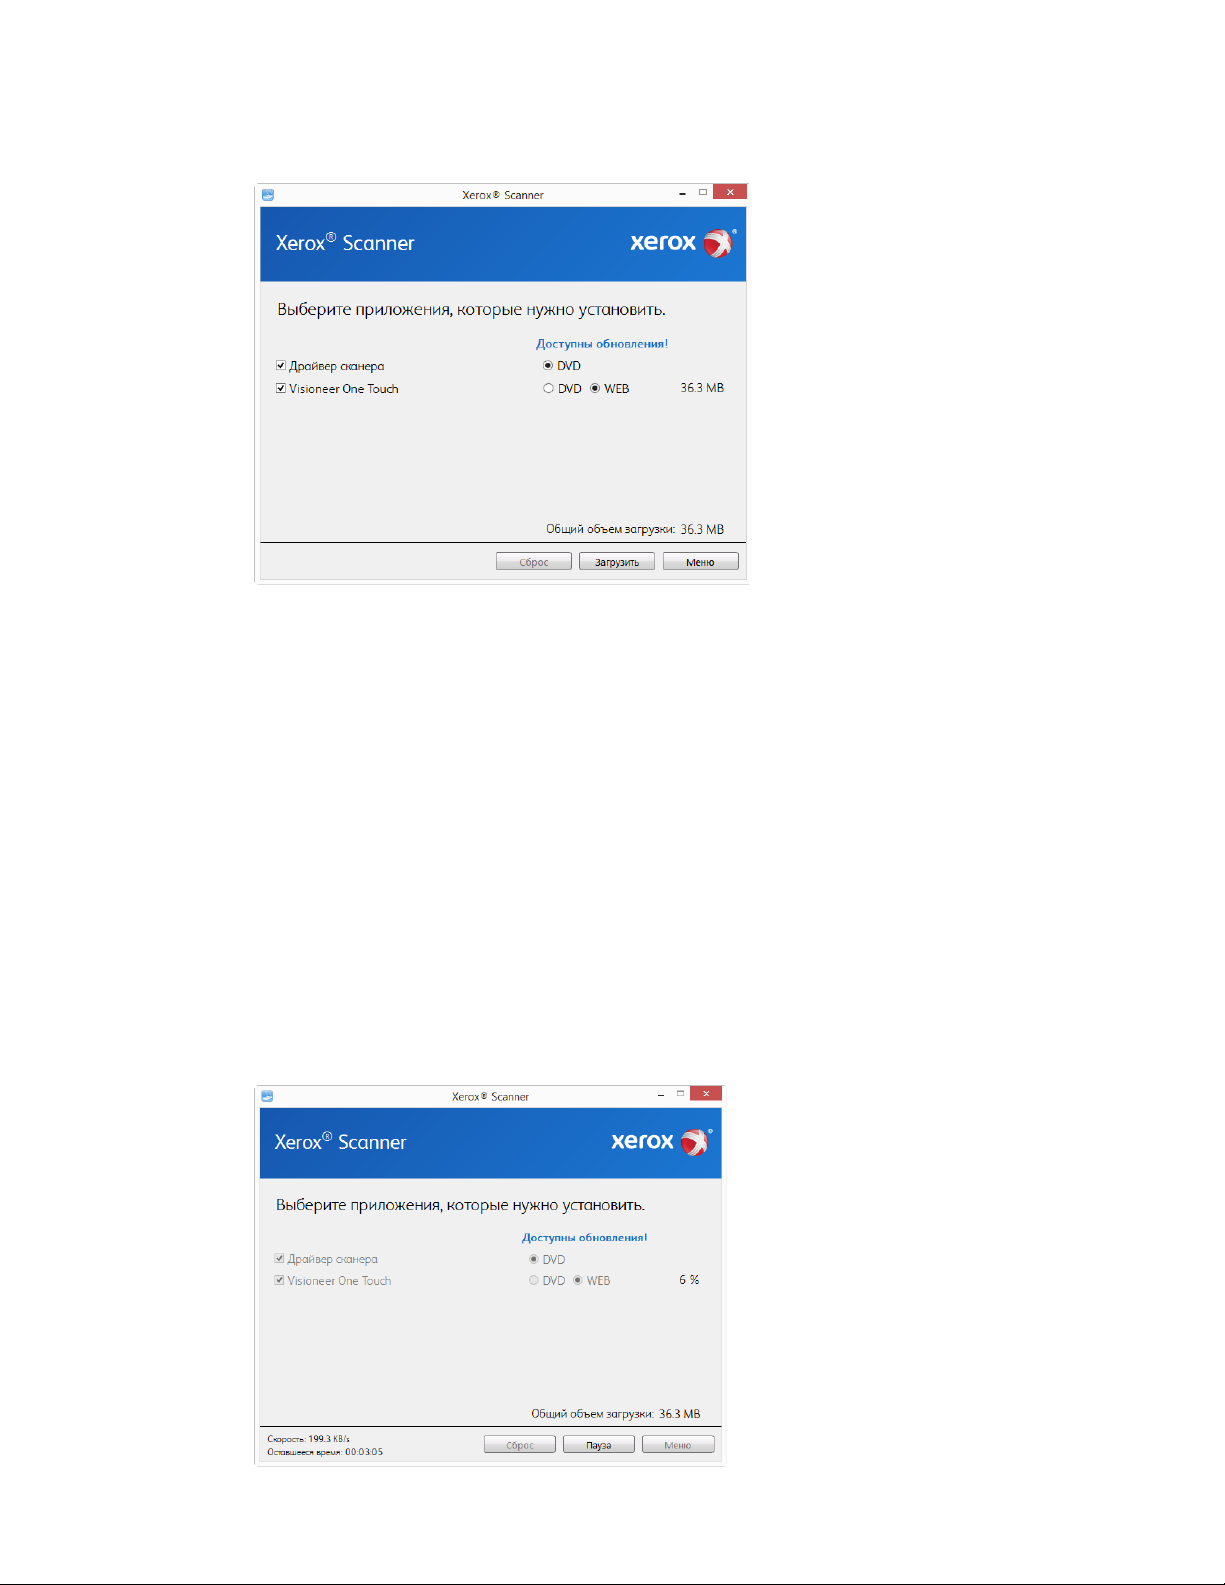
9. Убедитесь, что установлен флажок «Драйверы сканера» и «Visioneer OneTouch».
Примечание. Список программного обеспечения, поставляемого со сканером, может
немного отличаться от списка, отображаемого в окне.
10. Если новая версия программного обеспечения уже установлена в системе, данный
параметр будет неактивен. Если же на диске или в Интернете доступна более новая
версия программы, можно будет обновить ее, нажав соответствующую кнопку.
11. Если программное обеспечение на диске обновлено, то программа будет установлена с
DVD-диска. Однако, если в Интернете доступны более новые версии программного
обеспечения, появится и будет выбрана по умолчанию кнопка Интернет.
Выберите расположение, откуда нужно установить программное обеспечение.
12. Если выбрана какая-либо из кнопок «Интернет», программное обеспечение потребуется
сначала загрузить, нажав кнопку Загрузить сейчас. Внизу будет показан общий размер
загружаемого пакета.
13. Начатую загрузку можно приостановить. Если потребуется изменить выбранные
параметры, приостановите загрузку и нажмите кнопку Сброс. Это позволит изменить
настройки.
Установка программного обеспечения Xerox
®
DocuMate
®
4790
Руководство пользователя 4-5
Примечание. Если нажать кнопку «Сброс» в главном меню или меню установки, то
частично загруженные и ранее загруженные файлы будут удалены. Чтобы установить
эти файлы на компьютере, нужно будет снова загрузить их или установить с DVD-диска.
14. Загрузив программное обеспечение полностью, нажмите кнопку Установить сейчас.
УСТАНОВКА ДРАЙВЕРА СКАНЕРА
В первую очередь выполняется установка драйвера сканера.
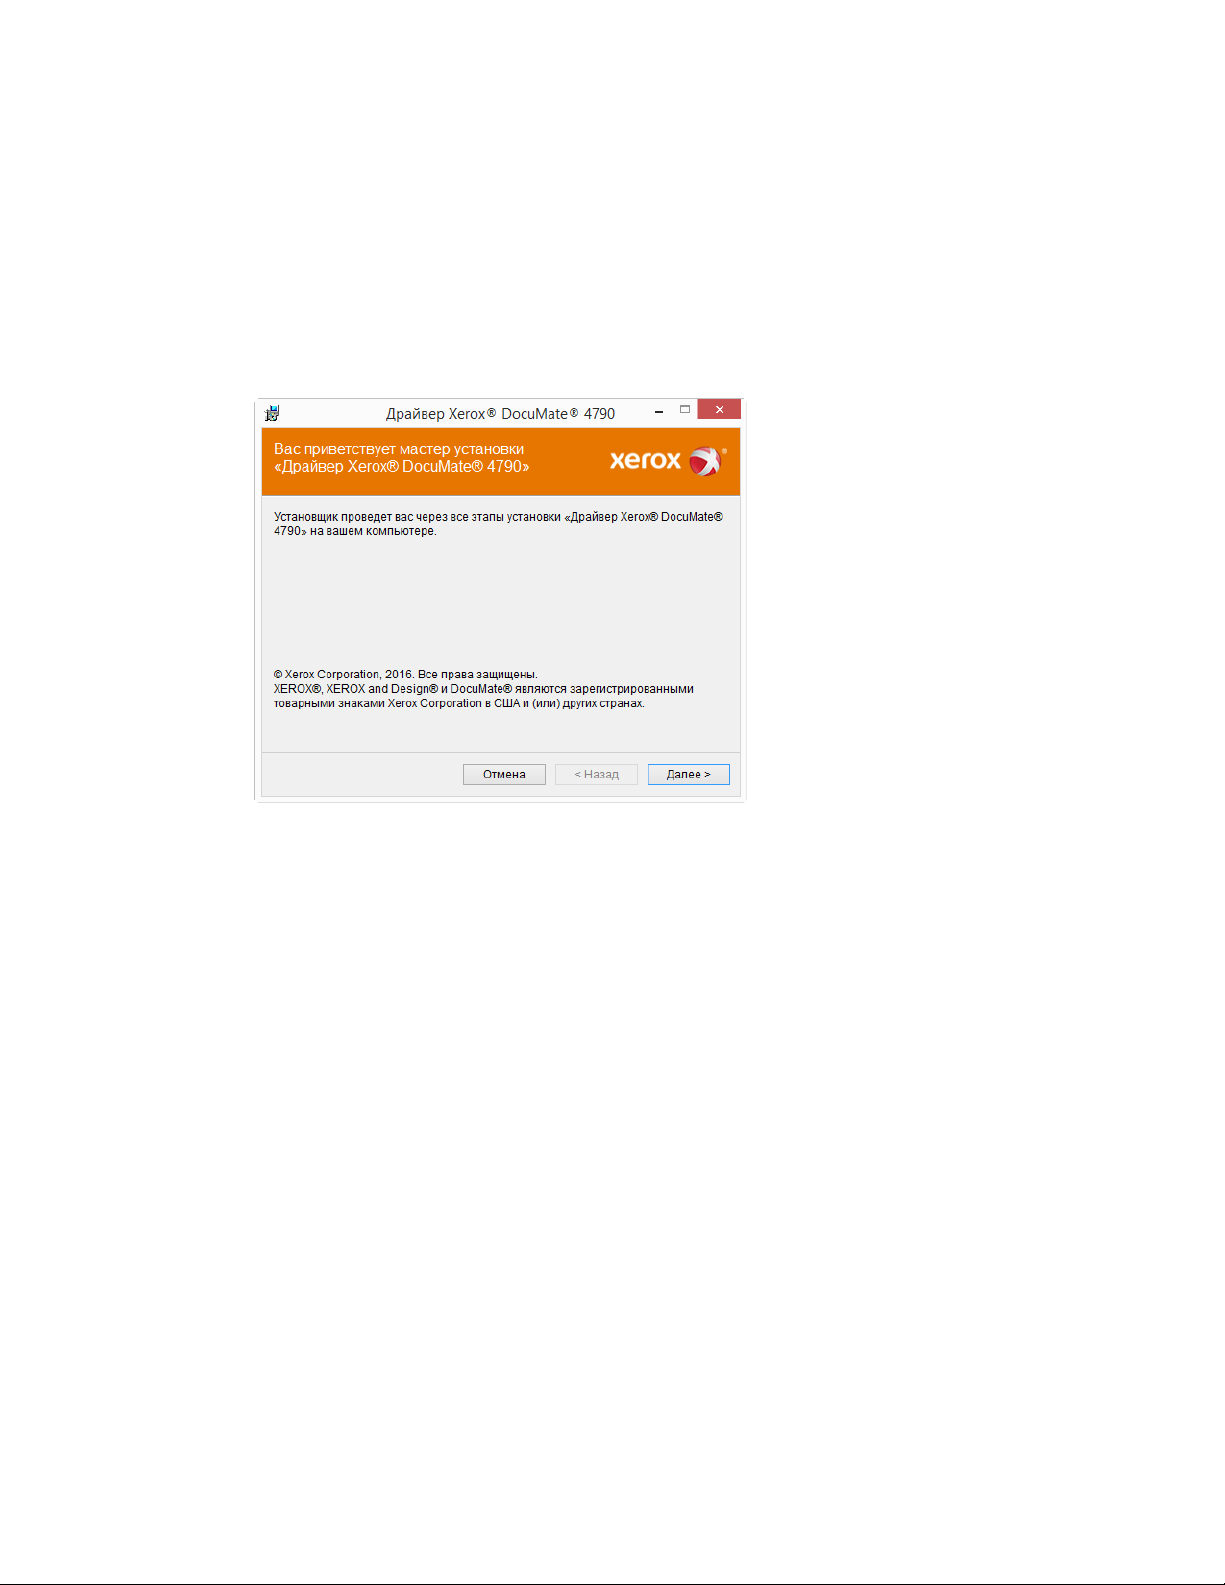
1. Откроется окно мастера установки драйвера сканера. Нажмите «Далее».
2. Ознакомьтесь с лицензионным соглашением Xerox
®
. Чтобы принять условия, выберите
«Я принимаю условия соглашения» инажмите «Далее».
Чтобы отклонить условия лицензионного соглашения, нажмите кнопку Отмена.
В окне «Установка прервана» нажмите кнопку Закрыть.
3. Программное обеспечение будет установлено.
Xerox
®
DocuMate
®
4790 Установка программного обеспечения
4-6 Руководство пользователя
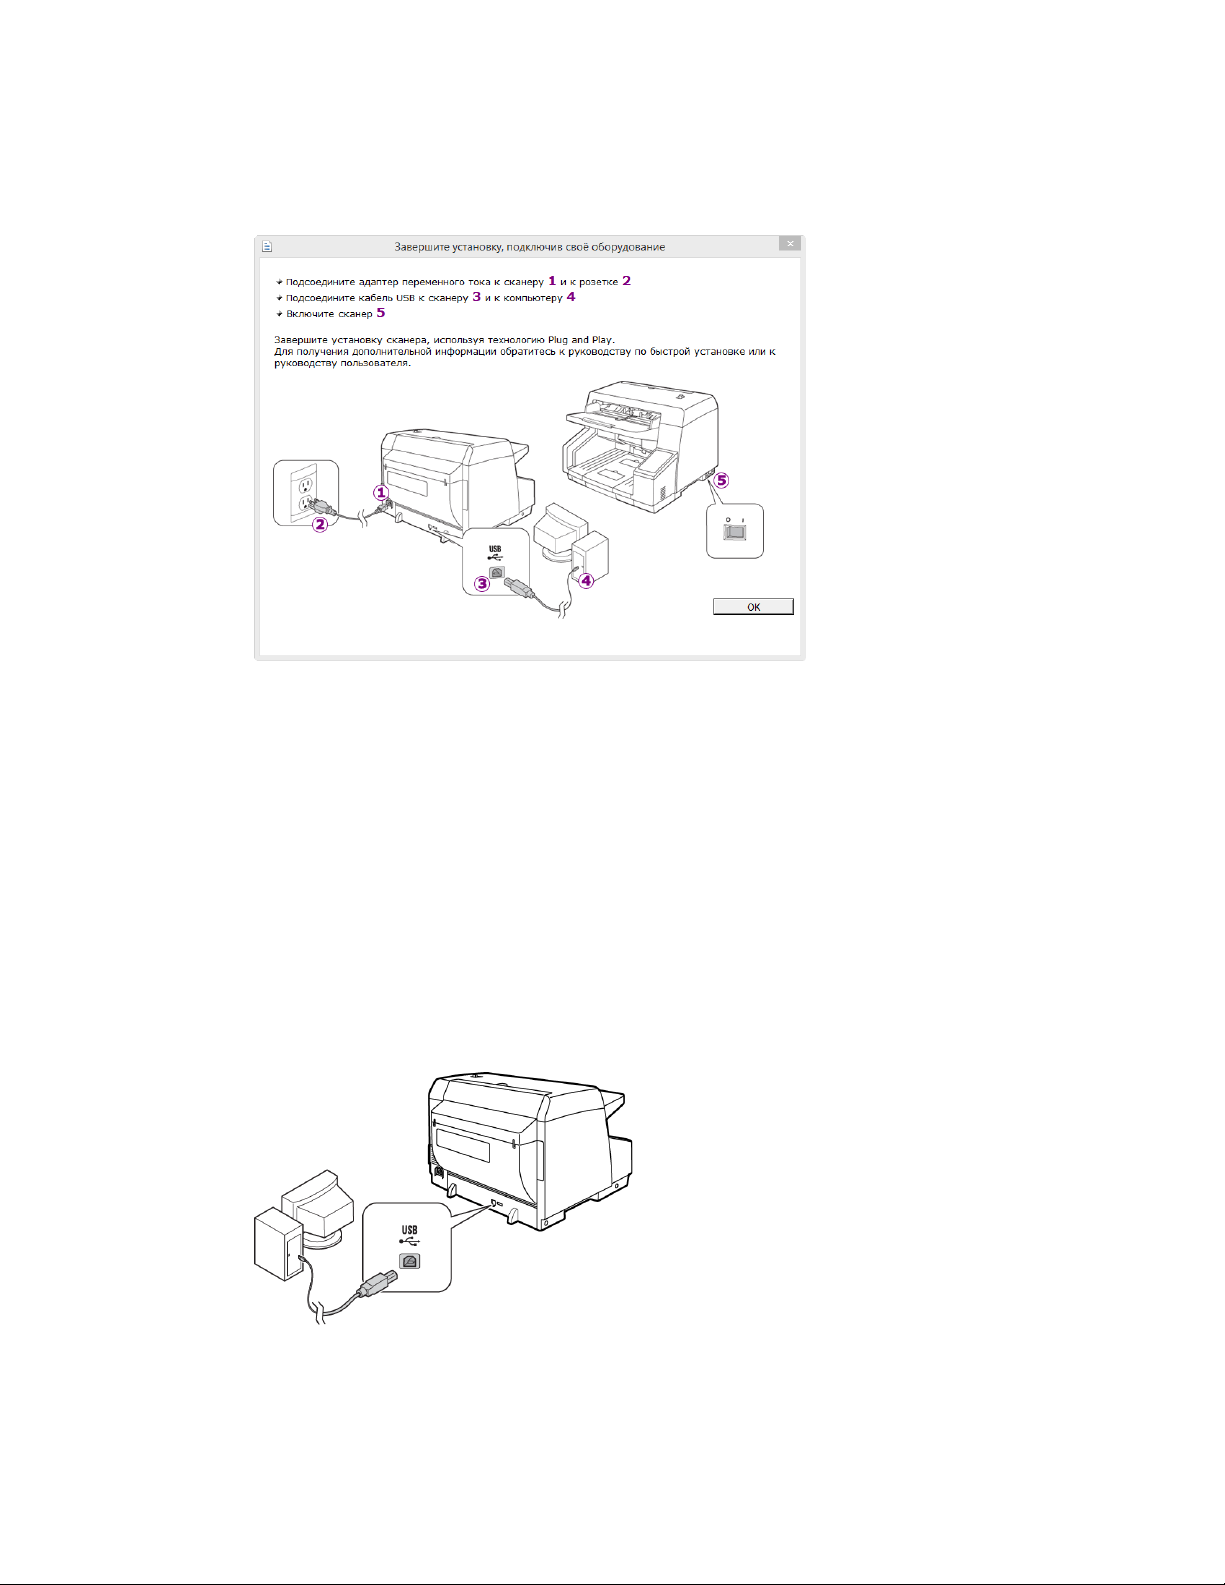
4. Когда откроется окно «Завершить установку подключением аппаратных средств»,
о
становитесь. Не нажимайте кнопку ОК. Оставьте окно открытым и перейдите
к
следующему разделу.
Примечание.
Если данный рисунок с инструкциями по подключению сканера не
отображается на экране, не продолжайте установку и следуйте инструкциям по
подключению сканера в следующем разделе.
ПОДКЛЮЧЕНИЕ КАБЕЛЯ USB И ВКЛЮЧЕНИЕ ПИТАНИЯ
Если сканер не был подключен ранее, выполните приведенные ниже инструкции.
Рекомендуется использовать кабель, поставляемый со сканером.
1. Освободите кабель USB от упаковочных материалов.
2. Подключите плоский разъем USB-кабеля к свободному USB-порту компьютера.
Определите расположение портов USB на компьютере из инструкций к компьютеру.
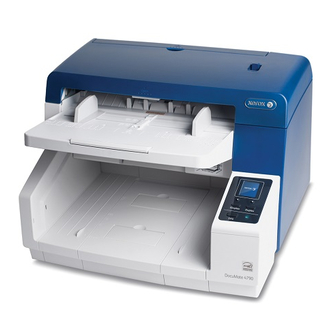
3. Подключите прямоугольный разъем USB-кабеля к выходному USB-порту на з
адней
па
нели сканера.
Если кабель не удается легко подсоединить к разъему, проверьте правильность
совмещения гнезда и штекера.
- Manuals
- Brands
- Xerox Manuals
- Scanner
- Xerox DocuMate 4790
- User manual
-
Contents
-
Table of Contents
-
Troubleshooting
-
Bookmarks
Quick Links
One Touch 4.6
March 2011
05-0820-000
Xerox
DocuMate
4790
®
®
User’s Guide
Related Manuals for Xerox DocuMate 4790
Summary of Contents for Xerox DocuMate 4790
-
Page 1: Xerox Documate 4790
One Touch 4.6 March 2011 05-0820-000 Xerox DocuMate 4790 ® ® User’s Guide…
-
Page 2
Design © 2011 Xerox Corporation. All rights reserved. XEROX®, XEROX and Design® and DocuMate® are registered trademarks of Xerox Corporation in the United States and/or other countries. Content © 2011 Visioneer, Inc. All rights reserved. The Visioneer brand name and OneTouch® logo are registered trademarks of Visioneer, Inc. -
Page 3: Table Of Contents
The Xerox DocuMate 4790 Scanner ……..
-
Page 4
Image Documents Properties …………108 Xerox DocuMate 4790… -
Page 5
Scanner Error Codes …………. . 175 Xerox DocuMate 4790… -
Page 6
Xerox DocuMate 4790 Scanner Parts List …….. -
Page 7: Safety
• Electrical Information on page 10 • Emergency Power Off on page 11 • Maintenance Information on page 12 • Product Safety Certification on page 13 • Environmental Health and Safety Contacts on page 14 Xerox DocuMate 4790 User’s Guide…
-
Page 8: Safety Introduction
Please read the following instructions carefully before operating the machine and refer to them as needed to ensure the continued safe operation of your machine. Your Xerox product and supplies have been designed and tested to meet strict safety requirements. These include safety agency evaluation and certification, and compliance with electromagnetic regulations and established environmental standards.
-
Page 9: Operational Safety Information
Your Xerox equipment and supplies have been designed and tested to meet strict safety requirements. These include safety agency examination, approval, and compliance with established environmental standards. To ensure the continued safe operation of your Xerox equipment, follow these safety guidelines at all times: Do These •…
-
Page 10: Electrical Information
Plug the power cable directly into a correctly grounded electrical outlet. If you are not sure whether or not an outlet is correctly grounded, consult an electrician. Do not use an adapter to connect any Xerox equipment to an electrical outlet that lacks a ground connection terminal.
-
Page 11: Emergency Power Off
Emergency Power Off If any of the following conditions occur, turn off the machine immediately and disconnect the power cable(s) from the electrical outlet(s). Contact an authorized Xerox Service Representative to correct the problem: • The equipment emits unusual odors or makes unusual noises.
-
Page 12: Maintenance Information
Do not perform any maintenance procedures unless you have been trained to do them by an authorized local dealer or unless a procedure is specifically described in the user manuals. Xerox DocuMate 4790 User’s Guide…
-
Page 13: Product Safety Certification
Product Safety Certification This product is certified by the following Agency using the Safety standards listed: Agency Standard Underwriters Laboratories Inc. UL60950-1 (USA) CSA 22.2 No. 60950-1 (Canada) IEC 60950-1 Xerox DocuMate 4790 User’s Guide…
-
Page 14: Environmental Health And Safety Contacts
Environmental Health and Safety Contacts Contact Information For more information on Environment, Health, and Safety in relation to this Xerox product and supplies, please contact the following customer help lines: USA & Canada: 1-800-828-6571 Europe: +44 1707 353 434 Xerox DocuMate 4790…
-
Page 15: Welcome
• Documentation on page 18 • The Xerox DocuMate 4790 Scanner on page 19 Your new Xerox scanner can quickly scan stacks of single-sided or double-sided pages and place their electronic images on your computer. Xerox DocuMate 4790 User’s Guide…
-
Page 16: What’s In The Box
Before proceeding, check the contents of the box. If items are missing or damaged, contact the dealer where you purchased the scanner. Shading paper Technical Support Card Quick Install Guide Xerox DocuMate 4790 Scanner USB Cable Double Feed Roller Cleaning Paper Windows™…
-
Page 17: System Requirements
The recommended settings for your monitor are: • Color quality of 16-bit or 32-bit • Resolution set to at least 800 x 600 pixels Refer to your Windows documentation for instructions on setting the color quality and resolution for the monitor. Xerox DocuMate 4790 User’s Guide…
-
Page 18: Documentation
Kofax Virtual ReScan User’s Guide—On the Installation Disc; contains detailed feature and configuration information for the VRS software. • EMC Captiva QuickScan User’s Guide—On the Installation Disc; contains detailed feature and configuration information for the QuickScan software. Xerox DocuMate 4790 User’s Guide…
-
Page 19: The Xerox Documate 4790 Scanner
The Xerox DocuMate 4790 Scanner Input tray Paper guides Paper guide ADF cover Manual feed Exit tray switch release switch Control panel Power switch Pre-Imprinter USB port Power jack door Input tray—Holds the documents in the Automatic Document Feeder for scanning.
-
Page 20
When scanning using the Simplex or Duplex button on the scanner, this button is disabled while scanning. Power switch—Turns the scanner’s power on or off. Pre-Imprinter Door—Open to access the pre-imprinter compartment. Universal Serial Bus (USB) port—Connects the scanner to the computer. Power jack—Connects the power cord to the scanner. Xerox DocuMate 4790 User’s Guide… -
Page 21: Scanner Setup
Scanner Setup This chapter includes: • Unpack the Scanner on page 22 • Install the Double Feed Prevention roller on page 24 • Connect the Scanner Power Cord on page 27 Xerox DocuMate 4790 User’s Guide…
-
Page 22: Unpack The Scanner
Always have at least two people carry the scanner, lifting the scanner up from underneath. Use a desk or table that can support the weight of the scanner, do not place the scanner on a cloth covered surface. Xerox DocuMate 4790 User’s Guide…
-
Page 23
Keep at least 15 inches of space on every side of the scanner for the input and exit tray extensions, performing maintenance, and to have sufficient air flow for ventilation. Remove all shipping tape from the top and side of the scanner. Xerox DocuMate 4790 User’s Guide… -
Page 24: Install The Double Feed Prevention Roller
Pull on the scanner cover release and lift the lid to open the scanner. Pull up on the double feed prevention roller cover and remove it from the scanner. Set the cover aside and make sure nothing is set on the cover as it will break. Xerox DocuMate 4790 User’s Guide…
-
Page 25
Press gently on the compartment cover to lock in the scanner. Make sure this cover is fully closed as it may break and cause damage to the scanner if it is not properly in place. Xerox DocuMate 4790 User’s Guide… -
Page 26
Close the scanner when you are finished. Xerox DocuMate 4790 User’s Guide… -
Page 27: Connect The Scanner Power Cord
Connect the Scanner Power Cord Select the appropriate power cord for your country. Plug the power cord into the scanner and into a wall outlet. Note: Do not turn on the scanner until after you install the software. Xerox DocuMate 4790 User’s Guide…
-
Page 28
Xerox DocuMate 4790 User’s Guide… -
Page 29: Installation
30 • Install the Software and Connect the Scanner on page 31 • Register Your Scanner on page 39 • Installing Additional Applications on page 40 • View the User Guides on page 42 Xerox DocuMate 4790 User’s Guide…
-
Page 30: Before You Begin
If you already have a scanner connected to your computer, it is recommended that you remove that scanner’s driver program prior to installing your Xerox scanner. You can remove these programs from the Windows Control Panel. Please refer to the user manual provided with your other scanner hardware for instructions about removing the driver and software for that unit.
-
Page 31: Install The Software And Connect The Scanner
Install the Software and Connect the Scanner The installation disc contains the necessary driver, and scanning software, to use your Xerox scanner. To install the software: Start Microsoft Windows and make sure that no other applications are running. Insert the installation disc into your computer’s DVD-ROM drive.
-
Page 32
Leave the default selections and click Install Now. You cannot deselect the TWAIN and Windows Driver as they are required for the scanner to work. Note: The software provided with your scanner may differ slightly from the list shown in the window. Xerox DocuMate 4790 User’s Guide… -
Page 33: Installing The Scanner Driver
The TWAIN and Windows Driver installation will start first. Click Next on the Welcome window. On the Xerox License Agreement window, read the license agreement. If you accept the terms, select I Agree then click Next. If you choose not to accept the license agreement, the installation will terminate and the scanner driver will not be installed.
-
Page 34: Connect The Usb Cable And Turn On The Power
Note: If you do not see this on-screen diagram for connecting the scanner, stop and follow the instructions below. Connect the USB Cable and Turn on the Power Remove any tape from the USB cable. Xerox DocuMate 4790 User’s Guide…
-
Page 35
Your computer recognizes that a scanner has been plugged into the USB port and automatically loads the appropriate software to run the scanner. If your computer is running Windows version XP or later, you will see a message similar to the one below. Xerox DocuMate 4790 User’s Guide… -
Page 36: User Utility Installation
Utility is a software diagnostic and maintenance software that you can use for monitoring your scanner hardware. On the Xerox User Utility License Agreement window, read the license agreement. If you accept the terms, select Yes to accept the agreement and continue with the installation.
-
Page 37: Installing The Isis Driver
The default options on this window will put the shortcut icon in your Windows All Programs list in the Xerox folder. We recommend that you keep the default options on this window and just click on Next to proceed with the installation.
-
Page 38: Installing One Touch
If you selected other software to install from the DVD the installation for that software will automatically start after you click Close on the Installation Complete window. Follow the instructions on-screen to install each application you selected. Xerox DocuMate 4790 User’s Guide…
-
Page 39: Register Your Scanner
Press Enter on your computer’s keyboard or click the option on screen to go to the web address. When the Xerox scanners web page loads click on Register Your Product. Fill in the registration form, all required fields have an asterisk (*).
-
Page 40: Installing Additional Applications
It uses an ISIS-certified driver for scanning and includes flexible job separation and barcode recognition. The Demo version lets you try the application first. Xerox DocuMate 4790 User’s Guide…
-
Page 41
Please install the ISIS driver packaged with your scanner.» This is not an error, please disregard this message and click OK. The Kofax VRS Certified ISIS® driver is installed correctly when you install it with your Xerox DocuMate scanner. -
Page 42: View The User Guides
From either of these user guide windows, click on the User guide menu button to return to the main user guide window, then select the other documentation section to view the user guides. Scanner documentation window Software documentation window Xerox DocuMate 4790 User’s Guide…
-
Page 43
When you’re finished, click Main Menu to return to the Main Menu window and click Exit. Remove the installation disc and store it in a safe place. That’s it! Installation is finished and your Xerox DocuMate 4790 is ready to scan. Xerox DocuMate 4790… -
Page 44
Xerox DocuMate 4790 User’s Guide… -
Page 45: Loading Documents To Scan
Staples and paper clips can jam the feed mechanism and scratch the internal components. Also remove any labels, stickers, or Post-It™ notes that may come off during the scanning process and get stuck in the scanner. Misuse as described here will void your scanner’s warranty. Xerox DocuMate 4790 User’s Guide…
-
Page 46: Items To Avoid Scanning
Lightweight paper such as carbon-less paper or tracing paper. • Irregular paper such as extremely thick card-stock paper, cardboard backing, documents that are glued together, paper with tabs, paper with glue residue, extremely smooth or glossy paper, and thermal or heat sensitive paper. Xerox DocuMate 4790 User’s Guide…
-
Page 47: Scanning From The Automatic Document Feeder (Adf)
Adjust the paper guide for the width of paper, and make sure the input and output trays are fully extended. Flip up the paper stop to make sure the paper stays in the output area as they are exited from the scanner. Xerox DocuMate 4790 User’s Guide…
-
Page 48
Load the documents face up with their tops into the Automatic Document Feeder. The stack of pages should not exceed the maximum height indicated on the input tray. You can now scan the documents using the scanner buttons, One Touch, or one of the other scanning interfaces. Xerox DocuMate 4790 User’s Guide… -
Page 49: Scanning Interfaces
Scanning Interfaces If you selected the recommended installation, then you have several different options to scan with your Xerox DocuMate 4790 scanner. Each method scans equally well, so use the one with appropriate options for the item you are scanning.
-
Page 50
ISIS Interface—This option uses the ISIS interface for scanning. Select the ISIS scan settings, put the document in the scanner, then click the Preview Scan button in the ISIS window. See Scanning from ISIS on page 161. Xerox DocuMate 4790 User’s Guide… -
Page 51: Scanning And Configuring One Touch
One Touch with Kofax VRS Technology on page 135 Based on the recommended full installation of the scanner driver and the Visioneer One Touch software, One Touch is your main scanning interface for using the scanner. Xerox DocuMate 4790 User’s Guide…
-
Page 52
(such as Email) and the icon of the destination (called the Destination Application) where the images will be sent when scanning is finished. The One Touch button panel shows which application the button is configured to send images to. Xerox DocuMate 4790 User’s Guide… -
Page 53: Default One Touch Settings
Imperial standard paper sizes such as 8.5” x 11”. • If Metric is the selected measurement, the default page size in each profile is based on the ISO 216 standard and the majority of the profiles will default to A4. Xerox DocuMate 4790 User’s Guide…
-
Page 54: Scan From The One Touch Button Panel
The One Touch panel is your on-screen set of controls for the scanner. From the panel you can access the hardware settings for your scanner and configure the Scan button. Click on the One Touch icon to open the panel. The Button View The Detail View The Hardware View Xerox DocuMate 4790 User’s Guide…
-
Page 55
Single-click on the detailed information to open the One Touch Properties. The Hardware View • Left-click on the scanner icon to return to the Button view. • Right-click on the scanner icon to open the scanner’s hardware properties. Xerox DocuMate 4790 User’s Guide… -
Page 56: Changing The Button Settings
Select a file format in the Select format panel. The formats are based on the type of Destination Application you select. The icon names indicate their file types. See File Formats on page 69 for more information about the available formats. Xerox DocuMate 4790 User’s Guide…
-
Page 57
Edit or Delete to change or remove them. OK/Cancel/Apply buttons—OK accepts any changes and closes the window. Apply accepts any changes but leaves the window open so you can continue making additional changes. Cancel closes the window without accepting any changes. Xerox DocuMate 4790 User’s Guide… -
Page 58: Selecting Options For One Touch
SMTP server without opening an email client application. • Storage and CD-R/W is for scanning directly to a folder on the computer, server, FTP server, SharePoint site, or to the Windows CD temp directory for burning the files to a CD. Xerox DocuMate 4790 User’s Guide…
-
Page 59
These tokens include counting numbers, date and time values, number of pages scanned, and so on. If the button name is not unique, you will see an on- screen notification that a {BatchID} and/or {#b} will be inserted into the name. Xerox DocuMate 4790 User’s Guide… -
Page 60
As each destination application link is different, there is no standard filename type you can create to use for all destinations. If you scan and the images are not grouped in the file(s) as needed, try deselecting “Use custom file naming” and then scan again. Xerox DocuMate 4790 User’s Guide… -
Page 61: Scan Configurations
We also recommend that you keep those configurations locked so they are not inadvertently deleted. That way, you will always have the factory-settings available. If you do delete or edit them, and want to get the factory pre-sets back again, you will need to uninstall then re-install your scanner. Xerox DocuMate 4790 User’s Guide…
-
Page 62: Scan Settings Tab
Resolution—Drag the slider to the right or left to adjust the dots per inch (dpi) of the resolution. The higher the dpi setting, the sharper and clearer the scanned image. However, higher dpi settings take longer to scan and produce larger files for the scanned images. Xerox DocuMate 4790 User’s Guide…
-
Page 63: Page Settings Tab
This option is only available if the scanner supports this feature. Always use the paper guides on the scanner so the page is not skewed. Skewed pages may not crop properly. Xerox DocuMate 4790 User’s Guide…
-
Page 64
6. When Skip Blank Originals is enabled, and 2 of the 3 pages in the stack are blank on one side, the total number of images counted is 4 not 6. Xerox DocuMate 4790 User’s Guide… -
Page 65: Advanced Settings Tab
Gamma value, the values at which saturation, hue, brightness and contrast affect the image are changed. It is recommended that you keep the default Gamma value or adjust this setting before adjusting the other options. This option is available for both Color and Grayscale scanning. Xerox DocuMate 4790 User’s Guide…
-
Page 66: Redaction Settings Tab
Front—This is the Simplex side of the page. The area(s) specified for the Front will only apply to the Simplex side of the page when scanning in Duplex. Therefore, if you scan 4 double-sided pages, the resulting image file(s) will have redacted areas on pages 1, 3, 5, and 7. Xerox DocuMate 4790 User’s Guide…
-
Page 67
Windows color palette. Select the color you want then click on OK. The color you selected will now display in the Color field on the Redaction Settings tab. Xerox DocuMate 4790 User’s Guide… -
Page 68
If Autorotate 90 is selected, redaction occurs after the page has been rotated. When inputting the position and area for redaction, use the measurements of the page in the landscape position. Click the name to toggle between inches and millimeters. Xerox DocuMate 4790 User’s Guide… -
Page 69: File Formats
Create single image files. Note that this option is automatically selected and disabled if you have selected a format that only supports single pages, such as BMP, PNG, GIF, JPG, or JP2. Xerox DocuMate 4790 User’s Guide…
-
Page 70: Image Formats
When scanning in color, it produces a file of similar quality and size to a BMP file. However, when scanning in Black & White, the TIF compression produces the smallest file size of all the image types without losing image quality. TIFF also supports multi-page image files. Xerox DocuMate 4790 User’s Guide…
-
Page 71
Other buttons that have JPG selected as the file format are not affected, so you can set the JPG file size/image quality independently for each button. Click OK or Apply on the One Touch Properties window. Xerox DocuMate 4790 User’s Guide… -
Page 72: Text Formats
Select a text format for documents with text or numbers, such as a business letter, report, or spreadsheet. The text format icon has several file formats available, depending on the Destination Application you select. Xerox DocuMate 4790 User’s Guide…
-
Page 73
Right-click on the text format icon. The menu options depend on the type of Destination Application you select. Choose the file type that you want for the text format. Click OK or Apply on the One Touch Properties window. Xerox DocuMate 4790 User’s Guide… -
Page 74: Configure Before Scan
Click the button you set up to use Configure Before Scan. The TWAIN Interface opens. Choose your scan settings, such as the Picture Type of Color, Grayscale or Black & White, Resolution in DPI, and Page Size. Xerox DocuMate 4790 User’s Guide…
-
Page 75
Instead of having to re-scan the entire batch, you can stop the current scan, change the picture type from Black & White to Color, then restart the scanning without losing the pages already scanned. Xerox DocuMate 4790 User’s Guide… -
Page 76: Open Scanned Document(S)
Windows documentation for instructions on associating file types. • When scanning to multiple destinations, the scanned file is still sent to the other selected destination application(s) in One Touch. Xerox DocuMate 4790 User’s Guide…
-
Page 77: Transfer To Storage
Storage Options tab and use this window to set a configuration to scan to a different folder than the one selected in the Link Properties window. Changing the options in this window only affects the configuration you are creating or modifying. All other configurations will retain their settings for this destination. Xerox DocuMate 4790 User’s Guide…
-
Page 78: Setting The Folder From Windows
When One Touch was installed, a storage option was added to the right-click menu of your Windows folders. This menu option allows you to set the Transfer to Storage folder location without opening One Touch first. Right-click on the folder you want set as the scan destination. Xerox DocuMate 4790 User’s Guide…
-
Page 79: Scanning To Multiple Folders
Then switch to another scan configuration and scan the next set of documents to store them in their folder. Setting up multiple folders for transfer to storage Using Microsoft Windows, create the folders that you want to use for storing scanned items. Xerox DocuMate 4790 User’s Guide…
-
Page 80
To help you remember which folder it is, give the new configuration a name that indicates the folder name, such as “Business Receipts.” Click the Scan Settings, Page Settings, and Advanced Settings tabs, and select the settings you want. Click the Storage Options tab. Click the Browse button. Xerox DocuMate 4790 User’s Guide… -
Page 81
11. Click OK. The new configuration is now listed as a Transfer to Storage configuration. 12. Repeat the process to create additional new configurations, such as one named “Personal Receipts.” Note: Make sure to designate separate folders as the Storage Locations for each new configuration. Xerox DocuMate 4790 User’s Guide… -
Page 82
When scanning is complete, insert the next set of documents in the scanner, then press the second button you set to scan documents and transfer them to storage. When scanning is finished, the documents are stored in the two separate folders. Xerox DocuMate 4790 User’s Guide… -
Page 83: Burn To Cd-Rom
The scanner will start scanning. When finished the file will be saved to the Windows temporary location for CD files. An information bubble will appear in the Windows notification area telling you that there are files waiting to be burned to CD. Xerox DocuMate 4790 User’s Guide…
-
Page 84
Click the Burn to CD button. The CD burner begins and your scanned documents are written to the CD. If other files are also waiting in this location, they will get written with the One Touch files on the Xerox DocuMate 4790 User’s Guide… -
Page 85: Printer Or Fax
The Properties button will be disabled in One Touch as there are no global properties for this type of destination. Select a printer or fax device, in the Select destination list, then open a Scan Configuration to modify the settings for the device you selected. Xerox DocuMate 4790 User’s Guide…
-
Page 86
For example, if the device is your printer, the dialog box is your printer’s setup settings. Note: When scanning to multiple printers and/or faxes, select the specific device, you want to configure the Advanced features for, from the list before clicking on the Advanced… button. Xerox DocuMate 4790 User’s Guide… -
Page 87: Paperport
PaperPort tab and use this window to set a configuration to scan to a different folder than the one selected in the Link Properties window. Changing the options in this window only affects the configuration you are creating or modifying. All other configurations will retain their settings for this destination. Xerox DocuMate 4790 User’s Guide…
-
Page 88
The selected folder in this list is where the scanned file will be saved when PaperPort is open and the One Touch option Scan to the current PaperPort folder is selected. Xerox DocuMate 4790 User’s Guide… -
Page 89: Sharepoint
Click on the SharePoint tab and fill in the fields with the information for your SharePoint site. • Protocol—Select which protocol you want to use to transfer the scan to the server. Xerox DocuMate 4790 User’s Guide…
-
Page 90: Sharepoint Link Log Viewer
The One Touch Link Log Viewer opens automatically when scanning is complete. Click on the menu arrow next to View logs for and select SharePoint Link from the list to display the transfer history for the SharePoint link only. Xerox DocuMate 4790 User’s Guide…
-
Page 91
Click on the Properties button to open the Log Viewer from the SharePoint One Touch Link Properties window. There are no global configuration properties for the SharePoint destination application, all configuration is done using the Scan Configuration Properties window as described in the previous section. Xerox DocuMate 4790 User’s Guide… -
Page 92: Ftp Transfer
Protocol—Select which protocol you want to use to transfer the scan to the server. • Host—Input the internet or intranet path of the server where you want to send the scanned documents. you do not need ftp:// at the beginning. For example, ftp.company.com Xerox DocuMate 4790 User’s Guide…
-
Page 93: Ftp Link Log Viewer
After you address the failure indicated in this log file, you can click the Retry button to resend the document to the server. Xerox DocuMate 4790 User’s Guide…
-
Page 94
Click on the Properties button to open the Log Viewer from the FTP One Touch Link Properties window. There are no global configuration properties for the FTP destination application, all configuration is done using the Scan Configuration Properties window as described in the previous section. Xerox DocuMate 4790 User’s Guide… -
Page 95: Smtp
Host—Input the internet or intranet path of the server where you want to send the scanned documents. For example, smtp.company.com • Port—Input which port to use with the selected protocol. Changing the selected protocol will reset this value to the appropriate default for the protocol. Xerox DocuMate 4790 User’s Guide…
-
Page 96: Smtp Link Log Viewer
After you address the failure indicated in this log file, you can click the Retry button to resend the document to the server. Xerox DocuMate 4790 User’s Guide…
-
Page 97
Click on the Properties button to open the Log Viewer from the SMTP One Touch Link Properties window. There are no global configuration properties for the SMTP destination application, all configuration is done using the Scan Configuration Properties window as described in the previous section. Xerox DocuMate 4790 User’s Guide… -
Page 98: Email Applications
Internet Options of Internet Explorer. Click on the email application that is in the list, then click on the Properties button to launch the Email One Touch Link Properties window to change the email application. Xerox DocuMate 4790 User’s Guide…
-
Page 99: Email Properties
If you changed the email application Internet Explorer, and it does not immediately appear in the Select destination list, click the Refresh button to update the destination list in One Touch. Xerox DocuMate 4790 User’s Guide…
-
Page 100: Text Editors
One Touch. Note that if you recently installed an application, click the Refresh button to see if One Touch will automatically configure the link before you try adding it manually. Xerox DocuMate 4790 User’s Guide…
-
Page 101: Text Documents Properties
This could occur if you scanned a photograph with a scanner button set for text applications. • Show message if text recognition failed—A message will open on the screen if the OCR reader does not detect text in the image. Xerox DocuMate 4790 User’s Guide…
-
Page 102: Adding Text Editor Applications To One Touch
When you select the application using the Browse button, steps 1 and 2 on the dialog box are automatically filled in, and the application icon appears in step 3. Select the icon in Step 3 of the dialog box. That is the icon that will appear in the One Touch Destination List. Xerox DocuMate 4790 User’s Guide…
-
Page 103
When you are done making changes in this window, click the Add button to accept the changes and close the window. Click OK on the Link Properties window. Click Refresh on the One Touch Properties window and the new application should now be available. Xerox DocuMate 4790 User’s Guide… -
Page 104: Creating An Html Web Page From Your Scanned Documents
Microsoft Internet Explorer, or other web browser you scanned to, then opens showing your converted page. The application’s URL field shows the location where One Touch saved the HTML files for you to locate and post to your website. Xerox DocuMate 4790 User’s Guide…
-
Page 105: Still Image Client
Open the One Touch Properties window, and select Still Image Client as the Destination Application. Choose a Scan Configuration and click OK. Start scanning using the button you selected for event forwarding. Xerox DocuMate 4790 User’s Guide…
-
Page 106
Click on OK when you are done making changes to this window. Now when you scan with Event Forwarding you will either be prompted to choose an application, or the default application you selected will open. Xerox DocuMate 4790 User’s Guide… -
Page 107: Image Editors
From this window you can add an application and set additional document handling options. Note that if you recently installed an application, click the Refresh button to see if One Touch will automatically configure the link before you try adding it manually. Xerox DocuMate 4790 User’s Guide…
-
Page 108: Image Documents Properties
• Convert Bitmaps to JPEG—JPEG files can be compressed to produce smaller file sizes and, therefore, shorter transmission times. Use this option to provide that compression capability to image files. Xerox DocuMate 4790 User’s Guide…
-
Page 109: Adding Image Editor Applications To One Touch
When you are done making changes in this window, click the Add button to accept the changes and close the window. Click OK on the Link Properties window. Click Refresh on the One Touch Properties window and the new application should now be available. Xerox DocuMate 4790 User’s Guide…
-
Page 110: Pdf Applications
Please note that any PDF application you add manually to One Touch will be classified as a “Text Based Link.” These applications will only show in the destination list when Text editing applications are enabled. Xerox DocuMate 4790 User’s Guide…
-
Page 111
When you select the application using the Browse button, steps 1 and 2 on the dialog box are automatically filled in, and the application icon appears in step 3. Select the icon in Step 3 of the dialog box. That is the icon that will appear in the One Touch Destination List. Xerox DocuMate 4790 User’s Guide… -
Page 112
When you are done making changes in this window, click the Add button to accept the changes and close the window. 10. Click OK on the Link Properties window. 11. Click Refresh on the One Touch Properties window and the new application should now be available. Xerox DocuMate 4790 User’s Guide… -
Page 113: Send To Application
Link Properties window. Changing the options in this window only affects the configuration you are creating or modifying. All other configurations will retain their settings for this destination. Xerox DocuMate 4790 User’s Guide…
-
Page 114
The scanner starts scanning and, when finished, sends the scanned file to the application you selected. Technical note After configuring this link, you may need to click Refresh in the One Touch Properties window to • show the correct application icon in the Select destination list. Xerox DocuMate 4790 User’s Guide… -
Page 115
This unique file is created at scan time and contains a list of every image in the scan job. Only select this option if you are sure that the application you are scanning to can use the job file to accept image transfer. Xerox DocuMate 4790 User’s Guide… -
Page 116: Scanning To Multiple Destinations
Click each destination where you want to send the scanned image in the Selected destinations (#) list. Click again to deselect a destination. As you click on each destination, the Selected destinations number will count so you know how many applications are selected to receive the image. Xerox DocuMate 4790 User’s Guide…
-
Page 117
For example, if you scan to a printer and to email, only the BMP file format will be available as printers can only receive an uncompressed image format. All other image formats and all text formats will be disabled until you deselect the printer. Xerox DocuMate 4790 User’s Guide… -
Page 118
The scanner starts scanning and when finished, the image is sent to each destination you selected in the One Touch Properties window. Technical Note • The Still Image Client destination cannot be used with multiple destination scanning. This destination will be disabled when the Enable scanning to multiple destinations is selected. Xerox DocuMate 4790 User’s Guide… -
Page 119: Scanning With Job Separation
Click on the Options tab in the One Touch Properties window. Click on the down arrow next to the Select Button list to select the button you want to modify. Note that the options in this window are specific to each One Touch button. Xerox DocuMate 4790 User’s Guide…
-
Page 120
When scanning is finished, each file will be sent to the destination location or application you have selected on the button tab. Technical Note • When Instant delivery is also selected on the Options tab, each file will be sent as it is created. Xerox DocuMate 4790 User’s Guide… -
Page 121
For example, if you scan 12 pages and 3 are blank, the total number of images counted for the job separation will be 9 not 12. Xerox DocuMate 4790 User’s Guide… -
Page 122: Scanning With Optical Character Recognition (Ocr)
The One Touch OmniPage Module or the OmniPage Pro software must be installed on your computer in order to use the OCR options with the One Touch software and your Xerox scanner. The One Touch OmniPage Module was automatically installed when you installed your driver from the installation disc.
-
Page 123: Text Formats
The specific file format is the file name extension on the text format icon. The specific text format; this example is for Rich Text Format (.rtf). To select a file type for the text format: Select the Destination Application. Xerox DocuMate 4790 User’s Guide…
-
Page 124
Excel Spreadsheet—The .xls file format used by Microsoft Excel. HTML Document—The .htm file format used to create web pages. Searchable PDF—The .pdf file format used by Adobe Acrobat. This format converts scanned text into PDF with an invisible text layer for searching. Xerox DocuMate 4790 User’s Guide… -
Page 125
Scans with Use MRC selected may take slightly longer to complete the processing. Select Use MRC for documents with harder-to-read text or lower-quality graphics to get the best possible scan output image. The Use MRC option is available for sPDF and PDF. Xerox DocuMate 4790 User’s Guide… -
Page 126: Selecting One Touch Omnipage Ocr Options
Select a Destination Application that has one of the text format file types as the page format, such as Microsoft Word or WordPad. Right-click on the page format icon to see the menu. Choose OCR Options from the menu. The OCR Properties window opens with the OCR tab selected. Xerox DocuMate 4790 User’s Guide…
-
Page 127: The Ocr Tab
The OCR engine does not automatically correct misspelled words that were present in the original document. When dictionaries are selected, the terms in those dictionaries are used to check the spelling. If this is option is not selected, User Dictionaries and Professional Dictionaries cannot be selected. Xerox DocuMate 4790 User’s Guide…
-
Page 128: Creating Your Own Dictionaries
These options will now apply to the OCR processing when you select any text format as the page format. Creating Your Own Dictionaries You can create multiple dictionaries for your personal use. For example, you might have different dictionaries for separate work projects, especially if each project uses different acronyms and terminology. Xerox DocuMate 4790 User’s Guide…
-
Page 129
Now open the OCR Options window. On the OCR Options window, click the button next to the menu arrow. The User Dictionary Files window opens and shows the available dictionaries. MyDictionary is an example of a user dictionary. Xerox DocuMate 4790 User’s Guide… -
Page 130: Editing User Dictionaries
It does not affect the original text file you created with the list of words. Editing User Dictionaries Once a dictionary has been added to the list of user dictionaries, its list of words can be edited. Xerox DocuMate 4790 User’s Guide…
-
Page 131
Select the file that has the words you want to add to your user dictionary. Importing will add the entire list of words in a file to the user dictionary. Click Import. The file’s words will be added to your user dictionary list. Xerox DocuMate 4790 User’s Guide… -
Page 132: The Format Tab
The file is exported as a formatted dictionary with the .ud filename extension so it can be opened by other programs. The Format Tab The options on the Format tab window are for setting the input and output formats for the scanned documents. Xerox DocuMate 4790 User’s Guide…
-
Page 133
• No Formatting (NF)—The document will be plain text, one column, left-aligned in a single font and font size. You can then export the plain text to nearly all file types and target applications. Xerox DocuMate 4790 User’s Guide… -
Page 134
The Spreadsheet output option is only available for documents scanned with the XLS format. Click OK or Apply. These options will now apply to the OCR processing when you select any text format as the page format. Xerox DocuMate 4790 User’s Guide… -
Page 135: One Touch With Kofax Vrs Technology
One Touch with Kofax VRS Technology The One Touch software you received with your Xerox scanner now includes the Kofax® Virtual ReScan® (VRS™) technology. This application has a set of features for improving and enhancing the quality of scanned documents, especially documents that would usually produce poorer quality images.
-
Page 136
AutoDeskew—Select this option to have the software automatically determine if a page is skewed, then straighten its image. If the page is scanned at too great an angle, the image may not straighten correctly. In that case, re-scan the page. Xerox DocuMate 4790 User’s Guide… -
Page 137: The Professional Features
AutoCrop, AutoDeskew, or Edge Cleanup is selected on the VRS Settings tab. The Professional Features If you upgrade your scanner’s VRS software to the VRS Professional version, the Professional Features shown at the bottom of the window become active. Xerox DocuMate 4790 User’s Guide…
-
Page 138
This option recognizes a document’s background color and makes sure it is a smooth, solid color. Background Smoothing is not available for Black&White scan configurations. Xerox DocuMate 4790 User’s Guide… -
Page 139: Scanning From Twain
One Touch configuration you are using is set to Configure Before Scan, and the selected option is TWAIN, the TWAIN interface opens right away when pressing the button on your scanner without opening any other TWAIN-compliant software first. Xerox DocuMate 4790 User’s Guide…
-
Page 140: Accessing The Twain Interface
Setup Wizard. • Adobe Software: Depending on the application you can “Create a file” then select the scanner as your creation source, or “Import a Picture” and select the scanner as your import from source. Xerox DocuMate 4790 User’s Guide…
-
Page 141: Configurations Tab
After clicking the Export button, you will be prompted for a file name and a location to save the profile. Choose a location on your computer where you will be able to find it. Xerox DocuMate 4790 User’s Guide…
-
Page 142
Delete—on the Configurations tab, select a profile from the list then click on the Delete button to remove that profile. Summary—this section lists some of the details of the current scan profile. These are the options found on the Scan Settings, Document Settings, and Image Enhancements tabs. Xerox DocuMate 4790 User’s Guide… -
Page 143: Scan Settings Tab
100-150 dpi will create an image of similar quality to the original. When making copies of color documents, 150-200 dpi will create an image of similar quality to the original. Higher resolutions are generally used for creating an image that can be enlarged without losing image quality. Xerox DocuMate 4790 User’s Guide…
-
Page 144
The scanner will only detect control sheets that are face-up in the document stack when scanning in Single-sided mode. • When scanning in Double-sided mode, the scanner will look for the control sheet data on both sides of the paper. Xerox DocuMate 4790 User’s Guide… -
Page 145
When you are finished scanning all pages, press the Simplex/Duplex buttons to stop the scanner, click the Abort button in the progress window, or simply let the timer run out. Xerox DocuMate 4790 User’s Guide… -
Page 146: Document Settings Tab
You can bypass the stop, without correcting the problem, by pressing the DFS (Double Feed Skip) button on the scanner, or by clicking Continue in the message box on-screen. You can stop the scan job completely by pressing the Simplex/Duplex buttons on the scanner simultaneously. Xerox DocuMate 4790 User’s Guide…
-
Page 147
The patch code should be a minimum of 9 mm long for best results. • The scanner can detect Kodak patch codes 2, 3, and T. There are various types of patch code sheets available on the scanner’s installation disc for you to print and use. Xerox DocuMate 4790 User’s Guide… -
Page 148: Image Enhancements Tab
JPEG images. After the image transfer is complete, the images are compiled and saved to your selected file format in the scanning application you are using. This option improves scan speeds when scanning at higher resolutions. Xerox DocuMate 4790 User’s Guide…
-
Page 149
This option works well when scanning items that have both text and graphics, such as marketing brochures. After selecting this technique, both sub-options for Threshold and Dither will be available. Xerox DocuMate 4790 User’s Guide… -
Page 150
Full Color Black and White Bayer Dither 64 Steps Close-up of Bayer Dither Dynamic Threshold—move the slider to the left or right to set the level of lightness or darkness for the scanner to leverage from. Xerox DocuMate 4790 User’s Guide… -
Page 151
Dark. This tells the scanner that the level to look for is dark, only very dark areas such as text are converted to black pixels. • The threshold option in this section individually looks at each page and applies the threshold if the software determines that it is needed. Xerox DocuMate 4790 User’s Guide… -
Page 152: Imprinter(S) Tab
You should set the paper size on the Scan Settings tab before adjusting the Vertical start position. Click on the label “mm” or “inches” to switch between the two units of measurement. Xerox DocuMate 4790 User’s Guide…
-
Page 153
{#0b}—inserts the step number with “0” padding the number based on the selected number of Counter digits. {YY/MM/DD}—inserts the current date in the 2-digit Year/Month/Day format (11/01/31). {YYYY/MM/DD}—inserts the current date in the 4-digit Year/Month/Day format (2011/01/31). {MM/DD/YY}—inserts the current date in the Month/Day/2-digit Year format (01/31/11). Xerox DocuMate 4790 User’s Guide… -
Page 154
With the Counting digit: 6, Starting number: 500, and Step value: 2 The resulting printed character string for a pre-imprinter on 4 pages scanned would be: • Scanned 11/01/31 — 000500 • Scanned 11/01/31 — 000502 • Scanned 11/01/31 — 000504 • Scanned 11/01/31 — 000506 Xerox DocuMate 4790 User’s Guide… -
Page 155: About Tab
The Front and Back background color displays the current side of the background plate. • The Scanner memory shows the total amount of installed memory in the scanner. Click the Refresh button to update the information in this window. Xerox DocuMate 4790 User’s Guide…
-
Page 156
Xerox DocuMate 4790 User’s Guide… -
Page 157: Scanning From Wia
Scanning from Microsoft’s Paint application uses the interface described in this section. Other applications may access the advanced WIA interface available with Windows Vista and Windows 7. Please refer to the Windows help for instructions on using WIA. Xerox DocuMate 4790 User’s Guide…
-
Page 158: Scan Using Wia From Microsoft Paint
From the File menu choose From Scanner or Camera. The scan window opens. Use this window to select scanning options and start the scan process. Click on the color mode appropriate for the item you are scanning. Place a document in the scanner. Xerox DocuMate 4790 User’s Guide…
-
Page 159
Click on the Scan button in the WIA interface. The scanner starts scanning. The scanned image will appear in Microsoft Paint (or other WIA application you’re using). Xerox DocuMate 4790 User’s Guide… -
Page 160: Fine Tuning Your Scans
Higher dpi settings take longer to scan and produce larger files for the scanned images. Picture type—Click the menu arrow and choose the most appropriate type for the item you’re scanning. Click OK. The Custom Settings button is now set to scan with the options you selected. Xerox DocuMate 4790 User’s Guide…
-
Page 161: Scanning From Isis
Note that the ISIS interface for each application varies depending on the application. Please refer to that software application’s User Guide for instructions on scanning the ISIS interface. The QuickScan User’s Guide is available on the installation disc that you received with the scanner. Xerox DocuMate 4790 User’s Guide…
-
Page 162: Accessing The Isis Interface In Quickscan
The ISIS drivers were installed correctly during the installation of your scanner. The Scanner Selection dialog box will then appear. Select Xerox DocuMate 4790 from the list of scanners and click OK. Your scanner is then ready to work with the ISIS driver.
-
Page 163: Scanner Options, Maintenance And Troubleshooting
Xerox DocuMate 4790 Specifications on page 194 • Xerox DocuMate 4790 Scanner Parts List on page 195 This section contains information on hardware options available for your scanner, the scanner User Utility, maintenance instructions, troubleshooting, uninstalling, scanner specifications, and spare parts.
-
Page 164: Changing The Background Color
Locate the background plates in the top and bottom of the scanner. Press gently on the background and roll it to switch between black and white. The bar will click when it is in place. Xerox DocuMate 4790 User’s Guide…
-
Page 165
Carefully close the scanner when you are finished. Xerox DocuMate 4790 User’s Guide… -
Page 166: Replacing The Rollers
Turn off the scanner power then unplug the power cord from the scanner. Pull the cover release handle and open the scanner. When you are done replacing the rollers, close the scanner carefully pressing down on both sides of the cover until it locks in place. Do not slam down the cover. Xerox DocuMate 4790 User’s Guide…
-
Page 167: Replacing The Feed Roller Module
Align the end of the plastic end on the right side of the roller module with the slot in the roller compartment. Make sure the flat side of the roller tip is aligned properly with the slot in the scanner. Xerox DocuMate 4790 User’s Guide…
-
Page 168: Replacing The Double Feed Prevention Roller
Replacing the Double Feed Prevention Roller Pull up on the double feed prevention roller cover and remove it from the scanner. Set the cover aside and make sure nothing is set on the cover as it will break. Xerox DocuMate 4790 User’s Guide…
-
Page 169
Make sure the flat side of the roller tip is aligned properly with the slot in the scanner. Carefully insert the gear end into the scanner and angle the roller down into the left side of the compartment. Xerox DocuMate 4790 User’s Guide… -
Page 170
10. Press gently on the compartment cover to lock in the scanner. Make sure this cover is fully closed as it may break and cause damage to the scanner if it is not properly in place. Xerox DocuMate 4790 User’s Guide… -
Page 171: Installing An Imprinter
Gently press down on the imprinter unit until it clicks in place. Connect the cable to the connection port in the scanner. Close the pre-imprinter door when you are finished. Xerox DocuMate 4790 User’s Guide…
-
Page 172: Installing An Ink Cartridge
Insert the ink cartridge into the carriage as shown in the diagram. Lower the arms on the carriage to lock the ink cartridge in place. Reverse this procedure to remove the ink cartridge when it is time to be replaced. Xerox DocuMate 4790 User’s Guide…
-
Page 173: Adjusting The Printing Position
You set the horizontal start position by moving the ink carriage in the imprinter unit itself. Move the ink carriage left or right and align the arrow tab to the appropriate paper width indicated on the imprinter unit. The vertical start position is set in the scanning interface you are using. Xerox DocuMate 4790 User’s Guide…
-
Page 174: User Utility
User Utility The User Utility is a software program designed to help maintain and troubleshoot your Xerox scanner. On installation you were prompted to place an icon on your Windows desktop. If you selected yes, simply double-click on the user utility icon to open the software.
-
Page 175: Scanner Error Codes
If an error occurs during scanning the LCD will display an error code and you can use the User Utility to troubleshoot and resolve the issue. The User Utility displays an error code and message in the Scanner Status field. The following table lists the codes, messages, possible causes and common resolutions. Xerox DocuMate 4790 User’s Guide…
-
Page 176
ADF and click Retry to continue as it was pulled into the scanner. U30 — U34 A cover is open. A scanner access cover is Verify all covers on the scanner are fully open. closed before scanning. Xerox DocuMate 4790 User’s Guide… -
Page 177
Plug the USB cable and power cable back into the scanner. Turn the scanner back on. If you are still unable to scan, contact Xerox Technical Support. Please refer to the Techni- cal Support Card you received with the scan- ner for contact information. -
Page 178: Setting Sleep Mode
To prepare for shading adjustment: • Clean the scanner rollers, image sensors, glass and reference plates, as described in the section Cleaning the Inside of the Scanner on page 183. Xerox DocuMate 4790 User’s Guide…
-
Page 179
When prompted to clean the scanner click on OK to proceed only if you have already cleaned the scanner during preparation. Otherwise, follow the instructions on screen and clean the scanner. Xerox DocuMate 4790 User’s Guide… -
Page 180
Change both the front and back scanning background reference plates to black then click on OK. Note: Do not place the Shading Paper in the scanner. The Shading Paper is not used for the black background shading adjustment. Xerox DocuMate 4790 User’s Guide… -
Page 181
On the main window click on the User Shading… button. Click on the Restore Default button. Click on OK to restore the factory default adjustment. When the adjustment has been restored, click on OK to close the User Utility shading restore window. Xerox DocuMate 4790 User’s Guide… -
Page 182: Cleaning The Outside Of The Scanner
If there is any accumulation of dust in the indentations around the buttons, use the blower brush to gently brush away the dust. When you’re finished, press the power button to turn the scanner back on. Xerox DocuMate 4790 User’s Guide…
-
Page 183: Cleaning The Inside Of The Scanner
When cleaning the inside of the scanner, you should clean all of the rollers, scanner glass and background plates at the same time. • Use scissors to open the roller cleaning paper bag, cutting across the dotted line. Xerox DocuMate 4790 User’s Guide…
-
Page 184: Cleaning The Adf Rollers
Pull on the scanner cover release and lift the lid to open the scanner. The following illustration shows where the rollers are located in the scanner. Use a roller cleaning paper to clean all of the rollers indicated in the illustration. Xerox DocuMate 4790 User’s Guide…
-
Page 185: Reset The Roller Count In The User Utility
The following illustration shows the location of the glass and background plates in the top and bottom of the scanner. The background plates are rollers that you can rotate to change from black to white. While cleaning the background plates, rotate the bars to clean the entire surface. Xerox DocuMate 4790 User’s Guide…
-
Page 186: Cleaning The Paper Sensors
Note: Do not clean the sensors with the roller cleaning paper. Preparation • Turn off the scanner prior to cleaning the sensors. • Locate the Blower Brush accessory that was provided with your scanner, this is what you will use to clean the sensors. Xerox DocuMate 4790 User’s Guide…
-
Page 187: Cleaning The Adf Sensors
Remove the brush tip from the Blower Brush and set it aside, you will be using only the blower to clean the sensors. Cleaning the ADF Sensors Pull on the scanner cover release and lift the lid to open the scanner. The following illustration shows the location of the sensors in the scanner. Xerox DocuMate 4790 User’s Guide…
-
Page 188
Point the tip of the blower at the sensor and squeeze the blower to direct a puff of air at the sensor head to remove dust. Do this for each sensor in the scanner. Xerox DocuMate 4790 User’s Guide… -
Page 189: Clearing Paper Jams
Remove the jammed page from the scanner. Close the ADF door and continue scanning. To reduce the number of paper jams, smooth and straighten the paper before scanning and adjust the paper guides to the paper size. Xerox DocuMate 4790 User’s Guide…
-
Page 190: Troubleshooting
Make sure Xerox DocuMate 4790 is the selected scanner. Problem: The scanned images are of poor quality. What do I do? There are various reasons why the scanned image is of poor quality.
-
Page 191
The «Skip Blank Originals» result will vary based on the DPI range and paper weight. Generally 100 dpi or 150 dpi produces the best results. Xerox DocuMate 4790 User’s Guide… -
Page 192
After scanning is complete and your file has been saved, turn the auto-protect feature back on. You do not need to close the Anti-SpyWare software. Xerox DocuMate 4790 User’s Guide… -
Page 193: Uninstalling Your Scanner
Uninstalling Your Scanner To uninstall the Xerox DocuMate scanner, remove the scanner software, and any other scanning software provided with the scanner. When uninstalling the scanner driver or One Touch, please leave the scanner’s USB cable plugged into the computer. Unplug the USB cable from the computer after the software uninstall program closes.
-
Page 194: Xerox Documate 4790 Specifications
Xerox DocuMate 4790 Specifications Optical resolution 600 dpi Bit depth 24-bit color, 8-bit grayscale, 1-bit bitonal (black & white) Scan method Duplex Automatic Document Feeder (ADF) ADF specifications Maximum item size 12″ x 100″ (305 mm x 2540 mm) Minimum item size 1.9″…
-
Page 195: Xerox Documate 4790 Scanner Parts List
Xerox DocuMate 4790 Scanner Parts List Please use the following part names and numbers when ordering replacements for your scanner. Part Name Part Number Roller Exchange Kit 70-0565-000 • Double Feed Prevention Roller • Feed Roller Module USB Cable 35-0113-000 Power Cord 35-0233-000 (U.S.)
-
Page 196
Xerox DocuMate 4790 User’s Guide… -
Page 197: Regulatory Information
Regulatory Information This chapter includes: • Basic Regulations on page 198 • Copy Regulations on page 200 Xerox DocuMate 4790 User’s Guide…
-
Page 198: Basic Regulations
Medical (ISM) equipment, the external radiation from ISM equipment may have to be limited or special mitigation measures taken. Changes and modifications to this equipment not specifically approved by Xerox may void the user’s authority to operate this equipment. Shielded cables must be used with this equipment to maintain compliance with FCC regulations.
-
Page 199: Other Regulations
A full declaration of conformity, defining the relevant directives and referenced standards, can be obtained from your Xerox Limited representative or by contacting: Environment, Heath and Safety The Document Company Xerox Bessemer Road Welwyn Garden City Herts AL7 1HE England, Telephone +44 (0) 1707 353434…
-
Page 200: Copy Regulations
Further information of these provisions may be obtained from the Copyright Office, Library of Congress, Washington, D.C. 20559. Ask for Circular R21. Certificates of Citizenship or Naturalization. (Foreign Naturalization Certificates may be photographed.) Passports. (Foreign Passports may be photographed.) Immigration Papers. Draft Registration Cards. Xerox DocuMate 4790 User’s Guide…
-
Page 201: Canada
The above list is provided for your convenience and assistance, but it is not all inclusive, and no liability is assumed for its completeness or accuracy. In case of doubt, consult your solicitor. Xerox DocuMate 4790 User’s Guide…
-
Page 202: Other Countries
Copyright material or trademarks without the consent of the owner • Postage stamps and other negotiable instruments Note: This list is not inclusive and no liability is assumed for either its completeness or accuracy. In case of doubt, contact your legal counsel. Xerox DocuMate 4790 User’s Guide…
-
Page 203: Compliance Information
Compliance Information This chapter includes: • Product Recycling & Disposal on page 204 • Energy Star for the USA on page 205 Xerox DocuMate 4790 User’s Guide…
-
Page 204: Product Recycling & Disposal
Product Recycling & Disposal USA & Canada If you are managing the disposal of your Xerox product, please note that the product contains lamp(s) with mercury, and may contain lead, Perchlorate and other materials whose disposal may be regulated due to environmental considerations. The presence of these materials is fully consistent with global regulations applicable at the time that the product was placed on the market.
-
Page 205: Energy Star For The Usa
Xerox ENERGY STAR equipment is preset at the factory. Your machine will be delivered with the timer for switching to Power Save Mode from the last copy/print out, set at 15 minutes. A more detailed description of this feature can be found in the Machine Setup Section of this guide.
-
Page 206
Xerox DocuMate 4790 User’s Guide… -
Page 207
Clear Counter, 175 eMail, 58 Collate copies, 86 Error Code, 174 Color, 143 Error Codes, 175 Color Dropout, 149 error diffusion, 149, 150 Color Filter, 65 Event Forward (STI), 59, 105 Color mode, 62, 74, 158 Xerox DocuMate 4790 User’s Guide… -
Page 208
133 OCR Dictionary, 128 OCR input format, 133 OCR Options, 126 Image quality and file size, 71, 72 OCR output format, 133 JPG file format, 69 OCR tab, 127 OmniPage® Pro, 40, 139 One Touch Xerox DocuMate 4790 User’s Guide… -
Page 209
Start Shading, 179 Resolution, 62, 74, 143, 160 Status light, 190 Rich Text Format, 124 Sti event forwarding, 59 RTF file format, 56, 122 Still Image Client, 105 rtf file format, 124 Storage and CD-R/W, 58 Xerox DocuMate 4790 User’s Guide… -
Page 210
130 new, 128 User Guides, 42 User Shading, 175, 179 User Utility, 174 Waiting Time, 178 Watermark, 65 Advanced settings, 160 WIA interface, 74, 157 Windows Image Acquisition, 157 Word Document, 124 Xerox DocuMate 4790 User’s Guide…
- Manuals
- Brands
- Xerox Manuals
- Scanner
- Xerox DocuMate 4790
- User manual
-
Contents
-
Table of Contents
-
Troubleshooting
-
Bookmarks
Quick Links
One Touch 4.6
March 2011
05-0820-000
Xerox
DocuMate
4790
®
®
User’s Guide
Related Manuals for Xerox DocuMate 4790
Summary of Contents for Xerox DocuMate 4790
-
Page 1: Xerox Documate 4790
One Touch 4.6 March 2011 05-0820-000 Xerox DocuMate 4790 ® ® User’s Guide…
-
Page 2
Design © 2011 Xerox Corporation. All rights reserved. XEROX®, XEROX and Design® and DocuMate® are registered trademarks of Xerox Corporation in the United States and/or other countries. Content © 2011 Visioneer, Inc. All rights reserved. The Visioneer brand name and OneTouch® logo are registered trademarks of Visioneer, Inc. -
Page 3: Table Of Contents
The Xerox DocuMate 4790 Scanner ……..
-
Page 4
Image Documents Properties …………108 Xerox DocuMate 4790… -
Page 5
Scanner Error Codes …………. . 175 Xerox DocuMate 4790… -
Page 6
Xerox DocuMate 4790 Scanner Parts List …….. -
Page 7: Safety
• Electrical Information on page 10 • Emergency Power Off on page 11 • Maintenance Information on page 12 • Product Safety Certification on page 13 • Environmental Health and Safety Contacts on page 14 Xerox DocuMate 4790 User’s Guide…
-
Page 8: Safety Introduction
Please read the following instructions carefully before operating the machine and refer to them as needed to ensure the continued safe operation of your machine. Your Xerox product and supplies have been designed and tested to meet strict safety requirements. These include safety agency evaluation and certification, and compliance with electromagnetic regulations and established environmental standards.
-
Page 9: Operational Safety Information
Your Xerox equipment and supplies have been designed and tested to meet strict safety requirements. These include safety agency examination, approval, and compliance with established environmental standards. To ensure the continued safe operation of your Xerox equipment, follow these safety guidelines at all times: Do These •…
-
Page 10: Electrical Information
Plug the power cable directly into a correctly grounded electrical outlet. If you are not sure whether or not an outlet is correctly grounded, consult an electrician. Do not use an adapter to connect any Xerox equipment to an electrical outlet that lacks a ground connection terminal.
-
Page 11: Emergency Power Off
Emergency Power Off If any of the following conditions occur, turn off the machine immediately and disconnect the power cable(s) from the electrical outlet(s). Contact an authorized Xerox Service Representative to correct the problem: • The equipment emits unusual odors or makes unusual noises.
-
Page 12: Maintenance Information
Do not perform any maintenance procedures unless you have been trained to do them by an authorized local dealer or unless a procedure is specifically described in the user manuals. Xerox DocuMate 4790 User’s Guide…
-
Page 13: Product Safety Certification
Product Safety Certification This product is certified by the following Agency using the Safety standards listed: Agency Standard Underwriters Laboratories Inc. UL60950-1 (USA) CSA 22.2 No. 60950-1 (Canada) IEC 60950-1 Xerox DocuMate 4790 User’s Guide…
-
Page 14: Environmental Health And Safety Contacts
Environmental Health and Safety Contacts Contact Information For more information on Environment, Health, and Safety in relation to this Xerox product and supplies, please contact the following customer help lines: USA & Canada: 1-800-828-6571 Europe: +44 1707 353 434 Xerox DocuMate 4790…
-
Page 15: Welcome
• Documentation on page 18 • The Xerox DocuMate 4790 Scanner on page 19 Your new Xerox scanner can quickly scan stacks of single-sided or double-sided pages and place their electronic images on your computer. Xerox DocuMate 4790 User’s Guide…
-
Page 16: What’s In The Box
Before proceeding, check the contents of the box. If items are missing or damaged, contact the dealer where you purchased the scanner. Shading paper Technical Support Card Quick Install Guide Xerox DocuMate 4790 Scanner USB Cable Double Feed Roller Cleaning Paper Windows™…
-
Page 17: System Requirements
The recommended settings for your monitor are: • Color quality of 16-bit or 32-bit • Resolution set to at least 800 x 600 pixels Refer to your Windows documentation for instructions on setting the color quality and resolution for the monitor. Xerox DocuMate 4790 User’s Guide…
-
Page 18: Documentation
Kofax Virtual ReScan User’s Guide—On the Installation Disc; contains detailed feature and configuration information for the VRS software. • EMC Captiva QuickScan User’s Guide—On the Installation Disc; contains detailed feature and configuration information for the QuickScan software. Xerox DocuMate 4790 User’s Guide…
-
Page 19: The Xerox Documate 4790 Scanner
The Xerox DocuMate 4790 Scanner Input tray Paper guides Paper guide ADF cover Manual feed Exit tray switch release switch Control panel Power switch Pre-Imprinter USB port Power jack door Input tray—Holds the documents in the Automatic Document Feeder for scanning.
-
Page 20
When scanning using the Simplex or Duplex button on the scanner, this button is disabled while scanning. Power switch—Turns the scanner’s power on or off. Pre-Imprinter Door—Open to access the pre-imprinter compartment. Universal Serial Bus (USB) port—Connects the scanner to the computer. Power jack—Connects the power cord to the scanner. Xerox DocuMate 4790 User’s Guide… -
Page 21: Scanner Setup
Scanner Setup This chapter includes: • Unpack the Scanner on page 22 • Install the Double Feed Prevention roller on page 24 • Connect the Scanner Power Cord on page 27 Xerox DocuMate 4790 User’s Guide…
-
Page 22: Unpack The Scanner
Always have at least two people carry the scanner, lifting the scanner up from underneath. Use a desk or table that can support the weight of the scanner, do not place the scanner on a cloth covered surface. Xerox DocuMate 4790 User’s Guide…
-
Page 23
Keep at least 15 inches of space on every side of the scanner for the input and exit tray extensions, performing maintenance, and to have sufficient air flow for ventilation. Remove all shipping tape from the top and side of the scanner. Xerox DocuMate 4790 User’s Guide… -
Page 24: Install The Double Feed Prevention Roller
Pull on the scanner cover release and lift the lid to open the scanner. Pull up on the double feed prevention roller cover and remove it from the scanner. Set the cover aside and make sure nothing is set on the cover as it will break. Xerox DocuMate 4790 User’s Guide…
-
Page 25
Press gently on the compartment cover to lock in the scanner. Make sure this cover is fully closed as it may break and cause damage to the scanner if it is not properly in place. Xerox DocuMate 4790 User’s Guide… -
Page 26
Close the scanner when you are finished. Xerox DocuMate 4790 User’s Guide… -
Page 27: Connect The Scanner Power Cord
Connect the Scanner Power Cord Select the appropriate power cord for your country. Plug the power cord into the scanner and into a wall outlet. Note: Do not turn on the scanner until after you install the software. Xerox DocuMate 4790 User’s Guide…
-
Page 28
Xerox DocuMate 4790 User’s Guide… -
Page 29: Installation
30 • Install the Software and Connect the Scanner on page 31 • Register Your Scanner on page 39 • Installing Additional Applications on page 40 • View the User Guides on page 42 Xerox DocuMate 4790 User’s Guide…
-
Page 30: Before You Begin
If you already have a scanner connected to your computer, it is recommended that you remove that scanner’s driver program prior to installing your Xerox scanner. You can remove these programs from the Windows Control Panel. Please refer to the user manual provided with your other scanner hardware for instructions about removing the driver and software for that unit.
-
Page 31: Install The Software And Connect The Scanner
Install the Software and Connect the Scanner The installation disc contains the necessary driver, and scanning software, to use your Xerox scanner. To install the software: Start Microsoft Windows and make sure that no other applications are running. Insert the installation disc into your computer’s DVD-ROM drive.
-
Page 32
Leave the default selections and click Install Now. You cannot deselect the TWAIN and Windows Driver as they are required for the scanner to work. Note: The software provided with your scanner may differ slightly from the list shown in the window. Xerox DocuMate 4790 User’s Guide… -
Page 33: Installing The Scanner Driver
The TWAIN and Windows Driver installation will start first. Click Next on the Welcome window. On the Xerox License Agreement window, read the license agreement. If you accept the terms, select I Agree then click Next. If you choose not to accept the license agreement, the installation will terminate and the scanner driver will not be installed.
-
Page 34: Connect The Usb Cable And Turn On The Power
Note: If you do not see this on-screen diagram for connecting the scanner, stop and follow the instructions below. Connect the USB Cable and Turn on the Power Remove any tape from the USB cable. Xerox DocuMate 4790 User’s Guide…
-
Page 35
Your computer recognizes that a scanner has been plugged into the USB port and automatically loads the appropriate software to run the scanner. If your computer is running Windows version XP or later, you will see a message similar to the one below. Xerox DocuMate 4790 User’s Guide… -
Page 36: User Utility Installation
Utility is a software diagnostic and maintenance software that you can use for monitoring your scanner hardware. On the Xerox User Utility License Agreement window, read the license agreement. If you accept the terms, select Yes to accept the agreement and continue with the installation.
-
Page 37: Installing The Isis Driver
The default options on this window will put the shortcut icon in your Windows All Programs list in the Xerox folder. We recommend that you keep the default options on this window and just click on Next to proceed with the installation.
-
Page 38: Installing One Touch
If you selected other software to install from the DVD the installation for that software will automatically start after you click Close on the Installation Complete window. Follow the instructions on-screen to install each application you selected. Xerox DocuMate 4790 User’s Guide…
-
Page 39: Register Your Scanner
Press Enter on your computer’s keyboard or click the option on screen to go to the web address. When the Xerox scanners web page loads click on Register Your Product. Fill in the registration form, all required fields have an asterisk (*).
-
Page 40: Installing Additional Applications
It uses an ISIS-certified driver for scanning and includes flexible job separation and barcode recognition. The Demo version lets you try the application first. Xerox DocuMate 4790 User’s Guide…
-
Page 41
Please install the ISIS driver packaged with your scanner.» This is not an error, please disregard this message and click OK. The Kofax VRS Certified ISIS® driver is installed correctly when you install it with your Xerox DocuMate scanner. -
Page 42: View The User Guides
From either of these user guide windows, click on the User guide menu button to return to the main user guide window, then select the other documentation section to view the user guides. Scanner documentation window Software documentation window Xerox DocuMate 4790 User’s Guide…
-
Page 43
When you’re finished, click Main Menu to return to the Main Menu window and click Exit. Remove the installation disc and store it in a safe place. That’s it! Installation is finished and your Xerox DocuMate 4790 is ready to scan. Xerox DocuMate 4790… -
Page 44
Xerox DocuMate 4790 User’s Guide… -
Page 45: Loading Documents To Scan
Staples and paper clips can jam the feed mechanism and scratch the internal components. Also remove any labels, stickers, or Post-It™ notes that may come off during the scanning process and get stuck in the scanner. Misuse as described here will void your scanner’s warranty. Xerox DocuMate 4790 User’s Guide…
-
Page 46: Items To Avoid Scanning
Lightweight paper such as carbon-less paper or tracing paper. • Irregular paper such as extremely thick card-stock paper, cardboard backing, documents that are glued together, paper with tabs, paper with glue residue, extremely smooth or glossy paper, and thermal or heat sensitive paper. Xerox DocuMate 4790 User’s Guide…
-
Page 47: Scanning From The Automatic Document Feeder (Adf)
Adjust the paper guide for the width of paper, and make sure the input and output trays are fully extended. Flip up the paper stop to make sure the paper stays in the output area as they are exited from the scanner. Xerox DocuMate 4790 User’s Guide…
-
Page 48
Load the documents face up with their tops into the Automatic Document Feeder. The stack of pages should not exceed the maximum height indicated on the input tray. You can now scan the documents using the scanner buttons, One Touch, or one of the other scanning interfaces. Xerox DocuMate 4790 User’s Guide… -
Page 49: Scanning Interfaces
Scanning Interfaces If you selected the recommended installation, then you have several different options to scan with your Xerox DocuMate 4790 scanner. Each method scans equally well, so use the one with appropriate options for the item you are scanning.
-
Page 50
ISIS Interface—This option uses the ISIS interface for scanning. Select the ISIS scan settings, put the document in the scanner, then click the Preview Scan button in the ISIS window. See Scanning from ISIS on page 161. Xerox DocuMate 4790 User’s Guide… -
Page 51: Scanning And Configuring One Touch
One Touch with Kofax VRS Technology on page 135 Based on the recommended full installation of the scanner driver and the Visioneer One Touch software, One Touch is your main scanning interface for using the scanner. Xerox DocuMate 4790 User’s Guide…
-
Page 52
(such as Email) and the icon of the destination (called the Destination Application) where the images will be sent when scanning is finished. The One Touch button panel shows which application the button is configured to send images to. Xerox DocuMate 4790 User’s Guide… -
Page 53: Default One Touch Settings
Imperial standard paper sizes such as 8.5” x 11”. • If Metric is the selected measurement, the default page size in each profile is based on the ISO 216 standard and the majority of the profiles will default to A4. Xerox DocuMate 4790 User’s Guide…
-
Page 54: Scan From The One Touch Button Panel
The One Touch panel is your on-screen set of controls for the scanner. From the panel you can access the hardware settings for your scanner and configure the Scan button. Click on the One Touch icon to open the panel. The Button View The Detail View The Hardware View Xerox DocuMate 4790 User’s Guide…
-
Page 55
Single-click on the detailed information to open the One Touch Properties. The Hardware View • Left-click on the scanner icon to return to the Button view. • Right-click on the scanner icon to open the scanner’s hardware properties. Xerox DocuMate 4790 User’s Guide… -
Page 56: Changing The Button Settings
Select a file format in the Select format panel. The formats are based on the type of Destination Application you select. The icon names indicate their file types. See File Formats on page 69 for more information about the available formats. Xerox DocuMate 4790 User’s Guide…
-
Page 57
Edit or Delete to change or remove them. OK/Cancel/Apply buttons—OK accepts any changes and closes the window. Apply accepts any changes but leaves the window open so you can continue making additional changes. Cancel closes the window without accepting any changes. Xerox DocuMate 4790 User’s Guide… -
Page 58: Selecting Options For One Touch
SMTP server without opening an email client application. • Storage and CD-R/W is for scanning directly to a folder on the computer, server, FTP server, SharePoint site, or to the Windows CD temp directory for burning the files to a CD. Xerox DocuMate 4790 User’s Guide…
-
Page 59
These tokens include counting numbers, date and time values, number of pages scanned, and so on. If the button name is not unique, you will see an on- screen notification that a {BatchID} and/or {#b} will be inserted into the name. Xerox DocuMate 4790 User’s Guide… -
Page 60
As each destination application link is different, there is no standard filename type you can create to use for all destinations. If you scan and the images are not grouped in the file(s) as needed, try deselecting “Use custom file naming” and then scan again. Xerox DocuMate 4790 User’s Guide… -
Page 61: Scan Configurations
We also recommend that you keep those configurations locked so they are not inadvertently deleted. That way, you will always have the factory-settings available. If you do delete or edit them, and want to get the factory pre-sets back again, you will need to uninstall then re-install your scanner. Xerox DocuMate 4790 User’s Guide…
-
Page 62: Scan Settings Tab
Resolution—Drag the slider to the right or left to adjust the dots per inch (dpi) of the resolution. The higher the dpi setting, the sharper and clearer the scanned image. However, higher dpi settings take longer to scan and produce larger files for the scanned images. Xerox DocuMate 4790 User’s Guide…
-
Page 63: Page Settings Tab
This option is only available if the scanner supports this feature. Always use the paper guides on the scanner so the page is not skewed. Skewed pages may not crop properly. Xerox DocuMate 4790 User’s Guide…
-
Page 64
6. When Skip Blank Originals is enabled, and 2 of the 3 pages in the stack are blank on one side, the total number of images counted is 4 not 6. Xerox DocuMate 4790 User’s Guide… -
Page 65: Advanced Settings Tab
Gamma value, the values at which saturation, hue, brightness and contrast affect the image are changed. It is recommended that you keep the default Gamma value or adjust this setting before adjusting the other options. This option is available for both Color and Grayscale scanning. Xerox DocuMate 4790 User’s Guide…
-
Page 66: Redaction Settings Tab
Front—This is the Simplex side of the page. The area(s) specified for the Front will only apply to the Simplex side of the page when scanning in Duplex. Therefore, if you scan 4 double-sided pages, the resulting image file(s) will have redacted areas on pages 1, 3, 5, and 7. Xerox DocuMate 4790 User’s Guide…
-
Page 67
Windows color palette. Select the color you want then click on OK. The color you selected will now display in the Color field on the Redaction Settings tab. Xerox DocuMate 4790 User’s Guide… -
Page 68
If Autorotate 90 is selected, redaction occurs after the page has been rotated. When inputting the position and area for redaction, use the measurements of the page in the landscape position. Click the name to toggle between inches and millimeters. Xerox DocuMate 4790 User’s Guide… -
Page 69: File Formats
Create single image files. Note that this option is automatically selected and disabled if you have selected a format that only supports single pages, such as BMP, PNG, GIF, JPG, or JP2. Xerox DocuMate 4790 User’s Guide…
-
Page 70: Image Formats
When scanning in color, it produces a file of similar quality and size to a BMP file. However, when scanning in Black & White, the TIF compression produces the smallest file size of all the image types without losing image quality. TIFF also supports multi-page image files. Xerox DocuMate 4790 User’s Guide…
-
Page 71
Other buttons that have JPG selected as the file format are not affected, so you can set the JPG file size/image quality independently for each button. Click OK or Apply on the One Touch Properties window. Xerox DocuMate 4790 User’s Guide… -
Page 72: Text Formats
Select a text format for documents with text or numbers, such as a business letter, report, or spreadsheet. The text format icon has several file formats available, depending on the Destination Application you select. Xerox DocuMate 4790 User’s Guide…
-
Page 73
Right-click on the text format icon. The menu options depend on the type of Destination Application you select. Choose the file type that you want for the text format. Click OK or Apply on the One Touch Properties window. Xerox DocuMate 4790 User’s Guide… -
Page 74: Configure Before Scan
Click the button you set up to use Configure Before Scan. The TWAIN Interface opens. Choose your scan settings, such as the Picture Type of Color, Grayscale or Black & White, Resolution in DPI, and Page Size. Xerox DocuMate 4790 User’s Guide…
-
Page 75
Instead of having to re-scan the entire batch, you can stop the current scan, change the picture type from Black & White to Color, then restart the scanning without losing the pages already scanned. Xerox DocuMate 4790 User’s Guide… -
Page 76: Open Scanned Document(S)
Windows documentation for instructions on associating file types. • When scanning to multiple destinations, the scanned file is still sent to the other selected destination application(s) in One Touch. Xerox DocuMate 4790 User’s Guide…
-
Page 77: Transfer To Storage
Storage Options tab and use this window to set a configuration to scan to a different folder than the one selected in the Link Properties window. Changing the options in this window only affects the configuration you are creating or modifying. All other configurations will retain their settings for this destination. Xerox DocuMate 4790 User’s Guide…
-
Page 78: Setting The Folder From Windows
When One Touch was installed, a storage option was added to the right-click menu of your Windows folders. This menu option allows you to set the Transfer to Storage folder location without opening One Touch first. Right-click on the folder you want set as the scan destination. Xerox DocuMate 4790 User’s Guide…
-
Page 79: Scanning To Multiple Folders
Then switch to another scan configuration and scan the next set of documents to store them in their folder. Setting up multiple folders for transfer to storage Using Microsoft Windows, create the folders that you want to use for storing scanned items. Xerox DocuMate 4790 User’s Guide…
-
Page 80
To help you remember which folder it is, give the new configuration a name that indicates the folder name, such as “Business Receipts.” Click the Scan Settings, Page Settings, and Advanced Settings tabs, and select the settings you want. Click the Storage Options tab. Click the Browse button. Xerox DocuMate 4790 User’s Guide… -
Page 81
11. Click OK. The new configuration is now listed as a Transfer to Storage configuration. 12. Repeat the process to create additional new configurations, such as one named “Personal Receipts.” Note: Make sure to designate separate folders as the Storage Locations for each new configuration. Xerox DocuMate 4790 User’s Guide… -
Page 82
When scanning is complete, insert the next set of documents in the scanner, then press the second button you set to scan documents and transfer them to storage. When scanning is finished, the documents are stored in the two separate folders. Xerox DocuMate 4790 User’s Guide… -
Page 83: Burn To Cd-Rom
The scanner will start scanning. When finished the file will be saved to the Windows temporary location for CD files. An information bubble will appear in the Windows notification area telling you that there are files waiting to be burned to CD. Xerox DocuMate 4790 User’s Guide…
-
Page 84
Click the Burn to CD button. The CD burner begins and your scanned documents are written to the CD. If other files are also waiting in this location, they will get written with the One Touch files on the Xerox DocuMate 4790 User’s Guide… -
Page 85: Printer Or Fax
The Properties button will be disabled in One Touch as there are no global properties for this type of destination. Select a printer or fax device, in the Select destination list, then open a Scan Configuration to modify the settings for the device you selected. Xerox DocuMate 4790 User’s Guide…
-
Page 86
For example, if the device is your printer, the dialog box is your printer’s setup settings. Note: When scanning to multiple printers and/or faxes, select the specific device, you want to configure the Advanced features for, from the list before clicking on the Advanced… button. Xerox DocuMate 4790 User’s Guide… -
Page 87: Paperport
PaperPort tab and use this window to set a configuration to scan to a different folder than the one selected in the Link Properties window. Changing the options in this window only affects the configuration you are creating or modifying. All other configurations will retain their settings for this destination. Xerox DocuMate 4790 User’s Guide…
-
Page 88
The selected folder in this list is where the scanned file will be saved when PaperPort is open and the One Touch option Scan to the current PaperPort folder is selected. Xerox DocuMate 4790 User’s Guide… -
Page 89: Sharepoint
Click on the SharePoint tab and fill in the fields with the information for your SharePoint site. • Protocol—Select which protocol you want to use to transfer the scan to the server. Xerox DocuMate 4790 User’s Guide…
-
Page 90: Sharepoint Link Log Viewer
The One Touch Link Log Viewer opens automatically when scanning is complete. Click on the menu arrow next to View logs for and select SharePoint Link from the list to display the transfer history for the SharePoint link only. Xerox DocuMate 4790 User’s Guide…
-
Page 91
Click on the Properties button to open the Log Viewer from the SharePoint One Touch Link Properties window. There are no global configuration properties for the SharePoint destination application, all configuration is done using the Scan Configuration Properties window as described in the previous section. Xerox DocuMate 4790 User’s Guide… -
Page 92: Ftp Transfer
Protocol—Select which protocol you want to use to transfer the scan to the server. • Host—Input the internet or intranet path of the server where you want to send the scanned documents. you do not need ftp:// at the beginning. For example, ftp.company.com Xerox DocuMate 4790 User’s Guide…
-
Page 93: Ftp Link Log Viewer
After you address the failure indicated in this log file, you can click the Retry button to resend the document to the server. Xerox DocuMate 4790 User’s Guide…
-
Page 94
Click on the Properties button to open the Log Viewer from the FTP One Touch Link Properties window. There are no global configuration properties for the FTP destination application, all configuration is done using the Scan Configuration Properties window as described in the previous section. Xerox DocuMate 4790 User’s Guide… -
Page 95: Smtp
Host—Input the internet or intranet path of the server where you want to send the scanned documents. For example, smtp.company.com • Port—Input which port to use with the selected protocol. Changing the selected protocol will reset this value to the appropriate default for the protocol. Xerox DocuMate 4790 User’s Guide…
-
Page 96: Smtp Link Log Viewer
After you address the failure indicated in this log file, you can click the Retry button to resend the document to the server. Xerox DocuMate 4790 User’s Guide…
-
Page 97
Click on the Properties button to open the Log Viewer from the SMTP One Touch Link Properties window. There are no global configuration properties for the SMTP destination application, all configuration is done using the Scan Configuration Properties window as described in the previous section. Xerox DocuMate 4790 User’s Guide… -
Page 98: Email Applications
Internet Options of Internet Explorer. Click on the email application that is in the list, then click on the Properties button to launch the Email One Touch Link Properties window to change the email application. Xerox DocuMate 4790 User’s Guide…
-
Page 99: Email Properties
If you changed the email application Internet Explorer, and it does not immediately appear in the Select destination list, click the Refresh button to update the destination list in One Touch. Xerox DocuMate 4790 User’s Guide…
-
Page 100: Text Editors
One Touch. Note that if you recently installed an application, click the Refresh button to see if One Touch will automatically configure the link before you try adding it manually. Xerox DocuMate 4790 User’s Guide…
-
Page 101: Text Documents Properties
This could occur if you scanned a photograph with a scanner button set for text applications. • Show message if text recognition failed—A message will open on the screen if the OCR reader does not detect text in the image. Xerox DocuMate 4790 User’s Guide…
-
Page 102: Adding Text Editor Applications To One Touch
When you select the application using the Browse button, steps 1 and 2 on the dialog box are automatically filled in, and the application icon appears in step 3. Select the icon in Step 3 of the dialog box. That is the icon that will appear in the One Touch Destination List. Xerox DocuMate 4790 User’s Guide…
-
Page 103
When you are done making changes in this window, click the Add button to accept the changes and close the window. Click OK on the Link Properties window. Click Refresh on the One Touch Properties window and the new application should now be available. Xerox DocuMate 4790 User’s Guide… -
Page 104: Creating An Html Web Page From Your Scanned Documents
Microsoft Internet Explorer, or other web browser you scanned to, then opens showing your converted page. The application’s URL field shows the location where One Touch saved the HTML files for you to locate and post to your website. Xerox DocuMate 4790 User’s Guide…
-
Page 105: Still Image Client
Open the One Touch Properties window, and select Still Image Client as the Destination Application. Choose a Scan Configuration and click OK. Start scanning using the button you selected for event forwarding. Xerox DocuMate 4790 User’s Guide…
-
Page 106
Click on OK when you are done making changes to this window. Now when you scan with Event Forwarding you will either be prompted to choose an application, or the default application you selected will open. Xerox DocuMate 4790 User’s Guide… -
Page 107: Image Editors
From this window you can add an application and set additional document handling options. Note that if you recently installed an application, click the Refresh button to see if One Touch will automatically configure the link before you try adding it manually. Xerox DocuMate 4790 User’s Guide…
-
Page 108: Image Documents Properties
• Convert Bitmaps to JPEG—JPEG files can be compressed to produce smaller file sizes and, therefore, shorter transmission times. Use this option to provide that compression capability to image files. Xerox DocuMate 4790 User’s Guide…
-
Page 109: Adding Image Editor Applications To One Touch
When you are done making changes in this window, click the Add button to accept the changes and close the window. Click OK on the Link Properties window. Click Refresh on the One Touch Properties window and the new application should now be available. Xerox DocuMate 4790 User’s Guide…
-
Page 110: Pdf Applications
Please note that any PDF application you add manually to One Touch will be classified as a “Text Based Link.” These applications will only show in the destination list when Text editing applications are enabled. Xerox DocuMate 4790 User’s Guide…
-
Page 111
When you select the application using the Browse button, steps 1 and 2 on the dialog box are automatically filled in, and the application icon appears in step 3. Select the icon in Step 3 of the dialog box. That is the icon that will appear in the One Touch Destination List. Xerox DocuMate 4790 User’s Guide… -
Page 112
When you are done making changes in this window, click the Add button to accept the changes and close the window. 10. Click OK on the Link Properties window. 11. Click Refresh on the One Touch Properties window and the new application should now be available. Xerox DocuMate 4790 User’s Guide… -
Page 113: Send To Application
Link Properties window. Changing the options in this window only affects the configuration you are creating or modifying. All other configurations will retain their settings for this destination. Xerox DocuMate 4790 User’s Guide…
-
Page 114
The scanner starts scanning and, when finished, sends the scanned file to the application you selected. Technical note After configuring this link, you may need to click Refresh in the One Touch Properties window to • show the correct application icon in the Select destination list. Xerox DocuMate 4790 User’s Guide… -
Page 115
This unique file is created at scan time and contains a list of every image in the scan job. Only select this option if you are sure that the application you are scanning to can use the job file to accept image transfer. Xerox DocuMate 4790 User’s Guide… -
Page 116: Scanning To Multiple Destinations
Click each destination where you want to send the scanned image in the Selected destinations (#) list. Click again to deselect a destination. As you click on each destination, the Selected destinations number will count so you know how many applications are selected to receive the image. Xerox DocuMate 4790 User’s Guide…
-
Page 117
For example, if you scan to a printer and to email, only the BMP file format will be available as printers can only receive an uncompressed image format. All other image formats and all text formats will be disabled until you deselect the printer. Xerox DocuMate 4790 User’s Guide… -
Page 118
The scanner starts scanning and when finished, the image is sent to each destination you selected in the One Touch Properties window. Technical Note • The Still Image Client destination cannot be used with multiple destination scanning. This destination will be disabled when the Enable scanning to multiple destinations is selected. Xerox DocuMate 4790 User’s Guide… -
Page 119: Scanning With Job Separation
Click on the Options tab in the One Touch Properties window. Click on the down arrow next to the Select Button list to select the button you want to modify. Note that the options in this window are specific to each One Touch button. Xerox DocuMate 4790 User’s Guide…
-
Page 120
When scanning is finished, each file will be sent to the destination location or application you have selected on the button tab. Technical Note • When Instant delivery is also selected on the Options tab, each file will be sent as it is created. Xerox DocuMate 4790 User’s Guide… -
Page 121
For example, if you scan 12 pages and 3 are blank, the total number of images counted for the job separation will be 9 not 12. Xerox DocuMate 4790 User’s Guide… -
Page 122: Scanning With Optical Character Recognition (Ocr)
The One Touch OmniPage Module or the OmniPage Pro software must be installed on your computer in order to use the OCR options with the One Touch software and your Xerox scanner. The One Touch OmniPage Module was automatically installed when you installed your driver from the installation disc.
-
Page 123: Text Formats
The specific file format is the file name extension on the text format icon. The specific text format; this example is for Rich Text Format (.rtf). To select a file type for the text format: Select the Destination Application. Xerox DocuMate 4790 User’s Guide…
-
Page 124
Excel Spreadsheet—The .xls file format used by Microsoft Excel. HTML Document—The .htm file format used to create web pages. Searchable PDF—The .pdf file format used by Adobe Acrobat. This format converts scanned text into PDF with an invisible text layer for searching. Xerox DocuMate 4790 User’s Guide… -
Page 125
Scans with Use MRC selected may take slightly longer to complete the processing. Select Use MRC for documents with harder-to-read text or lower-quality graphics to get the best possible scan output image. The Use MRC option is available for sPDF and PDF. Xerox DocuMate 4790 User’s Guide… -
Page 126: Selecting One Touch Omnipage Ocr Options
Select a Destination Application that has one of the text format file types as the page format, such as Microsoft Word or WordPad. Right-click on the page format icon to see the menu. Choose OCR Options from the menu. The OCR Properties window opens with the OCR tab selected. Xerox DocuMate 4790 User’s Guide…
-
Page 127: The Ocr Tab
The OCR engine does not automatically correct misspelled words that were present in the original document. When dictionaries are selected, the terms in those dictionaries are used to check the spelling. If this is option is not selected, User Dictionaries and Professional Dictionaries cannot be selected. Xerox DocuMate 4790 User’s Guide…
-
Page 128: Creating Your Own Dictionaries
These options will now apply to the OCR processing when you select any text format as the page format. Creating Your Own Dictionaries You can create multiple dictionaries for your personal use. For example, you might have different dictionaries for separate work projects, especially if each project uses different acronyms and terminology. Xerox DocuMate 4790 User’s Guide…
-
Page 129
Now open the OCR Options window. On the OCR Options window, click the button next to the menu arrow. The User Dictionary Files window opens and shows the available dictionaries. MyDictionary is an example of a user dictionary. Xerox DocuMate 4790 User’s Guide… -
Page 130: Editing User Dictionaries
It does not affect the original text file you created with the list of words. Editing User Dictionaries Once a dictionary has been added to the list of user dictionaries, its list of words can be edited. Xerox DocuMate 4790 User’s Guide…
-
Page 131
Select the file that has the words you want to add to your user dictionary. Importing will add the entire list of words in a file to the user dictionary. Click Import. The file’s words will be added to your user dictionary list. Xerox DocuMate 4790 User’s Guide… -
Page 132: The Format Tab
The file is exported as a formatted dictionary with the .ud filename extension so it can be opened by other programs. The Format Tab The options on the Format tab window are for setting the input and output formats for the scanned documents. Xerox DocuMate 4790 User’s Guide…
-
Page 133
• No Formatting (NF)—The document will be plain text, one column, left-aligned in a single font and font size. You can then export the plain text to nearly all file types and target applications. Xerox DocuMate 4790 User’s Guide… -
Page 134
The Spreadsheet output option is only available for documents scanned with the XLS format. Click OK or Apply. These options will now apply to the OCR processing when you select any text format as the page format. Xerox DocuMate 4790 User’s Guide… -
Page 135: One Touch With Kofax Vrs Technology
One Touch with Kofax VRS Technology The One Touch software you received with your Xerox scanner now includes the Kofax® Virtual ReScan® (VRS™) technology. This application has a set of features for improving and enhancing the quality of scanned documents, especially documents that would usually produce poorer quality images.
-
Page 136
AutoDeskew—Select this option to have the software automatically determine if a page is skewed, then straighten its image. If the page is scanned at too great an angle, the image may not straighten correctly. In that case, re-scan the page. Xerox DocuMate 4790 User’s Guide… -
Page 137: The Professional Features
AutoCrop, AutoDeskew, or Edge Cleanup is selected on the VRS Settings tab. The Professional Features If you upgrade your scanner’s VRS software to the VRS Professional version, the Professional Features shown at the bottom of the window become active. Xerox DocuMate 4790 User’s Guide…
-
Page 138
This option recognizes a document’s background color and makes sure it is a smooth, solid color. Background Smoothing is not available for Black&White scan configurations. Xerox DocuMate 4790 User’s Guide… -
Page 139: Scanning From Twain
One Touch configuration you are using is set to Configure Before Scan, and the selected option is TWAIN, the TWAIN interface opens right away when pressing the button on your scanner without opening any other TWAIN-compliant software first. Xerox DocuMate 4790 User’s Guide…
-
Page 140: Accessing The Twain Interface
Setup Wizard. • Adobe Software: Depending on the application you can “Create a file” then select the scanner as your creation source, or “Import a Picture” and select the scanner as your import from source. Xerox DocuMate 4790 User’s Guide…
-
Page 141: Configurations Tab
After clicking the Export button, you will be prompted for a file name and a location to save the profile. Choose a location on your computer where you will be able to find it. Xerox DocuMate 4790 User’s Guide…
-
Page 142
Delete—on the Configurations tab, select a profile from the list then click on the Delete button to remove that profile. Summary—this section lists some of the details of the current scan profile. These are the options found on the Scan Settings, Document Settings, and Image Enhancements tabs. Xerox DocuMate 4790 User’s Guide… -
Page 143: Scan Settings Tab
100-150 dpi will create an image of similar quality to the original. When making copies of color documents, 150-200 dpi will create an image of similar quality to the original. Higher resolutions are generally used for creating an image that can be enlarged without losing image quality. Xerox DocuMate 4790 User’s Guide…
-
Page 144
The scanner will only detect control sheets that are face-up in the document stack when scanning in Single-sided mode. • When scanning in Double-sided mode, the scanner will look for the control sheet data on both sides of the paper. Xerox DocuMate 4790 User’s Guide… -
Page 145
When you are finished scanning all pages, press the Simplex/Duplex buttons to stop the scanner, click the Abort button in the progress window, or simply let the timer run out. Xerox DocuMate 4790 User’s Guide… -
Page 146: Document Settings Tab
You can bypass the stop, without correcting the problem, by pressing the DFS (Double Feed Skip) button on the scanner, or by clicking Continue in the message box on-screen. You can stop the scan job completely by pressing the Simplex/Duplex buttons on the scanner simultaneously. Xerox DocuMate 4790 User’s Guide…
-
Page 147
The patch code should be a minimum of 9 mm long for best results. • The scanner can detect Kodak patch codes 2, 3, and T. There are various types of patch code sheets available on the scanner’s installation disc for you to print and use. Xerox DocuMate 4790 User’s Guide… -
Page 148: Image Enhancements Tab
JPEG images. After the image transfer is complete, the images are compiled and saved to your selected file format in the scanning application you are using. This option improves scan speeds when scanning at higher resolutions. Xerox DocuMate 4790 User’s Guide…
-
Page 149
This option works well when scanning items that have both text and graphics, such as marketing brochures. After selecting this technique, both sub-options for Threshold and Dither will be available. Xerox DocuMate 4790 User’s Guide… -
Page 150
Full Color Black and White Bayer Dither 64 Steps Close-up of Bayer Dither Dynamic Threshold—move the slider to the left or right to set the level of lightness or darkness for the scanner to leverage from. Xerox DocuMate 4790 User’s Guide… -
Page 151
Dark. This tells the scanner that the level to look for is dark, only very dark areas such as text are converted to black pixels. • The threshold option in this section individually looks at each page and applies the threshold if the software determines that it is needed. Xerox DocuMate 4790 User’s Guide… -
Page 152: Imprinter(S) Tab
You should set the paper size on the Scan Settings tab before adjusting the Vertical start position. Click on the label “mm” or “inches” to switch between the two units of measurement. Xerox DocuMate 4790 User’s Guide…
-
Page 153
{#0b}—inserts the step number with “0” padding the number based on the selected number of Counter digits. {YY/MM/DD}—inserts the current date in the 2-digit Year/Month/Day format (11/01/31). {YYYY/MM/DD}—inserts the current date in the 4-digit Year/Month/Day format (2011/01/31). {MM/DD/YY}—inserts the current date in the Month/Day/2-digit Year format (01/31/11). Xerox DocuMate 4790 User’s Guide… -
Page 154
With the Counting digit: 6, Starting number: 500, and Step value: 2 The resulting printed character string for a pre-imprinter on 4 pages scanned would be: • Scanned 11/01/31 — 000500 • Scanned 11/01/31 — 000502 • Scanned 11/01/31 — 000504 • Scanned 11/01/31 — 000506 Xerox DocuMate 4790 User’s Guide… -
Page 155: About Tab
The Front and Back background color displays the current side of the background plate. • The Scanner memory shows the total amount of installed memory in the scanner. Click the Refresh button to update the information in this window. Xerox DocuMate 4790 User’s Guide…
-
Page 156
Xerox DocuMate 4790 User’s Guide… -
Page 157: Scanning From Wia
Scanning from Microsoft’s Paint application uses the interface described in this section. Other applications may access the advanced WIA interface available with Windows Vista and Windows 7. Please refer to the Windows help for instructions on using WIA. Xerox DocuMate 4790 User’s Guide…
-
Page 158: Scan Using Wia From Microsoft Paint
From the File menu choose From Scanner or Camera. The scan window opens. Use this window to select scanning options and start the scan process. Click on the color mode appropriate for the item you are scanning. Place a document in the scanner. Xerox DocuMate 4790 User’s Guide…
-
Page 159
Click on the Scan button in the WIA interface. The scanner starts scanning. The scanned image will appear in Microsoft Paint (or other WIA application you’re using). Xerox DocuMate 4790 User’s Guide… -
Page 160: Fine Tuning Your Scans
Higher dpi settings take longer to scan and produce larger files for the scanned images. Picture type—Click the menu arrow and choose the most appropriate type for the item you’re scanning. Click OK. The Custom Settings button is now set to scan with the options you selected. Xerox DocuMate 4790 User’s Guide…
-
Page 161: Scanning From Isis
Note that the ISIS interface for each application varies depending on the application. Please refer to that software application’s User Guide for instructions on scanning the ISIS interface. The QuickScan User’s Guide is available on the installation disc that you received with the scanner. Xerox DocuMate 4790 User’s Guide…
-
Page 162: Accessing The Isis Interface In Quickscan
The ISIS drivers were installed correctly during the installation of your scanner. The Scanner Selection dialog box will then appear. Select Xerox DocuMate 4790 from the list of scanners and click OK. Your scanner is then ready to work with the ISIS driver.
-
Page 163: Scanner Options, Maintenance And Troubleshooting
Xerox DocuMate 4790 Specifications on page 194 • Xerox DocuMate 4790 Scanner Parts List on page 195 This section contains information on hardware options available for your scanner, the scanner User Utility, maintenance instructions, troubleshooting, uninstalling, scanner specifications, and spare parts.
-
Page 164: Changing The Background Color
Locate the background plates in the top and bottom of the scanner. Press gently on the background and roll it to switch between black and white. The bar will click when it is in place. Xerox DocuMate 4790 User’s Guide…
-
Page 165
Carefully close the scanner when you are finished. Xerox DocuMate 4790 User’s Guide… -
Page 166: Replacing The Rollers
Turn off the scanner power then unplug the power cord from the scanner. Pull the cover release handle and open the scanner. When you are done replacing the rollers, close the scanner carefully pressing down on both sides of the cover until it locks in place. Do not slam down the cover. Xerox DocuMate 4790 User’s Guide…
-
Page 167: Replacing The Feed Roller Module
Align the end of the plastic end on the right side of the roller module with the slot in the roller compartment. Make sure the flat side of the roller tip is aligned properly with the slot in the scanner. Xerox DocuMate 4790 User’s Guide…
-
Page 168: Replacing The Double Feed Prevention Roller
Replacing the Double Feed Prevention Roller Pull up on the double feed prevention roller cover and remove it from the scanner. Set the cover aside and make sure nothing is set on the cover as it will break. Xerox DocuMate 4790 User’s Guide…
-
Page 169
Make sure the flat side of the roller tip is aligned properly with the slot in the scanner. Carefully insert the gear end into the scanner and angle the roller down into the left side of the compartment. Xerox DocuMate 4790 User’s Guide… -
Page 170
10. Press gently on the compartment cover to lock in the scanner. Make sure this cover is fully closed as it may break and cause damage to the scanner if it is not properly in place. Xerox DocuMate 4790 User’s Guide… -
Page 171: Installing An Imprinter
Gently press down on the imprinter unit until it clicks in place. Connect the cable to the connection port in the scanner. Close the pre-imprinter door when you are finished. Xerox DocuMate 4790 User’s Guide…
-
Page 172: Installing An Ink Cartridge
Insert the ink cartridge into the carriage as shown in the diagram. Lower the arms on the carriage to lock the ink cartridge in place. Reverse this procedure to remove the ink cartridge when it is time to be replaced. Xerox DocuMate 4790 User’s Guide…
-
Page 173: Adjusting The Printing Position
You set the horizontal start position by moving the ink carriage in the imprinter unit itself. Move the ink carriage left or right and align the arrow tab to the appropriate paper width indicated on the imprinter unit. The vertical start position is set in the scanning interface you are using. Xerox DocuMate 4790 User’s Guide…
-
Page 174: User Utility
User Utility The User Utility is a software program designed to help maintain and troubleshoot your Xerox scanner. On installation you were prompted to place an icon on your Windows desktop. If you selected yes, simply double-click on the user utility icon to open the software.
-
Page 175: Scanner Error Codes
If an error occurs during scanning the LCD will display an error code and you can use the User Utility to troubleshoot and resolve the issue. The User Utility displays an error code and message in the Scanner Status field. The following table lists the codes, messages, possible causes and common resolutions. Xerox DocuMate 4790 User’s Guide…
-
Page 176
ADF and click Retry to continue as it was pulled into the scanner. U30 — U34 A cover is open. A scanner access cover is Verify all covers on the scanner are fully open. closed before scanning. Xerox DocuMate 4790 User’s Guide… -
Page 177
Plug the USB cable and power cable back into the scanner. Turn the scanner back on. If you are still unable to scan, contact Xerox Technical Support. Please refer to the Techni- cal Support Card you received with the scan- ner for contact information. -
Page 178: Setting Sleep Mode
To prepare for shading adjustment: • Clean the scanner rollers, image sensors, glass and reference plates, as described in the section Cleaning the Inside of the Scanner on page 183. Xerox DocuMate 4790 User’s Guide…
-
Page 179
When prompted to clean the scanner click on OK to proceed only if you have already cleaned the scanner during preparation. Otherwise, follow the instructions on screen and clean the scanner. Xerox DocuMate 4790 User’s Guide… -
Page 180
Change both the front and back scanning background reference plates to black then click on OK. Note: Do not place the Shading Paper in the scanner. The Shading Paper is not used for the black background shading adjustment. Xerox DocuMate 4790 User’s Guide… -
Page 181
On the main window click on the User Shading… button. Click on the Restore Default button. Click on OK to restore the factory default adjustment. When the adjustment has been restored, click on OK to close the User Utility shading restore window. Xerox DocuMate 4790 User’s Guide… -
Page 182: Cleaning The Outside Of The Scanner
If there is any accumulation of dust in the indentations around the buttons, use the blower brush to gently brush away the dust. When you’re finished, press the power button to turn the scanner back on. Xerox DocuMate 4790 User’s Guide…
-
Page 183: Cleaning The Inside Of The Scanner
When cleaning the inside of the scanner, you should clean all of the rollers, scanner glass and background plates at the same time. • Use scissors to open the roller cleaning paper bag, cutting across the dotted line. Xerox DocuMate 4790 User’s Guide…
-
Page 184: Cleaning The Adf Rollers
Pull on the scanner cover release and lift the lid to open the scanner. The following illustration shows where the rollers are located in the scanner. Use a roller cleaning paper to clean all of the rollers indicated in the illustration. Xerox DocuMate 4790 User’s Guide…
-
Page 185: Reset The Roller Count In The User Utility
The following illustration shows the location of the glass and background plates in the top and bottom of the scanner. The background plates are rollers that you can rotate to change from black to white. While cleaning the background plates, rotate the bars to clean the entire surface. Xerox DocuMate 4790 User’s Guide…
-
Page 186: Cleaning The Paper Sensors
Note: Do not clean the sensors with the roller cleaning paper. Preparation • Turn off the scanner prior to cleaning the sensors. • Locate the Blower Brush accessory that was provided with your scanner, this is what you will use to clean the sensors. Xerox DocuMate 4790 User’s Guide…
-
Page 187: Cleaning The Adf Sensors
Remove the brush tip from the Blower Brush and set it aside, you will be using only the blower to clean the sensors. Cleaning the ADF Sensors Pull on the scanner cover release and lift the lid to open the scanner. The following illustration shows the location of the sensors in the scanner. Xerox DocuMate 4790 User’s Guide…
-
Page 188
Point the tip of the blower at the sensor and squeeze the blower to direct a puff of air at the sensor head to remove dust. Do this for each sensor in the scanner. Xerox DocuMate 4790 User’s Guide… -
Page 189: Clearing Paper Jams
Remove the jammed page from the scanner. Close the ADF door and continue scanning. To reduce the number of paper jams, smooth and straighten the paper before scanning and adjust the paper guides to the paper size. Xerox DocuMate 4790 User’s Guide…
-
Page 190: Troubleshooting
Make sure Xerox DocuMate 4790 is the selected scanner. Problem: The scanned images are of poor quality. What do I do? There are various reasons why the scanned image is of poor quality.
-
Page 191
The «Skip Blank Originals» result will vary based on the DPI range and paper weight. Generally 100 dpi or 150 dpi produces the best results. Xerox DocuMate 4790 User’s Guide… -
Page 192
After scanning is complete and your file has been saved, turn the auto-protect feature back on. You do not need to close the Anti-SpyWare software. Xerox DocuMate 4790 User’s Guide… -
Page 193: Uninstalling Your Scanner
Uninstalling Your Scanner To uninstall the Xerox DocuMate scanner, remove the scanner software, and any other scanning software provided with the scanner. When uninstalling the scanner driver or One Touch, please leave the scanner’s USB cable plugged into the computer. Unplug the USB cable from the computer after the software uninstall program closes.
-
Page 194: Xerox Documate 4790 Specifications
Xerox DocuMate 4790 Specifications Optical resolution 600 dpi Bit depth 24-bit color, 8-bit grayscale, 1-bit bitonal (black & white) Scan method Duplex Automatic Document Feeder (ADF) ADF specifications Maximum item size 12″ x 100″ (305 mm x 2540 mm) Minimum item size 1.9″…
-
Page 195: Xerox Documate 4790 Scanner Parts List
Xerox DocuMate 4790 Scanner Parts List Please use the following part names and numbers when ordering replacements for your scanner. Part Name Part Number Roller Exchange Kit 70-0565-000 • Double Feed Prevention Roller • Feed Roller Module USB Cable 35-0113-000 Power Cord 35-0233-000 (U.S.)
-
Page 196
Xerox DocuMate 4790 User’s Guide… -
Page 197: Regulatory Information
Regulatory Information This chapter includes: • Basic Regulations on page 198 • Copy Regulations on page 200 Xerox DocuMate 4790 User’s Guide…
-
Page 198: Basic Regulations
Medical (ISM) equipment, the external radiation from ISM equipment may have to be limited or special mitigation measures taken. Changes and modifications to this equipment not specifically approved by Xerox may void the user’s authority to operate this equipment. Shielded cables must be used with this equipment to maintain compliance with FCC regulations.
-
Page 199: Other Regulations
A full declaration of conformity, defining the relevant directives and referenced standards, can be obtained from your Xerox Limited representative or by contacting: Environment, Heath and Safety The Document Company Xerox Bessemer Road Welwyn Garden City Herts AL7 1HE England, Telephone +44 (0) 1707 353434…
-
Page 200: Copy Regulations
Further information of these provisions may be obtained from the Copyright Office, Library of Congress, Washington, D.C. 20559. Ask for Circular R21. Certificates of Citizenship or Naturalization. (Foreign Naturalization Certificates may be photographed.) Passports. (Foreign Passports may be photographed.) Immigration Papers. Draft Registration Cards. Xerox DocuMate 4790 User’s Guide…
-
Page 201: Canada
The above list is provided for your convenience and assistance, but it is not all inclusive, and no liability is assumed for its completeness or accuracy. In case of doubt, consult your solicitor. Xerox DocuMate 4790 User’s Guide…
-
Page 202: Other Countries
Copyright material or trademarks without the consent of the owner • Postage stamps and other negotiable instruments Note: This list is not inclusive and no liability is assumed for either its completeness or accuracy. In case of doubt, contact your legal counsel. Xerox DocuMate 4790 User’s Guide…
-
Page 203: Compliance Information
Compliance Information This chapter includes: • Product Recycling & Disposal on page 204 • Energy Star for the USA on page 205 Xerox DocuMate 4790 User’s Guide…
-
Page 204: Product Recycling & Disposal
Product Recycling & Disposal USA & Canada If you are managing the disposal of your Xerox product, please note that the product contains lamp(s) with mercury, and may contain lead, Perchlorate and other materials whose disposal may be regulated due to environmental considerations. The presence of these materials is fully consistent with global regulations applicable at the time that the product was placed on the market.
-
Page 205: Energy Star For The Usa
Xerox ENERGY STAR equipment is preset at the factory. Your machine will be delivered with the timer for switching to Power Save Mode from the last copy/print out, set at 15 minutes. A more detailed description of this feature can be found in the Machine Setup Section of this guide.
-
Page 206
Xerox DocuMate 4790 User’s Guide… -
Page 207
Clear Counter, 175 eMail, 58 Collate copies, 86 Error Code, 174 Color, 143 Error Codes, 175 Color Dropout, 149 error diffusion, 149, 150 Color Filter, 65 Event Forward (STI), 59, 105 Color mode, 62, 74, 158 Xerox DocuMate 4790 User’s Guide… -
Page 208
133 OCR Dictionary, 128 OCR input format, 133 OCR Options, 126 Image quality and file size, 71, 72 OCR output format, 133 JPG file format, 69 OCR tab, 127 OmniPage® Pro, 40, 139 One Touch Xerox DocuMate 4790 User’s Guide… -
Page 209
Start Shading, 179 Resolution, 62, 74, 143, 160 Status light, 190 Rich Text Format, 124 Sti event forwarding, 59 RTF file format, 56, 122 Still Image Client, 105 rtf file format, 124 Storage and CD-R/W, 58 Xerox DocuMate 4790 User’s Guide… -
Page 210
130 new, 128 User Guides, 42 User Shading, 175, 179 User Utility, 174 Waiting Time, 178 Watermark, 65 Advanced settings, 160 WIA interface, 74, 157 Windows Image Acquisition, 157 Word Document, 124 Xerox DocuMate 4790 User’s Guide…
| Другие темы раздела | |
|
Сканеры Сетевой сканер Fujitsu-Siemens ScanSnap N1800 не могу подключить сетевой принтер https://www.cyberforum.ru/ scanners/ thread1277809.html Сетевой сканер Fujitsu-Siemens ScanSnap N1800 не могу подключить сетевой принтер KYOCERA FS-9530DN , оба устройства находятся в домене (Сервер 2008 р2) при подключении он его находит, но при… |
Сканеры Разрешающая способность протяжного сканера Всем привет! Имеется сканер plustek smartoffice PS406U. На сайте производится написано, что сей девайс умеет сканировать в разрешении 600dpi. Однако в таком разрешении сканер выдает изображения… |
|
Сканеры Стандартная программа сканирования на ноутбуке Всем здравствуйте! С недавнего времени мучает проблема сканирования на ноутбуке. Раньше всё работало, но в один прекрасный день перестало. Суть проблемы: стандартная программа отказывается… https://www.cyberforum.ru/ scanners/ thread1260968.html |
Сканеры Сканер не видится программами, драйвера стоят Доброго времени суток ЛЮДИ очень нужна помощь Сканер как всегда не нужен не нужен а потом как приспичит Сканер Lide 30 Canon Поставил дрова вроде встали https://www.cyberforum.ru/ scanners/ thread1248612.html |
|
Сканеры Konica Minolta bizhub 215 При сканировании с автоподатчика Konica Minolta bizhub 215 через finereader 11 документа формата А4, в настройках везде выставлено А4, содержимое уменьшается на 70-60%, куда копать?, изменения… |
Сканеры Сканирование в сетевую папку Sharp MX-2610N Здравствуйте! Есть МФУ SHARP MX-2610N. Необходимо настроить сканирование в сетевые шары. Настроить нужно так, чтобы не приходилось каждый раз вводить путь, а можно было бы выбрать из уже заранее… https://www.cyberforum.ru/ scanners/ thread1224234.html |
|
Сканеры HP LaserJet 3400 C перестал реагировать на кнопки При нажатии на кнопку сканирования на ПК никакой реакции, программа сканирования CmdTwain. Раньше при нажатии начинал сканировать, но после некоторых манипуляций в реестре, а именно повесил на кнопку… https://www.cyberforum.ru/ scanners/ thread1222634.html |
Периодически появляется полоса на отсканированном изображении Сканеры Здравствуйте! Периодически обнаруживаю, что на отсканированном изображении появляется тонкая горизонтальная полоса, которой нет на оригинале. После повторной попытки сканирования эта полоса может… |
|
Сканеры Не сканирует через программу Здравствуйте! Сканер: Xerox Documate 4790. Проблема следующего характера: при сканировании (в формате *tiff) больших пачек (и не только больших) через прогу PaperPort постоянно выдает ошибку, что… https://www.cyberforum.ru/ scanners/ thread1202428.html |
Сканеры Не хочет сканировать МФУ canon 3228 https://www.cyberforum.ru/ scanners/ thread1199693.html При попытке сканировать выдает 2 ошибки. Драйвера переустановить пробовал. Провод поменял. Как принтер работает. http://radikall.com/images/2014/06/05/tNaYy.th.jpg… |
|
Сканеры Работа со слайд-сканером Если у кого есть такой опыт, откликнитесь. |
Сканеры Сканирование по сети https://www.cyberforum.ru/ scanners/ thread1183901.html Это сканер и принтер canon i-sensys mf4040 в одном лице. в инструкции этого принтера написано, что сканирование по сети не поддерживается…… пробовала RemoteScan,blindscanner ничего не поняла,… |