Ошибка 0x80190001 в Xbox в основном является ошибкой входа в систему и часто возникает при попытке войти в консоль Xbox. Если вы столкнулись с этим кодом ошибки и не знаете, как решить эту проблему, прочитайте и примените решения, описанные в этой статье.
Прежде чем перейти к решениям, обязательно дважды проверьте свою учетную запись Xbox. Если вы позаимствовали чужую учетную запись Microsoft для игры, вам лучше связаться с ними и снова получить учетные данные. В противном случае вы продолжаете получать один и тот же код ошибки независимо от того, скольким решениям вы следуете.
Исправлено — Ошибка входа в Xbox 0x80190001
Чтобы устранить ошибку входа в Xbox 0x80190001, попробуйте указанные ниже исправления и посмотрите, решат ли они эту проблему.
1] Выключите и снова включите консоль Xbox.
Всякий раз, когда вы сталкиваетесь с проблемами при запуске или входе в Xbox, первое, что вы должны сделать, — это выключить и снова включить консоль. Это перезагрузит игровую консоль и при этом устранит вероятные причины. Давайте узнаем, как выключить и снова включить консоль Xbox —
- Нажмите и удерживайте кнопку Xbox, пока консоль полностью не выключится.
- Подождите несколько секунд, а затем отсоедините все кабели питания, подключенные к нему.
- Подождав еще 2-3 минуты, снова подключите силовые кабели к исходным точкам.
- Теперь нажмите кнопку Xbox, чтобы запустить его.
Проверьте, не сталкиваетесь ли вы с ошибкой 0x80190001 при входе в свою учетную запись Xbox. Если ошибка не устранена, попробуйте следующий набор решений, обсуждаемых ниже.
2] Удалите свою учетную запись из Xbox.
Вы должны войти в Xbox, используя официальную учетную запись Microsoft. Поскольку отключение питания не решает проблему, вам лучше удалить свою учетную запись с консоли Xbox. Для этого выполните следующие действия:
- Нажмите кнопку Xbox один раз, чтобы войти в его Руководство.
- Выберите «Профиль и система», а затем «Настройки» на левой панели.
- Перейти к
Account > Remove accountsследующему. - Выберите учетную запись, с которой у вас возникают проблемы со входом.
- Нажмите кнопку Удалить рядом.
- Консоль может предложить «если вы хотите удалить свою учетную запись?».
- Нажмите «Удалить» и подождите, пока ваша учетная запись выйдет из консоли Xbox.
Теперь, когда вы удалили свою учетную запись, повторно добавьте ее, следуя приведенным ниже инструкциям.
- Запустите консоль Xbox, нажав кнопку питания.
- Перейдите в «Профиль и система», а затем «Добавить» или выберите «Добавить новый«.
- Используйте свои учетные данные Microsoft для входа в свою учетную запись.
- Следуйте инструкциям на экране, чтобы завершить добавление учетной записи на игровую консоль.
3] Настройте параметры антивируса
Обычно двух вышеуказанных решений, т. е. выключения питания Xbox и повторного добавления учетной записи Microsoft, достаточно для устранения кода ошибки 0x80190001. Это не сработает, только если ваш брандмауэр или антивирус говорят об обратном. Временно отключите брандмауэр или систему безопасности Windows на своем ПК и посмотрите, решит ли это проблему.
Что такое WWAHost.exe и должен ли он работать в Windows?
Известно, что брандмауэр Windows блокирует файлы, которые он считает поврежденными или считает вредоносными. WWAHost.exe — это исполняемый файл в Windows, который должен оставаться запущенным в фоновом режиме для запуска консоли Xbox. Зайдите и проверьте, разрешен ли этот файл в интерфейсе брандмауэра. Если это не так, вам нужно разрешить компьютеру запускать этот процесс в фоновом режиме.
Вы можете найти этот файл в расположении ниже –
C:WindowsSystem32
4] Изменить дату и время
Часто ошибка 0x80190001 просто возникает из-за того, что дата и время на вашем компьютере не совпадают с вашей региональной датой и временем. Если вы намеренно изменили его, измените его обратно, чтобы он соответствовал дате и времени вашей локали. Перезагрузите компьютер и проверьте, можете ли вы теперь войти в консоль Xbox.
5] Очистить альтернативный MAC-адрес
Несколько пользователей сообщили, что им удалось исправить этот код ошибки, когда они очистили альтернативный MAC-адрес на своих консолях. Вы также можете попробовать это решение и проверить, устранена ли проблема впоследствии. Чтобы очистить альтернативный MAC-адрес в консоли Xbox, выполните следующие действия:
- Запустите руководство, нажав кнопку Xbox.
- Внутри него выберите «Настройки» и перейдите к следующему —
All Settings > Network > Network Settings > Advanced Settings
- Найдите и выберите опцию — Альтернативный MAC-адрес.
- Когда это расширится, нажмите «Очистить«.
Консоль Xbox предложит перезагрузить консоль. Что ж, сделайте то же самое, и ошибка 0x80190001 устранится автоматически.
Как исправить ошибки входа в Xbox?
Ошибки входа в Xbox возникают по разным причинам в консоли. Вы можете решить эту проблему, просто выключив питание игровой консоли. Если ошибка возникает снова, проверьте и измените дату и время, удалите и снова добавьте свою учетную запись Microsoft или очистите альтернативный MAC-адрес.
Rostov Papa
9.11.2021
Некоторые игры из стора ставятся только на системный диск
Ответить
Развернуть ветку
Rostov Papa
9.11.2021
Недавно качал 3 и 4, не хотят ставиться никуда кроме системного
Ответить
Развернуть ветку
Deckard
9.11.2021
Месяца 3 назад ставил и 3 и 4 на диск д. Недели 2 назад перенёс обе на освободившееся место на диске ц, который у меня ссд. Работали и там и там. Хз о чём ты.
Ответить
Развернуть ветку
Viktor Folderwin
9.11.2021
Там просто бывает если были игры из стора и ты переустановил систему то ранее созданные папки не дают создать новые системные , а так как они защищены их сходу и не удалить
Ответить
Развернуть ветку
Аккаунт удален
9.11.2021
Комментарий недоступен
Ответить
Развернуть ветку
Предвыборный ихтиандр
9.11.2021
1. Написать в техподдержку
2.
Ответить
Развернуть ветку
luffyjuzz
9.11.2021
Че то были проблемы с дисками, и путями установки.
Ответить
Развернуть ветку
Viktor Folderwin
9.11.2021
У меня такая фигня была после переустановки винды , папки под старые игры остались и новые не могли создаться так как владелец был другой и замениться не могли , пришлось владельца менять и удалять
Ответить
Развернуть ветку
Игорь Бычок
9.11.2021
Я исправил данную байду тем, что увеличил системный диск, я так понял он временные файлы по-любому качает на него и ему нужно было место, а сами игры ставятся уже на любой диск. Но это моë решение, не факт что поможет
Ответить
Развернуть ветку
Bo4ka
9.11.2021
У меня была проблема с переносом игр с геймпасса на другой диск, вроде ошибка та же. Нужно зайти в Параметры в windows > Система > Память . Снизу выбрать — «Изменить место сохранения нового содержимого» и поменять диск для приложений. Правда это на windows 10, может на 11 немного по другому.
Ответить
Развернуть ветку
Читать все 17 комментариев
За последнее время было замечено увеличение количества обсуждений об ошибке 0x80190001. Данный баг не является чем то новый в истории Windows. Похоже на то, он буквально перебрался из сервисов Центра обновления Windows, где располагался ранее, в Windows Store, а порой он может появиться даже на Xbox.
На самом деле, появления ошибки 0x80190001 в Windows Store и Центре обновления Windows связаны между собой. Если Windows Store не удается нормально функционировать, загрузка последних обновления будет заблокирована или временно ограничена.
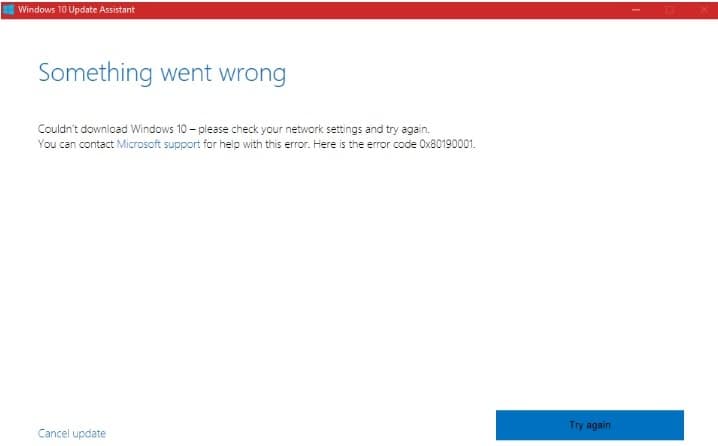
Множество пользователей столкнулись с этой ошибкой во время перехода с Windows 7 до Windows 10. Однако, с недавнего времени данная ошибка начала донимать преимущественно пользователей на Windows 10. Когда система ищет самые последние обновления, процесс поиска застревает и, со временем, вылетает с ошибкой 0x80190001.
Плохая новость заключается в том, что ни Майкрософт, ни другие официальные источники все еще не осведомлены об этой проблеме. Хорошая новость заключается в том, что в Интернете все же можно найти несколько методов, которые могут справиться с ошибкой 0x80190001.
Прежде чем мы перейдем к этим методам, давайте перечислим несколько действий, которые были бы неплохо выполнить перед ними:
- Просканируйте систему на наличие вирусных и вредоносных угроз.
- Запустите встроенную в систему утилиту по устранению проблем.
- Временно отключите антивирусное обеспечение.
Содержание
- Методы для решения ошибки 0x80190001
- Метод №1 Использования средства для создания установочного носителя
- Метод №2 Загрузка нужного обновления вручную
- Метод №3 Использование команд DISM и SFC
- Метод №4 Проверка корректности настроек даты и времени
Методы для решения ошибки 0x80190001
Метод №1 Использования средства для создания установочного носителя
Если вы столкнулись с ошибкой 0x80190001 при попытке обновиться с Windows 7 до Windows 10, то вы должны попробовать воспользоваться Средством для создания установочного носителя.
- Пройдите на официальный сайт Майкрософт и загрузите оговариваемое средством к себе на компьютер.
- Скачав средство, запустите его исполнительный файл – MediaCreationTool.exe.
- Нажмите на кнопку «Принять», как только перед вами появится запрос об уведомлениях и условиях лицензии.
- Далее выберите опцию «Обновить этот ПК» и нажмите «Далее». Также не забудьте выбрать опцию «Сохранить личные данные и приложения». Если вы этого не зделаете, то вся ваша личная информация будет стерта во время процесса обновления.
- И наконец-то, нажмите на кнопку «Установить» и дождитесь окончания процесса.
Метод №2 Загрузка нужного обновления вручную
Если ошибка 0x80190001 появляется во время установки самого последнего патча или обновления безопасности для Windows 10, то вы можете попробовать выполнить нужное обновление вручную.
- Нажмите комбинацию Win+I и перейдите в раздел «Обновление и безопасность».
- Кликните на ссылку «Центр обновления Windows» и найдите последнее обновление KB. Копируйте номер нужного вам обновления в буфер обмена или же запишите его куда-то, что использовать в дальнейшем.
- Перейдите на веб-ресурс Каталога Центра обновления Майкрософт и вставьте номер обновления в поисковую строку, а затем нажмите Enter.
- Кликните на ссылку для скачивания нужного обновления, дождитесь его загрузки на свой компьютер.
- Откройте загруженное обновление и запустите процесс обновления.
В этом варианте, никакой ошибки 0x80190001 возникнуть не должно.
Метод №3 Использование команд DISM и SFC
- Нажмите правой кнопкой мыши на Пуск и выберите «Командная строка(Администратор)».
- Как только откроется строка, вставляйте в нее следующие команды и нажимайте после каждой из них Enter:
- DISM.exe /Online /Cleanup-image /Restorehealth
- sfc /scannow
Метод №4 Проверка корректности настроек даты и времени
- Нажмите Win+S.
- Впишите в поисковую строку «Изменение даты и времени».
- Включите параметры «Установить время автоматически» и «Автоматическая установка часового пояса».
- Сохраните изменения и закройте окно с настройками.
На данный момент, это все методы решения для проблемы в виде ошибки 0x80190001, и мы надеемся, что хотя бы какой-то из них смог вам справиться с ней.
If you are receiving the error code 0x80190001 while signing in to your account on Xbox, the solutions provided in this article may help you fix the problem. All the games that you purchase from Xbox and the data of games that you play are saved on your registered account. Therefore, if you are not able to sign in to your account on Xbox, you will not be able to play your games. The same issue is experienced by the users who are getting 0x80190001 Xbox sign-in error.
If you are encountering the 0x80190001 Xbox sign-in error, try the solutions written below:
- Power Cycle your Xbox Console
- Remove your account from the Xbox Console and add it again
- Clear alternate MAC address
- Check your Firewall settings
- Check your date and time
Below, we have explained all these fixes in detail.
1] Power Cycle your Xbox Console
Most of the issues on an Xbox can be fixed simply by Power Cycling the console. Hence, if you are unable to sign in to your account on your Xbox Console, the first step is to Power Cycle your console. The following steps will guide you on this:
- Press and hold the Xbox button on your Xbox console for up to 10 settings or until the console shuts down completely.
- Unplug all the power cables from the console and wait for up to 5 minutes.
- Plug all the power cables back in and turn on your Xbox Console.
- Press the Xbox Console power button to turn it on.
Now, check if you are able to log in to your account. If not, try the next solution.
2] Remove your account from the Xbox Console and add it again
If after Power Cycling the Xbox Console, the issue persists, the next step is to remove your account from the console and add it again. Go through the following instructions:
- Press the Xbox button to open the guide.
- Go to “Profile & system > Settings > Account > Remove accounts.”
- Select the account that you want to remove.
- Click Remove to confirm.
After removing your account from the Xbox Console, follow the steps below to add it again.
- Press the Xbox button to open the guide.
- Go to “Profile & system > Add or switch > Add new.”
- Enter your account details and select Enter.
- Now, type your password and click Enter.
- Follow the on-screen instructions to add your account.
3] Clear alternate MAC address
Clearing the alternate MAC address is one of the effective ways to solve the issues on an Xbox Console. You can try this method if Power Cycling the Xbox Console fails to resolve the issue. The steps to clear alternate MAC address are as follows:
- Press the Xbox button to open the guide.
- Go to “Settings > All Settings > Network > Network Settings > Advanced Settings.”
- Now, select Alternate MAC Address.
- Select Clear.
- After that, you will be prompted to restart your Xbox Console. Select Restart.
After clearing the alternate MAC address on your Xbox Console, the problem should get fixed.
4] Check your Firewall and antivirus settings
If after trying the above three solutions, the problem still persists, your Firewall or antivirus might be causing the trouble. To check this, turn off your Firewall or antivirus temporarily, and then check if you can log in to your Xbox account. If yes, you can do one thing, temporarily disable your Firewall and antivirus while playing games on Xbox and enable them again after playing the games.
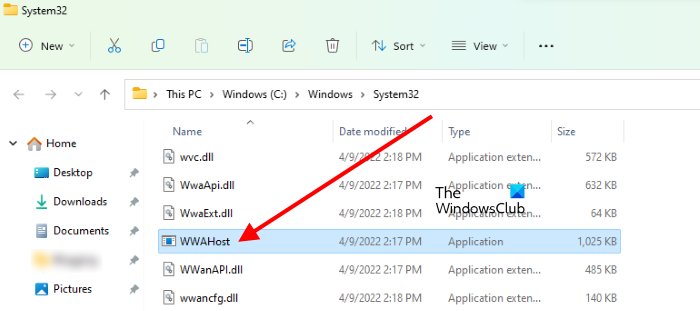
Some users have found that their antivirus or Firewall was blocking a process named WWAHost.exe. When they allowed the WWAHost.exe process in Firewall or antivirus, the issue was solved. You can also try this. Allow the WWAHost.exe process in Windows Firewall or your third-party Firewall and check if it helps. WWAHost.exe is a process in Windows operating systems that is required by some apps to run properly. If this process is blocked, the apps depending on it will not work properly.
To locate the WWAHost.exe, go to the following location on your system:
C:WindowsSystem32
5] Check your date and time
If your computer is not displaying the correct date and time, you will experience several issues with your system and apps running on it. Hence, change your date and time if it is incorrect. After changing the date and time, restart your system.
This should fix the problem.
Read: Fix Error 0x80270300 on Xbox One Console.
How do you fix the sign-in error on Xbox One?
To fix the sign-in error, first, check your date and time. If the date and time are correct, temporarily disable your antivirus and Firewall, and then check if you can log in to Xbox One. If yes, your Firewall or antivirus is the culprit. Other effective methods to resolve the sign-in issues on Xbox One are Power Cycling the Xbox Console, removing the account from Xbox Console and then adding it again, and clearing the alternate MAC address.
How do I fix Xbox 360 error 0x80070005?
If you see the error code 0x80070005 on Xbox, it means there might be an issue with the Xbox Live service or with the app or game that you are trying to launch. To fix this error, first, visit the Xbox Status page and check if there is a problem with their servers. If yes, wait till Microsoft resolves this problem.
If the Xbox Status page shows all services up and running, the problem is from your side. Now, Power Cycle your Xbox Console and see if it helps. You can also try uninstalling and reinstalling the problematic game or app, or resetting your Xbox Console.
Hope this helps.
Read next: Fix Xbox Error Code 0x8b0500B6.
Если вы получаете код ошибки 0x80190001 при входе в свою учетную запись на Xbox, решения, представленные в этой статье, могут помочь вам устранить проблему. Все игры, которые вы покупаете у Xbox, и данные игр, в которые вы играете, сохраняются в вашей зарегистрированной учетной записи. Поэтому, если вы не можете войти в свою учетную запись на Xbox, вы не сможете играть в свои игры. С той же проблемой сталкиваются пользователи, которые получают ошибку входа в Xbox 0x80190001.
Если вы столкнулись с ошибкой входа в Xbox 0x80190001, попробуйте решения, описанные ниже:
- Выключите и снова включите консоль Xbox
- Удалите свою учетную запись с консоли Xbox и добавьте ее снова.
- Очистить альтернативный MAC-адрес
- Проверьте настройки брандмауэра
- Проверьте дату и время
Ниже мы подробно объяснили все эти исправления.
1]Выключите и снова включите консоль Xbox.
Большинство проблем на Xbox можно решить, просто выключив и выключив питание консоли. Следовательно, если вы не можете войти в свою учетную запись на консоли Xbox, первым шагом будет включение и выключение консоли. Следующие шаги помогут вам в этом:
- Нажмите и удерживайте кнопку Xbox на консоли Xbox до 10 настроек или до полного отключения консоли.
- Отсоедините все кабели питания от консоли и подождите до 5 минут.
- Снова подключите все кабели питания и включите консоль Xbox.
- Нажмите кнопку питания консоли Xbox, чтобы включить ее.
Теперь проверьте, можете ли вы войти в свою учетную запись. Если нет, попробуйте следующее решение.
2]Удалите свою учетную запись из консоли Xbox и добавьте ее снова.
Если после включения и выключения консоли Xbox проблема не устранена, следующим шагом будет удаление вашей учетной записи с консоли и ее повторное добавление. Выполните следующие инструкции:
- Нажмите кнопку Xbox, чтобы открыть руководство.
- Перейдите в «Профиль и система > Настройки > Учетная запись > Удалить учетные записи».
- Выберите учетную запись, которую хотите удалить.
- Нажмите Удалить для подтверждения.
После удаления вашей учетной записи из консоли Xbox выполните следующие действия, чтобы добавить ее снова.
- Нажмите кнопку Xbox, чтобы открыть руководство.
- Перейдите в «Профиль и система > Добавить или переключиться > Добавить новый».
- Введите данные своей учетной записи и нажмите Enter.
- Теперь введите свой пароль и нажмите Enter.
- Следуйте инструкциям на экране, чтобы добавить свою учетную запись.
3]Очистить альтернативный MAC-адрес
Очистка альтернативного MAC-адреса — один из эффективных способов решения проблем на консоли Xbox. Вы можете попробовать этот метод, если перезагрузка консоли Xbox не решает проблему. Шаги для очистки альтернативного MAC-адреса следующие:
- Нажмите кнопку Xbox, чтобы открыть руководство.
- Перейдите в «Настройки»> «Все настройки»> «Сеть»> «Настройки сети»> «Дополнительные настройки».
- Теперь выберите Альтернативный MAC-адрес.
- Выберите Очистить.
- После этого вам будет предложено перезапустить консоль Xbox. Выберите «Перезагрузить».
После очистки альтернативного MAC-адреса на консоли Xbox проблема должна быть устранена.
4]Проверьте настройки брандмауэра и антивируса.
Если после того, как вы попробовали три вышеуказанных решения, проблема не устранена, проблема может быть вызвана вашим брандмауэром или антивирусом. Чтобы проверить это, временно отключите брандмауэр или антивирус, а затем проверьте, можете ли вы войти в свою учетную запись Xbox. Если да, вы можете сделать одну вещь: временно отключить брандмауэр и антивирус во время игры на Xbox и снова включить их после игры.
Некоторые пользователи обнаружили, что их антивирус или брандмауэр блокирует процесс с именем WWAHost.exe. Когда они разрешили процесс WWAHost.exe в брандмауэре или антивирусе, проблема была решена. Вы также можете попробовать это. Разрешите процесс WWAHost.exe в брандмауэре Windows или стороннем брандмауэре и проверьте, помогает ли это. WWAHost.exe — это процесс в операционных системах Windows, который требуется некоторым приложениям для правильной работы. Если этот процесс заблокирован, приложения, зависящие от него, не будут работать должным образом.
Чтобы найти WWAHost.exe, перейдите в следующую папку в вашей системе:
C:WindowsSystem325]Проверьте дату и время
Если ваш компьютер не отображает правильную дату и время, вы столкнетесь с рядом проблем с вашей системой и работающими на ней приложениями. Следовательно, измените дату и время, если они неверны. После изменения даты и времени перезагрузите систему.
Это должно решить проблему.
Читайте: исправьте ошибку 0x80270300 на консоли Xbox One.
Как исправить ошибку входа на Xbox One?
Чтобы исправить ошибку входа, сначала проверьте дату и время. Если дата и время указаны правильно, временно отключите антивирус и брандмауэр, а затем проверьте, можете ли вы войти в Xbox One. Если да, виноват ваш брандмауэр или антивирус. Другими эффективными способами решения проблем со входом в Xbox One являются включение и выключение консоли Xbox, удаление учетной записи из консоли Xbox и повторное ее добавление, а также очистка альтернативного MAC-адреса.
Как исправить ошибку Xbox 360 0x80070005?
Если вы видите код ошибки 0x80070005 на Xbox, это может означать, что проблема может быть связана со службой Xbox Live или с приложением или игрой, которую вы пытаетесь запустить. Чтобы исправить эту ошибку, сначала посетите Страница состояния Xbox и проверьте, есть ли проблема с их серверами. Если да, подождите, пока Microsoft решит эту проблему.
Если на странице состояния Xbox отображаются все запущенные службы, проблема на вашей стороне. Теперь включите и снова включите консоль Xbox и посмотрите, поможет ли это. Вы также можете попробовать удалить и переустановить проблемную игру или приложение или сбросить настройки консоли Xbox.
Надеюсь это поможет.
Читать дальше: исправьте код ошибки Xbox 0x8b0500B6.
Your antivirus software might be interfering with the PC update
by Madalina Dinita
Madalina has been a Windows fan ever since she got her hands on her first Windows XP computer. She is interested in all things technology, especially emerging technologies… read more
Published on October 10, 2022
Reviewed by
Vlad Turiceanu

Passionate about technology, Windows, and everything that has a power button, he spent most of his time developing new skills and learning more about the tech world. Coming… read more
- Error code 0x80190001 is one of the most common Windows update failures from older Windows OS to the latest.
- The error can prevent you from downloading new updates, leading to compatibility and security issues.
- One of the quick ways to fix the issue is to disable your antivirus software when updating your PC.
XINSTALL BY CLICKING THE DOWNLOAD FILE
This software will repair common computer errors, protect you from file loss, malware, hardware failure and optimize your PC for maximum performance. Fix PC issues and remove viruses now in 3 easy steps:
- Download Restoro PC Repair Tool that comes with Patented Technologies (patent available here).
- Click Start Scan to find Windows issues that could be causing PC problems.
- Click Repair All to fix issues affecting your computer’s security and performance
- Restoro has been downloaded by 0 readers this month.
Installing the latest updates on your Windows computer may take longer than expected.
That happens because various technical issues and errors can either block or limit the update process. Regarding update errors, we have provided fixes for notable ones like Windows 10 update error 0x8007042B.
Now, it is another notorious one in error 0x80190001 that is hindering Windows users from updating their PCs. Here’s how one user describes it:
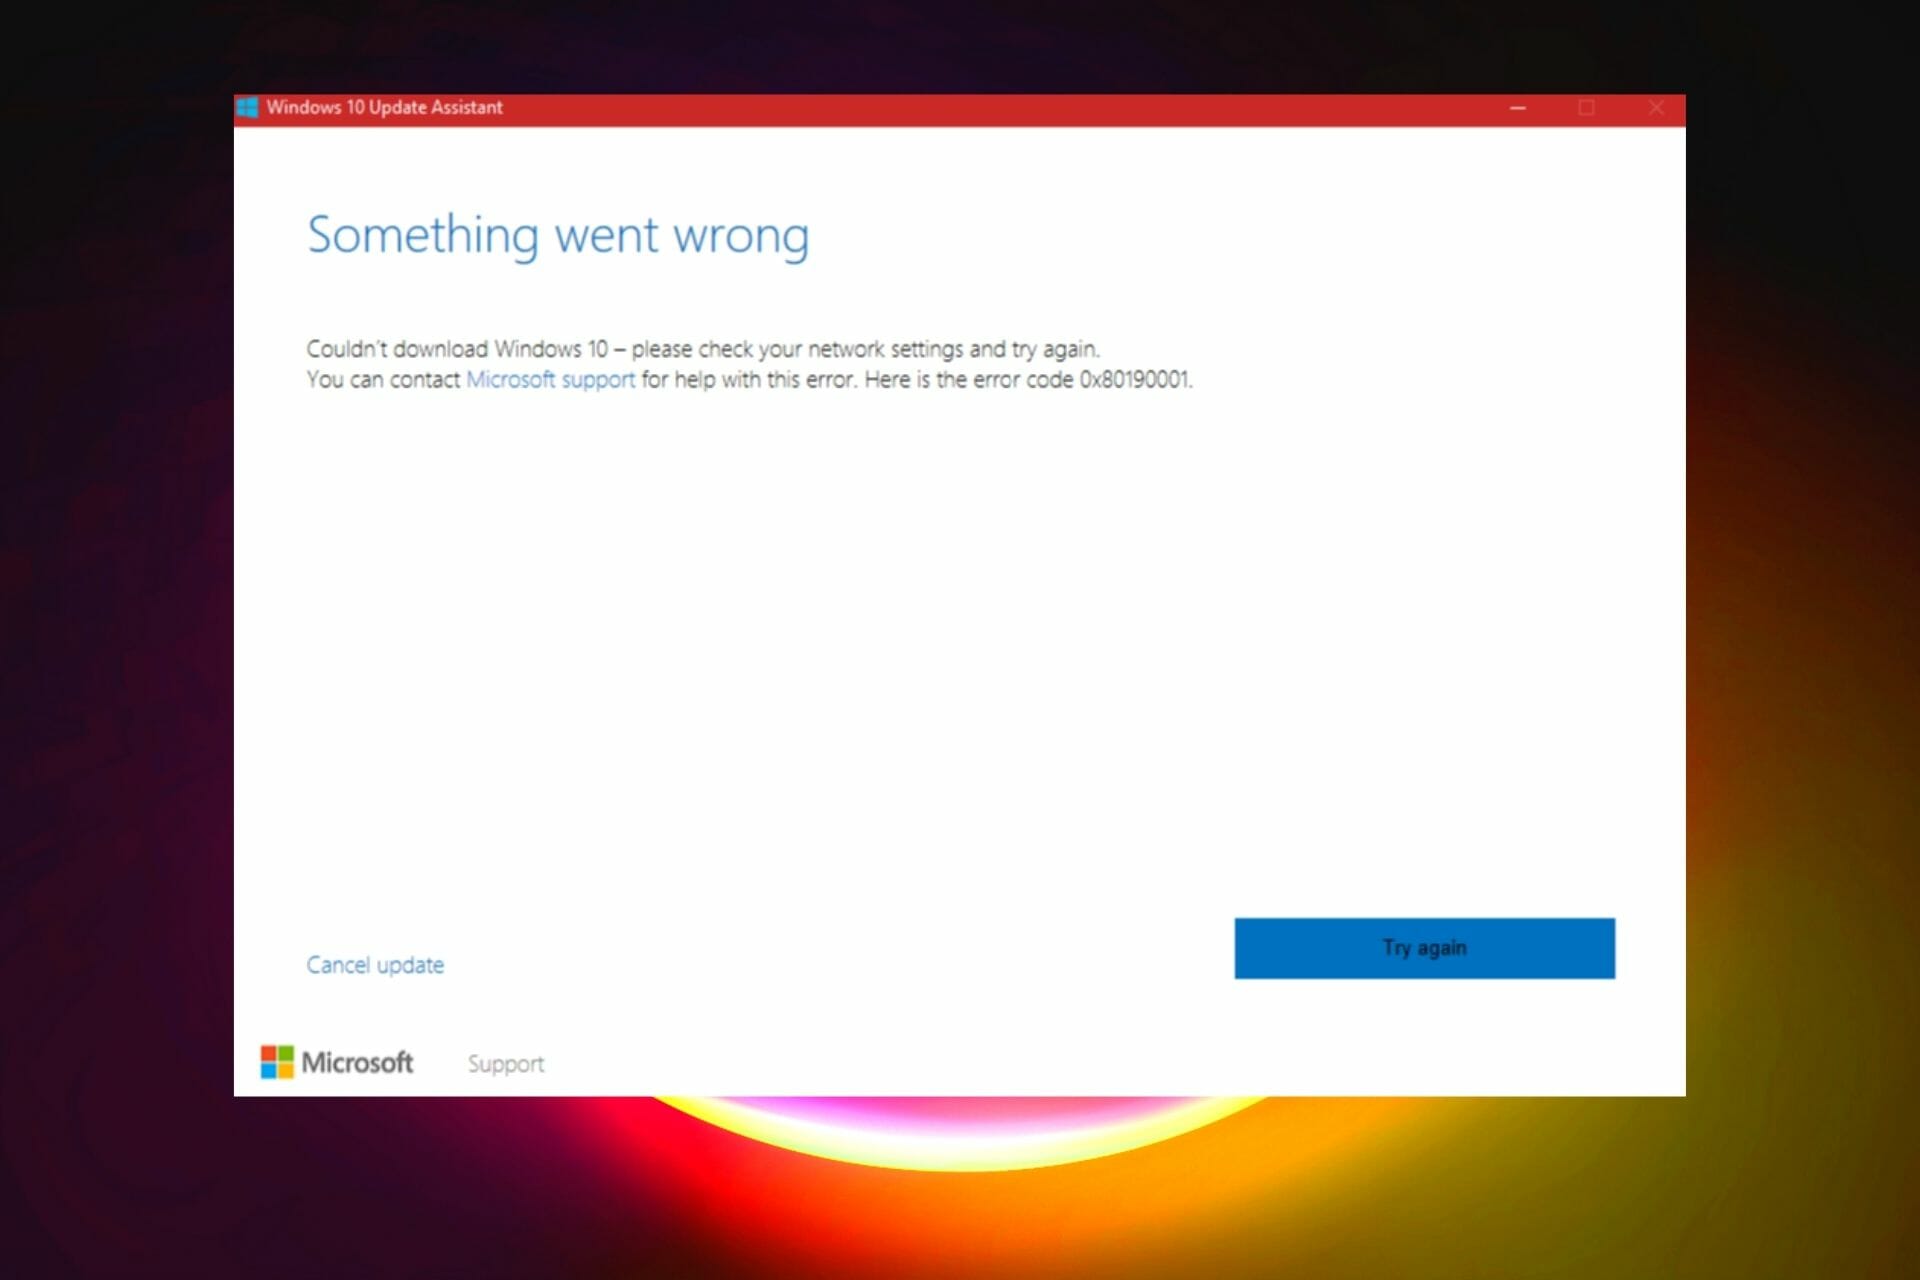
Upgrading to windows 10 from windows 7 pro. Repeatedly getting error code 0x80190001 after waiting a long time for the download. There is also a message to check network settings.
Troubleshooter couldn’t find any problems so I removed myself from the home group. Made no difference.
This error affects every version of Windows. For example, many users have reported that error 0x80190001 blocks the Creators Update install.
Error 0x80190001 can prevent you from downloading new updates, leading to compatibility and security issues. This guide will show you to fix the error with ease.
How do I fix the error code 0x80190001?
- How do I fix the error code 0x80190001?
- 1. Run the Update Troubleshooter
- 3. Disable your Internet connection
- 4. Check your antivirus
- 5. Disconnect all peripherals
- 6. Download and install the update manually
- 7. Make sure your date and time are correct
- 8. Perform a Clean boot
- 9. Perform an in-place upgrade
- How can I fix error code 0x80190001 on Windows 11?
- Why does the Windows Update error 0x80190001 appear?
- How do I do a factory reset with Windows 10?
1. Run the Update Troubleshooter
- Press the Windows key + I to open the Settings app.
- Now go to the Update & Security section.
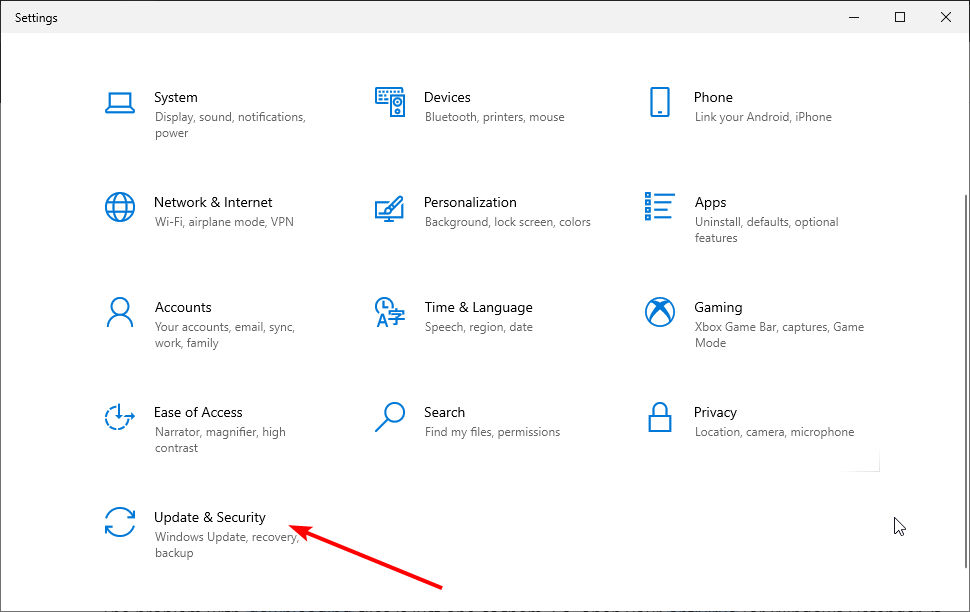
- Select Troubleshoot from the menu on the left.
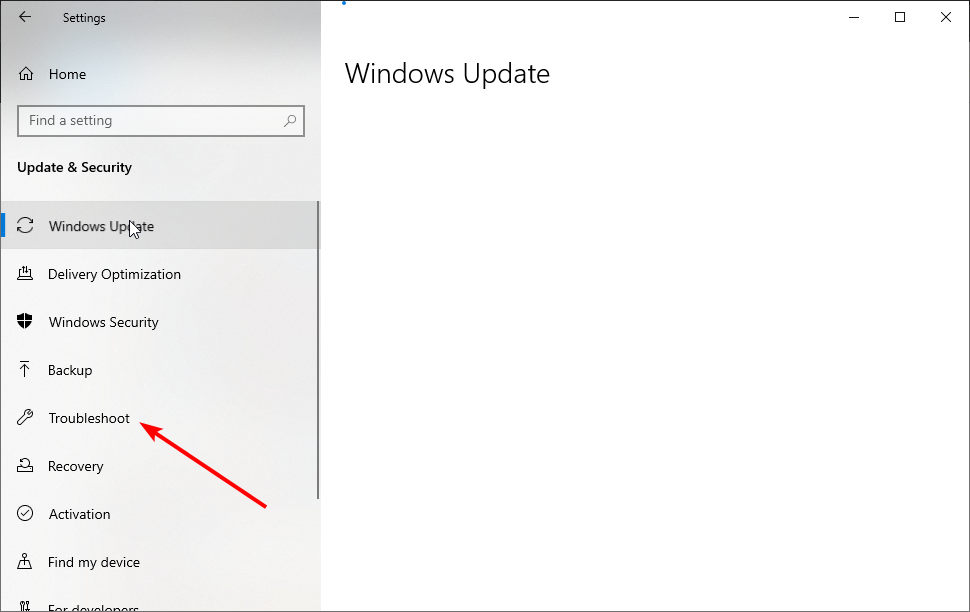
- Choose the Additional troubleshooters option.
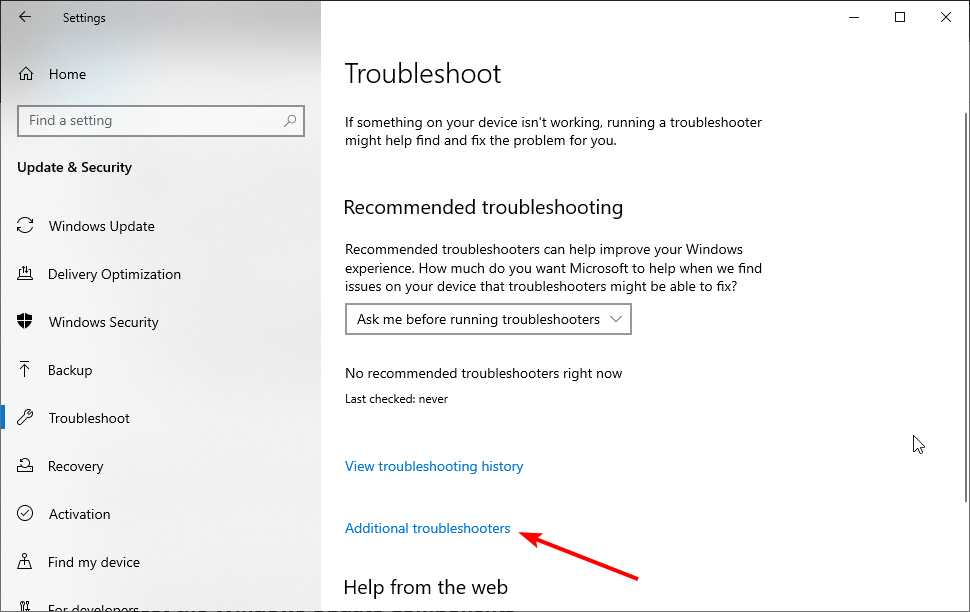
- Now, select Windows Update.
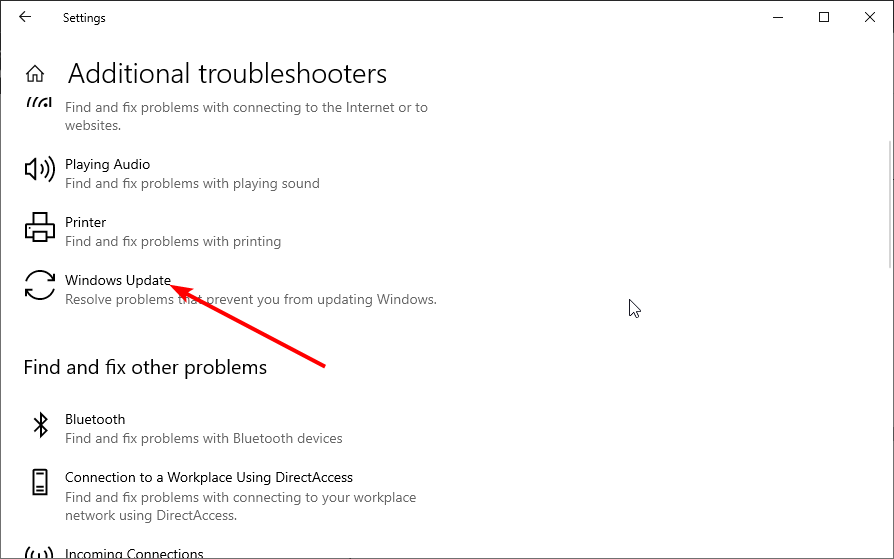
- Finally, click the Run the troubleshooter button.
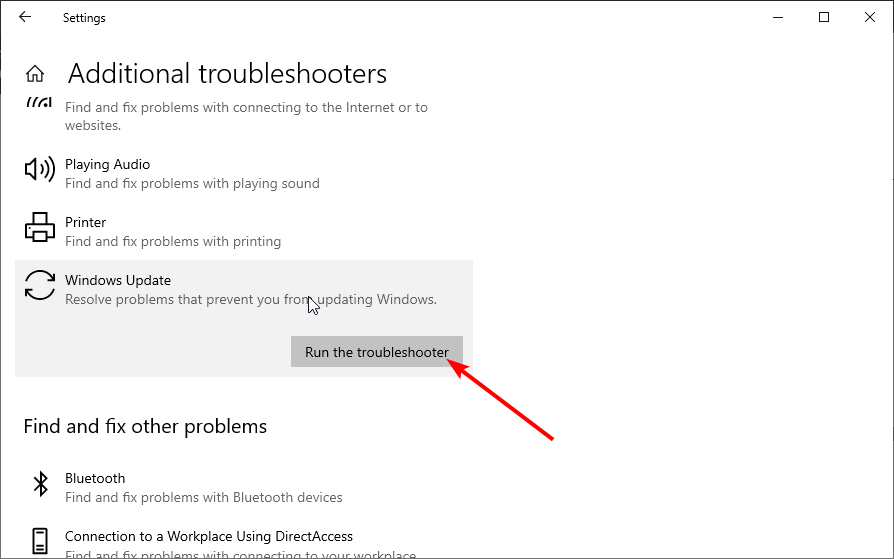
- Follow the instructions on the screen to complete the process.
The Windows Update troubleshooter is one of the built-in tools to fix update errors like 0x80190001. Once the troubleshooter is finished, try to update Windows again and check if the problem is still there.
2. Repair your system files
- Press Windows key + X and choose Command Prompt (Admin) or Powershell (Admin).
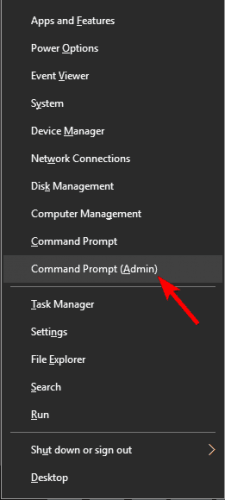
- When Command Prompt starts, run the sfc /scannow command.
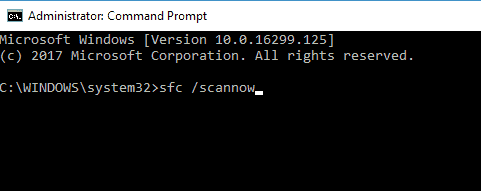
- SFC scan will now start. Remember that an SFC scan can take up to 10-15 minutes, so don’t interfere with it, and don’t run any other applications in the background.
Another cause for error 0x80190001 can be file corruption, and if your system files are damaged, you need to repair them using an SFC scan.
Once the SFC scan is finished, check if the problem is still there. If the issue persists or you could not run or complete the SFC scan, you need to use the DISM scan instead.
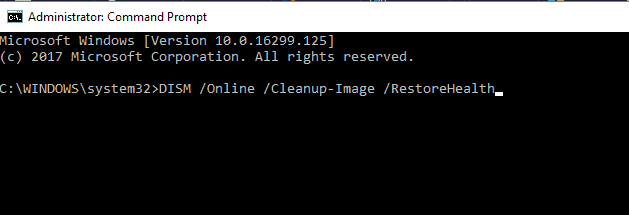
To do that, start Command Prompt as administrator and run the command below: DISM /Online /Cleanup-Image /RestoreHealth
This should fix the damaged files and solve any issue with the SFC scan
However, instead of going through this stress of repairing files manually, we recommend using a third-party repair program such as Restoro.
If your system files are faulty or missing, the software can replace them, restore your registry, and even do a comprehensive hardware analysis of your Windows PC.
Restoro repairs and reverses damage on your Windows OS by replacing damaged and removed files with new Windows files and components from the constantly updated online database.
Restoro
It enhances performance, prevents computer freezes and system crashes, and fixes Windows update errors.
3. Disable your Internet connection
According to users, you might be able to fix error 0x80190001 simply by disabling your Internet connection. Make sure that your update is downloaded and installed.
During the installation process, disable your Internet connection. After doing that, follow the instructions on the screen to complete the installation. Of course, this isn’t the best solution, but few users claim it works, so you might want to try it out.
4. Check your antivirus
The problem might be your antivirus software if you can’t update Windows due to error 0x80190001.
Although antivirus tools offer protection, they can often interfere with your system and cause various errors.
To fix this problem, many users suggest temporarily disabling some features or your antivirus. However, if removing the antivirus solves the issue, you should consider switching to a different antivirus solution.
Some PC issues are hard to tackle, especially when it comes to corrupted repositories or missing Windows files. If you are having troubles fixing an error, your system may be partially broken.
We recommend installing Restoro, a tool that will scan your machine and identify what the fault is.
Click here to download and start repairing.
There are many error-free antivirus options like the ESET NOD32 on the market. This software is your best bet to prevent future issues and keep your system running smoothly, as it is an antivirus with low CPU usage.
5. Disconnect all peripherals
If you have problems with error 0x80190001, the issue might be your USB devices. Sometimes USB devices can interfere with your system, leading to similar problems.
However, you might be able to fix the problem simply by disconnecting all USB devices before trying to install the update.
Disconnect all USB devices except for your mouse and keyboard. Once everything is disconnected, try to install the update again.
This isn’t the most efficient solution, but several users reported it works, so feel free to try it.
6. Download and install the update manually
- Find the KB number of the problematic update. You can do that from the Windows Update section or the Update History website.
- Once you get the KB number, go to Microsoft’s Update Catalog website and enter the KB number.
- A list of results will appear. Download the update that matches your system architecture and install it.
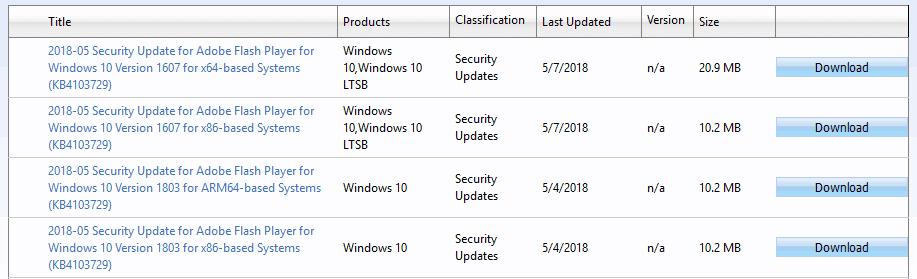
Several users reported successfully circumventing error 0x80190001 simply by manually downloading the update. However, we must mention that this isn’t a permanent solution, and the issue might reappear when you try to update your system.
7. Make sure your date and time are correct
- Right-click the clock in the bottom right corner and select Adjust the date/time.
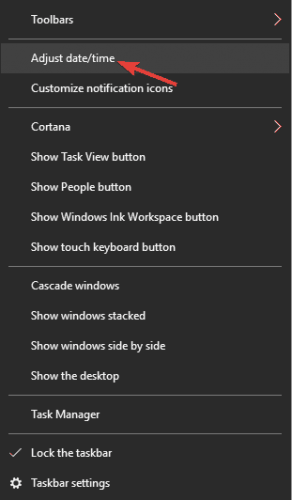
- Toggle switch for the Set time automatically option backward to disable it.
- Wait for a few moments and then turn it back on again.

A couple of users reported that error 0x80190001 occurred due to incorrect date and time on their PC. Adjusting your time and date should fix the issue in this case.
After following the steps above, the date and time will be readjusted and synchronized. You can also click the Change button and manually adjust the date and time if you want.
- Fix Windows 10/11 error 0x800F0955 to proceed with updates
- Fix: Error code 0x0 during Windows 10 upgrade
- What to do if Windows 10/11 update deletes all your files
- FIX: Windows Installer Service could not be accessed
8. Perform a Clean boot
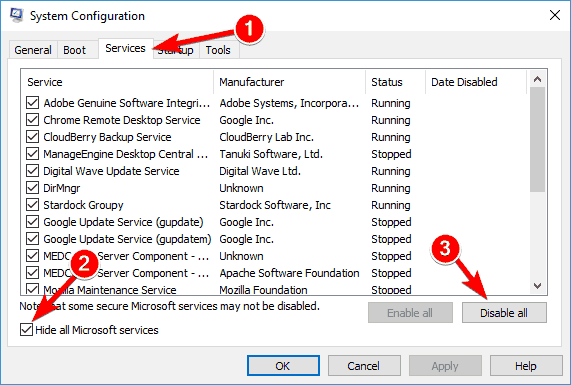
- Press Windows key + R, enter msconfig, and click OK.
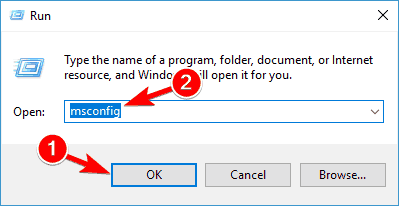
- Click the Services tab.
- Check the box for Hide all Microsoft services.
- Now, click the Disable all button.
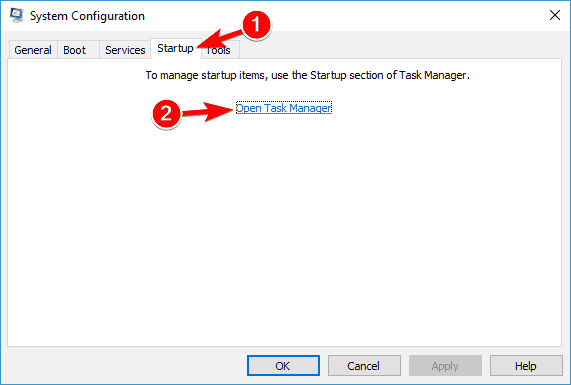
- Go to the Startup tab and click Open Task Manager.
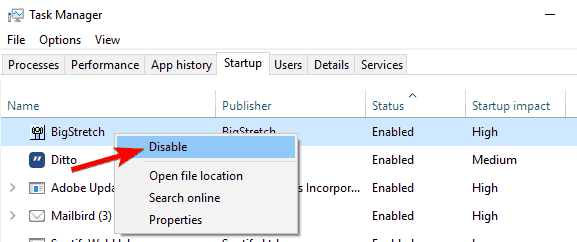
- Right-click on each application there and choose Disable from the menu.
- Go back to the System Configuration window and click Apply, followed by OK, to save the changes.
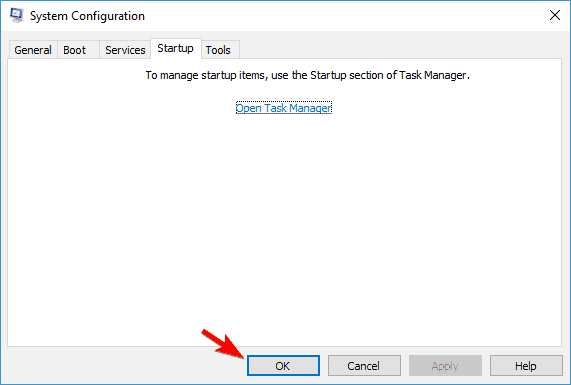
This issue can sometimes occur due to third-party applications and services. However, you can fix that by performing a Clean boot. Then, make sure you restart your PC and check if the issue is resolved.
9. Perform an in-place upgrade
- Go to Microsoft’s Windows 10 upgrade website.
- Click the Download Now button under the Create Windows 10 Installation Media option.
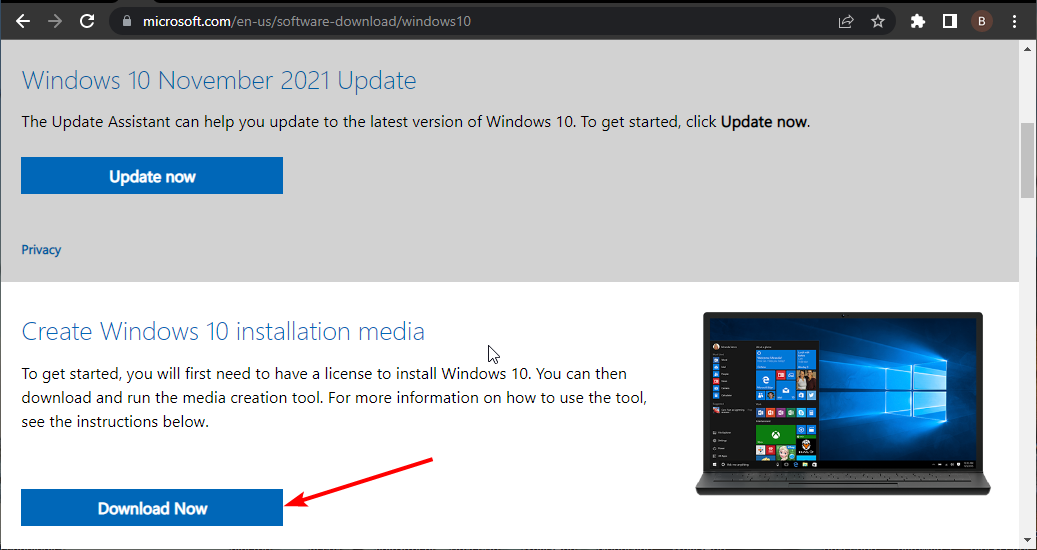
- Now, click the downloaded tool and Accept the license terms.
- Then, select Upgrade this PC now and click Next.
- Check the Keep personal files and apps option to keep your apps, files, and settings.
- Click Install to launch the upgrade process.
According to users, sometimes you can fix this problem simply by performing an in-place upgrade. However, performing an in-place upgrade will force Windows 10 to update to the latest version.
Once the setup is finished, you’ll have the latest version of Windows installed, and the problem will be resolved.
How can I fix error code 0x80190001 on Windows 11?
The main reason you are experiencing the update error 0x90190001 on Windows 11 is interference from your antivirus. You can solve this by disabling your antivirus or obliterating it.
Another known cause of the issue is incorrect time and date. We have shown how to change this earlier in this guide. Finally, you can use our other solutions to fix this error, as the causes are similar on all Windows PC.
- Windows Store Code: 0x87AF0813 [Solved]
- Can I Close my Laptop While Updating? [Answered]
Why does the Windows Update error 0x80190001 appear?
As mentioned earlier, there are various versions of this error, each with varying causes. Below are some of the popular ones:
- Windows 10 upgrade failed – If your Windows 10 upgrade fails due to this error code, try some of our solutions and check if that solves the problem.
- 0x80190001 Creators Update, Windows 10 – Many users reported this error while trying to install Creators Update. Bear in mind that this issue can affect any Windows 10 update, but in most cases, you can solve this problem by disabling your antivirus.
How do I do a factory reset with Windows 10?
- Press the Windows key + I to open the Settings app.
- Choose the Update & Security option.
- Click Recovery in the left pane.
- Click the Get Started button under the Reset this PC option.
- Choose to keep your files or wipe everything and click the Next button.
- Now, follow the simple onscreen instructions to complete the process.
If you encounter this issue, the standard solutions listed above will assist you in resolving the Windows 10 update error code 0x80190001.
You should also verify the product key to determine if it is a valid version because this problem might occur even if you use a copy of Windows.
If you are facing other issues like the Windows 10 update error 0x800f0900, check our easy guide to fix it quickly.
Feel free to let us know in the comments below if any of our fixes helped you solve the issue.

Newsletter
Your antivirus software might be interfering with the PC update
by Madalina Dinita
Madalina has been a Windows fan ever since she got her hands on her first Windows XP computer. She is interested in all things technology, especially emerging technologies… read more
Published on October 10, 2022
Reviewed by
Vlad Turiceanu
Passionate about technology, Windows, and everything that has a power button, he spent most of his time developing new skills and learning more about the tech world. Coming… read more
- Error code 0x80190001 is one of the most common Windows update failures from older Windows OS to the latest.
- The error can prevent you from downloading new updates, leading to compatibility and security issues.
- One of the quick ways to fix the issue is to disable your antivirus software when updating your PC.
XINSTALL BY CLICKING THE DOWNLOAD FILE
This software will repair common computer errors, protect you from file loss, malware, hardware failure and optimize your PC for maximum performance. Fix PC issues and remove viruses now in 3 easy steps:
- Download Restoro PC Repair Tool that comes with Patented Technologies (patent available here).
- Click Start Scan to find Windows issues that could be causing PC problems.
- Click Repair All to fix issues affecting your computer’s security and performance
- Restoro has been downloaded by 0 readers this month.
Installing the latest updates on your Windows computer may take longer than expected.
That happens because various technical issues and errors can either block or limit the update process. Regarding update errors, we have provided fixes for notable ones like Windows 10 update error 0x8007042B.
Now, it is another notorious one in error 0x80190001 that is hindering Windows users from updating their PCs. Here’s how one user describes it:
Upgrading to windows 10 from windows 7 pro. Repeatedly getting error code 0x80190001 after waiting a long time for the download. There is also a message to check network settings.
Troubleshooter couldn’t find any problems so I removed myself from the home group. Made no difference.
This error affects every version of Windows. For example, many users have reported that error 0x80190001 blocks the Creators Update install.
Error 0x80190001 can prevent you from downloading new updates, leading to compatibility and security issues. This guide will show you to fix the error with ease.
How do I fix the error code 0x80190001?
- How do I fix the error code 0x80190001?
- 1. Run the Update Troubleshooter
- 3. Disable your Internet connection
- 4. Check your antivirus
- 5. Disconnect all peripherals
- 6. Download and install the update manually
- 7. Make sure your date and time are correct
- 8. Perform a Clean boot
- 9. Perform an in-place upgrade
- How can I fix error code 0x80190001 on Windows 11?
- Why does the Windows Update error 0x80190001 appear?
- How do I do a factory reset with Windows 10?
1. Run the Update Troubleshooter
- Press the Windows key + I to open the Settings app.
- Now go to the Update & Security section.
- Select Troubleshoot from the menu on the left.
- Choose the Additional troubleshooters option.
- Now, select Windows Update.
- Finally, click the Run the troubleshooter button.
- Follow the instructions on the screen to complete the process.
The Windows Update troubleshooter is one of the built-in tools to fix update errors like 0x80190001. Once the troubleshooter is finished, try to update Windows again and check if the problem is still there.
2. Repair your system files
- Press Windows key + X and choose Command Prompt (Admin) or Powershell (Admin).
- When Command Prompt starts, run the sfc /scannow command.
- SFC scan will now start. Remember that an SFC scan can take up to 10-15 minutes, so don’t interfere with it, and don’t run any other applications in the background.
Another cause for error 0x80190001 can be file corruption, and if your system files are damaged, you need to repair them using an SFC scan.
Once the SFC scan is finished, check if the problem is still there. If the issue persists or you could not run or complete the SFC scan, you need to use the DISM scan instead.
To do that, start Command Prompt as administrator and run the command below: DISM /Online /Cleanup-Image /RestoreHealth
This should fix the damaged files and solve any issue with the SFC scan
However, instead of going through this stress of repairing files manually, we recommend using a third-party repair program such as Restoro.
If your system files are faulty or missing, the software can replace them, restore your registry, and even do a comprehensive hardware analysis of your Windows PC.
Restoro repairs and reverses damage on your Windows OS by replacing damaged and removed files with new Windows files and components from the constantly updated online database.
Restoro
It enhances performance, prevents computer freezes and system crashes, and fixes Windows update errors.
3. Disable your Internet connection
According to users, you might be able to fix error 0x80190001 simply by disabling your Internet connection. Make sure that your update is downloaded and installed.
During the installation process, disable your Internet connection. After doing that, follow the instructions on the screen to complete the installation. Of course, this isn’t the best solution, but few users claim it works, so you might want to try it out.
4. Check your antivirus
The problem might be your antivirus software if you can’t update Windows due to error 0x80190001.
Although antivirus tools offer protection, they can often interfere with your system and cause various errors.
To fix this problem, many users suggest temporarily disabling some features or your antivirus. However, if removing the antivirus solves the issue, you should consider switching to a different antivirus solution.
Some PC issues are hard to tackle, especially when it comes to corrupted repositories or missing Windows files. If you are having troubles fixing an error, your system may be partially broken.
We recommend installing Restoro, a tool that will scan your machine and identify what the fault is.
Click here to download and start repairing.
There are many error-free antivirus options like the ESET NOD32 on the market. This software is your best bet to prevent future issues and keep your system running smoothly, as it is an antivirus with low CPU usage.
5. Disconnect all peripherals
If you have problems with error 0x80190001, the issue might be your USB devices. Sometimes USB devices can interfere with your system, leading to similar problems.
However, you might be able to fix the problem simply by disconnecting all USB devices before trying to install the update.
Disconnect all USB devices except for your mouse and keyboard. Once everything is disconnected, try to install the update again.
This isn’t the most efficient solution, but several users reported it works, so feel free to try it.
6. Download and install the update manually
- Find the KB number of the problematic update. You can do that from the Windows Update section or the Update History website.
- Once you get the KB number, go to Microsoft’s Update Catalog website and enter the KB number.
- A list of results will appear. Download the update that matches your system architecture and install it.
Several users reported successfully circumventing error 0x80190001 simply by manually downloading the update. However, we must mention that this isn’t a permanent solution, and the issue might reappear when you try to update your system.
7. Make sure your date and time are correct
- Right-click the clock in the bottom right corner and select Adjust the date/time.
- Toggle switch for the Set time automatically option backward to disable it.
- Wait for a few moments and then turn it back on again.
A couple of users reported that error 0x80190001 occurred due to incorrect date and time on their PC. Adjusting your time and date should fix the issue in this case.
After following the steps above, the date and time will be readjusted and synchronized. You can also click the Change button and manually adjust the date and time if you want.
- Fix Windows 10/11 error 0x800F0955 to proceed with updates
- Fix: Error code 0x0 during Windows 10 upgrade
- What to do if Windows 10/11 update deletes all your files
- FIX: Windows Installer Service could not be accessed
8. Perform a Clean boot
- Press Windows key + R, enter msconfig, and click OK.
- Click the Services tab.
- Check the box for Hide all Microsoft services.
- Now, click the Disable all button.
- Go to the Startup tab and click Open Task Manager.
- Right-click on each application there and choose Disable from the menu.
- Go back to the System Configuration window and click Apply, followed by OK, to save the changes.
This issue can sometimes occur due to third-party applications and services. However, you can fix that by performing a Clean boot. Then, make sure you restart your PC and check if the issue is resolved.
9. Perform an in-place upgrade
- Go to Microsoft’s Windows 10 upgrade website.
- Click the Download Now button under the Create Windows 10 Installation Media option.
- Now, click the downloaded tool and Accept the license terms.
- Then, select Upgrade this PC now and click Next.
- Check the Keep personal files and apps option to keep your apps, files, and settings.
- Click Install to launch the upgrade process.
According to users, sometimes you can fix this problem simply by performing an in-place upgrade. However, performing an in-place upgrade will force Windows 10 to update to the latest version.
Once the setup is finished, you’ll have the latest version of Windows installed, and the problem will be resolved.
How can I fix error code 0x80190001 on Windows 11?
The main reason you are experiencing the update error 0x90190001 on Windows 11 is interference from your antivirus. You can solve this by disabling your antivirus or obliterating it.
Another known cause of the issue is incorrect time and date. We have shown how to change this earlier in this guide. Finally, you can use our other solutions to fix this error, as the causes are similar on all Windows PC.
- Windows Store Code: 0x87AF0813 [Solved]
- Can I Close my Laptop While Updating? [Answered]
- Fix Error Code 0x80070003 & Resume Your Windows Updates Now
- Windows Defender Error 0x80073b0: 4 Quick Fixes
- Windows Update Error 800B0100: 7 Quick Fixes
Why does the Windows Update error 0x80190001 appear?
As mentioned earlier, there are various versions of this error, each with varying causes. Below are some of the popular ones:
- Windows 10 upgrade failed – If your Windows 10 upgrade fails due to this error code, try some of our solutions and check if that solves the problem.
- 0x80190001 Creators Update, Windows 10 – Many users reported this error while trying to install Creators Update. Bear in mind that this issue can affect any Windows 10 update, but in most cases, you can solve this problem by disabling your antivirus.
How do I do a factory reset with Windows 10?
- Press the Windows key + I to open the Settings app.
- Choose the Update & Security option.
- Click Recovery in the left pane.
- Click the Get Started button under the Reset this PC option.
- Choose to keep your files or wipe everything and click the Next button.
- Now, follow the simple onscreen instructions to complete the process.
If you encounter this issue, the standard solutions listed above will assist you in resolving the Windows 10 update error code 0x80190001.
You should also verify the product key to determine if it is a valid version because this problem might occur even if you use a copy of Windows.
If you are facing other issues like the Windows 10 update error 0x800f0900, check our easy guide to fix it quickly.
Feel free to let us know in the comments below if any of our fixes helped you solve the issue.
Newsletter
Содержание
- ошибка 0x80190001 при входе в xbox live или другие программы microsoft
- Ответы (3)
- Не работает Xbox Live – в чем причина, как проверить?
- Какие ошибки бывают в Xbox Live
- Как проверить наличие ошибок Xbox Live
- Что делать, если Xbox Live не работает
ошибка 0x80190001 при входе в xbox live или другие программы microsoft
Не могу зайти в программы microsoft выдает эту ошибку или пишет что нет подключения к интернету хотя все работает и в других приложения проблем нет
Ответы (3)
Если у вас версия ОС 1809, попробуйте скачать и установить обновление
http://www.catalog.update.microsoft.com/Search.
Если оно не поможет или у вас другая версия ОС, попробуйте сделать так:
Пропишите любой шлюз в вашем сетевом адаптере.
Откройте его свойства, выберите IP версии4 (ipv4),дополнительно, «основные шлюзы»-«добавить», введите любой шлюз,например «120.101.010.122» (можете другие цифры, это просто пример) затем «добавить»-ОК, ОК.
Если это не поможет,попробуйте перезапустить сетевое соединение, для этого выполните следующее в командную строку с правами администратора введите:
netsh winsock reset и нажмите Enter.
netsh int ip reset и нажмите Enter.
ipconfig /release и нажмите Enter.
ipconfig /renew и нажмите Enter.
ipconfig /flushdns и нажмите Enter.
Если это не поможет, попробуйте попробуйте изменить DNS сервер в настройках ОС на DNS сервер яндекса или Google- 8.8.8.8.
Инструкция как это сделать доступна здесь:
http://dns.yandex.ru/
Если и это не поможет, проверьте сохраняется ли проблема в режиме чистой загрузки
https://support.microsoft.com/ru-ru/help/929135.
__
Если мой ответ вам помог, пожалуйста, отметьте его как ответ.
Disclaimer: В ответе могут быть ссылки на сайты не на сайты Microsoft, Все советы с таких сайтов Вы выполняете на свой страх и риск.
Не работает Xbox Live – в чем причина, как проверить?
Платформа Xbox Live включает в себя огромное количество сервисов, которые необходимы для комфортного взаимодействия с приставкой Xbox Live. Но время от времени бывают ситуации, когда Xbox Live не работает. Подробно рассмотрим, что можно сделать в такой ситуации, и как определить, что проблема именно на стороне сервиса, а не конкретно у вас.
Какие ошибки бывают в Xbox Live
Ошибок, которые могут возникать при проблемах в сервисе Xbox Live, огромное множество. Приведем несколько их них:
- Не работает мультиплеер на Xbox One в конкретной игре;
- Консоль Xbox One не может подключиться к сервису Xbox Live;
- Невозможно совершение покупок в Microsoft Store;
- Невозможно создание учетных записей Xbox Live или вход в эти записи;
- Не активируются коды Xbox Live, Xbox Game Pass, коды игр;
- Не работают облачные сохранения на Xbox One;
- Не работает редактирование аватара Xbox Live;
- Не работают конкретные приложения на Xbox One.
Это лишь малая часть ошибок, которые могут возникать при проблемах Xbox Live.
Как проверить наличие ошибок Xbox Live
У компании Microsoft есть отдельная страница сайта, где можно проверить наличие ошибки Xbox Live. Страница русифицирована, поэтому не составит труда определить на ней, какие именно сейчас есть ошибки в системе. Вот ссылка на эту страницу:
Что делать, если Xbox Live не работает
Решение проблемы одно – ждать. Обычно, на устранение ошибки уходит не более суток.
Если действие, которое вы хотите совершить, не терпит отлагательств, то можно пробовать его совершить до тех пор, пока это не будет успешно. В редких случаях службы не работают полностью и для всех. Зачастую, они просто не справляются с текущей нагрузкой, поэтому работают выборочно.
Если вы являетесь владельцем приставки Xbox One, обязательно подписывайтесь на наш канал в Яндекс.Дзен, и заходите на сайт — там вы найдете массу полезного для себя.