-
Про кеширование сайтов
-
Эффективность WP Super Cache
-
Обзор плагина WP Super Cache
-
Где скачать WP Super Cache
-
Как установить плагин WP Super Cache
-
Настройка WP Super Cache
-
Тонкая настройка кеширования
-
Статус кэширования
-
Метод доставки кеша
-
Разное
-
Расширенные
-
Модуль Mod Rewrite
-
Просроченные страницы, Очистка мусора
-
Поисковые и другие боты
-
Остальные настройки
-
Общий кеш
-
WP Super Cache и WooCommerce
-
Как проверить работу WP Super Cache самостоятельно
-
Настройка сервера для WP Super Cache
-
htaccess (Apache) и WP Super Cache
-
NGINX и WP Super Cache
-
Как проверить правильность URI файлов кеша WP Super Cache
-
Устранение ошибок в работе WP Super Cache
-
Отсутствующие модули Apache
-
WP Super Cache не создает общий кэш
-
Как очистить кеш WP Super Cache
-
Как правильно удалить WP Super Cache
-
W3 Total Cache или WP Super Cache
-
В заключение
Про кеширование сайтов
Кеширование в вебразработке — это очень важно. В WordPress особенно. Не то, чтобы Вордпресс такой плохой и тяжёлый, просто если можно ускорить загрузку страниц и одновременно снизить нагрузку на хостинг, а потратить на это пару минут, не воспользоваться этой возможностью было бы очень глупо. Итак, ближе к делу. Знакомьтесь с самым популярным плагином для кеширования страниц в вордпресс: WP Super Cache
Просто приведу 2 примера, до и после установки и настройки плагина
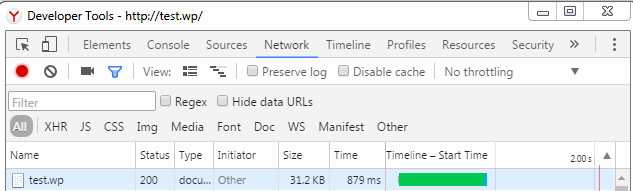
До установки WP Super Cache
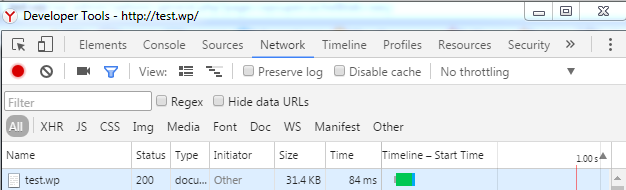
После установки WP Super Cache
То есть, вы сами видите грубый расчёт, без плагина страница генерируется 879 миллисекунд, а с плагином — 84 миллисекунды. Разница в 10 раз! Ещё остались сомнения в том, нужно ли его устанавливать?
Особо рекомендую к использованию на виртуальных хостингах, и если ваш сайт по типу информационный: блог или статейник — основное содержание почти не меняется.
Есть и противопоказания, но они больше условные: например, если ваш сайт почти не содержит постоянного содержимого, например предоставляет некоторый сервис, динамически изменяемые в php блоки и тому подобное. Правда, и тут можно найти выход, настроив тип кеширования Legacy или PHP и включив Enable dynamic caching в настройках. Так что, пути выхода есть 🙂 Однако, я лично думаю, что для таких сайтов лучше обходиться объектным кешированием, например, на основе W3 Total Cache, что тоже будет довольно эффективно.
Обзор плагина WP Super Cache
Принцип работы прост: плагин создаёт статичные html и php файлы – копии страниц WordPress и сохраняет их в кеш: /wp-content/cache/supercache/. Потом, при заходе пользователя на какую-либо страницу сайта, WordPress, вместо того, чтобы создать страницу с нуля, отдаёт браузеру заранее сохранённую копию html-страницы из кеша или собирает её максимально быстро из готовых php-файлов. Думаю, вполне очевидно, что такой вариант выходит экономнее по затратам ресурсов сервера и быстрее в плане скорости загрузки страницы.
Конечно, кеш отдаётся не всегда. При настройках по умолчанию, кеш не отдаётся для:
- Залогиненных пользователей;
- Пользователей, которые только что оставили комментарий на сайте;
- Пользователей, которые просматривают защищённую паролем запись.
Но, так как доля этих пользователей незначительна, WP Super Cache является очень эффективным кеширующим инструментом.
Где скачать WP Super Cache
Скачать плагин вы можете из официального репозитория https://wordpress.org/plugins/wp-super-cache/
Как установить плагин WP Super Cache
Можно либо распаковать архив в директорию плагинов /wp-content/plugins/, либо воспользоваться загрузчиком плагинов в админке http://example.com/wp-admin/plugin-install.php?tab=upload
Кстати, есть подробная инструкция с видео для новичков, как устанавливать плагины в WordPress
Здесь и далее заменяйте
http://example.comв примерах на ваш адрес сайта
Если у вас свой виртуальный или выделенный сервер, обязательно выставите верные права доступа на распакованные файлы, каталоги, и
/wp-content/, чтобы кеш смог записываться
Также, более простым вариантом будет зайти в http://example.com/wp-admin/plugin-install.php, вбить в поиск WP Super Cache и установить найденный плагин
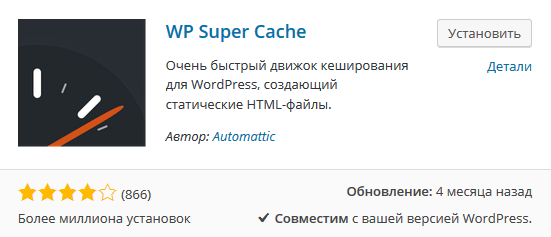
Установка WP Super Cache
Сигналом об удачной установке будет надпись:

Настройка WP Super Cache
После установки плагин нужно настроить. Это не займёт много времени. Самые основные моменты я опишу сначала, про тонкую настройку — чуть дальше.
Процесс установки и настройки WP Super Cache на видео:
Итак, вы переходите по ссылке http://example.com/options-general.php?page=wpsupercache.
Если на данном этапе вы видите ошибку
значит, у вас не настроены ЧПУ (человеко-понятные урлы). Переходите по ссылкеhttp://example.com/wp-admin/options-permalink.phpи выберите любой вариант, кроме первого

Теперь с ходу вас может огорошить сообщением
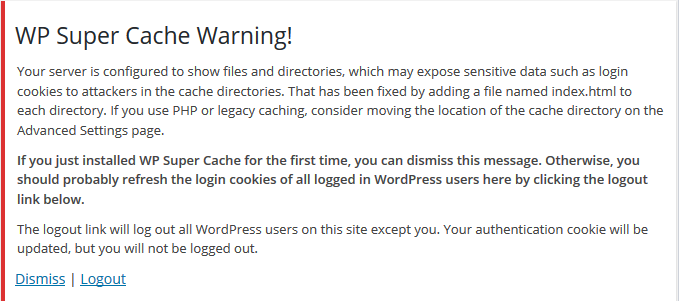
В нём говорится о потенциальных проблемах с безопасностью на сервере, но также это сообщение может выскочить при первой установке или сбросе настроек плагина. Так как мы только что установили плагин, спокойно пропускаем сообщение — Dismiss
Включаем кеширование

И тут же чуть ниже проверяем
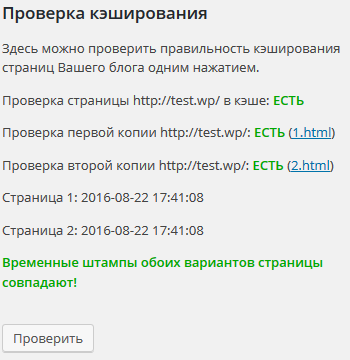
В принципе, всё, плагин работает и уже кеширует страницы 🙂
Но делает он в этом варианте не совсем эффективно. Приступим к тонкой настройке
Тонкая настройка кеширования
Переходим на вкладку Настройки (http://example.com/wp-admin/options-general.php?page=wpsupercache&tab=settings)
Статус кэширования

- Включить кеширование
- Отмечаем. Если снять галочку, кеширование выключится. То есть, грубо говоря, этот пункт включает и выключает кеширование, то есть делает то же самое, что и включение/отключение кеширования на странице
http://example.com/wp-admin/options-general.php?page=wpsupercache&tab=easy
Метод доставки кеша
Тут есть 2 варианта на выбор:
- Простой
- В данном случае, кеш будет обслуживать PHP. Вариант, когда сервер работает на NGINX + PHP-FPM, и нет возможности вносить изменения в конфигурацию NGINX. Также, может понадобиться, если на сайте используется отдельная тема для мобильных девайсов. В остальных случаях, выбирайте режим
Эксперт. - Эксперт
- Использовать
mod_rewriteдля обслуживания кешированных файлов. Выбираем этот пункт как наиболее быстрый и удобный для сервера.
Разное
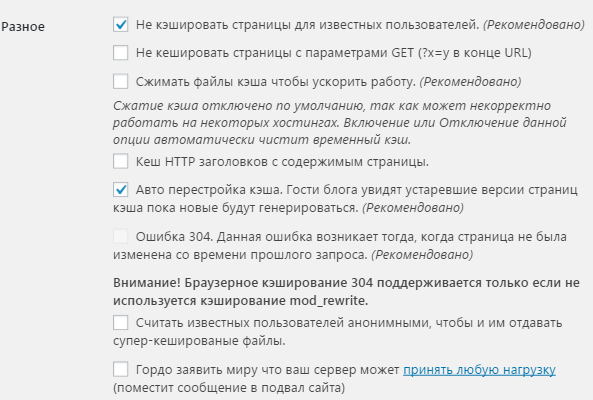
- Не кэшировать страницы для известных пользователей. (Рекомендовано)
- Включать однозначно. Если отключить, для известных пользователей (их 3 типа, указывались выше) будет генерироваться отдельный кеш, который ещё и всплыть наружу может, если теоретически. Ещё вы не будете видеть тулбар админа на страницах, что очень неудобно, когда нужно отредактировать страницу, сбросить кеш или ещё что-то в этом духе.
- Не кешировать страницы с параметрами GET (?x=y в конце URL)
-
Если отметить, то будет принимать во внимание параметры запроса и не кешировать её, если URL будет с параметрами навроде
http://example.com/post?utm_source=twitter. Можно включить, можно отключить, смотрите по вашим потребностям. Чаще всего, его отключают. - Сжимать файлы кэша чтобы ускорить работу. (Рекомендовано)
-
Отключить. В дополнение к обычному html будет создавать сжатую в gzip копию. Если экономите дисковое пространство — отключайте. Если у вас сервер на чистом Apache, либо NGINX без gzip, что встречается довольно редко — включите. Можете включить и посмотреть, будет мешать — отключите. Будет глючить на вашем хостинге — отключите.
- Кеш HTTP заголовков с содержимым страницы.
- Отключить. Включать, если есть проблемы с отдачей HTTP-заголовков. Заголовками HTTP должен заведовать сервер, а не плагин кеширования. При включении кеш страницы будет создаваться не в виде одной единой HTML-страницы, а в виде двух php-файлов, один из которых содержит заголовки, а второй — HTML-копию сгенерированной страницы.
- Ошибка 304. Данная ошибка возникает тогда, когда страница не была изменена со времени прошлого запроса.
-
Включать обязательно. Будет отдавать 304 заголовок повторно зашедшему пользователю, если страница не изменилась, что означает, что его браузер не будет выкачивать страницу с сервера, а воспользуется сохранённой локально копией, что очень полезно и эффективно.
Если включен режим Эксперт, то есть в работе используется
mod_rewrite, то этот пункт будет неактивным, ибо включен по умолчанию. - Считать известных пользователей анонимными, чтобы и им отдавать супер-кешированные файлы.
-
Если отметить, все пользователи, о которых Worpdress знает (авторизованные, прокомментировавшие), будут считаться анонимными и получать данные из кеша наравне со всеми. Я считаю, что лучше отключить, как правило, их не так уж их и много, а проблемы могут возникать. Но если аудитория сайта состоит, в основном, из авторизованных пользователей, и таковой функционал понадобится, то лучше воспользоваться W3 Total Cache или чем-то более подходящим.
- Авто перестройка кэша. Гости блога увидят устаревшие версии страниц кэша пока новые будут генерироваться
-
Включать, полезный функционал.
- Гордо заявить миру что ваш сервер может принять любую нагрузку (поместит сообщение в подвал сайта)
-
Отключить. Промо плагина и её автора. Если сайт делается ради фана — включите, сделаете добро человеку. Если проект коммерческий, и лишние ссылки недопустимы, отключать без вариантов.
Расширенные
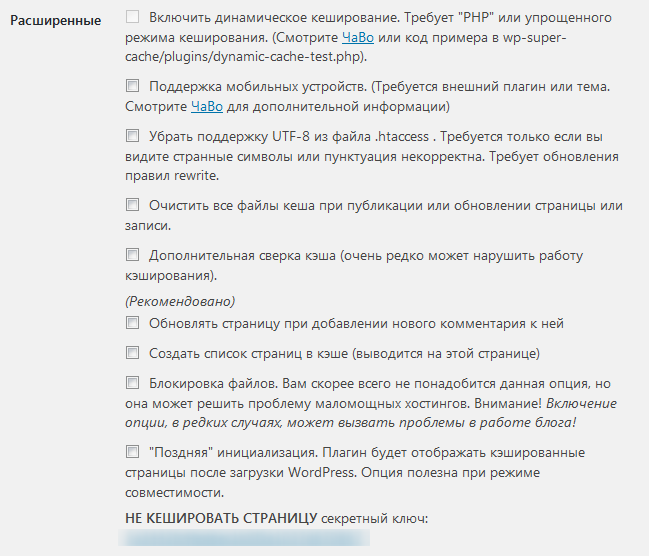
- Включить динамическое кеширование. Требует «PHP» или упрощенного режима кеширования. (Смотрите ЧаВо или код примера в
wp-super-cache/plugins/dynamic-cache-test.php). -
Отключать. Эта опция будет полезна тем, кто изменяет код шаблонов, вставляя в них динамическое содержимое. Он работает, исполняя динамический код на странице перед тем, как выдать её браузеру пользователя.
На пример такого шаблона можно посмотреть тут/wp-content/plugins/wp-super-cache/plugins/dynamic-cache-test.php - Поддержка мобильных устройств. (Требуется внешний плагин или тема. Смотрите ЧаВо для дополнительной информации)
- Отключить. В наш век адаптивного дизайна вопрос становится неактуальным. Включите, если же ваша тема подразумевает отдельную выдачу для мобильных, либо вы пользуетесь одним из следующих плагинов:
- Jetpack’s Mobile Theme Module
- WPTouch
- WordPress Mobile Edition
- WordPress Mobile Pack
- Убрать поддержку UTF-8 из файла
.htaccess. Требуется только если вы видите странные символы или пунктуация некорректна. Требует обновления правил rewrite - Отключить. Необходимо включать, только если вы видите странные символы или некорректные знаки пунктуации, что случается крайне редко.
- Очистить все файлы кеша при публикации или обновлении страницы или записи.
- Очищает весь кеш, когда запись или страница публикуется или обновляется. Я отключил, так как не вижу смысла сбрасывать весь кеш из-за одной страницы. Вы смотрите по вашей ситуации.
- Дополнительная сверка кэша (очень редко может нарушить работу кэширования).
- Отключить
- Обновлять страницу при добавлении нового комментария к ней
- На ваше усмотрение
- Создать список страниц в кэше (выводится на этой странице)
- Отключить. Список страниц в кеше можно посмотреть в разделе
Состояние кеша - «Поздняя» инициализация. Плагин будет отображать кэшированные страницы после загрузки WordPress. Опция полезна при режиме совместимости.
- Отключить
- НЕ КЕШИРОВАТЬ СТРАНИЦУ секретный ключ:
- Ключ, с помощью которого можно обойти кеш. Например, чтобы увидеть главную страницу в обход кеша, зайдите на страницу
http://example.com/?donotcachepage=5aasdawc4fed6ec1b0f5e1037d670867(ключ вставите свой)
Когда все пункты пройдены, сохраняем их.
Модуль Mod Rewrite
Если вы выбрали способ кеширования mod_rewrite, то плагин потребует обновить .htaccess

Прокручиваем страницу вниз и обновляем
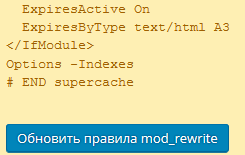
Просроченные страницы, Очистка мусора
Теперь нужно настроить правила очистки устаревшего кеша
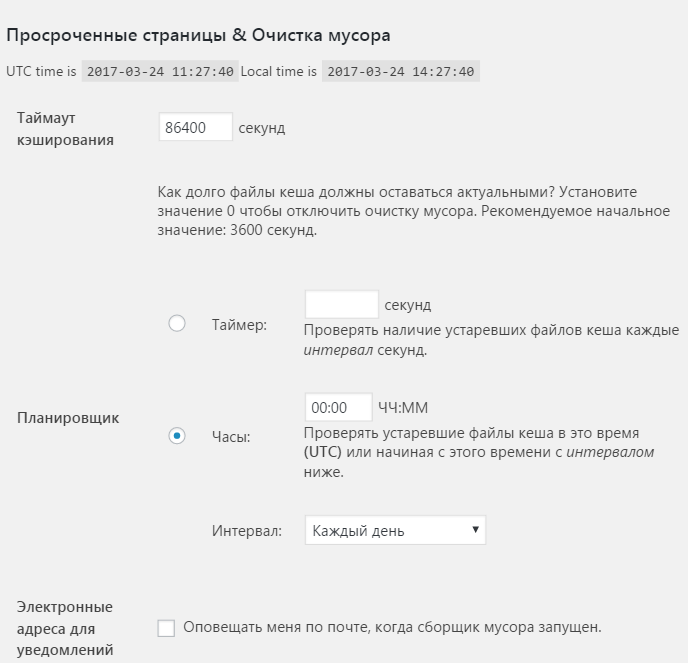
- Таймаут кэширования — выставляется время жизни кеша в секундах, сколько времени он остаётся актуальным. Хорошим тоном будет начать с 1 часа (3600 секунд). Вы подбирайте время, исходя из принципа, как часто обновляется контент на сайте: чем реже, тем большее число можно ставить. Например, в статейниках вполне можно оставлять
86400 секунд, что соответствует24 часам.
Также, вы можеет поставить 0, и тогда старый кеш не будет очищаться. Это может быть полезным, скажем, если Вы стремитесь к тому, чтобы дата создания страницы соответствовала дате создания её закешированной копии. Однако, помните, что если Вы вносите изменения в дизайн сайта, либо устанавливаете новый плагин, который вносит в изменения в дизайн страницы, изменения не будут приняты, пока кеш не будет очищен. Я лично рекомендую не обнулять очистку кеша, а ставить время жизни кеша побольше.
- Планировщик — как часто проверять устаревание кеша. Можно выбрать Таймер — тогда кеш будет проверяться постоянно с интервалом в указанное число секунд, а можно выбрать Часы — тут указывается чёткое время (час и минута) по UTC, в которое с регулярностью Интервал будет проходить проверка актуальности кеша.
- Электронные адреса для уведомлений — отсылать ли уведомления на email администратора сайта об очистке мусора.
Поисковые и другие боты
Чтобы запретить плагину кэшировать запросы от поисковых ботов и других сетевых роботов, введите их названия в поле ниже (по одному в строке). Если копия страницы уже существует в кэше Super Cache, то она все равно будет отправлена боту.
Стираем и оставляем поле пустым, сохраняем.
Остальные настройки
Несущественны, поэтому оставляете как есть.
Общий кеш
Этот раздел важен в свете того, что Google и другие поисковые системы теперь учитывают скорость загрузки страниц как один из факторов ранжирования сайта в поиске.
Обычно, WP Super Cache создаёт кеш только той страницы, которую кто-то посетил. И это, по сути, правильно. Но что, если этим кто-то является бот поисковика? Никакого положительного эффекта от кеширующего плагина он не увидит. И раздел настроек Общий кеш позволяет избежать этого недоразумения, предсоздавая закешированные копии всех страниц сайта ещё до их посещения кем-либо.
Для любителей консоли SSH есть возможность не использовать Общий кеш, а для разогрева кеша использовать wget:
wget -r -l 3 -nd --wait=5 --delete-after http://example.comТакую конструкцию можно отправить в cron:
- В консоль пишем
crontab -e- Конструкция ниже обходит сайт каждый час, поддерживая страничный кеш свежим:
0 * * * * wget -r -l 3 -nd --wait=5 --delete-after http://example.com
Раздел хорошо описан на русском языке, поэтому распишу только основные настройки:
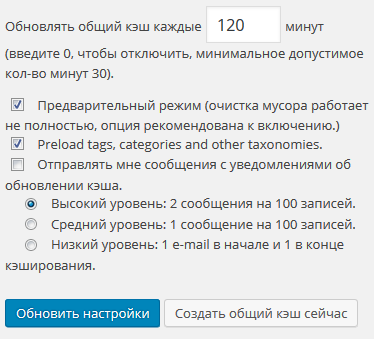
- Обновлять кеш каждые 120 минут — кеш будет считаться актуальным 2 часа. Вы ставите своё время. Чем реже обновляется сайт, тем большее время можно поставить.
- Предварительный режим (очистка мусора работает не полностью, опция рекомендована к включению.) — включить, в объяснении, думаю, не нуждается.
- Предзагрузка тегов, категорий и других таксономий. — включить. Будут предзагружены категории, теги и другие таксономии.
Теперь сохраняете данные или создаёте кеш прямо сейчас.
Общий объём кеша будет зависеть от количества записей, страниц, рубрик (категорий), меток (тегов). Дисковое пространство — это, как правило, самый дешёвый и легко масштабируемый ресурс на хостинге и сервере, и если у вас не сильно посещаемый проект (до 10-20 тысяч уникальных пользователей в сутки), а страничный кеш выходит большим, то вы вполне можете брать обычный дешёвый жёсткий диск hdd, на честном хостинге разницу с ssd вряд ли заметите, зато сэкономите бюджет. Если больше, hdd тоже будет хорошо себя показывать, но тут я бы порекомендовал посоветоваться с системными администраторами на предмет оптимизации сервера, либо написать мне в форму обратной связи.
На этом необходимый минимум по настройке WP Super Cache завершён. Далее будет идти информация для продвинутых вебмастеров и системных администраторов, а также некоторая информация, касаемо часто возникающих вопросов.
WP Super Cache и WooCommerce
Если у вас магазин на основе WooCommerce, и вы хотите использовать WP Super Cache, то вам нужно исключить следующие страницы из процесса кеширования:
- Корзина (Cart)
- Мой аккаунт (My Account)
- Оформление заказа (Checkout)
Это можно сделать в разделе Расширенные example.com/wp-admin/options-general.php?page=wpsupercache&tab=settings, просто отметив Страницы (is_page)
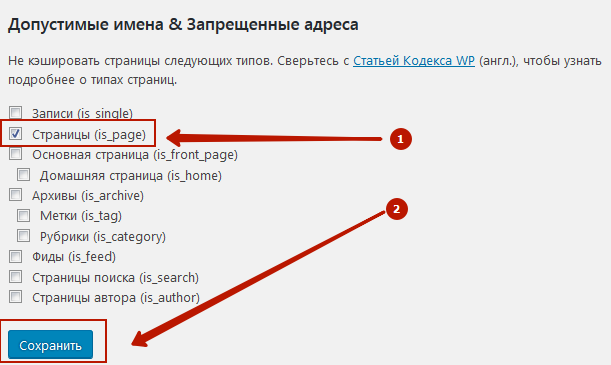
Такой вариант подойдёт, если у вас мало записей в Страницах. Если же их много, то лучше не отмечать Страницы (is_page), а добавить части адресов служебных страниц в раздел чуть ниже, как на примере
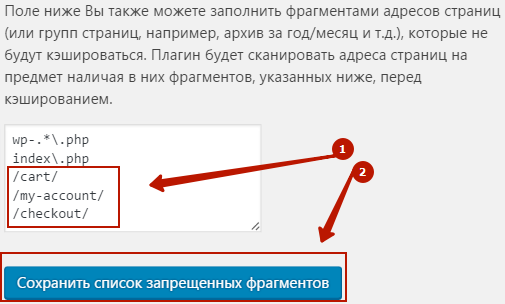
Добавляем служебные страницы WooCommerce в список исключений
Как проверить работу WP Super Cache самостоятельно
Вы можете самостоятельно проверить, как работает плагин, довольно просто.
Для начала, открываете браузер в режиме инкогнито или в приватном режиме. Для Firefox это делается с помощью Ctrl + Shift + P, для Google Chrome или Яндекс Браузера — Ctrl + Shift + N.
Теперь откройте исходный код страницы (Ctrl + U) и посмотрите в самый конец, там вы увидите примерно следующее
<!-- Dynamic page generated in 0.337 seconds. -->
<!-- Cached page generated by WP-Super-Cache on 2016-11-21 01:47:08 -->

<!-- super cache -->
Это отметка, сколько времени собиралась страница и в какие дату и время это произошло.
Если вы заглянете в исходный код страницы под админом, то увидите что-то навроде
<!-- Dynamic page generated in 0.389 seconds. -->
<!-- Page not cached by WP Super Cache. Check your settings page. Not caching requests by known users. (See Advanced Settings page) -->
Тут есть только отметка, сколько времени генерировалась страница, и замечание, что для авторизованных пользователей страница отдаётся не из кеша, а создаётся на лету.
Если этих меток нет, значит вы сделали что-то не так, и плагин не работает. Вернитесь к началу настройки и пройдитесь по основным пунктам, возможно, вы что-то упустили.
Далее, если всё в порядке, и вам интересно, сколько времени занимает отклик от сервера до вашего браузера, вы можете воспользоваться консолью разработчика.
Для этого, жмёте F12, откроется консоль, там вы переходите в раздел Network — Doc или Сеть — HTML и перезагружаете страницу (Ctrl + F5). По завершению, ищете верхнюю строчку и время отклика, оно должно занимать в норме 100-300 миллисекунд или 0.1-0.3 секунды. Может и больше, если ваш хостинг в США, а вы в России, континентальную удалённость нужно учитывать. Но вообще, чем меньше это значение, тем лучше.
Ради интереса можете временно выключить WP Super Cache и сравнить значения до и после установки плагина.
После установки WP Super Cache
И ещё маленький совет — кеш браузера иногда будет путать вас, поэтому полностью сбрасывайте его с помощью Ctrl + F5, а лучше тестируйте работу плагина и сайта в режиме инкогнито браузера.
Настройка сервера для WP Super Cache
Итак, плагин у нас установлен и настроен правильно. Как проверить правильность работы рассказано выше, а теперь перейдём к настройке сервера. Это будет актуальным, если у вас собственный VDS/VPS или выделенный сервер.
Далее, в примерах будет происходить настройка под домен
example.comи его поддоменов. Вы должны самостоятельно заменить их на своё имя домена
htaccess (Apache) и WP Super Cache
Этот пункт касается тех, у кого сервер настроен в режиме работы
LAMP(Linux, Apache, Mysql, PHP). Если во фронтенде или в роли основного вебсервера установлен NGINX, советую перейти к разделу ниже
Если вы дошли до этого пункта и выбрали в настройках плагина режим mod_rewrite, то по сути ничего делать и не нужно. Но, в целях оптимизации работы (.htaccess загружается каждый раз при загрузке сайта, apache2.conf только 1 раз во время рестарта сервера), или если обработка правил .htaccess на вашем сервере отключена, вы можете скопировать данные из .htaccess и перенести их в конфигурационный файл, где объявляются настройки вашего сайта (например, в Debian он может располагаться в /etc/apache2/vhosts/sheensay.ru.conf).
Далее, пример конфигурационного файла .htaccess
# BEGIN WPSuperCache
<IfModule mod_rewrite.c>
RewriteEngine On
RewriteBase /
#If you serve pages from behind a proxy you may want to change 'RewriteCond %{HTTPS} on' to something more sensible
AddDefaultCharset UTF-8
RewriteCond %{REQUEST_METHOD} !POST
RewriteCond %{QUERY_STRING} !.*=.*
RewriteCond %{HTTP:Cookie} !^.*(comment_author_|wordpress_logged_in|wp-postpass_).*$
RewriteCond %{HTTP:X-Wap-Profile} !^[a-z0-9"]+ [NC]
RewriteCond %{HTTP:Profile} !^[a-z0-9"]+ [NC]
RewriteCond %{HTTP:Accept-Encoding} gzip
RewriteCond %{HTTPS} on
RewriteCond %{DOCUMENT_ROOT}/wp-content/cache/supercache/%{SERVER_NAME}/$1/index-https.html.gz -f
RewriteRule ^(.*) "/wp-content/cache/supercache/%{SERVER_NAME}/$1/index-https.html.gz" [L]

RewriteCond %{REQUEST_METHOD} !POST
RewriteCond %{QUERY_STRING} !.*=.*
RewriteCond %{HTTP:Cookie} !^.*(comment_author_|wordpress_logged_in|wp-postpass_).*$
RewriteCond %{HTTP:X-Wap-Profile} !^[a-z0-9"]+ [NC]
RewriteCond %{HTTP:Profile} !^[a-z0-9"]+ [NC]
RewriteCond %{HTTP:Accept-Encoding} gzip
RewriteCond %{HTTPS} !on
RewriteCond %{DOCUMENT_ROOT}/wp-content/cache/supercache/%{SERVER_NAME}/$1/index.html.gz -f
RewriteRule ^(.*) "/wp-content/cache/supercache/%{SERVER_NAME}/$1/index.html.gz" [L]

RewriteCond %{REQUEST_METHOD} !POST
RewriteCond %{QUERY_STRING} !.*=.*
RewriteCond %{HTTP:Cookie} !^.*(comment_author_|wordpress_logged_in|wp-postpass_).*$
RewriteCond %{HTTP:X-Wap-Profile} !^[a-z0-9"]+ [NC]
RewriteCond %{HTTP:Profile} !^[a-z0-9"]+ [NC]
RewriteCond %{HTTPS} on
RewriteCond %{DOCUMENT_ROOT}/wp-content/cache/supercache/%{SERVER_NAME}/$1/index-https.html -f
RewriteRule ^(.*) "/wp-content/cache/supercache/%{SERVER_NAME}/$1/index-https.html" [L]

RewriteCond %{REQUEST_METHOD} !POST
RewriteCond %{QUERY_STRING} !.*=.*
RewriteCond %{HTTP:Cookie} !^.*(comment_author_|wordpress_logged_in|wp-postpass_).*$
RewriteCond %{HTTP:X-Wap-Profile} !^[a-z0-9"]+ [NC]
RewriteCond %{HTTP:Profile} !^[a-z0-9"]+ [NC]
RewriteCond %{HTTPS} !on
RewriteCond %{DOCUMENT_ROOT}/wp-content/cache/supercache/%{SERVER_NAME}/$1/index.html -f
RewriteRule ^(.*) "/wp-content/cache/supercache/%{SERVER_NAME}/$1/index.html" [L]
</IfModule>

# END WPSuperCache

# BEGIN WordPress
<IfModule mod_rewrite.c>
RewriteRule ^index.php$ - [L]
RewriteCond %{REQUEST_FILENAME} !-f
RewriteCond %{REQUEST_FILENAME} !-d
RewriteRule . /index.php [L]
</IfModule>

# END WordPress
Пример конфигурационного файла Apache. Вы можете вставить в него код из .htaccess
#user 'example' virtual host 'example.com' configuration file
<VirtualHost 127.0.0.1:8080>
  ServerName example.com
  AddDefaultCharset UTF-8
  AssignUserID example example
  DirectoryIndex index.html index.php
  DocumentRoot /var/www/example/data/www/example.com
  ServerAdmin [email protected]
  ServerAlias www.example.com
  <FilesMatch ".ph(p[3-5]?|tml)$">
    SetHandler application/x-httpd-php
  </FilesMatch>
  <FilesMatch ".phps$">
    SetHandler application/x-httpd-php-source
  </FilesMatch>
  php_admin_value sendmail_path "/usr/sbin/sendmail -t -i -f [email protected]"
  php_admin_value upload_tmp_dir "/var/www/example/data/mod-tmp"

  #php_admin_value session.save_path "/var/www/example/data/mod-tmp"
  php_admin_value session.save_handler "memcache"
  php_admin_value session.save_path "tcp://127.0.0.1:11211"


  php_admin_value open_basedir "/var/www/example/data:."
  CustomLog /var/www/httpd-logs/example.com.access.log combined
  ErrorLog /var/www/httpd-logs/example.com.error.log
</VirtualHost>
<Directory /var/www/example/data/www/example.com>
  php_admin_flag engine on
  Options -ExecCGI
  # После этой строки вставляются данные из .htaccess
</Directory>
NGINX и WP Super Cache
Предполагается, что NGINX настроен по подобному примеру
Итак, у вас свой виртуальный или выделенный сервер, и вам хочется, чтобы WP Super Cache выжимал по максимуму. Но, из коробки этот плагин предлагает настройки только под php и htaccess. И здесь я опишу, как можно настроить конфигурационный файл NGINX под оптимальную работу с WP Super Cache. Это может пригодиться, скажем, если у вас сервер собран в виде LEMP (Linux, NGINX (EngineX), Mysql, PHP), и вместо Apache в бекенде php-fpm.
Хочу заметить, что в данной конфигурации кеш NGINX включать не нужно, так как NGINX будет брать статичные страницы из кеша WP Super Cache напрямую, минуя интерпретатор PHP. И, на мой взгляд, удобнее именно эта конфигурация, так как управлять кешем из админпанели WordPress удобнее, нежели чем из консоли кешем NGINX.
Если для сайта включен кеш NGINX, и отключить его нельзя, то плагин WP Super Cache лучше не использовать, так как увеличения производительности Вы не заметите, а двойное кеширование будет только мешать.
WooCommerce и другие подобные плагины, которые используют переменные GET в URL, требуют, чтобы при обработке PHP передавались параметры
$args:try_files $wpsupercache $uri $uri/ /index.php?$argsОднако, WP Super Cache может работать неправильно при использовании
/index.php?$args.
В таком случае, могу посоветовать выбрать другой кеширующий плагин, например, W3 Total Cache.
В примере будет 3 варианта конфигурации, в зависимости от режима работы WordPress: обычный сайт, WordPress Multisite с сайтами в подкаталогах и WordPress Multisite с сайтами на поддоменах. По умолчанию, включен первый режим. Если у вас Miultisite, просто раскомментируйте нужные строчки.
Ниже пример конфигурационного файла NGINX + php-fpm с возможностью заменить бекенд на Apache с комментариями:
### user 'example' virtual host 'example.com' configuration file
### http://sheensay.ru/?p=1915
server {

  ### Если Multisite поддомены, для domain mapping замените строку ниже на: server_name example.com *.example.com;
  server_name example.com www.example.com;

  ### Если Multisite поддомены, раскомментируйте строку ниже для domain mapping
  #server_name_in_redirect off;

  ### Если Multisite поддомены, для domain mapping замените строку ниже на: listen 80 default_server;
  listen 1.2.3.4:80; # Укажите вместо 1.2.3.4 IP своего сервера

  charset UTF-8;
  disable_symlinks if_not_owner from=$root_path;
  index index.html index.php;
  root $root_path;
  set $root_path /var/www/example/data/www/example.com;
  access_log /var/log/example.com.access.log ;
  error_log /var/log/example.com.error.log warn;
  #error_log /var/log/example.com.debug.error.log debug;


  include /etc/nginx/vhosts-includes/*.conf;

  ### Если gzip не включен глобально, включим его тут
  # gzip on;
  # gzip_disable "msie6";
  # gzip_types text/plain text/css application/json application/x-javascript text/xml application/xml application/xml+rss text/javascript application/javascript;


  ### Разрешаем доступ для Let's Encrypt
  location ~ /.well-known {
    allow all;
  }

  ### Запрещаем доступ к файлам и каталогам с точкой в начале названия, например, .htaccess, .git
  location ~ /. {
    deny all;
  }

  ### Запрещаем доступ к файлам с расширением .php в каталогах загрузок, например, /wp-content/uploads
  location ~* /(?:uploads|languages|files)/.*.php$ {
    deny all;
  }


  ### Если Multisite в режиме подкаталогов, например http://example.com/wpsubsite/, просто раскоментируйте блок ниже ###

  #if (!-e $request_filename) {
  #  rewrite /wp-admin$ $scheme://$host$uri/ permanent;
  #  rewrite ^(/[^/]+)?(/wp-.*) $2 last;
  #  rewrite ^(/[^/]+)?(/.*.php) $2 last;
  #}


  ### Устанавливаем новую переменную $cache_uri, которой присваиваем запрос из предустановленной переменной $request_uri
  set $cache_uri $request_uri;

  ### POST запросы не кешируются
  if ($request_method = POST) {
    set $cache_uri 'null cache';
  }

  ### Запросы с параметрами в URL не кешируются
  if ($query_string != "") {
    set $cache_uri 'null cache';
  }

  ### Не кешировать запросы URL, содержащие следующие части (как правило, админка и служебные, sitemap yoast)
  if ($request_uri ~* "(/wp-admin/|/xmlrpc.php|/wp-(app|cron|login|register|mail).php|wp-.*.php|/feed/|index.php|wp-comments-popup.php|wp-links-opml.php|wp-locations.php|sitemap(_index)?.xml|[a-z0-9_-]+-sitemap([0-9]+)?.xml)") {
    set $cache_uri 'null cache';
  }

  ### Не использовать кеш для авторизованных пользователей и последних комментаторов
  if ($http_cookie ~* "comment_author|wordpress_[a-f0-9]+|wp-postpass|wordpress_logged_in") {
    set $cache_uri 'null cache';
  }

  ### фавикон не логировать
  location = /favicon.ico { log_not_found off; access_log off; }
  ### robots.txt может генерироваться движком WordPress
  location = /robots.txt  { try_files $uri /index.php; }


  ### Определим расположение кеша
  # ${http_host}${cache_uri} может не содержать слеша, потому что ${cache_uri} уже может начинаться со слеша. У вас может быть иначе. Проверьте с помощью add_header
  set $wpsupercache /wp-content/cache/supercache/${http_host}/${cache_uri}/index.html;

  ### Ещё будем пробовать искать версию для https
  set $wpsupercache_ssl /wp-content/cache/supercache/${http_host}/${cache_uri}/index-https.html;

  ### Если у вас сайт на SSL/TLS, то есть, работает по HTTPS, то вместо index.html у вас будут генерироваться index-https.html
  if ( $scheme = 'https' ) {
    set $wpsupercache /wp-content/cache/supercache/${http_host}/${cache_uri}/index-https.html;
  }
  ### Проверочный заголовок, если раскомментируете, увидите, что располагается в переменной $wpsupercache
  #add_header X-wpsc "$wpsupercache" always;


  ### Можно отлавливать переменные в заголовках. Подробнее http://sheensay.ru/nginx
  # add_header X-uri "$uri" always;
  # add_header X-cache-uri "$cache_uri" always;
  # add_header X-$http_host "$http_host" always;

  ### Переходим к работе с бекендом ###
  ### Ниже будут 2 варианта настройки, php5-fpm и Apache.  ####
  ### По умолчанию, всё настроено под первый вариант. ###
  ### Чтобы включить Apache, закомментируйте всё, что идёт ниже до блока Apache ###

  ### 1. PHP-FPM ###

  # Статичные файлы не логируем, выставляем http заголовок Expires на год
  location ~* ^.+.(jpe?g|gif|png|svg|js|css|mp3|ogg|mpe?g|avi|zip|gz|bz2?|rar|swf|ogg|ogv|svg|svgz|eot|otf|woff|mp4|ttf|css|rss|atom|js|jpg|jpeg|gif|png|ico|zip|tgz|gz|rar|bz2|doc|xls|exe|ppt|tar|mid|midi|wav|bmp|rtf)$ {
    expires 365d; log_not_found off; access_log off;
  }

  # Основной запрос, в котором мы пытаемся сначала получить закешированную версию страницы
  # Если кеша нет, тогда отправляемся к WordPress, чтобы он его нам создал
  location / {
    try_files $wpsupercache $wpsupercache_ssl $uri $uri/ /index.php?$args ;
  }


  # Наш бекенд - php-fpm
  location ~ .php$ {

    try_files $uri =404;
    include fastcgi_params;
    fastcgi_split_path_info ^(.+.php)(/.+)$;
    fastcgi_index index.php;
    fastcgi_param SERVER_NAME $http_host;
    fastcgi_param SCRIPT_FILENAME $document_root$fastcgi_script_name;

    # Тут, в зависимости от того, как установлен FastCGI, выбирайте или TCP, или сокет

    # TCP
    #fastcgi_pass 127.0.0.1:9000;
    # Сокет
    fastcgi_pass unix:/var/www/php5-fpm/example.com.sock; # Тут укажите путь до сокета php-fpm конкретного пользователя или сайта

  }


  ### 2. Apache. Если у вас в бекенде Apache, расскоментируйте всё, что ниже закомментировано одинарной решёткой, и закомментируйте всё, что выше до блока 1.PHP-FPM ###

  ### Статичные файлы не логируем, выставляем http заголовок Expires на год
  #location ~* ^.+.(jpe?g|gif|png|svg|js|css|mp3|ogg|mpe?g|avi|zip|gz|bz2?|rar|swf|ogg|ogv|svg|svgz|eot|otf|woff|mp4|ttf|css|rss|atom|js|jpg|jpeg|gif|png|ico|zip|tgz|gz|rar|bz2|doc|xls|exe|ppt|tar|mid|midi|wav|bmp|rtf)$ {
  #  expires 365d; log_not_found off; access_log off;
  #  try_files $uri $uri/ @apache ;
  #}


  #location / {
  #  try_files $wpsupercache $uri @apache ;
  #}


  ### php скрипты отправляем сразу в бекенд
  #location ~ [^/].ph(pd*|tml)$ {
  #  try_files /does_not_exists @apache;
  #}


  ### Отправляем запросы к бекенду (Apache или php-fpm)
  ### Если у вас в бекенде Apache, раскомментируйте блок ниже
  #location @apache {
    ### Apache ###
    #proxy_pass http://127.0.0.1:8080;
    #proxy_redirect http://127.0.0.1:8080 /;
    #proxy_set_header Host $host;
    #proxy_set_header X-Forwarded-For $proxy_add_x_forwarded_for;
    #proxy_set_header X-Forwarded-Proto $scheme;
  #}
}
Учтите, что Apache тут висит на порту
8080
Перезагружаем NGINX
nginx -t && nginx -s reload
Как проверить правильность URI файлов кеша WP Super Cache
Допустим, Вы хотите проверить страницу http://example.com/mypage, правильно ли видит NGINX её расположение в кеше. Для этого надо:
-
Раскомментировать строку с
add_header, код будет примерно следующего содержания:set $wpsc /wp-content/cache/supercache/$http_host$cache_uri/index.html; if ( $scheme = 'https' ){ set $wpsc /wp-content/cache/supercache/$http_host$cache_uri/index-https.html; } add_header X-$wpsc_uri $wpsc always; - Перезагрузить nginx:
nginx -s reload
- Открыть Хром в режиме инкогнито (Ctrl + Shift + N) и открыть любую страницу сайта
- Нажать F12, откроется консоль. Перезагрузить страницу F5
- В консоли выбрать
Network—Doc, затем кликнуть самый верхний пункт в списке (это наша страницаmypage), раскроются подробности — в пунктеResponce Headersвидим наш URI.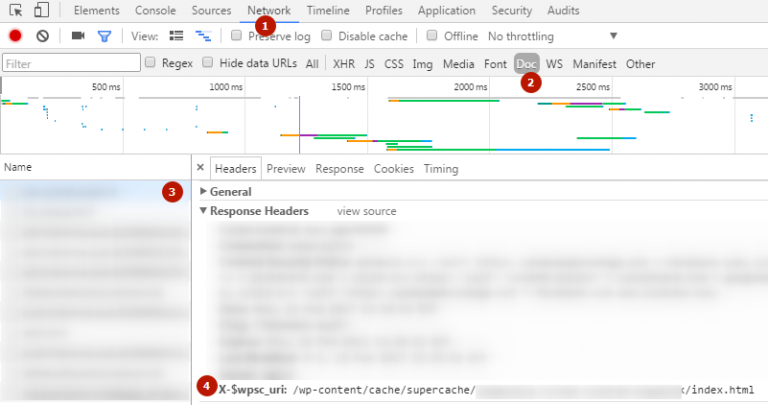
Как проверить заголовки в консоли F12 Googe Chrome
В переменной
X-$wpsc_uriдолжно находиться следующее:/wp-content/cache/supercache/example.com/mypage/index.html
Устранение ошибок в работе WP Super Cache
Порой возникают небольшие проблемы, которые довольно просто решаются
Отсутствующие модули Apache

Если в бекенде PHP-FPM, а не Apache, просто проигнорируйте это сообщение.
Эта ошибка решается довольно просто — включением необходимых модулей Apache
Если у вас стандартный виртуальный хостинг — напишите в службу поддержки, они решат этот вопрос.
Если у вас свой сервер, запускаете в консоли SSH:
a2enmod headers && a2enmod expires
Потом перезагружаете Апач
service apache2 restart
WP Super Cache не создает общий кэш
Убедитесь, что вы нажимаете именно на кнопку Создать общий кеш сейчас. Через 10 секунд перезагрузите страницу, вы увидите процесс создания кеша. Заодно проверьте каталог /wp-content/cache/supercache/имя_домена/структура_сайта/
Если кеш всё равно не создаётся, и у вас простой хостинг — напишите в службу поддержки, они помогут решить вопрос.
Если у вас свой сервер или vps/vds, и кеш не создаётся, проверьте, есть ли у WordPress права писать в каталог /wp-content/cache/. Это можно сделать, скажем, с помощью Far Manager:
- Авторизуетесь на сервере по ssh
- Переходите в каталог с файлами сайта, например
cd /var/www/sheensay.ru/wp-content/
- Перемещаете указатель на директорию
cacheи жмёте комбинацию Ctrl + A - Вылезет окно

Права на запись /wp-content/cache/
- В окошке посмотрите на строки
Owner,Group(здесь должны быть прописаны данные аккаунта по аналогии с моим примером). Воспользуйтесь командой chown, чтобы поменять владельца и группу. В консоль пишем:chown -Rv sheensay:sheensay cache
Или, так как часто nginx работает под пользователем
www-datachown -Rv www-data:www-data cache
- Также, обратите внимание на права доступа
Octal: 0755 — это верный уровень. Если что, можно сменить права доступа командой chmod, либо прямо из Far Manager путём проставления галочек вPermissions, не забывая поставить галочкуSet attributes recursively(установить атрибуты рекурсивно, то есть во всех вложенных каталогах тоже).
Как очистить кеш WP Super Cache
Периодически возникает необходимость подчистить кеш. Допустим, вы внесли изменения в рабочий код сайта и хотите, чтобы они немедленно вступили в силу.
Для этого есть 3 варианта
Не забудьте сбросить кеш браузера, например, Ctrl + F5 для конкретной страницы во фронтенде или Ctrl + Shift + Delete для Google Chrome
Как правильно удалить WP Super Cache
Плагин удаляется так же, как и любой другой — через панель управления http://example.com/wp-admin/plugins.php, деактивацию плагина и его последующего удаления.
Учтите, что даже простая деактивация плагина удаляет его кеш и сбрасывает все настройки на начальные, поэтому после повторной активации вам придётся проводить настройку заново
Если хотите удалить его вручную:
- Отключить кеширование и очистить кеш (желательно 3 способом)
- Деактивировать плагин
- Удалить из wp-config.php
define( 'WP_CACHE', true ); - Удалить из
.htaccessправила, добавленные в секцию#WPSuperCache - Удалить
/wp-content/advanced-cache.phpи/wp-content/wp-cache-config.php - Удалить
/wp-content/cache/ - Удалить
/wp-content/plugins/wp-super-cache/
W3 Total Cache или WP Super Cache
Меня часто спрашивают, какой плагин лучше выбрать, W3 Total Cache или WP Super Cache? Отвечу по пунктам:
- Выбирайте WP Super Cache, если:
-
- Если у вас информационный сайт — статейник, блог и тому подобное;
- Вы не особо разбираетесь или не хотите разбираться в тонкостях работы и настроек сайтов и плагинов. WP Super Cache проще в настройке, но от этого он не менее эффективен в работе;
- Выбирайте W3 Total Cache, если:
-
- Если у вас сервис или сайт, у которого большая аудитория — авторизованные пользователи — сервис, где основной сервис внутри, для доступа к которому нужно авторизоваться, форум, соцсеть и тому подобное;
- Вы — программист или пытливый человек, которому нравится возиться и разбираться в тонкой настройке кеширования, контролировать подобные тонкости.
В заключение
Пользуйтесь плагинами страничного кеширования в WordPress, даже если ваш сайт малопосещаемый, возможно, это поможет ему ранжироваться выше.
WP Super Cache — самый простой, проверенный и распространённый инструмент из подобных, который при должной настройке сможет удерживать работоспособным любой нагруженный проект на WordPress даже при внезапных всплесках посещаемости.
 Загрузка…
В популярном плагине кеширования WP Super Cache после обновления с 1.6.1 до 1.6.2 перестало работать кеширование, а именно WP стал отдавать при каждом запросе страницу с новой меткой времени вместо кешированный страницы с одной и той же меткой времени. Встроенная проверка кеширования (находится в настройках плагина) так и показывает, что метки времени не совпадают:
Также можно проверить кеширование, не заходя в настройки, а просто посмотрев метки в конце исходного кода страницы.
Поиск причины ошибки кеширования
При проверке выяснилось, что файлы кеша создаются плагином, но при каждом повторном запросе той же страницы сайт не отдаёт ранее кешированную страницу, а обновляет её и затем отдаёт обновлённую. Как будто кеш был просрочен.
Поскольку у меня была отключена сборка мусора — задано нулевое значение для параметра Таймаут кэширования, предположил, что нулевое значение может восприниматься новой версией плагина буквально, то есть как нулевое число секунд хранения.
После того, как поменял значение Таймаут кеширования на ненулевое, а именно, 604800 секунд (неделя):
кеширование сразу стало работать как ожидается – плагин стал отдавать именно кешированные страницы с одной и той же меткой времени.
Выводы
В итоге, если после обновления на WP Super Cache 1.6.2 возникает проблема кеширования, это может быть связано с отключенным сбором мусора (нулевое значение таймаута кеширования), и для восстановления работы кеша можно использовать большое ненулевое значение. Другие пользователи также подтверждают это наблюдение.
Надеюсь, в следующей версии автор плагина исправит эту ошибку.
UPD. Новая версия
На днях вышло обновление плагина WP Super Cache 1.6.3, где эта проблема исправлена:
Really disable garbage collection when timeout = 0 (#571)
Журнал изменений
Попробуем…
Full disclosure: WP Super Cache is a great caching plugin. We’re taking the time to write this post to help some users fix the most common issues encountered when you use WP Super Cache to speed up your website. WP Rocket is a great plugin but sometimes, all you need is a little help to debug your free option instead of going for premium. This post aims to help you figure out how to fix some problems and let you know which ones require some heavy-duty technical knowledge.
How to avoid caching plugin issues
Choose your caching solution wisely. There are many free and premium WordPress caching plugins out there. Here are the main things you should consider when picking a caching plugin for your website:
- Price: free isn’t necessarily free for you if you spend hours setting things up and getting errors. Consider how much time, effort and money you are willing to put in your caching efforts.
- Ease of use: setting up some plugins can feel like rocket science. This doesn’t have to be the case though. Do your homework and check which solutions are best for beginners or pros.
- Support: make sure you can rely on great documentation and human support for your plugin. Some plugins have a great community of users to help you out and others offer premium support to make sure that any issue gets resolved fast. Getting errors in WordPress is frustrating so it’s good to know you can have someone to count on.
Is WP Super Cache Bad For SEO?
We noticed some of you were wondering about that. Here’s the main point: caching is awesome to speed up a website. WordPress is one of those CMS that offers plenty of choice in terms of caching plugins. But some of these plugins can affect your website negatively if they are not configured properly.
Caching plugins need to auto renew the cache otherwise, many changes made to your website won’t be reflected. Changes made to links, text, pictures or design won’t be visible until the cache is cleared out otherwise. It can become quickly infuriating because you don’t want to find out that Google indexed some old content you thought was gone from your website. If you are a WP Super Cache user, you should remember to push the delete cache button in the settings to get WordPress to display your changes.
Another alternative is to use a plugin that’s been designed with search engine optimization in mind. WP Rocket automatically…
Will a caching plugin help CPU usage spikes?
Using a CMS like WordPress means that it must connect to the database to see if the requested page exists. If you own a high traffic website or if you see a surge in traffic due to bots or a viral post, this can quickly use up a lot of CPU resources from your server.
One way to reduce CPU usage spikes is to install and setup a caching plugin like WP Super Cache, W3 Total Cache or WP Rocket. These plugins cache the first visitor’s request of a new page to a plain HTML file on the server so that if can be served to the next visitor requesting it (unless you’ve made some changes to it in the meantime).
WP Super Cache For Developers
Developers love WP Super Cache as a caching plugin for WordPress over W3 Total Cache because it’s easier to setup and has less compatibility problems with other WordPress plugins. Still, it comes with its own set of problems so if you are a developer looking for a plugin that`s going to remain compatible and effective in the future, we recommend you check out our WP Rocket developer license (unlimited websites). Let other developers work on keeping your websites’ caching secure, up-to-date and efficient for years to come.
Fixes for common WP Super Cache error notifications
WP Super Cache may break WordPress plugins, themes or your ability to even log into WordPress depending on its compatibility with other plugins or themes used and the overall configuration of this caching plugin. So how can you tell if this plugin is causing all your troubles? Typical symptoms are a spikes in CPU usage, 500 errors or pages not displaying correctly, WooCommerce shopping carts not updating or showing the wrong order. Here are some common errors that you can encounter when using WP Super Cache:
Failed To Acquire Key 0x152b: Permission Denied
File locking errors such as “failed to acquire key 0x152b: Permission denied in…” or “Page not cached by WP Super Cache. Could not get mutex lock.” mean that you may have to use file locking. File locking is a mechanism that restricts access to a file by allowing only one user or process access at any specific time. To get rid of this error you must edit wp-content/wp-cache-config.php and uncomment “$use_flock = true” or set $sem_id to a different value. Alternatively, you can choose to disable file locking by going to the Admin screen but this should be a last resort to solve this WP Super Cache issue.
500 Internal Server Error messages
Sometimes, WP Super Cache will cause 500 errors to pop up upon installation or upon updating. In those cases, the easiest fix is to uninstall the plugin and to do a fresh install of WP Super Cache.
If you’ve been getting these 500 errors pretty regularly when using WP Super Cache, maybe it’s time to think about using a new caching plugin.
WP Super Cache 0 Cached Pages
This issue requires intermediate to expert knowledge to be fixed. Oftentimes, it has something to do with the wp-settings.php file. You need to make sure that there are no missing line in that file. You can read a good tutorial to help you along. If you don’t feel confident doing this by yourself, consider asking your developer or switching to a caching plugin that’s more user-friendly.
WP Super Cache Delete Cached Pages
This isn’t an error per say but if you are looking for a way to delete cached pages you could be looking to do two very different things: clearing your cache or excluding certain pages from being cached. If you are looking to clear your cache, you can go to the plugin’s settings and click on “Delete Cache”.
How to Exclude Pages in WP Super Cache
Go to the plugin’s settings and in Advanced, select the accepted filenames and rejected URIs to add the URLs you wish to exclude. Save your new settings and you should be good to go. Normally, WC 1.4.2+ sets the DONOTCACHEPAGE, constant which means you shouldn’t have this issue with the latest version of WordPress and of WP Super Cache. If the problem persists in WooCommerce, we recommend switching to WP Rocket as it is 100% compatible with WooCommerce. It guarantees you won’t ever have these issues again.
How To Uninstall WP Super Cache WordPress Plugin
If you suspect that WP Super Cache is causing issues on your website or if you would like to install another WordPress caching plugin, it is very important to make sure that you uninstall it the right way. Otherwise, it could haunt you and your load time performance!
Sidenote if you are considering WP Rocket: the plugin will automatically detect other caching plugins and let you know that you should get rid of certain files via FTP. Within the wp-content/cache folder, the only 2 folders WP Rocket creates are /min and /wp-rocket. All others should be removed.
Tutorial Requirements
You should have:
- A WordPress website setup
- Be using WP Super Cache Plugin
- Have admin access to the WordPress website
- Have FTP access to the web server
Estimated Completion Time: < 15 Minutes
Difficulty: Medium
Step 1: Turn Off All Caching
Go to the WP Super Cache settings page WordPress and clear the cache.
Step 2: Deactivate and Delete the Plugin
Go to the plugins page and deactivate WP Super Cache. Once that’s done, you should see the Delete option appear. Go ahead and delete the plugin.
Step 3: Remove Files From the Web Server
Back everything up before you remove files, just in case. Remove the WP_CACHE define from wp-config.php. Look for define( ‘WP_CACHE’, true ); and remove the files wp-content/advanced-cache.php and wp-content/wp-cache-config.php.
If you plan on installing WP Rocket, you can also delete the entire wp-content/cache folder to make sure everything is removed. WP Rocket will recreate this folder and you’ll be set.
Step 4: Solve any .htaccess errors caused by WP Super Cache
Make sure that no WP Super Cache rules remain in your .htaccess file after you uninstall it by removing the Super Cache mod_rewrite rules from the file. Create a backup of your file before you delete anything from it. Once modified, just reupload it to the server, check that everything works and you are good to go.
That’s it, wave goodbye to WP Super Cache!
The Elevator Pitch, or Why you should switch to WP Rocket
We’ll make it short and sweet:
- It’s always compatible with WordPress, WooCommerce and CDNs.
- It gets s#@! done. Your WordPress will be blazingly fast after your setup.
- Switching to WP Rocket is easy and our plugin will tell you if you have other caching things lurking in WordPress that should be removed.
- We have awesome support in 5 languages! Our Rocketeers are very active helping customers solve their issues.
- WP Rocket is easy to use. We mean it. It is seriously easy to get started.
Try it for yourself: Get WP Rocket now!
And if for some reason you aren’t convinced, we have a 14-day money back guarantee.
 Всем привет! Сегодня не совсем обычная статья для моего блога, в которой я расскажу о проблеме, возникшей у меня при установке плагина wp super cache, может, кому из вас и пригодится.
Почему необычная? Так как она вряд ли мне принесёт трафика, но весьма будет полезна для вас, дорогие друзья.
Ни для кого не секрет, что 90% вебмастеров, сегодня используют популярный движок на платформе wordpress и мой блог не стал исключением. Если вы помните, раньше я использовал движок DLE, но там есть много ещё над чем работать разработчикам, но статья не об этом.
Основное преимущество wordpress в его простоте. Как правило, нужно пару движении и «уаля» у вас на блоге новая «плюшка» в виде плагина. Да, друзья, может, кому интересно, но плагины тормозят работу wordpress, но это можно минимизировать при помощи того же плагина под названием wp super cache.
WP Super Cache — плагин, отвечающий за кэширования данных вашего сайта, более простым языком он хранит информацию у себя в папке. В результате работы wp super cache, ваш сайт загружается в несколько раз быстрее сайтов, где не используют технологию кэширования данных.
Важно! Для wordpress есть и другие плагины, отвевающие за кэширование страницы, но совместная их работа, как правило, приводит к ухудшению скорости загрузки сайта. Помните! Используйте только один плагин сохранения данных (кэширования).
Собственно сама проблема плагина кэширования
Вот я решил ускорить свой блог, установив wp super cache, но столкнулся с проблемой некорректной работы с плагином для мобильной версии блога WPtoutch. Вот такое я получил сообщение от wp super cache:
WPtouch: WP Super Cache необходимо конфигурировать для корректной работы с WPtouch.
Разрешение данной проблемы предотвращает обслуживание кэшированных страниц настольного компьютера на мобильном устройстве и в обратном направлении.
Пошаговое руководство изложено на незнакомом мне английском языке, что затруднило мне задачу исправления этой ошибки.
Некорректная работа WPtouch и WP Super Cache — «видеотаблетка от болезни»
Сразу скажу, я первым делам бросился искать ответ на форумах, — но без результативно. Изучив проблему «своими силами», я нашёл выход из сложившейся ситуации. Как я это сделал советую посмотреть в видеоролике, ПРИЯТНОГО ПРОСМОТРА!
Если у вас остались вопросы, пишите в комментариях — обсудим, не стесняйтесь. А пока вы ждете новою статью, советую прочесть, не менее интересный обзор, как я исправил некорректную работу предпросмотра записи в wordpress. До встречи, на просторах seovpmr.ru!
Бала ли вам статья полезной?
I have to set up the cache on a WordPress project, which is already on «support mode» in the agency for a while.
The plugin WP Super Cache was already installed so I activated it, to setting up it.
I work locally on dev mode and the project have a preprod and a prod environments.
When I activated it, the following error messages appear in back-office :
Warning:
include(/var/www/xx/xx/xx/xx/xx/xx/wp-content/plugins/wp-super-cache/wp-cache-base.php):
failed to open stream: No such file or directory in
/var/www/wp-content/plugins/wp-super-cache/wp-cache.php on line 65Warning: include(): Failed opening
‘/var/www/xx/xx/xx/xx/xx/xx/wp-content/plugins/wp-super-cache/wp-cache-base.php’
for inclusion (include_path=’.:/usr/share/php:/usr/share/pear’) in
/var/www/wp-content/plugins/wp-super-cache/wp-cache.php on line 65Warning:
include_once(/var/www/xx/xx/xx/xx/xx/xx/wp-content/plugins/wp-super-cache/ossdl-cdn.php):
failed to open stream: No such file or directory in
/var/www/wp-content/plugins/wp-super-cache/wp-cache.php on line 82Warning: include_once(): Failed opening
‘/var/www/xx/xx/xx/xx/xx/xx/wp-content/plugins/wp-super-cache/ossdl-cdn.php’
for inclusion (include_path=’.:/usr/share/php:/usr/share/pear’) in
/var/www/wp-content/plugins/wp-super-cache/wp-cache.php on line 82
Looking in the file wp-cache.php on lines 65 and 82, it says that :
include(WPCACHEHOME . 'wp-cache-base.php');
Path ‘dirname(FILE).’/…wp-cache-base.php’ not found Include
expression is not resolved
include_once( WPCACHEHOME . 'ossdl-cdn.php' );
Path ‘dirname(FILE).’/…ossdl-cdn.php’ not found Include expression
is not resolved
So I was thinking about changing the path. However, this is bothering me because I am afraid that this action will be potentially a troubleshooting cause when the plugin will have to be updated.
I have no ideas how I can fix it.
Uninstall and reinstall the plugin ?
Use an other plugin to manage the cache?
Thank you in advance for your answers. Have a nice day!
- Details
- Reviews
- Installation
- Development
This plugin generates static html files from your dynamic WordPress blog. After a html file is generated your webserver will serve that file instead of processing the comparatively heavier and more expensive WordPress PHP scripts.
The static html files will be served to the vast majority of your users:
- Users who are not logged in.
- Users who have not left a comment on your blog.
- Or users who have not viewed a password protected post.
99% of your visitors will be served static html files. One cached file can be served thousands of times. Other visitors will be served custom cached files tailored to their visit. If they are logged in, or have left comments those details will be displayed and cached for them.
The plugin serves cached files in 3 ways (ranked by speed):
- Expert. The fastest method is by using Apache mod_rewrite (or whatever similar module your web server supports) to serve “supercached” static html files. This completely bypasses PHP and is extremely quick. If your server is hit by a deluge of traffic it is more likely to cope as the requests are “lighter”. This does require the Apache mod_rewrite module (which is probably installed if you have custom permalinks) and a modification of your .htaccess file which is risky and may take down your site if modified incorrectly.
- Simple. Supercached static files can be served by PHP and this is the recommended way of using the plugin. The plugin will serve a “supercached” file if it exists and it’s almost as fast as the mod_rewrite method. It’s easier to configure as the .htaccess file doesn’t need to be changed. You still need a custom permalink. You can keep portions of your page dynamic in this caching mode.
- WP-Cache caching. This is mainly used to cache pages for known users, URLs with parameters and feeds. Known users are logged in users, visitors who leave comments or those who should be shown custom per-user data. It’s the most flexible caching method and slightly slower. WP-Cache caching will also cache visits by unknown users if supercaching is disabled. You can have dynamic parts to your page in this mode too. This mode is always enabled but you can disable caching for known users, URLs with parameters, or feeds separately. Set the constant “DISABLE_SUPERCACHE” to 1 in your wp-config.php if you want to only use WP-Cache caching.
If you’re not comfortable with editing PHP files then use simple mode. It’s easy to set up and very fast.
Recommended Settings
- Simple caching.
- Compress pages.
- Don’t cache pages for known users.
- Cache rebuild.
- CDN support.
- Extra homepage checks.
Garbage collection is the act of cleaning up cache files that are out of date and stale. There’s no correct value for the expiry time but a good starting point is 1800 seconds.
Consider deleting the contents of the “Rejected User Agents” text box and allow search engines to cache files for you.
Preload as many posts as you can and enable “Preload Mode”. Garbage collection of old cached files will be disabled. If you don’t care about sidebar widgets updating often set the preload interval to 2880 minutes (2 days) so all your posts aren’t recached very often. When the preload occurs the cache files for the post being refreshed is deleted and then regenerated. Afterwards a garbage collection of all old files is performed to clean out stale cache files.
Even with preload mode enabled cached files will still be deleted when posts are modified or comments made.
Development
- Active development of this plugin is handled on GitHub.
- Translation of the plugin into different languages is on the translation page.
Documentation
If you need more information than the following, you can have a look at the Developer documentation.
Preloading
You can generate cached files for the posts, categories and tags of your site by preloading. Preloading will visit each page of your site generating a cached page as it goes along, just like any other visitor to the site. Due to the sequential nature of this function, it can take some time to preload a complete site if there are many posts.
To make preloading more effective it can be useful to disable garbage collection so that older cache files are not deleted. This is done by enabling “Preload Mode” in the settings. Be aware however, that pages will go out of date eventually but that updates by submitting comments or editing posts will clear portions of the cache.
Garbage Collection
Your cache directory fills up over time, which takes up space on your server. If space is limited or billed by capacity, or if you worry that the cached pages of your site will go stale then garbage collection has to be done. Garbage collection happens on a regular basis and deletes old files in the cache directory. On the advanced settings page you can specify:
1. Cache timeout. How long cache files are considered fresh for. After this time they are stale and can be deleted.
2. Scheduler. Setup how often garbage collection should be done.
3. Notification emails. You can be informed on garbage collection job progress.
There’s no right or wrong settings for garbage collection. It depends on your own site.
If your site gets regular updates, or comments then set the timeout to 1800 seconds, and set the timer to 600 seconds.
If your site is mostly static you can disable garbage collection by entering 0 as the timeout, or use a really large timeout value.
The cache directory, usually wp-content/cache/ is only for temporary files. Do not ever put important files or symlinks to important files or directories in that directory. They will be deleted if the plugin has write access to them.
CDN
A Content Delivery Network (CDN) is usually a network of computers situated around the world that will serve the content of your website faster by using servers close to you. Static files like images, Javascript and CSS files can be served through these networks to speed up how fast your site loads. You can also create a “poor man’s CDN” by using a sub domain of your domain to serve static files too.
OSSDL CDN off-linker has been integrated into WP Super Cache to provide basic CDN support. It works by rewriting the URLs of files (excluding .php files) in wp-content and wp-includes on your server so they point at a different hostname. Many CDNs support origin pull. This means the CDN will download the file automatically from your server when it’s first requested, and will continue to serve it for a configurable length of time before downloading it again from your server.
Configure this on the “CDN” tab of the plugin settings page. This is an advanced technique and requires a basic understanding of how your webserver or CDNs work. Please be sure to clear the file cache after you configure the CDN.
REST API
There are now REST API endpoints for accessing the settings of this plugin. You’ll need to be authenticated as an admin user with permission to view the settings page to use it. This has not been documented yet but you can find all the code that deals with this in the “rest” directory.
Custom Caching
It is now possible to hook into the caching process using the add_cacheaction() function.
Three hooks are available:
- ‘wp_cache_get_cookies_values’ – modify the key used by WP Cache.
- ‘add_cacheaction’ – runs in phase2. Allows a plugin to add WordPress hooks.
- ‘cache_admin_page’ – runs in the admin page. Use it to modify that page, perhaps by adding new configuration options.
There is one regular WordPress filter too. Use the “do_createsupercache” filter
to customize the checks made before caching. The filter accepts one parameter.
The output of WP-Cache’s wp_cache_get_cookies_values() function.
WP Super Cache has its own plugin system. This code is loaded when WP Super Cache loads and can be used to change how caching is done. This is before most of WordPress loads so some functionality will not be available. Plugins can be located anywhere that PHP can load them. Add your own plugin either:
- by putting your plugin in the wp-content/plugins/wp-super-cache-plugins directory, or
- by calling wpsc_add_plugin( $name ) where $name is the full filename and path to the plugin. You only need to call that function once to add it. Use wpsc_delete_plugin( $name ) to remove it from the list of loaded plugins.
The cookies WP Super Cache uses to identify “known users” can be modified now by adding the names of those cookies to a list in the plugin configuration. Use wpsc_add_cookie( $name ) to add a new cookie, and wpsc_delete_cookie( $name ) to remove it. The cookie names also modify the mod_rewrite rules used by the plugin but I recommend using Simple mode caching to avoid complications with updating the .htaccess file.
The cookie name and value are used to differenciate users so you can have one cookie, but different values for each type of user on your site for example. They’ll be served different cache files.
See plugins/searchengine.php as an example I use for my No Adverts for Friends plugin.
Troubleshooting
If things don’t work when you installed the plugin here are a few things to check:
- Is wp-content writable by the web server?
- Is there a wp-content/wp-cache-config.php ? If not, copy the file wp-super-cache/wp-cache-config-sample.php to wp-content/wp-cache-config.php and make sure WPCACHEHOME points at the right place.
- Is there a wp-content/advanced-cache.php ? If not, then you must copy wp-super-cache/advanced-cache.php into wp-content/. You must edit the file and change the path so it points at the wp-super-cache folder.
- If pages are not cached at all, remove wp-content/advanced-cache.php and recreate it, following the advice above.
-
Make sure the following line is in wp-config.php and it is ABOVE the “require_once(ABSPATH.’wp-settings.php’);” line:
define( 'WP_CACHE', true ); - Try the Settings->WP Super Cache page again and enable cache.
- Look in wp-content/cache/supercache/. Are there directories and files there?
- Anything in your php error_log?
- If your browser keeps asking you to save the file after the super cache is installed you must disable Super Cache compression. Go to the Settings->WP Super Cache page and disable it there.
- The plugin does not work very well when PHP’s safe mode is active. This must be disabled by your administrator.
- If pages are randomly super cached and sometimes not, your blog can probably be viewed with and without the “www” prefix on the URL. You should choose one way and install the Enforce www preference plugin if you are using an old WordPress install. The latest versions redirect themselves (you should always be running the latest version of WordPress anyway!)
- Private Server users at Dreamhost should edit wp-content/wp-cache-config.php and set the cache dir to “/tmp/” if they are getting errors about increasing CPU usage. See this discussion for more.
- File locking errors such as “failed to acquire key 0x152b: Permission denied in…” or “Page not cached by WP Super Cache. Could not get mutex lock.” are a sign that you may have to use file locking. Edit wp-content/wp-cache-config.php and uncomment “$use_flock = true” or set $sem_id to a different value. You can also disable file locking from the Admin screen as a last resort.
- Make sure cache/wp_cache_mutex.lock is writable by the web server if using coarse file locking.
- The cache folder cannot be put on an NFS or Samba or NAS share. It has to be on a local disk. File locking and deleting expired files will not work properly unless the cache folder is on the local machine.
-
Garbage collection of old cache files won’t work if WordPress can’t find wp-cron.php. If your hostname resolves to 127.0.0.1 it could be preventing the garbage collection from working. Check your access_logs for wp-cron.php entries. Do they return a 404 (file not found) or 200 code? If it’s 404 or you don’t see wp-cron.php anywhere WordPress may be looking for that script in the wrong place. You should speak to your server administator to correct this or edit /etc/hosts on Unix servers and remove the following line. Your hostname must resolve to the external IP address other servers on the network/Internet use. See http://yoast.com/wp-cron-issues/ for more. A line like “127.0.0.1 localhost localhost.localdomain” is ok.
127.0.0.1 example.com - If old pages are being served to your visitors via the supercache, you may be missing Apache modules (or their equivalents if you don’t use Apache). 3 modules are required: mod_mime, mod_headers and mod_expires. The last two are especially important for making sure browsers load new versions of existing pages on your site.
- The error message, “WP Super Cache is installed but broken. The path to wp-cache-phase1.php in wp-content/advanced-cache.php must be fixed!” appears at the end of every page. Open the file wp-content/advanced-cache.php in your favourite editor. Is the path to wp-cache-phase1.php correct? This file will normally be in wp-content/plugins/wp-super-cache/. If it is not correct the caching engine will not load.
- Caching doesn’t work. The timestamp on my blog keeps changing when I reload. Check that the path in your .htaccess rules matches where the supercache directory is. You may have to hardcode it. Try disabling supercache mode.
-
If supercache cache files are generated but not served, check the permissions on all your wp-content/cache/supercache folders (and each of wp-content cache and supercache folders) and wp-content/cache/.htaccess. If your PHP runs as a different user to Apache and permissions are strict Apache may not be able to read the PHP generated cache files. To fix you must add the following line to your wp-config.php (Add it above the WP_CACHE define.) Then clear your cache.
umask( 0022 ); -
If you see garbage in your browser after enabling compression in the plugin, compression may already be enabled in your web server. In Apache you must disable mod_deflate, or in PHP zlib compression may be enabled. You can disable that in three ways. If you have root access, edit your php.ini and find the zlib.output_compression setting and make sure it’s “Off” or add this line to your .htaccess:
php_flag zlib.output_compression offIf that doesn’t work, add this line to your wp-config.php:
ini_set('zlib.output_compression', 0); - The “white screen of death” or a blank page when you visit your site is almost always caused by a PHP error but it may also be caused by APC. Disable that PHP extension if you have trouble and replace with eAccelerator or Xcache.
- After uninstalling, your permalinks may break if you remove the WordPress mod_rewrite rules too. Regenerate those rules by visiting the Settings->Permalink page and saving that form again.
- If your blog refuses to load make sure your wp-config.php is correct. Are you missing an opening or closing PHP tag?
- Your front page is ok but posts and pages give a 404? Go to Settings->permalinks and click “Save” once you’ve selected a custom permalink structure. You may need to manually update your .htaccess file.
-
If certain characters do not appear correctly on your website your server may not be configured correctly. You need to tell visitors what character set is used. Go to Settings->Reading and copy the ‘Encoding for pages and feeds’ value. Edit the .htaccess file with all your Supercache and WordPress rewrite rules and add this at the top, replacing CHARSET with the copied value. (for example, ‘UTF-8’)
AddDefaultCharset CHARSET - Use Cron View to help diagnose garbage collection and preload problems. Use the plugin to make sure jobs are scheduled and for what time. Look for the wp_cache_gc and wp_cache_full_preload_hook jobs.
- The error message, “WP Super Cache is installed but broken. The constant WPCACHEHOME must be set in the file wp-config.php and point at the WP Super Cache plugin directory.” appears at the end of every page. You can delete wp-content/advanced-cache.php and reload the plugin settings page or edit wp-config.php and look for WPCACHEHOME and make sure it points at the wp-super-cache folder. This will normally be wp-content/plugins/wp-super-cache/ but you’ll likely need the full path to that file (so it’s easier to let the settings page fix it). If it is not correct the caching engine will not load.
- If your server is running into trouble because of the number of semaphores used by the plugin it’s because your users are using file locking which is not recommended (but is needed by a small number of users). You can globally disable file locking by defining the constant WPSC_DISABLE_LOCKING, or defining the constant WPSC_REMOVE_SEMAPHORE so that sem_remove() is called after every page is cached but that seems to cause problems for other processes requesting the same semaphore. Best to disable it.
- Set the variable $htaccess_path in wp-config.php or wp-cache-config.php to the path of your global .htaccess if the plugin is looking for that file in the wrong directory. This might happen if you have WordPress installed in an unusual way.
Install like any other plugin, directly from your plugins page but make sure you have custom permalinks enabled. Go to the plugin settings page at Settings->WP Super Cache and enable caching.
How to uninstall WP Super Cache
Almost all you have to do is deactivate the plugin on the plugins page. The plugin should clean up most of the files it created and modified, but it doesn’t as yet remove the mod_rewrite rules from the .htaccess file. Look for the section in that file marked by SuperCache BEGIN and END tags. The plugin doesn’t remove those because some people add the WordPress rules in that block too.
To manually uninstall:
- Turn off caching on the plugin settings page and clear the cache.
- Deactivate the plugin on the plugins page.
- Remove the WP_CACHE define from wp-config.php. It looks like
define( 'WP_CACHE', true ); - Remove the Super Cache mod_rewrite rules from your .htaccess file.
- Remove the files wp-content/advanced-cache.php and wp-content/wp-cache-config.php
- Remove the directory wp-content/cache/
- Remove the directory wp-super-cache from your plugins directory.
If all else fails and your site is broken
- Remove the WP_CACHE define from wp-config.php. It looks like
define( 'WP_CACHE', true ); - Remove the rules (see above) that the plugin wrote to the .htaccess file in your root directory.
- Delete the wp-super-cache folder in the plugins folder.
- Optionally delete advanced-cache.php, wp-cache-config.php and the cache folder in wp-content/.
-
How do I know my blog is being cached?
-
Go to Settings -> WP Super Cache and look for the “Cache Tester” form on the easy settings page. Click “Test Cache” and the plugin will request the front page of the site twice, comparing a timestamp on each to make sure they match.
If you want to do it manually, enable debugging in the plugin settings page and load the log file in a new browser tab. Then view your blog while logged in and logged out. You should see activity in the log. View the source of any page on your site. When a page is first created, you’ll see the text “Dynamic page generated in XXXX seconds.” and “Cached page generated by WP-Super-Cache on YYYY-MM-DD HH:MM:SS” at the end of the source code. On reload, a cached page will show the same timestamp so wait a few seconds before checking.
If Supercaching is disabled and you have compression enabled, the text “Compression = gzip” will be added. If compression is disabled and the page is served as a static html file, the text “super cache” will be added. The only other way to check if your cached file was served by PHP script or from the static cache is by looking at the HTTP headers. PHP cached pages will have the header “WP-Super-Cache: Served supercache file from PHP”. WPCache cached files will have the header, “WP-Super-Cache: Served WPCache cache file”. You should also check your cache directory in wp-content/cache/supercache/hostname/ for static cache files.
If the plugin rules are missing from your .htaccess file, the plugin will attempt to serve the super cached page if it’s found. The header “WP-Super-Cache: Served supercache file from PHP” if this happens.
The pagespeed module for Apache may cause problems when testing. Disable it if you notice any problems running the cache tester. -
How do I disable Supercaching?
-
If you only want to use the WP-Cache engine then edit your wp-config.php or create an mu-plugin that sets the constant ‘DISABLE_SUPERCACHE’ to 1.
-
WP-Cache vs Supercache files
-
All cache files are stored in wp-content/cache/supercache/HOSTNAME/ where HOSTNANE is your domain name. The files are stored in directories matching your site’s permalink structure. Supercache files are index.html or some variant of that, depending on what type of visitor hit the blog. Other files are named wp-cache-XXXXXXXXXXXXXXXXX.php. Associated meta filesnames start with “meta”. Those files contain information about the cached file. These files are generated by the “WPCache caching” engine in the plugin.
-
Will comments and other dynamic parts of my blog update immediately?
-
Comments will show as soon as they are moderated, depending on the comment policy of the blog owner. Other dynamic elements on a page may not update unless they are written in Javascript, Flash, Java or another client side browser language. The plugin really produces static html pages. No PHP is executed when those pages are served. “Popularity Contest” is one such plugin that will not work.
-
Will the Super Cache compression slow down my server?
-
No, it will do the opposite. Super Cache files are compressed and stored that way so the heavy compression is done only once. These files are generally much smaller and are sent to a visitor’s browser much more quickly than uncompressed html. As a result, your server spends less time talking over the network which saves CPU time and bandwidth, and can also serve the next request much more quickly.
-
How do I make certain parts of the page stay dynamic?
-
Note: this functionality is disabled by default. You will have to enable it on the Advanced Settings page.
There are 2 ways of doing this. You can use Javascript to draw the part of the page you want to keep dynamic. That’s what Google Adsense and many widgets from external sites do and is the recommended way. Or you can use a WP Super Cache filter to do the job but you can’t use mod_rewrite mode caching. You have to use the “simple” delivery method or disable supercaching.
WP Super Cache 1.4 introduced a cacheaction filter called wpsc_cachedata. The cached page to be displayed goes through this filter and allows modification of the page. If the page contains a placeholder tag the filter can be used to replace that tag with your dynamically generated html.
The function that hooks on to the wpsc_cachedata filter should be put in a file in the WP Super Cache plugins folder unless you use the late_init feature. An example plugin is included. Edit dynamic-cache-test.php to see the example code.
There are two example functions there. There’s a simple function that replaces a string (or tag) you define when the cached page is served. The other example function uses an output buffer to generate the dynamic content. Due to a limitation in how PHP works the output buffer code MUST run before the wpsc_cachedata filter is hit, at least for when a page is cached. It doesn’t matter when serving cached pages. See this post for a more technical and longer explanation.
To execute WordPress functions you must enable the ‘Late init’ feature on the advanced settings page. -
How do I delay serving the cache until the “init” action fires?
-
Cached files are served before almost all of WordPress is loaded. While that’s great for performance it’s a pain when you want to extend the plugin using a core part of WordPress. Enable ‘Late init’ mode on the Advanced settings page and cached files will be served when “init” fires. WordPress and it’s plugins will be loaded now.
-
Why don’t WP UserOnline, Popularity Contest, WP Postratings or plugin X not work or update on my blog now?
-
This plugin caches entire pages but some plugins think they can run PHP code every time a page loads. To fix this, the plugin needs to use Javascript/AJAX methods or the wpsc_cachedata filter described in the previous answer to update or display dynamic information.
-
Why do my WP Super Cache plugins disappear when I upgrade the plugin?
-
WordPress deletes the plugin folder when it updates a plugin. This is the same with WP Super Cache so any modified files in wp-super-cache/plugins/ will be deleted. You can put your custom plugins in a different directory in a number of ways. You can define the variable $wp_cache_plugins_dir in wp-config.php or wp-content/wp-cache-config.php and point it at a directory outside of the wp-super-cache folder. The plugin will look there for it’s plugins. Or if you distribute a plugin that needs to load early you can use the function
wpsc_add_plugin( $filename )to add a new plugin wherever it may be. Usewpsc_delete_plugin( $filename )to remove the plugin file. See #574 or this post on writing WP Super Cache plugins. -
What does the Cache Rebuild feature do?
-
When a visitor leaves a comment the cached file for that page is deleted and the next visitor recreates the cached page. A page takes time to load so what happens if it receives 100 visitors during this time? There won’t be a cached page so WordPress will serve a fresh page for each user and the plugin will try to create a cached page for each of those 100 visitors causing a huge load on your server. This feature stops this happening. The cached page is not cleared when a comment is left. It is marked for rebuilding instead. The next visitor within the next 10 seconds will regenerate the cached page while the old page is served to the other 99 visitors. The page is eventually loaded by the first visitor and the cached page updated. See this post for more.
-
Why doesn’t the plugin cache requests by search engine bots by default?
-
Those bots usually only visit each page once and if the page is not popular there’s no point creating a cache file that will sit idle on your server. However you can allow these visits to be cached by removing the list of bots from “Rejected User Agents” on the Advanced settings page.
-
A category page is showing instead of my homepage
-
A tiny proportion of websites will have problems with the following configuration:
- Uses a static page for the front page.
- Uses /%category%/%postname%/ permalink structure.
Sometimes a category page is cached as the homepage of the site instead of the static page. I can’t replicate the problem but a simple solution is to use the “Simple” mode. You can also enable “Extra homepage checks” on the Advanced Settings page.
-
Why do I get warnings about caching from http://ismyblogworking.com/
-
“Your blog doesn’t support client caching (no 304 response to If-modified-since).”
“Your feed doesn’t support caching (no 304 response to If-modified-since)”Supercache doesn’t support 304 header checks in Expert mode but does support it in Simple mode. This is caching done by your browser, not the server. It is a check your browser does to ask the server if an updated version of the current page is available. If not, it doesn’t download the old version again. The page is still cached by your server, just not by your visitors’ browsers.
Try the Cacheability Engine at http://www.ircache.net/cgi-bin/cacheability.py or https://redbot.org/ for further analysis. -
How should I best use the utm_source tracking tools in Google Analytics with this plugin?
-
That tracking adds a query string to each url linked from various sources like Twitter and feedreaders. Unfortunately it stops pages being supercached. See Joost’s comment here for how to turn it into an anchor tag which can be supercached.
-
The plugin complains that wp-content is writable! htdocs is writable!
-
It’s not good when the web server can write to these directories but sometimes shared hosting accounts are set up in this way to make administration easier. Use
chmod 755 directoryto fix the permissions or find the permissions section of your ftp client. This Google search will lead you to more information on this topic and there’s also this codex page too. Unfortunately some hosts require that those directories be writable. If that’s the case just ignore this warning. -
How do I delete the WP_CACHE define from wp-config.php?
-
Load your desktop ftp client and connect to your site. Navigate to the root (or the directory below it) of your site where you’ll find wp-config.php. Download that file and edit it in a text editor. Delete the line
define( 'WP_CACHE', true );and save the file. Now upload it, overwriting the wp-config.php on your server. -
How do I delete the Super Cache rules from the .htaccess file?
-
Load your desktop ftp client and connect to your site. You may need to enable “Show hidden files” in the preferences of the ftp client. Navigate to the root of your site where you’ll find the .htaccess file. Download that file and edit it in a text editor. Delete the lines between “# BEGIN WPSuperCache” and “# END WPSuperCache” and save the file. Now upload it, overwriting the .htaccess file on your server.
-
How do I change file permissions?
-
This page on the WordPress Codex explains everything you need to know about file permissions on your server and various ways of changing them.
-
Why do I get load spikes when new posts are made?
-
You may have the “clear all cached files when new posts are made” option set. Clearing those files can take time plus your visitors will now be visiting uncached pages. Are you using Google Analytics campaign tracking with utm_source in the url? Those pages aren’t cached. See the question, “How should I best use the utm_source tracking tools in Google Analytics with this plugin” above for how to use them properly.
Cached pages have to be refreshed when posts are made. Perhaps your server just isn’t up to the job of serving the amount of traffic you get. Enable the “cache rebuild” feature as that may help. -
How many pages can I cache?
-
The only real limit are limits defined by your server. For example, EXT2 and EXT3 allow a maximum of 31,999 sub directories so if you have a flat permalink structure (like /%POSTNAME%/) and more than 32,000 posts you may run into problems. Likewise, if you run a multisite network and have more than 31,999 sites (blogs) you won’t be able to cache all of them. Realistically if you had that many active sites you wouldn’t be running on one server.
-
I can see that the www version of my site is cached separately. How do I stop that?
-
WordPress should redirect to the canonical URL of your site but if it doesn’t, add this to your .htaccess above the Supercache and WordPress rules. Change example.com to your own hostname.
RewriteCond %{HTTP_HOST} www.example.com$ [NC]
RewriteRule ^(.*)$ https://example.com/$1 [L,R=301] -
How do I serve cached mobile pages to clients on small screens like phones and tablets?
-
Your theme is probably responsive which means it resizes the page to suit whatever device is displaying the page. If it’s not responsive, you’ll have to use a separate mobile plugin to render a page formatted for those visitors. The following plugins have been tested but YMMV depending on mobile client. You’ll have to enable mobile browser support as well on the Advanced settings page.
- Jetpack’s Mobile Theme Module
- WPTouch
- WordPress Mobile Edition
- WordPress Mobile Pack (can’t have “Don’t cache pages for known users.” enabled)

Instant boost to performance — could not be happier with the product.


After dumping SP because of constant problems I reverted back to WPSC. Simple to set up and works. But to tell the truth we don’t much hacking, big programming, own theme etc. Just simple Gutenberg sites which are already fast without cache but with it they are lightning 😀
Never had a problem with WPSC!

UPDATE)
So originally I left one star because I couldnt even activate this plugin and I just was annoyed because of how useless it was.
Come to find even without activation, after I deleted it…IT KEEPS FILES ON YOUR WEBSITE. FILES THAT ARE LITERALLY IMPOSSIBLE TO FIND!
It broke the images on my website and I had to perform a backup restoration which DESTROYED HOURS OF WORK. I hope whoever created this plugin steps on a rusty nail, stop developing things.
Can’t believe this plugin found a way to be worse than useless. DO NOT USE THIS PLUGIN!!!

Simple, yet useful plugin. On some pages, this plugin helps to make the Lighthouse result to 100. Thank you!

Read all 1,303 reviews
“WP Super Cache” is open source software. The following people have contributed to this plugin.
Contributors
1.9.1-beta – 2022-12-09
Added
- Added a dismissable option to install Jetpack Boost.
- Improved stability with the start of an end-to-end test suite.
- Tested with v6.1 of WordPress.
Changed
- Updated package dependencies.
Fixed
- Compatibility: Avoid use of QUERY_STRING value, which is not available in all environments.
- Updated links to related plugins to remove click-tracking redirects.
See the previous changelogs here
- Details
- Reviews
- Installation
- Development
This plugin generates static html files from your dynamic WordPress blog. After a html file is generated your webserver will serve that file instead of processing the comparatively heavier and more expensive WordPress PHP scripts.
The static html files will be served to the vast majority of your users:
- Users who are not logged in.
- Users who have not left a comment on your blog.
- Or users who have not viewed a password protected post.
99% of your visitors will be served static html files. One cached file can be served thousands of times. Other visitors will be served custom cached files tailored to their visit. If they are logged in, or have left comments those details will be displayed and cached for them.
The plugin serves cached files in 3 ways (ranked by speed):
- Expert. The fastest method is by using Apache mod_rewrite (or whatever similar module your web server supports) to serve “supercached” static html files. This completely bypasses PHP and is extremely quick. If your server is hit by a deluge of traffic it is more likely to cope as the requests are “lighter”. This does require the Apache mod_rewrite module (which is probably installed if you have custom permalinks) and a modification of your .htaccess file which is risky and may take down your site if modified incorrectly.
- Simple. Supercached static files can be served by PHP and this is the recommended way of using the plugin. The plugin will serve a “supercached” file if it exists and it’s almost as fast as the mod_rewrite method. It’s easier to configure as the .htaccess file doesn’t need to be changed. You still need a custom permalink. You can keep portions of your page dynamic in this caching mode.
- WP-Cache caching. This is mainly used to cache pages for known users, URLs with parameters and feeds. Known users are logged in users, visitors who leave comments or those who should be shown custom per-user data. It’s the most flexible caching method and slightly slower. WP-Cache caching will also cache visits by unknown users if supercaching is disabled. You can have dynamic parts to your page in this mode too. This mode is always enabled but you can disable caching for known users, URLs with parameters, or feeds separately. Set the constant “DISABLE_SUPERCACHE” to 1 in your wp-config.php if you want to only use WP-Cache caching.
If you’re not comfortable with editing PHP files then use simple mode. It’s easy to set up and very fast.
Recommended Settings
- Simple caching.
- Compress pages.
- Don’t cache pages for known users.
- Cache rebuild.
- CDN support.
- Extra homepage checks.
Garbage collection is the act of cleaning up cache files that are out of date and stale. There’s no correct value for the expiry time but a good starting point is 1800 seconds.
Consider deleting the contents of the “Rejected User Agents” text box and allow search engines to cache files for you.
Preload as many posts as you can and enable “Preload Mode”. Garbage collection of old cached files will be disabled. If you don’t care about sidebar widgets updating often set the preload interval to 2880 minutes (2 days) so all your posts aren’t recached very often. When the preload occurs the cache files for the post being refreshed is deleted and then regenerated. Afterwards a garbage collection of all old files is performed to clean out stale cache files.
Even with preload mode enabled cached files will still be deleted when posts are modified or comments made.
Development
- Active development of this plugin is handled on GitHub.
- Translation of the plugin into different languages is on the translation page.
Documentation
If you need more information than the following, you can have a look at the Developer documentation.
Preloading
You can generate cached files for the posts, categories and tags of your site by preloading. Preloading will visit each page of your site generating a cached page as it goes along, just like any other visitor to the site. Due to the sequential nature of this function, it can take some time to preload a complete site if there are many posts.
To make preloading more effective it can be useful to disable garbage collection so that older cache files are not deleted. This is done by enabling “Preload Mode” in the settings. Be aware however, that pages will go out of date eventually but that updates by submitting comments or editing posts will clear portions of the cache.
Garbage Collection
Your cache directory fills up over time, which takes up space on your server. If space is limited or billed by capacity, or if you worry that the cached pages of your site will go stale then garbage collection has to be done. Garbage collection happens on a regular basis and deletes old files in the cache directory. On the advanced settings page you can specify:
1. Cache timeout. How long cache files are considered fresh for. After this time they are stale and can be deleted.
2. Scheduler. Setup how often garbage collection should be done.
3. Notification emails. You can be informed on garbage collection job progress.
There’s no right or wrong settings for garbage collection. It depends on your own site.
If your site gets regular updates, or comments then set the timeout to 1800 seconds, and set the timer to 600 seconds.
If your site is mostly static you can disable garbage collection by entering 0 as the timeout, or use a really large timeout value.
The cache directory, usually wp-content/cache/ is only for temporary files. Do not ever put important files or symlinks to important files or directories in that directory. They will be deleted if the plugin has write access to them.
CDN
A Content Delivery Network (CDN) is usually a network of computers situated around the world that will serve the content of your website faster by using servers close to you. Static files like images, Javascript and CSS files can be served through these networks to speed up how fast your site loads. You can also create a “poor man’s CDN” by using a sub domain of your domain to serve static files too.
OSSDL CDN off-linker has been integrated into WP Super Cache to provide basic CDN support. It works by rewriting the URLs of files (excluding .php files) in wp-content and wp-includes on your server so they point at a different hostname. Many CDNs support origin pull. This means the CDN will download the file automatically from your server when it’s first requested, and will continue to serve it for a configurable length of time before downloading it again from your server.
Configure this on the “CDN” tab of the plugin settings page. This is an advanced technique and requires a basic understanding of how your webserver or CDNs work. Please be sure to clear the file cache after you configure the CDN.
REST API
There are now REST API endpoints for accessing the settings of this plugin. You’ll need to be authenticated as an admin user with permission to view the settings page to use it. This has not been documented yet but you can find all the code that deals with this in the “rest” directory.
Custom Caching
It is now possible to hook into the caching process using the add_cacheaction() function.
Three hooks are available:
- ‘wp_cache_get_cookies_values’ – modify the key used by WP Cache.
- ‘add_cacheaction’ – runs in phase2. Allows a plugin to add WordPress hooks.
- ‘cache_admin_page’ – runs in the admin page. Use it to modify that page, perhaps by adding new configuration options.
There is one regular WordPress filter too. Use the “do_createsupercache” filter
to customize the checks made before caching. The filter accepts one parameter.
The output of WP-Cache’s wp_cache_get_cookies_values() function.
WP Super Cache has its own plugin system. This code is loaded when WP Super Cache loads and can be used to change how caching is done. This is before most of WordPress loads so some functionality will not be available. Plugins can be located anywhere that PHP can load them. Add your own plugin either:
- by putting your plugin in the wp-content/plugins/wp-super-cache-plugins directory, or
- by calling wpsc_add_plugin( $name ) where $name is the full filename and path to the plugin. You only need to call that function once to add it. Use wpsc_delete_plugin( $name ) to remove it from the list of loaded plugins.
The cookies WP Super Cache uses to identify “known users” can be modified now by adding the names of those cookies to a list in the plugin configuration. Use wpsc_add_cookie( $name ) to add a new cookie, and wpsc_delete_cookie( $name ) to remove it. The cookie names also modify the mod_rewrite rules used by the plugin but I recommend using Simple mode caching to avoid complications with updating the .htaccess file.
The cookie name and value are used to differenciate users so you can have one cookie, but different values for each type of user on your site for example. They’ll be served different cache files.
See plugins/searchengine.php as an example I use for my No Adverts for Friends plugin.
Troubleshooting
If things don’t work when you installed the plugin here are a few things to check:
- Is wp-content writable by the web server?
- Is there a wp-content/wp-cache-config.php ? If not, copy the file wp-super-cache/wp-cache-config-sample.php to wp-content/wp-cache-config.php and make sure WPCACHEHOME points at the right place.
- Is there a wp-content/advanced-cache.php ? If not, then you must copy wp-super-cache/advanced-cache.php into wp-content/. You must edit the file and change the path so it points at the wp-super-cache folder.
- If pages are not cached at all, remove wp-content/advanced-cache.php and recreate it, following the advice above.
-
Make sure the following line is in wp-config.php and it is ABOVE the “require_once(ABSPATH.’wp-settings.php’);” line:
define( 'WP_CACHE', true ); - Try the Settings->WP Super Cache page again and enable cache.
- Look in wp-content/cache/supercache/. Are there directories and files there?
- Anything in your php error_log?
- If your browser keeps asking you to save the file after the super cache is installed you must disable Super Cache compression. Go to the Settings->WP Super Cache page and disable it there.
- The plugin does not work very well when PHP’s safe mode is active. This must be disabled by your administrator.
- If pages are randomly super cached and sometimes not, your blog can probably be viewed with and without the “www” prefix on the URL. You should choose one way and install the Enforce www preference plugin if you are using an old WordPress install. The latest versions redirect themselves (you should always be running the latest version of WordPress anyway!)
- Private Server users at Dreamhost should edit wp-content/wp-cache-config.php and set the cache dir to “/tmp/” if they are getting errors about increasing CPU usage. See this discussion for more.
- File locking errors such as “failed to acquire key 0x152b: Permission denied in…” or “Page not cached by WP Super Cache. Could not get mutex lock.” are a sign that you may have to use file locking. Edit wp-content/wp-cache-config.php and uncomment “$use_flock = true” or set $sem_id to a different value. You can also disable file locking from the Admin screen as a last resort.
- Make sure cache/wp_cache_mutex.lock is writable by the web server if using coarse file locking.
- The cache folder cannot be put on an NFS or Samba or NAS share. It has to be on a local disk. File locking and deleting expired files will not work properly unless the cache folder is on the local machine.
-
Garbage collection of old cache files won’t work if WordPress can’t find wp-cron.php. If your hostname resolves to 127.0.0.1 it could be preventing the garbage collection from working. Check your access_logs for wp-cron.php entries. Do they return a 404 (file not found) or 200 code? If it’s 404 or you don’t see wp-cron.php anywhere WordPress may be looking for that script in the wrong place. You should speak to your server administator to correct this or edit /etc/hosts on Unix servers and remove the following line. Your hostname must resolve to the external IP address other servers on the network/Internet use. See http://yoast.com/wp-cron-issues/ for more. A line like “127.0.0.1 localhost localhost.localdomain” is ok.
127.0.0.1 example.com - If old pages are being served to your visitors via the supercache, you may be missing Apache modules (or their equivalents if you don’t use Apache). 3 modules are required: mod_mime, mod_headers and mod_expires. The last two are especially important for making sure browsers load new versions of existing pages on your site.
- The error message, “WP Super Cache is installed but broken. The path to wp-cache-phase1.php in wp-content/advanced-cache.php must be fixed!” appears at the end of every page. Open the file wp-content/advanced-cache.php in your favourite editor. Is the path to wp-cache-phase1.php correct? This file will normally be in wp-content/plugins/wp-super-cache/. If it is not correct the caching engine will not load.
- Caching doesn’t work. The timestamp on my blog keeps changing when I reload. Check that the path in your .htaccess rules matches where the supercache directory is. You may have to hardcode it. Try disabling supercache mode.
-
If supercache cache files are generated but not served, check the permissions on all your wp-content/cache/supercache folders (and each of wp-content cache and supercache folders) and wp-content/cache/.htaccess. If your PHP runs as a different user to Apache and permissions are strict Apache may not be able to read the PHP generated cache files. To fix you must add the following line to your wp-config.php (Add it above the WP_CACHE define.) Then clear your cache.
umask( 0022 ); -
If you see garbage in your browser after enabling compression in the plugin, compression may already be enabled in your web server. In Apache you must disable mod_deflate, or in PHP zlib compression may be enabled. You can disable that in three ways. If you have root access, edit your php.ini and find the zlib.output_compression setting and make sure it’s “Off” or add this line to your .htaccess:
php_flag zlib.output_compression offIf that doesn’t work, add this line to your wp-config.php:
ini_set('zlib.output_compression', 0); - The “white screen of death” or a blank page when you visit your site is almost always caused by a PHP error but it may also be caused by APC. Disable that PHP extension if you have trouble and replace with eAccelerator or Xcache.
- After uninstalling, your permalinks may break if you remove the WordPress mod_rewrite rules too. Regenerate those rules by visiting the Settings->Permalink page and saving that form again.
- If your blog refuses to load make sure your wp-config.php is correct. Are you missing an opening or closing PHP tag?
- Your front page is ok but posts and pages give a 404? Go to Settings->permalinks and click “Save” once you’ve selected a custom permalink structure. You may need to manually update your .htaccess file.
-
If certain characters do not appear correctly on your website your server may not be configured correctly. You need to tell visitors what character set is used. Go to Settings->Reading and copy the ‘Encoding for pages and feeds’ value. Edit the .htaccess file with all your Supercache and WordPress rewrite rules and add this at the top, replacing CHARSET with the copied value. (for example, ‘UTF-8’)
AddDefaultCharset CHARSET - Use Cron View to help diagnose garbage collection and preload problems. Use the plugin to make sure jobs are scheduled and for what time. Look for the wp_cache_gc and wp_cache_full_preload_hook jobs.
- The error message, “WP Super Cache is installed but broken. The constant WPCACHEHOME must be set in the file wp-config.php and point at the WP Super Cache plugin directory.” appears at the end of every page. You can delete wp-content/advanced-cache.php and reload the plugin settings page or edit wp-config.php and look for WPCACHEHOME and make sure it points at the wp-super-cache folder. This will normally be wp-content/plugins/wp-super-cache/ but you’ll likely need the full path to that file (so it’s easier to let the settings page fix it). If it is not correct the caching engine will not load.
- If your server is running into trouble because of the number of semaphores used by the plugin it’s because your users are using file locking which is not recommended (but is needed by a small number of users). You can globally disable file locking by defining the constant WPSC_DISABLE_LOCKING, or defining the constant WPSC_REMOVE_SEMAPHORE so that sem_remove() is called after every page is cached but that seems to cause problems for other processes requesting the same semaphore. Best to disable it.
- Set the variable $htaccess_path in wp-config.php or wp-cache-config.php to the path of your global .htaccess if the plugin is looking for that file in the wrong directory. This might happen if you have WordPress installed in an unusual way.
Install like any other plugin, directly from your plugins page but make sure you have custom permalinks enabled. Go to the plugin settings page at Settings->WP Super Cache and enable caching.
How to uninstall WP Super Cache
Almost all you have to do is deactivate the plugin on the plugins page. The plugin should clean up most of the files it created and modified, but it doesn’t as yet remove the mod_rewrite rules from the .htaccess file. Look for the section in that file marked by SuperCache BEGIN and END tags. The plugin doesn’t remove those because some people add the WordPress rules in that block too.
To manually uninstall:
- Turn off caching on the plugin settings page and clear the cache.
- Deactivate the plugin on the plugins page.
- Remove the WP_CACHE define from wp-config.php. It looks like
define( 'WP_CACHE', true ); - Remove the Super Cache mod_rewrite rules from your .htaccess file.
- Remove the files wp-content/advanced-cache.php and wp-content/wp-cache-config.php
- Remove the directory wp-content/cache/
- Remove the directory wp-super-cache from your plugins directory.
If all else fails and your site is broken
- Remove the WP_CACHE define from wp-config.php. It looks like
define( 'WP_CACHE', true ); - Remove the rules (see above) that the plugin wrote to the .htaccess file in your root directory.
- Delete the wp-super-cache folder in the plugins folder.
- Optionally delete advanced-cache.php, wp-cache-config.php and the cache folder in wp-content/.
-
How do I know my blog is being cached?
-
Go to Settings -> WP Super Cache and look for the “Cache Tester” form on the easy settings page. Click “Test Cache” and the plugin will request the front page of the site twice, comparing a timestamp on each to make sure they match.
If you want to do it manually, enable debugging in the plugin settings page and load the log file in a new browser tab. Then view your blog while logged in and logged out. You should see activity in the log. View the source of any page on your site. When a page is first created, you’ll see the text “Dynamic page generated in XXXX seconds.” and “Cached page generated by WP-Super-Cache on YYYY-MM-DD HH:MM:SS” at the end of the source code. On reload, a cached page will show the same timestamp so wait a few seconds before checking.
If Supercaching is disabled and you have compression enabled, the text “Compression = gzip” will be added. If compression is disabled and the page is served as a static html file, the text “super cache” will be added. The only other way to check if your cached file was served by PHP script or from the static cache is by looking at the HTTP headers. PHP cached pages will have the header “WP-Super-Cache: Served supercache file from PHP”. WPCache cached files will have the header, “WP-Super-Cache: Served WPCache cache file”. You should also check your cache directory in wp-content/cache/supercache/hostname/ for static cache files.
If the plugin rules are missing from your .htaccess file, the plugin will attempt to serve the super cached page if it’s found. The header “WP-Super-Cache: Served supercache file from PHP” if this happens.
The pagespeed module for Apache may cause problems when testing. Disable it if you notice any problems running the cache tester. -
How do I disable Supercaching?
-
If you only want to use the WP-Cache engine then edit your wp-config.php or create an mu-plugin that sets the constant ‘DISABLE_SUPERCACHE’ to 1.
-
WP-Cache vs Supercache files
-
All cache files are stored in wp-content/cache/supercache/HOSTNAME/ where HOSTNANE is your domain name. The files are stored in directories matching your site’s permalink structure. Supercache files are index.html or some variant of that, depending on what type of visitor hit the blog. Other files are named wp-cache-XXXXXXXXXXXXXXXXX.php. Associated meta filesnames start with “meta”. Those files contain information about the cached file. These files are generated by the “WPCache caching” engine in the plugin.
-
Will comments and other dynamic parts of my blog update immediately?
-
Comments will show as soon as they are moderated, depending on the comment policy of the blog owner. Other dynamic elements on a page may not update unless they are written in Javascript, Flash, Java or another client side browser language. The plugin really produces static html pages. No PHP is executed when those pages are served. “Popularity Contest” is one such plugin that will not work.
-
Will the Super Cache compression slow down my server?
-
No, it will do the opposite. Super Cache files are compressed and stored that way so the heavy compression is done only once. These files are generally much smaller and are sent to a visitor’s browser much more quickly than uncompressed html. As a result, your server spends less time talking over the network which saves CPU time and bandwidth, and can also serve the next request much more quickly.
-
How do I make certain parts of the page stay dynamic?
-
Note: this functionality is disabled by default. You will have to enable it on the Advanced Settings page.
There are 2 ways of doing this. You can use Javascript to draw the part of the page you want to keep dynamic. That’s what Google Adsense and many widgets from external sites do and is the recommended way. Or you can use a WP Super Cache filter to do the job but you can’t use mod_rewrite mode caching. You have to use the “simple” delivery method or disable supercaching.
WP Super Cache 1.4 introduced a cacheaction filter called wpsc_cachedata. The cached page to be displayed goes through this filter and allows modification of the page. If the page contains a placeholder tag the filter can be used to replace that tag with your dynamically generated html.
The function that hooks on to the wpsc_cachedata filter should be put in a file in the WP Super Cache plugins folder unless you use the late_init feature. An example plugin is included. Edit dynamic-cache-test.php to see the example code.
There are two example functions there. There’s a simple function that replaces a string (or tag) you define when the cached page is served. The other example function uses an output buffer to generate the dynamic content. Due to a limitation in how PHP works the output buffer code MUST run before the wpsc_cachedata filter is hit, at least for when a page is cached. It doesn’t matter when serving cached pages. See this post for a more technical and longer explanation.
To execute WordPress functions you must enable the ‘Late init’ feature on the advanced settings page. -
How do I delay serving the cache until the “init” action fires?
-
Cached files are served before almost all of WordPress is loaded. While that’s great for performance it’s a pain when you want to extend the plugin using a core part of WordPress. Enable ‘Late init’ mode on the Advanced settings page and cached files will be served when “init” fires. WordPress and it’s plugins will be loaded now.
-
Why don’t WP UserOnline, Popularity Contest, WP Postratings or plugin X not work or update on my blog now?
-
This plugin caches entire pages but some plugins think they can run PHP code every time a page loads. To fix this, the plugin needs to use Javascript/AJAX methods or the wpsc_cachedata filter described in the previous answer to update or display dynamic information.
-
Why do my WP Super Cache plugins disappear when I upgrade the plugin?
-
WordPress deletes the plugin folder when it updates a plugin. This is the same with WP Super Cache so any modified files in wp-super-cache/plugins/ will be deleted. You can put your custom plugins in a different directory in a number of ways. You can define the variable $wp_cache_plugins_dir in wp-config.php or wp-content/wp-cache-config.php and point it at a directory outside of the wp-super-cache folder. The plugin will look there for it’s plugins. Or if you distribute a plugin that needs to load early you can use the function
wpsc_add_plugin( $filename )to add a new plugin wherever it may be. Usewpsc_delete_plugin( $filename )to remove the plugin file. See #574 or this post on writing WP Super Cache plugins. -
What does the Cache Rebuild feature do?
-
When a visitor leaves a comment the cached file for that page is deleted and the next visitor recreates the cached page. A page takes time to load so what happens if it receives 100 visitors during this time? There won’t be a cached page so WordPress will serve a fresh page for each user and the plugin will try to create a cached page for each of those 100 visitors causing a huge load on your server. This feature stops this happening. The cached page is not cleared when a comment is left. It is marked for rebuilding instead. The next visitor within the next 10 seconds will regenerate the cached page while the old page is served to the other 99 visitors. The page is eventually loaded by the first visitor and the cached page updated. See this post for more.
-
Why doesn’t the plugin cache requests by search engine bots by default?
-
Those bots usually only visit each page once and if the page is not popular there’s no point creating a cache file that will sit idle on your server. However you can allow these visits to be cached by removing the list of bots from “Rejected User Agents” on the Advanced settings page.
-
A category page is showing instead of my homepage
-
A tiny proportion of websites will have problems with the following configuration:
- Uses a static page for the front page.
- Uses /%category%/%postname%/ permalink structure.
Sometimes a category page is cached as the homepage of the site instead of the static page. I can’t replicate the problem but a simple solution is to use the “Simple” mode. You can also enable “Extra homepage checks” on the Advanced Settings page.
-
Why do I get warnings about caching from http://ismyblogworking.com/
-
“Your blog doesn’t support client caching (no 304 response to If-modified-since).”
“Your feed doesn’t support caching (no 304 response to If-modified-since)”Supercache doesn’t support 304 header checks in Expert mode but does support it in Simple mode. This is caching done by your browser, not the server. It is a check your browser does to ask the server if an updated version of the current page is available. If not, it doesn’t download the old version again. The page is still cached by your server, just not by your visitors’ browsers.
Try the Cacheability Engine at http://www.ircache.net/cgi-bin/cacheability.py or https://redbot.org/ for further analysis. -
How should I best use the utm_source tracking tools in Google Analytics with this plugin?
-
That tracking adds a query string to each url linked from various sources like Twitter and feedreaders. Unfortunately it stops pages being supercached. See Joost’s comment here for how to turn it into an anchor tag which can be supercached.
-
The plugin complains that wp-content is writable! htdocs is writable!
-
It’s not good when the web server can write to these directories but sometimes shared hosting accounts are set up in this way to make administration easier. Use
chmod 755 directoryto fix the permissions or find the permissions section of your ftp client. This Google search will lead you to more information on this topic and there’s also this codex page too. Unfortunately some hosts require that those directories be writable. If that’s the case just ignore this warning. -
How do I delete the WP_CACHE define from wp-config.php?
-
Load your desktop ftp client and connect to your site. Navigate to the root (or the directory below it) of your site where you’ll find wp-config.php. Download that file and edit it in a text editor. Delete the line
define( 'WP_CACHE', true );and save the file. Now upload it, overwriting the wp-config.php on your server. -
How do I delete the Super Cache rules from the .htaccess file?
-
Load your desktop ftp client and connect to your site. You may need to enable “Show hidden files” in the preferences of the ftp client. Navigate to the root of your site where you’ll find the .htaccess file. Download that file and edit it in a text editor. Delete the lines between “# BEGIN WPSuperCache” and “# END WPSuperCache” and save the file. Now upload it, overwriting the .htaccess file on your server.
-
How do I change file permissions?
-
This page on the WordPress Codex explains everything you need to know about file permissions on your server and various ways of changing them.
-
Why do I get load spikes when new posts are made?
-
You may have the “clear all cached files when new posts are made” option set. Clearing those files can take time plus your visitors will now be visiting uncached pages. Are you using Google Analytics campaign tracking with utm_source in the url? Those pages aren’t cached. See the question, “How should I best use the utm_source tracking tools in Google Analytics with this plugin” above for how to use them properly.
Cached pages have to be refreshed when posts are made. Perhaps your server just isn’t up to the job of serving the amount of traffic you get. Enable the “cache rebuild” feature as that may help. -
How many pages can I cache?
-
The only real limit are limits defined by your server. For example, EXT2 and EXT3 allow a maximum of 31,999 sub directories so if you have a flat permalink structure (like /%POSTNAME%/) and more than 32,000 posts you may run into problems. Likewise, if you run a multisite network and have more than 31,999 sites (blogs) you won’t be able to cache all of them. Realistically if you had that many active sites you wouldn’t be running on one server.
-
I can see that the www version of my site is cached separately. How do I stop that?
-
WordPress should redirect to the canonical URL of your site but if it doesn’t, add this to your .htaccess above the Supercache and WordPress rules. Change example.com to your own hostname.
RewriteCond %{HTTP_HOST} www.example.com$ [NC]
RewriteRule ^(.*)$ https://example.com/$1 [L,R=301] -
How do I serve cached mobile pages to clients on small screens like phones and tablets?
-
Your theme is probably responsive which means it resizes the page to suit whatever device is displaying the page. If it’s not responsive, you’ll have to use a separate mobile plugin to render a page formatted for those visitors. The following plugins have been tested but YMMV depending on mobile client. You’ll have to enable mobile browser support as well on the Advanced settings page.
- Jetpack’s Mobile Theme Module
- WPTouch
- WordPress Mobile Edition
- WordPress Mobile Pack (can’t have “Don’t cache pages for known users.” enabled)
Instant boost to performance — could not be happier with the product.
After dumping SP because of constant problems I reverted back to WPSC. Simple to set up and works. But to tell the truth we don’t much hacking, big programming, own theme etc. Just simple Gutenberg sites which are already fast without cache but with it they are lightning 😀
Never had a problem with WPSC!
UPDATE)
So originally I left one star because I couldnt even activate this plugin and I just was annoyed because of how useless it was.
Come to find even without activation, after I deleted it…IT KEEPS FILES ON YOUR WEBSITE. FILES THAT ARE LITERALLY IMPOSSIBLE TO FIND!
It broke the images on my website and I had to perform a backup restoration which DESTROYED HOURS OF WORK. I hope whoever created this plugin steps on a rusty nail, stop developing things.
Can’t believe this plugin found a way to be worse than useless. DO NOT USE THIS PLUGIN!!!
Simple, yet useful plugin. On some pages, this plugin helps to make the Lighthouse result to 100. Thank you!
Read all 1,303 reviews
“WP Super Cache” is open source software. The following people have contributed to this plugin.
Contributors
1.9.1-beta – 2022-12-09
Added
- Added a dismissable option to install Jetpack Boost.
- Improved stability with the start of an end-to-end test suite.
- Tested with v6.1 of WordPress.
Changed
- Updated package dependencies.
Fixed
- Compatibility: Avoid use of QUERY_STRING value, which is not available in all environments.
- Updated links to related plugins to remove click-tracking redirects.
See the previous changelogs here
Плагин WP Super Cache генерирует статические Html файлы с динамически созданных файлов блога на WordPress. После создания статические файлы будут отправляться вашим сервером пользователю и загружаться значительно быстрее чем при помощи PHP скриптов WordPress.
Статические HTML файлы будут обслуживать подавляющее большинство пользователей вашего сайта, однако некоторые пользователи оставившие новые комментарии в форме будут получать старый кэш, потому что этими данными управляет двигатель WordPress и комментарий будет доступен из кэша позднее. На кого же распространяются статические файлы?
- Не авторизированные пользователи.
- Пользователи не оставившие комментарии на вашем блоге.
- Пользователи не просмотревшие посты защищенные паролем.
Плагин кэширует файлы тремя способами (по скорости):
- Самый быстрый способ, заключается в использовании Apache mod_rewrite (или любого другого модуля вашего веб-сервера) для создания HTML файлов. Этот способ полностью обходит PHP и очень быстрый. Если ваш сервер попадет под большое количество одновременного трафика, то это лучший метод для того чтобы справиться с такой задачей. Этот способ требует установленного модуля Apache mod_rewrite и модифицированного файла .htaccess. Визиты анонимных или неизвестных пользователей будут обслуживаться этими файлами.
- PHP. Статические файлы сгенерированные плагином будут поданы пользователям через PHP скрипты. Этот способ почти такой же быстрый как предыдущий, он проще в настройке и не требует модификации файла .htaccess.
- Наследие кэширования. Этот способ в основном используется для постоянных посетителей вашего сайта, которые авторизированны, оставляют комментарии. Это самый медленный способ но он подходит для отдельных посетителей, которым важна изменяющаяся информация. Наследие отправляет кэшированные файлы новым посетителям, чего в принципе мы и добиваемся.
Если вы новичок в кэшировании используйте метод PHP, он легок в настройке и достаточно быстрый. По возможности избегайте наследования.
- Рекомендуемые настройки WP Super Cache.
- Установка и подготовка к использованию плагина WP Super Cache.
- Подробная настройка плагина WP Super Cache
- Как удалить WP Super Cache?
- WP Super cache и настройка CDN.
- Ответы на часто задаваемые вопросы по WP Super Cache.
Рекомендуемые настройки WP Super Cache.
Продвинутые пользователи, скорее всего, захотят использовать mod_rewrite кэширование, но с помощью PHP кэширование почти так же хорошо. PHP кэширование включает в себя следующее:
- PHP кэширование.
- Сжатие страниц.
- Отсутствие кэша страниц для «старых» посетителей.
- Восстановление кэша.
- Поддержка CDN.
- Добавочные проверки начальной страницы.
Очистка мусорных файлов кэша, которые устарели, является функцией плагина. В настройках значения срока очистки нету правильного значения, хорошим примером может быть значение 1800 секунд.
Подробнее о настройках плагина мы поговорим далее в статье.
Установка и подготовка к использованию плагина WP Super Cache.
- На вашем сервере должны быть установлены Apache mod mime и mod rewrite модули, а так же в настройках WordPress должен быть установлен параметр постоянных ссылок в одном режиме и не меняться после создания кэша. Безопасный режим PHP должен быть отключен.
- Если у вас установлен плагин WP-Cache, пожалуйста, отключите его и правильно удалите. Убедитесь в том что из файла wp-config.php удалены WP_CACHE и WPCACHEHOME. Также нужно проверить удален ли файл WP-Cache-config.php находящийся в директории wp-content/wp-cache-config.php и wp-content/advanced-cache.php. Они будут вновь созданы при установке нового плагина WP Super Cache.
- Загрузите плагин в директорию с плагинами WordPress (‘wp-content/plugins/wp-super-cache/’), что в последствии создаст новую папку плагина или же установите плагин в обычном режиме из админки. После установки плагина его нужно активировать.
- После активации плагина переходим с админки в пункт меню Настройки/WP Super Cache и включаем кэширование. При возникновении ошибок или пустого экрана, нужно будет провести некоторые проверки, которые описаны в разделе «Вопросы и ответы» в данной статье.
- Если вы выбираете способ кэширования mod_rewrite, в файл .htaccess должно быть добавлено правило, которое выглядит примерно таким образом:
-----------------.htaccess----------------- RewriteEngine On RewriteBase / RewriteCond %{REQUEST_METHOD} !=POST RewriteCond %{QUERY_STRING} !.*=.* RewriteCond %{HTTP_COOKIE} !^.*(comment_author_|wordpress|wp-postpass_).*$ RewriteCond %{HTTP:Accept-Encoding} gzip RewriteCond %{HTTP_USER_AGENT} !^.*(2.0 MMP|240x320|400X240|AvantGo|BlackBerry|Blazer|Cellphone|Danger|DoCoMo|Elaine/3.0|EudoraWeb|Googlebot-Mobile|hiptop|IEMobile|KYOCERA/WX310K|LG/U990|MIDP-2.|MMEF20|MOT-V|NetFront|Newt|Nintendo Wii|Nitro|Nokia|Opera Mini|Palm|PlayStation Portable|portalmmm|Proxinet|ProxiNet|SHARP-TQ-GX10|SHG-i900|Small|SonyEricsson|Symbian OS|SymbianOS|TS21i-10|UP.Browser|UP.Link|webOS|Windows CE|WinWAP|YahooSeeker/M1A1-R2D2|iPhone|iPod|Android|BlackBerry9530|LG-TU915 Obigo|LGE VX|webOS|Nokia5800).* RewriteCond %{DOCUMENT_ROOT}/wp-content/cache/supercache/%{HTTP_HOST}/$1/index.html.gz -f RewriteRule ^(.*) /wp-content/cache/supercache/%{HTTP_HOST}/$1/index.html.gz [L] RewriteCond %{REQUEST_METHOD} !=POST RewriteCond %{QUERY_STRING} !.*=.* RewriteCond %{QUERY_STRING} !.*attachment_id=.* RewriteCond %{HTTP_COOKIE} !^.*(comment_author_|wordpress|wp-postpass_).*$ RewriteCond %{HTTP_USER_AGENT} !^.*(2.0 MMP|240x320|400X240|AvantGo|BlackBerry|Blazer|Cellphone|Danger|DoCoMo|Elaine/3.0|EudoraWeb|Googlebot-Mobile|hiptop|IEMobile|KYOCERA/WX310K|LG/U990|MIDP-2.|MMEF20|MOT-V|NetFront|Newt|Nintendo Wii|Nitro|Nokia|Opera Mini|Palm|PlayStation Portable|portalmmm|Proxinet|ProxiNet|SHARP-TQ-GX10|SHG-i900|Small|SonyEricsson|Symbian OS|SymbianOS|TS21i-10|UP.Browser|UP.Link|webOS|Windows CE|WinWAP|YahooSeeker/M1A1-R2D2|iPhone|iPod|Android|BlackBerry9530|LG-TU915 Obigo|LGE VX|webOS|Nokia5800).* RewriteCond %{DOCUMENT_ROOT}/wp-content/cache/supercache/%{HTTP_HOST}/$1/index.html -f RewriteRule ^(.*) /wp-content/cache/supercache/%{HTTP_HOST}/$1/index.html [L] RewriteCond %{REQUEST_FILENAME} !-f RewriteCond %{REQUEST_FILENAME} !-d RewriteRule . /index.php [L] -----------------.htaccess----------------- - После активации плагина проверьте наличие файла «wp-content/cache/.htaccess», если он не был создан автоматически, создайте его со следующим наполнением:
# BEGIN supercache <FilesMatch ".html.gz$"> ForceType text/html FileETag None AddEncoding gzip .gz AddType text/html .gz SetEnvIfNoCase Request_URI .gz$ no-gzip Header set Cache-Control 'max-age=3, must-revalidate' ExpiresActive On ExpiresByType text/html A3 `` # END supercache
- Apache должен быть настроен для модулей используемых в примере. Если вы получите «Ошибку 500» при обслуживании анонимных пользователей, вам нужно будет разбираться в конфигурации сервера. Пример конфигурации для правильной работы плагина:
<Directory / дома / WWW /> AllowOverride Все Directory>
- wp-content/advanced-cache.php загружает кэширование движка. Этот файл создается автоматически при установке плагина. Он использует постоянный WPCACHEHOME для кэширования.
Подробная настройка плагина WP Super Cache
После установки плагина первое что вам нужно сделать это включить кэширование вашего сайта. Для этого переходим с админки в пункт меню Настройки/Wp Super Cache и в появившемся меню произвести главную настройку плагина — включение кэширования.
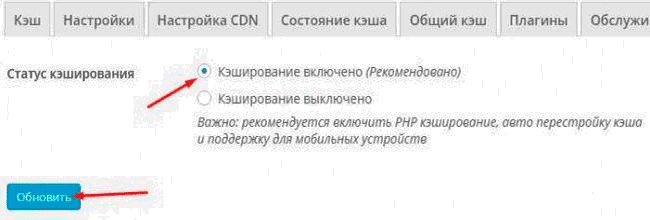
Данным действием мы сделали главное, глобальное включение кэширования на сайте. Теперь проведем необходимые настройки кэша, и адаптируем плагин под наш сайт и сервер в целом.
Первым делом удалим старые файлы кэша, которые хранятся в папке wp-content/cache на сервере. Делается это также через плагин:

После удаления ненужных файлов, проверим правильность работы плагина WP Super Cache, если все работает корректно мы сможем продолжить тонкие настройки дополнения. Итак, произведем проверку, нажав на соответствующую кнопку:
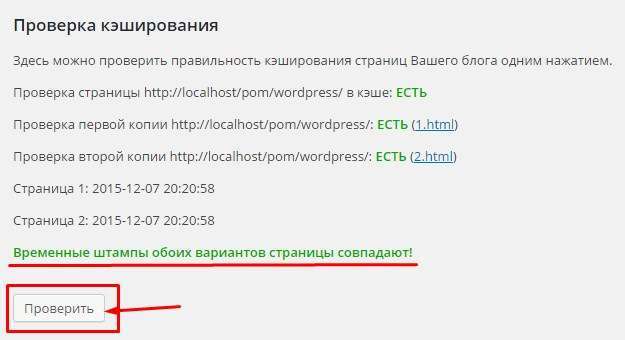
Если после проверки вы видите такую же надпись «Временные штампы обоих вариантов страницы совпадают!» это означает что кэширование включено и нужно переходить к их настройке.
Первым делом выберем способ которым будут создаваться наши кэшированые страницы. Описание способов представлено выше в статье. Для примера выберем самый быстрый и эффективный способ. Выставите все настройки как показано ниже:
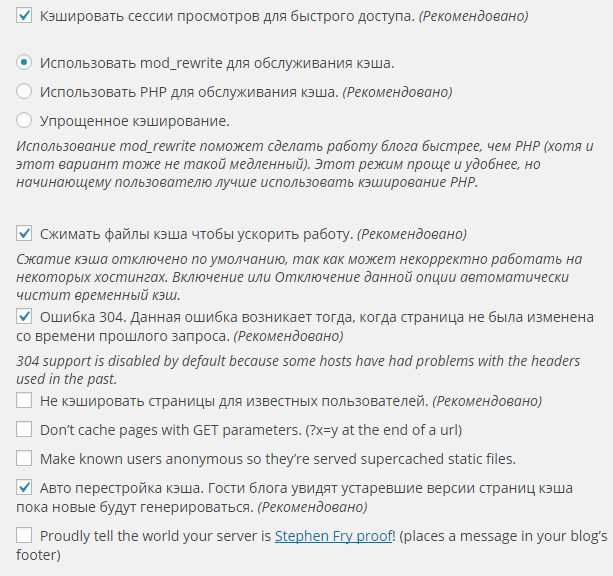
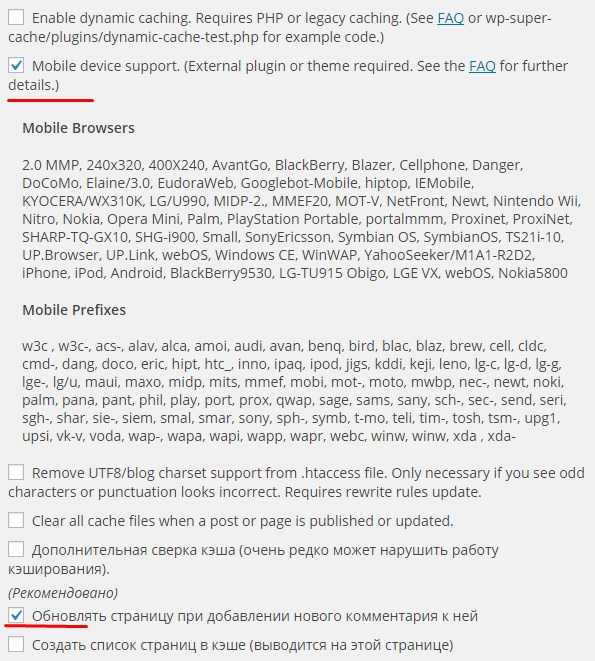
После того как вы отметите нужные пункты настройки опускаемся немного ниже и нажимаем на кнопку «Обновить».
После обновления нужно внести некоторые коррективы в файл .htaccess, для этого опускаемся вниз пока не найдем большой код желтого цвета, находим конец кода и кнопку «Обновить правила mod_rewrite» и нажимаем на нее. Плагин автоматически впишет нужные строчки в .htaccess.
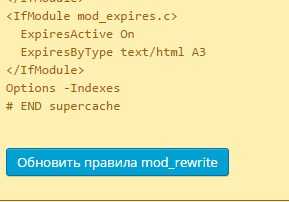
При успешном добавлении новых правил вы увидите зеленое оповещение об этом:
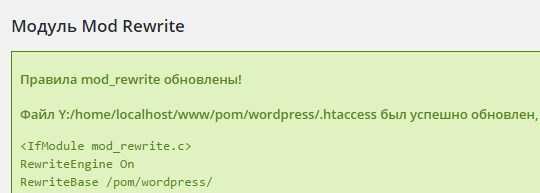
После сохранения новых параметров нужно задать время жизни кэшированых страниц. Для этого на этой же странице настроек опускаемся ниже, вводим необходимые данные и сохраняем их.
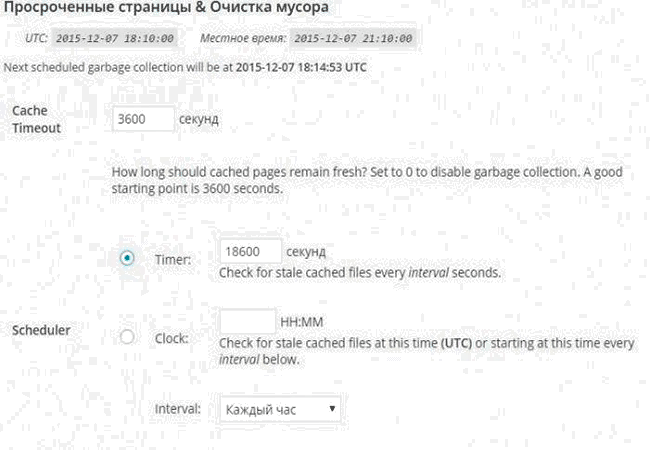
Как настраивать время жизни файлов кэша? Все дело в том что для каждого сайта данная настройка будет индивидуальной. Если вы выставите время жизни «Cache Timeout» значением «0», то кэш не будет иметь срока годности, и будет действовать пока вы его вручную не удалите. Такая настройка полезна для сайтов на которых страницы не обновляются вообще, если же вы вносите изменения, имеете на сайте возможность комментирования тогда, нужно будет подобрать подходящее время жизни кэшированых страниц.
После этой настройки вам рекомендуется принудительно создать кэш всех существующих страниц сайта, в противном случае этот процесс будет зависеть от посещения тех или иных разделов сайта, а зачем нам это. Все довольно просто, переходим во вкладку плагина «Общий кэш» и создаем собственно наши статические страницы:
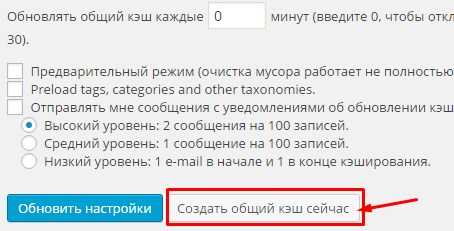
Если все прошло без проблем, тогда можно вас поздравить ваши страницы будут грузиться намного быстрее благодаря кэшу, созданном при помощи плагина WP Super Cache.
В случае возникновения проблем при установке и настройке плагина, попробуйте найти решение ниже в цикле статьи «Вопросы и ответы».
Как удалить WP Super Cache?
Для того что бы удалить плагин вам нужно сперва удалить весь кэш и отредактировать файл .htaccess. Плагин желательно удалять в ручном режиме, далее представлена подробная инструкция по удалению:
- Отключить кэширование в настройках плагина, и очистить кэш.
- Деактивировать плагин из административной панели WordPress.
- Удалить строчку из файла конфигурации wp-config.php — define( ‘WP_CACHE’, true ).
- Удалить правила mod_rewrite из файла .htacces (начало и конец которого отмечено SuperCache BEGIN и END тегами).
- Удалить файлы по адресу wp-content/advanced-cache.php и wp-content/wp-cache-config.php.
- Очистить папку wp-content/cache.
- Удалите папку wp-super-cache из директории плагинов WordPress.
Что делать если при автоматическом удалении плагина сайт перестал работать или работает не корректно?
При возникновении проблем после деактивации и удаления плагина WP Super Cache требуется ручное вмешательство, проделайте операции описанные в пунктах 3-7 представленных в инструкциях выше.
WP Super cache и настройка CDN.
Сеть доставки контента предназначена для ускорения загрузки требуемых данных вашему сайту. Статические данные, JS, CSS можно подгружать к вашему сайту из сторонних источников или же с поддоменов. Эта функция была подключена к базовой поддержке WP Super Cache. Данная функция работает путем переписывания URL адресов требуемых файлов (за исключением файлов .php) находящихся в директориях wp-content и wp-includes находящихся на сервере. Данная функция позволит скачать требуемые файлы, до истечения их срока действия они будут автоматически подключаться к статической странице вывода пользователю.
Данная возможность предоставлена для продвинутых пользователей с базовым пониманием принципов работы с CDN, настроить которую можно во вкладке «Настройка CDN» плагина.
Ответы на часто задаваемые вопросы по WP Super Cache.
Почему WP-Super-Cache лучше чем WP-Cache?
Плагин WP Super Cache основан на базе популярного WP Cache, он создает статические копии страниц, которые по скорости загрузки не сильно уступает загружаемым файлам HTML с локального компьютера, это позволило в разы увеличить скорость загрузки сайтов на WordPress.
Будут ли комментарии и другие динамические страницы моментально обновляться в кэше?
Комментарии будут отображены на странице как только ни будут одобрены (в зависимости он политики администратора сайта), и кэш будет обновлен. Это происходит по заданным параметрам владельца сайта в плагине кэширования.
PHP скрипты не будут выполняться и отправляться пользователям, по этому комментарии и другие динамические измененные элементы будут обновляться позднее.
Будет ли плагин WP Super Cache замедлять загрузку сайта?
Нет, плагин делает все да наоборот. Он генерирует статические файлы, которые гораздо «легче» стандартных отправляемых. Отправка данных и загрузка страниц будет происходить даже быстрее, чем если бы вы отправляли обычные HTML файлы, так как они будут отправлены в сжатом виде.
В результате такой работы ваш сервер тратит гораздо меньше времени на «диалог» с пользователем, что значительно разгружает его работу и приносит хороший результат.
Кэш исчезает после обновления плагина WP Super Cache?
Когда плагины WordPress обновляются, папки с плагинами удаляются и воссоздаются заново, по этому данные кэша будут утеряны после обновления. Это можно обойти расположив переменную $wp_cache_plugins_dir, находящуюся в wp-config.php или wp-content/wp-cache-config.php, вне папки wp-super-cache.
Надеюсь данная статья была полезна, она будет дополняться по мере возникновения вопросов по плагину.
Рекомендую почитать:
- Login LockDown, настройка плагина безопасности WordPress.
- Как создать XML карту сайта? Настройка плагина Google xml sitemaps.
- Плагин обратной связи WordPress — Contact Form 7.
- Нужные и удобные плагины для wordpress.
- Адаптивная тема под мобильные устройства.
- Критерии оценки сайта поисковыми системами.