Some Windows users that are trying to use VMware Workstation or VMware Player are reporting that they see the “Operating System not found” error during the bootup sequence of the virtual machine. The error is reported to occur when users try to install an OS from a physical drive or from an ISO file. The issue is not exclusive to a certain Windows version since it’s confirmed to occur on Windows 7, Windows 8.1 and Windows 10.
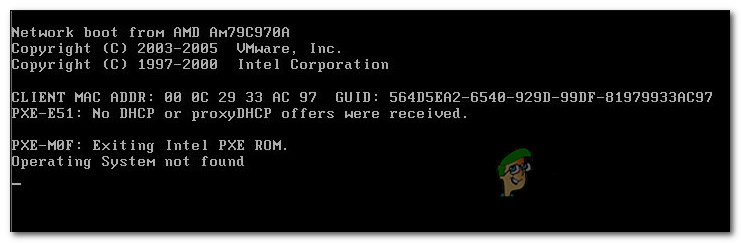
What is causing the “Operating System not found” error?
We looked into this particular issue by analyzing various user reports and the repair strategies that are most effective in resolving this particular error. As it turns out, there are multiple culprits that have the potential of triggering the “Operating System not found” error:
- ISO is not bootable – In most cases, this error occurs because the user tries to use an ISO file that is not actually bootable but contains a collection of update. If this scenario is applicable, you can resolve the issue by using a different ISO that is bootable.
- VMware isn’t instructed to use a physical drive – If you’re trying to use a physical disk for your virtual machine installation (an optical drive or flash drive), you’ll need to reflect that change inside VMware’s settings. In this case, you can resolve the issue by making some changes inside the Settings menu associated with the VM.
- Corrupted VM files – In some cases, this error might occur if some files belonging to the virtual machine that you’re trying to launch have become corrupted. If this scenario is applicable, you can resolve the issue by recreating the virtual machine from scratch.
- PXE boot period is too short – It’s also possible that the booting sequence fails because the PXE sequence is over before the screen asking for user interaction is shown. In this case, you can resolve the hte issue by modifying the .vmx file with a boot delay.
If you’re currently to resolve the same error message, this article will provide you with tested solutions that might just fix the issue for you. Down below, you’ll find several methods that other users encountering the “Operating System not found” error have successfully used to fix this particular issue.
Because the methods below are ordered via their efficiency and difficulty, we advise you to follow them in the order that they are presented. One of them is bound to resolve the issue regardless of the culprit that ends up causing it.
Method 1: Verifying that the ISO is bootable
In most cases, this particular issue occurs with users that are mistakenly trying to use an ISO file that actually contains a package with updates instead of a bootable OS. Keep in mind that you need to use a bootable operating system media in order for the mounting to be successful on your virtual machine.
If you are seeing the “Operating System not found” error when attempting to install an OS file on VMware, start by ensuring that the ISO you’re using is actually bootable. In the event that you determine that the ISO that you are using is not bootable, go for a different option or follow the next method below.
Method 2: Specifying that you’re using a physical device (if applicable)
If you’re trying to install the OS from a bootable disk, chances are you get the “Operating System not found” error because you’ve failed to specify the boot drive. In order to boot from a physical CD/DVD without encountering issues, you’ll need to tell VMware (via the Settings menu) that it needs to boot from a physical CD or DVD.
Here’s a quick guide on how to do this:
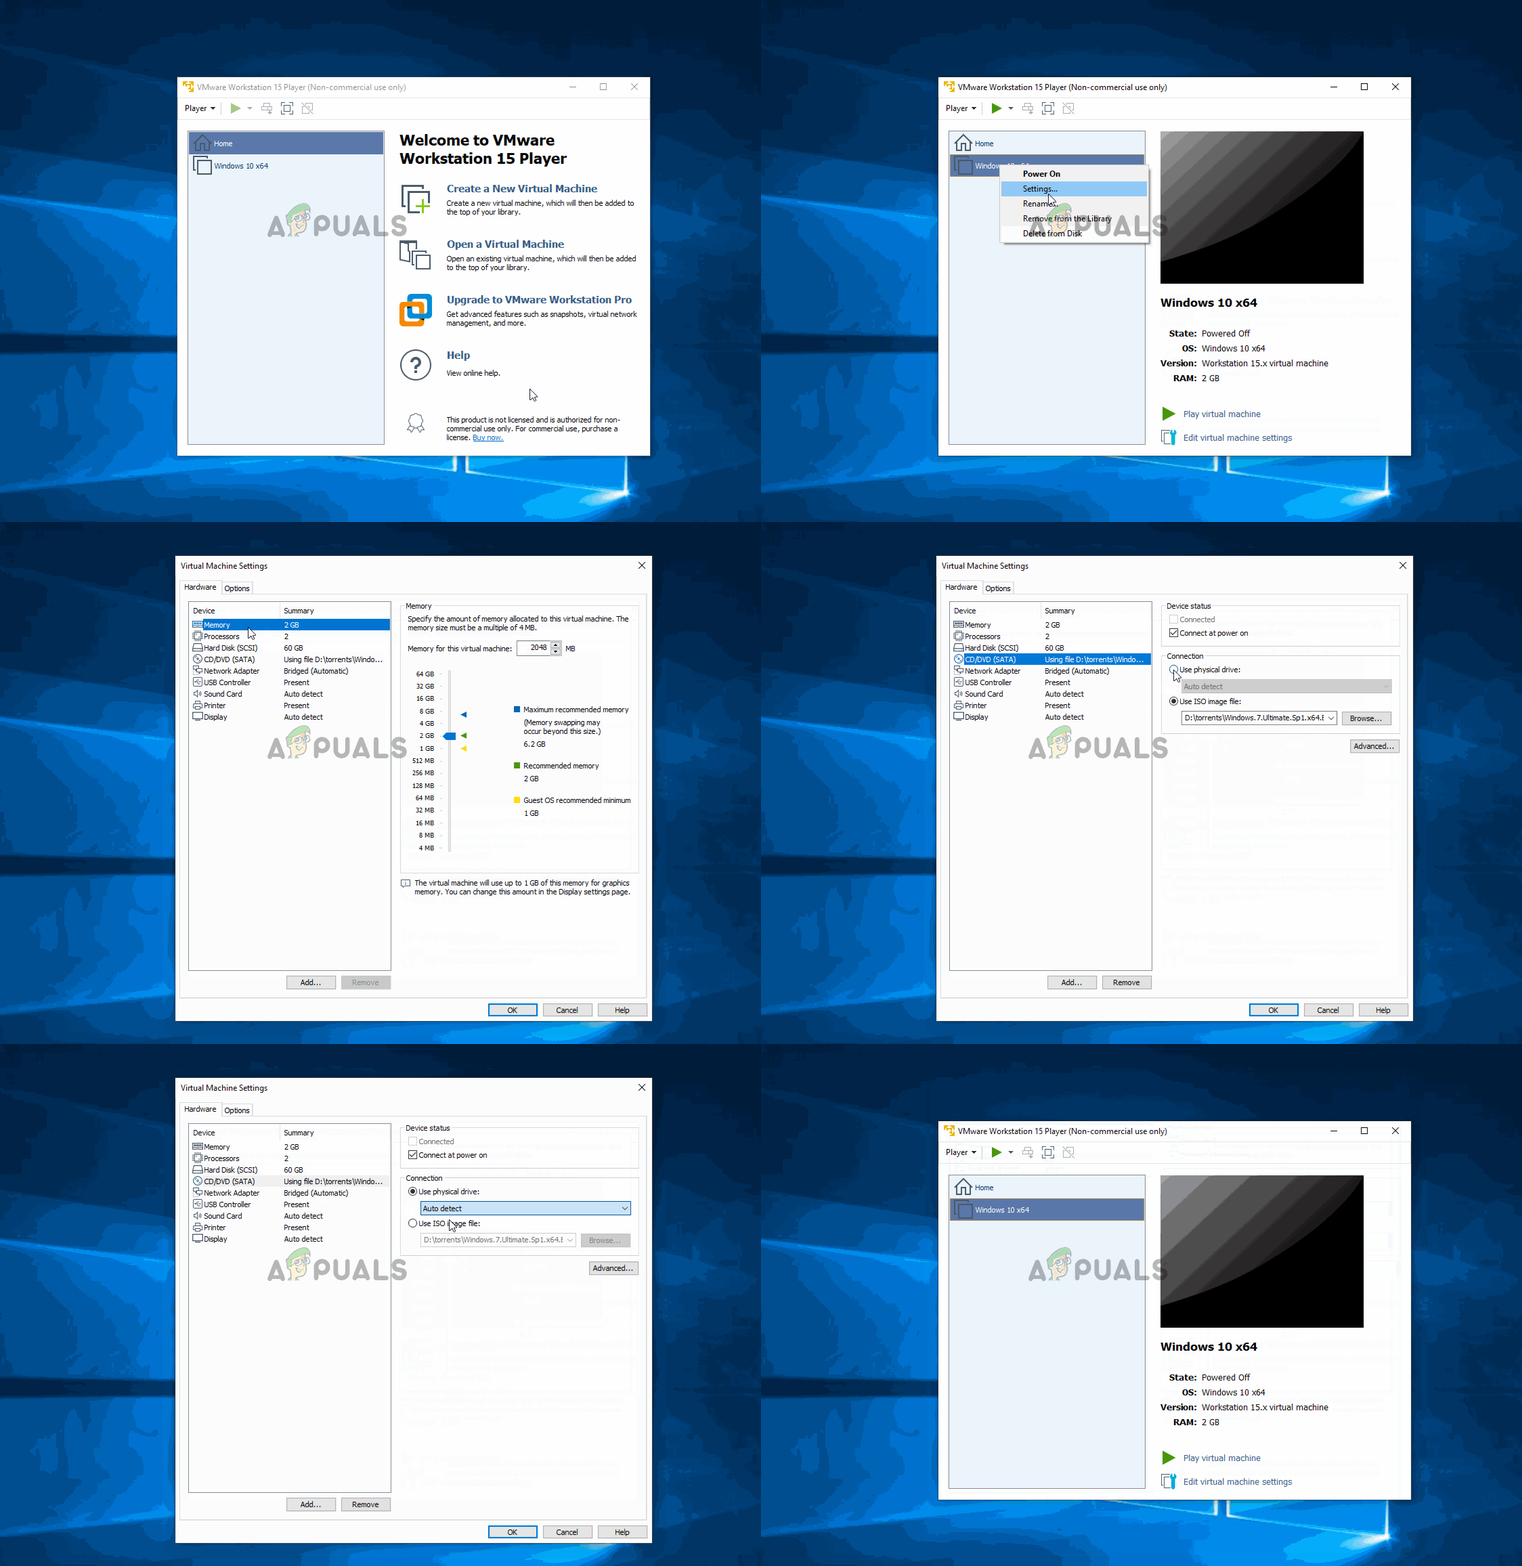
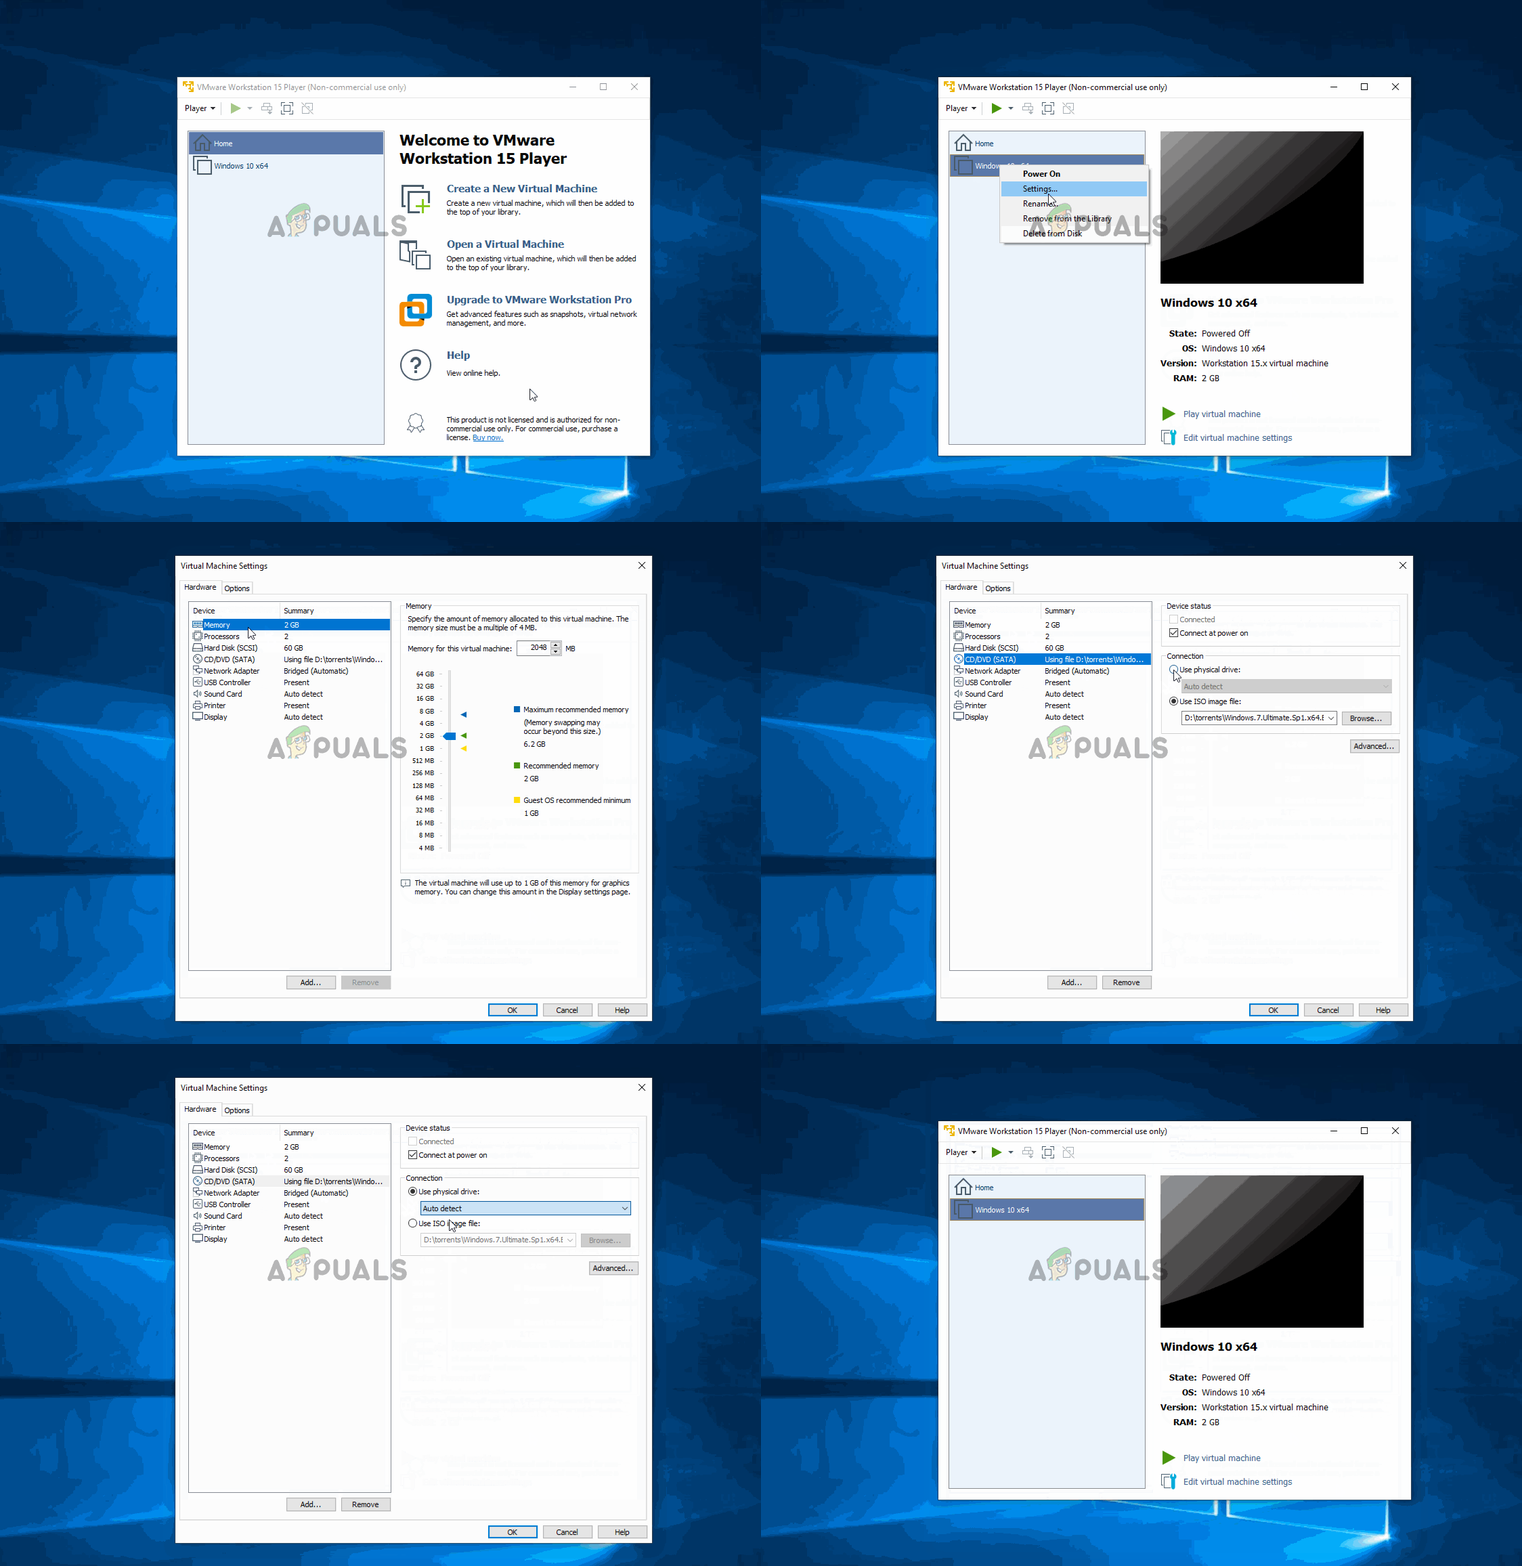
- Double-click on VMware Workstation or VMware player to open the application.
- From the main menu, right-click on the machine that you’re having issues with and choose Settings.
- Inside the Virtual Machine Settings, select the Hardware tab from the top of the screen.
- Next, scroll down through the list of devices and click on CD/DVD (SATA) once to select it.
- With the CD/DVD (SATA) device selected, move over to the right-hand pane and change the Connection toggle to Use physical drive. Then, use the drop-down menu to select the optical drive that you’re inserting the installation media in.
- Once you instruct VMware to use the right physical optical drive, click Ok to save the changes.
- Launch the virtual machine once again and see if the issue has been resolved.
If you’re still encountering the “Operating System not found” error, move down to the next method below.
Method 3: Recreating the virtual machine
Some affected users have reported that they were able to resolve the issue by recreating the virtual machine and making sure that BIOS is preferred instead of UEFI. Others that we’re using VM Fusion or VMware workstation have reported that unchecking Easy Install has resolved the issue for them.
Here’s a quick guide on recreating the virtual machine:
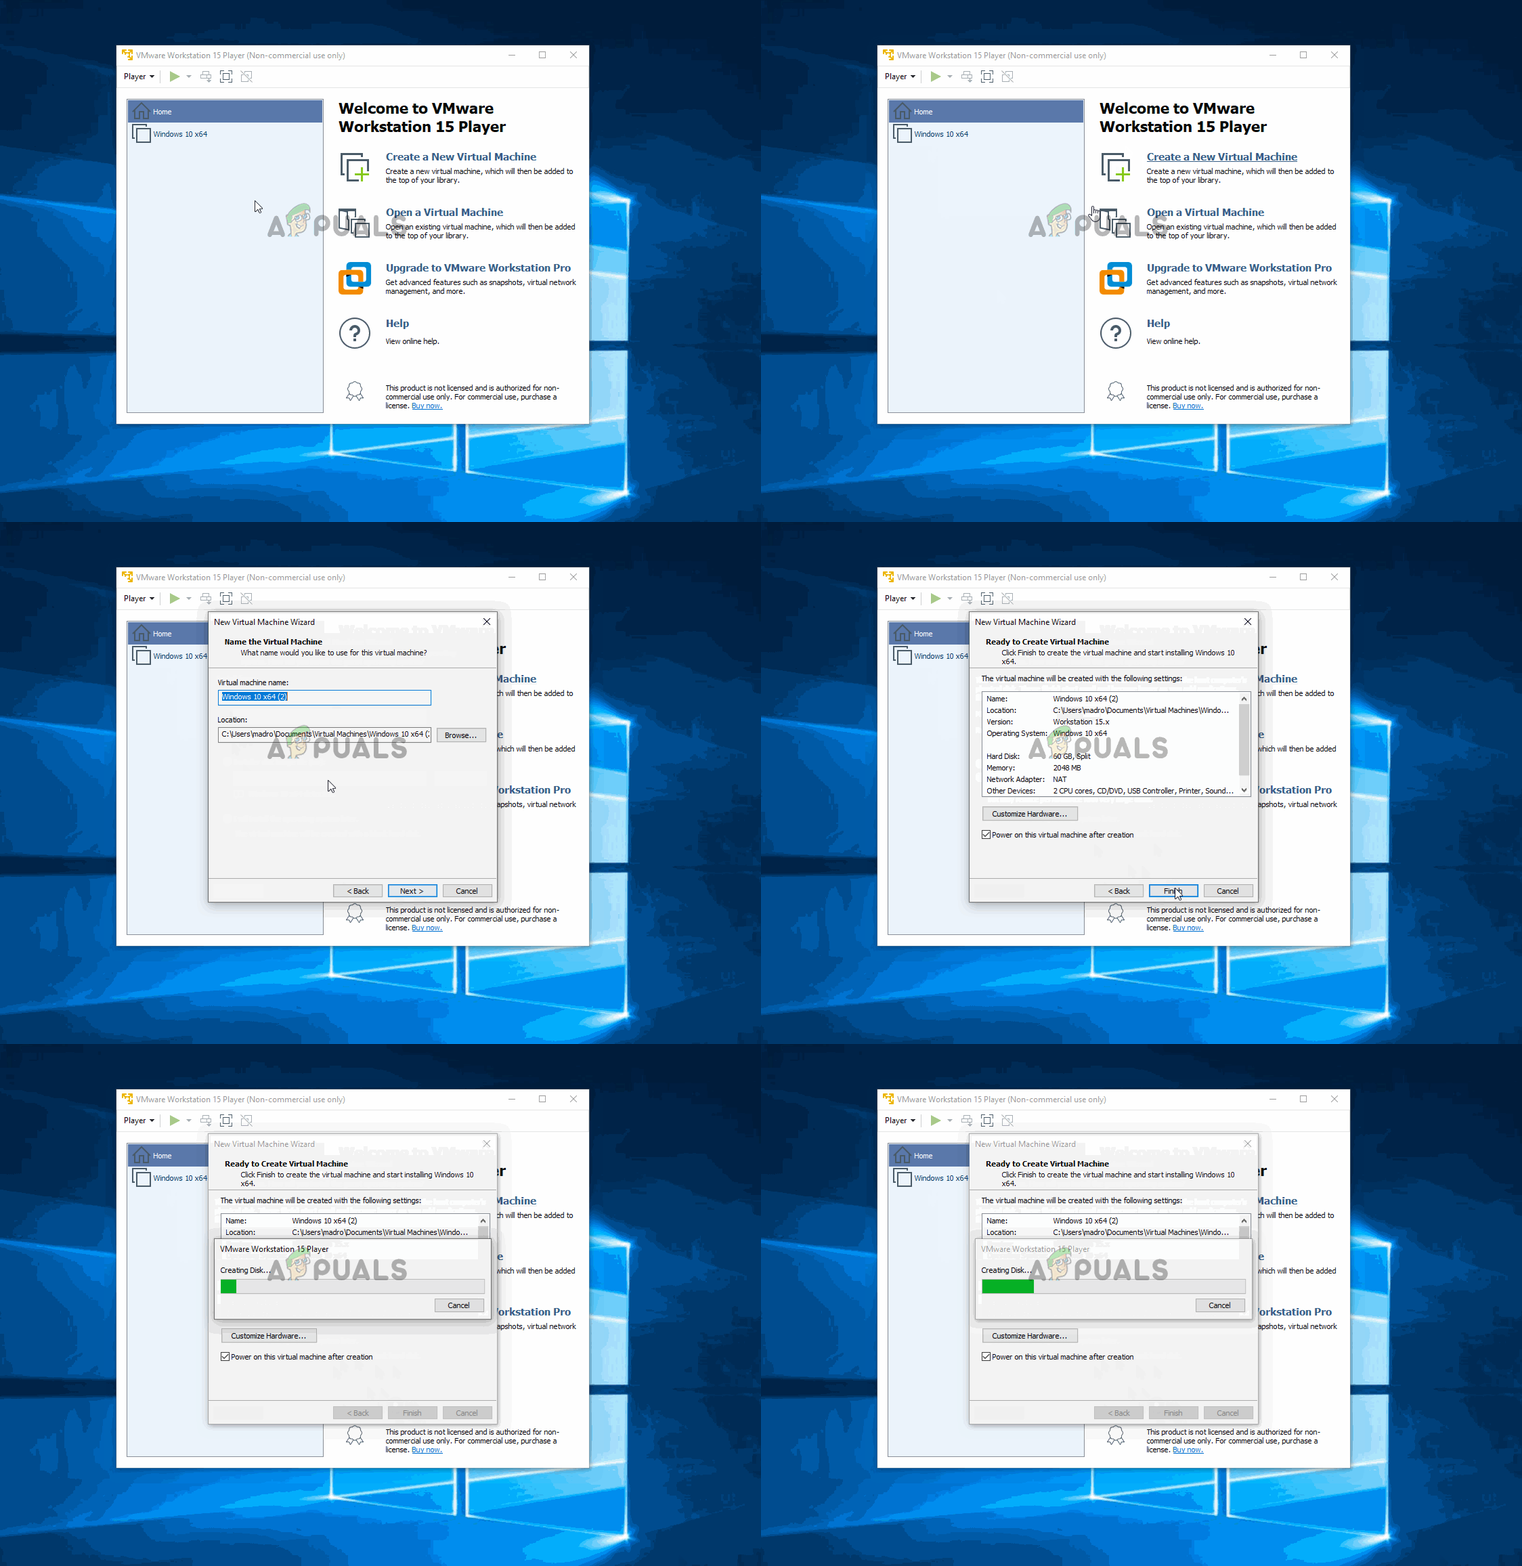
- Open your VMware application and click on Home from the left-hand menu. Then, move over to the menu on the right and click on Create a New Virtual Machine.
- From the New Virtual Machine Wizard screen, select the source of your installation and click Next.
Note: If you’re using VM Fusion or VMware workstation, make sure that you un-check “Easy Install“. - From the next screen, set a name for your virtual machine and a location where the virtual machine will be saved.
- At the next screen, set the maximum disk size and decide on the method of storing the virtual disk before clicking on Next again.
- At the next screen, leave the hardware settings to the default values or set them yourself before clicking on Finish.
- Run the newly created virtual machine and see if the issue has been resolved.
If the same “Operating System not found” error is still occurring, move down to the next method below.
Method 4: Ensuring that you get to see the Windows Installer screen
As it turns out, with certain virtual machine configurations the VMware has the potential of attempting to PXE boot and ends up failing because the user is unable to connect with the VM quick enough and press a key at the Press any key to boot into Windows Installer screen quick enough.
If this scenario is applicable, you can resolve the issue by establishing a boot delay of 6 seconds or higher in order to give yourself the time to act during the Press any key to boot into Windows Installer screen.
Here’s a quick guide on how to do this:
- Make sure that any virtual machine and the main VMware application is closed.
- First things first, you’ll need a text editor smart enough to let you edit the .vmx file. You can also do this with notepad, but in order to ensure that you don’t end up overdoing any data, we encourage you to download & install Notepad++ (here).
- Once you have a reliable text editor installed, open File Explorer and navigate to the following location:
C:Users*YourUser*DocumentsVirtual Machines
Note: Keep in mind that *YourUser* is simply a placeholder for the name of your Windows user account. Replace it with the name applicable in your situation.
- Once you get to the Virtual Machines folder, open the folder associated with the virtual machine that you’re having issues with.
- Inside the folder of the virtual machine look for the .vmx file belonging to this VM.
Note: If you are unable to see the extensions go to the ribbon at the top, click on View tab and make sure that the box associated with File name extensions is enabled. - Right-click on the .vmx file and choose Edit with Notepad++.
- Inside the Notepad++ windows, scroll down to the bottom of the screen and paste the following line of code:
bios.bootDelay = "6000"
- Go to File from the ribbon bar at the top and click on Save. Then, you can safely close the file opened in Notepad++.
- Open the virtual machine that was previously triggering the “Operating System not found” error and see if the issue has been resolved.

Kevin Arrows
Kevin is a dynamic and self-motivated information technology professional, with a Thorough knowledge of all facets pertaining to network infrastructure design, implementation and administration. Superior record of delivering simultaneous large-scale mission critical projects on time and under budget.
Follow this simple guide to get back to using VMware normally
by Radu Tyrsina
Radu Tyrsina has been a Windows fan ever since he got his first PC, a Pentium III (a monster at that time). For most of the kids of… read more
Updated on December 22, 2022
Reviewed by
Vlad Turiceanu

Passionate about technology, Windows, and everything that has a power button, he spent most of his time developing new skills and learning more about the tech world. Coming… read more
- This error appears in various shapes and affects multiple types of devices, but the solutions are the same.
- To resolve this problem, you should set your VMware app to use a physical drive instead of a virtual one.
XINSTALL BY CLICKING THE DOWNLOAD FILE
This software will repair common computer errors, protect you from file loss, malware, hardware failure and optimize your PC for maximum performance. Fix PC issues and remove viruses now in 3 easy steps:
- Download Restoro PC Repair Tool that comes with Patented Technologies (patent available here).
- Click Start Scan to find Windows issues that could be causing PC problems.
- Click Repair All to fix issues affecting your computer’s security and performance
- Restoro has been downloaded by 0 readers this month.
Using any virtualization software, your PC will run two operating systems simultaneously, so issues are bound to appear if the setup is not completed correctly.
Before you start using virtualization on your PC, be sure to check if your PC meets the VMware requirements.
What does the operating system wasn’t found error mean?
An Operating system error is displayed when the BIOS cannot find an operating system on a hard drive from your system. This is just one of many VMware Workstartion errors that you can encounter.
As you can see below, there are plenty of variations to this error, including some common types of devices and error formats.
What are the most common variations for this error?
- An operating system wasn’t found; try disconnecting any drives from VMware – This issue can be caused by the virtual machine trying to boot from another drive.
- Exiting Intel PXE Rom operating system not found VMware – It is the same error with the VMware Intel PXE ROM OS.
- VMWare operating system not found VMDK – The VMDK (Virtual Machine Disk File) was not found and VMware is not booting.
- Operating system not found in VMware Workstation 16 – This issue is present mostly on version 16 of the WMware Workstation.
- The operating system was not found VMware ESXi – The ESXi is an optional component in WMware that partitions into multiple virtual machines.
- VMware operating system not found on Mac – Of course, this error manifests itself on Mac as well.
- The operating system was not found VMware on Ubuntu – You can create a virtual OS on Ubuntu and this error is also present.
Some of our readers also had errors when installing VMware on Windows 11 but this guide will help you fix it.
What can I do if the operating system is not found in VMware?
Before you attempt any advanced troubleshooting, there are a few checks you should perform:
- Unplug any external USB devices from the USB ports of your physical device.
- Check if the ISO image of the OS you’re trying to install on VMware is bootable.
- Restart the VMware application and your system. Take a closer look at our solutions if Windows 11 won’t restart.
- Check if VMware has the latest updates installed.
Some PC issues are hard to tackle, especially when it comes to corrupted repositories or missing Windows files. If you are having troubles fixing an error, your system may be partially broken.
We recommend installing Restoro, a tool that will scan your machine and identify what the fault is.
Click here to download and start repairing.
After going through all these prerequisite measures, let’s fix this problem by going through the solutions below.
1. Set VMware to work with a physical drive
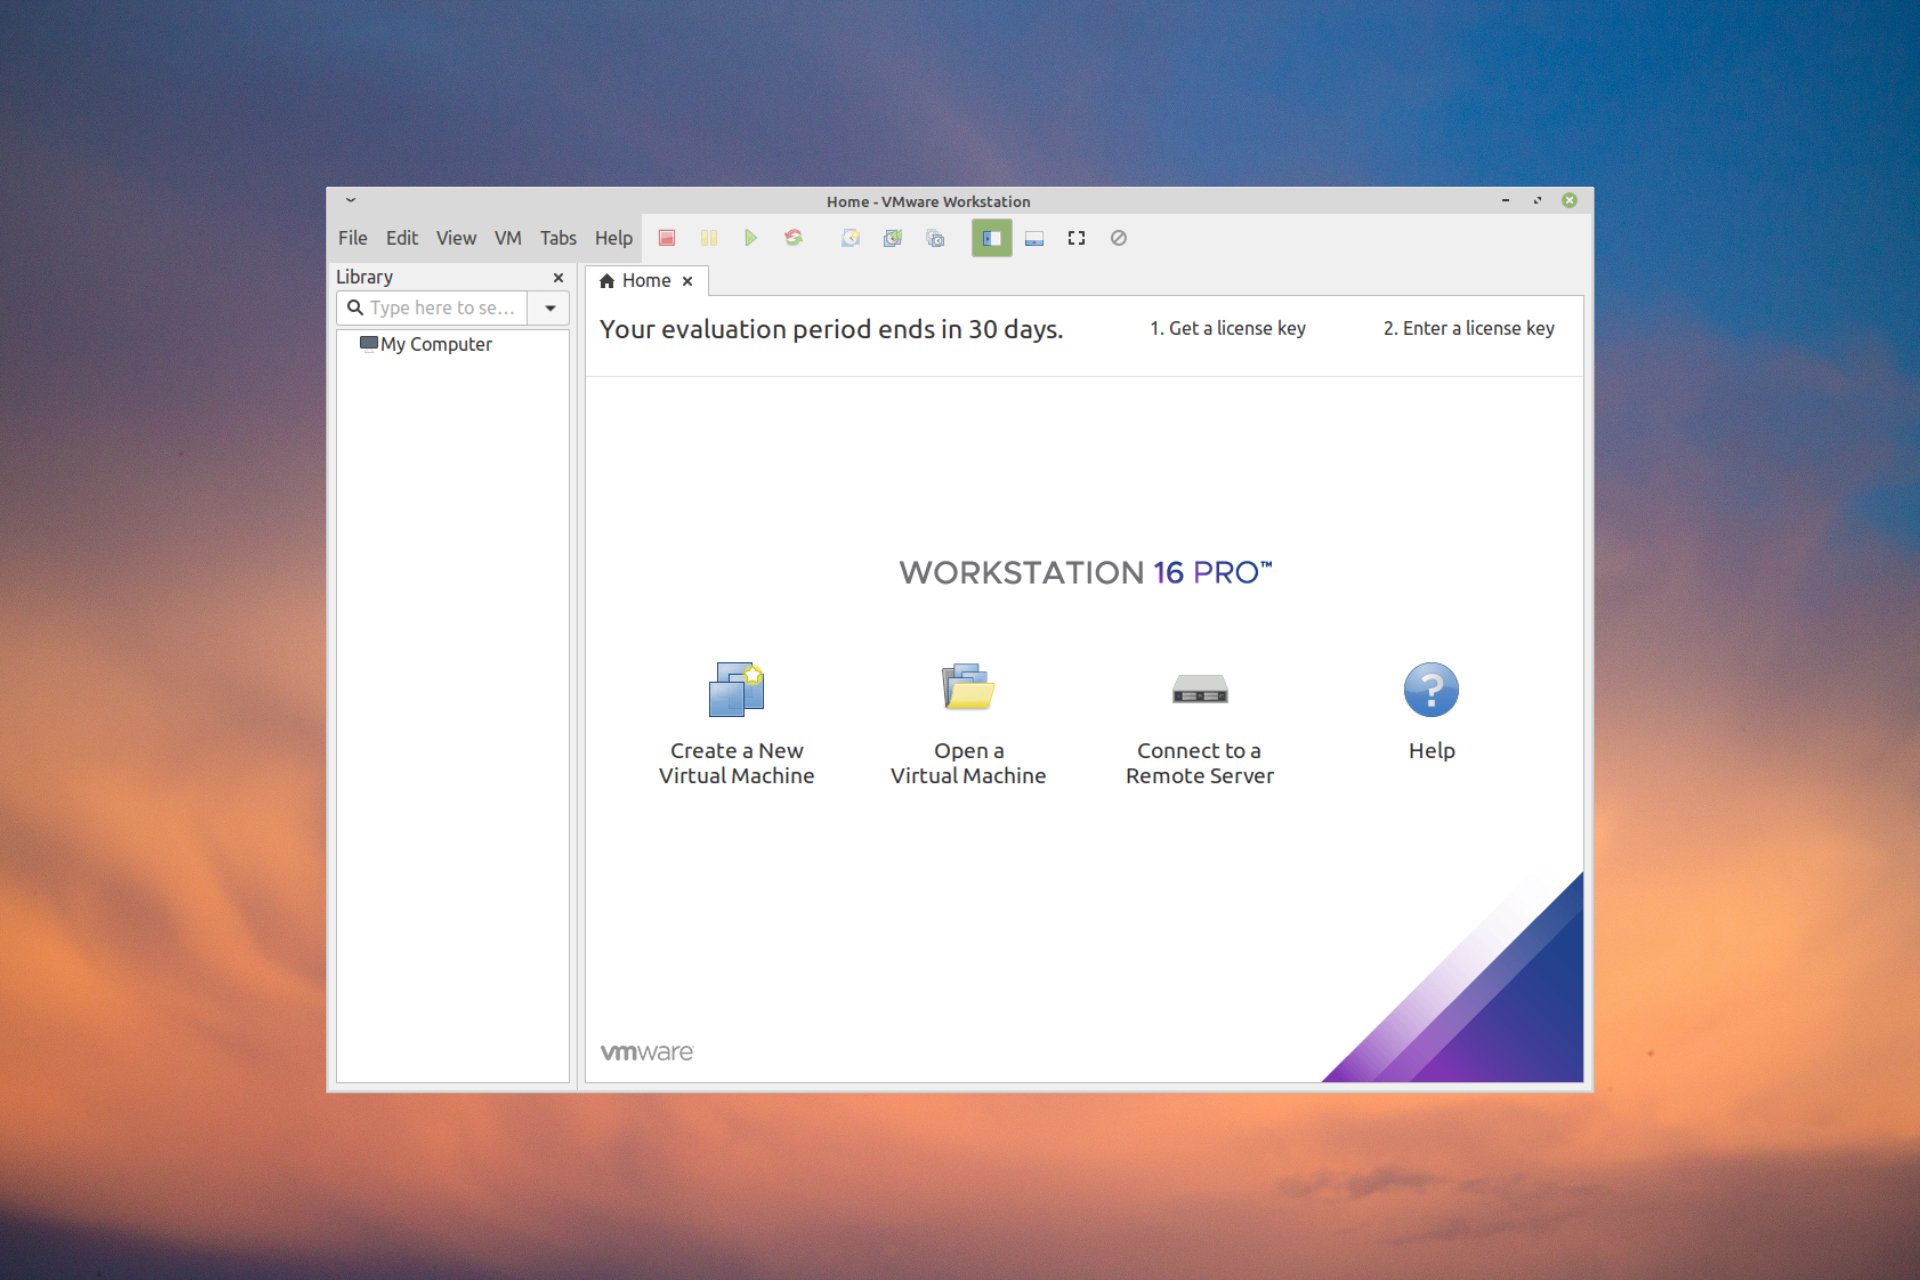
- Open your VMware Workstation.
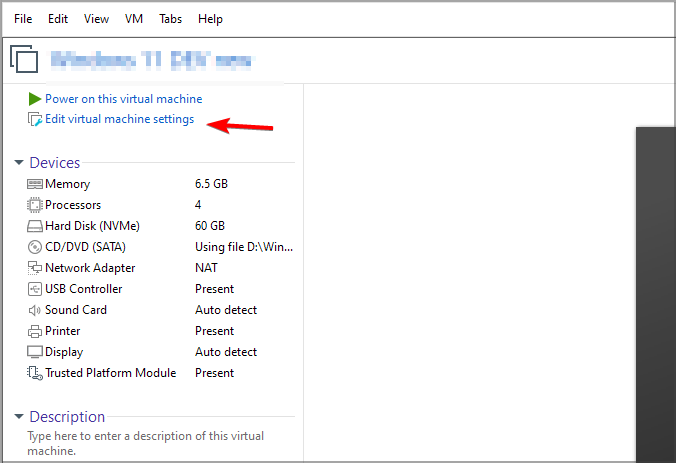
- Select your virtual machine and click on Edit virtual machine settings.
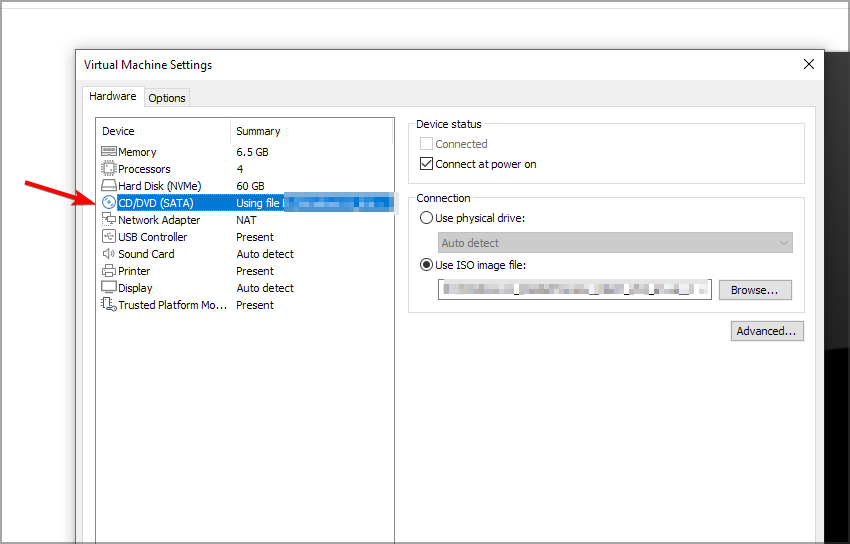
- Scroll down and click on CD/DVD (SATA).
- Change the Connection to Use physical drive on the right-hand panel.
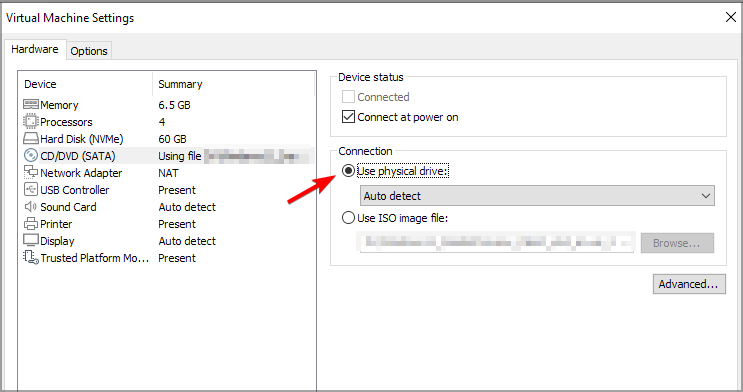
- Select the optical drive you’re inserting the installation media from the drop-down menu, and click OK.
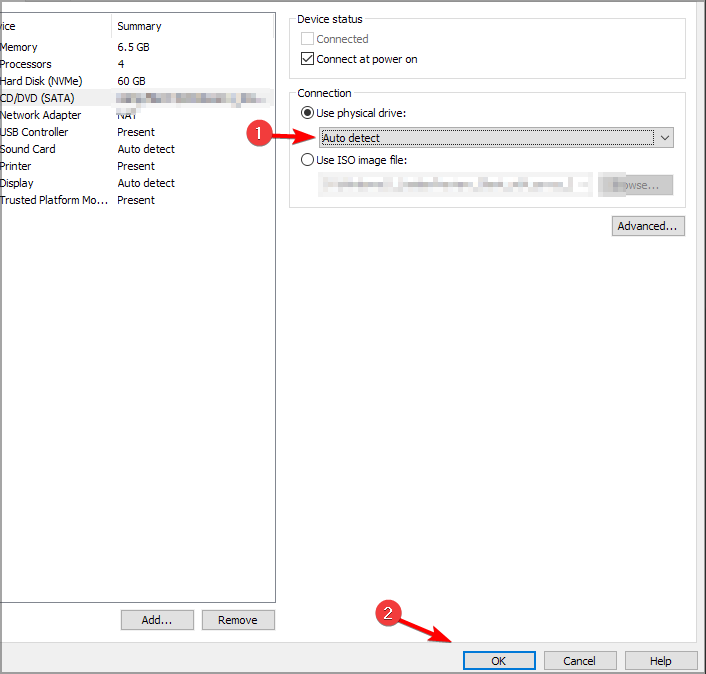
- Start the Virtual Machine again.
2. Recreate the Virtual Machine
- Open your VMware application.
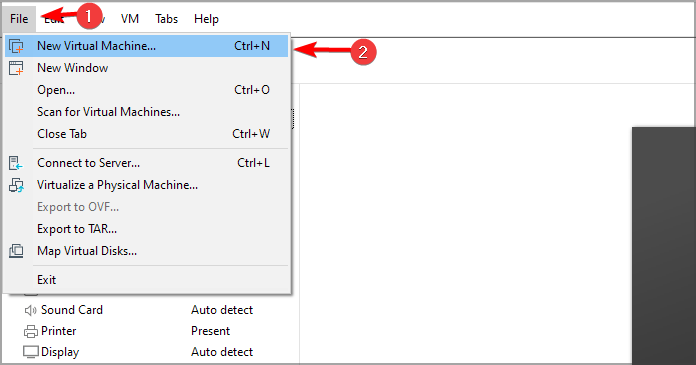
- Click on File and select New Virtual Machine.
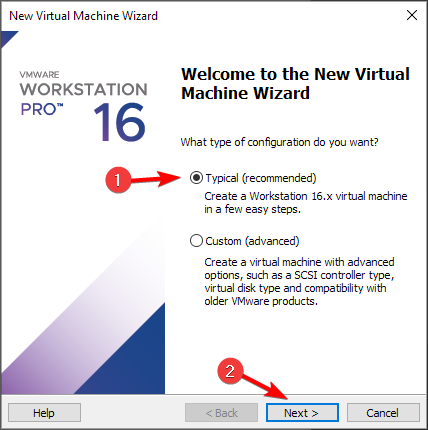
- Select Typical (recommended) and click Next.
- Choose your installation media or select I will install the operating system later and click Next.
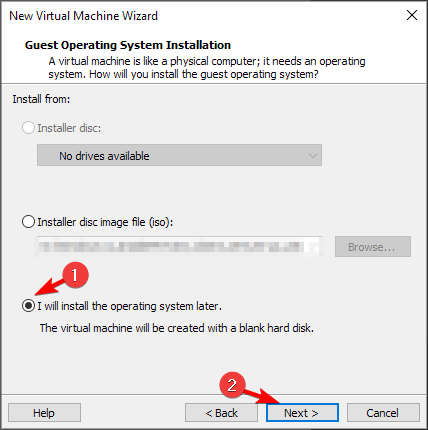
- Select the operating system and click on Next.
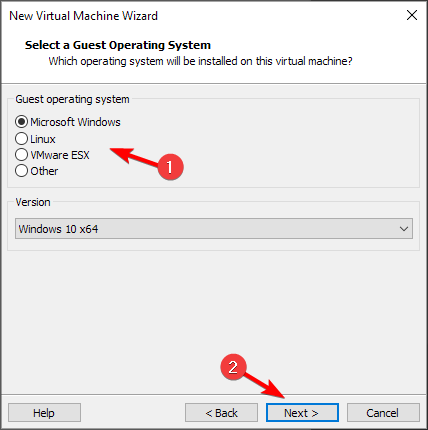
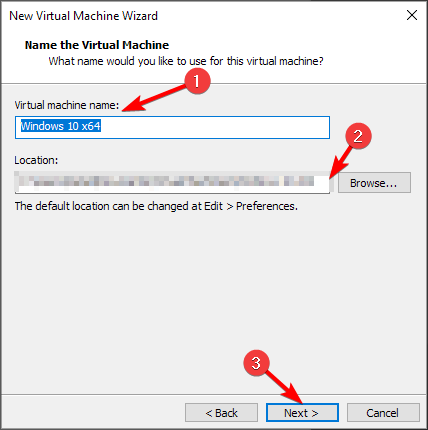
- Set a name for your VM and a location where the VM will be saved. After that, click Next.
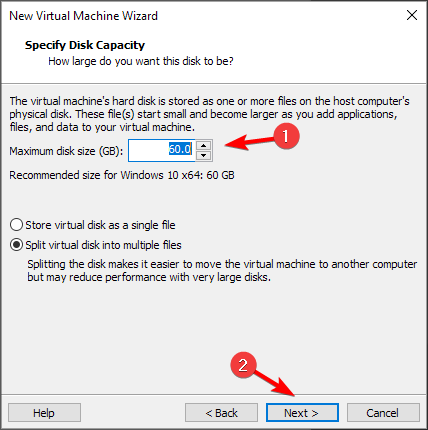
- Set the maximum disk size and the method of storing before clicking on Next.
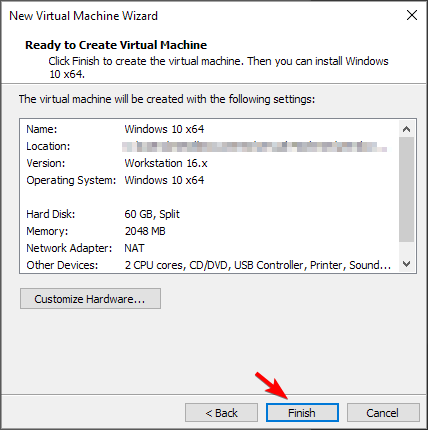
- Customize hardware settings if needed. Once done, click on Finish.
If you need to change the network adapter in VMware, we have a special guide that will help you with that.
- Install VMware Tools grayed out / unavailable [Full Fix]
- VMware: Cannot find a valid peer process to connect to [FIX]
- VMware Not Detecting USB Device: 2 Quick Fixes
- VirtualBox Shared Folder Permission Denied [Windows 11 Fix]
- How to Fix Install VMware Tools Greyed Out / Disabled
- Virtualization Software to Run Different OS on Windows 10/11
3. Reinstall the OS in VMware Workstation
- Go to File and select New Virtual Machine.
- Select the Typical option, and click Next.
- Choose the Installer disc or Installer disc image file (ISO) if you face a disc drive or a file that contains the OS.
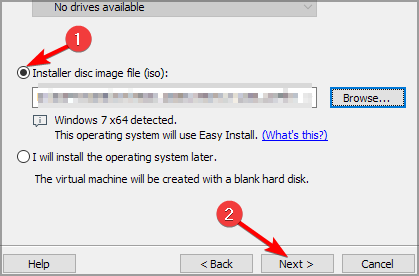
- Set a name for your VM and a location where the file will be saved, and click Next again.
- Define how storage should occur with this VM, and then press Next.
- Adjust the hardware settings if needed and click Finish.
- Follow any on-screen prompts to begin the OS installation.
Speaking of hardware customization, if you’re planning to run Windows 11 on a virtual machine, you need to enable TPM in VMware first. Don’t worry, it’s simpler than you think. Also, don’t hesitate to check out the best VMs that work perfectly on Windows 11.
Check the link below if you want to learn more about the VMware Workstation and how to download and install it.
⇒ Get VMware Workstation for Windows
In case you have additional problems with this software, our VMware isn’t working guide will surely help you fix them.
Please let us know in the comments section below if you have any more questions or suggestions about this topic.

Newsletter
VMware applications are some of the most popular for creating and managing virtual machines. However, it’s not uncommon to see users experience a variety of problems when operating them. For example, when booting a newly created virtual machine, it fails to load but then throws an error message that says the Operating system is not found.
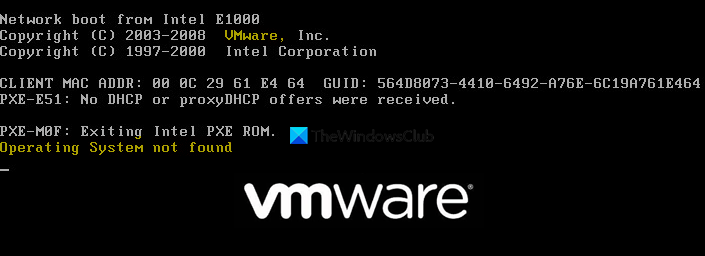
The VMware boot error is not exclusive to specific operating systems or installation media. You can get it when you attempt to install the operating system from a bad ISO file or when installing from physical storage without properly configuring VMware for it.
This error message pops up when working with different Windows editions. In this section, we’ll explore the various causes of the VMware boot error and look into the best ways to fix it, next.
- Your virtual machine files are corrupted.
- When creating the virtual machine, you didn’t instruct VMware to read from a physical storage media.
- The ISO file from which you want to create the virtual machine is not a bootable one.
- The PXE boot delay period is too brief.
How to fix this VMware boot error
Here, I’ll show you the general methods used to fix the VMware boot problem. If VMware is unable to find your operating system, you should go over the causes of the issue outlined in the above section.
From those, you can likely nail the exact cause and pick the troubleshooting technique that applies to your case.
- Confirm that the ISO is bootable.
- Re-make the virtual machine with BIOS.
- If installing from a physical drive, let VMware know.
- Increase the PXE boot delay period.
If you’re not sure how to carry out the above operations, then continue reading this guide. Below are detailed explanations for these solutions.
1] Confirm that the ISO is bootable
You need to mount an ISO file on your virtual machine, and this ISO has to be a bootable OS to work. However, not every ISO files are bootable. Some of them are actually operating system updates.
Therefore, before going into more complex troubleshooting techniques for the VMware boot error, first, confirm that the ISO is bootable. If the ISO is not bootable, then you have to get a bootable one. On the other hand, if you find that the ISO is bootable, you can then begin the repair.
Read: VMware Bridged network not working or detecting.
2] Re-create the virtual machine with different settings
If you’re using a bootable ISO, and VMWare cannot find your operating system, a second suspect it that the machine isn’t configured with UEFI. In the course of creating the VM, if you selected UEFI, you are likely to run into these boot errors. You need to go back, create a new virtual machine, and set it to BIOS and not UEFI. Here’s what to do:
Launch VMware and from the left-hand menu, go to Home. Select New Virtual Machine from the right section and hit Next.
Choose the installation source and then hit the Next button. If you use VM Fusion or VMware workstation, unmark the Easy Install checkbox.
Select your preferred type of virtual machine based on the hardware of the host operating system. Now, select Custom from the next page where you are asked to choose between Typical and Custom.
Name the new virtual machine and select the directory to save it.
Modify the maximum disk size and select how you want to store the virtual disk. Click the Next button.
You can configure the hardware settings any way you seem fit or leave the default settings. Finally, click on the Finish button.
At this point, you can run the new virtual machine to check that the boot error no longer shows up.
3] If installing from a physical drive, let VMware know
Many users who install operating systems from a bootable disk run into the Operating system not found boot error because they didn’t point out the drive from which to boot. To prevent this problem, VMware should be aware that you’re installing it from that specific drive.
Launch the VMware application. Right-click on the problematic virtual machine and click on Settings.
Navigate to the Hardware tab and select CD/DVD (SATA) from the list of devices.
Change the Connection to Use physical drive.
Click on the dropdown menu and choose the drive that contains the ISO file. Strike the OK button to save your settings.
Read: VMware Workstation cannot enter Unity mode.
4] Increase the PXE boot delay period
The configuration of your virtual machine could cause VMware to attempt to PXE boot. This could be the root of the boot error you’re experiencing because you may not be able to get into the Windows Installer screen fast enough.
VMware allows you only a brief window to press any key to boot into Windows Installer. Therefore, a great way to tackle this issue is to increase the boot delay to 6 seconds or more.
First, shut down all open virtual machines and then close the VMware application.
Launch File Explorer and go to the following directory:
C:Users[your username}DocumentsVirtual Machines
Remember to replace the [your username] part in the path above to your actual user account name.
In this directory, double-click on the folder of the specific machine that’s giving issues and find its .VMX file. Open this file with a smart text editor (such as Notepad ++).
This guide will help you show file extensions in the folder if you do not see them.
In the open document, go to the bottom end of the text and then paste the code below:
bios.bootDelay = "6000"
Save the document now and close your text editor.
Let us know if this worked for you.
Related: What is syswow64 vmnat.exe process?
-
MiniTool
-
MiniTool News Center
- VMware Operating System Not Found! How to Fix It?
By Stella | Follow |
Last Updated December 15, 2020

Are you bothered by VMware operating system not found when you want to install the VMware OS using an ISO file or a physical drive? Do you know how to fix this issue? If no, you can read this post because MiniTool Software will show you the main causes and how to fix this issue in different cases.
If you are a user of VMware Workstation or VMware Player, you may encounter the issue of VMware operating system not found. This issue always happens when you are trying to install an OS from a physical installation driver or an ISO file.
When VMware OS not found, you will go to a black screen with an error message saying Operating System not found. The following screenshot message is an example.

Tip: Operating System Not Found can also happen on different versions of Windows like Windows 10, Windows 8/8.1, and Windows 7. You can refer to this article to solve the issue: Here Are 5 Perfect Solutions to Missing Operating System.
Reasons for Operating System Not Found VMware
Why does this issue happen? Here, we will show you some main causes.
The ISO File Is Unbootable
This is a very common reason. The issue happens when you want to use an ISO file that is not bootable. In a situation like this, you need to use another copy of the ISO file that is bootable to install OS on your VMware Workstation or VMware Player.
Your VMware Is Not Set to Boot from the Physical Drive
If you are trying to install OS using a physical drive, you need to set your VMware to boot from that drive. If not, VMware operating system not found can happen. So, you need to shut down your VMware and then boot it from that drive to have a try.
The VM Files Are Corrupted
Some VM files that are involving in OS startup may be corrupted, causing the issue of operating system not found VMware. You need to recreate the virtual machine to have a try.
PXE Boot Period Is Too Short
If the PXE sequence is over before the screen is asking for user interaction is shown, you can also encounter this issue. If so, you need to modify the .vmx file with a boot delay to solve this issue.
Now, we will show you how to solve this issue in different situations.
How to Fix VMware Operating System Not Found?
- Check whether the ISO file is bootable
- Set your VMware to boot from the target physical drive
- Recreate the VMware machine
- Check whether you can see the Windows installer screen
#1. Check Whether the ISO File Is Bootable
If you want to install the VMware OS using an ISO file, you need to make sure that the ISO file is bootable. Perhaps, sometimes, the file you use just contains a package of some update that is not bootable. So, you can just make a confirmation to rule out this possibility.
#2. Set Your VMware to Boot from the Target Physical Drive
If you want to install the VMware OS from a physical drive, you need to make your VMware boot from that drive. Here is what you need to do:
- Open your VMware Workstation or VMware player.
- You can see the main menu. Then, right-click the faulty machine and select Settings.
- In Virtual Machine Settings, select Hardware.
- Click CD/DVD (SATA).
- Move the cursor to the right panel and then select Use physical drive under Connection.
- Unfold its option and then select the physical drive you want to boot from.
- Click OK to save the change.
- Reboot your VMware again to see whether it is bootable now.
#3. Recreate the VMware Machine
Some users reported that they solve the issue (especially the VMware fusion operating system not found issue) by recreating the VMware machine. You can also use this method to have a try.
- Open your VMware application and then click Home from the left menu.
- Click Create a New Virtual Machine. Here, if you are using VM Fusion or VMware workstation, you need to make sure that the Easy install option is not selected.
- Set a name and select a location for your virtual machine on the next page.
- Set the maximum disk size and select the way you want to save the virtual disk.
- Click Next.
- Set the hardware according to your requirements.
- Click Finish.
- Try the newly created VMware machine and see whether it can work normally.
#4. Check Whether You Can See the Windows Installer Screen
If the PXE boot period is too short, you may not see the Windows installer screen and select the drive you want to boot from during the startup process. But, you can manually set a boot delay of 6 seconds or even longer to make you have time to press any key to boot into the Windows installer.
Here is the thing you need to do:
- Close your virtual machine and the main VMware application.
- Open the File Explorer and then go to C:Users*YourUser*DocumentsVirtual Machines. Here, YourUser means your Windows user account.
- Open the folder that is related to the faulty virtual machine.
- Find the .vmx file and right-click it. Then, select Edit with Notepad++. If you can’t see the file’s extension, you can make it show.
- Scroll down to the bottom of the file. Then, copy and paste the following code to the bottom: bootDelay = «6000».
- Click File on the top menu and click Save to save the file.
After this setting, you can reboot your VMware machine to see whether the VMware operating system not found issue is solved.
We hope these solutions can help you solve the issue you are facing. If you are facing some related issues, you can let us know in the comment.
About The Author

Position: Columnist
Stella has been working in MiniTool Software as an English Editor for more than 4 years. Her articles mainly cover the fields of data recovery including storage media data recovery and phone data recovery, YouTube videos download, partition management, and video conversions.
Updated January 2023: Stop getting error messages and slow down your system with our optimization tool. Get it now at this link
- Download and install the repair tool here.
- Let it scan your computer.
- The tool will then repair your computer.
Some Windows users trying to use VMware Workstation or VMware Player report that they see the “Operating System Not Found” error when starting the virtual machine. The error is reported when users attempt to install an operating system from a physical disk or ISO file. The problem is not exclusive to a particular version of Windows because it has been confirmed on Windows 7, Windows 8.1 and Windows 10.

ISO connection to a virtual machine
To resolve the “Operating system not found” error when powering up the virtual machine you just created, you must connect the device/ISO to the virtual machine.
- Select your virtual machine in the inventory window.
- Right-click -> Change settings -> Select CD/DVD
- Under Device Status -> Select Connection when the device is powered on. It’s over for you.
- Then try turning on the device now, and you should see the installation screen of the next operating system instead of this error.

Recreating the virtual machine
Some concerned users indicated that they had succeeded in solving the problem by rebuilding the virtual machine and ensuring that BIOS was preferred to UEFI. Others that we use with VM Fusion or VMware Workstation reported that disabling Easy Install fixed the problem for them.
January 2023 Update:
You can now prevent PC problems by using this tool, such as protecting you against file loss and malware. Additionally it is a great way to optimize your computer for maximum performance.
The program fixes common errors that might occur on Windows systems with ease — no need for hours of troubleshooting when you have the perfect solution at your fingertips:
- Step 1 : Download PC Repair & Optimizer Tool (Windows 10, 8, 7, XP, Vista – Microsoft Gold Certified).
- Step 2 : Click “Start Scan” to find Windows registry issues that could be causing PC problems.
- Step 3 : Click “Repair All” to fix all issues.

Here is a brief guide to restoring the virtual machine:
- Open your VMware application and click on Home in the left menu. Then go to the right menu and click on Create a new virtual machine.
- In the New Virtual Machine Wizard screen, select the source of your installation and click Next.
- Note: If you are using VM Fusion or VMware Workstation, be sure to disable the Easy Installation option.
- On the next screen, enter a name for your virtual machine and a location where the virtual machine will be stored.
- On the next screen, set the maximum disk size and choose the virtual disk storage method before clicking Next again.
- On the next screen, leave the hardware settings at their default values or adjust them yourself before clicking Finish.
- Run the newly created virtual machine and check that the problem is solved.
Reload the VMX file

To reload the.vmx file, please follow the following steps:
- We must first obtain the Vmid virtual machine with the following command:
#vim-cmd vmsvc/getallvms - You will see an exit similar to the one you see in
- Vmid Name File Guest Operating System Version Note 2848 Win2003_storage_performance[local] Win.vmx winNetEnterpriseGuest vmx-07 Use as template
- In this example, the Vmid is 2848.
- Reload the.vmx file with this command:
# vim-cmd vmsvc/reload Vmid
CONCLUSION
The reason for this problem is that the VM tries to boot from the first SCSI device, and since the new empty virtual disk I added was the first SCSI device, the system could not boot.
If you have any questions, please let us know in the comment field below.
https://communities.vmware.com/thread/452942
Expert Tip: This repair tool scans the repositories and replaces corrupt or missing files if none of these methods have worked. It works well in most cases where the problem is due to system corruption. This tool will also optimize your system to maximize performance. It can be downloaded by Clicking Here

CCNA, Web Developer, PC Troubleshooter
I am a computer enthusiast and a practicing IT Professional. I have years of experience behind me in computer programming, hardware troubleshooting and repair. I specialise in Web Development and Database Design. I also have a CCNA certification for Network Design and Troubleshooting.
Post Views: 82
Problem
After a successful VM restore, without error of a VMware guest using a EFI system partition, it cannot start and displays «operating system not found»
Symptom
«operating system not found» seen at boot time after a successful VM restore
Cause
The IBM Spectrum Protect for Virtual Environments — Data Protection for VMware backup VM operation will not save the EFI configuration located in the guest nvram file.
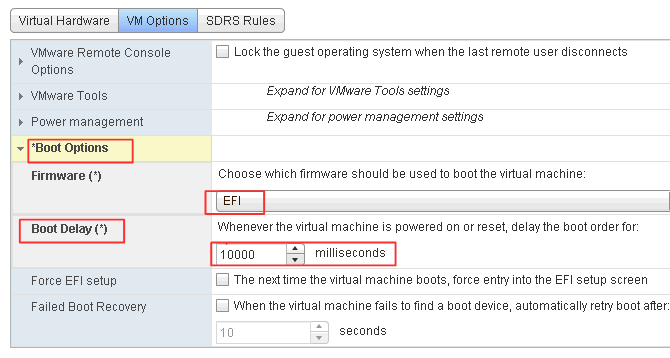
Upon restore, under yet unknown conditions the VMware guest boot settings might be reset to the defaults and for example the boot method «EFI» can be reset to «BIOS» or the Boot delay reset to 0 milliseconds.

When that happens, the guest cannot boot.
Environment
VMware guests in a vSphere environment
Resolving The Problem
If the original guest is still present in the environment, the .nvram file of the original virtual machine can be used to overwrite the restored virtual machine’s .nvram file.
- Log on into the vSphere Web Client as an administrator.
- Find the original guest’s .nvram file in the datastore.
- Power off the original guest if it is powered on.
- Right click the .nvram file, and from the context menu choose to download the file to a local file.
- Restart the original guest.
- Find the restored guest’s .nvram in the datastore.
- In the restored guest files datastore, right click the .nvram file, and from the context menu choose to delete it.
- Upload the original guest’s .nvram file to the restored guest datastore files.
- Power on the restored guest. The system should boot up successfully.
If the original guest is not available, after having restored the guest, edit the boot configuration to put the original settings back before starting it.
[{«Product»:{«code»:»SSERB6″,»label»:»IBM Spectrum Protect for Virtual Environments»},»Business Unit»:{«code»:»BU058″,»label»:»IBM Infrastructure w/TPS»},»Component»:»Data Protection for VMware»,»Platform»:[{«code»:»PF016″,»label»:»Linux»},{«code»:»PF033″,»label»:»Windows»}],»Version»:»Version Independent»,»Edition»:»Edition Independent»,»Line of Business»:{«code»:»LOB26″,»label»:»Storage»}}]