Во время установки программ с помощью пакетного менеджера apt в любом из дистрибутивов, использующих этот пакетный менеджер, вы можете столкнуться с ошибкой, что у вас зафиксированы сломанные пакеты. Это пакеты, которые не установились полностью потому что им не хватает зависимостей или процесс установки был по какой-либо причине прерван.
В этой статье мы рассмотрим что делать с такой ошибкой, как её исправить, а также я дам ссылки на другие материалы на сайте, которые помогут справится с проблемой.
Как исправить у вас зафиксированы сломанные пакеты?
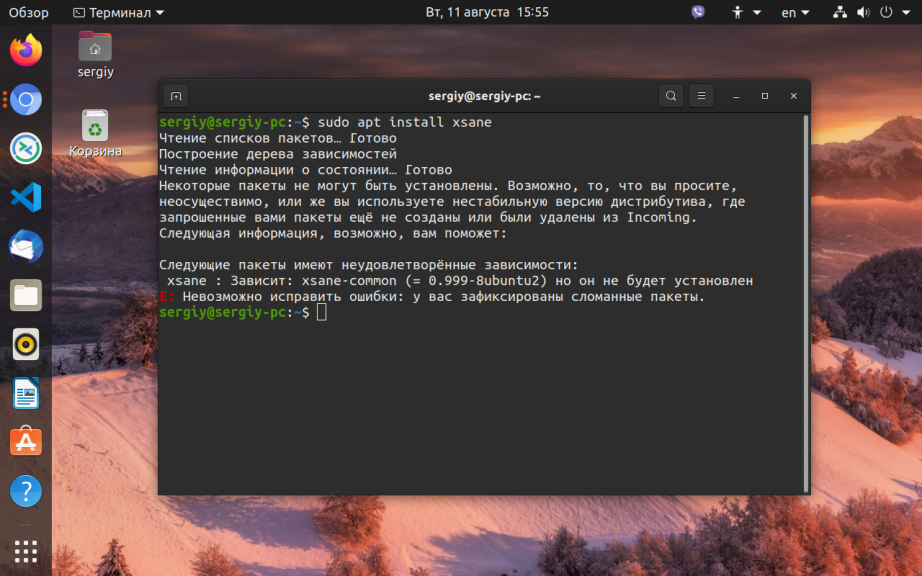
1. Обновите списки пакетов
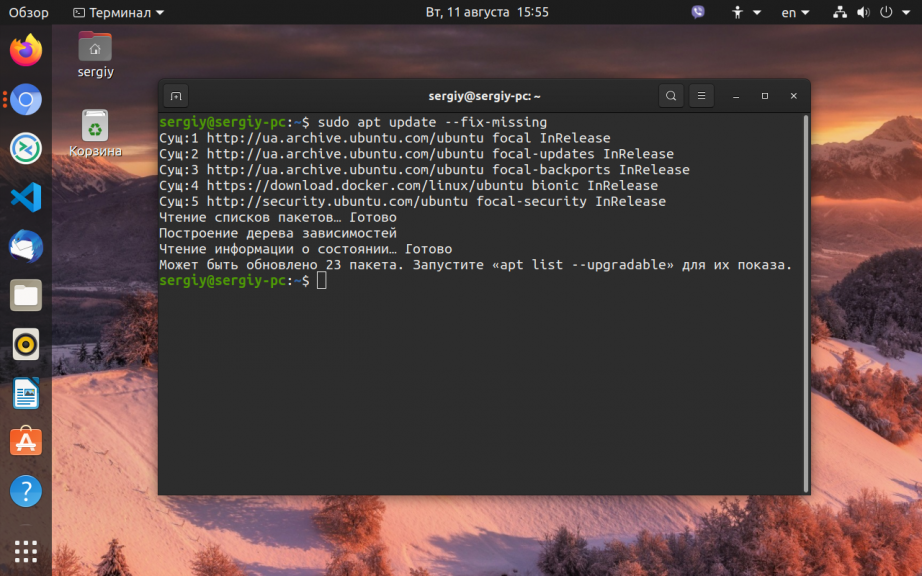
Возможно вам не удалось установить нужные пакеты потому что списки репозиториев устарели, и там ещё не было нужных пакетов. Для обновления списка пакетов выполните:
sudo apt update --fix-missing
2. Установите битые пакеты
После обновления списка пакетов из репозиториев может помочь установка битых пакетов. Этот шаг поможет особенно если вы устанавливали пакет с помощью dpkg и теперь нужно доустановить его зависимости с помощью пакетного менеджера. Для этого есть специальная команда:
sudo apt install -f

3. Очистите лишние пакеты
Установке могут мешать лишние пакеты, которые больше не нужны в системе. Для их удаления выполните:
sudo apt clean
Затем:
sudo apt autoremove
Утилита отобразит список всех битых пакетов, которые не установлены, вы можете попытаться их удалить с помощью команды:
sudo dpkg --remove -force --force-remove-reinstreq имя_пакета
4. Используйте dpkg
Вместо apt вы можете использовать команду dpkg чтобы посмотреть какие пакеты вызывают проблему. Просто выполните:
sudo dpkg --configure -a
Команда покажет проблемные пакеты, а потом вы сможете их удалить той же командой:
sudo dpkg --remove -force --force-remove-reinstreq имя_пакета
5. Разрешите зависимости
Битые пакеты чаще всего появляются из-за того, что пакетный менеджер не может найти для них нужные зависимости. Если вам всё же очень нужно установить такой пакет, просто разрешите эти зависимости. Для этого можно скачать и установить их вручную или если вы уверенны, что зависимости в пакете указаны неверно, можно скачать его распаковать и удалить мешающие зависимости. Подробнее об этом читайте в этой статье.
Выводы
В этой небольшой статье мы рассмотрели что делать если в вашей системе появились битые пакеты и как их исправить. Здесь решение проблемы очень сильно зависит от вашей ситуации, но здесь приведены основные варианты решения, которые должны помочь вернуть пакетный менеджер к работе. Иногда рекомендуют удалить пакет вручную из базы данных dpkg /var/lib/dpkg/status, однако лучше этого не делать и найти путь решить проблему по другому, ручное редактирование подобных файлов может создать ещё больше проблем.

Статья распространяется под лицензией Creative Commons ShareAlike 4.0 при копировании материала ссылка на источник обязательна .
Об авторе

Основатель и администратор сайта losst.ru, увлекаюсь открытым программным обеспечением и операционной системой Linux. В качестве основной ОС сейчас использую Ubuntu. Кроме Linux, интересуюсь всем, что связано с информационными технологиями и современной наукой.
Если вы активный пользователь Linux, то наверняка встречались с тем, что некоторые пакеты так сказать ломаются. Это может быть вызвано по разным причинам, некорректно установленный пакет, какие-то ошибки во время установки и многое другое. Что в свою очередь может сказаться и на самом менеджере пакетов “apt-get”, и как итог, возможно что дойдет даже то того, что вы не сможете обновляться или устанавливать программное обеспечения. Данная статья поможет вам решить вопрос со сломанными пакетами в Debian / Ubuntu, а так же их производными. Так как сломанные пакеты могут возникать по разным причинам, существует несколько способов для решения этой задачи, но, не все они могут сработать, тут все зависит от конкретного случая.
P.S. Желательно точно знать какой пакет у вас сломан, так как это поможет вам выбрать один из способом решения задачи.
Содержание
- Чиним сломанные пакеты с apt-get
- Чиним сломанные пакеты с apt-get и dpkg
- Принудительное удаление пакета с помощью apt-get и dpkg
- Заключение
Чиним сломанные пакеты с apt-get
Первый вариант, который может помочь починить сломанные пакеты имеется в самом менеджере пакетов apt, и для починки сломанных пакетов достаточно ввести две команды:
sudo apt-get update --fix-missing
sudo apt-get install -f

Этот способ поможет для решения уже установленных в вашей системе пакетов, который по каким то причинам сломались. После выполнения первой команды необходимо убедиться, что она исправила ошибки, а затем переходить к введению второй команды. Возможно, что для исправления сломанных пакетов понадобиться несколько минут:
Чиним сломанные пакеты с apt-get и dpkg
Но, что делать если пакет сломался во время установки? Можно попробовать выполнить команды из первого примера, если они не сработают, переходим к использованию apt-get и dpkg, для этого первым делом используем dpkg для настройки пакетов. А затем выполняем очистку apt-get:
sudo dpkg --configure -a
sudo apt-get clean
sudo apt-get update

В некоторых ситуациях может понадобиться удалить файл блокировки, после удаления файла блокировки, снова выполните предыдущие команды:
sudo rm /var/lib/apt/lists/lock
Принудительное удаление пакета с помощью apt-get и dpkg
В редких ситуациях может случиться и такое, что ни один из выше указанных методов не сработает и вам понадобиться вручную удалить сломанный пакет. Для этого разумеется вы должны точно знать что это за пакет, и первый вариант удаление пакета с помощью apt-get, для этого вводим команду:
sudo apt-get remove и название пакета
Если же вам не удалось удалить пакет, переходим к кардинальным мерам, для принудительного пакеты введите команду:
sudo dpkg --remove --force-remove-reinstreq и название пакеты
Затем выполните очистку и обновление пакетов:
sudo apt-get clean && sudo apt-get update
Заключение
Если вы не знаете про менеджеры пакетов apt-get и dpkg, на WIKI имеется статьи, первая про apt, вторая статья про dpkg. В редких ситуациях, выше приведенных мер может быть недостаточно для исправления сломанных пакетов. В этом случае, может понадобиться ручная сборка и удаление сломанных пакетов, правда, имеется риск повредить работоспособность всей системы, что в свою очередь может вывести ее из строя. В этом случае, если вы делали резервные копии вашей системы можно откатиться работоспособной версии системы. Сделать резервную копию вашей системы можно при помощи Timeshift или Deja Dup, последняя имеется в дистрибутиве Ubuntu. Но, чаще всего удается отделаться малой кровью когда появляются сломанные пакеты, и выше приведенных мер достаточно для исправления сломанных пактов.
А на этом сегодня все. Надеюсь данная статья будет вам полезна.
Журнал Cyber-X
Let’s understand this error with an example:
Assume this is the error message:
The following packages have unmet dependencies:
 nginx-module-brotli : Depends: nginx (= 1.17.3-2-ppa7~bionic)
E: Unable to correct problems, you have held broken packages.
Let’s break it down into variables:
X=nginx-module-brotli
Y=nginx
Z=1.17.3-2-ppa7~bionic
Here X is the package you are trying to install. Y is the package, which is causing dependency troubles (there may be multiple Ys) and Z is the version that is required.
So in a summary:
X needs the package Y with the version Z to work.
However, apt is facing troubles while finding the version Z for Y.
So, let’s check if version Z is available for the package Y. We can use apt-cache policy <package_name> to find the available versions for the package. For example:
 $ apt-cache policy nginx
libasound2:
  Installed: nginx_1.20.2-1~bionic
  Candidate: 1.2.2-2.1ubuntu2
  Version table:
 *** nginx_1.20.2-1~bionic 100
        100 /var/lib/dpkg/status
     1.17.3-2-ppa7~bionic 500
        500 http://br.archive.ubuntu.com/ubuntu focal/main amd64 Packages
Here, you can see two versions for the package nginx is available. The version required by X is Z. According to the version table, version Z for the package Y is available. But apt always installs the latest version (I know it’s a little dumb.) So there are two ways to fix this:
- Install the correct package version.
- Increase the aptitude of
apt.
To install the correct package version use:
sudo apt update
sudo apt install <Y>=<Z>
Where is the package causing dependency troubles and is the version needed by X. Now, the installation should be successful.
To increase the aptitude of your package manager:
sudo apt update
sudo apt install aptitude
sudo aptitude -f install <Z>
Where is the package you are trying to install. Some useful tips with aptitude:
-
-foption will do advance troubleshooting. It’s pretty useful! -
selecting
nfor a solution will make aptitude propose more solutions! -
Running
man aptitudewill show a detailed manual for using aptitude. Online manual.
Is the package version not available?
First, try running sudo apt update to update the repository list. Then try installing the package again.
Still not available?
You have two options:
-
Search for the package in https://packages.ubuntu.com/ and restore the default repositories.
-
Add custom PPAs to satisfy dependencies.
Searching package and restoring default repositories:-
-
Go to https://packages.ubuntu.com
-
Scroll down to the Search section.
-
In the Keyword column, enter the name of the package.
-
In the Distribution column, select the code name of your Ubuntu version (
lsb_release -c). -
Click on search!

-
Select the Exact Hit.

-
Check the version and repository for the package.

Check if the version needed and version available matches. If yes then refer to How do I restore the default repositories?
Adding a custom PPA.
You have to take help from Google for that. Just google up the package and version and hopefully you’ll find a PPA.
Some helpful commands:
sudo apt -f install <package>to force install package.sudo aptitude -f install <package>To force install package.sudo add-apt-repository whatever/ppato add a PPA.sudo apt purge <package>to remove a package.
I’m asking a new question, what information should I provide?
Information such as:
- Your Ubuntu version (output of
lsb_release -d. - Output of
sudo apt install <package> - Output of
apt policy <package>andapt policy <package's dependency>
Other details should be provided when asked.
Содержание
Предисловие
Иногда, при работе с пакетными менеджерами, возникает проблема с неразрешенными зависимостями пакетов. В данной статье будут рассмотрены варианты решения этой проблемы.
Все операции выполняются в терминале.
Убедитесь что ни один пакетный менеджер не запущен. Это может быть: apt-get, aptitude, Synaptic, KPackageKit, Центр Приложений Ubuntu и тд.
Используя APT-GET
Обычно ошибка выглядит так:
E: Неудовлетворённые зависимости. Попытайтесь выполнить 'apt-get -f install', не указывая имени пакета, (или найдите другое решение).
Удалите кеш пакетов:
sudo apt-get clean
Удалите осиротевшие пакеты:
sudo apt-get autoremove
Обновите список пакетов:
sudo apt-get update
Исправьте зависимости:
sudo apt-get -f install
Обычно этого достаточно.
Если вы запутались с зависимостями, поможет интеллектуальное обновление системы:
sudo apt-get dist-upgrade
Если установка была прервана, то следует переустановить пакет
sudo apt-get install --reinstall имя_пакета
Если репозиторий недоступен, исправить:
-
/etc/apt/sources.list — главный список репозиториев
-
/etc/apt/sources.list.d — каталог для сторонних репозиториев
Если невозможно удалить/переустановить пакет, исправить:
-
/var/lib/dpkg/status — список установленных пакетов
-
/var/lib/dpkg/available — список доступных для скачивания пакетов
Linux package managers, like Apt and DNF, are extremely powerful and intuitive, but that doesn’t mean things can’t go wrong. Occasionally, a package install goes wrong, and you’re left to pick up the pieces. Package managers have the ability to fix broken packages and skip broken updates to get your system working again and avoid troubles in the future.
This article covers how to fix broken packages in Linux. These fixes should help you get unstuck in most instances.
Content
- Fixing Broken Packages in Ubuntu/Mint/Debian
- Fixing Broken Packages in Fedora/CentOS/RHEL
- Fixing Broken Packages in Arch
- Frequently Asked Questions
Fixing Broken Packages in Ubuntu/Mint/Debian
Apt has a couple of flags to fix missing dependencies or packages that broke for one reason or another during install. A common use here would be installing a third-party .deb and finding that it had dependencies you didn’t know about. Those dependencies probably won’t be pulled in on their own, and dpkg will complain that it can’t resolve dependencies. In any case, you can try the following steps:
Note: learn how Apt works before attempting any of the fixes below.

- Run an update to make sure there aren’t newer versions of the required packages:
sudo apt --fix-missing update
- Force Apt to look for and correct any missing dependencies or broken packages when you attempt to install the offending package again. This will install any missing dependencies and repair existing installs:
Fixing DPKG Configuration Issues
Another place where an error can pop up in package installations is the configuration process. Behind the scenes, dpkg takes care of this part, so when a package fails during configuration, dpkg is the tool to fix it.

- Start by trying to force dpkg to reconfigure any broken or partially configured packages:
- If that doesn’t solve the problem, take a more forceful approach. Start by listing any packages that dpkg marked as requiring a reinstall:
The above command will show you the packages that cause problems. For this next step, check and make sure that the packages marked for reinstall are really broken. Do a sudo apt reinstall and pay attention to which packages fail to reinstall.
- For each package that fails to reinstall, get the name and forcibly remove the broken package:
sudo dpkg --remove --force-remove-reinstreq [package name]
- Dpkg should now be clean. Do a cleanup with Apt:
sudo apt clean && sudo apt update
With any luck, that’ll get you back to where you started. It won’t get you the broken packages that you tried to install, but at least Apt will be functional again, and you can go back to using it to attempt to install the package you were originally trying to install and its dependencies.
Permanent DPKG Lock
There’s a less common issue with dpkg locks preventing you from doing anything. Every time you try to use Apt or dpkg, you get an error saying another application is already using it … when it isn’t.
It’s easy to delete the lock file preventing you from using Apt and getting back to doing what you need to. Sometimes these lock files remain in place after an install error or power outage, derailing the process and preventing the file from being removed automatically. In this case, you’ll need to do it yourself.
sudo rm /var/lib/apt/lists/lock
For good measure, delete the lock in the cache.
sudo rm /var/cache/apt/archives/lock
Warning: Before removing this lock, make sure that it’s not being used. In Ubuntu, there’s an updater that starts up together with the system that locks DPKG/APT when it’s searching for updates. If you’re unsure whether the updater is running, press your Win key to bring up the Activity Center and type “Software Updater,” then press Enter to open it.

If the updater says that it can’t run, and you have no terminals open with package managers running in the background, go ahead with the above instructions.
If instead of the broken packages issue you are facing an issue with the Software Center not working, we have the fixes.
Fixing Broken Packages in Fedora/CentOS/RHEL
Fixing broken packages in Fedora/CentOS/RHEL is a less common affair. dnf does really great work making sure packages are installed correctly. That said, it’s still not perfect, and things will sometimes get mixed up in package management.
Note: learn the differences between Fedora, CentOS and RHEL.
1. List Troublesome Packages
The command to sort this out on RHEL-based systems like Fedora is:

The -V option is to verify, meaning it will go through and compare information on the installed files with the information stored in the rpm database. Attaching -a to this just verifies all core packages. This is slightly unhelpful, as it will usually give you a long list of files, but it can give you somewhere to start if you’re having issues with a particular application.
For example, seeing something marked as “missing” in your terminal will tell you that there are missing files in that particular package.
2. Attempt a Reinstall
Run a dnf reinstall on any packages you see in that list that might be giving you trouble.
sudo dnf --refresh reinstall [package name]
That will set all metadata as expired, so it will crawl through every repository you have enabled and look for a new version of that package. If you find that there are broken dependencies with that package, DNF will probably complain and tell you to use the --skip-broken flag. This will just skip that package entirely and let you update your system normally.
3. The Last Resort – Remove Packages
If you’ve reached the point where you have to use --skip-broken to complete your updates, it’s more hygienic for your system to remove it entirely.
Remembering the name of the package you failed to properly reinstall, uninstall it:
sudo dnf remove [package name]
The worst that could happen here is that you end up removing a core part of your daily flow, such as your browser, forcing you to find an alternative.
Tip: learn how to use flatpak in Fedora to better manage your packages.
Fixing Broken Packages in Arch
Although Arch’s package manager has some similarities to the others listed here (i.e, it has a database lock file and pulls dependencies in a similar way), it’s an entirely different beast of its own when it comes to how its logic is structured. The first step in diagnosing your issue is to make sure that the repositories are up to date and attempt a full upgrade:
If your attempts to install your package or do a system upgrade are still ending in failure, we have to isolate the cause according to what the terminal told you:
Note: learn how pacman works before you attempt to fix it.
“Invalid or Corrupted Package”
Making changes to “pacman.conf” in any manner can cause issues that cause pacman to incorrectly label packages as corrupt. The most likely culprit here is a partial (“.part”) file in the package manager cache, and your solution is to remove it:
sudo find /var/cache/pacman/pkg/ -iname "*.part" -delete
There’s always a chance that the package you’re trying to install is indeed corrupt and doesn’t provide valid metadata to Arch’s package manager. In that case, you’ll have to wait for the package maintainer to update it. If the package is installed on your system and causing problems during an upgrade, remove it with:
sudo pacman -Rns [package name]
“Unable to Lock Database”
Like Debian’s apt, Arch’s package manager makes a lock file during operations. If you experienced a power outage or pacman experienced a hard interrupt and couldn’t remove the lock, it’s very likely to leave behind a lock file.
First, find out if some process on your computer is still using the file:
sudo fuser /var/lib/pacman/db.lck

In the image above, a process with ID 121497 is using the file lock. If you’re curious about the process and want more information, use ps:

In my case, another pacman instance owns the lock file. The safest way to remove the lock is to first kill that process:
Now that the process is dead, remove the lock file:
sudo rm /var/lib/pacman/db.lck
You’re good to go now!
“Conflicting Files/File Exists in Filesystem”
This happens during upgrades where pacman detects a conflict of ownership. Before fixing anything, pay attention to the path to the file that the package manager is complaining about.
To find out who owns the file:
pacman -Qo [path to the file]
If it’s owned by a user and not another package, just remove it:
sudo rm [path to the file]
If it’s owned by another package, the safest thing to do is wait for the package’s maintainer to fix this conflict themselves. Sometimes that’s not an option, though, and you want to get things done now.
The simplest way to accomplish this is using the --overwrite flag in pacman. Just know that this is generally unsafe and could lead to some applications not working correctly in your system. I suggest making a backup prior to running this.
The --overwrite flag allows Arch’s package manager to ignore ownership rules for a particular file and just steamroll through the update. Example:
sudo pacman -Syu --overwrite [file name]
If the above command doesn’t work, replace the file name with its absolute path. Some users have reported that removing the leading slash (“/”) in front of the path makes the command work when it’s being stubborn.
Alternatively, you could also just tell pacman to overwrite everything it needs to:
sudo pacman -Syu --overwrite='*'
“Invalid or Corrupted Package (PGP Signature)”

In some packages that are poorly maintained, the developer may not have the time or willingness to properly update the digital signature that certifies their package. This will eventually result in a message in your terminal while trying to install it, such as, “signature from [someone] is marginal trust,” followed by the package manager asking if you’d like to delete the file.
Because signature updates depend entirely on the maintainer, there’s nothing you can realistically do to fix the situation from your terminal. If you’re doing an update and want to keep the package, use the --ignore flag for that package in particular:
sudo pacman -Syu --ignore [package name]
If you get this for many packages, your keyring might be out of date. Update it with:
sudo pacman -S archlinux-keyring
Frequently Asked Questions
Can I apply the Arch Fixes with an AUR helper?
Generally, yes. Replace “pacman” with your AUR helper in the commands in this guide. Example: yay -Qo /path/to/file
What should I do if I interrupt an update?
Breaking an update process either by pressing Ctrl + C , killing the package manager’s process, or closing the terminal prematurely will result in some level of corruption in your package database that could complicate things when you try to install something else. To fix this, clear the cache and repeat the update.
Image credit: Flickr. All screenshots by Miguel Leiva-Gomez.

Miguel Leiva-Gomez
Miguel has been a business growth and technology expert for more than a decade and has written software for even longer. From his little castle in Romania, he presents cold and analytical perspectives to things that affect the tech world.
Subscribe to our newsletter!
Our latest tutorials delivered straight to your inbox