Sometimes, (maybe after updating Android Studio) you might encounter a strange error, which might cause you a nightmare, the error is thrown by the Studio itself and it says:
Error while waiting for device: The emulator process for AVD was killed
Uggh…Now, what’s this error all about? Why did it happen on the system? How do I fix it? Follow the Steps Below, and you’ll certainly solve it yourself!
You might encounter this error when you start the Android Emulator and then wait for it to get started but only see the process running and the GUI never comes into play, this is especially very nasty and troublesome when you have some important work to do (maybe a client project to test in the 11th hour) and then suddenly your hope of running the emulator gets numb because the process which was still running went out nowhere and got killed.
Method 1: Update Android Emulator to the Latest Release
As blunt as it may sound, but updating the emulator which you’re running could simply end your problem, for eg. if you’re working on API Level 30 and your emulator version is 30.1.2 then updating it to 30.1.5 would perhaps resolve your issue. Updating Emulator is a breeze, simply: Android Studio -> Go to preferences -> Android SDK -> Then find and update the Android Emulator from the list. Use the Image below if you get stuck at any place:
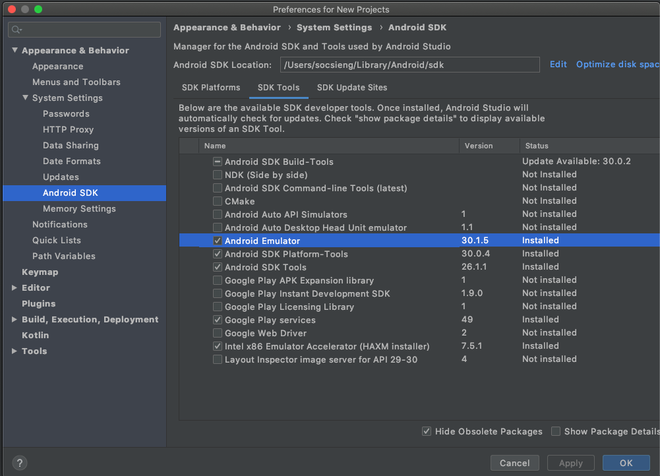
Updating Android Emulator
Method 2: Clear your Disk Space
Sometimes, the only force acting between you and the emulator running is the low disk space, clearing the disk space and re-running the emulator (after restarting the studio) could resolve this issue for you, it’s simply an easy lookout for the node modules ????
ProTip: Clearing you Android Studio cache could clear huge chunks of data!
Method 3: Enabling Support for OpenGL
If your emulator is a device with the Google Play Services enabled, the error might be related to “OpenGL” to fix this, simply:
- Go to: Tools > Android > AVD Manager
- Press the “edit” (pencil) icon next to your AVD
- Change “Graphics” to “Software”.
Method 4: Install the Intel x86 Emulator Accelerator on your system
Apart from updating the Android Studio Emulator on your system, you should also consider installing the Intel x86 Emulator Accelerator as Android is a large Operating System and some system images run on the old x86 bit architecture. To Install the x86 Emulator Accelerator
- Go to Preferences
- Navigate to Android SDK
- Mark the Checkbox against “Intel x86 Emulator Accelerator (HAXM)”
You may refer to the below screenshot if you need help:
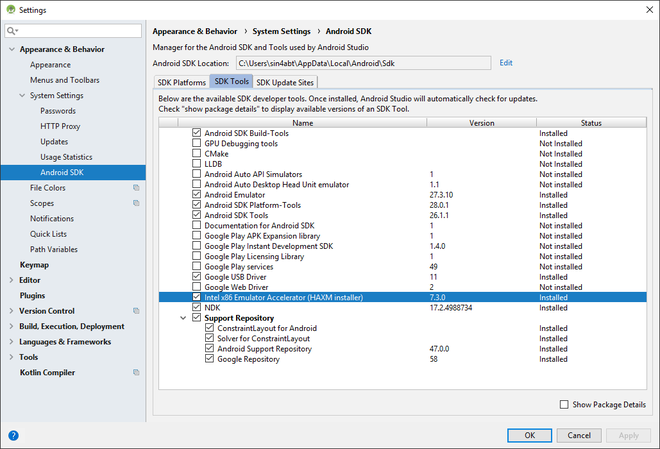
Installing the Intel x86 Emulator (HAXM)
Method 5: Parallel SDK Installation (Rare)
If all the above-mentioned steps didn’t work out for you and you’re still not able to run the Emulator, it might be the fact that there are two SDK Installations in your system and the “ANDROID_HOME” points to the wrong location. This error might occur if you recently installed Nativescript or software like that. In order to fix it, follow:
- Android Studio settings
- Find the proper Android SDK location
- Update the environment variable and restart Android Studio.
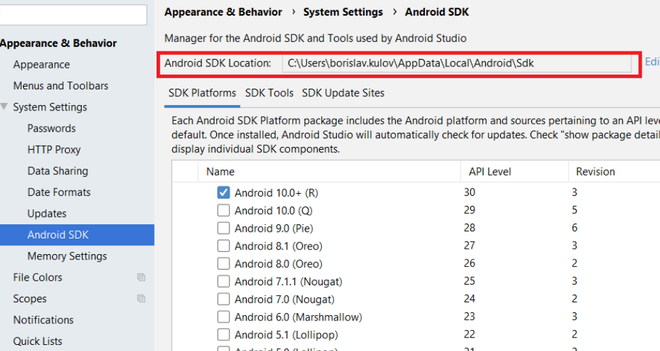
Fixing Parallel SDK Installation
Conclusion
All the above-mentioned methods would’ve solved your issue, and your emulator would be up and running again, however, if the odds turn on to be against you, always remember that a clean installation of the whole setup would fix this problem.

При запуске эмулятора выдается такая ошибка:»The emulator process for AVD Nexus was killed.»
В event log выдает: «Emulator: PANIC: Broken AVD system path. Check your ANDROID_SDK_ROOT value [C:]!»
В SDK Manager установлены все Tools. Что делать, чтобы исправить эту ошибку? Программу скачала первый раз, то бишь ничего не знаю.
-
Вопрос заданболее двух лет назад
-
44579 просмотров
Пригласить эксперта
Вариант решения если в имени пользователя кириллица :
Открываем «Этот компьютер» — «Свойства системы» — «Дополнительные параметры системы» — «Переменные среды» — «Переменные среды для ПК» — «Создать».
1 запись: Имя — «ANDROID_SDK_ROOT», значение — путь к папке с SDK (например D:androidsdk )
2. запись: Имя «ANDROID_SDK_HOME», значение — путь к папке проектами (например D:androidproject )
Пути для записей должны быть разными.
На windows 10 Долго пытался исправить проблему, использовал различные пути решения. Выяснил что проблема возникала из-за того, что имя пользователя и папка была в на русском. C:UsersСергей
Помогло создание другого пользователя C:Usersserega и последующая переустановка android studio для нового пользователя
Немного изменилось. Теперь менять переменную среды нужно ещё и в Android Studio: File — Settings — Appearance & Behavior — Path Variables.
-
Показать ещё
Загружается…
29 янв. 2023, в 03:07
300000 руб./за проект
29 янв. 2023, в 02:16
700000 руб./за проект
29 янв. 2023, в 01:54
5000 руб./за проект
Минуточку внимания
Yesterday when I’m trying to make AVD(Android Virtual Device) of latest version of Android 11 and Android 10 in android studio 4.1.2 then I had seen a problem the every time when I created a AVD it will automatically stopped or you can say it’s process was killed every time. So the question raised in my mind “Why it’s happing what should I do to remove this error known as The Emulator Process for AVD was Killed Windows 7, 8.1, 10 “. So after researching a lot on internet finally I found a 100% working solution for this problem so many android app developer like me dose solve this error. So let’s get started 🙂 .
Note:- Intel HAXM Installed is installed on my computer and Virtualization is on. I have a dedicated graphics card of 2 GB installed in my computer.
Error Screenshot:-

Contents in this project The Emulator Process for AVD was Killed Windows 7,8.1,10 Error Solution:-
1. The first step is to Start your Android Studio.
 2. Click on Configure -> SDK Manager.
 3. Now on the next window Select Android SDK -> SDK Tools -> Select Android SDK Build Tools to update, CMake to update and Intel X86 Emulator Accelerator( HAXM Installed ) to update to latest version and click on Apply to update them manually.
 4. Now it will ask you to confirm the updates to download. Click on OK to start downloading the updates.
 Here you go friends, Now wait for few minutes until its get updated. After successfully update just restart your computer and you are ready to go. Now we can make AVD on latest Android 11 easily and it will run smoothly without any error. See the below screenshot of my AVD.


Related posts:
Hello Guys, How are you all? Hope You all Are Fine. Today I have a received notification to update android studio to the latest version As I updated my Android studio My emulator not working now in AVD Manager shows me this error The emulator process for AVD Pixel_C_API_30 was killed In Windows. So Here I am Explain to you all the possible solutions here.
Without Wasting your time, Lets start This Article to Solve This Error.
Contents
- How The emulator process for AVD Pixel_C_API_30 was killed In Windows Error Occurs ?
- How To Solve The emulator process for AVD Pixel_C_API_30 was killed In Windows Error ?
- Solution 1: Create the file
~/.android/advancedFeatures.ini - Solution 2: For windows users
- Summery
I am Using flutter with an android studio in my Windows 10. Today I have received a notification to update android studio to their latest version 4.2.1. So I Just Updated my android studio. But the emulator stopped working. Every Time I launch my emulator it crashes and AVD Manager shows me this error.
"The emulator process for AVD Pixel_C_API_30 was killed"How To Solve The emulator process for AVD Pixel_C_API_30 was killed In Windows Error ?
- How To Solve The emulator process for AVD Pixel_C_API_30 was killed In Windows Error?
To Solve The emulator process for AVD Pixel_C_API_30 was killed In Windows Error If You are using Windows then Open This path
C:Usersssc.androidAnd Create advancedFeatures.ini File and Put this content in your advancedFeatures.ini file: Vulkan = off GLDirectMem = on Then Restart Your Emulator and your error will be fixed. Thank You. - The emulator process for AVD Pixel_C_API_30 was killed
To Solve The emulator process for AVD Pixel_C_API_30 was killed In Windows Error Believe me you are not gonna trust me. I am just faced this issue in my windows machine. Nothing was worked. I am wasted my two days solving this error but no result. Then I just try this solution And boom It worked. You just need to Create the file
~/.android/advancedFeatures.ini(for Windows users path should beC:UsersDane.androidadvancedFeatures.ini) with the following content: Vulkan = off GLDirectMem = on And now, Restart Your Emulator and your error will be fixed. Thanks.
Solution 1: Create the file ~/.android/advancedFeatures.ini
Believe me you are not gonna trust me. I am just faced this issue in my windows machine. Nothing was worked. I am wasted my two days to solve this error but no result. Then I just try this solution And boom It worked.
You just need to Create the file ~/.android/advancedFeatures.ini with the following content:
# Here's how to disable Vulkan apps to talk to the emulator.

# Add the following lines to ~/.android/advancedFeatures.ini (create this file if it doesn't exist already):

Vulkan = off
GLDirectMem = on
And now, Restart Your Emulator and your error will be fixed. Thanks.
Solution 2: For windows users
If You are using Windows then Open This path C:Usersssc.android And Create advancedFeatures.ini File and Put this content in your advancedFeatures.ini file.
# Here's how to disable Vulkan apps to talk to the emulator.

# Add the following lines to ~/.android/advancedFeatures.ini (create this file if it doesn't exist already):

Vulkan = off
GLDirectMem = on
Then Restart Your Emulator and your error will be fixed. Thank You.
Summery
It’s all About this issue. Hope all solution helped you a lot. Comment below Your thoughts and your queries. Also, Comment below which solution worked for you?
Also Read
- mysql.connector.errors.ProgrammingError: Character set ‘utf8’ unsupported
- Error: error:0308010C:digital envelope routines::unsupported
- Error: A is only ever to be used as the child of element
- [ERR_REQUIRE_ESM]: require() of ES Module from not supported
- Impish Release no longer has a Release file