Использование утилиты Sysprep является одним из этапов подготовки образа Windows к развертыванию на компьютерах. Будучи запущенной, она сбрасывает различные системные данные, включая время активации и идентификатор безопасности SID. Пользоваться ею очень просто, запустив утилиту командой sysprep.exe, нужно установить в открывшемся окошке галку «Подготовка к использованию», выбрать «Завершение работы» и нажать «OK». Прибегать к Sysprep рядовым пользователям приходится нечасто, поэтому ошибки в ее работе обычно приводят в ступор. Причины появления одной из таких ошибок мы сегодня рассмотрим.
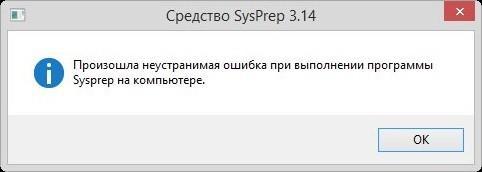
Произошла неустранимая ошибка при выполнении sysprep
Появляется она в момент запуска, при этом пользователь видит окошко с сообщением «Произошла неустранимая ошибка при выполнении sysprep». Так вот, основная и самая распространенная ее причина — срабатывание ограничения на количество запусков.
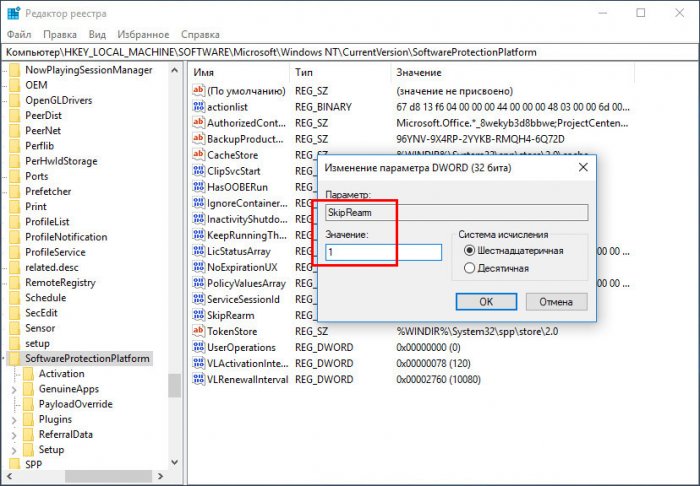
Дело в том, что запустить Sysprep с последующим сбросом системных данных можно только три раза. Четвертый запуск средства Sysprep скорее всего приведет к описанной неустранимой ошибке. Чтобы ее исправить, необходимо применить несложный твик реестра. Откройте редактор Regedit и перейдите к этому ключу:
HKLM/SOFTWARE/Microsoft/Windows NT/CurrentVersion/SoftwareProtectionPlatform
Справа найдите параметр ключа SkipRearm и установите в качестве его значения 1.
Запустите Sysprep и проверьте не исчезла ли ошибка. Если нет, применяем второй твик. На этот раз разверните ключ HKLM/SYSTEM/Setup/Status/SysprepStatusи измените значение параметра GeneralizationState на 7
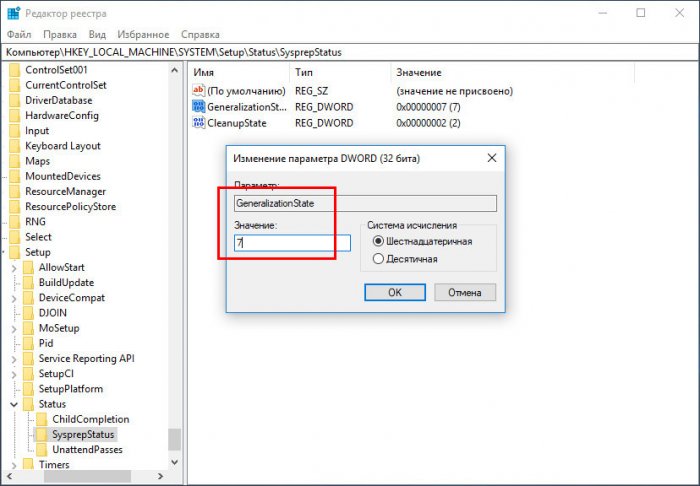
и параметра CleanupState на 2.
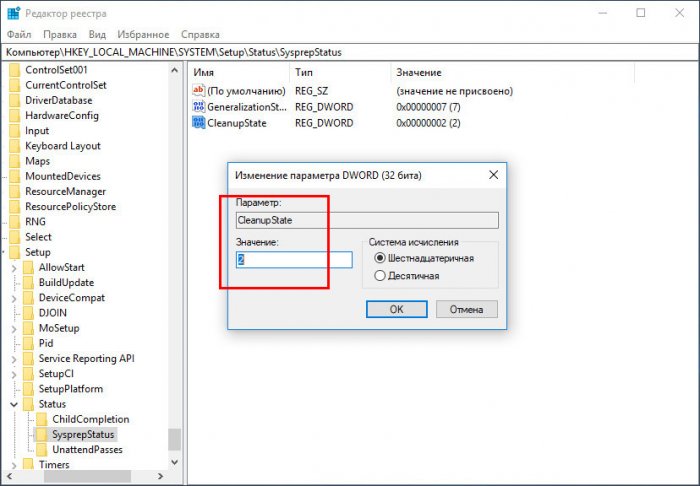
Если последний параметр отсутствует, ничего страшного, ограничьтесь редактированием только GeneralizationState.
Если правка реестра не принесла результатов, придется действовать более решительно, переустановив службу координатора распределенных транзакций MSDTC. Для этого в запущенной от имени администратора командной строке последовательно выполняем эти две команды:
• msdtc -uninstall
• msdtc -install
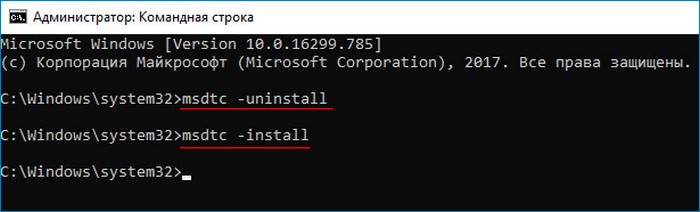
Затем перезагружаем на всякий случай компьютер и пробуем запустить Sysprep повторно. По идее, утилита должна стартовать без ошибок.
В конце статьи замечу, что работе Sysprep могут мешать антивирусы, а также программы DAEMON Tools, Alcohol 120%, UltraISO, об этом я писал в этой статье.
О том, как использовать Sysprep при переносе Windows написано здесь.
Утилита Sysprep используется для подготовки эталонного образа Windows и его обезличивания, удаляя из системы все уникальные идентификаторы (SID-ы, GUID-ы), что необходимо для его корректного разворачивания в корпоративной сети. В некоторых случаях, когда вы выполняете команду sysprep /generalize /oobe /shutdown при создании образа Windows 10, программа Sysprep.exe может вернуть следующую ошибку:
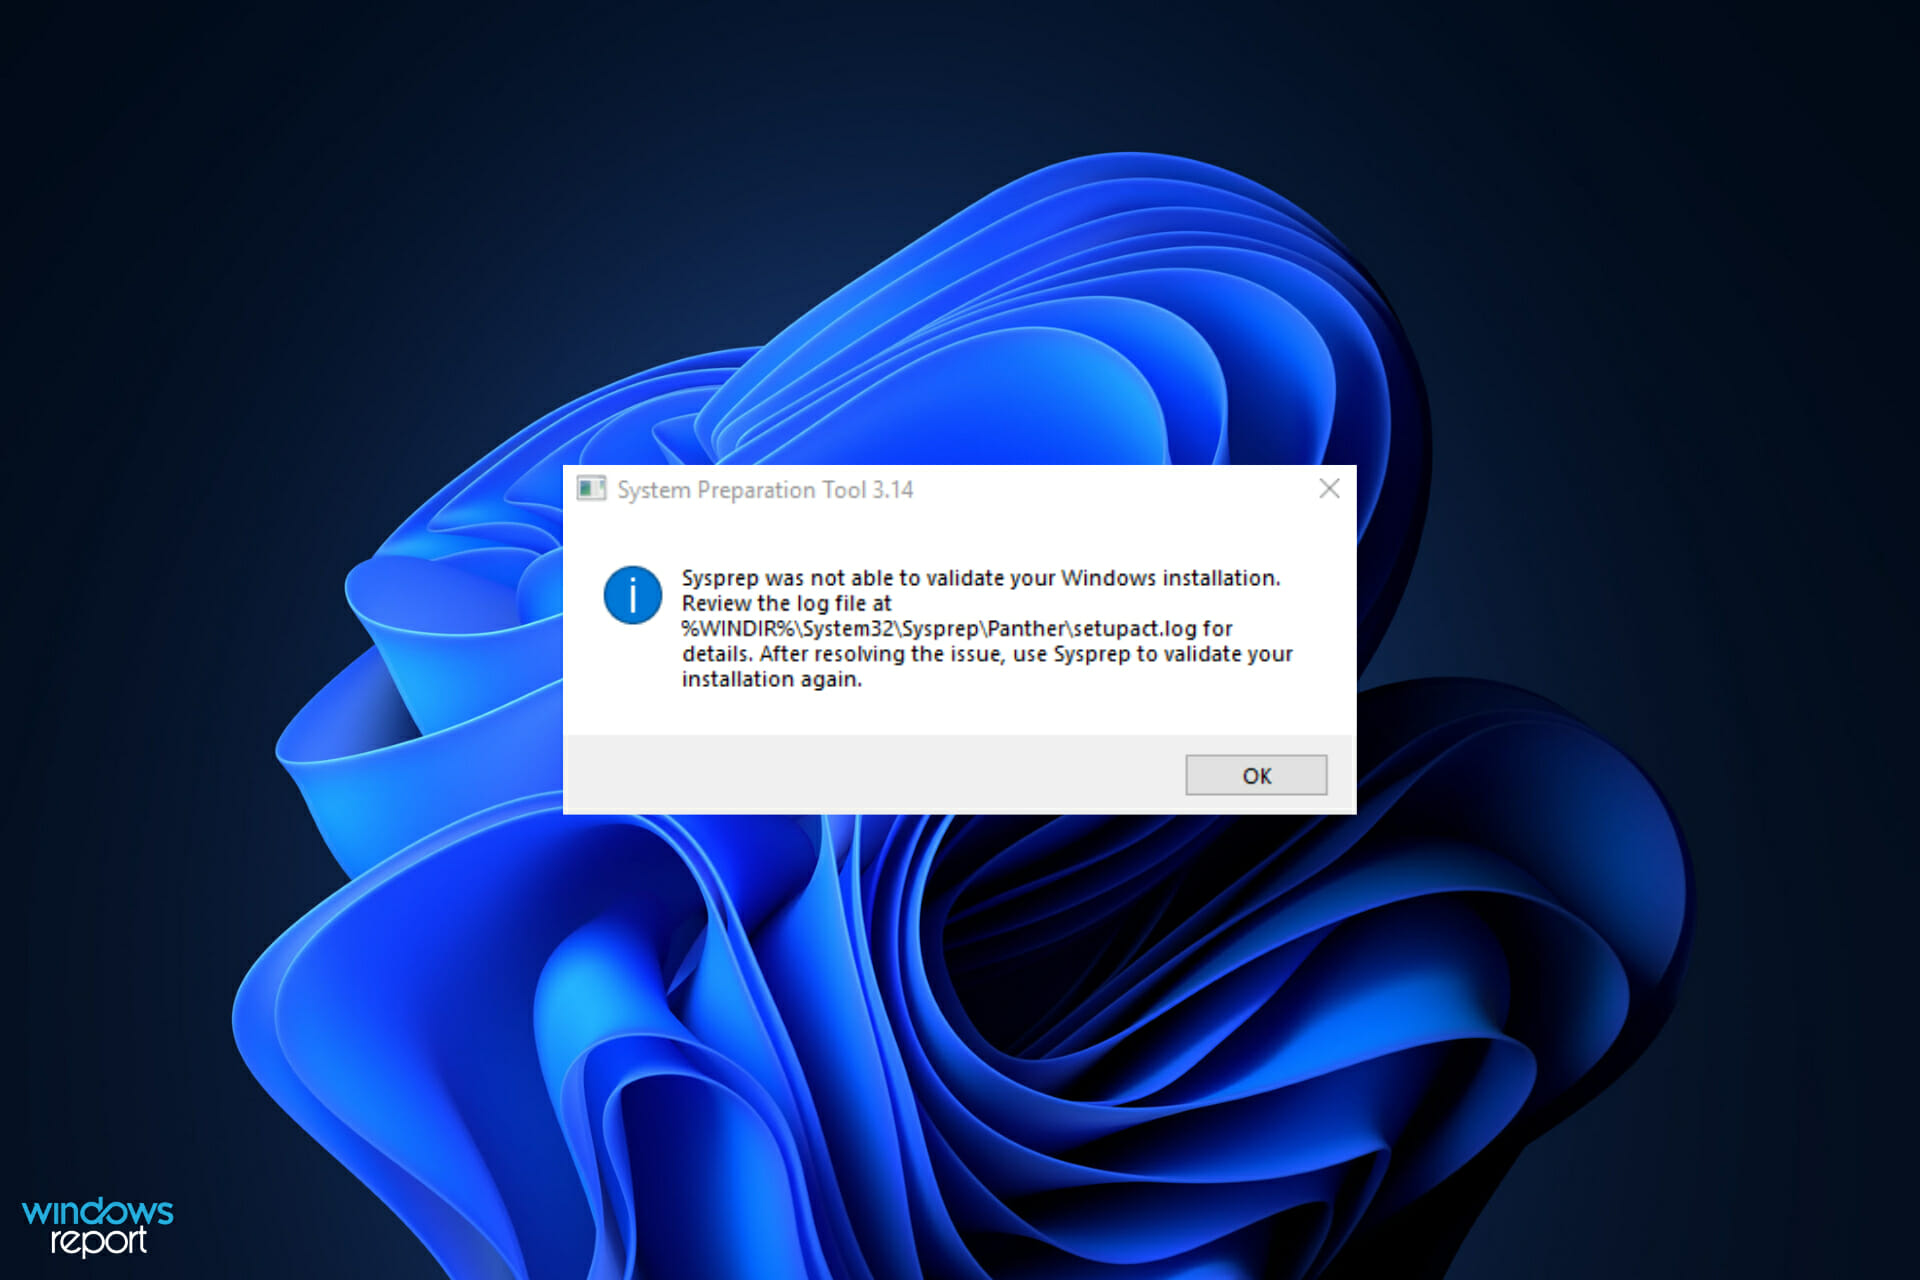
Sysprep не удалось проверить установку Windows. Дополнительные сведения см. в файле журнала %Windows%System32SysprepPanthersetupact.log. После устранения проблемы снова проверьте установку с помощью Sysprep.
Sysprep was not able to validate your Windows installation. Review the log file at %windir%system32Syspreppanthersetupact.log for details. After resolving the issue use Sysprep to validate your installation again.
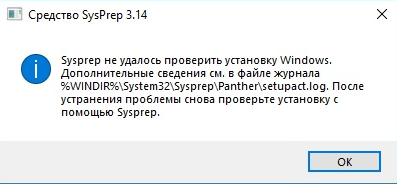
Чтобы исправить ошибку «Sysprep не удалось проверить установку Windows», перейдите в каталог C:WindowsSystem32SysprepPanther и откройте с помощью любого текстового редактора (например, блокнота) файл с журналом утилиты sysprep — setupact.log.
Начните просматривать содержимое файл setupact.log снизу вверх и ищите строку с ошибками. В зависимости от найденной ошибки, вам нужно будет выполнить определенные действия для ее исправления. Рассмотрим возможнее ошибки Sysprep:
- Отключите BitLocker для запуска Sysprep
- Не удается удалить современные приложения у текущего пользователя
- Sysprep не работает на обновленной ОС
Содержание:
Отключите BitLocker для запуска Sysprep
Error SYSPRP BitLocker-Sysprep: BitLocker is on for the OS volume. Turn BitLocker off to run Sysprep. (0x80310039)
Error [0x0f0082] SYSPRP ActionPlatform::LaunchModule: Failure occurred while executing 'ValidateBitLockerState' from C:WindowsSystem32BdeSysprep.dll
If you run manage-bde -status command it will show the following:
Disk volumes that can be protected with
BitLocker Drive Encryption:
Volume C: [OSDisk]
Эта ошибка в основном возникает на планшетах и ноутбуках с Windows 10, поддерживающих шифрование InstantGo (на основе BitLocker.) Чтобы исправить эту ошибку нужно отключить шифрование для системного тома с помощью следующей команды PowerShell:
Disable-Bitlocker –MountPoint “C:”

Не удается удалить современные приложения у текущего пользователя
Если в журнале setupact.log встречаются ошибки:
Error SYSPRP Package AppName_1.2.3.500_x64__xxxxxxxxx was installed for a user, but not provisioned for all users. This package will not function properly in the sysprep image.
Error SYSPRP Failed to remove apps for the current user: 0x80073cf2.
Это означает, что вы вручную устанавливали приложения (Modern / Universal Apps) из Windows Store, или некорректно удалили предустановленные приложения.
Попробуйте удалить данный пакет с помощью команд PowerShell:
Get-AppxPackage –Name *AppName* | Remove-AppxPackage
Remove-AppxProvisionedPackage -Online -PackageName AppName_1.2.3.500_x64__xxxxxxxxx
Кроме того, чтобы Microsoft Store не обновлял приложения, необходимо отключить ваш эталонный компьютер с образом Windows 10 от Интернета и отключить автоматическое обновление в режиме аудита перед тем как вы создаете образ.
Также удалите все локальные профили пользователей.
Sysprep не работает на обновленной ОС
В том случае, если вы обновили операционную систему в вашем образе до Windows 10 с предыдущей версии (Windows 8.1 или Windows 7 SP1), то при попытке выполнить Sysprep в журнале setupact.log должна содержаться следующая ошибка:
Error [0x0f0036] SYSPRP spopk.dll:: Sysprep will not run on an upgraded OS. You can only run Sysprep on a custom (clean) install version of Windows.
Microsoft не рекомендует выполнять Sysprep образа, который был проапгрейжен с предыдущей версии Windows, рекомендуется использовать чистую установку Windows 10. Однако есть способ обойти это требования.
- Откройте редактор реестра и перейдите в раздел HKEY_LOCAL_MACHINESYSTEMSetup.
- Найдите параметр с именем Upgrade и удалите его.
- Затем перейдите в ветку HKEY_LOCAL_MACHINESYSTEMSetupStatusSysprepStatus и измените значение ключа CleanupState на 7.
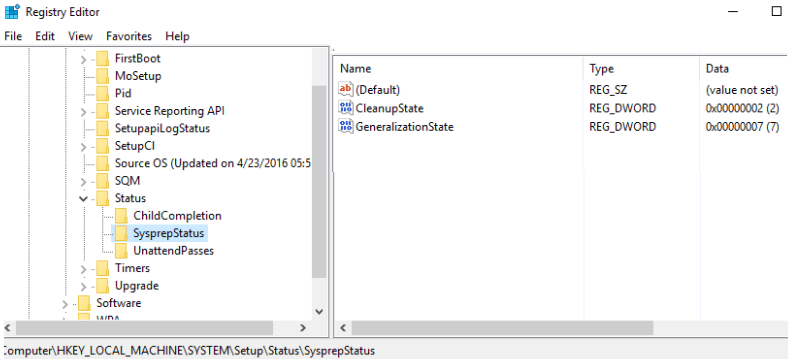
- Тем самым, вы заставите Sysprep считать, что данная копия Windows установлена в режиме чистой установки.
Перезагрузите компьютер и запустите Sysprep еще раз.
Windows
- 30.05.2019
- 3 307
- 0
- 16.06.2019
- 1
- 1
- 0
- Содержание статьи
- Отключение конфликтующей службы
- Завершение процесса конфликтующей службы
- Восстановление системы в исходное состояние лицензирования
- Удаление Internet Explorer 10
- Вариант 4
- Вариант 5
- Добавить комментарий
Sysprep — утилита системной подготовки Microsoft Windows к развертыванию. Но при попытке запуска данной программы могут возникать ошибки, из-за которых пользоваться ей нормально — невозможно. Некоторые способы устранения ошибок мы рассмотрим в данной статье.
Перед тем, как что то делать, обязательно загляните в логи вашего компьютера, чтобы понять, на что именно жалуется утилита Sysprep при работе
Отключение конфликтующей службы
1) Нажмите Пуск, введите в строке поиска Services.msc и нажмите Enter (Пуск -> Администрирование -> Службы)
2) Дважды щелкните на службу Служба общих сетевых ресурсов проигрывателя Windows Media
3) Установите Тип запуска в значение Отключена и нажмите ОК.
4) Перезапустите sysprep с необходимыми Вам параметрами.
Завершение процесса конфликтующей службы
1) Запустите sysprep
2) Выберите необходимые опции
3) Запустите Диспетчер задач (Ctrl+Shift+Esc)
4) В Диспетчере задач завершите процесс wmpnetwk.exe
5) В окне sysprep быстро нажмите кнопку OK (до момента перезапуска процесса wmpnetwk.exe)
Восстановление системы в исходное состояние лицензирования
1) Запустите командную строку от имени администратора.
В строке поиска меню Пуск введите cmd и нажмите одновременно Ctrl+Shift+Enter.
2) Введите команду: c:windowssystem32slmgr.vbs –rearm
Удаление Internet Explorer 10
1) Удалите Internet Explorer 10
2) Запустите sysprep с необходимыми Вам параметрами.
Вариант 4
1) Откройте папку C:WindowsPanther
2) В случае наличия в данной папке файла unattended.xml откройте его в блокноте
3) Измените используемые по умолчанию значения параметра PersistAllDeviceInstalls с true на false.
4) Сохраните измененные значения и закройте блокнот.
5) Запустите sysprep с необходимыми Вам параметрами.
Вариант 5
1) Откройте папку C:WindowsPanther
2) Скопируйте файл setup.etl на другой раздел (диск) во временную папку. Например, в D:Test
3) Удерживая нажатой клавишу Shift, щелкните правой кнопкой мыши на папку D:Test и выберите пункт Открыть окно команд
4) Введите команду: tracerpt setup.etl -o logfile.csv
5) Закройте окно команд и откройте файл logfile.csv
6) Проанализируйте данный файл на предмет раздела реестра или процесса вызывающего ошибку.
7) Исправьте значение найденных конфликтующих параметров реестра на правильные, завершите конфликтующий процесс или удалите приложение, которому он принадлежит.
8) Запустите sysprep с необходимыми Вам параметрами.
Sysprep — это встроенная программа в Windows, которая подготавливает систему убирая привязку компьютера к оборудованию и выполняет очистку таких данных как SID, точки восстановления, журналы, драйверы и т.п.
В первую очередь, Sysprep полезен администраторам, так как они могут развернуть массового много систем на большое количество машин и избежать ошибок одинаковых ID доменов. Утилита также может быть полезна и простым пользователям, чтобы отвязать полную привязку от старого оборудования при установке новых компонентов.
Некоторые пользователи могут столкнуться с ошибкой «Sysprep не удалось проверить установку Windows» при установке Windows на свои компьютеры. Разберем, как исправить данную ошибку.
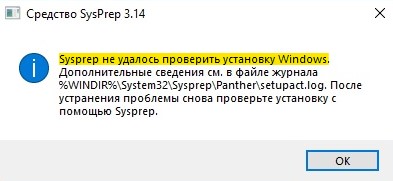
1. Удалить ключ обновления
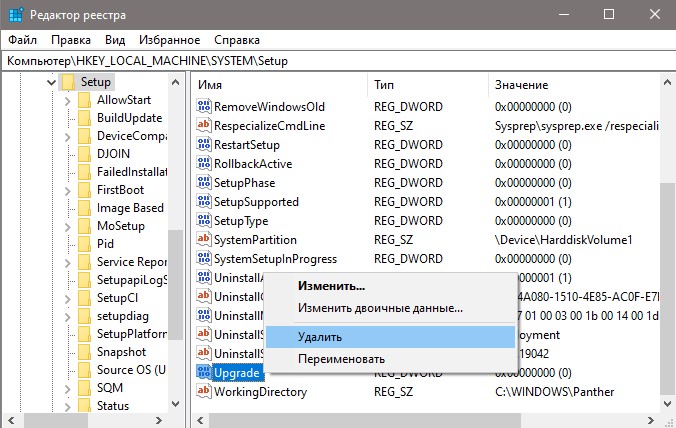
Нажмите Win+R и введите regedit, чтобы открыть редактор реестра. В реестре перейдите по следующему пути:
- HKEY_LOCAL_MACHINESYSTEMSetup
- Удалите справа Upgrade
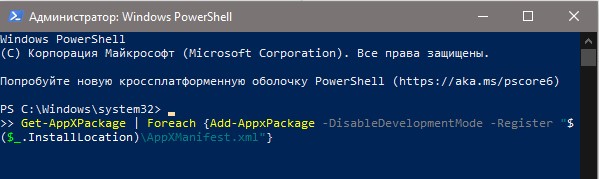
2. Переустановить приложения по умолчанию
Запустите PoweShell от имени администратора и введите следующий апплет, после чего перезагрузите ПК:
Get-AppxPackage -AllUsers| Foreach {Add-AppxPackage -DisableDevelopmentMode -Register “$($_.InstallLocation)AppXManifest.xml”}
3. Анализ setupact.log
Если открыть лог файл setupact.log по пути C:WindowsSystem32SysprepPanther, то можно увидеть сообщение:
Ошибка пакета SYSPRP XYZ_4.1.5.432_x64_83sdd78i870d был установлен для пользователя, но не подготовлен для всех пользователей. Этот пакет не будет правильно работать в образе Sysprep»
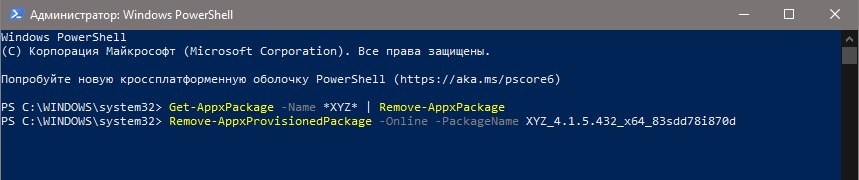
Видно, что проблема из-за приложения XYZ_4.1.5.432_x64_83sdd78i870d, который может быть поврежден. По этому, мы этот пакет приложения удалим.
Запустите PowerShell от имени администратора и введите для удаления пакета ниже две команды меняя свои значения:
Get-AppxPackage –Name *XYZ* | Remove-AppxPackage
Remove-AppxProvisionedPackage -Online -PackageName XYZ_4.1.5.432_x64_83sdd78i870d
4. SFC и DISM
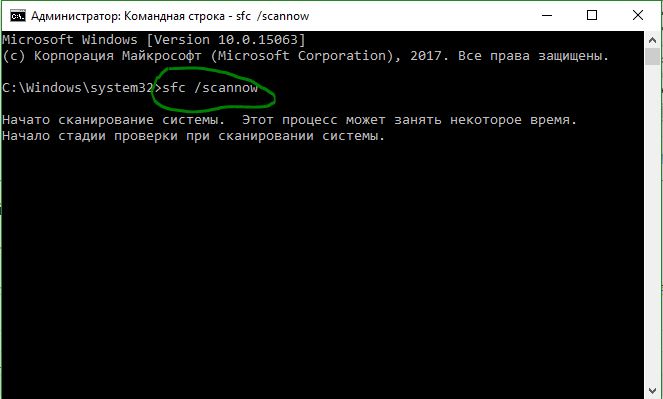
Восстановим системные файлы, которые могут быть повреждены и вызывать ошибку «Sysprep не удалось проверить установку Windows«. Запустите командную строку от имени администратора и введите ниже две команды по очереди, после чего перезагрузите ПК:
sfc /scannowDISM.exe /Online /Cleanup-image /Restorehealth
Дополнительный совет
Если у вас включен Bitlocker, то его нужно отключить.
Смотрите еще:
- DISM: Не удалось найти исходные файлы в Windows 10
- Windows не удалось автоматически обнаружить параметры прокси этой сети
- Нам не удалось завершить обновления windows 10
- Не удалось подключить файл — Файл образа диска поврежден
- 0x80073701 или 0x800f0988 — Не удалось обновить Windows 10
[ Telegram | Поддержать ]
Обновлено 06.08.2016
Добрый день сегодня рассматриваем ошибку: неустранимая ошибка при выполнении программы sysprep в Windows 7. После выхода Internet Explorer 10 и ряда обновлений, включая операционную систему некоторое прикладное ПО, было решено собрать новый WIM образ Windows 7 для развёртывания операционной системы через ConfigMgr 2012.
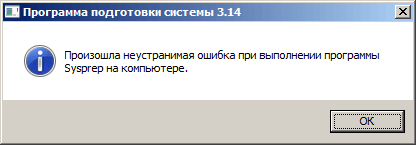
Произошла неустранимая ошибка при выполнении программы sysprep на компьютере в Windows 7
При запуске утилиты Sysprep появилась ошибка: Программа подготовки системы 3.14 — Произошла неустранимая ошибка при выполнении программы Sysprep на компьютере. Журнал событий содержал более информативную запись.
SYSPRP LaunchDll:Could not load DLL C:WindowsSysWOW64iesysprep.dll
[gle=0x000000c1]
Из нового — установлены Windows Management Framework 3.0 (PowerShell 3.0) и Internet Explorer 10.
Название ошибки намекает на причастность IE 10 к возникновению ошибки Sysprep. Быстро находится решение этой проблемы.
Необходимо запустить редактор реестра и внести изменения. На следующие ветки реестра изменить права доступа для группы Administrators на Full access:
HKEY_LOCAL_MACHINESOFTWAREMicrosoftWindowsCurrentVersionSetup
SysprepCleanup
HKEY_LOCAL_MACHINESOFTWAREMicrosoftWindowsCurrentVersionSetup
SysprepGeneralize
HKEY_LOCAL_MACHINESOFTWAREMicrosoftWindowsCurrentVersionSetup
SysprepSpecialize
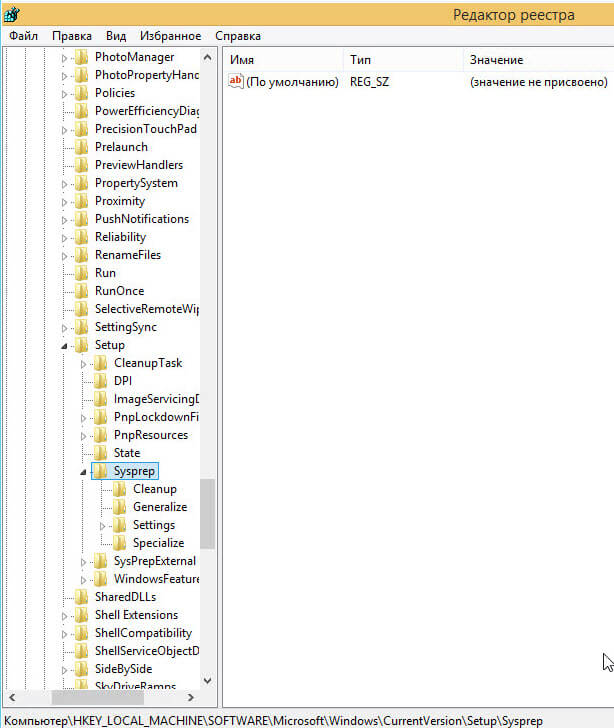
Произошла неустранимая ошибка при выполнении программы sysprep на компьютере в Windows 7-01
Даем права Администраторам
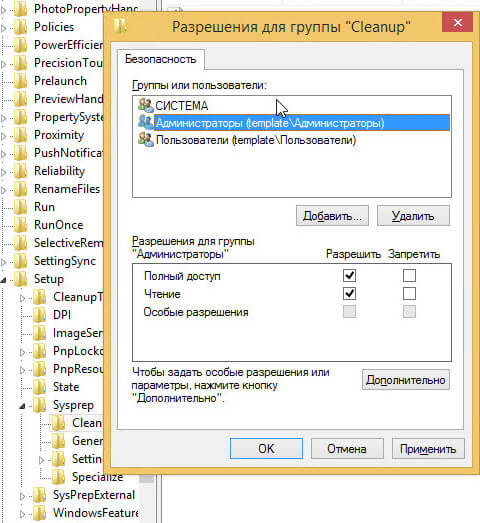
Произошла неустранимая ошибка при выполнении программы sysprep на компьютере в Windows 7-02
HKEY_LOCAL_MACHINESOFTWAREMicrosoftWindowsCurrentVersionSetup
SysprepCleanup
Параметр {EC9FE15D-99DD-4FB9-90D5-5B56E42A0F80}
C:WindowsSysWOW64iesysprep.dll,Sysprep_Cleanup_IE
Изменить на:
C:WindowsSystem32iesysprep.dll,Sysprep_Cleanup_IEHKEY_LOCAL_MACHINESOFTWAREMicrosoftWindowsCurrentVersionSetup
SysprepGeneralize
Параметр {EC9FE15D-99DD-4FB9-90D5-CE53C91AB9A1}
C:WindowsSysWOW64iesysprep.dll,Sysprep_Generalize_IE
Изменить на:
C:WindowsSystem32iesysprep.dll,Sysprep_Cleanup_IEHKEY_LOCAL_MACHINESOFTWAREMicrosoftWindowsCurrentVersionSetup
SysprepSpecialize
Параметр {EC9FE15D-99DD-4FB9-90D5-676C338DC1DA}
C:WindowsSysWOW64iesysprep.dll,Sysprep_Cleanup_IE
Изменить на:
C:WindowsSystem32iesysprep.dll,Sysprep_Cleanup_IE
После этого процедура Sysprep прошла в штатном режиме. Вот так вот просто устраняется ошибка Произошла неустранимая ошибка при выполнении программы sysprep на компьютере в Windows 7
Материал сайта pyatilistnik.org
Авг 6, 2016 16:05
Windows Vista Enterprise 64-bit Edition Windows Vista Home Basic 64-bit Edition Windows Vista Home Premium 64-bit Edition Windows Vista Ultimate 64-bit Edition Windows Vista Business Windows Vista Business 64-bit Edition Windows Vista Enterprise Windows Vista Home Basic Windows Vista Home Premium Windows Vista Starter Windows Vista Ultimate Еще…Меньше
Симптомы
При использовании программы подготовки системы (Sysprep) на компьютере под управлением Windows Vista может появиться следующее сообщение об ошибке:
Неустранимая ошибка при выполнении программы sysprep на компьютере.
Кроме того в файле Setuperr.log регистрируется сообщение об ошибке, подобное приведенному ниже:
Date
Время, RunExternalDlls:Not SYSPRP [0x0f0073] Ошибка запуска DLL; машина находится в недопустимом состоянии или мы не удалось обновить записанное состояние dwRet = 31
Причина
Это сообщение об ошибке призвана предотвратить развертывание поврежденного образа. При запуске средства Sysprep, ход его выполнения отслеживаются через каждого из этапов программы Sysprep. Программа Sysprep не способ развертывания после его возникают ошибки.
Решение
При возникновении этой ошибки необходимо повторно создать изображение. Не удается исправить проблемы с изображением. При запуске средства Sysprep, он удаляет файл %windir%system32syspreppanthersetupact.log. Таким образом не возможно увидеть ошибку время последнего запуска средства Sysprep. Чтобы увидеть, что сбой после последнего запуска средства Sysprep, необходимо иметь копию файла %windir%system32syspreppanthersetupact.log, существовавшие до запуска программы Sysprep.
Примечание. Прежде чем создавать новый образ или снова запустить средство Sysprep, рекомендуется сохранить содержимое следующих папок:
-
%Windir%Panther
-
%Windir%System32SysprepPanther
Примечание. Сохраните содержимое всех подпапок из этих двух папок.
Нужна дополнительная помощь?
Оглавление
- Что такое Sysprep
- Для чего нужен Sysprep?
- Установка Sysprep
- Запуск Sysprep
- Возникающие ошибки в работе Sysprep
Что такое Sysprep
Sysprep это стандартная программа для подготовки настроенной системы для переноса на новое железо, убирает любые идентифицирующие данные устройств и удаляет все драйвера комплектующих вместе с
системным журналом. В итоге после её применения мы получаем новую, чистую систему, но со своими старыми файлами и настройками. Программа появилась на борту системы уже в Windows NT 4.0 (1996 год).
Для чего нужен Sysprep?
Sysprep нужен для создания различных образов и сборок windows для последующего развёртывания на клиентских компьютерах, для развёртывания/клонирования виртуальных машин или если вы собираетесь полностью обновить железо на своём компьютере.
Установка Sysprep
Данная утилита не поставляется как отдельное программное обеспечение, а идёт сразу вместе с установленной ОС Windwows и её можно найти в каталоге sysprep:
%WINDIR%system32sysprep
Запуск Sysprep
Программу необходимо запускать от имени Администратора и желательно из под учётной записи Администратора. Для запуска программы перейдём в каталог программы, выполнив WIN + R команду:
Sysprep
После запуска программы мы увидим следующее диалоговое окно:
Переход в окно приветствия системы (OOBE) означает что после завершения сброса при следующем запуске появится настройка первого запуска, где мы будем указывать имя пользователя, давать имя своему компьютеру и т.д,
а галочка напротив параметра Подготовка к использованию поможет нам сбросить активацию Windows.
При развертывании Windows распространенной практикой является настройка параметров первого запуска компьютеров, на которых выполняется развертывание. Эту процедуру также называют OOBE.
Параметры завершения работы дают нам выбор:
- Завершение установки — выбираем в том случае, когда мы собираемся заменить материнскую плату или процессор. А сам сброс мы выподняем ДО (!) замены оборудования
- Перезагрузка — данный пункт нам нужен в случае сброса лицензии или устранения каких-то ошибок на текущей конфигурации компьютера (без замены комплектующих) для чистой установки всех необходимых драйверов.
- Выход — соответственно завершает сеанс пользователя по завершению.
После выбора всех параметров запускаем очистку sysprep OK
Sysprep ошибка
Произошла неустранимая ошибка при выполнении sysprep
Такая ошибка появляется в том случае, если срабатывает ограничение на количество запусков. По умолчанию в Sysprep заложено ограничение на 3 запуска. Но выход есть, обратимся к реестру
WIN + R
regedit
Идём по ветке:
HKLM/SOFTWARE/Microsoft/Windows NT/CurrentVersion/SoftwareProtectionPlatform
И меняем значения параметра SkipRearm на 1 или 0. После этого проблема должна уйти.
Ещё бывает, что собьётся другая настройка, но это реже случается. Переходим по ветке в реестре:
HKLM/SYSTEM/Setup/Status/SysprepStatus
И у параметра GeneralizationState выставляем значение 7. И, если есть, у параметра CleanupState выставляем значение 2
Если уже и это не помогло, то запускаем Командную строку от имени Администратора и выполняем последовательно следующие две команды:
msdtc -uninstall
msdtc -install
Тем самым мы перезапустим службу координатора распределенных транзакций MSDTC. И после этого для верности перезапустите машину. После этого ошибка должна уйти 100%
Sysprep не удалось проверить установку Windows
Иногда возникает ошибка проверки установки Windows. Для решения этой ошибки мы переходим в каталог:
C:WindowsSystem32SysprepPanther
И открываем на редактирование файл setupact.log. Этот файл представляет собой журнал программы sysprep. И смотрим что за ошибку мы поймали.
Отключение BitLocker
Error SYSPRP BitLocker-Sysprep: BitLocker is on for the OS volume. Turn BitLocker off to run Sysprep. (0x80310039)
Error [0x0f0082] SYSPRP ActionPlatform::LaunchModule: Failure occurred while executing 'ValidateBitLockerState' from C:WindowsSystem32BdeSysprep.dll
If you run manage-bde -status command it will show the following:

Disk volumes that can be protected with
BitLocker Drive Encryption:
Volume C: [System]
В этом случае для устранения ошибки нам нужно отключить BitLocker (это понятно из самой ошибки, если просто прочитать её). Чаше всего проблема возникает на ноутбуках с Windows 10, которые используют шифрование InstantGo. Чтобы
отключить BitLocker запускаем Командную строку от имени Администратора и выполняем следующую команду:
manage-bde -off X:
Где X — это буква вашего системного диска.
Не удается удалить современные приложения у текущего пользователя
Error SYSPRP Package Application_2.2.5.666_x64__xxxx was installed for a user, but not provisioned for all users. This package will not function properly in the sysprep image.
Error SYSPRP Failed to remove apps for the current user: 0x80073cf2.
Такая ошибка появляется, когда вы устанавливали приложение из Windows Store или криво его удалили 🙂 Удалим через PowerShell командой:
Get-AppxPackage –Name Application | Remove-AppxPackage
Remove-AppxProvisionedPackage -Online -PackageName Application_2.2.5.666_x64__xxxx
Заключение
Вот собственно и всё, не знаю что ещё написать по такой небольшой, но очень полезной утилите. Надеюсь я вам помог, спасибо что заглянули 😉
by Matthew Adams
Matthew is a freelancer who has produced a variety of articles on various topics related to technology. His main focus is the Windows OS and all the things… read more
Updated on April 21, 2022
- The Sysprep was not able to validate your Windows installation Windows 11/10 error frequently occurs because of user-installed UWP apps and BitLocker.
- Uninstalling some UWP apps you’ve installed could fix the Sysprep Windows 11 error.
- Some users might need to disable BitLocker to fix the Sysprep was not able to validate your windows installation 0x80073cf2 error.
XINSTALL BY CLICKING THE DOWNLOAD FILE
- Download Restoro PC Repair Tool that comes with Patented Technologies (patent available here).
- Click Start Scan to find Windows 11 issues that could be causing PC problems.
- Click Repair All to fix issues affecting your computer’s security and performance
- Restoro has been downloaded by 0 readers this month.
Sysprep, otherwise System Preparation, is a command-line tool some users utilize to prepare Windows images for deployment. However, an error can arise for some users after entering a Sysprep command for system preparation. One user said this in an MS forum post:
I have a clean installed Windows 10 pro which was activated by MAK license. When I tried to prepare this system with Sysprep, I got the error message Sysprep was not able to validate Your Windows installation.
That Sysprep issue can arise on Windows 11, 10, and 8 platforms. When that issue arises, the Sysprep command doesn’t run and validate the installation as expected. If you need to fix that Sysprep issue, check out the Windows 11/10 resolutions for it below.
How come the Sysprep error arises in Windows?
The Sysprep was not able to validate Your Windows installation error has existed since Windows 8. That issue often arises because of user-installed UWP apps. Many users have confirmed they fixed this issue by uninstalling certain UWP apps they installed from MS Store.
This issue can also occur if a default app, which is supposed to come pre-installed with Windows, is missing. In such a scenario, you would need to reinstall the missing Windows app. A general reinstall app command will do the job.
If you’re utilizing Windows Pro and Enterprise editions, the Sysprep error might be due to the BitLocker encryption feature. BitLocker doesn’t mix well with the Sysprep utility. So, disabling that feature on Windows Pro and Enterprise editions can sometimes resolve this error as well.
How can I fix the Sysprep error in Windows?
1. Reinstall default Windows UWP apps
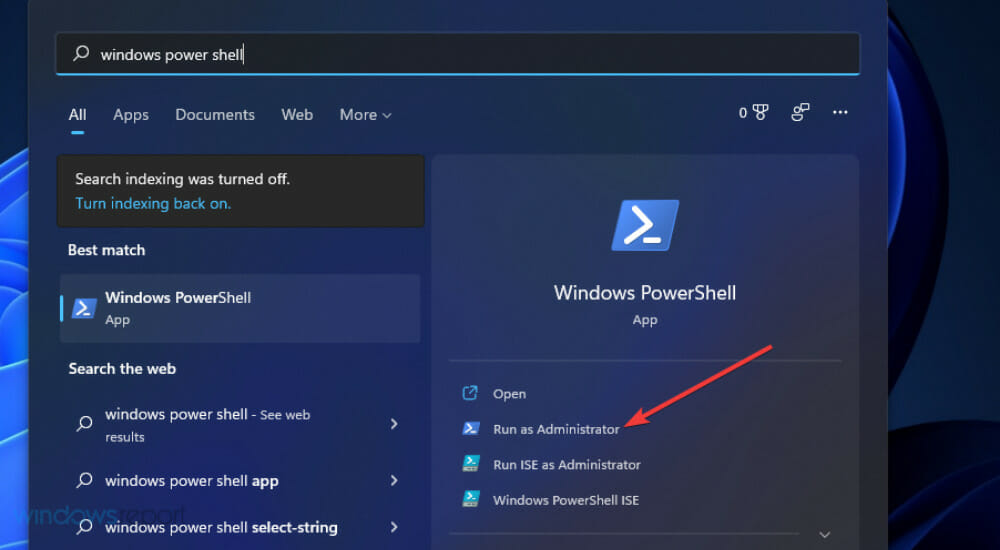
- To bring up the search box, press the Windows + S keyboard shortcut.
- Type Windows PowerShell in the search box.
- Click PowerShell’s Run as administrator option.
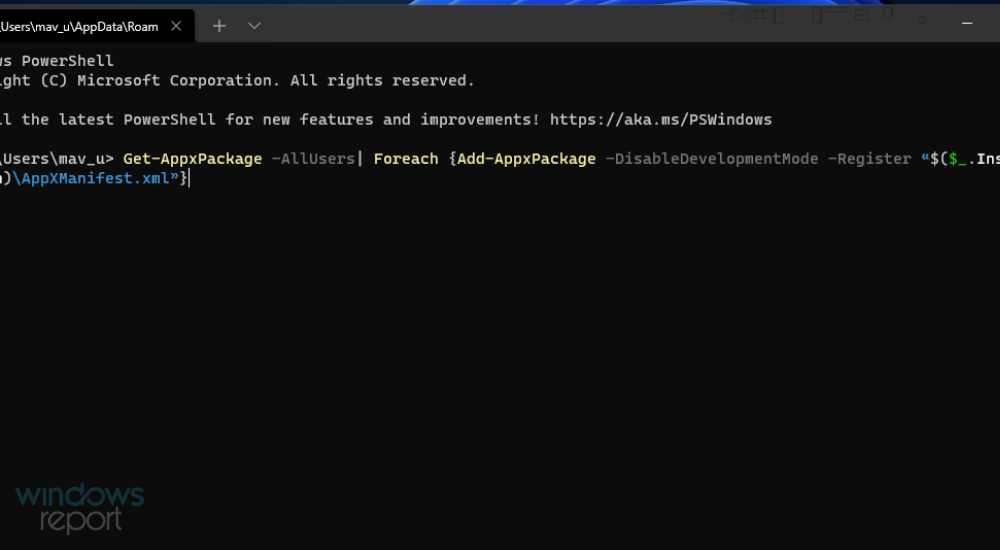
- Input this PowerShell command:
Get-AppxPackage -AllUsers| Foreach {Add-AppxPackage -DisableDevelopmentMode -Register “$($_.InstallLocation)AppXManifest.xml”} - Press the Enter keyboard key to execute.
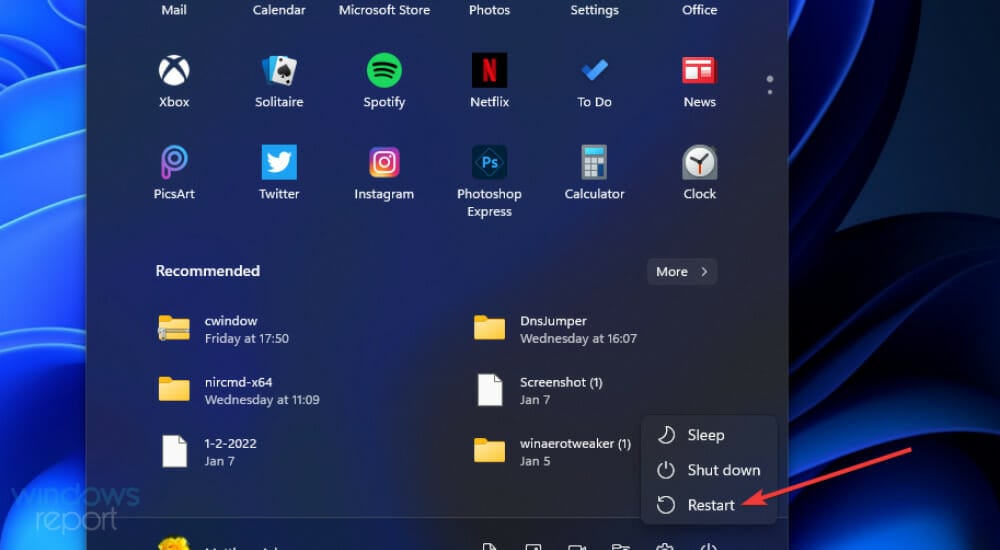
- When the command has finished, click Power and Restart on your Start menu.
2. Disable BitLocker
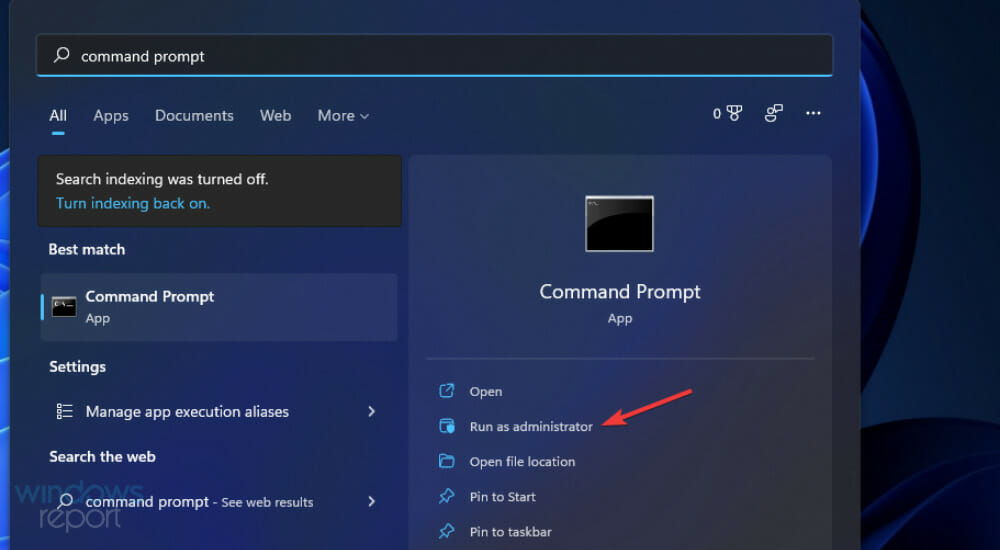
- Launch the Windows 11/10 search tool with its hotkey (specified in resolution one).
- Input Command Prompt into the search tool’s text box to find that app.
- Click the Run as administrator option for the Command Prompt shown directly below.
- Enter this command and press Return:
manage-bde -status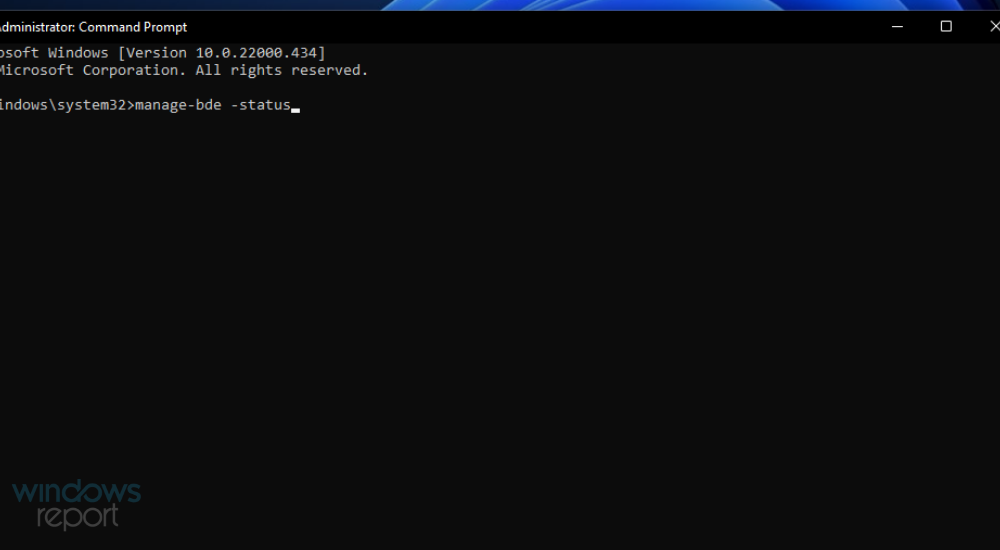
- To disable BitLocker, type in this command and press Return:
Disable-Bitlocker –MountPoint ‘C:’
3. Edit the registry
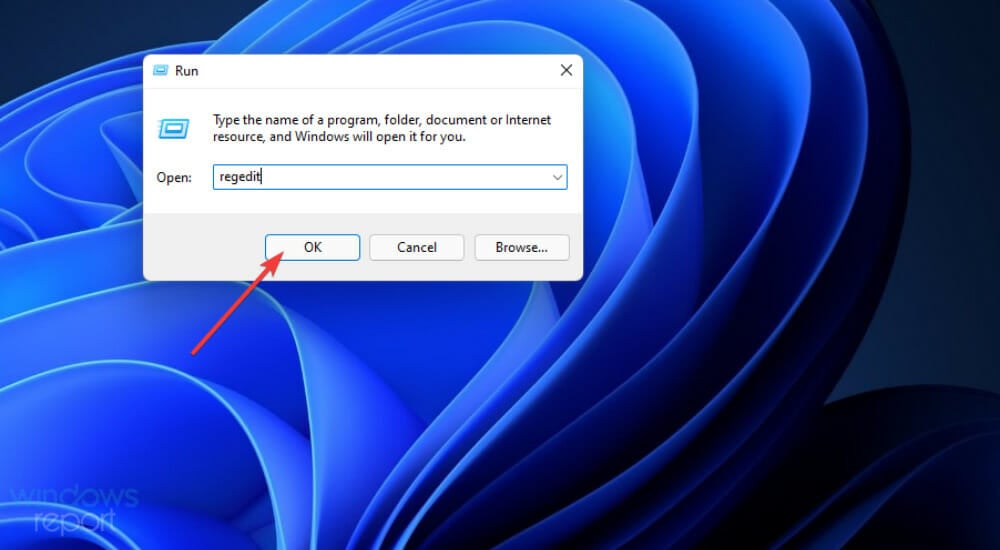
- Press the Windows + R keys together at the same time to launch Run.
- Type this Run command in the Open box:
regedit - Click OK to open Registry Editor.
- Then navigate to this registry key:
ComputerHKEY_LOCAL_MACHINESYSTEMSetup - Select the Setup key on the left side of the registry.
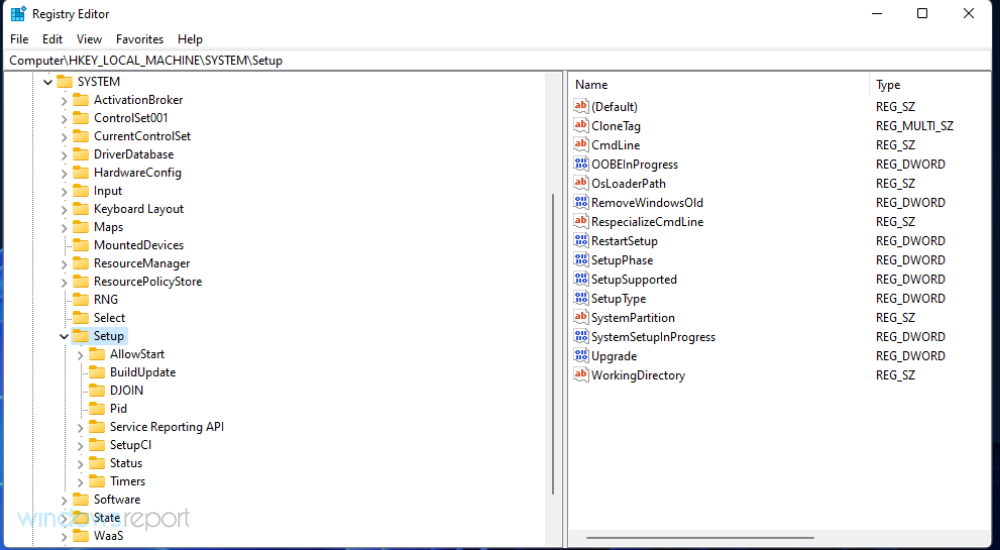
- Right-click the Upgrade DWORD and select Delete.
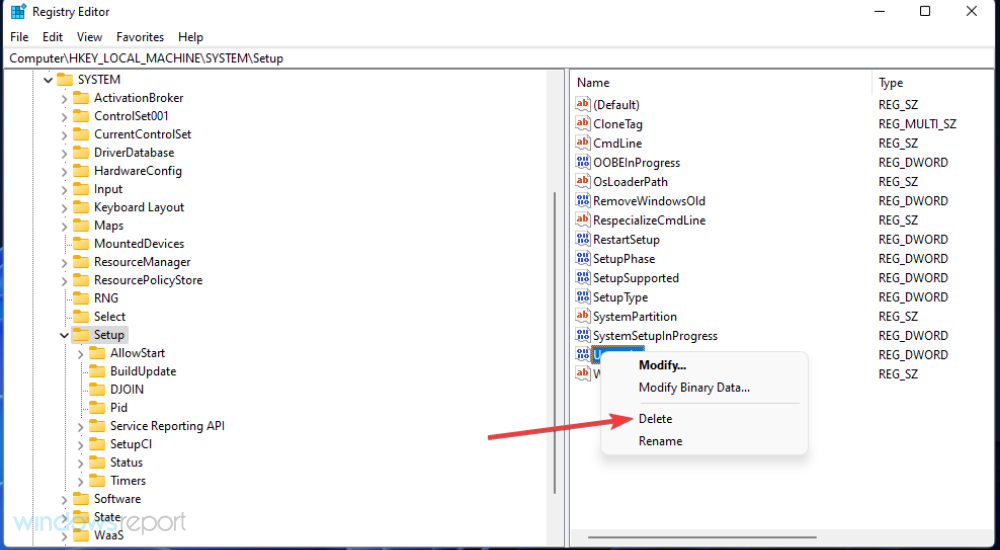
- Go to this registry key:
HKEY_LOCAL_MACHINESYSTEMSetupStatusSysprepStatus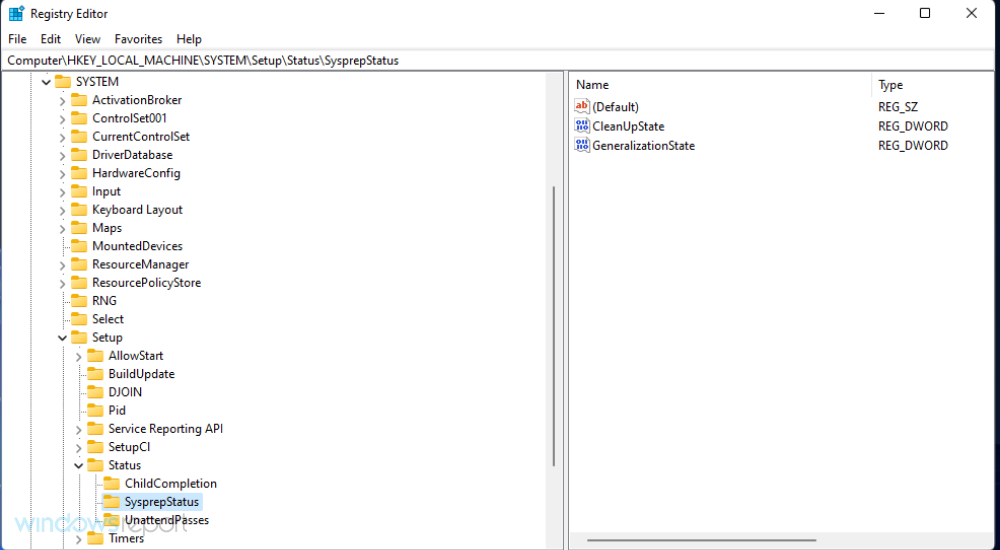
- Double-click the CleanUpState DWORD.
- Erase the current number and enter 7 in the Value data box, and click the OK option.
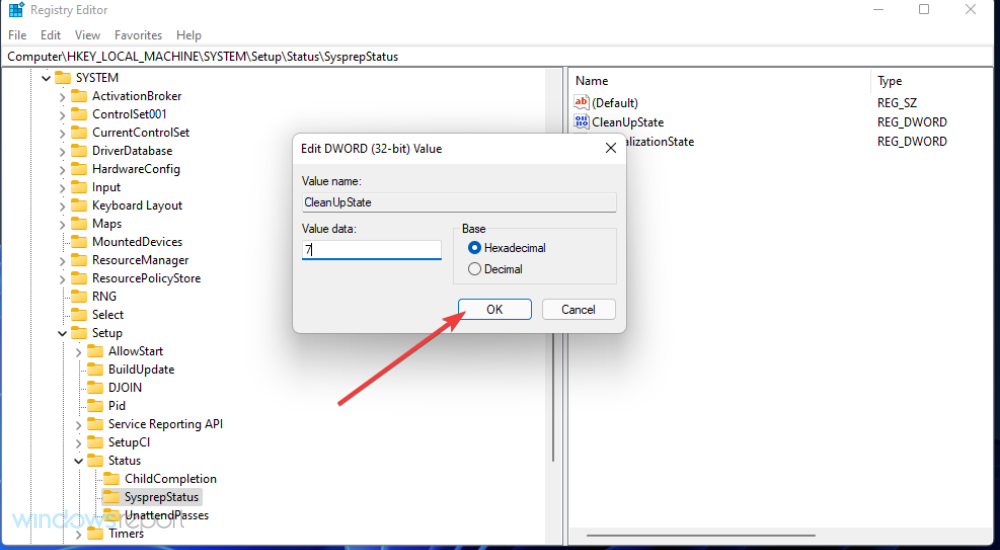
- Thereafter, press the Start button. Select the Power and Restart options there.

NOTE
This potential resolution is recommended for users who need to fix the Sysprep error after recently upgrading to a new Windows platform.
4. Uninstall any UWP apps you’ve installed yourself
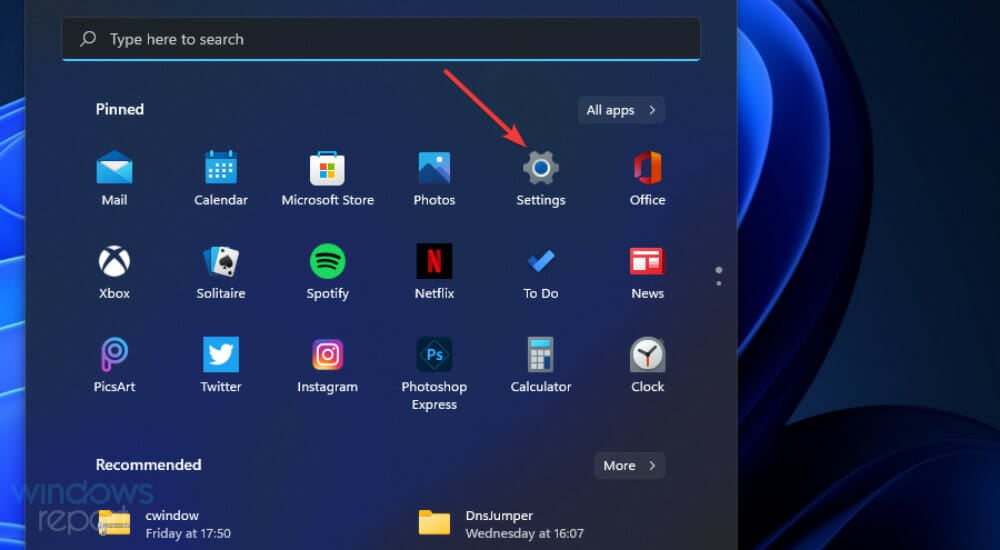
- Click Start and select the pinned Settings app on that menu.
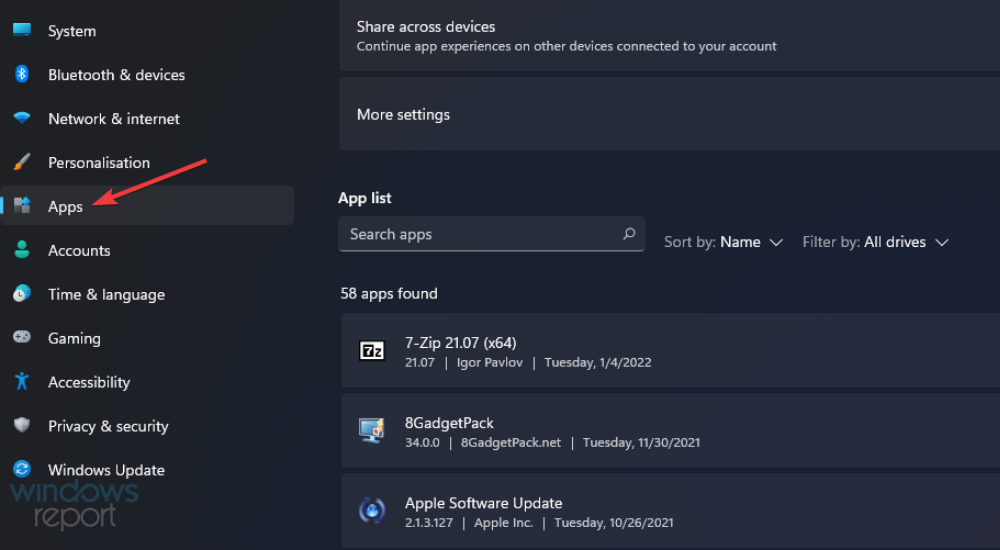
- Select the Apps tab.
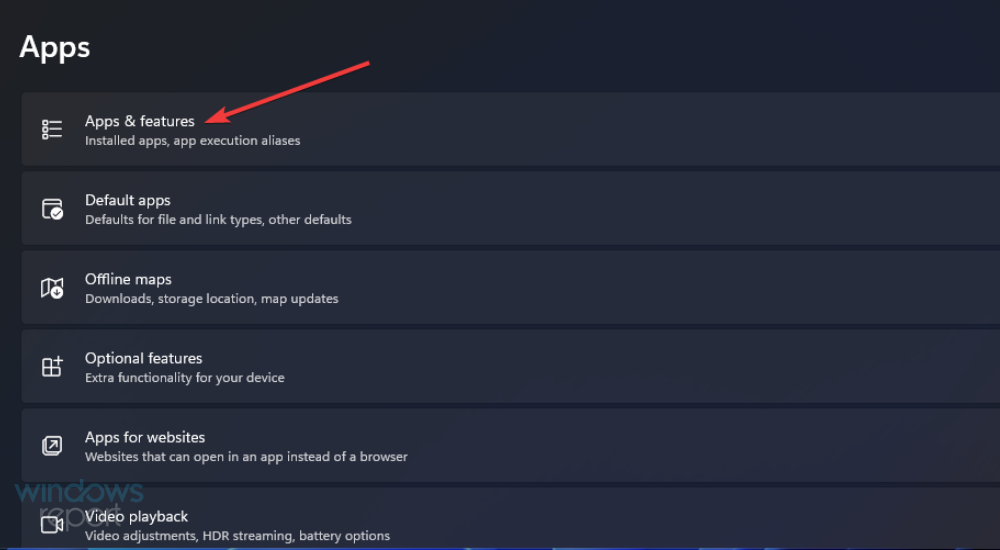
- Click Apps & features to open uninstall options.
- Click the three-dot button for a UWP app you’ve downloaded from the MS Store.
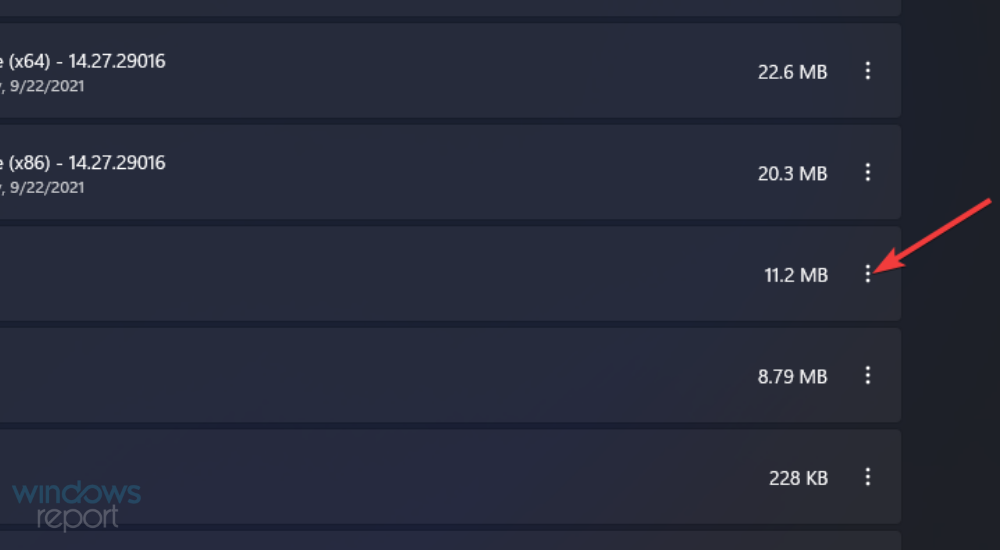
- Select the Uninstall option.
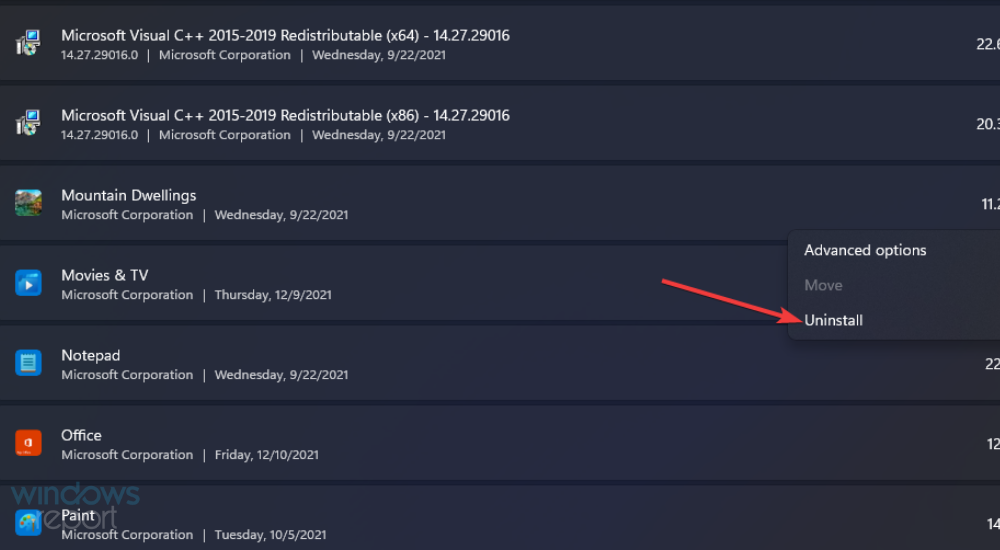
Note that you can bulk uninstall UWP apps with some third-party uninstaller such as CCleaner. This software enables you to select and uninstall multiple apps and also includes options for erasing leftover residual files.
You’ll probably notice that the Sysprep error message includes a setupact.log file path. Checking that file will help you identify UWP apps causing the error, and other potential factors behind it.
Some PC issues are hard to tackle, especially when it comes to corrupted repositories or missing Windows files. If you are having troubles fixing an error, your system may be partially broken.
We recommend installing Restoro, a tool that will scan your machine and identify what the fault is.
Click here to download and start repairing.
This is how you can check the setuppact.log file in Windows 11/10.
- Right-click Start and select the Run accessory on the alternative Win + X menu.
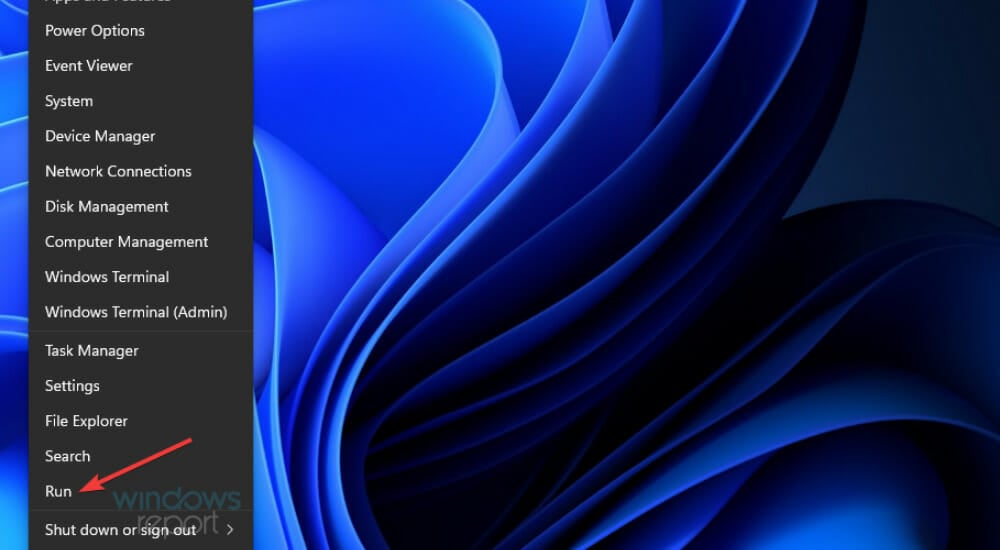
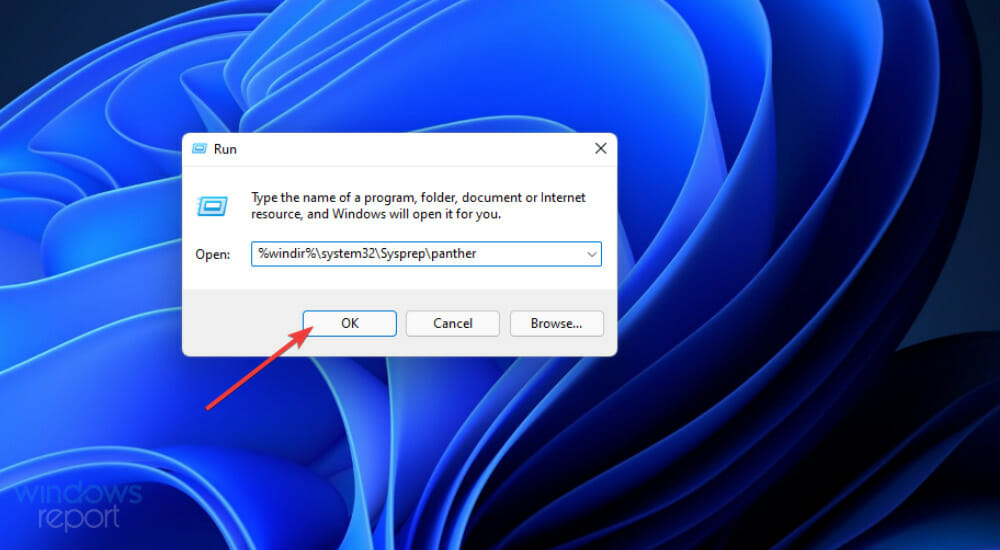
- Enter the folder path specified within the Sysprep error message in the Open box:
%windir%system32Syspreppanther - Click OK to open the folder.
- Right-click the setupact.log file in the folder and select Open with.
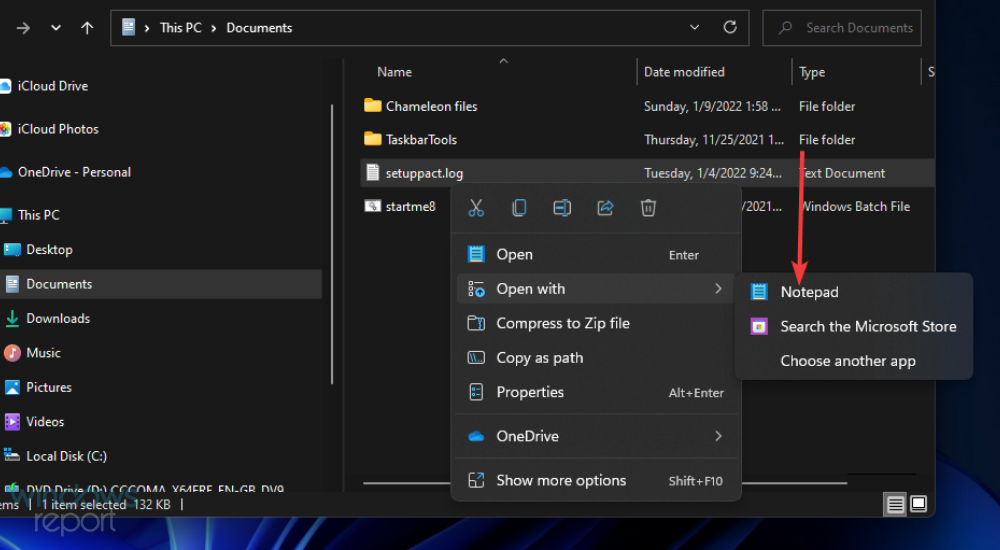
- Then choose to open the log file with Notepad.
Thereafter, scroll down to the bottom of that log file to view Sysprep error details. If there’s an app causing the issue, the log file will include details for it as follows.
SYSPRP Package [app ID] was installed for a user, but not provisioned for all users. This package will not function properly in the Sysprep image. Error SYSPRP Failed to remove apps for the current user: 0x80073cf2.
If you see log details like that, you’ve probably hit the bullseye! Simply uninstall the app (or apps) specified there as outlined within resolution four.
Those are some of the best ways you can fix the Sysprep Windows 11/10 error. As they’re confirmed resolutions, they’ll probably fix that error in most cases.
However, that doesn’t mean they’re 100 percent guaranteed resolutions. If you need more suggestions, some of the resolutions in our How to fix Windows 10 Sysprep errors guide might help.
You can also send a support ticket to Microsoft at the Contact Microsoft Support page.
Feel free to chat about the Sysprep was not able to validate error in this page’s comments section below. You can share other potential resolutions for this issue (if you’ve found any) and add questions for it there.
Still having issues? Fix them with this tool:
SPONSORED
If the advices above haven’t solved your issue, your PC may experience deeper Windows problems. We recommend downloading this PC Repair tool (rated Great on TrustPilot.com) to easily address them. After installation, simply click the Start Scan button and then press on Repair All.

Newsletter
by Matthew Adams
Matthew is a freelancer who has produced a variety of articles on various topics related to technology. His main focus is the Windows OS and all the things… read more
Updated on April 21, 2022
- The Sysprep was not able to validate your Windows installation Windows 11/10 error frequently occurs because of user-installed UWP apps and BitLocker.
- Uninstalling some UWP apps you’ve installed could fix the Sysprep Windows 11 error.
- Some users might need to disable BitLocker to fix the Sysprep was not able to validate your windows installation 0x80073cf2 error.
XINSTALL BY CLICKING THE DOWNLOAD FILE
- Download Restoro PC Repair Tool that comes with Patented Technologies (patent available here).
- Click Start Scan to find Windows 11 issues that could be causing PC problems.
- Click Repair All to fix issues affecting your computer’s security and performance
- Restoro has been downloaded by 0 readers this month.
Sysprep, otherwise System Preparation, is a command-line tool some users utilize to prepare Windows images for deployment. However, an error can arise for some users after entering a Sysprep command for system preparation. One user said this in an MS forum post:
I have a clean installed Windows 10 pro which was activated by MAK license. When I tried to prepare this system with Sysprep, I got the error message Sysprep was not able to validate Your Windows installation.
That Sysprep issue can arise on Windows 11, 10, and 8 platforms. When that issue arises, the Sysprep command doesn’t run and validate the installation as expected. If you need to fix that Sysprep issue, check out the Windows 11/10 resolutions for it below.
How come the Sysprep error arises in Windows?
The Sysprep was not able to validate Your Windows installation error has existed since Windows 8. That issue often arises because of user-installed UWP apps. Many users have confirmed they fixed this issue by uninstalling certain UWP apps they installed from MS Store.
This issue can also occur if a default app, which is supposed to come pre-installed with Windows, is missing. In such a scenario, you would need to reinstall the missing Windows app. A general reinstall app command will do the job.
If you’re utilizing Windows Pro and Enterprise editions, the Sysprep error might be due to the BitLocker encryption feature. BitLocker doesn’t mix well with the Sysprep utility. So, disabling that feature on Windows Pro and Enterprise editions can sometimes resolve this error as well.
How can I fix the Sysprep error in Windows?
1. Reinstall default Windows UWP apps
- To bring up the search box, press the Windows + S keyboard shortcut.
- Type Windows PowerShell in the search box.
- Click PowerShell’s Run as administrator option.
- Input this PowerShell command:
Get-AppxPackage -AllUsers| Foreach {Add-AppxPackage -DisableDevelopmentMode -Register “$($_.InstallLocation)AppXManifest.xml”} - Press the Enter keyboard key to execute.
- When the command has finished, click Power and Restart on your Start menu.
2. Disable BitLocker
- Launch the Windows 11/10 search tool with its hotkey (specified in resolution one).
- Input Command Prompt into the search tool’s text box to find that app.
- Click the Run as administrator option for the Command Prompt shown directly below.
- Enter this command and press Return:
manage-bde -status - To disable BitLocker, type in this command and press Return:
Disable-Bitlocker –MountPoint ‘C:’
3. Edit the registry
- Press the Windows + R keys together at the same time to launch Run.
- Type this Run command in the Open box:
regedit - Click OK to open Registry Editor.
- Then navigate to this registry key:
ComputerHKEY_LOCAL_MACHINESYSTEMSetup - Select the Setup key on the left side of the registry.
- Right-click the Upgrade DWORD and select Delete.
- Go to this registry key:
HKEY_LOCAL_MACHINESYSTEMSetupStatusSysprepStatus - Double-click the CleanUpState DWORD.
- Erase the current number and enter 7 in the Value data box, and click the OK option.
- Thereafter, press the Start button. Select the Power and Restart options there.
NOTE
This potential resolution is recommended for users who need to fix the Sysprep error after recently upgrading to a new Windows platform.
4. Uninstall any UWP apps you’ve installed yourself
- Click Start and select the pinned Settings app on that menu.
- Select the Apps tab.
- Click Apps & features to open uninstall options.
- Click the three-dot button for a UWP app you’ve downloaded from the MS Store.
- Select the Uninstall option.
Note that you can bulk uninstall UWP apps with some third-party uninstaller such as CCleaner. This software enables you to select and uninstall multiple apps and also includes options for erasing leftover residual files.
You’ll probably notice that the Sysprep error message includes a setupact.log file path. Checking that file will help you identify UWP apps causing the error, and other potential factors behind it.
Some PC issues are hard to tackle, especially when it comes to corrupted repositories or missing Windows files. If you are having troubles fixing an error, your system may be partially broken.
We recommend installing Restoro, a tool that will scan your machine and identify what the fault is.
Click here to download and start repairing.
This is how you can check the setuppact.log file in Windows 11/10.
- Right-click Start and select the Run accessory on the alternative Win + X menu.
- Enter the folder path specified within the Sysprep error message in the Open box:
%windir%system32Syspreppanther - Click OK to open the folder.
- Right-click the setupact.log file in the folder and select Open with.
- Then choose to open the log file with Notepad.
Thereafter, scroll down to the bottom of that log file to view Sysprep error details. If there’s an app causing the issue, the log file will include details for it as follows.
SYSPRP Package [app ID] was installed for a user, but not provisioned for all users. This package will not function properly in the Sysprep image. Error SYSPRP Failed to remove apps for the current user: 0x80073cf2.
If you see log details like that, you’ve probably hit the bullseye! Simply uninstall the app (or apps) specified there as outlined within resolution four.
Those are some of the best ways you can fix the Sysprep Windows 11/10 error. As they’re confirmed resolutions, they’ll probably fix that error in most cases.
However, that doesn’t mean they’re 100 percent guaranteed resolutions. If you need more suggestions, some of the resolutions in our How to fix Windows 10 Sysprep errors guide might help.
You can also send a support ticket to Microsoft at the Contact Microsoft Support page.
Feel free to chat about the Sysprep was not able to validate error in this page’s comments section below. You can share other potential resolutions for this issue (if you’ve found any) and add questions for it there.
Still having issues? Fix them with this tool:
SPONSORED
If the advices above haven’t solved your issue, your PC may experience deeper Windows problems. We recommend downloading this PC Repair tool (rated Great on TrustPilot.com) to easily address them. After installation, simply click the Start Scan button and then press on Repair All.