Термин linting применяется для обозначения процесса обнаружения ошибок в исходных файлах программ, скриптов или документов. Программа такого рода должна иметься в инструментарии каждого разработчика, так как с помощью таких программ можно обнаруживать ошибки в процессе написания кода. Популярный редактор кода Sublime Text не имеет встроенных возможностей для обнаружения ошибок; однако такую ситуацию легко исправить.
При помощи linting‘а можно обнаруживать небольшие ошибки кода “на лету”, в процессе написания этого кода — например, пропущенную точку с запятой в JavaScript-коде. Возможность обнаружения ошибок в редакторе Sublime Text осуществляется с помощью плагина SublimeLinter, который необходимо установить прежде всего.
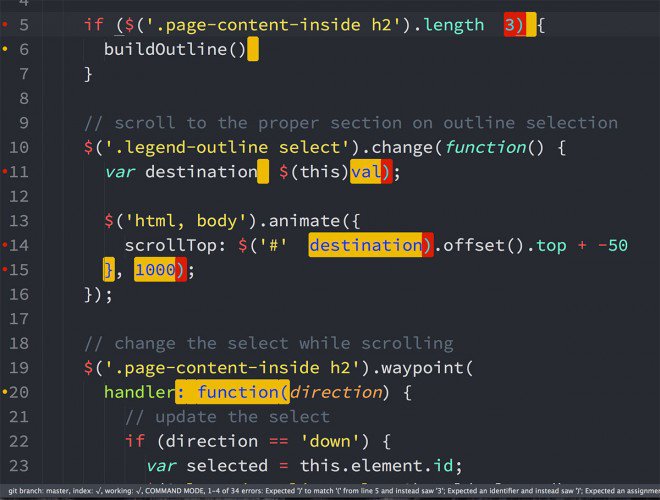
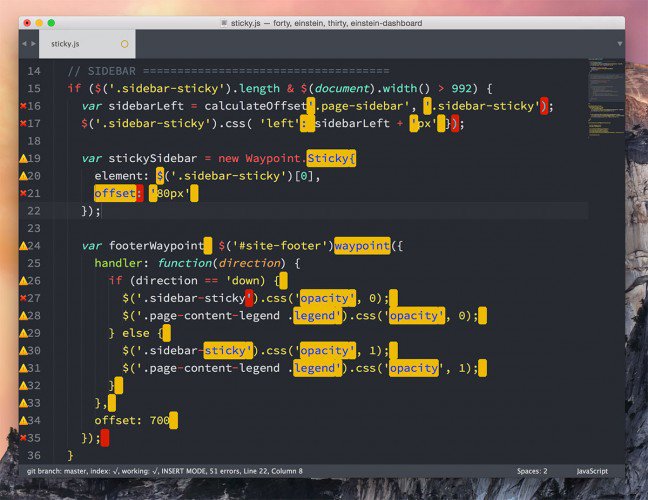
Если в какой-либо строке кода этот редактор обнаружит ошибку, то данная строка будет подсвечена в gutter редактора Sublime. Более того, если поместить курсор мыши в строку с ошибкой, то в status bar редактора Sublime Text отобразится краткое описание ошибки, что поможет принять меры для ее правильного устранения.
Ниже представлен наглядный пример подсветки ошибок в Sublime Text с помощью плагина SublimeLinter:
Плагин SublimeLinter сам по себе не выполняет процесса “отлавливания” ошибок в коде, так как является всего-лишь фреймворком, основой для других плагинов (linter), каждый из которых создан для обнаружения ошибок в каком-то определенном языке — JavaScript, PHP, Ruby, Python, HTML, CSS и так далее.
SublimeLinter в Sublime Text
Как уже упоминалось ранее, плагин SublimeLinter является фреймворком, основой для более маленьких плагинов (linter), которые осуществляют непосредственный поиск синтаксических ошибок в программном коде.
Поэтому первоначально необходимо установить этот фреймворк (как плагин) в редактор Sublime Text и самый простой способ это сделать — воспользоваться менеджером пакетов Package Control. Для этого нажимаем сочетание клавиш Shift+Ctrl+P (Linux Windows) или Shift+Cmd+P (Mac OSX). В поле поиска вводим название устанавливаемого пакета — SublimeLinter. Далее — производим установку.
Теперь необходимо определиться с тем, в каких языках программирования необходимо “отлавливать” ошибки. Другими словами, на каких языках программирования вы пишете и в каких из них вам необходима поддержка SublimeLinter.
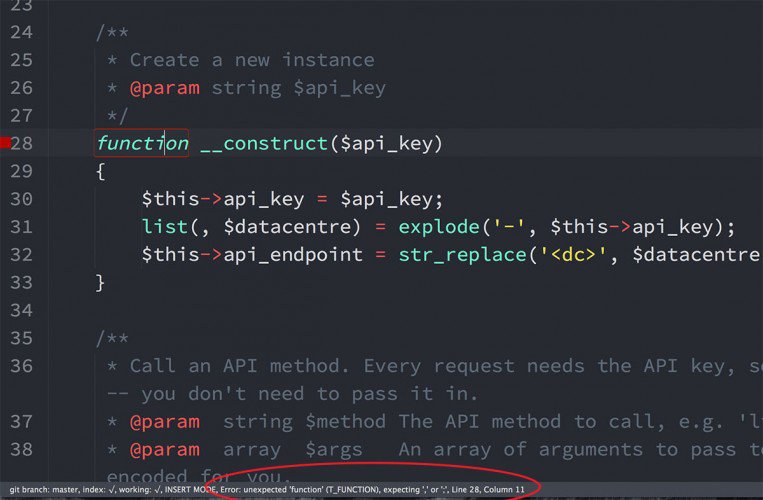
Допустим, это серверный язык PHP. Тогда для включения возможности обнаружения ошибок в Sublime Text необходимо установить плагин SublimeLinter-php, так же через менеджер пакетов Package Control. Стоит оговориться, что дополнительной зависимостью этого плагина является язык PHP, который предустановлен в операционных системах LinuxMacOSX, но который необходимо заранее установить отдельно в операционной системе Windows.
Примером работы связки SublimeLinter + SublimeLinter-php в редакторе Sublime Text может послужить нижеследующее изображение:
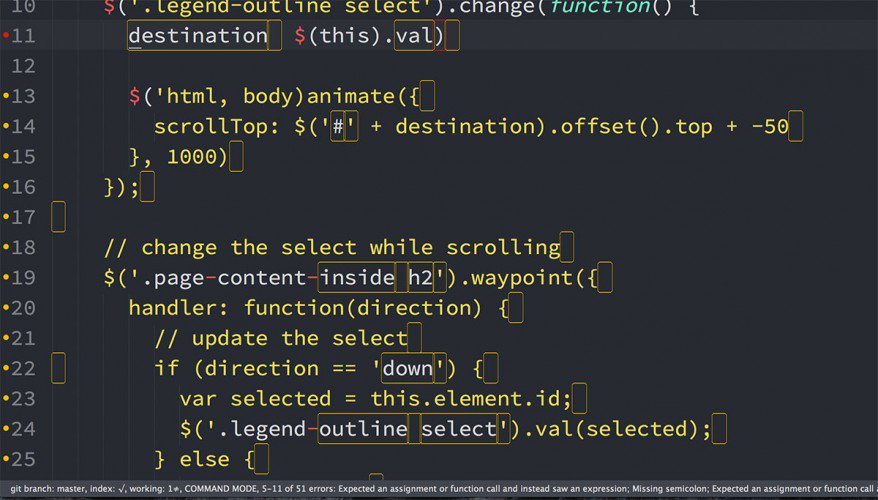
Рассмотрим другой случай, когда в редакторе Sublime Text используется язык программирования JavaScript. Тогда для возможности отлавливания ошибок в JS-коде необходимо установить плагин SublimeLinter-jshint. В этом случае вопрос зависимостей этого пакета выглядит несколько сложнее. Плагин SublimeLinter-jshint основывает свою работу на JSHint, который необходимо установить в виде пакета под Node.js и устанавливается с помощью менеджера пакетов npm. Поэтому в операционной системе заранее должны быть установлены Node.js, npm и JSHint.
Примером работы плагина SublimeLinter-jshint может послужить нижеследующее изображение:
Рассмотрим еще один случай, когда в редакторе Sublime Text используется язык таблиц каскадных стилей CSS (куда же без него?). Тогда необходимо доустановить в Sublime Text плагин SublimeLinter-csslint.
Рассмотрение подобных плагинов (linter) можно продолжать еще долго. Поэтому ограничимся только тремя вышеприведенными. Стоит сказать, что для поиска какого-либо конкретного плагина (linter) удобно воспользоваться online-сервисом Package Control, в поисковой строке которого достаточно ввести начало названия искомого пакета, например, так — “SublimeLinter-“. Система автоматически выдаст список все плагинов под фреймворк SublimeLinter.
Как нетрудно заметить, окончание (суффикс) в названии каждого из плагинов является подсказкой, для поддержки какого языка был создан этот плагин. Например, для языка Ruby существует плагин SublimeLinter-ruby, для препроцессора Haml имеется плагин SublimeLinter-haml.
Также стоит сказать, что необходимо внимательно читать описание к каждому из тех плагинов, которые планируется установить, так как каждый из них имеет разные зависимости. Наглядный пример зависимостей у плагинов SublimeLinter-php и SublimeLinter-jshint был приведен выше.
Настройка SublimeLint
В плагине SublimeLint имеется большое количество настроек. Однако, с большинством из них не составит труда разобраться. Ниже приведено краткое описание некоторых из них.
Linting Modes
Эта настройка отвечает за поведение плагина SublimeLinter — когда плагин должен оповещать об обнаруженной ошибке в коде программы или документа.
- Background — это поведение по умолчанию плагина SublimeLinter. Сообщения об обнаруженных ошибках будут появляться по мере их обнаружения (другими словами — по мере написания строк кода) и будут обновляться каждый раз, когда будет производиться исправление обнаруженных ошибок. Такой режим может показаться излишне назойливым, так как иногда сообщение об ошибке может появиться прежде, чем будет дописана до конца инструкция, в которой вкралась ошибка.
- LoadSave — в этом случае сообщения об ошибках будут отображаться плагином только после сохранения или загрузки сохраненного документа.
- Save Only — сообщения об обнаруженных ошибках будут отображаться только при сохранении документа.
- Manual — ручной вызов проверки на ошибки, из командной панели редактора Sublime Text.
Лично я предпочитаю режим LoadSave, так как в этом случае плагин SublimeLinter не мешает работать с кодом до тех пор, пора не будет выполнено сохранение этого кода в файле. Режим Background может показаться излишне назойливым, так как сообщения об ошибках будут появляться постоянно, мешая работе.
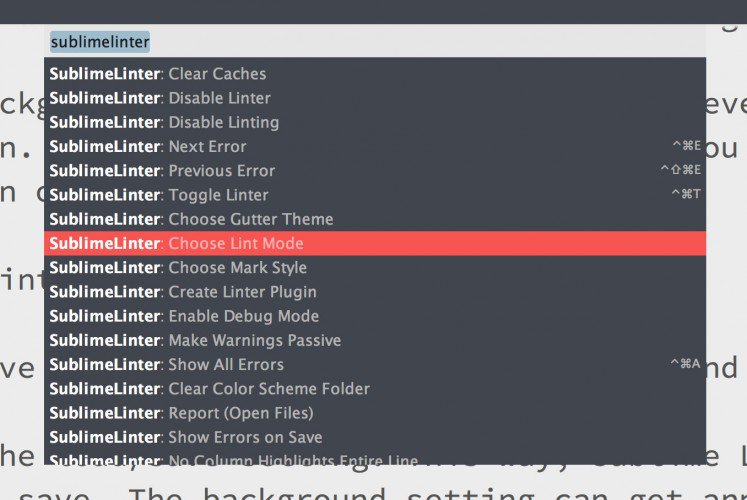
Для того, чтобы изменить поведение плагина SublimeLinter через настройку Linting Modes, необходимо зайти в командную панель редактора Sublime Text с помощью сочетания клавиш (Shift+Ctrl+P или Shift+Cmd+P) и ввести в строке поиска следующее:
sublimelinter lint mode
… откроется выпадающий список со всеми настройками плагина SublimeLinter, из которого необходимо выбрать SublimeLinter: Choose Lint Mode:
Mark Style
Настройка Mark Style отвечает за внешний вид выделения ошибки в строке кода. Значением по умолчанию является outline. Но можно выбрать любое другое значение из предустановленных настроек.
В соответствии с официальной документацией SublimeLinter имеются несколько вариантов выделения ошибок в строке кода:
- fill
- outline
- solid underline
- squiggly underline
- stippled underline
Аналогично с режимом Linting Modes, режим Mark Style настраивается через командную панель редактора Sublime Text — Shift+Ctrl+P (Linux Windows) или Shift+Cmd+P (Mac OSX). В выпадающм списке нужно выбрать строку Sublime Linter: Choose Mark Style.
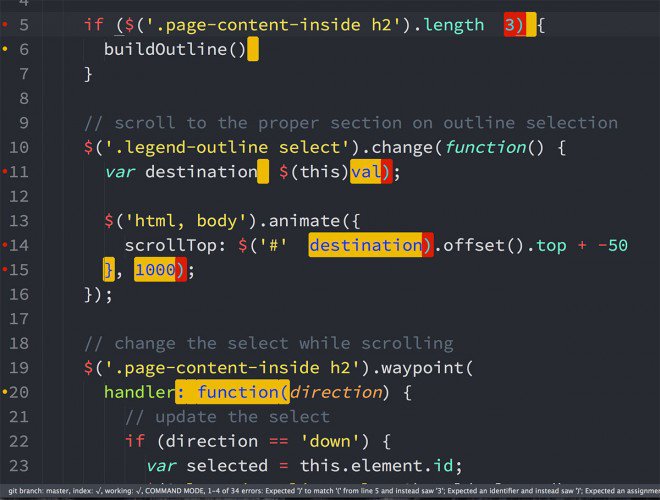
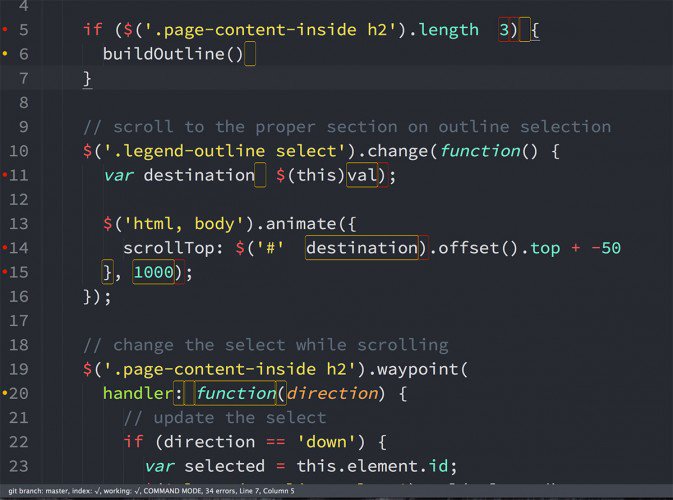
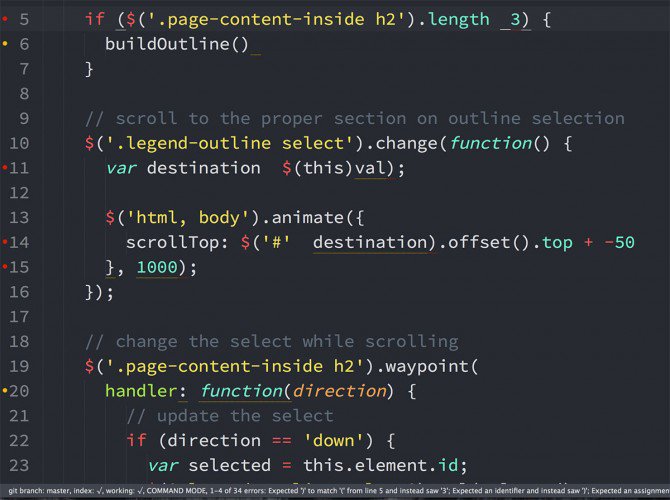
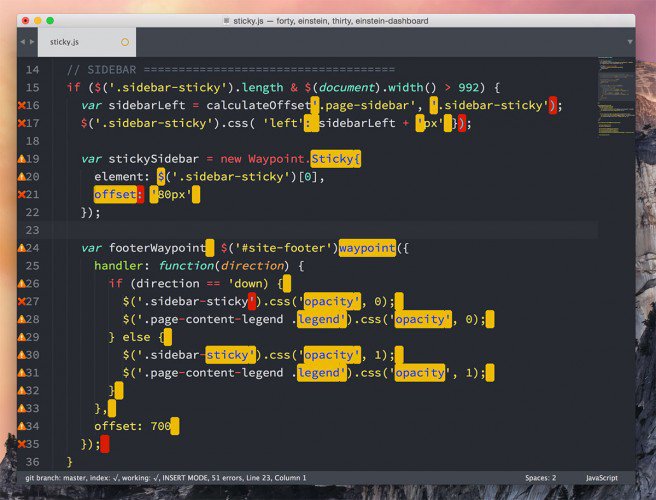
Ниже представлены скриншоты всех пяти режимов выделения ошибок в строке, чтобы можно было сравнить и выбрать наиболее подходящий вариант.
Fill
Outline
Solid Underline
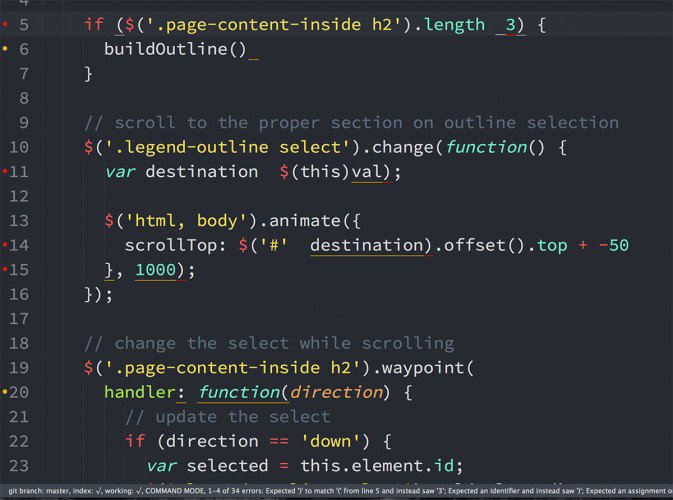
Squiggly Underline
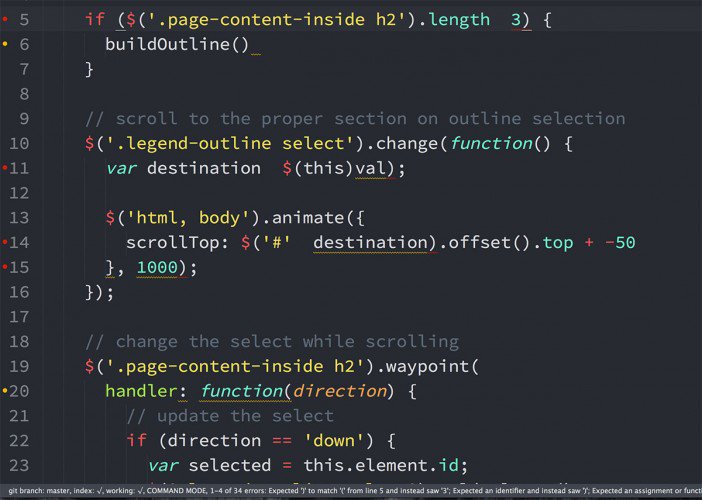
Stippled Underline
Gutter Themes
В дополнение к настройке выделения ошибок в строке кода, можно выполнить настройку иконок, который помещаются в области gutter редактора Sublime Text напротив строки с обнаруженной ошибкой. Такое выделение строки служит для большей информативности.
В плагине SublimeLinter имеется набор предустановленных иконок, наглядное изображение которых представлено ниже.
Blueberry – cross
Blueberry – round
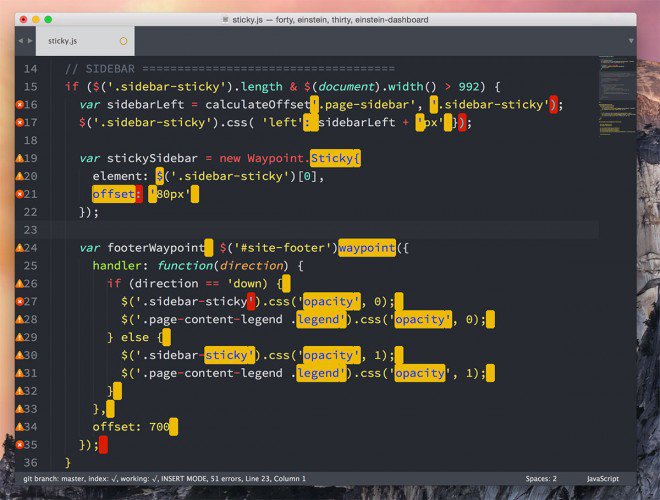
Circle
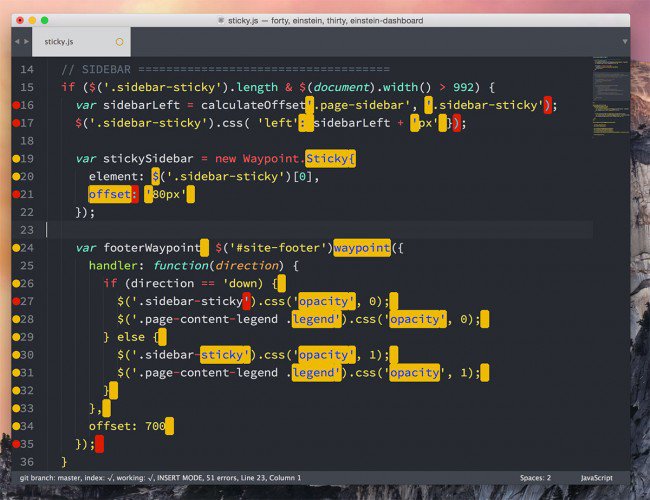
Danish Royalty
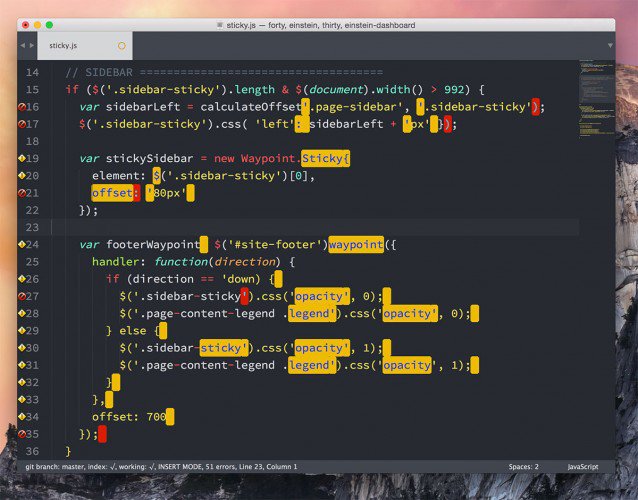
Hands
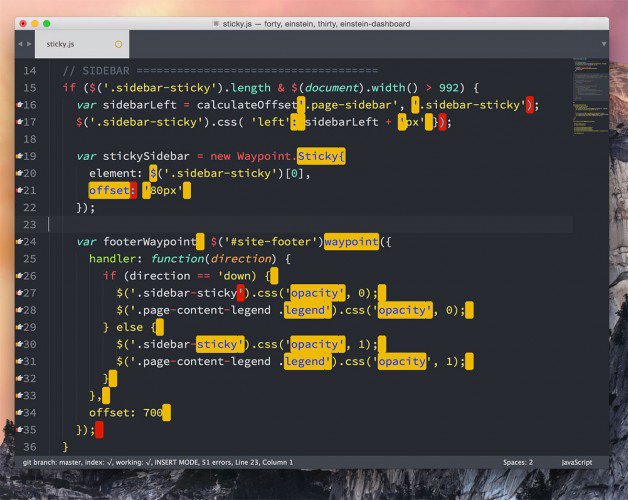
Knob – simple
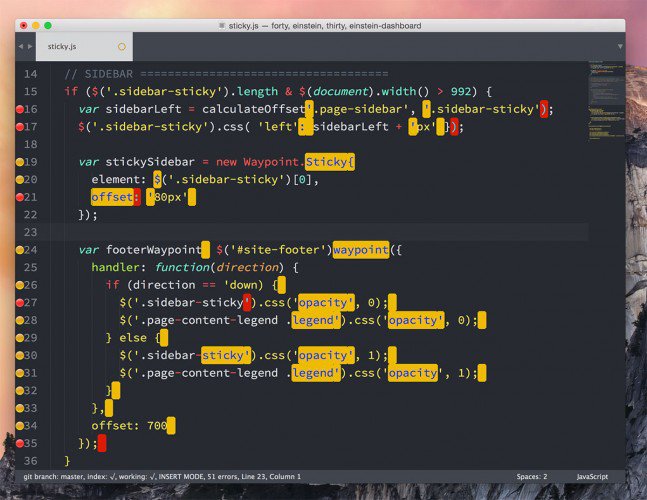
Knob – symbol
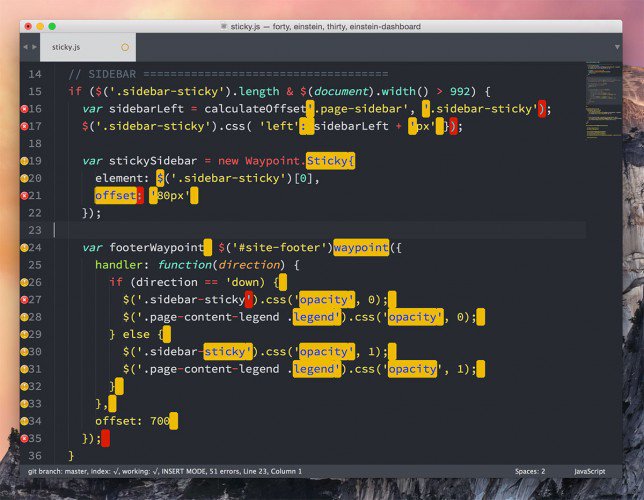
Koloria
ProjectIcons

Изменить настройки отображения иконок можно, зайдя в командную панель редактора Sublime Text и выбрав в выпадающем списке строку Sublime Linter: Choose Gutter Theme.
Заключение
Плагин SublimeLinter является очень мощным и гибким, а количество поддерживаемых им язык — очень большое. Вы можете посетить страницу поддерживаемых языков, чтобы убедиться в богатом выборе поддерживаемых языков программирования, разметки и многих других.
Рассмотренные в этой статье возможности плагина SublimeLinter являются далеко не исчерпывающими. На официальной странице документации вы всегда найдете для себя что-то новое. Для этого нужно только периодически просматривать эту документацию.
Текстовой редактор Sublime Text 3 позволяет проверять программистам и верстальщикам код на наличие ошибок в css, JavaScript, php и т.д. Если вы где-то ошиблись, то на соответствующей строчке высветится ошибка.
Программы для проверки ошибок называются линтерами.
Установка SublimeLinter
Для того, чтобы была возможность проверки кода надо установить из Package Control пакет SublimeLinter.
После установки SublimeLinter появится возможность устанавливать отдельные компоненты, которые и позволят задействовать эти инструменты.

Установка SublimeLinter-jshint
SublimeLinter-jshint — позволяет увидеть ошибки в коде на JavaScript.
Ссылка на инструкцию:
https://github.com/SublimeLinter/SublimeLinter-jshint
Краткая инструкция
1. Перед установкой компонентов на компьютере должен быть установлен Node.js.
2. Открываем Терминал. Пишем команду:
sudo npm install -g jshint
3. В Sublime Text 3 открываем установку пакетов и пишем SublimeLinter-jshint. Нажимаем на него, пакет установлен. Теперь если возникнет ошибка в JavaScript коде, вы сразу об этом узнаете.
Установка SublimeLinter-csslint
SublimeLinter-csslint — показывает ошибки в CSS коде.
Ссылка на инструкцию:
https://github.com/SublimeLinter/SublimeLinter-csslint
Краткая инструкция
1. Точно также должен быть установлен Node.
2. В Терминале запускаем команду:
3. В Sublime Text 3 устанавливаем пакет SublimeLinter-csslint.
Как видно на картинке выше показываются не только ошибки, но и рекомендации. Например, SublimeLinter-у не нравится, что используется описание стиля для идентификатора, а не для стиля.
Установка SublimeLinter-php
Пакет для проверки ошибок в PHP коде.
Ссылка на инструкцию:
https://github.com/SublimeLinter/SublimeLinter-php
Краткая инструкция
1. На компьютере должен быть установлен PHP. Возможно он уже установлен у вас, например, вместе с MAMP PRO. Если не установлен, по ссылке выше, есть ссылка на дистрибутивы.
2. В Sublime Text 3 устанавливаем пакет SublimeLinter-php.
Если ничего не заработало
После установки перезапустите программу Sublime Text 3.
Writing codes for hours only to find that it returns errors is one of the most distressing thing about a developer’s life. This is made worse when we have no idea what we did wrong. And when things go wrong, developers cope in every way they can (check out Jake’s post for 30 common ways we deal with code error).
However, if you write code with Sublime Text, here is a small tip to minimize this frequent problem and stop you from giving up code.
Recommended Reading: Working With Code Snippets In Sublime Text
Lint and Linters
Lint, in programming, is the term referring to an attempt of analyzing potential errors or bugs within the codes. Linter is the tool for Lint(ing). There are literally a bunch of linters for almost any languages, like JS, PHP, Java, and even CSS.
By Linting, not only will you be able to minimize errors and bugs, we can also become a better coder as it serves as a reason for us to follow the standard rules and best pratices in writing code. Luckily, there is a Sublime Text plugin that have packed all these linters in one package, allowing us to lint various codes seamlessly.
Installing SublimeLinter
First, you need to install Package Control for the easiest way to install Sublime Text plugin. If you have installed it, hit Shift + Command + P and search for “Install Package“. This will load the package repository.
Once loaded, search for SublimeLinter, and hit Enter to install.

Adjusting When Linting Happens
The linting process, by default, runs on the background, the process runs immediately as we are writing the codes. For more convenient experience, I suggest changing this behaviour (but if you are fine with the current setting, then skip ahead).
Head over to the Preferences > Package Setting > Sublime Linter > Setting – User, which opens in a new tab.
Then, add the following line to ensure that linting only occurs upon a file save.
{
	"sublimelinter": "save-only"
}
Linting CSS
Now, let’s try it out with our codes, starting from CSS. We have the following adjoining class selector without the closing curly bracket.
.class.anotherclass {
    border-radius: 5px;
After saving the file, it turns out that I got 1 caution and 1 warning.

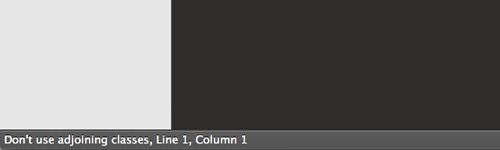
The error message can be found at the status bar, to the left of the line number, marked with a warning sign. In my example, it notified me of the missing curly bracket, and also advised me to avoid using adjoining class selector as it has some issues in Internet Explorer 6.
Linting JavaScript
Next, let’s try this with JavaScript. This time we have the following JavaScript function taken from W3School. I have introduced errors into it by removing the semicolons, something most thinks programmers often forget to do.
function myFunction() {
var x = ""
var time = new Date().getHours();
	if (time <= 20) {
		x = "Good day"
	}
document.getElementById("demo").innerHTML = x
}
After saving the file, (ta-da) yes, I am missing a few semicolons.

Final Thought
If you are coding with Sublime Text, I think SublimeLinter is a must-install plugin. Not only does it help cut down on the time you need to find errors in your code, it also helps you to become a better coder on the long run.
SublimeLinter

The code linting framework for Sublime Text.
No linters included: get them via Package Control.
Installation
Install SublimeLinter and linters via Package Control.
Settings
Settings are documented in the default settings.
Open the settings using the Command Palette (ctrl+shift+P) searching for Preferences: SublimeLinter Settings (mnemonic: sls).
When you open the SublimeLinter settings you’ll see the defaults on the left
or top. Usually that’s all that is needed for end-users but some additional information is in our docs at sublimelinter.com.
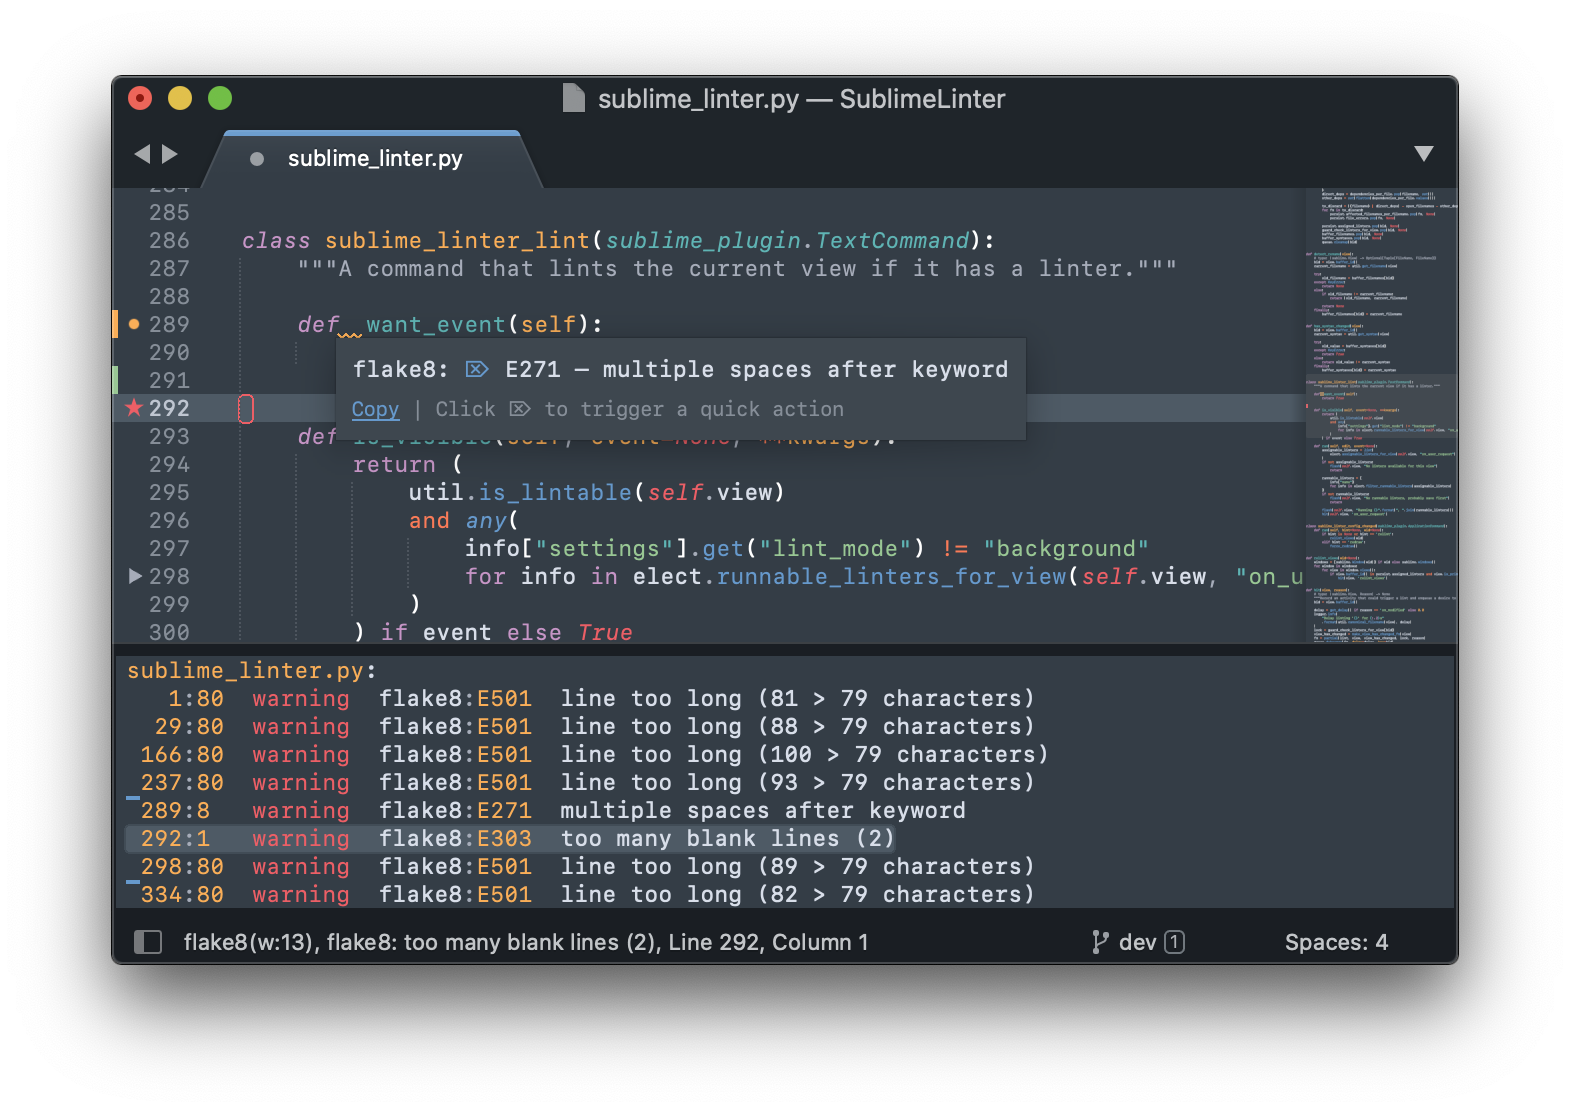
Quick Actions/Fixers
As we do just linting SublimeLinter naturally does not come with fixers
and/or code formatters. However, we have a fixer API and ship (mostly)
«fix by ignoring» actions. These allow you to quickly ignore specific error messages inline and ad hoc.[1]
SublimeLinter currently ships actions for eslint, stylelint, flake8, mypy, shellcheck, codespell and phpcs.
Want to see actions for your favourite linter? Please open a PR with your addition to quick_fix.py. We have tests for them!
[1] Why this limitation though? Well it is usually easy to add a semicolon here and a space there, but the inline ignore rules and syntaxes are very cumbersome to type and to remember. And there is basically no project of any size where you don’t have to ignore ad-hoc something somewhere once.
Key Bindings
SublimeLinter comes with some pre-defined keyboard shortcuts. You can customize these via the Package Settings menu.
| Command | Linux & Windows | MacOS |
|---|---|---|
| Lint this view | CTRL + K, L | CTRL + CMD + L |
| Open diagnostics panel | CTRL + K, A | CTRL + CMD + A |
| Goto next error | CTRL + K, N | CTRL + CMD + E |
| Goto prev error | CTRL + K, P | CTRL + CMD + SHIFT + E |
Take also a look at the default bindings because
we document other commands and have usually some tricks in there too.
For example, it is very advisable to bind sublime_linter_quick_actions, e.g.
    // To trigger a quick action
    // { "keys": ["ctrl+k", "ctrl+f"],
    //   "command": "sublime_linter_quick_actions"
    // },
Support & Bugs
Yeah, totally! Often if it doesn’t work, Sublime will have something in the
console (View -> Show Console). Enable debug mode in the settings,
restart Sublime Text and look at the console output for anything.
If your issue is specific to a particular linter, please report it on that linter’s repository, otherwise open it right here.
Creating a linter plugin
Fork the template to get started on your plugin.
It contains a howto with all the information you need. Of course, take a look at a similar linter plugin and let it inspire you.
Also Support
❤️😒 Donate 🙄
Проверка орфографии в Sublime Text. давно я хотел разобраться, как же работает проверка орфографии в Sublime Text.
Давайте разбираться!
О проверке орфографии в Sublime Text 3
- Установка словарей в Sublime Text 3 — видео
- Как проверяются ошибки в Sublime Text 3
- Скачать словари для проверки орфографии в Sublime Text 3
- Установка словарей для проверки орфографии в Sublime Text 3
- Включение проверки орфографии в Sublime Text 3
- Если ошибка найдена в тексте в программе Sublime Text 3
- Скачать можно здесь
Друзья!
Мне очень нужны подписчики!
Пожалуйста подпишись на Дзене!
Заранее спасибо!
Проверка орфографии Sublime Text
Для большего понимания и иллюстрации процесса мы сделали видео о том, как устанавливать словари в Sublime Text 3
Как проверяются ошибки в Sublime Text 3
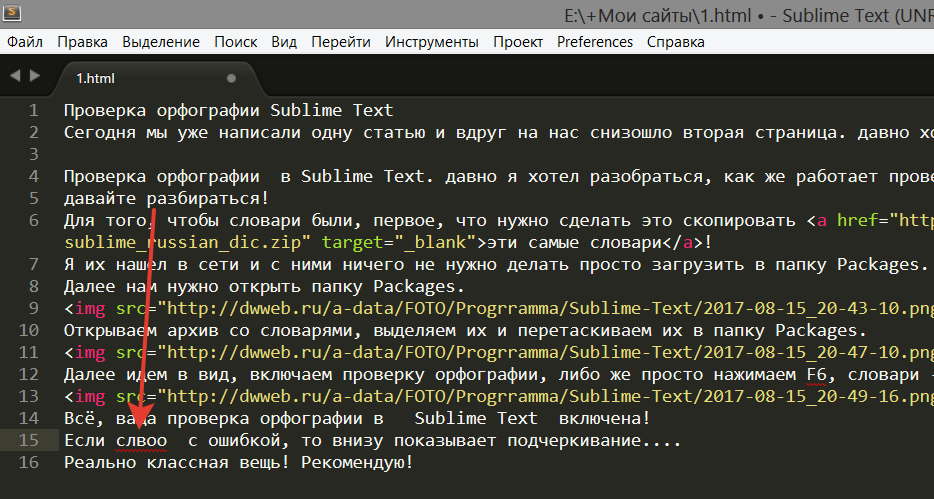
В Sublime Text 3 можно включить проверку орфографии! Если вы допустили какую-то ошибку. то в том месте, где есть ошибка Sublime Text 3 подчеркнет красным цветом слово с ошибкой
Нажмите, чтобы открыть в новом окне.
Скачать словари для проверки орфографии в Sublime Text 3
Где можно «Скачать словари для проверки орфографии в Sublime Text 3»!? Когда-то(не помню, давно это было…) нашел себс словари для проверки орфографии в Sublime Text 3 — естественно, что как вы знаете, если у нас есть архив, то его можно скачать
внизу страницы…
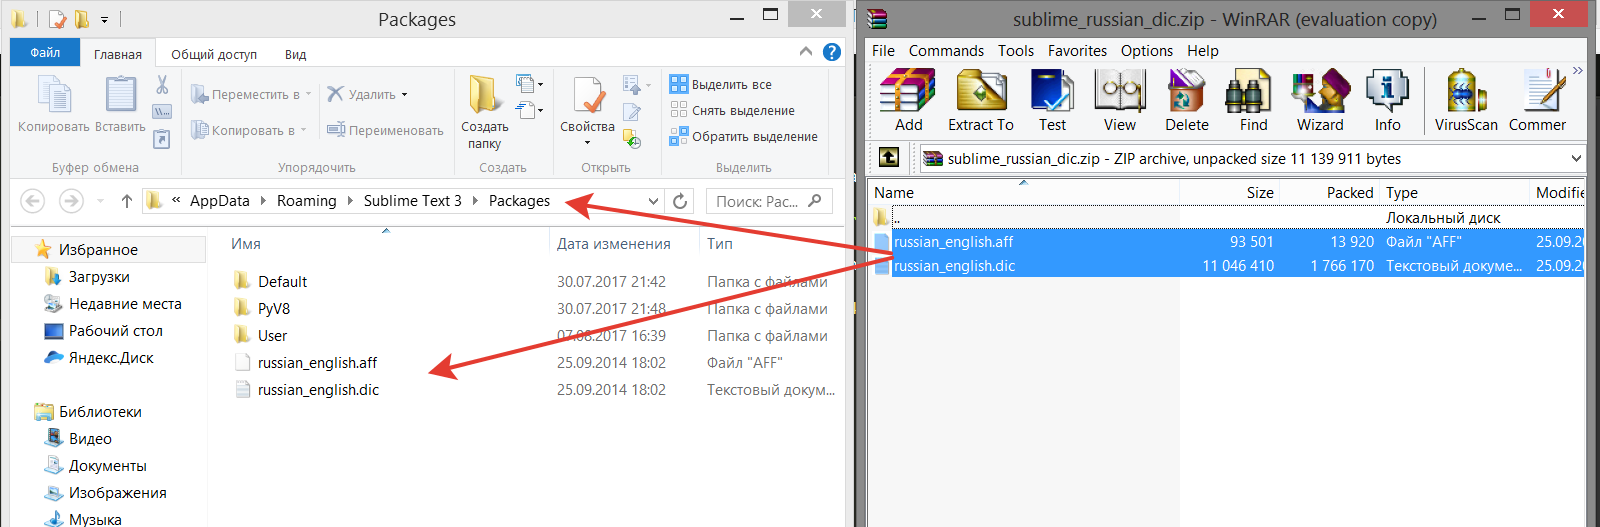
Установка словарей для проверки орфографии в Sublime Text 3
Как устанавливать словари для Sublime Text 3:
Открываем папку Packages.
Нажмите, чтобы открыть в новом окне.

Открываем архив со словарями, выделяем их и перетаскиваем их в папку Packages.
Нажмите, чтобы открыть в новом окне.
Включение проверки орфографии в Sublime Text 3
Далее идем в вид, включаем проверку орфографии, либо же просто нажимаем F6, словари — russian english!
Нажмите, чтобы открыть в новом окне.
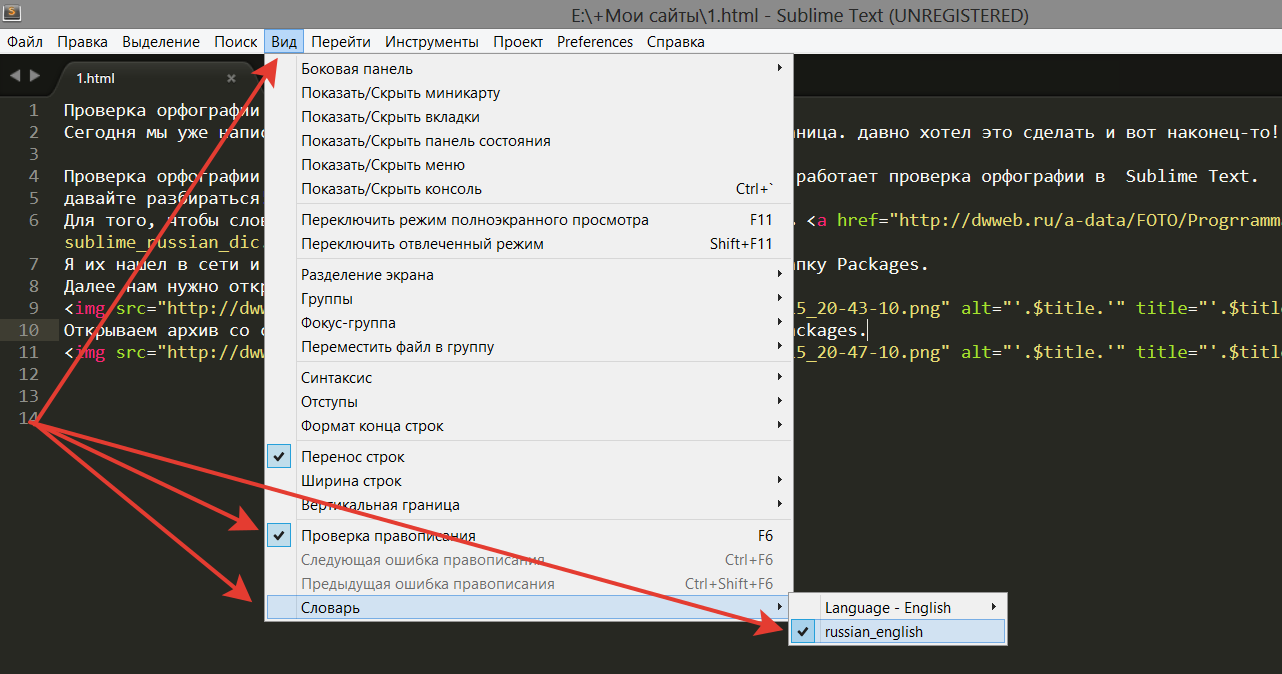
Всё, ваша проверка орфографии в Sublime Text включена!
Если ошибка найдена в тексте в программе Sublime Text 3
Если слово с ошибкой, то внизу показывает подчеркивание….
Нажмите, чтобы открыть в новом окне.
Реально классная вещь! Рекомендую!
P.S.
Если это происходило раньше, то приходилось сперва печатать в Word-е, а теперь не нужно бегать туда сюда. Просто печатаешь в своей любимой программе и наслаждаешься процессом!
Можете не благодарить, лучше помогите!
Название скрипта :Словари для sublime text
Теги :
COMMENTS+
BBcode
Sublime Text — Introduction
Sublime Text Editor is a full featured Text editor for editing local files or a code base. It includes various features for editing code base which helps developers to keep track of changes. Various features that are supported by Sublime are as follows −
- Syntax Highlight
- Auto Indentation
- File Type Recognition
- Sidebar with files of mentioned directory
- Macros
- Plug-in and Packages
Sublime Text editor is used as an Integrated Development Editor (IDE) like Visual Studio code and NetBeans. The current version of Sublime Text editor is 3.0 and is compatible with various operating systems like Windows, Linux and MacOS.
Why Sublime Text?
When you use a suitable Text editor, you can enjoy its rich beneficial features. Sublime Text offers its users the following benefits −
- Ability to solve linker errors.
- Keeping track of all files and folders to work with.
- Connectivity with version control systems like Git, Mercurial.
- Problem solving capabilities.
- Keeping color combination for syntax combination.
You can download Sublime Text from its official Website − www.sublimetext.com. In the next chapter, we will learn about installation procedure of Sublime Text editor in various operating systems.
Sublime Text — Installation
Sublime Text editor is supported by the following major operating systems −
- Windows
- Linux and its distributions
- OS X
You can download Sublime Text from its official website − www.sublimetext.com
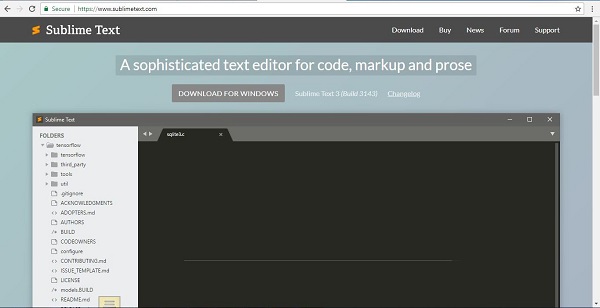
In this chapter, you will learn about the installation of Sublime Text on various operating systems.
Installation on Windows
You will have to go follow the steps shown below to install Sublime Text on Windows −
Step 1 − Download the .exe package from the official website as shown below −
https://www.sublimetext.com/3
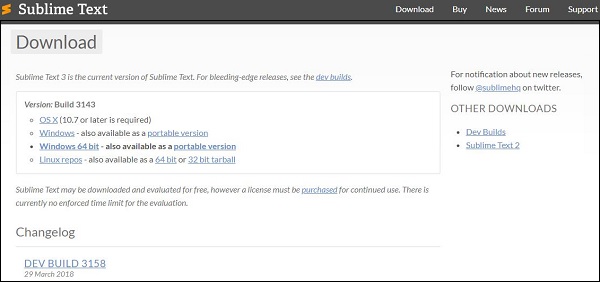
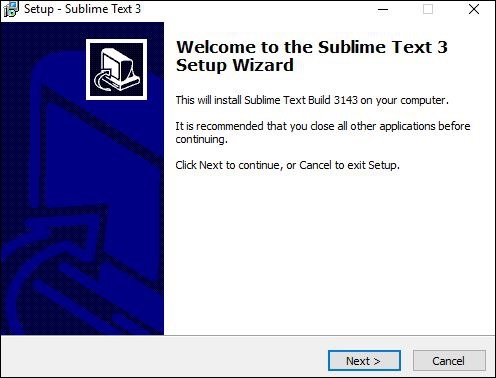
Step 2 − Now, run the executable file. This defines the environment variables. When you run the executable file, you can observe the following window on your screen. Click Next.
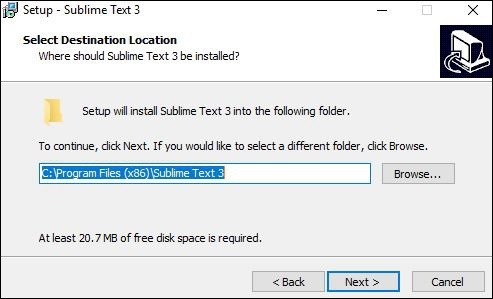
Step 3 − Now, choose a destination location to install Sublime Text3 and click Next.
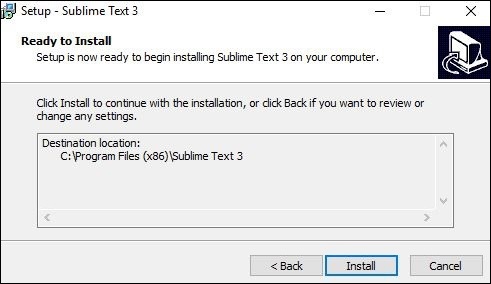
Step 4 − Verify the destination folder and click Install.
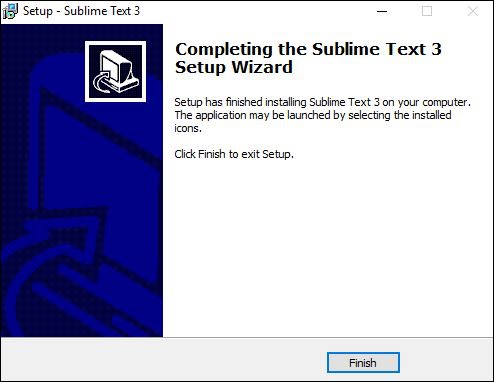
Step 5 − Now, click Finish to complete the installation.
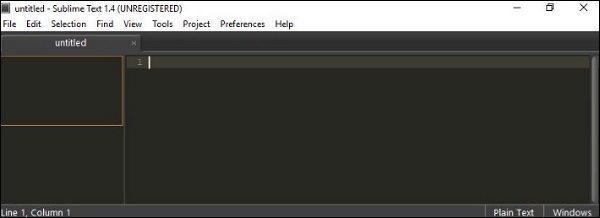
Step 6 − Upon a successful installation, your editor will appear as shown below −
Installation on Linux
You will have to follow the steps shown below to install Sublime Text on Linux distributions −
Step 1 − Using the command line terminal, install the packages for Sublime Text editor, using the command given below −
sudo add-apt-repository ppa:webupd8team/Sublime-Text-3
Step 2 − Update the packages using the following command −
sudo apt-get update
Step 3 − Install the Sublime Text repository using the following command −
sudo apt-get install Sublime-Text
After the successful execution of above mentioned commands, you will find that Sublime Text editor is installed on the system.
Installation on OSX
For OSX operating systems,
-
Download the .dmg file of Sublime Text Editor.
-
Open it and drag-and-drop in the Applications folder.
-
Follow the steps that you have seen in above two cases.
-
Launch the application.
Sublime Text — Data Directory
Throughout this tutorial, we will be focusing on using the subversion control system, Git and bit bucket in combination with Sublime Text editor.
As with any other Text editor, working on a specific repository is the key aspect of Sublime Text. It is shown in detail in the steps given below −
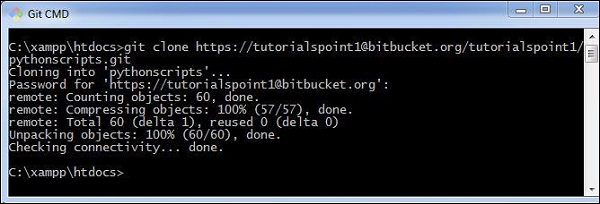
Step 1 − Consider a repository to be cloned from the bit bucket. Please note that we will be working with Python scripts throughout this tutorial.
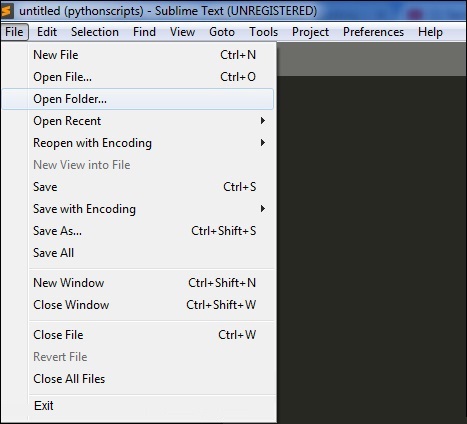
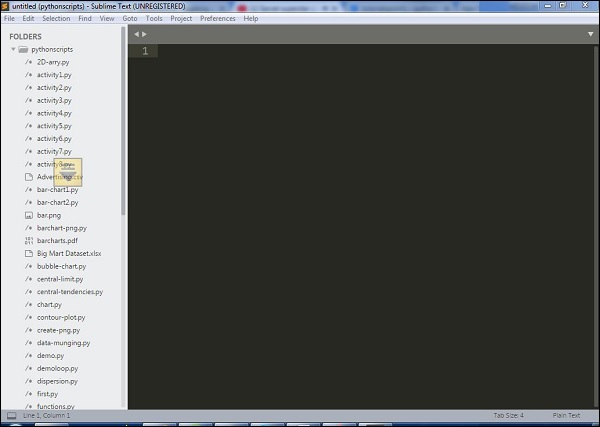
Step 2 − Include the repository in Sublime Text editor using the Open Folder option, as shown below.
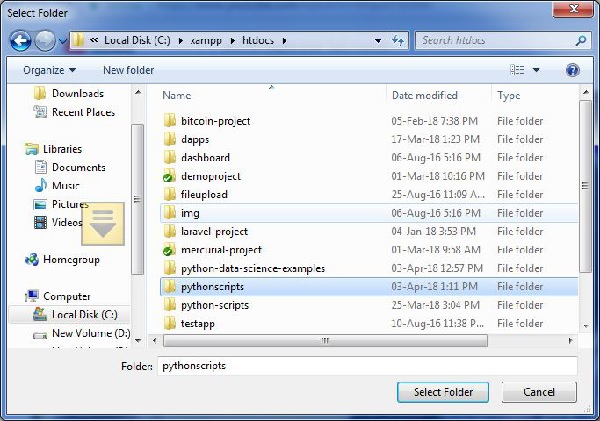
Step 3 − After including the repository, the screen of Sublime Text editor will be as shown below −
You can choose the file you wish to open from the list that is displayed in the left hand side of the screen, as shown in the image below −
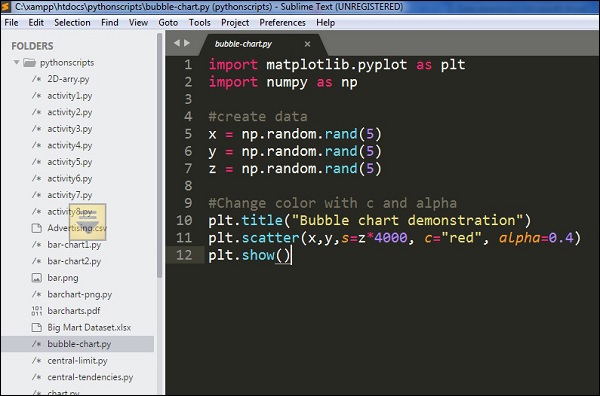
Note that the color combination gives recognition of keywords and packages included in the code.
Sublime Text — Creating First Document
In this chapter, you will learn step by step how to create a file in Sublime Text.
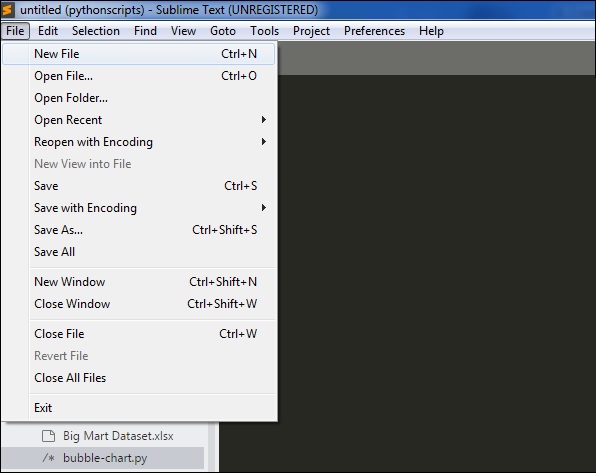
Step 1 − Use the option New File to create a file in Sublime Text editor.
Step 2 − Once the new file is available, you can insert the code, similar to any other text editor, and save the file in your working repository.
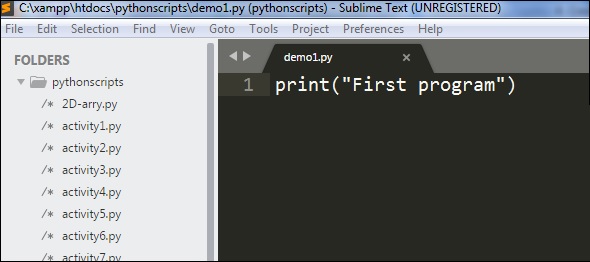
Step 3 − Once you save the associated file, Sublime Text editor provides a variety of options based on the type of file, for example .php for PHP scripts, .py for Python scripts and .java for Java code base.
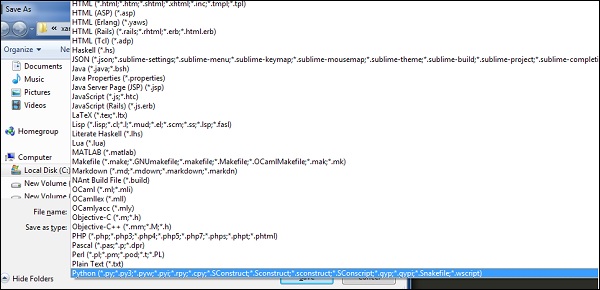
Step 4 − As our code repository is on Python project, we will save the file as demo1.py, as shown below −
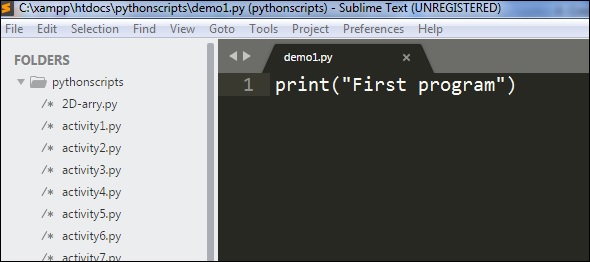
Sublime Text — Editing First Text Document
Code editors allow the users to edit the code scripts and text documents with various shortcut keys. In this chapter, let us understand through various examples about editing options of first text document in Sublime Text.
Simultaneous Write-Up
In this example, you will see how to add print statements at two locations.
Step 1 − Consider the first script of Python with the following code in it −
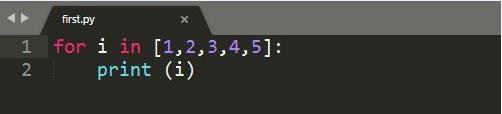
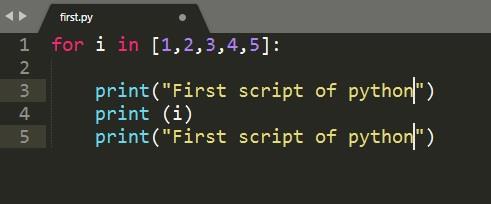
Step 2 − Let us suppose that, in the given script you want to mention the starting and ending points of the loop, using simple statements. You can write the print statement wherever required, however, in Sublime Text editor you can simultaneously add comments and statements in two places with a shortcut of Ctrl+cursor point for Windows or Linux, and Cmd+cursor point for Mac. Then, you can see the cursor points as mentioned below −
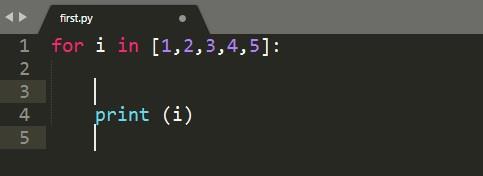
Step 3 − Now, you can insert the print statements at both the locations of the mentioned cursor points, as shown in the image below.
Finding Occurrences
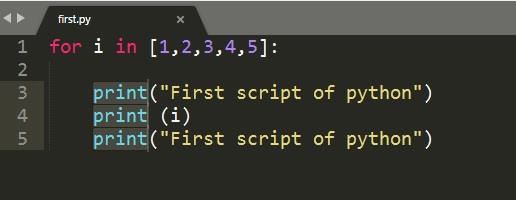
Sublime Text editor includes a feature to find the occurrences of the keywords included in the scripts. The shortcut key for finding occurrences of the keyword is Ctrl+D after highlighting the associated keyword.
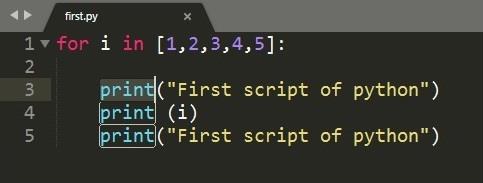
If you want to search for a keyword, say print from the given code, you can use Ctrl+D or Cmd+D to get the count of occurrences of the associated keyword.
Appending Comments in Line
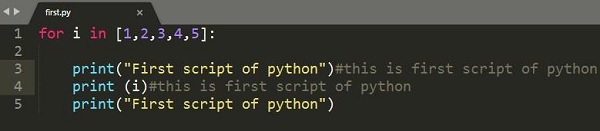
We can append comments at the end of line using the shortcut key Ctrl+Shift+L for Windows and Cmd+Shift+L for Mac operating system after selecting the code section where you actually need the comment.
Sublime Text — Patterns of Code Editing
There are various types of code editing and shortcut keys used in Sublime Text editor −
- Splitting the selection into lines
- Wrapping the complete paragraph in HTML file
- Finding all occurrences
This chapter discusses each of them in detail.
Splitting the Selection into Lines
The key combination Ctrl+Shift+L allows you to select the blocks of lines and split them, on Windows. The screenshot given below explains this −
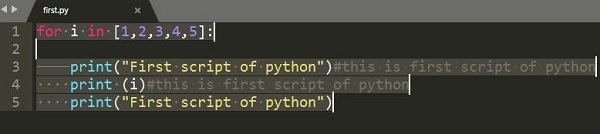
Wrapping Complete Paragraph in HTML File
The key combination Alt+Shift+w for Windows and Cmd+Shift+w for Mac, allows the user to split the sections of code and create various paragraphs. It is referred as a wrap selection with html tag. This also allows you to include HTML tags using Sublime editor.
The screenshot given below explains wrapping text with a HTML tag −
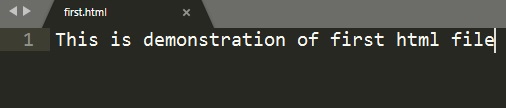
After wrapping the text, the text wrapped with a HTML tag will be seen as shown below −

Finding all Occurrences
The key pattern Ctrl+Shift+f allows you to find a keyword in a given project. The screenshot given below explains this −
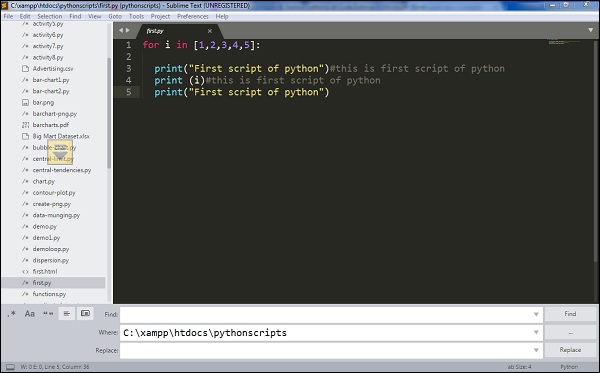
The shortcut key opens a window with three options included in it, namely find, where and replace,
where,
-
find refers to the search of the particular keyword,
-
where mentions the section as to which repository is searched, and
-
replace mentions the keyword which is replaced instead of find keyword.
Sublime Text — Sublime Linter
Linting is the process of flagging suspicious constructs and likely to be bugs in any programming language.
Sublime Linter is the package of Sublime Text that helps you to perform linting in Sublime. It helps in creating files in different modes for the manipulation of code base. It is not an in built package and you need to install it manually.
You can install any package control in Sublime Text editor using the shortcut key combination Ctrl+Shift+P, and selecting the Package Control: Install Package option.
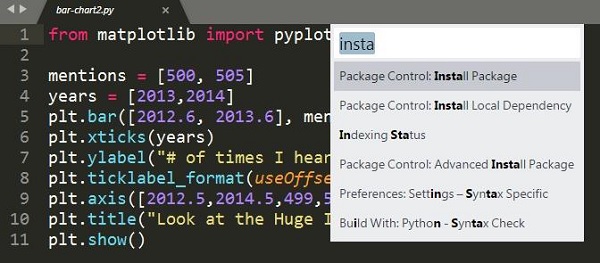
Select the associated package to install in Sublime Text editor. To install Sublime Linter, you need to select the option of SublimeLinter plugin.
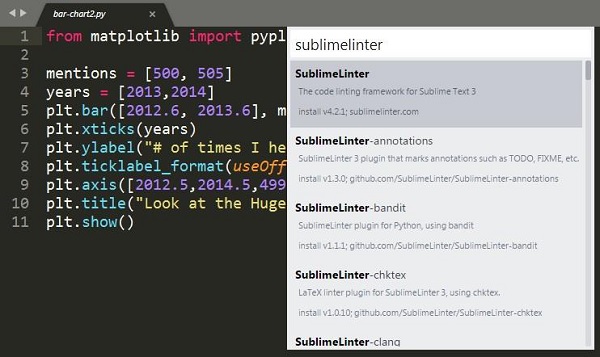
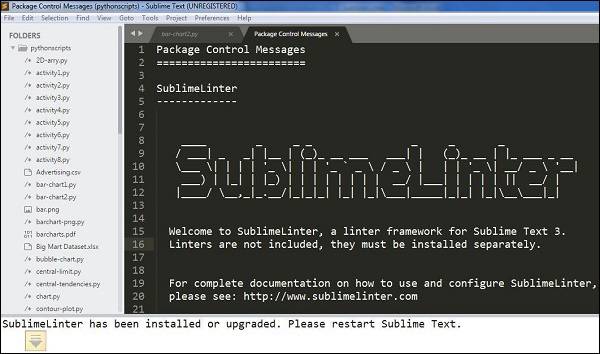
On successful installation, your screen will look as shown below −
Modes of Sublime Linter
Sublime Linter runs in four different modes as mentioned below −
Background Mode
When the Sublime Linter key is set to true, linting is performed in the background constantly each time the file is modified.
Load-Save Mode
When the Sublime Linter key is set to , linting load savewill be performed when a file is loaded from the repository.
Save-Only Mode
When the Sublime Linter key is set to save only mode, linting is performed while saving the particular file in working repository.
On Demand Mode
In the on-demand mode, the Sublime Linter will be set to true, using the shortcut Ctrl+Alt+L, which sets up the linter to detect bugs, if any present in the code.
Sublime Text — Shortcuts
Sublime Text editor includes shortcuts and methods for manipulating the output. This chapter discusses in detail about these shortcuts with the help of suitable illustrations.
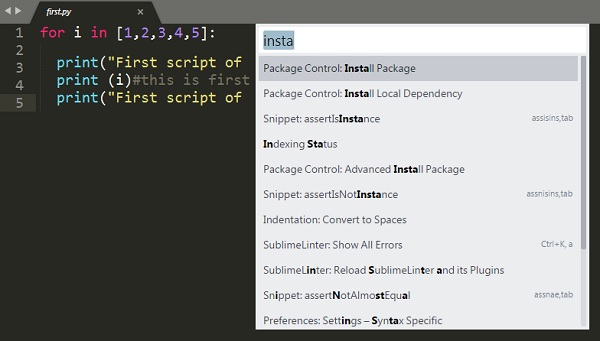
Opening the Command Palette
Command palette in Sublime Text editor includes options for installing packages and console. The shortcut key for this purpose is Ctrl+Shift+P for Windows and Cmd+Shift+P for Mac. The screenshot given below shows opening the command palette using this shortcut.
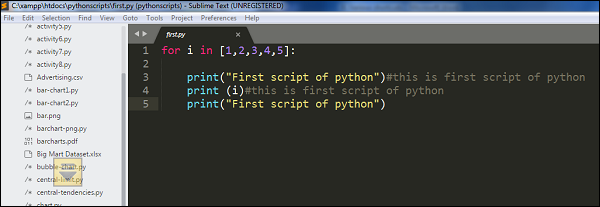
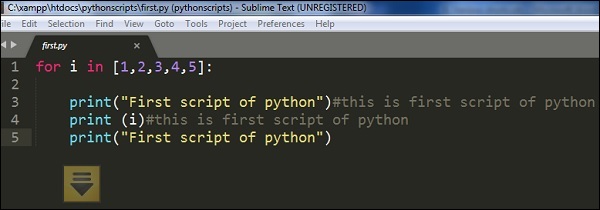
Toggle Side Bar
Sublime text editor includes a side bar which displays the scripts or the file names. You can use the shortcut key Ctrl+KB on Windows and Cmd+KB for Mac for this purpose.
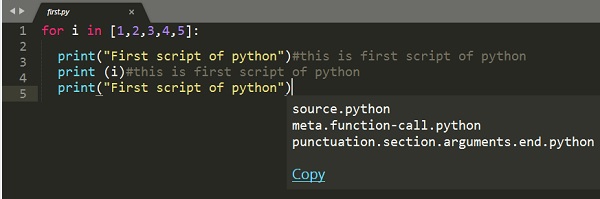
Display Scope in Status Bar
The shortcut key Ctrl+Shift+Alt+P for Windows and Ctrl+Shift+P for Mac displays scope in the status bar. The following screenshot shows an illustration of this shortcut.
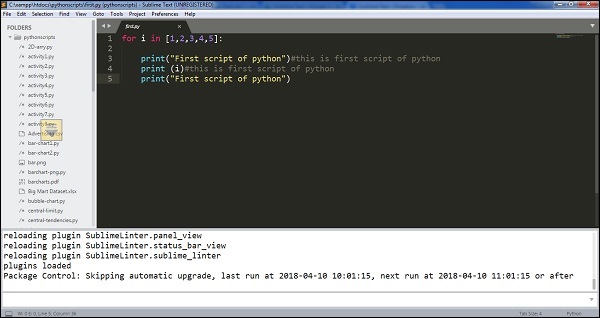
Python Console
When you are working with Python scripts using Sublime Text editor, you can use Ctrl+` for Windows or Control + ` for Windows, to operate the Python console.
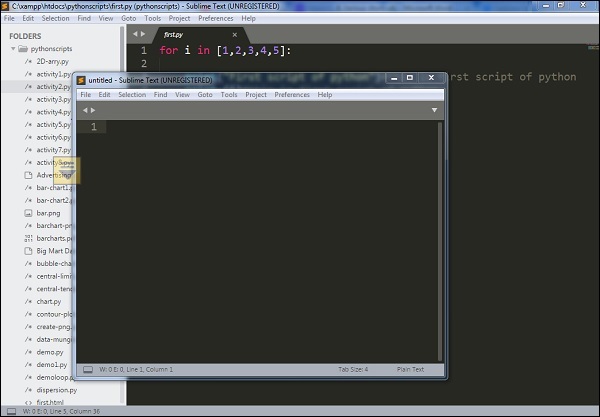
New Window
With new windows, you can manage a number of projects simultaneously. You can use the shortcut key Ctrl+Shift+N on Windows and Cmd+Shift+N for Mac to create a new window on Sublime Text editor.
Sublime Text — Snippets
Snippets are the smart templates which can be reused whenever needed. Sublime text editor includes snippets feature for HTML templates. In this chapter, you will learn about them in detail.
Understanding Snippets
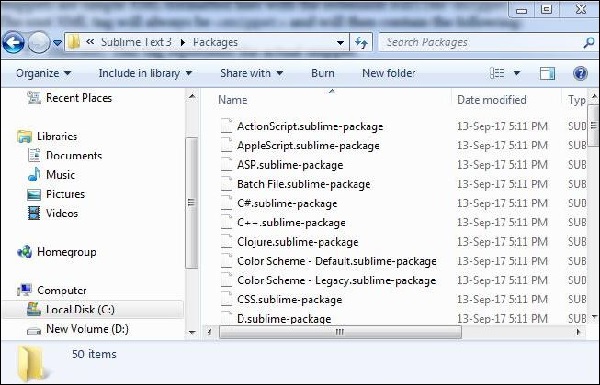
Snippets are simple XML supported files with various attributes. They include an extension called sublime-snippet. The root tag of XML element will be the <snippet> tag. Snippets created are saved in the Packages folder and are considered to live in this folder.
The file format and syntax of snippets are discussed in detail as follows −
-
Content −This section includes description of the snippet.
-
tabTrigger − It includes a sequence of characters which trigger when the snippet is written.
-
Scope − It defines the scope in which the snippet remains active.
-
Description − It includes all the meta description. It will be displayed when snippet’s menu is open.
Creating First Snippet
You can create the default snippet using Tools → Developer → Snippet option.
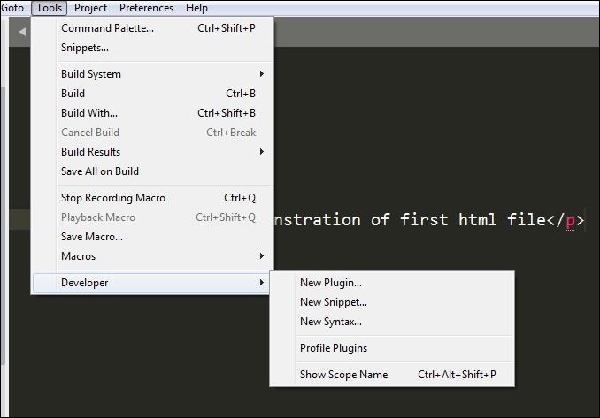
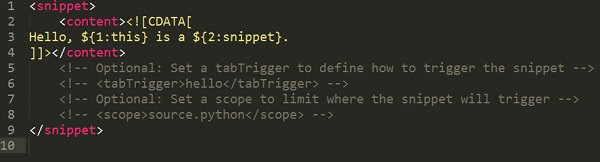
Then, a demo snippet with the associated tags will be created as shown below −
To create a first snippet in Sublime Text editor, click the Tools menu and select the Snippets option from the drop down window, as shown in the screenshot here.
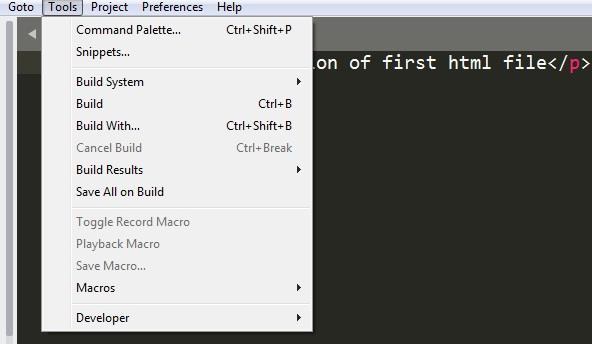
Now, choose Snippet:html from the options displayed.
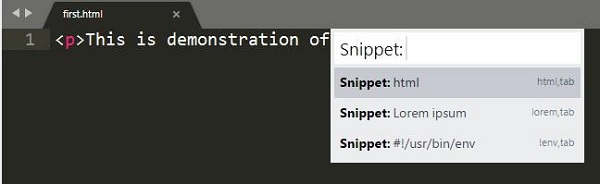
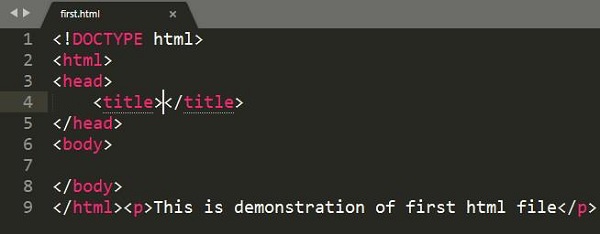
This creates a default snippet on the specified html file as shown below.
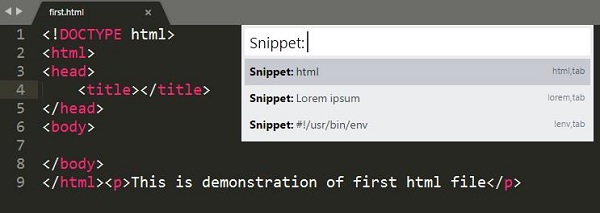
Note that there are various snippets for different types of files. For html files in the code base, there are three snippets defined in Sublime Text editor, as shown below.
Package Control Snippets
Control snippets are primarily used for product development. With install packages option in Sublime editor, you can download any snippet needed for web development and install it.
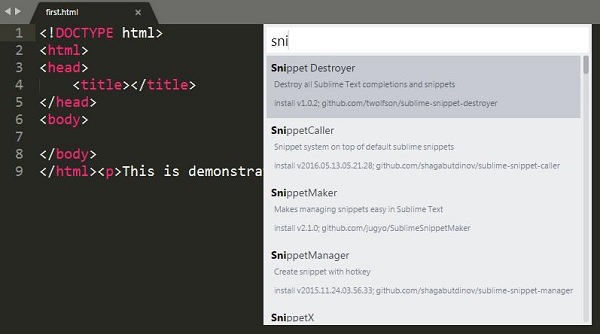
You may need the following packages for web development −
- EverCodeLab Sublime supports for Ruby on Rails
- Additional PHP snippets for PHP
- HTML snippets for HTML files
- Twitter Bootstrap snippets for Twitter Bootstrap
- JavaScript snippets for JS files
- jQuery snippets pack for jQuery
Sublime Text — Macros
Macros are the basic automation facility that includes a sequence of commands. You can use macros whenever you need to perform an operation which includes same steps.
Macro files are JSON files with an extension called .sublime-micro and are considered to be very helpful.
Recording a Macro
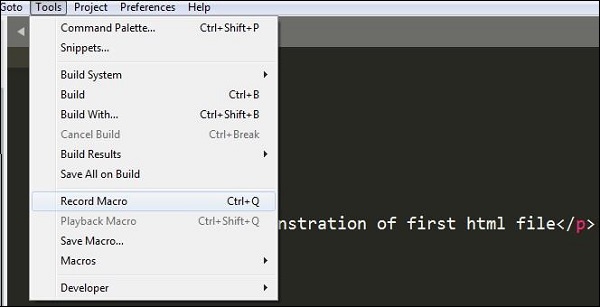
Recording a macro defines the procedure to keep a set of commands needed for the given file. You can record a macro in two ways −
-
Use the shortcut key Ctrl+Q for recording a macro in Windows and Cmd+Q in Mac.
-
Use the record option in Tools → Record Macro.
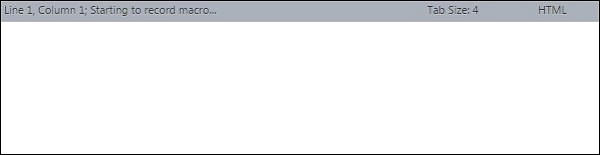
Once the macro has started recording, you can see the following message in Sublime Text editor −
Playing a Macro
You can use the shortcut key Ctrl+Shift+Q on Windows and Cmd+Shift+Q for Mac, to play a macro recorded by the user in Sublime Text. Note that this shortcut plays the last recorded macro in Sublime.
Saving a Macro
You can save a recorded macro using the option Tools → Save Macro. The following screenshot shows how to save a macro using this option.
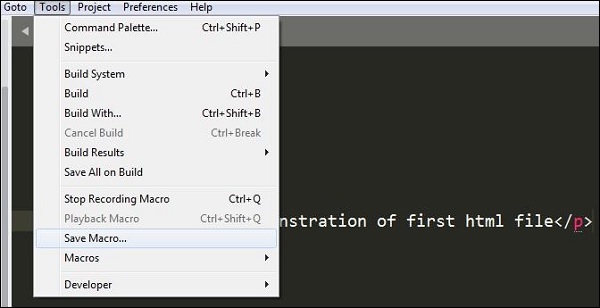
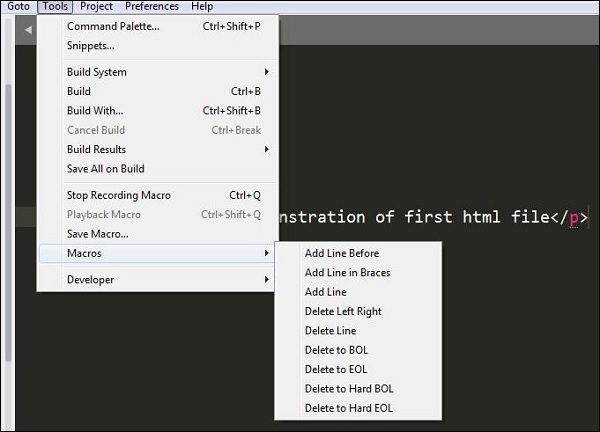
You can also redefine the macros using various options in Tool menu bar, as shown below −
Sublime Text — Key Bindings
Key bindings in Sublime Text helps a user to process and map the sequences of key presses to actions. They are defined in the JSON format and are stored in .sublime-keymap files.
For better integration, it is important to keep separate key map files for Linux, OSX and Windows. Key maps of the corresponding platform will be loaded in the Sublime Text editor.
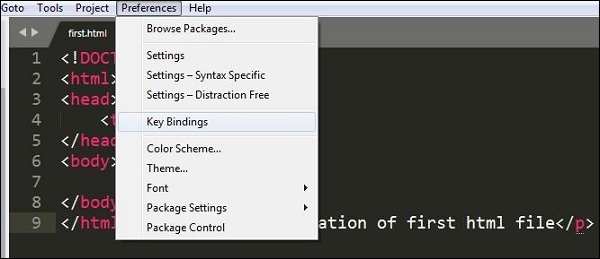
A user can open the keymap file or default key bindings using the option Preferences → Key Bindings.
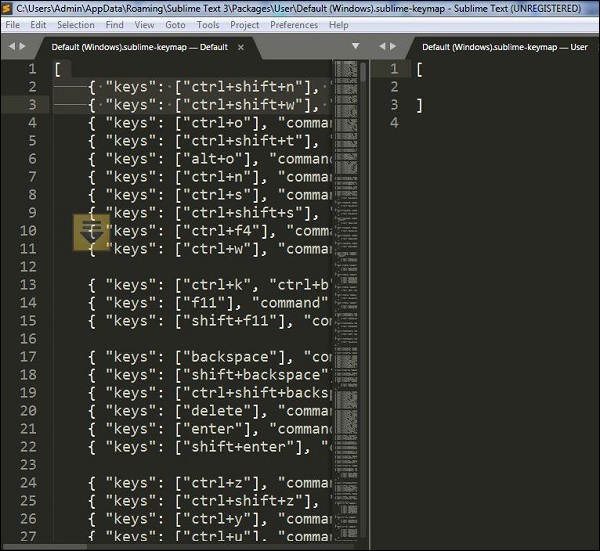
The following example shows how to perform key bindings in Windows −
[
   { "keys": ["ctrl+shift+n"], "command": "new_window" },
   { "keys": ["ctrl+shift+w"], "command": "close_window" }
]
Defining Key Bindings
Sublime Text editor includes an option to define a key map. The key bindings defined in the file .sublime-keymap includes all the key value combinations.
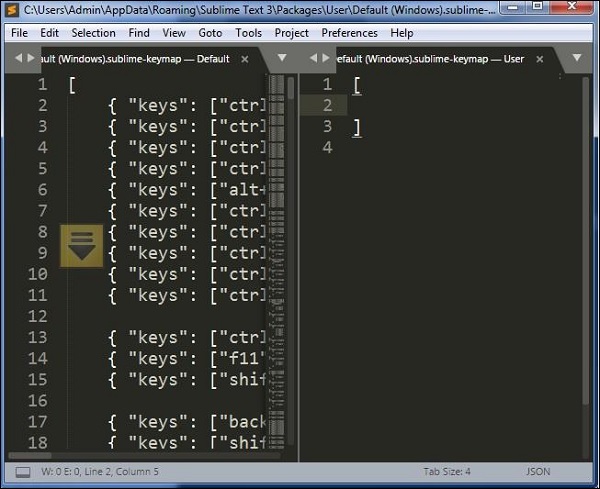
You can include the following key binding set into this file and save them to check the execution, with the help of the code shown below −
[
   {
      "keys": ["super+alt+;"], "command": "run_macro_file",
      "args":
      {"file": "Packages/User/semicolon.sublime-macro"}
   }
]
Here super is the Winkey in Windows or Linux, and a command on OSX operating system. Note that this code will run the macro that is located in Packages/User and is named semicolon.sublime-macro on pressing the Super+Alt+ keys.
Sublime Text — Column Selection
In this chapter, you will learn various shortcuts keys to move and select the columns of a file in Sublime Text.
Moving the Pointer to the Beginning of Code
You can use the shortcut Ctrl+Home to move the pointer to the beginning of the code in Sublime Text editor.
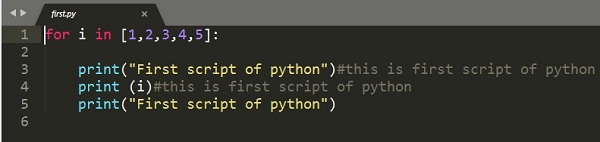
Observe the sample code shown here.
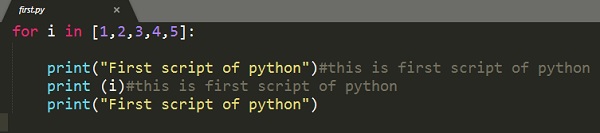
The screenshot given below shows the same code where the cursor is moved to its beginning.
Extending a Column
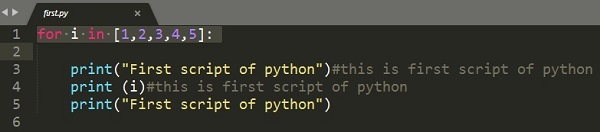
You can use the shortcut Ctrl+L to extend a specified column. This shortcut will select the column which includes the pointer. The following screenshot explains this in a detailed manner −
Trimming a column
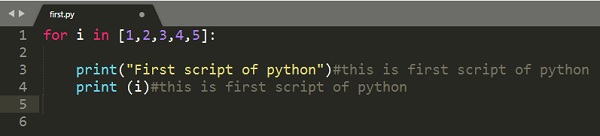
You can use the shortcut Ctrl+K to trim the specified column of the file. For OSX, you will have to use the key combination Cmd+K for this purpose.
The example shown here displays the code where the line mentioned in the fifth column is trimmed.
Split a Block of Text
You can use the shortcut Ctrl+Shift+K to split a selected block of text into two selections.

Note − The difference in key combinations from the previous key combination is that columns are visible. Ctrl+Shift+K removes the column number from the specified code, whereas Ctrl+K keeps the column number intact after trimming the entire column.
Sublime Text — Indentation
Indentation is the process of maintaining the code blocks of programming languages to maintain a systematic structure. It helps to convey the developers a better structure of program. This chapter explains you in detail about indentation in Sublime Text editor.
Importance of Indentation
Indentation helps to maintain the code structure such that it is easily understood by anyone who accesses it. Proper indentation imparts the following features to the code −
- Readability
- User-friendliness
- Adaptability
- Ease of maintenance
Options for Indentation in Sublime Text
Sublime Text editor provides various options for code indentation as shown in the following screenshot −
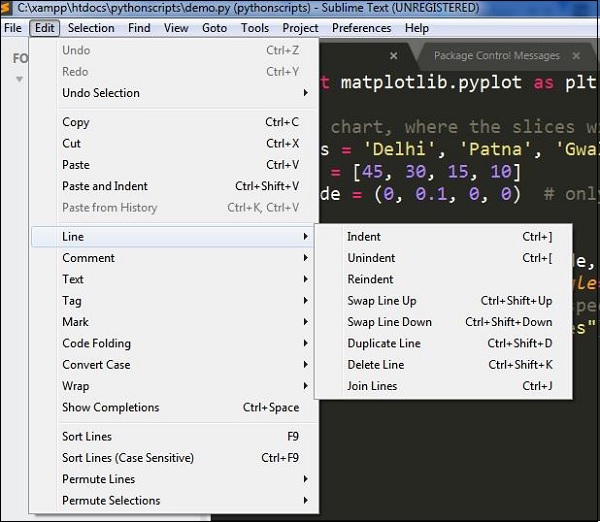
The usage of these options is discussed in detail here −
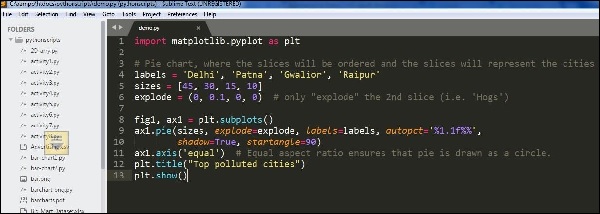
Indent Option
Indent option helps to create indentation of the specified code. You have to select the code specified and select the Indent option. You can also use the shortcut Ctrl+[ after selecting the required code that is to be indented. Refer to the following screenshot for a better understanding −
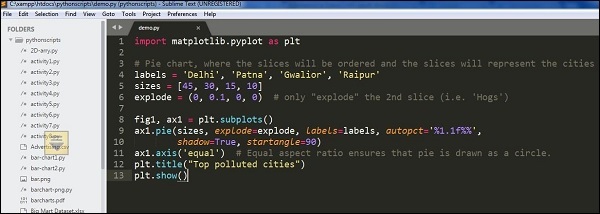
Unindent Option
Unindent option works in the reverse of indent procedure. The shortcut for the unindent option is Ctrl+]. Refer to the following screenshot for a better understanding −
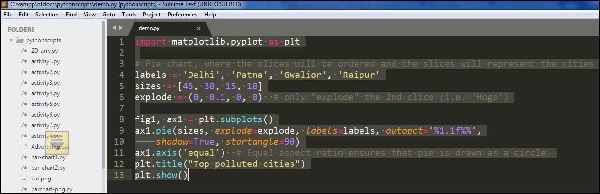
Reindent Option
Reindent option is used to undo the unindent option and revert the code back to the same condition. Refer to the following screenshot for a better understanding −
Benefits of Indentation
Proper indentation offers various benefits to the code and developers. They are discussed below −
-
Code blocks will be visible without much effort.
-
Developer can focus on lines of code that are necessary and easily ignore the irrelevant ones.
-
A developer using the same kind of code structure multiple times need not focus on the start of block and end of block statements.
-
Any misplaced lines of code can be easily identified.
Sublime Text — Base Settings
Base settings of the Sublime Text editor are the configuration needed for editor such as font size, display of line numbers or color scheme of the editor.
All the base settings are configured in JSON format. To view the list of settings, go to menu of Preferences -> Settings.
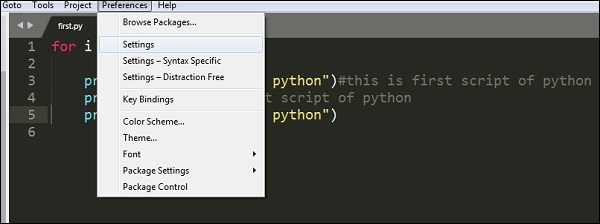
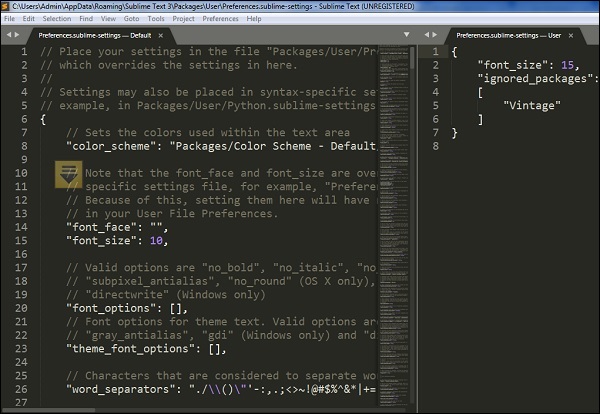
The settings include two types of configurations namely −
- Default
- User
Default includes all the default configurations and user defines the customized settings for base settings.
For the scenario mentioned above, the customized settings are as mentioned below −
"font_size": 15,
   "ignored_packages":
   [
      "Vintage"
   ]
Categories of Settings
Various categories of the settings in Sublime Text are as follows −
Editor Settings
These include the basic settings for editing the files of the code base. Examples include font_face, font_size and tab_size. The settings are present in the default configuration.
User Interface Settings
These include the general settings which specifically focus on background, theme and various color combinations. These settings are appended in the second section of the default configuration.
Application Behavior
These settings focus on behavior of the application included in Sublime Text editor across open windows. These settings are included in the third section of default configuration settings.
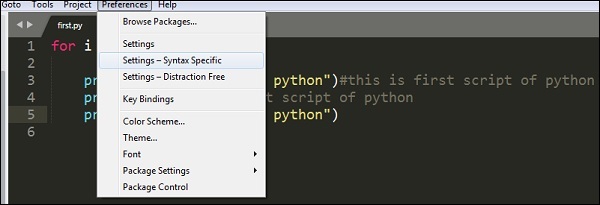
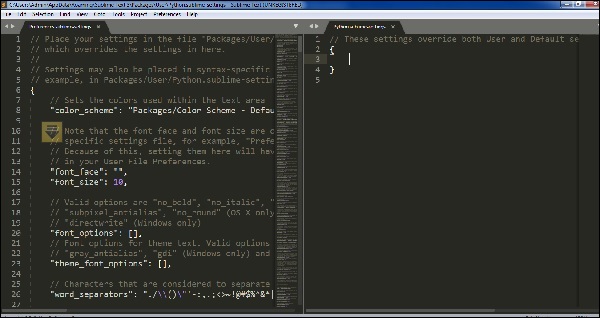
Syntax — Specific Settings
These settings are used for designing the syntax of Sublime Text editor. To get the list of syntax specific settings, the user needs to use option Preferences − Syntax-Specific.
Sublime Text — Theme Management
Theme management in Sublime text editor implies enhancing the appearance of editor with colors and attractive backgrounds. Themes are JSON formatted values with .sublime-theme extension and manage the appearance of the user interface of the editor by changing the colors of elements of the IDE.
Installing and Applying Themes
The following steps will guide you about installing and applying themes in Sublime Text editor −
Step 1 − Use the Install Package of the Sublime Text to install package for themes, as shown in the screenshot here −
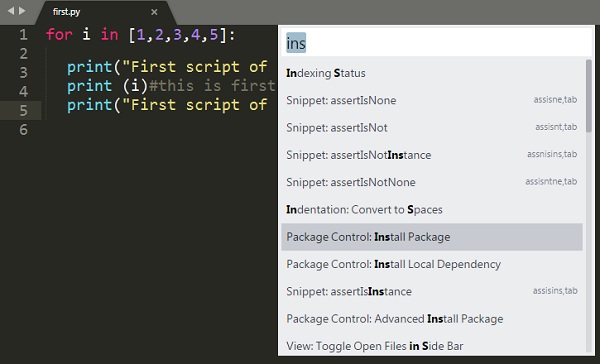
Step 2 − You can see a list of options with Install Package option and you can download them and install in Sublime Text editor.
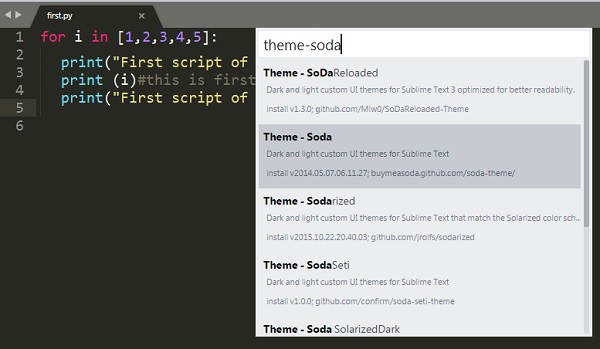
Step 3 − Once you select a theme, activate it.
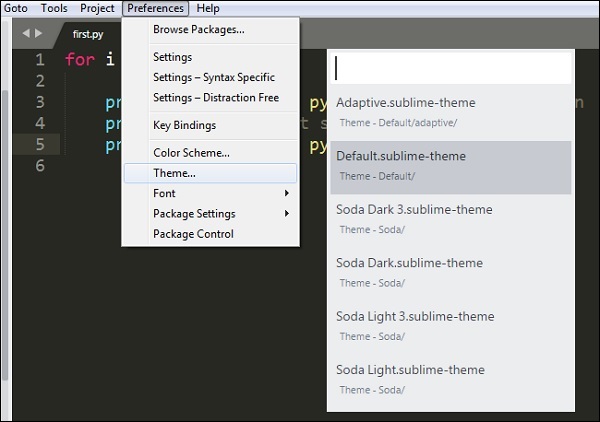
Step 4 − Now select your desired theme from the list of installed theme list. This automatically changes the appearance of the editor.
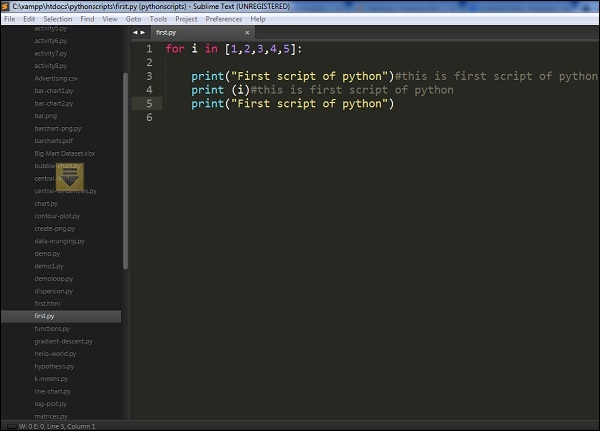
Color Schemes
Color schemes are XML formatted files located at the Packages folder with color schemes. They are an awesome way for the customization of Sublime text colors, unlike themes which are specific to UI elements.
You can choose color schemes using option Preferences → Color Scheme. Refer to the following screenshot that shows the same.
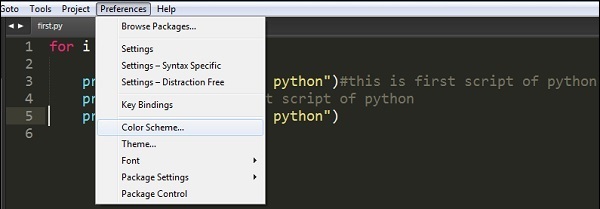
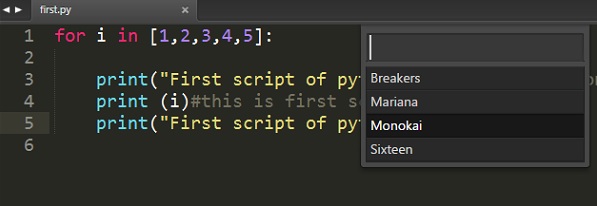
Color schemes include various options such as Breakers, Mariana, Monokai, and Sixteen. The appearance of the editor depends on the color scheme that you choose. Note that these patterns will only focus on color syntax.
Sublime Text — Understanding Vintage Mode
Vintage mode in Sublime text editor is a package that includes a combination of editing features of vi. Vintage Mode lets you to use a list of vi commands in the Sublime editor.
Vintage mode is an open source project and you can download it from the link −
https://github.com/sublimehq/Vintage
Understanding vi editor
Vi is a primitive and popularly used text editor. It was originally created for UNIX operating system and with basic functionality of scripts execution. It is a popularly used command line editor across various operating systems because it does not require mouse for operations.
Sublime includes vim, which is an advanced section of vi editor, and includes customization of macros, snippets and plugins.
Enabling Vintage Mode
You can enable Vintage mode through the following steps −
-
Select the option Preferences → Settings
-
Edit the json file of the settings configuration with key name as ignored_packages. Vintage package is included in the ignored_packages section.

-
Remove the attribute of Vintage from the configurations to enable Vintage property in Sublime text editor.
"ignored_packages": []
-
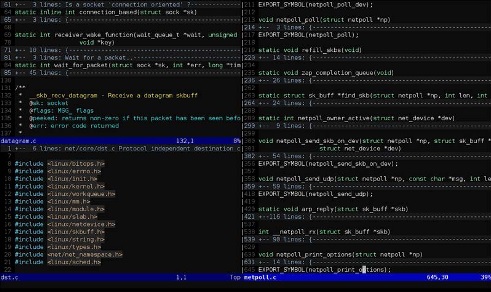
Your vintage mode editor will appear as shown in the following screenshot −
Sublime Text — Vintage Commands
Vintage mode includes a variety of commands similar to the vi editor. This includes the basic settings of Sublime Text editor as shown in the code given below −
{
   "color_scheme": "Packages/Color Scheme - Default/Monokai.tmTheme",
   "font_size": 15,
   "ignored_packages":
   [

   ],
   "vintage_start_in_command_mode": true,
   "theme": "Soda Dark.sublime-theme"
}
| Mode | Description | Key |
|---|---|---|
| Command Mode | Waits for the user to enter a command | Esc |
| Insert Mode | Text can be inserted in different positions | i/I/a/A |
| Visual Mode | Select/highlight the text using the Movement Commands | V |
| Visual Line Mode | Select/highlight lines of text using the arrow keys | Shift + V |
Vintageous Mode
Vintageous is the package used for the descriptive analysis of vi editor. It can be downloaded using package control as mentioned below −
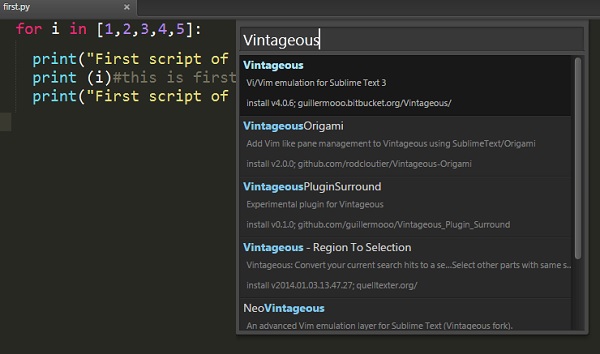
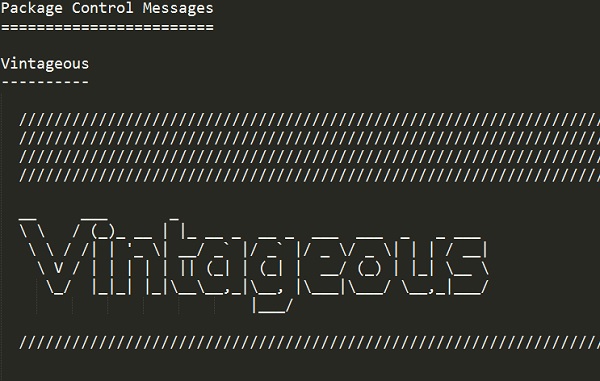
Once you successfully install the vintageous package, your screen will look like as shown in the following screenshot −
Sublime Text — Testing Javascript
Sublime Editor includes testing modules for various programming languages. This helps in unit testing of files and scripts and helps developers to analyze bugs, errors and issues, if any.
Sublime Text editor includes 3 modules which are necessary for testing and deployment of JavaScript. This chapter discusses them in detail.
JsFormat
JsFormat is a JavaScript plugin used for formatting the script lines which eases the unit testing process. Behind the scenes, it uses JS beautifier (http://jsbeautifier.org/) to format the full JS or portions of JS files. JSFormat can be installed using the Install Package option of Sublime editor.
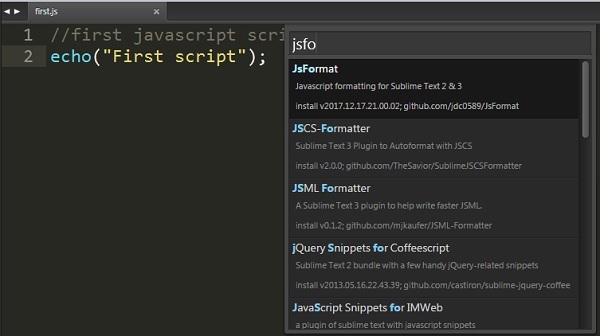
Features
JsFormat offers the following features to the script −
- Eases JS and JSON file formatting.
- Offers full text formatting and selected formatting.
- Provides customizable settings for formatting options.
JSHint
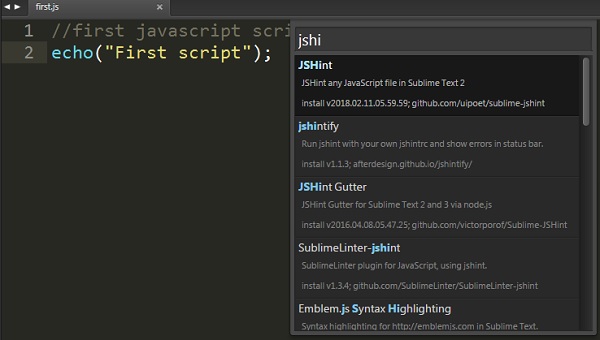
JSHint is a community driven tool used for analyzing the mistakes through hints. This helps to detect errors and potential problems. JSHint is an open source package, simple and easy to understand. You can install JSHine in Sublime Text editor through Install Package mode.
To implement JSHint plugin in Sublime Text Editor, you can use the shortcut Alt+J on Windows and Cmd+j on OSX systems.
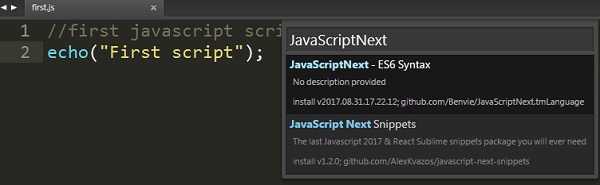
JavaScriptNext
This script is used to highlight the syntax of JS file and its associated meaning. It includes a feature of syntax highlight with various modules, arrow functions, classes and generators.
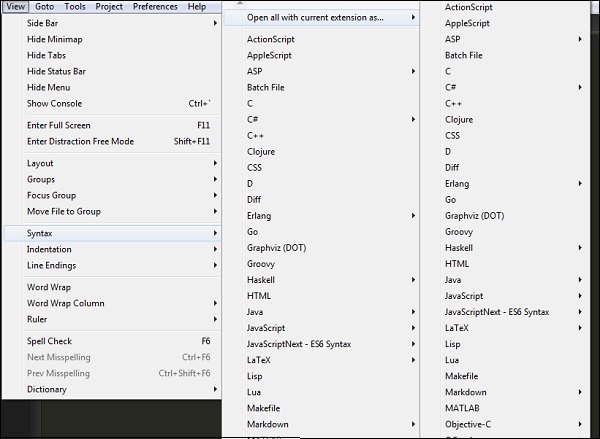
You can perform syntax check on a file using the syntax list as shown in the screenshot below −
Sublime Text — Testing Python Code
Python offers unittest, an official unit testing framework for unit testing the scripts designed before deployment. It is also called as PyUnit. Python unit tests used in Sublime Text editor are called as sublime-unittests and they are available in the following link −
https://github.com/martinsam/sublime-unittest
These unit tests contain a number of useful snippets to ease the writing of unit test cases.
Installation of UnitTest
The package control of Sublime manages the installation of unittests and the following steps describe it in detail −
Step 1 − Use the command palette of Sublime Editor Ctrl+Shift+P for installation of the package, as shown in the screenshots given below −
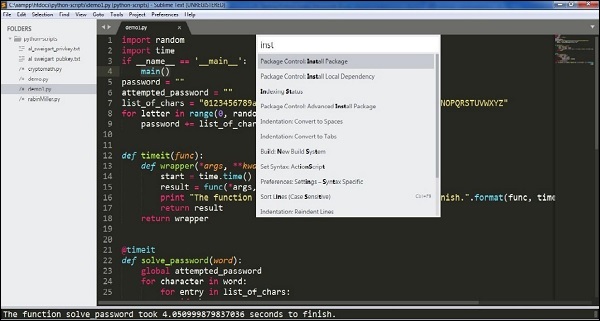
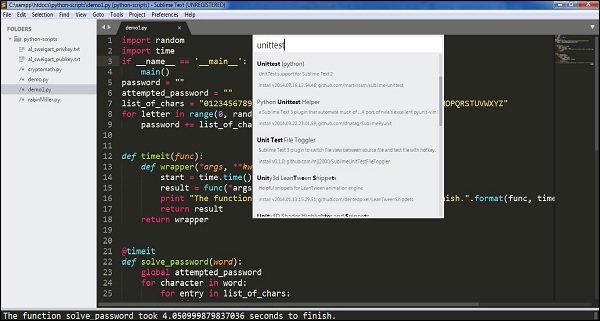
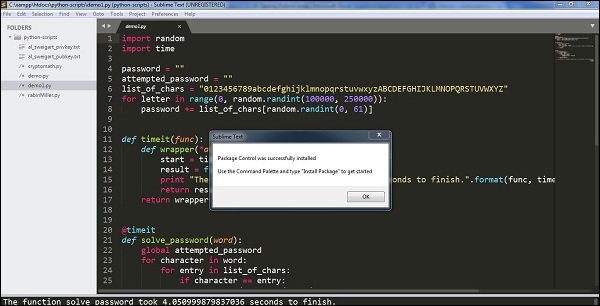
Step 2 − The installed packages use the following two main snippets −
-
testclass which is used to create a new test class
-
testfunc which is used to create a new test function for us to fill out
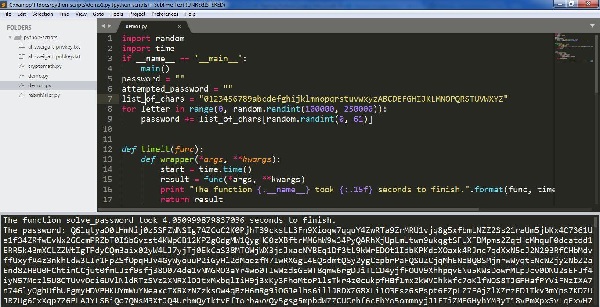
Step 3 − The console computes test results as shown in the screenshot below. Note that the result depends on the success or failure of the test.
Success Result
Failure Result
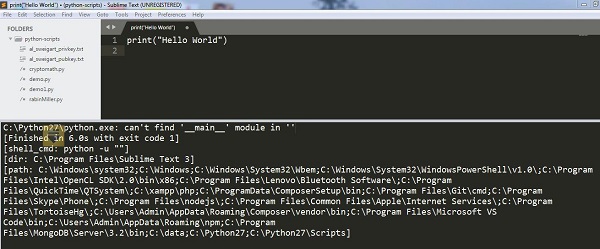
Note − Unit test cases work as a compiler for computing scripts in python.
Sublime Text — Spell Check
Sublime Text Editor uses Hunspell for spell checking process. Hunspell is the spell checker of LibreOffice, Mozilla Thunderbird, Google chrome and many proprietary packages. Sublime Text editor includes dictionary support for proper spell check of words.
Dictionaries
Sublime Text includes UTF-8 encoded dictionaries. To implement a dictionary with Sublime Text editor, it should be first converted into UTF-8. If the user has UTF-8 encoded dictionary, it can be installed using the Preferences option in Sublime Text editor.
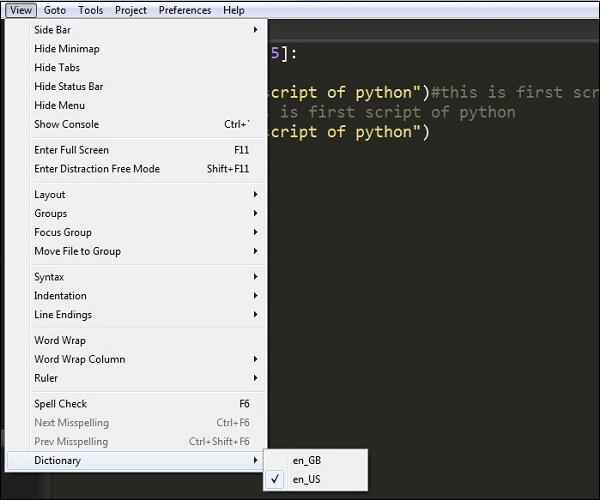
You can select the dictionary from View → Dictionary menu as shown in the given screenshot −
Settings for Dictionary
There are two settings defined for the spell check of Sublime Text Editor −
- Spell_check
- Dictionary
// Set to true to turn spell checking on by default
"spell_check": false,

// Word list to use for spell checking
"dictionary": "Packages/Language - English/en_US.dic"
These configurations are included in the settings file. Added and ignored words are stored in the user settings under the added_words and ignored_words keys, respectively.
Sublime Text — Packages
Software packages are installed in Sublime Text for additional functionalities. You can see the list of software packages through the shortcut key Ctrl+Shift+P on Windows and Cmd+Shift+P on Mac. Observe the following screenshots for a better understanding −
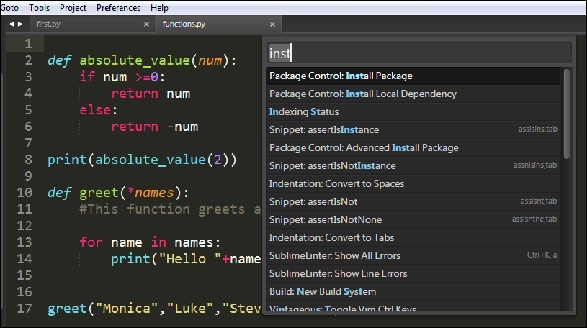
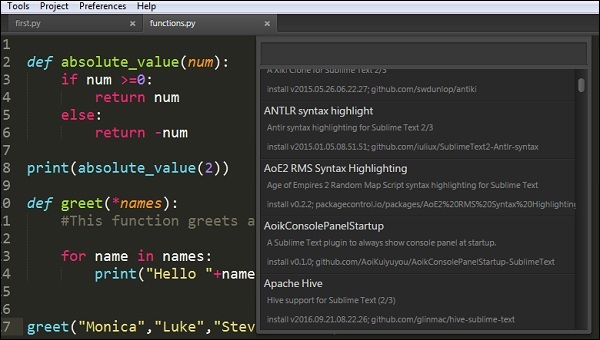
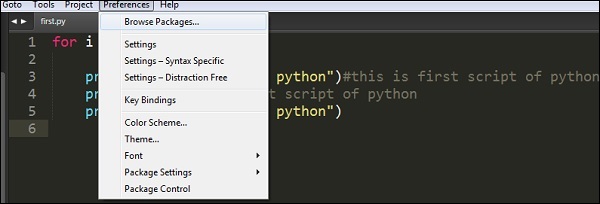
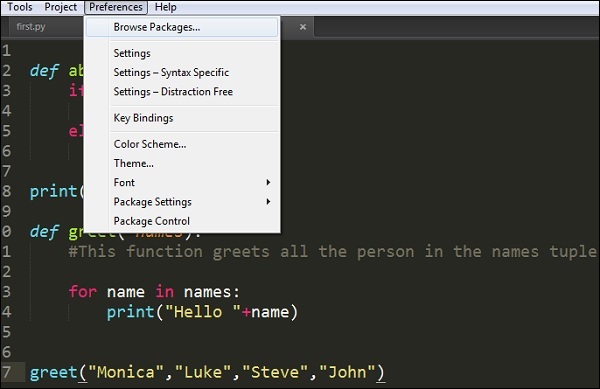
These packages are installed in the Packages → User directory which includes the entire necessary configuration. To browse the packages, select Preferences → Browse Packages option, as shown in the screenshot below −
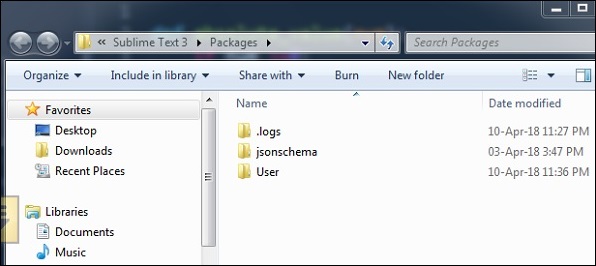
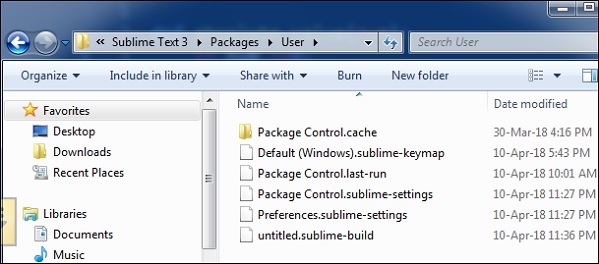
These files are the customized configuration which can be changed as and when needed. The packages are created in JSON format.
Consider the sublime-keymap package created which includes following code −
[
   {
      "keys": ["super+alt+;"],
      "command": "run_macro_file",
      "args": {"file": "Packages/User/semicolon.sublime-macro"}
   }
]
Sublime Text — Menus
In this chapter, you will learn about the primary options of File, Edit and Goto menus of Sublime Text editor.
Save with Encoding
This option is included in the File menu which helps in saving the scripts and file with appropriate encoding. Sublime Text Editor includes a variety of options for encoding Python scripts, as shown in the following screenshot −
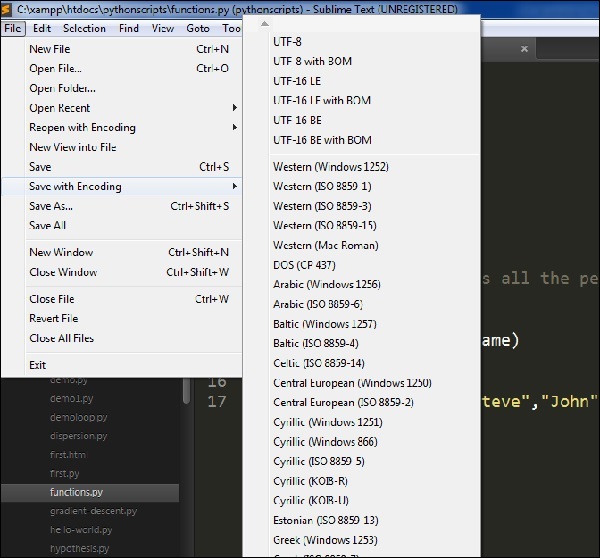
Encoding process helps the scripts to be secured from third-party attacks and allows the perceived item of use or interest which to be converted into a construct.
Convert Case
Convert case helps in the conversion of upper case to lower case and vice versa. Refer to the following screenshot for a better understanding −
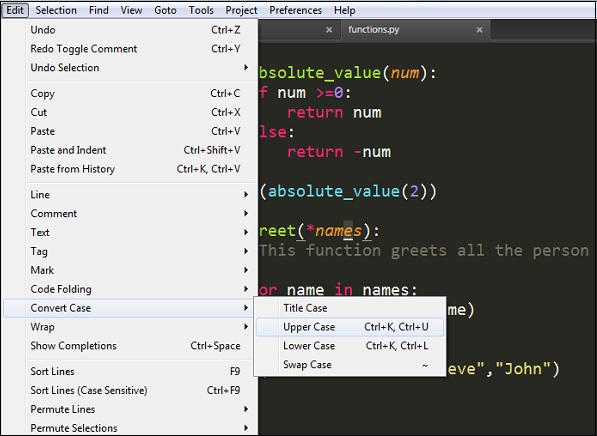
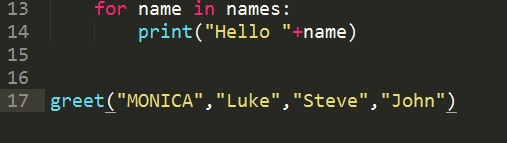
For example, consider a keyword Monica included in the file and let us convert it to uppercase. Refer to the following screenshot for a better understanding −
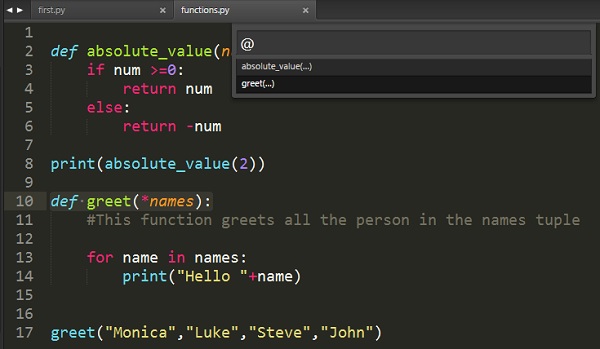
Goto Symbol
With this option, a user can search or get the appropriate keyword or any function. This option is very beneficial when we have more than 1000 lines of code and user got to search a unique line or annotation.
The following screenshot shows the demonstration of Goto Symbol −
Sublime Text — Sub Menus of Font
The previous chapters discussed various options related to the Preferences menu. In this chapter, you will learn in detail about the Font settings of Sublime Text editor.
Sublime Editor offers three dimensions of font sizes − Larger, Smaller and Reset option to undo the particular changes made. Implementing the specified font is possible once the user selects the appropriate paragraph or text in editor.
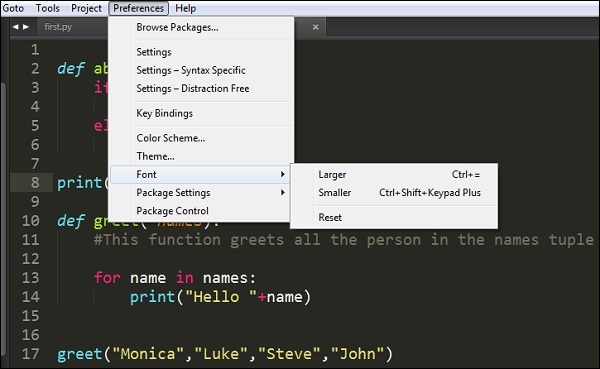
Consider a selected text in the file functions.py where the you need to make desired changes −
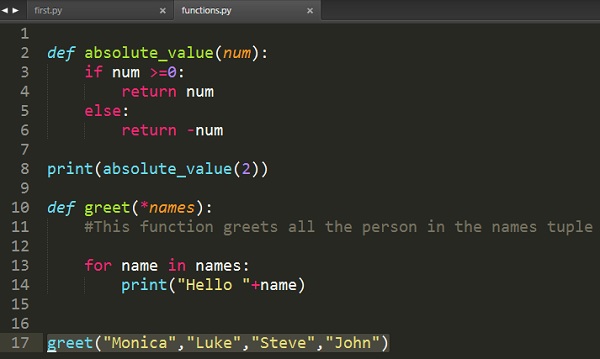
Observe that after the implementation of larger font, the dimensions and font size of the scripts will be automatically changed to larger dimension.
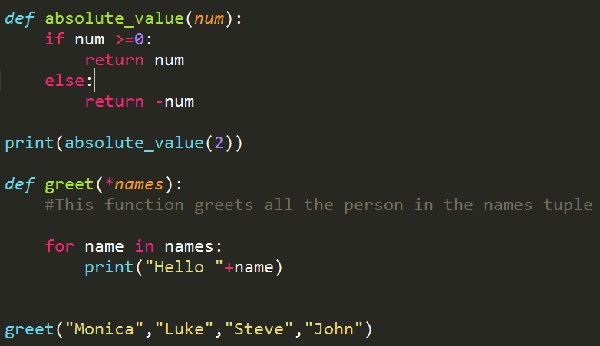
Sublime Text — Developing Plugin
Every editor includes plugin for the development, that triggers set of activities and default packages. Sublime Text editor includes a feature for developing your own customized plugin. This chapter discusses in detail about developing your own plugin in Sublime Text.
Developing Plugin
The following steps show you in detail how to develop a plugin in Sublime Text −
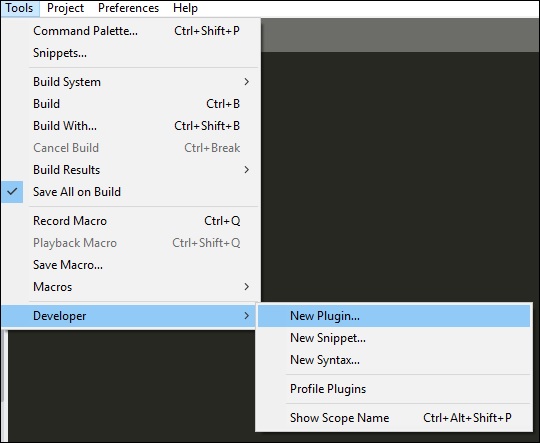
Step 1 − Select the New Plugin option by navigating through Tools → Developer → New Plugin as shown below −
Step 2 − The basic code of a plugin includes import of two main libraries: sublime and sublime_plugin.
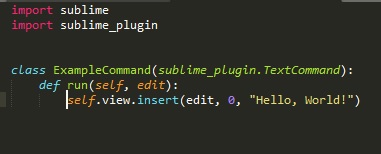
The code for the plugin is −
import sublime
import sublime_plugin
class ExampleCommand(sublime_plugin.TextCommand):
   def run(self, edit):
      self.view.insert(edit, 0, "Hello, World!")
Step 3 − The customized plugins are saved in Packages → User folder. Refer to the following screenshot that gives you the complete understanding of the plugins saved in Sublime Text editor.
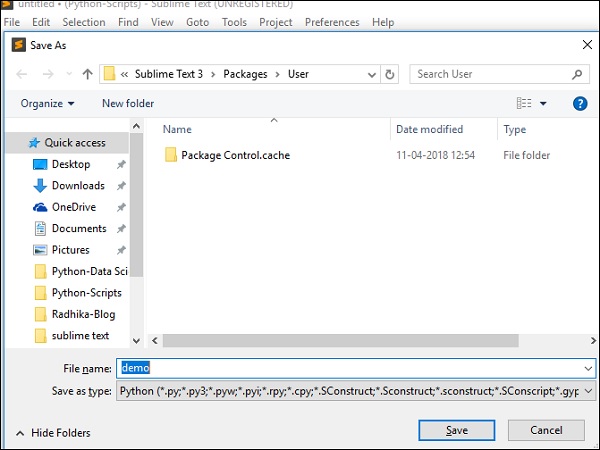
Running the plugin
When you have created a plugin and saved it, open the console using the shortcut key Ctrl+` on Windows and Cmd+` on OSX, and execute the command shown here −
view.run_command(plugin-name)
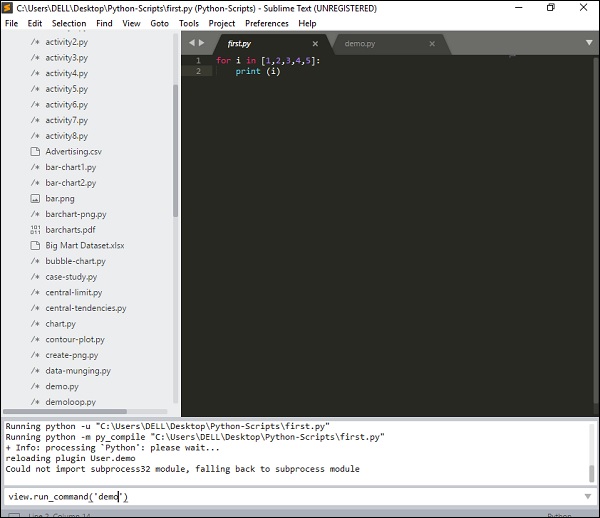
This command will execute the plugin defined by the user with the list of activities included in it.
Sublime Text — Command Palette
Command Palette includes a list of items or commands which are used frequently. The entries of commands are included in the .sublime-commands file.
Using Command Palette
To open a command palette in Sublime Text editor, you can use the shortcut key combination Ctrl+Shift+P on Windows and Cmd+Shift+P on OSX.
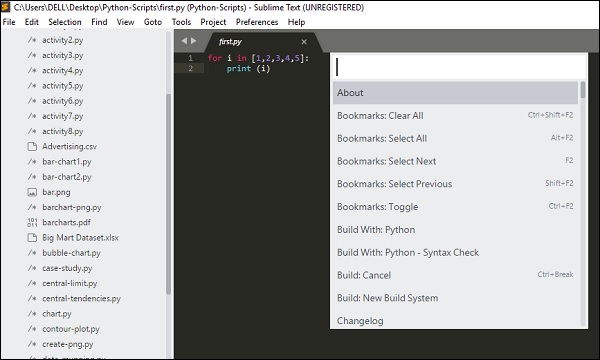
The commonly used commands from the palette are −
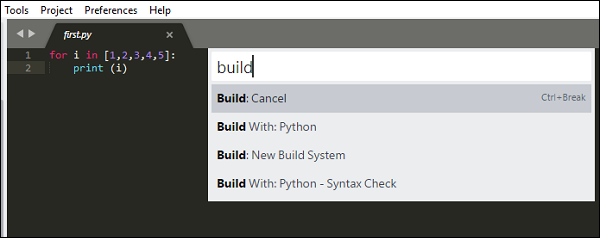
- Build with Python
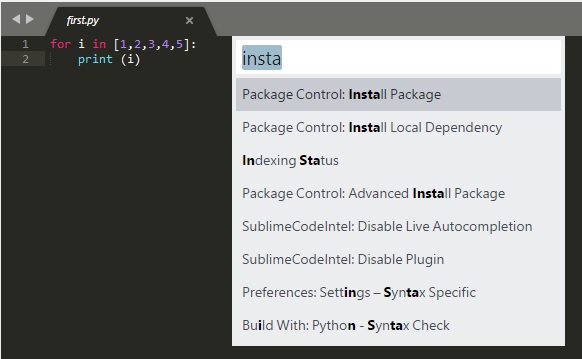
- Install Packages
Build with Python
This will generate all the dependencies and build the specified code of a given Python file.
Install Packages
With this command, we get list of packages which can be installed which is not included earlier.
All the commands included in the command palette are stored in the Packages directory. The basic example of command declared inside the Default.sublime-commands file is shown in the code given below −
[
   { "caption": "Project: Save As", "command": "save_project_as" },

   { "caption": "Project: Close", "command": "close_project" },

   { "caption": "Project: Add Folder", "command": "prompt_add_folder" },
]
Note − The JSON file includes 3 main keys for every command −
- Name/Caption
- Location
- Content
Sublime Text — Debugging PHP Application
Debugging is the process of finding errors and bugs in the given code and fixing them. Sublime editor includes various plugins that have debugging features, which helps in finding errors easily.
In this chapter, you will learn how to debug a PHP web application. Sublime uses Sublime TestX debug plugin for this purpose. The features of this plugin are −
-
It is an extension used for debugging the PHP files and scripts.
-
Provides a list of debugging and profiling capabilities.
-
Maintains stack traces and real time parameters like display and functionalities.
Installation of Sublime Plugin
To install Sublime Text Xdebug plugin, you will have to take the following steps −
Step 1 − Install package control palette installation with the shortcut of Ctrl+Shift+P or Cmd+shift+P.
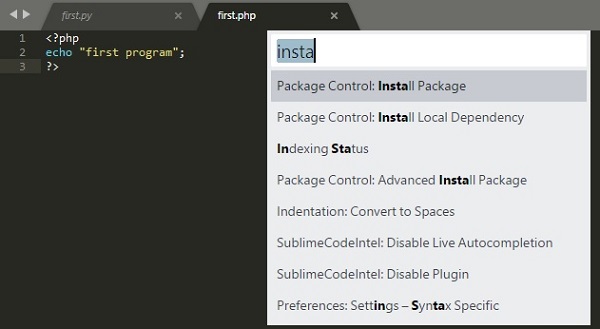
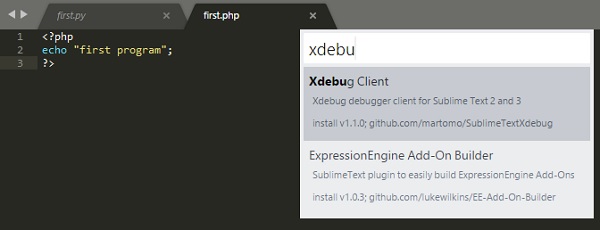
Step 2 − After the successful installation of Xdebug client, the configuration file will be kept in the Installed Packages folder. The configuration file is the JSON file which includes the parameters for debugging a PHP web application.
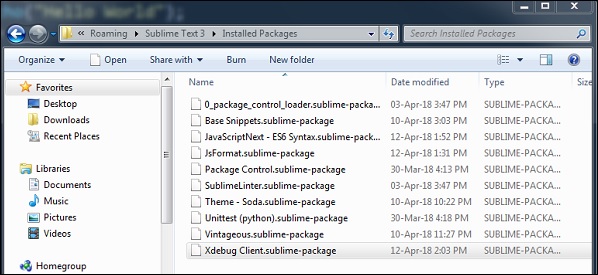
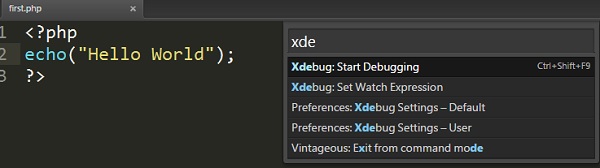
Step 3 − Start the debug session of PHP file using the shortcut Ctrl+F9. You can also do it using the Start Debug option using command palette.
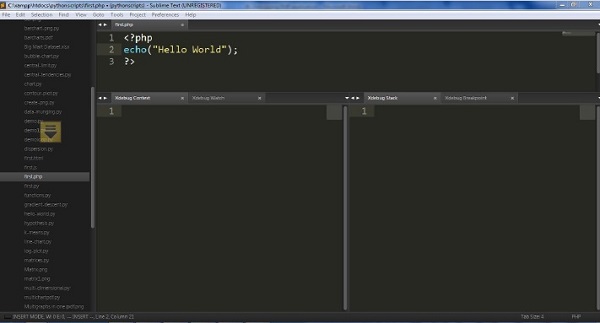
Step 4 − The split windows of XdebugClient will show the output of PHP file. It keeps a process of debugging code line by line. Refer to the following screenshot for a better understanding −
Debugging Javascript Application
Sublime Text Editor has a plugin Web Inspector for debugging JavaScript code. It helps us to set breakpoints, examine the console and evaluate sections of code. In this chapter, you will learn in detail about this plugin.
Installation of Sublime Web Inspector
The following steps show the installation of Sublime Web Inspector −
Step 1
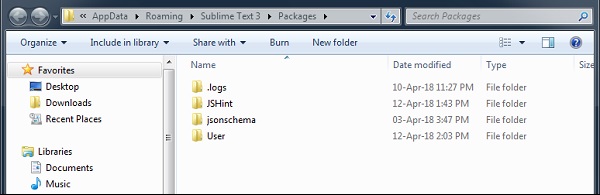
Use the menu option Preferences → Browse Packages to get the path of installed packages as shown in the given screenshot.
Step 2
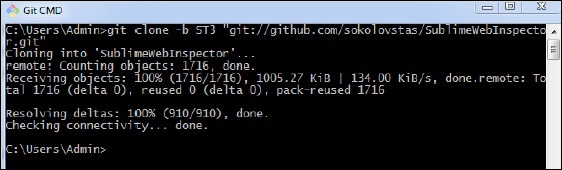
With the help of git command prompt, clone the packages of Debugging Javascript web application using the git repository, as shown in the command given below −
git clone -b ST3 "git://github.com/sokolovstas/SublimeWebInspector.git"
Step 3
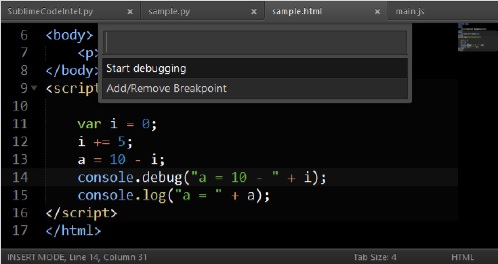
To test the installation, open a command palette and start the web inspector. You can use the shortcut key for web inspector Ctrl+Shift+R on Windows and Cmd+Shift+R on OSX systems. You can see all the breakpoints needed for JavaScript application, as shown below −
Sublime Text — Batch Processing
Batch processing in Sublime Text also refers to Build systems. Build systems helps user to run files through external programs such as make, tidy and interpreters.
The following points are worth notable while working with Build systems −
-
They are JSON files and have the extension .sublime-build.
-
To initiate the build process, you can select the option Tools → Build or the shortcut Ctrl+B on Windows and Cmd+B for OSX system.
Recall that throughout this tutorial, we are focusing on Python files. Sublime text includes two build modes for python files.
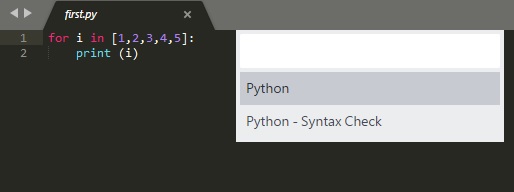
Once the build for Python is completed, you can observe the following output on the editor −
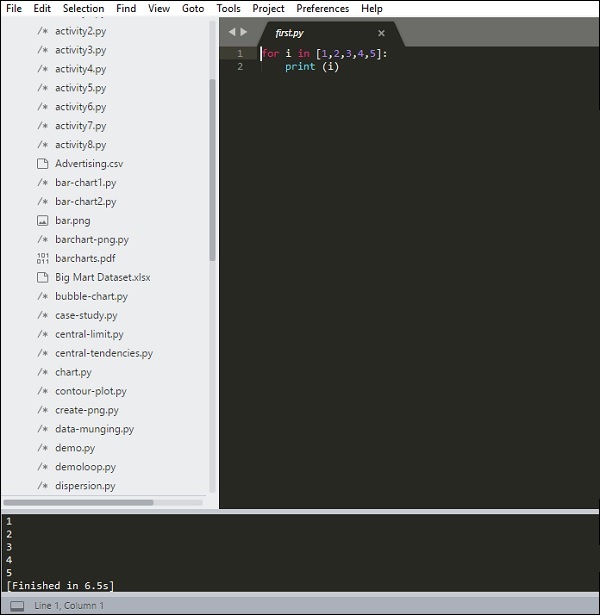
You can see the list of build results created for the specific project in Sublime Text editor using the option Tools → Build Results → Show Build Results.
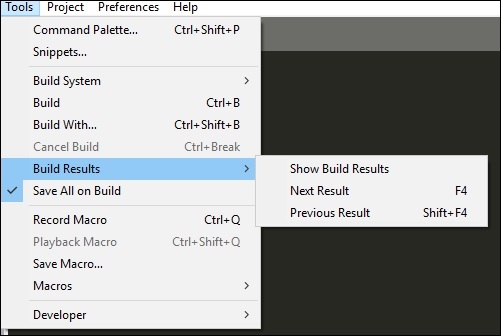
Note that build systems and the complete files associated with batch processing must be located under the Packages folder (Packages/user). Many packages in Sublime Editor include their own build systems.
Sublime Text — Distraction Free Mode
Distraction Free Mode in Sublime Text editor allows displaying the code and files full screen. You can enter distraction free mode via option View → Enter distraction mode menu item.
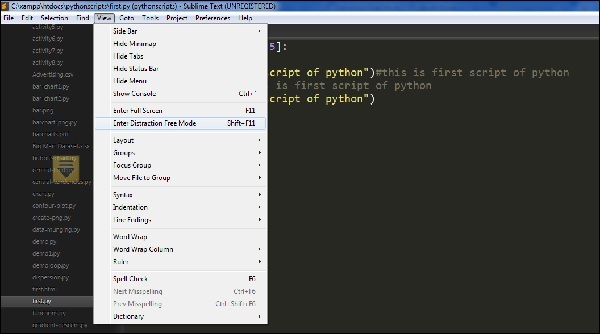
Once the distraction mode is enabled in the Sublime Text editor, the output will be visible as below −
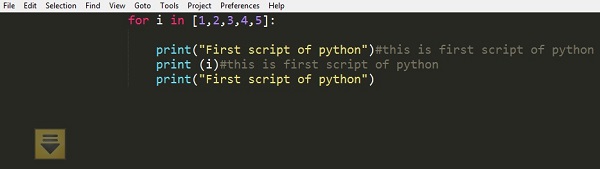
All UI chrome accessible items are hidden, but accessible in distraction mode.
Customization
All the properties of customization of distraction free mode of Sublime Text editor are included in Distraction Free.sublime-settings JSON file as shown in the screenshot given below.
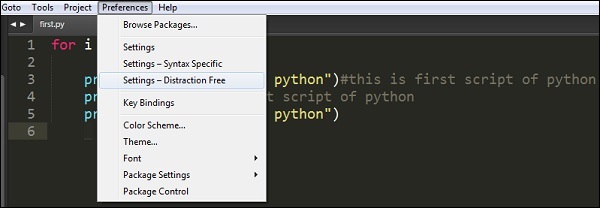
The following screenshot shows the properties included in Distraction free mode of Sublime editor −
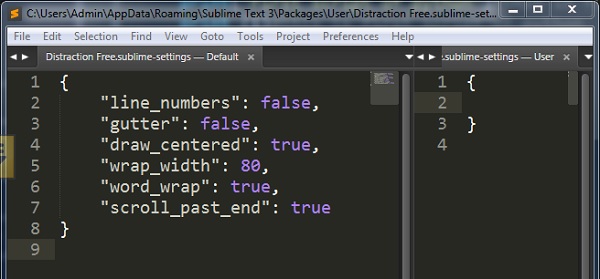
Note that the attributes like line_numbers, gutter, draw_centered, wrap_width, word_wrap and scroll_past_end are such that they enable attractive distraction free mode.
Sublime Text — SublimeCodeIntel Plugin
SublimeCodeIntel is an important plugin for the Sublime Text editor. It offers the following features −
-
Jump to symbol feature, which helps the user to jump to the file and the specified line of the symbol.
-
Includes library of autocomplete and displays the modules/symbols in real time.
-
Tooltips display information in the status bar about the associated function.
Installation
You can install the SublimeCodeIntel plugin through the following steps −
Step 1 − Get the install package functionality of Sublime Text editor using the shortcut Ctrl+Shift+P on Windows and Cmd+Shift+P for OSX system. Refer to the following screenshot for better understanding −
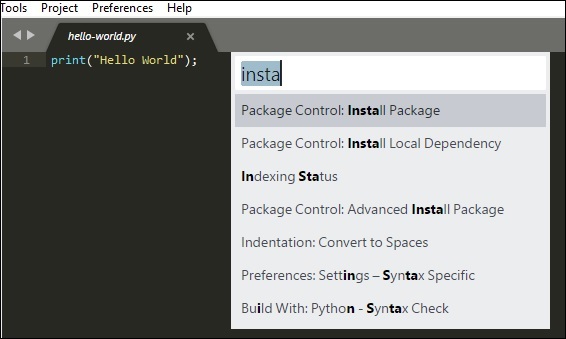
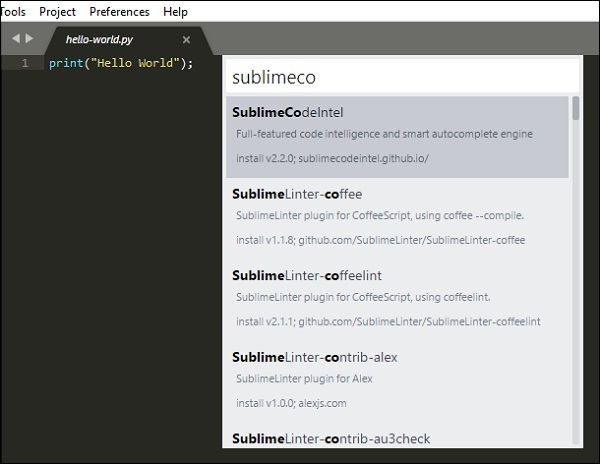
Step 2 − Now, select the plugin SublimeCodeIntel for installation and restart the Sublime Text editor.
Step 3 − On successful installation of SublimeCodeIntel plugin, your screen will look like this −
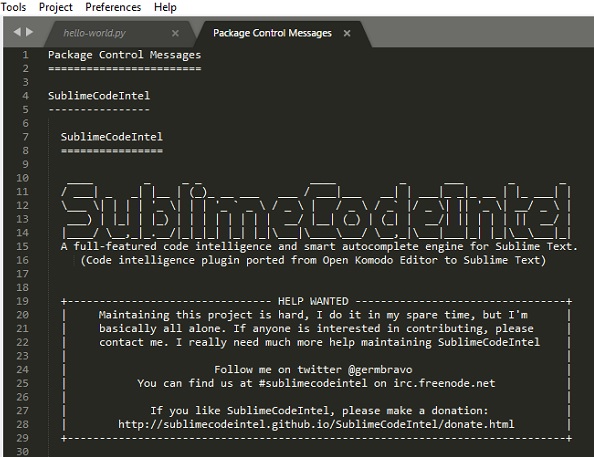
Configuration
There are two in built configurations of SublimeCodeIntel −
- Settings − Default
- Settings − User
Refer to the following screenshot that shows these configurations −
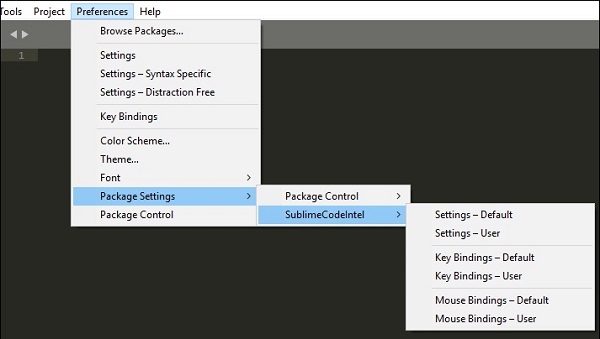
The configuration for SublimeCodeIntel is included in the JSON file called SublimeCodeIntel.sublime-settings. The configuration needed for each language is included in SublimeCodeIntel plugin as below −
/*
   Defines a configuration for each language.
*/

"codeintel_language_settings": {
   "Python3": {
      "python3": "/usr/local/bin/python3.3",
      "codeintel_scan_extra_dir": [
         "/Applications/Sublime Text.app/Contents/MacOS",
         "~/Library/Application Support/Sublime Text 3/Packages/SublimeCodeIntel/arch",
         "~/Library/Application Support/Sublime Text 3/Packages/SublimeCodeIntel/libs"
      ],
      "codeintel_scan_files_in_project": true,
      "codeintel_selected_catalogs": []
   },

   "JavaScript": {
      "codeintel_scan_extra_dir": [],
      "codeintel_scan_exclude_dir":["/build/", "/min/"],
      "codeintel_scan_files_in_project": false,
      "codeintel_max_recursive_dir_depth": 2,
      "codeintel_selected_catalogs": ["jQuery"]
   },

   "PHP": {
      "php": "/Applications/MAMP/bin/php/php5.5.3/bin/php",
      "codeintel_scan_extra_dir": [],
      "codeintel_scan_files_in_project": true,
      "codeintel_max_recursive_dir_depth": 15,
      "codeintel_scan_exclude_dir":["/Applications/MAMP/bin/php/php5.5.3/"]
   }
}
These configurations can be customized as and when needed. It depends on the number of modules/libraries installed by the user with various parameters such as the size and complexity of the project a user is working on.
Sublime Text — Introduction
Sublime Text Editor is a full featured Text editor for editing local files or a code base. It includes various features for editing code base which helps developers to keep track of changes. Various features that are supported by Sublime are as follows −
- Syntax Highlight
- Auto Indentation
- File Type Recognition
- Sidebar with files of mentioned directory
- Macros
- Plug-in and Packages
Sublime Text editor is used as an Integrated Development Editor (IDE) like Visual Studio code and NetBeans. The current version of Sublime Text editor is 3.0 and is compatible with various operating systems like Windows, Linux and MacOS.
Why Sublime Text?
When you use a suitable Text editor, you can enjoy its rich beneficial features. Sublime Text offers its users the following benefits −
- Ability to solve linker errors.
- Keeping track of all files and folders to work with.
- Connectivity with version control systems like Git, Mercurial.
- Problem solving capabilities.
- Keeping color combination for syntax combination.
You can download Sublime Text from its official Website − www.sublimetext.com. In the next chapter, we will learn about installation procedure of Sublime Text editor in various operating systems.
Sublime Text — Installation
Sublime Text editor is supported by the following major operating systems −
- Windows
- Linux and its distributions
- OS X
You can download Sublime Text from its official website − www.sublimetext.com
In this chapter, you will learn about the installation of Sublime Text on various operating systems.
Installation on Windows
You will have to go follow the steps shown below to install Sublime Text on Windows −
Step 1 − Download the .exe package from the official website as shown below −
https://www.sublimetext.com/3
Step 2 − Now, run the executable file. This defines the environment variables. When you run the executable file, you can observe the following window on your screen. Click Next.
Step 3 − Now, choose a destination location to install Sublime Text3 and click Next.
Step 4 − Verify the destination folder and click Install.
Step 5 − Now, click Finish to complete the installation.
Step 6 − Upon a successful installation, your editor will appear as shown below −
Installation on Linux
You will have to follow the steps shown below to install Sublime Text on Linux distributions −
Step 1 − Using the command line terminal, install the packages for Sublime Text editor, using the command given below −
sudo add-apt-repository ppa:webupd8team/Sublime-Text-3
Step 2 − Update the packages using the following command −
sudo apt-get update
Step 3 − Install the Sublime Text repository using the following command −
sudo apt-get install Sublime-Text
After the successful execution of above mentioned commands, you will find that Sublime Text editor is installed on the system.
Installation on OSX
For OSX operating systems,
-
Download the .dmg file of Sublime Text Editor.
-
Open it and drag-and-drop in the Applications folder.
-
Follow the steps that you have seen in above two cases.
-
Launch the application.
Sublime Text — Data Directory
Throughout this tutorial, we will be focusing on using the subversion control system, Git and bit bucket in combination with Sublime Text editor.
As with any other Text editor, working on a specific repository is the key aspect of Sublime Text. It is shown in detail in the steps given below −
Step 1 − Consider a repository to be cloned from the bit bucket. Please note that we will be working with Python scripts throughout this tutorial.
Step 2 − Include the repository in Sublime Text editor using the Open Folder option, as shown below.
Step 3 − After including the repository, the screen of Sublime Text editor will be as shown below −
You can choose the file you wish to open from the list that is displayed in the left hand side of the screen, as shown in the image below −
Note that the color combination gives recognition of keywords and packages included in the code.
Sublime Text — Creating First Document
In this chapter, you will learn step by step how to create a file in Sublime Text.
Step 1 − Use the option New File to create a file in Sublime Text editor.
Step 2 − Once the new file is available, you can insert the code, similar to any other text editor, and save the file in your working repository.
Step 3 − Once you save the associated file, Sublime Text editor provides a variety of options based on the type of file, for example .php for PHP scripts, .py for Python scripts and .java for Java code base.
Step 4 − As our code repository is on Python project, we will save the file as demo1.py, as shown below −
Sublime Text — Editing First Text Document
Code editors allow the users to edit the code scripts and text documents with various shortcut keys. In this chapter, let us understand through various examples about editing options of first text document in Sublime Text.
Simultaneous Write-Up
In this example, you will see how to add print statements at two locations.
Step 1 − Consider the first script of Python with the following code in it −
Step 2 − Let us suppose that, in the given script you want to mention the starting and ending points of the loop, using simple statements. You can write the print statement wherever required, however, in Sublime Text editor you can simultaneously add comments and statements in two places with a shortcut of Ctrl+cursor point for Windows or Linux, and Cmd+cursor point for Mac. Then, you can see the cursor points as mentioned below −
Step 3 − Now, you can insert the print statements at both the locations of the mentioned cursor points, as shown in the image below.
Finding Occurrences
Sublime Text editor includes a feature to find the occurrences of the keywords included in the scripts. The shortcut key for finding occurrences of the keyword is Ctrl+D after highlighting the associated keyword.
If you want to search for a keyword, say print from the given code, you can use Ctrl+D or Cmd+D to get the count of occurrences of the associated keyword.
Appending Comments in Line
We can append comments at the end of line using the shortcut key Ctrl+Shift+L for Windows and Cmd+Shift+L for Mac operating system after selecting the code section where you actually need the comment.
Sublime Text — Patterns of Code Editing
There are various types of code editing and shortcut keys used in Sublime Text editor −
- Splitting the selection into lines
- Wrapping the complete paragraph in HTML file
- Finding all occurrences
This chapter discusses each of them in detail.
Splitting the Selection into Lines
The key combination Ctrl+Shift+L allows you to select the blocks of lines and split them, on Windows. The screenshot given below explains this −
Wrapping Complete Paragraph in HTML File
The key combination Alt+Shift+w for Windows and Cmd+Shift+w for Mac, allows the user to split the sections of code and create various paragraphs. It is referred as a wrap selection with html tag. This also allows you to include HTML tags using Sublime editor.
The screenshot given below explains wrapping text with a HTML tag −
After wrapping the text, the text wrapped with a HTML tag will be seen as shown below −
Finding all Occurrences
The key pattern Ctrl+Shift+f allows you to find a keyword in a given project. The screenshot given below explains this −
The shortcut key opens a window with three options included in it, namely find, where and replace,
where,
-
find refers to the search of the particular keyword,
-
where mentions the section as to which repository is searched, and
-
replace mentions the keyword which is replaced instead of find keyword.
Sublime Text — Sublime Linter
Linting is the process of flagging suspicious constructs and likely to be bugs in any programming language.
Sublime Linter is the package of Sublime Text that helps you to perform linting in Sublime. It helps in creating files in different modes for the manipulation of code base. It is not an in built package and you need to install it manually.
You can install any package control in Sublime Text editor using the shortcut key combination Ctrl+Shift+P, and selecting the Package Control: Install Package option.
Select the associated package to install in Sublime Text editor. To install Sublime Linter, you need to select the option of SublimeLinter plugin.
On successful installation, your screen will look as shown below −
Modes of Sublime Linter
Sublime Linter runs in four different modes as mentioned below −
Background Mode
When the Sublime Linter key is set to true, linting is performed in the background constantly each time the file is modified.
Load-Save Mode
When the Sublime Linter key is set to , linting load savewill be performed when a file is loaded from the repository.
Save-Only Mode
When the Sublime Linter key is set to save only mode, linting is performed while saving the particular file in working repository.
On Demand Mode
In the on-demand mode, the Sublime Linter will be set to true, using the shortcut Ctrl+Alt+L, which sets up the linter to detect bugs, if any present in the code.
Sublime Text — Shortcuts
Sublime Text editor includes shortcuts and methods for manipulating the output. This chapter discusses in detail about these shortcuts with the help of suitable illustrations.
Opening the Command Palette
Command palette in Sublime Text editor includes options for installing packages and console. The shortcut key for this purpose is Ctrl+Shift+P for Windows and Cmd+Shift+P for Mac. The screenshot given below shows opening the command palette using this shortcut.
Toggle Side Bar
Sublime text editor includes a side bar which displays the scripts or the file names. You can use the shortcut key Ctrl+KB on Windows and Cmd+KB for Mac for this purpose.
Display Scope in Status Bar
The shortcut key Ctrl+Shift+Alt+P for Windows and Ctrl+Shift+P for Mac displays scope in the status bar. The following screenshot shows an illustration of this shortcut.
Python Console
When you are working with Python scripts using Sublime Text editor, you can use Ctrl+` for Windows or Control + ` for Windows, to operate the Python console.
New Window
With new windows, you can manage a number of projects simultaneously. You can use the shortcut key Ctrl+Shift+N on Windows and Cmd+Shift+N for Mac to create a new window on Sublime Text editor.
Sublime Text — Snippets
Snippets are the smart templates which can be reused whenever needed. Sublime text editor includes snippets feature for HTML templates. In this chapter, you will learn about them in detail.
Understanding Snippets
Snippets are simple XML supported files with various attributes. They include an extension called sublime-snippet. The root tag of XML element will be the <snippet> tag. Snippets created are saved in the Packages folder and are considered to live in this folder.
The file format and syntax of snippets are discussed in detail as follows −
-
Content −This section includes description of the snippet.
-
tabTrigger − It includes a sequence of characters which trigger when the snippet is written.
-
Scope − It defines the scope in which the snippet remains active.
-
Description − It includes all the meta description. It will be displayed when snippet’s menu is open.
Creating First Snippet
You can create the default snippet using Tools → Developer → Snippet option.
Then, a demo snippet with the associated tags will be created as shown below −
To create a first snippet in Sublime Text editor, click the Tools menu and select the Snippets option from the drop down window, as shown in the screenshot here.
Now, choose Snippet:html from the options displayed.
This creates a default snippet on the specified html file as shown below.
Note that there are various snippets for different types of files. For html files in the code base, there are three snippets defined in Sublime Text editor, as shown below.
Package Control Snippets
Control snippets are primarily used for product development. With install packages option in Sublime editor, you can download any snippet needed for web development and install it.
You may need the following packages for web development −
- EverCodeLab Sublime supports for Ruby on Rails
- Additional PHP snippets for PHP
- HTML snippets for HTML files
- Twitter Bootstrap snippets for Twitter Bootstrap
- JavaScript snippets for JS files
- jQuery snippets pack for jQuery
Sublime Text — Macros
Macros are the basic automation facility that includes a sequence of commands. You can use macros whenever you need to perform an operation which includes same steps.
Macro files are JSON files with an extension called .sublime-micro and are considered to be very helpful.
Recording a Macro
Recording a macro defines the procedure to keep a set of commands needed for the given file. You can record a macro in two ways −
-
Use the shortcut key Ctrl+Q for recording a macro in Windows and Cmd+Q in Mac.
-
Use the record option in Tools → Record Macro.
Once the macro has started recording, you can see the following message in Sublime Text editor −
Playing a Macro
You can use the shortcut key Ctrl+Shift+Q on Windows and Cmd+Shift+Q for Mac, to play a macro recorded by the user in Sublime Text. Note that this shortcut plays the last recorded macro in Sublime.
Saving a Macro
You can save a recorded macro using the option Tools → Save Macro. The following screenshot shows how to save a macro using this option.
You can also redefine the macros using various options in Tool menu bar, as shown below −
Sublime Text — Key Bindings
Key bindings in Sublime Text helps a user to process and map the sequences of key presses to actions. They are defined in the JSON format and are stored in .sublime-keymap files.
For better integration, it is important to keep separate key map files for Linux, OSX and Windows. Key maps of the corresponding platform will be loaded in the Sublime Text editor.
A user can open the keymap file or default key bindings using the option Preferences → Key Bindings.
The following example shows how to perform key bindings in Windows −
[
   { "keys": ["ctrl+shift+n"], "command": "new_window" },
   { "keys": ["ctrl+shift+w"], "command": "close_window" }
]
Defining Key Bindings
Sublime Text editor includes an option to define a key map. The key bindings defined in the file .sublime-keymap includes all the key value combinations.
You can include the following key binding set into this file and save them to check the execution, with the help of the code shown below −
[
   {
      "keys": ["super+alt+;"], "command": "run_macro_file",
      "args":
      {"file": "Packages/User/semicolon.sublime-macro"}
   }
]
Here super is the Winkey in Windows or Linux, and a command on OSX operating system. Note that this code will run the macro that is located in Packages/User and is named semicolon.sublime-macro on pressing the Super+Alt+ keys.
Sublime Text — Column Selection
In this chapter, you will learn various shortcuts keys to move and select the columns of a file in Sublime Text.
Moving the Pointer to the Beginning of Code
You can use the shortcut Ctrl+Home to move the pointer to the beginning of the code in Sublime Text editor.
Observe the sample code shown here.
The screenshot given below shows the same code where the cursor is moved to its beginning.
Extending a Column
You can use the shortcut Ctrl+L to extend a specified column. This shortcut will select the column which includes the pointer. The following screenshot explains this in a detailed manner −
Trimming a column
You can use the shortcut Ctrl+K to trim the specified column of the file. For OSX, you will have to use the key combination Cmd+K for this purpose.
The example shown here displays the code where the line mentioned in the fifth column is trimmed.
Split a Block of Text
You can use the shortcut Ctrl+Shift+K to split a selected block of text into two selections.
Note − The difference in key combinations from the previous key combination is that columns are visible. Ctrl+Shift+K removes the column number from the specified code, whereas Ctrl+K keeps the column number intact after trimming the entire column.
Sublime Text — Indentation
Indentation is the process of maintaining the code blocks of programming languages to maintain a systematic structure. It helps to convey the developers a better structure of program. This chapter explains you in detail about indentation in Sublime Text editor.
Importance of Indentation
Indentation helps to maintain the code structure such that it is easily understood by anyone who accesses it. Proper indentation imparts the following features to the code −
- Readability
- User-friendliness
- Adaptability
- Ease of maintenance
Options for Indentation in Sublime Text
Sublime Text editor provides various options for code indentation as shown in the following screenshot −
The usage of these options is discussed in detail here −
Indent Option
Indent option helps to create indentation of the specified code. You have to select the code specified and select the Indent option. You can also use the shortcut Ctrl+[ after selecting the required code that is to be indented. Refer to the following screenshot for a better understanding −
Unindent Option
Unindent option works in the reverse of indent procedure. The shortcut for the unindent option is Ctrl+]. Refer to the following screenshot for a better understanding −
Reindent Option
Reindent option is used to undo the unindent option and revert the code back to the same condition. Refer to the following screenshot for a better understanding −
Benefits of Indentation
Proper indentation offers various benefits to the code and developers. They are discussed below −
-
Code blocks will be visible without much effort.
-
Developer can focus on lines of code that are necessary and easily ignore the irrelevant ones.
-
A developer using the same kind of code structure multiple times need not focus on the start of block and end of block statements.
-
Any misplaced lines of code can be easily identified.
Sublime Text — Base Settings
Base settings of the Sublime Text editor are the configuration needed for editor such as font size, display of line numbers or color scheme of the editor.
All the base settings are configured in JSON format. To view the list of settings, go to menu of Preferences -> Settings.
The settings include two types of configurations namely −
- Default
- User
Default includes all the default configurations and user defines the customized settings for base settings.
For the scenario mentioned above, the customized settings are as mentioned below −
"font_size": 15,
   "ignored_packages":
   [
      "Vintage"
   ]
Categories of Settings
Various categories of the settings in Sublime Text are as follows −
Editor Settings
These include the basic settings for editing the files of the code base. Examples include font_face, font_size and tab_size. The settings are present in the default configuration.
User Interface Settings
These include the general settings which specifically focus on background, theme and various color combinations. These settings are appended in the second section of the default configuration.
Application Behavior
These settings focus on behavior of the application included in Sublime Text editor across open windows. These settings are included in the third section of default configuration settings.
Syntax — Specific Settings
These settings are used for designing the syntax of Sublime Text editor. To get the list of syntax specific settings, the user needs to use option Preferences − Syntax-Specific.
Sublime Text — Theme Management
Theme management in Sublime text editor implies enhancing the appearance of editor with colors and attractive backgrounds. Themes are JSON formatted values with .sublime-theme extension and manage the appearance of the user interface of the editor by changing the colors of elements of the IDE.
Installing and Applying Themes
The following steps will guide you about installing and applying themes in Sublime Text editor −
Step 1 − Use the Install Package of the Sublime Text to install package for themes, as shown in the screenshot here −
Step 2 − You can see a list of options with Install Package option and you can download them and install in Sublime Text editor.
Step 3 − Once you select a theme, activate it.
Step 4 − Now select your desired theme from the list of installed theme list. This automatically changes the appearance of the editor.
Color Schemes
Color schemes are XML formatted files located at the Packages folder with color schemes. They are an awesome way for the customization of Sublime text colors, unlike themes which are specific to UI elements.
You can choose color schemes using option Preferences → Color Scheme. Refer to the following screenshot that shows the same.
Color schemes include various options such as Breakers, Mariana, Monokai, and Sixteen. The appearance of the editor depends on the color scheme that you choose. Note that these patterns will only focus on color syntax.
Sublime Text — Understanding Vintage Mode
Vintage mode in Sublime text editor is a package that includes a combination of editing features of vi. Vintage Mode lets you to use a list of vi commands in the Sublime editor.
Vintage mode is an open source project and you can download it from the link −
https://github.com/sublimehq/Vintage
Understanding vi editor
Vi is a primitive and popularly used text editor. It was originally created for UNIX operating system and with basic functionality of scripts execution. It is a popularly used command line editor across various operating systems because it does not require mouse for operations.
Sublime includes vim, which is an advanced section of vi editor, and includes customization of macros, snippets and plugins.
Enabling Vintage Mode
You can enable Vintage mode through the following steps −
-
Select the option Preferences → Settings
-
Edit the json file of the settings configuration with key name as ignored_packages. Vintage package is included in the ignored_packages section.
-
Remove the attribute of Vintage from the configurations to enable Vintage property in Sublime text editor.
"ignored_packages": []
-
Your vintage mode editor will appear as shown in the following screenshot −
Sublime Text — Vintage Commands
Vintage mode includes a variety of commands similar to the vi editor. This includes the basic settings of Sublime Text editor as shown in the code given below −
{
   "color_scheme": "Packages/Color Scheme - Default/Monokai.tmTheme",
   "font_size": 15,
   "ignored_packages":
   [

   ],
   "vintage_start_in_command_mode": true,
   "theme": "Soda Dark.sublime-theme"
}
| Mode | Description | Key |
|---|---|---|
| Command Mode | Waits for the user to enter a command | Esc |
| Insert Mode | Text can be inserted in different positions | i/I/a/A |
| Visual Mode | Select/highlight the text using the Movement Commands | V |
| Visual Line Mode | Select/highlight lines of text using the arrow keys | Shift + V |
Vintageous Mode
Vintageous is the package used for the descriptive analysis of vi editor. It can be downloaded using package control as mentioned below −
Once you successfully install the vintageous package, your screen will look like as shown in the following screenshot −
Sublime Text — Testing Javascript
Sublime Editor includes testing modules for various programming languages. This helps in unit testing of files and scripts and helps developers to analyze bugs, errors and issues, if any.
Sublime Text editor includes 3 modules which are necessary for testing and deployment of JavaScript. This chapter discusses them in detail.
JsFormat
JsFormat is a JavaScript plugin used for formatting the script lines which eases the unit testing process. Behind the scenes, it uses JS beautifier (http://jsbeautifier.org/) to format the full JS or portions of JS files. JSFormat can be installed using the Install Package option of Sublime editor.
Features
JsFormat offers the following features to the script −
- Eases JS and JSON file formatting.
- Offers full text formatting and selected formatting.
- Provides customizable settings for formatting options.
JSHint
JSHint is a community driven tool used for analyzing the mistakes through hints. This helps to detect errors and potential problems. JSHint is an open source package, simple and easy to understand. You can install JSHine in Sublime Text editor through Install Package mode.
To implement JSHint plugin in Sublime Text Editor, you can use the shortcut Alt+J on Windows and Cmd+j on OSX systems.
JavaScriptNext
This script is used to highlight the syntax of JS file and its associated meaning. It includes a feature of syntax highlight with various modules, arrow functions, classes and generators.
You can perform syntax check on a file using the syntax list as shown in the screenshot below −
Sublime Text — Testing Python Code
Python offers unittest, an official unit testing framework for unit testing the scripts designed before deployment. It is also called as PyUnit. Python unit tests used in Sublime Text editor are called as sublime-unittests and they are available in the following link −
https://github.com/martinsam/sublime-unittest
These unit tests contain a number of useful snippets to ease the writing of unit test cases.
Installation of UnitTest
The package control of Sublime manages the installation of unittests and the following steps describe it in detail −
Step 1 − Use the command palette of Sublime Editor Ctrl+Shift+P for installation of the package, as shown in the screenshots given below −
Step 2 − The installed packages use the following two main snippets −
-
testclass which is used to create a new test class
-
testfunc which is used to create a new test function for us to fill out
Step 3 − The console computes test results as shown in the screenshot below. Note that the result depends on the success or failure of the test.
Success Result
Failure Result
Note − Unit test cases work as a compiler for computing scripts in python.
Sublime Text — Spell Check
Sublime Text Editor uses Hunspell for spell checking process. Hunspell is the spell checker of LibreOffice, Mozilla Thunderbird, Google chrome and many proprietary packages. Sublime Text editor includes dictionary support for proper spell check of words.
Dictionaries
Sublime Text includes UTF-8 encoded dictionaries. To implement a dictionary with Sublime Text editor, it should be first converted into UTF-8. If the user has UTF-8 encoded dictionary, it can be installed using the Preferences option in Sublime Text editor.
You can select the dictionary from View → Dictionary menu as shown in the given screenshot −
Settings for Dictionary
There are two settings defined for the spell check of Sublime Text Editor −
- Spell_check
- Dictionary
// Set to true to turn spell checking on by default
"spell_check": false,

// Word list to use for spell checking
"dictionary": "Packages/Language - English/en_US.dic"
These configurations are included in the settings file. Added and ignored words are stored in the user settings under the added_words and ignored_words keys, respectively.
Sublime Text — Packages
Software packages are installed in Sublime Text for additional functionalities. You can see the list of software packages through the shortcut key Ctrl+Shift+P on Windows and Cmd+Shift+P on Mac. Observe the following screenshots for a better understanding −
These packages are installed in the Packages → User directory which includes the entire necessary configuration. To browse the packages, select Preferences → Browse Packages option, as shown in the screenshot below −
These files are the customized configuration which can be changed as and when needed. The packages are created in JSON format.
Consider the sublime-keymap package created which includes following code −
[
   {
      "keys": ["super+alt+;"],
      "command": "run_macro_file",
      "args": {"file": "Packages/User/semicolon.sublime-macro"}
   }
]
Sublime Text — Menus
In this chapter, you will learn about the primary options of File, Edit and Goto menus of Sublime Text editor.
Save with Encoding
This option is included in the File menu which helps in saving the scripts and file with appropriate encoding. Sublime Text Editor includes a variety of options for encoding Python scripts, as shown in the following screenshot −
Encoding process helps the scripts to be secured from third-party attacks and allows the perceived item of use or interest which to be converted into a construct.
Convert Case
Convert case helps in the conversion of upper case to lower case and vice versa. Refer to the following screenshot for a better understanding −
For example, consider a keyword Monica included in the file and let us convert it to uppercase. Refer to the following screenshot for a better understanding −
Goto Symbol
With this option, a user can search or get the appropriate keyword or any function. This option is very beneficial when we have more than 1000 lines of code and user got to search a unique line or annotation.
The following screenshot shows the demonstration of Goto Symbol −
Sublime Text — Sub Menus of Font
The previous chapters discussed various options related to the Preferences menu. In this chapter, you will learn in detail about the Font settings of Sublime Text editor.
Sublime Editor offers three dimensions of font sizes − Larger, Smaller and Reset option to undo the particular changes made. Implementing the specified font is possible once the user selects the appropriate paragraph or text in editor.
Consider a selected text in the file functions.py where the you need to make desired changes −
Observe that after the implementation of larger font, the dimensions and font size of the scripts will be automatically changed to larger dimension.
Sublime Text — Developing Plugin
Every editor includes plugin for the development, that triggers set of activities and default packages. Sublime Text editor includes a feature for developing your own customized plugin. This chapter discusses in detail about developing your own plugin in Sublime Text.
Developing Plugin
The following steps show you in detail how to develop a plugin in Sublime Text −
Step 1 − Select the New Plugin option by navigating through Tools → Developer → New Plugin as shown below −
Step 2 − The basic code of a plugin includes import of two main libraries: sublime and sublime_plugin.
The code for the plugin is −
import sublime
import sublime_plugin
class ExampleCommand(sublime_plugin.TextCommand):
   def run(self, edit):
      self.view.insert(edit, 0, "Hello, World!")
Step 3 − The customized plugins are saved in Packages → User folder. Refer to the following screenshot that gives you the complete understanding of the plugins saved in Sublime Text editor.
Running the plugin
When you have created a plugin and saved it, open the console using the shortcut key Ctrl+` on Windows and Cmd+` on OSX, and execute the command shown here −
view.run_command(plugin-name)
This command will execute the plugin defined by the user with the list of activities included in it.
Sublime Text — Command Palette
Command Palette includes a list of items or commands which are used frequently. The entries of commands are included in the .sublime-commands file.
Using Command Palette
To open a command palette in Sublime Text editor, you can use the shortcut key combination Ctrl+Shift+P on Windows and Cmd+Shift+P on OSX.
The commonly used commands from the palette are −
- Build with Python
- Install Packages
Build with Python
This will generate all the dependencies and build the specified code of a given Python file.
Install Packages
With this command, we get list of packages which can be installed which is not included earlier.
All the commands included in the command palette are stored in the Packages directory. The basic example of command declared inside the Default.sublime-commands file is shown in the code given below −
[
   { "caption": "Project: Save As", "command": "save_project_as" },

   { "caption": "Project: Close", "command": "close_project" },

   { "caption": "Project: Add Folder", "command": "prompt_add_folder" },
]
Note − The JSON file includes 3 main keys for every command −
- Name/Caption
- Location
- Content
Sublime Text — Debugging PHP Application
Debugging is the process of finding errors and bugs in the given code and fixing them. Sublime editor includes various plugins that have debugging features, which helps in finding errors easily.
In this chapter, you will learn how to debug a PHP web application. Sublime uses Sublime TestX debug plugin for this purpose. The features of this plugin are −
-
It is an extension used for debugging the PHP files and scripts.
-
Provides a list of debugging and profiling capabilities.
-
Maintains stack traces and real time parameters like display and functionalities.
Installation of Sublime Plugin
To install Sublime Text Xdebug plugin, you will have to take the following steps −
Step 1 − Install package control palette installation with the shortcut of Ctrl+Shift+P or Cmd+shift+P.
Step 2 − After the successful installation of Xdebug client, the configuration file will be kept in the Installed Packages folder. The configuration file is the JSON file which includes the parameters for debugging a PHP web application.
Step 3 − Start the debug session of PHP file using the shortcut Ctrl+F9. You can also do it using the Start Debug option using command palette.
Step 4 − The split windows of XdebugClient will show the output of PHP file. It keeps a process of debugging code line by line. Refer to the following screenshot for a better understanding −
Debugging Javascript Application
Sublime Text Editor has a plugin Web Inspector for debugging JavaScript code. It helps us to set breakpoints, examine the console and evaluate sections of code. In this chapter, you will learn in detail about this plugin.
Installation of Sublime Web Inspector
The following steps show the installation of Sublime Web Inspector −
Step 1
Use the menu option Preferences → Browse Packages to get the path of installed packages as shown in the given screenshot.
Step 2
With the help of git command prompt, clone the packages of Debugging Javascript web application using the git repository, as shown in the command given below −
git clone -b ST3 "git://github.com/sokolovstas/SublimeWebInspector.git"
Step 3
To test the installation, open a command palette and start the web inspector. You can use the shortcut key for web inspector Ctrl+Shift+R on Windows and Cmd+Shift+R on OSX systems. You can see all the breakpoints needed for JavaScript application, as shown below −
Sublime Text — Batch Processing
Batch processing in Sublime Text also refers to Build systems. Build systems helps user to run files through external programs such as make, tidy and interpreters.
The following points are worth notable while working with Build systems −
-
They are JSON files and have the extension .sublime-build.
-
To initiate the build process, you can select the option Tools → Build or the shortcut Ctrl+B on Windows and Cmd+B for OSX system.
Recall that throughout this tutorial, we are focusing on Python files. Sublime text includes two build modes for python files.
Once the build for Python is completed, you can observe the following output on the editor −
You can see the list of build results created for the specific project in Sublime Text editor using the option Tools → Build Results → Show Build Results.
Note that build systems and the complete files associated with batch processing must be located under the Packages folder (Packages/user). Many packages in Sublime Editor include their own build systems.
Sublime Text — Distraction Free Mode
Distraction Free Mode in Sublime Text editor allows displaying the code and files full screen. You can enter distraction free mode via option View → Enter distraction mode menu item.
Once the distraction mode is enabled in the Sublime Text editor, the output will be visible as below −
All UI chrome accessible items are hidden, but accessible in distraction mode.
Customization
All the properties of customization of distraction free mode of Sublime Text editor are included in Distraction Free.sublime-settings JSON file as shown in the screenshot given below.
The following screenshot shows the properties included in Distraction free mode of Sublime editor −
Note that the attributes like line_numbers, gutter, draw_centered, wrap_width, word_wrap and scroll_past_end are such that they enable attractive distraction free mode.
Sublime Text — SublimeCodeIntel Plugin
SublimeCodeIntel is an important plugin for the Sublime Text editor. It offers the following features −
-
Jump to symbol feature, which helps the user to jump to the file and the specified line of the symbol.
-
Includes library of autocomplete and displays the modules/symbols in real time.
-
Tooltips display information in the status bar about the associated function.
Installation
You can install the SublimeCodeIntel plugin through the following steps −
Step 1 − Get the install package functionality of Sublime Text editor using the shortcut Ctrl+Shift+P on Windows and Cmd+Shift+P for OSX system. Refer to the following screenshot for better understanding −
Step 2 − Now, select the plugin SublimeCodeIntel for installation and restart the Sublime Text editor.
Step 3 − On successful installation of SublimeCodeIntel plugin, your screen will look like this −
Configuration
There are two in built configurations of SublimeCodeIntel −
- Settings − Default
- Settings − User
Refer to the following screenshot that shows these configurations −
The configuration for SublimeCodeIntel is included in the JSON file called SublimeCodeIntel.sublime-settings. The configuration needed for each language is included in SublimeCodeIntel plugin as below −
/*
   Defines a configuration for each language.
*/

"codeintel_language_settings": {
   "Python3": {
      "python3": "/usr/local/bin/python3.3",
      "codeintel_scan_extra_dir": [
         "/Applications/Sublime Text.app/Contents/MacOS",
         "~/Library/Application Support/Sublime Text 3/Packages/SublimeCodeIntel/arch",
         "~/Library/Application Support/Sublime Text 3/Packages/SublimeCodeIntel/libs"
      ],
      "codeintel_scan_files_in_project": true,
      "codeintel_selected_catalogs": []
   },

   "JavaScript": {
      "codeintel_scan_extra_dir": [],
      "codeintel_scan_exclude_dir":["/build/", "/min/"],
      "codeintel_scan_files_in_project": false,
      "codeintel_max_recursive_dir_depth": 2,
      "codeintel_selected_catalogs": ["jQuery"]
   },

   "PHP": {
      "php": "/Applications/MAMP/bin/php/php5.5.3/bin/php",
      "codeintel_scan_extra_dir": [],
      "codeintel_scan_files_in_project": true,
      "codeintel_max_recursive_dir_depth": 15,
      "codeintel_scan_exclude_dir":["/Applications/MAMP/bin/php/php5.5.3/"]
   }
}
These configurations can be customized as and when needed. It depends on the number of modules/libraries installed by the user with various parameters such as the size and complexity of the project a user is working on.