Ever stumbled across this error message when trying to upload a sketch?
avrdude: stk500_recv(): programmer is not responding
avrdude: stk500_getsync() attempt 1 of 10: not in sync: resp=0x00

Is this some kind of joke? Who is this mysterious AVR Dude, why is he so uncool, and — most importantly — what does he have against you trying to upload a sketch to your Arduino? It’s beyond frustrating.
In this quick lesson, you’ll learn how to banish the mysterious AVR dude to the dusty highways of the nether realms. Or, to be less poetic, you’ll learn how to get rid of this error so you can get back to uploading your sketch.
So who is this AVR dude, and why does the error happen?
AVRDude stands for AVR Downloader Uploader and is a utility used by the Arduino IDE. The utility’s main job is pretty straightforward — it allows you to load code onto your Arduino board.
So that’s who the dude is, but why does the error happen?
The avrdude: stk500_recv() error message is alerting you to a generic connection error between your computer and the Arduino. I wish I could keep it simple and tell you this error happens because of one single problem, but that would be too easy. This generic error can pop up for a host of reasons.
But don’t worry, I’ve got your back. In this lesson, I’m going to go through a “laundry list” of possible solutions. (Many thanks to “The Guy with The Hat” from the Arduino Stack Exchange for compiling this great list of fixes.) I’ll walk through each in detail, starting at the most common and easiest and moving on to more detailed troubleshooting tasks if those don’t work.
Here goes.
Let’s start with the easy stuff
Before we touch on some of the more elaborate and involved potential solutions, it’s smart to rule out all those obvious and small glitches.
- Disconnect and reconnect the USB cable: I told you we’d start simple.
- Press the reset button: If your Arduino board has a reset button on it, press it and see if you can now upload without the avrdude: stk500_recv() error.
- Close and reopen the Arduino IDE: Giving the Arduino IDE a fresh start can fix a host of problems avrdude stk500_recv errors included.
- Make sure you have the right Arduino board selected: In the Arduino IDE, go to Tools> Board, and select the Arduino board you’re using from the list.

- Make sure you have the correct port selected: In the Arduino IDE, go to Tools>Port and select the port corresponding to your board. On a PC, it will start with COM. On a Mac, it should start with cu.usb.

Useful tip: If you’re unsure of the correct port, take note of all the ports you have listed. Then disconnect your Arduino board from the USB cable and check the port menu again. The port now missing from the list is the port your Arduino was using.
- Remove connections to the RX and TX pins: The Receive (RX) and Transmit (TX) pins (pins 0 and 1) are used when you upload sketches to your Arduino board. Unplugging connections to those pins may banish the avrdude: stk500_recv() upload error.
- Remove any shields: If you have an Arduino shield attached to your Arduino board, remove the shield and try uploading again. The shield may have a circuit interfering with the transmit and receive pins.
Still getting avrdude: stk500_recv() error?
If you’re still getting the avrdude: stk500_recv() error, all is not lost — not by a long shot. It’s time to dig into some real troubleshooting.
So what could be going wrong here? We know the problem could be at three possible locations: the USB cable, the Arduino Board, or your computer. We’ll use a process of elimination to figure out the point of failure.
- Test the USB Cable: USB cables fail, and surprisingly often. Check to see if using a different USB cable gets rid of the avrdude: stk500_recv() error.
- Test another Arduino board: If you have one handy, try uploading to another Arduino board. Did the avrdude: stk500_recv() error suddenly vanish? Your original board is the likely culprit.
- Test a different computer: If you’ve ruled out your USB cable and Arduino board, try uploading your sketch to another computer with the Arduino IDE installed on it. If you can successfully upload a sketch to the other computer, the avrdude: stk500_recv() error probably originates at your computer.
Once you have some hard data on the point of failure, you can read one of the following three sections to hone in on resolving the avrdude: stk500_recv() error.
The USB cable is to blame!
Well, I’ll go right ahead and state the obvious solution. Use a different cable 🙂
My computer is the problem
Here are three fixes you can try.
- Reinstall the Arduino IDE: Just go to the Arduino website, download the most recent version of the IDE and install it again. Don’t worry, this won’t affect your old sketches. They’ll still be stored in your sketchbook folder.
- Reinstall drivers: If you’re still getting the avrdude: stk500_recv() error, you’ll need to check that your drivers are installed correctly. These should be installed automatically when you install the Arduino IDE, but you can always try installing them manually.
- Check to see if you need different drivers: Some Arduino clones require special drivers. You should be able to download these drivers from the website of the company that makes the board. If you can’t, contact the company directly.
My Arduino board is causing the stk500_recv() error:
This is where things get a little dicey. It may be that your Arduino board is bricked — electronics speak for broken in a manner that does not allow fixing. But try these steps before you throw it out and buy a new board:
- Check that the microcontroller is seated properly: Some Arduino boards have a removable microcontroller chip — the Arduino UNO, for example. Check that it’s seated properly on the circuit board.
- Burn a new bootloader: The bootloader is a program on your microcontroller that allows sketches to run. A corrupt bootloader can cause the stk500_recv() error. Try burning a new bootloader on the microcontroller.
- Swap out a spare microcontroller: Got a spare microcontroller handy? If the kaput Arduino board has a removable microcontroller, you could always replace it with your backup microcontroller. You’ll have to load the microcontroller with the bootloader — as described in the previous step.
Have you banished the dude?
By the time you get here, you’ll hopefully have banished the AVR dude back to the shadowy chaos realm from whence he sprung. With any luck, you’ll never meet him again. But if you do, now you have some tricks up your sleeve to get rid of the avrdude: stk500_recv() error swiftly and efficiently.
If you’re still getting the error, please read the comments below. You may find the hidden clue you’ve been looking for. Drop us a line in the comments if you don’t — someone out there may have faced the same problem.
And, of course, if you found a different solution, please leave a comment — it may help someone else.
Because sometimes evil dude banishment takes a village.
Эта ошибка возникает, когда компонент Arduino IDE не может связаться с платой. Причины могут быть следующие:
Физическая проблема с подключением
-
Выключите и включите плату. Если контакт был плохой, это поможет исправить ситуацию.
-
Замените USB-кабель. Иногда попадаются некачественные провода, где нет жил для передачи данных.
-
Убедитесь, что провод не болтается в разъёме, контакт есть, на плату поступает питание.
Неправильные настройки в Arduino IDE
-
Убедитесь, что выбрана правильная модель платы в Tools → Boards.
-
Убедитесь, что выбран правильный порт в Tools → Port. Если вариантов несколько, попробуйте другие.
-
Попробуйте другие USB-порты: иногда один внутренний USB-концентратор компьютера настроен неверно, а другой нормально. Также можно попробовать подключить плату через внешний USB-расширитель.
-
Аккурат в момент перед прошивкой, или одновременно, или на полсекунды позже попробуйте нажать Reset на плате. Иногда по USB сброс не работает, и приходится сбрасывать плату вручную.
-
Откройте диспетчер устройств.
-
Переподключите плату.
-
Подождите несколько секунд. В диспетчере устройств появится новый COM-порт с именем платы. Запомните номер порта.
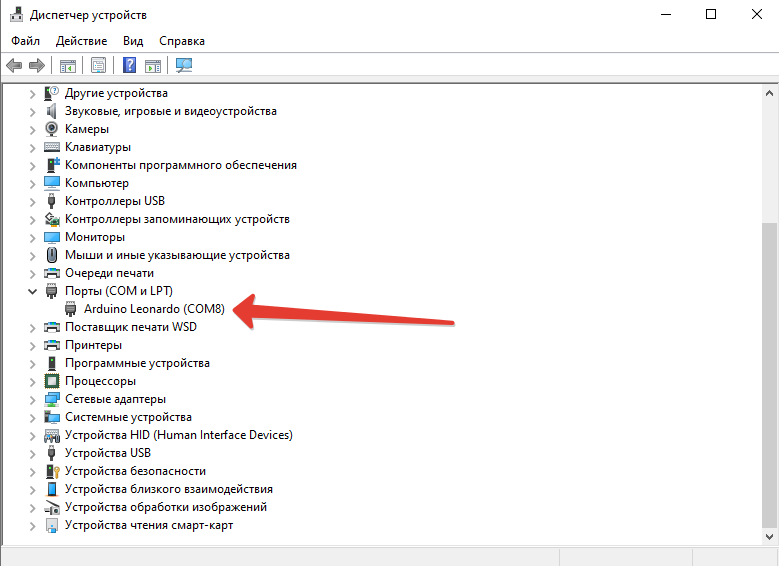 Если вместо COM-порта у вас появилось неизвестное устройство, попробуйте обновить драйвера или прошить загрузчик.
 -
В Arduino IDE выбирайте тот номер порта, который увидели в предыдущем пункте.
-
Проверьте, что у вас нет других открытых программ, которые используют COM-порт. Например, CURA, Serial Projector или монитор порта.
Проблема с загрузчиком на плате
Если предыдущие пункты не помогли, то проблема может быть с загрузчиком. Эта особая подпрограмма, которая позволяет загружать прошивку по USB без использования особых ISP-программаторов. Она работает первые секунды при включении платы. Если эта программа стирается или повреждается, то загрузчик надо перезаписать.
Для прошивки загрузчика есть специальная инструкция.
Понять, что сейчас работает загрузчик, можно по плавному миганию светодиода L на платах Iskra Neo и Arduino Leonardo. На них проблема поломанного загрузчика особенно актуальна, так как чип подключается к контактам USB напрямую, без преобразователя USB-UART.
Совершенно неожиданно у меня возникла проблема с добавлением нового скетча в Arduino. Arduino IDE стал зависать на моменте загрузки скетч в микроконтроллер на долгое время и потом выдавать множественные ошибки вида:
Код: Выделить всё
avrdude: stk500_recv(): programmer is not responding
avrdude: stk500_getsync() attempt 1 of 10: not in sync: resp=0x45
avrdude: stk500_recv(): programmer is not responding
avrdude: stk500_getsync() attempt 2 of 10: not in sync: resp=0x45
avrdude: stk500_recv(): programmer is not responding
.....
avrdude: stk500_getsync() attempt 9 of 10: not in sync: resp=0x45
avrdude: stk500_recv(): programmer is not responding
avrdude: stk500_getsync() attempt 10 of 10: not in sync: resp=0x45
У меня была китайская Arduino Uno rev3, с которой я работал уже полгода без проблем. Покупал тут в составе набора для изучения (Starter Kit), и ей даже китайский драйвер CH340 не понадобился, заработала с фирменным из состава IDE. И внезапная ошибка «avrdude: stk500_recv(): programmer is not responding» меня — неопытного новичка, немного напугала. Четких инструкций для решения я не смог найти: либо старая версия IDE с несуществующими командами, либо не мой случай. Но вот, что случилось у меня. У китайцев для прошивки контролеров без USB (типа Arduino Mini) я прикупил программатора USBasp, который надо подключать к разъему ICSP на плате и немного «поиграл» с ним для проверки, заливая программу в большую Arduino Uno.
Разъемов, кстати, две штуки на плате, еще один для прошивки самого контролера USB интерфейса. Но нам это не нужно.
И я так понял: при использовании программатора напрямую в ATmega заливается только сам скомпилированный код HEX, что позволяет сэкономить немного памяти для больших программ. А для работы через USB нужен еще и загрузчик Bootloader, который стирается программатором. И поэтому его нужно восстановить. Отключаем USB, подключаем назад USBasp и выбираем пункт Burn Bootloader, очень быстро внизу появится сообщение, что загрузчик успешно загружен и все! Можно снова подключаться по USB и работать как раньше.
Обратите внимание, что у меня выбран тип программатора USBasp (programmer), тип платы Arduino/Genuino Uno, а виртуального порта подключения нет, потому что USB отключен.
А вот если в меню выбрать пункт Export compiled Binary, то в папке проекта мы получи два файла:
- test.ino.with_bootloader.standard.hex
- test.ino.standard.hex
Которые будут отличаться небольшим куском кода, добавленным в конце.
Эти файлы нужно прошивать опять же программатором, использую специальные программы. Например, тот же AVRDude, название которого мы видим в ошибке.
Но это уже другая история, свою проблему я решил, чего и вам желаю.
Вот нашел такое упоминание этого процесса в разделе про доступную память устройства.
https://arduinomaster.ru/platy-arduino/ … duino-uno/
Когда вы прошиваете контроллер своим скетчем, он записывается именно сюда. 2кБ из данного пула памяти отводится на bootloader- программу, которая занимается инициализацией системы, загрузки через USB и запуска скетча.
Драйвер USBasp-win-driver-x86-x64-v3.0.7.zip для своего китайского USBasp программатора я скачал отсюда USBasp AVR Programmer, Program Atmel AVR microcontrollers:
https://protostack.com.au/shop/accessor … -downloads
Ставил его на Windows 7 SP1 x64, устройство в системе появилось с названием libusbK Usb Devices. Драйверы есть еще у Zadig, на его сайт ссылается сам Thomas Fischl.
 Моя китайская Arduino Mega 2560 начала барахлить. При загрузке скетча выдает ошибку avrdude: stk500_getsync(): not in sync: resp=0x00.
Долго искать в интернете решение проблемы, но советы пользователей мне не помогали. В результате случайно попал на зарубежный форум, где и нашел инструкцию по перепрошивке Bootloader в Arduino Mega 2560. Это решило проблему с ошибкой avrdude: stk500_getsync(): not in sync: resp=0x00.
Опишу всё пошагово, чтобы у вас не возникло вопросов.
- Сделайте копию папки с программой arduino — мы будем колупать эту копию, а не вашу рабочую версию
- В hardwarearduinoboards.txt в самый конец файла добавьте:
##############################################
# Added for Emartee in china
mega2560.name=Arduino Mega2560
mega2560.upload.protocol=stk500
mega2560.upload.maximum_size=258048
mega2560.upload.speed=57600
mega2560.bootloader.low_fuses=0xFF
mega2560.bootloader.high_fuses=0xD8
mega2560.bootloader.extended_fuses=0xFD
mega2560.bootloader.path=atmega
mega2560.bootloader.file=ATmegaBOOT_168_mega2560.hex
mega2560.bootloader.unlock_bits=0x3F
mega2560.bootloader.lock_bits=0x0F
mega2560.build.mcu=atmega2560
mega2560.build.f_cpu=16000000L
mega2560.build.core=arduino
- Добавьте файл ATmegaBOOT_168_mega2560.hex из архива в hardwarearduinobootloadersatmega
ATmegaBOOT_168_mega2560.hex.zip (2,5 KiB, 3 589 hits)
- Скопируйте содержимое архива в hardwarearduinocoresarduino с заменой файлов
arduino.zip (29,2 KiB, 3 757 hits)
- Запустите, а потом закройте программу Arduino
- Снова запустите программу Arduino
- Выберите свою плату
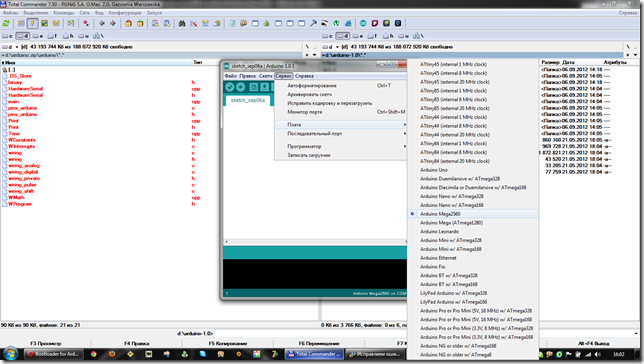
- Выберите программатор
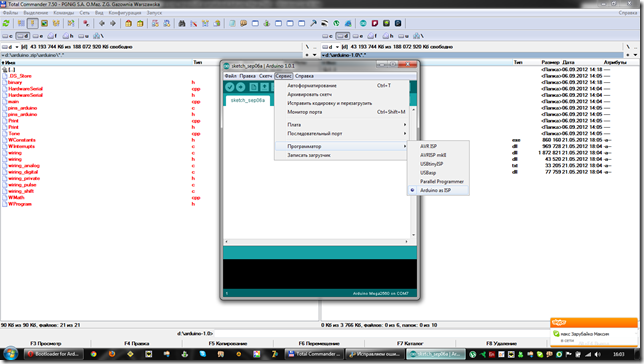
- Запишите загрузчик
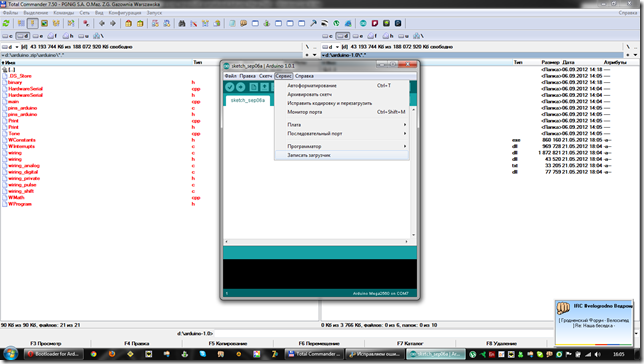
- Во время прошивки загрузчика опять выскочит ошибка avrdude: stk500_getsync(): not in sync: resp=0x00.
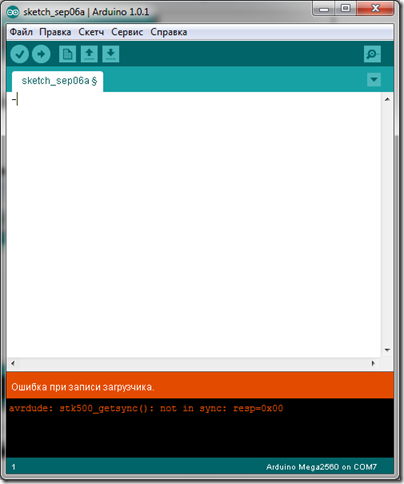
- Отключите от Arduino Mega 2560 USB кабель
- Подключите его заново
- Попробуйте загрузить скетч ЧЕРЕЗ ВАЩУ ОСНОВНУЮ ПРОГРАММУ Arduino, а не через эту копию, которую мы колупали
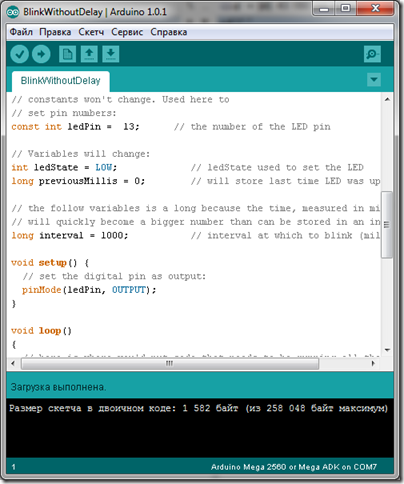
У меня все получилось. Надеюсь, у вас тоже. Всем удачи.
Собрали новый проект.
Написали скетч.
Прошиваем….
Ооопс!
avrdude: stk500_recv(): programmer is not responding
«Но ведь вчера же все работало!»(с)
Не беда, советов по устранению на форумах много:
- В Arduino IDE не правильно указан порт к которому в системе подключено устройство. Перепроверяем.
- В Arduino IDE не правильно указана модель нашей железки. Перепроверяем.
- Проблема с кабелем. Заменяем
- Еще есть проблемы со скоростью порта и прочими разными, это все расписано…
Но… есть еще один вариант, про который нигде не написано…
Если до этого arduino использовалась в других проектах и в нее уже прошит другой скетч… В новой схеме она может просто замыкаться уже назначенными на другое дело пинами =)
Поэтому, для начала, просто попробуйте ее прошить, выдернув из макетки.. Если до этого она где-то использовалась и все работало — скорее всего поможет.
Проверено на собственной глупости =)
UPD: По просьбам из комментариев еще один частый вариант: помимо правильно указанной платы в Arduino IDE нужно проверить правильность указания процессора (просто ATmega или Old Bootloader)
Спасибо за комментарии и активность в теме =)