Ошибки — это хорошо. Автор материала, перевод которого мы сегодня публикуем, говорит, что уверен в том, что эта идея известна всем. На первый взгляд ошибки кажутся чем-то страшным. Им могут сопутствовать какие-то потери. Ошибка, сделанная на публике, вредит авторитету того, кто её совершил. Но, совершая ошибки, мы на них учимся, а значит, попадая в следующий раз в ситуацию, в которой раньше вели себя неправильно, делаем всё как нужно.
Выше мы говорили об ошибках, которые люди совершают в обычной жизни. Ошибки в программировании — это нечто иное. Сообщения об ошибках помогают нам улучшать код, они позволяют сообщать пользователям наших проектов о том, что что-то пошло не так, и, возможно, рассказывают пользователям о том, как нужно вести себя для того, чтобы ошибок больше не возникало.
Этот материал, посвящённый обработке ошибок в JavaScript, разбит на три части. Сначала мы сделаем общий обзор системы обработки ошибок в JavaScript и поговорим об объектах ошибок. После этого мы поищем ответ на вопрос о том, что делать с ошибками, возникающими в серверном коде (в частности, при использовании связки Node.js + Express.js). Далее — обсудим обработку ошибок в React.js. Фреймворки, которые будут здесь рассматриваться, выбраны по причине их огромной популярности. Однако рассматриваемые здесь принципы работы с ошибками универсальны, поэтому вы, даже если не пользуетесь Express и React, без труда сможете применить то, что узнали, к тем инструментам, с которыми работаете.
Код демонстрационного проекта, используемого в данном материале, можно найти в этом репозитории.
1. Ошибки в JavaScript и универсальные способы работы с ними
Если в вашем коде что-то пошло не так, вы можете воспользоваться следующей конструкцией.
throw new Error('something went wrong')В ходе выполнения этой команды будет создан экземпляр объекта Error и будет сгенерировано (или, как говорят, «выброшено») исключение с этим объектом. Инструкция throw может генерировать исключения, содержащие произвольные выражения. При этом выполнение скрипта остановится в том случае, если не были предприняты меры по обработке ошибки.
Начинающие JS-программисты обычно не используют инструкцию throw. Они, как правило, сталкиваются с исключениями, выдаваемыми либо средой выполнения языка, либо сторонними библиотеками. Когда это происходит — в консоль попадает нечто вроде ReferenceError: fs is not defined и выполнение программы останавливается.
▍Объект Error
У экземпляров объекта Error есть несколько свойств, которыми мы можем пользоваться. Первое интересующее нас свойство — message. Именно сюда попадает та строка, которую можно передать конструктору ошибки в качестве аргумента. Например, ниже показано создание экземпляра объекта Error и вывод в консоль переданной конструктором строки через обращение к его свойству message.
const myError = new Error('please improve your code')
console.log(myError.message) // please improve your code
Второе свойство объекта, очень важное, представляет собой трассировку стека ошибки. Это — свойство stack. Обратившись к нему можно просмотреть стек вызовов (историю ошибки), который показывает последовательность операций, приведшую к неправильной работе программы. В частности, это позволяет понять — в каком именно файле содержится сбойный код, и увидеть, какая последовательность вызовов функций привела к ошибке. Вот пример того, что можно увидеть, обратившись к свойству stack.
Error: please improve your code
 at Object.<anonymous> (/Users/gisderdube/Documents/_projects/hacking.nosync/error-handling/src/general.js:1:79)
 at Module._compile (internal/modules/cjs/loader.js:689:30)
 at Object.Module._extensions..js (internal/modules/cjs/loader.js:700:10)
 at Module.load (internal/modules/cjs/loader.js:599:32)
 at tryModuleLoad (internal/modules/cjs/loader.js:538:12)
 at Function.Module._load (internal/modules/cjs/loader.js:530:3)
 at Function.Module.runMain (internal/modules/cjs/loader.js:742:12)
 at startup (internal/bootstrap/node.js:266:19)
 at bootstrapNodeJSCore (internal/bootstrap/node.js:596:3)
Здесь, в верхней части, находится сообщение об ошибке, затем следует указание на тот участок кода, выполнение которого вызвало ошибку, потом описывается то место, откуда был вызван этот сбойный участок. Это продолжается до самого «дальнего» по отношению к ошибке фрагмента кода.
▍Генерирование и обработка ошибок
Создание экземпляра объекта Error, то есть, выполнение команды вида new Error(), ни к каким особым последствиям не приводит. Интересные вещи начинают происходить после применения оператора throw, который генерирует ошибку. Как уже было сказано, если такую ошибку не обработать, выполнение скрипта остановится. При этом нет никакой разницы — был ли оператор throw использован самим программистом, произошла ли ошибка в некоей библиотеке или в среде выполнения языка (в браузере или в Node.js). Поговорим о различных сценариях обработки ошибок.
▍Конструкция try…catch
Блок try...catch представляет собой самый простой способ обработки ошибок, о котором часто забывают. В наши дни, правда, он используется гораздо интенсивнее чем раньше, благодаря тому, что его можно применять для обработки ошибок в конструкциях async/await.
Этот блок можно использовать для обработки любых ошибок, происходящих в синхронном коде. Рассмотрим пример.
const a = 5

try {
    console.log(b) // переменная b не объявлена - возникает ошибка
} catch (err) {
    console.error(err) // в консоль попадает сообщение об ошибке и стек ошибки
}

console.log(a) // выполнение скрипта не останавливается, данная команда выполняется
Если бы в этом примере мы не заключили бы сбойную команду console.log(b) в блок try...catch, то выполнение скрипта было бы остановлено.
▍Блок finally
Иногда случается так, что некий код нужно выполнить независимо от того, произошла ошибка или нет. Для этого можно, в конструкции try...catch, использовать третий, необязательный, блок — finally. Часто его использование эквивалентно некоему коду, который идёт сразу после try...catch, но в некоторых ситуациях он может пригодиться. Вот пример его использования.
const a = 5

try {
    console.log(b) // переменная b не объявлена - возникает ошибка
} catch (err) {
    console.error(err) // в консоль попадает сообщение об ошибке и стек ошибки
} finally {
    console.log(a) // этот код будет выполнен в любом случае
}
▍Асинхронные механизмы — коллбэки
Программируя на JavaScript всегда стоит обращать внимание на участки кода, выполняющиеся асинхронно. Если у вас имеется асинхронная функция и в ней возникает ошибка, скрипт продолжит выполняться. Когда асинхронные механизмы в JS реализуются с использованием коллбэков (кстати, делать так не рекомендуется), соответствующий коллбэк (функция обратного вызова) обычно получает два параметра. Это нечто вроде параметра err, который может содержать ошибку, и result — с результатами выполнения асинхронной операции. Выглядит это примерно так:
myAsyncFunc(someInput, (err, result) => {
    if(err) return console.error(err) // порядок работы с объектом ошибки мы рассмотрим позже
    console.log(result)
})
Если в коллбэк попадает ошибка, она видна там в виде параметра err. В противном случае в этот параметр попадёт значение undefined или null. Если оказалось, что в err что-то есть, важно отреагировать на это, либо так как в нашем примере, воспользовавшись командой return, либо воспользовавшись конструкцией if...else и поместив в блок else команды для работы с результатом выполнения асинхронной операции. Речь идёт о том, чтобы, в том случае, если произошла ошибка, исключить возможность работы с результатом, параметром result, который в таком случае может иметь значение undefined. Работа с таким значением, если предполагается, например, что оно содержит объект, сама может вызвать ошибку. Скажем, это произойдёт при попытке использовать конструкцию result.data или подобную ей.
▍Асинхронные механизмы — промисы
Для выполнения асинхронных операций в JavaScript лучше использовать не коллбэки а промисы. Тут, в дополнение к улучшенной читабельности кода, имеются и более совершенные механизмы обработки ошибок. А именно, возиться с объектом ошибки, который может попасть в функцию обратного вызова, при использовании промисов не нужно. Здесь для этой цели предусмотрен специальный блок catch. Он перехватывает все ошибки, произошедшие в промисах, которые находятся до него, или все ошибки, которые произошли в коде после предыдущего блока catch. Обратите внимание на то, что если в промисе произошла ошибка, для обработки которой нет блока catch, это не остановит выполнение скрипта, но сообщение об ошибке будет не особенно удобочитаемым.
(node:7741) UnhandledPromiseRejectionWarning: Unhandled promise rejection (rejection id: 1): Error: something went wrong
(node:7741) DeprecationWarning: Unhandled promise rejections are deprecated. In the future, promise rejections that are not handled will terminate the Node.js process with a non-zero exit code. */
В результате можно порекомендовать всегда, при работе с промисами, использовать блок catch. Взглянем на пример.
Promise.resolve(1)
    .then(res => {
        console.log(res) // 1

        throw new Error('something went wrong')

        return Promise.resolve(2)
    })
    .then(res => {
        console.log(res) // этот блок выполнен не будет
    })
    .catch(err => {
        console.error(err) // о том, что делать с этой ошибкой, поговорим позже
        return Promise.resolve(3)
    })
    .then(res => {
        console.log(res) // 3
    })
    .catch(err => {
        // этот блок тут на тот случай, если в предыдущем блоке возникнет какая-нибудь ошибка
        console.error(err)
    })
▍Асинхронные механизмы и try…catch
После того, как в JavaScript появилась конструкция async/await, мы вернулись к классическому способу обработки ошибок — к try...catch...finally. Обрабатывать ошибки при таком подходе оказывается очень легко и удобно. Рассмотрим пример.
;(async function() {
    try {
        await someFuncThatThrowsAnError()
    } catch (err) {
        console.error(err) // об этом поговорим позже
    }

    console.log('Easy!') // будет выполнено
})()
При таком подходе ошибки в асинхронном коде обрабатываются так же, как в синхронном. В результате теперь, при необходимости, в одном блоке catch можно обрабатывать более широкий диапазон ошибок.
2. Генерирование и обработка ошибок в серверном коде
Теперь, когда у нас есть инструменты для работы с ошибками, посмотрим на то, что мы можем с ними делать в реальных ситуациях. Генерирование и правильная обработка ошибок — это важнейший аспект серверного программирования. Существуют разные подходы к работе с ошибками. Здесь будет продемонстрирован подход с использованием собственного конструктора для экземпляров объекта Error и кодов ошибок, которые удобно передавать во фронтенд или любым механизмам, использующим серверные API. Как структурирован бэкенд конкретного проекта — особого значения не имеет, так как при любом подходе можно использовать одни и те же идеи, касающиеся работы с ошибками.
В качестве серверного фреймворка, отвечающего за маршрутизацию, мы будем использовать Express.js. Подумаем о том, какая структура нам нужна для организации эффективной системы обработки ошибок. Итак, вот что нам нужно:
- Универсальная обработка ошибок — некий базовый механизм, подходящий для обработки любых ошибок, в ходе работы которого просто выдаётся сообщение наподобие
Something went wrong, please try again or contact us, предлагающее пользователю попробовать выполнить операцию, давшую сбой, ещё раз или связаться с владельцем сервера. Эта система не отличается особой интеллектуальностью, но она, по крайней мере, способна сообщить пользователю о том, что что-то пошло не так. Подобное сообщение гораздо лучше, чем «бесконечная загрузка» или нечто подобное. - Обработка конкретных ошибок — механизм, позволяющий сообщить пользователю подробные сведения о причинах неправильного поведения системы и дать ему конкретные советы по борьбе с неполадкой. Например, это может касаться отсутствия неких важных данных в запросе, который пользователь отправляет на сервер, или в том, что в базе данных уже существует некая запись, которую он пытается добавить ещё раз, и так далее.
▍Разработка собственного конструктора объектов ошибок
Здесь мы воспользуемся стандартным классом Error и расширим его. Пользоваться механизмами наследования в JavaScript — дело рискованное, но в данном случае эти механизмы оказываются весьма полезными. Зачем нам наследование? Дело в том, что нам, для того, чтобы код удобно было бы отлаживать, нужны сведения о трассировке стека ошибки. Расширяя стандартный класс Error, мы, без дополнительных усилий, получаем возможности по трассировке стека. Мы добавляем в наш собственный объект ошибки два свойства. Первое — это свойство code, доступ к которому можно будет получить с помощью конструкции вида err.code. Второе — свойство status. В него будет записываться код состояния HTTP, который планируется передавать клиентской части приложения.
Вот как выглядит класс CustomError, код которого оформлен в виде модуля.
class CustomError extends Error {
    constructor(code = 'GENERIC', status = 500, ...params) {
        super(...params)

        if (Error.captureStackTrace) {
            Error.captureStackTrace(this, CustomError)
        }

        this.code = code
        this.status = status
    }
}

module.exports = CustomError
▍Маршрутизация
Теперь, когда наш объект ошибки готов к использованию, нужно настроить структуру маршрутов. Как было сказано выше, нам требуется реализовать унифицированный подход к обработке ошибок, позволяющий одинаково обрабатывать ошибки для всех маршрутов. По умолчанию фреймворк Express.js не вполне поддерживает такую схему работы. Дело в том, что все его маршруты инкапсулированы.
Для того чтобы справиться с этой проблемой, мы можем реализовать собственный обработчик маршрутов и определять логику маршрутов в виде обычных функций. Благодаря такому подходу, если функция маршрута (или любая другая функция) выбрасывает ошибку, она попадёт в обработчик маршрутов, который затем может передать её клиентской части приложения. При возникновении ошибки на сервере мы планируем передавать её во фронтенд в следующем формате, полагая, что для этого будет применяться JSON-API:
{
    error: 'SOME_ERROR_CODE',
    description: 'Something bad happened. Please try again or contact support.'
}
Если на данном этапе происходящие кажется вам непонятным — не беспокойтесь — просто продолжайте читать, пробуйте работать с тем, о чём идёт речь, и постепенно вы во всём разберётесь. На самом деле, если говорить о компьютерном обучении, здесь применяется подход «сверху-вниз», когда сначала обсуждаются общие идеи, а потом осуществляется переход к частностям.
Вот как выглядит код обработчика маршрутов.
const express = require('express')
const router = express.Router()
const CustomError = require('../CustomError')

router.use(async (req, res) => {
    try {
        const route = require(`.${req.path}`)[req.method]

        try {
            const result = route(req) // Передаём запрос функции route
            res.send(result) // Передаём клиенту то, что получено от функции route
        } catch (err) {
            /*
            Сюда мы попадаем в том случае, если в функции route произойдёт ошибка
            */
            if (err instanceof CustomError) {
                /*
                Если ошибка уже обработана - трансформируем её в
                возвращаемый объект
                */

                return res.status(err.status).send({
                    error: err.code,
                    description: err.message,
                })
            } else {
                console.error(err) // Для отладочных целей

                // Общая ошибка - вернём универсальный объект ошибки
                return res.status(500).send({
                    error: 'GENERIC',
                    description: 'Something went wrong. Please try again or contact support.',
                })
            }
        }
    } catch (err) {
        /*
         Сюда мы попадём, если запрос окажется неудачным, то есть,
         либо не будет найдено файла, соответствующего пути, переданному
         в запросе, либо не будет экспортированной функции с заданным
         методом запроса
        */
        res.status(404).send({
            error: 'NOT_FOUND',
            description: 'The resource you tried to access does not exist.',
        })
    }
})

module.exports = router
Полагаем, комментарии в коде достаточно хорошо его поясняют. Надеемся, читать их удобнее, чем объяснения подобного кода, данные после него.
Теперь взглянем на файл маршрутов.
const CustomError = require('../CustomError')

const GET = req => {
    // пример успешного выполнения запроса
    return { name: 'Rio de Janeiro' }
}

const POST = req => {
    // пример ошибки общего характера
    throw new Error('Some unexpected error, may also be thrown by a library or the runtime.')
}

const DELETE = req => {
    // пример ошибки, обрабатываемой особым образом
    throw new CustomError('CITY_NOT_FOUND', 404, 'The city you are trying to delete could not be found.')
}

const PATCH = req => {
    // пример перехвата ошибок и использования CustomError
    try {
        // тут случилось что-то нехорошее
        throw new Error('Some internal error')
    } catch (err) {
        console.error(err) // принимаем решение о том, что нам тут делать

        throw new CustomError(
            'CITY_NOT_EDITABLE',
            400,
            'The city you are trying to edit is not editable.'
        )
    }
}

module.exports = {
    GET,
    POST,
    DELETE,
    PATCH,
}
В этих примерах с самими запросами ничего не делается. Тут просто рассматриваются разные сценарии возникновения ошибок. Итак, например, запрос GET /city попадёт в функцию const GET = req =>..., запрос POST /city попадёт в функцию const POST = req =>... и так далее. Эта схема работает и при использовании параметров запросов. Например — для запроса вида GET /city?startsWith=R. В целом, здесь продемонстрировано, что при обработке ошибок, во фронтенд может попасть либо общая ошибка, содержащая лишь предложение попробовать снова или связаться с владельцем сервера, либо ошибка, сформированная с использованием конструктора CustomError, которая содержит подробные сведения о проблеме.
Данные общей ошибки придут в клиентскую часть приложения в таком виде:
{
    error: 'GENERIC',
    description: 'Something went wrong. Please try again or contact support.'
}
Конструктор CustomError используется так:
throw new CustomError('MY_CODE', 400, 'Error description')Это даёт следующий JSON-код, передаваемый во фронтенд:
{
    error: 'MY_CODE',
    description: 'Error description'
}
Теперь, когда мы основательно потрудились над серверной частью приложения, в клиентскую часть больше не попадают бесполезные логи ошибок. Вместо этого клиент получает полезные сведения о том, что пошло не так.
Не забудьте о том, что здесь лежит репозиторий с рассматриваемым здесь кодом. Можете его загрузить, поэкспериментировать с ним, и, если надо, адаптировать под нужды вашего проекта.
3. Работа с ошибками на клиенте
Теперь пришла пора описать третью часть нашей системы обработки ошибок, касающуюся фронтенда. Тут нужно будет, во-первых, обрабатывать ошибки, возникающие в клиентской части приложения, а во-вторых, понадобится оповещать пользователя об ошибках, возникающих на сервере. Разберёмся сначала с показом сведений о серверных ошибках. Как уже было сказано, в этом примере будет использована библиотека React.
▍Сохранение сведений об ошибках в состоянии приложения
Как и любые другие данные, ошибки и сообщения об ошибках могут меняться, поэтому их имеет смысл помещать в состояние компонентов. При монтировании компонента данные об ошибке сбрасываются, поэтому, когда пользователь впервые видит страницу, там сообщений об ошибках не будет.
Следующее, с чем надо разобраться, заключается в том, что ошибки одного типа нужно показывать в одном стиле. По аналогии с сервером, здесь можно выделить 3 типа ошибок.
- Глобальные ошибки — в эту категорию попадают сообщения об ошибках общего характера, приходящие с сервера, или ошибки, которые, например, возникают в том случае, если пользователь не вошёл в систему и в других подобных ситуациях.
- Специфические ошибки, выдаваемые серверной частью приложения — сюда относятся ошибки, сведения о которых приходят с сервера. Например, подобная ошибка возникает, если пользователь попытался войти в систему и отправил на сервер имя и пароль, а сервер сообщил ему о том, что пароль неправильный. Подобные вещи в клиентской части приложения не проверяются, поэтому сообщения о таких ошибках должны приходить с сервера.
- Специфические ошибки, выдаваемые клиентской частью приложения. Пример такой ошибки — сообщение о некорректном адресе электронной почты, введённом в соответствующее поле.
Ошибки второго и третьего типов очень похожи, работать с ними можно, используя хранилище состояния компонентов одного уровня. Их главное различие заключается в том, что они исходят из разных источников. Ниже, анализируя код, мы посмотрим на работу с ними.
Здесь будет использоваться встроенная в React система управления состоянием приложения, но, при необходимости, вы можете воспользоваться и специализированными решениями для управления состоянием — такими, как MobX или Redux.
▍Глобальные ошибки
Обычно сообщения о таких ошибках сохраняются в компоненте наиболее высокого уровня, имеющем состояние. Они выводятся в статическом элементе пользовательского интерфейса. Это может быть красное поле в верхней части экрана, модальное окно или что угодно другое. Реализация зависит от конкретного проекта. Вот как выглядит сообщение о такой ошибке.
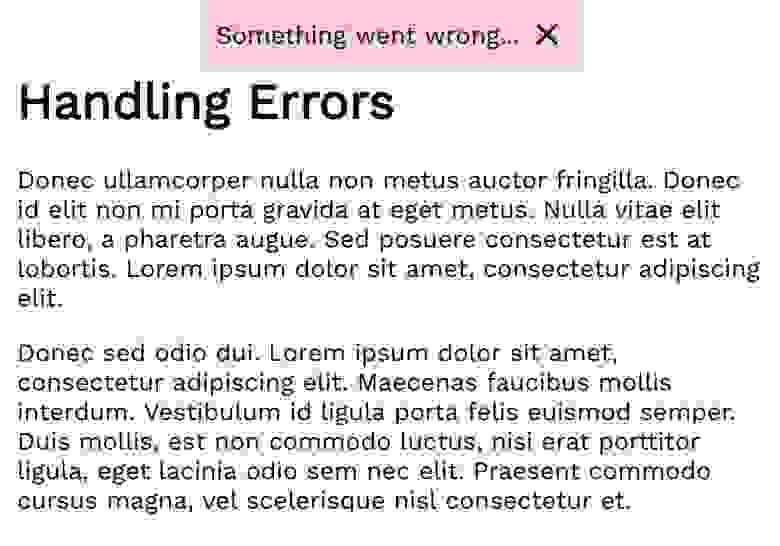
Сообщение о глобальной ошибке
Теперь взглянем на код, который хранится в файле Application.js.
import React, { Component } from 'react'

import GlobalError from './GlobalError'

class Application extends Component {
    constructor(props) {
        super(props)

        this.state = {
            error: '',
        }

        this._resetError = this._resetError.bind(this)
        this._setError = this._setError.bind(this)
    }

    render() {
        return (
            <div className="container">
                <GlobalError error={this.state.error} resetError={this._resetError} />
                <h1>Handling Errors</h1>
            </div>
        )
    }

    _resetError() {
        this.setState({ error: '' })
    }

    _setError(newError) {
        this.setState({ error: newError })
    }
}

export default Application
Как видно, в состоянии, в Application.js, имеется место для хранения данных ошибки. Кроме того, тут предусмотрены методы для сброса этих данных и для их изменения.
Ошибка и метод для сброса ошибки передаётся компоненту GlobalError, который отвечает за вывод сообщения об ошибке на экран и за сброс ошибки после нажатия на значок x в поле, где выводится сообщение. Вот код компонента GlobalError (файл GlobalError.js).
import React, { Component } from 'react'

class GlobalError extends Component {
    render() {
        if (!this.props.error) return null

        return (
            <div
                style={{
                    position: 'fixed',
                    top: 0,
                    left: '50%',
                    transform: 'translateX(-50%)',
                    padding: 10,
                    backgroundColor: '#ffcccc',
                    boxShadow: '0 3px 25px -10px rgba(0,0,0,0.5)',
                    display: 'flex',
                    alignItems: 'center',
                }}
            >
                {this.props.error}

                <i
                    className="material-icons"
                    style={{ cursor: 'pointer' }}
                    onClick={this.props.resetError}
                >
                    close
                </font></i>
            </div>
        )
    }
}

export default GlobalError
Обратите внимание на строку if (!this.props.error) return null. Она указывает на то, что при отсутствии ошибки компонент ничего не выводит. Это предотвращает постоянный показ красного прямоугольника на странице. Конечно, вы, при желании, можете поменять внешний вид и поведение этого компонента. Например, вместо того, чтобы сбрасывать ошибку по нажатию на x, можно задать тайм-аут в пару секунд, по истечении которого состояние ошибки сбрасывается автоматически.
Теперь, когда всё готово для работы с глобальными ошибками, для задания глобальной ошибки достаточно воспользоваться _setError из Application.js. Например, это можно сделать в том случае, если сервер, после обращения к нему, вернул сообщение об общей ошибке (error: 'GENERIC'). Рассмотрим пример (файл GenericErrorReq.js).
import React, { Component } from 'react'
import axios from 'axios'

class GenericErrorReq extends Component {
    constructor(props) {
        super(props)

        this._callBackend = this._callBackend.bind(this)
    }

    render() {
        return (
            <div>
                <button onClick={this._callBackend}>Click me to call the backend</button>
            </div>
        )
    }

    _callBackend() {
        axios
            .post('/api/city')
            .then(result => {
                // сделать что-нибудь с результатом в том случае, если запрос оказался успешным
            })
            .catch(err => {
                if (err.response.data.error === 'GENERIC') {
                    this.props.setError(err.response.data.description)
                }
            })
    }
}

export default GenericErrorReq
На самом деле, на этом наш разговор об обработке ошибок можно было бы и закончить. Даже если в проекте нужно оповещать пользователя о специфических ошибках, никто не мешает просто поменять глобальное состояние, хранящее ошибку и вывести соответствующее сообщение поверх страницы. Однако тут мы не остановимся и поговорим о специфических ошибках. Во-первых, это руководство по обработке ошибок иначе было бы неполным, а во-вторых, с точки зрения UX-специалистов, неправильно будет показывать сообщения обо всех ошибках так, будто все они — глобальные.
▍Обработка специфических ошибок, возникающих при выполнении запросов
Вот пример специфического сообщения об ошибке, выводимого в том случае, если пользователь пытается удалить из базы данных город, которого там нет.

Сообщение о специфической ошибке
Тут используется тот же принцип, который мы применяли при работе с глобальными ошибками. Только сведения о таких ошибках хранятся в локальном состоянии соответствующих компонентов. Работа с ними очень похожа на работу с глобальными ошибками. Вот код файла SpecificErrorReq.js.
import React, { Component } from 'react'
import axios from 'axios'

import InlineError from './InlineError'

class SpecificErrorRequest extends Component {
    constructor(props) {
        super(props)

        this.state = {
            error: '',
        }

        this._callBackend = this._callBackend.bind(this)
    }

    render() {
        return (
            <div>
                <button onClick={this._callBackend}>Delete your city</button>
                <InlineError error={this.state.error} />
            </div>
        )
    }

    _callBackend() {
        this.setState({
            error: '',
        })

        axios
            .delete('/api/city')
            .then(result => {
                // сделать что-нибудь с результатом в том случае, если запрос оказался успешным
            })
            .catch(err => {
                if (err.response.data.error === 'GENERIC') {
                    this.props.setError(err.response.data.description)
                } else {
                    this.setState({
                        error: err.response.data.description,
                    })
                }
            })
    }
}

export default SpecificErrorRequest
Тут стоит отметить, что для сброса специфических ошибок недостаточно, например, просто нажать на некую кнопку x. То, что пользователь прочёл сообщение об ошибке и закрыл его, не помогает такую ошибку исправить. Исправить её можно, правильно сформировав запрос к серверу, например — введя в ситуации, показанной на предыдущем рисунке, имя города, который есть в базе. В результате очищать сообщение об ошибке имеет смысл, например, после выполнения нового запроса. Сбросить ошибку можно и в том случае, если пользователь внёс изменения в то, что будет использоваться при формировании нового запроса, то есть — при изменении содержимого поля ввода.
▍Ошибки, возникающие в клиентской части приложения
Как уже было сказано, для хранения данных о таких ошибках можно использовать состояние тех же компонентов, которое используется для хранения данных по специфическим ошибкам, поступающим с сервера. Предположим, мы позволяем пользователю отправить на сервер запрос на удаление города из базы только в том случае, если в соответствующем поле ввода есть какой-то текст. Отсутствие или наличие текста в поле можно проверить средствами клиентской части приложения.

В поле ничего нет, мы сообщаем об этом пользователю
Вот код файла SpecificErrorFrontend.js, реализующий вышеописанный функционал.
import React, { Component } from 'react'
import axios from 'axios'

import InlineError from './InlineError'

class SpecificErrorRequest extends Component {
    constructor(props) {
        super(props)

        this.state = {
            error: '',
            city: '',
        }

        this._callBackend = this._callBackend.bind(this)
        this._changeCity = this._changeCity.bind(this)
    }

    render() {
        return (
            <div>
                <input
                    type="text"
                    value={this.state.city}
                    style={{ marginRight: 15 }}
                    onChange={this._changeCity}
                />
                <button onClick={this._callBackend}>Delete your city</button>
                <InlineError error={this.state.error} />
            </div>
        )
    }

    _changeCity(e) {
        this.setState({
            error: '',
            city: e.target.value,
        })
    }

    _validate() {
        if (!this.state.city.length) throw new Error('Please provide a city name.')
    }

    _callBackend() {
        this.setState({
            error: '',
        })

        try {
            this._validate()
        } catch (err) {
            return this.setState({ error: err.message })
        }

        axios
            .delete('/api/city')
            .then(result => {
                // сделать что-нибудь с результатом в том случае, если запрос оказался успешным
            })
            .catch(err => {
                if (err.response.data.error === 'GENERIC') {
                    this.props.setError(err.response.data.description)
                } else {
                    this.setState({
                        error: err.response.data.description,
                    })
                }
            })
    }
}

export default SpecificErrorRequest
▍Интернационализация сообщений об ошибках с использованием кодов ошибок
Возможно, сейчас вы задаётесь вопросом о том, зачем нам нужны коды ошибок (наподобие GENERIC), если мы показываем пользователю только сообщения об ошибках, полученных с сервера. Дело в том, что, по мере роста и развития приложения, оно, вполне возможно, выйдет на мировой рынок, а это означает, что настанет время, когда создателям приложения нужно будет задуматься о поддержке им нескольких языков. Коды ошибок позволяют отличать их друг от друга и выводить сообщения о них на языке пользователя сайта.
Итоги
Надеемся, теперь у вас сформировалось понимание того, как можно работать с ошибками в веб-приложениях. Нечто вроде console.error(err) следует использовать только в отладочных целях, в продакшн подобные вещи, забытые программистом, проникать не должны. Упрощает решение задачи логирования использование какой-нибудь подходящей библиотеки наподобие loglevel.
Уважаемые читатели! Как вы обрабатываете ошибки в своих проектах?

Порядок выполнения и обработка ошибок
- « Предыдущая статья
- Следующая статья »
JavaScript поддерживает компактный набор инструкций, особенно управляющих инструкций, которые вы можете использовать, чтобы реализовать интерактивность в вашем приложении. В данной главе даётся обзор этих инструкций.
Более подробная информация об инструкциях, рассмотренных в данной главе, содержится в справочнике по JavaScript. Точка с запятой (;) используется для разделения инструкций в коде.
Любое выражение (expression) в JavaScript является также инструкцией (statement). Чтобы получить более подробную информацию о выражениях, прочитайте Выражения и операторы.
Инструкция block
Инструкция block является фундаментальной и используется для группировки других инструкций. Блок ограничивается фигурными скобками:
{ statement_1; statement_2; ... statement_n; }
Блок обычно используется с управляющими инструкциями (например, if, for, while).
В вышеприведённом примере { x++; } является блоком.
Обратите внимание: в JavaScript отсутствует область видимости блока до ECMAScript2015. Переменные, объявленные внутри блока, имеют область видимости функции (или скрипта), в которой находится данный блок, вследствие чего они сохранят свои значения при выходе за пределы блока. Другими словами, блок не создаёт новую область видимости. «Автономные» (standalone) блоки в JavaScript могут продуцировать полностью отличающийся результат, от результата в языках C или Java. Например:
var x = 1;
{
  var x = 2;
}
console.log(x); // выведет 2
В вышеприведённом примере инструкция var x внутри блока находится в той же области видимости, что и инструкция var x перед блоком. В C или Java эквивалентный код выведет значение 1.
Начиная с ECMAScript 6, оператор let позволяет объявить переменную в области видимости блока. Чтобы получить более подробную информацию, прочитайте let.
Условные инструкции
Условная инструкция — это набор команд, которые выполняются, если указанное условие является истинным. JavaScript поддерживает две условные инструкции: if...else и switch.
Инструкция if…else
Используйте оператор if для выполнения инструкции, если логическое условия истинно. Используйте опциональный else, для выполнения инструкции, если условие ложно. Оператор if выглядит так:
if (condition) {
    statement_1;
} else {
    statement_2;
}
Здесь condition может быть любым выражением, вычисляемым как истинное (true) или ложное (false). Чтобы получить более подробную информацию о значениях true и false, прочитайте Boolean. Если условие оценивается как true, то выполняется statement_1, в противном случае — statement_2. Блоки statement_1 и statement_2 могут быть любыми блоками, включая также вложенные инструкции if.
Также вы можете объединить несколько инструкций, пользуясь else if для получения последовательности проверок условий:
if (condition_1) { statement_1;} else if (condition_2) { statement_2;} else if (condition_n) { statement_n; } else { statement_last;}
В случае нескольких условий только первое логическое условие, которое вычислится истинным (true), будет выполнено. Используйте блок ({ ... }) для группировки нескольких инструкций. Применение блоков является хорошей практикой, особенно когда используются вложенные инструкции if:
if (condition) {
  statement_1_runs_if_condition_is_true;
  statement_2_runs_if_condition_is_true;
} else {
  statement_3_runs_if_condition_is_false;
  statement_4_runs_if_condition_is_false;
}
Нежелательно использовать простые присваивания в условном выражении, т.к. присваивание может быть спутано с равенством при быстром просмотре кода. Например, не используйте следующий код:
Если вам нужно использовать присваивание в условном выражении, то распространённой практикой является заключение операции присваивания в дополнительные скобки. Например:
if ( (x = y) ) { /* ... */ }
Ложные значения
Следующие значения являются ложными:
falseundefinednull0NaN- пустая строка (
"")
Все остальные значения, включая все объекты, будут восприняты как истина при передаче в условное выражение.
Не путайте примитивные логические значения true и false со значениями true и false объекта Boolean. Например:
var b = new Boolean(false);
if (b) // это условие true
if (b == true) // это условие false
В следующем примере функция checkData возвращает true, если число символов в объекте Text равно трём; в противном случае функция отображает окно alert и возвращает false.
function checkData() {
  if (document.form1.threeChar.value.length == 3) {
    return true;
  } else {
    alert("Enter exactly three characters. " +
    document.form1.threeChar.value + " is not valid.");
    return false;
  }
}
Инструкция switch
Инструкция switch позволяет сравнить значение выражения с различными вариантами и при совпадении выполнить соответствующий код. Инструкция имеет следующий вид:
switch (expression) {
   case label_1:
      statements_1
      [break;]
   case label_2:
      statements_2
      [break;]
   ...
   default:
      statements_default
      [break;]
}
Сначала производится поиск ветви case с меткой label, совпадающей со значением выражения expression. Если совпадение найдено, то соответствующий данной ветви код выполняется до оператора break, который прекращает выполнение switch и передаёт управление дальше. В противном случае управление передаётся необязательной ветви default и выполняется соответствующий ей код. Если ветвь default не найдена, то программа продолжит выполняться со строчки, следующей за инструкцией switch. По соглашению ветвь default является последней ветвью, но следовать этому соглашению необязательно.
Если оператор break отсутствует, то после выполнения кода, который соответствует выбранной ветви, начнётся выполнение кода, который следует за ней.
В следующем примере если fruittype имеет значение "Bananas", то будет выведено сообщение "Bananas are $0.48 a pound." и оператор break прекратит выполнение switch. Если бы оператор break отсутствовал, то был бы также выполнен код, соответствующий ветви "Cherries", т.е. выведено сообщение "Cherries are $3.00 a pound.".
switch (fruittype) {
  case "Oranges":
    console.log("Oranges are $0.59 a pound.");
    break;
  case "Apples":
    console.log("Apples are $0.32 a pound.");
    break;
  case "Bananas":
    console.log("Bananas are $0.48 a pound.");
    break;
  case "Cherries":
    console.log("Cherries are $3.00 a pound.");
    break;
  case "Mangoes":
    console.log("Mangoes are $0.56 a pound.");
    break;
  case "Papayas":
    console.log("Mangoes and papayas are $2.79 a pound.");
    break;
  default:
   console.log("Sorry, we are out of " + fruittype + ".");
}
console.log("Is there anything else you'd like?");
Инструкции обработки исключений
Инструкция throw используется, чтобы выбросить исключение, а инструкция try...catch, чтобы его обработать.
Типы исключений
Практически любой объект может быть выброшен как исключение. Тем не менее, не все выброшенные объекты создаются равными. Обычно числа или строки выбрасываются как исключения, но часто более эффективным является использование одного из типов исключений, специально созданных для этой цели:
- Исключения ECMAScript
DOMException(en-US) иDOMError(en-US)
Инструкция throw
Используйте инструкцию throw, чтобы выбросить исключение. При выбросе исключения нужно указать выражение, содержащее значение, которое будет выброшено:
throw expression;
Вы можете выбросить любое выражение, а не только выражения определённого типа. В следующем примере выбрасываются исключения различных типов:
throw "Error2";                                              // string
throw 42;                                                    // number
throw true;                                                  // boolean
throw { toString: function() { return "I'm an object!"; } }; // object
Примечание: Вы можете выбросить объект как исключение. Вы можете обращаться к свойствам данного объекта в блоке catch.
Примечание: В следующем примере объект UserException выбрасывается как исключение:
function UserException (message) {
  this.message = message;
  this.name = "UserException";
}

UserException.prototype.toString = function () {
  return this.name + ': "' + this.message + '"';
}

throw new UserException("Value too high");
Инструкция try…catch
Инструкция try...catch состоит из блока try, который содержит одну или несколько инструкций, и блок catch, которые содержит инструкции, определяющие порядок действий при выбросе исключения в блоке try. Иными словами, если в блоке try будет выброшено исключение, то управление будет передано в блок catch. Если в блоке try не возникнет исключений, то блок catch будет пропущен. Блок finally будет выполнен после окончания работы блоков try и catch, вне зависимости от того, было ли выброшено исключение.
В следующем примере вызывается функция getMonthName, которая возвращает название месяца по его номеру. Если месяца с указанным номером не существует, то функция выбросит исключение "InvalidMonthNo", которое будет перехвачено в блоке catch:
function getMonthName(mo) {
  mo = mo - 1; // Adjust month number for array index (1 = Jan, 12 = Dec)
  var months = ["Jan","Feb","Mar","Apr","May","Jun","Jul",
                "Aug","Sep","Oct","Nov","Dec"];
  if (months[mo]) {
    return months[mo];
  } else {
    throw "InvalidMonthNo"; //throw keyword is used here
  }
}

try { // statements to try
  monthName = getMonthName(myMonth); // function could throw exception
}
catch (e) {
  monthName = "unknown";
  logMyErrors(e); // pass exception object to error handler -> your own
}
Блок catch
Используйте блок catch, чтобы обработать исключения, сгенерированные в блоке try.
catch (catchID) { statements }
JavaScript создаёт идентификатор catchID, которому присваивается перехваченное исключение, при входе в блок catch; данный идентификатор доступен только в пределах блока catch и уничтожается при выходе из него.
В следующем примере выбрасывается исключение, которое перехватывается в блоке catch:
try {
  throw "myException"
} catch (e) {
  console.error(e);
}
Блок finally
Блок finally содержит код, который будет выполнен после окончания работы блоков try и catch, но до того, как будет выполнен код, который следует за инструкцией try...catch. Блок finally выполняется вне зависимости от того, было ли выброшено исключение. Блок finally выполняется даже в том случае, если исключение не перехватывается в блоке catch.
В следующем примере открывается файл, затем в блоке try происходит вызов функции writeMyFile, который может выбросить исключение. Если возникает исключение, то оно обрабатывается в блоке catch. В любом случае файл будет закрыт функцией closeMyFile, вызов которой находится в блоке finally.
openMyFile();
try {
  writeMyFile(theData);
} catch(e) {
  handleError(e);
} finally {
  closeMyFile();
}
Если блок finally возвращает значение, то данное значение становится возвращаемым значением всей связки try-catch-finally. Значения, возвращаемые блоками try и catch, будут проигнорированы.
function f() {
  try {
    console.log(0);
    throw "bogus";
  } catch(e) {
    console.log(1);
    return true;    // приостанавливается до завершения блока `finally`
    console.log(2); // не выполняется
  } finally {
    console.log(3);
    return false;   // заменяет предыдущий `return`
    console.log(4); // не выполняется
  }
  // `return false` выполняется сейчас
  console.log(5);  // не выполняется
}
f();               // отображает 0, 1, 3 и возвращает `false`
Замена возвращаемых значений блоком finally распространяется в том числе и на исключения, которые выбрасываются или перевыбрасываются в блоке catch:
function f() {
  try {
    throw "bogus";
  } catch(e) {
    console.log('caught inner "bogus"');
    throw e;      // приостанавливается до завершения блока `finally`
  } finally {
    return false; // заменяет предыдущий `throw`
  }
  // `return false` выполняется сейчас
}

try {
  f();
} catch(e) {
  // Не выполняется, т.к. `throw` в `catch `заменяется на `return` в `finally`
  console.log('caught outer "bogus"');
}

// В результате отображается сообщение caught inner "bogus"
// и возвращается значение `false`
Вложенные инструкции try...catch
Вы можете вкладывать инструкции try...catch друг в друга. Если внутренняя инструкция try...catch не имеет блока catch, то она должна иметь блок finally, кроме того исключение будет перехвачено во внешнем блоке catch. Для получения большей информации ознакомьтесь с вложенными try-блоками.
Использование объекта Error
В зависимости от типа ошибки вы можете использовать свойства name и message, чтобы получить более подробную информацию. Свойство name содержит название ошибки (например, DOMException или Error), свойство message — описание ошибки.
Если вы выбрасываете собственные исключения, то чтобы получить преимущество, которое предоставляют эти свойства (например, если ваш блок catch не делает различий между вашими исключениями и системными), используйте конструктор Error. Например:
function doSomethingErrorProne () {
  if ( ourCodeMakesAMistake() ) {
    throw ( new Error('The message') );
  } else {
    doSomethingToGetAJavascriptError();
  }
}

try {
  doSomethingErrorProne();
} catch (e) {
  console.log(e.name);    // 'Error'
  console.log(e.message); // 'The message' или JavaScript error message
}
Объект Promise
Начиная с ECMAScript2015, JavaScript поддерживает объект Promise, который используется для отложенных и асинхронных операций.
Объект Promise может находиться в следующих состояниях:
- ожидание (pending): начальное состояние, не выполнено и не отклонено.
- выполнено (fulfilled): операция завершена успешно.
- отклонено (rejected): операция завершена с ошибкой.
- заданный (settled): промис выполнен или отклонен, но не находится в состоянии ожидания.

Загрузка изображения при помощи XHR
Простой пример использования объектов Promise и XMLHttpRequest для загрузки изображения доступен в репозитории MDN promise-test на GitHub. Вы также можете посмотреть его в действии. Каждый шаг прокомментирован, что позволяет вам разобраться в архитектуре Promise и XHR. Здесь приводится версия без комментариев:
function imgLoad(url) {
  return new Promise(function(resolve, reject) {
    var request = new XMLHttpRequest();
    request.open('GET', url);
    request.responseType = 'blob';
    request.onload = function() {
      if (request.status === 200) {
        resolve(request.response);
      } else {
        reject(Error('Image didn't load successfully; error code:'
                     + request.statusText));
      }
    };
    request.onerror = function() {
      reject(Error('There was a network error.'));
    };
    request.send();
  });
}
- « Предыдущая статья
- Следующая статья »
Murphy’s law states that whatever can go wrong will eventually go wrong. This applies a tad too well in the world of programming. If you create an application, chances are you’ll create bugs and other issues. Errors in JavaScript are one such common issue!
A software product’s success depends on how well its creators can resolve these issues before hurting their users. And JavaScript, out of all programming languages, is notorious for its average error handling design.
If you’re building a JavaScript application, there’s a high chance you’ll mess up with data types at one point or another. If not that, then you might end up replacing an undefined with a null or a triple equals operator (===) with a double equals operator (==).
It’s only human to make mistakes. This is why we will show you everything you need to know about handling errors in JavaScript.
This article will guide you through the basic errors in JavaScript and explain the various errors you might encounter. You’ll then learn how to identify and fix these errors. There are also a couple of tips to handle errors effectively in production environments.
Without further ado, let’s begin!
Check Out Our Video Guide to Handling JavaScript Errors
What Are JavaScript Errors?
Errors in programming refer to situations that don’t let a program function normally. It can happen when a program doesn’t know how to handle the job at hand, such as when trying to open a non-existent file or reaching out to a web-based API endpoint while there’s no network connectivity.
These situations push the program to throw errors to the user, stating that it doesn’t know how to proceed. The program collects as much information as possible about the error and then reports that it can not move ahead.
Murphy’s law states that whatever can go wrong will eventually go wrong 😬 This applies a bit too well in the world of JavaScript 😅 Get prepped with this guide 👇Click to Tweet
Intelligent programmers try to predict and cover these scenarios so that the user doesn’t have to figure out a technical error message like “404” independently. Instead, they show a much more understandable message: “The page could not be found.”
Errors in JavaScript are objects shown whenever a programming error occurs. These objects contain ample information about the type of the error, the statement that caused the error, and the stack trace when the error occurred. JavaScript also allows programmers to create custom errors to provide extra information when debugging issues.
Properties of an Error
Now that the definition of a JavaScript error is clear, it’s time to dive into the details.
Errors in JavaScript carry certain standard and custom properties that help understand the cause and effects of the error. By default, errors in JavaScript contain three properties:
- message: A string value that carries the error message
- name: The type of error that occurred (We’ll dive deep into this in the next section)
- stack: The stack trace of the code executed when the error occurred.
Additionally, errors can also carry properties like columnNumber, lineNumber, fileName, etc., to describe the error better. However, these properties are not standard and may or may not be present in every error object generated from your JavaScript application.
Understanding Stack Trace
A stack trace is the list of method calls a program was in when an event such as an exception or a warning occurs. This is what a sample stack trace accompanied by an exception looks like:
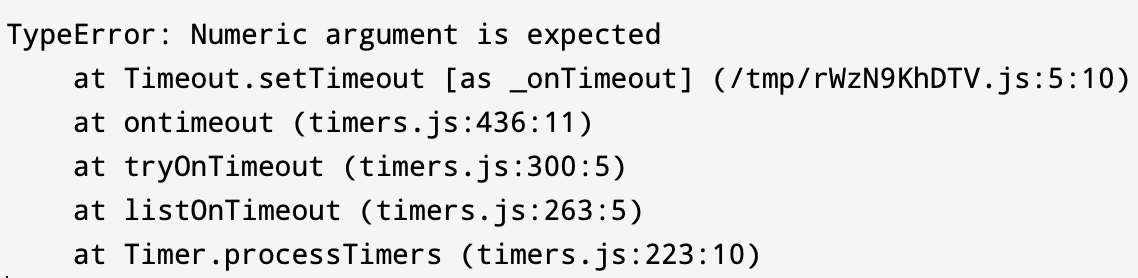
As you can see, it starts by printing the error name and message, followed by a list of methods that were being called. Each method call states the location of its source code and the line at which it was invoked. You can use this data to navigate through your codebase and identify which piece of code is causing the error.
This list of methods is arranged in a stacked fashion. It shows where your exception was first thrown and how it propagated through the stacked method calls. Implementing a catch for the exception will not let it propagate up through the stack and crash your program. However, you might want to leave fatal errors uncaught to crash the program in some scenarios intentionally.
Errors vs Exceptions
Most people usually consider errors and exceptions as the same thing. However, it’s essential to note a slight yet fundamental difference between them.
To understand this better, let’s take a quick example. Here is how you can define an error in JavaScript:
const wrongTypeError = TypeError("Wrong type found, expected character")And this is how the wrongTypeError object becomes an exception:
throw wrongTypeErrorHowever, most people tend to use the shorthand form which defines error objects while throwing them:
throw TypeError("Wrong type found, expected character")This is standard practice. However, it’s one of the reasons why developers tend to mix up exceptions and errors. Therefore, knowing the fundamentals is vital even though you use shorthands to get your work done quickly.
Types of Errors in JavaScript
There’s a range of predefined error types in JavaScript. They are automatically chosen and defined by the JavaScript runtime whenever the programmer doesn’t explicitly handle errors in the application.
This section will walk you through some of the most common types of errors in JavaScript and understand when and why they occur.
RangeError
A RangeError is thrown when a variable is set with a value outside its legal values range. It usually occurs when passing a value as an argument to a function, and the given value doesn’t lie in the range of the function’s parameters. It can sometimes get tricky to fix when using poorly documented third-party libraries since you need to know the range of possible values for the arguments to pass in the correct value.
Some of the common scenarios in which RangeError occurs are:
- Trying to create an array of illegal lengths via the Array constructor.
- Passing bad values to numeric methods like
toExponential(),toPrecision(),toFixed(), etc. - Passing illegal values to string functions like
normalize().
ReferenceError
A ReferenceError occurs when something is wrong with a variable’s reference in your code. You might have forgotten to define a value for the variable before using it, or you might be trying to use an inaccessible variable in your code. In any case, going through the stack trace provides ample information to find and fix the variable reference that is at fault.
Some of the common reasons why ReferenceErrors occur are:
- Making a typo in a variable name.
- Trying to access block-scoped variables outside of their scopes.
- Referencing a global variable from an external library (like $ from jQuery) before it’s loaded.
SyntaxError
These errors are one of the simplest to fix since they indicate an error in the syntax of the code. Since JavaScript is a scripting language that is interpreted rather than compiled, these are thrown when the app executes the script that contains the error. In the case of compiled languages, such errors are identified during compilation. Thus, the app binaries are not created until these are fixed.
Some of the common reasons why SyntaxErrors might occur are:
- Missing inverted commas
- Missing closing parentheses
- Improper alignment of curly braces or other characters
It’s a good practice to use a linting tool in your IDE to identify such errors for you before they hit the browser.
TypeError
TypeError is one of the most common errors in JavaScript apps. This error is created when some value doesn’t turn out to be of a particular expected type. Some of the common cases when it occurs are:
- Invoking objects that are not methods.
- Attempting to access properties of null or undefined objects
- Treating a string as a number or vice versa
There are a lot more possibilities where a TypeError can occur. We’ll look at some famous instances later and learn how to fix them.
InternalError
The InternalError type is used when an exception occurs in the JavaScript runtime engine. It may or may not indicate an issue with your code.
More often than not, InternalError occurs in two scenarios only:
- When a patch or an update to the JavaScript runtime carries a bug that throws exceptions (this happens very rarely)
- When your code contains entities that are too large for the JavaScript engine (e.g. too many switch cases, too large array initializers, too much recursion)
The most appropriate approach to solve this error is to identify the cause via the error message and restructure your app logic, if possible, to eliminate the sudden spike of workload on the JavaScript engine.
URIError
URIError occurs when a global URI handling function such as decodeURIComponent is used illegally. It usually indicates that the parameter passed to the method call did not conform to URI standards and thus was not parsed by the method properly.
Diagnosing these errors is usually easy since you only need to examine the arguments for malformation.
EvalError
An EvalError occurs when an error occurs with an eval() function call. The eval() function is used to execute JavaScript code stored in strings. However, since using the eval() function is highly discouraged due to security issues and the current ECMAScript specifications don’t throw the EvalError class anymore, this error type exists simply to maintain backward compatibility with legacy JavaScript code.
If you’re working on an older version of JavaScript, you might encounter this error. In any case, it’s best to investigate the code executed in the eval() function call for any exceptions.
Creating Custom Error Types
While JavaScript offers an adequate list of error type classes to cover for most scenarios, you can always create a new error type if the list doesn’t satisfy your requirements. The foundation of this flexibility lies in the fact that JavaScript allows you to throw anything literally with the throw command.
So, technically, these statements are entirely legal:
throw 8
throw "An error occurred"
However, throwing a primitive data type doesn’t provide details about the error, such as its type, name, or the accompanying stack trace. To fix this and standardize the error handling process, the Error class has been provided. It’s also discouraged to use primitive data types while throwing exceptions.
You can extend the Error class to create your custom error class. Here is a basic example of how you can do this:
class ValidationError extends Error {
    constructor(message) {
        super(message);
        this.name = "ValidationError";
    }
}
And you can use it in the following way:
throw ValidationError("Property not found: name")And you can then identify it using the instanceof keyword:
try {
    validateForm() // code that throws a ValidationError
} catch (e) {
    if (e instanceof ValidationError)
    // do something
    else
    // do something else
}
Top 10 Most Common Errors in JavaScript
Now that you understand the common error types and how to create your custom ones, it’s time to look at some of the most common errors you’ll face when writing JavaScript code.
Check Out Our Video Guide to The Most Common JavaScript Errors
1. Uncaught RangeError
This error occurs in Google Chrome under a few various scenarios. First, it can happen if you call a recursive function and it doesn’t terminate. You can check this out yourself in the Chrome Developer Console:
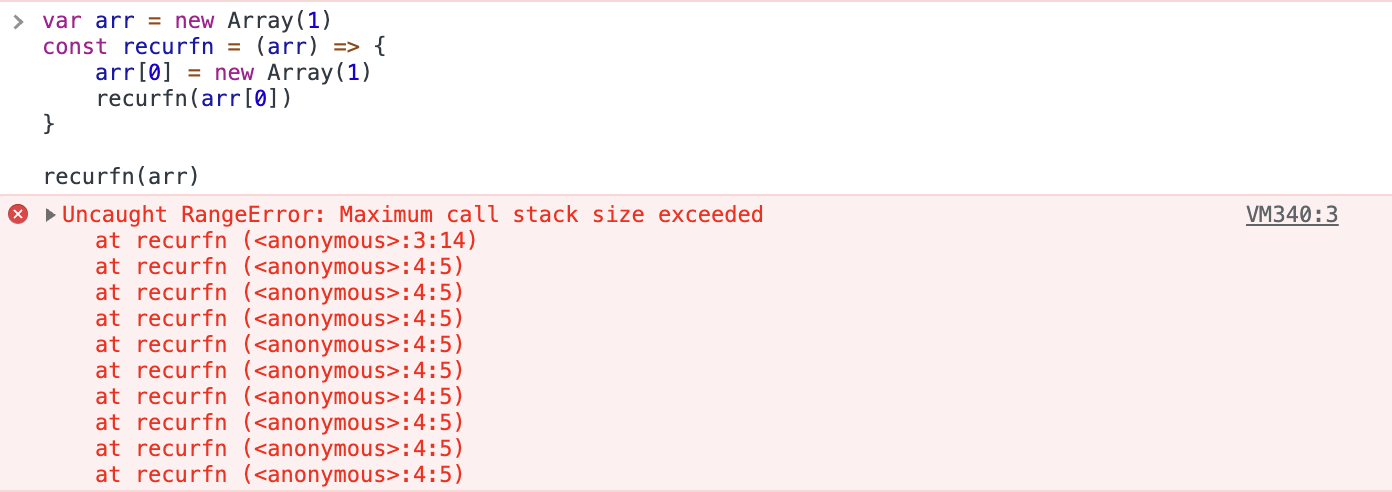
So to solve such an error, make sure to define the border cases of your recursive function correctly. Another reason why this error happens is if you have passed a value that is out of a function’s parameter’s range. Here’s an example:

The error message will usually indicate what is wrong with your code. Once you make the changes, it will be resolved.

2. Uncaught TypeError: Cannot set property
This error occurs when you set a property on an undefined reference. You can reproduce the issue with this code:
var list
list.count = 0
Here’s the output that you’ll receive:

To fix this error, initialize the reference with a value before accessing its properties. Here’s how it looks when fixed:

3. Uncaught TypeError: Cannot read property
This is one of the most frequently occurring errors in JavaScript. This error occurs when you attempt to read a property or call a function on an undefined object. You can reproduce it very easily by running the following code in a Chrome Developer console:
var func
func.call()
Here’s the output:

An undefined object is one of the many possible causes of this error. Another prominent cause of this issue can be an improper initialization of the state while rendering the UI. Here’s a real-world example from a React application:
import React, { useState, useEffect } from "react";

const CardsList = () => {

    const [state, setState] = useState();

    useEffect(() => {
        setTimeout(() => setState({ items: ["Card 1", "Card 2"] }), 2000);
    }, []);

    return (
        <>
            {state.items.map((item) => (
                <li key={item}>{item}</li>
            ))}
        </>
    );
};

export default CardsList;
The app starts with an empty state container and is provided with some items after a delay of 2 seconds. The delay is put in place to imitate a network call. Even if your network is super fast, you’ll still face a minor delay due to which the component will render at least once. If you try to run this app, you’ll receive the following error:
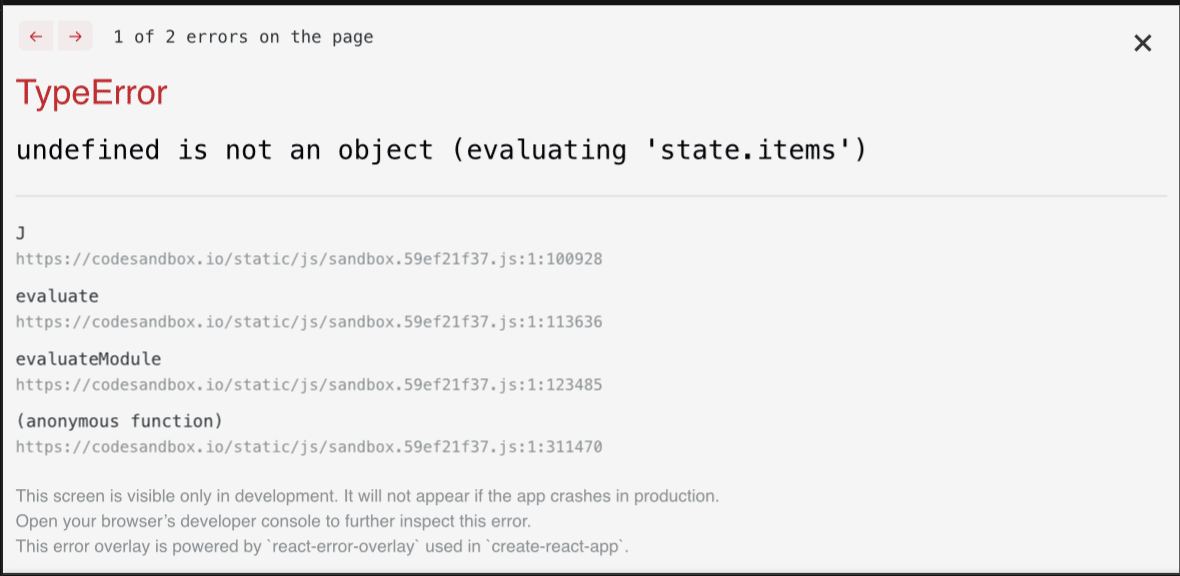
This is because, at the time of rendering, the state container is undefined; thus, there exists no property items on it. Fixing this error is easy. You just need to provide an initial default value to the state container.
// ...
const [state, setState] = useState({items: []});
// ...
Now, after the set delay, your app will show a similar output:

The exact fix in your code might be different, but the essence here is to always initialize your variables properly before using them.
4. TypeError: ‘undefined’ is not an object
This error occurs in Safari when you try to access the properties of or call a method on an undefined object. You can run the same code from above to reproduce the error yourself.

The solution to this error is also the same — make sure that you have initialized your variables correctly and they are not undefined when a property or method is accessed.
5. TypeError: null is not an object
This is, again, similar to the previous error. It occurs on Safari, and the only difference between the two errors is that this one is thrown when the object whose property or method is being accessed is null instead of undefined. You can reproduce this by running the following piece of code:
var func = null

func.call()
Here’s the output that you’ll receive:

Since null is a value explicitly set to a variable and not assigned automatically by JavaScript. This error can occur only if you’re trying to access a variable you set null by yourself. So, you need to revisit your code and check if the logic that you wrote is correct or not.
6. TypeError: Cannot read property ‘length’
This error occurs in Chrome when you try to read the length of a null or undefined object. The cause of this issue is similar to the previous issues, but it occurs quite frequently while handling lists; hence it deserves a special mention. Here’s how you can reproduce the problem:
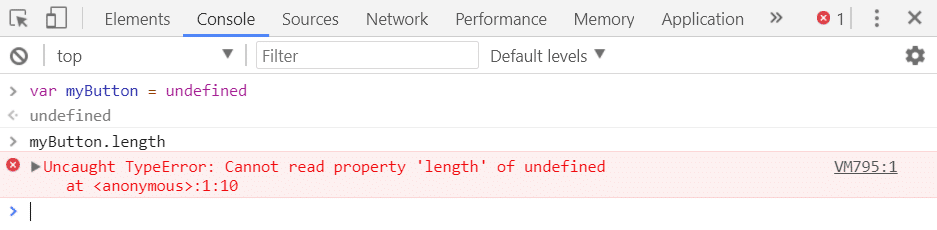
However, in the newer versions of Chrome, this error is reported as Uncaught TypeError: Cannot read properties of undefined. This is how it looks now:

The fix, again, is to ensure that the object whose length you’re trying to access exists and is not set to null.
7. TypeError: ‘undefined’ is not a function
This error occurs when you try to invoke a method that doesn’t exist in your script, or it does but can not be referenced in the calling context. This error usually occurs in Google Chrome, and you can solve it by checking the line of code throwing the error. If you find a typo, fix it and check if it solves your issue.
If you have used the self-referencing keyword this in your code, this error might arise if this is not appropriately bound to your context. Consider the following code:
function showAlert() {
    alert("message here")
}

document.addEventListener("click", () => {
    this.showAlert();
})
If you execute the above code, it will throw the error we discussed. It happens because the anonymous function passed as the event listener is being executed in the context of the document.
In contrast, the function showAlert is defined in the context of the window.
To solve this, you must pass the proper reference to the function by binding it with the bind() method:
document.addEventListener("click", this.showAlert.bind(this))8. ReferenceError: event is not defined
This error occurs when you try to access a reference not defined in the calling scope. This usually happens when handling events since they often provide you with a reference called event in the callback function. This error can occur if you forget to define the event argument in your function’s parameters or misspell it.
This error might not occur in Internet Explorer or Google Chrome (as IE offers a global event variable and Chrome attaches the event variable automatically to the handler), but it can occur in Firefox. So it’s advisable to keep an eye out for such small mistakes.
9. TypeError: Assignment to constant variable
This is an error that arises out of carelessness. If you try to assign a new value to a constant variable, you’ll be met with such a result:

While it seems easy to fix right now, imagine hundreds of such variable declarations and one of them mistakenly defined as const instead of let! Unlike other scripting languages like PHP, there’s minimal difference between the style of declaring constants and variables in JavaScript. Therefore it’s advisable to check your declarations first of all when you face this error. You could also run into this error if you forget that the said reference is a constant and use it as a variable. This indicates either carelessness or a flaw in your app’s logic. Make sure to check this when trying to fix this issue.
10. (unknown): Script error
A script error occurs when a third-party script sends an error to your browser. This error is followed by (unknown) because the third-party script belongs to a different domain than your app. The browser hides other details to prevent leaking sensitive information from the third-party script.
You can not resolve this error without knowing the complete details. Here’s what you can do to get more information about the error:
- Add the
crossoriginattribute in the script tag. - Set the correct
Access-Control-Allow-Originheader on the server hosting the script. - [Optional] If you don’t have access to the server hosting the script, you can consider using a proxy to relay your request to the server and back to the client with the correct headers.
Once you can access the details of the error, you can then set down to fix the issue, which will probably be with either the third-party library or the network.
How to Identify and Prevent Errors in JavaScript
While the errors discussed above are the most common and frequent in JavaScript, you’ll come across, relying on a few examples can never be enough. It’s vital to understand how to detect and prevent any type of error in a JavaScript application while developing it. Here is how you can handle errors in JavaScript.
Manually Throw and Catch Errors
The most fundamental way of handling errors that have been thrown either manually or by the runtime is to catch them. Like most other languages, JavaScript offers a set of keywords to handle errors. It’s essential to know each of them in-depth before you set down to handle errors in your JavaScript app.
throw
The first and most basic keyword of the set is throw. As evident, the throw keyword is used to throw errors to create exceptions in the JavaScript runtime manually. We have already discussed this earlier in the piece, and here’s the gist of this keyword’s significance:
- You can
throwanything, including numbers, strings, andErrorobjects. - However, it’s not advisable to throw primitive data types such as strings and numbers since they don’t carry debug information about the errors.
- Example:
throw TypeError("Please provide a string")
try
The try keyword is used to indicate that a block of code might throw an exception. Its syntax is:
try {
    // error-prone code here
}
It’s important to note that a catch block must always follow the try block to handle errors effectively.
catch
The catch keyword is used to create a catch block. This block of code is responsible for handling the errors that the trailing try block catches. Here is its syntax:
catch (exception) {
    // code to handle the exception here
}
And this is how you implement the try and the catch blocks together:
try {
    // business logic code
} catch (exception) {
    // error handling code
}
Unlike C++ or Java, you can not append multiple catch blocks to a try block in JavaScript. This means that you can not do this:
try {
    // business logic code
} catch (exception) {
    if (exception instanceof TypeError) {
        // do something
    }
} catch (exception) {
    if (exception instanceof RangeError) {
    // do something
    }
}
Instead, you can use an if...else statement or a switch case statement inside the single catch block to handle all possible error cases. It would look like this:
try {
    // business logic code
} catch (exception) {
    if (exception instanceof TypeError) {
        // do something
    } else if (exception instanceof RangeError) {
        // do something else
    }
}
finally
The finally keyword is used to define a code block that is run after an error has been handled. This block is executed after the try and the catch blocks.
Also, the finally block will be executed regardless of the result of the other two blocks. This means that even if the catch block cannot handle the error entirely or an error is thrown in the catch block, the interpreter will execute the code in the finally block before the program crashes.
To be considered valid, the try block in JavaScript needs to be followed by either a catch or a finally block. Without any of those, the interpreter will raise a SyntaxError. Therefore, make sure to follow your try blocks with at least either of them when handling errors.
Handle Errors Globally With the onerror() Method
The onerror() method is available to all HTML elements for handling any errors that may occur with them. For instance, if an img tag cannot find the image whose URL is specified, it fires its onerror method to allow the user to handle the error.
Typically, you would provide another image URL in the onerror call for the img tag to fall back to. This is how you can do that via JavaScript:
const image = document.querySelector("img")

image.onerror = (event) => {
    console.log("Error occurred: " + event)
}
However, you can use this feature to create a global error handling mechanism for your app. Here’s how you can do it:
window.onerror = (event) => {
    console.log("Error occurred: " + event)
}
With this event handler, you can get rid of the multiple try...catch blocks lying around in your code and centralize your app’s error handling similar to event handling. You can attach multiple error handlers to the window to maintain the Single Responsibility Principle from the SOLID design principles. The interpreter will cycle through all handlers until it reaches the appropriate one.
Pass Errors via Callbacks
While simple and linear functions allow error handling to remain simple, callbacks can complicate the affair.
Consider the following piece of code:
const calculateCube = (number, callback) => {
    setTimeout(() => {
        const cube = number * number * number
        callback(cube)
    }, 1000)
}

const callback = result => console.log(result)

calculateCube(4, callback)
The above function demonstrates an asynchronous condition in which a function takes some time to process operations and returns the result later with the help of a callback.
If you try to enter a string instead of 4 in the function call, you’ll get NaN as a result.
This needs to be handled properly. Here’s how:
const calculateCube = (number, callback) => {

    setTimeout(() => {
        if (typeof number !== "number")
            throw new Error("Numeric argument is expected")

        const cube = number * number * number
        callback(cube)
    }, 1000)
}

const callback = result => console.log(result)

try {
    calculateCube(4, callback)
} catch (e) { console.log(e) }
This should solve the problem ideally. However, if you try passing a string to the function call, you’ll receive this:

Even though you have implemented a try-catch block while calling the function, it still says the error is uncaught. The error is thrown after the catch block has been executed due to the timeout delay.
This can occur quickly in network calls, where unexpected delays creep in. You need to cover such cases while developing your app.
Here’s how you can handle errors properly in callbacks:
const calculateCube = (number, callback) => {

    setTimeout(() => {
        if (typeof number !== "number") {
            callback(new TypeError("Numeric argument is expected"))
            return
        }
        const cube = number * number * number
        callback(null, cube)
    }, 2000)
}

const callback = (error, result) => {
    if (error !== null) {
        console.log(error)
        return
    }
    console.log(result)
}

try {
    calculateCube('hey', callback)
} catch (e) {
    console.log(e)
}
Now, the output at the console will be:

This indicates that the error has been appropriately handled.
Handle Errors in Promises
Most people tend to prefer promises for handling asynchronous activities. Promises have another advantage — a rejected promise doesn’t terminate your script. However, you still need to implement a catch block to handle errors in promises. To understand this better, let’s rewrite the calculateCube() function using Promises:
const delay = ms => new Promise(res => setTimeout(res, ms));

const calculateCube = async (number) => {
    if (typeof number !== "number")
        throw Error("Numeric argument is expected")
    await delay(5000)
    const cube = number * number * number
    return cube
}

try {
    calculateCube(4).then(r => console.log(r))
} catch (e) { console.log(e) }
The timeout from the previous code has been isolated into the delay function for understanding. If you try to enter a string instead of 4, the output that you get will be similar to this:

Again, this is due to the Promise throwing the error after everything else has completed execution. The solution to this issue is simple. Simply add a catch() call to the promise chain like this:
calculateCube("hey")
.then(r => console.log(r))
.catch(e => console.log(e))
Now the output will be:

You can observe how easy it is to handle errors with promises. Additionally, you can chain a finally() block and the promise call to add code that will run after error handling has been completed.
Alternatively, you can also handle errors in promises using the traditional try-catch-finally technique. Here’s how your promise call would look like in that case:
try {
    let result = await calculateCube("hey")
    console.log(result)
} catch (e) {
    console.log(e)
} finally {
    console.log('Finally executed")
}
However, this works inside an asynchronous function only. Therefore the most preferred way to handle errors in promises is to chain catch and finally to the promise call.
throw/catch vs onerror() vs Callbacks vs Promises: Which is the Best?
With four methods at your disposal, you must know how to choose the most appropriate in any given use case. Here’s how you can decide for yourselves:
throw/catch
You will be using this method most of the time. Make sure to implement conditions for all possible errors inside your catch block, and remember to include a finally block if you need to run some memory clean-up routines after the try block.
However, too many try/catch blocks can make your code difficult to maintain. If you find yourself in such a situation, you might want to handle errors via the global handler or the promise method.
When deciding between asynchronous try/catch blocks and promise’s catch(), it’s advisable to go with the async try/catch blocks since they will make your code linear and easy to debug.
onerror()
It’s best to use the onerror() method when you know that your app has to handle many errors, and they can be well-scattered throughout the codebase. The onerror method enables you to handle errors as if they were just another event handled by your application. You can define multiple error handlers and attach them to your app’s window on the initial rendering.
However, you must also remember that the onerror() method can be unnecessarily challenging to set up in smaller projects with a lesser scope of error. If you’re sure that your app will not throw too many errors, the traditional throw/catch method will work best for you.
Callbacks and Promises
Error handling in callbacks and promises differs due to their code design and structure. However, if you choose between these two before you have written your code, it would be best to go with promises.
This is because promises have an inbuilt construct for chaining a catch() and a finally() block to handle errors easily. This method is easier and cleaner than defining additional arguments/reusing existing arguments to handle errors.
Keep Track of Changes With Git Repositories
Many errors often arise due to manual mistakes in the codebase. While developing or debugging your code, you might end up making unnecessary changes that may cause new errors to appear in your codebase. Automated testing is a great way to keep your code in check after every change. However, it can only tell you if something’s wrong. If you don’t take frequent backups of your code, you’ll end up wasting time trying to fix a function or a script that was working just fine before.
This is where git plays its role. With a proper commit strategy, you can use your git history as a backup system to view your code as it evolved through the development. You can easily browse through your older commits and find out the version of the function working fine before but throwing errors after an unrelated change.
You can then restore the old code or compare the two versions to determine what went wrong. Modern web development tools like GitHub Desktop or GitKraken help you to visualize these changes side by side and figure out the mistakes quickly.
A habit that can help you make fewer errors is running code reviews whenever you make a significant change to your code. If you’re working in a team, you can create a pull request and have a team member review it thoroughly. This will help you use a second pair of eyes to spot out any errors that might have slipped by you.
Best Practices for Handling Errors in JavaScript
The above-mentioned methods are adequate to help you design a robust error handling approach for your next JavaScript application. However, it would be best to keep a few things in mind while implementing them to get the best out of your error-proofing. Here are some tips to help you.
1. Use Custom Errors When Handling Operational Exceptions
We introduced custom errors early in this guide to give you an idea of how to customize the error handling to your application’s unique case. It’s advisable to use custom errors wherever possible instead of the generic Error class as it provides more contextual information to the calling environment about the error.
On top of that, custom errors allow you to moderate how an error is displayed to the calling environment. This means that you can choose to hide specific details or display additional information about the error as and when you wish.
You can go so far as to format the error contents according to your needs. This gives you better control over how the error is interpreted and handled.
2. Do Not Swallow Any Exceptions
Even the most senior developers often make a rookie mistake — consuming exceptions levels deep down in their code.
You might come across situations where you have a piece of code that is optional to run. If it works, great; if it doesn’t, you don’t need to do anything about it.
In these cases, it’s often tempting to put this code in a try block and attach an empty catch block to it. However, by doing this, you’ll leave that piece of code open to causing any kind of error and getting away with it. This can become dangerous if you have a large codebase and many instances of such poor error management constructs.
The best way to handle exceptions is to determine a level on which all of them will be dealt and raise them until there. This level can be a controller (in an MVC architecture app) or a middleware (in a traditional server-oriented app).
This way, you’ll get to know where you can find all the errors occurring in your app and choose how to resolve them, even if it means not doing anything about them.
3. Use a Centralized Strategy for Logs and Error Alerts
Logging an error is often an integral part of handling it. Those who fail to develop a centralized strategy for logging errors may miss out on valuable information about their app’s usage.
An app’s event logs can help you figure out crucial data about errors and help to debug them quickly. If you have proper alerting mechanisms set up in your app, you can know when an error occurs in your app before it reaches a large section of your user base.
It’s advisable to use a pre-built logger or create one to suit your needs. You can configure this logger to handle errors based on their levels (warning, debug, info, etc.), and some loggers even go so far as to send logs to remote logging servers immediately. This way, you can watch how your application’s logic performs with active users.
4. Notify Users About Errors Appropriately
Another good point to keep in mind while defining your error handling strategy is to keep the user in mind.
All errors that interfere with the normal functioning of your app must present a visible alert to the user to notify them that something went wrong so the user can try to work out a solution. If you know a quick fix for the error, such as retrying an operation or logging out and logging back in, make sure to mention it in the alert to help fix the user experience in real-time.
In the case of errors that don’t cause any interference with the everyday user experience, you can consider suppressing the alert and logging the error to a remote server for resolving later.
5. Implement a Middleware (Node.js)
The Node.js environment supports middlewares to add functionalities to server applications. You can use this feature to create an error-handling middleware for your server.
The most significant benefit of using middleware is that all of your errors are handled centrally in one place. You can choose to enable/disable this setup for testing purposes easily.
Here’s how you can create a basic middleware:
const logError = err => {
    console.log("ERROR: " + String(err))
}

const errorLoggerMiddleware = (err, req, res, next) => {
    logError(err)
    next(err)
}

const returnErrorMiddleware = (err, req, res, next) => {
    res.status(err.statusCode || 500)
       .send(err.message)
}

module.exports = {
    logError,
    errorLoggerMiddleware,
    returnErrorMiddleware
}
You can then use this middleware in your app like this:
const { errorLoggerMiddleware, returnErrorMiddleware } = require('./errorMiddleware')

app.use(errorLoggerMiddleware)

app.use(returnErrorMiddleware)
You can now define custom logic inside the middleware to handle errors appropriately. You don’t need to worry about implementing individual error handling constructs throughout your codebase anymore.
6. Restart Your App To Handle Programmer Errors (Node.js)
When Node.js apps encounter programmer errors, they might not necessarily throw an exception and try to close the app. Such errors can include issues arising from programmer mistakes, like high CPU consumption, memory bloating, or memory leaks. The best way to handle these is to gracefully restart the app by crashing it via the Node.js cluster mode or a unique tool like PM2. This can ensure that the app doesn’t crash upon user action, presenting a terrible user experience.
7. Catch All Uncaught Exceptions (Node.js)
You can never be sure that you have covered every possible error that can occur in your app. Therefore, it’s essential to implement a fallback strategy to catch all uncaught exceptions from your app.
Here’s how you can do that:
process.on('uncaughtException', error => {
    console.log("ERROR: " + String(error))
    // other handling mechanisms
})
You can also identify if the error that occurred is a standard exception or a custom operational error. Based on the result, you can exit the process and restart it to avoid unexpected behavior.
8. Catch All Unhandled Promise Rejections (Node.js)
Similar to how you can never cover for all possible exceptions, there’s a high chance that you might miss out on handling all possible promise rejections. However, unlike exceptions, promise rejections don’t throw errors.
So, an important promise that was rejected might slip by as a warning and leave your app open to the possibility of running into unexpected behavior. Therefore, it’s crucial to implement a fallback mechanism for handling promise rejection.
Here’s how you can do that:
const promiseRejectionCallback = error => {
    console.log("PROMISE REJECTED: " + String(error))
}

process.on('unhandledRejection', callback)
If you create an application, there are chances that you’ll create bugs and other issues in it as well. 😅 Learn how to handle them with help from this guide ⬇️Click to Tweet
Summary
Like any other programming language, errors are quite frequent and natural in JavaScript. In some cases, you might even need to throw errors intentionally to indicate the correct response to your users. Hence, understanding their anatomy and types is very crucial.
Moreover, you need to be equipped with the right tools and techniques to identify and prevent errors from taking down your application.
In most cases, a solid strategy to handle errors with careful execution is enough for all types of JavaScript applications.
Are there any other JavaScript errors that you still haven’t been able to resolve? Any techniques for handling JS errors constructively? Let us know in the comments below!
Get all your applications, databases and WordPress sites online and under one roof. Our feature-packed, high-performance cloud platform includes:
- Easy setup and management in the MyKinsta dashboard
- 24/7 expert support
- The best Google Cloud Platform hardware and network, powered by Kubernetes for maximum scalability
- An enterprise-level Cloudflare integration for speed and security
- Global audience reach with up to 35 data centers and 275+ PoPs worldwide
Test it yourself with $20 off your first month of Application Hosting or Database Hosting. Explore our plans or talk to sales to find your best fit.
Murphy’s law states that whatever can go wrong will eventually go wrong. This applies a tad too well in the world of programming. If you create an application, chances are you’ll create bugs and other issues. Errors in JavaScript are one such common issue!
A software product’s success depends on how well its creators can resolve these issues before hurting their users. And JavaScript, out of all programming languages, is notorious for its average error handling design.
If you’re building a JavaScript application, there’s a high chance you’ll mess up with data types at one point or another. If not that, then you might end up replacing an undefined with a null or a triple equals operator (===) with a double equals operator (==).
It’s only human to make mistakes. This is why we will show you everything you need to know about handling errors in JavaScript.
This article will guide you through the basic errors in JavaScript and explain the various errors you might encounter. You’ll then learn how to identify and fix these errors. There are also a couple of tips to handle errors effectively in production environments.
Without further ado, let’s begin!
Check Out Our Video Guide to Handling JavaScript Errors
What Are JavaScript Errors?
Errors in programming refer to situations that don’t let a program function normally. It can happen when a program doesn’t know how to handle the job at hand, such as when trying to open a non-existent file or reaching out to a web-based API endpoint while there’s no network connectivity.
These situations push the program to throw errors to the user, stating that it doesn’t know how to proceed. The program collects as much information as possible about the error and then reports that it can not move ahead.
Murphy’s law states that whatever can go wrong will eventually go wrong 😬 This applies a bit too well in the world of JavaScript 😅 Get prepped with this guide 👇Click to Tweet
Intelligent programmers try to predict and cover these scenarios so that the user doesn’t have to figure out a technical error message like “404” independently. Instead, they show a much more understandable message: “The page could not be found.”
Errors in JavaScript are objects shown whenever a programming error occurs. These objects contain ample information about the type of the error, the statement that caused the error, and the stack trace when the error occurred. JavaScript also allows programmers to create custom errors to provide extra information when debugging issues.
Properties of an Error
Now that the definition of a JavaScript error is clear, it’s time to dive into the details.
Errors in JavaScript carry certain standard and custom properties that help understand the cause and effects of the error. By default, errors in JavaScript contain three properties:
- message: A string value that carries the error message
- name: The type of error that occurred (We’ll dive deep into this in the next section)
- stack: The stack trace of the code executed when the error occurred.
Additionally, errors can also carry properties like columnNumber, lineNumber, fileName, etc., to describe the error better. However, these properties are not standard and may or may not be present in every error object generated from your JavaScript application.
Understanding Stack Trace
A stack trace is the list of method calls a program was in when an event such as an exception or a warning occurs. This is what a sample stack trace accompanied by an exception looks like:
As you can see, it starts by printing the error name and message, followed by a list of methods that were being called. Each method call states the location of its source code and the line at which it was invoked. You can use this data to navigate through your codebase and identify which piece of code is causing the error.
This list of methods is arranged in a stacked fashion. It shows where your exception was first thrown and how it propagated through the stacked method calls. Implementing a catch for the exception will not let it propagate up through the stack and crash your program. However, you might want to leave fatal errors uncaught to crash the program in some scenarios intentionally.
Errors vs Exceptions
Most people usually consider errors and exceptions as the same thing. However, it’s essential to note a slight yet fundamental difference between them.
To understand this better, let’s take a quick example. Here is how you can define an error in JavaScript:
const wrongTypeError = TypeError("Wrong type found, expected character")And this is how the wrongTypeError object becomes an exception:
throw wrongTypeErrorHowever, most people tend to use the shorthand form which defines error objects while throwing them:
throw TypeError("Wrong type found, expected character")This is standard practice. However, it’s one of the reasons why developers tend to mix up exceptions and errors. Therefore, knowing the fundamentals is vital even though you use shorthands to get your work done quickly.
Types of Errors in JavaScript
There’s a range of predefined error types in JavaScript. They are automatically chosen and defined by the JavaScript runtime whenever the programmer doesn’t explicitly handle errors in the application.
This section will walk you through some of the most common types of errors in JavaScript and understand when and why they occur.
RangeError
A RangeError is thrown when a variable is set with a value outside its legal values range. It usually occurs when passing a value as an argument to a function, and the given value doesn’t lie in the range of the function’s parameters. It can sometimes get tricky to fix when using poorly documented third-party libraries since you need to know the range of possible values for the arguments to pass in the correct value.
Some of the common scenarios in which RangeError occurs are:
- Trying to create an array of illegal lengths via the Array constructor.
- Passing bad values to numeric methods like
toExponential(),toPrecision(),toFixed(), etc. - Passing illegal values to string functions like
normalize().
ReferenceError
A ReferenceError occurs when something is wrong with a variable’s reference in your code. You might have forgotten to define a value for the variable before using it, or you might be trying to use an inaccessible variable in your code. In any case, going through the stack trace provides ample information to find and fix the variable reference that is at fault.
Some of the common reasons why ReferenceErrors occur are:
- Making a typo in a variable name.
- Trying to access block-scoped variables outside of their scopes.
- Referencing a global variable from an external library (like $ from jQuery) before it’s loaded.
SyntaxError
These errors are one of the simplest to fix since they indicate an error in the syntax of the code. Since JavaScript is a scripting language that is interpreted rather than compiled, these are thrown when the app executes the script that contains the error. In the case of compiled languages, such errors are identified during compilation. Thus, the app binaries are not created until these are fixed.
Some of the common reasons why SyntaxErrors might occur are:
- Missing inverted commas
- Missing closing parentheses
- Improper alignment of curly braces or other characters
It’s a good practice to use a linting tool in your IDE to identify such errors for you before they hit the browser.
TypeError
TypeError is one of the most common errors in JavaScript apps. This error is created when some value doesn’t turn out to be of a particular expected type. Some of the common cases when it occurs are:
- Invoking objects that are not methods.
- Attempting to access properties of null or undefined objects
- Treating a string as a number or vice versa
There are a lot more possibilities where a TypeError can occur. We’ll look at some famous instances later and learn how to fix them.
InternalError
The InternalError type is used when an exception occurs in the JavaScript runtime engine. It may or may not indicate an issue with your code.
More often than not, InternalError occurs in two scenarios only:
- When a patch or an update to the JavaScript runtime carries a bug that throws exceptions (this happens very rarely)
- When your code contains entities that are too large for the JavaScript engine (e.g. too many switch cases, too large array initializers, too much recursion)
The most appropriate approach to solve this error is to identify the cause via the error message and restructure your app logic, if possible, to eliminate the sudden spike of workload on the JavaScript engine.
URIError
URIError occurs when a global URI handling function such as decodeURIComponent is used illegally. It usually indicates that the parameter passed to the method call did not conform to URI standards and thus was not parsed by the method properly.
Diagnosing these errors is usually easy since you only need to examine the arguments for malformation.
EvalError
An EvalError occurs when an error occurs with an eval() function call. The eval() function is used to execute JavaScript code stored in strings. However, since using the eval() function is highly discouraged due to security issues and the current ECMAScript specifications don’t throw the EvalError class anymore, this error type exists simply to maintain backward compatibility with legacy JavaScript code.
If you’re working on an older version of JavaScript, you might encounter this error. In any case, it’s best to investigate the code executed in the eval() function call for any exceptions.
Creating Custom Error Types
While JavaScript offers an adequate list of error type classes to cover for most scenarios, you can always create a new error type if the list doesn’t satisfy your requirements. The foundation of this flexibility lies in the fact that JavaScript allows you to throw anything literally with the throw command.
So, technically, these statements are entirely legal:
throw 8
throw "An error occurred"
However, throwing a primitive data type doesn’t provide details about the error, such as its type, name, or the accompanying stack trace. To fix this and standardize the error handling process, the Error class has been provided. It’s also discouraged to use primitive data types while throwing exceptions.
You can extend the Error class to create your custom error class. Here is a basic example of how you can do this:
class ValidationError extends Error {
    constructor(message) {
        super(message);
        this.name = "ValidationError";
    }
}
And you can use it in the following way:
throw ValidationError("Property not found: name")And you can then identify it using the instanceof keyword:
try {
    validateForm() // code that throws a ValidationError
} catch (e) {
    if (e instanceof ValidationError)
    // do something
    else
    // do something else
}
Top 10 Most Common Errors in JavaScript
Now that you understand the common error types and how to create your custom ones, it’s time to look at some of the most common errors you’ll face when writing JavaScript code.
Check Out Our Video Guide to The Most Common JavaScript Errors
1. Uncaught RangeError
This error occurs in Google Chrome under a few various scenarios. First, it can happen if you call a recursive function and it doesn’t terminate. You can check this out yourself in the Chrome Developer Console:
So to solve such an error, make sure to define the border cases of your recursive function correctly. Another reason why this error happens is if you have passed a value that is out of a function’s parameter’s range. Here’s an example:
The error message will usually indicate what is wrong with your code. Once you make the changes, it will be resolved.
2. Uncaught TypeError: Cannot set property
This error occurs when you set a property on an undefined reference. You can reproduce the issue with this code:
var list
list.count = 0
Here’s the output that you’ll receive:
To fix this error, initialize the reference with a value before accessing its properties. Here’s how it looks when fixed:
3. Uncaught TypeError: Cannot read property
This is one of the most frequently occurring errors in JavaScript. This error occurs when you attempt to read a property or call a function on an undefined object. You can reproduce it very easily by running the following code in a Chrome Developer console:
var func
func.call()
Here’s the output:
An undefined object is one of the many possible causes of this error. Another prominent cause of this issue can be an improper initialization of the state while rendering the UI. Here’s a real-world example from a React application:
import React, { useState, useEffect } from "react";

const CardsList = () => {

    const [state, setState] = useState();

    useEffect(() => {
        setTimeout(() => setState({ items: ["Card 1", "Card 2"] }), 2000);
    }, []);

    return (
        <>
            {state.items.map((item) => (
                <li key={item}>{item}</li>
            ))}
        </>
    );
};

export default CardsList;
The app starts with an empty state container and is provided with some items after a delay of 2 seconds. The delay is put in place to imitate a network call. Even if your network is super fast, you’ll still face a minor delay due to which the component will render at least once. If you try to run this app, you’ll receive the following error:
This is because, at the time of rendering, the state container is undefined; thus, there exists no property items on it. Fixing this error is easy. You just need to provide an initial default value to the state container.
// ...
const [state, setState] = useState({items: []});
// ...
Now, after the set delay, your app will show a similar output:
The exact fix in your code might be different, but the essence here is to always initialize your variables properly before using them.
4. TypeError: ‘undefined’ is not an object
This error occurs in Safari when you try to access the properties of or call a method on an undefined object. You can run the same code from above to reproduce the error yourself.
The solution to this error is also the same — make sure that you have initialized your variables correctly and they are not undefined when a property or method is accessed.
5. TypeError: null is not an object
This is, again, similar to the previous error. It occurs on Safari, and the only difference between the two errors is that this one is thrown when the object whose property or method is being accessed is null instead of undefined. You can reproduce this by running the following piece of code:
var func = null

func.call()
Here’s the output that you’ll receive:
Since null is a value explicitly set to a variable and not assigned automatically by JavaScript. This error can occur only if you’re trying to access a variable you set null by yourself. So, you need to revisit your code and check if the logic that you wrote is correct or not.
6. TypeError: Cannot read property ‘length’
This error occurs in Chrome when you try to read the length of a null or undefined object. The cause of this issue is similar to the previous issues, but it occurs quite frequently while handling lists; hence it deserves a special mention. Here’s how you can reproduce the problem:
However, in the newer versions of Chrome, this error is reported as Uncaught TypeError: Cannot read properties of undefined. This is how it looks now:
The fix, again, is to ensure that the object whose length you’re trying to access exists and is not set to null.
7. TypeError: ‘undefined’ is not a function
This error occurs when you try to invoke a method that doesn’t exist in your script, or it does but can not be referenced in the calling context. This error usually occurs in Google Chrome, and you can solve it by checking the line of code throwing the error. If you find a typo, fix it and check if it solves your issue.
If you have used the self-referencing keyword this in your code, this error might arise if this is not appropriately bound to your context. Consider the following code:
function showAlert() {
    alert("message here")
}

document.addEventListener("click", () => {
    this.showAlert();
})
If you execute the above code, it will throw the error we discussed. It happens because the anonymous function passed as the event listener is being executed in the context of the document.
In contrast, the function showAlert is defined in the context of the window.
To solve this, you must pass the proper reference to the function by binding it with the bind() method:
document.addEventListener("click", this.showAlert.bind(this))8. ReferenceError: event is not defined
This error occurs when you try to access a reference not defined in the calling scope. This usually happens when handling events since they often provide you with a reference called event in the callback function. This error can occur if you forget to define the event argument in your function’s parameters or misspell it.
This error might not occur in Internet Explorer or Google Chrome (as IE offers a global event variable and Chrome attaches the event variable automatically to the handler), but it can occur in Firefox. So it’s advisable to keep an eye out for such small mistakes.
9. TypeError: Assignment to constant variable
This is an error that arises out of carelessness. If you try to assign a new value to a constant variable, you’ll be met with such a result:
While it seems easy to fix right now, imagine hundreds of such variable declarations and one of them mistakenly defined as const instead of let! Unlike other scripting languages like PHP, there’s minimal difference between the style of declaring constants and variables in JavaScript. Therefore it’s advisable to check your declarations first of all when you face this error. You could also run into this error if you forget that the said reference is a constant and use it as a variable. This indicates either carelessness or a flaw in your app’s logic. Make sure to check this when trying to fix this issue.
10. (unknown): Script error
A script error occurs when a third-party script sends an error to your browser. This error is followed by (unknown) because the third-party script belongs to a different domain than your app. The browser hides other details to prevent leaking sensitive information from the third-party script.
You can not resolve this error without knowing the complete details. Here’s what you can do to get more information about the error:
- Add the
crossoriginattribute in the script tag. - Set the correct
Access-Control-Allow-Originheader on the server hosting the script. - [Optional] If you don’t have access to the server hosting the script, you can consider using a proxy to relay your request to the server and back to the client with the correct headers.
Once you can access the details of the error, you can then set down to fix the issue, which will probably be with either the third-party library or the network.
How to Identify and Prevent Errors in JavaScript
While the errors discussed above are the most common and frequent in JavaScript, you’ll come across, relying on a few examples can never be enough. It’s vital to understand how to detect and prevent any type of error in a JavaScript application while developing it. Here is how you can handle errors in JavaScript.
Manually Throw and Catch Errors
The most fundamental way of handling errors that have been thrown either manually or by the runtime is to catch them. Like most other languages, JavaScript offers a set of keywords to handle errors. It’s essential to know each of them in-depth before you set down to handle errors in your JavaScript app.
throw
The first and most basic keyword of the set is throw. As evident, the throw keyword is used to throw errors to create exceptions in the JavaScript runtime manually. We have already discussed this earlier in the piece, and here’s the gist of this keyword’s significance:
- You can
throwanything, including numbers, strings, andErrorobjects. - However, it’s not advisable to throw primitive data types such as strings and numbers since they don’t carry debug information about the errors.
- Example:
throw TypeError("Please provide a string")
try
The try keyword is used to indicate that a block of code might throw an exception. Its syntax is:
try {
    // error-prone code here
}
It’s important to note that a catch block must always follow the try block to handle errors effectively.
catch
The catch keyword is used to create a catch block. This block of code is responsible for handling the errors that the trailing try block catches. Here is its syntax:
catch (exception) {
    // code to handle the exception here
}
And this is how you implement the try and the catch blocks together:
try {
    // business logic code
} catch (exception) {
    // error handling code
}
Unlike C++ or Java, you can not append multiple catch blocks to a try block in JavaScript. This means that you can not do this:
try {
    // business logic code
} catch (exception) {
    if (exception instanceof TypeError) {
        // do something
    }
} catch (exception) {
    if (exception instanceof RangeError) {
    // do something
    }
}
Instead, you can use an if...else statement or a switch case statement inside the single catch block to handle all possible error cases. It would look like this:
try {
    // business logic code
} catch (exception) {
    if (exception instanceof TypeError) {
        // do something
    } else if (exception instanceof RangeError) {
        // do something else
    }
}
finally
The finally keyword is used to define a code block that is run after an error has been handled. This block is executed after the try and the catch blocks.
Also, the finally block will be executed regardless of the result of the other two blocks. This means that even if the catch block cannot handle the error entirely or an error is thrown in the catch block, the interpreter will execute the code in the finally block before the program crashes.
To be considered valid, the try block in JavaScript needs to be followed by either a catch or a finally block. Without any of those, the interpreter will raise a SyntaxError. Therefore, make sure to follow your try blocks with at least either of them when handling errors.
Handle Errors Globally With the onerror() Method
The onerror() method is available to all HTML elements for handling any errors that may occur with them. For instance, if an img tag cannot find the image whose URL is specified, it fires its onerror method to allow the user to handle the error.
Typically, you would provide another image URL in the onerror call for the img tag to fall back to. This is how you can do that via JavaScript:
const image = document.querySelector("img")

image.onerror = (event) => {
    console.log("Error occurred: " + event)
}
However, you can use this feature to create a global error handling mechanism for your app. Here’s how you can do it:
window.onerror = (event) => {
    console.log("Error occurred: " + event)
}
With this event handler, you can get rid of the multiple try...catch blocks lying around in your code and centralize your app’s error handling similar to event handling. You can attach multiple error handlers to the window to maintain the Single Responsibility Principle from the SOLID design principles. The interpreter will cycle through all handlers until it reaches the appropriate one.
Pass Errors via Callbacks
While simple and linear functions allow error handling to remain simple, callbacks can complicate the affair.
Consider the following piece of code:
const calculateCube = (number, callback) => {
    setTimeout(() => {
        const cube = number * number * number
        callback(cube)
    }, 1000)
}

const callback = result => console.log(result)

calculateCube(4, callback)
The above function demonstrates an asynchronous condition in which a function takes some time to process operations and returns the result later with the help of a callback.
If you try to enter a string instead of 4 in the function call, you’ll get NaN as a result.
This needs to be handled properly. Here’s how:
const calculateCube = (number, callback) => {

    setTimeout(() => {
        if (typeof number !== "number")
            throw new Error("Numeric argument is expected")

        const cube = number * number * number
        callback(cube)
    }, 1000)
}

const callback = result => console.log(result)

try {
    calculateCube(4, callback)
} catch (e) { console.log(e) }
This should solve the problem ideally. However, if you try passing a string to the function call, you’ll receive this:
Even though you have implemented a try-catch block while calling the function, it still says the error is uncaught. The error is thrown after the catch block has been executed due to the timeout delay.
This can occur quickly in network calls, where unexpected delays creep in. You need to cover such cases while developing your app.
Here’s how you can handle errors properly in callbacks:
const calculateCube = (number, callback) => {

    setTimeout(() => {
        if (typeof number !== "number") {
            callback(new TypeError("Numeric argument is expected"))
            return
        }
        const cube = number * number * number
        callback(null, cube)
    }, 2000)
}

const callback = (error, result) => {
    if (error !== null) {
        console.log(error)
        return
    }
    console.log(result)
}

try {
    calculateCube('hey', callback)
} catch (e) {
    console.log(e)
}
Now, the output at the console will be:
This indicates that the error has been appropriately handled.
Handle Errors in Promises
Most people tend to prefer promises for handling asynchronous activities. Promises have another advantage — a rejected promise doesn’t terminate your script. However, you still need to implement a catch block to handle errors in promises. To understand this better, let’s rewrite the calculateCube() function using Promises:
const delay = ms => new Promise(res => setTimeout(res, ms));

const calculateCube = async (number) => {
    if (typeof number !== "number")
        throw Error("Numeric argument is expected")
    await delay(5000)
    const cube = number * number * number
    return cube
}

try {
    calculateCube(4).then(r => console.log(r))
} catch (e) { console.log(e) }
The timeout from the previous code has been isolated into the delay function for understanding. If you try to enter a string instead of 4, the output that you get will be similar to this:
Again, this is due to the Promise throwing the error after everything else has completed execution. The solution to this issue is simple. Simply add a catch() call to the promise chain like this:
calculateCube("hey")
.then(r => console.log(r))
.catch(e => console.log(e))
Now the output will be:
You can observe how easy it is to handle errors with promises. Additionally, you can chain a finally() block and the promise call to add code that will run after error handling has been completed.
Alternatively, you can also handle errors in promises using the traditional try-catch-finally technique. Here’s how your promise call would look like in that case:
try {
    let result = await calculateCube("hey")
    console.log(result)
} catch (e) {
    console.log(e)
} finally {
    console.log('Finally executed")
}
However, this works inside an asynchronous function only. Therefore the most preferred way to handle errors in promises is to chain catch and finally to the promise call.
throw/catch vs onerror() vs Callbacks vs Promises: Which is the Best?
With four methods at your disposal, you must know how to choose the most appropriate in any given use case. Here’s how you can decide for yourselves:
throw/catch
You will be using this method most of the time. Make sure to implement conditions for all possible errors inside your catch block, and remember to include a finally block if you need to run some memory clean-up routines after the try block.
However, too many try/catch blocks can make your code difficult to maintain. If you find yourself in such a situation, you might want to handle errors via the global handler or the promise method.
When deciding between asynchronous try/catch blocks and promise’s catch(), it’s advisable to go with the async try/catch blocks since they will make your code linear and easy to debug.
onerror()
It’s best to use the onerror() method when you know that your app has to handle many errors, and they can be well-scattered throughout the codebase. The onerror method enables you to handle errors as if they were just another event handled by your application. You can define multiple error handlers and attach them to your app’s window on the initial rendering.
However, you must also remember that the onerror() method can be unnecessarily challenging to set up in smaller projects with a lesser scope of error. If you’re sure that your app will not throw too many errors, the traditional throw/catch method will work best for you.
Callbacks and Promises
Error handling in callbacks and promises differs due to their code design and structure. However, if you choose between these two before you have written your code, it would be best to go with promises.
This is because promises have an inbuilt construct for chaining a catch() and a finally() block to handle errors easily. This method is easier and cleaner than defining additional arguments/reusing existing arguments to handle errors.
Keep Track of Changes With Git Repositories
Many errors often arise due to manual mistakes in the codebase. While developing or debugging your code, you might end up making unnecessary changes that may cause new errors to appear in your codebase. Automated testing is a great way to keep your code in check after every change. However, it can only tell you if something’s wrong. If you don’t take frequent backups of your code, you’ll end up wasting time trying to fix a function or a script that was working just fine before.
This is where git plays its role. With a proper commit strategy, you can use your git history as a backup system to view your code as it evolved through the development. You can easily browse through your older commits and find out the version of the function working fine before but throwing errors after an unrelated change.
You can then restore the old code or compare the two versions to determine what went wrong. Modern web development tools like GitHub Desktop or GitKraken help you to visualize these changes side by side and figure out the mistakes quickly.
A habit that can help you make fewer errors is running code reviews whenever you make a significant change to your code. If you’re working in a team, you can create a pull request and have a team member review it thoroughly. This will help you use a second pair of eyes to spot out any errors that might have slipped by you.
Best Practices for Handling Errors in JavaScript
The above-mentioned methods are adequate to help you design a robust error handling approach for your next JavaScript application. However, it would be best to keep a few things in mind while implementing them to get the best out of your error-proofing. Here are some tips to help you.
1. Use Custom Errors When Handling Operational Exceptions
We introduced custom errors early in this guide to give you an idea of how to customize the error handling to your application’s unique case. It’s advisable to use custom errors wherever possible instead of the generic Error class as it provides more contextual information to the calling environment about the error.
On top of that, custom errors allow you to moderate how an error is displayed to the calling environment. This means that you can choose to hide specific details or display additional information about the error as and when you wish.
You can go so far as to format the error contents according to your needs. This gives you better control over how the error is interpreted and handled.
2. Do Not Swallow Any Exceptions
Even the most senior developers often make a rookie mistake — consuming exceptions levels deep down in their code.
You might come across situations where you have a piece of code that is optional to run. If it works, great; if it doesn’t, you don’t need to do anything about it.
In these cases, it’s often tempting to put this code in a try block and attach an empty catch block to it. However, by doing this, you’ll leave that piece of code open to causing any kind of error and getting away with it. This can become dangerous if you have a large codebase and many instances of such poor error management constructs.
The best way to handle exceptions is to determine a level on which all of them will be dealt and raise them until there. This level can be a controller (in an MVC architecture app) or a middleware (in a traditional server-oriented app).
This way, you’ll get to know where you can find all the errors occurring in your app and choose how to resolve them, even if it means not doing anything about them.
3. Use a Centralized Strategy for Logs and Error Alerts
Logging an error is often an integral part of handling it. Those who fail to develop a centralized strategy for logging errors may miss out on valuable information about their app’s usage.
An app’s event logs can help you figure out crucial data about errors and help to debug them quickly. If you have proper alerting mechanisms set up in your app, you can know when an error occurs in your app before it reaches a large section of your user base.
It’s advisable to use a pre-built logger or create one to suit your needs. You can configure this logger to handle errors based on their levels (warning, debug, info, etc.), and some loggers even go so far as to send logs to remote logging servers immediately. This way, you can watch how your application’s logic performs with active users.
4. Notify Users About Errors Appropriately
Another good point to keep in mind while defining your error handling strategy is to keep the user in mind.
All errors that interfere with the normal functioning of your app must present a visible alert to the user to notify them that something went wrong so the user can try to work out a solution. If you know a quick fix for the error, such as retrying an operation or logging out and logging back in, make sure to mention it in the alert to help fix the user experience in real-time.
In the case of errors that don’t cause any interference with the everyday user experience, you can consider suppressing the alert and logging the error to a remote server for resolving later.
5. Implement a Middleware (Node.js)
The Node.js environment supports middlewares to add functionalities to server applications. You can use this feature to create an error-handling middleware for your server.
The most significant benefit of using middleware is that all of your errors are handled centrally in one place. You can choose to enable/disable this setup for testing purposes easily.
Here’s how you can create a basic middleware:
const logError = err => {
    console.log("ERROR: " + String(err))
}

const errorLoggerMiddleware = (err, req, res, next) => {
    logError(err)
    next(err)
}

const returnErrorMiddleware = (err, req, res, next) => {
    res.status(err.statusCode || 500)
       .send(err.message)
}

module.exports = {
    logError,
    errorLoggerMiddleware,
    returnErrorMiddleware
}
You can then use this middleware in your app like this:
const { errorLoggerMiddleware, returnErrorMiddleware } = require('./errorMiddleware')

app.use(errorLoggerMiddleware)

app.use(returnErrorMiddleware)
You can now define custom logic inside the middleware to handle errors appropriately. You don’t need to worry about implementing individual error handling constructs throughout your codebase anymore.
6. Restart Your App To Handle Programmer Errors (Node.js)
When Node.js apps encounter programmer errors, they might not necessarily throw an exception and try to close the app. Such errors can include issues arising from programmer mistakes, like high CPU consumption, memory bloating, or memory leaks. The best way to handle these is to gracefully restart the app by crashing it via the Node.js cluster mode or a unique tool like PM2. This can ensure that the app doesn’t crash upon user action, presenting a terrible user experience.
7. Catch All Uncaught Exceptions (Node.js)
You can never be sure that you have covered every possible error that can occur in your app. Therefore, it’s essential to implement a fallback strategy to catch all uncaught exceptions from your app.
Here’s how you can do that:
process.on('uncaughtException', error => {
    console.log("ERROR: " + String(error))
    // other handling mechanisms
})
You can also identify if the error that occurred is a standard exception or a custom operational error. Based on the result, you can exit the process and restart it to avoid unexpected behavior.
8. Catch All Unhandled Promise Rejections (Node.js)
Similar to how you can never cover for all possible exceptions, there’s a high chance that you might miss out on handling all possible promise rejections. However, unlike exceptions, promise rejections don’t throw errors.
So, an important promise that was rejected might slip by as a warning and leave your app open to the possibility of running into unexpected behavior. Therefore, it’s crucial to implement a fallback mechanism for handling promise rejection.
Here’s how you can do that:
const promiseRejectionCallback = error => {
    console.log("PROMISE REJECTED: " + String(error))
}

process.on('unhandledRejection', callback)
If you create an application, there are chances that you’ll create bugs and other issues in it as well. 😅 Learn how to handle them with help from this guide ⬇️Click to Tweet
Summary
Like any other programming language, errors are quite frequent and natural in JavaScript. In some cases, you might even need to throw errors intentionally to indicate the correct response to your users. Hence, understanding their anatomy and types is very crucial.
Moreover, you need to be equipped with the right tools and techniques to identify and prevent errors from taking down your application.
In most cases, a solid strategy to handle errors with careful execution is enough for all types of JavaScript applications.
Are there any other JavaScript errors that you still haven’t been able to resolve? Any techniques for handling JS errors constructively? Let us know in the comments below!
Get all your applications, databases and WordPress sites online and under one roof. Our feature-packed, high-performance cloud platform includes:
- Easy setup and management in the MyKinsta dashboard
- 24/7 expert support
- The best Google Cloud Platform hardware and network, powered by Kubernetes for maximum scalability
- An enterprise-level Cloudflare integration for speed and security
- Global audience reach with up to 35 data centers and 275+ PoPs worldwide
Test it yourself with $20 off your first month of Application Hosting or Database Hosting. Explore our plans or talk to sales to find your best fit.
Существует ряд причин, по которым код JavaScript может вызывать ошибки, например:
- Проблема с сетевым подключением;
- Пользователь мог ввести неверное значение в поля формы;
- Ссылка на объекты или функции, которые не существуют;
- Неправильные данные отправляются или принимаются с веб-сервера;
- Служба, к которой приложение должно получить доступ, может быть временно недоступна.
Эти типы ошибок известны как ошибки времени выполнения (runtime errors), поскольку они возникают во время выполнения скрипта. Профессиональное приложение должно иметь возможность корректно обрабатывать такие ошибки во время выполнения. Обычно это означает понятное информирование пользователя о возникшей проблеме.
Оператор try…catch
JavaScript предоставляет оператор try-catch, чтобы перехватывать ошибки времени выполнения и корректно их обработать.
Любой код, который может вызвать ошибку, должен быть помещен в блок оператора try, а код для обработки ошибки помещен в блок catch, как показано здесь:
try {
    // Код, который может вызвать ошибку
} catch(error) {
    // Действие, которое нужно выполнить при возникновении ошибки
}
Если ошибка возникает в любой точке блока try, выполнение кода немедленно переносится из блока try в блок catch. Если в блоке try ошибки не возникает, блок catch будет проигнорирован, и программа продолжит выполнение после оператора try-catch.
Следующий пример демонстрирует, как работает оператор try-catch:
try {
    var greet = "Hi, there!";
    document.write(greet);

    // Попытка получить доступ к несуществующей переменной
    document.write(welcome);

    // Если произошла ошибка, следующая строка не будет выполнена
    alert("All statements are executed successfully.");
} catch(error) {
    // Обработка ошибки
  alert("Caught error: " + error.message);
}

// Продолжаем исполнение кода
document.write("<p>Hello World!</p>");
Приведенный выше скрипт генерирует ошибку, которая отображается в диалоговом окне с предупреждением, а не выводится в консоль браузера. Кроме того, программа не остановилась внезапно, даже если произошла ошибка.
Также обратите внимание, что за ключевым словом catch указывается идентификатор в скобках. Этот идентификатор действует как параметр функции. При возникновении ошибки интерпретатор JavaScript генерирует объект, содержащий сведения о нем. Этот объект ошибки затем передается в качестве аргумента для обработки.
Оператор try-catch является механизмом обработки исключений. Исключением является сигнал, который указывает, что во время выполнения программы возникли какие-то исключительные условия или ошибки. Термины «исключение» и «ошибка» часто используются взаимозаменяемо.
Оператор try…catch…finally
Оператор try-catch также может содержать предложение finally. Код внутри блока finally всегда будет выполняться независимо от того, произошла ошибка в блоке try или нет.
В следующем примере всегда отображается общее время, затраченное на выполнение кода.
// Присвоение значения, возвращаемого диалоговым окном
var num = prompt("Enter a positive integer between 0 to 100");

// Запоминание времени начала исполнения
var start = Date.now();

try {
    if(num > 0 && num <= 100) {
        alert(Math.pow(num, num)); // the base to the exponent power
    } else {
        throw new Error("An invalid value is entered!");
    }
} catch(e) {
    alert(e.message);
} finally {
    // Отображение времени, необходимого для выполнения кода
    alert("Execution took: " + (Date.now() - start) + "ms");
}
Вызов ошибок с помощью оператора throw
До сих пор мы видели ошибки, которые автоматически генерируются парсером JavaScript. Тем не менее, также можно вызвать ошибку вручную с помощью оператора throw.
Общий синтаксис оператора throw: throw expression;
Выражение expression может быть объектом или значением любого типа данных. Однако лучше использовать объекты, желательно со свойствами name и message. Встроенный в JavaScript конструктор Error() предоставляет удобный способ создания объекта ошибки. Давайте посмотрим на некоторые примеры:
throw 123;
throw "Missing values!";
throw true;
throw { name: "InvalidParameter", message: "Parameter is not a number!" };
throw new Error("Something went wrong!");
Если вы используете встроенные в JavaScript функции конструктора ошибок (например, Error(), TypeError() и т. д.) для создания объектов ошибок, тогда свойство name совпадает с именем конструктора, а message равно аргументу функции конструктора.
Теперь мы собираемся создать функцию squareRoot(), чтобы найти квадратный корень числа. Это можно сделать просто с помощью встроенной в JavaScript функции Math.sqrt(), но проблема здесь в том, что она возвращает NaN для отрицательных чисел, не давая никаких подсказок о том, что пошло не так.
Мы собираемся исправить эту проблему, показывая пользователю ошибку, если указано отрицательное число.
function squareRoot(number) {
    // Выдает ошибку, если число отрицательное
    if(number < 0) {
        throw new Error("Sorry, can't calculate square root of a negative number.");
    } else {
        return Math.sqrt(number);
    }
}

try {
    squareRoot(16);
    squareRoot(625);
    squareRoot(-9);
    squareRoot(100);

    // Если выдается ошибка, следующая строка не будет выполнена
    alert("All calculations are performed successfully.");
} catch(e) {
    // Обработка ошибки
    alert(e.message);
}
Теоретически можно вычислить квадратный корень из отрицательного числа, используя мнимое число i, где i2 = -1. Следовательно, квадратный корень из -4 равен 2i, квадратный корень из -9 равен 3i и так далее. Но мнимые числа не поддерживаются в JavaScript.
Типы ошибок
Объект Error является базовым типом всех ошибок и имеет два основных свойства: name, указывающее тип ошибки и свойство message, которое содержит сообщение, описывающее ошибку более подробно. Любая выданная ошибка будет экземпляром объекта Error.
Существует несколько различных типов ошибок, которые могут возникнуть во время выполнения программы JavaScript, например RangeError, ReferenceError, SyntaxError, TypeError, и URIError.
В следующем разделе описывается каждый из этих типов ошибок более подробно:
RangeError
RangeError генерируется, когда вы используете число, выходящее за пределы допустимых значений. Например, создание массива с отрицательной длиной вызовет RangeError.
var num = 12.735;
num.toFixed(200); // выдает ошибку диапазона (допустимый диапазон от 0 до 100)

var array = new Array(-1); // выдает ошибку диапазона
ReferenceError
Ошибка ReferenceError обычно выдается, когда вы пытаетесь сослаться на переменную или объект, которые не существуют, или получить к ним доступ. В следующем примере показано, как происходит ошибка ReferenceError.
var firstName = "Harry";
console.log(firstname); // выдает ошибку ссылки (имена переменных чувствительны к регистру)

undefinedObj.getValues(); // выдает ошибку ссылки

nonexistentArray.length; // выдает ошибку ссылки
SyntaxError
SyntaxError генерируется, если в вашем коде JavaScript есть какие-либо синтаксические проблемы. Например, если закрывающая скобка отсутствует, циклы не структурированы должным образом и т. д.
var array = ["a", "b", "c"];
document.write(array.slice(2); // выдает синтаксическую ошибку (отсутствует скобка)

alert("Hello World!'); // выдает синтаксическую ошибку (несоответствие кавычек)
TypeError
Ошибка TypeError возникает, когда значение не относится к ожидаемому типу. Например, вызов метода строки для числа, вызов метода массива для строки и т. д.
var num = 123;
num.toLowerCase(); /* выдает ошибку (поскольку toLowerCase() является строковым методом, число не может быть преобразовано в нижний регистр) */

var greet = "Hello World!"
greet.join() // выдает ошибку (так как join() является методом массива)
URIError
URIError генерируется, когда вы указали недопустимый URI (расшифровывается как Uniform Resource Identifier) для функций, связанных с URI, таких как encodeURI() или decodeURI(), как показано здесь:
var a = "%E6%A2%B";
decodeURI(a);  // выдает ошибку URI

var b = "uD800";
encodeURI(b);   // выдает ошибку URI
Существует еще один тип ошибки EvalError, который генерируется при возникновении ошибки во время выполнения кода с помощью функции eval(). Хотя эта ошибка больше не генерируется JavaScript, этот объект все еще остается для обратной совместимости.
Конкретный тип ошибки также может быть выдан вручную с использованием соответствующего конструктора и оператора throw. Например, чтобы сгенерировать ошибку TypeError, вы можете использовать конструктор TypeError(), например:
var num = prompt("Please enter a number");

try {
    if(num != "" && num !== null && isFinite(+num)) {
        alert(Math.exp(num));
    } else {
        throw new TypeError("You have not entered a number.");
    }
} catch(e) {
    alert(e.name);
    alert(e.message);
    alert(e.stack); // нестандартное свойство
}
Объект Error также поддерживает некоторые нестандартные свойства. Одним из наиболее широко используемых таких свойств является: stack trace, который возвращает трассировку стека для этой ошибки. Вы можете использовать его в целях отладки, но не используйте его на рабочих сайтах.

Ришат Габайдуллов
руководитель группы практики Frontend компании «Рексофт»
Тема обработки ошибок в JavaScript возникает не только у каждого новичка, но и матерого разработчика. Замечу, что тема уже довольно заезжена, поэтому я позволю себе резюмировать в кратком изложении все, что действительно эффективно и проверено в бою мною, коллегами и гуру IT.
Не погружаясь в этимологию ошибки в JavaScript, охарактеризуем ее абстрактно, поскольку сам по себе объект ошибки в JS не стандартизирован полностью.
Ошибка в JS — это «выбрасывание» исключения (throw of an exception). Исключение должно быть обработано программой, в противном случае интерпретатор вернет нас на то место, где это исключение было выброшено. По умолчанию исключение выбрасывает объект Error.
Неважно, пишете ли вы Frontend или Backend, подход к обработке один – поймать злосчастное исключение и обработать. Обрабатывать нужно все, особенно в проде.
Сразу просветим пару нестандартных ситуаций:
- Ошибка извне программы
- Терминальная ошибка
Терминальная ошибка – это код ошибки, который возвращает ОС или демон.
Ошибка извне программы может быть частным случаем терминальной, но тем не менее она должна быть обработана.
Любая из этих нестандартных ситуаций может попасть в общий стек ошибок и будет обработана, т.к. каждое выброшенное исключение, попавшее в программу, захватывает стек.
Самый главный вопрос – когда возникает ошибка?
Ошибка возникает в том случае, когда программа или интерпретатор не может перейти к следующей инструкции по некоторым причинам:
- синтаксическая ошибка (забыли запятую, скобку и т.д.);
- ошибка интерпретатора (обращение к несуществующей переменной и т.д.);
- ошибка исполнения (тип переменной оказался, например, undefined) – самая частая в работающем приложении;
- и еще несколько вариантов, с которыми вы можете ознакомиться тут.
В каждом из случаев есть человеческий фактор. Чтобы этого не допускать используйте линтеры, которые следят за чистотой вашего кода и минимизируют риск возникновения ошибок еще до запуска. Вдобавок к этому, ошибки исполнения – частое явление в JavaScript, следить за этим помогает Typescript.
Железобетонные методы обработки ошибок
Чтобы сражаться с врагом, нужно знать его в лицо, поэтому ниже основные свойства объекта Error:
- name – название ошибки;
- message – текст выбрасываемой ошибки;
- stack – стек вызовов, приведших к ошибке.
Важно заметить, что свойства не стандартизированы. Также важно помнить, что исключение может быть любым типом данных.
Из этого набора информации при обработке ошибок самым важным является их классификация. По моему мнению, если удалось правильно классифицировать выброшенное исключение – это 80% работы. Остальные 20% завязаны на правильной обработке, ведь каждое приложение – это бизнес, следовательно минимизация ошибок в бизнесе – прирост конверсии.
В зависимости от приложения классификация и обработка могут быть написаны собственноручно, либо можно задействовать готовые инструменты. Мы не будем рассматривать производные методы отлова ошибок, такие как TDD или E2E, а ограничимся только девелоперскими инструментами, но прежде определим, что мы желаем получить от инструмента:
- стек вызовов, приведших к ошибке;
- уровень ошибки (фатальная, критическая, баг, неожиданная и т.д.);
- класс ошибки (сетевая, сервисная, пользовательская и т.д.);
- хранение ошибки для анализа и пост-обработки;
- логирование;
- профилирование / метрика.
Из всего обилия существующих инструментов выбирать нужно именно по этим критериям. Разница инструментов, как правило, в том, что одни заточены под разработку приложения, а другие под работу приложения в релизе. Суть одна, но какому-то из критериев просто уделяется больше внимания.
Уметь выбирать библиотеку – отличный навык, а умение компоновать поможет вам приблизиться к идеалу. Предлагаю разобрать способы именно для процесса разработки.
Придерживаясь методологий SOLID и DRY, нам следует внедрить наш обработчик (middleware) на самый верхний уровень и уже оттуда обрабатывать все ошибки, которые прошли мимо. Middleware может быть как написанный самостоятельно, так и из библиотеки. Ниже примеры.
- Для Node.js
- Для Vanilla JS
- Для React
- Для Angular
- Для Vue
Данные примеры касаются верхнеуровнего отлова и обработки ошибок, но возникает резонный вопрос: как быть с частными случаями, встречающимися в парадигме JavaScript? Ниже несколько примеров.
Всегда оборачивайте асинхронный код в try…catch, а также вызовы сторонних библиотек. Например, вот так:
// ...

const middlewareRequest = async (req) => {
  try {
    const { data } = await axios.get(req);

    return data;
  } catch (err) {
    throw new Error(err);
  }
}

// ...
Опытный архитектор может заметить, что если оборачивать все асинхронные конструкции в try…catch, то это сродни «аду коллбэков», поэтому придерживайтесь методологии DRY и пишите все на верхнем уровне, если позволяет ваша архитектура.
То же касается и работы с событийной моделью: можно назначать middleware через Функции Высшего Порядка – в будущем это позволит вам быстро масштабироваться.
// ...

const wrapEventWithExcpetionHandler = (middleware) => (e) => {
  const { error } = e; // предположим, что ошибка в этом поле

  if (error) {
    throw new Error(error);
  }

  try {
    return middleware(e);
  } catch (err) {
    throw new Error(err);
  }
}

window.addEventListener('mousemove', wrapEventWithExceptionHandler(middlewareGlobalMouseMove));

// ...
Как видно из примеров выше, следуя путем самостоятельной классификации, разработчику придется сильно напрячься и писать велосипед для каждой библиотеки или фреймворка, следовательно, эффективнее выбирать готовый инструмент в зависимости от потребностей.
В любом случае эти примеры могут быть вам полезны, поскольку внедрение даже готового инструмента подразумевает «поднятие» обработчиков на верхний уровень.
Еще раз взглянув на примеры, можно удостовериться в одном: любая пойманная ошибка в идеале должна иметь одинаковый набор параметров информативности независимо от инструмента и среды исполнения, а ведь мы еще не рассмотрели логирование, профилирование и хранение ошибок на сервере. Соответственно, из этого можно сделать вывод, что слой обработки ошибок должен сосуществовать со слоем исполнения, а это уже влечет за собой последствия и накладывается на архитектуру.
Так для чего же нужны эти приемы?
Ответ – для ведения простой и надежной разработки. Ваша задача как разработчика – делать отказоустойчивый код и при возникновении ошибки не дебажить все подряд, а сразу бить в «яблочко» и устранять проблему. Это попросту экономит ваше время, силы и деньги бизнеса.
Работайте с DevTools и выбрасывайте исключения, другие разработчики будут вам благодарны, опираясь на этот гайд. Обязательно ознакомьтесь, если не знали, вот пример:
// ...

/* обычный console.log может превратиться в нечто большее */

/*
  как правило, начинающие программисты логируют по одной переменной,
  мы же можем форматировать строки с любым количеством аргументов
*/

console.log('Check:rn  username - %srn  age - %irn  data - %o', 'Mike', 23, {status: 'registered'});
/*
Check:
  username - Mike
  age - 23
  data - {status: "registered"}
*/

/* выводить таблицы массивов */
console.table([{username: 'Mike', age: 23}, {username: 'Sarah', age: 46}]);

/* или просто логировать данные в их первоначальном виде */
console.dir(document.body.childNodes[1]);

// ...
Далее рассмотрим инструменты, которые собирают данные не только от компонентов, но и от сервисов (например, сетевые запросы, запросы к устройству и т.д.), а также сторонних библиотек и приложений, что кратно улучшает вашу производительность при обработке ошибок.
Облегчаем себе жизнь
- Рекомендую взять за правило: перед началом каждой разработки централизовать любое логирование, особенно ошибок. С этой задачей помогут справиться библиотеки по типу log4js. Это сразу даст вам понять, ошибка в вашем приложении, либо извне.
- Используйте Брейкпоинты в DevTools! Это важно уметь делать. Это как машина времени программы, вы останавливаете интерпретатор на нужной строчке и вам даже не нужна консоль – просто смотрите значения переменных и поймете, что не так. Делается это простым кликом на нужной строчке во вкладке Source. Выбираете нужный файл, ставите брейкпоинт и перезапускаете программу. Для удаления брейкпоинта кликните на ту же строчку.
- Старайтесь перехватывать все ошибки и исключения на верхнем уровне.
- Хранение ошибок на сервере больше относится к проду, но имейте в виду, что готовый инструмент прекрасно справляется с данной задачей (см. ниже).
- Профилирование – тема тоже непростая, если вы знаете, что это измерение времени от начала до конца исполнения монады, вы уже на полпути. К счастью, DevTools позволяют делать замеры без вмешательства в код.
Эти правила априори необходимы, даже если вы опытный разработчик, вам всегда нужно знать, как ведет себя программа в конкретный момент времени.
Для ПРОДвинутых
Если вы уже как рыба в воде при работе с ошибками в JS, рекомендую посмотреть на сервисы для автоматизации сбора и ведения статистики ошибок.
Такие сервисы, как Sentry и Rollbar, уже заточены под работу со многими популярными пакетами и требуют от вас только установки, задания конфигурации в точке входа вашего приложения и определение надстроек в зависимости от вашей архитектуры.
Их преимущество в том, что они покрывают большую часть потребностей, о которых написано выше и требуют вашего минимального вмешательства. На выходе вы получите приятные бонусы с красивым интерфейсом и все пункты, которые я указал важными (Железобетонные методы обработки ошибок).
Также рекомендую ознакомиться с Graphana, это за рамками статьи, т.к. относится не только к JavaScript, но очень хорошо коррелирует с нашей темой и позволяет отображать на графиках текущее состояние приложений, слать уведомления в чат об ошибках и не только.
Ошибки зависимостей
Очень частым явлением среди разработчиков является работа со сторонними пакетами, в которых тоже могут встречаться ошибки.
Тут нет выработанного универсального решения для отлова или же игнорирования, т.к. многое зависит непосредственно от сборки самого пакета. Какие советы тут можно дать? Их немного:
- Самым важным в логировании исключений являются уровни ошибок. Вы можете задавать их посредством встроенного console (log, warn, error, info), либо в сторонних библиотеках (см. выше log4js). Здесь решением проблемы является максимальное разделение ошибок вашего приложения и стороннего, но не переборщите, ведь могут быть действительно важные исключения.
- Разделяйте ваши сборки на production/development/test и используйте source-map во время разработки либо пре-релиза, это позволит вам получать более детальную информацию в бою о том, что пошло не так с информативным стеком ошибки.
- Другим способом в перехвате ошибок зависимостей является реальное устранение проблемы, например, посредством Pull Request. Для ленивых можно использовать Fork с фиксом, но тогда его нужно поддерживать, а некоторые проекты не всегда позволяют это делать.
- Ну, и самым изощренным и неочевидным является использование соответствующих надстроек для babel. Транспайлинг посредством babel работает через AST, который в первом приближении разбирает весь код JavaScript на дерево с вершинами. Есть специальные плагины, которые делают необходимые обертки для удобства разработчиков, по типу полифиллов, перегрузок, а также оборачиванию в специальные конструкции. Оборачивать можно, как вы догадались, и обработку ошибок, но данное решение должно иметь острую необходимость, просто имейте это в виду.
Заключение
Выше были рассмотрены вполне стандартные методы обработки ошибок, а также продемонстрированы примеры техник с кодом для популярных пакетов. Дополнением выступают инструменты по автоматизации сбора и обработки ошибок. Подробную информацию читайте по ссылкам.
Комбинируйте несколько методов и доверяйте проектам с хорошей репутацией. Обязательно логируйте во время разработки, брейкпоинты только помогают понять проблему в конкретном случае, но не являются лекарством.
Оператор try позволяет проверить блок кода на возникновение ошибок.
Оператор catch позволяет обрабатывать возникшую ошибку.
Оператор throw позволяет генерировать пользовательские ошибки.
Оператор finally позволяет выполнять код после операторов try и catch не зависимо от результата.
Ошибки будут!
Во время выполнения кода JavaScript, могут возникать разные ошибки.
Это могут быть ошибки кодирования, сделанные программистом, ошибки, возникающие в результате ввода неверных данных, и другие непредвиденные вещи.
В следующем примере, чтобы умышленно создать ошибку, мы вместо команды alert написали adddlert:
<p id="demo"></p>

<script>
try {
    adddlert("Добро пожаловать, гость!");
}
catch(err) {
    document.getElementById("demo").innerHTML = err.message;
}
</script>
JavaScript перехватит adddlert как ошибку и выполнит код в операторе catch, чтобы ее обработать.
Операторы try и catch
Оператор try определяет блок кода, который во время выполнения будет проверяться на возникновение ошибок.
Оператор catch определяет блок кода, который будет выполняться, если в блоке оператора try возникнет ошибка.
Операторы try и catch всегда используются в паре:
try {
     // проверяемый блок кода
}
 catch(err) {
     // блок кода для обработки ошибок
}
JavaScript генерирует ошибки
Когда возникает ошибка, обычно интерпретатор JavaScript останавливает выполнение кода и генерирует сообщение об ошибке.
Если говорить техническими терминами, то интерпретатор JavaScript сгенерирует исключение (сгенерирует ошибку).
На самом деле интерпретатор JavaScript создаст объект Error с двумя свойствами — name и message.
Оператор throw
Оператор throw позволяет создавать пользовательские ошибки.
В техническом смысле вы можете генерировать исключения (генерировать ошибки).
Исключения могут быть строкой, числом, логическим значением или объектом JavaScript:
throw "Слишком большой";
throw 500;
Используя оператор throw вместе с try и catch, вы можете контролировать ход программы и генерировать пользовательские сообщения об ошибках.
Пример проверки ввода
В следующем примере проверяются данные ввода. Если введено неверное значение, то генерируется исключение (err).
Исключение (err) перехватывается оператором catch, и выводится пользовательское сообщение об ошибке:
<!DOCTYPE html>
<html>
<body>

<p>Введите число от 5 до 10:</p>

<input id="demo" type="text">
<button type="button" onclick="myFunction()">Проверка ввода</button>
<p id="p01"></p>

<script>
function myFunction() {
    var message, x;
    message = document.getElementById("p01");
    message.innerHTML = "";
    x = document.getElementById("demo").value;
    try {
        if(x == "") throw "пусто";
        if(isNaN(x)) throw "не число";
        x = Number(x);
        if(x < 5) throw "слишком мало";
        if(x > 10) throw "слишком много";
    }
    catch(err) {
        message.innerHTML = "Вы ввели " + err;
    }
}
</script>

</body>
</html>
HTML проверка
Приведенный выше код это всего лишь пример.
Современные браузеры часто используют комбинацию JavaScript и встроенной HTML проверки, реализуемой при помощи предопределенных правил, заданных в HTML атрибутах:
<input id="demo" type="number" min="5" max="10" step="1" >
Оператор finally
Оператор finally позволяет выполнить код после операторов try и catch, независимо от результатов проверки:
try {
     // проверяемый блок кода
}
catch(err) {
     // блок кода для обработки ошибок
}
finally {
    // блок кода, выполняемый не зависимо от результата операторов try / catch
}
Пример:
function myFunction() {
    var message, x;
    message = document.getElementById("p01");
    message.innerHTML = "";
    x = document.getElementById("demo").value;
    try {
        if(x == "") throw "пусто";
        if(isNaN(x)) throw "не число";
        x = Number(x);
        if(x < 5) throw "слишком мало";
        if(x > 10) throw "слишком много";
    }
    catch(err) {
        message.innerHTML = "Ошибка: " + err + ".";
    }
    finally {
        document.getElementById("demo").value = "";
    }
}
Объект Error
В JavaScript есть встроенный объект Error, который предоставляет информацию по возникшей ошибке.
Объект Error предоставляет два полезных свойства:
| Свойство | Описание |
|---|---|
| name | Устанавливает или возвращает имя ошибки |
| message | Устанавливает или возвращает сообщение об ошибке (строку) |
Значения свойства name
В свойстве name объекта Error может быть возвращено шесть различных значений:
| Имя ошибки | Описание |
|---|---|
| EvalError | Ошибка в функции eval() |
| RangeError | Число «за пределами диапазона» |
| ReferenceError | Недопустимая ссылка (обращение) |
| SyntaxError | Синтаксическая ошибка |
| TypeError | Ошибка типов |
| URIError | Ошибка в encodeURI() |
EvalError
EvalError указывает на то, что возникла ошибка в функции eval().
В более новых версиях JavaScript никогда не генерируется ошибка EvalError. Вместо нее используется SyntaxError.
RangeError
Ошибка RangeError возникает, если вы используете число, которое выходит за пределы диапазона допустимых значений.
Например, нельзя задать число с 500 знаковыми цифрами.
var num = 1;
try {
    num.toPrecision(500);   // Число не может иметь 500 знаковых цифр
}
catch(err) {
    document.getElementById("demo").innerHTML = err.name;
}
ReferenceError
Ошибка ReferenceError возникает в том случае, когда вы используете (ссылаетесь) переменную, которая не была декларирована:
var x;
try {
    x = y + 1;   // нельзя использовать (ссылаться на) переменную y
}
catch(err) {
    document.getElementById("demo").innerHTML = err.name;
}
SyntaxError
Ошибка SyntaxError возникает, когда вы пытаетесь выполнить код с синтаксическими ошибками.
try {
    eval("alert('Hello)");   // Пропуск ' приведет к синтаксической ошибке
}
catch(err) {
     document.getElementById("demo").innerHTML = err.name;
}
TypeError
Ошибка TypeError возникает, когда вы используете значение, выходящее за пределы диапазона ожидаемых типов:
var num = 1;
try {
    num.toUpperCase();   // Нельзя преобразовать число в верхний регистр
}
catch(err) {
    document.getElementById("demo").innerHTML = err.name;
}
URIError
Ошибка URIError возникает, когда вы используете недопустимые символы в функциях URI:
try {
    decodeURI("%%%");   // Нельзя декодировать эти символы процентов
}
catch(err) {
    document.getElementById("demo").innerHTML = err.name;
}
Нестандартные свойства объекта Error
Mozilla и Microsoft определяют ряд нестандартных свойств объекта Error:
fileName (Mozilla)
lineNumber (Mozilla)
columnNumber (Mozilla)
stack (Mozilla)
description (Microsoft)
number (Microsoft)
Никогда не используйте эти свойства в публичном веб-сайте. Они не будут работать во всех браузерах.