 Loading…
Color Image Scanner
User’s Manual
Regulatory model: DF-1701B/DF-1702B
Avision Inc.

User’s Manual
Trademarks
Microsoft is a U.S. registered trademark of Microsoft Corporation.
Windows, Windows Vista, Windows 7, Windows 8 and Windows 10 are either registered trademarks or trademarks of Microsoft Corporation in the United States and/or other countries.
IBM, IBM PC are registered trademarks of International Business Machines Corp.
Other brands and product names herein are trademarks or registered trademarks of their respective holders.
Copyright
All rights reserved. No part of this publication may be reproduced, transmitted, transcribed, stored in a retrieval system, or translated into any language or computer language, in any form or by any means, electronic, mechanical, magnetic, optical, chemical, manual, or otherwise, without the prior written permission of Avision Inc.
Material scanned by this product may be protected by governmental laws and other regulations, such as copyright laws, the customer is solely responsible for complying with all such laws and regulations.
Warranty
The information contained in this document is subject to change without notice.
Avision makes no warranty of any kind with regard to this material, including, but not limited to, the implied warranties of fitness for a particular purpose.
Avision shall not be liable for errors contained herein or for incidental or consequential damages in connection with the furnishing, performance, or use of this material.
ii

User’s Manual
FCC Radio Frequency Interference Statement
This product has been tested and found to comply with the limits for a class B digital device, pursuant to Part 15 of the FCC rules. Operation is subject to the following two conditions: (1) this device may not cause harmful interference, and (2) this device must accept any interference received, including interference that may cause undesired operation. The FCC Class B limits are designed to provide reasonable protection against harmful interference in a residential installation. This equipment generates, uses, and can radiate radio frequency energy and, if not installed and used in accordance with the instructions, may cause harmful interference to radio communications. However, there is no guarantee that interference will not occur in a particular installation. If this equipment does cause harmful interference to radio or television reception, which can be determined by turning the equipment off and on, the user is encouraged to try to correct the interference by one or more of the following measures:
Reorient or relocate the receiving antenna.
Increase the separation between the equipment and receiver.
Connect the equipment into an outlet on a circuit different from that to which the receiver is connected.
Consult your point of purchase or service representative for additional suggestions.
As an ENERGY STAR® Partner, Avision Inc. has determined that this product meets the ENERGY STAR guidelines for energy efficiency.
iii

User’s Manual
European Union Regulatory Notice
Products bearing the CE marking comply with the following EU Directives:
Low Voltage Directive 2014/35/EC
EMC Directive 2014/30/EC
Restriction of the use of certain hazardous substances (RoHS) Directive 2011/65/EU
CE compliance of this product is valid if powered with the correct CE-marked AC adapter provided by Avision.
This product satisfies the Class B limits of EN55022, EN55024 and safety requirements of EN 60950.
*This machine is certified as Class 1 LED product. This means that this machine does not produce hazardous laser radiation.
Disposal of Waste Equipment
This symbol on the product or on its packaging indicates that the product can not be disposed of with your other household waste. Instead it should be sent to appropriate facilities for recovery and recycling in an effort to protect human health and the environment. Fore more information about where you can drop off your waste equipment for recycling, please contact your local city office, your household waste disposal service or the shop where you purchased the product.
iv

User’s Manual
System Requirements
|
CPU: |
Intel® Core™ 2 Duo or higher |
|
Memory: |
32 bit: 2 GB |
|
64 bit: 4 GB |
|
|
Optical Drive: |
DVD-ROM Drive |
|
USB Port: |
USB port 2.0 (compatible with USB 1.1) |
|
Compatible |
Microsoft Windows XP(SP3), Windows Vista, |
|
Operating |
Windows 7, Windows 8 (32 bits/64 bits), |
|
System: |
Windows 10 (32 bits/64 bits) |
v
User’s Manual
1. Introduction
Congratulations on your purchase of the color image scanner. With this scanner, you can scan documents in a rated speed to increase your productivity.
Before you install and operate the new scanner, please take a few minutes to read through this manual. It provides proper instructions for you to unpack, install, operate and maintain the scanner.
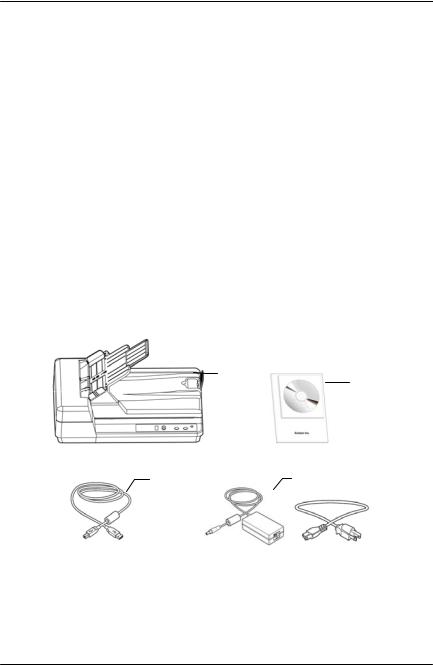
The following figure indicates the package contents. Please check all the items against your checklist. If you do not receive all the items, please contact your authorized local dealer immediately.
1.Scanner Main Unit
2.Software CD/Quick Guide
3.USB Cable
4.Power Adapter & Power Cord
1-1

User’s Manual
NOTE:
1.Only use the AC adapter (DA-48M24 made by APD) included in the machine. Using other AC adapters may damage the machine and void the warranty.
2.Please unpack the packing carefully, and check the contents against the checklist. If any items are missing or damaged, please contact your dealer immediately.
3.To access more service supports, visit www.avision.com to register your Avision’s product.
1-2

User’s Manual
2.Scanner Installation
Precautions
Keep the scanner out of direct sunlight. Direct exposure to the sun or excessive heat may cause damage to the unit.
Do not install the scanner in a humid or dusty place.
Be sure to use the proper AC power source.
Place the scanner securely on an even, flat surface. Tilted or uneven surfaces may cause mechanical or paper-feeding problems.
Retain the scanner box and packing materials for shipping purposes.
2-1
User’s Manual
2.1 Installing the Scanner Driver and Cables
NOTE:
1). The Windows system CD may be required when installing on some PC’s.
2). To ensure your computer can identify the USB scanner, please install scanner driver first before connecting the scanner to your computer.
3). The scanner driver contains TWAIN, ISIS and WIA driver. If you are running Windows Me, Windows XP, or Windows Vista, after the installation of scanner driver is completed, this scanner allows you to scan via a TWAIN, ISIS, or a WIA interface. Start your TWAIN-compliant image editing software application to select a TWAIN or WIA user interface or your ISIS software to select an ISIS user interface. You may also launch Microsoft’s Scanner and Camera Wizard to scan via a WIA user interface.
2.1.1 Connecting to Power
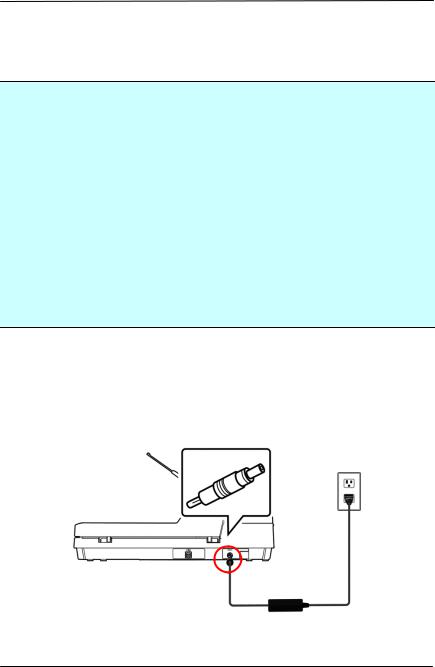
Plug the small end of the power adaptor into the power jack of your scanner. Insert the other end to an appropriate power outlet.
2-2
User’s Manual
2.1.2 Turning on the Scanner
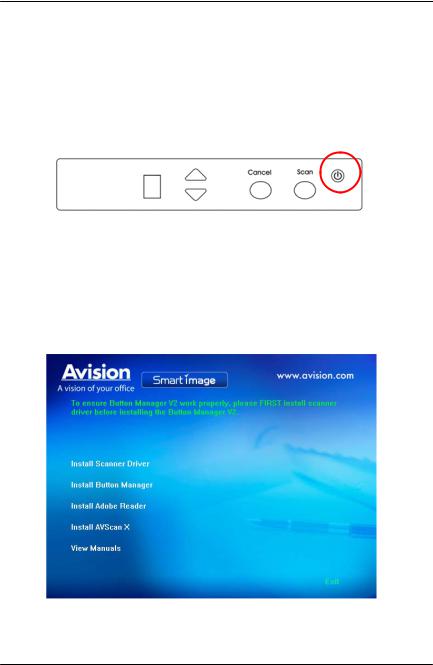
Press the Power Switch button on the front panel, the Power LED will be lit. To turn off the scanner, press the Power Switch button for about 3 seconds, the Power LED will be off.
2.1.3 Installing the Scanner Driver
1.Place the supplied CD-ROM onto your CD-ROM drive.
2.The software installation graphic appears. If not, run
“setup.exe”.
2-3

User’s Manual
Contents on the installation graphic:
Install Scanner Driver: To communicate with your scanner, you need to install the scanner driver.
Install Button Manager V2: To use the buttons on the scanner, you need to install Button Manager V2. To ensure Button Manager V2 works properly, please FIRST install scanner driver before installing Button Manager V2.
Install Adobe Reader: To view the user’s manuals for the scanner and Button Manager V2, you need to use Adobe Reader to open and view the manuals in pdf file format. If you already have Adobe Reader installed on your computer, you may disregard this item.
Install AVScan X: To scan and organize your multi-page document(s), you can install the software application to manage them easily and effectively.
View Manual: Click “View Manual” to view or print the detailed user manual for the scanner and Button Manager V2 respectively.
3.Click Install Button Manager V2 to install the Button Manager V2 software and then click Install Scanner Driver to install the scanner driver on your computer.
2-4
User’s Manual
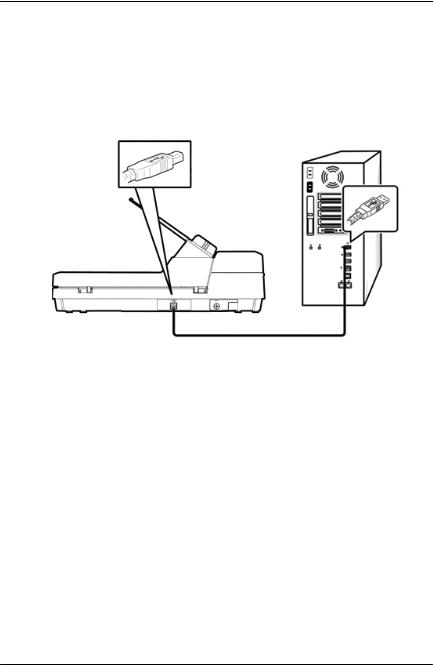
2.1.4 Connecting to Computer
1.Connect the square end of the USB cable to the USB port of your scanner. Connect the rectangle end to the USB port of your computer.
2.The computer should detect a new USB device and prompt a “New Hardware Found” message.
3.By following the on-screen instructions, click the Next button to continue. When the certification screen appears, click Continue Anyway to complete the installation.
4.When the Finish dialog is prompted, click the Finish button.
5.Click “View Manual” to view or print the detailed user manual for the scanner and bundled applications respectively.
2-5
User’s Manual
3.Completing Your First Scan
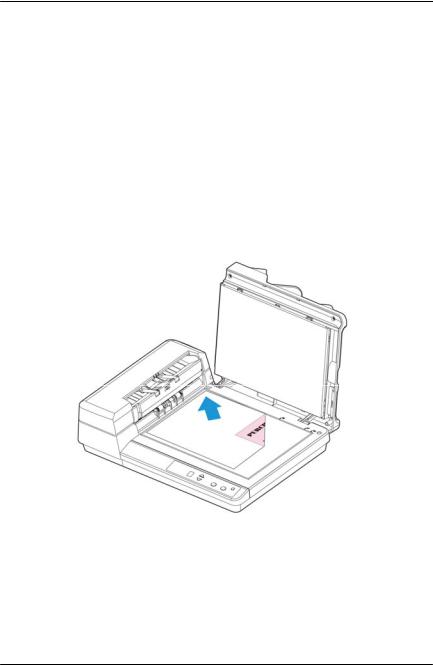
3.1 Placing paper on the document glass
Place your document face down on the document glass and align the document to the reference mark as indicated.
3-1

User’s Manual
3.2 Loading Your Paper
3.2.1 Notice on Using the ADF
Before using the ADF, please make sure that your paper meets the following specifications:
Document(s) can range in size from 114 x 140 mm (4.5 x 5.5 in.) to 216 x 356 mm (8.5 x 14 in.).
Document(s) can range in weight from 52 ~127 g/m2 (14 to 34 lbs)
Document(s) should be square or rectangular and in good condition (not fragile or worn).
Document(s) should be free of curl, wrinkle, tears, wet ink, or punch holes.
Document(s) should be free of staples, paper clips, paper sticky notes.
3-2
User’s Manual
3.2.2 Placing Your Document in the ADF Paper Tray Fanning Your Document
Note:
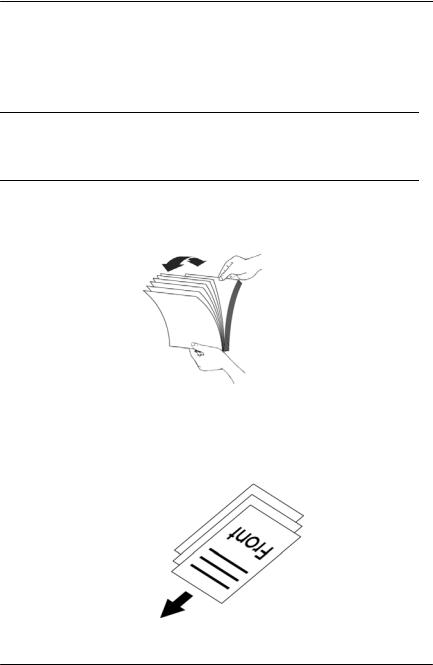
To avoid occasional multi-feeds or paper jams, please fan your documents and align the top edges before feeding them into the scanner.
1.Hold both ends of the documents and fan them a few times.
2.Rotate the documents by 90 degrees and fan them in the same manner.
3.Align the edges of the documents in a step-like pattern (see picture below).
Step-like
Scanning
Direction
3-3
User’s Manual
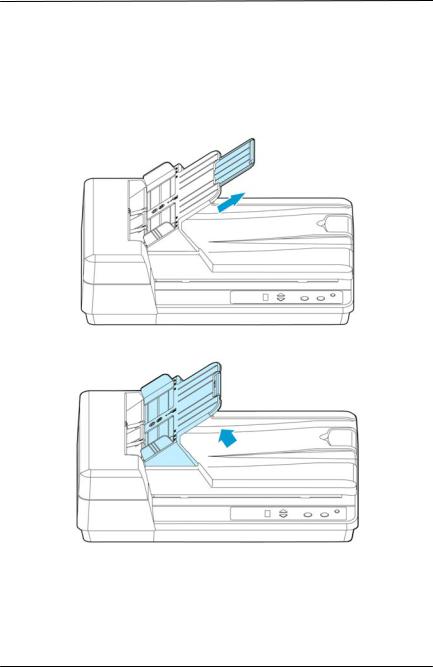
Document Feeding
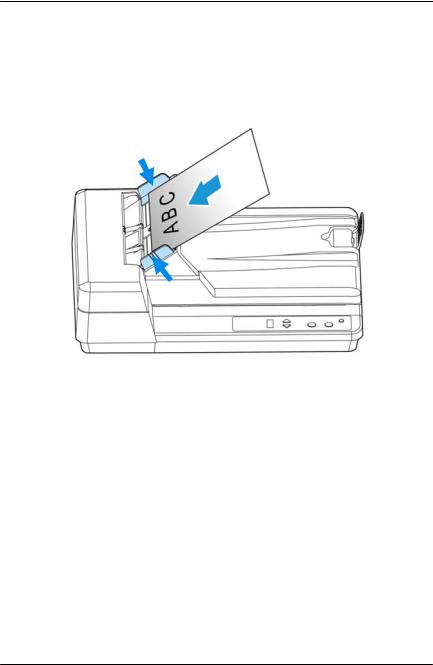
1.Raise the ADF paper tray to about 45 degrees and pull the tray extension.
3-4
User’s Manual
2.Place your document with the text face up and make the top of the page point to the document feeder as shown below. Center your document with the paper guides and make sure the edge of document touch the paper guides.
3-5
User’s Manual
3.2.3Scanning a Stack of Document with Various sizes and Weights
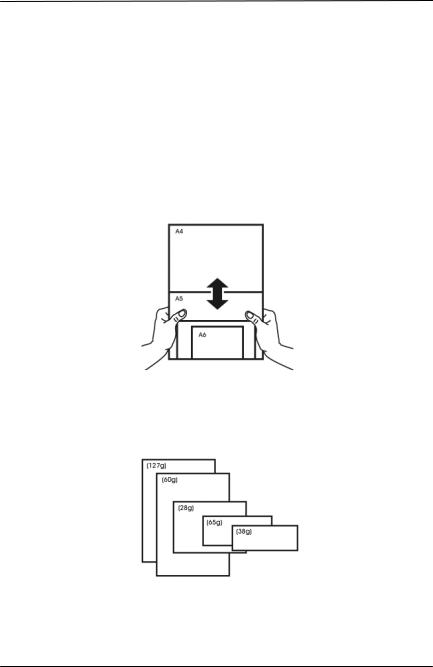
When scanning a batch of documents with different sizes and weights, be sure to follow these guidelines to avoid a skewed image or a paper jam:
1.Align the documents TOP EDGE first in the sequence of paper size from large to small.
2.If two pages are of the same size yet with different weight, arrange these pages in the sequence of paper weight from heavyweight to lightweight.
3-6
User’s Manual
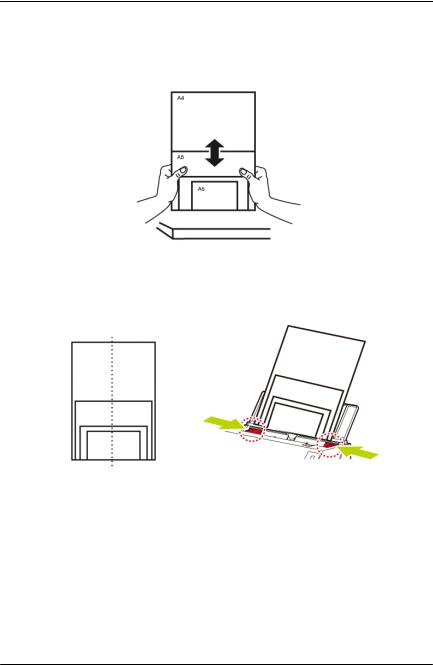
3.Align the edges of the documents by tapping the bottom of the stack against the table top.
4.Center these pages in the document feeder and make sure that the edges of page of the largest size slightly touch the Paper Guide.
3-7
User’s Manual
3.2Verifying Your Scanner Installation
To verify if your scanner installation is correct, Avision provides you a useful test program called Avision Capture Tool. With this tool, you can perform simple scans and view the captured images. In addition, it helps you complete your scan at a rated speed.
The following procedure describes how to verify your scanner installation. If the installation is not correct, please review the preceding section to check if the cable connection and scanner driver have been successfully installed.
Before you begin, be sure the scanner is on.
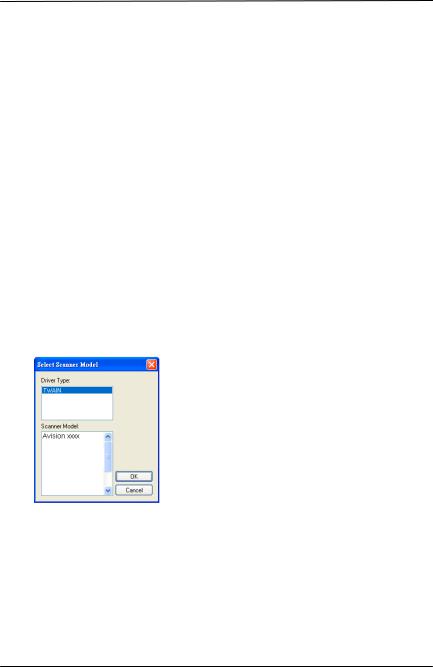
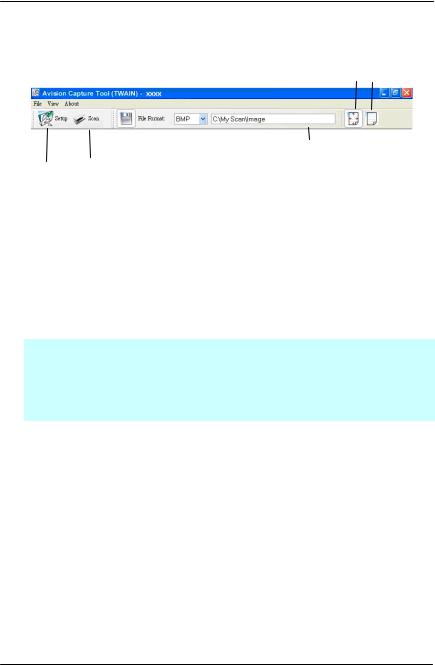
1.Select Start>Programs>Avision xxx Scanner>Avision Capture Tool. The Select Scanner Model dialog box will be displayed.
2.Select your driver type and scanner model and click OK. The following Avision Capture Tool dialog box will be displayed.
3-8
User’s Manual
Fit Actual
Page Size
|
Setup Scan Save |
File Format |
File Path |
||
3.Choose your desired file format from the File Format drop down list box. (Default is JPEG, other choice includes TIFF, MTIFF, PDF, MPDF, GIF, and BMP.) The supported file formats vary depending on your scanner model.
4.Type your desired folder name and file name in the File Path box. (Default is C:Documents and SettingsUser NameMy DocumentsMy ScanImage.)
Note: If you do not wish to save the scanned image, deselect the Save button since default is Save Enable. In this case, the thumbnail view will be disabled. And therefore, after viewing all the scanned images, only the last one will remain on the screen.
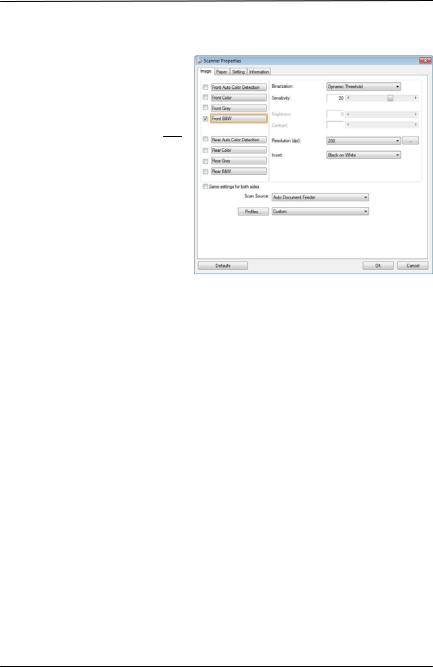
5.Click the Setup button ( ) or choose Setup from the File menu to prompt the Scanner Properties dialog box.
3-9
User’s Manual
Image
Selection
Box
6.From the Image Selection Box, choose your desired image type for your scanned image. (Default is Front B&W) If you have a duplex scanner, choose Front and Rear to scan both sides of your document.
7.Click OK to quit the Scanner Properties dialog box. (To learn more details about the Scanner Properties dialog box, please see the subsequent chapter, Using the Scanner Properties Dialog Box.)
8.Place your document face down on the document glass or face up in the auto document feeder.
9.In the Scan Validation dialog box, click the Scan button ( ) or choose Scan from the File menu.
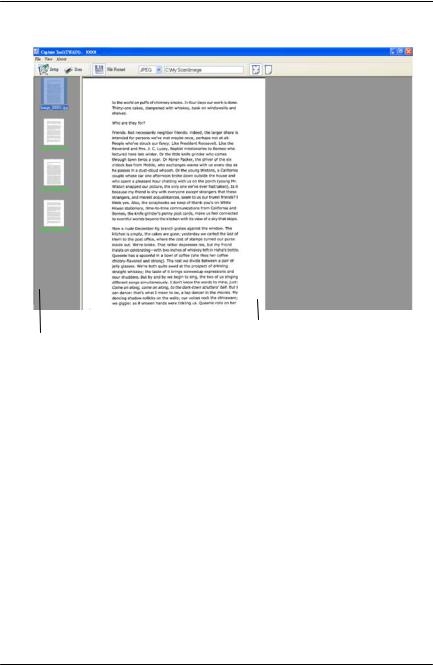
10.The document will be scanned and displayed in the Scan Validation screen. After the scanned images have been displayed, your scanner installation verification is completed.
3-10
User’s Manual
Display View
Thumbnail View
11.You can view the scanned image in Fit Page ( ) or Actual Size (100%) button (
 ) from the Viewing toolbars at the right side.
12.Click the Close box or Quit from the File menu to exit the Scan Validation Tool.
3-11
User’s Manual
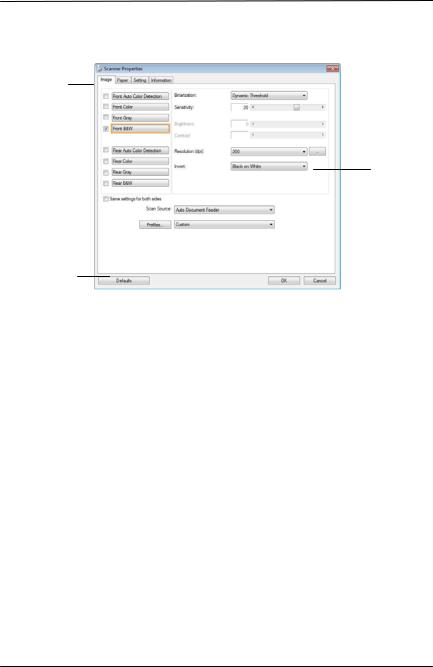
3.3A Glance of the Scanner Properties Dialog Box
1
|
2 |
3 |
|||||||
|
4 |
||||||||
|
5 |
||||||||
|
6 |
||||||||
|
7 |
||||||||
8
|
1. |
Tab Options |
Choice: Image, Compression, Color Dropout, |
|
Paper, Multi-Feed Detection, Preview, Options, |
||
|
Settings, Information. |
||
|
2. |
Image |
Choose your image type and the side of |
|
Selection Box |
document you wish to scan. Options vary |
|
|
based on type of scanner. |
||
|
3. |
Brightness |
Adjust the brightness level from –100 to +100. |
|
4. |
Contrast |
Adjust the contrast level from –100 to +100. |
|
5. Resolution |
Determine the quality of the scanned image. |
|
|
The industry standard is 200 dpi. |
||
|
6. |
Invert |
Reverse the color of your scanned image. |
|
7. |
Scan Source |
Choice: Auto Document Feeder, Flatbed, |
|
Flatbed (Book), Automatic (varies due to |
||
|
different scanner model) |
||
|
8. |
Defaults |
Reset all values on the tabs to the factory |
|
default settings. |
3-12
User’s Manual
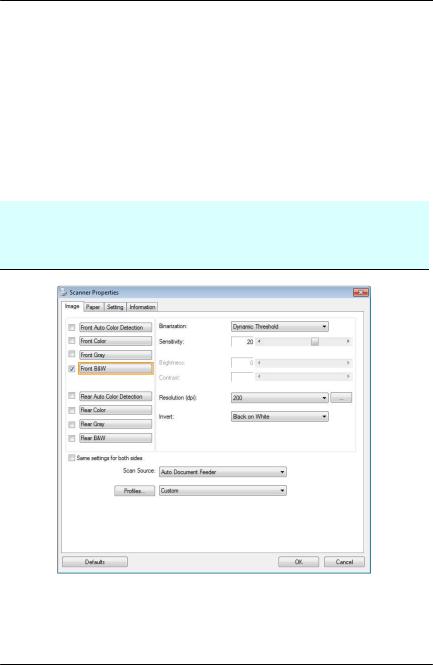
4.Using the Scanner Properties Dialog Box
The Scanner Properties dialog box allows you to configure the scanner’s settings. It consists of several tabbed windows each of which will be described in this chapter.
Note: In this chapter, all options are available based on a duplex (double-side) scanner. If you have purchased a simplex (single-side) scanner, all options are available for single sided only.
The Scanner Properties dialog box
4-1
User’s Manual
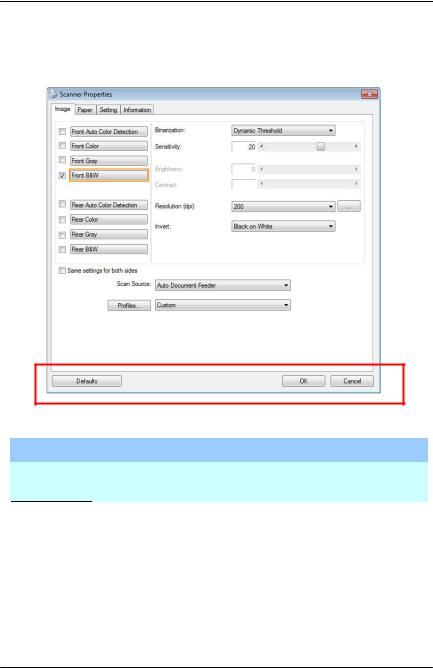
4.1 Buttons on the Scanner Properties Dialog Box
The buttons on the Scanner Properties dialog box Buttons Description
Defaults Click the Defaults button, the factory default settings will be shown on each tab.
Cancel Click the Cancel button to leave the Scanner Properties dialog box.
4-2

User’s Manual
The following table shows the default settings
|
Tab name |
Default settings |
|
Image |
Image Front B&W |
|
Binarization Dynamic Threshold |
|
|
Resolution 200 dpi |
|
|
Invert Blank on White |
|
|
Scan Source Auto Document Feeder |
|
|
Threshold None |
|
|
Brightness None |
|
|
Contrast None |
|
|
Compression |
None |
|
Color Dropout |
None |
|
Paper |
Cropping Automatic |
|
Deskew Yes |
|
|
Orientation Portrait |
|
|
OverScan 0.00 |
|
|
Note: The availability of this option |
|
|
varies due to scanner model. |
|
|
Unit Inch |
|
|
Multi-Feed |
None |
|
Detection |
|
|
Preview |
None |
|
Options |
Rotation Degrees None |
|
Blank Page Removal None |
|
|
Edge Fill White 0 mm |
|
|
Image Control Option None |
|
|
Setting |
Enable Energy Saver Enable, 15 |
|
minutes after last scan action |
|
|
Show Scanning Progress Yes |
|
|
Show Warning Message Yes |
|
|
Save Settings after Closing Yes |
|
|
Imprinter |
Digital Imprinter |
4-3

User’s Manual
4.2Showing or Hiding Tabs
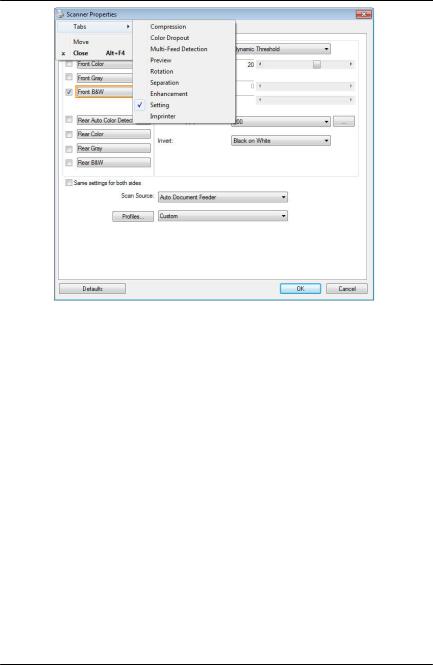
The [Scanner Properties] dialog box is displayed in default with three basic tabs — Image, Paper, and Information. To show more tabs, click the [Scanner Properties] icon to access more scan settings.
To show more tabs,
1.Click the [Scanner Properties] icon ( ) on the upper left corner, and choose [Tab] to show available tab names. The available tabs include Compression, Color Drop out, Preview, Rotation, Separation, Multi-Feed, Options, Settings, and Imprinter. (Note: the options vary based on scanner model.)
2.Choose the tab you want to display. The selected tab will be shown with a check mark and then displayed in the [Scanner Properties] dialog box.
3.To access the settings, click the selected tab on the top of the [Scanner Properties] dialog box. The page of the selected tab will be displayed.
To hide a tab window,
1.Click the [Scanner Properties] icon ( ) on the upper left corner, and choose [Tabs] to show available tab names.
2.Choose the tab you want to hide. Then, the selected tab will be hided in the [Scanner Properties] dialog box.
Note: The [Image], [Paper], and [Information] tab can not be hided since they preprogrammed to be displayed by default.
4-4
User’s Manual
4-5
User’s Manual
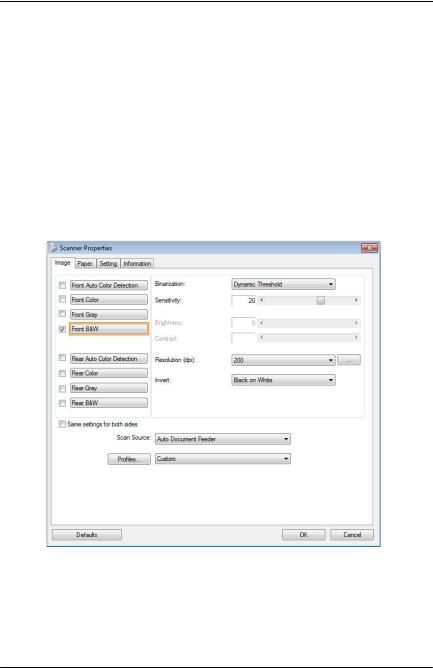
4.3The Image Tab
The Image tab allows you to choose the front side and (or) the rear side of your document, the type of image, and to set several basic scan settings. Note that except for the resolution, you can set individual scan settings for the front side and the rear side. For example, all settings in the Image tab, Compression tab, Color Dropout tab can be set individually for the front and the rear side. However, the settings in the Paper tab, the Option tab, and the Setting tab have to be set the same for the front and rear side.
The Image tab dialog box
4-6

User’s Manual
4.3.1 The Image Selection Box
The Image Selection box includes the image type and document side option. If you wish to scan both the front side and the rear side of your color document, you can check both Front Color and Rear Color at the same time. Note the options vary based on type of scanner.
Example 1 Scanning a two-sided color document, both sides in color
|
Side/Image |
Front |
Rear |
|
Selection |
||
4-7

User’s Manual
Example 2 Scanning a two-sided color document, one in B&W, the other in color
Side/Image
Selection
Image Type
Color
Gray
B&W
Front Rear
Description
Choose Color if you wish to scan a color image for your original in color.
Choose Gray image if your original contains actual shades of gray.
Choose B&W if your original contains only text, pencil or ink sketch.
4-8

User’s Manual
Front/Rear Auto Color Detection:
Click to automatically detect and scan the front or the rear page of your color document in color image mode. If your document is in colors, the scanner will automatically scan the document into a color image. If your document is non-color, you can choose the output to be either B&W or Gray from the Non-Color Selection option. This option is useful when you have a mixture of color and non-color document.
Note: If you choose Front Rear Auto Color Detection, you can not specify the image mode of your rear page and vice versas.
Modes of Auto Color Detection:
If [Front/Rear Auto Color Detection] is selected, its modes will be displayed. Choice includes Normal, Ignore Paper Color. For paper with background color such as invoices, choosing [Ignore Paper Color] will automatically remove the background color and enhance the detection accuracy.
|
Normal |
Ignore single background |
|
color |
|
4-9

User’s Manual
Sensitivity of Auto Color Detection
If your documents contain primarily B&W text and small amount of light or pale colors and you do not wish them to be recognized as color image to save the file size, you can increase the sensitivity value by moving the bar to the right to let these images to be detected as B&W. The value ranges from 1 to 100. The default is 37.
Original
|
Sensitivity: 1 |
Sensitivity: 100 |
|
(The image is recognized |
(The image is recognized |
|
as a color one) |
as a black and white one) |
4-10

User’s Manual
Same settings on both sides:
Click to apply same scan settings for both sides of your documents. After checking this option, any settings you have changed will automatically applied to both the front side and the rear side. For example, if you choose your ideal resolution to be 300 dpi, this will be applied both to the front side and rear side of your document.
4-11

User’s Manual
4.3.2 Other Image Options
Binarization This is the process of converting a grayscale or color image to a bi-tonal image. There are several different methods of performing this conversion.
Options: Dynamic Threshold,
Dynamic Threshold (AD), Fixed
Processing, Halftone 1~5, Error Diffusion.
Dynamic Threshold: Selecting Dynamic Threshold allows the scanner to dynamically evaluate each document to determine the optimal threshold value to produce the highest quality image. This is used to scan mixed document containing faint text, shaded background, or color background with a single setting. If Dynamic Threshold is selected, Threshold, Brightness, and Contrast are not available.
Dynamic Threshold (AD): Selecting Dynamic Threshold (AD) to perform the enhanced mode of the Dynamic Threshold feature. However, using this mode may slow down your scanning speed.
Sensitivity of Dynamic Threshold
Occasionally your scanned image may contain small dots or speckles. To remove these spots, increase the sensitivity value by moving the bar to the right. The value ranges from 1 to 30. The default is 20.
4-12

User’s Manual
Fixed Processing: Used for black-and- white and other high contrast documents. A single level is set to determine the black- and-white transition. The threshold is programmable over the entire density range. Fixed Processing sets Contrast to 0. If Fixed Processing is selected, Contrast is not available.
Halftone: In addition to the black and white display, Halftone can present a somehow gray shade of image by using different size of dots. Halftone image looks like the picture we have seen in the newspaper. Options include Halftone 1,
Halftone 2, Halftone 3, Halftone 4, Halftone 5.
Error Diffusion: Error Diffusion is a type of Halftone. Error Diffusion gives good image texture and makes text in images more readable than Halftone.
Halftone Image
4-13

User’s Manual
Error Diffusion Image
|
Dynamic Threshold |
Dynamic Threshold (AD) |
4-14
AD130
Компактный и простой в использовании сканер
Combining a flatbed scanner with the convenience of a 50-page ADF, the Avision AD130 is a compact and affordable productivity scanning solution delivering 30 pages per minute and 60 images per minute at 300 dpi. The combination of high productivity and affordability makes this series the obvious choice for reducing the total cost of scanning.
-
ОСОБЕННОСТИ
-
СПЕЦИФИКАЦИЯ
-
загрузки
-
FAQ
Product Details


В сканере AD130 используется CIS (контактный датчик изображения) технология и лампа LED как источник света. Благодаря автоподатчику на 50 листов сканер может обрабатывать односторонние и двухсторонние документы одновременно. Скорость сканирования составляет 30 страниц или 60 изображений в минуту, Сканер оснащен удобной функцией обрезки изображений. С этой функцией документы различных размеров, такие как фотографии, удостоверения личности или визитные карточки могут быть помещены на планшет, и сканер в состоянии обрезать и создать изображения согласно первоначальным размерам документов за одно сканирование. Для опытных пользователей, которые хотят управлять параметрами настройки сканирования AD130, пользовательский интерфейс TWAIN предлагает различные полезные функции, для улучшения качества изображения включая автоматическую обрезку и выравнивание, автоматическое определение цвета и т.д.
▍More Information
Сканер AD130 комплектуется TWAIN и ISIS драйверами, а также мощными приложениями, включающими Avision Button Manager, AvScan X и PaperPort 14. С помощью программы Button Manager Вы можете отсканировать документы в формате PDF, JPEG, BMP или GIF, и отправить их на электронную почту, принтер или другое приложение.
▎Сертификационный знак
Где купить
| Общая спецификация | |
| Технология |
Contact Image Sensor (CIS) |
|---|---|
| Источник света |
LED |
| Режим подачи документов |
Flatbed and ADF |
| Оптическое разрешение (т/д) |
1200 |
| Output Resolution (dpi) |
1200 |
| Форматы файлов |
BMP, PNG, GIF, JPEG, Single-Page PDF, Multi-Page PDF, Multi-TIFF, TIFF, RTF, TXT, OCR( for iScan only ), XPS, DOC, XLS, PPT, DOCS, XLSX, PPTX, HTML |
| Полутоновые узоры |
Dither and Error Diffusion |
| Режим оттенков серого |
16-bit input 8-bit output |
| Цветовой режим |
48-bit input 24-bit output |
| Размер памяти |
64MB SDRAM |
| Размеры (ШхГхВ) |
453 x 324 x 237 mm ( 17.8 x 12.8 x 9.3 in. ) |
| Вес |
4.3 kg ( 9.5 lb. ) |
| Интерфейс |
USB 2.0, ( USB 3.0 compatible ) |
| Потребляемая мощность |
Operation : < 16 W;Ready : < 7 W;Sleep : < 2.9 W;Off : < 0.5 W |
| Рекомендуемый дневной объём |
Up to 4,000 pages |
| Поддержка ОС |
Win 7, Win 8, Win 10 |
| Программное обеспечение в комплекте |
Button Manager, PaperPort, AVScan |
| Features | |
| Ультразвуковое обнаружение замятия бумаги |
Yes |
| Long Paper Mode |
Up to 300 dpi Color Duplex ( 120 in. ) |
| Scan Size | |
| Минимум АПД |
90 x 90 mm ( 3.5 x 3.5 in. ) |
| Максимум АПД |
216 x 356 mm ( Legal )( 8.5 x 14 in. ) |
| Ёмкость АПД |
50 sheets |
| Плотность бумаги (толщина) |
49 ~127 g/㎡ |
| Размер сканирования | |
| Ч/Б при 200 т.д., A4 |
Simplex : 40 ppm;Duplex : 80 ipm, Flatbed : 4 sec / 8 sec ( Include Backhome ) |
| Ч/Б при 300 т.д., A4 |
Simplex : 30 ppm;Duplex : 60 ipm, Flatbed : 4 sec / 8 sec ( Include Backhome ) |
| Цветной при 200 т.д., A4 |
Simplex : 40 ppm;Duplex : 80 ipm, Flatbed : 4 sec / 8 sec ( Include Backhome ) |
| Цветной при 300 т.д., A4 |
Simplex : 30 ppm;Duplex : 60 ipm, Flatbed : 4 sec / 8 sec ( Include Backhome ) |
* The above specifications may vary due to computer performance and sales regions. For further details, please consult your local distributor.
▎Фотографии продуктов
▎руководство
▎брошюра
▎программное обеспечение
| Имя | Версия | Размер | системная поддержка | Ссылка |
|---|---|---|---|---|
| PaperPort | 14 | 455.79 MB | Win XP / Vista / 7 / 8 / 10 | загрузки |
| World Card Team | V1.8.3 | 235 MB | Win XP / 7 / 8 / 10 | загрузки |
| ButtonManager V2 | V3.0.0.0 | 594 MB | Win XP / Vista / 7 / 8 / 10 | загрузки |
| AVScan X | V1.2.0.0 | 549.39 MB | win XP / Vista / 7 / 8 / 10 | загрузки |
▎Драйверы
| Имя | Версия | Размер | системная поддержка | Ссылка |
|---|---|---|---|---|
| AD130 | VB.22 | 140.03 MB | Win XP, Win Vista, Win 7, Win | загрузки |
▎Программное обеспечение
Когда я выбираю оптическое разрешение 600 dpi, функции «автоматической обрезки» и «выравнивания» будут отключены.
Поскольку для выполнения автоматической обрезки и устранения перекоса требуется много системной памяти, рекомендуется, если вы хотите выполнить функции «автоматической обрезки» и «выравнивания перекоса», выберите оптическое разрешение менее 600 dpi во избежание появления сообщения об ошибке.
Почему мое отсканированное изображение всегда получается слишком темным?
- Настройте параметры экрана на sRGB.
- Пожалуйста, отрегулируйте настройки яркости на экране с помощью прикладного программного обеспечения.
▎Инструкция
Бумага перекашивается в сканере.
- Выровняйте направляющие для документов так, чтобы они подходили как можно ближе друг к другу, и размещайте документы так, чтобы они подавались прямо.
- Проверьте состояние подающего ролика. При необходимости следуйте инструкциям по очистке и выполните очистку.
▎Аппаратное обеспечение
Бумага застревает во время сканирования.
- Откройте переднюю крышку
- Осторожно вытащите застрявшую бумагу.
- Закройте переднюю крышку.

Руководство пользователя
Примечание.
Рекомендованное разрешение: 200~600 dpi для
обычного штрих-кода, 300~600 dpi для QR code
Перекошенные штрих-коды могут распознаваться с
ошибками.
Многократное использование одного листа может
снизить точность распознавания из-за накопления
грязи на листах. Если лист распознается с ошибками
или содержит загрязнения, замените его на новый.
Patch code Detection (Определение кода
исправления):
Выберите ячейку [Enable (Включить)] для определения
кодов исправления и уведомления программного
приложения для расширенной обработки.
Код исправления — это узор из параллельных черных
полосок, чередующихся с пробелами (т.е. штрих-код),
напечатанный на документе. Лист с кодом исправления
обычно используется в качестве разделителя документов в
пачке.
Чтобы просмотреть различные размеры кодов исправления
(PDF), перейдите по вкладкам:
меню [Start (ПУск)]>[All Programs (Все
программы)]>[Avision Scanner Series(Сканер серии
Avision)]>[Patch code (Код исправления)].
Распечатайте файл PDF, чтобы создать лист с кодом
исправления. Вставьте листы с кодом исправления в местах
разделения файла.
Лист с кодом
исправления
4-66
Как мы работаем
Если не знаете где отремонтировать Сканер Avision AD130 в вашем городе, мы поможем вам бесплатно подобрать сервисный центр или частного мастера по ремонту и обслуживанию сканеров, работаем ежедневно с 7:00 до 24:00, бесплатная консультация по телефону: +7 (930) 999-42-15
Бесплатная заявка
Оставляйте бесплатную заявку на срочный ремонт сканеров
Подбор сервиса
Наши специалисты подберут для Вас проверенный сервисный центр или частного мастера
Ремонт с гарантией
Оригинальные запчасти в наличии и гарантия на ремонт до 3-х лет
Узнайте стоимость ремонта
Оставьте бесплатную заявку на ремонт или просто задайте вопрос мастерам.
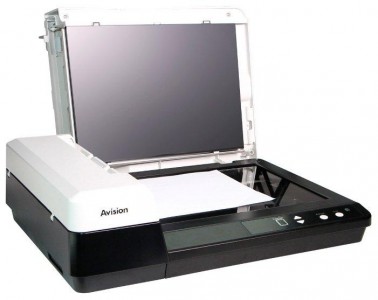
Сканер Avision AD130 — характеристики
| Дополнительно | |
| Особенности | сочетание планшетного и протяжного сканера; ультразвуковой датчик замятия бумаги |
| Вес | 4.3 кг |
| Размеры (ШxВxГ) | 453x237x324 мм |
| Емкость устройства автоподачи | 50 листов |
| Мощность при работе / в режиме ожидания | 16 Вт / 7 Вт |
| Поддержка стандартов | ISIS, TWAIN |
| Уровень шума при работе / в режиме ожидания | 58 дБ / 40 дБ |
| Устройство автоподачи | двустороннее |
| Характеристики | |
| Глубина цвета | 48 бит |
| Глубина цвета (внешн.) | 24 бит |
| Максимальный формат бумаги | A4 |
| Разрешение | 600×600 dpi |
| Скорость сканирования (цветн.) | одностороннее: 30 стр/мин, двустороннее: 60 изобр/мин |
| Скорость сканирования (ч/б) | одностороннее: 30 стр/мин, двустороннее: 60 изобр/мин |
| Общее | |
| Интерфейс | USB 3.0 |
| Совместимость | PC |
| Тип | протяжный |
| Тип датчика | CIS |
Ремонт похожих моделей
Частые вопросы
Как отремонтировать Сканер Avision AD130 самостоятельно?
Мы настоятельно не рекомендуем выполнять ремонт самостоятельно — своими руками, так как это может привести к потере гарантии.
Как найти сервис по ремонту рядом со мной?
Выберете в фильтре необходимую локацию в вашем горде и найдите адреса сервисных центров поблизости.
Возможен ли ремонт на дому?
Починить Сканер Avision AD130 можно на дому или в любом сервисном центре.
Остались вопросы? Мы Вам перезвоним
Новый отзыв про Сканер Avision AD130
Записаться на ремонт
Стоимость работы
Закажите ремонт вашего устройства на сайте и получите скидку до 25%
Или по телефонам:
+7 (495) 021-43-98
+7 (930) 333-28-64
Нажимая на кнопку, Вы даете согласие на обработку персональных данных и соглашаетесь с политикой конфиденциальности.
Записаться на ремонт
Закажите ремонт вашего устройства на сайте и получите скидку до 25%
Или по телефонам:
+7 (495) 021-43-98
+7 (930) 333-28-64
Нажимая на кнопку, Вы даете согласие на обработку персональных данных и соглашаетесь с политикой конфиденциальности.