Sharp TV — сброс ошибок!
Есть множество моделей TV Sharp, которые имеют , блокировку памяти на материнской плате. Когда подсветка или источник питания выходят из строя и TV включать 5 раз или более, то включиться блокировка.
И если даже произвести ремонт неисправных узлов TV не включится. При этом индикатор сети мигает сначала зелёным ,а затем красным.
Описание ,как восстановить работу TV.
1. Отключить шнур питания, удерживая кнопку источника (AVTV) и кнопку уменьшения громкости.
2. Вставить вилку в розетку (не отпуская кнопок удерживаемые до этого).
3. После появления экрана отпустить кнопки.
4. На экране появиться буква K. Это заводской режим отладки. При этом режиме , есть только два уровня увеличения и уменьшения громкости: 15 и 30.
5. Нажать и удерживать V — и CH. — одновременно. Появится английское меню.
6. Используя кнопки со стрелками на пульте ДУ телевизора, переключиться на вторую страницу меню.
7. На первом столбце второй страницы нажать — сброс на заводские установки. Или в некоторых моделях выбрать пункт» ERROR NO RESET» (сброс ошибки, число равно количеству неисправностей) .Сделать сброс ошибок.
8. После этого отключить вилку питания.
TV должен включиться.
- 22 Мар 2008
Пришёл в ремонт такой аппарат.
LCD-контроллер: IXA370WJ
Процессор: TDA15521EN1B80
При включении загорается зелёным светодиод на пару секунд, потом опять красный. Вошёл K-mode, было 5 ошибок. Сбросил — ТВ включился, проработал несколько часов. Глюков не замечено, счётчик ошибок тоже на нуле пока.
А вопрос следующий: из-за чего вообще они могут возникать, ошибки? Можно ли уже отдавать аппарат клиенту или надо искать косяк?
- 23 Мар 2008
После такого же глюка в этой модели делал тотальную пропайку блока питания и инверторов +кучу электролитов поменял,с некоторых «рубашки»уже сползали,а судя по версии скалера в сервисе,если не ошибаюсь,аппарату было около года.Вообщем четвертый месяц обратно не несут.
- 23 Мар 2008
Ev_58RUS, почту посмотрите
- 23 Мар 2008
- 23 Мар 2008
Пардон!
Состав завтра напишу.
Способ входа в сервис нашёл здесь:
https://monitor.net.ru/forum/threads/101337/
Именно сетевым шнуром, а не кнопкой включения при нажатых «V-» и «Enter»
Сергеевич, спасибо, это у нас есть. Только там схемы нету.
- 24 Мар 2008
Схема подошла от LC-15SH1E почти один в один.
- 25 Мар 2008
В SERVICE MODE ты сбросил 5 неправельных включений ламп LAMP error detection
ERROR RESET =0 лампы могли невключиться из за чево угодно.Обычно я проверяю хп,
разёмы контактов ламп , питание .Прогон
- 25 Апр 2008
- 6 Май 2008
После недели прогона ошибки не появились. Аппарат выдали, пока возврата нет.
Ничего не пропаивал. Есть предположение что ошибки эти могут возникать из-за э/м помех, скачков напряжения и т.п. Поэтому со временем почти каждый аппарат будет иметь LAMP ERROR.
14
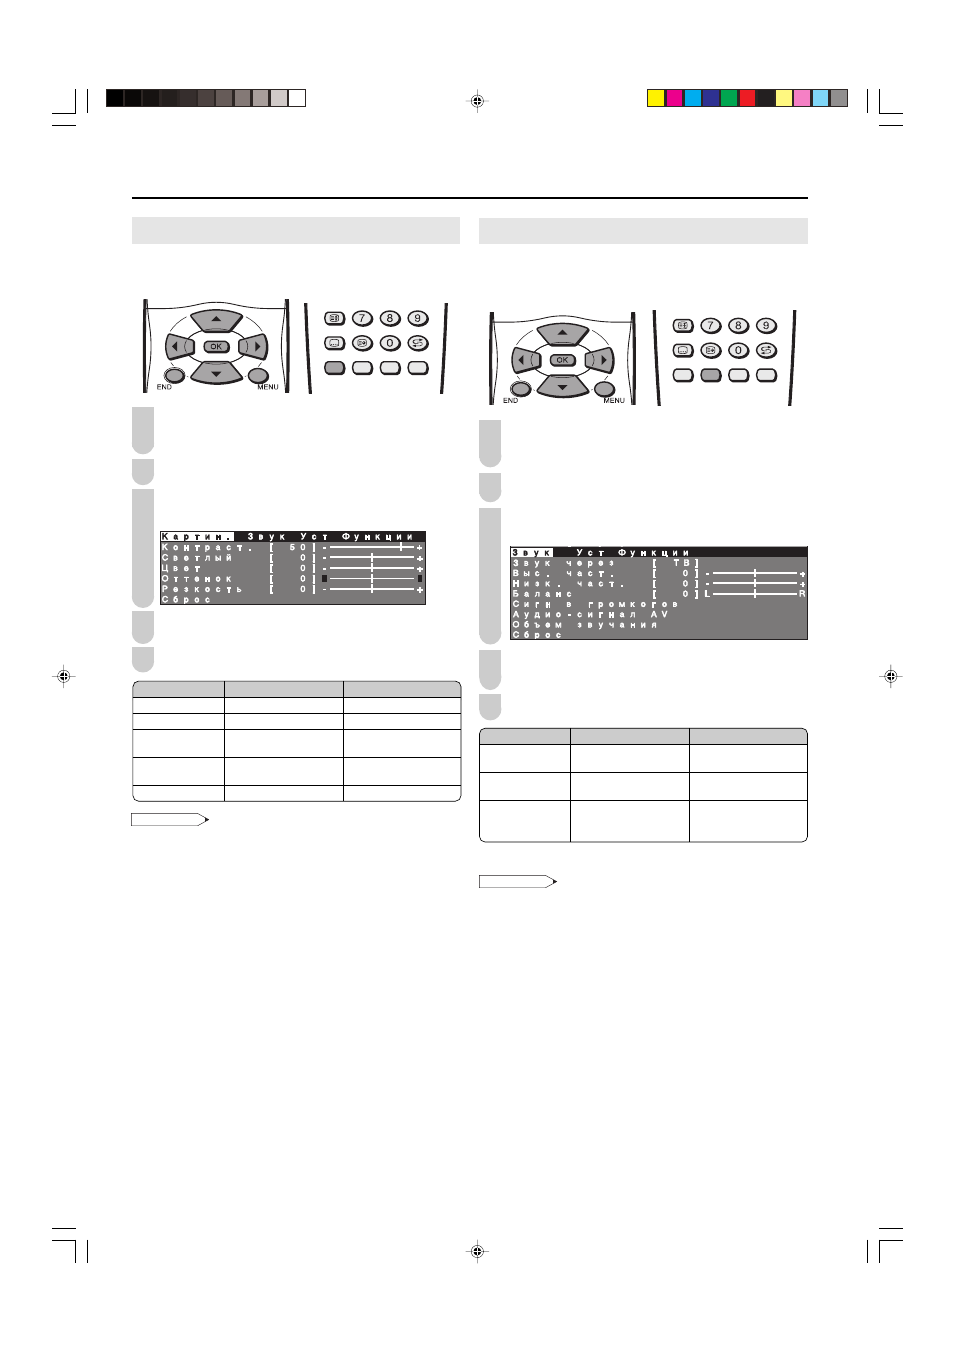
Регулировкa картинки
Регулируйте картинку в соответствии с Вашими пред-
почтениями. Пункты регулировки смотрите в таблице ниже.
Нажмите MENU, чтобы вызвать экран меню.
• Экран меню картинки можно вызвать непосредственно,
нажав на Красную кнопку.
Нажмите /|, чтобы выбрать “Картин.”.
Нажмите ‘/», чтобы выбрать определенный пункт
регулировки.
Нажмите /|, чтобы отрегулировать пункт до
желаемого положения.
Нажмите END, чтобы выйти.
• При переустановке всех пунктов регулировки на
предварительно установленные заводские значения
выполните следующие действия.
1 Нажмите ‘/», чтобы выбрать “Сброс”, и нажмите OK.
2 Нажмите ‘/», чтобы выбрать “Да”, и нажмите OK.
1
Полезные функции
5
2
1
2
Регулировка звука
Регулируйте качество и громкость звука в соответствии
с Вашими предпочтениями. Пункты регулировки смотрите
в таблице ниже.
Нажмите MENU, чтобы вызвать экран меню.
• Экран меню звука можно вызвать непосредственно,
нажав на Зеленую кнопку.
Нажмите /|, чтобы выбрать “Звук”.
Нажмите ‘/», чтобы выбрать определенный пункт
регулировки.
Нажмите /|, чтобы отрегулировать пункт до
желаемого положения.
Нажмите END, чтобы выйти.
* Эти пункты не могут быть отрегулированы, когда “Звук через”
установлен на “Ни-фи”.
Примечания:
• При переустановке всех пунктов регулировки на
предварительно установленные заводские значения
выполните следующие действия.
1 Нажмите ‘/», чтобы выбрать “Сброс”, и нажмите OK.
2 Нажмите ‘/», чтобы выбрать “Да”, и нажмите OK.
5
Выбранный пункт
Выс. част.*
Низк. част.*
Баланс*
кнопка
Для ослабления
высоких частот
Для ослабления
низких частот
Уменьшение
громкости динамика
на правой стороне.
кнопка |
|
|
|
|
Для усиления
высоких частот
Для усиления низких
частот
Уменьшение
громкости динамика
на левой стороне.
4
3
4
Выбранный пункт
Контраст.
Светлый
Цвет
Оттенок
Резкость
кнопка d
d
d
d
d
Для увеличения контраста
Для увеличения яркости
Для увеличения
интенсивности цвета
Цветовые тона кожи
становятся зеленоватыми.
Для увеличения резкости
кнопка c
c
c
c
c
Для уменьшения контраста
Для уменьшения яркости
Для уменьшения
интенсивности цвета
Цветовые тона кожи
становятся розоватыми.
Для уменьшения резкости
Примечания:
3
Техническое описание и состав телевизора SHARP LC-15SH2E, тип панели и применяемые модули. Состав модулей.
Общие рекомендации по ремонту TV LCD LCD
Возможные проявления неисправностей
— Телевизор SHARP LC-15SH2E не включается совсем. Контрольные лампочки не светят и не мигают. Телевизор на ПДУ и кнопки панели управления не реагирует.
В таких случаях неисправность следует искать в первую очередь в модуле питания DUNTKC857WE.
Необходимо замерить его выходные напряжения, а в случае их отсутствия (полного или частичного), следует проверить исправность силовых ключей преобразователей и выпрямительных диодов на наличие возможного КЗ.
При любых пробоях полупроводников во вторичных цепях, преобразователь обычно может штатно работать в аварийном режиме короткого замыкания. Выходные напряжения при этом отсутствуют. А при КЗ в силовых элементах первичной цепи, как правило, обрывается сетевой предохранитель и реже датчик тока в истоке ключа.
Силовые ключи Mos-Fet, применяемые в импульсных источниках питания, иногда выходят из строя по причине неисправности каких-либо других элементов, способных вывести его из работы в ключевом режиме, либо создать превышение максимально допустимых параметров ключа. Это могут быть элементы, питающие ШИМ-регулятор, частотозадающие или демпферные цепи, либо элементы отрицательной обратной связи в цепи стабилизации. ШИМ-контроллеры STR-W6765N, при отсутствии видимых повреждений или откровенных КЗ между выводами, проверяются заменой на новые, либо заведомо исправные.
— Изображение отсутствует, но есть звук и реакция на пульт ДУ. Либо на секунду изображение может появиться сразу после включения.
Данные проявления могут быть спровоцированы и модулем питания, либо дефектами инвертора, а так же перекосом токов в лампах по причине их неравномерного износа.
После проверки всех электролитических конденсаторов фильтров, которые участвуют в питании инвертора, следует прозвонить в его преобразователе силовые ключи на пробой и вторичные обмотки трансформаторов на обрыв.
Если при диагностике неисправности, требуется отключить защиту инвертора, появляется риск выхода из строя силовых элементов инвертора, и требуется особая осторожность при работах, а после их окончания необходимо обязательно восстановить цепи защиты для дальнейшей безопасной эксплуатации телевизора владельцем в штатном режиме.
— Индикатор моргает или светится постоянно, телевизор не включается, на пульт не реагирует.
Ремонт или диагностику материнской платы KC860WE следует начать с проверки стабилизаторов и преобразователей питания, необходимых для питания микросхем и матрицы. При необходимости, следует обновить или заменить ПО (программное обеспечение).
Сложный ремонт MB (SSB) возможен только в условиях сервисного центра при наличии необходимого оборудования. Проверка или замена элементов TDA15521E/N1B80 , IX3251CE (TDA9178) , MM1563DF , THC63LVDF84B , THC63LVDF84B , IXA370WJ , BD8120FP , 24C64 , TDA15521E/N1B80 требует необходимой подготовки и профессиональных навыков ремонта модулей на компонентном уровне. Проблемы, связанные с использованием технологий пайки BGA иногда можно диагностировать методом прогрева.
Если нет приёма телевизионных каналов, но телевизор исправно работает от внешних устройств, в первую очередь необходимо проверить напряжение питания тюнера 1Y5ED501 и обновить ПО. Импульсы обмена данными по шине I2C необходимо контролировать с помощью осциллографа.
Пользователям и владельцам телевизоров необходимо помнить, что попытки самостоятельного ремонта телевизора SHARP LC-15SH2E без соответствующей квалификации и необходимого опыта, могут привести к серьёзным негативным последствиям!
Дополнительно по ремонту MainBoard
Внешний вид MainBoard KC860WE показан на рисунке ниже:

KC860WE может применяться в телевизорах:
SHARP LC-13SH1 (Panel 13 дюймов 921600 dots VGA), SHARP LC-15SH1E (Panel LQ150V3Z50), SHARP LC-15SH2E (Panel LQ150V3FZ40).
Внешний вид блока питания
Основные особенности устройства SHARP LC-15SH2E:
Установлена матрица (LCD-панель) LQ150V3FZ40.
Для питания ламп подсветки применён преобразователь, совмещённый с блоком питания. В преобразователе инвертора установлен трансформатор ZA073WJ. В качестве силовых элементов инвертора применяются ключи типа 2SC6000.
Формирование необходимых питающих напряжений для всех узлов телевизора SHARP LC-15SH2E осуществляет модуль питания DUNTKC857WE, либо его аналоги c использованием микросхем STR-W6765N.
MainBoard — основная плата (материнская плата) представляет собой модуль KC860WE, с применением микросхем TDA15521E/N1B80 , IX3251CE (TDA9178) , MM1563DF , THC63LVDF84B , THC63LVDF84B , IXA370WJ , BD8120FP , 24C64 , TDA15521E/N1B80 и других.
Тюнер 1Y5ED501 обеспечивает приём телевизионных программ и настройку на каналы.
Внимание мастерам!
Информация на этом сайте накапливается из записей ремонтников и участников форумов.
Будьте внимательны! Возможны опечатки или ошибки!
Пожалуйста, сообщайте нам о любых ляпах или несоответствиях в записях по почте info@tel-spb.ru, присылайте прошивки и наработки из своего опыта, опубликуем в помощь коллегам.
Ближайшие в таблице модели:
SHARP LC-19D1RU-WH
Panel: LK185T3GW10
Inverter (backlight): integrated into PSU
Power Supply (PSU): RDENCA242WJQ1
MainBoard: DUNTKE243WE, DUNKE683WE
IC Main: CPU: RH-IXB882WJZZ (BGA), EEPROM: 24CS64A
SHARP LC-15SH1E
Panel: LQ150V3Z50 // LQ150V3FZ40
Inverter (backlight): integrated into PSU
MOSFET Inverter: 2SC6000
Trans Inverter: ZA073WJ
Power Supply (PSU): DUNTKC857WE
PWM Power: STR-W6765N
MainBoard: KC860WE
Тuner: 1Y5ED501
IC Main: CPU: TDA15521E/N1B80, EEPROM: 24C64
Control: Remote: GA339WJ8A, IR: DUNTKC859WE

13
Основные действия (продолжение)
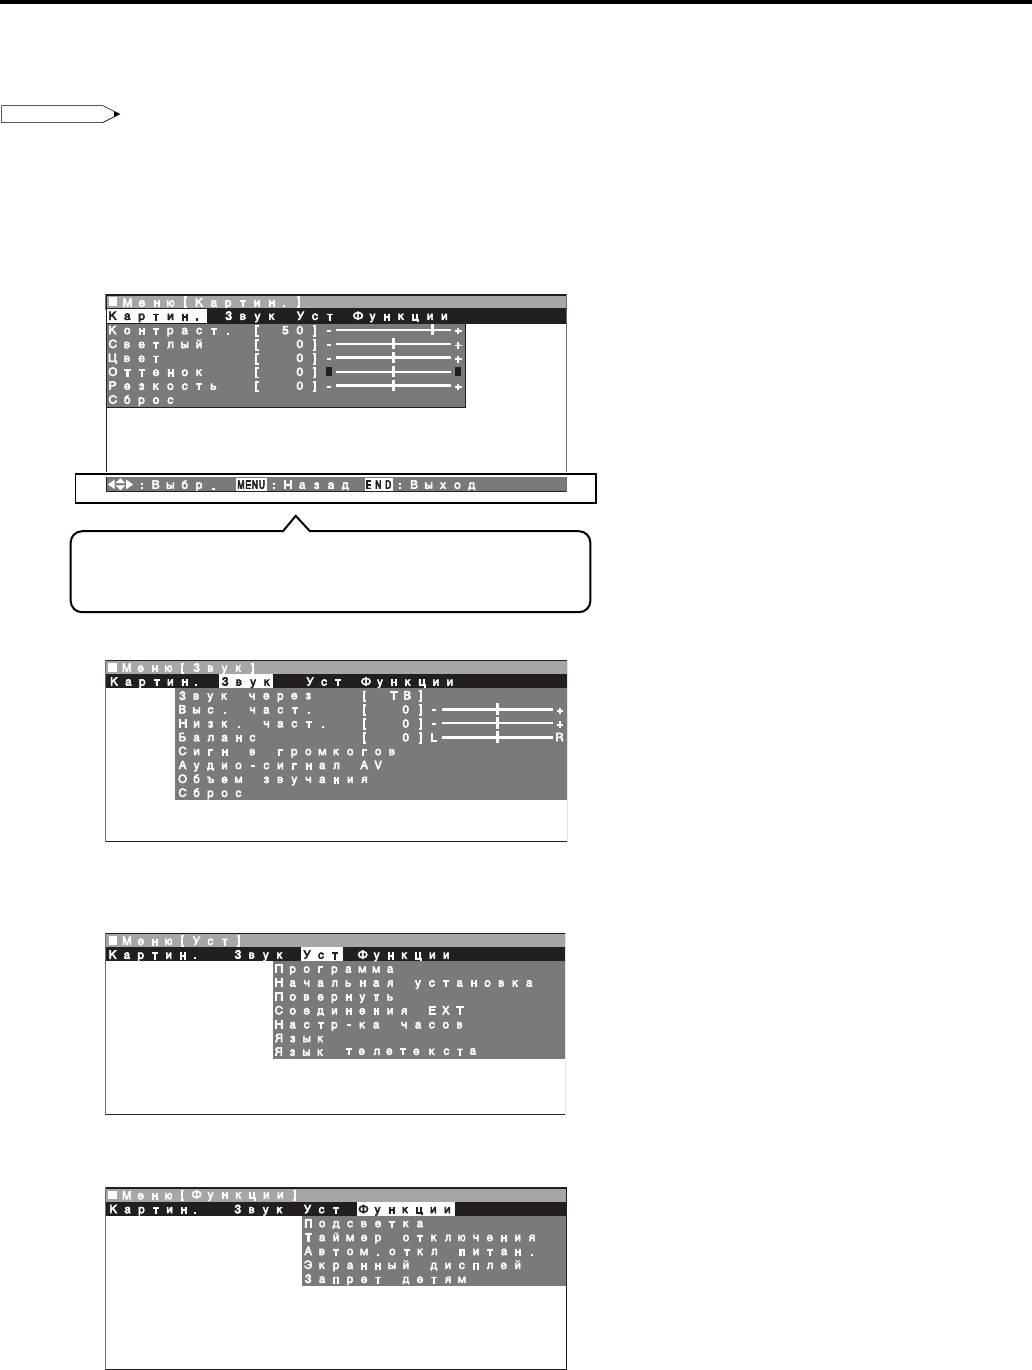
I Экраны установок меню
Подробную информацию об установке каждого пункта меню смотрите на страницах, номера которых указаны ниже.
Примечания:
• Иллюстрации и изображения экранного меню в этом руководстве приведены в целях объяснения и могут немного
отличаться от действительных.
• “Программа” или “Начальная установка” не могут быть установлены, когда в качестве режима ввода выбран режим EXT1 или
EXT2.
Картин.
Страница
Контраст. ………………………………………………. 14
Светлый ………………………………………………… 14
Цвет ………………………………………………………. 14
Оттенок …………………………………………………. 14
Резкость ……………………………………………….. 14
Сброс …………………………………………………….. 14
Страница
Звук через…………………………………………….. 15
Выс. част. ……………………………………………… 14
Низк. част. …………………………………………….. 14
Баланс …………………………………………………… 14
Сигн в громкогов …………………………………… 15
Аудио-сигнал AV ……………………………………. 15
Обьем звучания …………………………………….. 15
Сброс …………………………………………………….. 14
Полоска, показанная выше, это рабочий указатель для
пульта дистанционного управления. Полоска будет
соответственно меняться с каждым экраном установок
меню.
Страница
Программа ………………………………………… 16,17
Начальная установка …………………………….. 6
Повернуть ……………………………………………… 18
Соединения ЕХТ ……………………………………. 19
Настр-ка часов ……………………………………… 20
Язык ……………………………………………………… 20
Язык телетекста …………………………………… 20
Страница
Подсветка …………………………………………….. 21
Таймер отключения ………………………………. 21
Автом.откл питан. …………………………………. 21
Экранный дисплей ………………………………… 22
Запрет детям …………………………………… 22, 23
Звук
Уст
Функции
0
Основные действия
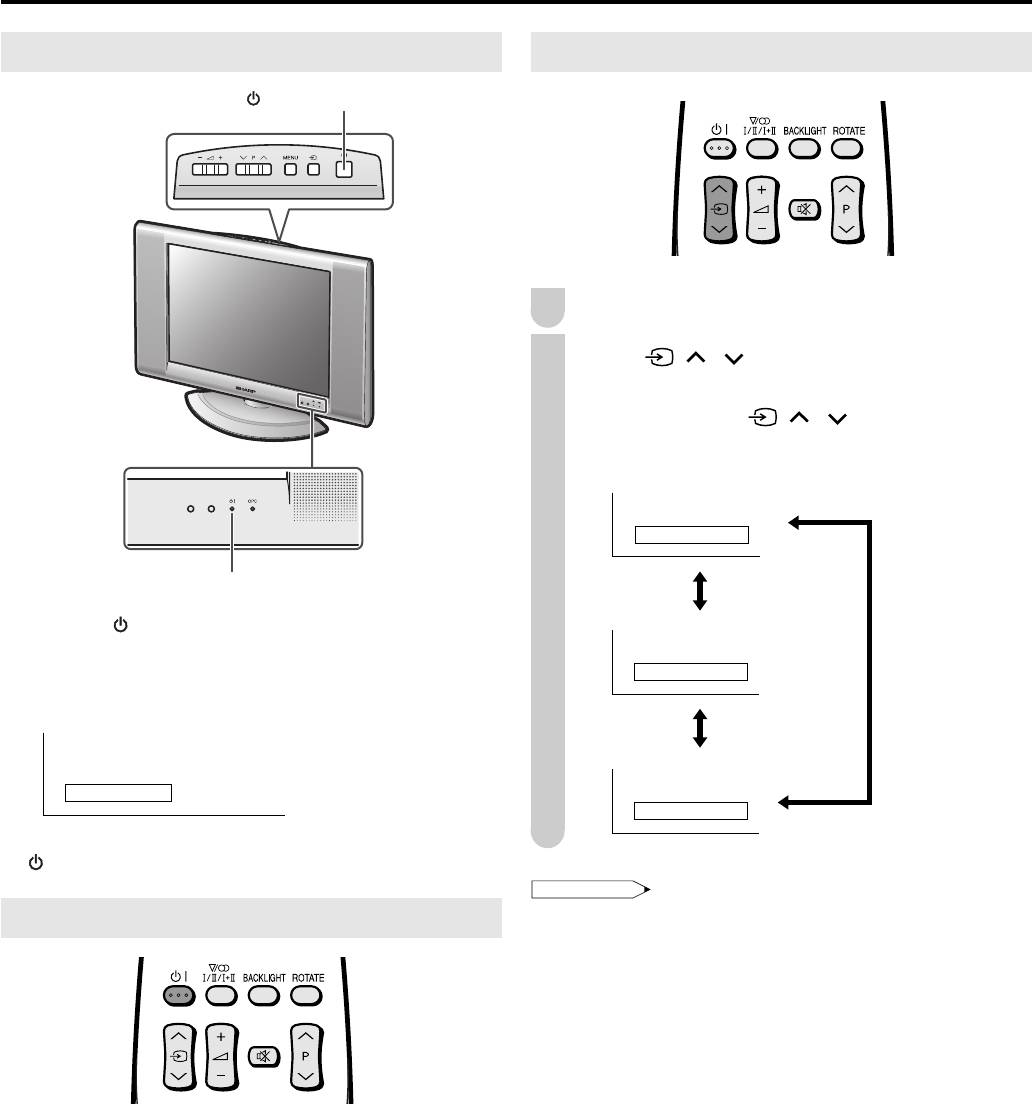
Включение и выключение основного питания
Переключение режимов ввода (ЕХТ1/ЕХТ2/TВ)
(ОСНОВНОЕ ПИТАНИЕ)
Включите питание подключенных устройств.
Нажмите
( )/( ) (Ввод)
, чтобы выбрать применимый
источник ввода.
• Экран меняется в порядке режимов
ЕХТ1, ЕХТ2
и TВ при
каждом нажатии на ( )/( ) (Ввод).
Индикатор ГОТОВНОСТЬ/ВКЛ
● Нажмите (ОСНОВНОЕ ПИТАНИЕ).
• Индикатор ГОТОВНОСТЬ/ВКЛ немедленно меняет цвет с
красного на зеленый, и ЖКД телевизор включается.
• Экранное меню появляется на несколько секунд после
включения основного питания.
Экранное меню
1 S- 6
● Чтобы выключить основное питание, нажмите
(ОСНОВНОЕ ПИТАНИЕ) снова.
ГОТОВНОСТЬ/ВКЛ
Чтобы выключить ЖКД телевизор
Нажмите
B (Питание).
B B
B B
• Индикатор ГОТОВНОСТЬ/ВКЛ станет красным.
Чтобы снова включить ЖКД телевизор
Нажмите
B (Питание) cнова.
BB
BB
• Индикатор ГОТОВНОСТЬ/ВКЛ станет зеленым.
10
Примечания:
1
2
Режим
ЕХТ1
EXT1
Режим
ЕХТ2
EXT2
Режим ТВ
1 S- 6
• ЕХТ1: Выберите этот режим при просмотре сигналов с
видеооборудования, подключенного к разъему
ЕХТ1 (21-штырьковый Eвро-SCART (RGB)).
• ЕХТ2: Выберите этот режим при просмотре сигналов с
видеооборудования, подключенного к разъемам
ЕХТ2, используя разъем VIDEO или S-VIDEO для
ввода видео. Если к обоим разъемам, VIDEO и
S-VIDEO, подключены кабели, разъем ввода
S-VIDEO выбирается приоритетно.
Основные действия (продолжение)
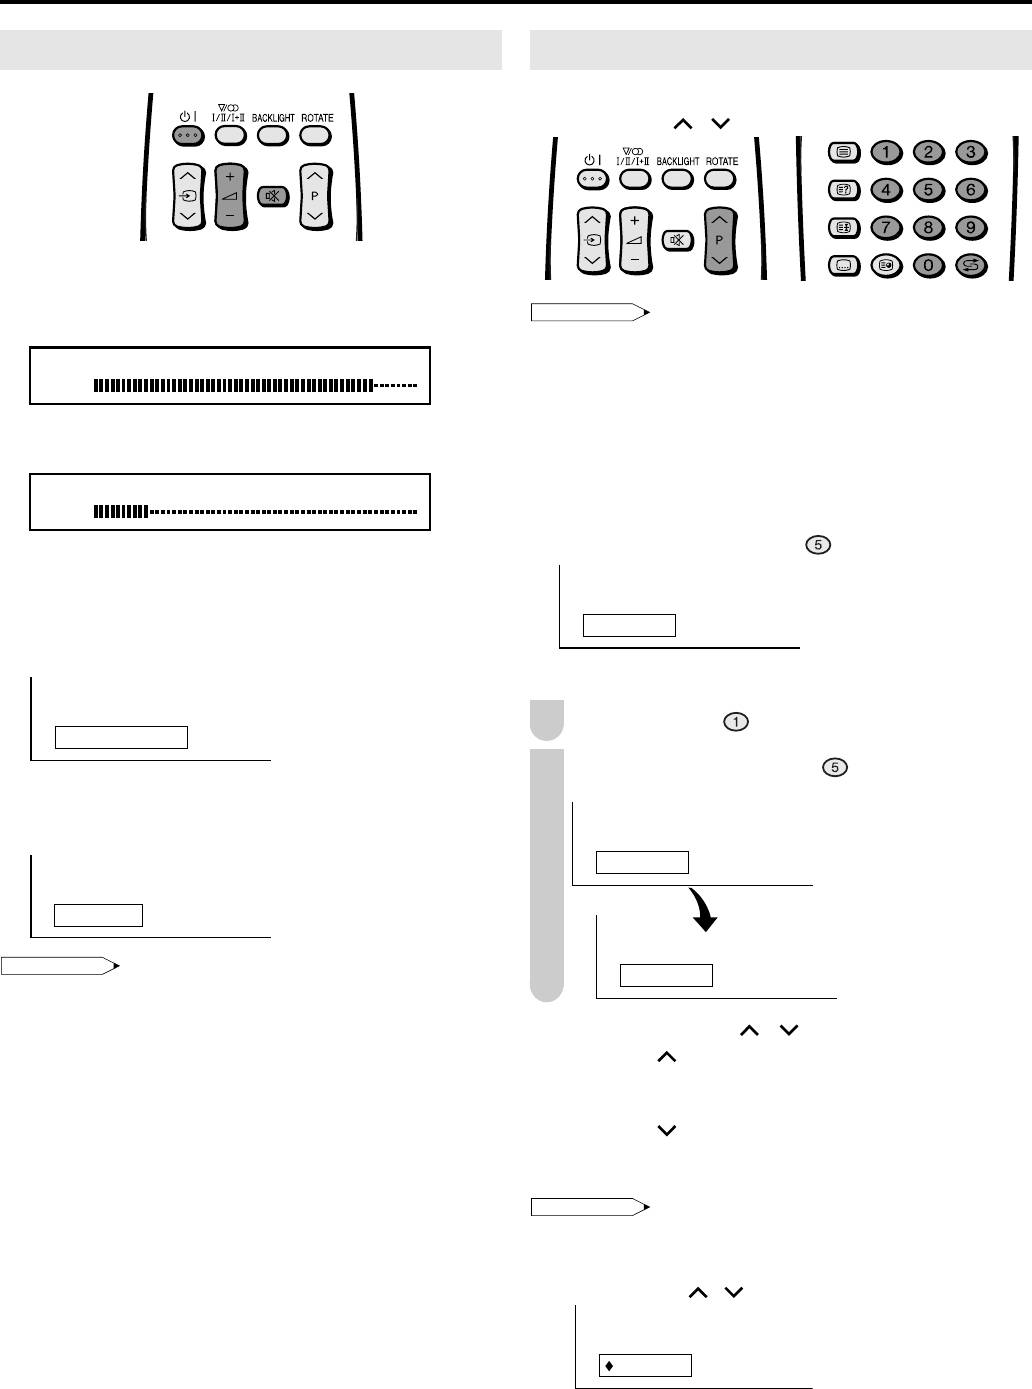
Смена каналов
Вы можете выбирать каналы, используя Выбор
каналов или Р ( )/( ) (Канал).
11
Примечания:
•
Чтобы управляться с возрастающим количеством доступных каналов, этот
ЖКД телевизор позволяет Вам выбирать до 200 каналов (от 0 до 199).
■ Использование Выбора каналов
При выборе каналов, используя Выбор каналов,
завершите ввод номера канала, немного подержав
нажатой кнопку для последней цифры.
Чтобы выбрать однозначный канал (например, канал 5)
● Подержите нажатой кнопку .
Чтобы выбрать двух/трехзначный канал (например, канал 15)
Нажмите кнопку .
Подержите нажатой кнопку
.
1
15
■ Использование Р ( )/( ) (Канал)
● Нажмите Р ( ), чтобы менять каналы в следующем
порядке:
1 → 2 → 3 → . . . → 198 → 199 → 0 → 1 → 2 → 3 → . . .
● Нажмите Р ( ), чтобы менять каналы в следующем
порядке:
3 → 2 → 1 → 0 → 199 → 198 → . . . → 3 → 2 → 1 → . . .
Примечания:
Громкость звука
Чтобы регулировать громкость
● Нажмите i (+), чтобы увеличить громкость звука.
• Полоски индикатора cдвигаются вправо.
íÇ ÉÓÏÍÓÒÚ¸
50
● Нажмите i (–), чтобы уменьшить громкость звука.
• Полоски индикатора cдвигаются влево.
íÇ ÉÓÏÍÓÒÚ¸
10
Чтобы выключить звук
● Нажмите
ee
ee
e (Выключение звука), чтобы временно
5
выключить звук.
• Показывается “Выключить звук”.
1
Выключить звук
2
● Нажмите
ee
e (Выключение звука) снова, чтобы
ee
выключить функцию выключения звука.
• Показывается “Звук вкл”.
Звук вкл
Примечания:
• При нажатии на i (+)/(–) в режиме выключения звука звук
включается, и показывается индикатор громкости.
• Функция выключения звука отменяется при нажатии на
B .
B B
B B
• Канал “0” резервирован для вывода RF видеомагнитофона.
• Каналы, не установленные функцией “Авто Поиск” или “Уст”,
пропускаются, и поэтому не могут быть показаны при
использовании Р ( )/( ) (Канал).
1
■ Использование
AA
AA
A (Ретроспекция)
●
Нажмите
AA
A, чтобы переключиться с принимаемого в
AA
данный момент канала на принимавшийся ранее канал.
● Нажмите
AA
AA
A снова, чтобы переключиться обратно на
принимаемый в данный момент канал.
Основные действия (продолжение)
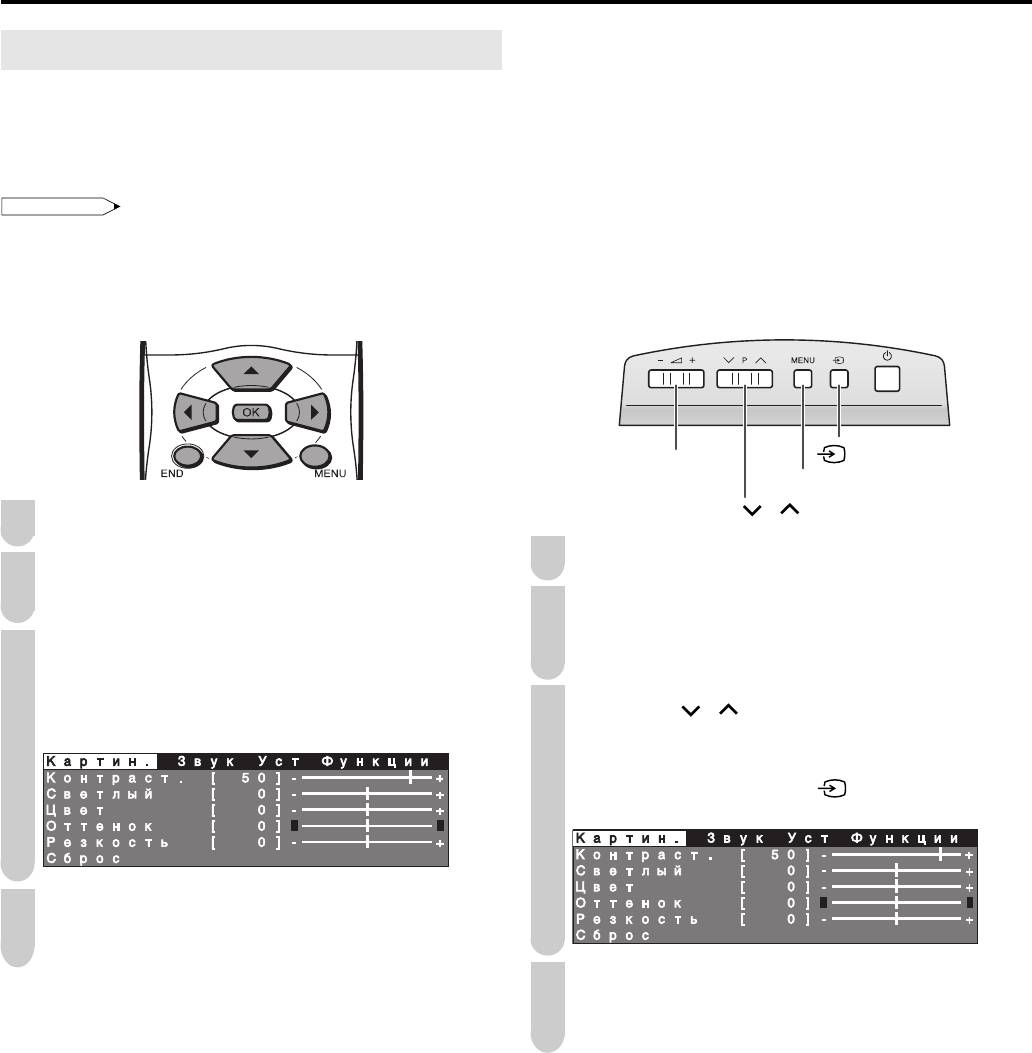
Выбор пунктов меню
Меню можно использовать, чтобы регулировать
различные установки Вашего ЖКД телевизора. Выберите
желаемый пункт меню, выполняя следующие шаги.
Смотрите каждый экран меню на следующей странице.
Примечания:
• Установки, произведенные наиболее недавно, сохраняются в
памяти.
■ Использование пульта дистанционного
■ Использование верхней панели управления
управления
основного блока
(Ввод)
i (–)/(+)
ii
ii
(Громкость)
MENU (Меню)
Р ( )/( ) (Канал)
1
Нажмите MENU, чтобы вызвать экран меню.
1
Нажмите MENU, чтобы вызвать экран меню.
2
Нажмите /|, чтобы выбрать желаемый пункт меню.
• Курсор двигается влево или вправо.
• Курсор показывает выбранный пункт меню.
2
Нажмите
i (–)/(+)
, чтобы выбрать желаемый
пункт меню.
3
Нажмите ‘/«, чтобы выбрать желаемый пункт, и
• Курсор двигается влево или вправо.
• Курсор показывает выбранный пункт меню.
нажмите /|, чтобы регулировать выбранный пункт.
• Для некоторых пунктов (например, “Программа” на
экране меню “Уст”) нажмите OK, чтобы вызвать экран
3
Нажмите Р ( )/( ), чтобы выбрать желаемый
установки.
пункт, и нажмите i (–)/(+), чтобы регулировать
выбранный пункт.
• Для некоторых пунктов (например, “Программа” на
экране меню “Уст”) нажмите (Ввод), чтобы
вызвать экран установки.
4
Нажмите MENU, чтобы вернуться к предыдущему
экрану, или END, чтобы вернуться к нормальному
экрану.
4
Нажмите MENU, чтобы вернуться к предыдущему
экрану.
• При каждом нажатии на MENU Вы будете возвращаться
к показанному ранее экрану.
12
Основные действия (продолжение)
■ Экраны установок меню
0
Подробную информацию об установке каждого пункта меню смотрите на страницах, номера которых указаны ниже.
Примечания:
• Иллюстрации и изображения экранного меню в этом руководстве приведены в целях объяснения и могут немного
отличаться от действительных.
• “Программа” или “Начальная установка” не могут быть установлены, когда в качестве режима ввода выбран режим EXT1 или
EXT2.
Страница
Картин.
Контраст. ………………………………………………. 14
Светлый ………………………………………………… 14
Цвет ………………………………………………………. 14
Оттенок …………………………………………………. 14
Резкость ……………………………………………….. 14
Сброс …………………………………………………….. 14
Полоска, показанная выше, это рабочий указатель для
пульта дистанционного управления. Полоска будет
соответственно меняться с каждым экраном установок
меню.
Страница
Звук
Звук через …………………………………………….. 15
Выс. част. ……………………………………………… 14
Низк. част. …………………………………………….. 14
Баланс …………………………………………………… 14
Сигн в громкогов …………………………………… 15
Аудио-сигнал AV ……………………………………. 15
Обьем звучания …………………………………….. 15
Сброс …………………………………………………….. 14
Страница
Уст
Программа ………………………………………… 16,17
Начальная установка …………………………….. 6
Повернуть ……………………………………………… 18
Соединения ЕХТ ……………………………………. 19
Настр-ка часов ……………………………………… 20
Язык ……………………………………………………… 20
Язык телетекста …………………………………… 20
Страница
Функции
Подсветка …………………………………………….. 21
Таймер отключения ………………………………. 21
Автом.откл питан. …………………………………. 21
Экранный дисплей ………………………………… 22
Запрет детям …………………………………… 22, 23
13
-
Contents
-
Table of Contents
-
Troubleshooting
-
Bookmarks
Quick Links
LC-15SH2E
LC-20SH2E
LCD COLOUR TELEVISION
LCD-FARBFERNSEHGERÄT
TÉLÉVISION COULEUR À ÉCRAN
À CRISTAUX LIQUIDES (LCD)
TELEVISORE A COLORI LCD
TELEVISIÓN EN COLOR LCD
LCD-KLEURENTELEVISIE
OPERATION MANUAL
BEDIENUNGSANLEITUNG
MODE D’EMPLOI
MANUALE DI ISTRUZIONI
MANUAL DE MANEJO
GEBRUIKSAANWIJZING
Related Manuals for Sharp LC-15SH2E
Summary of Contents for Sharp LC-15SH2E
-
Page 1
LC-15SH2E LC-20SH2E LCD COLOUR TELEVISION LCD-FARBFERNSEHGERÄT TÉLÉVISION COULEUR À ÉCRAN À CRISTAUX LIQUIDES (LCD) TELEVISORE A COLORI LCD TELEVISIÓN EN COLOR LCD LCD-KLEURENTELEVISIE OPERATION MANUAL BEDIENUNGSANLEITUNG MODE D’EMPLOI MANUALE DI ISTRUZIONI MANUAL DE MANEJO GEBRUIKSAANWIJZING… -
Page 2
SPECIAL NOTE FOR USERS IN THE U.K. The mains lead of this product is fitted with a non-rewireable (moulded) plug incorporating a 3A fuse. Should the fuse need to be replaced, a BSI or ASTA approved BS 1362 fuse marked and of the same rating as above, which is also indicated on the pin face of the plug, must be used. -
Page 3: Table Of Contents
LC-15SH2E LC-20SH2E LCD COLOUR TELEVISION ENGLISH OPERATION MANUAL Contents Dear SHARP Customer ………… 2 Useful Features ………….. 14 Important Safety Precautions ……… 2 Picture Adjustments ……….14 Supplied Accessories …………4 Sound Adjustments ……….. 14 Preparation …………… 4 Sound Mode Settings ……….15 Installing Batteries in the Remote Control ….
-
Page 4: Dear Sharp Customer
Dear SHARP Customer Thank you for your purchase of the SHARP LCD colour TV product. To ensure safety and many years of trouble-free operation of your product, please read the Important Safety Precautions carefully before using this product. Important Safety Precautions Electricity is used to perform many useful functions, but it can also cause personal injuries and property damage if improperly handled.
-
Page 5
Important Safety Precautions (Continued) • Cleaning—Unplug the AC cord • The LCD panel used in this from the AC outlet before cleaning product is made of glass. the product. Use a damp cloth to Therefore, it can break when the clean the product. -
Page 6: Supplied Accessories
Make sure the following accessories are provided with the LCD TV set. Wireless remote control “AA” size batteries (×2) AC cord Operation manual LC-15SH2E LC-20SH2E * Product shape may vary from country to country. pages 4 and 9 page 4…
-
Page 7: Power Connection
Preparation (Continued) Power Connection Connect to the AC input terminal of the LCD TV set using the AC cord (supplied). ( MAIN POWER ) Household AC INPUT power outlet terminal (220-240V) Plug into an AC outlet. AC cord * Product shape may vary from country to country.
-
Page 8: First Installation
Preparation (Continued) First Installation When you turn on the LCD TV set for the first time, the Press ‘/» to select the desired item, and press First Installation routine, which makes installation easier, /| to make the setting. is activated. Using this routine, you can select the on- screen display language, clock setup and automatically C o u n t r y search for and store all the receivable TV channels.
-
Page 9: Part Names Of The Main Unit
Part Names of the Main Unit The examples used throughout this manual are based on the LC-20SH2E model. How to adjust the angle Controls Upper control panel (MAIN POWER) (Input) MENU P ( )/( ) (Channel) i (–)/(+) (Volume) Tilt the display by holding the upper part while securely holding down the stand with your other hand.
-
Page 10: How To Fix The Cables
Part Names of the Main Unit (Continued) Terminals Rear View Antenna terminal EXT1 (21-pin Euro-SCART) Headphone jack EXT2 AUDIO OUT VIDEO AUDIO (L) Round lock for Kensington AUDIO OUT AC INPUT Security Standard slot AUDIO (R) terminal S-VIDEO How to Fix the Cables Pull the cables connected to each terminal.
-
Page 11: Part Names Of The Remote Control
Part Names of the Remote Control (Sound) BACKLIGHT Switches to the sound mode. Selects the brightness and (P. 24) OPC of the display. (P. 21) (Power) ROTATE (P. 10) Rotates the display in every direction. (P. 18) (+)/(-) ( Volume ) (P.
-
Page 12: Basic Operation
Basic Operation Turning On and Off the Main Power Switching the Input Mode (EXT1/EXT2/TV) (MAIN POWER) Turn on the power of the connected devices. Press ) (Input) to select the applicable input source. • The screen changes in order of EXT1, EXT2 and TV mode ) (Input) each time is pressed.
-
Page 13: Sound Volume
Basic Operation (Continued) Sound Volume Changing Channels You can select channels using Channel Select or ) (Channel). To adjust the volume ● Press i (+) to increase the sound volume. • The bar indicator shifts right. NOTE • To handle the increasing number of channels available, this LCD TV Volume TV set allows you to select up to 200 channels (0 to 199).
-
Page 14: Selecting Menu Items
Basic Operation (Continued) Selecting Menu Items The menus can be used to adjust the various settings of your LCD TV set. Select the desired menu item by following the steps below. See the next page for each Menu screen. NOTE •…
-
Page 15: Menu Setting Screens
Basic Operation (Continued) ■ Menu setting screens For details on setting each menu item, refer to the page number indicated below. NOTE • The illustrations and on-screen displays in this manual are for explanation purposes and may vary slightly from the actual appearance.
-
Page 16: Useful Features
Useful Features Picture Adjustments Sound Adjustments Adjust the picture to suit your preference. See the table Adjust the sound quality and volume to suit your preference. below for the adjustment items. See the table below for the adjustment items. Press MENU to display the Menu screen. Press MENU to display the Menu screen.
-
Page 17: Sound Mode Settings
Useful Features (Continued) NOTE Sound Mode Settings For the “Sound via” setting • When setting “Sound via” to “Hi-fi” in the Sound Menu screen, the sound from the built-in speakers will be turned off. To exit this You can make various sound mode settings. mode, switch “Sound via”…
-
Page 18: Programmes
Useful Features (Continued) Programmes Press ‘/» to select “Start search”, and press OK to begin the automatic programme search. [1] Automatic Search C o u n t r y Perform the procedure below to search for and store new C o l o u r s y s t e m P A L TV programmes after the First Installation routine.
-
Page 19
Useful Features (Continued) [3] Sort If you are erasing programmes in a connected range, The programme positions for individual programmes can press ‘/»//| to select the programme at the end of be changed freely. the range. Press OK to erase the selected programme(s). All the Perform steps 1 to 3 in [1] Automatic Search to subsequent programmes move up. -
Page 20: Using The Programme Table
Useful Features (Continued) Using the Programme Table Rotate The Programme table shows a list of all receivable pro- You can set the orientation of the picture. grammes. They are located in channels 0 to 199. To select the desired programme Press MENU to display the Menu screen.
-
Page 21: Ext Connections
Useful Features (Continued) NOTE EXT Connections • If no (colour) image is displayed, try to change to a different signal type. • Depending on the compatibility with the various types of equip- It is possible to manually adjust various settings for connec- ment, the picture may become skewed.
-
Page 22: Clock Setup
Useful Features (Continued) Clock Setup Language The Sleep timer that turns power off at the specified time The language for the on-screen display can be selected from does not work unless the clock has been adjusted. Be sure English, Spanish, German, French, Italian, Swedish, Dutch, to adjust the clock first.
-
Page 23: Backlight
Useful Features (Continued) Backlight Sleep Timer You can make the setting for the brightness of the screen. You can set “Sleep timer” to automatically turn off the LCD TV set. Press MENU to display the Menu screen. Perform steps 1 and 2 in Backlight to display the Press /| to select “Features”.
-
Page 24: On-Screen Display
Useful Features (Continued) On-Screen Display Child Lock Important: You can adjust various settings for on-screen displays. • Please refer to page 31 for “IMPORTANT NOTE ON DISENGAGING ADVANCED CHILD LOCK”. The Child lock function blocks the viewing of any channels. To use this function, you need to define your PIN (Personal Identification Number) first.
-
Page 25
Useful Features (Continued) [3] Changing/Cancelling a PIN Press ‘/» to select “For all programmes”, and press To change a PIN Perform steps 1 and 2 in [2] Setting a Child Lock to F o r a l l p r o g r a m m e s F o r i n d i v i d u a l p r o g . -
Page 26: Nicam Broadcast Selection
Useful Features (Continued) NICAM Broadcast Selection A2 Stereo Broadcast Selection This enables the selection of the reception mode when This enables the selection of the reception mode when receiving a NICAM-I or NICAM-B/G signal. To let you enjoy receiving an A2 stereo signal. To let you enjoy A2 stereo NICAM broadcasting, this LCD TV set receives NICAM broadcasting, this LCD TV set receives A2 stereo system stereo system, bilingual, and monaural broadcasts.
-
Page 27: Teletext
Teletext ■ What is Teletext? [1] Turning on and off Teletext mode Teletext is an information service organised like a magazine, which is provided by some TV stations in addition to regular television broadcasting. Your LCD TV set receives special Teletext signals broadcast by a TV station, processes the information and displays it graphically on the screen.
-
Page 28
Teletext (Continued) [3] Changing subpages If a page has been selected from among several subpages, you can display a control line which contains the subpage numbers. Press (Subpage). TELETEXT Press Channel Select to select the desired subpage number. Press (Subpage) to turn off the control line. [4] Useful Features for Teletext ●… -
Page 29: Connecting External Devices
Connecting External Devices You can enjoy picture and sound by connecting devices, such as a VCR or home video game system, to the terminals located on the rear of the LCD TV set. When connecting an external device, turn off the power of the LCD TV set first to prevent any possible damage. Example of external devices that can be connected To EXT1 terminal •…
-
Page 30: Connecting To The Ext1/Ext2 Terminals
Connecting External Devices (Continued) Connecting to the EXT1/EXT2 Terminals Video Audio (L) Audio (R) Audio/Video cable (commercially available) Camcorder S-Video S-Video cable (commercially available) 21-pin Euro-SCART connector (commercially available) Decoder 21-pin Euro-SCART (RGB) 1. Audio right output 11. GREEN input 2.
-
Page 31: Troubleshooting
Troubleshooting Before calling for repair services, make the following checks for possible remedies to the symptoms encountered. LCD TV set Reference Problem Check item page • Reception other than that of broadcasting stations could be the – problem. Picture Sound •…
-
Page 32: Antenna
• The dimensional drawings for each model are shown on the inside back cover. ■ As a part of policy of continuous improvement, SHARP reserves the right to make design and specification changes for the LCD TV set improvement without prior notice. The performance specification figures indicated are nominal values of production units. There may be…
-
Page 33
(1) For our customers in Belgium, The Netherlands, Sweden, and Switzerland SHARP takes part in the respective national recycling systems for electronic equipment, which have been founded on the basis of the environmental laws in these countries. -
Page 34
The Consumer Electronics Industry has initiated a commitment to improve the energy efficiency of TVs. SHARP has signed this commitment and as a result this TV may have a label on the front of the product informing the customer of the energy consumption in various operating modes. -
Page 35: Dimensional Drawings
Dimensional Drawings LC-15SH2E/LC-20SH2E Unit: mm 122.4/134.8 43.4/49.8 79/85 307/403.3 176/199.2 300.5/436.2 473/584…
-
Page 36: Sharp Corporation
SHARP CORPORATION Printed on environmentally friendly paper Printed in Spain Auf ökologischem Papier gedruckt Gedruckt in Spanien Imprimé sur papier écologique Imprimé en Espagne Stampato su carta ecologica Stampato in Spagna Impreso en papel ecológico Impreso en España Afgedrukt op ecologisch papier…
-
Contents
-
Table of Contents
-
Troubleshooting
-
Bookmarks
Quick Links
LC-15SH2E
LC-20SH2E
LCD COLOUR TELEVISION
LCD-FARBFERNSEHGERÄT
TÉLÉVISION COULEUR À ÉCRAN
À CRISTAUX LIQUIDES (LCD)
TELEVISORE A COLORI LCD
TELEVISIÓN EN COLOR LCD
LCD-KLEURENTELEVISIE
OPERATION MANUAL
BEDIENUNGSANLEITUNG
MODE D’EMPLOI
MANUALE DI ISTRUZIONI
MANUAL DE MANEJO
GEBRUIKSAANWIJZING
Related Manuals for Sharp LC-15SH2E
Summary of Contents for Sharp LC-15SH2E
-
Page 1
LC-15SH2E LC-20SH2E LCD COLOUR TELEVISION LCD-FARBFERNSEHGERÄT TÉLÉVISION COULEUR À ÉCRAN À CRISTAUX LIQUIDES (LCD) TELEVISORE A COLORI LCD TELEVISIÓN EN COLOR LCD LCD-KLEURENTELEVISIE OPERATION MANUAL BEDIENUNGSANLEITUNG MODE D’EMPLOI MANUALE DI ISTRUZIONI MANUAL DE MANEJO GEBRUIKSAANWIJZING… -
Page 2
SPECIAL NOTE FOR USERS IN THE U.K. The mains lead of this product is fitted with a non-rewireable (moulded) plug incorporating a 3A fuse. Should the fuse need to be replaced, a BSI or ASTA approved BS 1362 fuse marked and of the same rating as above, which is also indicated on the pin face of the plug, must be used. -
Page 3: Table Of Contents
LC-15SH2E LC-20SH2E LCD COLOUR TELEVISION ENGLISH OPERATION MANUAL Contents Dear SHARP Customer ………… 2 Useful Features ………….. 14 Important Safety Precautions ……… 2 Picture Adjustments ……….14 Supplied Accessories …………4 Sound Adjustments ……….. 14 Preparation …………… 4 Sound Mode Settings ……….15 Installing Batteries in the Remote Control ….
-
Page 4: Dear Sharp Customer
Dear SHARP Customer Thank you for your purchase of the SHARP LCD colour TV product. To ensure safety and many years of trouble-free operation of your product, please read the Important Safety Precautions carefully before using this product. Important Safety Precautions Electricity is used to perform many useful functions, but it can also cause personal injuries and property damage if improperly handled.
-
Page 5
Important Safety Precautions (Continued) • Cleaning—Unplug the AC cord • The LCD panel used in this from the AC outlet before cleaning product is made of glass. the product. Use a damp cloth to Therefore, it can break when the clean the product. -
Page 6: Supplied Accessories
Make sure the following accessories are provided with the LCD TV set. Wireless remote control “AA” size batteries (×2) AC cord Operation manual LC-15SH2E LC-20SH2E * Product shape may vary from country to country. pages 4 and 9 page 4…
-
Page 7: Power Connection
Preparation (Continued) Power Connection Connect to the AC input terminal of the LCD TV set using the AC cord (supplied). ( MAIN POWER ) Household AC INPUT power outlet terminal (220-240V) Plug into an AC outlet. AC cord * Product shape may vary from country to country.
-
Page 8: First Installation
Preparation (Continued) First Installation When you turn on the LCD TV set for the first time, the Press ‘/» to select the desired item, and press First Installation routine, which makes installation easier, /| to make the setting. is activated. Using this routine, you can select the on- screen display language, clock setup and automatically C o u n t r y search for and store all the receivable TV channels.
-
Page 9: Part Names Of The Main Unit
Part Names of the Main Unit The examples used throughout this manual are based on the LC-20SH2E model. How to adjust the angle Controls Upper control panel (MAIN POWER) (Input) MENU P ( )/( ) (Channel) i (–)/(+) (Volume) Tilt the display by holding the upper part while securely holding down the stand with your other hand.
-
Page 10: How To Fix The Cables
Part Names of the Main Unit (Continued) Terminals Rear View Antenna terminal EXT1 (21-pin Euro-SCART) Headphone jack EXT2 AUDIO OUT VIDEO AUDIO (L) Round lock for Kensington AUDIO OUT AC INPUT Security Standard slot AUDIO (R) terminal S-VIDEO How to Fix the Cables Pull the cables connected to each terminal.
-
Page 11: Part Names Of The Remote Control
Part Names of the Remote Control (Sound) BACKLIGHT Switches to the sound mode. Selects the brightness and (P. 24) OPC of the display. (P. 21) (Power) ROTATE (P. 10) Rotates the display in every direction. (P. 18) (+)/(-) ( Volume ) (P.
-
Page 12: Basic Operation
Basic Operation Turning On and Off the Main Power Switching the Input Mode (EXT1/EXT2/TV) (MAIN POWER) Turn on the power of the connected devices. Press ) (Input) to select the applicable input source. • The screen changes in order of EXT1, EXT2 and TV mode ) (Input) each time is pressed.
-
Page 13: Sound Volume
Basic Operation (Continued) Sound Volume Changing Channels You can select channels using Channel Select or ) (Channel). To adjust the volume ● Press i (+) to increase the sound volume. • The bar indicator shifts right. NOTE • To handle the increasing number of channels available, this LCD TV Volume TV set allows you to select up to 200 channels (0 to 199).
-
Page 14: Selecting Menu Items
Basic Operation (Continued) Selecting Menu Items The menus can be used to adjust the various settings of your LCD TV set. Select the desired menu item by following the steps below. See the next page for each Menu screen. NOTE •…
-
Page 15: Menu Setting Screens
Basic Operation (Continued) ■ Menu setting screens For details on setting each menu item, refer to the page number indicated below. NOTE • The illustrations and on-screen displays in this manual are for explanation purposes and may vary slightly from the actual appearance.
-
Page 16: Useful Features
Useful Features Picture Adjustments Sound Adjustments Adjust the picture to suit your preference. See the table Adjust the sound quality and volume to suit your preference. below for the adjustment items. See the table below for the adjustment items. Press MENU to display the Menu screen. Press MENU to display the Menu screen.
-
Page 17: Sound Mode Settings
Useful Features (Continued) NOTE Sound Mode Settings For the “Sound via” setting • When setting “Sound via” to “Hi-fi” in the Sound Menu screen, the sound from the built-in speakers will be turned off. To exit this You can make various sound mode settings. mode, switch “Sound via”…
-
Page 18: Programmes
Useful Features (Continued) Programmes Press ‘/» to select “Start search”, and press OK to begin the automatic programme search. [1] Automatic Search C o u n t r y Perform the procedure below to search for and store new C o l o u r s y s t e m P A L TV programmes after the First Installation routine.
-
Page 19
Useful Features (Continued) [3] Sort If you are erasing programmes in a connected range, The programme positions for individual programmes can press ‘/»//| to select the programme at the end of be changed freely. the range. Press OK to erase the selected programme(s). All the Perform steps 1 to 3 in [1] Automatic Search to subsequent programmes move up. -
Page 20: Using The Programme Table
Useful Features (Continued) Using the Programme Table Rotate The Programme table shows a list of all receivable pro- You can set the orientation of the picture. grammes. They are located in channels 0 to 199. To select the desired programme Press MENU to display the Menu screen.
-
Page 21: Ext Connections
Useful Features (Continued) NOTE EXT Connections • If no (colour) image is displayed, try to change to a different signal type. • Depending on the compatibility with the various types of equip- It is possible to manually adjust various settings for connec- ment, the picture may become skewed.
-
Page 22: Clock Setup
Useful Features (Continued) Clock Setup Language The Sleep timer that turns power off at the specified time The language for the on-screen display can be selected from does not work unless the clock has been adjusted. Be sure English, Spanish, German, French, Italian, Swedish, Dutch, to adjust the clock first.
-
Page 23: Backlight
Useful Features (Continued) Backlight Sleep Timer You can make the setting for the brightness of the screen. You can set “Sleep timer” to automatically turn off the LCD TV set. Press MENU to display the Menu screen. Perform steps 1 and 2 in Backlight to display the Press /| to select “Features”.
-
Page 24: On-Screen Display
Useful Features (Continued) On-Screen Display Child Lock Important: You can adjust various settings for on-screen displays. • Please refer to page 31 for “IMPORTANT NOTE ON DISENGAGING ADVANCED CHILD LOCK”. The Child lock function blocks the viewing of any channels. To use this function, you need to define your PIN (Personal Identification Number) first.
-
Page 25
Useful Features (Continued) [3] Changing/Cancelling a PIN Press ‘/» to select “For all programmes”, and press To change a PIN Perform steps 1 and 2 in [2] Setting a Child Lock to F o r a l l p r o g r a m m e s F o r i n d i v i d u a l p r o g . -
Page 26: Nicam Broadcast Selection
Useful Features (Continued) NICAM Broadcast Selection A2 Stereo Broadcast Selection This enables the selection of the reception mode when This enables the selection of the reception mode when receiving a NICAM-I or NICAM-B/G signal. To let you enjoy receiving an A2 stereo signal. To let you enjoy A2 stereo NICAM broadcasting, this LCD TV set receives NICAM broadcasting, this LCD TV set receives A2 stereo system stereo system, bilingual, and monaural broadcasts.
-
Page 27: Teletext
Teletext ■ What is Teletext? [1] Turning on and off Teletext mode Teletext is an information service organised like a magazine, which is provided by some TV stations in addition to regular television broadcasting. Your LCD TV set receives special Teletext signals broadcast by a TV station, processes the information and displays it graphically on the screen.
-
Page 28
Teletext (Continued) [3] Changing subpages If a page has been selected from among several subpages, you can display a control line which contains the subpage numbers. Press (Subpage). TELETEXT Press Channel Select to select the desired subpage number. Press (Subpage) to turn off the control line. [4] Useful Features for Teletext ●… -
Page 29: Connecting External Devices
Connecting External Devices You can enjoy picture and sound by connecting devices, such as a VCR or home video game system, to the terminals located on the rear of the LCD TV set. When connecting an external device, turn off the power of the LCD TV set first to prevent any possible damage. Example of external devices that can be connected To EXT1 terminal •…
-
Page 30: Connecting To The Ext1/Ext2 Terminals
Connecting External Devices (Continued) Connecting to the EXT1/EXT2 Terminals Video Audio (L) Audio (R) Audio/Video cable (commercially available) Camcorder S-Video S-Video cable (commercially available) 21-pin Euro-SCART connector (commercially available) Decoder 21-pin Euro-SCART (RGB) 1. Audio right output 11. GREEN input 2.
-
Page 31: Troubleshooting
Troubleshooting Before calling for repair services, make the following checks for possible remedies to the symptoms encountered. LCD TV set Reference Problem Check item page • Reception other than that of broadcasting stations could be the – problem. Picture Sound •…
-
Page 32: Antenna
• The dimensional drawings for each model are shown on the inside back cover. ■ As a part of policy of continuous improvement, SHARP reserves the right to make design and specification changes for the LCD TV set improvement without prior notice. The performance specification figures indicated are nominal values of production units. There may be…
-
Page 33
(1) For our customers in Belgium, The Netherlands, Sweden, and Switzerland SHARP takes part in the respective national recycling systems for electronic equipment, which have been founded on the basis of the environmental laws in these countries. -
Page 34
The Consumer Electronics Industry has initiated a commitment to improve the energy efficiency of TVs. SHARP has signed this commitment and as a result this TV may have a label on the front of the product informing the customer of the energy consumption in various operating modes. -
Page 35: Dimensional Drawings
Dimensional Drawings LC-15SH2E/LC-20SH2E Unit: mm 122.4/134.8 43.4/49.8 79/85 307/403.3 176/199.2 300.5/436.2 473/584…
-
Page 36: Sharp Corporation
SHARP CORPORATION Printed on environmentally friendly paper Printed in Spain Auf ökologischem Papier gedruckt Gedruckt in Spanien Imprimé sur papier écologique Imprimé en Espagne Stampato su carta ecologica Stampato in Spagna Impreso en papel ecológico Impreso en España Afgedrukt op ecologisch papier…