 Среди прочих процессов в диспетчере задач Windows 10 (иногда — и в Windows 11) вы можете увидеть SearchApp.exe. В большинстве случаев процесс не нагружает систему, однако бывают исключения: как высокая нагрузка, так и сбои этого процесса.
В этой статье подробно о назначении процесса SearchApp.exe, как убедиться, что это не вирус или вредоносное ПО, что делать, если он вызывает сбои или грузит процессор и о том, как его отключить при необходимости.
Назначение процесса SearchApp.exe, как определить, что это оригинальный процесс Windows
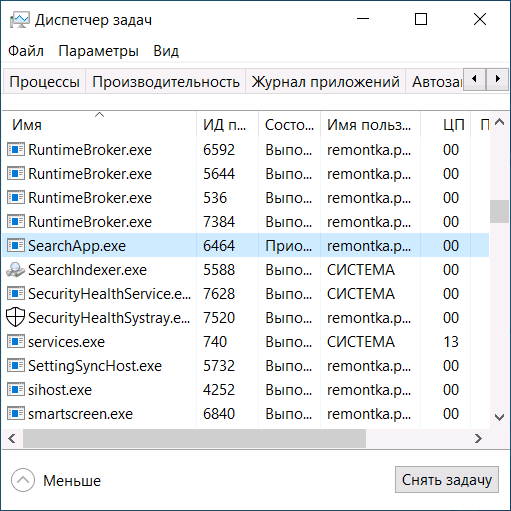
Как должно быть ясно из названия, процесс SearchApp.exe — один из процессов, использующийся для функционирования поиска в Windows. Не только на панели задач, но и, к примеру, в поле поиска проводника.
Определить, что этот процесс не является вирусом сравнительно легко:
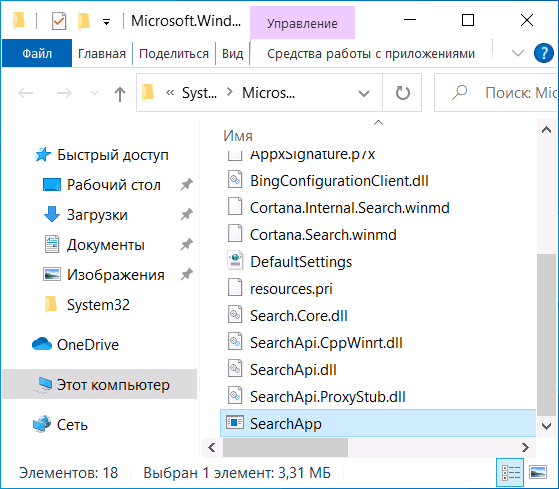
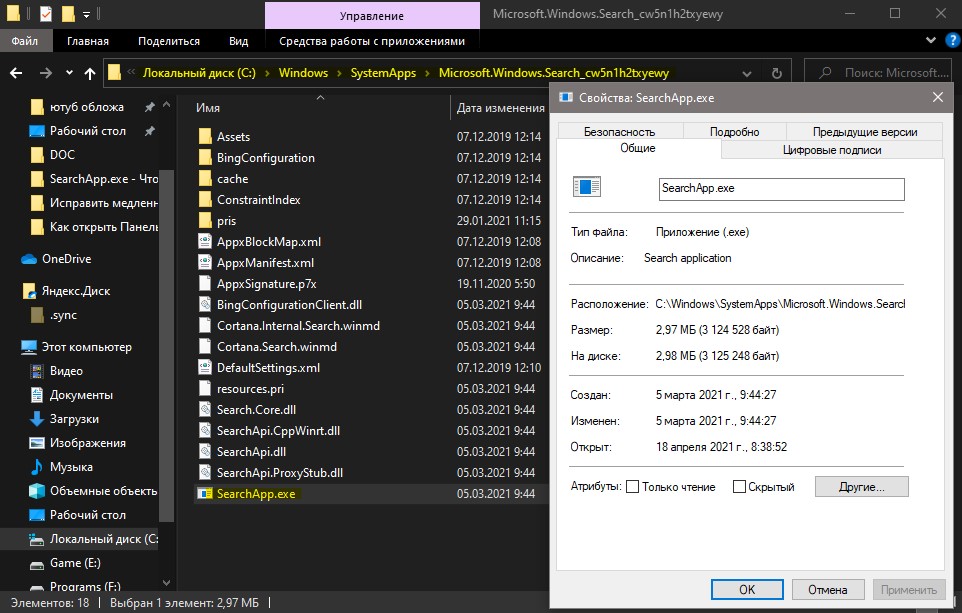
- Оригинальный файл запущенного процесса SearchApp.exe должен располагаться в папке
%windir%SystemAppsMicrosoft.Windows.Search_cw5n1h2txyewy
Посмотреть расположение можно, нажав по процессу правой кнопкой мыши в проводнике и выбрав пункт «Открыть расположение файла».
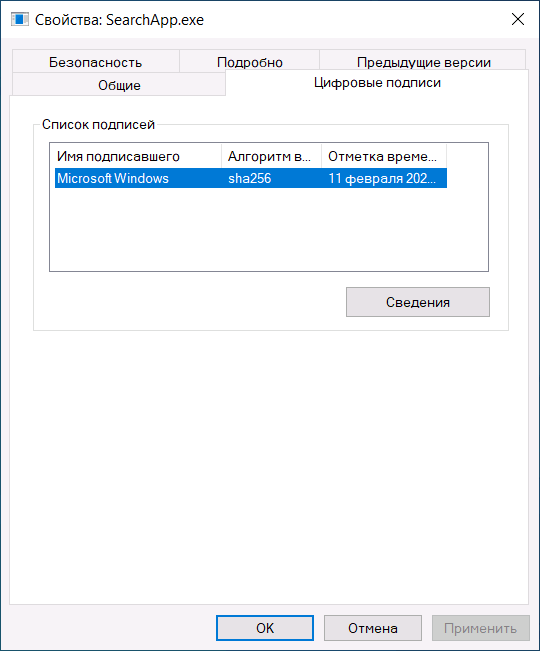
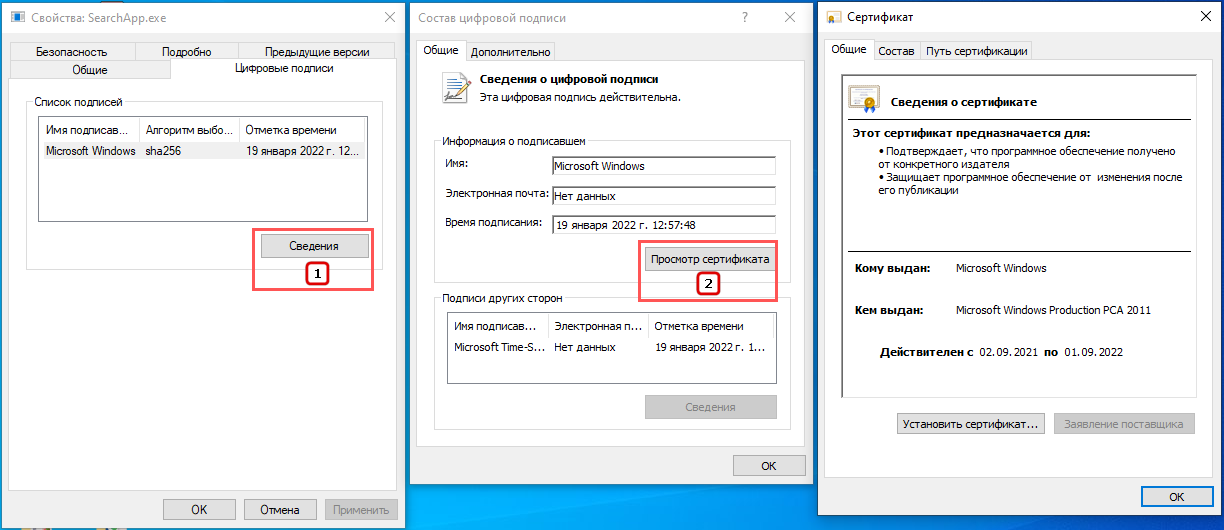
- В свойствах файла на вкладке «Цифровые подписи» можно убедиться, что он подписан цифровой подписью Microsoft Windows. Выбрав подпись, можно посмотреть подробные сведения о ней, используя соответствующую кнопку.
Что делать, если SearchApp.exe грузит процессор или вызывает сбои
При обычной работе SearchApp.exe не должен вызывать значимой нагрузки на систему и большую часть времени находится в статусе «Приостановлено». Если это не так, рекомендую попробовать следующие простые шаги:
- Выбрать процесс в диспетчере задач и нажать кнопку «Снять задачу».
- После этого он будет перезапущен и можно будет посмотреть, сохранилась ли нагрузка.
- Если проблема временно исчезает, но затем появляется вновь, проверьте, существует ли закономерность: SearchApp.exe грузит систему после завершения работы и включения компьютера или ноутбука, но работает исправно после перезагрузки (завершение работы с последующим включением и перезагрузка работают сильно по-разному в последних версиях Windows). Если такая закономерность присутствует, попробуйте отключить быстрый запуск и посмотреть, сохранится ли проблема в дальнейшем.
При сбоях приложения SearchApp.exe рекомендую также попробовать 3-й пункт из описанных выше. Если это не помогло, возможно имеет смысл использовать точки восстановления системы на дату, когда ошибки себя не проявляли и проверить целостность системных файлов Windows.
Как отключить (удалить) SearchApp.exe
Если вы решили сделать так, чтобы процесс SearchApp.exe не запускался, сделать это можно, переименовав исполняемый файл — в этом случае запуститься он больше не сможет, но вы, в свою очередь, не сможете использовать функции поиска Windows. Я не рекомендую этого делать, но если решились, шаги будут следующими:
- Запустите командную строку от имени администратора.
- По порядку введите следующие команды, нажимая Enter после каждой
takeown /f %windir%SystemAppsMicrosoft.Windows.Search_cw5n1h2txyewy /r /d y
icacls %windir%SystemAppsMicrosoft.Windows.Search_cw5n1h2txyewy /grant Администраторы:F /t
ren %windir%SystemAppsMicrosoft.Windows.Search_cw5n1h2txyewysearchapp.exe seachapp.old.exe
- Закройте командную строку и снимите задачу с процесса SearchApp.exe в диспетчере задач.
- После этого вы сможете и удалить этот файл, но я бы не рекомендовал это делать на случай, если поиск все-таки потребуется.
В результате процесс не сможет быть перезапущен, а поиск перестанет работать. Чтобы восстановить работу поиска в дальнейшем, нужно будет переименовать файл searchapp.old.exe в searchapp.exe.
SearchApp.exe — это фоновый системный процесс Windows 10, который позволяет работать поиску на панели задач. До версии 19H1 апреля 2019 года процесс назывался SearchUI.exe и был объединен с cortana.

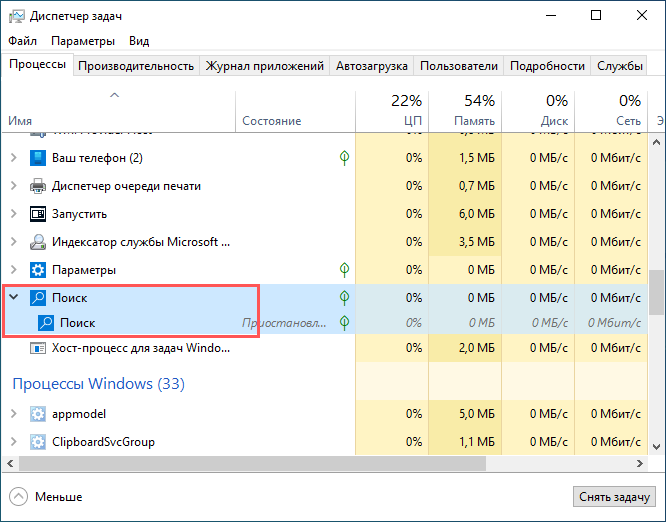
Открыв диспетчер задач и раскрыв службу «Поиск», то обнаружим фоновый процесс SearchApp.exe (в старых версиях Windows 10 он называется SearchUI.exe). Он очень мало занимает ресурсов и не является вирусом, как некоторые пользователи могут подумать. Его не стоит удалять из системы, так как это может нарушить работу Windows 10 в будущем, если Microsoft интегрирует данный процесс с SearchIndexer.exe (индексацией файлов) и SearchApp.exe станет уже зависимым от других процессов.
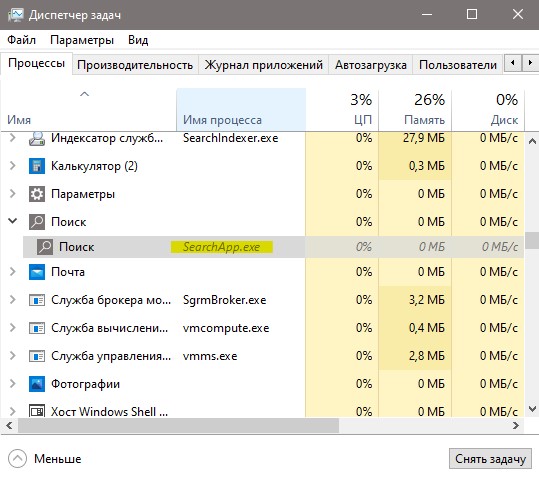
Расположение процесса SearchApp.exe
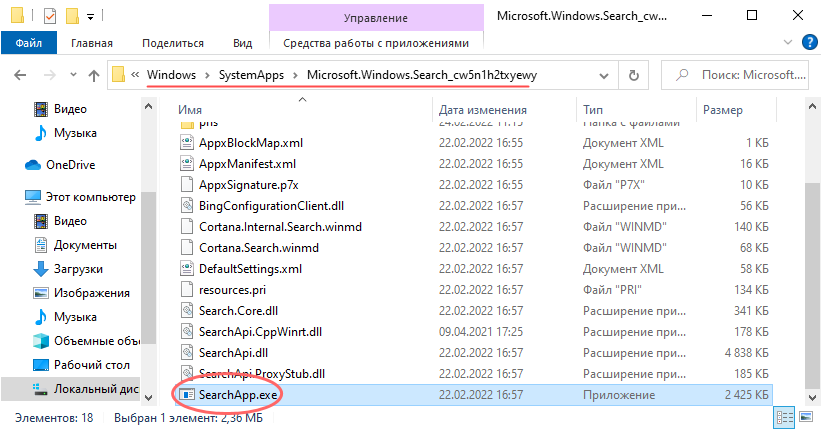
Процесс SearchApp.exe находится по пути C:WindowsSystemAppsMicrosoft.Windows.Search_cw5n1h2txyewy.
Что делать, если SearchApp.exe не работает должным образом?
Если процесс SearchApp.exe начал использовать много системных ресурсов или поиск открывается через раз, то разберем пару способов как устранить проблемы.
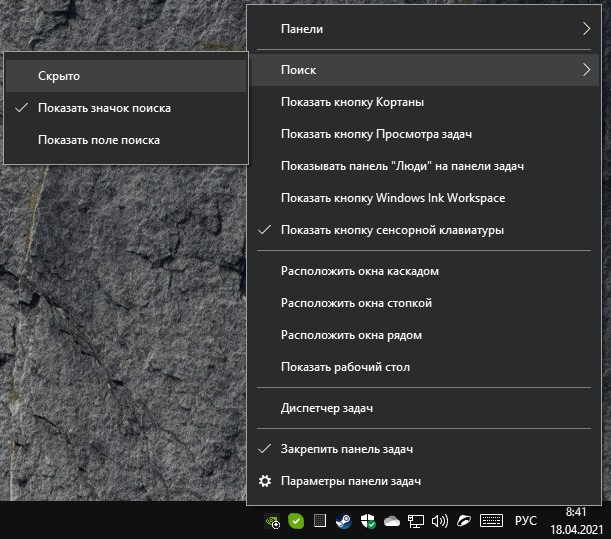
1. Нажмите правой кнопкой мыши на пустом месте панели задач и выберите «Поиск» > «Скрыть«. Это позволит приостановить процесс, но он будет включенным.
2. Перезапуск процесса SearchApp.exe позволит устранить различные проблемы связанные с его работай. Откройте диспетчер задач и завершите «Поиск», после чего он автоматически перезапуститься, когда вы нажмете мышкой на поиск панели задач.
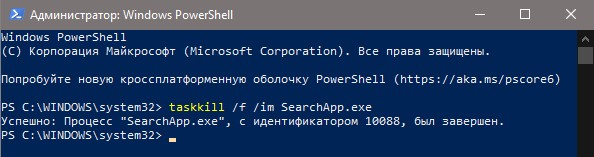
Также, можете запустить PowerShell от имени администратора и ввести команду:
taskkill /f /im SearchApp.exe
Смотрите еще:
- Что за процесс Lockapp.exe в Windows 10?
- Что за папка Inetpub в Windows 10 и можно ли её удалить?
- Что за процесс Agent.exe в Windows 10?
- Что за процесс ASUS Com Service (atkexComSvc.exe) в Windows 10?
- Что за папка FileRepository в DriverStore, можно ли удалить?
[ Telegram | Поддержать ]
Значительная часть наблюдаемых в Диспетчере задач процессов являются фоновыми, лишенными какого бы то ни было графического интерфейса. Есть и такие фоновые процессы, которые имеют к GUI косвенное отношение, например, таковым процессом является searchapp.exe (Поиск), отвечающий за работу некоторых функций поиска Windows и Cortana. Данный процесс не является критическим, поэтому при повышенной загрузке им процессора он может быть завершен.
В ранних версиях Windows 10 процесс SearchApp.exe был автономным и использовался для поиска внутри Cortana, но начиная с версии Windows 10 2004, Microsoft решила объединить его функцией системного поиска, вызываемого кликом по известной иконке в левой части панели задач.
Процесс потребляет минимум ресурсов, но в некоторых случаях он может начать проявлять несвойственную для него активность, загружая CPU. Такое поведение чаще всего вызывается ошибками в работе функции поиска, но нельзя исключать и подмены SearchApp.exe вирусным процессом.
Файл SearchApp.exe должен находиться в расположении %windir%SystemAppsMicrosoft.Windows.Search_cw5n1h2txyewy, также его экземпляры можно найти в каталогах C:WindowsWinSxS…, если вы обнаружите его в других местах, в частности, в папках профиля, обязательно проверьте его на VirusTotal, скорее всего, этот файл окажется вредоносным.
А еще оригинальный файл должен иметь соответствующую цифровую подпись.
Чтобы ее просмотреть, открываем свойства файла, переключаемся на вкладку «Цифровые подписи», жмем «Сведения» -> «Просмотр сертификата».
Как остановить процесс SearchApp.exe
Если SearchApp.exe проявляет чрезмерную активность, вы можете завершить его принудительно в Диспетчере задач.
В результат процесс будет немедленно перезапущен, выждите минуту и посмотрите, пришел ли он в норму.
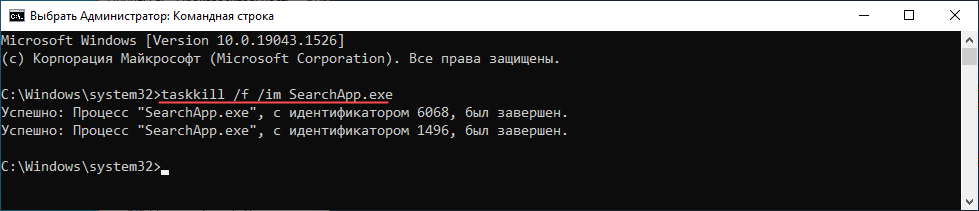
Для завершения процесса можно использовать и запущенную от имени администратора командную строку.
Выполняем в ней команду:
taskkill /f /im SearchApp.exe
Наконец, радикальный способ — получить на файл SearchApp.exe права доступа и переименовать его, добавив к «.exe» расширение «.bak». Права получаем вручную в дополнительных параметрах безопасности (Свойства -> Безопасность -> Дополнительно) или с помощью сторонней утилиты TakeOwnershipEx.
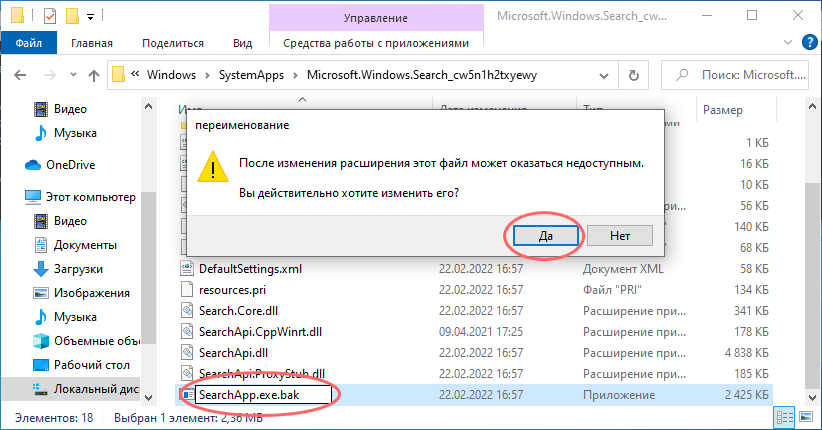
Учтите только, что после такой манипуляции у вас перестанет работать поиск Windows.
Поэтому отключение процесса является не самым лучшим решением, разве что вы готовы отказаться от системного поиска и перейти на его сторонние аналоги.
 Загрузка…
‘SearchApp.exe’ is an executable file that handles the working of the search function of the Windows taskbar. Since this application belongs to the search functions in Windows 10, therefore, you can find it in the following directory:
C:WindowsSystemAppsMicrosoft.Windows.Search_cw5n1h2txyewy
In the previous builds of Windows 10, this executable file was a part of Cortana, and back then, its name was ‘SearchUI.exe.’ But in the 19H1 update of Windows-10, Microsoft renamed this executable file and removed it from Cortana to distinguish this feature from the other components.

Often people face different issues with ‘SearchApp.exe’ and they try to disable this executable file. But this is a necessary windows process, so disabling this might cause the search feature to stop throughout the operating system.
The only way to fix this issue is by disabling this executable file. However, there are various ways to disable this executable file (permanently or temporarily). So, we’re going to discuss all the possible fixes to this issue.
But first, we will share some methods to check whether this file is harmful or not. So, without any further delay, let’s get right to it.
Contents
- Is ‘SearchApp.exe’ Harmful?
- Method 1: Checking via the Properties of ‘SearchApp.exe’
- Method 2: Checking via CMD or PowerShell
- How to Disable / Fix the Errors with the ‘SearchApp.exe’ File?
- Disabling ‘SearchApp.exe’ via Deleting the ‘SearchApp.exe’ Folder
(Temporary Method) - Disabling it via CMD/PowerShell (Permanent Method)
- Disabling it by Deleting Cortana (For Users using old Windows 10 Build)
- Disabling ‘SearchApp.exe’ via Deleting the ‘SearchApp.exe’ Folder
- Enabling the ‘SearchApp.exe’ File:
Is ‘SearchApp.exe’ Harmful?
The original ‘SearchApp.exe’ file is Microsoft’s executable file. However, sometimes cyber thieves deliberately give their processes the same name for injecting trojan or malware into a system. The infected executable files often use extensive system resources without activating them and if that’s your case, then removing those files should be your priority.
However, executable files are not always infected. So, it’s best to check the authenticity of any executable file that looks suspicious to you.
There are various ways to check the authenticity of an executable file. Some people use a third-party application. However, as ‘SearchApp.exe’ is Microsoft’s executable file, therefore, we will check this file for Microsoft’s digital signatures. So, let’s begin the SearchApp.exe virus detection process.
Method 1: Checking via the Properties of ‘SearchApp.exe’
Microsoft has included its digital signature in the catalog of this executable file. So, the procedure for checking the digital signatures for this file is pretty straightforward.
- First, you’ll open the ‘This PC’ window.
- Then, you’ll type the following address in the address bar of This PC’s opened window and hit the ‘Enter’ key:
C:WindowsSystemAppsMicrosoft.Windows.Search_cw5n1h2txyewy

- A new window will open and now you’ll locate the ‘SearchApp.exe’ file.

Locating the ‘SearchApp.exe’ file
Note: If you’re using an older version of Windows-10 (older than 19H1 update), then look for ‘SearchUI’ instead of ‘SearchApp’
- Now, you’ll select the ‘SearchApp.exe’ file and press the ‘Alt + Enter’ keys to enter its ‘Properties’ window.
- Then, you’ll move to the ‘Digital Signatures’ tab and here you’ll find Microsoft’s ownership.

Moving to the ‘Digital Signature’ tab and finding Microsoft’s ownership - To get more information, you’ll select the signature and click on the ‘Details’ button.

Clicking on the ‘Details’ button in the ‘Digital Signature’ tab - A new window will open and now, you’ll click on the ‘View Certificate’ button in the ‘General’ tab.

Clicking on the ‘View Certificate’ button inside the ‘General’ tab - This will open another new window and here you’ll find Microsoft’s certification information regarding this executable file.

Finding Microsoft’s certificate information - You can also hover over to the ‘Certification Path’ tab and view the ‘Certificate status:’ section for verifying the certificate of this executable file.

Viewing ‘Certificate path’ and ‘Certificate status’
Method 2: Checking via CMD or PowerShell
If you can’t find the ‘Digital Signatures’ Tab in ‘Properties’ of ‘SearchApp.exe’
For some executable files, Microsoft doesn’t provide the digital signature information inside their catalog. So, if you’re in one such situation, then follow the steps below 👇🏻.
- First, you’ll follow the ‘first two steps of Method # 1’ for reaching the folder of the executable file (under-discussed).
- Now, you’ll open any browser and copy-paste the following link:
https://docs.microsoft.com/en-us/sysinternals/downloads/sigcheck

- Then, you’ll press the ‘Enter’ key to open the required webpage.
- From the new webpage, you’ll download the ‘Sigcheck’ application by clicking on the ‘Download Sigcheck’ option.

Downloading ‘Sigcheck’ - Once the download is complete, then you’ll extract the downloaded file.
- After the extraction, you’ll select the file named ‘sigcheck’ and copy it.

Selecting the ‘sigcheck’ file for copying - Now, you’ll paste the (copied) file inside the ‘SearchApp.exe’ folder and type ‘cmd’ in the address bar of that folder.

Typing ‘cmd’ in the address bar of the ‘SearchApp.exe’ folder - In the CMD window, you’ll type the following command and press the ‘Enter’ key to execute that command:
sigcheck.exe SearchApp.exe
- A new window will appear and here you’ll find the Digital Signature information of the executable file (under-discussed).

Verifying digital signatures via CMD
If you’ve followed both methods and after both methods, your signature information is similar to the provided information, then ‘SearchApp.exe’ is safe (in your case). However, if you didn’t find Microsoft’s ownership, then your executable file is a virus, and removing that file should be your priority.
How to Disable / Fix the Errors with the ‘SearchApp.exe’ File?
If you’re facing any of the mentioned issues with ‘SearchApp.exe’ and you want to disable this executable file, then you should know that disabling this will stop the search function of Windows 10 because the search feature in Windows 10 depends on this feature.
Disabling ‘SearchApp.exe’ via Deleting the ‘SearchApp.exe’ Folder
(Temporary Method)
In this solution, we will delete the root folder of the ‘SearchApp.exe’ file. But first, we have to kill its process from the Task Manager.
- First, you’ll open the ‘Task Manager’ by pressing the ‘Ctrl + Alt + Delete’ keys or searching in the Start Menu.
- Then, inside the ‘Processes’ tab, you’ll look for the ‘Search’ process.

Locating the ‘SearchApp.exe’ in Task Manager - Then, you’ll expand the ‘Search’ process and right-click on the selected process to open a drop-down menu.
- From the drop-down menu, you’ll choose the ‘Open file location’ option.

Selecting the ‘Open File Location’ option in Task Manager - This will open the root folder of the ‘Search’ process and I recommend opening both windows (Task Manager and Root Folder) side-by-side.

Opening ‘Task Manager’ and ‘Root Folder’ windows side-by-side - Now, you’ll kill the ‘Search’ process in the task manager. But keep in mind that you have to continuously delete this process 6-7 times. Because the system will automatically reopen this process until you delete it 6-7 times.

Killing the ‘Search’ process and selecting its root folder - Once the process is no longer in the task manager, then you can either rename the root folder of the ‘Search’ process or you can delete it.
After deleting, you won’t be able to use any of the search functions in Windows 10. But this will solve the issues with the ‘SearchApp.exe’ file.
However, after you install any update on Windows 10, the system will automatically enable this. So, if you want to delete this process permanently, then head over to the next solution.
Disabling it via CMD/PowerShell (Permanent Method)
If the above method didn’t resolve your issue or if you want to permanently delete the executable file (under-discussed), then follow the steps below. But keep in mind that the search facility in Windows 10 won’t work after deleting the search process because it’s a native windows component and disabling this might lead you to windows re-installation.
- First, you’ll press ‘Windows + R’ to open the Run dialog box and type ‘cmd.’ Then, (instead of pressing enter) you’ll press the ‘Ctrl + Shift + Enter’ keys to open the command prompt as administrator.

Typing ‘cmd’ in the ‘Run’ dialog box - In the next window, you’ll select ‘Yes’ for opening the ‘Command Prompt’ as administrator.

Choosing ‘Yes’ for running the ‘Command Prompt’ as Administrator - Now, you’ll copy and paste the following command in the command prompt to enter the ‘System Apps’ folder:
cd %windir%SystemApps
- After that, you’ll type the following command again and again until it permanently kills the ‘Search’ process from the taskbar.
taskkill /f /im SearchApp.exe
Note: If you’re using an older version of Windows 10 (older than 19H1 update), then use ‘SearchUI’ instead of ‘SearchApp’
Note: You can also open a Task Manager window side-by-side as I’ve mentioned in the ‘5th Step of Solution # 1′
- Once the system has successfully deleted the process, then you can type the following command:
move Microsoft.Windows.Search_cw5n1h2txyewy Microsoft.Windows.Search_cw5n1h2txyewy.old
Now, you have successfully disabled the ‘SearchApp.exe’ or ‘SearchUI.exe’ file. This method will resolve any issues regarding this executable file because it has permanently deleted the executable file. But keep in mind that you can’t use any search feature inside Windows-10 now.
Disabling it by Deleting Cortana (For Users using old Windows 10 Build)
If you’re using the old Windows 10 build (older than 19H1 update) and the executable file is associated with Cortana, then you have to erase the Cortana permanently. So, follow the steps down below 👇🏻.
- First, you’ll open the ‘Windows PowerShell’ as administrator by searching it in the search bar and clicking on the ‘Run as administrator’ option.
- Then, you’ll choose the ‘Yes’ option in the next window to allow ‘Windows PowerShell’ to make changes to your system.

Allowing ‘Windows PowerShell’ to make changes to the system - Now, you’ll type the following commands in the PowerShell to remove Cortana permanently.
Get-AppxPackage *Microsoft.549981C3F5F10* | Remove-AppxPackage
- PowerShell will display the following message:

Windows PowerShell’s message - Then, you’ll type ‘exit’ to close the ‘Windows PowerShell.’
This method will permanently remove Cortana. But if you want to reinstall it, you can use the ‘Microsoft Store’ for that.
Enabling the ‘SearchApp.exe’ File:
If you want to enable the ‘SearchApp.exe’ or ‘SearchUI.exe,’ then, follow these steps:
Note: If you’re trying this method immediately after disabling the executable file (under-discussed), then it’s better to restart the system. Otherwise, this process might not work. However, if that’s not the case, then you don’t need to restart your system before this method.
- First, you’ll follow the ‘first 2 steps of Solution # 2’ for opening the ‘Command Prompt’ as administrator.
- In the ‘Command Prompt’ window, you’ll type the following command and press the ‘Enter’ key to execute this command:
cd %windir%SystemApps
- Then, type the following command and press the ‘Enter’ key to execute this command:
move Microsoft.Windows.Search_cw5n1h2txyewy.old Microsoft.Windows.Search_cw5n1h2txyewy
Now, you’ll verify by clicking the search icon in the taskbar to see if it is working. If yes, then good for you, but if it’s not working, then you’ll restart your system. After restarting, it will work.

I am a BSCS graduate and a technology nerd who now loves working and writing about computers and other tech-related stuff. In my free time, I like watching Netflix and playing Cricket 22 and The Witcher 3 (Wild Hunt).
В фоновом режиме работает множество процессов, о которых мы не замечаем, и один из них — SearchApp.exe. Возможно, вы наткнулись на эту задачу, исследуя диспетчер задач. В этой статье мы рассмотрим, что такое SearchApp.exe и сможете ли вы его отключить.
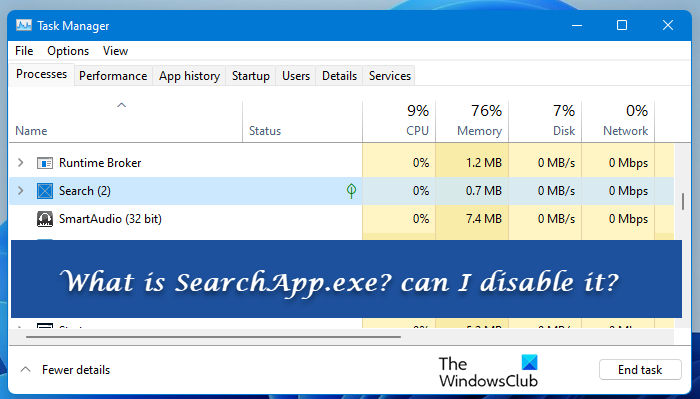
Если вы являетесь пользователем Windows 11/10, возможно, вы знакомы с меню «Пуск» и связанной с ним панелью поиска. Вероятно, это то, что вы используете все время для поиска файлов, запуска приложений, выключения компьютера и других действий. SearchApp.exe — это процесс панели поиска, который запускается Cortana. Когда вы пытаетесь что-то найти, процесс запускается.
Этот процесс не должен занимать много ваших ресурсов, и если он это делает, у вас есть проблема. Далее в этом руководстве мы поговорим о том, почему, когда и как следует отключить этот процесс.
SearchApp.exe безопасный?
Да, SearchApp.exe — это подлинный процесс Windows. Это легкий процесс, который требует очень мало ресурсов и чаще всего не вызывает никаких проблем. Однако есть случаи, о которых сообщают пользователи, когда процесс начинает демонстрировать странное поведение.
Несмотря на то, что SearchApp сам по себе не является вирусом, существует множество вирусов, которые могут замаскировать процесс, поэтому важно знать состояние вашего файла. Для этого вы должны проверить местоположение и сертификат файла.
Ниже приведено подлинное местоположение SearchApp.exe.
C:WindowsSystemAppsMicrosoft.Windows.Search_cw5n1h2txyewy
Там вы запустите процесс SearchApp.exe, просто щелкните его правой кнопкой мыши и выберите «Свойства». Идти к Цифровые подписи и нажмите Подробности. Затем нажмите Посмотреть сертификат. Если вы видите сертификат, выданный Microsoft Windows, значит, ваш процесс является подлинным.
Стоит ли отключать SearchApp.exe?
Вы не должны сразу отключать SearchApp.exe, это неотъемлемая часть вашей системы. Иногда отключение этой функции также может привести к сбою системы, поэтому важно создать точку восстановления системы, если вы решите пойти по этому пути.
Говоря об отключении процесса, у вас должна быть веская причина для этого. Если процесс вызывает высокую загрузку ЦП или какие-то другие проблемы, отключите этот процесс. Однако мы рекомендуем отключать SearchApp.exe в указанном ниже порядке.
Как отключить SearchApp?
Есть два способа отключить SearchApp.exe.
- Использование диспетчера задач
- Использование командной строки.
Поговорим о них подробно.
1]Использование диспетчера задач
Первый метод довольно прост, и если вы испытываете высокую загрузку ЦП, это также может решить проблему. Итак, откройте диспетчер задач, выполнив поиск в меню «Пуск» или Ctrl+Shift+Esc. Тогда ищите Поиск или SearchApp.exe, щелкните по ним правой кнопкой мыши и выберите «Завершить задачу».
Наконец, перезагрузите систему и проверьте, сохраняется ли проблема.
2]Использование командной строки
Многие пользователи смогли решить проблему высокой загрузки ЦП, вызванную SearchApp, выполнив некоторые команды cmd. Мы собираемся сделать то же самое. Откройте командную строку от имени администратора, выполнив поиск в меню «Пуск».
Затем выполните следующие команды одну за другой.
cd %windir%SystemAppstaskkill /f /im SearchApp.exemove Microsoft.Windows.Search_cw5n1h2txyewy Microsoft.Windows.Search_cw5n1h2txyewy.old
Как только вы закончите с этим, перезагрузите компьютер, и процесс будет временно отключен, что позволит решить проблему.
Вот и все!
Читайте также:

- Описание
- Отключение
- Вывод
Приветствую. Данная заметка опишет предназначение модуля SearchApp.exe, который может содержать операционная система.
SearchApp.exe — что это за процесс? (Windows 10)
Сразу коротко ответ: системный компонент (UWP-приложение) голосового помощника Cortana, обеспечивающего функционирование поиска через меню Пуск.
Имеется ввиду данный поиск:

Директория запуска компонента:
C:WindowsSystemAppsMicrosoft.Windows.Cortana_cw5n1h2txyewy
Диспетчер задач отображает компонент как Search (Suspended означает приостановлен, необходимо в целях экономии ресурсов):

SearchApp.exe — как отключить?
ВАЖНО: сперва создайте точку восстановления системы!
Убрать процесс можно путем отключения Кортаны в параметрах поиска Пуск (при наличии), после — удалить программу Кортана используя консоль PowerShell (запущенную с правами администратора), собственно команда (вводить целиком):
Remove-AppxPackage Microsoft.Windows.Cortana_1.4.8.176_neutral_neutral_cw5n1h2txyewy
Также можно полностью удалить Кортану (данный голосовой помощник не функционирует в русской десятке) следующей командой:
Get-AppxPackage -allusers Microsoft.549981C3F5F10 | Remove-AppxPackage
Принудительный способ отключения SearchApp.exe:
- Откройте диспетчер задач. Найдите процесс. Нажмите правой кнопкой > выберите пункт Открыть расположение.
- Появится папка, содержащая выделенный файл. Процесс завершаем.
- Папку, которая содержит файл SearchApp.exe — необходимо переименовать, например просто добавив слово old (или сам компонент).
- Выполняем перезагрузку. После — диспетчер задач компонент SearchApp.exe содержать не должен.
При появлении проблем с изменением названии папки — можно использовать утилиту Unlocker.
Вышеописанный метод может быть выполнен используя командную строку (запущенная с правами администратора):
- Переместитесь в каталог SystemApps командой: cd %windir%SystemApps
- Завершите работу компонента командой: taskkill /f /im SearchApp.exe
- Переименуйте директорию командой: move Microsoft.Windows.Search_cw5n1h2txyewy Microsoft.Windows.Search_cw5n1h2txyewy.old (вводить целиком)
После отключения данного компонента поиск Windows может перестать функционировать. Отключение системных модулей — всегда риск. Поэтому создайте сперва точку восстановления.
Заключение
Разобрались:
- SearchApp.exe — процесс, обеспечивающий работу поиска через меню Пуск.
- Убрать процесс можно отключив поиск среди настроек Пуск, а также удалив утилиту Кортана используя команду PowerShell (голосовой ассистент Cortana не работает в русскоязычной Виндовс).
Удачи и добра.
На главную!
13.03.2021