In my view «SCP permission denied» error, is the most common error in the world of Linux. So, whether you are Linux admin or newbie, Every one of us would have encountered this error. At least, once in a lifetime, that I can bet.
As a Linux user for many years. I have faced this issue during SCP and SSH operations. So I am sure, if you will land on this page, you will get the solution to all your «permission denied error in Linux». Below mentioned are the samples of a few errors, you generally encounter. I am sure, at least one of the 9 solutions provided in this post will help you to resolve these issues.

- SCP permission denied
- SCP permission denied (publickey)
- Saving key «.ssh/id_rsa» failed: permission denied when SCP
- SCP permission denied ec2
- SCP permission denied AWS
- SCP permission denied, please try again
- SCP permission denied (publickey gssapi-keyex gssapi-with-mic)
- SCP permission denied (publickey). lost connection
Before explaining anything, Let me tell you all these problems occurs during file copy using SCP. So let’s understand about SCP utility first —
Table of Contents
- 1 What is SCP file transfer?
- 2 How do you SCP?
- 3 SCP permission denied issue
- 4 SCP permission denied (publickey) — AWS EC2 instance
- 5 Frequently Asked Questions (FAQ’s)
- 6 Video tutorial
- 7 Conclusion
What is SCP file transfer?
SCP stands for Secure copy. This program helps in copying a file or folder between two computers securely, whether local or remote. it uses SSH (secure shell) protocol in background. Additionally, The data and password are encrypted to secure sensitive information.
Using scp, you have option of file or directory copy between —
- Local to the local system
- Remote system to local system
- Local system to remote system
- Local system to AWS EC2 instance
How do you SCP?
There are a lot of options and switches to use with SCP command. Let me show you some basic commands, just to give you some understanding of SCP.
SCP syntax:-
$ scp [-346BCpqrTv] [-c cipher] [-F ssh_config] [-i identity_file]
[-l limit] [-o ssh_option] [-P port] [-S program]
[[user@]host1:]file1 … [[user@]host2:]file2
- Visit scp man page for more information on options or syntax.
$ man scp
How to Copy local files to remote host with SCP
$ scp file user@host:path
Host :- can be IP address or hostname of remote system
: (colon) :- helps scp to identify remote host
Username:- on remote host
SSH key or password :- is required to copy file using scp
Path :- Absolute or relative path for local file or directory
For example —
$ scp test.txt user1@ubuntu:/tmp
Copy Remote file to local host
$ scp user@host:file path
How to Copy directories to local host using SCP
$ scp -r user@host:directory_path path
Copy file between two remote hosts
$ scp user1@host1:file1.txt user2@host1:directory_path
Now when you know, what are basic scp commands. Time to know about public key authentication-
SCP requires a password to authenticate to the remote system. But in case you want to avoid it or using SCP in scripts, Public key is required.
Basically, you generate a public-private key pair on the client (local) and copy the public key to a remote system (server) into the authorized key.
To make you understand scp commands easily, i have shared my LAB details
Lab setup details —
Local server name — Server1 (Ubuntu 18.04)
Remote server name — Server2 (Ubuntu 20.04)
Source file — /test/file1.txt
Target directory — /remote-test
username — dev

Scenario1-
I am trying to copy /test/file1.txt from server1 (local) to server2 (remote) in /remote-test directory. I am also getting permission denied.
$ scp "local-file" "user@remote-host:/path-to-remote-dir"
Reference output


To resolve these error — perform below mentioned steps-
Solution 1 :- Double check your user and password
Please make sure, you have mentioned correct username and password in the command. This is one of the very basic mistakes, we do. So, you can try writing your password in notepad, copy and paste it in command prompt. When asked during SCP command.
i have validated username and password is correct in my case.
Solution 2 :- Check for remote path
Make sure, the path you have mentioned as the remote directory is correct. For example, in my case /remote-test is the remote directory and it’s correct.
Solution 3 :- Check for Read write access on remote directory
Double-check, whether your user mentioned in command have read-write (RW) access on the remote directory. For example, in my case «/remote-dir» must-have RW access to user «dev«.
Follow these steps to check —
-> Login to remote system (server2)
-> Run «ls» -ld command to check permissions of /remote-dir.
$ ls -ld "your-remote-dir"
Reference output

So, if you will see in image, /remote-dir only allows read, write and execute (rwx) permission to root user only. For group and others, it has read and execute (r-x) permission. So my user «dev» will be treated as other, and it won’t be able to write. As a result, I am getting SCP permission denied error.
-> Now to resolve this error, assign Read-write-execute (rwx) permission to everyone.
$ sudo chmod 777 "path-to-your-remote-directory"
Reference output
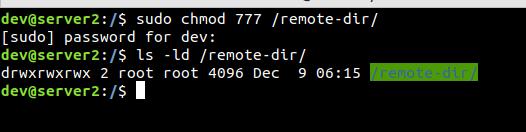
-> Run scp command again

Warning
Setting 777 permission on any directory is not secure. So once you are able to isolate the «SCP permission denied» issue. Either change ownership and set permission to 755.
If you are still facing permission denied error, move to next step
Solution 4 :- ownership issues (directory should be owned by user)
-> Login to your remote system (server2)
-> Change ownership of your remote directory for your user. For example, I will change ownership of /remote-dir to my user «dev» instead of «root«.
$ sudo chown -R dev:dev "path to your remote directory"
Reference output

-> Run scp command and it must work for you

Solution 5 :- Diagnose problem with scp -v command
Try to use -v (verbose) option to diagnose the issue with scp command.
For example
$ scp -v /test/file1.txt dev@192.168.126.129:/remote-dir
output truncated -
debug1: Sending environment.
 debug1: Sending env LANG = en_IN
 debug1: Sending command: scp -v -t /remote-dir
 Sending file modes: C0644 0 file1.txt
 Sink: C0644 0 file1.txt
 scp: /remote-dir/file1.txt: Permission denied
Check message after scp -v -t command, if it shows permission denied, Follow solution 3 or 4 as described in the post. it will resolve your issue.

Solution 6 :- Validate option -P is used for port not -p
When running SCP command Option -P is used to mention custom port, in case default port TCP 22 is not used. Sometimes, instead of -P, we use -p (lowercase) by mistake. For better understanding let me tell you the difference between these two —
- -p (lowercase):- Preserve access, modification and modes from the original file.
- -P (uppercase):- Specified customize port to connect remote host.
For example port 2314 is custom port instead of 22.
$ scp -P 2314 dev@192.168.126.129:/remote-dir/file1.txt /test/
SCP permission denied (publickey) — AWS EC2 instance

Scenario 2-
Try below mentioned solution, in case of SCP permission denied (publickey) with AWS ec2 instance —
If you have set up password-less authentication or you have permission key with you to authenticate remote system, you may encounter this error.
Have a check from Solution 1-6 mentioned in the post, if it doesn’t help move further —
Solution 7 :- Use -i option and provide «.pem» private key always
When you use SCP and don’t use -i option. It uses default ssh key under (~/.ssh/) directory. So always use -i option and provide the path to «.pem» key file.
For example «ubuntu.pem» is key file in my case.
$ scp -i ~/Desktop/ubuntu.pem ~/Desktop/test/code/www/index.html dev2@server:/var/wwwSolution 8 :- if using permission key SSH is working but not SCP
If you are able to ssh to the remote host using -i option and not able to scp. It means you are hitting a bug.
So instead of using -i «path to .pem file»
$ scp -i ~/Desktop/ubuntu.pem ~/Desktop/test/code/www/index.html dev@server2:/var/wwwuse -o "IdentityFile" option.
$ scp -o IdentityFile ~/Desktop/ubuntu.pem ~/Desktop/test/code/www/index.html dev@server2:/var/wwwSolution 9 :- Try removing your host entry from «known_hosts» file
Sometime, there may be issue due to old or incorrect host key. Delete that particular host from know_hosts file using editor or command as follows.
$ ssh-keygen -R hostname

or

$ vim ~/.ssh/known_hosts
Frequently Asked Questions (FAQ’s)

Can ssh but not SCP permission denied?
Answer
Run SCP command -vv option and try to debug the issue. Depending upon error, follow solution 1-9 mentioned in this post to resolve your issue.
Will SCP overwrite existing file?
Answer
Yes, SCP utility finds a file with the same name on target, and you have write permission on it. SCP command will overwrite it. You can change the permission of the target file or directory. So that SCP complaints about permission issue and can avoid overwriting. Alternatively, you can use rsync tool, which has a lot of options to sync data.
Does SCP copy or move?
Answer
SCP mean secure copy, as name suggest it only copy files or directories. There is no file movement occurs.
Why SCP is not working?
Answer
There may be many reasons if SCP is not working. check SCP «-vvv» option and try to debug, why it’s not working. I have given 9 solutions to tackle different permission denied errors. you can refer to them.
How do I know if SCP is working?
Answer
if the exit status of your command is «0 » and you are able to copy your file or directory to remote host or AWS EC2 instance. You can be assured, SCP is working.
Why is permission denied error in Linux?
Answer
A lot of scenarios may be there for «permission denied error in Linux«. For example, if you don’t have read-write access on file or directory. Also, if you are trying to run a command which only root can run. You would need either root or sudo access to run these commands. For example, chmod or chown is one of these commands.
Video tutorial
If you need some video guidance. Check out this video on «SCP permission denied error«, The basic or common troubleshooting to start with.
Conclusion
There is no limit to issues or errors when you are in the technical world or on the way of learning. But I think your question on «why am I getting permission denied with SCP» will be resolved, once you will read the solution mentioned in this post. One or other solution will resolve your issue depending upon error code.
I hope you will leave with smile on your face, once your permission denied issue during scp will get resolve.
See you soon in the next post. Till that time keep learning.
Your commands are trying to put the new Document to the root (/) of your machine. What you want to do is to transfer them to your home directory (since you have no permissions to write to /). If path to your home is something like /home/erez try the following:
scp My_file.txt user_id@server:/home/erez/
You can substitute the path to your home directory with the shortcut ~/, so the following will have the same effect:
scp My_file.txt user_id@server:~/
You can even leave out the path altogether on the remote side; this means your home directory.
scp My_file.txt user_id@server:
That is, to copy the file to your desktop you might want to transfer it to /home/erez/Desktop/:
scp My_file.txt user_id@server:/home/erez/Desktop/
or using the shortcut:
scp My_file.txt user_id@server:~/Desktop/
or using a relative path on the remote side, which is interpreted relative to your home directory:
scp My_file.txt user_id@server:Desktop/
As @ckhan already mentioned, you also have to swap the arguments, it has to be
scp FROM TO
So if you want to copy the file My_file.txt from the server user_id@server to your desktop you should try the following:
scp user_id@server:/path/to/My_file.txt ~/Desktop/
If the file My_file.txt is located in your home directory on the server you may again use the shortcut:
scp user_id@server:~/My_file.txt ~/Desktop/
As with all operating systems, Linux is not devoid of its own errors. A common one that often occurs for users is the “SCP permission denied” error, which pops up when you are trying to transfer encrypted files from one Linux system to another, remote or otherwise. This article will address both what the SCP command is, how it works, and it will also take a look at why you may be getting the “SCP permission denied” error, and how you can go about transferring your files successfully.

What Does SCP Mean?
The SCP in “SCP permission denied” stands for “secure copy” which is another way to say that the copy transfer process is secure between the origin point and the destination. The SCP transfer process is simply a safer alternative to the “cp” or copy command on Linux.
What Is the CP (Copy) Command and How is it Different?
This is the primary command used for copying files and directories in Linux. The format of this in its most basic form is “cp [additional_option] source_file target_file“.
It runs in the same directory as you are working in, but does not allow two of the same files to exist in one directory. It will overwrite any files that have the same name when it copies the file over. The SCP command is very similar, with the only difference being that it provides encryption for sensitive information.
Brief Rundown of How the SCP Command Works
When you run the SCP command, Linux will generate an encrypted copy of a specified file, folder, or directory, and deposit that copy to the specified location. The basic syntax of SCP is as follows:
scp [options] username1@source_host: /location1/ file1 username2@destination_host: /location2 /file2
You may also choose to use wildcards with the SCP command to make it do different things, like change the copied file name, but we will talk about this below in the How to Properly Use SCP to Successfully Transfer Files section.
What Does The SCP Command Do?
The SCP or secure copy helps you copy files or folders between two Linux systems. These systems can be local or they can be remote. For instance, you may want to copy a file from a Linux computer to another on the same network, or you may want to copy a file from a Linux computer to a remote server. The SCP command is secure because it uses a secure shell or SSH protocol. All data, usernames, and passwords are encrypted during the copy process to ensure that any sensitive information is secured.
You can use SCP to copy files, folders, or directories from/to:
- Local to local systems.
- Local to remote systems.
- Remote to local systems.
- Remote to remote servers.
- Or local systems to AWS EC2 instances (Amazon Elastic Compute Cloud Web Services).
In order for SCP to work, you must have a secure shell (SSH) login for the servers’ you are trying to use SCP on/to. You may also need root access to both the client (user profile), and the server you are transferring to.
Common Reasons Why Permission May Be Denied
Most Linux users will run into the “SCP permission denied” error at some point, often due to very simple errors or missteps during command execution. Here are several common causes that may be the culprit:
- You have typed in or used an invalid username or password when using the command.
- Your file may be in a different location than what you’re specifying with the SCP command.
- The file might have restricted read or write access (or both).
- Your user profile does not have ownership over the directory in which you are trying to transfer the file from.
- Specifying the incorrect port when mentioning a custom port during the transfer process.
- You have an incorrect or old host key in your “known_hosts” file.
How to Resolve the “SCP Permission Denied” Error on Linux
The aforementioned errors above are all things to look for when troubleshooting the “SCP Permission Denied” error, and each come with simple, straight-forward solutions.
- Double check your username and password. It wouldn’t be the first time, nor will it be the last that we make a typo in either our username or password. Try again and make sure the access credentials are correct.
- Make sure your target files are where you think they are. The SCP command requires you to at least have a general idea of where your target files are located. If the command can’t find them, it will consider them inaccessible. Be sure to check that your files haven’t been moved or otherwise misplaced.
- Ensure you have Read/Write access to your target file or remote directory. If you are restricted from accessing your target directory, the SCP command will return with the appropriate error. You can log in to the remote directory and check your Read/Write access using the following command:
$ ls -ld “your remote directory”
Where “your remote directory” is the name of your target directory. If your user does not have Read/Write access to the desired directory, you must assign it access manually.
- Change the ownership of the target remote directory to your user. It is very possible that another user, including the root user, has ownership over your target directory. Solve this by using the following command:
$ sudo chown -R “username”:”username” “path to your remote directory”
- Ensure you’re properly specifying a custom port. Specifying a custom port is accomplished with the -P command option, with an uppercase P. It’s easy to get confused and think that -p will produce the same results, however, this command option has nothing to do with ports. Make sure you’re typing all of your commands properly in order to avoid such errors.
- You may be getting the “SCP permission denied” error due to an old or incorrect host file. You can resolve this by removing your host entry, using the following command:
$ ssh-keygen -R hostname
Or you can also use:
$ vim ~/.ssh/known_hosts
How To Use SCP Properly to Successfully Transfer Files
When it comes to using SCP properly, it is important to know what the options and wildcards are. The most common basic commands that you would use include:
Basic Option Commands You Would Use
- -P – this will specify the SSH server port.
- -p – this will create a timestamp for modification and access.
- -q – this ensures that progress or messages are not displayed.
- -C – with this, you compress the data during the transmission.
- -c – this is the cipher option.
- -r – this is for “recursive” which includes subdirectories & their content.
- -F – this is to configure SSH.
- -i – this is for an identity_file.
- -l – this is to limit.
- -o – this is to bring up SSH options.
The wildcard options include things like:
- ~/ which stands for the user’s home/directory.
- * allows you to specify a string of text.
For instance, you can use the /~/*.txt to copy all files in the home directory that end with the .txt file extension. We will use the test.txt in the examples below.
How to Copy from Local to Remote Server
When sending files to a remote server, you will first need to know what port SSH requests are filtered through, then specify it in your command. Then you will need to know where you will be sending the file, such as the destination server’s home directory. Your command should end up looking something like this:
scp -P “Port number” *.txt “Remote Server Username”:/”Target Location”/
This particular command, when executed, will copy all files in the user’s home folder ending in .txt and deposit the copy to the remote server’s specified folder.
It is important to note that if you only specify the destination directory for the remote host, then the filename will stay as is. This is done with the following command example:
scp *txt username2@destination_host:/~/
If you wanted to change the filename after being copied to the remote destination, you would run the following command:
scp test.txt username2@destination_host:/user/home/user1test.txt
How to Copy from One Remote Host to Another Remote Host
If you are looking to copy from one remote host to another remote system, you can do so by using the following SCP command:
scp user1@host1.com : /files/test.txt user2@user2.com : /files
With this line, you would be moving the test.txt file from the directory on the first host to the directory on the second host. The specified location being the host’s server name. When you run this command, you will need to enter in the passwords for both user1 and user2 for it to complete successfully.
How to Copy Your Large Files/Folders/Directories
We recommend that if you are looking to copy a large batch of files, that you run your SCP commands in a terminal multiplexer, which is a software application that you can use to run separate pseudoterminal-based login sessions within one single terminal display. It is extremely useful for running multiple command line programs.
An example of a terminal multiplexer is tmux, which is open-source and used for Unix operating systems. You can use it to run multiple terminal sessions within one single window, and as such, more than one command-line program at the same time. You can view tmux on GitHub, here.
What You Need to Remember When Using the SCP Command on Linux
There are two major things you need to remember when using the SCP command on Linux/Unix, in order to not get the “SCP permission denied” error. These are:
- You will need the password for the user on the remote system(s) when using the SCP command to transfer the file or folder over.
- On the source system (the computer you are using), the user profile you are using must have read access to the file(s) you are looking to copy. On the destination system (local system, remote, or AWS), you use an account that has write access to the directory that you want to save the file(s) to.
If you do not have either of these things, you are likely to get the “SCP permission denied” error. You can use a root user account to solve permissions issues.
Wrapping It Up
Most of the time, the “SCP permission denied” error is caused by a simple mistake in the command execution, or is due to a lack of having the right read/write permissions on the remote or local server you are sending the file to. We hope that the above scenarios have helped you resolve your “SCP permission denied” error, and if they have, please leave a comment below and let us know.
The SCP permission denied is an error message that is displayed when the user tries to copy files or data from a remote host that he does not have permission to access or tries to store the data in the root directory of his system, which does not allow the user to store data in it. In either of the cases, permission to access the data is required.
The SCP (Secure Copy Protocol) is a data transfer protocol explicitly used to copy data from one host to another over the network. The protocol runs on top of SSH (secured shell), which uses asymmetric cryptography to protect the data during transfers. Today we show you how to deal with protocol’s scp permission denied error.
Contents
- 1 Defining SCP
- 2 How to copy files using SCP
- 3 SCP permission denied
- 3.1 SCP permission denied ownership issue.
- 3.2 Try using –verbose option
- 3.3 Use -P to specify the port number
- 4 SCP permission denied (publickey)
- 5 Gcloud scp permission denied
- 6 FAQs on SCP Permission Denied
- 6.1 Does the SCP utility come pre-installed with Windows?
- 6.2 What is the extension of a private key file?
- 6.3 What is the shortcut for accessing the home directory in Linux?
- 7 Conclusion
- 8 Trending Now
Defining SCP
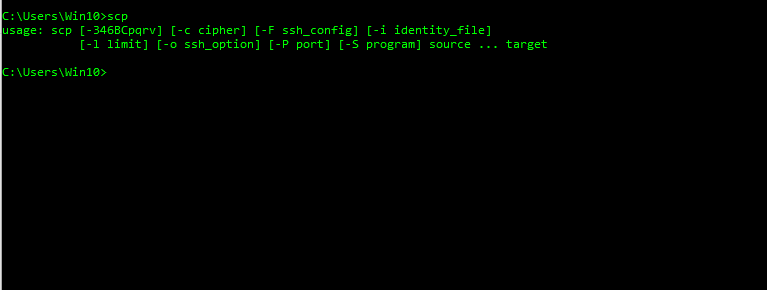
SCP is shot for secure copy protocol. It is an application layer protocol that works on top of the SSH protocol, a security protocol implemented between the application layer and the transport layer (TCP in this case). Scp command is compatible with all mainstream operating systems like Windows, Linux, macOS, etc. There are other similar protocols to the scp, such as SFTP (secure file transfer protocol), which transfers the data and performs data management functions. SCP comes pre-installed on macOS, Linux, and Windows. The user must have appropriate rights and permissions to avoid an scp permission denied error.
How to copy files using SCP
The scp command is not very complicated and simple to use. To perform any actions using the SCP without facing any permission error, you must have at least read permission on the remote host and otherwise write permission on the localhost. You might receive an scp permission error. The syntax of the command is intuitive and straightforward to use. Follow the given syntax to copy a file to the target location using scp.
scp [OPTION] [email protected]_host:file1 [email protected]_host:file2The OPTIONs are additional options that can be used to perform tasks according to the provided arguments. [email protected]_host:file1 is the file’s name to be copied prefixed with the username and address of the source host. And [email protected]_host:file2 is the name to the resultant file with the specified address prefixed with the target host username and machine address. Use the -r option to copy all the files and subdirectories inside the folder recursively.
The scp permission denied error shows up when the users do not have the required rights or permission to perform a specific operation. Executable permissions are not required on any host while using the scp command. It requires read permissions on the source system and writing permission on the target system. There might be some ownership issue with the file or directory if you are receiving the scp permission denied error.
SCP permission denied ownership issue.
If the remote host’s directory from which the user is trying to copy the file or data is not owned by the username specified in the command, then an SCP permission denied error could be encountered. Follow the given steps to resolve this issue.
- Login into the remost host with admin privileges.
- Change the ownership of the directory to the USER instead of the root.
- Use the chown (change owner) command to change the ownership.
- Now run the scp command again.
Try using –verbose option
The -v or –verbose options are used to provide a detailed output of the program’s working. Use this option with the scp command to wisely observe the problems occurring under the hood and then troubleshoot the scp permission denied problem accordingly.
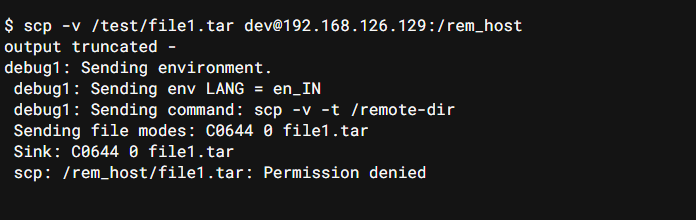
Use -P to specify the port number
Sometimes hidden or silent processes run on the arbitrary standard ports number on either host. For example, on the remote host, the chosen port number might be used by another process for another connection. Conflicting port numbers can also cause errors. Use the -P option to provide a specific arbitrary port number in such a case. NOTE – keep in mind that an uppercase -P is used to specify the port number while a lowercase -p is used for other purposes related to the original file.

SCP permission denied (publickey)
The SCP permission denied (public key) is an error message that the users are reported to face when they try to login to their AWS EC2 instance while using the passphrase-less authentication protocol such as ssh. The ssh passwordless authentication makes use of asymmetric cryptography to authenticate the user. If you provide the wrong private key to the scp utility, the scp permission denied error occurs. By default, the scp uses the default ssh private key directory to authenticate the user. Use the -i option to provide your specific private key file.

Gcloud scp permission denied
Google provides cloud computing services in many forms. Google Compute Engine is one such way to use googles cloud services. The glcoud is a command-line utility tool that can interact with the cloud server. The cloud compute scp command is used to copy files from a google cloud virtual machine to your local computer. The syntax is almost similar to the SCP command. Complete documentation of the command can be found here.
If you receive an SCP permission error while copying data from your cloud host, then try downloading the content as the root user. Add @root before your destination or target address to resolve this issue.
gcloud compute scp /Users/File.tar [email protected]_machine:/home/Desktop
FAQs on SCP Permission Denied
Does the SCP utility come pre-installed with Windows?
Yes, it comes pre-installed on windows.
What is the extension of a private key file?
.pem, is the extension for private key files.
What is the shortcut for accessing the home directory in Linux?
~/, can be used in place of /home.
Conclusion
The SCP permission denied is one of the common errors that could happen during the use of SCP utility for copying files from one host to another. This article provided you with complete information regarding the SCP protocol. We discussed some of the ways and methods that could help in the scenario of the permission denied error.
Trending Now
-

Resolve Error Code E4301 Using These 4 Exciting Methods
●October 20, 2022
-

15 Incredible Ways to Fix Paramount Plus Keeps Pausing Error
by Amal Santosh●October 20, 2022
-

5 Strategies to Fix Adobe Short Media Token Validation Error Invalid Signature
by Amal Santosh●October 11, 2022
-

Fix the Apple TV 4K Turns off by Itself with 7 Wonderful Ways
by Amal Santosh●October 11, 2022
I had the same problem.
Tried everything couldn’t fix it, until I checked my ISP Gateway.
I work with a Zyxel gateway from my ISP and because that is far away from where I have another terminal I shoved a old Linksys DD-WRT flashed Router/Repeater in between. My host terminal that was connected to that Linksys was first connected to the Gateway with a DHCP table lock (I ordered the gateway to give the MAC from that terminal the same IP via DHCP). I did this because I first had a NAS server on that mac. Now I moved the terminal to another location and totally forgot the mac ip assignment.
So now i had a WIFI repeater connected to the Gateway, and the computer with the mac assigned was connected to that.
The problem now was that my Gateway thought it was the old NAS whilst it was the other terminal, and assigned the IP to the WIFI repeater, and this was an IP conflict so scp couldn’t find the right location. Which on it’s turn resulted in a access denied on scp. Weird was that everything did work out fine, i could get on the internet, surf, mail, but with scp it gave an conflict.
Changed it in the Gateway (removed the DHCP table), and assigned another ip to the terminal…
Now scp command worked as before!
It took me 8 hours to figure it out so I thought to share this little hickup that can really frustrate you freaking butt off…
Greets
Pi @ir
Windows consists of hundreds of small tools and utilities to help users with daily tasks. Many of these tools can also be used for network file transferring and management.
In this article, we’re looking at the SCP permission denied error, its causes and what you can do to fix the problem.
Also read: How to fix the Windows Photo Viewer: Not enough memory issue?
What is the SCP permission denied error?
SCP or Secure Copy Protocol runs on top of SSH and is used to explicitly copy data from one host to another over a network or the internet.
The SCP permission denied error is usually displayed when the user is trying to copy data from a remote host or server while not having the required permissions to access the data. You can also run into this problem if you’re trying to copy files to your root directory, which doesn’t allow the user to store data.
How to fix the SCP permission denied error?
Here are a few fixes you can try to resolve the SCP permission denied error.
Change the directory
If you’re trying to store data in the root directory, you’ll run into the permission denied error. The root directory in Windows doesn’t let users save data, which can cause the SCP permission denied error.

Instead, store data in a folder or somewhere else. You can specify the path to your home directory using.
/home/foldernameAlternatively
~/Check permissions
Having the right permissions on the remote server to access data is also essential, as otherwise, you’ll be able to see data but won’t be able to copy or move it to another host. Check the host machine and change data access permissions to the user rather than the root.
Specify the port number
For security reasons, admins often change the default port for the SCP command on the remote host. If you’re using the default or incorrect port number, you will have permission issues and several other problems.
Check the host machine for the correct port number and then use it in the SCP command using the -P flag.
Also read: Green checkmarks on Windows explained

Someone who writes/edits/shoots/hosts all things tech and when he’s not, streams himself racing virtual cars.
You can contact him here: [email protected]
This is a authentication error, there is not a matching key to pair to.
When having problems with ssh or using ssh over scp as your doing the -v switch is very informative to diagnose the problem, the more v‘s you put in there the more verbose the output:
scp -vvv -P 30000 /somedir/somedir/file user@domain:/somedir/somedir/
Here is a sample output of it:
OpenSSH_6.7p1 Debian-5+deb8u7, OpenSSL 1.0.1t  3 May 2016
debug1: Reading configuration data /etc/ssh/ssh_config
debug1: /etc/ssh/ssh_config line 19: Applying options for *
debug2: ssh_connect: needpriv 0
debug1: Connecting to 192.168.1.171 [192.168.1.171] port 30000.
debug1: Connection established.
debug1: permanently_set_uid: 0/0
debug1: key_load_public: No such file or directory
debug1: identity file /root/.ssh/identity type -1
debug1: key_load_public: No such file or directory
debug1: identity file /root/.ssh/identity-cert type -1
debug1: key_load_public: No such file or directory
debug1: identity file /root/.ssh/id_rsa type -1
debug1: key_load_public: No such file or directory
debug1: identity file /root/.ssh/id_rsa-cert type -1
debug1: key_load_public: No such file or directory
debug1: identity file /root/.ssh/id_dsa type -1
debug1: key_load_public: No such file or directory
debug1: identity file /root/.ssh/id_dsa-cert type -1
debug1: key_load_public: No such file or directory
debug1: identity file /root/.ssh/id_ecdsa type -1
debug1: key_load_public: No such file or directory
debug1: identity file /root/.ssh/id_ecdsa-cert type -1
debug1: key_load_public: No such file or directory
debug1: identity file /root/.ssh/id_ed25519 type -1
debug1: key_load_public: No such file or directory
debug1: identity file /root/.ssh/id_ed25519-cert type -1
debug1: Remote protocol version 2.0, remote software version OpenSSH_7.4p1 Debian-10+deb9u4
debug1: match: OpenSSH_7.4p1 Debian-10+deb9u4 pat OpenSSH* compat 0x04000000
debug1: Enabling compatibility mode for protocol 2.0
debug1: Local version string SSH-2.0-OpenSSH_6.7p1 Debian-5+deb8u7
debug2: fd 3 setting O_NONBLOCK
debug3: put_host_port: [192.168.1.171]:30000
debug3: load_hostkeys: loading entries for host "[192.168.1.171]:30000" from file "/root/.ssh/known_hosts"
debug3: load_hostkeys: found key type ECDSA in file /root/.ssh/known_hosts:7
debug3: load_hostkeys: loaded 1 keys
debug3: order_hostkeyalgs: prefer hostkeyalgs: ecdsa-sha2-nistp256-cert-v01@openssh.com,ecdsa-sha2-nistp384-cert-v01@openssh.com,ecdsa-sha2-nistp521-cert-v01@openssh.com,ecdsa-sha2-nistp256,ecdsa-sha2-nistp384,ecdsa-sha2-nistp521
debug1: SSH2_MSG_KEXINIT sent
debug1: SSH2_MSG_KEXINIT received
You could check if the permissions on the ssh files are rightly set, you can see the right permissions below in my ls command
There maybe is someone who deleted your key from the server.
Or as in the comments someone said, maybe you don’t have a matching private key?
To create a ssh key if anyone needs that at this stage, this is how you do that:
ssh-keygen -o -b 4096 -t rsa -C your-email@gmail.com
that creates a private key and a public key in ~/.ssh/ directory, be careful never to share your private key, that’s the id_rsa….notice that ~/.ssh/ has a dot in front of it because it’s a hidden directory like here:
$ls -sail .ssh/
total 20
  658 4 drwx------  2 user user 4096 Nov 10 06:05 .
   12 4 drwxr-xr-x 47 user user 4096 Nov 10 06:11 ..
34211 4 -rw-r--r--  1 user user 1487 Nov  1 02:37 authorized_keys
34375 4 -rw-------  1 user user 3434 Nov 10 06:05 id_rsa
34376 4 -rw-r--r--  1 user user  749 Nov 10 06:05 id_rsa.pub
  664 0 -rw-r--r--  1 user user   0 Nov 10 06:04 known_hosts
then to copy the key over to the server:
cat ~/.ssh/id_rsa.pub | ssh -p 30000 something@SERVER 'cat >> .ssh/authorized_keys'
You need to get your public ssh key to the server and if you don’t have access to it in physical and can edit sshd_config to allow passwords
 # Change to no to disable tunnelled clear text passwords
 PasswordAuthentication no
while you copy it, you could email it to the system administrator and he can put it on the server.
I’m trying to copy a file from my local host to my Amazon EC2 instance using SCP and receiving the error:
Warning: Identity file blocks_key.pem not accessible: No such file or directory.
Permission denied (publickey).
lost connection
The command that prompts this error is:
scp -i ~/Desktop/Blocks/blocks_key.pem ~/Desktop/Blocks/code/www/uploadtest.html ubuntu@ip.address:/var/www
I was able to SSH using the same -i ~/Desktop/Blocks/blocks_key.pem so I’m unclear why this isn’t working correctly. Any insight would be much appreciated!
Debugging info:
OpenSSH_5.3p1 Debian-3ubuntu7, OpenSSL 0.9.8k 25 Mar 2009
Warning: Identity file /Desktop/Blocks/blocks_key.pem not accessible: No such file or directory.
debug1: Reading configuration data /etc/ssh/ssh_config
debug1: Applying options for *
debug1: Connecting to 184.73.234.234 [184.73.234.234] port 22.
debug1: Connection established.
debug1: identity file /home/ubuntu/.ssh/identity type -1
debug1: identity file /home/ubuntu/.ssh/id_rsa type -1
debug1: identity file /home/ubuntu/.ssh/id_dsa type -1
debug1: Remote protocol version 2.0, remote software version OpenSSH_5.3p1 Debian-3ubuntu7
debug1: match: OpenSSH_5.3p1 Debian-3ubuntu7 pat OpenSSH*
debug1: Enabling compatibility mode for protocol 2.0
debug1: Local version string SSH-2.0-OpenSSH_5.3p1 Debian-3ubuntu7
debug1: SSH2_MSG_KEXINIT sent
debug1: SSH2_MSG_KEXINIT received
debug1: kex: server->client aes128-ctr hmac-md5 none
debug1: kex: client->server aes128-ctr hmac-md5 none
debug1: SSH2_MSG_KEX_DH_GEX_REQUEST(1024<1024<8192) sent
debug1: expecting SSH2_MSG_KEX_DH_GEX_GROUP
debug1: SSH2_MSG_KEX_DH_GEX_INIT sent
debug1: expecting SSH2_MSG_KEX_DH_GEX_REPLY
debug1: Host '184.73.234.234' is known and matches the RSA host key.
debug1: Found key in /home/ubuntu/.ssh/known_hosts:1
debug1: ssh_rsa_verify: signature correct
debug1: SSH2_MSG_NEWKEYS sent
debug1: expecting SSH2_MSG_NEWKEYS
debug1: SSH2_MSG_NEWKEYS received
debug1: SSH2_MSG_SERVICE_REQUEST sent
debug1: SSH2_MSG_SERVICE_ACCEPT received
debug1: Authentications that can continue: publickey
debug1: Next authentication method: publickey
debug1: Trying private key: /home/ubuntu/.ssh/identity
debug1: Trying private key: /home/ubuntu/.ssh/id_rsa
debug1: Trying private key: /home/ubuntu/.ssh/id_dsa
debug1: No more authentication methods to try.
Permission denied (publickey).
lost connection
Thanks
asked Jul 25, 2011 at 18:56

JohnJohn
911 gold badge1 silver badge4 bronze badges
2
Perhaps you’ve found a bug?
Another way of doing the same thing (wonder if this works for you?):
scp -oIdentityFile=/Users/emmie/Desktop/Blocks/blocks_key.pem ~/Desktop/Blocks/code/www/uploadtest.html ubuntu@ip.address:/var/www
Also, it might help (just curious) if you post the output of:
stat /Users/emmie/Desktop/Blocks/blocks_key.pem
answered Jul 25, 2011 at 19:59

loopforeverloopforever
1,1858 silver badges11 bronze badges
3
From your verbose output see this message.
Warning: Identity file /Desktop/Blocks/blocks_key.pem not accessible: No such file or directory.
Instead of using ~/, try providing the full path in your command line. Perhaps you are using a shell that doesn’t support the expansion of ~ to your home directory.
Not sure if that is your problem, but you will give a path to scp that will actually allow it to find the key on the filesystem, in order to use it.
answered Jul 25, 2011 at 19:37

ZoredacheZoredache
130k40 gold badges271 silver badges414 bronze badges
2
If you are using Amazon Web service all you need to do is to reconnect the ec2 by going back to putty and save the IP and the path, and load the ip. The terminal will open and let you connect to the ec2. it worked for me.
good luck
answered Mar 7, 2017 at 7:22

Make sure the permissions on /var/www are set correctly
(chmod 777 /var/www should work)
answered Aug 6, 2013 at 17:30

1