Axios Cheatsheet 🤘
На главную
Содержание
- Возможности
- Установка
- Примеры отправки GET и POST-запросов
- Пример отправки нескольких запросов
- Настройки запроса
- Схема ответа
- Настройки по умолчанию
- Перехватчики
- Обработка ошибок
- Отмена запроса
Возможности
- Отправка XMLHttpRequest из браузера
- Отправка http-запросов из node.js
- Поддержка Promise API
- Перехват запроса и ответа
- Преобразование данных запроса и ответа
- Отмена запроса
- Автоматическое преобразование данных в формате JSON
- Автоматическая защита от XSRF
Установка
yarn add axios
# или
npm i axios
Примеры отправки GET и POST-запросов
// GET-запрос
const getUserById = async (userId) => {
  try {
    const response = await axios.get(`/users?id=${userId}`)
    return response.data
  } catch (err) {
    console.error(err.toJSON())
  }
}
getUserById('1')

// POST-запрос
const addNewUser = async (newUser) => {
  try {
    const response = await axios.post('/users', newUser)
    return response.data
  } catch (err) {
    console.error(err.toJSON())
  }
}
addNewUser({ firstName: 'John', lastName: 'Smith' })
Пример отправки нескольких запросов
// Первый запрос
const getUserAccount = () => axios.get(`/user/123`)
// Второй запрос
const getUserPermissions = () => axios.get('/user/123/permissions')
// Отправка обоих запросов
const getUserInfo = async () => {
  const [account, permissions] = await Promise.all([getUserAccount(), getUserPermissions()])

  return {
    account,
    permissions
  }
}
Настройки запроса
{
  url: '/users',
  method: 'get', // default
  baseURL: 'http://example.com',
  // Преобразование запроса
  transfromRequest: [(data, headers) => {
    return data
  }],
  // Преобразование ответа
  transformResponse: [(data) => {
    return data
  }],
  headers: {
    'Authorization': 'Bearer [token]'
  },
  data: {
    firstName: 'John'
  },
  // Параметры строки запроса
  params: {
    id: '123'
  },
  withCredentials: false, // default
  responseType: 'json', // default
  responseEncoding: 'utf8', // default
  // Прогресс загрузки файлов
  onUploadProgress: (e) => {},
  // Прогресс скачивания файлов
  onDownloadProgress: (e) => {},
  // Максимальный размер ответа в байтах
  maxContentLength: 2048,
  // Максимальный размер запроса в байтах
  maxBodyLength: 2048,
  proxy: {
    protocol: 'https',
    host: '127.0.0.1',
    port: 5000,
    auth: {
      username: 'John',
      password: 'secret'
    }
  },
  // Токен для отмены запроса
  cancelToken: new CancelToken((cancel) => {})
}
Схема ответа
{
  data: {},
  status: 200,
  statusText: 'OK',
  headers: {},
  config: {},
  request: {}
}
Настройки по умолчанию
axios.defaults.baseURL = 'http://example.com'
// Дефолтные настройки общих заголовков
axios.defaults.headers.common['Authorization'] = TOKEN
// Дефолтные настройки для POST-запроса
axios.defaults.headers.post['Content-Type'] = 'application/x-www-form-urlencoded'
Перехватчики
Мы можем перехватывать запросы или ответы перед их обработкой в then или catch.
// Перехватчик запроса
axios.interceptors.request.use((config) => {
  return config
}, (error) => {
  return Promise.reject(error)
})

// Перехватчик ответа
axios.interceptors.response.use((response) => {
  return response
}, (error) => {
  return Promise.reject(error)
})
Обработка ошибок
const getUserById = (userId) => {
  try {
    const { data } = await axios.get(`/users?id=${userId}`)
    return data
  } catch (error) {
    if (error.response) {
      // Статус ответа выходит за пределы 2xx
      const { data, status, headers } = error.response
      console.error(data)
    } else if (error.request) {
      // Отсутствует тело ответа
      console.error(error.request)
    } else {
      // Ошибка, связанная с неправильной настройкой запроса
      console.error(error.message)
    }
    // Другая ошибка
    console.error(error.config)
    // Подробная информация об ошибке
    console.error(error.toJSON())
  }
}
Отмена запроса
const { CancelToken } = axios
const source = CancelToken.source()

const getUserById = (userId) => {
  try {
    const { data } = await axios.get(`/users?id=${userId}`)
    return data
  } catch (thrown) {
    if (axios.isCancel(thrown)) {
      console.error(thrown.message)
    } else {
      // Обработка ошибки
    }
  }
}

// Отмена запроса (параметр `message` является опциональным)
source.cancel('Выполнение операции отменено')
Introduction
Axios is a JavaScript library that uses the Promise API to create HTTP requests with http in Node.js runtime or XMLHttpRequests in the browser. Because these requests are promises, they work with the newer async/await syntax, as well as .then() functions for promise chaining and the .catch() mechanism for error handling.
try {
    let res = await axios.get('/my-api-route');

    // Work with the response...
} catch (err) {
    // Handle error
    console.log(err);
}
In this article, we will see how to handle errors with Axios, as this is very important when making any HTTP calls knowing fully well that there are times when the service you’re calling might not be available or return other unexpected errors. We’ll show the
.then()/.catch()method, but primarily use the async/await syntax.
Then and Catch
Promises can be handled in two ways using modern JS — the async/await syntax, which was shown above, as well as .then() and .catch() methods. Note that both of these methods can produce the same functionality, but async/await is typically regarded as being easier to work with and requires less boilerplate code in longer promise chains.
Here is how you’d achieve the same thing, but using the then/catch method:
axios.get('/my-api-route')
    .then(res => {
        // Work with the response...
    }).catch(err => {
        // Handle error
        console.log(err);
    });
Both the res and err objects are the same as with the async/await syntax.
Handling Errors
In this section, we will look at two primary categories of problems, as well as other issues that we may encounter and how to manage them using Axios. It is critical that you understand that this applies to all types of HTTP queries handled by Axios, including GET, POST, PATCH, and so on.
Here you can see the syntax for the three aspects — this will capture the error; it is crucial to note that this error carries a large error object with a lot of information:
try {
    let res = await axios.get('/my-api-route');

    // Work with the response...
} catch (err) {
    if (err.response) {
        // The client was given an error response (5xx, 4xx)
    } else if (err.request) {
        // The client never received a response, and the request was never left
    } else {
        // Anything else
    }
}
The differences in the error object, highlighted above in the catch code, indicate where the request encountered the issue. We’ll look deeper into this in the following sections.
error.response
This is the type of mistake we are most familiar with, and it is much easier to deal with. Many sites display a 404 Not Found page/error message or various response codes based on what the API provides; this is often handled via the response.
If your error object has a response property, it signifies your server returned a 4xx/5xx error. This will assist you choose what sort of message to return to users; the message you’ll want to provide for 4xx may differ from that for 5xx, and if your backend isn’t returning anything at all.
try {
    let res = await axios.get('/my-api-route');

    // Work with the response...
} catch (err) {
    if (err.response) {
        // The client was given an error response (5xx, 4xx)
        console.log(err.response.data);
        console.log(err.response.status);
        console.log(err.response.headers);
    } else if (err.request) {
        // The client never received a response, and the request was never left
    } else {
        // Anything else
    }
}
error.request
This error is most commonly caused by a bad/spotty network, a hanging backend that does not respond instantly to each request, unauthorized or cross-domain requests, and lastly if the backend API returns an error.
Note: This occurs when the browser was able to initiate a request but did not receive a valid answer for any reason.
try {
    let res = await axios.get('/my-api-route');

    // Work with the response...
} catch (err) {
    if (err.response) {
        // The client was given an error response (5xx, 4xx)
    } else if (err.request) {
        // The client never received a response, and the request was never left
        console.log(err.request);
    } else {
        // Anything else
    }
}
Earlier we mentioned that the underlying request Axios uses depends on the environment in which it’s being run. This is also the case for the err.request object. Here the err.request object is an instance of XMLHttpRequest when being executed in the browser, whereas it’s an instance of http.ClientRequest when being used in Node.js.
Other Errors
It’s possible that the error object does not have either a response or request object attached to it. In this case it is implied that there was an issue in setting up the request, which eventually triggered an error.
try {
    let res = await axios.get('/my-api-route');

    // Work with the response...
} catch (err) {
    if (err.response) {
        // The client was given an error response (5xx, 4xx)
    } else if (err.request) {
        // The client never received a response, and the request was never left
    } else {
        // Anything else
        console.log('Error', err.message);
    }
}
For example, this could be the case if you omit the URL parameter from the .get() call, and thus no request was ever made.
Conclusion
In this short article, we looked at how we may handle various sorts of failures and errors in Axios. This is also important for giving the correct message to your application/website visitors, rather than always returning a generic error message, sending a 404, or indicating network problems.
Note: If you want to see how to handle these in React, take a look at my new post on that here — handling async errors with axios in react.
Whenever you’re making a backend API call with axios, you have to consider what to do with the .catch() block of your promise. Now, you might think that your API is highly available and it’ll be running 24/7. You might think that the user workflow is pretty clear, your javascript is sane, and you have unit tests. So when you stare at the catch block when making requests using axios you might think — «Well… I’ll just console.log it. That’ll be fine.»
axios.get('/my-highly-available-api').then(response => {
    // do stuff
})
.catch(err => {
    // what now?
    console.log(err);
})
But there are so many many many more things that are outside of your control that could throw errors when making API requests. And you probably don’t even know that they’re happening!
This post deals mainly with errors you see in the browser. Things can get pretty funny looking on the back end too — just take a look at 3 things you might see in your backend logs
Below are 3 types of errors that could appear, and how to handle it, when using axios.
Catching axios errors
Below is a snippet I’ve started including in a few JS projects.
axios.post(url, data).then(res => {
        // do good things
})
.catch(err => {
    if (err.response) {
      // client received an error response (5xx, 4xx)
    } else if (err.request) {
      // client never received a response, or request never left
    } else {
      // anything else
    }
})
Each condition is meant to capture a different type of error.
Checking error.response
If your error object contains a response field, that means your server responded with a 4xx/5xx error. Usually this is the error we’re most familiar with, and is most straightforward to handle.
Do things like a show a 404 Not Found page/error message if your API returns a 404. Show a different error message if your backend is returning a 5xx or not returning anything at all. You might think your well-architected backend won’t throw errors — but its a matter of when, not if.
Checking error.request
The second class of errors is where you don’t have a response but there’s a request field attached to the error. When does this happen? This happens when the browser was able to make a request, but for some reason, it didn’t see a response.
This can happen if:
- you’re in a spotty network (think underground subway, or a building wireless network)
- if your backend is hanging on each request and not returning a response on time
- if you are making cross-domain requests and you’re not authorized to make the request
- if you’re making cross-domain requests and you are authorized, but the backend API returns an error
One of the more common versions of this error had a message «Network Error» which is a useless error message. We have a front-end and a backend api hosted on different domains, so every backend API call is a cross-domain request.
Due to security constraints on JS in the browser, if you make an API request, and it fails due to crappy networks, the only error you’ll see is «Network Error» which is incredibly unhelpful. It can mean anything from «your device doesn’t have internet connectivity» to «your OPTIONS returned a 5xx» (if you make CORS requests). The reason for «Network Error» is described well here on this StackOverflow answer
All the other types of errors
If your error object doesn’t have the response or request field on it, that means its not an axios error and theres likely something else wrong in your app. The error message + stack trace should help you figure out where its coming from.
How do you fix it?
Degrading the user experience
This all depends on your app. For the projects I work on, for each of the features that use those endpoints, we degrade the user experience.
For example, if the request fails, and the page is useless without that data, then we have a bigger error page that will appear and offer users a way out — which sometimes is only a «Refresh the page» button.
Another example, if a request fails for a profile picture in a social media stream, we can show a placeholder image and disable profile picture changes, along with a toaster message explaining why the «update profile picture» button is disabled. However, showing an alert saying «422 Unprocessable Entity» is useless to see as a user.
Spotty networks
The web client I work on is used in school networks which can be absolutely terrible. The availability of your backend barely has anything to do with it, the request sometimes fail to leave the school network.
To solve these types of intermittent network problems, we added in axios-retry. This solved a good amount of the errors we were seeing in production. We added this to our axios setup:
const _axios = require('axios')
const axiosRetry = require('axios-retry')

const axios = _axios.create()

// https://github.com/softonic/axios-retry/issues/87
const retryDelay = (retryNumber = 0) => {
    const seconds = Math.pow(2, retryNumber) * 1000;
    const randomMs = 1000 * Math.random();
    return seconds + randomMs;
};

axiosRetry(axios, {
    retries: 2,
    retryDelay,
    // retry on Network Error & 5xx responses
    retryCondition: axiosRetry.isRetryableError,
});

module.exports = axios;
We were able to see that 10% of our users (which are in crappy school networks) were seeing sporadic «Network Errors» and that dropped down to <2% after adding in automatic retries on failure.

^ This is a screenshot of our errors is the count of «Network Errors» as they appear in NewRelic and are showing <1% of requests are erroring out.
Which leads to my last point:
Add error reporting to your front-end
Its helpful to have front-end error/event reporting so that you know whats happening in prod before your users tell you. At my day job, we use NewRelic Browser (paid service — no affiliation, just a fan) to send error events from the front-end. So whenever we catch an exception, we log the error message, along with the stack trace (although thats sometimes useless with minified bundles), and some metadata about the current session so we can try to recreate it.
Other tools that fill this space are Sentry + browser SDK, Rollbar, and a whole bunch of other useful ones listed here
Wrapping up
If you get nothing else out of this, do one thing.
Go to your code base now, and review how you’re handling errors with axios.
- Check if you’re doing automatic retries, and consider adding
axios-retryif you aren’t - Check that you’re catching errors, and letting the user know that something has happened.
axios.get(...).catch(console.log)isn’t good enough.
So. How do you handle your errors? Let me know in the comments.
Introduction
I really love the problem/solution. approach. We see some problem, and then, a really nice solution. But for this talking, i think we need some introduction as well.
When you develop an web application, you generally want’s to separate the frontend and backend. Fo that, you need something that makes the communication between these guys.
To illustrate, you can build a frontend (commonly named as GUI or user interface) using vanilla HTML, CSS and Javascript, or, frequently, using several frameworks like Vue, React and so many more avaliable online. I marked Vue because it’s my personal preference.
Why? I really don’t study the others so deeply that i can’t assure to you that Vue is the best, but i liked the way he works, the syntax, and so on. It’s like your crush, it’s a personal choice.
But, beside that, any framework you use, you will face the same problem:_ How to communicate with you backend_ (that can be written in so many languages, that i will not dare mention some. My current crush? Python an Flask).
One solution is to use AJAX (What is AJAX? Asynchronous JavaScript And XML). You can use XMLHttpRequest directly, to make requests to backend and get the data you need, but the downside is that the code is verbose. You can use Fetch API that will make an abstraction on top of XMLHttpRequest, with a powerfull set of tools. Other great change is that Fetch API will use Promises, avoiding the callbacks from XMLHttpRequest (preventing the callback hell).
Alternatively, we have a awesome library named Axios, that have a nice API (for curiosity purposes, under the hood, uses XMLHttpRequest, giving a very wide browser support). The Axios API wraps the XMLHttpRequest into Promises, different from Fetch API. Beside that, nowadays Fetch API is well supported by the browsers engines available, and have polyfills for older browsers. I will not discuss which one is better because i really think is personal preference, like any other library or framework around. If you dont’t have an opinion, i suggest that you seek some comparisons and dive deep articles. Has a nice article that i will mention to you written by Faraz Kelhini.
My personal choice is Axios because have a nice API, has Response timeout, automatic JSON transformation, and Interceptors (we will use them in the proposal solution), and so much more. Nothing that cannot be accomplished by Fetch API, but has another approach.
The Problem
Talking about Axios, a simple GET HTTP request can be made with these lines of code:
import axios from 'axios'

//here we have an generic interface with basic structure of a api response:
interface HttpResponse<T> {
  data: T[]
}

// the user interface, that represents a user in the system
interface User {
  id: number
  email: string
  name: string
}

//the http call to Axios
axios.get<HttpResponse<User>>('/users').then((response) => {
  const userList = response.data
  console.log(userList)
})
Enter fullscreen mode
Exit fullscreen mode
We’ve used Typescript (interfaces, and generics), ES6 Modules, Promises, Axios and Arrow Functions. We will not touch them deeply, and will presume that you already know about them.
So, in the above code, if everything goes well, aka: the server is online, the network is working perfectly, so on, when you run this code you will see the list of users on console. The real life isn’t always perfect.
We, developers, have a mission:
Make the life of users simple!
So, when something is go bad, we need to use all the efforts in ours hands to resolve the problem ourselves, without the user even notice, and, when nothing more can be done, we have the obligation to show them a really nice message explaining what goes wrong, to easy theirs souls.
Axios like Fetch API uses Promises to handle asynchronous calls and avoid the callbacks that we mention before. Promises are a really nice API and not to difficult to understand. We can chain actions (then) and error handlers (catch) one after another, and the API will call them in order. If an Error occurs in the Promise, the nearest catch is found and executed.
So, the code above with basic error handler will become:
import axios from 'axios'

//..here go the types, equal above sample.

//here we call axios and passes generic get with HttpResponse<User>.
axios
  .get<HttpResponse<User>>('/users')
  .then((response) => {
    const userList = response.data
    console.log(userList)
  })
  .catch((error) => {
    //try to fix the error or
    //notify the users about somenthing went wrong
    console.log(error.message)
  })
Enter fullscreen mode
Exit fullscreen mode
Ok, and what is the problem then? Well, we have a hundred errors that, in every API call, the solution/message is the same. For curiosity, Axios show us a little list of them: ERR_FR_TOO_MANY_REDIRECTS, ERR_BAD_OPTION_VALUE, ERR_BAD_OPTION, ERR_NETWORK, ERR_DEPRECATED, ERR_BAD_RESPONSE, ERR_BAD_REQUEST, ERR_CANCELED, ECONNABORTED, ETIMEDOUT. We have the HTTP Status Codes, where we found so many errors, like 404 (Page Not Found), and so on. You get the picture. We have too much common errors to elegantly handle in every API request.
The very ugly solution
One very ugly solution that we can think of, is to write one big ass function that we increment every new error we found. Besides the ugliness of this approach, it will work, if you and your team remember to call the function in every API request.
function httpErrorHandler(error) {
  if (error === null) throw new Error('Unrecoverable error!! Error is null!')
  if (axios.isAxiosError(error)) {
    //here we have a type guard check, error inside this if will be treated as AxiosError
    const response = error?.response
    const request = error?.request
    const config = error?.config //here we have access the config used to make the api call (we can make a retry using this conf)

    if (error.code === 'ERR_NETWORK') {
      console.log('connection problems..')
    } else if (error.code === 'ERR_CANCELED') {
      console.log('connection canceled..')
    }
    if (response) {
      //The request was made and the server responded with a status code that falls out of the range of 2xx the http status code mentioned above
      const statusCode = response?.status
      if (statusCode === 404) {
        console.log('The requested resource does not exist or has been deleted')
      } else if (statusCode === 401) {
        console.log('Please login to access this resource')
        //redirect user to login
      }
    } else if (request) {
      //The request was made but no response was received, `error.request` is an instance of XMLHttpRequest in the browser and an instance of http.ClientRequest in Node.js
    }
  }
  //Something happened in setting up the request and triggered an Error
  console.log(error.message)
}
Enter fullscreen mode
Exit fullscreen mode
With our magical badass function in place, we can use it like that:
import axios from 'axios'

axios
  .get('/users')
  .then((response) => {
    const userList = response.data
    console.log(userList)
  })
  .catch(httpErrorHandler)
Enter fullscreen mode
Exit fullscreen mode
We have to remember to add this catch in every API call, and, for every new error that we can graciously handle, we need to increase our nasty httpErrorHandler with some more code and ugly if's.
Other problem we have with this approach, besides ugliness and lack of mantenability, is that, if in one, only single one API call, i desire to handle different from global approach, i cannot do.
The function will grow exponentially as the problems that came together. This solution will not scale right!
The elegant and recommended solution
When we work as a team, to make them remember the slickness of every piece of software is hard, very hard. Team members, come and go, and i do not know any documentation good enough to surpass this issue.
In other hand, if the code itself can handle these problems on a generic way, do-it! The developers cannot make mistakes if they need do nothing!
Before we jump into code (that is what we expect from this article), i have the need to speak some stuff to you understand what the codes do.
Axios allow we to use something called Interceptors that will be executed in every request you make. It’s a awesome way of checking permission, add some header that need to be present, like a token, and preprocess responses, reducing the amount of boilerplate code.
We have two types of Interceptors. Before (request) and After (response) an AJAX Call.
It’s use is simple as that:
//Intercept before request is made, usually used to add some header, like an auth
const axiosDefaults = {}
const http = axios.create(axiosDefaults)
//register interceptor like this
http.interceptors.request.use(
  function (config) {
    // Do something before request is sent
    const token = window.localStorage.getItem('token') //do not store token on localstorage!!!
    config.headers.Authorization = token
    return config
  },
  function (error) {
    // Do something with request error
    return Promise.reject(error)
  }
)
Enter fullscreen mode
Exit fullscreen mode
But, in this article, we will use the response interceptor, because is where we want to deal with errors. Nothing stops you to extend the solution to handle request errors as well.
An simple use of response interceptor, is to call ours big ugly function to handle all sort of errors.
As every form of automatic handler, we need a way to bypass this (disable), when we want. We are gonna extend the AxiosRequestConfig interface and add two optional options raw and silent. If raw is set to true, we are gonna do nothing. silent is there to mute notifications that we show when dealing with global errors.
declare module 'axios' {
  export interface AxiosRequestConfig {
    raw?: boolean
    silent?: boolean
  }
}
Enter fullscreen mode
Exit fullscreen mode
Next step is to create a Error class that we will throw every time we want to inform the error handler to assume the problem.
export class HttpError extends Error {
  constructor(message?: string) {
    super(message) // 'Error' breaks prototype chain here
    this.name = 'HttpError'
    Object.setPrototypeOf(this, new.target.prototype) // restore prototype chain
  }
}
Enter fullscreen mode
Exit fullscreen mode
Now, let’s write the interceptors:
// this interceptor is used to handle all success ajax request
// we use this to check if status code is 200 (success), if not, we throw an HttpError
// to our error handler take place.
function responseHandler(response: AxiosResponse<any>) {
  const config = response?.config
  if (config.raw) {
    return response
  }
  if (response.status == 200) {
    const data = response?.data
    if (!data) {
      throw new HttpError('API Error. No data!')
    }
    return data
  }
  throw new HttpError('API Error! Invalid status code!')
}

function responseErrorHandler(response) {
  const config = response?.config
  if (config.raw) {
    return response
  }
  // the code of this function was written in above section.
  return httpErrorHandler(response)
}

//Intercept after response, usually to deal with result data or handle ajax call errors
const axiosDefaults = {}
const http = axios.create(axiosDefaults)
//register interceptor like this
http.interceptors.response.use(responseHandler, responseErrorHandler)
Enter fullscreen mode
Exit fullscreen mode
Well, we do not need to remember our magical badass function in every ajax call we made. And, we can disable when we want, just passing raw to request config.
import axios from 'axios'

// automagically handle error
axios
  .get('/users')
  .then((response) => {
    const userList = response.data
    console.log(userList)
  })
  //.catch(httpErrorHandler) this is not needed anymore

// to disable this automatic error handler, pass raw
axios
  .get('/users', {raw: true})
  .then((response) => {
    const userList = response.data
    console.log(userList)
  }).catch(() {
    console.log("Manually handle error")
  })
Enter fullscreen mode
Exit fullscreen mode
Ok, this is a nice solution, but, this bad-ass ugly function will grow so much, that we cannot see the end. The function will become so big, that anyone will want to maintain.
Can we improve more? Oh yeahhh.
The IMPROVED and elegant solution
We are gonna develop an Registry class, using Registry Design Pattern. The class will allow you to register error handling by an key (we will deep dive in this in a moment) and a action, that can be an string (message), an object (that can do some nasty things) or an function, that will be executed when the error matches the key. The registry will have parent that can be placed to allow you override keys to custom handle scenarios.
Here are some types that we will use througth the code:
// this interface is the default response data from ours api
interface HttpData {
  code: string
  description?: string
  status: number
}

// this is all errrors allowed to receive
type THttpError = Error | AxiosError | null

// object that can be passed to our registy
interface ErrorHandlerObject {
  after?(error?: THttpError, options?: ErrorHandlerObject): void
  before?(error?: THttpError, options?: ErrorHandlerObject): void
  message?: string
  notify?: QNotifyOptions
}

//signature of error function that can be passed to ours registry
type ErrorHandlerFunction = (error?: THttpError) => ErrorHandlerObject | boolean | undefined

//type that our registry accepts
type ErrorHandler = ErrorHandlerFunction | ErrorHandlerObject | string

//interface for register many handlers once (object where key will be presented as search key for error handling
interface ErrorHandlerMany {
  [key: string]: ErrorHandler
}

// type guard to identify that is an ErrorHandlerObject
function isErrorHandlerObject(value: any): value is ErrorHandlerObject {
  if (typeof value === 'object') {
    return ['message', 'after', 'before', 'notify'].some((k) => k in value)
  }
  return false
}
Enter fullscreen mode
Exit fullscreen mode
So, with types done, let’s see the class implementation. We are gonna use an Map to store object/keys and a parent, that we will seek if the key is not found in the current class. If parent is null, the search will end. On construction, we can pass an parent,and optionally, an instance of ErrorHandlerMany, to register some handlers.
class ErrorHandlerRegistry {
  private handlers = new Map<string, ErrorHandler>()

  private parent: ErrorHandlerRegistry | null = null

  constructor(parent: ErrorHandlerRegistry = undefined, input?: ErrorHandlerMany) {
    if (typeof parent !== 'undefined') this.parent = parent
    if (typeof input !== 'undefined') this.registerMany(input)
  }

  // allow to register an handler
  register(key: string, handler: ErrorHandler) {
    this.handlers.set(key, handler)
    return this
  }

  // unregister a handler
  unregister(key: string) {
    this.handlers.delete(key)
    return this
  }

  // search a valid handler by key
  find(seek: string): ErrorHandler | undefined {
    const handler = this.handlers.get(seek)
    if (handler) return handler
    return this.parent?.find(seek)
  }

  // pass an object and register all keys/value pairs as handler.
  registerMany(input: ErrorHandlerMany) {
    for (const [key, value] of Object.entries(input)) {
      this.register(key, value)
    }
    return this
  }

  // handle error seeking for key
  handleError(
    this: ErrorHandlerRegistry,
    seek: (string | undefined)[] | string,
    error: THttpError
  ): boolean {
    if (Array.isArray(seek)) {
      return seek.some((key) => {
        if (key !== undefined) return this.handleError(String(key), error)
      })
    }
    const handler = this.find(String(seek))
    if (!handler) {
      return false
    } else if (typeof handler === 'string') {
      return this.handleErrorObject(error, { message: handler })
    } else if (typeof handler === 'function') {
      const result = handler(error)
      if (isErrorHandlerObject(result)) return this.handleErrorObject(error, result)
      return !!result
    } else if (isErrorHandlerObject(handler)) {
      return this.handleErrorObject(error, handler)
    }
    return false
  }

  // if the error is an ErrorHandlerObject, handle here
  handleErrorObject(error: THttpError, options: ErrorHandlerObject = {}) {
    options?.before?.(error, options)
    showToastError(options.message ?? 'Unknown Error!!', options, 'error')
    return true
  }

  // this is the function that will be registered in interceptor.
  resposeErrorHandler(this: ErrorHandlerRegistry, error: THttpError, direct?: boolean) {
    if (error === null) throw new Error('Unrecoverrable error!! Error is null!')
    if (axios.isAxiosError(error)) {
      const response = error?.response
      const config = error?.config
      const data = response?.data as HttpData
      if (!direct && config?.raw) throw error
      const seekers = [
        data?.code,
        error.code,
        error?.name,
        String(data?.status),
        String(response?.status),
      ]
      const result = this.handleError(seekers, error)
      if (!result) {
        if (data?.code && data?.description) {
          return this.handleErrorObject(error, {
            message: data?.description,
          })
        }
      }
    } else if (error instanceof Error) {
      return this.handleError(error.name, error)
    }
    //if nothings works, throw away
    throw error
  }
}
// create ours globalHandlers object
const globalHandlers = new ErrorHandlerRegistry()
Enter fullscreen mode
Exit fullscreen mode
Let’s deep dive the resposeErrorHandler code. We choose to use key as an identifier to select the best handler for error. When you look at the code, you see that has an order that key will be searched in the registry. The rule is, search for the most specific to the most generic.
const seekers = [
  data?.code, //Our api can send an error code to you personalize the error messsage.
  error.code, //The AxiosError has an error code too (ERR_BAD_REQUEST is one).
  error?.name, //Error has a name (class name). Example: HttpError, etc..
  String(data?.status), //Our api can send an status code as well.
  String(response?.status), //respose status code. Both based on Http Status codes.
]
Enter fullscreen mode
Exit fullscreen mode
This is an example of an error sent by API:
{
  "code": "email_required",
  "description": "An e-mail is required",
  "error": true,
  "errors": [],
  "status": 400
}
Enter fullscreen mode
Exit fullscreen mode
Other example, as well:
{
  "code": "no_input_data",
  "description": "You doesnt fill input fields!",
  "error": true,
  "errors": [],
  "status": 400
}
Enter fullscreen mode
Exit fullscreen mode
So, as an example, we can now register ours generic error handling:
globalHandlers.registerMany({
  //this key is sent by api when login is required
  login_required: {
    message: 'Login required!',
    //the after function will be called when the message hides.
    after: () => console.log('redirect user to /login'),
  },
  no_input_data: 'You must fill form values here!',
  //this key is sent by api on login error.
  invalid_login: {
    message: 'Invalid credentials!',
  },
  '404': { message: 'API Page Not Found!' },
  ERR_FR_TOO_MANY_REDIRECTS: 'Too many redirects.',
})

// you can registre only one:
globalHandlers.register('HttpError', (error) => {
  //send email to developer that api return an 500 server internal console.error
  return { message: 'Internal server errror! We already notify developers!' }
  //when we return an valid ErrorHandlerObject, will be processed as whell.
  //this allow we to perform custom behavior like sending email and default one,
  //like showing an message to user.
})
Enter fullscreen mode
Exit fullscreen mode
We can register error handler in any place we like, group the most generic in one typescript file, and specific ones inline. You choose. But, to this work, we need to attach to ours http axios instance. This is done like this:
function createHttpInstance() {
  const instance = axios.create({})
  const responseError = (error: any) => globalHandlers.resposeErrorHandler(error)
  instance.interceptors.response.use(responseHandler, responseError)
  return instance
}

export const http: AxiosInstance = createHttpInstance()
Enter fullscreen mode
Exit fullscreen mode
Now, we can make ajax requests, and the error handler will work as expected:
import http from '/src/modules/http'

// automagically handle error
http.get('/path/that/dont/exist').then((response) => {
  const userList = response.data
  console.log(userList)
})
Enter fullscreen mode
Exit fullscreen mode
The code above will show a Notify ballon on the user screen, because will fire the 404 error status code, that we registered before.
Customize for one http call
The solution doesn’t end here. Let’s assume that, in one, only one http request, you want to handle 404 differently, but just 404. For that, we create the dealsWith function below:
export function dealWith(solutions: ErrorHandlerMany, ignoreGlobal?: boolean) {
  let global
  if (ignoreGlobal === false) global = globalHandlers
  const localHandlers = new ErrorHandlerRegistry(global, solutions)
  return (error: any) => localHandlers.resposeErrorHandler(error, true)
}
Enter fullscreen mode
Exit fullscreen mode
This function uses the ErrorHandlerRegistry parent to personalize one key, but for all others, use the global handlers (if you wanted that, ignoreGlobal is there to force not).
So, we can write code like this:
import http from '/src/modules/http'

// this call will show the message 'API Page Not Found!'
http.get('/path/that/dont/exist')

// this will show custom message: 'Custom 404 handler for this call only'
// the raw is necessary because we need to turn off the global handler.
http.get('/path/that/dont/exist', { raw: true }).catch(
  dealsWith({
    404: { message: 'Custom 404 handler for this call only' },
  })
)

// we can turn off global, and handle ourselves
// if is not the error we want, let the global error take place.
http
  .get('/path/that/dont/exist', { raw: true })
  .catch((e) => {
    //custom code handling
    if (e.name == 'CustomErrorClass') {
      console.log('go to somewhere')
    } else {
      throw e
    }
  })
  .catch(
    dealsWith({
      404: { message: 'Custom 404 handler for this call only' },
    })
  )
Enter fullscreen mode
Exit fullscreen mode
The Final Thoughts
All this explanation is nice, but code, ah, the code, is so much better. So, i’ve created an github repository with all code from this article organized to you try out, improve and customize.
- Click here to access the repo in github.
FOOTNOTES:
- This post became so much bigger than a first realize, but i love to share my thoughts.
- If you have some improvement to the code, please let me know in the comments.
- If you see something wrong, please, fix-me!

In this guide, you will see exactly how to use Axios.js with React using tons of real-world examples featuring React hooks.
You’ll see why you should use Axios as a data fetching library, how to set it up with React, and perform every type of HTTP request with it.
Then we’ll touch on more advanced features like creating an Axios instance for reusability, using async-await with Axios for simplicity, and how to use Axios as a custom hook.
Let’s dive right in!
Want Your Own Copy? 📄
Click here to download the cheatsheet in PDF format (it takes 5 seconds).
It includes all of the essential information here as a convenient PDF guide.
Table of Contents
- What is Axios?
- Why Use Axios in React?
- How to Set Up Axios with React
- How to Make a GET Request (Retrieve Data)
- How to Make a POST Request (Create Data)
- How to Make a PUT Request (Update Data)
- How to Make a DELETE Request (Delete Data)
- How to Handle Errors with Axios
- How to Create an Axios Instance
- How to Use the Async-Await Syntax with Axios
- How to Create a Custom
useAxiosHook
What is Axios?
Axios is an HTTP client library that allows you to make requests to a given endpoint:
This could be an external API or your own backend Node.js server, for example.
By making a request, you expect your API to perform an operation according to the request you made.
For example, if you make a GET request, you expect to get back data to display in your application.
Why Use Axios in React
There are a number of different libraries you can use to make these requests, so why choose Axios?
Here are five reasons why you should use Axios as your client to make HTTP requests:
- It has good defaults to work with JSON data. Unlike alternatives such as the Fetch API, you often don’t need to set your headers. Or perform tedious tasks like converting your request body to a JSON string.
- Axios has function names that match any HTTP methods. To perform a GET request, you use the
.get()method. - Axios does more with less code. Unlike the Fetch API, you only need one
.then()callback to access your requested JSON data. - Axios has better error handling. Axios throws 400 and 500 range errors for you. Unlike the Fetch API, where you have to check the status code and throw the error yourself.
- Axios can be used on the server as well as the client. If you are writing a Node.js application, be aware that Axios can also be used in an environment separate from the browser.
Using Axios with React is a very simple process. You need three things:
- An existing React project
- To install Axios with npm/yarn
- An API endpoint for making requests
The quickest way to create a new React application is by going to react.new.
If you have an existing React project, you just need to install Axios with npm (or any other package manager):
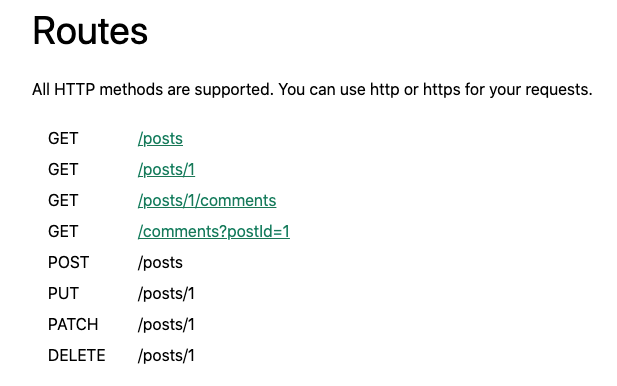
npm install axiosIn this guide, you’ll use the JSON Placeholder API to get and change post data.
Here is a list of all the different routes you can make requests to, along with the appropriate HTTP method for each:
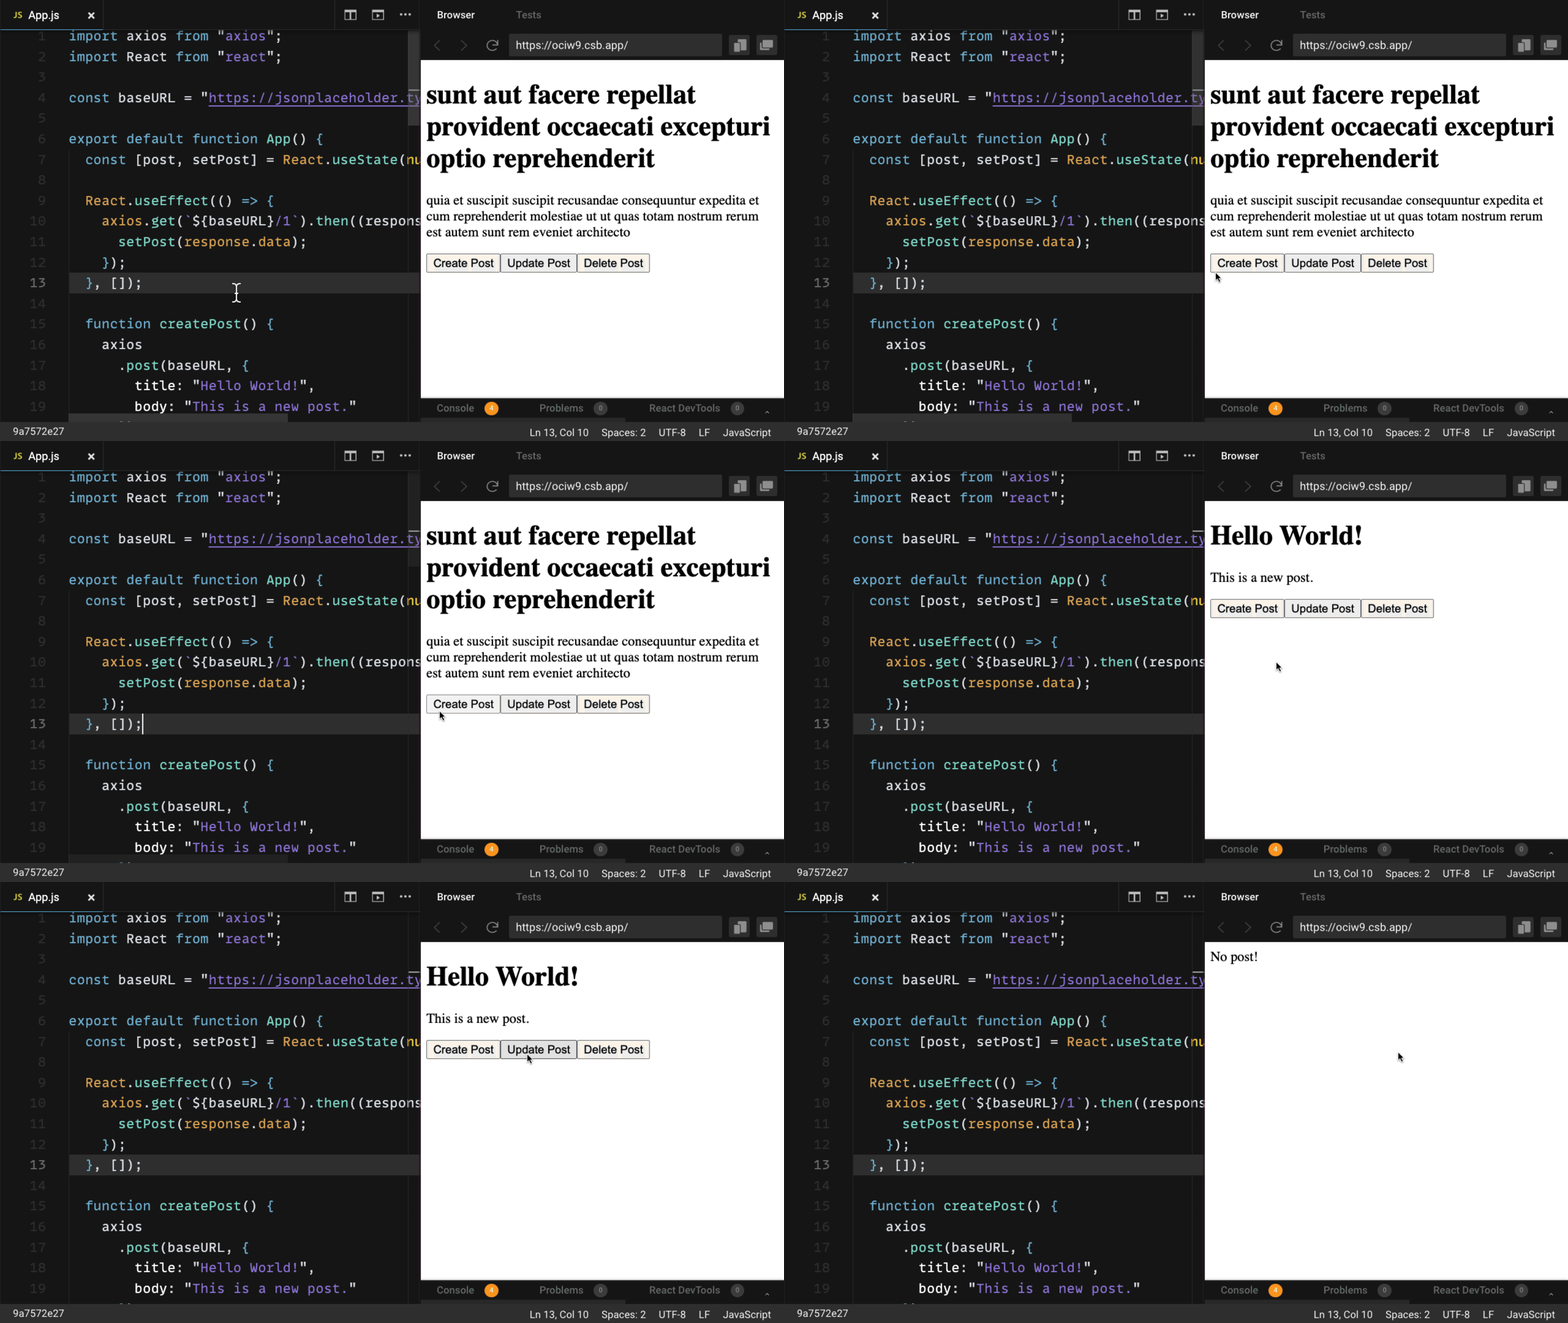
Here is a quick example of all of the operations you’ll be performing with Axios and your API endpoint — retrieving, creating, updating, and deleting posts:
How to Make a GET Request
To fetch data or retrieve it, make a GET request.
First, you’re going to make a request for individual posts. If you look at the endpoint, you are getting the first post from the /posts endpoint:
import axios from "axios";
import React from "react";

const baseURL = "https://jsonplaceholder.typicode.com/posts/1";

export default function App() {
  const [post, setPost] = React.useState(null);

  React.useEffect(() => {
    axios.get(baseURL).then((response) => {
      setPost(response.data);
    });
  }, []);

  if (!post) return null;

  return (
    <div>
      <h1>{post.title}</h1>
      <p>{post.body}</p>
    </div>
  );
}
To perform this request when the component mounts, you use the useEffect hook. This involves importing Axios, using the .get() method to make a GET request to your endpoint, and using a .then() callback to get back all of the response data.
The response is returned as an object. The data (which is in this case a post with id, title, and body properties) is put in a piece of state called post which is displayed in the component.
Note that you can always find the requested data from the .data property in the response.
How to Make a POST Request
To create new data, make a POST request.
According to the API, this needs to be performed on the /posts endpoint. If you look at the code below, you’ll see that there’s a button to create a post:
import axios from "axios";
import React from "react";

const baseURL = "https://jsonplaceholder.typicode.com/posts";

export default function App() {
  const [post, setPost] = React.useState(null);

  React.useEffect(() => {
    axios.get(`${baseURL}/1`).then((response) => {
      setPost(response.data);
    });
  }, []);

  function createPost() {
    axios
      .post(baseURL, {
        title: "Hello World!",
        body: "This is a new post."
      })
      .then((response) => {
        setPost(response.data);
      });
  }

  if (!post) return "No post!"

  return (
    <div>
      <h1>{post.title}</h1>
      <p>{post.body}</p>
      <button onClick={createPost}>Create Post</button>
    </div>
  );
}
When you click on the button, it calls the createPost function.
To make that POST request with Axios, you use the .post() method. As the second argument, you include an object property that specifies what you want the new post to be.
Once again, use a .then() callback to get back the response data and replace the first post you got with the new post you requested.
This is very similar to the .get() method, but the new resource you want to create is provided as the second argument after the API endpoint.
How to Make a PUT Request
To update a given resource, make a PUT request.
In this case, you’ll update the first post.
To do so, you’ll once again create a button. But this time, the button will call a function to update a post:
import axios from "axios";
import React from "react";

const baseURL = "https://jsonplaceholder.typicode.com/posts";

export default function App() {
  const [post, setPost] = React.useState(null);

  React.useEffect(() => {
    axios.get(`${baseURL}/1`).then((response) => {
      setPost(response.data);
    });
  }, []);

  function updatePost() {
    axios
      .put(`${baseURL}/1`, {
        title: "Hello World!",
        body: "This is an updated post."
      })
      .then((response) => {
        setPost(response.data);
      });
  }

  if (!post) return "No post!"

  return (
    <div>
      <h1>{post.title}</h1>
      <p>{post.body}</p>
      <button onClick={updatePost}>Update Post</button>
    </div>
  );
}
In the code above, you use the PUT method from Axios. And like with the POST method, you include the properties that you want to be in the updated resource.
Again, using the .then() callback, you update the JSX with the data that is returned.
How to Make a DELETE Request
Finally, to delete a resource, use the DELETE method.
As an example, we’ll delete the first post.
Note that you do not need a second argument whatsoever to perform this request:
import axios from "axios";
import React from "react";

const baseURL = "https://jsonplaceholder.typicode.com/posts";

export default function App() {
  const [post, setPost] = React.useState(null);

  React.useEffect(() => {
    axios.get(`${baseURL}/1`).then((response) => {
      setPost(response.data);
    });
  }, []);

  function deletePost() {
    axios
      .delete(`${baseURL}/1`)
      .then(() => {
        alert("Post deleted!");
        setPost(null)
      });
  }

  if (!post) return "No post!"

  return (
    <div>
      <h1>{post.title}</h1>
      <p>{post.body}</p>
      <button onClick={deletePost}>Delete Post</button>
    </div>
  );
}
In most cases, you do not need the data that’s returned from the .delete() method.
But in the code above, the .then() callback is still used to ensure that your request is successfully resolved.
In the code above, after a post is deleted, the user is alerted that it was deleted successfully. Then, the post data is cleared out of the state by setting it to its initial value of null.
Also, once a post is deleted, the text «No post» is shown immediately after the alert message.
How to Handle Errors with Axios
What about handling errors with Axios?
What if there’s an error while making a request? For example, you might pass along the wrong data, make a request to the wrong endpoint, or have a network error.
To simulate an error, you’ll send a request to an API endpoint that doesn’t exist: /posts/asdf.
This request will return a 404 status code:
import axios from "axios";
import React from "react";

const baseURL = "https://jsonplaceholder.typicode.com/posts";

export default function App() {
  const [post, setPost] = React.useState(null);
  const [error, setError] = React.useState(null);

  React.useEffect(() => {
    // invalid url will trigger an 404 error
    axios.get(`${baseURL}/asdf`).then((response) => {
      setPost(response.data);
    }).catch(error => {
      setError(error);
    });
  }, []);

  if (error) return `Error: ${error.message}`;
  if (!post) return "No post!"

  return (
    <div>
      <h1>{post.title}</h1>
      <p>{post.body}</p>
    </div>
  );
}
In this case, instead of executing the .then() callback, Axios will throw an error and run the .catch() callback function.
In this function, we are taking the error data and putting it in state to alert our user about the error. So if we have an error, we will display that error message.
In this function, the error data is put in state and used to alert users about the error. So if there’s an error, an error message is displayed.
When you run this code code, you’ll see the text, «Error: Request failed with status code 404».
How to Create an Axios Instance
If you look at the previous examples, you’ll see that there’s a baseURL that you use as part of the endpoint for Axios to perform these requests.
However, it gets a bit tedious to keep writing that baseURL for every single request. Couldn’t you just have Axios remember what baseURL you’re using, since it always involves a similar endpoint?
In fact, you can. If you create an instance with the .create() method, Axios will remember that baseURL, plus other values you might want to specify for every request, including headers:
import axios from "axios";
import React from "react";

const client = axios.create({
  baseURL: "https://jsonplaceholder.typicode.com/posts"
});

export default function App() {
  const [post, setPost] = React.useState(null);

  React.useEffect(() => {
    client.get("/1").then((response) => {
      setPost(response.data);
    });
  }, []);

  function deletePost() {
    client
      .delete("/1")
      .then(() => {
        alert("Post deleted!");
        setPost(null)
      });
  }

  if (!post) return "No post!"

  return (
    <div>
      <h1>{post.title}</h1>
      <p>{post.body}</p>
      <button onClick={deletePost}>Delete Post</button>
    </div>
  );
}
The one property in the config object above is baseURL, to which you pass the endpoint.
The .create() function returns a newly created instance, which in this case is called client.
Then in the future, you can use all the same methods as you did before, but you don’t have to include the baseURL as the first argument anymore. You just have to reference the specific route you want, for example, /, /1, and so on.
How to Use the Async-Await Syntax with Axios
A big benefit to using promises in JavaScript (including React applications) is the async-await syntax.
Async-await allows you to write much cleaner code without then and catch callback functions. Plus, code with async-await looks a lot like synchronous code, and is easier to understand.
But how do you use the async-await syntax with Axios?
In the example below, posts are fetched and there’s still a button to delete that post:
import axios from "axios";
import React from "react";

const client = axios.create({
  baseURL: "https://jsonplaceholder.typicode.com/posts"
});

export default function App() {
  const [post, setPost] = React.useState(null);

  React.useEffect(() => {
    async function getPost() {
      const response = await client.get("/1");
      setPost(response.data);
    }
    getPost();
  }, []);

  async function deletePost() {
    await client.delete("/1");
    alert("Post deleted!");
    setPost(null);
  }

  if (!post) return "No post!"

  return (
    <div>
      <h1>{post.title}</h1>
      <p>{post.body}</p>
      <button onClick={deletePost}>Delete Post</button>
    </div>
  );
}
However in useEffect, there’s an async function called getPost.
Making it async allows you to use the await keword to resolve the GET request and set that data in state on the next line without the .then() callback.
Note that the getPost function is called immediately after being created.
Additionally, the deletePost function is now async, which is a requirement to use the await keyword which resolves the promise it returns (every Axios method returns a promise to resolve).
After using the await keyword with the DELETE request, the user is alerted that the post was deleted, and the post is set to null.
As you can see, async-await cleans up the code a great deal, and you can use it with Axios very easily.
How to Create a Custom useAxios Hook
Async-await is a great way to simplify your code, but you can take this a step further.
Instead of using useEffect to fetch data when the component mounts, you could create your own custom hook with Axios to perform the same operation as a reusable function.
While you can make this custom hook yourself, there’s a very good library that gives you a custom useAxios hook called use-axios-client.
First, install the package:
npm install use-axios-clientTo use the hook itself, import useAxios from use-axios-client at the top of the component.
Because you no longer need useEffect, you can remove the React import:
import { useAxios } from "use-axios-client";

export default function App() {
  const { data, error, loading } = useAxios({
    url: "https://jsonplaceholder.typicode.com/posts/1"
  });

  if (loading || !data) return "Loading...";
  if (error) return "Error!";

  return (
    <div>
      <h1>{data.title}</h1>
      <p>{data.body}</p>
    </div>
  )
}
Now you can call useAxios at the top of the app component, pass in the URL you want to make a request to, and the hook returns an object with all the values you need to handle the different states: loading, error and the resolved data.
In the process of performing this request, the value loading will be true. If there’s an error, you’ll want to display that error state. Otherwise, if you have the returned data, you can display it in the UI.
The benefit of custom hooks like this is that it really cuts down on code and simplifies it overall.
If you’re looking for even simpler data fetching with Axios, try out a custom useAxios hook like this one.
What’s Next?
Congratulations! You now know how to use one of the most powerful HTTP client libraries to power your React applications.
I hope you got a lot out of this guide.
Remember that you can download this guide as a PDF cheatsheet to keep for future reference.
Want Even More? Join The React Bootcamp
The React Bootcamp takes everything you should know about learning React and bundles it into one comprehensive package, including videos, cheatsheets, plus special bonuses.
Gain the insider information 100s of developers have already used to become a React pro, find their dream job, and take control of their future:

Click here to be notified when it opens
Learn to code for free. freeCodeCamp’s open source curriculum has helped more than 40,000 people get jobs as developers. Get started