This chapter will help you to recognize malfunctions and take
appropriate measures or, if possible and acceptable, to perform
some simple repairs.
8.1 Error messages
In case of an error, the heater switches off for safety reasons.
The following error messages may be displayed:
Index Category Error
1
Entry
T < B
2
Entry
L > T
3
Entry
V2x <= V1x
4
Entry
V2x > Tx + 1°C
5
Entry
Incorrect values for V1x, V2x
6
System
Current temperature after
Start > Tx + 50 °C
7
System
Temperature in the firing
chamber > 410 °C at the
start of the calibration
program, i.e. too high
8
Entry
T2 < T1
9
System
Power failure > 10 s during
a firing program in progress
10
Entry
T1 > V12
11
Entry
vV set, but V2 is
missing or invalid
12
System
Error in the heating system
13
System
Heating muffle very old
14
System
Heating muffle defective
15
System
Temperature in the furnace
base is higher than 65 °C
16
Entry
T is > B + 200 °C at the
start of a firing program
17
System
Furnace head cannot
be initialized
18
System
The furnace head does not
reach the target position
19
System
Temperature > 1225°C (SW)
or > 1300°C (HW)
(8) EXCESS TEMPERATURE
20
System
The vacuum is not released
21
System
Necessary vacuum (xxxmbar)
is not reached within 1 min.
22
System
Write error in the
firing program memory
23
System
Read error in the firing
program memory
The furnace continuously checks
all functions during operation.
If an error is detected, the
respective error message is
displayed.
ERR
Conti-
Error Message Text
No.
nuation
possible
2
Enter a logical value for T
8
Enter a logical value for long-term cooling L
9
Enter a logical value for the vacuum-on temperature Vx1 or the vacuum-off temperature Vx2
10
Change either the vacuum values or the holding time T
11
Enter a logical value for V1x, V2x
13
Excess temperature! Program aborted, furnace head opens to allow the furnace to cool down.
*, **
14
Temperature too high for calibration; the furnace cools down! Start the program again later!
*
16
Enter a lower value for T1 or a higher value for T2.
17
A firing program in progress was interrupted for more than 10 s. The program cannot be continued!
18
Enter a lower value for T1 or a higher value for V12
19
Pre-vacuum activated! V2 must be higher than B.
20
no
Check the heater fuse. If the fuse is O.K., contact your local Ivoclar Vivadent Service Center.
**
23
The heating muffle is very old. It is recommended to replace it. After the error message has been
acknowledged, a firing program may still be started.
24
The condition of the muffle is so poor that is has to be replaced immediately.
25
The furnace base is too hot! Make sure that the air vents of the furnace are clean and unobstructed.
Maximum temperature 65 °C
26
Firing chamber too hot to start a firing program.
27
The furnace head cannot be moved to the final position. It might be blocked by an external mechanical
**, ***
source! If this is not the case, please contact your local Ivoclar Vivadent Service Center!
28
The furnace head does not open/close correctly. The furnace head was manually moved or is obstructed.
**
The furnace head must only be moved using the keys intended for this purpose!
29
no
Excess temperature! The temperature in the furnace head by far exceeds the acceptable temperature
*, **,
range (maximum temperature 1200 °C).
***
32
nein
The vacuum cannot be released. The vacuum valve might be dirty or stuck. Please contact your service
**
technicians.
33
The vacuum cannot be established. Check the seal of the firing chamber, vacuum hose, vacuum pump,
pump fuse.
43
Error while saving firing program data to the internal memory.
44
Error while reading firing program data from the internal memory.
27
- Manuals
- Brands
- Ivoclar Vivadent Manuals
- Oven
- Programat P300/G2
- Operating instructions manual
-
Contents
-
Table of Contents
-
Bookmarks
Quick Links
Programat
P300/G2
®
Operating Instructions
Summary of Contents for Ivoclar Vivadent Programat P300/G2
-
Page 1
Programat P300/G2 ® Operating Instructions… -
Page 3: Table Of Contents
Explanation of the symbols on the display Explanation of the beeper signals Practical Use Switching on/off Firing using an Ivoclar Vivadent program Firing using an individual program Other options and special features of the furnace Maintenance, Cleaning and Diagnosis Monitoring and maintenance…
-
Page 4: Views Of The Furnace, List Of Parts
List of parts Front view: Sealing surface Furnace head sealing ring Insulation Thermocouple Firing plate Display Frame plate QTK heating muffle Furnace housing 10 Keypad 11 On/Off switch 12 Heating element fuse 13 Vacuum pump fuse 15 Fuse holder 16 Power cord 17 Power socket 18 Vacuum pump socket 19 Rating plate…
-
Page 6
26 30… -
Page 7
Control unit: 70 Program key 71 ESC key 72 ENTER key 73 START key 74 Start LED 75 STOP key 76 + key 77 – key 78 Information / Settings 79 Cursor key right 80 Cursor key left 81 Stand-by temperature 82 Closing time 83 Temperature increase 84 Holding temperature… -
Page 8: Introduction / Signs And Symbols
Operating Instructions Dear Customer The signs and symbols in these Operating Instructions facilitate Thank you for having purchased the finding of important points the Programat P300/G2. It is a and have the following state-of-the-art furnace for meanings: Furnace concerned: dental applications.
-
Page 9: Safety First
2. Safety First This chapter is especially important for personnel who work with the 2.1.1 Programat P300/G2 or who have to carry out maintenance or repair work. This chapter must be read and the corresponding instructions followed. Risks and dangers…
-
Page 10
2.1.6 2.1.11 Risk of crushing and burn hazard Risks and dangers Do not carry the furnace by the Never reach under the furnace cooling tray. head with the hand or other parts of the body during operation, since there is a risk of crushing and a burn hazard. -
Page 11: Health And Safety Instructions
– Do not touch any parts that become hot during the operation of The heat insulation of the firing chamber in the Programat P300/G2 the furnace. There is a burn hazard! consists of ceramic fibres. After prolonged use of ceramic fibres at temperatures of over 900 °C (1652 °F), silicogenic substances…
-
Page 12: Product Description
3. Product Description 3.1 Components 3.2 Hazardous areas and safety equipment The Programat P300/G2 Description of the risk areas of the furnace: comprises the following components: Hazardous area Type of risk – Furnace base with electronic controls Firing chamber Risk of burning –…
-
Page 13: Installation And Initial Start-Up
Check the delivery for completeness (see delivery form in Chapter 9) and transportation damage. If parts are damaged or missing, contact your local Ivoclar Vivadent Service Center. Packing and shipping of individual components: The packaging of the P300/G2 permits simple and safe shipping of individual components.
-
Page 14
Place the cooling tray (34) on the frame plate (7). Make sure that the cooling tray (34) is correctly positioned on the frame plate (7). Secure the cooling tray (34) with the two screws (35) including the silicone washer (47). Step 2: Placing the firing plate (5) Place the firing plate (5) on the firing plate holder… -
Page 15
Step 3: Mounting the furnace head The complete furnace head is best mounted with the rear panel of the furnace pointing towards the user. Lift the furnace head with both hands (see picture) and carefully position it on the furnace head mounting (43). -
Page 16
Connect the vacuum pump plug with the vacuum pump socket (18). We recommend using only the VP3 easy or VP4 vacuum pumps from Ivoclar Vivadent, since these pumps are especially coordinated with the furnace. If other pumps are used, please observe and do not… -
Page 17: Initial Start-Up
4.5 Initial start-up Stand-by mode 1. Connect the power cord (16) with the wall After program selection (Ivoclar Vivadent or socket. individual programs), the stand-by display is 2. Put the On/Off switch (11) at the rear of the shown.
-
Page 18: Operation And Configuration
– Cursor keys (79, 80) The current cursor position is indicated by means of a fix (non- The Programat P300/G2 is equipped with a graphic display with blinking) frame around the value. backlighting. Moreover, the keypad features a parameter firing curve –…
-
Page 19: Program Structure
5.3 Program structure 5.4 Adjustable parameters and possible value ranges The furnace offers two types of programs: Symbol Parameter Value range Value range a. Ivoclar Vivadent programs for Ivoclar Program number P 1–300 Vivadent materials b. Individual programs Stand-by temperature 100–700 °C 212–1292 °F…
-
Page 20
Information Settings used to switch on the write protection. (For further information see chapter 6.4.2) ”Ivoclar Vivadent Only after entry of optimized the STD code. temperature control function“ The cursor position (frame around the symbol) can be changed by means of the cursor keys. To view the required Settings or Information, press the Enter key. -
Page 21
5.5.2 Information Settings Display Short description Settings Display Short description Selection of factory With this setting, all settings values and para- Serial number Serial number of the meters can be reset furnace to the factory settings. Attention: All individual pro- grams which have Software version been created and… -
Page 22
5.6 Symbols in the display 5.7 Explanation of the speaker signals Basically, all the acoustic signals are played in the melody and at the Symbol name Meaning Symbol volume selected by the user. The signal transmitter can only be ended with the STOP key. “One-stage Indicates that a program”… -
Page 23: Practical Use
The operating procedure for the Programat P300/G2 will be If the program is started with the START key, the firing curve display explained with the help of two examples: one Ivoclar Vivadent and with the vacuum status is shown. one individual program.
-
Page 24: Firing Using An Individual Program
In addition, TSP works only if the stand-by temperature of B = 403 °C/757 °F required for Ivoclar Vivadent materials is used. The active TSP function is shown on the display by means of the symbol «TSP».
-
Page 25: Maintenance, Cleaning And Diagnosis
Check the insulation for cracks and damages. If the insulation is worn down it has to Insulation (3) monthly be replaced by a certified Ivoclar Vivadent Service Center. Fine hairline cracks on the surface of the insulation are harmless and do not influence the function of the furnace in a negative fashion.
-
Page 26: Special Programs
1200 firing the following display appears. hours. For that reason, Ivoclar Vivadent recommends to have the fur- nace serviced. Please see your Equipment Service Pass for further To select the calibration pro- information.
-
Page 27: What If
In case of an error, the heater switches off for safety reasons. The following error messages may be displayed. If there are any questions, please contact the Ivoclar Vivadent After Sales Service. Error Conti- Error…
-
Page 28
Please contact the Ivoclar Vivadent After Sales Service, if one of the following error messages is being displayed: 25, 29 43, 44, 45, 46, 47, 48 54, 56 103, 107 143, 144, 145, 146, 147, 148 700, 701, 703, 704, 705, 706, 707… -
Page 29: Technical Malfunctions
8.2 Technical malfunctions These malfunctions may occur without an error message being displayed: * If there are any questions, please contact the Ivoclar Vivadent After Sales Service. Description Double-check Action Vacuum is not released Is the vacuum released within Wait until the vacuum is released, remove object.
-
Page 30: Product Specifications
Max. 80 % relative humidity Acceptable ambient pressure 500 mbar to 1060 mbar 9.2 Technical data Use only original packaging of the Programat P300/G2 together with Power supply 110–120 V / 50–60 Hz the respective foam material for shipping purposes.
-
Page 31: Appendix
10. Appendix 10.1 Program table Two program tables (°C / °F) are enclosed to these Operating Instruc- tions. If not, please contact your local Service Centre. Important information The current program table is also available at: www.ivoclarvivadent.com/downloadcenter The program tables can be downloaded from the internet as PDF files.
-
Page 32
10.2 Menu structure 10.2.1 Possibilities of the program selection… -
Page 33
10.2.2 Information / Settings… -
Page 34: Firing Curves
10.3 Firing curves 10.3.1 Vacuum during both stages 10.3.2 Vacuum during long-term cooling 10.3.3 Pre-drying 10.3.4 Controlled long-term cooling…
-
Page 36
Ivoclar Vivadent – worldwide Ivoclar Vivadent AG Ivoclar Vivadent Marketing Ltd. Ivoclar Vivadent s.r.l. & C. s.a.s Ivoclar Vivadent Marketing Ltd. Bendererstrasse 2 Rm 603 Kuen Yang Via Gustav Flora, 32 Derbenevskaja Nabereshnaja 11W FL-9494 Schaan International Business Plaza 39025 Naturno (BZ)
- Manuals
- Brands
- Ivoclar Vivadent Manuals
- Oven
- Programat P300/G2
- Operating instructions manual
-
Contents
-
Table of Contents
-
Bookmarks
Quick Links
Programat
P300/G2
®
Operating Instructions
Summary of Contents for Ivoclar Vivadent Programat P300/G2
-
Page 1
Programat P300/G2 ® Operating Instructions… -
Page 3: Table Of Contents
Explanation of the symbols on the display Explanation of the beeper signals Practical Use Switching on/off Firing using an Ivoclar Vivadent program Firing using an individual program Other options and special features of the furnace Maintenance, Cleaning and Diagnosis Monitoring and maintenance…
-
Page 4: Views Of The Furnace, List Of Parts
List of parts Front view: Sealing surface Furnace head sealing ring Insulation Thermocouple Firing plate Display Frame plate QTK heating muffle Furnace housing 10 Keypad 11 On/Off switch 12 Heating element fuse 13 Vacuum pump fuse 15 Fuse holder 16 Power cord 17 Power socket 18 Vacuum pump socket 19 Rating plate…
-
Page 6
26 30… -
Page 7
Control unit: 70 Program key 71 ESC key 72 ENTER key 73 START key 74 Start LED 75 STOP key 76 + key 77 – key 78 Information / Settings 79 Cursor key right 80 Cursor key left 81 Stand-by temperature 82 Closing time 83 Temperature increase 84 Holding temperature… -
Page 8: Introduction / Signs And Symbols
Operating Instructions Dear Customer The signs and symbols in these Operating Instructions facilitate Thank you for having purchased the finding of important points the Programat P300/G2. It is a and have the following state-of-the-art furnace for meanings: Furnace concerned: dental applications.
-
Page 9: Safety First
2. Safety First This chapter is especially important for personnel who work with the 2.1.1 Programat P300/G2 or who have to carry out maintenance or repair work. This chapter must be read and the corresponding instructions followed. Risks and dangers…
-
Page 10
2.1.6 2.1.11 Risk of crushing and burn hazard Risks and dangers Do not carry the furnace by the Never reach under the furnace cooling tray. head with the hand or other parts of the body during operation, since there is a risk of crushing and a burn hazard. -
Page 11: Health And Safety Instructions
– Do not touch any parts that become hot during the operation of The heat insulation of the firing chamber in the Programat P300/G2 the furnace. There is a burn hazard! consists of ceramic fibres. After prolonged use of ceramic fibres at temperatures of over 900 °C (1652 °F), silicogenic substances…
-
Page 12: Product Description
3. Product Description 3.1 Components 3.2 Hazardous areas and safety equipment The Programat P300/G2 Description of the risk areas of the furnace: comprises the following components: Hazardous area Type of risk – Furnace base with electronic controls Firing chamber Risk of burning –…
-
Page 13: Installation And Initial Start-Up
Check the delivery for completeness (see delivery form in Chapter 9) and transportation damage. If parts are damaged or missing, contact your local Ivoclar Vivadent Service Center. Packing and shipping of individual components: The packaging of the P300/G2 permits simple and safe shipping of individual components.
-
Page 14
Place the cooling tray (34) on the frame plate (7). Make sure that the cooling tray (34) is correctly positioned on the frame plate (7). Secure the cooling tray (34) with the two screws (35) including the silicone washer (47). Step 2: Placing the firing plate (5) Place the firing plate (5) on the firing plate holder… -
Page 15
Step 3: Mounting the furnace head The complete furnace head is best mounted with the rear panel of the furnace pointing towards the user. Lift the furnace head with both hands (see picture) and carefully position it on the furnace head mounting (43). -
Page 16
Connect the vacuum pump plug with the vacuum pump socket (18). We recommend using only the VP3 easy or VP4 vacuum pumps from Ivoclar Vivadent, since these pumps are especially coordinated with the furnace. If other pumps are used, please observe and do not… -
Page 17: Initial Start-Up
4.5 Initial start-up Stand-by mode 1. Connect the power cord (16) with the wall After program selection (Ivoclar Vivadent or socket. individual programs), the stand-by display is 2. Put the On/Off switch (11) at the rear of the shown.
-
Page 18: Operation And Configuration
– Cursor keys (79, 80) The current cursor position is indicated by means of a fix (non- The Programat P300/G2 is equipped with a graphic display with blinking) frame around the value. backlighting. Moreover, the keypad features a parameter firing curve –…
-
Page 19: Program Structure
5.3 Program structure 5.4 Adjustable parameters and possible value ranges The furnace offers two types of programs: Symbol Parameter Value range Value range a. Ivoclar Vivadent programs for Ivoclar Program number P 1–300 Vivadent materials b. Individual programs Stand-by temperature 100–700 °C 212–1292 °F…
-
Page 20
Information Settings used to switch on the write protection. (For further information see chapter 6.4.2) ”Ivoclar Vivadent Only after entry of optimized the STD code. temperature control function“ The cursor position (frame around the symbol) can be changed by means of the cursor keys. To view the required Settings or Information, press the Enter key. -
Page 21
5.5.2 Information Settings Display Short description Settings Display Short description Selection of factory With this setting, all settings values and para- Serial number Serial number of the meters can be reset furnace to the factory settings. Attention: All individual pro- grams which have Software version been created and… -
Page 22
5.6 Symbols in the display 5.7 Explanation of the speaker signals Basically, all the acoustic signals are played in the melody and at the Symbol name Meaning Symbol volume selected by the user. The signal transmitter can only be ended with the STOP key. “One-stage Indicates that a program”… -
Page 23: Practical Use
The operating procedure for the Programat P300/G2 will be If the program is started with the START key, the firing curve display explained with the help of two examples: one Ivoclar Vivadent and with the vacuum status is shown. one individual program.
-
Page 24: Firing Using An Individual Program
In addition, TSP works only if the stand-by temperature of B = 403 °C/757 °F required for Ivoclar Vivadent materials is used. The active TSP function is shown on the display by means of the symbol «TSP».
-
Page 25: Maintenance, Cleaning And Diagnosis
Check the insulation for cracks and damages. If the insulation is worn down it has to Insulation (3) monthly be replaced by a certified Ivoclar Vivadent Service Center. Fine hairline cracks on the surface of the insulation are harmless and do not influence the function of the furnace in a negative fashion.
-
Page 26: Special Programs
1200 firing the following display appears. hours. For that reason, Ivoclar Vivadent recommends to have the fur- nace serviced. Please see your Equipment Service Pass for further To select the calibration pro- information.
-
Page 27: What If
In case of an error, the heater switches off for safety reasons. The following error messages may be displayed. If there are any questions, please contact the Ivoclar Vivadent After Sales Service. Error Conti- Error…
-
Page 28
Please contact the Ivoclar Vivadent After Sales Service, if one of the following error messages is being displayed: 25, 29 43, 44, 45, 46, 47, 48 54, 56 103, 107 143, 144, 145, 146, 147, 148 700, 701, 703, 704, 705, 706, 707… -
Page 29: Technical Malfunctions
8.2 Technical malfunctions These malfunctions may occur without an error message being displayed: * If there are any questions, please contact the Ivoclar Vivadent After Sales Service. Description Double-check Action Vacuum is not released Is the vacuum released within Wait until the vacuum is released, remove object.
-
Page 30: Product Specifications
Max. 80 % relative humidity Acceptable ambient pressure 500 mbar to 1060 mbar 9.2 Technical data Use only original packaging of the Programat P300/G2 together with Power supply 110–120 V / 50–60 Hz the respective foam material for shipping purposes.
-
Page 31: Appendix
10. Appendix 10.1 Program table Two program tables (°C / °F) are enclosed to these Operating Instruc- tions. If not, please contact your local Service Centre. Important information The current program table is also available at: www.ivoclarvivadent.com/downloadcenter The program tables can be downloaded from the internet as PDF files.
-
Page 32
10.2 Menu structure 10.2.1 Possibilities of the program selection… -
Page 33
10.2.2 Information / Settings… -
Page 34: Firing Curves
10.3 Firing curves 10.3.1 Vacuum during both stages 10.3.2 Vacuum during long-term cooling 10.3.3 Pre-drying 10.3.4 Controlled long-term cooling…
-
Page 36
Ivoclar Vivadent – worldwide Ivoclar Vivadent AG Ivoclar Vivadent Marketing Ltd. Ivoclar Vivadent s.r.l. & C. s.a.s Ivoclar Vivadent Marketing Ltd. Bendererstrasse 2 Rm 603 Kuen Yang Via Gustav Flora, 32 Derbenevskaja Nabereshnaja 11W FL-9494 Schaan International Business Plaza 39025 Naturno (BZ)
Главная » Диагностика » Ошибка P0300 — что значит, симптомы, причины, диагностика, устранение
На чтение 4 мин Просмотров 142к. Опубликовано 20.11.2019
Обновлено 20.01.2022
Код ошибки P0300 — случайные / множественные пропуски зажигания.

Что означает код P0300?
Код неисправности P0300 указывает на то, что в одном или нескольких цилиндрах пропуски воспламенения. Если последняя цифра кода не равна нулю, например, P0302, то цифра 2 означает, что в цилиндре № 2 происходит пропуск зажигания.
Пропуск зажигания в цилиндре вызывает неустойчивость частоты вращения двигателя. Если изменение частоты увеличивается, это чувствует датчик положения коленчатого вала, и блок управления двигателем (ЭБУ / ECM) может обнаружить, что в одном из цилиндров только что был пропуск.
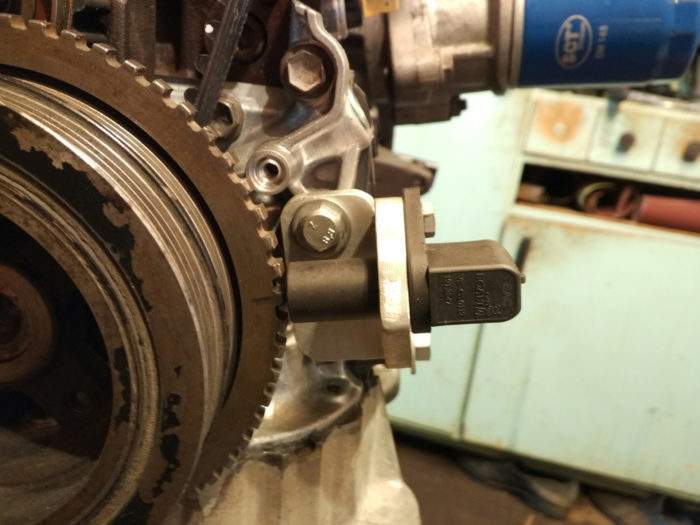
Пропуск воспламенения означает неполное сгорание топливно-воздушной смеси внутри цилиндра. Когда ситуация ухудшается, машина начинает дергаться и производительность значительно падает. Эти пропуски зажигания и вызывают код ошибки P0300.
Симптомы P0300
Вот некоторые распространенные симптомы, связанные с ошибкой P0300.
- Трудность запуска двигателя.
- Лампочка Check Engine.
- Двигатель вообще не запускается.
- Слабое ускорение.
- Увеличение расхода топлива.
Причины P0300
Код неисправности P0300 вызван многими причинами. Вот некоторые из них.
- Износ свечей зажигания.
- Неисправные провода.
- Неисправность катушки зажигания.
- Неисправность датчика кислорода.
- Неисправность топливных форсунок
- Сгоревший выпускной клапан.
- Неисправный каталитический нейтрализатор.
- Неисправен датчик положения дроссельной заслонки.
- Неисправный блок управления двигателем (PCM/ECM).
- Утечка в прокладке головки блока цилиндров.
- Нарушение герметичности впуска.
Устранение P0300
- Заменить неисправные свечи зажигания.
- Проверьте и отремонтируйте обрыв проводов.
- Заменить неисправную катушку зажигания.
- Заменить или отремонтировать датчик кислорода.
- Осмотреть топливные форсунки.
- Заменить каталитический нейтрализатор.
- Заменить неисправную прокладку головки.
- Устранить подсос воздуха.
- Диагностика и ремонт неисправного блока управления двигателем.
Как диагностировать код ошибки P0300?
После обнаружения ошибки P0300 профессиональный автомеханик выполнит следующие действия. Тоже самое вы можете проделать самостоятельно.
Подключите автомобильное зарядное устройство
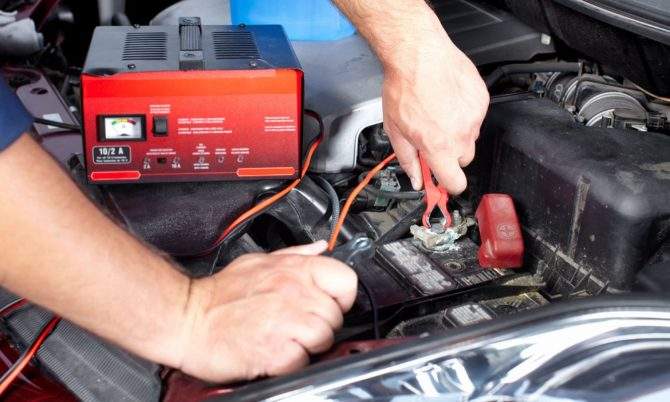
Зарядное устройство чрезвычайно важно при диагностике ошибки P0300. Поскольку при поиске неисправности требуется, чтобы зажигание оставалось включенным, а это может привести к разрядке аккумулятора. В результате возникнут дополнительные коды ошибок, что усложнит поиск. Автомобильное зарядное устройство позволит сохранить заряд батареи.
Подключите OBD2 сканер

Сканер OBD2 необходим для сканирования и устранения кода ошибки P0300. С помощью него вы можете отслеживать проблемы, связанные с ошибкой, а также легко их устранять.
Для автомобилей, выпущенных до 1996 года, используется сканер OBD1. Если автомобиль выпущен после 1996 года — используют сканер OBD2.
Проверьте проводку
Перед заменой какой-либо детали, сначала убедитесь, что все провода и соединения в исправном состоянии. Визуально осмотрите проводку, проверьте наличие коррозии и исправьте это при необходимости.
Проверьте свечи зажигания
Свечи зажигания изнашиваются не быстро. Но если в цилиндре происходят пропуски зажигания, рекомендуется проверить свечи и заметить их при любых признаках неисправности.

Если свеча зажигания кажется неисправной — замените ее. В рамках регулярного технического обслуживания вы должны менять свечи через каждые 30000 км. Вы также должны проверить катушки зажигания!
Осмотрите крышку распределителя (трамблера)
Если вы заменили свечи зажигания, но проблема не ушла — проверьте топливные форсунки на наличие дефектов. Если у вас старый автомобиль — проверьте крышку распределителя зажигания.

Проверьте другие коды ошибок
Если сканер OBD2 обнаружил более одного кода неисправности, примите необходимые меры для их диагностики и устранения. После этого проверьте, возвращается ли ошибка P0300.
Заменить блок управления двигателем

Если вы проверили всё, что указано выше, но ошибка не уходит — существует вероятность, что проблема связана с блоком управления (PCM). Может потребоваться его перепрошивка или замена.
Как заменить свечу зажигания?
Замена свечи зажигания является простой задачей, и вы можете это сделать в домашних условиях. Прежде чем менять свечи, убедитесь, что температура двигателя невысокая.
Шаг 1: Откройте капот и найдите свечу зажигания
Откройте капот, и вы увидите несколько проводов, идущих в моторном отсеке. Свечи зажигания расположены в двигателе на конце этих проводов.
Шаг 2: Потяните за провод
Потяните провод, и вы увидите установленную свечу зажигания.

Шаг 3: Снимите свечу
Вставьте свечной ключ внутрь и поверните, чтобы ослабить свечу зажигания. Снимите старую свечу зажигания и обратите внимание на её состояние.
Шаг 4. Установите новую свечу
Используя тот же свечной ключ, установите новую свечу зажигания и правильно её затяните. Затем подсоедините провод, как он был раньше. Всё готово.
Должен ли я немедленно исправить ошибку P0300?
Неисправность P0300 должна быть устранена сразу же, так как это может вызвать проблемы с управляемостью и повредить детали двигателя.
Рекомендуемые инструменты для исправления кода P0300
- Автомобильное зарядное устройство.
- Цифровой мультиметр для проверки напряжения и сопротивления.
- OBD2 сканер для диагностики ошибок.
- Свечи зажигания.