Машина прошлого года, пробег 50000 км. Свечи не смотрел, пока, хозяин говорит что троила хх с этого и началось.
Ремешок не думаю что проскочил…
Да чуть не забыл проблемы начались после замены фильтра.
а до замены фильтра проблем совсем не было?
Дела такие:
Завели ее с помощью «Холодного пуска»… Машинка заработала все показатели вроде норма.
Прокатился но вот динамика мне не понравилась, машинку остановили погазовали с выхлопа каптит и сажа!
Заглушили и все! история таже.. крути не крути бесполезно…
Ток померил на датчик там чет около 0,8 было.
Но вот наконец то хоть выскочила ошибка P1391 GPC Low input (bank 1) расшифровать пока не получилось что это…на Ардио нет такого..
Рпсшифруй что за «Холодного пуска»… ???
Как применяли, как завелась?
Обратку пережимали, но эфекта сие не вразумило, и промывку делали и что ток не делал, нифига из того не вышло…
Сегодня еще сам датчик посмотрю на топливной рейке, подгоним похожую машину и поробуем перекинуть…
Думаю таким макаром всеж пойму что да как.
На большинстве современных дизелей Комон Рейл категорически ЗАПРЕЩАЕТСЯ менять датчики и клапана на рампе.
Они должны меняться вместе с рампой.
Ты же не хочешь чтобы он выстрелил…..?
эта машина меня добила…
Вроде все что надо для запуска есть: Подача топлива, вращение стартера, фиг с ним одна свеча накала не работает, но все ж должна запуститься, а нифига.
Если б не исправны форсы были то я бы не мог их отключать на работающем двигле…-вариант отпадает
Не поступало б топливо…, то с подачи на вход «мгновенного запуска двигателя» — она тоже не работала бы..
Вариант с фильтром исключен -поставили новый!
Подсос воздуха?-но где искать не понятно по всем линиям вроде герметично все!
Но что самое странное как заведешь на ХХ работает нормально, как только даешь газу -коптит как паровоз!
Такие делы… что еще подскажите???? Я уже клиенту прикальнул чтоб он таких флаконов для запуска ящик взял

Если отключить пьезоэлектрическую форсунку на работающем двигателе она может умереть безвозвратно!!
Для поиска подсоса воздуха нужно поставить прозрачную трубку на подающую магистраль к ТНВД.
И наблюдать наличие пузырьков.
это первое что НЕОБХОДИМО сделать.
То что машина коптит и не развивает мощности после запуска может говорить об недостаточном наддуве воздуха или неисправности всего что с этим связано.
Компрессию то померял?
Когда форсунки снимал шайбы менялись???
Форсунки местами не перепутал???
Патрубок топливного насоса можно снимать и повторно устанавливать до пяти раз.
Использовать толкача тоже не стоит!
От этого может быть больше проблемм чем пользы.
открути и тщательно закрути Клапан слива конденсата из топливного фильтра дизельного двигателя
Изменено 6 мая 2009 пользователем MAIKLE
-
#1
Ребята нужны ваши подсказки.
Дело было в с середине Февраля
Самодиагностика: код P1391 — прерывание сигнала с датчиков коленвала и распредвала.
Залез под машину с вольтметром, замерил напряжение на фишке коленвала: середина — 0, по краям 5 и 9 В. Вроде норм. (! хотя в книге указано 8 В, разница в 1 В может дать проблему?)
1. Полазил по форуму, посоветовался с Димой @dozmorovds — заказал датчик коленвала.
Вместе с ним заказал датчик давления масла — были явные подтеки масла… хз откуда прёт, поменяем посмотрим. Кстати, для замены датчика давления масла нужна головка на 27 длинная — тоже заказал
!ВНИМАНИЕ! 622227 ДЕЛО ТЕХНИКИ Головка торцевая головка на 27 удл 12- гранная — НЕ ПОКУПАТЬ! это фуфло оказалось на 28мм — замерил штангеном! Пришлось по-бырому бежать в автомагаз и брать еще одну.
Старый датчик колена долго не хотел вылазить — короче вытаскивал я его как дантист коренной зуб. Поддевал отверткой и тянул и прокручивал… засел конкретно. Но все же потихоньку вылез, грязный — жуть.
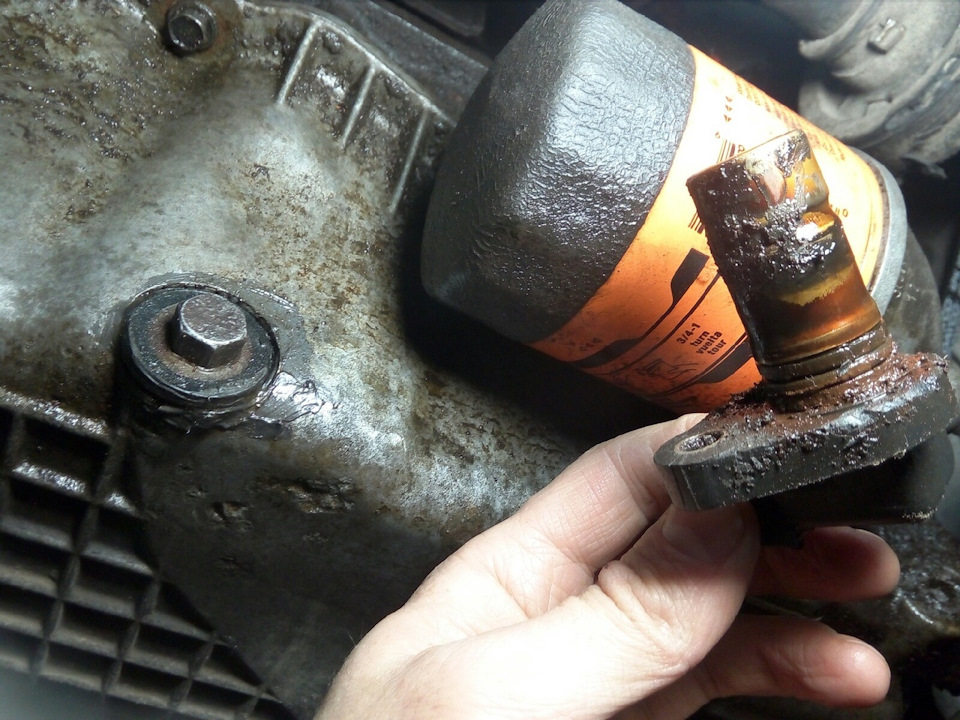
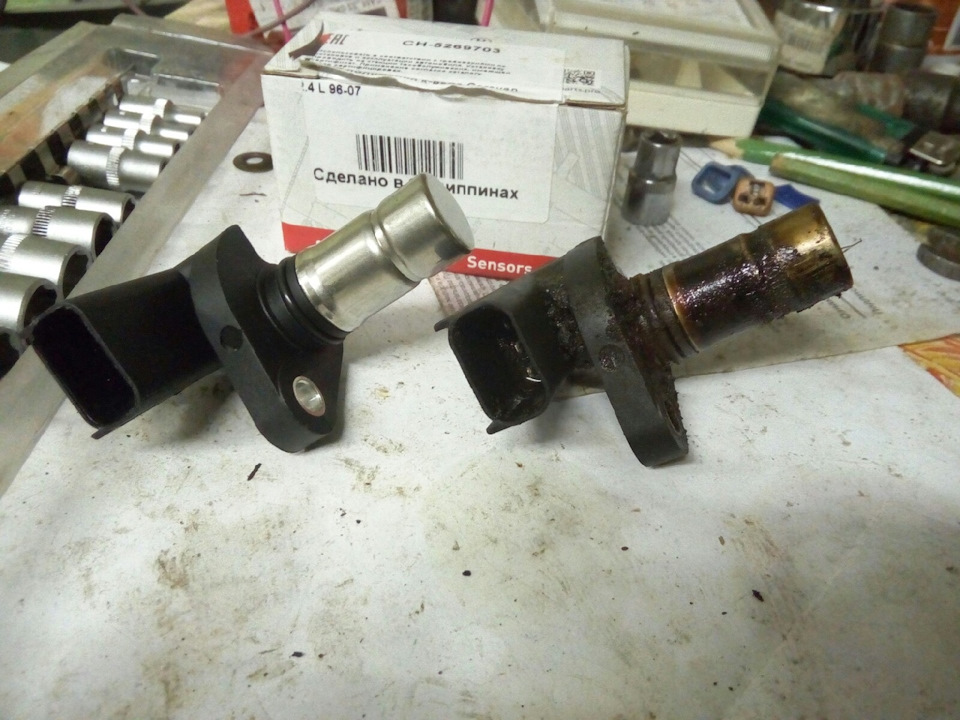
ну что воткнул новый датчик, проехался 500 метров — все ошибки погасли! супер — подумал я. Фиг тебе — подумал ПиТюн и еще через 500 метров заглох как раз на парковке. Оставил до вечера. Вечерочком завёл и пока обороты не упали — погнал в обратно в гараж. Замерил напряжение на фишке распредвала: середина — 0, по краям 5 и 9 В. Ну, вроде норм…
2. Полазил по форуму, посоветовался с Димой @dozmorovds — заказал датчик распредвала. Пока он ехал — поменял датчик давления масла:
— разобрал верхушку (снял впускной коллектор, чтобы легче дотянутся до датчика)
— берем головку удлиненную на 27, вороток с трещёткой, удлинитель на вороток
— ложимся на клапанную крышку
— левой рукой лезем туда «где макар телят не пас»
— снимаем фишку
— выкручиваем старый датчик, закручиваем новый датчик.
— надеваем фишку.
Приехал датчик распредвала — меняем. Кстати я еще магнит выкручивал — пылинки там сдул, протёр и воткнул обратно!
Датчик распредвала комплектуется резиновым колечком — вставлен в паз.
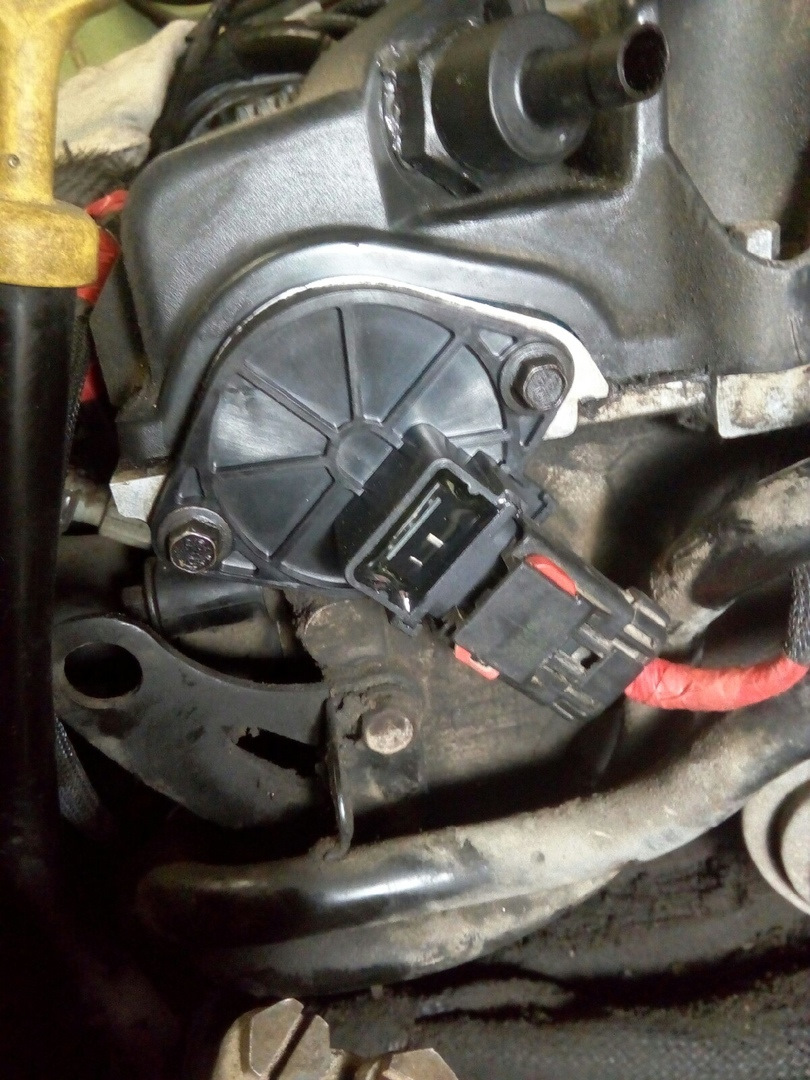
ну и заводимся… и поехали! и сука едет!
—
В Итоге:
CH4882851AB PREMIUM PARTS Датчик распредвала
CH5269703 PREMIUM PARTS Датчик коленвала
Цена вопроса: 2 000
ОДНАКО! так мы прокатали с Питюном 2 месяца.
Вчера, возвращаясь с дачи, как въехали в город — заглох на светофоре.
Завелся, поехал, если на газ не давить машина как-будто тормозит сама, стрелка оборотов дергается. Доковыляли так до дома.
Самодиагностика:
код P0108 — Напряжение c датчика МАР слишком высокое
код P0403 — Неисправность цепи соленоида EGR
и опять вылез:
код P1391 — Прерывание сигнала с датчиков коленвала и распредвала.
—
что опять все заново разбирать? Я уже устал с этой возней…
у меня мысль на счет косы проводов — все эти датчики и фишки висят на одной косе да? а коса сцеплена в один большой раъем висящий на кронштейне аккумулятора да? или нет? — может там в этом большом казъёме че то закисло? ..хз
или может МАП-сенсор реально накрылся? он вроде тоже машину глушит да? а почему 1391 вылез опять?
-
#2
Кстати я еще магнит выкручивал — пылинки там сдул, протёр и воткнул обратно!
Для начала, поменяй этот магнит.
-
#3
Для начала, поменяй этот магнит.
Серьёзно? Магнит может как-то ослабнуть?
Магнит пади только оригинальный заказывать и ждать или по нему есть варианты?
-
#4
Серьёзно? Магнит может как-то ослабнуть?
Более чем серьёзно.Это естественное старение.У Вас же половое влечение не то,что в 20-25 лет.Вот где то примерно так же и с магнетизмом.
Со временем и от нагрева магнитная индукция постоянных магнитов ослабевает.(сила примагничивания)
Последнее редактирование: 22 Апр 2019
-
#6
аналоги Магнита:
AIRTEX 5S11729
WELLS SU13182
Standard PC881
-
#7
проблема осталась. продолжене истории:
..после совета 41krieger что надо поменять магнит, заказал оригинальный магнит в АвтоКлондайке — обещали 2 недели (из USA) но случились майские праздники и магнит типа застрял надолго на таможне.
чтоб не терять время, решил прозвонить провода, первом делом открутил блок управления снял с него 2 фишки и капец! — там было все в масле. решил все очистить. 40 пинов в каждой фишке и контакты на блоке управления —
все вытер, очистил.
Прозвонил все контакты — все звонятся. Единственное что имитацию тряски проводов не получилось сделать — это надо вдвоем делать.
после этой процедуры недели 3 катал нормально и даже подумал, что решил проблему. Но чек 1391 выскочил опять.
11 июня, наконец, спустя 40 дней, приехал мопаровский магнит — установил.
Ездил до 29 июня без проблем, ни ошибок ни заглохиваний.
29го в Субботу, поехал на дачу, доехал паркуюсь — глохнет. завожу 2 метра и глохнет… более-менее припарковался. Седня еду обратно с дачи в город — 12 км. — заезжаю в город, перекрестки- светофоры, торможение обороты падают — глохнем! вобщем по городу 2 раза заглох.
Ошибка 1391 опять.
Сегодня собираюсь потрести с тестером провод от фишки коленвала.
Может кто знает, есть возможность проверить датчик КВ тестером? типа замерить сопротивление между выводами?
где-то читал что если датчик индукционный то можно мерить сопротивление, а если датчик Холла — то при измерении сопротивления он сдохнет, что его нельзя так проверить. А какой у нас датчик?

-
#8
Я тебе говорил, что нужно попробовать через DRB сделать обучение… пока всем помогало!
-
#9
Была такая-же хрень,тонкими ,маленькими пасатижами изагнул пины на блоке управления ,предварительно обезжирив. По моему,27,29,35 шестой месяц полёт нормальный.
-
#10
Я тебе говорил, что нужно попробовать через DRB сделать обучение… пока всем помогало!
Дима, офицалов нет поблизости, на местных СТО нет сканеров с крайслеровскими прошивками — обзванивал — никто не хочет возиться. или в Челябинск или в Уфу гнать надо.
А какой софт должен стоять на сканере, чтоб обучить датчики? Могу еще раз поузнавать на счет этого софта.
Последнее редактирование: 1 Июл 2019
-
#11
Была такая-же хрень,тонкими ,маленькими пасатижами изагнул пины на блоке управления ,предварительно обезжирив. По моему,27,29,35 шестой месяц полёт нормальный.
а зачем ты их гнул? они были помяты и ты их выгнул или наоборот было норм а ты их замял и что это дало?
-
#12
Они не были помяты,и я их не мял,а немного изогнул дугой сами штырьки ,дабы восстановить контакт.
-
#13
Короче, опять все снял. Разъемы с блока управления — опять всё было в масле! непонимаю откуда оно там берется — вокруг все сухо. прочистил, продул. Снял разъем датчика коленвала. прочистил продул. Вытащил сам датчик — выгялдит как новый — хоть на витрину ставь, чистый как слеза младенца (на прошлой неделе масло новое залил — присадки работают).
Прозвонили контакты от фишки КВ до фишки ЭБУ с тряской проводов — все норм. Обрыва нет. Завтра сутра все обратно соберу. Посмотрим.
-
#14
Да к стати на датчике коленвала штырьки повернул вокруг своей оси градусов на 10.
Масло у Вас в самих фишках по видимому,прополоскайте сами фишки в обезжиривателе.
-
#15
Может быть это не масло, желе растаяло из блока вытекает?
-
#16
Может быть это не масло, желе растаяло из блока вытекает?
блок открывал — желе на месте. кстати красиво смотрится. радиаторы там видно.. прикольно.
-
#17
Может быть это не масло, желе растаяло из блока вытекает?
Это желле горелкой 1000 градусов жгли,только блистеть начинает и всё.
-
#18
Это желле горелкой 1000 градусов жгли,только блистеть начинает и всё.
Не от температуры, от старости. Открывал на своем , по краю местами растворилось (или испарилось).
-
#19
Такая же проблема, один разъём на блоке управления раз в 2 недели чищу от масла( третий по счету слева-направо) Знакомый сказал что через датчик давления масла давит по внутренней оплётке провода масло. С отпуска вернусь буду разбираться.
-
#20
я думал об этом, но если открыть наружние крышечкки у разьемов — там где проводочки заводяться внутрь — то там все сухо
| Code | Fault Location | Probable Cause |
|---|---|---|
| P1391 | P1391 – Glow Plug Circuit Low Input Bank 1 (Ford, Lincoln, Mercury, Mazda, Nissan) (Buy Part On Amazon) |
We recommend Torque Pro
Manufacturer Specific Definitions for P1391
| Make | Fault Location |
|---|---|
| Acura | G-sensor — performance problem |
| Audi | Camshaft position (CMP) sensor 2/ Bank 2 — short to ground |
| Buick | Wheel Speed Sensor 1 G-Sensor Circuit Performance |
| Cadillac | Wheel Speed Sensor 1 G-Sensor Circuit Performance |
| Chevrolet | Rough road sensor -signal malfunction |
| Chrysler | Crankshaft position (CKP) sensor/camshaft position (CMP) sensor -intermittent signal |
| Citroen | Glow Plug Circuit Low Input (Bank #1) |
| Daewoo | Rough road G-force sensor – implausible signal |
| Dodge | Crankshaft position (CKP) sensor/camshaft position (CMP) sensor -intermittent signal |
| Eagle | Crankshaft position (CKP) sensor/camshaft position (CMP) sensor -intermittent signal |
| Ford | Glow Plug Circuit Low Input Bank 1 |
| Gm | Wheel Speed Sensor 1 G-Sensor Circuit Performance |
| Honda | G-sensor — performance |
| Isuzu | G-force sensor – performance |
| Jeep | Crankshaft position (CKP) sensor/camshaft position (CMP) sensor -intermittent signal |
| Mitsubishi | Intermittent Loose Of Camshaft Position Or Crankshaft Position Sensor |
| Peugeot | Glow Plug Circuit Low Input (Bank #1) |
| Plymouth | Crankshaft position (CKP) sensor/camshaft position (CMP) sensor -intermittent signal |
| Ram | Crankshaft position (CKP) sensor/camshaft position (CMP) sensor -intermittent signal |
| Saab | Cylinder 1, misfire detected – fuel level low |
| Suzuki | G Sensor Rough Road Rationality |
| Volkswagen | Camshaft position (CMP) short to ground |
Table of Contents
- What Does Code P1391 Mean?
- What are the common causes of code P1391?
- What are the symptoms of code P1391?
- How do you troubleshoot code P1391?
- Codes Related to P1391
- Get Help with P1391
What Does Code P1391 Mean?
OBD II fault code P1391 is a manufacturer specific code that is defined by car makers Ford, Lincoln, Mercury, Mazda, and Nissan as “Glow Plug Circuit Low Input (Bank #1)”. On these applications, code P1391 is set when the PCM (Powertrain Control Module) detects a low input voltage in the glow plug control circuit. “Bank 1” refers to the bank of cylinders that contains cylinder #1 on diesel engines with two cylinder heads. Note that this code refers specifically to a low input voltage in the glow plug control circuit, and as such, the glow plugs themselves are rarely implicated in this code, although in some cases, glow plug failure can contribute to code P1391 being set.
Glow plugs are essentially resistors that heat up when a current is applied to them, with the resulting heat being used to heat the air/fuel mixture in diesel engines to aid in the combustion of the air/fuel mixture when the engine is cold. On most applications, the glow plugs will remain heated after start-up for a set period to aid combustion, especially during very low ambient temperature conditions. Note therefore that with very few exceptions, a diesel engine can generally not be started in low temperatures when the glow plug control circuit is inoperative, or if one or more glow plugs have failed.
In terms of general operating principles, when the ignition of a diesel-powered vehicle is turned on, a low voltage circuit energizes a heavy-duty electro-mechanical relay that then feeds power to the glow plugs simultaneously with current drawn directly from the battery. However, the amount of time that current is fed to the glow plugs is controlled by a timer that cuts power to the relay after the time set by the manufacturer has elapsed. If the engine does not start after this time, the glow plug control circuit can be activated again to continue heating of the glow plugs.
While the above describes the working principles of older glow plug control systems, new developments in the field have produced glow plugs that heat up faster than older versions, while consuming less current. On these systems, the glow plugs are controlled by dedicated control modules that employ pulse width modulation to heat up each glow plug individually. This type of system typically supplies 6 VDC current to the glow plugs, in contrast to the 12 VDC current used by older systems.
Regardless of the design of the control circuit though, the PCM monitors the input voltage both before and after the glow plug relay when the system is in operation, and when it detects an input voltage that is lower than expected, it will set a trouble code and illuminate a warning light.
The image below shows the basic construction of a typical glow plug.

What are the common causes of code P1391?
Some common causes of code P1391 could include the following-
- Defective glow plug relay/timer
- Defective engine coolant /oil temperature/intake air temperature sensor, depending on the application
- Low battery voltage
- Damaged, burnt, shorted, disconnected, or corroded wiring and/or connectors
- Open circuits
- Failed PCM or glow plug control module. Note that this is a rare event, and the fault must be sought elsewhere before any controller is replaced
What are the symptoms of code P1391?
Common symptoms of code P1391 could include the following, but note that the severity of one or more symptoms could vary between applications-
- No start condition when the engine is cold
- Engine may not idle
- Idle may be rough or erratic
- Extended cranking times when the engine is cold, or has partially cooled down
- White smoke from the tail pipe may be present upon start-up and during the warm-up cycle
- Loss of power may be present following a cold start and during the warm-up period. Note that in some cases the loss of power may be slight, while in others, it may be severe enough to render the vehicle undriveable
How do you troubleshoot code P1391?
NOTE #1: Exhaust emission control regulations in some states, California in particular, require that glow plug control systems incorporate a self-test diagnostic function to identify failed, or failing glow plugs, and that the diagnostic function must illuminate a warning light if such failed or failing glow plugs are likely to increase, or affect exhaust emissions negatively. Therefore, vehicles from California, or from the so-called Green States, will have components in their glow plug control systems that are not present on vehicles that do not have to comply with California, or “Green State” regulations. Consult the manual for these applications for information on testing procedures for the additional components.
NOTE #2: Always make sure that the engine is cold before starting a diagnostic procedure for this, or any other glow plug related code since the control system is deactivated if the engine temperature exceeds a specified value. In practice, this means that the control system cannot be properly tested when the engine is hot.
WARNING: Since the power requirements of glow plugs vary greatly between applications, no assumptions about the probable cause of a low input voltage should be made without reference to the relevant technical information for the application being worked on. Non-professional mechanics in particular are strongly urged NOT to attempt a diagnosis/repair of P1391 (or any other glow plug related code) if the relevant/required repair manual or technical information is not available. Note that any diagnostic procedure(s) for this code that is based on guesswork and false assumptions has the potential to cause extensive damage to the vehicle’s electrical system.
Step 1
Record all fault codes present, as well as all available freeze frame data. This information can be of use should an intermittent fault be diagnosed later on. If any other codes are present along with P1391, resolve these codes in the order in which they were stored before proceeding with the diagnostic procedure for P1391, and especially if the other codes indicate low (or abnormal system voltages) or if additional codes indicate problems with the alternator, battery, or charging system in general.
NOTE: Be aware that a flashing glow plug warning light on VW applications with TDI engines does not necessarily indicate a problem in the glow plug control circuit. For reasons that are not entirely clear, VW engineers have decided that the glow plug warning light should do double duty as a “blown bulb” indicator, so always make sure that a glow plug related fault actually exists when the warning light starts flashing.
Step 2
Once all other codes had been resolved and it is certain that the3 applications’ charging/electrical system is fully functional, consult the manual to locate the glow plug relay, fuses, and other components that are likely to be implicated.
Check all fuses and/or fusible links for resistance and continuity, and replace all that are suspect, or proven to be defective. Clear all codes, and retest the system to see if the code returns.
Step 3
If the code persists, locate the glow plug relay, and consult the manual on the correct procedure to test its resistance. Compare the obtained reading with the manufacturer’s specifications, and replace the relay if it does not comply with specified values. Clear all codes after testing or replacing the relay, and rescan the system to see if the code returns.
WARNING: Some relays require that wires and cables be removed either to test, or to replace the relay. Be aware that in most cases, some of the cables will be live, so exercise extreme caution when removing cables to prevent short circuits that could cause fires and/or damage the vehicles’ electrical system.
Step 4
If the code does return but the relay checks out OK, consult the manual to determine if the glow plugs are controlled by the engine coolant temperature, or by the oil temperature. In both cases, it is necessary to check if the relevant sensor is working as intended, since a malfunctioning sensor can cause or contribute to setting code P1391. Consult the manual on the correct procedure to test the implicated sensor, but be aware that to get the most reliable result, you need to have access to the manufacturers’ temperature-to-resistance chart for that sensor. Follow the testing procedure in the manual exactly, and replace the sensor if it does not comply with specified values.
Clear all codes after the sensor replacement, and rescan the system to see if the code returns.
Step 5
If the code still persists, prepare to test the wiring leading to the relay, but be aware that to prevent accidental short circuits during this step, it is important to follow the instructions in the manual EXACTLY.
The values for the currents (and their resistances) that enter the glow plug relay vary greatly between applications, which means that to avoid misdiagnoses, it is necessary to use a top quality digital multimeter for this step. The manual will describe the testing procedure in some detail, but this step generally involves testing the current that enters the “low” side of the relay. In addition, the current needs to be at the correct voltage for the prescribed time, although timer failure is usually indicated by a code other than P1391.
Step 6
If the input current does not match the specified value, the most likely cause is either a high resistance, or a poor ground connection.
If the required input voltage is not present, prepare to perform a thorough visual inspection of all associated wiring, but be aware that it may be necessary to remove parts of the dashboard, and/or trim panels to gain access to all relevant wiring.
Nonetheless, look for damaged, burnt, shorted, disconnected, or corroded wiring and/or connectors, and make repairs as required. Clear all codes after repairs are complete, and rescan the system to see if the code returns.
Step 7
If no visible damage to the wiring is found but the code persists, prepare to perform ground, resistance, and continuity tests on all associated wiring. Consult the manual to determine the location, routing, color-coding, and function of each wire, but take great care not to insert a test probe into any terminal, or allow it to touch any pin other than the terminal or pin indicated in the manual- allowing this to happen can cause serious, if not always fatal damage to the electrical system.
If the application is fitted with a dedicated control module for the glow plugs, be sure to disconnect the module from the system to prevent damage to the module during this step. Compare all obtained readings to the values stated in the manual, and if discrepancies are found, make repairs as required, or replace wiring as required to ensure that all electrical values fall within the manufacturer’s specifications.
Step 8
Assuming that all components are in working order and that all repairs had been performed to industry standards it is unlikely that the code will return, although it is not altogether impossible, since the definition of code P1391 does not indicate exactly where in the control circuit the “low input” might be.
On older systems where all the glow plugs are heated simultaneously, one likely spot is the wiring between the relay and the glow plugs, rather than in the glow plugs themselves. On these systems, the glow plugs on a bank of cylinders are all connected to each other with a continuous conductor, with the connector being connected to the relay with a single wire or cable. Therefore, if the glow plug relay is energized, the entire conductor should carry the specified glow plug input voltage for that application.
So, apply power to the glow plug relay, and check the voltage in the conductor by placing the red probe of the multimeter on the conductor and the black probe on a suitable ground, such as the engine block. If the displayed value deviates from the specified value, check the connection where the cable from the relay attaches to the conductor. Look for signs of arcing, burning, or discoloration that would indicate a poor connection, and hence a high resistance. Make repairs as required, and recheck the voltage in the conductor after repairs are complete to verify that the repair was successful.
Clear all codes, and rescan the system to see if the code returns. If the code does return or persists, it is likely that there is an intermittent fault present in the system. Note though that intermittent faults can be extremely challenging to find and repair and in some cases, it may be necessary to allow the fault to worsen before an accurate diagnosis and definitive repair can be made.
Step 9
On systems that use dedicated control modules, each glow plug is provided with its own lead, much like a plug lead on a gasoline engine. However, testing these leads for high resistance, and hence low voltage, needs to be performed in strict accordance with the instructions in the manual to prevent damage to the controller on the one hand, and to obtain reliable and accurate results on the other.
Note also that even though glow plug control modules perform self-test diagnostic functions, generic code readers can often not access this information. In practice, this means that if this diagnostic information is not available, you need to follow the instructions on testing the glow plug leads exactly to avoid damaging anything.
Follow the instructions provided carefully, but make notes of the resistance of each lead; all leads should have the same or very close to the same resistance. Compare the resistance values to those stated in the manual, and replace all leads that do not conform to specifications. Clear all codes after replacing leads, and rescan the system to see if the code returns or persists.
If the code does return or persists, it is likely that there is an intermittent fault present in the system. Note though that intermittent faults can be extremely challenging to find and repair and in some cases, it may be necessary to allow the fault to worsen before an accurate diagnosis and definitive repair can be made.
NOTE: While it is sometimes possible to replace only the defective lead(s), the better option is to replace the leads as a complete set.
Step 10
As a final step, consult the manual on the correct procedure to test the resistance of the glow plugs themselves, since in some cases, differences in resistance and/or current draw can set trouble codes, or contribute toward setting code P1391.
Note that glow plugs are self-limiting in the sense that their internal resistance drops off sharply as they heat up. This is normal, so be prepared for the drop but take note of the time that elapses before it happens. Glow plug operation is set to a time period specified by the manufacturer, and if the resistance drops off too soon or too late, there is a fault in the control system.
Nonetheless, take careful note of each glow plug’s resistance and amperage draw, which should be the same for all glow plugs. The manufacturer may allow small differences, but any reading that exceeds the range specified in the manual is indicative of a defective glow plug. Replace any glow plugs that do not match the manufacturers’ specifications closely.
Clear all codes after repairs/replacements are complete, and rescan the system to see if the code returns. At this point, the code is unlikely to return, but if it does, suspect an intermittent fault to be the cause, rather than a failed or failing control module.
- P1392 – Relates to “Glow Plug Circuit High Input (Bank #1)”
NOTE: Many manufacturers have assigned different definitions to code P1391. Below are some examples-
- Acura – “G-Sensor Performance”
- Chrysler/Dodge/Jeep/Mitsubishi – “Intermittent loss of CMP or CKP”
- GM – “Wheel Speed Sensor 1 – G – Sensor Circuit Performance”
- Volkswagen/Audi/Volvo – “Camshaft Pos. Sensor, (Bank2) Short to Ground”
Help Us Help You
Please comment below describing your issue as well as the specifics of your vehicle (make, model, year, miles, and engine),
and one of our mechanics will respond as soon as possible. We appreciate a $9.99 donation via the payment button below.
Расшифровка кодов диагностики OBDII/EOBD
Если ваш автомобиль поддерживает OBD2 или EOBD, то вы уже можете искать среди 5000 описаний кодов, являющихся стандартными для всех производителей. Это коды следующих серий: P0XXX, P2XXX, P34XX, B0XXX, C0XXX, U0XXX, U2XXX, U3XXX.
Также доступны более 13500 дополнительных кодов, специфичных для конкретных производителей.
Выберите код:
Acura:
G-Sensor Performance
Chrysler/Dodge/Jeep:
Intermittent loss of CMP or CKP
Citroen/Peugeot:
Glow Plug Circuit Low Input (Bank #1)
Ford:
Glow Plug Circuit Low Input (Bank #1)
GM:
Wheel Speed Sensor 1 — G — Sensor Circuit Performance
Isuzu:
G Sensor Performance
Lincoln:
Glow Plug Circuit Low Input (Bank #1)
Mercury:
Glow Plug Circuit Low Input (Bank #1)
Mitsubishi:
Intermittent loss of CMP or CKP sensor signals
Oldsmobile:
Glow Plug Circuit Low Input (Bank #1)
Plymouth:
Intermittent Loss of CMP Or CKP
Volkswagen/Audi:
Camshaft Pos. Sensor,Bank2 Short to Ground
Volvo:
Camshaft Pos. Sensor,Bank2 Short to Ground
Мало того, что OBD2 ошибки работы двигателя или других электронных систем автомобиля не всегда на прямую указывают на неработающий элемент, но и в разных марках и моделях автомобилей одна и таже ошибка может возникать как следствие неисправности абсолютно разных элементов электронной системы.
Мы надеемся, с Вашей помощью, сформировать причино-следственную связь возникновения той или иной OBD2 ошибки у конкретного автомобиля (марка и модель). Как показал опыт если рассматривать определенную марка-модель автомобиля, то в подавляющем большинстве случаев причина ошибки одна и также.
Если ошибка указывает на неверные параметры (высокие или низкие значения) какого нибудь из датчиков или анализаторов, то вероятней всего этот элемент исправен, а проблему надо искать так сказать «выше по течению», в элементах работу которых анализирует датчик или зонд.
Если ошибка указывает на постоянно открытый или закрытый клапан, то тут надо подойти к решению вопроса с умом, а не менять бездумно этот элемент. Причин может быть несколько: клапан засорен, клапан заклинил, на клапан приходит неверный сигнал от других неисправных узлов.
Ошибки работы двигателя OBD2 и других систем автомобиля не всегда на прямую указывают на неработающий элемент. Сама по себе ошибка является косвенными данными о неисправности в системе, в некотором смысле подсказкой, и только в редких случаях прямым указанием на неисправный элемент, датчик или деталь. Ошибки (коды ошибок) полученные от прибора, сканера требуют правильной интерпретации информации, дабы не тратить время и деньги на замену работающих элементов автомобиля. Проблема зачастую кроется намного глубже чем кажется на первый взгляд. Это вызвано теми обстоятельствами, что информационные сообщения содержат, как было выше сказано, косвенную информацию о шарушении работы системы.
Вот пару общих примеров. Если ошибка указывает на неверные параметры (высокие или низкие значения) какого нибудь из датчиков или анализаторов, то вероятней всего этот элемент исправен, так как он анализирует (выдает некие параметры или значения), а проблему надо искать так сказать «выше по течению», в элементах работу которых анализирует датчик или зонд.
Если ошибка указывает на постоянно открытый или закрытый клапан, то тут надо подойти к решению вопроса с умом, а не менять бездумно этот элемент. Причин может быть несколько: клапан засорен, клапан заклинил, на клапан приходит неверный сигнал от других неисправных узлов.
Еще один момент который хотелось бы отметить — это специфика той или иной марки и модели. Поэтому узнав ошибку работы двигателя или дрогой системы Вашего автомобиля не спешите делать поспешных решений, а подойдите к вопросу комплексно.