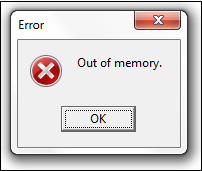
Многие пользователи ПК во время работы с какой-либо программой могут столкнуться с «вылетом» указанной программы, и появившимся сообщением «Out of memory». Возникшая проблема может иметь множество причин, начиная от банального недостатка памяти на пользовательском ПК, и заканчивая некорректной работой с памятью какой-либо программы.
- Причины появления дисфункции
- Как исправить ошибку «Out of memory»
- Заключение
Причины появления дисфункции
Сообщение «Out of memory» (в переводе дословно «вне памяти», или «недостаточно памяти») обычно возникает при недостатке памяти на пользовательском компьютере. В частности же, в появлении данной ошибки «виновен» следующий набор факторов:
- Недостаток памяти RAM на вашем ПК (рабочей памяти, планки которой установлены на материнской плате вашего компьютера). Если на вашем компьютере установлен всего 1 гигабайт памяти, вы будете встречаться с описываемой ошибкой довольно часто. Нормальным же ныне считается наличие на компьютере 4 гигабайт памяти и выше;
- Недостаток места на жёстком диске.
Когда вашему компьютеру не хватает физической R.A.M. памяти, он заимствует часть места на жёстком диске, и создаёт так называемую «виртуальную память». Система временно хранит в такой виртуальной памяти ту часть данных, которая не помещается в памяти обычной. Такие данные обычно хранятся в файле «pagefile.sys», размер которого может увеличиваться или уменьшаться в зависимости от специфики работы вашей ОС. Если на диске будет недостаточно места, файл «pagefile.sys» не сможет расти, и пользователь получит рассматриваемую ошибку.
- При одновременном запуске на ПК большого количества программ, каждая из которых бронирует часть памяти ПК под свои задачи;
- При запуск большого количества вкладок браузера. Веб-навигаторы уровня «Firefox» или «Google Chrome» способны занимать от 500 мегабайт до 1 гигабайта памяти под свой функционал, при этом число открытых вкладок и соответствующей обслуживающей памяти может быть ограничено системой. Специалисты Майрософт называют такую проблему «the desktop heap limitation» — «ограничение кучи рабочего стола»);
- Некорректная работа с памятью ряда программ (наиболее часто это игровые программы);
- Не оптимальный размер файла подкачки, с которым работает система.

Как исправить ошибку «Out of memory»
Для решения указанной проблемы рекомендую сделать следующее:
- Перезагрузите ваш ПК, и запустите требуемую программу вновь. Возможно, что проблема имеет случайный характер, и более повторяться не будет;
- Перед запуском нужной программы закройте другие ненужные программы (браузер, музыкальный или видео плеер, текстовый или графический редактор, мессенджер и так далее);
- Если проблема возникает во время серфинга в сети, закройте всё множество вкладок вашего браузера (при наличии), оставив лишь одну или две.
Альтернативным вариантом решения проблемы является установка соответствующего фикса от Майкрософт. Или использование расширений или дополнений для браузера уровня «The Great Suspender» для «Google Chrome», хорошо работающего с ненужными вкладками браузера.
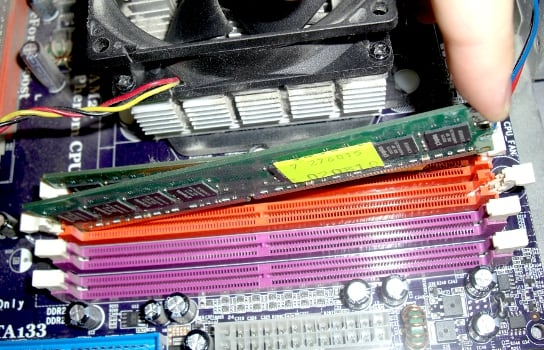
- Добавьте оперативной памяти на ваш ПК. Если у вас на компьютере установлено 1-2 гигабайта памяти, будет оптимальным довести её объём до 4 гигабайт (а для 64-битных Виндовс 7, 8 и 10 версии рекомендую 8 и более гигабайт);
- Убедитесь, что на вашем жёстком диске (или SSD) достаточно свободного места. При необходимости, освободите диск от ненужных файлов;
- Используйте инструмент командной строки BCDEdit для изменения параметров загрузки системы. Если у вас на ПК установлена Виндовс 7 и более, запустите командную строку от имени администратора на Виндовс 7 и Виндовс 10, и в ней наберите:
bcdedit/set IncreaseUserVa 3072
И нажмите на ввод, и перезагрузите ваш ПК. Функционал данной команды позволяет выделить пользовательским приложениям 3 гигабайта оперативной памяти для работы. В некоторых системах этого может быть слишком много, потому если после ввода данной команды система начала чаще сбоить, то введите в командной строке от имени администратора:
bcdedit /set IncreaseUserVa 2560 — что позволит задействовать 2,5 гигабайта вместо ранее забронированных 3.
Если ситуацию этим исправить не удалось, верните настройки на состояние по умолчанию:
bcdedit /deletevalue IncreaseUserVa
- Увеличьте объём файла подкачки. Нажмите кнопку «Пуск», в строке поиска введите sysdm.cpl и нажмите ввод. В открывшемся окне настроек системы выберите «Дополнительно» — «Быстродействие» — «Параметры» — «Дополнительно» — «Виртуальная память» — «Изменить». Снимите галочку с опции автоматического размера, поставьте галочку на «Указать размер», и поставьте исходный размер в 8192, и максимальный в 8192. Затем выберите «Задать»;
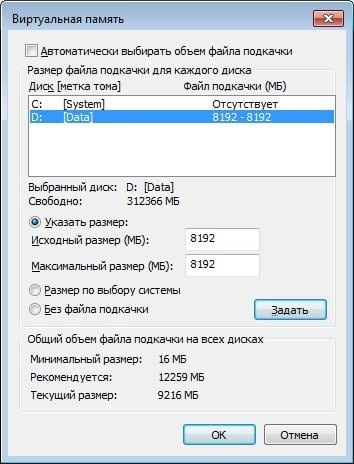
Установите нужный размер файла подкачки
- Если ошибка возникает при использовании игровой программы, перейдите в её графические настройки, и выберите их минимальные значения;
- Произведите правильную настройку «Java». Для решения проблем с игровой программой «Майнкрафт» перейдите в Панель управления Виндовс, найдите там «Java» и запустите данную среду исполнения. Нажмите на кнопку «View», затем дважды кликните на «Runtime Parametres». Введите туда –Xms256m – Xmx3072m (или больше). Xms – это минимальное выделение ОЗУ, Xmx – максимальное. Значение Xmx рекомендуют устанавливать на процентов 70-80% от общего объёма ОЗУ. Примените изменения, и перезагрузите ваш ПК.
Заключение
Ошибка «Out of memory» может иметь множество причин, связанных как с физическим недостатком памяти на ПК, так и другими детерминантами, изложенными мной выше. Для решения проблемы советую закрыть ненужные программы (вкладки браузера) на вашем компьютере (тем самым разгрузив его память), а самым эффективным инструментом является установка дополнительной планки памяти на ПК, что в большинстве случаев поможет избавиться от ошибки на вашем компьютере.
Continuing our journey from understanding the OutOfMemory Error from the previous article we now check on the main reasons which cause the OOM Error in Android Studio. Every Android developer must have encountered the OutOfMemoryError, sometimes known as OOM. If you haven’t yet encountered an OOM in your Android application, you will in the near future. Memory leaks cause the OutOfMemoryError in Android. To eliminate the OutOfMemoryError, you must first eliminate memory leaks from your Android application.

The Error!
But Firstly, What exactly is a Memory Leak?
When you run an application on an Android device, the Android system allocates memory to it in order for it to function. All variables, functions, and activity creation, for example, takes happen alone in that memory.
Example: If the Android System assigns 200MB to your program, for example, your application can only use 200MB at a time. If the amount of space allotted to the program is reduced over time, or if very little space is available, the Garbage Collector (GC) will release the memory held by variables and activities that are no longer in use. As a result, the application will get some space once more.
However, if you build your code in such a way that it contains references to objects that are no longer necessary, the Garbage Collector will be unable to release the unused space, and the application will run out of space. This is referred to as a Memory Leak.
We encounter the OutOfMemoryError in Android due to the phenomenon of Memory Leak in Android because your code is holding references to objects that are no longer required and the Garbage Collector is unable to perform its job, and your application consumes all of the space allocated to it by the Android System and demands more.
What Could Be the Cause of an OutOfMemoryError?
OutOfMemoryError in Android can occur for a variety of reasons. The following are some of the most typical causes of Memory Leaks that result in an OutOfMemoryError:
- The inner class that isn’t static
- Use of getContext() and getApplicationContext() incorrectly()
- Application of a static view, context, or activity
Let’s go through each of them One by One:
1. Inner class that isn’t static
If you have a nested class in your application, make it a static class because static classes don’t require an implicit reference to the outer class. If you make the inner class non-static, the outer class will be active till the application is active. If your class uses a lot of memory, this can result in an OutOfMemoryError. As a result, it’s preferable to make the inner class static. In Java, you must manually make the inner class static, whereas, in Kotlin, the inner class is static by default. In Kotlin, you don’t have to worry about static inner classes.
2. Use of getContext() and getApplicationContext() incorrectly()
In our application, we use a lot of third-party libraries, and the majority of them employ the Singleton class. If you need to give some context to a third-party library that is beyond the scope of the current activity, use getApplicationContext() rather than getContext(). Like in the Example below initialize is a static function in the library that uses the context
Java
SomeLibrary
{
object companion
{
initializeGeeksforGeeksLib(Content context)
{
this.context = context.getApplicationContext()
}
}
}
Some libraries, however, do not utilize the aforementioned notation. So, in that scenario, it will use the current activity’s context, and the current activity’s reference will be retained till the application is alive, which may result in an OutOfMemoryError (as the initialize function is static). As a result, it is preferable to utilize getApplicationContext() directly in your code rather than relying on third-party libraries. These are some of the methods for eliminating OutOfMemoryError from our application. It is preferable to write code that does not result in an OutOfMemoryError. Still, if your project is large and you’re having trouble finding the class that causes OutOfMemoryError, you can utilize Android Studio’s memory profiler to locate the classes that cause OutOfMemoryError.
3. Application of a static view, context, or activity
OutOfMemoryError will occur if you use any static views, contexts, or activities (if your activities are dealing with lots of space). This is because the program will hold the view, context, or activity until the application is alive, and the memory used by these will not be released by the Garbage Collector.
Example: If you’re going to use Bitmap in some project. That project will meet the OutOfMemoryError on your mobile device if you use more than 10 photos with a size of 500KB each. The number of images that can cause an OutOfMemoryError in other situations can be greater than or fewer than 10. You may ascertain the limit by adding photos to the BitmapArray one by one until you get an OOM, which indicates the device’s limit.
Continuing our journey from understanding the OutOfMemory Error from the previous article we now check on the main reasons which cause the OOM Error in Android Studio. Every Android developer must have encountered the OutOfMemoryError, sometimes known as OOM. If you haven’t yet encountered an OOM in your Android application, you will in the near future. Memory leaks cause the OutOfMemoryError in Android. To eliminate the OutOfMemoryError, you must first eliminate memory leaks from your Android application.
The Error!
But Firstly, What exactly is a Memory Leak?
When you run an application on an Android device, the Android system allocates memory to it in order for it to function. All variables, functions, and activity creation, for example, takes happen alone in that memory.
Example: If the Android System assigns 200MB to your program, for example, your application can only use 200MB at a time. If the amount of space allotted to the program is reduced over time, or if very little space is available, the Garbage Collector (GC) will release the memory held by variables and activities that are no longer in use. As a result, the application will get some space once more.
However, if you build your code in such a way that it contains references to objects that are no longer necessary, the Garbage Collector will be unable to release the unused space, and the application will run out of space. This is referred to as a Memory Leak.
We encounter the OutOfMemoryError in Android due to the phenomenon of Memory Leak in Android because your code is holding references to objects that are no longer required and the Garbage Collector is unable to perform its job, and your application consumes all of the space allocated to it by the Android System and demands more.
What Could Be the Cause of an OutOfMemoryError?
OutOfMemoryError in Android can occur for a variety of reasons. The following are some of the most typical causes of Memory Leaks that result in an OutOfMemoryError:
- The inner class that isn’t static
- Use of getContext() and getApplicationContext() incorrectly()
- Application of a static view, context, or activity
Let’s go through each of them One by One:
1. Inner class that isn’t static
If you have a nested class in your application, make it a static class because static classes don’t require an implicit reference to the outer class. If you make the inner class non-static, the outer class will be active till the application is active. If your class uses a lot of memory, this can result in an OutOfMemoryError. As a result, it’s preferable to make the inner class static. In Java, you must manually make the inner class static, whereas, in Kotlin, the inner class is static by default. In Kotlin, you don’t have to worry about static inner classes.
2. Use of getContext() and getApplicationContext() incorrectly()
In our application, we use a lot of third-party libraries, and the majority of them employ the Singleton class. If you need to give some context to a third-party library that is beyond the scope of the current activity, use getApplicationContext() rather than getContext(). Like in the Example below initialize is a static function in the library that uses the context
Java
SomeLibrary
{
object companion
{
initializeGeeksforGeeksLib(Content context)
{
this.context = context.getApplicationContext()
}
}
}
Some libraries, however, do not utilize the aforementioned notation. So, in that scenario, it will use the current activity’s context, and the current activity’s reference will be retained till the application is alive, which may result in an OutOfMemoryError (as the initialize function is static). As a result, it is preferable to utilize getApplicationContext() directly in your code rather than relying on third-party libraries. These are some of the methods for eliminating OutOfMemoryError from our application. It is preferable to write code that does not result in an OutOfMemoryError. Still, if your project is large and you’re having trouble finding the class that causes OutOfMemoryError, you can utilize Android Studio’s memory profiler to locate the classes that cause OutOfMemoryError.
3. Application of a static view, context, or activity
OutOfMemoryError will occur if you use any static views, contexts, or activities (if your activities are dealing with lots of space). This is because the program will hold the view, context, or activity until the application is alive, and the memory used by these will not be released by the Garbage Collector.
Example: If you’re going to use Bitmap in some project. That project will meet the OutOfMemoryError on your mobile device if you use more than 10 photos with a size of 500KB each. The number of images that can cause an OutOfMemoryError in other situations can be greater than or fewer than 10. You may ascertain the limit by adding photos to the BitmapArray one by one until you get an OOM, which indicates the device’s limit.
Windows 7 Professional Windows 7 Enterprise Windows 7 Ultimate Windows Server 2008 R2 Standard Windows Server 2008 R2 Enterprise Windows Server 2008 R2 Datacenter Windows Server 2008 R2 Foundation Windows Server 2008 R2 for Itanium-Based Systems More…Less
Symptoms
Consider the following scenario:
-
You have a computer that is running Windows 7 or Windows Server 2008 R2.
-
You try to export to some circular files that are used by the Event Tracing for Windows (ETW) feature.
In this scenario, you cannot export to these files, and you receive the following error message:
out of memory
For example, consider the following scenario:
-
You run the following command to set the cluster log size to 512 megabytes (MB):
cluster log /size:512
-
You run the following command to export the trace to a text file:
cluster log /g
In this scenario, you receive the error message. Because of this issue, the memory usage of the Cprepsrv.exe process is high. Additionally, the computer stops responding because memory is insufficient.
Cause
This issue occurs because the ETW engine handles finalized files incorrectly.
When the ETW engine handles some circular files that have finalized and non-finalized files, the buffer count value becomes very large. However, this incorrect buffer count value is used to allocate memory. Therefore, you receive the error message that is mentioned in the «Symptoms» section.
Resolution
Hotfix information
A supported hotfix is available from Microsoft. However, this hotfix is intended to correct only the problem that is described in this article. Apply this hotfix only to systems that are experiencing this specific problem.
If the hotfix is available for download, there is a «Hotfix download available» section at the top of this Knowledge Base article. If this section does not appear, submit a request to Microsoft Customer Service and Support to obtain the hotfix.
Note If additional issues occur or if any troubleshooting is required, you might have to create a separate service request. The usual support costs will apply to additional support questions and issues that do not qualify for this specific hotfix. For a complete list of Microsoft Customer Service and Support telephone numbers or to create a separate service request, visit the following Microsoft Web site:
http://support.microsoft.com/contactus/?ws=supportNote The «Hotfix download available» form displays the languages for which the hotfix is available. If you do not see your language, it is because a hotfix is not available for that language.
Prerequisites
To apply this hotfix, you must be running one of the following operating systems:
-
Windows 7
-
Windows 7 Service Pack 1 (SP1)
-
Windows Server 2008 R2
-
Windows Server 2008 R2 Service Pack 1 (SP1)
For more information about how to obtain a Windows 7 or a Windows Server 2008 R2 service pack, click the following article number to view the article in the Microsoft Knowledge Base:
976932 Information about Service Pack 1 for Windows 7 and for Windows Server 2008 R2
Registry information
To use the hotfix in this package, you do not have to make any changes to the registry.
Restart requirement
You must restart the computer after you apply this hotfix.
Hotfix replacement information
This hotfix does not replace a previously released hotfix.
File information
The global version of this hotfix installs files that have the attributes that are listed in the following tables. The dates and the times for these files are listed in Coordinated Universal Time (UTC). The dates and the times for these files on your local computer are displayed in your local time together with your current daylight saving time (DST) bias. Additionally, the dates and the times may change when you perform certain operations on the files.
Windows 7 and Windows Server 2008 R2 file information notes
Important Windows 7 hotfixes and Windows Server 2008 R2 hotfixes are included in the same packages. However, hotfixes on the Hotfix Request page are listed under both operating systems. To request the hotfix package that applies to one or both operating systems, select the hotfix that is listed under «Windows 7/Windows Server 2008 R2» on the page. Always refer to the «Applies To» section in articles to determine the actual operating system that each hotfix applies to.
-
The files that apply to a specific product, SR_Level (RTM, SPn), and service branch (LDR, GDR) can be identified by examining the file version numbers as shown in the following table.
Version
Product
SR_Level
Service branch
6.1.760
0.
20xxxWindows 7 and Windows Server 2008 R2
RTM
LDR
6.1.760
1.
21xxxWindows 7 and Windows Server 2008 R2
SP1
LDR
-
The MANIFEST files (.manifest) and the MUM files (.mum) that are installed for each environment are listed separately in the «Additional file information for Windows Server 2008 R2 and for Windows 7» section. MUM and MANIFEST files, and the associated security catalog (.cat) files, are extremely important to maintain the state of the updated components. The security catalog files, for which the attributes are not listed, are signed with a Microsoft digital signature.
For all supported x86-based versions of Windows 7
|
File name |
File version |
File size |
Date |
Time |
Platform |
|---|---|---|---|---|---|
|
Advapi32.dll |
6.1.7600.20928 |
640,000 |
19-Mar-2011 |
06:52 |
x86 |
|
Advapi32.dll |
6.1.7601.21687 |
640,512 |
19-Mar-2011 |
06:53 |
x86 |
For all supported x64-based versions of Windows 7 and of Windows Server 2008 R2
|
File name |
File version |
File size |
Date |
Time |
Platform |
|---|---|---|---|---|---|
|
Advapi32.dll |
6.1.7600.20928 |
877,568 |
19-Mar-2011 |
07:32 |
x64 |
|
Advapi32.dll |
6.1.7601.21687 |
878,080 |
19-Mar-2011 |
07:38 |
x64 |
|
Advapi32.dll |
6.1.7600.20928 |
640,000 |
19-Mar-2011 |
06:52 |
x86 |
|
Advapi32.dll |
6.1.7601.21687 |
640,512 |
19-Mar-2011 |
06:53 |
x86 |
For all supported IA-64-based versions of Windows Server 2008 R2
|
File name |
File version |
File size |
Date |
Time |
Platform |
|---|---|---|---|---|---|
|
Advapi32.dll |
6.1.7600.20928 |
1,564,160 |
19-Mar-2011 |
06:43 |
IA-64 |
|
Advapi32.dll |
6.1.7601.21687 |
1,564,160 |
19-Mar-2011 |
06:48 |
IA-64 |
|
Advapi32.dll |
6.1.7600.20928 |
640,000 |
19-Mar-2011 |
06:52 |
x86 |
|
Advapi32.dll |
6.1.7601.21687 |
640,512 |
19-Mar-2011 |
06:53 |
x86 |
Status
Microsoft has confirmed that this is a problem in the Microsoft products that are listed in the «Applies to» section.
More Information
For more information about software update terminology, click the following article number to view the article in the Microsoft Knowledge Base:
824684 Description of the standard terminology that is used to describe Microsoft software updates
For more information about a similar issue in Windows Server 2008 or in Windows Vista, click the following article number to view the article in the Microsoft Knowledge Base:
2257986 You receive the «out of memory» error message when you try to export to circular files in Windows Server 2008 or in Windows Vista
Additional file information
Additional file information for Windows 7 and for Windows Server 2008 R2
Additional files for all supported x86-based versions of Windows 7
|
File name |
Update.mum |
|
File version |
Not applicable |
|
File size |
2,773 |
|
Date (UTC) |
21-Mar-2011 |
|
Time (UTC) |
21:49 |
|
Platform |
Not applicable |
|
File name |
X86_56f2164f922b2f8537785abcba4fac65_31bf3856ad364e35_6.1.7601.21687_none_ee94589842885ebe.manifest |
|
File version |
Not applicable |
|
File size |
696 |
|
Date (UTC) |
21-Mar-2011 |
|
Time (UTC) |
21:49 |
|
Platform |
Not applicable |
|
File name |
X86_f75d57ff99dca7655288df83c5252bb6_31bf3856ad364e35_6.1.7600.20928_none_485b6566fa29ab9f.manifest |
|
File version |
Not applicable |
|
File size |
696 |
|
Date (UTC) |
21-Mar-2011 |
|
Time (UTC) |
21:49 |
|
Platform |
Not applicable |
|
File name |
X86_microsoft-windows-advapi32_31bf3856ad364e35_6.1.7600.20928_none_e3ec2e7d00bf840d.manifest |
|
File version |
Not applicable |
|
File size |
2,719 |
|
Date (UTC) |
19-Mar-2011 |
|
Time (UTC) |
07:22 |
|
Platform |
Not applicable |
|
File name |
X86_microsoft-windows-advapi32_31bf3856ad364e35_6.1.7601.21687_none_e590a9cafe178121.manifest |
|
File version |
Not applicable |
|
File size |
2,719 |
|
Date (UTC) |
19-Mar-2011 |
|
Time (UTC) |
07:20 |
|
Platform |
Not applicable |
Additional files for all supported x64-based versions of Windows 7 and of Windows Server 2008 R2
|
File name |
Amd64_3144ba4d9040a7e1feab72a1e3b0ebc4_31bf3856ad364e35_6.1.7600.20928_none_8350571323769fab.manifest |
|
File version |
Not applicable |
|
File size |
1,040 |
|
Date (UTC) |
21-Mar-2011 |
|
Time (UTC) |
21:49 |
|
Platform |
Not applicable |
|
File name |
Amd64_56f2164f922b2f8537785abcba4fac65_31bf3856ad364e35_6.1.7601.21687_none_4ab2f41bfae5cff4.manifest |
|
File version |
Not applicable |
|
File size |
698 |
|
Date (UTC) |
21-Mar-2011 |
|
Time (UTC) |
21:49 |
|
Platform |
Not applicable |
|
File name |
Amd64_8014512d693bc0ef97c6e78d60ef6e04_31bf3856ad364e35_6.1.7600.20928_none_4cc5c8743cf574aa.manifest |
|
File version |
Not applicable |
|
File size |
700 |
|
Date (UTC) |
21-Mar-2011 |
|
Time (UTC) |
21:49 |
|
Platform |
Not applicable |
|
File name |
Amd64_84924b498e7ec05493e1d22793b6dd48_31bf3856ad364e35_6.1.7601.21687_none_204a572a8aa3532c.manifest |
|
File version |
Not applicable |
|
File size |
1,040 |
|
Date (UTC) |
21-Mar-2011 |
|
Time (UTC) |
21:49 |
|
Platform |
Not applicable |
|
File name |
Amd64_c7bacbeccb6d5e63576fd2c03142b861_31bf3856ad364e35_6.1.7601.21687_none_e1118973af1d173a.manifest |
|
File version |
Not applicable |
|
File size |
700 |
|
Date (UTC) |
21-Mar-2011 |
|
Time (UTC) |
21:49 |
|
Platform |
Not applicable |
|
File name |
Amd64_f75d57ff99dca7655288df83c5252bb6_31bf3856ad364e35_6.1.7600.20928_none_a47a00eab2871cd5.manifest |
|
File version |
Not applicable |
|
File size |
698 |
|
Date (UTC) |
21-Mar-2011 |
|
Time (UTC) |
21:49 |
|
Platform |
Not applicable |
|
File name |
Amd64_microsoft-windows-advapi32_31bf3856ad364e35_6.1.7600.20928_none_400aca00b91cf543.manifest |
|
File version |
Not applicable |
|
File size |
2,723 |
|
Date (UTC) |
19-Mar-2011 |
|
Time (UTC) |
08:18 |
|
Platform |
Not applicable |
|
File name |
Amd64_microsoft-windows-advapi32_31bf3856ad364e35_6.1.7601.21687_none_41af454eb674f257.manifest |
|
File version |
Not applicable |
|
File size |
2,723 |
|
Date (UTC) |
19-Mar-2011 |
|
Time (UTC) |
08:13 |
|
Platform |
Not applicable |
|
File name |
Update.mum |
|
File version |
Not applicable |
|
File size |
4,059 |
|
Date (UTC) |
21-Mar-2011 |
|
Time (UTC) |
21:49 |
|
Platform |
Not applicable |
|
File name |
X86_microsoft-windows-advapi32_31bf3856ad364e35_6.1.7600.20928_none_e3ec2e7d00bf840d.manifest |
|
File version |
Not applicable |
|
File size |
2,719 |
|
Date (UTC) |
19-Mar-2011 |
|
Time (UTC) |
07:22 |
|
Platform |
Not applicable |
|
File name |
X86_microsoft-windows-advapi32_31bf3856ad364e35_6.1.7601.21687_none_e590a9cafe178121.manifest |
|
File version |
Not applicable |
|
File size |
2,719 |
|
Date (UTC) |
19-Mar-2011 |
|
Time (UTC) |
07:20 |
|
Platform |
Not applicable |
Additional files for all supported IA-64-based versions of Windows Server 2008 R2
|
File name |
Ia64_2f59fc48dd07386c526633d65501fb87_31bf3856ad364e35_6.1.7600.20928_none_65e5f6455878c21f.manifest |
|
File version |
Not applicable |
|
File size |
698 |
|
Date (UTC) |
21-Mar-2011 |
|
Time (UTC) |
21:49 |
|
Platform |
Not applicable |
|
File name |
Ia64_56f2164f922b2f8537785abcba4fac65_31bf3856ad364e35_6.1.7601.21687_none_ee95fc8e428667ba.manifest |
|
File version |
Not applicable |
|
File size |
697 |
|
Date (UTC) |
21-Mar-2011 |
|
Time (UTC) |
21:49 |
|
Platform |
Not applicable |
|
File name |
Ia64_c79b6fad3ef91b5958151a25bde7f91e_31bf3856ad364e35_6.1.7601.21687_none_2c4d549af0405275.manifest |
|
File version |
Not applicable |
|
File size |
698 |
|
Date (UTC) |
21-Mar-2011 |
|
Time (UTC) |
21:49 |
|
Platform |
Not applicable |
|
File name |
Ia64_f75d57ff99dca7655288df83c5252bb6_31bf3856ad364e35_6.1.7600.20928_none_485d095cfa27b49b.manifest |
|
File version |
Not applicable |
|
File size |
697 |
|
Date (UTC) |
21-Mar-2011 |
|
Time (UTC) |
21:49 |
|
Platform |
Not applicable |
|
File name |
Ia64_microsoft-windows-advapi32_31bf3856ad364e35_6.1.7600.20928_none_e3edd27300bd8d09.manifest |
|
File version |
Not applicable |
|
File size |
2,721 |
|
Date (UTC) |
19-Mar-2011 |
|
Time (UTC) |
08:20 |
|
Platform |
Not applicable |
|
File name |
Ia64_microsoft-windows-advapi32_31bf3856ad364e35_6.1.7601.21687_none_e5924dc0fe158a1d.manifest |
|
File version |
Not applicable |
|
File size |
2,721 |
|
Date (UTC) |
19-Mar-2011 |
|
Time (UTC) |
08:15 |
|
Platform |
Not applicable |
|
File name |
Update.mum |
|
File version |
Not applicable |
|
File size |
2,169 |
|
Date (UTC) |
21-Mar-2011 |
|
Time (UTC) |
21:49 |
|
Platform |
Not applicable |
|
File name |
X86_microsoft-windows-advapi32_31bf3856ad364e35_6.1.7600.20928_none_e3ec2e7d00bf840d.manifest |
|
File version |
Not applicable |
|
File size |
2,719 |
|
Date (UTC) |
19-Mar-2011 |
|
Time (UTC) |
07:22 |
|
Platform |
Not applicable |
|
File name |
X86_microsoft-windows-advapi32_31bf3856ad364e35_6.1.7601.21687_none_e590a9cafe178121.manifest |
|
File version |
Not applicable |
|
File size |
2,719 |
|
Date (UTC) |
19-Mar-2011 |
|
Time (UTC) |
07:20 |
|
Platform |
Not applicable |
Need more help?
Google Chrome может широко использоваться на мои миллиарды по всему миру, но он посмертно известен тем, что пожирает ресурсы. Люди, запускающие его на старом оборудовании, часто заявляют, что он замедляется и иногда выдает код ошибки. Много Пользователи Chrome сообщают о ошибка «недостаточно памяти» при недавней загрузке веб-сайта.

На самом деле есть два кода ошибок, с которыми пользователи сталкиваются во время просмотра. Один говорит: «Ай, щёлк! Что-то пошло не так при отображении этой веб-страницы. Код ошибки: Недостаточно памяти. И другое сообщение об ошибке, которое вы, возможно, просматриваете, гласит: «Ой, щелк! Google Chrome не хватило памяти при попытке отобразить эту веб-страницу».
Оба кода ошибки означают одно и то же. Этому браузеру Chrome не хватает памяти или ресурсов для извлечения и открытия рассматриваемой веб-страницы. Это может быть вызвано несколькими причинами, которые мы рассмотрим ниже с решениями.
Давай начнем.
1. Закройте некоторые вкладки
Открытие слишком большого количества вкладок в Chrome может привести к замедлению работы в Интернете. Проверьте, можете ли вы закрыть некоторые вкладки, которые больше не нужны. Это должно освободить память для других вкладок, а также для новых вкладок.

Также рекомендуется использовать несколько окон Chrome для открытия вкладок. Например, вместо того, чтобы открывать 10 вкладок в одном окне, вы можете открыть 4-5 вкладок в одном, а остальные — в другом окне Chrome. Короче говоря, управляйте открытыми вкладками, когда это возможно, чтобы сэкономить память.
2. Попробуйте режим инкогнито
Мы рекомендуем использовать режим инкогнито (чтобы открыть, нажмите Ctrl+Shift+N), поскольку он отключает все расширения, работающие в фоновом режиме. Иногда расширение может вызывать конфликт.
Откройте веб-страницу, которая выдает ошибку «недостаточно памяти», и проверьте, загружается ли она в режиме инкогнито. Если да, то одно из расширений может быть виновато. Отключите все расширения и включите их по одному, чтобы выяснить, какое из них вызывает проблему.
Шаг 1: Откройте новую вкладку Chrome и перейдите по указанному ниже адресу.
хром://расширения
Шаг 2: Нажмите на переключатель, чтобы включить/отключить расширение, и нажмите кнопку «Удалить», чтобы удалить расширение Chrome.

Перед перезапуском Chrome не забудьте сохранить всю свою работу, чтобы не потерять ее. После этого закройте все открытые окна Chrome вместе с вкладками, подождите несколько секунд, а затем перезапустите Chrome.
4. Управление расширениями
Мы обсудили, как старое несовместимое расширение может вызывать утечку памяти. Но установка слишком большого количества расширений также может привести к проблемам с памятью в Chrome, поскольку они, как правило, потребляют много ресурсов. Выше мы видели, как вы можете удалить или удалить расширение Chrome, но вместо этого вы также можете управлять расширениями и быстро отключать / включать их, когда это необходимо, не вмешиваясь в настройки браузера.
По иронии судьбы, это требует установки другого расширения, но это облегчит вашу жизнь.
5. Очистите кеш браузера и файлы cookie.
Очистка кеша браузера и файлов cookie может помочь повысить производительность браузера и исправить некоторые проблемы, такие как ошибка «недостаточно памяти», с которой сталкиваются пользователи. Существует скрытый трюк для очистки кеша и файлов cookie для одного сайта, который не загружается в вашем браузере, или вы можете очистить данные для всех сайтов в настройках браузера. Не забудьте сохранить все открытые вкладки и работать, прежде чем очищать кеш и куки, если вы не уверены, что произойдет потом.
6. Очистить временные файлы
Кэш веб-сайта и файлы cookie помогают быстро загружать соответствующие сайты. И Chrome сохраняет некоторые временные файлы на вашем компьютере с Windows, которые со временем могут накопиться до нескольких ГБ. Вы удаляете эти временные и старые файлы, чтобы Chrome получил новый пакет данных и предотвратил конфликтующие ошибки.

Windows 10 поставляется со встроенной опцией для удаления временных файлов с каждого диска на вашем компьютере. Вам нужно очистить его для диска, на котором вы установили Chrome. Скорее всего, это диск по умолчанию, обычно это диск C. Вы можете использовать стороннее приложение, если предпочитаете его.
7. Запустите инструмент очистки Chrome
Google выпустил специальный инструмент для устранения многих распространенных проблем, связанных с браузером Chrome. Его можно загрузить бесплатно, и вы найдете ссылку ниже. Google рекомендует пользователям запустить утилиту один раз, чтобы исправить проблемы, связанные с памятью и сбоем страницы.
Скачать инструмент очистки Chome
8. Отключить аппаратное ускорение
Шаг 1. Перейдите в «Настройки» > «Дополнительно» > «Система» или введите указанный ниже путь в адресной строке.
хром://настройки/система
Шаг 2. Отключите параметр «Использовать аппаратное ускорение, когда оно доступно».

Проверьте еще раз, можете ли вы открыть веб-страницу или по-прежнему получаете код ошибки «недостаточно памяти».
9. Новый профиль пользователя
Профиль пользователя Chrome мог быть поврежден. Создание нового профиля может решить проблему с памятью. Шаги просты и не займут больше нескольких минут.
10. Переустановите Хром
Кэш и временные файлы, которые накапливаются со временем, могут привести к ошибкам. Когда пользователи удаляют приложение в Windows, оно оставляет записи реестра и другие файлы, которые также могут вызывать конфликты. Вот почему мы рекомендуем чистую переустановку.
Вы можете использовать надежные приложения, такие как Revo Uninstaller, для удаления приложений в Windows, а также для удаления оставшихся файлов.
Вы можете проверить текущую версию Chrome, установленную на вашем компьютере, по указанному ниже адресу.
хром://настройки/помощь
После этого вы готовы загрузить и установить последнюю стабильную версию Chrome.
Получить Chrome
11. Увеличьте лимит памяти
Это для опытных пользователей, и большинству из вас не придется прибегать к этому. У Google есть установить лимит памяти 512 МБ для 32-разрядных и 1,4 ГБ для 64-разрядных систем. Используя «–max_old_space_size», вы можете увеличить этот предел памяти позже до 1 ГБ для 32-разрядных и 4 ГБ для 64-разрядных систем. Обратите внимание, что эти предельные значения памяти относятся к отдельным вкладкам, а не к окнам.
На основе текущих обсуждения, чтобы удалить это ограничение в 4 ГБ, вы можете ожидать решения в будущем. Причина в том, что повышение лимита затронет лишь небольшое количество пользователей. Несколько лет назад большинство веб-приложений также не использовали так много памяти, но теперь все по-другому. Некоторые разработчики также отметили, что ограничение памяти до 4 ГБ предотвратило некоторые эксплойты, тем самым защитив пользователей.

Однако сейчас все по-другому, и у пользователей есть более мощные машины с Chrome, а веб-приложения прошли долгий путь. Будем надеяться, что команда разработчиков Google Chrome увеличит лимит памяти в последующих сборках.
Один из способов увеличить лимит памяти — изменить адрес ссылки Chrome с:
C:Program Files (x86)GoogleChromeApplicationchrome.exe
к
C:Program Files (x86)GoogleChromeApplicationchrome.exe» —max_old_space_size=4096
Опять же, здесь задействовано много переменных, поскольку у разных пользователей разные версии, ОЗУ, ОС и т. д., что затрудняет предложение универсального решения.
Вниз по переулку памяти
Вы можете увидеть ошибку «недостаточно памяти» в Chrome, если у вас одновременно открыто слишком много вкладок или слишком много расширений, работающих в фоновом режиме. Упомянутые выше решения должны помочь вам решить проблему, и вы должны вернуться к просмотру своих любимых сайтов в кратчайшие сроки.
Далее: Firefox пробивается на доминирующий рынок браузеров Chrome с Quantum. Стоит ли переходить с Chrome на Firefox? Проверьте это.
Post Views: 739