В этом документе содержатся сведения о том, как устранить неполадки связывания и импорта при импорте аудиофайлов.
Выявление неполадок связывания и импорта при работе с аудиофайлами
При попытке импортировать такие файлы, как AVCHD (MTS), MP3 и MP4, в проект при помощи Premiere Pro может появиться сообщение об ошибке, в котором говорится: «Файл содержит неподдерживаемый тип сжатия». Эта ошибка иногда возникает в других продуктах Adobe для работы с аудио и видео, такими как After Effects и Media Encoder.
Устранение ошибок импорта
-
Если вы видите сообщение об ошибке «Файл содержит неподдерживаемый тип сжатия», проверьте Кэшированные медиафайлы и базу данных кэшированных медиафайлов в Premiere Pro.
-
Выберите пункт меню «Правка» > «Установки» > «База данных кэшированных медиафайлов» в ОС Windows или меню Premiere Pro > «Установки» > «База данных кэшированных медиафайлов» в Mac OS. Запомните, где находится папка Media Cache Database на вашем компьютере.

Как очистить кэш медиафайлов -
Закройте Premiere Pro и другие приложения Adobe для работы с аудио- и видеофайлами.
-
Перейдите в папку Media Cache в каталоге Premiere Pro > Preferences и переименуйте папки Media Cache file и Media Cache. Выберите «Очистить», чтобы очистить папку с базой данных кэшированных медиафайлов.
-
Запустите Premiere Pro и попытайтесь импортировать требуемые файлы.
-
Если проблема все равно наблюдается, измените каталог для хранения файлов AVCHD и проверьте, удалось ли устранить эту проблему. Например, если структура папок выглядит следующим образом:
AVCHD>BDMV>STREAM>.MTS0000
Создайте новую папку XYZ и переместите содержимое папки AVCHD XYZ в папку XYZ.
Убедитесь в том, что структура папки с файлами MTS идентична со структурой исходной папки.
-
Если проблему устранить не удается, она может быть связана с активацией.
-
Проверьте, не используется ли пробная версия Adobe Premiere Pro. Если используется пробная версия, могут наблюдаться проблемы при импорте файлов AVCHD и MP4, поскольку необходимые файлы с расширением .dll отсутствуют в папке C:UsersОбщиеОбщие документыAdobeInstalledCodecs.Обновите тариф до платной подписки на Creative Cloud.
-
В ОС Windows удалите Premiere Pro.
-
Перейдите в папку C:UsersОбщиеОбщие документыAdobeInstalledCodecs.
-
Переименуйте папку AdobeInstalledCodecs.

Как переименовать папку AdobeInstalledCodecs в ОС Windows -
Переустановите Premiere Pro.
-
Запустите Premiere Pro и попытайтесь импортировать файлы MTS или MP4.
-
В Mac OS удалите Premiere Pro.
-
Перейдите в папку Mac HD/Users/Имя пользователя/Shared и переименуйте папку AdobeInstalledCodecs.

Как переименовать папку AdobeInstalledCodecs в Mac OS -
Переустановите Premiere Pro.
-
Запустите Premiere Pro и попытайтесь импортировать файлы MTS или MP4.
Сжатие данных и шифрование – это лишь дань моде. Причем сегодня они могут быть на пике популярности, но в один прекрасный день становятся совершенно не модными и не важными. Их популярность постоянно то растет, то снижается – циклично. Причем иногда шифрование данных становится более модным, в то время как сжатие сильно теряет в популярности, а затем ситуация снова может измениться…
Давайте посмотрим, какие типы шифрования (и сжатия) вообще доступны для пользователя Windows, и что вы можете сделать, если потеряли сжатые или зашифрованные данные.

Содержание:
- NTFS-сжатие в реальном времени
- Ограничения на сжатие файлов
- Алгоритмы самосжатия
- Восстановление зашифрованных данных
- Восстановление файлов с зашифрованных NTFS
- Восстановление данных из разделов зашифрованных BitLocker
Начнем с сжатия.
NTFS-сжатие в реальном времени
Windows 7, 8, 8.1, а также некоторые более старые версии Windows используют высокоразвитую файловую систему NTFS. Одной из особенностей NTFS является возможность сжатия файлов в реальном времени с использованием быстрого алгоритма потокового сжатия. Алгоритмы сжатия в NTFS нацелены на обеспечение максимально понятной и прозрачной работы пользователя с сжатыми данными. То есть ни вы, ни какое-либо приложение не определите, что определенный файл или папка являются сжатыми, если только вы не пытались обнаружить сжатый элемент намеренно.
Сжатие NTFS – это быстро, понятно и удобно. Вы можете сжимать файлы поштучно, изменяя их свойства; так же вы можете сжать папку или весь диск (в этом случае сжатие станет стандартным атрибутом для всех файлов внутри сжатого объекта).
Если вы хотите использовать сжатие, обратите внимание, что оно лучше всего подходит для файлов малого и среднего размера, которые хорошо поддаются сжатию (например, сообщения электронной почты, файлы журналов, тексты или HTML), записываемые не часто и в определенной последовательности, не сжимаемые сами по себе.
Последний момент важен, поскольку он в значительной степени исключает возможность использовать сжатие для тех данных, которые занимают больше всего места на вашем жестком диске, например, фотографий, музыки и видео. Просто потому что все видео уже и так сжаты в максимально возможной степени. То же самое можно сказать о картинах во всех распространенных форматах (включая сжатие с потерей качества и без). Музыка также сжимается различными алгоритмами сжатия с потерями (MP3, OGG, AC3) или без (FLAC, ALAC). Очевидно, что нет никакого смысла сжимать папки, содержащие какие-либо из этих файлов.
На самом деле, сжатие папки «Документы» – также не лучшая идея. «Новые» форматы Microsoft Office (.docx, .xlsx и т. д.) на самом деле являются XML-файлами, сжатыми в ZIP-архивы. Так что использование NTFS-сжатия для этих файлов (или всей папки «Документы») также не принесет пользы.
Сжатие исполняемых файлов действительно может освободить несколько мегабайт – за счет более длительного времени их загрузки. Наконец, сжатие системных файлов может привести к невозможности загрузки всей операционной системы (хотя Windows достаточно умна, чтобы защитить эти файлы от сжатия).
Ограничения на сжатие файлов</h2
Довольно теории. Если вы читаете это, вероятно, у вас пропал файл, папка или целый сжатый раздел, и вы ищете инструмент для восстановления этих данных. Итак, есть хорошие новости и плохие.
Хорошая новость в том, что файлы, сжатые NTFS, возможно восстановить. А плохая – в том, что они не восстанавливаются так же легко и в том же объеме, что файлы, не подвергавшиеся сжатию.
Хотя разработчики многих средств восстановления данных заявляют о возможности восстановления сжатых файлов, эффективность данной функции на самом деле может быть весьма ограниченной. Например, некоторые инструменты восстановления данных оказываются неспособными использовать нужный алгоритм обработки данных (вариант метода поиска по сигнатурам) в файлах, сжатых NTFS. Разумеется, лучшие инструменты обнаруживают, что определенный дисковый кластер был сжат, и сразу же распаковывают его, чтобы применить алгоритм восстановления по сигнатурам.
Другая проблема с файлами, сжатыми NTFS, посерьезнее, чем обычная фрагментация. Реализация алгоритма сжатия файлов в Windows позволяет практически мгновенно получать доступ к сжатым данным. Однако из-за некоторых конструктивных особенностей этих алгоритмов большие сжимаемые файлы могут сильно фрагментироваться. Из-за этого восстановить сжатые файлы размером более 64 КБ гораздо сложнее, чем несжатые файлы или файлы меньшего размера (например, сообщения электронной почты).
Если вы ищите инструмент для восстановления файлов, сжатых NTFS, попробуйте RS Partition Recovery, программу, поддерживающую восстановление сжатых файлов.
Алгоритмы самосжатия
Существует существенное исключение из правил, описанных выше. Некоторые устройства хранения данных, такие как накопители SSD с контроллерми Sandforce, сжимают данные в фоновом режиме. Суть этой логики – в сокращении износа привода (через запись меньших объемов информации в ячейки памяти NAND) и одновременном повышении производительности. В реальности это работает не так хорошо, как задумывалось, и ни одна другая компания (за парой исключений) не использовала этот принцип.
Что касается восстановления данных, самосжимающие устройства хранения данных полностью прозрачны для приложений, операционной системы и, что самое важное, для инструментов восстановления данных. Если мы говорим о контроллерах Sandforce, в них была допущена ошибка в реализации программы TRIM и «зачистке мусора», в результате чего удаленные данные просто оставались на устройстве, а не стирались. Все это сделало SSD-накопители Sandforce прекрасно подходящими для восстановления данных (но не особенно подходящими для других целей, в частности, для их использования в качестве, собственно, дисков).
Восстановление зашифрованных данных
Шифрование – очень общий термин. Зашифрованные данные могут варьироваться от защищенных паролем документов Word до целых разделов диска, заблокированных с помощью шифрования. В этой статье мы не сможем охватить все, что связано с шифрованием – для этого пришлось бы написать книгу, и не самую тонкую.
Вместо этого мы поговорим о двух совершенно разных типах шифрования, доступных пользователям Windows. Это файловое шифрование NTFS и разделов BitLocker.
Восстановление файлов с зашифрованных NTFS
NTFS – замечательная файловая система с множеством возможностей и функций. Одна из них – Encrypting File System (EFS) – обеспечивает надежное и понятное шифрование файлов и папок в разделах NTFS. Важно отметить, что EFS шифрует данные для каждого файла и не использует свободное пространство специально для шифрования. Однако любые зашифрованные файлы, которые теряются или удаляются, будут оставаться на диске в зашифрованном виде, даже если они уже находятся на дисковом пространстве, помеченном как «свободное». Важно отметить, что вы не можете шифровать и сжимать файлы с помощью NTFS одновременно, поскольку это взаимоисключающие опции.
NTFS шифрует данные с использованием объемного симметричного ключа. Это шифрование полностью прозрачно для пользователя и приложений, запрашивающих доступ к зашифрованным файлам через системные API. Однако пытаясь получить доступ к зашифрованным файлам, читая диск напрямую (в обход системных API), вы будете видеть только зашифрованные данные, расшифровать которые, не зная ключа шифрования и не владея правильным алгоритмом дешифрования, очень сложно. В результате многие средства восстановления данных либо не могут восстановить зашифрованные файлы, либо используют только половинчатый подход (например, производят восстановление на уровне файловой системы, но не используют низкоуровневый поиск данных / сигнатур).
Тем не менее, в NTFS, зашифрованные файлы — это просто … файлы. Если с ними что-то случается, и в файловой системе все еще есть информация о их местонахождении в прошлом, вы можете применить все известные приемы, чтобы проанализировать записи файловой системы и восстанавливать зашифрованный файл в оригинальном виде. Инструменты для восстановления данных, работающие с такими данными, всегда «помечают» восстановленный файл как зашифрованный, чтобы Windows могла правильно распознать его и расшифровать содержимое файла для пользователя.
Обратите внимание, что файлы с зашифрованными файлами NTFS могут быть успешно дешифрованы только после того, как их владелец войдет в свою учетную запись. Если вы не знаете пароль для учетной записи пользователя, сброс этого пароля мгновенно сделает зашифрованные файлы недоступными. Также обратите внимание, что для дешифрования файлов, зашифрованных NTFS, можно использовать текущий пароль или предыдущие пароли для этой учетной записи, которые использовались в прошлом.
Ищете инструмент для восстановления файлов, зашифрованных NTFS? Попробуйте RS Partition Recovery – средство восстановления данных, поддерживающее восстановление зашифрованных файлов и папок.
Восстановление данных из разделов зашифрованных BitLocker
BitLocker – это встроенная система шифрования всего диска Windows. BitLocker не работает с отдельными файлами и папками. Вместо этого он шифрует весь том на диске, включая свободное пространство (независимо от настроек).
Разделы BitLocker могут быть прочитаны всеми версиями Windows (Windows 7, 8, 8.1 и новее). Однако новые тома могут быть созданы только в Windows 7 Ultimate и большинстве систем Windows 8.x.
Начиная с Windows 8, основной раздел (диск C:) автоматически зашифровывается с помощью BitLocker после входа пользователя в учетную запись Microsoft (учитывая, что учетная запись Microsoft имеет административные привилегии). Если администратор использует локальную учетную запись Windows, диск C: по умолчанию не зашифрован.
Что это значит для возможностей восстановления данных? Что при восстановлении данных вам так или иначе придется иметь дело с разделами BitLocker…
Шифрование BitLocker полностью прозрачно. Доступ к томам BitLocker можно получить на низком уровне с помощью системных API, которые вернут незашифрованные данные. В результате вы сможете успешно восстановить информацию из разделов BitLocker, используя те же инструменты восстановления данных, которые вы использовали бы для восстановления простого, незашифрованного раздела.
Трудности начинаются, когда ваша система не загружается, и вы пытаетесь восстановить раздел BitLocker, который не был установлен. Если вы подключили диск к системе Windows, вы можете установить раздел BitLocker, введя ключ восстановления. (Не знаете, куда вводить этот ключ? Не беспокойтесь, Windows предложит вам это в тот момент, когда вы попытаетесь получить доступ к разделу BitLocker.) Свой ключ восстановления вы можете получить, войдя в свою учетную запись Microsoft и используя следующую ссылку: https://onedrive.live.com/recoverykey
После этого найдите правильный ключ восстановления, сопоставив запрошенное имя со списком доступных ключей. Раздел BitLocker будет установлен.
Что делать, если у вас нет доступа к ключу восстановления? В этом случае вы действительно ничего не можете сделать. В конце концов, BitLocker был разработан, чтобы противостоять атакам против несанкционированного доступа.
Ищете инструмент для восстановления защищенных разделов BitLocker? Попробуйте RS Partition Recovery, средство восстановления данных, поддерживающее восстановление дисков и разделов, зашифрованных BitLocker.
Full solutions to «can’t read from the source file or disk error» are available here. Try them one by one to fix «can’t read from the source file or disk» while copying from external hard drive in Windows 10/8/7.
Can’t Read from the Source File or Disk
Sometimes, when you try to copy files to another location like external hard drive, you receive «can’t read from the source file or disk error» like shown in the picture below. Even you try again and again, this error persists.
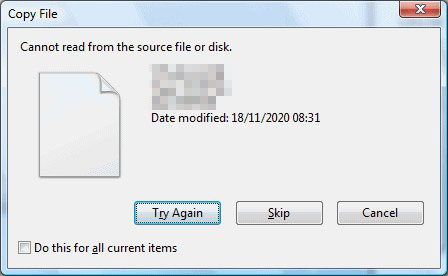
By searching on the internet, we find that many users had the experience of suffering and struggling with this error. Here is a true example that states more from Geekstogo.com: Video Files Can Be Played Well but Cannot Be Copied.
Question:
I’m trying to copy some old files from one of my external hard-drives, onto a more recent one with bigger memory. I’ve had no problem so far, I’ve moved about 70GB with no problems, but now there are 2 files which keep giving me this error. I can’t copy it from one hard-drive to the other, I can’t create a copy on my desktop, I can’t create a copy on the original hard drive. The only thing that I can do, is «delete» the file and have it sent to the Recycle bin, and I tried moving it to my desktop from there but got the same message, and can only restore it to its original location. They are videos files (.avi) and I watched them all the way through with no issues so the files aren’t corrupt. I’m running Windows Vista, with admin permissions. If there’s any more info you need to know, please ask.
Do you know what does «can’t read from the source file or disk while copying» indicates, and how can you remove this error? Please read on.
Possible Reasons and Solutions to This Error
In this article, we list 5 possible causes and corresponding solutions to help address hard disk can’t read from source file or disk. Please try them one by one and see whether a solution is helpful.
1. Possible Bad Sectors
If you’re using an external drive to your local computer, please try plugging in the external drive into another computer and see if you get the same error. If so, that means you could possibly have some bad sectors on the hard drive, which is causing the problem.
And to verify whether there is a bad sector, use MiniTool Partition Wizard to do the test. MiniTool Partition Wizard is a professional disk partition manager that can deal with most disk partition management issues. With well-designed interface, Partition Wizard can finish surface test in the most user-friendly way. And, Partition Wizard supports mainstream OSs such as Windows XP, Windows 7, Windows 8, and Windows 10, etc.
Free Download
Then do the followings:
Step 1. After installing Free Partition Wizard on your computer, Run it to get the main interface. Then click the partition where the file rejects to be copied and select «Surface Test» from the Check Partition group.
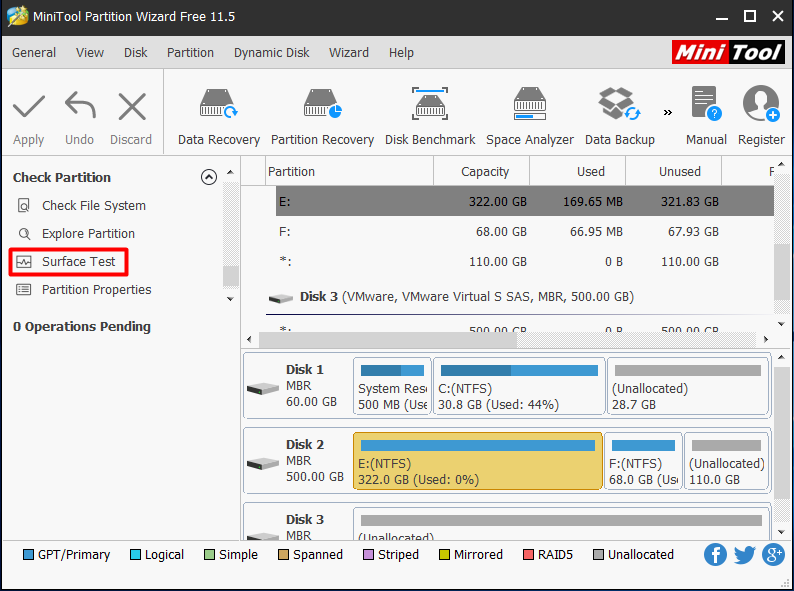
Step 2. Then a new smaller window appears where you can click the «Start» button to begin surface test. Note the disk block without read error is marked with Green and disk block with read error is marked with Red.
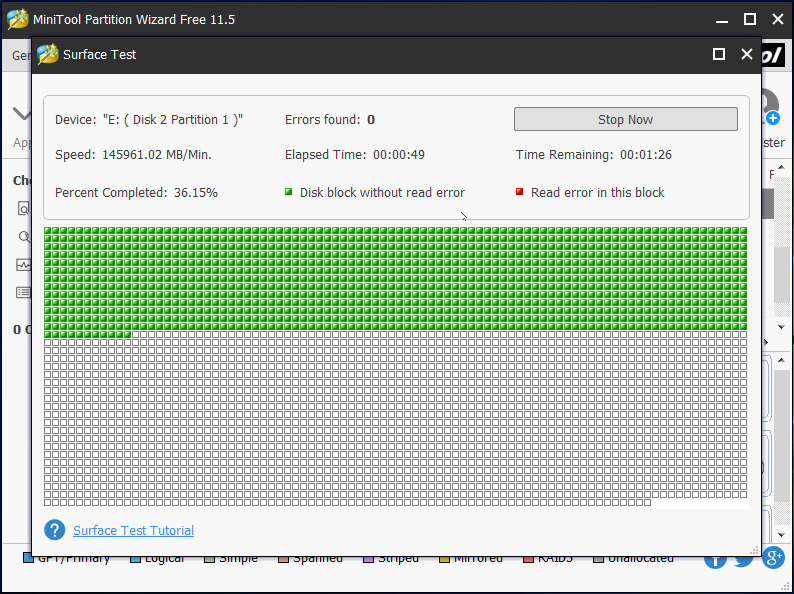
In case there are some bad sectors on your drive, you can do these 3 solutions to deal with this issue.
① Use Chkdsk to Fix Error
You should scan the hard drive using a tool like chkdsk. If there are any errors, it will go ahead and fix them. Just do the followings:
Step 1. At the command prompt (possibly needs to be run as administrator), type «chkdsk n: /r» (note that «n» should be replaced with the correct partition number from which you want to copy files.)
Tip: If this is an OS drive, it will ask to run at next boot time. Answer YES, then reboot. You can then find the results of chkdsk in the «Event Viewer».
Step 2. Restart your computer and retry file copy.
② Use Partition Wizard to Copy
Also, it’s a good idea to use some third-party programs at this point to copy the files off forcefully even if they have errors. When you copy files and it stops at bad sectors saying «can’t read from the source file or disk», MiniTool Partition Wizard can help you copy files regardless of bad sectors after running «chkdsk», which will not hang, freeze or fail.
Step 1. Launch MiniTool Partition Wizard and enter the main interface. Then click the partition which holds the files you want to copy and choose «Copy Partition» from Partition Management group.
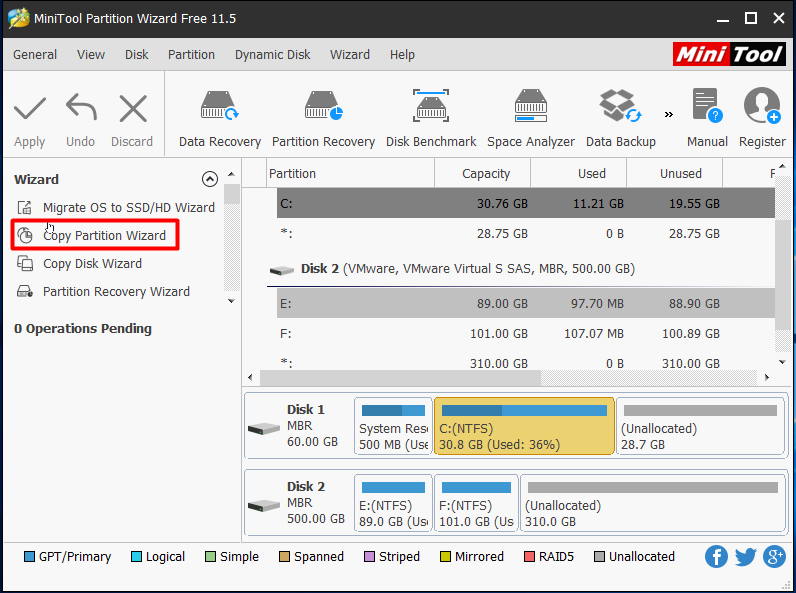
Tip: If you want to clone a whole drive, this How to Clone Hard Drive Windows 10 may help you to a certain degree.
Step 2. In the newly presented window, select where you want to copy the partition to. Please note that it must be an unallocated space and should be large enough to store all data on the source drive. Then click «Next» to continue.
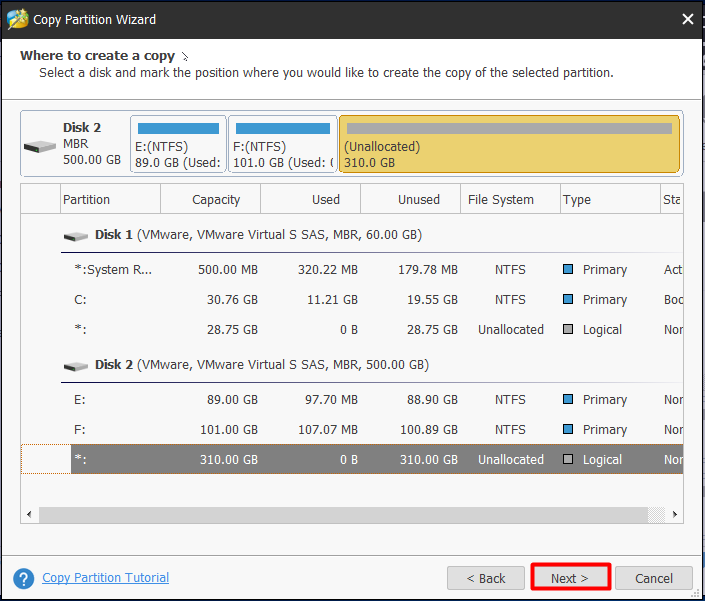
Step 3. Now you can customize the location of the new partition, and you want it to be primary or logical. If you are going to store more and more data to it, you can drag the arrow key rightwards to enlarge the partition. Or you can resize partition later. After that, click «Finish» to go back to the main interface.
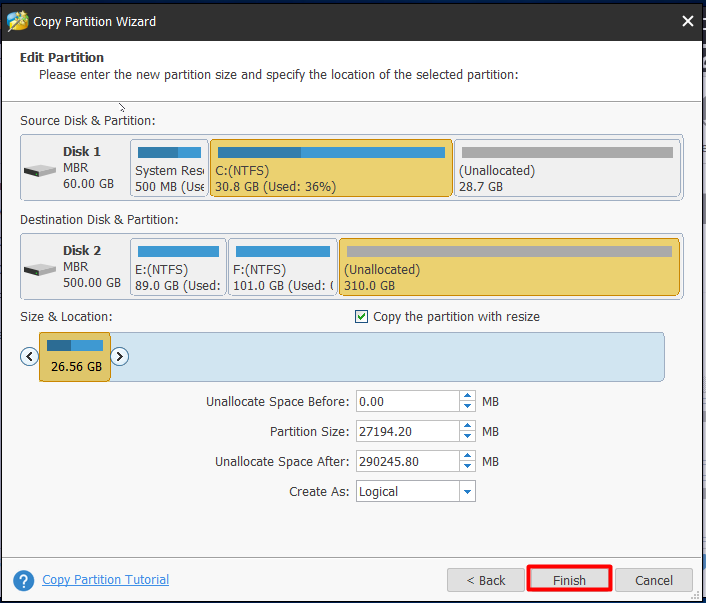
Step 4. See! There will be a new partition created on the target location. At this time, press «Apply» to start copying the partition.
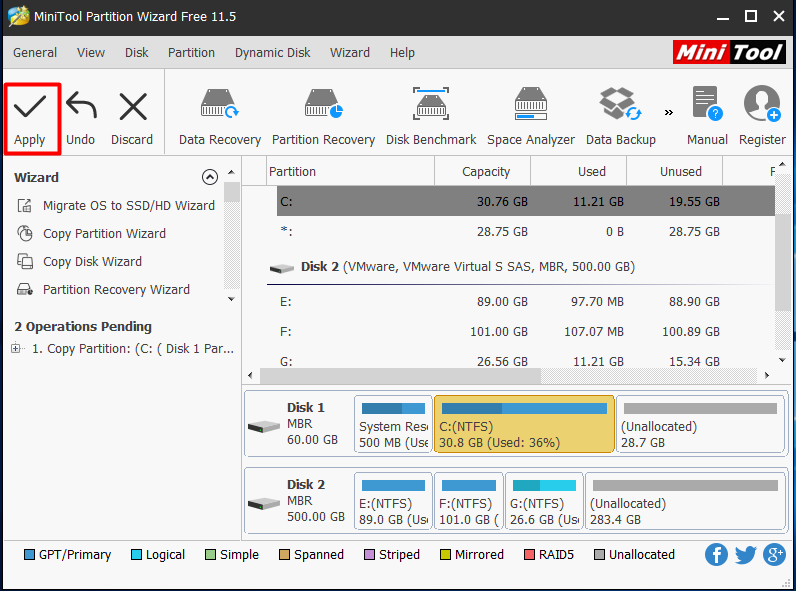
When Partition Wizard finishes, just keep the useful files by deleting the unnecessary files in the target partition. In this way, you get a copy of the target files.
You can watch this video to get a more intuitive guide.
Click to Tweet
③ Use Data Recovery to Restore Data
The third trying is to use data recovery feature in MiniTool Partition Wizard to help move it to another location. MiniTool Partition Wizard includes the Data Recovery function that can be used to retrieve lost data caused by various reasons. It is a read-only program that does no harm to your hard drive and you don’t even need to worry about privacy leakage.
You may wonder: why do I need this program? My data is not lost, I just can’t copy it. Note that in our example the user said: «the only thing that I can do, is ‘delete’ the file and have it sent to the Recycle Bin.» So you can delete the files causing «can’t read from the source file or disk» and then do the recovery. Please download this software to recover your data by hitting the button below.
Buy Now
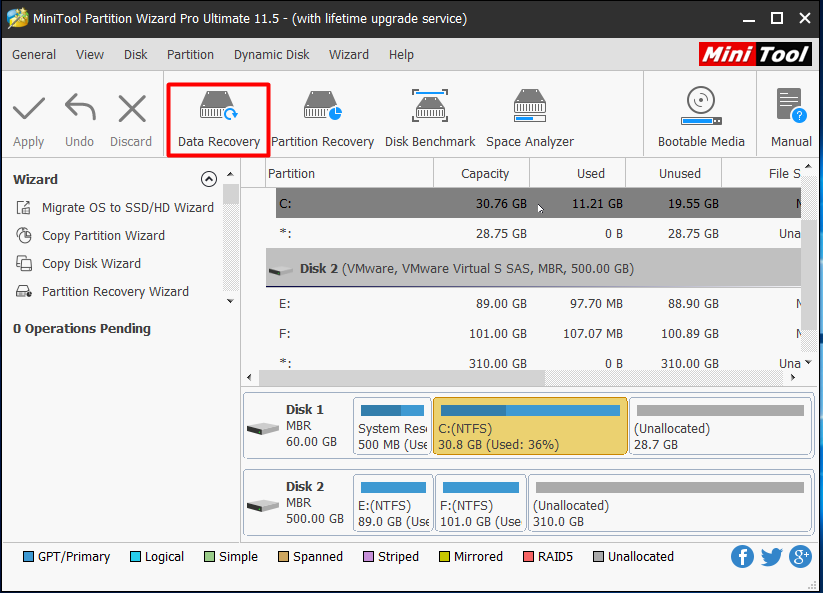
Tip: MiniTool Partition Wizard Free and Pro Editions don’t support data recovery, but it’s pro ultimate and above editions support the function.
Now follow the steps below and try to work it out.
Step 1. After installing MiniTool Partition Wizard to your PC, launch it to the main interface and then you can see the Data Recovery at the top of the main page. You can choose the partition that your data is missing from, then click Data Recovery.
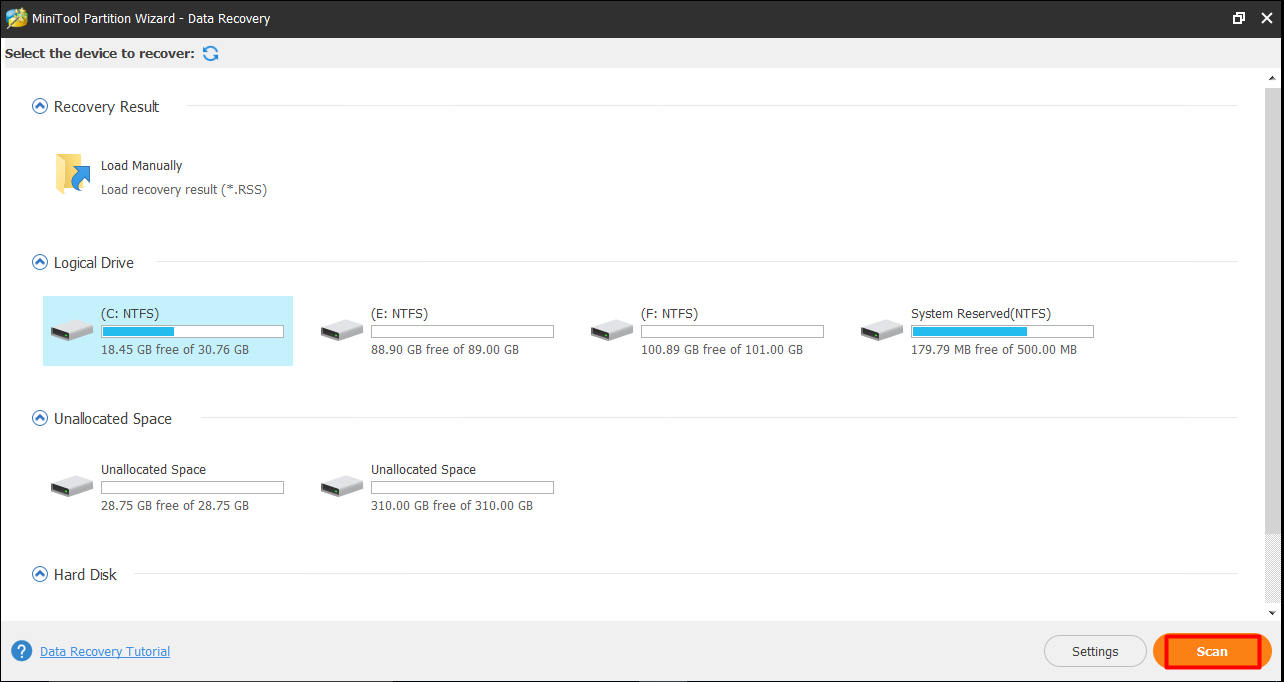
Step 2. Immediately you can see all partitions are listed there. Remember in which partition the files used to exist? Just select it and choose Scan.
Tip: You can press the Settings button to choose desired file systems and file types before you start to scan.
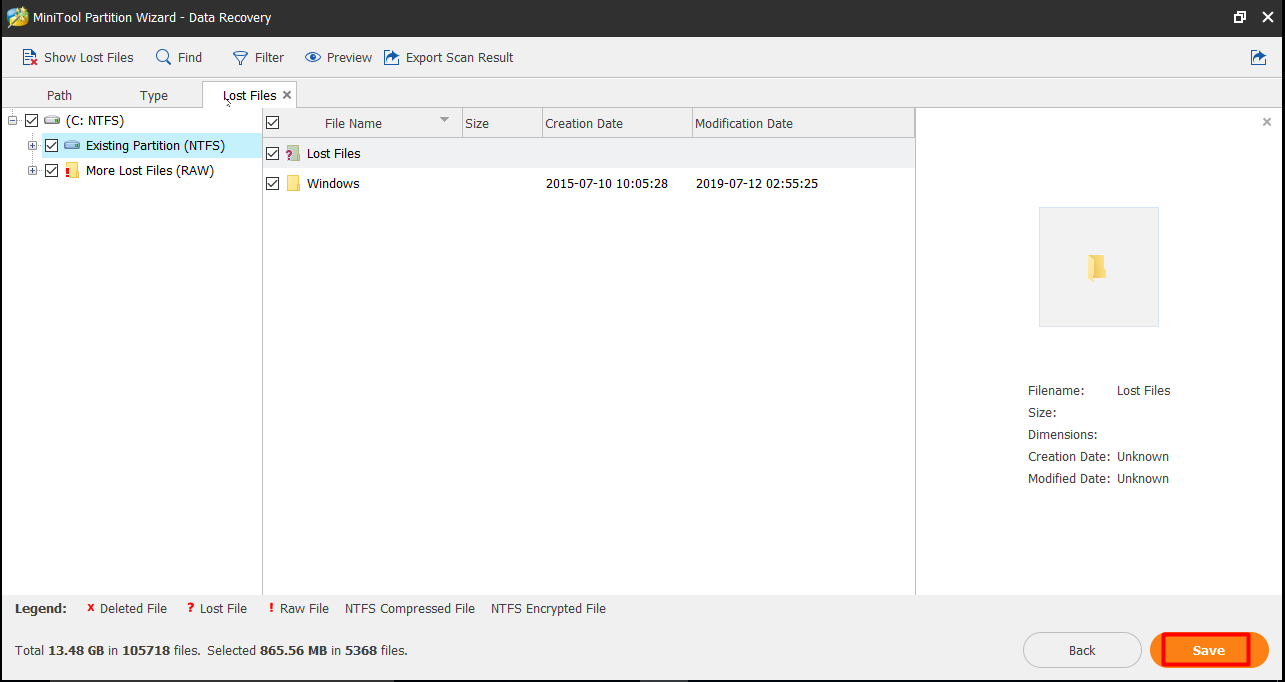
Step 3. After some time, MiniTool Partition Wizard has scanned all data on the drive and listed them in another interface. Here you can unfold the folders and try to find the files that keep causing Windows reporting «can’t read from the source file or disk».
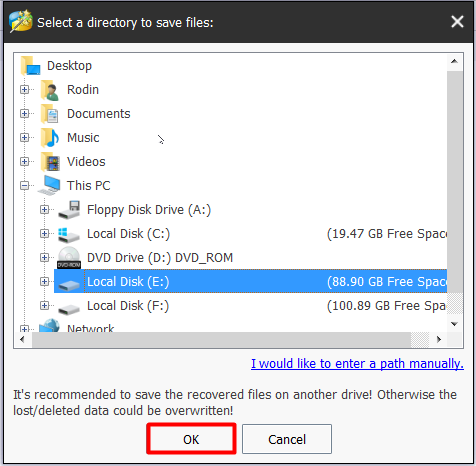
Here Filter is another feature we recommend to quickly find the desired files. Finally, you need to click Save and choose a partition on the target drive to store these files.
Tip: You’d better choose another drive to save your recovered data in case the data is overwritten.
2. System Error
Please keep this in mind: always try restarting the computer when an error occurs. Sometimes there are errors in the system, and restarting the system can solve the problem in a minute.
3. Power and Cables
In a few cases, the issue is related to other hardware factors. If you’re trying to copy to an external hard drive, make sure it’s got enough power. Sometimes if it’s connected to a USB hub, the drive may not get enough power for the writes and therefore it fails.
Also, try switching out the cable you are using to connect the external drive to your computer and see if that makes any difference.
4. File Size Limit
Another possible reason is that you are copying large files. For example, if one of your files is a huge 8GB movie file, then you won’t be able to copy it to an external hard drive that is formatted with FAT32 file system.
Most external hard drives and flash drives are formatted in FAT32 nowadays, which can only support up to a 4GB individual file. If this is the cause, then you should first of all convert the file system of your target drive to NTFS. Here we recommend using MiniTool Partition Wizard to do this job because it can finish this conversion without losing data. For more information, please refer to Convert FAT to NTFS.
5. File Name Problem
Sometimes it is the file name that plays tricks. If the file name is something that Windows doesn’t recognize, then Windows gives you an error while copying. For example, you can’t move files using Windows Explorer if the file name is ended up with a dot, like «test.». this can happen if the file was originally copied from a different operating system like Mac, or is renamed by command prompt. etc.
Try to rename the file and see if that makes any difference. You may have to go into DOS and rename the file there if you are unable to do so in Windows.
Summary
In this post, we mainly talk about what cause «can’t read from the source file or disk error», and what can we do if we encounter this issue. Hope these are helpful. In the daily usage of computer, if you can’t move files using Windows Explorer, or Windows can’t read from the source file or disk while copying from external hard drive, please try these methods out to see whether it works.
Besides, if you have any question or come up with a better solution, please leave it in the following comment area. If you have any question towards using MiniTool software, please don’t hesitate to email to [email protected]. Thanks in advance!
Full solutions to «can’t read from the source file or disk error» are available here. Try them one by one to fix «can’t read from the source file or disk» while copying from external hard drive in Windows 10/8/7.
Can’t Read from the Source File or Disk
Sometimes, when you try to copy files to another location like external hard drive, you receive «can’t read from the source file or disk error» like shown in the picture below. Even you try again and again, this error persists.
By searching on the internet, we find that many users had the experience of suffering and struggling with this error. Here is a true example that states more from Geekstogo.com: Video Files Can Be Played Well but Cannot Be Copied.
Question:
I’m trying to copy some old files from one of my external hard-drives, onto a more recent one with bigger memory. I’ve had no problem so far, I’ve moved about 70GB with no problems, but now there are 2 files which keep giving me this error. I can’t copy it from one hard-drive to the other, I can’t create a copy on my desktop, I can’t create a copy on the original hard drive. The only thing that I can do, is «delete» the file and have it sent to the Recycle bin, and I tried moving it to my desktop from there but got the same message, and can only restore it to its original location. They are videos files (.avi) and I watched them all the way through with no issues so the files aren’t corrupt. I’m running Windows Vista, with admin permissions. If there’s any more info you need to know, please ask.
Do you know what does «can’t read from the source file or disk while copying» indicates, and how can you remove this error? Please read on.
Possible Reasons and Solutions to This Error
In this article, we list 5 possible causes and corresponding solutions to help address hard disk can’t read from source file or disk. Please try them one by one and see whether a solution is helpful.
1. Possible Bad Sectors
If you’re using an external drive to your local computer, please try plugging in the external drive into another computer and see if you get the same error. If so, that means you could possibly have some bad sectors on the hard drive, which is causing the problem.
And to verify whether there is a bad sector, use MiniTool Partition Wizard to do the test. MiniTool Partition Wizard is a professional disk partition manager that can deal with most disk partition management issues. With well-designed interface, Partition Wizard can finish surface test in the most user-friendly way. And, Partition Wizard supports mainstream OSs such as Windows XP, Windows 7, Windows 8, and Windows 10, etc.
Free Download
Then do the followings:
Step 1. After installing Free Partition Wizard on your computer, Run it to get the main interface. Then click the partition where the file rejects to be copied and select «Surface Test» from the Check Partition group.
Step 2. Then a new smaller window appears where you can click the «Start» button to begin surface test. Note the disk block without read error is marked with Green and disk block with read error is marked with Red.
In case there are some bad sectors on your drive, you can do these 3 solutions to deal with this issue.
① Use Chkdsk to Fix Error
You should scan the hard drive using a tool like chkdsk. If there are any errors, it will go ahead and fix them. Just do the followings:
Step 1. At the command prompt (possibly needs to be run as administrator), type «chkdsk n: /r» (note that «n» should be replaced with the correct partition number from which you want to copy files.)
Tip: If this is an OS drive, it will ask to run at next boot time. Answer YES, then reboot. You can then find the results of chkdsk in the «Event Viewer».
Step 2. Restart your computer and retry file copy.
② Use Partition Wizard to Copy
Also, it’s a good idea to use some third-party programs at this point to copy the files off forcefully even if they have errors. When you copy files and it stops at bad sectors saying «can’t read from the source file or disk», MiniTool Partition Wizard can help you copy files regardless of bad sectors after running «chkdsk», which will not hang, freeze or fail.
Step 1. Launch MiniTool Partition Wizard and enter the main interface. Then click the partition which holds the files you want to copy and choose «Copy Partition» from Partition Management group.
Tip: If you want to clone a whole drive, this How to Clone Hard Drive Windows 10 may help you to a certain degree.
Step 2. In the newly presented window, select where you want to copy the partition to. Please note that it must be an unallocated space and should be large enough to store all data on the source drive. Then click «Next» to continue.
Step 3. Now you can customize the location of the new partition, and you want it to be primary or logical. If you are going to store more and more data to it, you can drag the arrow key rightwards to enlarge the partition. Or you can resize partition later. After that, click «Finish» to go back to the main interface.
Step 4. See! There will be a new partition created on the target location. At this time, press «Apply» to start copying the partition.
When Partition Wizard finishes, just keep the useful files by deleting the unnecessary files in the target partition. In this way, you get a copy of the target files.
You can watch this video to get a more intuitive guide.
Click to Tweet
③ Use Data Recovery to Restore Data
The third trying is to use data recovery feature in MiniTool Partition Wizard to help move it to another location. MiniTool Partition Wizard includes the Data Recovery function that can be used to retrieve lost data caused by various reasons. It is a read-only program that does no harm to your hard drive and you don’t even need to worry about privacy leakage.
You may wonder: why do I need this program? My data is not lost, I just can’t copy it. Note that in our example the user said: «the only thing that I can do, is ‘delete’ the file and have it sent to the Recycle Bin.» So you can delete the files causing «can’t read from the source file or disk» and then do the recovery. Please download this software to recover your data by hitting the button below.
Buy Now
Tip: MiniTool Partition Wizard Free and Pro Editions don’t support data recovery, but it’s pro ultimate and above editions support the function.
Now follow the steps below and try to work it out.
Step 1. After installing MiniTool Partition Wizard to your PC, launch it to the main interface and then you can see the Data Recovery at the top of the main page. You can choose the partition that your data is missing from, then click Data Recovery.
Step 2. Immediately you can see all partitions are listed there. Remember in which partition the files used to exist? Just select it and choose Scan.
Tip: You can press the Settings button to choose desired file systems and file types before you start to scan.
Step 3. After some time, MiniTool Partition Wizard has scanned all data on the drive and listed them in another interface. Here you can unfold the folders and try to find the files that keep causing Windows reporting «can’t read from the source file or disk».
Here Filter is another feature we recommend to quickly find the desired files. Finally, you need to click Save and choose a partition on the target drive to store these files.
Tip: You’d better choose another drive to save your recovered data in case the data is overwritten.
2. System Error
Please keep this in mind: always try restarting the computer when an error occurs. Sometimes there are errors in the system, and restarting the system can solve the problem in a minute.
3. Power and Cables
In a few cases, the issue is related to other hardware factors. If you’re trying to copy to an external hard drive, make sure it’s got enough power. Sometimes if it’s connected to a USB hub, the drive may not get enough power for the writes and therefore it fails.
Also, try switching out the cable you are using to connect the external drive to your computer and see if that makes any difference.
4. File Size Limit
Another possible reason is that you are copying large files. For example, if one of your files is a huge 8GB movie file, then you won’t be able to copy it to an external hard drive that is formatted with FAT32 file system.
Most external hard drives and flash drives are formatted in FAT32 nowadays, which can only support up to a 4GB individual file. If this is the cause, then you should first of all convert the file system of your target drive to NTFS. Here we recommend using MiniTool Partition Wizard to do this job because it can finish this conversion without losing data. For more information, please refer to Convert FAT to NTFS.
5. File Name Problem
Sometimes it is the file name that plays tricks. If the file name is something that Windows doesn’t recognize, then Windows gives you an error while copying. For example, you can’t move files using Windows Explorer if the file name is ended up with a dot, like «test.». this can happen if the file was originally copied from a different operating system like Mac, or is renamed by command prompt. etc.
Try to rename the file and see if that makes any difference. You may have to go into DOS and rename the file there if you are unable to do so in Windows.
Summary
In this post, we mainly talk about what cause «can’t read from the source file or disk error», and what can we do if we encounter this issue. Hope these are helpful. In the daily usage of computer, if you can’t move files using Windows Explorer, or Windows can’t read from the source file or disk while copying from external hard drive, please try these methods out to see whether it works.
Besides, if you have any question or come up with a better solution, please leave it in the following comment area. If you have any question towards using MiniTool software, please don’t hesitate to email to [email protected]. Thanks in advance!
В этом руководстве мы покажем вам различные способы решения проблемы с неработающим файлом экспорта Adobe Premiere Pro. Это программное обеспечение для нелинейного редактирования видео на основе временной шкалы от Adobe, без тени сомнения, является лучшим в этой области. Однако, несмотря на множество функций, которые он видит, он также не свободен от своей доли проблем. У многочисленных пользователей выразили свою озабоченность что параметр «Экспорт файла» не работает должным образом в Adobe Premier Pro.
Всякий раз, когда они пытаются экспортировать файл, их вместо этого приветствует «Импортер файлов обнаружил несоответствие в файловой структуре %filename.mp4%. Чтение и запись метаданных этого файла (XMP) отключены». Кроме того, некоторые также сообщают, что имя файла имеет тенденцию усекаться при попытке экспортировать файл. Если вас также беспокоят эти проблемы, то это руководство поможет вам. Следите за исправлениями.
Рекомендуется попробовать каждый из перечисленных ниже обходных путей, а затем посмотреть, какой из них принесет вам успех. Итак, имея это в виду, давайте начнем.
ИСПРАВЛЕНИЕ 1. Отключение кодирования с аппаратным ускорением
Ваш первый курс действий должен состоять в том, чтобы отключить «Аппаратно-ускоренное кодирование». [especially if you dealing with H.264 exports] используя перечисленные ниже шаги, а затем проверьте результаты.
- Запустите Adobe Premiere Pro и перейдите на вкладку «Экспорт».
- Затем выберите H.264/HEVC в меню «Формат».
Кредиты: Adobe
- Теперь перейдите в «Производительность» и выберите «Кодирование программного обеспечения».
- Проверьте, устраняет ли это проблему с файлом экспорта Adobe Premiere Pro.
ИСПРАВЛЕНИЕ 2. Проверка местоположения экспорта
Затем убедитесь, что в каталоге экспорта используются только однобайтовые английские символы ASCII. Если в нем есть диакритические знаки, умляуты или неосновные английские символы, у вас могут возникнуть проблемы при экспорте этого файла или файл может оказаться усеченным.
ИСПРАВЛЕНИЕ 3: более ранняя версия Adobe Premiere Pro
Если ни один из вышеперечисленных методов не привел к успеху, то вашим последним действием должно быть понижение версии программного обеспечения до его более ранней стабильной версии. [either v22.6 or v 23]. Для этого вы можете обратиться к нашему подробному руководству о том, как понизить версию приложений Adobe Creative Cloud до более ранней версии, или выполнить следующие более короткие шаги:
- Откройте приложение Creative Clouds и перейдите к приложению, версию которого вы хотите понизить.
- Затем нажмите кнопку «Дополнительно» (…) рядом с этим приложением.
- После этого выберите «Другие версии» в раскрывающемся меню.
- Теперь нажмите кнопку «Установить» рядом с выбранной версией приложения.
- Теперь будет установлена более старая сборка этого приложения, и она должна исправить основную проблему.
Вот и все. Это были различные методы, которые должны помочь вам решить проблему с неработающим файлом экспорта Adobe Premiere Pro. Что касается официальной позиции по этому вопросу, разработчики знают об этой проблеме, но не сообщают о сроках выпуска исправления. Как и когда это произойдет, мы соответствующим образом обновим это руководство. Между тем, вышеупомянутые обходные пути — ваш лучший выбор.