Страница 1 из 2
-
- Регистрация:
- 21 май 2014
- Сообщения:
- 870
- Пол:
- Мужской
- Регион:
- Москва
Собственно s1000R периодически вот так вот как на видео глючит.
Ошибок никаких не показывает по блокам.
Аккумулятор свежий.какие мысли?
-
Так он сам пишит, NoCan… происходит приперегазовки, значит вибрации и где то отваливается контакт…
-
- Регистрация:
- 21 май 2014
- Сообщения:
- 870
- Пол:
- Мужской
- Регион:
- Москва
Прозвонили всю проводку обрывов нет, как найти хз
-
Так CAN это цифровая шина… думаю осциллографом… начать с простого, подмена блоков от заранее исправного, потом всю проводку шевелить…
-
что такое CAN скажите мне.
-
- Регистрация:
- 21 май 2014
- Сообщения:
- 870
- Пол:
- Мужской
- Регион:
- Москва
Ты на вопрос так и не ответил, какие блоки то? Конкретнее. Все блоки прога показывает рабочие, проверяю через ISTA.
что CAN это цифровая шина ты мне америку не открыл. -
а теперь давай мыслить логично, контакт в шине может пропадать как в проводке так и в блоках, что быстрее все проводку снимать, вскрывать, прозванивать… или начать с того что можно подкинуть другие блоки за 10 минут и исключить их из списка возможных неисправностей….
-
- Регистрация:
- 21 май 2014
- Сообщения:
- 870
- Пол:
- Мужской
- Регион:
- Москва
Так в том то и дело что показывает якобы все блоки рабочие и с ними все впорядке. Если бы у меня были блоки под рукой все, само собой подцепить не проблема, но крайне странная ошибка сама по себе аккум зарядил поставил день катаюсь, через день моросить начинает как на видео
-
если я правильно понимаю, то моросить начинает при выкручивании газа, похоже на то что идет вибрация и где то контакт отваливается… а так как мот не глохнет а гаснет приборка, то приборка теряет связь с абс или дме….
-
- Регистрация:
- 21 май 2014
- Сообщения:
- 870
- Пол:
- Мужской
- Регион:
- Москва
Да пишет еще ошибки по датчику наклона (VDS) и подвеске (DDC)
-
было у меня такое, но искал обрыв в проводе управление впрыском дизельных форсунок… обычным мультиметром бесполезно, нужно осциллографом…
-
- Регистрация:
- 21 май 2014
- Сообщения:
- 870
- Пол:
- Мужской
- Регион:
- Москва
-

Slavsa J
Участник тусовки- Регистрация:
- 25 ноя 2016
- Сообщения:
- 38
- Регион:
- Колумбия
Это EWS, скорее всего, с 2016 года на ХР и Р сталкивается народ….дребезг в блоке от ключа, часто устраняется снятием брелока….
-

- Регистрация:
- 24 июл 2017
- Сообщения:
- 7
- Пол:
- Мужской
- Регион:
- Москва
Аккум какой стоит? Попробуй с другим акб
-
- Регистрация:
- 21 май 2014
- Сообщения:
- 870
- Пол:
- Мужской
- Регион:
- Москва
-
Странно, что: Ошибок никаких не показывает по блокам. при потери связи блоков ошибка фиксируется…. а чем ошибки читали? во всех блоках посмотрели?
-
- Регистрация:
- 24 июл 2017
- Сообщения:
- 7
- Пол:
- Мужской
- Регион:
- Москва
Какой бренд? Проверь тестером напряжение
-
Какая взаимосвязь?! Ошибка выскакивает на заведенном моторе, питание всей системы осуществляется от генератора… вы можете хоть вынуть АКБ (не рекомендуется).
-
Похоже на наводки от высоковольтовой части зажигания. Свечи уже менялись? Оригинал? С сопротивлением?
Возможно, пробой катушки. -
БНВ мотоцикл не глупый, любой пробой привел бы к пропускам…. ошибка есть по пропускам? нет… логично?
-
-
Осцилограф и сканер есть, велком в гости)
-

для НЕместных, какой осциллограф посоветуйте купить для таких вот ситуаций и если можно с ссылками где купить и главное какой=то мануал про процессу проверки если есть где почитать в интернете
-
- Регистрация:
- 21 май 2014
- Сообщения:
- 870
- Пол:
- Мужской
- Регион:
- Москва
-
- Регистрация:
- 21 май 2014
- Сообщения:
- 870
- Пол:
- Мужской
- Регион:
- Москва
-
- Регистрация:
- 24 июл 2017
- Сообщения:
- 7
- Пол:
- Мужской
- Регион:
- Москва
Прямая, на 636, при исправном генераторе, без АКБ мото глох на холостых, это конечно БНВ, а не кава, но все же начинать стоит с самого простого….
Страница 1 из 2
Поделиться этой страницей
Добрый день, соконфетники
Хочу рассказать о проблеме с которой столкнулся, проблема проявилась при резком торможение со 100 км в ноль. На приборной панеле появилась надпись NO CAN, прочитав инструкцию стало понятно, что где то идет кз, но как его найти на тот момент не понимал.
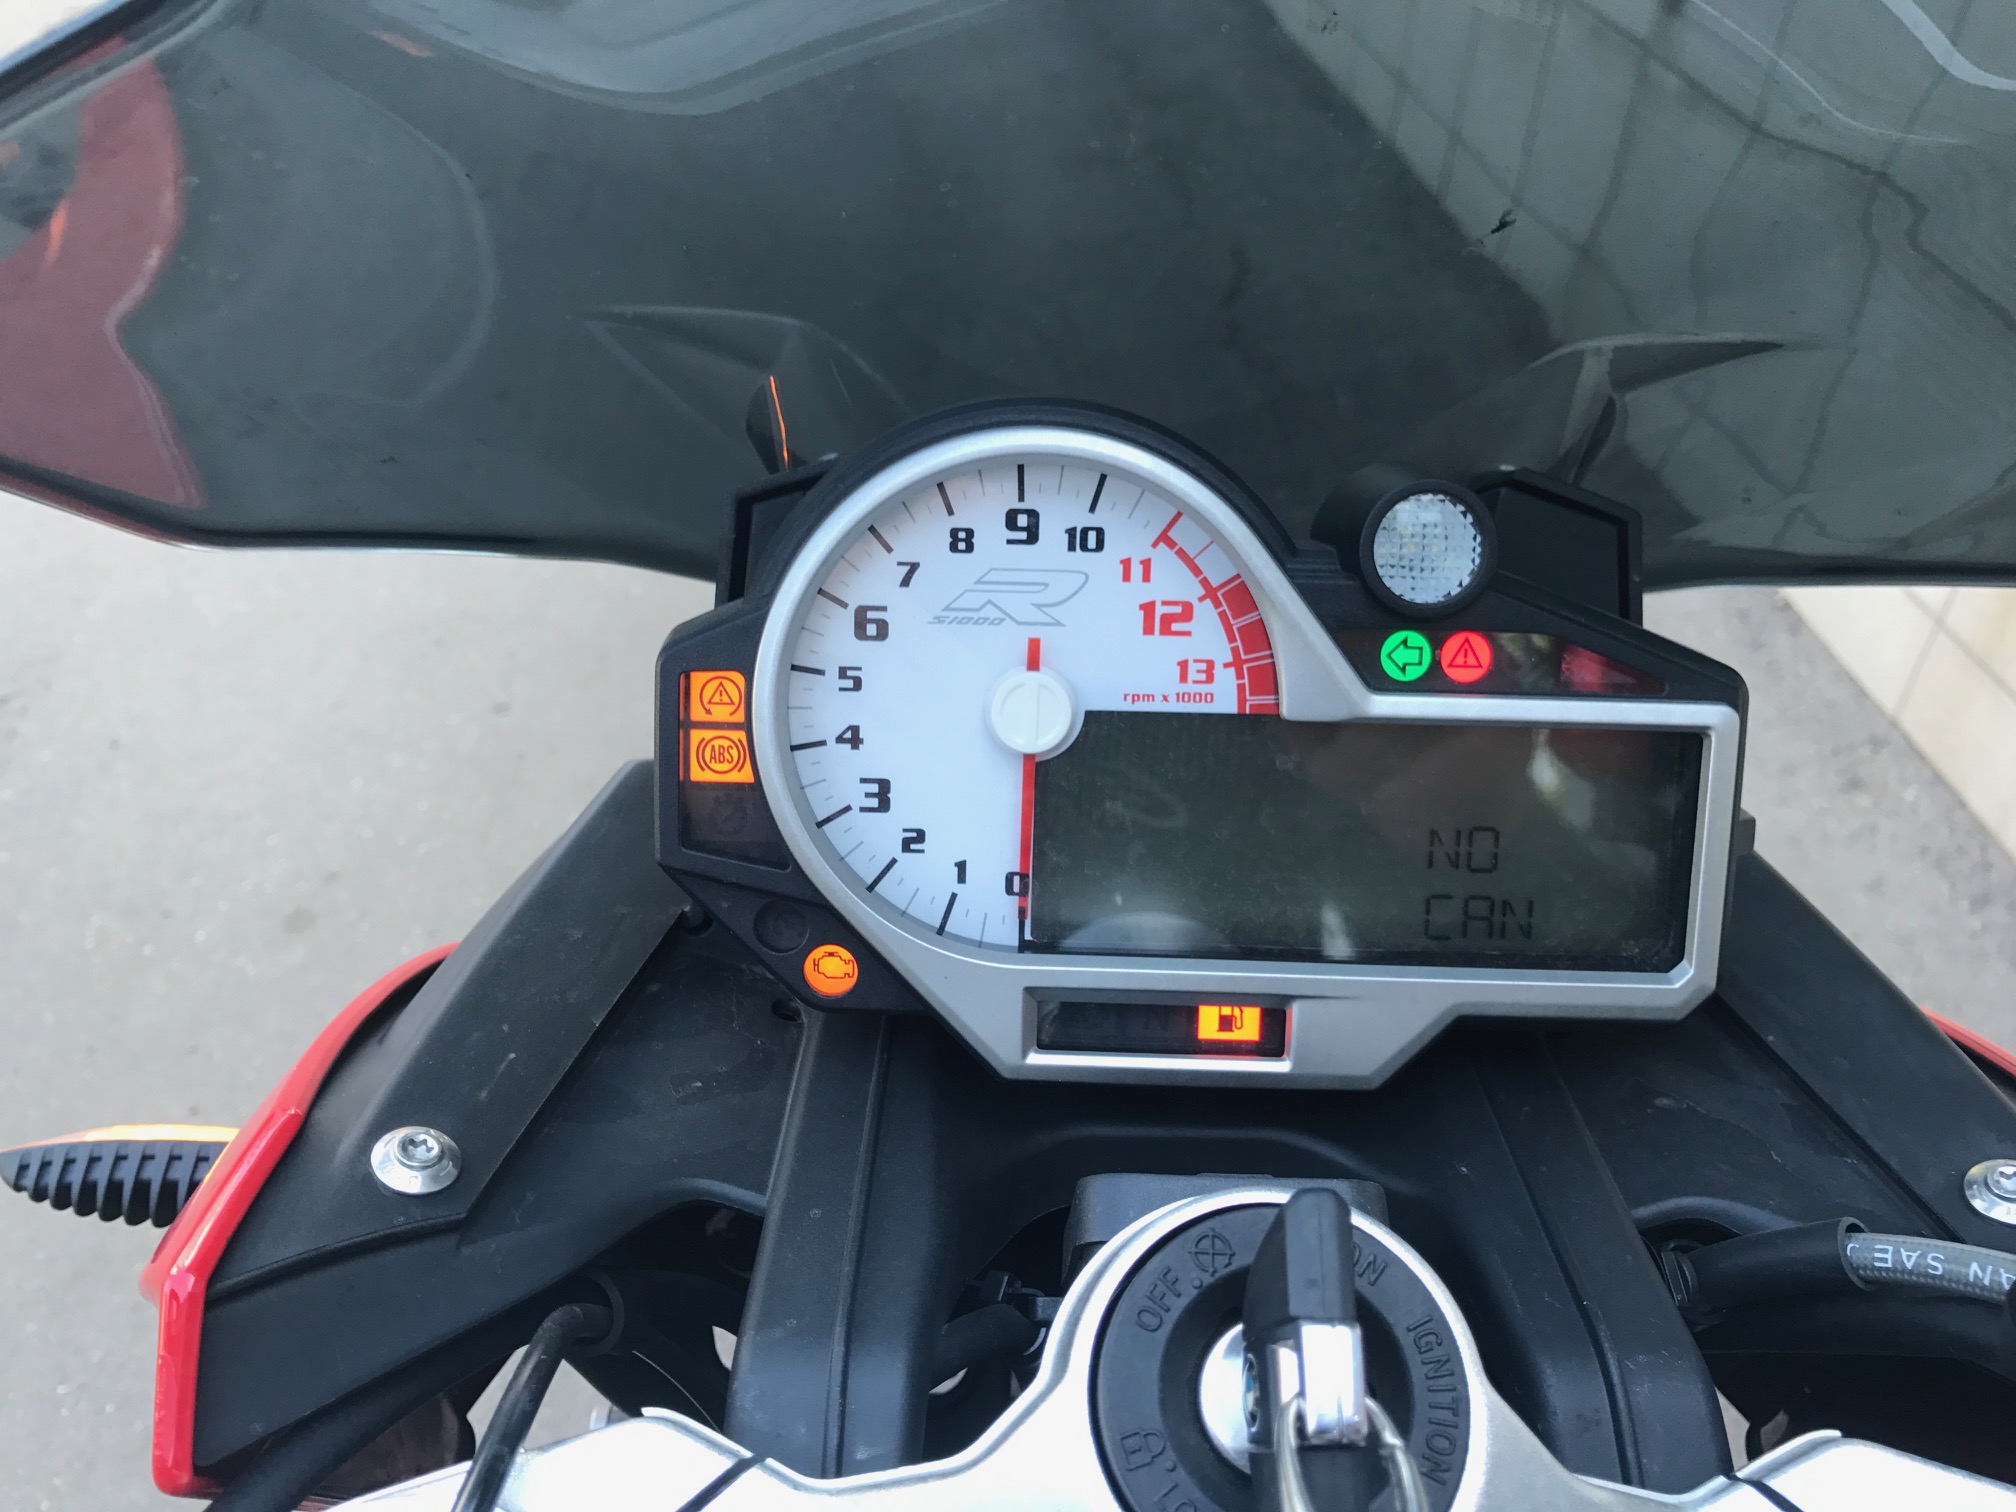
Ошибка проявлялась периодически, мот то исправно работал, то просто не заводился высаживая весь аккумулятор в ноль.
Поменял аккумулятор, но проблема не уходила.
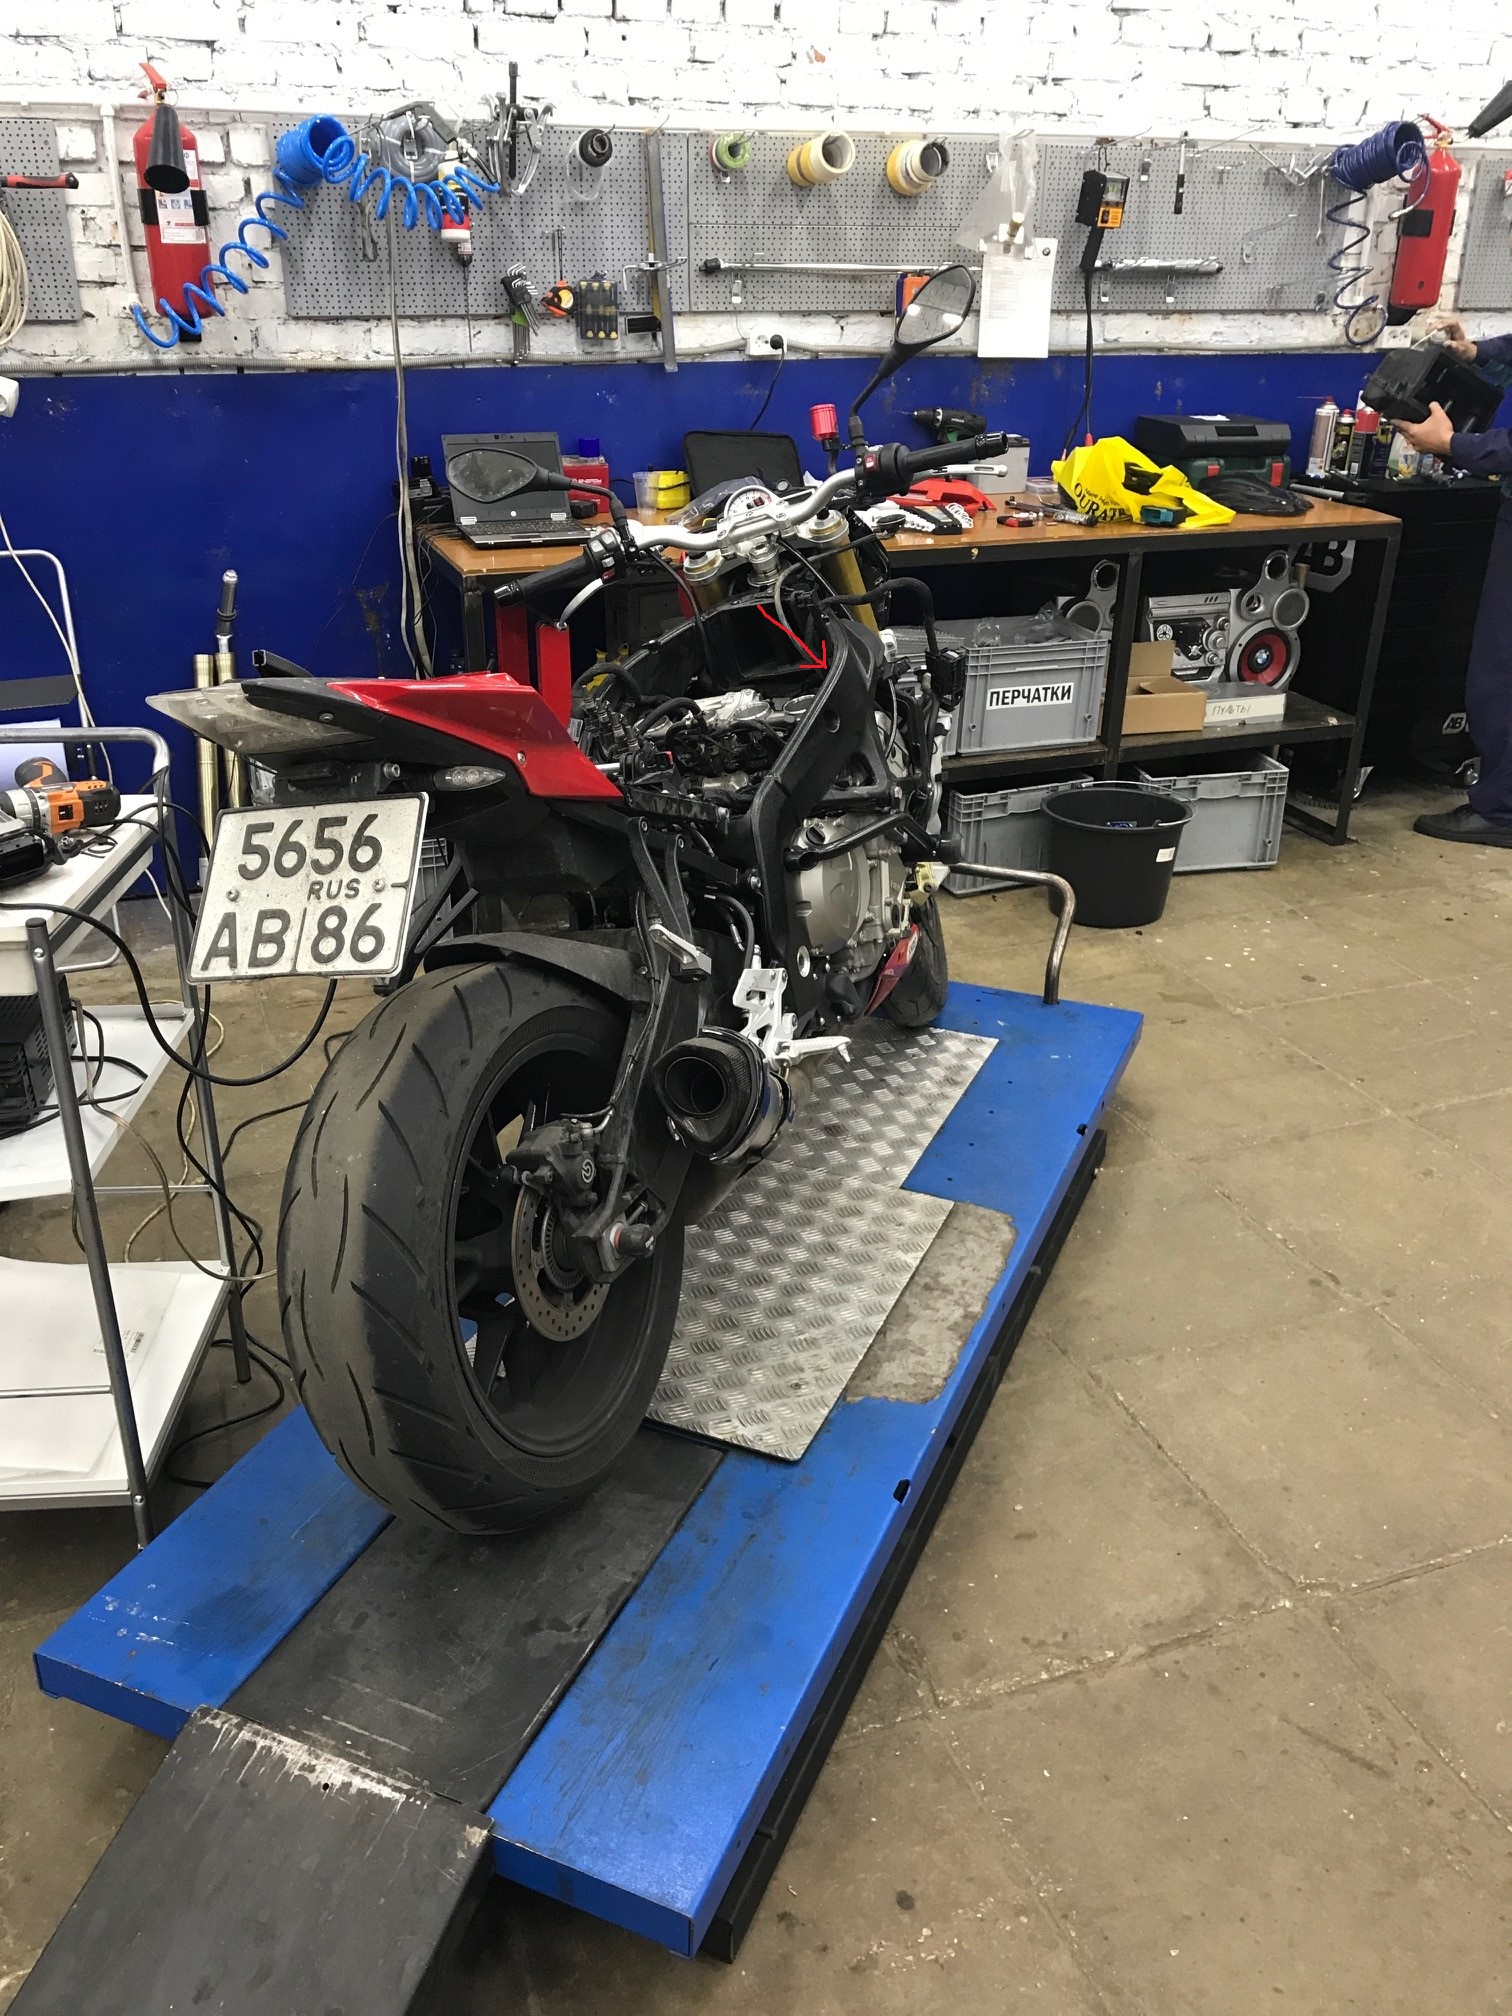
Нашел закономерность, что как только выскакивает ошибка, если с правой стороны рамы подергать провод, то на время ошибка уходит и приборка работает штатно, но до следующей остановки на светофоре и снова выскакивает ошибка, вот так забавно было ездить дергая постоянно этот провод.

Собственно на фото отметил стрелкой красной место с внутренней стороны рамы, именно в этом месте перетерся провод.
Провод в данном месте был приведен в порядок и проблема решилась.
Надеюсь, что данный пост будет кому то полезен так как судя по форумам проблема проявляется периодически.
Schumacher69rus
Приветствую, парни подскажите переключаться вверх без сцепления постоянно можно в городской эксплуатации?, или всё же лучше по обычному с выжимом?, заметил что при оборотах 5-7тыщ очень плавно переключается, а со сцеплением как то не очень даже с рывком…
Artur
переключайся всегда без выжима
Кремль
Не парься. Переключай как хочешь (только вниз не надо), ничего не будет.
Schumacher69rus
Я так и думал, спасибо…, я вообще в шоке как мягко работает кпп, до бэхи была р1 так там как кувалдой били)))
Последнее редактирование: 15 Апр 2014
Dmitr
Не парься. Переключай как хочешь (только вниз не надо), ничего не будет.
Сань, да похеру, под сброс и вниз нормально.
Кремль
Ну «береженого» сам знаешь.
Schumacher69rus
Парни, снова возник вопрос, теперь по колодкам, в чём разница hp race от обычных порошковых?, пишут что race не для дорог общего пользования, почему так? Вот номера колодок 77238535423 и 34117714800
Стич
В условиях города не будет достаточного прогрева… соответственно хуже работа тормозов
CosmoZeeS
Всем привет!Хотел обратиться с вопросом к форумчанам.
Мигает пробег на приборке(BMW S100RR 2011г.),причину в принципе знаю.Подскажите можно ли привязать мозги к приборке через программу BMW Rheingold.В программе показывает что в одном месте 6 с копейками пробег во втором 10 с копейками.И из за разницы пробега программа не может объединить.
Вообщем если кто сталкивался подскажите как решить этот вопрос.
Заранее благодарен.
Dmitr
Всем привет!Хотел обратиться с вопросом к форумчанам.
Мигает пробег на приборке(BMW S100RR 2011г.),причину в принципе знаю.Подскажите можно ли привязать мозги к приборке через программу BMW Rheingold.В программе показывает что в одном месте 6 с копейками пробег во втором 10 с копейками.И из за разницы пробега программа не может объединить.
Вообщем если кто сталкивался подскажите как решить этот вопрос.
Заранее благодарен.
Замени причину и пробег моргать не будет )))))
Чего менялось то, приборка или дме?
CosmoZeeS
причина — скручивался скорее всего пробег.Но почему то это обнаружилось когда мотоцикл постоял без аккумулятора неделю(сбросились настройки).Сам ничего не менял,может что то химичил предыдущий хозяин.
В этой теме читал что у кого то так же пробег мигал,ответ был что необходимо привязать мозги к приборке.
Я так понимаю все это делается программно,потому что на приборке стрелка спидометра крутится,переключение передач показывает,но сколько км/ч я еду показывает ноль.
Schumacher69rus
У меня тоже мигает пробег, но он даже мигающий увеличивается и скорость показывает, просто крутнули маленько вот и всё)
CosmoZeeS
А лампочки АБС ДТС гаснут при трогании?
Schumacher а ты не звонил никому не узнавал как решить такой вопрос,такого же не должно быть.Техника должна работать как ей положено работать.
Schumacher69rus
Да, гаснут, всё как по книжке, вот только пробег мигает, на мотофоруме спросил, пока ещё никто не ответил, к диллеру можно сгонять, но мне далековато, потом уже летом как нибудь…, если у тебя скорость не показывает, то скорей всего в этом и проблема, я не знаю где в бмв датчик скорости, но в р1 был в кпп сверху под баком, ща гляну в мануале где у бехи…
CosmoZeeS
Schumacher69rus
Всё нашёл, на мотах с абс датчика скорости нет, есть датчик уровня оборотов, такая довольно большая квадратная коробочка, не так всё просто как я думал)
Последнее редактирование: 22 Апр 2014
CosmoZeeS
Понятно.Может кто появится ещё на форуме подскажет как исправить.
Написал ещё на http://www.bmwclub.ru
Может там кто подскажет.Если что отпишусь здесь если узнаю как исправить.
Schumacher69rus
Schnaider
Если горит пробег красным и моргает, то его либо скручивали, либо мот был бит и меняли приборную панель.
Скидывание аккумуляторной клеммы абсолютно ничего не решает…
Решение — а) ехать к оффициалам для синхронизации приборной панели с блоком управления двигателя, б) списать пробег с приборки, снять блок упр. двиг. и отдать это всё электрику!!!
предпочтителен вариант «а» так как не надо будет вскрывать блок упр. двиг.
Кремль
У меня тоже мигает пробег, но он даже мигающий увеличивается и скорость показывает, просто крутнули маленько вот и всё)
Ответ прост. Либо снимали приборку и ездили с другой, либо снимали мозги и ездили с другими. Третьего не дано. Сделаешь синхронизацию и увидишь не мигающий пробег, при этом, реальный.
———- Сообщение добавлено в 15:47 ———- Предыдущее сообщение размещено в 15:44 ———-
В условиях города не будет достаточного прогрева… соответственно хуже работа тормозов
Ну это как ехать. )))) А вообще, спортивные колодки стойкие на износ в городской эксплуатации. Вот если бы говорили о дисках тормозных, то тут да, чтобы прогреть их надо постараться.
motorcycle. This error message
is suppressed in SLICK mode.
Installing number-plate carrier
(
92).
Motorcycle dropped
VDS!
(Vertical Down Sensor)
appears on the blank display.
Possible cause:
The drop sensor has detected a
drop and has cut out the engine.
Bring the motorcycle to the
upright position
Switch the ignition off and
then on again or switch the kill
switch on and then off again.
Drop sensor missing or
defective
VDS!
(Vertical Down Sensor)
appears on the display.
Possible cause:
The drop sensor is not installed.
Install the drop sensor.
Possible cause:
A defect in the drop sensor has
been detected.
Seek the advice of a specialist
workshop, preferably an author-
ised BMW Motorrad dealer.
with BMW Motorrad Race
OE
ABS
Mode of presentation
ABS warnings are indicated by
one of the ABS warning lights.
ABS warning light
described in this manual.
Possible alternative warning
light necessary on account
of special regulations.
The detailed descriptions relat-
ing to BMW Motorrad Race ABS
start on page (
100), and you
will find an overview listing the
possible warnings on the next
page.
3
27
z
На самом деле была суббота, утро, 25 и солнце, хотя бы ради любопытства раз в год на чем-то новом надо прокатиться, БМВ рядом, новый S1000RR там видел и знал, что спроса на тест на него не будет (у БМВ проблема с производством этих мотоциклов и даты доставок на заказ не оглашают, что большинству покупателей просто напросто не подходит).
Пока 10 минут ехал до салона увидел их S1000RR на дороге, пилот и его подружка, выруливали на шоссе, ок, значит, все-таки, придется подождать какое-то время.
В салоне меня помнят и знают по имени, хотя я к ним минимум год не заходил. Даже немного неудобно, ведь я там перекатал много мотоциклов, не купив ни одного, они мне еще бесплатно болтов для Сузуки дали однажды, реально выручили, ну делал у них сервис разок и что-то из одежды давно купил, но в принципе от меня им как от козла молока, и тем не менее всегда приветливы и рады со мной поговорить.
Расписывать долго не буду, короткая заметка себе на память, тест — от 30кмч до примерно 80кмч, два перевала и через деревушки, на шоссе не выезжал, там ограничение 120, а это не скорость даже для моей 600ки, не говоря уже про 204лс (меряли и выше) и 193.5кг с М-пакетом и дисками из углеволокна.
Полный размер
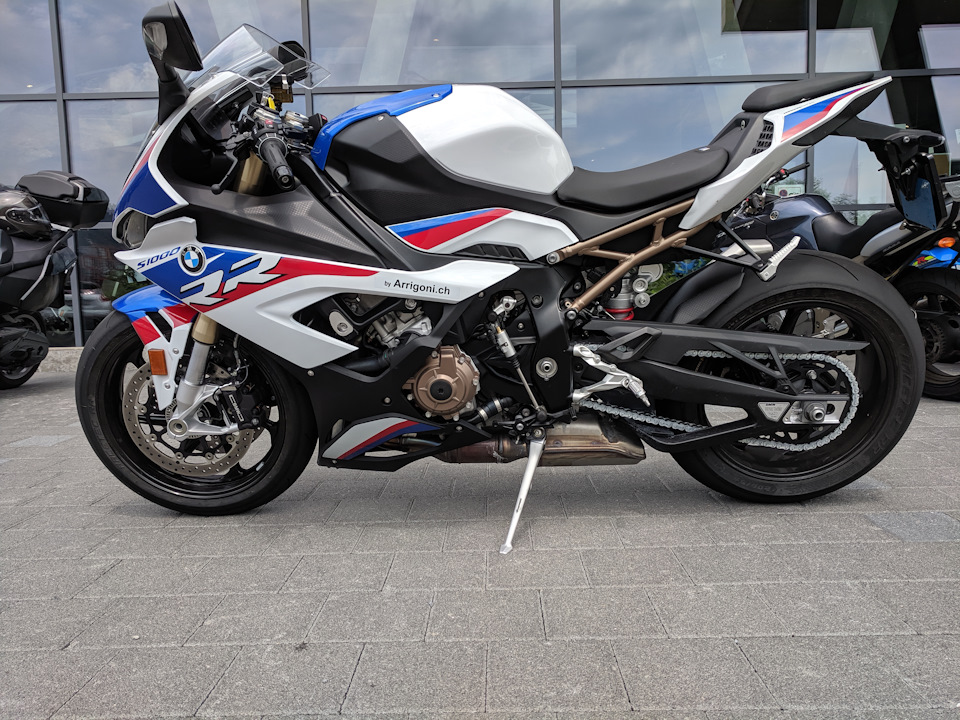
Модель с полным фаршем, это значит к электронным примочкам добавили Pro Mode, легкая батарея, М-седло, легкие диски из углеволокна, М-шасси с настраиваемой высотой сзади, и вот эта эксклюзивная Motorsport окраска.
Полный размер
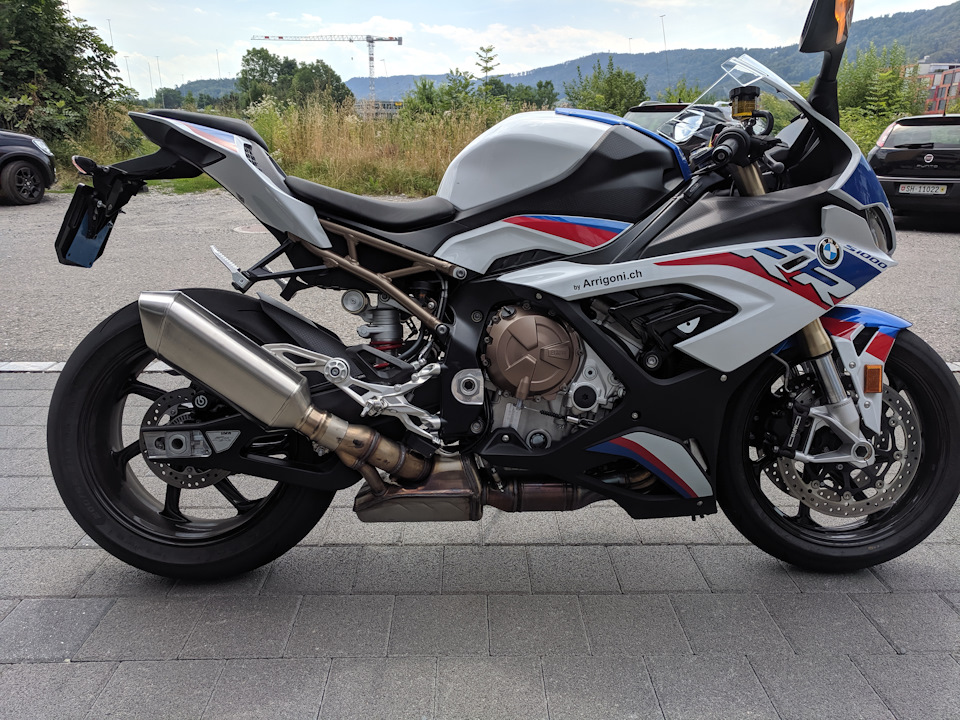
С М-пакетом мотоцикл весит на 15кг меньше чем предыдущая модель с легкими коваными дисками. Мотор стал на 4кг легче, выхлоп на 1.3кг легче чем на предыдущей версии и весит как один цилиндр от BMW G310R. В этом мотоцикле абсолютно все новое, новый мотор, новое шасси, новый маятник, новая подвеска, новая инструменталка, новый внешний вид, даже зеркала новые и сзади подсветка, и звук. Абсолютно новый подход во всем, и это немедленно чувствуется. Выхлопная система торчит как и раньше некрасиво, и я не любитель Моторспорт окраски, мне больше нравится черно-красная со стандартного мотоцикла, но эту окраску на М выбрать нельзя.
Полный размер
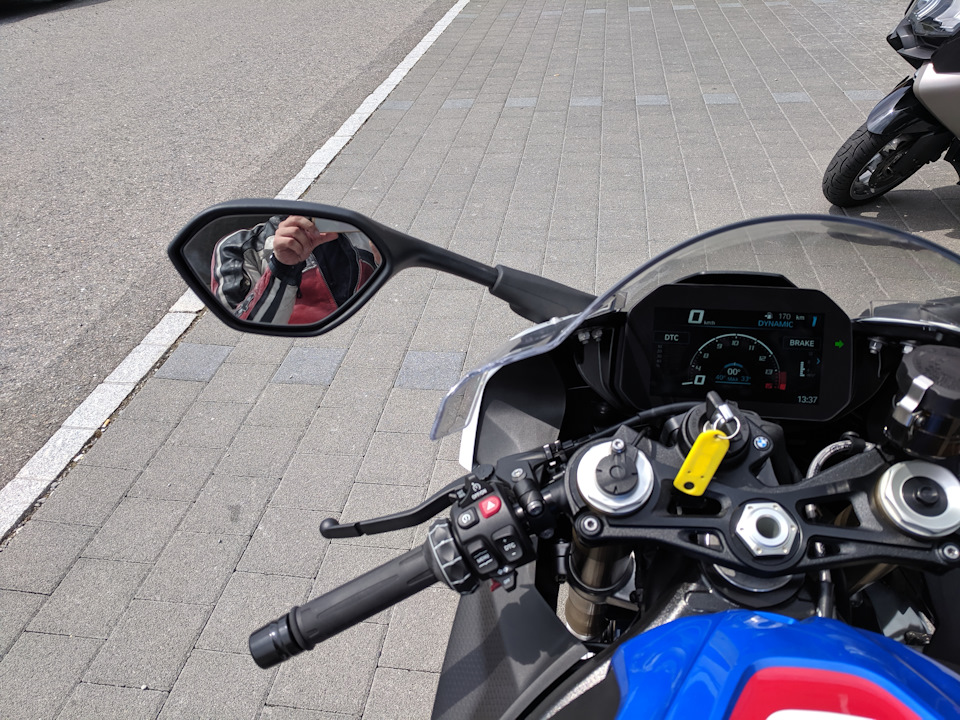
Новые зеркала, теперь корпус фиксированный, а зеркала внутри и их можно ворочать. Таким образом на высокой скорости нет вибрации и в зеркала видно. Я не проверял. На моей Дайтоне такой же подход, но если правильно помню, на скорости все равно есть вибрация. На Дайтоне руку зеркала можно загнуть к обвесу, не знаю можно ли это на БМВ. Могу сказать, что в зеркалах БМВ отличная обзорность назад, на Дайтоне — хуже. На Сузуки тоже хорошая обзорность и зеркала можно загнуть, это помогает когда надо профильтроваться между близко стоящих машин.
Полный размер
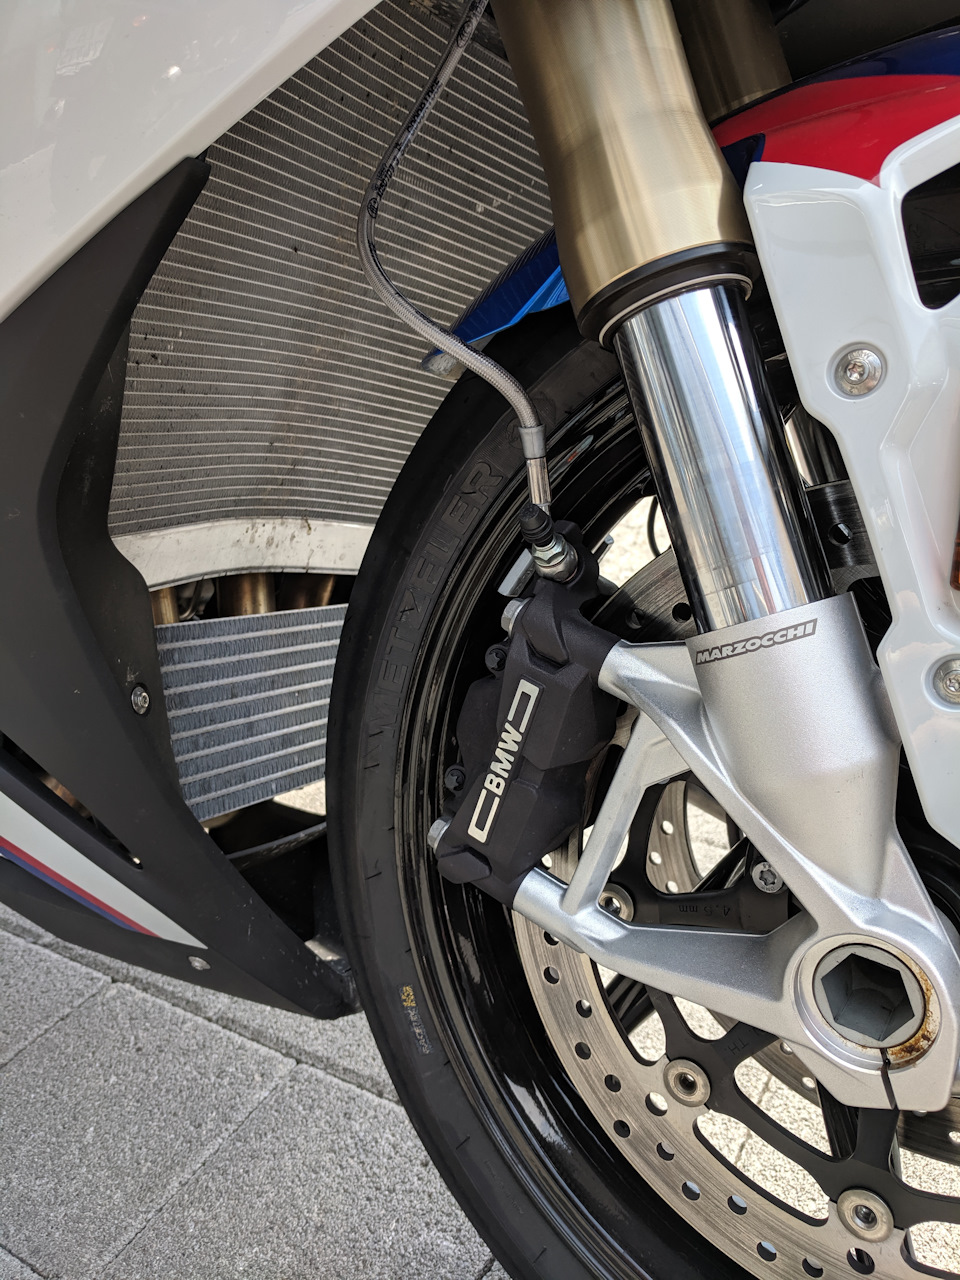
Диски из углеволокна, Marzocchi вилка, и тормозные суппорта Heyes. Одно время Marzocchi была на гране банкротства, но как видно существует до сих пор, может кто-то фирму купил. Обычно Marzocchi вилки ставят на Дукати и я удивлен, что на М-BMW нет премиальных Ohlins. И тормоза тоже не ожидаемые Brembo с суппортами последнего писка моды Stylema, а Heyes. Однако жаловаться не приходится, электронная подвеска замечательно работает на дороге, жесткая, но не слишком, реагирует как надо и сглаживает где требуется. К тормозам тоже нарекания нет, офигенные тормоза! Радиаторы торчат не особо красиво, на Сузуки они закрыты щитками, на R1 тоже красивее сделано.
Полный размер
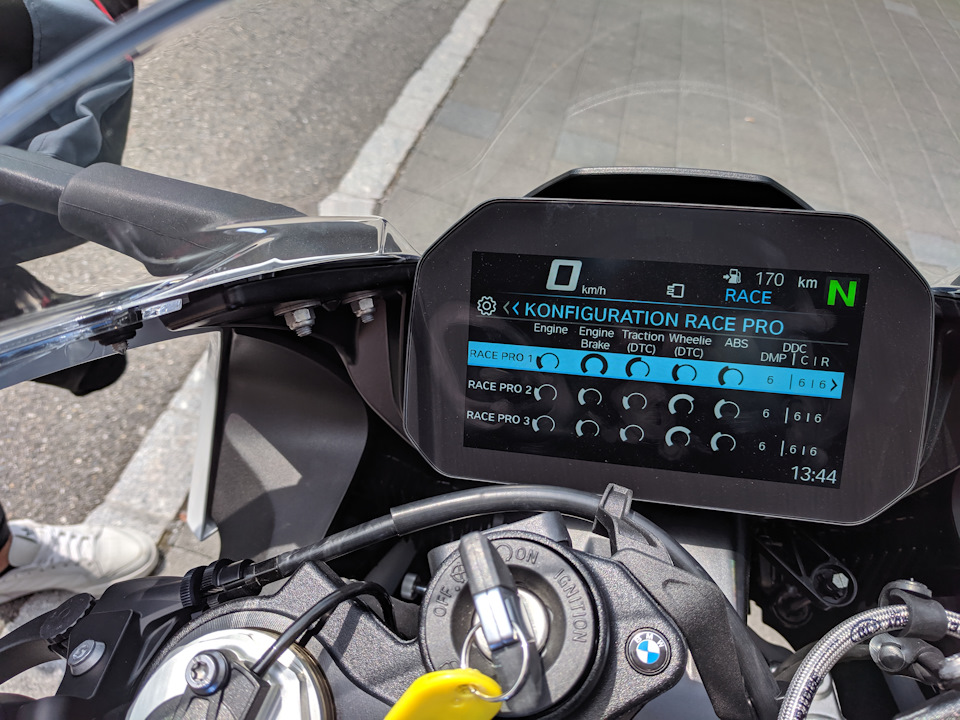
Режимы Pro Mode — можно настроить абсолютно все и сохранить в памяти, есть 3 памяти, то есть можно сохранить настройки для трех треков или например холодный/горячий/мокрый асфальт для одного трека.
Полный размер
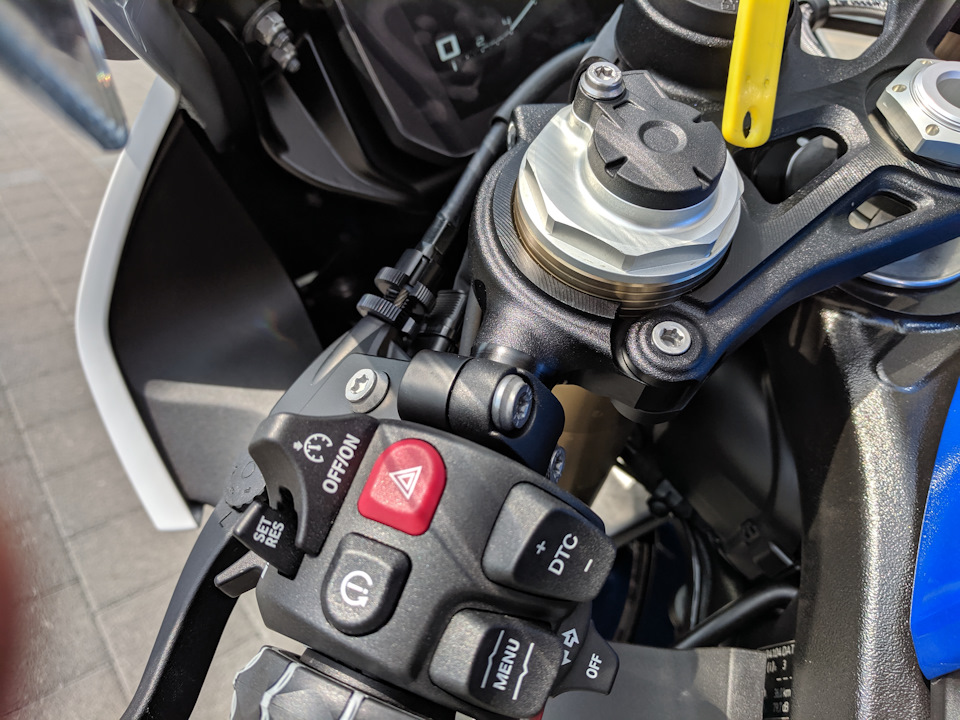
Изменили даже устройство руля. Теперь на БМВ рукоятки привинчены совсем по другому. Чтобы быстро поменять рукоятки, для трека например, можно развинтить один болт и вытащить рукоятку в сторону. Не требуется снимать мост/корону, или как там по-русски tripple clamp называется. Естественно есть круиз-контроль и подогрев рукояток, Трекшн Контроль можно менять на ходу кнопочкой. Вот рычажок включения поворотного сигнала для меня сидит слишком низко, постоянно приходилось за ним охотиться, за 40 минут езды не привык.
Полный размер
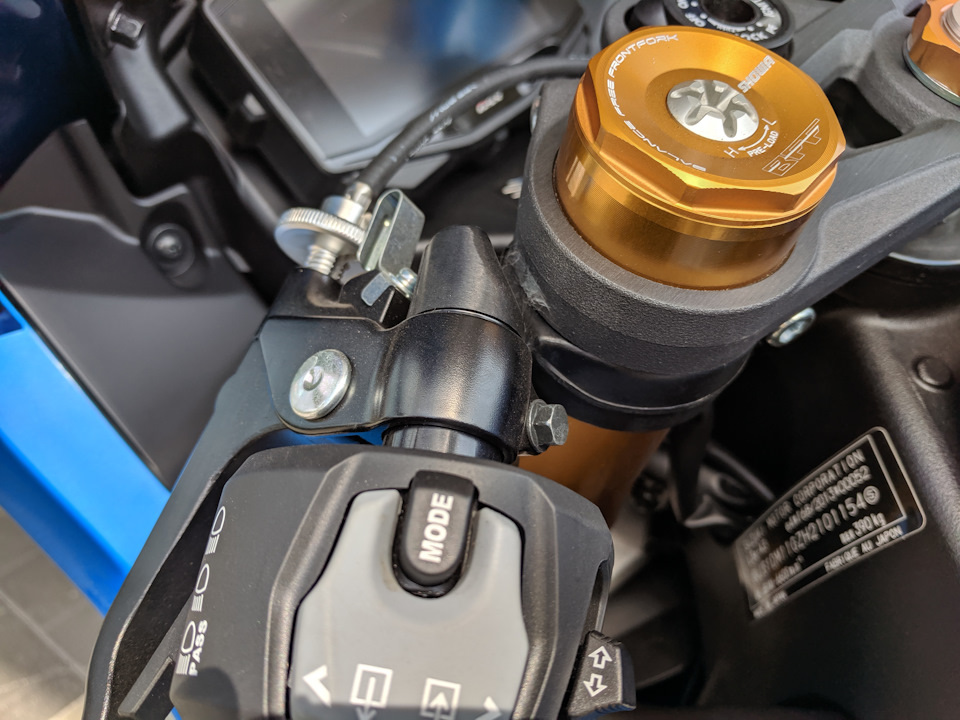
А это — мой Сузуки. Все намного проще и выглядит дешевле, ни подогрева, ни круиз-контроля, чтобы поменять рукоятку нужно снять мост и стянуть рукоятку через верх. Но поворотнички — на правильном месте.
Полный размер
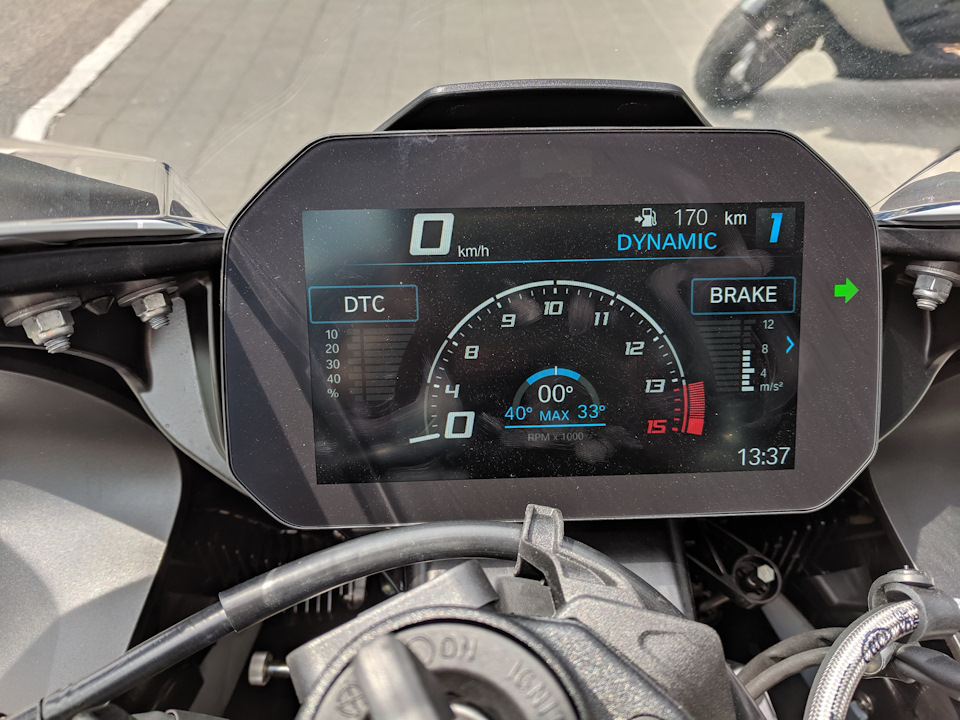
Приборная панель — 6.5 дюймов, отличное разрешение и все видно даже под сильным солнцем. Есть два режима информации, один, видимо, для трека, там по всему экрану лента оборотов, а это второй режим, мне он очень нравится, не перегружена информацией и в то же время показывает много интересного, слева — насколько используешь трекшн контроль, справа — насколько используешь тормоза, посередине показывает угол наклона, а по сторонам максимально достигнутый угол наклона. Время, скорость, обороты и остаточное топливо, и режим. Что еще надо, в принципе? Я ездил в режиме Динамик — полная мощность и все системы работают. Тракшн контрол даже ни разу не включился, 40 градусов наклона максимально влево и 33 вправо, есть над чем работать, но это был один проезд по серпантинам на новом для меня и не моем мотоцикле, уверен будь он моим и немного практики — удалось бы похвастаться больше. 🙂 В любом случае, инструменталка выполнена на 5+. Мне кажется это лучшее что я видел, включая Дукати и Априлию. Немного напоминает Триумф Стрит/Спид, там тоже черный фон. Мне кажется на черном фоне видно лучше. На Сузуки тоже черный фон, но белые цифры, размер похожий, видно отлично, но чувствуется устаревшим, без цветов-то, хотя это не проблема для меня, но Сузуки экран немного перегружен информацией, там есть например мгновенный расход топлива и средний расход топлива и сколько километров осталось на баке, это слишком много инфо, нахрена мне мгновенный расход топлива? Дайте мне углы наклона! На Сузуки, однако, есть температура воздуха и температура воды, это, я считаю, полезная информация.

Полный размер
Внешний вид…отвлечемся от Сузуки, он выглядит как он выглядит и мне нравится как он выглядит, мне нравится фара по центру и две подсвечивающиеся реснички. Что касается нового S1000RR, совершенно новый подход к внешнему виду. Исчезла ассиметричная мордочка, она мне всегда нравилась, легко узнаваемая и одновременно какая-то сумасшедшая, причем ты знал, что это сделано не для ‘красоты’, а ради снижения массы. Есть у предыдущей S1000RR какое-то родство с тогдашней BMW 1M, у этой машинки тоже был вид душевнобольного на гране срыва, который вот-вот сделает что-нибудь ужасающее, эти вытаращенные глаза, взгляд попавшего в свет фар оленя…мне 1М до сих пор очень нравится, а вот М2 уже не то…и новый S1000RR меня лично видом спереди не радует, нет уникальности, какая-то смесь Ducati Panigale + Yamaha R1, и ноздря от предыдущей модели. Да, я бы предпочел новый S1000RR со старым лицом, но это все лирика, в принципе внешне меня новый БМВ не отторгает, а едет он лучше чем предыдущая модель.
Что касается езды, опять, 40 минут соблюдая скорость по серпантинам, через поселки с пробками, светофорами, 30кмч участками, и немного по пустым загородным дорогам между полей…
1.
В первом же повороте я подумал: ‘Черт, это же Дайтона!’ То есть когда я катал предыдущую модель у меня возникала мысль о Сузуки GSXR1000, а новая модель сразу сассоциировалась с Triumph Daytona. Потому что новый S1000RR — очень легкий и поворотливый! Тут конечно надо отдать дань легким углеволокнистым дискам, даже на невысокой скорости чувствуется разница, я не могу себе даже представить как она чувствуется на гоночном треке! Если я когда-либо собрался бы что-то менять на Сузуки, первым делом это была бы смена дисков на углеволокно. То есть я считаю хорошая подвеска (с правильной настройкой) и шины — самое важное, но легкие диски идут сразу за ними.
2.
Электронная подвеска на новом S1000RR — высший класс, по крайней мере для дорог. Помню ездил на Honda CBR1000RR SP Fireblade, там тоже электронная подвеска, вообще отличный мотоцикл, мягкий и легкий, как часто говорят на Хонде легче всего ездить, но на SP помню на ямах зад ходил вверх и вниз как на рессоре, на S1000RR ничего такого нет, подвеска и жесткая и одновременно не жесткая, плотная, но одновременно сглаживает все ямы и не прыгает. На Сузуки аналоговая (но продвинутая Balance Free Fork/Shock) подвеска, я ее так и не удосужился настроить с тех пор как купил, и сейчас она в жестком режиме, на кочках иногда подпрыгивает мотоцикл. То есть сравнить не могу, во всех тестах GSXR1000R положительно отзываются о вилке, но на S1000RR ничего вручную настраивать не надо, поменял режим и едь, или в Pro Mode можно настроить отбой и сжатие и сохранить, вуаля!
3.
Инструменталка, как писал, супер. Зеркала — супер. Легкое сцепление.
4.
Посадка — удобная. Мне предыдущая модель не нравилась за седло, оно мне по форме не подходило, я скатывался к баку. На этом М S1000RR особое М седло, оно жесткое и с особым ‘рисунком’ благодаря которому отлично держит и никуда не скатываешься, но одновременно комфортабельное. Вырезы в баке сделаны как под меня, в них засовываешь колени и отлично держишься, не надо никаких Stompgrip. И вообще очень удобно сидеть, за весь тест не появилось никаких болей, не затекли руки/ноги. Отлично, БМВ, просто отлично.
5.
Реакция на закрытие/открытие газа, я попробовал на разных скоростях, на разных передачах, на холодный мотор, на горячий мотор, под горку, в пробках…5+, нет рывков, электронный газ прекрасно настроен. Напоминает Триумф. Мой Сузуки, даже после прошивки, далеко позади в этом плане. 🙁
Однако, что мне не понравилось в газе, очень надо крутить рукоятку, так было и на Honda CBR1000RR SP, я писал. Не то чтобы надо выкручивать до конца, но точно крутил больше чем на своей Сузуки, не говоря уже о любом мотоцикле с троссиком. Может еще и ожидания были слишком высокие, но я кручу, а БМВ разгоняется как-то ‘медленно’, как швейцарский поезд размеренно и плавно, нет рывка как на моем 954 Fireblade, даже мой Сузуки с электронным газом реагирует поагрессивнее мне кажется. Очень трудно что-то доказать, но все такие тесты часто именно на чувствах построены, и по чувствам S1000RR разгоняется плавнее и менее агрессивно. Хотя это обманное чувство, потому что на самом деле разгоняется этот мотоцикл очень быстро, а набрав немного оборотов просто ужасающе быстро. Это очень-очень-очень опасный мотоцикл для швейцарских дорог с ограничениями и драконскими штрафами, можно очень легко превысить скорость, именно из-за плавности работы газа, отсутствия наростания давления ветра (типично для спорта) и довольно тихого звука. Однако это не значит, что на этом мотоцикле сложно ездить 30-50кмч, очень просто, нет рывков и посадка удобная. Просто надо себя очень контроллировать, а то чревато…
6.
Еще одна штука по газу, из-за того, что так сильно надо выкручивать рукоятку, или по крайней мере я выкручивал, то при торможении часто еще под газом, под гору это не очень, тормозишь и одновременно мотоцикл хочет ехать вперед, приотпускаешь тормоз и он начинает слишком разгонятся, это в серпантинах под гору немного убивает доверие. Я об этом сказал потом в салоне, шеф, он катал этот мотоцикл на треке, сказал, что БМВ знает про проблему что люди, когда резко тормозят, все еще держат мотоцикл под газом, и поэтому на этом S1000RR встроена функция, когда резко тормозишь в экстремальной ситуации, то электроника отключает газ, даже если у тебя еще вывернута ручка. Получается на не экстремальных торможениях это не работает. В принципе это не проблема, просто требует привыкания, по крайней мере для меня, на других мотоциклах, включая предыдущую версию S1000RR, у меня таких проблем не было.
7.
Звук. Скажем сразу, звук »важен» когда едешь медленно, когда набираешь скорость звук ветра перебивает звук мотора/выхлопа. Как со стороны мотоцикл звучит я не могу сказать и мне, как пилоту, это не интересно. Звук на новом S1000RR — слабый. Евро 5 ограничения, к сожалению. Нет агрессии, не то что, скажем, у BMW S1000R родстера, где он звуком тебе как бы говорит: «чувак, ты чего едешь 50, я хочу ехать 150! Давай, давай!» То есть мотоцикл очень тихий, и одновременно мотор звучит как 100-процентная швейная машинка, тттттт.» Наверное это можно улучшить поменяв выхлоп, но если только легальную банку ставить — не думаю что будет намного лучше. В России можно наверное прямоток заебашить, но не у нас. Мой 954 Фаер тоже очень тихий, но у него мотор звучит и вибрирует погрубее. На моей Сузуке уже в базе, с этим громадным фабричным выхлопом звук был агрессивнее и сильнее, ну как у настоящего литрового спорта, а с новой банкой еще басистее. Причем у меня на Сузуки мотор грубее звучит, вибрирует без балансировочного вала, а сейчас еще вибрирует клапан выхлопной системы, расшатался, надо подтянуть, но мне нравится этот звук ведра болтов, типичный звук Сузуки, я его люблю. БМВ мотор не вибрирует (на низких скоростях по крайней мере), звучит как швейная машинка (я никогда не думал, что какой-то мотоцикл в этом «швейно-машиновом» плане превзойдет мой 997 Турбо) и выхлопная система не звучит. С одной стороны хорошо, не напрягает в длинных путешествиях, можно музыку слушать в наушники, с другой стороны нет бывшей звуковой агрессии. Еще интересная фича, под сброс газа и под горку мотоцикл начинает отплевываться из выхлопной трубы, очень зажигающе звучит, напоминает, опять-таки Дайтону, но у Дайтоны отплевывание более натуральное чтоли, всегда звучит по разному и по разному долго.
8.
Квикшифтер/блиппер — работают отлично, ничего другого от современных мотоциклов не ожидаешь, на моем Сузуки не хуже.
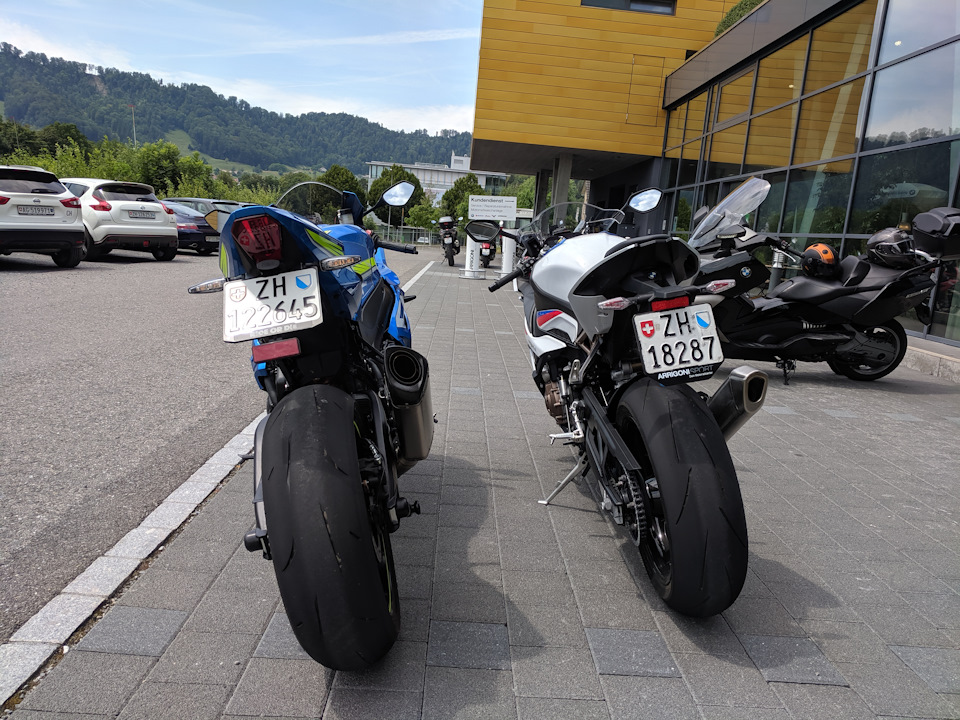
Полный размер
Ха! Вот еще, видимо у БМВ нет заднего фонаря, только тормозной фонарь. Задняя подсветка — в поворотничках. Хотя может там какой-то сенсор освещения и в темноте включается лампа, но днем горели только LED поворотнички.
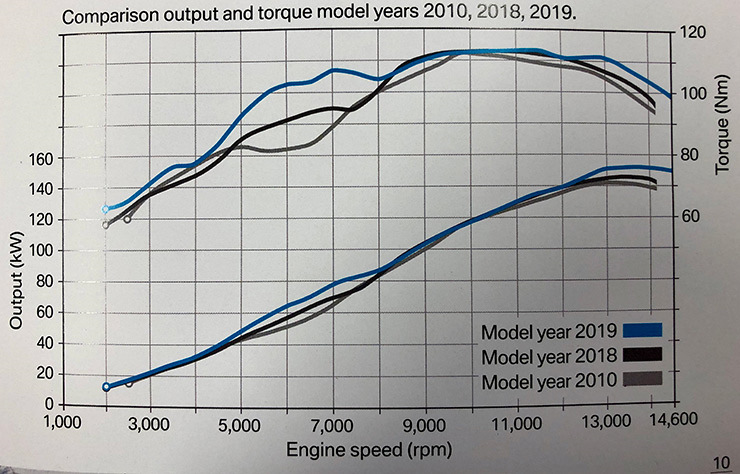
мотоцикл стал намного сильнее на средних, уличных, оборотах, и 100нм от 5500 оборотов и до конца, это серьезно!
Не знаю что еще сказать. Мотоцикл — понравился. Теперь он действительно как 600ка рулится. На нем можно медленно ездить, на нем можно, естественно, очень быстро ездить, можно возить пассажира (та пара передо мной отсутствовала почти час, а по-приезду жена водителя сказала что она хочет этот мотоцикл 🙂 ), можно ездить на трек и точно можно ездить на длинные дистанции, по крайней мере я могу спокойно проехать на этом S1000RR 300-400км за день по перевалам и не устать, это для меня длинные дистанции.
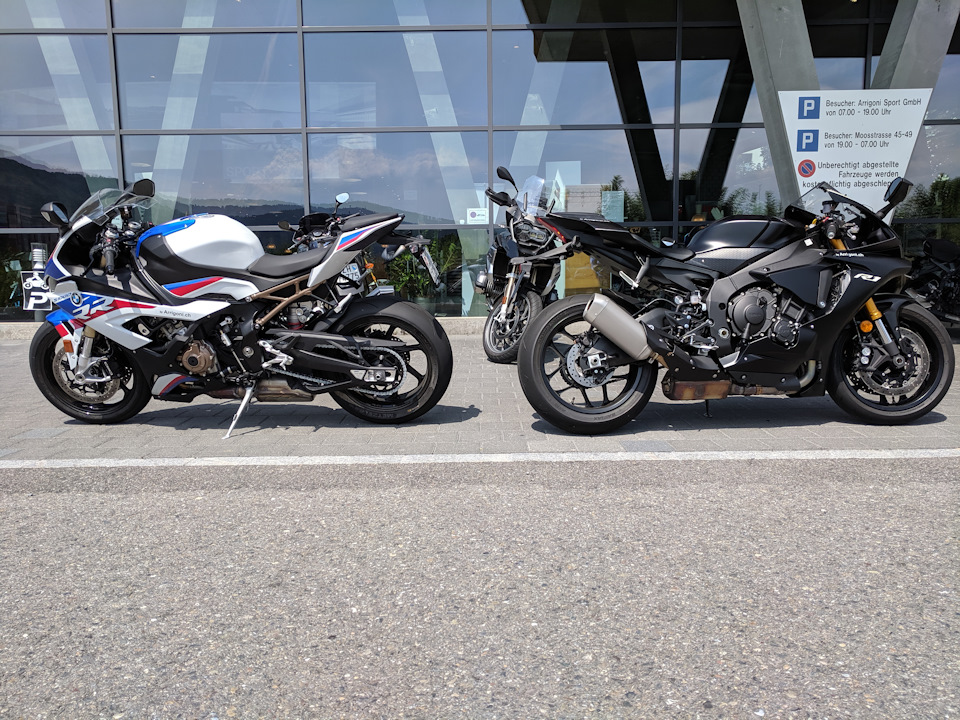
Полный размер
После S1000RR решил прокатиться на Yamaha R1. Это представительство прежде всего BMW, но с прошлого года — eще и Yamaha. Yamaha R1 — мой давний знакомый, я ее катал в 2015 году когда она только вышла, тогда я сказал, что этот мотоцикл чувствуется как 600-кубовый по размерам и управлению, но реакция на газ, в режиме А, а никаких заторможенных режимов я не признаю, очень дерганная. Потом я катал его на треке в Италии, и это было вау! Попросил их выкатить R1 для меня, она где-то в глубине гаража стояла, видимо не ожидают, что будет спрос на тест-драйвы этого мотоцикла, в принципе прошло 4 года, а он мало изменился и кто хотел — уже поездил или купил.
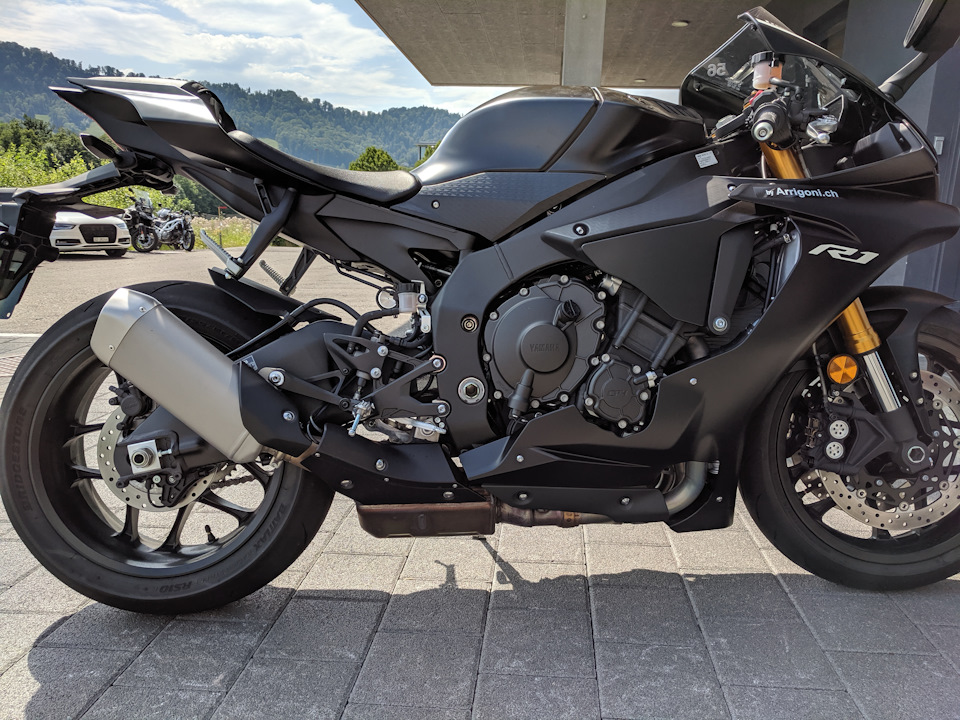
Полный размер
Скажу следующее, мотоцикл больше не дергается. Это 2018 модель, и заметно, что поработали над электронным газом, реагирует не в пример Сузуки. Добавили блиппер, теперь можно без сцепления переключаться как вверх так и вниз, работает, естественно, без нареканий. Изменили ли что-то еще? Мне кажется нет.
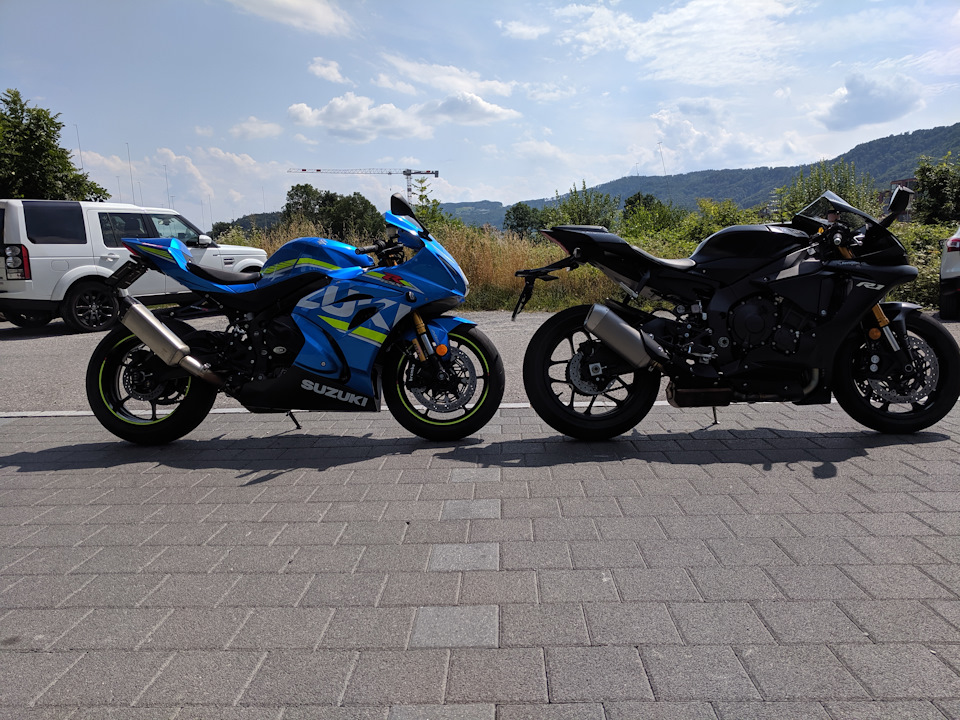
Полный размер
В матовом черном мне очень нравится, такое злое черное облако, хотя такой колор требует ухода, потому что сильно пачкается. Кишки выхлопной системы торчат как и на БМВ, хотя чуть пообгорели и на черном фоне из не так видно. Банку надо несомненно заменить на Akrapovic, она выглядит намного лучше.
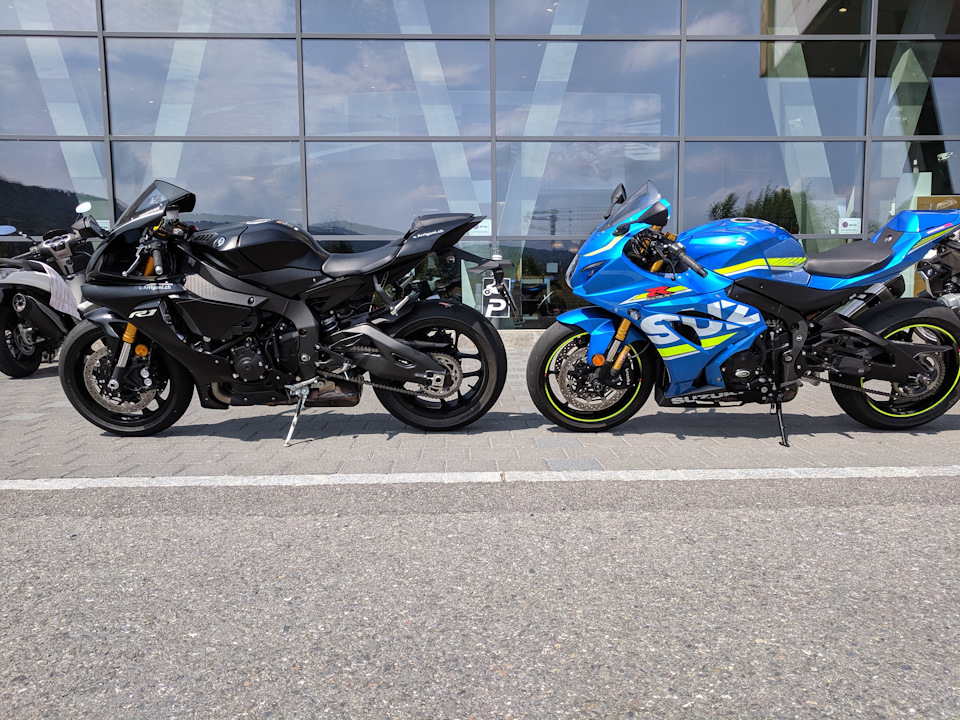
Полный размер
Что я могу сказать про R1…мне кажется из тройки тут представленных мотоциклов он больше чем другие требует пилота с навыками. Да, на нем можно ездить медленно, и даже новичок, если не с отбитыми мозгами и имеет уважение к такой технике, может купить и ездить на нем, ездить на трек и учиться. Не для совсем зеленых, однако. Для совсем зеленых подойдет БМВ, с ним легче по многим параметрам. Сузуки, в принципе, тоже, но до БМВ он не дотягивает, на Сузуки надо крутить, прошивать и так далее. R1 — он заточен под трек, это совершенно ясно. Намного неудобнее БМВ, седло врезалось мне в ляжки, от мотора и выхлопа очень сильно нагревались ноги, я ездил в высоких мотокроссовках Dainese D-WP, очень быстро затекла правая рука, пришлось ее ‘вытряхивать’, это из-за вибраций и из-за очень спортивной посадки…На длинные расстояния я бы на R1 врядли бы поехал, R1 утомляет. Более того, в серпантинах я себя увереннее чувствовал на БМВ и на Сузуки, не знаю почему, но на R1 страшнее и напряженнее, и в итоге я ехал медленнее.
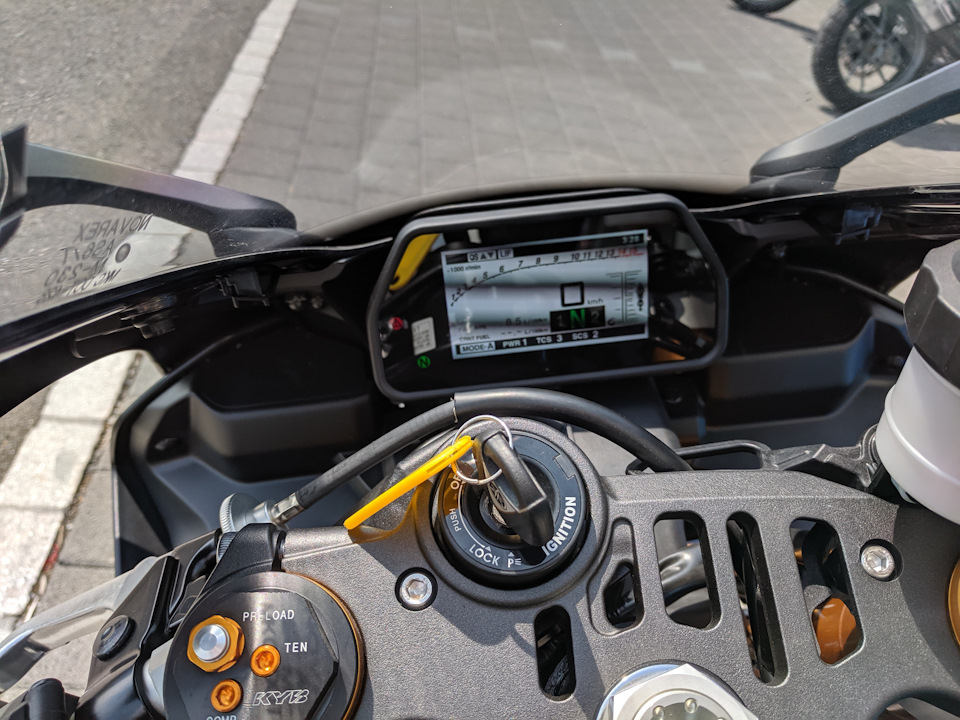
Полный размер
Еще наверное дань гоночнуму треку, угол наклона экрана. Экран, во первых, по сравнению с БМВ и с Сузуки — малюсенький. Но главное, под солнцем, не видно включенных поворотников, они маленькими лампочками по краям в черном фоне, а угол наклона такой, что их мигания не видно, вот несколько раз забывал их выключать. Пытался даже рукой наклонить экран, но он фиксированный. Наверное если прижаться головой к баку видно будет хорошо, но на обычных дорогах экран не лучший, и маленький.
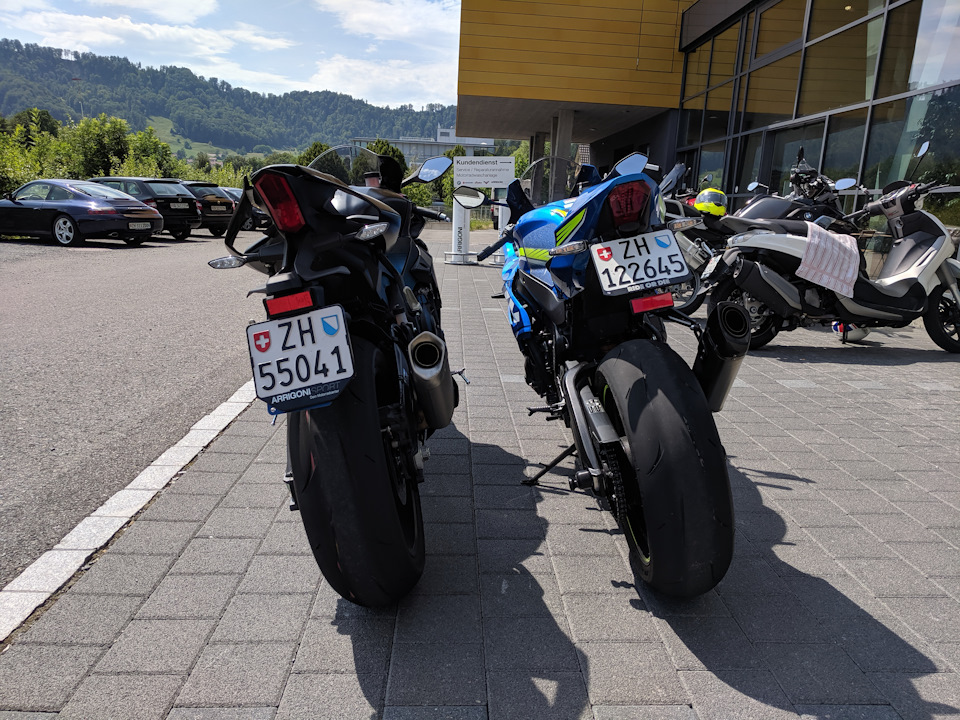
Полный размер
очень красивый зад у R1.
Дополнительно про R1. Мне кажется из этих трех мотоциклов быстрее всего потеряешь права именно на R1. БМВ — мощнее, но звук мотора R1 — это нечто! У всех трех мотоциклов — рядная четверка, но у R1 — нерегулярные вспышки (cross plane коленвал), технология из МоtoGP, взята чтобы сгладить реакции на задней шине. Из-за этой технологии мотор звучит совсем по-другому. Во-первых создается впечатление, что мотор — сухой, металл по металлу. На совсем низких оборотах он тикает как БМВ, но чуть поднял их — и начинается симфония cross plane, при этом мгновенно перемещаешься в MotoGP, но главное, если у БМВ и Сузуки с набором скорости вой мотора перекрывается свистом ветра по шлему, в R1 наоборот нарастает звук мотора, и чем быстрее едешь тем круче он звучит, и еще его чувствуешь всем телом, через педали, через седло. Из-за этого звука постоянно хочется ехать быстрее, больше оборотов, только чтобы послушать этот мотор, который еще и тянет отменно, даже до 7000 оборотов, где у него скачок, потому что это гоночный мотор и все ниже 7000 — это для девочек :-).
Подведем итог:
В сумме качеств — 2019 BMW S1000RR лучший из трех мотоциклов. И его надо покупать только в топовом М пакете с дисками из углеволокна.
По звуку — R1 на первом месте, далее Suzuki GSXR1000R (громче и агрессивнее чем БМВ и грубее), на третьем месте БМВ.
На длинные расстояния — S1000RR или GSXR1000R, с учетом того, что у Сузуки надо настроить подвеску вручную, а у БМВ — в принципе сел и поехал.
Для коротких поездок, предпочтительно прострелов и зажигания — R1.
Для гоночного ощущения — R1.
На трек — S1000RR или R1. Думаю БМВ прежде всего, он новее, читал, что у R1 тормоза дубовые, но на дороге я не заметил негативов. У GSXR1000R тормоза хуже чем у S1000RR и R1, надо дорабатывать, а это время и деньги.
Что касается меня — поменял бы я свой GSXR1000R на новый S1000RR? Если для дорог общего пользования — нет, не поменял бы. Да, у Сузуки длинный ход тормозного рычага, но мотоцикл тормозит более чем достаточно для дорог, просто требует небольшого привыкания если переходишь с мотоцикла с мгновенными тормозами. Дерганье на закрытие/открытие газа? После прошивки стало лучше, в последнюю поездку в горы не замечал так, чтобы напрягало, а в городе на нем не езжу. Звучит отлично, мощность более чем надо, удобый, нравится внешний вид. То есть меня устраивает мой GSXR1000R, да, надо настроить подвеску в конце концов.
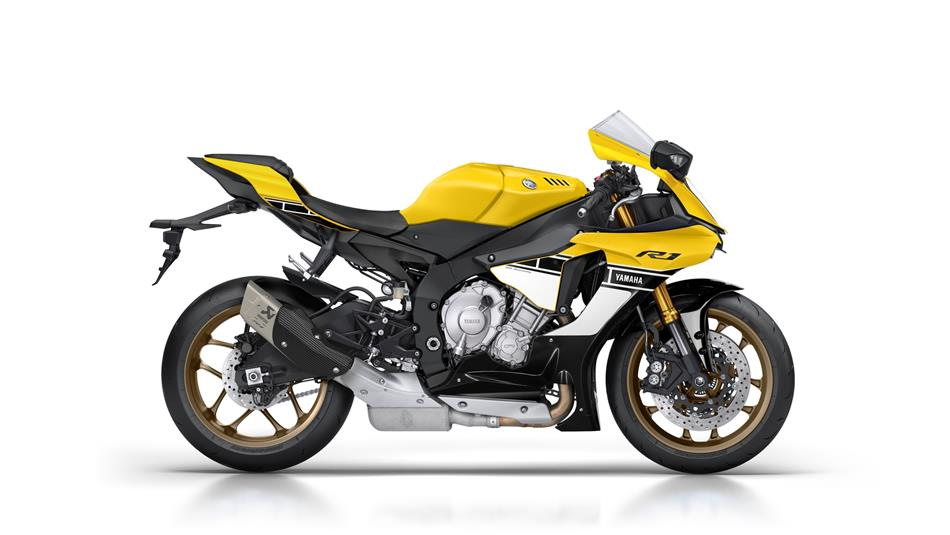
Если бы что-то я хотел, и были бы деньги, то я бы оставил себе GSXR1000R и купил бы R1 Anniversary Edition, 2016 года лимитированная модель в окраске, я ее называю, speedbump yellow, это окраска Кенни Робертса, который выиграл чемпионат 500сс три раза на Yamaha, 1978-1980. Самая любимая моя окраска, и позолоченые колеса, и Акрапович банка. Я бы этот мотоцикл выкатывал иногда на серпантины, только чтобы послушать звук этого мотора.
- Manuals
- Brands
- BMW Manuals
- Motorcycle
- S 1000 RR —
- Rider’s manual
-
Contents
-
Table of Contents
-
Troubleshooting
-
Bookmarks
Quick Links
BMW Motorrad
The Ultimate
Riding Machine
Rider’s Manual (US Model)
S 1000 RR
Related Manuals for BMW S 1000RR
Summary of Contents for BMW S 1000RR
-
Page 1
BMW Motorrad The Ultimate Riding Machine Rider’s Manual (US Model) S 1000 RR… -
Page 2
Motorcycle/Dealer Data Motorcycle data Dealer Data Model Contact in Service Ms./Mr Vehicle identification number Phone number Color number Initial registration Dealer’s address/phone number (company License plate stamp) -
Page 3
We congratulate you on your choice of a motorcycle from We wish you many miles of safe BMW and welcome you to the and enjoyable riding community of BMW riders. Familiarize yourself with your new BMW Motorrad. -
Page 4: Table Of Contents
Heated handlebar grips ..39 Brakes ….. . 65 BMW Motorrad Race Parking your motorcycle ..66 ABS .
-
Page 5
….. . 144 BMW Motorrad DTC ..104 defects ….162 Paint care . -
Page 6
Maintenance proce- dures ….. . 163 Confirmation of mainte- nance work ….165 Confirmation of service . -
Page 7: General Instructions
General instructions Overview ……6 Abbreviations and symbols ..6 Equipment .
-
Page 8: Overview
BMW Motorrad Result of an activity. When the time comes to sell retailer. your BMW, please remember Reference to a page with to hand over this Rider’s Manual; EWS Electronic immobilizer. more detailed informa- it is an important part of the mo- tion.
-
Page 9: Equipment
BMW motorcycles are on account of country-specific maintained by consistent, on- differences. going development efforts em- If your BMW is equipped with bracing their design, equipment options or accessories not de- and accessories. For this rea- scribed in this Rider’s Manual,…
-
Page 11: Overviews
Overviews General view, left side ….11 General view, right side … . . 13 Multifunction switch, left … . 14 Multifunction switch, right .
-
Page 13: General View, Left Side
General view, left side Adjusting front spring preload ( Adjusting front rebound- stage damping ( Adjusting rear compression (jounce) damping ( Adjuster for spring preload, rear ( Seat lock ( Tire inflation pressure table Payload table Chain adjustment values Engine oil level indicator 111) Adjusting front compres- sion damping (…
-
Page 15: General View, Right Side
General view, right side Brake-fluid reservoir, rear 116) Vehicle Identification Num- ber and type plate (on steering-head bearing at right) Brake-fluid reservoir, front 115) Steering damper (behind the right side panel) Coolant level indicator (be- hind side panel) ( 117) Engine oil fill location 112) Adjusting rear rebound-…
-
Page 16: Multifunction Switch, Left
Multifunction switch, left High-beam headlight and headlight flasher ( Using lap timer ( ABS operation ( with BMW Motorrad Using DTC ( Hazard warning flashers operation ( Turn indicators ( Horn Setting clock ( Using racing functions Operating odometer…
-
Page 17: Right
Multifunction switch, right with heated handlebar grips Heated hand grip ( Selecting riding mode Emergency-off switch (kill switch) ( Starting the engine…
-
Page 18: Underneath Seat
Underneath seat Battery ( 140) Helmet holder ( Luggage loops ( Onboard tool kit ( 110) Fuse box ( 139) Rider’s Manual (US Model)
-
Page 19: Instrument Cluster
Instrument cluster Indicator and warning lamps ( Tachometer Shiftpoint lamp ( Ambient light sensor (for brightness adjustment of instrument lighting) with anti-theft alarm Anti-theft alarm indicator light (see anti-theft alarm operating instructions) Multifunction display…
-
Page 21: Displays
Displays Multifunction display ….20 Warning and indicator lamps ..21 Service display ….. . 22 Cruising range .
-
Page 22: Multifunction Display
Multifunction display Speedometer Coolant temperature with heated handlebar grips Heated grip display Odometer ( Clock ( Set riding mode ( Gear indicator display, «N» indicates «neutral». Selection of the ride mode Refer to Chapter 5 for in- formation regarding the dis- play modes available for track use.
-
Page 23: Warning And Indicator Lamps
Warning and indicator lamps ABS warning lamp ( with BMW Motorrad DTC warning lamp ( Indicator lamp for left turn signal Universal warning lamp, appears together with warnings in display panel Indicator lamp for right turn signal Fuel-reserve warning lamp…
-
Page 24: Service Display
If the time remaining until the preferably an authorized vice intervals may be required. next service will elapse within BMW Motorrad retailer, for When the odometer reading for one month, the service date 1 setting of the date. the recalculated early service falls…
-
Page 25: Cruising Range
The determined range is an approximate reading. BMW Motorrad therefore recom- Warnings for which no individual mends that you do not try to use warning lamp is present are sig- The cruising range 1 indicates the full range before refueling.
-
Page 26
Overview of warning indicators Warning and indicator Warning symbols in the Meaning lamps display ! EWS lights up yellow is indicated Electronic immobilizer is active ( lights up Fuel down to reserve ( lights up red Temperature dis- Coolant temperature too high ( play flashes lights up Engine in emergency-operation mode… -
Page 27
Warning and indicator Warning symbols in the Meaning lamps display ! VDS is indicated Fall sensor defective ( flashes ABS self-diagnosis not completed lights up ABS deactivated ( lights up ABS error ( flashes rapidly DTC intervention ( flashes slowly DTC self-diagnosis not completed lights up DTC deactivated (… -
Page 28
Warning and indicator Warning symbols in the Meaning lamps display ! DWALO is indi- Anti-theft alarm battery weak ( cated ! DWA lights up yellow is indicated Anti-theft alarm battery discharged ! SPEED Shiftpoint lamp is indi- Speed warning ( cated flashes or remains on continuously. -
Page 29
Approx. 1.1 gal (Approx. 4 l) located on the ignition key. workshop, preferably an autho- Refueling procedure ( 67). Use the reserve key. rized BMW Motorrad retailer. Have the defective key re- Coolant temperature too placed, preferably by an autho- Engine in emergency- high rized BMW Motorrad retailer. -
Page 30: Parking Light Bulb
In exceptional cialized workshop, preferably A defective bulb places cases, the engine stops and can an authorized BMW Motorrad your safety at risk because no longer be started. Otherwise, retailer. it is easy for other users to not the engine runs in the emer- see the motorcycle.
-
Page 31: Abs Error
Fall sensor defective thorized workshop, preferably ABS deactivated an authorized BMW Motorrad ! VDS (Vertical Down Sensor) is retailer. ABS warning lamp lights shown. Possible cause:…
-
Page 32
Observe addi- DTC deactivated ing that the system has initiated tional information on situations active closed-loop intervention with BMW Motorrad DTC which can lead to a DTC error even after the critical situation 104). DTC warning lamp lights has passed. -
Page 33
Contact an authorized service Contact an authorized service facility, preferably an authorized facility, preferably an authorized BMW Motorrad retailer. BMW Motorrad retailer. Anti-theft alarm battery Speed warning discharged Shiftpoint lamp flashes or remains on continuously with anti-theft alarm according to the selected setting. -
Page 35: Operation
Heated handlebar grips … . . 39 BMW Motorrad Race ABS ..40 Dynamic Traction Control (DTC) ..41 Riding mode .
-
Page 36: Steering And Ignition Lock
Pre-Ride Check in progress. You are provided with 2 ignition keys. ABS self-diagnosis in progress. Should you lose your keys please refer to the information regard- with BMW Motorrad DTC ing the electronic immobilizer DTC self-diagnosis is per- (EWS) ( 34). formed. (…
-
Page 37: Clock
Adjust the clock only when the If you lose a key, you can have it desired, press and hold but- motorcycle is stationary. disabled by your BMW Motorrad ton 2 until minutes 4 flash. partner. When having a key dis- Switch on ignition.
-
Page 38: Odometer
Setting is completed. Remaining cruising range (when fuel level reaches Odometer reserve) Selecting readings Resetting tripmeter Switch on ignition. Switch on ignition. Select desired trip odometer. Continue to press the button 2 LIMIT until appears in the display. Press button 1 repeatedly until desired value is displayed in Press and hold button 1 until area 3.
-
Page 39: Lights
ton 1 until appears in the display. Lights Parking lights The parking lights come on au- tomatically when the ignition is switched on. The parking lights are a To adopt the current speed as When you exceed the preset strain on the battery. Do the new limit: Press the but- speed the shiftpoint lamp 3 re- not leave the ignition switched…
-
Page 40: Turn Indicators
Press switch 1 toward front to Immediately after switching off Press button 1 toward left to switch on high beams. the ignition push button 1 to switch on left-hand turn indica- the left and hold until the park- tor. Pull switch 1 rearward to actu- ing lights come on.
-
Page 41: Emergency-Off Switch
The hazard warning flash- Ignition can be switched off. The engine can be switched ers place a strain on the off easily and quickly using the Press button 1 again to switch battery. Do not use the hazard emergency kill switch. off hazard warning flashers.
-
Page 42: Bmw Motorrad Race Abs
BMW Motorrad Race The increase in power con- sumption caused by the heated grips can drain the bat- Switching off ABS tery if you are riding at low en- function gine speeds. If the battery is in- adequately charged, the heated Switch on ignition.
-
Page 43: Dynamic Traction Control
Switching on ABS with BMW Motorrad DTC If the coding plug is not used for the SLICK function, as an function alternative, the ignition can be switched off, then on again. If the ABS warning light lights up after switching…
-
Page 44: Riding Mode
Switching on DTC If the coding plug is not used for the SLICK function, as an function alternative, the ignition can be switched off, then on again. If the DTC warning light lights up after switching the ignition off and on and then continued driving over 3,1 mph (5 km/h), a DTC error has occurred.
-
Page 45
Details on the selectable driving modes are provided in the chapter «Technology in Detail». With the coding plug installed, Press button 1 repeatedly until SLICK the driving mode selection arrow appears before is also offered in the selection desired setting. menu. -
Page 46
When the motorcycle comes Do not use the encoding plug on to a stop, the selected riding public roads. mode is activated after approx. Switch off ignition. ten seconds. Removing driver’s seat ( 54). The new riding mode is acti- vated during operation under the following conditions: Brakes not engaged… -
Page 47: Brakes
Adjusting the handbrake from Position 1: largest dis- lever while driving can lead tance between handlebar grip to accidents. and brake lever Only adjust the handbrake up to Position 6: smallest dis- lever when the motorcycle is tance between handlebar grip stationary.
-
Page 48: Spring Preload
Spring preload Adjustment of spring preload dependent on Setting loading The spring preload on the front wheel must be adapted to the 0.4…0.6 in (10…15 mm) weight of the rider. Higher (With rider 187 lbs (85 kg)) weight requires higher spring preload, lower weight requires lower spring preload.
-
Page 49
adjusting screws 3 with tool of edge 1 of license-plate carrier onboard tool kit in direction a. and screw 2 of chain guard. To increase spring deflection Load motorcycle with driver. (decrease spring preload), turn With the assistance of a helper, adjusting screws 3 with tool of measure distance d between onboard tool kit in direction b. -
Page 50: Damping
Adjusting compression Tighten screw 1 to specified torque. damping on front wheel Clamp screw on upper spring plate 2 lb/ft (3 Nm) Damping Setting Your motorcycle’s han- The damping must be adjusted dling will suffer if you do to the road conditions and the not match the spring-preload and Use adjusting screws 1 on left spring preload.
-
Page 51
Compression stage, ba- sic setting, front Position 8 (sporty setting with driver 187 lbs (85 kg)) Make sure that the same val- ues are set on the left and right. Rebound-stage damping To increase damping: turn ad- To increase damping: turn ad- on front wheel justing screw with tool on on- justing screw with tool on on-… -
Page 52
Rebound stage, basic setting, front Position 7 (sporty setting with driver 187 lbs (85 kg)) Make sure that the same val- ues are set on the left and right. Factory settings at front Adjust compression damping To increase damping: turn wheel extended jounce travel (low adjusting screw or adjustment… -
Page 53
Adjusting rebound-stage Pressure stage basic set- damping at rear wheel ting at rear High-Speed Make sure ground is level and Position 2 (comfortable firm and park motorcycle. setting with rider 187 lbs (85 kg)) Position 4 (normal setting with rider 187 lbs (85 kg)) Position 9 (sport-oriented To increase damping: turn ad- setting with rider 187 lbs… -
Page 54: Tires
cycle and reduces the life of the Rebound stage, basic Tire pressure, rear tires. setting, rear Ensure proper tire inflation pressure. Position 4 (standard setting 42.1 psi (2.9 bar) (With tire with rider 187 lbs (85 kg)) cold) At high road speeds, tire valves have a tendency to If tire pressure is too low: Position 7 (sport-oriented…
-
Page 55: Rider And Passenger Seats
Unlock seat lock 1 with the specialized workshop, preferably vehicle ignition key. an authorized BMW Motorrad Mount passenger seat in Lift passenger seat at rear, mounts 2 on left and right. retailer.
-
Page 56: Helmet Holder
Installing driver’s seat Lock seat lock with ignition key. Removing driver’s seat Press cover of driver’s seat over screw sockets toward Mount driver’s seat in mount 2, front somewhat and hold in then position over screw sock- place. ets 3. When doing so, make Press cover of driver’s seat Install screws 1.
-
Page 57: Luggage Loops
Luggage loops Locking luggage on motorcycle Removing passenger seat 53). Turn over passenger seat. Use loops 1 e.g. in conjunction The helmet catch can with passenger footrests, to scratch the paneling. lash luggage onto passenger When hooking on the helmet, seat.
-
Page 59: Riding
Riding Safety instructions ….58 Checklist ……59 Starting .
-
Page 60: Safety Instructions
Your authorized shock absorber system vehicle is in use. There is a risk BMW Motorrad retailer will be Imbalanced load of burn injuries by contact with happy to advise you and has Loose clothing hot surfaces.
-
Page 61: Checklist
BMW Motorrad DTC Brakes with the motorcycle at a stand- Front and rear brake fluid levels DTC self-diagnosis is per- still: overheating would result.
-
Page 62
Phase 1 You cannot start the mo- The start attempt is auto- torcycle with the side stand matically interrupted if bat- extended and a gear engaged. tery voltage is too low. Recharge The engine will switch itself off if the battery before you start the it is started with the transmission engine, or use jump leads and a in neutral and then a gear is en-… -
Page 63
Phase 2 cannot be indicated. The readiness for operation Checking wheel sensors while Watch all warning and indicator of the BMW Motorrad DTC is starting off. lights on the display. checked by the self-diagnosis. ABS warning lamp flashes. Have the malfunction corrected… -
Page 64: Breaking In
Phase 2 an authorized BMW Motorrad Engine run-in speed retailer. Checking the diagnosable sys- tem components while driv- Breaking in ing. So that the DTC self-di- no full throttle (Odome- agnosis can be completed, the Engine ter reading 0…621 miles motorcycle must be driven at (0…1000 km))
-
Page 65: Shifting Gears
Tires Shifting gears Shiftpoint lamp flashing: engine rpm too high New tires have a smooth sur- Shiftpoint lamp face. This must be roughened by Upshift rpm riding in a restrained manner at During driving the shiftpoint lamp various heel angles until the tires indicates the speed at which the are run in.
-
Page 66: Steering
BMW Motorrad recommends only upshifting with clutch operation in these driving situations. The shifting assistant Attempts to adjust the…
-
Page 67: Brakes
Locking up of the front wheel is Basic steering damper the weight transfer to the front prevented by the BMW Motorrad adjustment setting wheel. Increases in the load at Race ABS. an individual wheel are accom-…
-
Page 68: Parking Your Motorcycle
Parking your Wet, soiled brakes Refueling motorcycle Moisture and dirt on the brake Fuel specifications disks and the brake pads result in Side stand For optimal fuel economy, the a decrease in the braking action. gasoline should be sulfur-free or Switch off engine.
-
Page 69
Immediately wipe off plastic parts Recommended fuel qual- after contact with fuel. Make sure ground is level and Super unleaded, (max. 10 % firm and place motorcycle on ethanol, E10) side stand. 89 AKI (95 ROZ/RON) The available fuel tank vol- 89 AKI ume can only be optimally used with the vehicle standing on… -
Page 70: Fastening Motorcycle For Trans
the engine dies off due to lack of ping away to the side, prefer- fuel. ably with the help of a second person. Usable fuel quantity Push motorcycle onto transport surface, and do not place on side stand. Approx. 4.6 gal (Approx. 17.5 l) Reserve fuel quantity Undo the screws 1 and remove…
-
Page 71
Fasten rear straps on both sides to the passenger foot- pegs and then tighten them. Tension all straps evenly; the vehicle should be pulled down against its springs with the sus- pension compressed as much as possible. -
Page 73: On The Racetrack
On the racetrack Multifunction display ….72 LAPTIMER mode ….74 INFO mode .
-
Page 74: Multifunction Display
Multifunction display INFO mode: In the INFO mode the stored information from the Selecting display mode LAPTIMER mode can be dis- played. This mode can only be activated with the motorcycle stopped. SETUP mode: In the SETUP mode the instrument cluster’s display features can be adjusted INFO-MENU to driver’s preferences.
-
Page 75
Overview of mode selection Solid line: button pressed briefly Dotted line: press and hold button Operating odometer Setting clock ( 35). Start time recording 76). Start INFO menu ( Start SETUP menu Speed warning (… -
Page 76: Laptimer Mode
LAPTIMER mode Marking displayed value delay can be set as described on Page ( 90). The following times can be Display shown in the second line: The time of the previous lap is marked with «LASTLAP». The running time of the current lap.
-
Page 77
Overview of lap timer mode Solid line: button pressed briefly Dotted line: press and hold button End time entry ( 77). Interrupt time entry 77). Start time recording 76). Adjust display setting 76). -
Page 78
Adjusting display setting Starting time recording new lap can only be started in the other modes with an exter- nal signal. Infrared receiver with infrared receiver Operation of the instrument clus- ter in the LAPTIMER mode can be carried out conveniently with an infrared signal. -
Page 79
Interrupting time entry Ending time entry continued. Only after the current recording has been deleted in INFO mode does counting begin at lap 1 again. Fastest lap expected This function must be activated SETUP in the menu ( 91). To interrupt time entry, press First, press the button 1 to in- button 1. -
Page 80
fastest lap then a new fastest lap can be anticipated. The «fastest lap» lamp 1 lights up. -
Page 81: Info Mode
INFO mode All-time best lap time ATBEST Selecting stored lap BEST Best stored lap time ( LAST Last stored lap time ( All other stored laps The total sum of all recorded TOTAL lap times ( Exit INFO mode INFO RETURN Allows deletion of stored data INFO CLEAR ALL ) (except…
-
Page 82
Overview of Info mode Solid line: button pressed briefly Dotted line: press and hold button Select stored lap ( 79). Delete lap times ( 83). Jump directly to CLEAR ALL menu Exit INFO mode ( 81). Clear recording ( 82). Activate ROAD mode 82). -
Page 83
Information on each race Lap time of displayed race Exiting INFO mode Press and hold button 2 to exit INFO mode. The recorded values are Alternately: top speed stored. (max) and minimum speed Press button 1 or button 2 re- (min) of the indicated race INFO RETURN peatedly until… -
Page 84
Clearing recording Activating ROAD mode The all-time best lap remains stored even if the recorded laps are deleted. As a result, a new race can be recorded at other times and compared with the best lap from previous races. The all-time best lap can also be deleted. -
Page 85
LAST Deleting lap times the last stored lap , the corresponding lap is deleted. The lap that previously had been the second to last lap is taken over as the new last lap. a random stored lap, it is deleted. The numbering of the remaining laps is maintained. -
Page 86: Setup Mode
SETUP mode Shiftpoint lamp activation rpm SFT-ON Selecting parameter Shiftpoint lamp switch-off rpm SFTOFF Shiftpoint lamp brightness set- SFT-BR ting ( Shiftpoint lamp flashing fre- SFT-FL quency ( Display structure in Laptimer SETUP LAPTIMER mode ( Display duration for last HOLD recorded time ( LAP-TM…
-
Page 87
Overview of Setup mode Solid line: button pressed briefly Dotted line: press and hold button Select parameter ( 84). Jump directly to ROAD mode Set parameter ( 86). Exit settings ( 86). -
Page 88
Setting parameter Exiting settings Switch-on speed of shifting flasher Press and hold button 2 until Press and hold button 1 until multifunction display switches displayed parameter begins to Display of switch-on speed in over to ROAD mode. flash. rpm. Press button 1 or button 2 re- A value which is still flashing peatedly until desired value is will not be saved. -
Page 89
Switch-off speed of Brightness of shifting Flashing frequency of shifting flasher flasher shiftpoint lamp Display of switch-off speed in Display of shifting flasher bright- Flashing frequency of the shift- rpm. ness in percent of the maximum point lamp and the speed warn- brightness. -
Page 90
Version 1 Version 2 Version 3 The running time of the cur- The time required for the pre- The running time of the current rent lap is shown in the second ceding lap is shown in the sec- lap is shown in the second line line and the best lap time of the ond line and the running time of and the all-time best lap time is… -
Page 91
Version 4 Version 5 Version 6 The time required for the pre- The running time of the current The second line remains empty ceding lap is shown in the sec- lap is shown in the second line and the running time of the cur- ond line and the best lap time of and the third line remains empty. -
Page 92
Display duration for last Minimum lap time Lamp malfunction stopped time displays When using an infrared receiver to determine the lap times, the Display of the display duration in If lamps or bulbs are removed time can be set which must seconds. -
Page 93
Fastest lap display Speed warning Display brightness The «fastest lap expected» func- When you select this function Five different intensities are avail- tion ( 77) is activated. able for adjusting the display a supplementary main menu al- brightness. lowing selection of a maximum speed is activated. -
Page 94: In A Gravel Bed
BMW Motorrad DTC Use the HP Race Cover DTC shut-off Kit from BMW Motorrad to cover the exposed screw sock- On very loose substrates (e.g. a ets and secure the mounting gravel bed on a racetrack), the attachment.
-
Page 95: Tion
Install nuts on back of fairing with anti-theft alarm with torque. Mirror on front panel car- rier Securing device: mechanical 6 lb/ft (8 Nm) Removing and installing Release the cable tie 1 (is suit- license-plate carrier able for reuse). Activate locking mechanisms 3 Removing license-plate Actuate locking mechanism 2 and disconnect plug.
-
Page 96
Carefully disconnect anti-theft Press locking mechanism 7 Detach screws 8 with wash- alarm system bracket 5 from to left with small screwdriver ers and remove license-plate rear frame and rotate it upward. while simultaneously sliding carrier. Guide cable through connector toward rear off anti- opening 9 when doing so. -
Page 97
secure on rear frame with cable tie 1. with anti-theft alarm Position license-plate carrier Close connector so that locking and guide cable through open- mechanism 6 engages. ing 9. Install screws 8 with washers. Slide connector of license-plate carrier onto anti-theft alarm system bracket so that lock- ing mechanism 7 engages. -
Page 98: Removing And Installing Front Turn
fairing side panel also apply logi- cally for the left side. Removing fairing side panel 117). Mount anti-theft alarm system Undo the screw 2 and remove in bracket from front. the turn signal. Guide cable through fairing side panel. Install screw 4. Protect connector on motorcy- Close connector so that locking cle against contamination.
-
Page 99
Installing front turn signal Mount side panel in rubber Position the wind deflection buffer at position 4. wing 2 ensuring that is on the Unfasten the screws 1 then correct side. Install screws 3 with washers. remove the wind deflection The letters «R»… -
Page 100
Remove screws 2. Position turn signal and install screw 2. Remove screws 3 with wash- ers. Pull fairing side panel out of rubber buffer at position 4 and remove. Guide cable through fairing side panel. Clip the turn signal cable in at position 1. -
Page 101: Technology In Detail
Race ABS ……102 Engine management with BMW Motorrad DTC ….104…
-
Page 102: Riding Mode
BMW Motorrad. SLICK mode Do not use the encoding plug on assumes racing tires and roads SPORT public roads.
-
Page 103
ing tires with maximum adhesion The DTC system intervenes later SLICK than in the RAIN mode so that (slick tires) are mounted. Longer To activate the SLICK mode, the minor drifts are possible at the wheelies and wheelies at small coding plug must be used. -
Page 104: Brake System With
If the maximum transferrable tact to the road. At this point in braking force is exceeded when time, the BMW Motorrad Integral the driver increases the brake…
-
Page 105
Consequently, ABS does not in- an ABS fault is indicated. The How is the BMW Motorrad tervene until very late, if at all. condition for a fault code is the Race ABS noticeable to Under these circumstances the completed self-diagnosis. -
Page 106: Engine Management With Bmw Motorrad Dtc
Do not reduce the additional mentum take over and even safety provided with risky How important is regular BMW Motorrad Race ABS is un- driving. maintenance? able to counteract their effects. Special situations Any technical system is al-…
-
Page 107
Unusual driving conditions: In this case, BMW Motorrad rec- ommends turning back the throt- Driving on the rear wheel tle grip somewhat to achieve (wheelie) for a longer period a stable driving state again as with DTC deactivated. -
Page 109: Accessories
Accessories General instructions ….108…
-
Page 110: General Instructions
BMW motorcycles without proved by BMW for this purpose. constituting a safety hazard. Nor Your authorized BMW Motorrad is this guarantee provided when…
-
Page 111: Maintenance
Maintenance General instructions ….110 Battery ……140 Onboard tool kit .
-
Page 112: General Instructions
Special tools and thorough spe- insert cialized knowledge are required Adjusting rear damping to carry out some of the work (in conjunction with slot- described here. If you are in ted blade). doubt, consult an authorized workshop, preferably your au- thorized BMW Motorrad retailer.
-
Page 113: Engine Oil
check the oil level with the en- Open-ended wrench 10 Reversible screwdriver in- sert gine at operating temperature. Wrench size: 10/13 with Phillips PH1 and Torx Adjusting chain tension Make sure ground is level and 122). firm and hold motorcycle at op- Removing driver’s seat Plastic attachment for erating temperature vertically.
-
Page 114: Brake System
Add engine oil up to specified ity, preferably an authorized level. BMW Motorrad retailer. Check engine oil level ( 111). Install cap of engine oil fill loca- Topping up engine oil tion 1.
-
Page 115
Have the brakes checked at an mum thickness. authorized workshop, preferably an authorized BMW Motorrad Have the brake pads replaced retailer. at an authorized service facil- ity, preferably an authorized Check front brake pad BMW Motorrad retailer. -
Page 116
0.18 in (4.5 mm). brakes. BMW Motorrad recommends In order to ensure the operating installing only genuine reliability of the brake system, BMW Motorrad brake pads. make sure that the brake pads… -
Page 117
Have the brake pads replaced at an authorized service facil- ity, preferably an authorized BMW Motorrad retailer. Checking front brake fluid level Read off brake fluid level at Make sure ground is level and Front brake fluid level brake-fluid reservoir 1. -
Page 118: Checking Rear Brake Fluid Level
Check brake fluid level regularly. Have the defect corrected as soon as possible by an autho- rized workshop, preferably an authorized BMW Motorrad re- tailer. Checking rear brake fluid level Check level of brake fluid in Rear brake fluid level rear brake-fluid reservoir 1.
-
Page 119: Coolant
Have the defect corrected as soon as possible by an autho- rized workshop, preferably an authorized BMW Motorrad re- tailer. Coolant Open cap 1 of expansion tank. Checking coolant level Add coolant up to specified Make sure ground is level and level.
-
Page 120
fairing side panel also apply logi- Pull fairing side panel out of cally for the left side. rubber buffer at position 4 and remove. Remove the screw 1 on the inside of the side panel. Unfasten the screws 1 then remove the wind deflection Disconnect plug 5. -
Page 121: Clutch
Installing fairing side panel Mount side panel in rubber Position the wind deflection buffer at position 4. wing 2 ensuring that is on the correct side. Install screws 3 with washers. Mount fairing side panel in The letters «R» for the right Install screws 2.
-
Page 122: Wheel Rims And Tires
Have the clutch checked by an Checking clutch lever play authorized workshop, preferably 0.02…0.04 in (0.5…1.0 mm) 120). an authorized BMW Motorrad (on the handlebar fitting, Repeat these operations until retailer. when the engine is cold) the clutch play is correctly ad-…
-
Page 123: Chain
TI, TWI or by an arrow. To extend and maximize When the minimum tread depth the chain’s service life is reached: BMW Motorrad recommends Replace tires concerned. using BMW Motorrad chain Using a screwdriver, push the lubricant or: chain in the middle between…
-
Page 124: Adjusting Chain Tension
the pinion and sprocket and Locknut of drive-chain measure the difference a. tensioning screw Chain sag 14 lb/ft (19 Nm) Tighten quick-release axle 1.6…2 in (40…50 mm) (Mo- nut 1 to specified torque. torcycle unloaded on side Rear-wheel quick-release stand) axle in swinging arm If the measured figure is outside Loosen quick-release axle…
-
Page 125: Wheels
Tire recommendation lations. A change in these sizes For every size of tire, due to conversion to others than BMW Motorrad has tested and the wheels installed as standard approved certain makes as equipment can seriously affect roadworthy. BMW Motorrad…
-
Page 126
Do not operate the handbrake Place motorcycle on an auxil- lever when the brake calipers iary stand; BMW Motorrad rec- have been removed. ommends BMW Motorrad rear Remove screws 2 of brake wheel stand. -
Page 127: Installing Front Wheel
BMW Motorrad front wheel Remove quick-release axle 2 The front wheel must be stand for lifting the motorcycle. while supporting wheel. installed right way round to rotate in the correct direction. Installing the auxiliary stand on Roll front wheel forward to re- the front wheel ( 130).
-
Page 128: Removing Rear Wheel
28 lb/ft (38 Nm) tance point is felt. Removing rear wheel Place motorcycle on an auxil- iary stand; BMW Motorrad rec- ommends BMW Motorrad rear wheel stand. Installing the auxiliary stand on Position clip 6.
-
Page 129
it cannot fall down after the quick-release axle is removed. Remove quick-release axle 5 Remove brake line from and take out adjusting plate 6. bracket 8. Remove axle nut 1 with washer. Loosen lock nuts 3 on left and right. Loosen adjusting screws 2 on left and right. -
Page 130: Installing Rear Wheel
BMW Motorrad The chain sprocket and retailer. the spacer sleeves on the left and right are loosely inserted Roll rear wheel on support into in the wheel.
-
Page 131
pushing brake caliper carrier 10 toward the front. Make sure that the ABS Insert the right side shim 6 in sensor 9 is not damaged when the swing arm with the travel rolling the rear wheel into stop 12 pointing toward the Roll rear wheel as far forward place. -
Page 132: Front Wheel Stand
BMW Motorrad front wheel stand. Place motorcycle on an auxil- iary stand; BMW Motorrad rec- ommends the BMW Motorrad auxiliary stand. Mount adjusting plate on left 4. Mount brake and ABS line in Installing the auxiliary stand on bracket 8.
-
Page 133: Rear-Wheel Stand
Rear-wheel stand serted into the front suspen- sion. Installing the auxiliary Adjust the height of the aux- stand on the rear wheel iliary stand so that the front wheel is lifted slightly off the ground. Insert the mounting pins (83 30 2 152 840) 1 at the left and right into the front suspension.
-
Page 134: Lamps
Install the mounting pins (83 Turn in the bracket 2 with the Attach the auxiliary stand to 30 2 152 841) 1 on the left long sides facing the outside. the rear wheel swing arm and and right into the rear wheel press it on the ground evenly.
-
Page 135
Replace defective bulb. Bulbs featuring specifi- cation ratings for higher levels of illumination are com- mercially available as special ac- cessories. These bulbs have a shorter service life than conven- tional bulbs and also generate more heat. Under some circum- stances the high levels of heat Remove the cover 1 to replace Disconnect plug 3. -
Page 136: Light Bulb
where other than on its metal socket base. Attach plug 3. Remove parking light cover 1. Install the cover. Replacing left parking Install bulb 5. Start by inserting the lug 6 then press the bulb light bulb into the socket. Make sure ground is level and Insert both sides of wire firm and park motorcycle.
-
Page 137
Replacing right parking light bulb Make sure ground is level and firm and park motorcycle. Switch off ignition. Remove bulb 4 from the Insert bulb 4 into the socket. socket. Replace defective bulb. Bulb for parking light Remove cover 1. W5W / 12 V / 5 W To prevent contaminants from being deposited on the new… -
Page 138
Replace defective bulb. Bulb for parking light W5W / 12 V / 5 W To prevent contaminants from being deposited on the new bulb’s glass surface, always use a clean, dry cloth to hold it. Push the retainer 2 downward Insert socket 3 in headlight (using a screwdriver if nec- housing, continuing to apply… -
Page 139
bulb’s glass surface, always use a clean, dry cloth to hold it. Remove screw 1. Remove bulb 2 from light housing by turning it counterclockwise. Install bulb 2 by screwing Replace defective bulb. clockwise into light housing. Bulbs for flashing turn indicators, front RY10W / 12 V / 10 W Bulbs for flashing turn… -
Page 140
Technical Data below, the tail light bulb must be replaced. In this case: Contact an authorized service facility, preferably an authorized BMW Motorrad retailer. Press bulb into socket. Maximum number of de- fective LEDs in taillight Pull bulb out of socket. -
Page 141: Fuses
If the fuses blow frequently, fuses. Latch audibly engages. have the electrical system Installing passenger seat Switch off ignition. checked by an authorized spe- 53). Make sure ground is level and cialized workshop, preferably a firm and park motorcycle. BMW Motorrad retailer.
-
Page 142: Jump-Starting
Jump-starting terminal while connecting fully insulated crocodile clips at both ends. the other end to discharged The wires leading to the battery’s negative terminal. Jump-starting with a donor- power socket do not have Start engine of the vehicle with battery voltage higher than a load-capacity rating adequate discharged battery in usual 12 V can damage the motorcycle…
-
Page 143
Compliance with the points be- BMW Motorrad has devel- low is important in order to maxi- oped a trickle-charger spe- mize battery life: cially designed for compatibility with the electronics of your mo- Keep the surface of the battery torcycle. Using this charger, you… -
Page 144
Consult a certified service fa- In the case of longer peri- cility, preferably an authorized ods when the motorcycle is BMW Motorrad retailer, for set- not being used, the battery must ting of the date. be recharged regularly. See the… -
Page 145: Care
Care Care products ….. 144 Washing your vehicle ….144 Cleaning sensitive vehicle parts .
-
Page 146: Care Products
Brake early until the brake disks and pads are dry. BMW Motorrad recommends BMW Motorrad recommends Warm water intensifies the that you use BMW Insect Re- that you use cleaning and effect of salt. care products available at your mover to soften and wash off…
-
Page 147: Paint Care
BMW clean cloth or cotton ball. BMW auto shampoo. Use chrome pol- Motorrad recommends remov- ish for additional treatment. ing tar spots with BMW Tar Re- mover. Then add a protective…
-
Page 148: Protective Wax Coating
To preserve the finish of your thorized BMW Motorrad retailer. vehicle, BMW Motorrad recom- Combine work for storing/return- mends using BMW Car Wax or ing to use with maintenance ser- agents that contain carnauba or vice or an inspection. synthetic waxes.
-
Page 149: Technical Data
Technical data Troubleshooting chart … . . 148 Performance data ….159 Threaded fasteners ….149 Engine .
-
Page 150: Troubleshooting Chart
Troubleshooting chart Engine does not start at all or is very difficult to start. Possible cause Remedy Side stand extended and gear engaged Retract side stand. Gear engaged and clutch not disengaged Place transmission in neutral or disengage clutch. No fuel in tank Refueling procedure ( 67).
-
Page 151: Threaded Fasteners
Threaded fasteners Front wheel Value Valid Quick-release axle in threaded bush M24 x 1.5 37 lb/ft (50 Nm) Clamping screw in axle adapter M8 x 35 14 lb/ft (19 Nm) Radial brake calipers on the axle adapter M10 x 65 28 lb/ft (38 Nm) Rear wheel Value…
-
Page 152
Rear wheel Value Valid Adapter on rear wheel swinging M8 x 30 15 lb/ft (20 Nm) Clamp screw on upper spring plate M5 x 25 2 lb/ft (3 Nm) Spring strut on main frame M10 x 65 41 lb/ft (56 Nm) Mirrors Value Valid… -
Page 153: Engine
Engine Engine design Transverse-mounted four-cylinder, four-stroke inline engine, angled 32° toward front. With four valves per cylinder, actuated by two overhead camshafts and trailing valve levers; liquid cooled, electronic fuel injection, integrated six-speed transmission, wet-sump lubrication. Displacement 999 cc (999 cm Cylinder bore 3.1 in (80 mm) Piston stroke…
-
Page 154: Fuel
Usable fuel quantity Approx. 4.6 gal (Approx. 17.5 l) Reserve fuel quantity Approx. 1.1 gal (Approx. 4 l) BMW recommends the use of BP fuel Engine oil Engine oil, capacity 3.7 quarts (3.5 l), with filter change Products recommended by BMW Motorrad…
-
Page 155: Clutch
Clutch Clutch design Multi-disk oil-bath clutch, slipper clutch Transmission Transmission design Claw-shifted 6-speed transmission integrated in engine housing Transmission gear ratios 1.652 (76:46 teeth), Primary gear ratio 2.647 (45:17 teeth), 1st gear 2.091 (46:22 teeth), 2nd gear 1.727 (38:22 teeth), 3rd gear 1.500 (36:24 teeth), 4th gear 1.360 (34:25 teeth), 5th gear 1.261 (29:23 teeth), 6th gear…
-
Page 156: Rear-Wheel Drive
Rear-wheel drive Type of final drive Chain drive Type of rear suspension Two-arm aluminum swinging arm Number of teeth of rear-wheel drive (Pinion/ 17/45 sprocket) Secondary gear ratio 2.647 Suspension Front wheel Type of front suspension Upside-down telescopic forks Spring travel, front 4.7 in (120 mm), on wheel Rear wheel Type of rear suspension…
-
Page 157: Brakes
Organic Wheels and tires Recommended tire combinations You can obtain an overview of the current tire approvals from your authorized BMW Motorrad retailer or on the Internet at www.bmw- motorrad.com Front wheel Front wheel design Cast aluminum, MT H2 Front-wheel rim size 3.50″…
-
Page 158: Electrical System
Rear wheel Rear wheel design Cast aluminum, MT H2 Rear-wheel rim size 6.0″ x 17″ Rear tire designation 190 / 55 ZR 17 Tire inflation pressure Tire pressure, front 36.3 psi (2.5 bar), with tire cold Tire pressure, rear 42.1 psi (2.9 bar), with tire cold Electrical system Fuses Nominal current of fuse 1 (Instrument cluster)
-
Page 159
Nominal current of fuse 6 (Horn) 7.5 A Nominal current of fuse 7 (Ignition switch) Nominal current of fuse 8 (Sensor group) Main fuse 40 A Battery Battery design AGM (Absorptive Glass Mat) battery Battery voltage 12 V Battery capacity 10 Ah Spark plugs Spark plugs, manufacturer and designation… -
Page 160: Frame
Maximum number of defective LEDs in taillight Bulbs for flashing turn indicators, front RY10W / 12 V / 10 W Bulbs for flashing turn indicators, rear RY10W / 12 V / 10 W Bulb for license-plate light W5W / 12 V / 5 W Frame Frame design Cast light alloy — welded design with screwed-on…
-
Page 161: Weights
Weights Unladen weight 445 lbs (202 kg), DIN unladen weight, ready for road, 90 % full tank of gas, without OE Permissible gross weight 893 lbs (405 kg) Maximum payload 448 lbs (203 kg) Performance data Top speed >124 mph (>200 km/h)
-
Page 163: Service
Service Reporting safety defects … 162 BMW Motorrad Service … . 163 BMW Motorrad Mobility Services ……163 Maintenance procedures .
-
Page 164: Defects
National Highway Traffic Safety Ad- ministration (NHTSA) in addition to notifying BMW of North America, LLC. If NHTSA receives similar complaints, it may open an investigation, and if it finds that a safety defect exists in a group of vehicles, it may order a recall and remedy campaign.
-
Page 165: Bmw Motorrad Service
BMW Motorrad Service of a breakdown (BMW Roadside To ensure that your BMW con- Assistance, breakdown assis- sistently remains in optimal con- With its worldwide dealer net- tance, vehicle recovery and re- dition BMW Motorrad urges you work, BMW Motorrad can attend trieval, etc.).
-
Page 166
BMW Service The specified service intervals apply to street operation. For BMW Service is carried out once racing operation, adjust the inter- a year. The scope of the ser- vals in accordance with loading. vices performed may be de- pendent on the vehicle owner and the mileage driven. -
Page 167: Confirmation Of Maintenance Work
Confirmation of maintenance work BMW Pre-Delivery BMW Running-in Check Check Conducted Conducted Odometer reading Next service at the latest or, if reached sooner, Odometer reading Stamp, Signature Stamp, Signature…
-
Page 168
BMW Service BMW Service BMW Service Conducted Conducted Conducted Odometer reading Odometer reading Odometer reading Next service Next service Next service at the latest at the latest at the latest or, if reached sooner, or, if reached sooner, or, if reached sooner,… -
Page 169
BMW Service BMW Service BMW Service Conducted Conducted Conducted Odometer reading Odometer reading Odometer reading Next service Next service Next service at the latest at the latest at the latest or, if reached sooner, or, if reached sooner, or, if reached sooner,… -
Page 170
BMW Service BMW Service BMW Service Conducted Conducted Conducted Odometer reading Odometer reading Odometer reading Next service Next service Next service at the latest at the latest at the latest or, if reached sooner, or, if reached sooner, or, if reached sooner,… -
Page 171
BMW Service BMW Service BMW Service Conducted Conducted Conducted Odometer reading Odometer reading Odometer reading Next service Next service Next service at the latest at the latest at the latest or, if reached sooner, or, if reached sooner, or, if reached sooner,… -
Page 172: Confirmation Of Service
Confirmation of service The table is intended as proof of maintenance and repair work, the installed optional accessories and any special campaign (recall) work carried out. Work carried out Odometer Date reading…
-
Page 173
Work carried out Odometer Date reading… -
Page 174: Index
Brake fluid Abbreviations and symbols, 6 Chain Checking fluid level at rear, 116 Adjusting tension, 122 Checking front fluid level, 115 Control, 14 Checking tension, 121 Front reservoir, 13 Operating, 40 Checking wear, 122 Rear reservoir, 13 Self-diagnosis, 61 Lubricating, 121 Brake pads Technology in detail, 102 Checklist, 59…
-
Page 175
Engine Fuses Damping Position on vehicle, 16 Starting, 59 Adjusting, 48 Replacing, 139 Technical data, 151 Front adjustment element, 11 Technical data, 156 Warning for electronic engine Rear adjuster, 11, 13 management, 27 Dimensions Engine oil Hazard warning flashers Technical data, 158 Checking level, 111 Control, 14 Driving mode… -
Page 176
Immobilizer, 34 Luggage Using INFO mode, 79 Warning indicator, 27 Loading information, 58 Using LAPTIMER mode, 74 Indicator lights, 17 Luggage loops Using SETUP mode, 84 Overview, 21 Position on vehicle, 16 Multifunction switch General view, left, 14 Instrument cluster Use, 55 Ambient light sensor, 17 General view, right, 15… -
Page 177
Underneath seat, 16 Seats Steering lock Installing, 53 Locking, 34 Warning and indicator Locking mechanism, 11 lamps, 21 Storing, 146 Removing, 53 Switching off, 66 Service, 163 Pre-ride check, 60 Reporting safety defects, 162 Tachometer, 17 Service display, 22 Technical data Shifting gear Rear-wheel drive Battery, 157… -
Page 178
Weights, 159 Size change, 123 Warning indicators Wheels and tires, 155 Technical data, 155 ABS, 29 Tires Anti-theft alarm system, 31 Checking tire inflation Bulb defective, 28 pressures, 52 Display, 23 Checking tire tread depth, 120 DTC, 29 Inflation pressure table, 11 Electronic engine Inflation pressures, 156 management, 27… -
Page 179
Errors and omissions excepted. ©2013 Bayerische Motoren Werke Aktiengesellschaft 80788 Munich, Germany Reprints and duplication of this work, in whole or part, are pro- hibited without the express writ- ten approval of BMW Motorrad, Aftersales. -
Page 180
Approx. 1.1 gal (Approx. 4 l) Tire inflation pressure Tire pressure, front 36.3 psi (2.5 bar), with tire cold Tire pressure, rear 42.1 psi (2.9 bar), with tire cold BMW recommends *01418550327* Order No.: 01 41 8 550 327 08.2013, 3rd edition, 07…
- Manuals
- Brands
- BMW Manuals
- Motorcycle
- S 1000 RR —
- Rider’s manual
-
Contents
-
Table of Contents
-
Troubleshooting
-
Bookmarks
Quick Links
BMW Motorrad
The Ultimate
Riding Machine
Rider’s Manual (US Model)
S 1000 RR
Related Manuals for BMW S 1000RR
Summary of Contents for BMW S 1000RR
-
Page 1
BMW Motorrad The Ultimate Riding Machine Rider’s Manual (US Model) S 1000 RR… -
Page 2
Motorcycle/Dealer Data Motorcycle data Dealer Data Model Contact in Service Ms./Mr Vehicle identification number Phone number Color number Initial registration Dealer’s address/phone number (company License plate stamp) -
Page 3
We congratulate you on your choice of a motorcycle from We wish you many miles of safe BMW and welcome you to the and enjoyable riding community of BMW riders. Familiarize yourself with your new BMW Motorrad. -
Page 4: Table Of Contents
Heated handlebar grips ..39 Brakes ….. . 65 BMW Motorrad Race Parking your motorcycle ..66 ABS .
-
Page 5
….. . 144 BMW Motorrad DTC ..104 defects ….162 Paint care . -
Page 6
Maintenance proce- dures ….. . 163 Confirmation of mainte- nance work ….165 Confirmation of service . -
Page 7: General Instructions
General instructions Overview ……6 Abbreviations and symbols ..6 Equipment .
-
Page 8: Overview
BMW Motorrad Result of an activity. When the time comes to sell retailer. your BMW, please remember Reference to a page with to hand over this Rider’s Manual; EWS Electronic immobilizer. more detailed informa- it is an important part of the mo- tion.
-
Page 9: Equipment
BMW motorcycles are on account of country-specific maintained by consistent, on- differences. going development efforts em- If your BMW is equipped with bracing their design, equipment options or accessories not de- and accessories. For this rea- scribed in this Rider’s Manual,…
-
Page 11: Overviews
Overviews General view, left side ….11 General view, right side … . . 13 Multifunction switch, left … . 14 Multifunction switch, right .
-
Page 13: General View, Left Side
General view, left side Adjusting front spring preload ( Adjusting front rebound- stage damping ( Adjusting rear compression (jounce) damping ( Adjuster for spring preload, rear ( Seat lock ( Tire inflation pressure table Payload table Chain adjustment values Engine oil level indicator 111) Adjusting front compres- sion damping (…
-
Page 15: General View, Right Side
General view, right side Brake-fluid reservoir, rear 116) Vehicle Identification Num- ber and type plate (on steering-head bearing at right) Brake-fluid reservoir, front 115) Steering damper (behind the right side panel) Coolant level indicator (be- hind side panel) ( 117) Engine oil fill location 112) Adjusting rear rebound-…
-
Page 16: Multifunction Switch, Left
Multifunction switch, left High-beam headlight and headlight flasher ( Using lap timer ( ABS operation ( with BMW Motorrad Using DTC ( Hazard warning flashers operation ( Turn indicators ( Horn Setting clock ( Using racing functions Operating odometer…
-
Page 17: Right
Multifunction switch, right with heated handlebar grips Heated hand grip ( Selecting riding mode Emergency-off switch (kill switch) ( Starting the engine…
-
Page 18: Underneath Seat
Underneath seat Battery ( 140) Helmet holder ( Luggage loops ( Onboard tool kit ( 110) Fuse box ( 139) Rider’s Manual (US Model)
-
Page 19: Instrument Cluster
Instrument cluster Indicator and warning lamps ( Tachometer Shiftpoint lamp ( Ambient light sensor (for brightness adjustment of instrument lighting) with anti-theft alarm Anti-theft alarm indicator light (see anti-theft alarm operating instructions) Multifunction display…
-
Page 21: Displays
Displays Multifunction display ….20 Warning and indicator lamps ..21 Service display ….. . 22 Cruising range .
-
Page 22: Multifunction Display
Multifunction display Speedometer Coolant temperature with heated handlebar grips Heated grip display Odometer ( Clock ( Set riding mode ( Gear indicator display, «N» indicates «neutral». Selection of the ride mode Refer to Chapter 5 for in- formation regarding the dis- play modes available for track use.
-
Page 23: Warning And Indicator Lamps
Warning and indicator lamps ABS warning lamp ( with BMW Motorrad DTC warning lamp ( Indicator lamp for left turn signal Universal warning lamp, appears together with warnings in display panel Indicator lamp for right turn signal Fuel-reserve warning lamp…
-
Page 24: Service Display
If the time remaining until the preferably an authorized vice intervals may be required. next service will elapse within BMW Motorrad retailer, for When the odometer reading for one month, the service date 1 setting of the date. the recalculated early service falls…
-
Page 25: Cruising Range
The determined range is an approximate reading. BMW Motorrad therefore recom- Warnings for which no individual mends that you do not try to use warning lamp is present are sig- The cruising range 1 indicates the full range before refueling.
-
Page 26
Overview of warning indicators Warning and indicator Warning symbols in the Meaning lamps display ! EWS lights up yellow is indicated Electronic immobilizer is active ( lights up Fuel down to reserve ( lights up red Temperature dis- Coolant temperature too high ( play flashes lights up Engine in emergency-operation mode… -
Page 27
Warning and indicator Warning symbols in the Meaning lamps display ! VDS is indicated Fall sensor defective ( flashes ABS self-diagnosis not completed lights up ABS deactivated ( lights up ABS error ( flashes rapidly DTC intervention ( flashes slowly DTC self-diagnosis not completed lights up DTC deactivated (… -
Page 28
Warning and indicator Warning symbols in the Meaning lamps display ! DWALO is indi- Anti-theft alarm battery weak ( cated ! DWA lights up yellow is indicated Anti-theft alarm battery discharged ! SPEED Shiftpoint lamp is indi- Speed warning ( cated flashes or remains on continuously. -
Page 29
Approx. 1.1 gal (Approx. 4 l) located on the ignition key. workshop, preferably an autho- Refueling procedure ( 67). Use the reserve key. rized BMW Motorrad retailer. Have the defective key re- Coolant temperature too placed, preferably by an autho- Engine in emergency- high rized BMW Motorrad retailer. -
Page 30: Parking Light Bulb
In exceptional cialized workshop, preferably A defective bulb places cases, the engine stops and can an authorized BMW Motorrad your safety at risk because no longer be started. Otherwise, retailer. it is easy for other users to not the engine runs in the emer- see the motorcycle.
-
Page 31: Abs Error
Fall sensor defective thorized workshop, preferably ABS deactivated an authorized BMW Motorrad ! VDS (Vertical Down Sensor) is retailer. ABS warning lamp lights shown. Possible cause:…
-
Page 32
Observe addi- DTC deactivated ing that the system has initiated tional information on situations active closed-loop intervention with BMW Motorrad DTC which can lead to a DTC error even after the critical situation 104). DTC warning lamp lights has passed. -
Page 33
Contact an authorized service Contact an authorized service facility, preferably an authorized facility, preferably an authorized BMW Motorrad retailer. BMW Motorrad retailer. Anti-theft alarm battery Speed warning discharged Shiftpoint lamp flashes or remains on continuously with anti-theft alarm according to the selected setting. -
Page 35: Operation
Heated handlebar grips … . . 39 BMW Motorrad Race ABS ..40 Dynamic Traction Control (DTC) ..41 Riding mode .
-
Page 36: Steering And Ignition Lock
Pre-Ride Check in progress. You are provided with 2 ignition keys. ABS self-diagnosis in progress. Should you lose your keys please refer to the information regard- with BMW Motorrad DTC ing the electronic immobilizer DTC self-diagnosis is per- (EWS) ( 34). formed. (…
-
Page 37: Clock
Adjust the clock only when the If you lose a key, you can have it desired, press and hold but- motorcycle is stationary. disabled by your BMW Motorrad ton 2 until minutes 4 flash. partner. When having a key dis- Switch on ignition.
-
Page 38: Odometer
Setting is completed. Remaining cruising range (when fuel level reaches Odometer reserve) Selecting readings Resetting tripmeter Switch on ignition. Switch on ignition. Select desired trip odometer. Continue to press the button 2 LIMIT until appears in the display. Press button 1 repeatedly until desired value is displayed in Press and hold button 1 until area 3.
-
Page 39: Lights
ton 1 until appears in the display. Lights Parking lights The parking lights come on au- tomatically when the ignition is switched on. The parking lights are a To adopt the current speed as When you exceed the preset strain on the battery. Do the new limit: Press the but- speed the shiftpoint lamp 3 re- not leave the ignition switched…
-
Page 40: Turn Indicators
Press switch 1 toward front to Immediately after switching off Press button 1 toward left to switch on high beams. the ignition push button 1 to switch on left-hand turn indica- the left and hold until the park- tor. Pull switch 1 rearward to actu- ing lights come on.
-
Page 41: Emergency-Off Switch
The hazard warning flash- Ignition can be switched off. The engine can be switched ers place a strain on the off easily and quickly using the Press button 1 again to switch battery. Do not use the hazard emergency kill switch. off hazard warning flashers.
-
Page 42: Bmw Motorrad Race Abs
BMW Motorrad Race The increase in power con- sumption caused by the heated grips can drain the bat- Switching off ABS tery if you are riding at low en- function gine speeds. If the battery is in- adequately charged, the heated Switch on ignition.
-
Page 43: Dynamic Traction Control
Switching on ABS with BMW Motorrad DTC If the coding plug is not used for the SLICK function, as an function alternative, the ignition can be switched off, then on again. If the ABS warning light lights up after switching…
-
Page 44: Riding Mode
Switching on DTC If the coding plug is not used for the SLICK function, as an function alternative, the ignition can be switched off, then on again. If the DTC warning light lights up after switching the ignition off and on and then continued driving over 3,1 mph (5 km/h), a DTC error has occurred.
-
Page 45
Details on the selectable driving modes are provided in the chapter «Technology in Detail». With the coding plug installed, Press button 1 repeatedly until SLICK the driving mode selection arrow appears before is also offered in the selection desired setting. menu. -
Page 46
When the motorcycle comes Do not use the encoding plug on to a stop, the selected riding public roads. mode is activated after approx. Switch off ignition. ten seconds. Removing driver’s seat ( 54). The new riding mode is acti- vated during operation under the following conditions: Brakes not engaged… -
Page 47: Brakes
Adjusting the handbrake from Position 1: largest dis- lever while driving can lead tance between handlebar grip to accidents. and brake lever Only adjust the handbrake up to Position 6: smallest dis- lever when the motorcycle is tance between handlebar grip stationary.
-
Page 48: Spring Preload
Spring preload Adjustment of spring preload dependent on Setting loading The spring preload on the front wheel must be adapted to the 0.4…0.6 in (10…15 mm) weight of the rider. Higher (With rider 187 lbs (85 kg)) weight requires higher spring preload, lower weight requires lower spring preload.
-
Page 49
adjusting screws 3 with tool of edge 1 of license-plate carrier onboard tool kit in direction a. and screw 2 of chain guard. To increase spring deflection Load motorcycle with driver. (decrease spring preload), turn With the assistance of a helper, adjusting screws 3 with tool of measure distance d between onboard tool kit in direction b. -
Page 50: Damping
Adjusting compression Tighten screw 1 to specified torque. damping on front wheel Clamp screw on upper spring plate 2 lb/ft (3 Nm) Damping Setting Your motorcycle’s han- The damping must be adjusted dling will suffer if you do to the road conditions and the not match the spring-preload and Use adjusting screws 1 on left spring preload.
-
Page 51
Compression stage, ba- sic setting, front Position 8 (sporty setting with driver 187 lbs (85 kg)) Make sure that the same val- ues are set on the left and right. Rebound-stage damping To increase damping: turn ad- To increase damping: turn ad- on front wheel justing screw with tool on on- justing screw with tool on on-… -
Page 52
Rebound stage, basic setting, front Position 7 (sporty setting with driver 187 lbs (85 kg)) Make sure that the same val- ues are set on the left and right. Factory settings at front Adjust compression damping To increase damping: turn wheel extended jounce travel (low adjusting screw or adjustment… -
Page 53
Adjusting rebound-stage Pressure stage basic set- damping at rear wheel ting at rear High-Speed Make sure ground is level and Position 2 (comfortable firm and park motorcycle. setting with rider 187 lbs (85 kg)) Position 4 (normal setting with rider 187 lbs (85 kg)) Position 9 (sport-oriented To increase damping: turn ad- setting with rider 187 lbs… -
Page 54: Tires
cycle and reduces the life of the Rebound stage, basic Tire pressure, rear tires. setting, rear Ensure proper tire inflation pressure. Position 4 (standard setting 42.1 psi (2.9 bar) (With tire with rider 187 lbs (85 kg)) cold) At high road speeds, tire valves have a tendency to If tire pressure is too low: Position 7 (sport-oriented…
-
Page 55: Rider And Passenger Seats
Unlock seat lock 1 with the specialized workshop, preferably vehicle ignition key. an authorized BMW Motorrad Mount passenger seat in Lift passenger seat at rear, mounts 2 on left and right. retailer.
-
Page 56: Helmet Holder
Installing driver’s seat Lock seat lock with ignition key. Removing driver’s seat Press cover of driver’s seat over screw sockets toward Mount driver’s seat in mount 2, front somewhat and hold in then position over screw sock- place. ets 3. When doing so, make Press cover of driver’s seat Install screws 1.
-
Page 57: Luggage Loops
Luggage loops Locking luggage on motorcycle Removing passenger seat 53). Turn over passenger seat. Use loops 1 e.g. in conjunction The helmet catch can with passenger footrests, to scratch the paneling. lash luggage onto passenger When hooking on the helmet, seat.
-
Page 59: Riding
Riding Safety instructions ….58 Checklist ……59 Starting .
-
Page 60: Safety Instructions
Your authorized shock absorber system vehicle is in use. There is a risk BMW Motorrad retailer will be Imbalanced load of burn injuries by contact with happy to advise you and has Loose clothing hot surfaces.
-
Page 61: Checklist
BMW Motorrad DTC Brakes with the motorcycle at a stand- Front and rear brake fluid levels DTC self-diagnosis is per- still: overheating would result.
-
Page 62
Phase 1 You cannot start the mo- The start attempt is auto- torcycle with the side stand matically interrupted if bat- extended and a gear engaged. tery voltage is too low. Recharge The engine will switch itself off if the battery before you start the it is started with the transmission engine, or use jump leads and a in neutral and then a gear is en-… -
Page 63
Phase 2 cannot be indicated. The readiness for operation Checking wheel sensors while Watch all warning and indicator of the BMW Motorrad DTC is starting off. lights on the display. checked by the self-diagnosis. ABS warning lamp flashes. Have the malfunction corrected… -
Page 64: Breaking In
Phase 2 an authorized BMW Motorrad Engine run-in speed retailer. Checking the diagnosable sys- tem components while driv- Breaking in ing. So that the DTC self-di- no full throttle (Odome- agnosis can be completed, the Engine ter reading 0…621 miles motorcycle must be driven at (0…1000 km))
-
Page 65: Shifting Gears
Tires Shifting gears Shiftpoint lamp flashing: engine rpm too high New tires have a smooth sur- Shiftpoint lamp face. This must be roughened by Upshift rpm riding in a restrained manner at During driving the shiftpoint lamp various heel angles until the tires indicates the speed at which the are run in.
-
Page 66: Steering
BMW Motorrad recommends only upshifting with clutch operation in these driving situations. The shifting assistant Attempts to adjust the…
-
Page 67: Brakes
Locking up of the front wheel is Basic steering damper the weight transfer to the front prevented by the BMW Motorrad adjustment setting wheel. Increases in the load at Race ABS. an individual wheel are accom-…
-
Page 68: Parking Your Motorcycle
Parking your Wet, soiled brakes Refueling motorcycle Moisture and dirt on the brake Fuel specifications disks and the brake pads result in Side stand For optimal fuel economy, the a decrease in the braking action. gasoline should be sulfur-free or Switch off engine.
-
Page 69
Immediately wipe off plastic parts Recommended fuel qual- after contact with fuel. Make sure ground is level and Super unleaded, (max. 10 % firm and place motorcycle on ethanol, E10) side stand. 89 AKI (95 ROZ/RON) The available fuel tank vol- 89 AKI ume can only be optimally used with the vehicle standing on… -
Page 70: Fastening Motorcycle For Trans
the engine dies off due to lack of ping away to the side, prefer- fuel. ably with the help of a second person. Usable fuel quantity Push motorcycle onto transport surface, and do not place on side stand. Approx. 4.6 gal (Approx. 17.5 l) Reserve fuel quantity Undo the screws 1 and remove…
-
Page 71
Fasten rear straps on both sides to the passenger foot- pegs and then tighten them. Tension all straps evenly; the vehicle should be pulled down against its springs with the sus- pension compressed as much as possible. -
Page 73: On The Racetrack
On the racetrack Multifunction display ….72 LAPTIMER mode ….74 INFO mode .
-
Page 74: Multifunction Display
Multifunction display INFO mode: In the INFO mode the stored information from the Selecting display mode LAPTIMER mode can be dis- played. This mode can only be activated with the motorcycle stopped. SETUP mode: In the SETUP mode the instrument cluster’s display features can be adjusted INFO-MENU to driver’s preferences.
-
Page 75
Overview of mode selection Solid line: button pressed briefly Dotted line: press and hold button Operating odometer Setting clock ( 35). Start time recording 76). Start INFO menu ( Start SETUP menu Speed warning (… -
Page 76: Laptimer Mode
LAPTIMER mode Marking displayed value delay can be set as described on Page ( 90). The following times can be Display shown in the second line: The time of the previous lap is marked with «LASTLAP». The running time of the current lap.
-
Page 77
Overview of lap timer mode Solid line: button pressed briefly Dotted line: press and hold button End time entry ( 77). Interrupt time entry 77). Start time recording 76). Adjust display setting 76). -
Page 78
Adjusting display setting Starting time recording new lap can only be started in the other modes with an exter- nal signal. Infrared receiver with infrared receiver Operation of the instrument clus- ter in the LAPTIMER mode can be carried out conveniently with an infrared signal. -
Page 79
Interrupting time entry Ending time entry continued. Only after the current recording has been deleted in INFO mode does counting begin at lap 1 again. Fastest lap expected This function must be activated SETUP in the menu ( 91). To interrupt time entry, press First, press the button 1 to in- button 1. -
Page 80
fastest lap then a new fastest lap can be anticipated. The «fastest lap» lamp 1 lights up. -
Page 81: Info Mode
INFO mode All-time best lap time ATBEST Selecting stored lap BEST Best stored lap time ( LAST Last stored lap time ( All other stored laps The total sum of all recorded TOTAL lap times ( Exit INFO mode INFO RETURN Allows deletion of stored data INFO CLEAR ALL ) (except…
-
Page 82
Overview of Info mode Solid line: button pressed briefly Dotted line: press and hold button Select stored lap ( 79). Delete lap times ( 83). Jump directly to CLEAR ALL menu Exit INFO mode ( 81). Clear recording ( 82). Activate ROAD mode 82). -
Page 83
Information on each race Lap time of displayed race Exiting INFO mode Press and hold button 2 to exit INFO mode. The recorded values are Alternately: top speed stored. (max) and minimum speed Press button 1 or button 2 re- (min) of the indicated race INFO RETURN peatedly until… -
Page 84
Clearing recording Activating ROAD mode The all-time best lap remains stored even if the recorded laps are deleted. As a result, a new race can be recorded at other times and compared with the best lap from previous races. The all-time best lap can also be deleted. -
Page 85
LAST Deleting lap times the last stored lap , the corresponding lap is deleted. The lap that previously had been the second to last lap is taken over as the new last lap. a random stored lap, it is deleted. The numbering of the remaining laps is maintained. -
Page 86: Setup Mode
SETUP mode Shiftpoint lamp activation rpm SFT-ON Selecting parameter Shiftpoint lamp switch-off rpm SFTOFF Shiftpoint lamp brightness set- SFT-BR ting ( Shiftpoint lamp flashing fre- SFT-FL quency ( Display structure in Laptimer SETUP LAPTIMER mode ( Display duration for last HOLD recorded time ( LAP-TM…
-
Page 87
Overview of Setup mode Solid line: button pressed briefly Dotted line: press and hold button Select parameter ( 84). Jump directly to ROAD mode Set parameter ( 86). Exit settings ( 86). -
Page 88
Setting parameter Exiting settings Switch-on speed of shifting flasher Press and hold button 2 until Press and hold button 1 until multifunction display switches displayed parameter begins to Display of switch-on speed in over to ROAD mode. flash. rpm. Press button 1 or button 2 re- A value which is still flashing peatedly until desired value is will not be saved. -
Page 89
Switch-off speed of Brightness of shifting Flashing frequency of shifting flasher flasher shiftpoint lamp Display of switch-off speed in Display of shifting flasher bright- Flashing frequency of the shift- rpm. ness in percent of the maximum point lamp and the speed warn- brightness. -
Page 90
Version 1 Version 2 Version 3 The running time of the cur- The time required for the pre- The running time of the current rent lap is shown in the second ceding lap is shown in the sec- lap is shown in the second line line and the best lap time of the ond line and the running time of and the all-time best lap time is… -
Page 91
Version 4 Version 5 Version 6 The time required for the pre- The running time of the current The second line remains empty ceding lap is shown in the sec- lap is shown in the second line and the running time of the cur- ond line and the best lap time of and the third line remains empty. -
Page 92
Display duration for last Minimum lap time Lamp malfunction stopped time displays When using an infrared receiver to determine the lap times, the Display of the display duration in If lamps or bulbs are removed time can be set which must seconds. -
Page 93
Fastest lap display Speed warning Display brightness The «fastest lap expected» func- When you select this function Five different intensities are avail- tion ( 77) is activated. able for adjusting the display a supplementary main menu al- brightness. lowing selection of a maximum speed is activated. -
Page 94: In A Gravel Bed
BMW Motorrad DTC Use the HP Race Cover DTC shut-off Kit from BMW Motorrad to cover the exposed screw sock- On very loose substrates (e.g. a ets and secure the mounting gravel bed on a racetrack), the attachment.
-
Page 95: Tion
Install nuts on back of fairing with anti-theft alarm with torque. Mirror on front panel car- rier Securing device: mechanical 6 lb/ft (8 Nm) Removing and installing Release the cable tie 1 (is suit- license-plate carrier able for reuse). Activate locking mechanisms 3 Removing license-plate Actuate locking mechanism 2 and disconnect plug.
-
Page 96
Carefully disconnect anti-theft Press locking mechanism 7 Detach screws 8 with wash- alarm system bracket 5 from to left with small screwdriver ers and remove license-plate rear frame and rotate it upward. while simultaneously sliding carrier. Guide cable through connector toward rear off anti- opening 9 when doing so. -
Page 97
secure on rear frame with cable tie 1. with anti-theft alarm Position license-plate carrier Close connector so that locking and guide cable through open- mechanism 6 engages. ing 9. Install screws 8 with washers. Slide connector of license-plate carrier onto anti-theft alarm system bracket so that lock- ing mechanism 7 engages. -
Page 98: Removing And Installing Front Turn
fairing side panel also apply logi- cally for the left side. Removing fairing side panel 117). Mount anti-theft alarm system Undo the screw 2 and remove in bracket from front. the turn signal. Guide cable through fairing side panel. Install screw 4. Protect connector on motorcy- Close connector so that locking cle against contamination.
-
Page 99
Installing front turn signal Mount side panel in rubber Position the wind deflection buffer at position 4. wing 2 ensuring that is on the Unfasten the screws 1 then correct side. Install screws 3 with washers. remove the wind deflection The letters «R»… -
Page 100
Remove screws 2. Position turn signal and install screw 2. Remove screws 3 with wash- ers. Pull fairing side panel out of rubber buffer at position 4 and remove. Guide cable through fairing side panel. Clip the turn signal cable in at position 1. -
Page 101: Technology In Detail
Race ABS ……102 Engine management with BMW Motorrad DTC ….104…
-
Page 102: Riding Mode
BMW Motorrad. SLICK mode Do not use the encoding plug on assumes racing tires and roads SPORT public roads.
-
Page 103
ing tires with maximum adhesion The DTC system intervenes later SLICK than in the RAIN mode so that (slick tires) are mounted. Longer To activate the SLICK mode, the minor drifts are possible at the wheelies and wheelies at small coding plug must be used. -
Page 104: Brake System With
If the maximum transferrable tact to the road. At this point in braking force is exceeded when time, the BMW Motorrad Integral the driver increases the brake…
-
Page 105
Consequently, ABS does not in- an ABS fault is indicated. The How is the BMW Motorrad tervene until very late, if at all. condition for a fault code is the Race ABS noticeable to Under these circumstances the completed self-diagnosis. -
Page 106: Engine Management With Bmw Motorrad Dtc
Do not reduce the additional mentum take over and even safety provided with risky How important is regular BMW Motorrad Race ABS is un- driving. maintenance? able to counteract their effects. Special situations Any technical system is al-…
-
Page 107
Unusual driving conditions: In this case, BMW Motorrad rec- ommends turning back the throt- Driving on the rear wheel tle grip somewhat to achieve (wheelie) for a longer period a stable driving state again as with DTC deactivated. -
Page 109: Accessories
Accessories General instructions ….108…
-
Page 110: General Instructions
BMW motorcycles without proved by BMW for this purpose. constituting a safety hazard. Nor Your authorized BMW Motorrad is this guarantee provided when…
-
Page 111: Maintenance
Maintenance General instructions ….110 Battery ……140 Onboard tool kit .
-
Page 112: General Instructions
Special tools and thorough spe- insert cialized knowledge are required Adjusting rear damping to carry out some of the work (in conjunction with slot- described here. If you are in ted blade). doubt, consult an authorized workshop, preferably your au- thorized BMW Motorrad retailer.
-
Page 113: Engine Oil
check the oil level with the en- Open-ended wrench 10 Reversible screwdriver in- sert gine at operating temperature. Wrench size: 10/13 with Phillips PH1 and Torx Adjusting chain tension Make sure ground is level and 122). firm and hold motorcycle at op- Removing driver’s seat Plastic attachment for erating temperature vertically.
-
Page 114: Brake System
Add engine oil up to specified ity, preferably an authorized level. BMW Motorrad retailer. Check engine oil level ( 111). Install cap of engine oil fill loca- Topping up engine oil tion 1.
-
Page 115
Have the brakes checked at an mum thickness. authorized workshop, preferably an authorized BMW Motorrad Have the brake pads replaced retailer. at an authorized service facil- ity, preferably an authorized Check front brake pad BMW Motorrad retailer. -
Page 116
0.18 in (4.5 mm). brakes. BMW Motorrad recommends In order to ensure the operating installing only genuine reliability of the brake system, BMW Motorrad brake pads. make sure that the brake pads… -
Page 117
Have the brake pads replaced at an authorized service facil- ity, preferably an authorized BMW Motorrad retailer. Checking front brake fluid level Read off brake fluid level at Make sure ground is level and Front brake fluid level brake-fluid reservoir 1. -
Page 118: Checking Rear Brake Fluid Level
Check brake fluid level regularly. Have the defect corrected as soon as possible by an autho- rized workshop, preferably an authorized BMW Motorrad re- tailer. Checking rear brake fluid level Check level of brake fluid in Rear brake fluid level rear brake-fluid reservoir 1.
-
Page 119: Coolant
Have the defect corrected as soon as possible by an autho- rized workshop, preferably an authorized BMW Motorrad re- tailer. Coolant Open cap 1 of expansion tank. Checking coolant level Add coolant up to specified Make sure ground is level and level.
-
Page 120
fairing side panel also apply logi- Pull fairing side panel out of cally for the left side. rubber buffer at position 4 and remove. Remove the screw 1 on the inside of the side panel. Unfasten the screws 1 then remove the wind deflection Disconnect plug 5. -
Page 121: Clutch
Installing fairing side panel Mount side panel in rubber Position the wind deflection buffer at position 4. wing 2 ensuring that is on the correct side. Install screws 3 with washers. Mount fairing side panel in The letters «R» for the right Install screws 2.
-
Page 122: Wheel Rims And Tires
Have the clutch checked by an Checking clutch lever play authorized workshop, preferably 0.02…0.04 in (0.5…1.0 mm) 120). an authorized BMW Motorrad (on the handlebar fitting, Repeat these operations until retailer. when the engine is cold) the clutch play is correctly ad-…
-
Page 123: Chain
TI, TWI or by an arrow. To extend and maximize When the minimum tread depth the chain’s service life is reached: BMW Motorrad recommends Replace tires concerned. using BMW Motorrad chain Using a screwdriver, push the lubricant or: chain in the middle between…
-
Page 124: Adjusting Chain Tension
the pinion and sprocket and Locknut of drive-chain measure the difference a. tensioning screw Chain sag 14 lb/ft (19 Nm) Tighten quick-release axle 1.6…2 in (40…50 mm) (Mo- nut 1 to specified torque. torcycle unloaded on side Rear-wheel quick-release stand) axle in swinging arm If the measured figure is outside Loosen quick-release axle…
-
Page 125: Wheels
Tire recommendation lations. A change in these sizes For every size of tire, due to conversion to others than BMW Motorrad has tested and the wheels installed as standard approved certain makes as equipment can seriously affect roadworthy. BMW Motorrad…
-
Page 126
Do not operate the handbrake Place motorcycle on an auxil- lever when the brake calipers iary stand; BMW Motorrad rec- have been removed. ommends BMW Motorrad rear Remove screws 2 of brake wheel stand. -
Page 127: Installing Front Wheel
BMW Motorrad front wheel Remove quick-release axle 2 The front wheel must be stand for lifting the motorcycle. while supporting wheel. installed right way round to rotate in the correct direction. Installing the auxiliary stand on Roll front wheel forward to re- the front wheel ( 130).
-
Page 128: Removing Rear Wheel
28 lb/ft (38 Nm) tance point is felt. Removing rear wheel Place motorcycle on an auxil- iary stand; BMW Motorrad rec- ommends BMW Motorrad rear wheel stand. Installing the auxiliary stand on Position clip 6.
-
Page 129
it cannot fall down after the quick-release axle is removed. Remove quick-release axle 5 Remove brake line from and take out adjusting plate 6. bracket 8. Remove axle nut 1 with washer. Loosen lock nuts 3 on left and right. Loosen adjusting screws 2 on left and right. -
Page 130: Installing Rear Wheel
BMW Motorrad The chain sprocket and retailer. the spacer sleeves on the left and right are loosely inserted Roll rear wheel on support into in the wheel.
-
Page 131
pushing brake caliper carrier 10 toward the front. Make sure that the ABS Insert the right side shim 6 in sensor 9 is not damaged when the swing arm with the travel rolling the rear wheel into stop 12 pointing toward the Roll rear wheel as far forward place. -
Page 132: Front Wheel Stand
BMW Motorrad front wheel stand. Place motorcycle on an auxil- iary stand; BMW Motorrad rec- ommends the BMW Motorrad auxiliary stand. Mount adjusting plate on left 4. Mount brake and ABS line in Installing the auxiliary stand on bracket 8.
-
Page 133: Rear-Wheel Stand
Rear-wheel stand serted into the front suspen- sion. Installing the auxiliary Adjust the height of the aux- stand on the rear wheel iliary stand so that the front wheel is lifted slightly off the ground. Insert the mounting pins (83 30 2 152 840) 1 at the left and right into the front suspension.
-
Page 134: Lamps
Install the mounting pins (83 Turn in the bracket 2 with the Attach the auxiliary stand to 30 2 152 841) 1 on the left long sides facing the outside. the rear wheel swing arm and and right into the rear wheel press it on the ground evenly.
-
Page 135
Replace defective bulb. Bulbs featuring specifi- cation ratings for higher levels of illumination are com- mercially available as special ac- cessories. These bulbs have a shorter service life than conven- tional bulbs and also generate more heat. Under some circum- stances the high levels of heat Remove the cover 1 to replace Disconnect plug 3. -
Page 136: Light Bulb
where other than on its metal socket base. Attach plug 3. Remove parking light cover 1. Install the cover. Replacing left parking Install bulb 5. Start by inserting the lug 6 then press the bulb light bulb into the socket. Make sure ground is level and Insert both sides of wire firm and park motorcycle.
-
Page 137
Replacing right parking light bulb Make sure ground is level and firm and park motorcycle. Switch off ignition. Remove bulb 4 from the Insert bulb 4 into the socket. socket. Replace defective bulb. Bulb for parking light Remove cover 1. W5W / 12 V / 5 W To prevent contaminants from being deposited on the new… -
Page 138
Replace defective bulb. Bulb for parking light W5W / 12 V / 5 W To prevent contaminants from being deposited on the new bulb’s glass surface, always use a clean, dry cloth to hold it. Push the retainer 2 downward Insert socket 3 in headlight (using a screwdriver if nec- housing, continuing to apply… -
Page 139
bulb’s glass surface, always use a clean, dry cloth to hold it. Remove screw 1. Remove bulb 2 from light housing by turning it counterclockwise. Install bulb 2 by screwing Replace defective bulb. clockwise into light housing. Bulbs for flashing turn indicators, front RY10W / 12 V / 10 W Bulbs for flashing turn… -
Page 140
Technical Data below, the tail light bulb must be replaced. In this case: Contact an authorized service facility, preferably an authorized BMW Motorrad retailer. Press bulb into socket. Maximum number of de- fective LEDs in taillight Pull bulb out of socket. -
Page 141: Fuses
If the fuses blow frequently, fuses. Latch audibly engages. have the electrical system Installing passenger seat Switch off ignition. checked by an authorized spe- 53). Make sure ground is level and cialized workshop, preferably a firm and park motorcycle. BMW Motorrad retailer.
-
Page 142: Jump-Starting
Jump-starting terminal while connecting fully insulated crocodile clips at both ends. the other end to discharged The wires leading to the battery’s negative terminal. Jump-starting with a donor- power socket do not have Start engine of the vehicle with battery voltage higher than a load-capacity rating adequate discharged battery in usual 12 V can damage the motorcycle…
-
Page 143
Compliance with the points be- BMW Motorrad has devel- low is important in order to maxi- oped a trickle-charger spe- mize battery life: cially designed for compatibility with the electronics of your mo- Keep the surface of the battery torcycle. Using this charger, you… -
Page 144
Consult a certified service fa- In the case of longer peri- cility, preferably an authorized ods when the motorcycle is BMW Motorrad retailer, for set- not being used, the battery must ting of the date. be recharged regularly. See the… -
Page 145: Care
Care Care products ….. 144 Washing your vehicle ….144 Cleaning sensitive vehicle parts .
-
Page 146: Care Products
Brake early until the brake disks and pads are dry. BMW Motorrad recommends BMW Motorrad recommends Warm water intensifies the that you use BMW Insect Re- that you use cleaning and effect of salt. care products available at your mover to soften and wash off…
-
Page 147: Paint Care
BMW clean cloth or cotton ball. BMW auto shampoo. Use chrome pol- Motorrad recommends remov- ish for additional treatment. ing tar spots with BMW Tar Re- mover. Then add a protective…
-
Page 148: Protective Wax Coating
To preserve the finish of your thorized BMW Motorrad retailer. vehicle, BMW Motorrad recom- Combine work for storing/return- mends using BMW Car Wax or ing to use with maintenance ser- agents that contain carnauba or vice or an inspection. synthetic waxes.
-
Page 149: Technical Data
Technical data Troubleshooting chart … . . 148 Performance data ….159 Threaded fasteners ….149 Engine .
-
Page 150: Troubleshooting Chart
Troubleshooting chart Engine does not start at all or is very difficult to start. Possible cause Remedy Side stand extended and gear engaged Retract side stand. Gear engaged and clutch not disengaged Place transmission in neutral or disengage clutch. No fuel in tank Refueling procedure ( 67).
-
Page 151: Threaded Fasteners
Threaded fasteners Front wheel Value Valid Quick-release axle in threaded bush M24 x 1.5 37 lb/ft (50 Nm) Clamping screw in axle adapter M8 x 35 14 lb/ft (19 Nm) Radial brake calipers on the axle adapter M10 x 65 28 lb/ft (38 Nm) Rear wheel Value…
-
Page 152
Rear wheel Value Valid Adapter on rear wheel swinging M8 x 30 15 lb/ft (20 Nm) Clamp screw on upper spring plate M5 x 25 2 lb/ft (3 Nm) Spring strut on main frame M10 x 65 41 lb/ft (56 Nm) Mirrors Value Valid… -
Page 153: Engine
Engine Engine design Transverse-mounted four-cylinder, four-stroke inline engine, angled 32° toward front. With four valves per cylinder, actuated by two overhead camshafts and trailing valve levers; liquid cooled, electronic fuel injection, integrated six-speed transmission, wet-sump lubrication. Displacement 999 cc (999 cm Cylinder bore 3.1 in (80 mm) Piston stroke…
-
Page 154: Fuel
Usable fuel quantity Approx. 4.6 gal (Approx. 17.5 l) Reserve fuel quantity Approx. 1.1 gal (Approx. 4 l) BMW recommends the use of BP fuel Engine oil Engine oil, capacity 3.7 quarts (3.5 l), with filter change Products recommended by BMW Motorrad…
-
Page 155: Clutch
Clutch Clutch design Multi-disk oil-bath clutch, slipper clutch Transmission Transmission design Claw-shifted 6-speed transmission integrated in engine housing Transmission gear ratios 1.652 (76:46 teeth), Primary gear ratio 2.647 (45:17 teeth), 1st gear 2.091 (46:22 teeth), 2nd gear 1.727 (38:22 teeth), 3rd gear 1.500 (36:24 teeth), 4th gear 1.360 (34:25 teeth), 5th gear 1.261 (29:23 teeth), 6th gear…
-
Page 156: Rear-Wheel Drive
Rear-wheel drive Type of final drive Chain drive Type of rear suspension Two-arm aluminum swinging arm Number of teeth of rear-wheel drive (Pinion/ 17/45 sprocket) Secondary gear ratio 2.647 Suspension Front wheel Type of front suspension Upside-down telescopic forks Spring travel, front 4.7 in (120 mm), on wheel Rear wheel Type of rear suspension…
-
Page 157: Brakes
Organic Wheels and tires Recommended tire combinations You can obtain an overview of the current tire approvals from your authorized BMW Motorrad retailer or on the Internet at www.bmw- motorrad.com Front wheel Front wheel design Cast aluminum, MT H2 Front-wheel rim size 3.50″…
-
Page 158: Electrical System
Rear wheel Rear wheel design Cast aluminum, MT H2 Rear-wheel rim size 6.0″ x 17″ Rear tire designation 190 / 55 ZR 17 Tire inflation pressure Tire pressure, front 36.3 psi (2.5 bar), with tire cold Tire pressure, rear 42.1 psi (2.9 bar), with tire cold Electrical system Fuses Nominal current of fuse 1 (Instrument cluster)
-
Page 159
Nominal current of fuse 6 (Horn) 7.5 A Nominal current of fuse 7 (Ignition switch) Nominal current of fuse 8 (Sensor group) Main fuse 40 A Battery Battery design AGM (Absorptive Glass Mat) battery Battery voltage 12 V Battery capacity 10 Ah Spark plugs Spark plugs, manufacturer and designation… -
Page 160: Frame
Maximum number of defective LEDs in taillight Bulbs for flashing turn indicators, front RY10W / 12 V / 10 W Bulbs for flashing turn indicators, rear RY10W / 12 V / 10 W Bulb for license-plate light W5W / 12 V / 5 W Frame Frame design Cast light alloy — welded design with screwed-on…
-
Page 161: Weights
Weights Unladen weight 445 lbs (202 kg), DIN unladen weight, ready for road, 90 % full tank of gas, without OE Permissible gross weight 893 lbs (405 kg) Maximum payload 448 lbs (203 kg) Performance data Top speed >124 mph (>200 km/h)
-
Page 163: Service
Service Reporting safety defects … 162 BMW Motorrad Service … . 163 BMW Motorrad Mobility Services ……163 Maintenance procedures .
-
Page 164: Defects
National Highway Traffic Safety Ad- ministration (NHTSA) in addition to notifying BMW of North America, LLC. If NHTSA receives similar complaints, it may open an investigation, and if it finds that a safety defect exists in a group of vehicles, it may order a recall and remedy campaign.
-
Page 165: Bmw Motorrad Service
BMW Motorrad Service of a breakdown (BMW Roadside To ensure that your BMW con- Assistance, breakdown assis- sistently remains in optimal con- With its worldwide dealer net- tance, vehicle recovery and re- dition BMW Motorrad urges you work, BMW Motorrad can attend trieval, etc.).
-
Page 166
BMW Service The specified service intervals apply to street operation. For BMW Service is carried out once racing operation, adjust the inter- a year. The scope of the ser- vals in accordance with loading. vices performed may be de- pendent on the vehicle owner and the mileage driven. -
Page 167: Confirmation Of Maintenance Work
Confirmation of maintenance work BMW Pre-Delivery BMW Running-in Check Check Conducted Conducted Odometer reading Next service at the latest or, if reached sooner, Odometer reading Stamp, Signature Stamp, Signature…
-
Page 168
BMW Service BMW Service BMW Service Conducted Conducted Conducted Odometer reading Odometer reading Odometer reading Next service Next service Next service at the latest at the latest at the latest or, if reached sooner, or, if reached sooner, or, if reached sooner,… -
Page 169
BMW Service BMW Service BMW Service Conducted Conducted Conducted Odometer reading Odometer reading Odometer reading Next service Next service Next service at the latest at the latest at the latest or, if reached sooner, or, if reached sooner, or, if reached sooner,… -
Page 170
BMW Service BMW Service BMW Service Conducted Conducted Conducted Odometer reading Odometer reading Odometer reading Next service Next service Next service at the latest at the latest at the latest or, if reached sooner, or, if reached sooner, or, if reached sooner,… -
Page 171
BMW Service BMW Service BMW Service Conducted Conducted Conducted Odometer reading Odometer reading Odometer reading Next service Next service Next service at the latest at the latest at the latest or, if reached sooner, or, if reached sooner, or, if reached sooner,… -
Page 172: Confirmation Of Service
Confirmation of service The table is intended as proof of maintenance and repair work, the installed optional accessories and any special campaign (recall) work carried out. Work carried out Odometer Date reading…
-
Page 173
Work carried out Odometer Date reading… -
Page 174: Index
Brake fluid Abbreviations and symbols, 6 Chain Checking fluid level at rear, 116 Adjusting tension, 122 Checking front fluid level, 115 Control, 14 Checking tension, 121 Front reservoir, 13 Operating, 40 Checking wear, 122 Rear reservoir, 13 Self-diagnosis, 61 Lubricating, 121 Brake pads Technology in detail, 102 Checklist, 59…
-
Page 175
Engine Fuses Damping Position on vehicle, 16 Starting, 59 Adjusting, 48 Replacing, 139 Technical data, 151 Front adjustment element, 11 Technical data, 156 Warning for electronic engine Rear adjuster, 11, 13 management, 27 Dimensions Engine oil Hazard warning flashers Technical data, 158 Checking level, 111 Control, 14 Driving mode… -
Page 176
Immobilizer, 34 Luggage Using INFO mode, 79 Warning indicator, 27 Loading information, 58 Using LAPTIMER mode, 74 Indicator lights, 17 Luggage loops Using SETUP mode, 84 Overview, 21 Position on vehicle, 16 Multifunction switch General view, left, 14 Instrument cluster Use, 55 Ambient light sensor, 17 General view, right, 15… -
Page 177
Underneath seat, 16 Seats Steering lock Installing, 53 Locking, 34 Warning and indicator Locking mechanism, 11 lamps, 21 Storing, 146 Removing, 53 Switching off, 66 Service, 163 Pre-ride check, 60 Reporting safety defects, 162 Tachometer, 17 Service display, 22 Technical data Shifting gear Rear-wheel drive Battery, 157… -
Page 178
Weights, 159 Size change, 123 Warning indicators Wheels and tires, 155 Technical data, 155 ABS, 29 Tires Anti-theft alarm system, 31 Checking tire inflation Bulb defective, 28 pressures, 52 Display, 23 Checking tire tread depth, 120 DTC, 29 Inflation pressure table, 11 Electronic engine Inflation pressures, 156 management, 27… -
Page 179
Errors and omissions excepted. ©2013 Bayerische Motoren Werke Aktiengesellschaft 80788 Munich, Germany Reprints and duplication of this work, in whole or part, are pro- hibited without the express writ- ten approval of BMW Motorrad, Aftersales. -
Page 180
Approx. 1.1 gal (Approx. 4 l) Tire inflation pressure Tire pressure, front 36.3 psi (2.5 bar), with tire cold Tire pressure, rear 42.1 psi (2.9 bar), with tire cold BMW recommends *01418550327* Order No.: 01 41 8 550 327 08.2013, 3rd edition, 07…