Permalink
Cannot retrieve contributors at this time
| title | description | ms.date |
|---|---|---|
|
Troubleshooting ‘This application could not be started’ |
Learn what to do if you see a ‘This application could not be started’ dialog box. |
10/06/2021 |
Troubleshooting a ‘This application could not be started’ error message
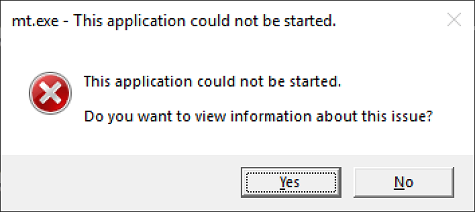
Applications that are developed for .NET Framework typically require that a specific version of .NET Framework be installed on your system. In some cases, you may attempt to run an application without either an installed version or the expected version of .NET Framework present. This often produces an error dialog box like the following:

Error causes
This error typically indicates one of the following conditions:
-
A .NET Framework installation on your system has become corrupted.
-
The version of .NET Framework needed by your application cannot be detected.
How to fix the error
To address this issue so that you can run your application, do the following:
-
Download the .NET Framework Repair Tool (NetFxRepairTool.exe). The tool runs automatically when the download completes.
-
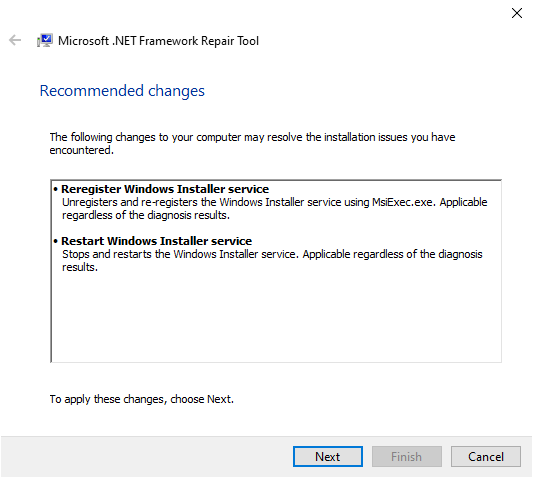
If the .NET Framework Repair Tool recommends any additional action, such as those shown in the following figure, select Next.

-
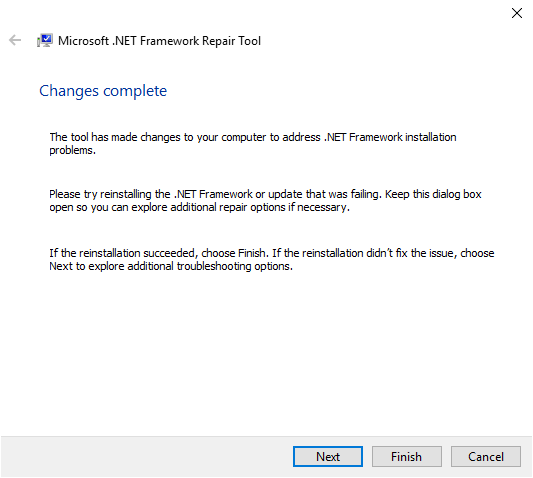
The .NET Framework Repair Tools displays a dialog box shown in the following figure to indicate that changes are complete. Leave the dialog box open while you to try rerun your application. This should succeed if the .NET Framework Repair Tool has identified and corrected a corrupted .NET Framework installation.

-
If your application runs successfully, select the Finish button. Otherwise, select the Next button.
-
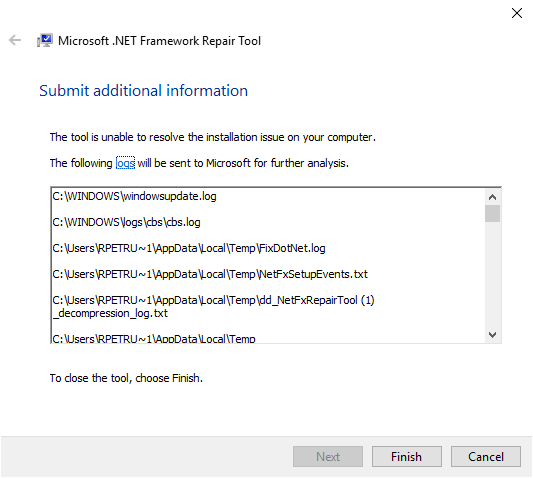
If you selected the Next button, the .NET Framework Repair Tool displays a dialog box like the following. Select the Finish button to send diagnostic information to Microsoft.

-
If you still cannot run the application, install the latest version of .NET Framework that’s supported by your version of Windows, as shown in the following table.
Windows version .NET Framework installation Windows 10 Anniversary Update and later versions .NET Framework 4.8 Runtime Windows 10, Windows 10 November Update .NET Framework 4.6.2 Windows 8.1 .NET Framework 4.8 Runtime Windows 8 .NET Framework 4.6.1 Windows 7 SP1 .NET Framework 4.8 Runtime Windows Vista SP2 .NET Framework 4.6 [!NOTE]
.NET Framework 4.8 is preinstalled on Windows 11 and Windows 10 May 2019 Update and later versions. -
Attempt to launch the application.
-
In some cases, you may see a dialog box like the following, which asks you to install .NET Framework 3.5. Select Download and install this feature to install .NET Framework 3.5, then launch the application again.

See also
- .NET Framework System Requirements
- .NET Framework installation guide
- Troubleshoot blocked .NET Framework installations and uninstallations
Troubleshooting a ‘This application could not be started’ error message
Error causes
This error typically indicates one of the following conditions:
How to fix the error
To address this issue so that you can run your application, do the following:
If your application runs successfully, select the Finish button. Otherwise, select the Next button.
| Windows version | .NET Framework installation |
|---|---|
| Windows 10 Anniversary Update and later versions | .NET Framework 4.8 Runtime |
| Windows 10, Windows 10 November Update | .NET Framework 4.6.2 |
| Windows 8.1 | .NET Framework 4.8 Runtime |
| Windows 8 | .NET Framework 4.6.1 |
| Windows 7 SP1 | .NET Framework 4.8 Runtime |
| Windows Vista SP2 | .NET Framework 4.6 |
.NET Framework 4.8 is preinstalled on Windows 11 and Windows 10 May 2019 Update and later versions.
Attempt to launch the application.
Источник
Comments
antdude commented Jun 9, 2019
The text was updated successfully, but these errors were encountered:
mika76 commented Jun 9, 2019 •
antdude commented Jun 9, 2019
antdude commented Jun 9, 2019
mika76 commented Jun 9, 2019 •
Seems the latest paint.net uses 4.7. I would have thought that would work with mamesaver too. You could always try install 4.6 and see what happens. Shouldn’t give a you any problems.
mika76 commented Jun 9, 2019
Or maybe you have an older paint.net with an older framework? Here Microsoft’s instructions on how to determine which is installed : https://docs.microsoft.com/en-us/dotnet/framework/migration-guide/how-to-determine-which-versions-are-installed
antdude commented Jun 9, 2019
From my regedit.exe:
Windows Registry Editor Version 5.00
[HKEY_LOCAL_MACHINESOFTWAREMicrosoftNET Framework SetupNDPv4]
[HKEY_LOCAL_MACHINESOFTWAREMicrosoftNET Framework SetupNDPv4Client]
«Version»=»4.7.02558»
«TargetVersion»=»4.0.0»
«Install»=dword:00000001
«MSI»=dword:00000001
«Servicing»=dword:00000000
«InstallPath»=»C:WindowsMicrosoft.NETFramework64v4.0.30319»
«Release»=dword:000709fe
[HKEY_LOCAL_MACHINESOFTWAREMicrosoftNET Framework SetupNDPv4Client1033]
«Version»=»4.7.02558»
«TargetVersion»=»4.0.0»
«Install»=dword:00000001
«Servicing»=dword:00000000
«Release»=dword:000709fe
[HKEY_LOCAL_MACHINESOFTWAREMicrosoftNET Framework SetupNDPv4Full]
«Version»=»4.7.02558»
«TargetVersion»=»4.0.0»
«Install»=dword:00000001
«MSI»=dword:00000001
«Servicing»=dword:00000000
«InstallPath»=»C:WindowsMicrosoft.NETFramework64v4.0.30319»
«Release»=dword:000709fe
[HKEY_LOCAL_MACHINESOFTWAREMicrosoftNET Framework SetupNDPv4Full1033]
«Version»=»4.7.02558»
«TargetVersion»=»4.0.0»
«Install»=dword:00000001
«Servicing»=dword:00000000
«Release»=dword:000709fe
antdude commented Jun 9, 2019
I am using paint.net v4.1.6. BTW, I’m going to sleep soon.
mika76 commented Jun 9, 2019
Seems you have 4.7 which should run it without problems. Hmm I’ll have to play around with it a bit and see if I can figure it out.
antdude commented Jun 9, 2019
I was able to reproduce it in a clean, updated 64-bit W7 HPE SP1 in a virtual machine (VM) with VirtualBox. Its registry shows:
Windows Registry Editor Version 5.00
[HKEY_LOCAL_MACHINESOFTWAREMicrosoftNET Framework SetupNDPv4]
[HKEY_LOCAL_MACHINESOFTWAREMicrosoftNET Framework SetupNDPv4Client]
«Version»=»4.6.01055»
«TargetVersion»=»4.0.0»
«Install»=dword:00000001
«MSI»=dword:00000001
«Servicing»=dword:00000000
«Release»=dword:0006041f
«InstallPath»=»C:WindowsMicrosoft.NETFramework64v4.0.30319»
[HKEY_LOCAL_MACHINESOFTWAREMicrosoftNET Framework SetupNDPv4Client1033]
«Version»=»4.6.01055»
«TargetVersion»=»4.0.0»
«Install»=dword:00000001
«Servicing»=dword:00000000
«Release»=dword:0006041f
[HKEY_LOCAL_MACHINESOFTWAREMicrosoftNET Framework SetupNDPv4Full]
«Version»=»4.6.01055»
«TargetVersion»=»4.0.0»
«Install»=dword:00000001
«MSI»=dword:00000001
«Servicing»=dword:00000000
«InstallPath»=»C:WindowsMicrosoft.NETFramework64v4.0.30319»
«Release»=dword:0006041f
[HKEY_LOCAL_MACHINESOFTWAREMicrosoftNET Framework SetupNDPv4Full1033]
«Version»=»4.6.01055»
«TargetVersion»=»4.0.0»
«Install»=dword:00000001
«Servicing»=dword:00000000
«Release»=dword:0006041f
Источник
Go to here C:Program Files (x86)SteamsteamappscommonFINAL FANTASY FFX&FFX-2 HD Remaster or where ever you install it at. Run FFX.exe, or run as admin on FFX.exe if it works, then you have a launcher problem, it could be a number things.
Software conflicting with your game, as there was a case with Avest would remove some of the files for the game that was needed and was read as a false virus scan. Could have missing, out of date update/firmware, or bad installs of the content of the software, or hardware support. There a number of things it could be, but for now can you share your specs, or the model of your PC?
If you don’t want to use CPUID CPU-Z then tell me your PC model number if it’s pre-build, this is a how to video how to find the model number.
https://www.youtube.com/watch?v=OsrZS1SoSNA

Go to here C:Program Files (x86)SteamsteamappscommonFINAL FANTASY FFX&FFX-2 HD Remaster or where ever you install it at. Run FFX.exe, or run as admin on FFX.exe if it works, then you have a launcher problem, it could be a number things.
Software conflicting with your game, as there was a case with Avest would remove some of the files for the game that was needed and was read as a false virus scan. Could have missing, out of date update/firmware, or bad installs of the content of the software, or hardware support. There a number of things it could be, but for now can you share your specs, or the model of your PC?
If you don’t want to use CPUID CPU-Z then tell me your PC model number if it’s pre-build, this is a how to video how to find the model number.
https://www.youtube.com/watch?v=OsrZS1SoSNA
Run as admin didn’t worked.
Here we go:
CPU: Intel Core i5 750 2.67GHz
GPU: Nvidia GeForce 750 Ti 2GB
Memory: 8GB DDR3
Mainboard: ASUSTeK Computer INC, Model: P7H55-M BR
Verifying the game cache for now, it gonna take some time! But really thank you for the help!

Go to here C:Program Files (x86)SteamsteamappscommonFINAL FANTASY FFX&FFX-2 HD Remaster or where ever you install it at. Run FFX.exe, or run as admin on FFX.exe if it works, then you have a launcher problem, it could be a number things.
Software conflicting with your game, as there was a case with Avest would remove some of the files for the game that was needed and was read as a false virus scan. Could have missing, out of date update/firmware, or bad installs of the content of the software, or hardware support. There a number of things it could be, but for now can you share your specs, or the model of your PC?
If you don’t want to use CPUID CPU-Z then tell me your PC model number if it’s pre-build, this is a how to video how to find the model number.
https://www.youtube.com/watch?v=OsrZS1SoSNA
Run as admin didn’t worked.
Here we go:
CPU: Intel Core i5 750 2.67GHz
GPU: Nvidia GeForce 750 Ti 2GB
Memory: 8GB DDR3
Mainboard: ASUSTeK Computer INC, Model: P7H55-M BR
Verifying the game cache for now, it gonna take some time! But really thank you for the help!
Источник
ServerManager.exe – This application could not be started
The Windows Server Manager enables the IT staff to keep a tab on all the servers hosted on a network. The Server Manager tool gives IT staff the ability to manage server roles without having physical access to the servers. If you’re unable to get the Server Manager working, whereby when you click on Server Manager, you encounter the error message ServerManager.exe – This application could not be started, then the solutions presented in this post are intended to help you resolve the issue.
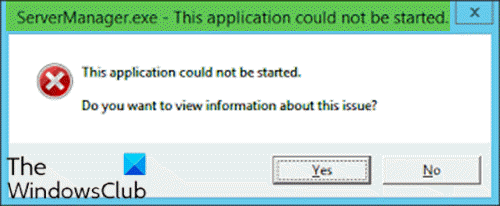
When you encounter this issue, you’ll receive the following full error message;
ServerManager.exe – This application could not be started. L?.
This application could not be started.
Do you want to view Information about this issue?
ServerManager.exe – This application could not be started
Let’s take a look at the description of the process involved concerning each of the listed solutions.
1] Run DISM command
Afterward, the server manager application should open without the error.
2] Manually delete user.config file
3] Edit the ServerList.xml
If you have multiple server OS installations running, you may discover that one of the servers is responsible for the Server Manager error. You can determine this by opening Server Manager on the other servers and try adding servers. All goes well until you try doing the same on a particular server, that’s when the server manager would crash and stop working again. In this case, you can edit the ServerList.xml, and remove the problematic server. The Server Manager should work fine now.
4] Perform System Restore
Similar to the client operating system Windows 10, you can perform a system restore and see if that helps. This is applicable if you are unable to start Server Manager only recently and that things worked fine prior to that.
5] Perform In-place Upgrade Repair
Also, similar to the client OS Windows 10, you can perform an In-place Upgrade Repair and see if that helps.
6] Format and clean install Server OS
As a last resort, you can format and clean install the server OS.
Hope something here helps you.
Date: February 26, 2021 Tags: Errors, Server
Источник
How to Fix the Error «This App Can’t Run On Your PC»?
Read this article to learn how to fix the problem with running an application on PC, and we will find out why this error appears and how to solve the problem.
The core of the problem
On the Internet, there are lots of websites offering to install various applications and programs. At an early stage, Windows 10 operating system can detect and warn the user of possible issues, or even block a harmful application or program at once.
For this purpose, Microsoft has improved greatly the built-in defense component, SmartScreen. Its main task is to protect the user from apps provided by questionable developers. SmartScreen helps to reveal any previously detected malware, applications or websites created for malicious purposes, and takes informed decisions on blocking their access, download or use on your personal computer or another computing device.
At the first stage, SmartScreen analyzes all applications, programs and webpages for any suspicious activities. The next step will be to compare suspicious apps and webpages with the list of programs and websites recognized to be harmful. In case of a coincidence, SmartScreen will block download or installation for such a program, and display a corresponding notification for the user.
Obviously, SmartScreen is quite a useful feature in Windows 10 and using it seems absolutely justified. However, frequent error messages or warning notifications displayed while you are working with an application or website that you trust can become quite irritating. In that case, SmartScreen is easy to disable – if you know the app we are talking about is absolutely safe.
This security feature can display quite a number of various warnings and error messages, but most of these can be sorted out on your own. Mostly, these are issues related to providing additional permissions or signing in to an account with administrator’s rights.
Still, cases when you see a SmartScreen message saying This app can’t run on your PC are totally different. Such messages only suggest that you contact the program’s developer for advice – and that’s all. Also, you can face such messages when apps that used to run seamlessly on your computer, suddenly can’t start, for no evident reason. Yet don’t worry: even if you see the error This app can’t run on your PC in Windows 10, here’s what you can do.
The error This app can’t run on your PC
If you see such a message, it means there is a compatibility error. The application you are trying to install is incompatible with your operating system, Windows 10. You may also encounter this error if the application requires special permissions to run – and the current user account lacks them. This error only appears when you are trying to install an application, and never does when you start one. If an application is already installed to your computer, starting it will never trigger this error. There are two ways to fix it.

Use your account with administrator rights
When you see this error message, it might be due to your signing in to an account which doesn’t have administrator rights. To exclude this one out, check the account you are using now. If the current account is not the administrator’s one, switch to that account, and try installing the application again. If this method doesn’t work, try another one on the list.
32-bit or 64-bit application
If you’re using the 32-bit version of Windows 10 and trying to run a 64-bit version of the program, the error should have been expected. Similarly, if you’re trying to install a 32-bit program onto a 64-bit version of Windows 10, this error may also take place. If the problem comes from bitness, there’s only one solution – you’ve got to find the proper version of the necessary application and install it.
Disable SmartScreen in Windows 10
Sometimes, the error This app can’t run on your PC may be false. That’s why if the advice I have given you in this article didn’t help you and you still face this error, and you still need to run this app despite the warning, try disabling SmartScreen filter. In this tutorial, we will show you three ways to disable the security feature, as it is applied to the entire Windows 10 operating system, to applications received from Microsoft Store, and to the system’s featured browser, Microsoft Edge.
Disable SmartScreen in Windows 10 with Windows Defender Security Center
In this case, you should open Windows Defender Security Center. It can be done in a few ways.
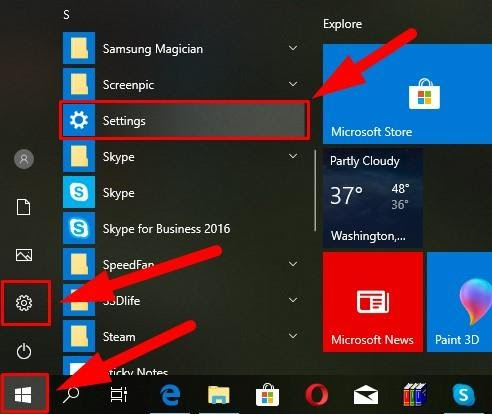
Click on the Start button on the Taskbar, and open the main Windows menu, then click the gearwheel symbol. Alternatively, drag the scroll bar down until you find the line Settings.
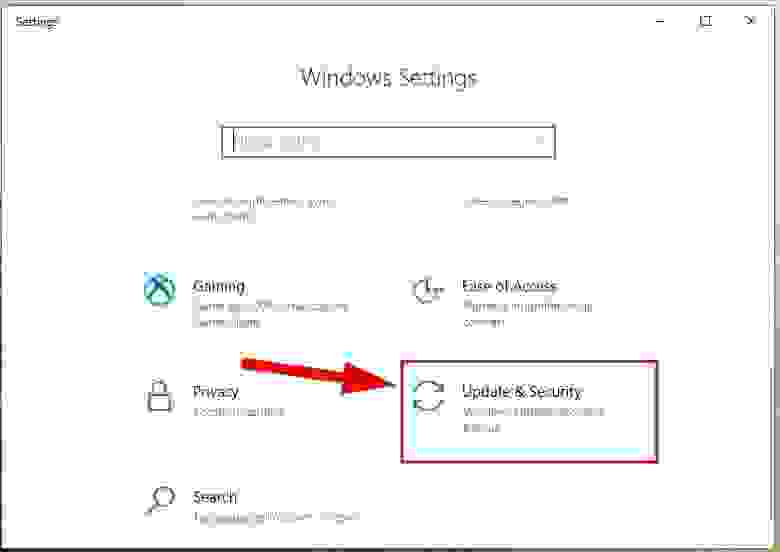
In the application window, drag the slider down and select the section Update and Security.
On the left, select Windows Security, and on the right click on Open Windows Defender Security Center.

It opens the main window of Windows Defender Security Center.

In the side menu on the right, select App & browser control. You will be redirected to the page where you can configure SmartScreen for applications and browsers.

Here, you can disable Check apps & files, SmartScreen for Microsoft Edge and SmartScreen for Microsoft Store apps. Check the Off option in corresponding sections.
When the pop-up notification from Windows User Account Control asks Do you want to allow this app to make changes to your device? click Yes for the changes to take effect.
Disable SmartScreen in Windows 10 with the Registry Editor
Note: It is important to remember that anything you do to the registry is on your own responsibility. Any actions involving the registry may cause irreversible consequences. Windows 10 may begin working with errors, some apps or programs may not be able to start, the operating system can crash or have problems when booting. Before you start modifying the registry, we strongly recommend backing it up, just in case. To do it, open the Registry Editor, choose the File tab in the main menu, and select Export. The operating system will suggest you to give a name to the registry backup and select the directory where to save it. Choose a name that will help you to remember when exactly this backup was created. The best name would be the date of creation, for example, 02-04-2019. After that, click Save. Now you will have a registry backup file which you can use to restore it if necessary.
One more time, open the Run dialogue box in any of the ways described in this article (for example, by pressing the keyboard shortcut Windows + R for quick access to the Runwindow). In the command prompt field, type the command for opening the Registry Editor (regedit) and click ОК to perform the command.

When the pop-up notification from Windows User Account Control asks Do you want to allow this app to make changes to your device? click Yes and open the Registry Editor window.
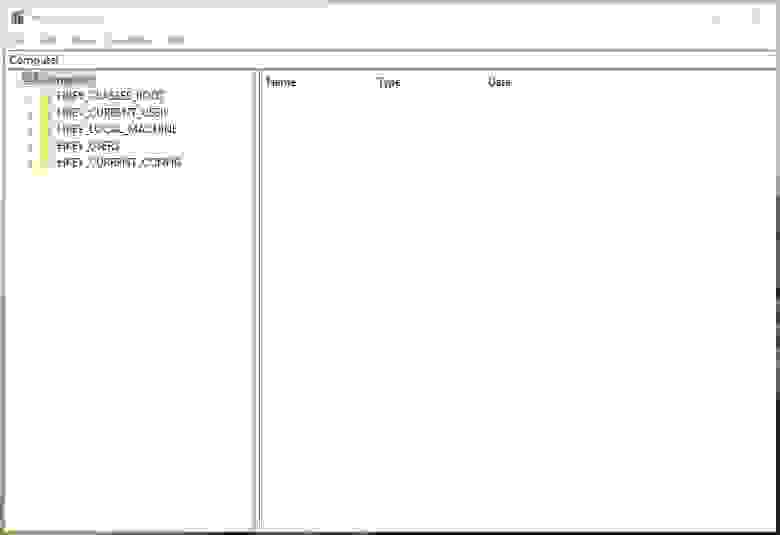
In the left-side part of the window, follow the path:
You can also use a different method for accessing this particular section of the registry. Just copy and paste it into the address bar of the Registry Editor (it’s under the main menu). This way, you can avoid possible errors when selecting the registry section, as the left panel displays many similar directories, and this specific method helps you make sure you use the correct address.
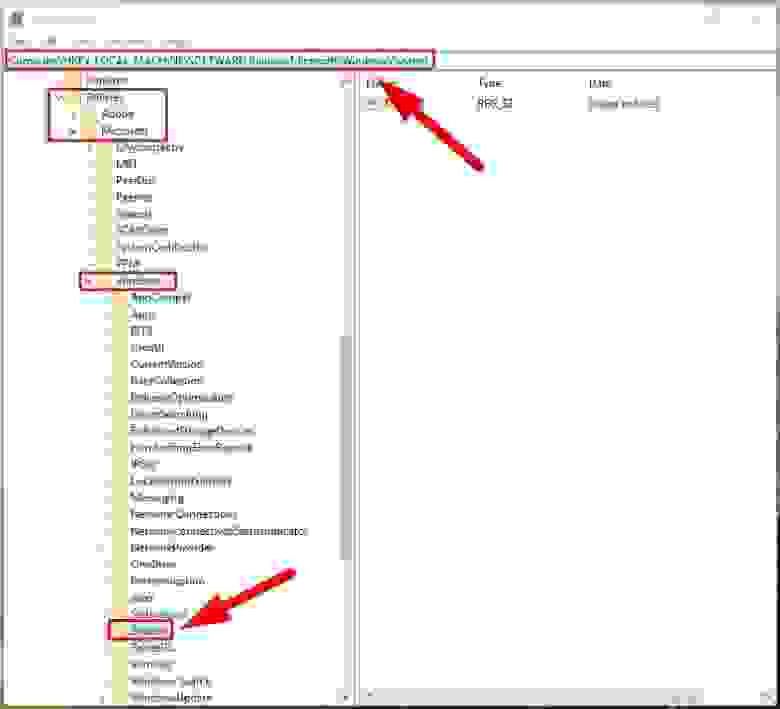
Right-click on an empty area on the right, select New from the context menu that appears, and click on the nested menu option DWORD value (32 bit).

Give the new DWORD value the name EnableSmartScreen. Double-click on it, or right-click on it and select Modify from the menu.
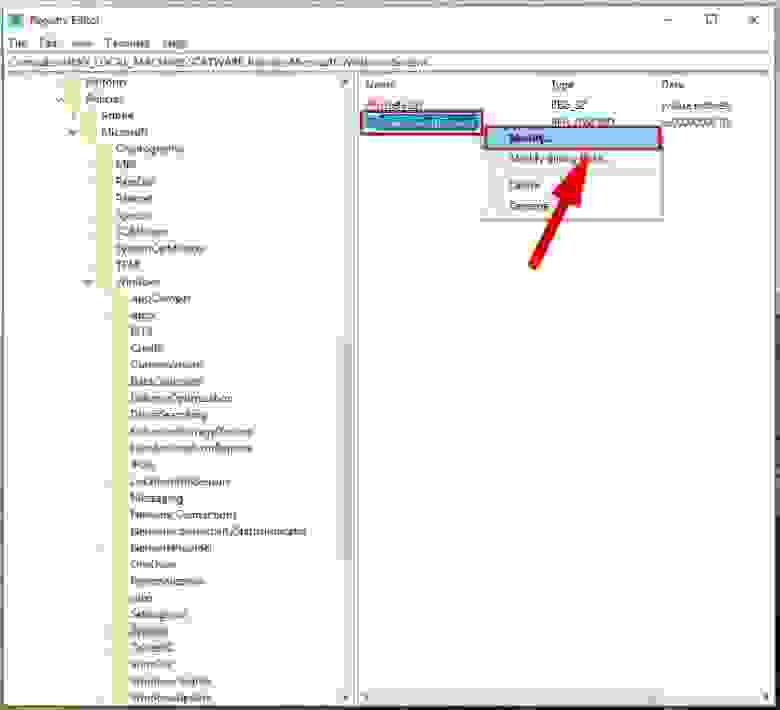
In the window Edit DWORD value (32 bit) set the Value data to0 (this value data will be used by default). Click ОК or press Enter on your keyboard to save the changes to the value.

Now close the Registry Editor window and restart your computer. After that, SmartScreen will be disabled.
Disable SmartScreen in Windows 10 with the Local Group Policy Editor
If your computer is running Windows 10 Home Edition, you won’t be able to use the functionality of the Local Group Policy Editor, as this utility is not excluded into this particular version of the operating system. For other versions of Windows 10, do the following.
Open the Run dialogue box in any of the ways described in today’s article (for example, right-click on the Start button in the Taskbar, and select the Run dialogue box in the menu that opens). In the Command Prompt window, type the command gpedit.msc.
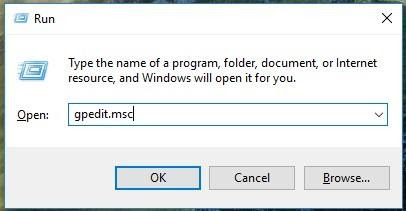
Click ОК or press Enter on your keyboard to confirm your action, and the Local Group Policy Editor window will appear.

In the left-side panel, follow this path:
Computer Configuration – Administrative Templates – Windows Components – Windows Defender SmartScreen.

There are two subsections, Explorer and Microsoft Edge. Each of them contains a policy setting Configure Windows SmartScreen that allows you to enable or disable the filter as you like. Double-click on it, or right-click on it and select Edit from the menu.

In the window that opens, check the option for Disabled, then click Apply and ОК to save the changes you have made.

Apply this algorithm to every subsection: Explorer and Microsoft Edge. In the first subsection, it disables checking files in Windows 10, and in the second subsection it turns off SmartScreen in Microsoft Edge. After saving the changes, close the Local Group Policy Editor, and the SmartScreen feature will be disabled.
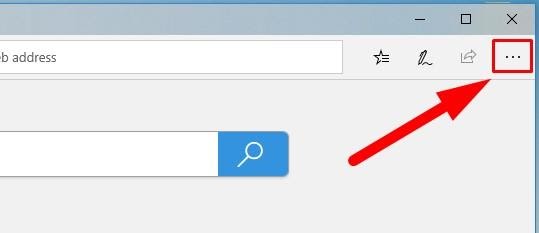
There is also a way to disable SmartScreen in Microsoft Edge in the browser settings. Open Microsoft Edge and click on the three-dot button in the top right corner to open the main menu.

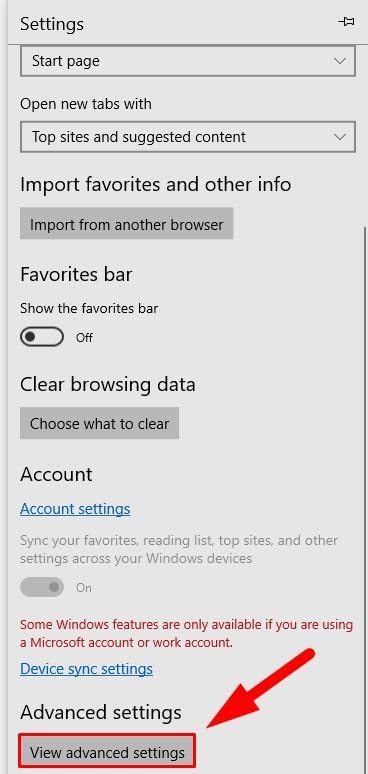
Then click View advanced settings.
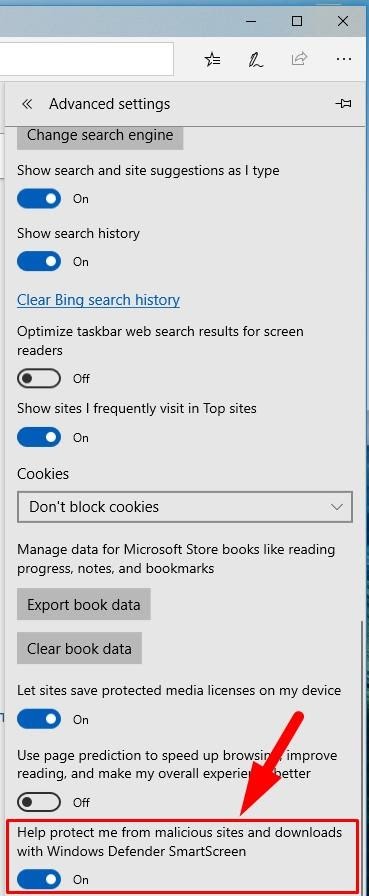
Scroll down to find the line Help protect me from malicious sites and downloads with Windows Defender SmartScreen and set the slider to Off.
Finally, when the SmartScreen feature is disabled, make sure that your application starts and works correctly now. If you see the error again, the problem must be in the application itself, not in the security feature.
Then all you can do is to wait for another update to fix this issue, or find another program to replace the faulty app. If you disabled the SmartScreen feature, make sure you turn it on again after the necessary application is installed. It’s not a good idea to leave your system open to threats and without protection, so turn the feature on again and improve the security of your operating system.
See the full article with all additional video tutorials. If you still have any questions, please ask in a comments. Also visit our Youtube channel, there are over 400 video tutorials.
Источник
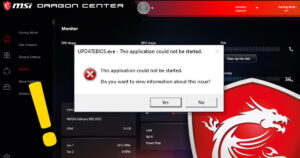 If you have an MSI puter that you upgraded to Windows 11, you probably noticed an annoying little error. Every time you boot up, you got a popup window that states:
UPDATEBIOS.exe could not be started. Do you want to view information about this issue?
So of course you click Yes, and then you get another error message.
Obviously, the problem has something to do with the built-in Dragon Center software trying to do a BIOS update check – and failing.
Not to worry – the fix is pretty simple!
The error message
This is the error popup you should be seeing:
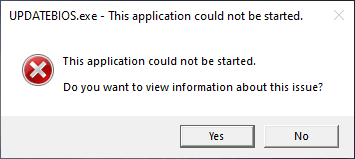
Naturally, there is no information about this issue. So, you may as well just click No to make the popup go away.
Next, let’s make it go away for good!
Method #1: Turn off auto-updates in Dragon Center
If you don’t care about automatic driver/BIOS updates, just turn off the Auto Update feature in Dragon Center (which you can start either by double-clicking the red icon in the system tray, or by just clicking the Start button and searching for “dragon”).
Ta-da! Problem solved.
Only trouble is that you no longer get automatic driver updates from MSI…
So, I opted for the better solution below.
Method #2: Compatibility Mode
This method actually works without disabling auto-updates from MSI.
Open Explorer (type Windows Key + E on your keyboard).
Navigate to the folder: Documents -> temp -> OneDC_Updater
You should see a file called OneDC_Updater.exe.
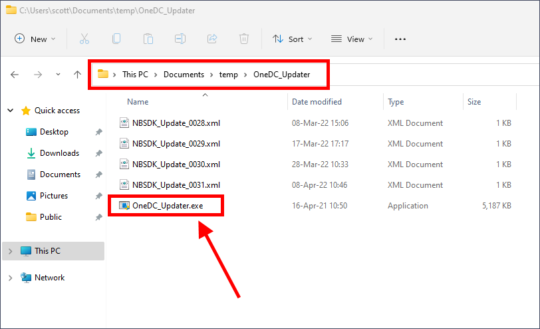
RIGHT-click that file, and choose Properties.
Now, you could click the Run compatibility troubleshooter button, but that’s a lot of extra clicking.
Instead, check the box for Run this program in compatibility mode for: and choose Windows 8 in the pulldown menu:
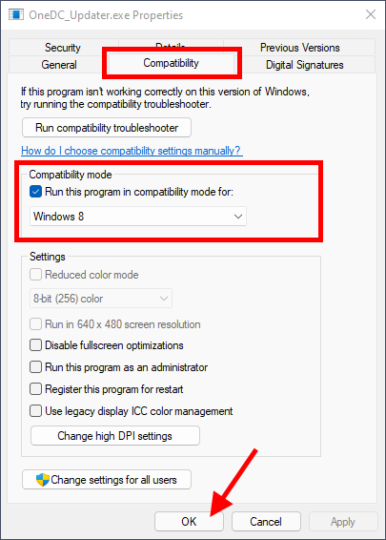
Then just click OK.
One last thing: If there is another file called updater.exe in the same folder or one level up in Documentstemp, delete it!
Now restart the puter, and the error message should be gone.
What the heck?! It’s not gone!
No worries… Go into Dragon Center and check your BIOS version. Then, go to MSI’s support page for your model. Just fine your product page, and click the Support link. Then click Firmware.
For example, this is the link to the GE75 Raider 10SF.
If there’s a new version of the BIOS available, download it. Follow the instructions and copy the BIOS update to a USB stick. Plug it in, reboot, and tap the Del key repeatedly to enter the BIOS setup. Find the BIOS update section, and let ‘er rip.
Then when the BIOS update is complete, boot back into Windows. You may need to repeat the above procedure for OneDC_Updater.exe.
Reboot one last time, and you should be all set!


Short Answer: Uncheck «Prefer 32-bit».
Long Answer: (Not 100% sure but here goes)
Assuming you have a 64 bit machine, keep in mind that System32 is a folder that is reserved for 64 bit application usage, and although it may seem strange, SysWOW64 contains 32 bit dlls and is reserved for 32-bit applications. Typically, 32-bit applications that access System32 will go through a file system redirector to the SysWOW64 folder. More info here.
However, when your application (which runs as a 32-bit process) runs in System32 itself, the redirector probably doesn’t do anything because it thinks there isn’t any need to redirect, which is why your app works outside of System32 but not inside it.
So to solve this, uncheck Prefer 32-bit so that it will try to target 64 bit platform, … or better yet, put the app elsewhere and add the application directory to your environment path variable. That way you can still access your application .exe anywhere, and it won’t pollute your System32 folder which should only be used for Windows files anyways.
rust.exe — Application could not be started ошибка в Rust что делать?
Вообщем вот, такая хрень вылазит при попытке запустить Rust. Системные требования сверял со своими характеристиками — всё подходит. В режиме совместимости и от имени админа запускал — ничего не изменилось. Прошу дать мне дельный совет который поможет исправить эту проблему, Спасибо!

17321 просмотр
больше 5 лет назад
 Rust
Rust
3 ответа
 0
0


Если вы помните какой именно
.dll файл кароче я его удалил)
то могу предложить следующее. Напишите вашему другу который тоже играет в Rust, и попросите скинуть этот .dll файл, закиньте его в ту папку где он был до того как вы его удалили, и пробуйте играть 🙂
Ответ дан
больше 5 лет назад
1


Вам же четко сказано что игра не могла установить связь с Microsoft .NET Framework , установите его или же обновите, если он был установлен ранее, и личная рекомендация после этого всего перезагрузите комп, и будем вам счастье.
Ответ дан
больше 5 лет назад
0

Забыл добавить, раньше всё было нормально, и я заходил играл. Потом у меня начало выбивать ошибку
связанную с .dll файлом, я кароче просто его удалил) Игра после этого запустилась, я поиграл но вот после следующего включения компа, начало выбивать этот Error.
Ответ дан
больше 5 лет назад
0
Введите ваш ответ


Символов нужно 2
Download PC Repair Tool to quickly find & fix Windows errors automatically
The Windows Server Manager enables the IT staff to keep a tab on all the servers hosted on a network. The Server Manager tool gives IT staff the ability to manage server roles without having physical access to the servers. If you’re unable to get the Server Manager working, whereby when you click on Server Manager, you encounter the error message ServerManager.exe – This application could not be started, then the solutions presented in this post are intended to help you resolve the issue.
When you encounter this issue, you’ll receive the following full error message;
ServerManager.exe – This application could not be started. L?.
This application could not be started.
Do you want to view Information about this issue?
You may encounter this error due to one or more of the following reasons:
- The registry key of ServerManager.exe is invalid or damaged.
- Computer malware has injected malicious code and modified ServerManager.exe file.
- The ServerManager.exe file was uninstalled by other software.
- The ServerManager.exe file was intentionally or mistakenly deleted by other software.
- The required version of ServerManager.exe file is overwritten by other software.
- There is a hardware failure, such as a bad hard disk.
If you’re faced with this issue, you can try our recommended solutions below in no particular order and see if that helps to resolve the issue.
- Run DISM command
- Manually delete user.config file
- Edit the ServerList.xml
- Perform System Restore
- Perform In-place Upgrade Repair
- Format and clean install Server OS
Let’s take a look at the description of the process involved concerning each of the listed solutions.
1] Run DISM command
This solution requires you to fix/reinstall .NET Frameworks versions 3 and 4 using the DISM command. Here’s how:
- Open Command Prompt in admin mode.
- In the CMD prompt window, run the following command one after the other:
DISM.exe /online /enable-feature /all /featurename:NetFx3

DISM.exe /online /enable-feature /all /featurename:NetFx4
Afterward, the server manager application should open without the error.
2] Manually delete user.config file
Do the following:
- Press Windows key + E to open File Explorer.
- Navigate to the file path below in your C drive or the drive housing the server installation identified as the root folder:
C:Users<YourUserName>AppDataLocalMicrosoft_CorporationServerManager.exe_StrongName_m3xk0k0ucj0oj3ai2hibnhnv4xobnimj10.0.0.0user.config
- At the location, delete the user.config file.
- Restart Server Manager – this recreates the file and will also address any issues of the file has become corrupted and such.
3] Edit the ServerList.xml
If you have multiple server OS installations running, you may discover that one of the servers is responsible for the Server Manager error. You can determine this by opening Server Manager on the other servers and try adding servers. All goes well until you try doing the same on a particular server, that’s when the server manager would crash and stop working again. In this case, you can edit the ServerList.xml, and remove the problematic server. The Server Manager should work fine now.
4] Perform System Restore
Similar to the client operating system Windows 10, you can perform a system restore and see if that helps. This is applicable if you are unable to start Server Manager only recently and that things worked fine prior to that.
5] Perform In-place Upgrade Repair
Also, similar to the client OS Windows 10, you can perform an In-place Upgrade Repair and see if that helps.
6] Format and clean install Server OS
As a last resort, you can format and clean install the server OS.
Hope something here helps you.

Obinna Onwusobalu has studied Information & Communication Technology and is a keen follower of the Windows ecosystem. He has been a Windows Insider MVP (2020). He runs a computer software clinic.
- Remove From My Forums
-
Question
-
Just installed a brand new Win Server 2012 Essentials for my office. I’ve tried to run the connector but when it installs it gives me a generic error message which says «This application could not be started. Would you like help with this issue?»
When I click yes, it takes me to a webpage which tells me all about SHIM Error codes… apparently those are related to .NET Framework issues? IDK for sure. All I know is I can’t get the connector to run on some of these PCs. The only PCs I can
make it work on is the 32 bit machines. All are Win 7 Pro. All the 64 bit machines run into the same error message when trying to install, the 32 bit machines work and the connector runs just fine. Doesn’t make sense to me but that’s what’s
happening right now.Additional data: the only other thing about this that I suspect might have some sort of effect on it (but I’m not sure how): I ran a profile migration applet on each of the machines so I could remove them from the old domain and transfer to the new domain
and retain all their settings. Part of me thinks that little Profwiz.exe might have messed with some registry settings which is now messing up the Connector App.If it would be helpful I can post logs — although I’m not sure which logs you’d like at this point. I can’t see anything relevant showing up in the event logs currently but maybe I’m missing something obvious. Anywhoosies, thanks for your input.
Answers
-
Thank you for your suggestions. I had tried uninstalling and reinstalling the .NET Framework and all the possible solutions surrounding issues with bad earlier .NET versions. Also tried creating a new local account and running the connector from
there. They all came back with the same «this application could not be started» message.Finally stumbled across another post with that same error message and this solution worked for me:
—
I experienced this problem and was able to resolve it by doing the following.
C:WindowsMicrosoft.NETFramework64v2.0.50727>Ldr64.exe query
The above command returned a current status of: 0x00000000 meaning .net was set to run in 32bit. I then ran the following:
C:WindowsMicrosoft.NETFramework64v2.0.50727>Ldr64.exe set64
loading kernel32…done.
retrieved GetComPlusPackageInstallStatus entry point
retrieved SetComPlusPackageInstallStatus entry point
Setting status to: 0x00000001
SUCCESSOnce 64bit was enabled Server Manager began working again
(source: https://social.technet.microsoft.com/Forums/windowsserver/en-US/e554224a-c31d-451b-a4ca-853b328c7f09/server-manager-2012-is-not-starting?forum=winservermanager)
—
Somehow through my profile migration the .net got set to 32bit?? IDK for sure how that happened but this fixed the trouble for me on the 64bit systems.
-
Marked as answer by
Friday, April 22, 2016 7:52 PM
-
Edited by
Kevin in St Louis
Friday, April 22, 2016 7:54 PM
reformated text
-
Marked as answer by