Некоторые пользователи сталкиваются с ошибкой «sudo unable to resolve host». Обычно, эта ошибка появляется после смены имени компьютера. Это простая проблема, которую можно быстро решить.
В этой статье мы рассмотрим, почему возникает эта ошибка, что она означает, а также как её решить на примере Ubuntu.
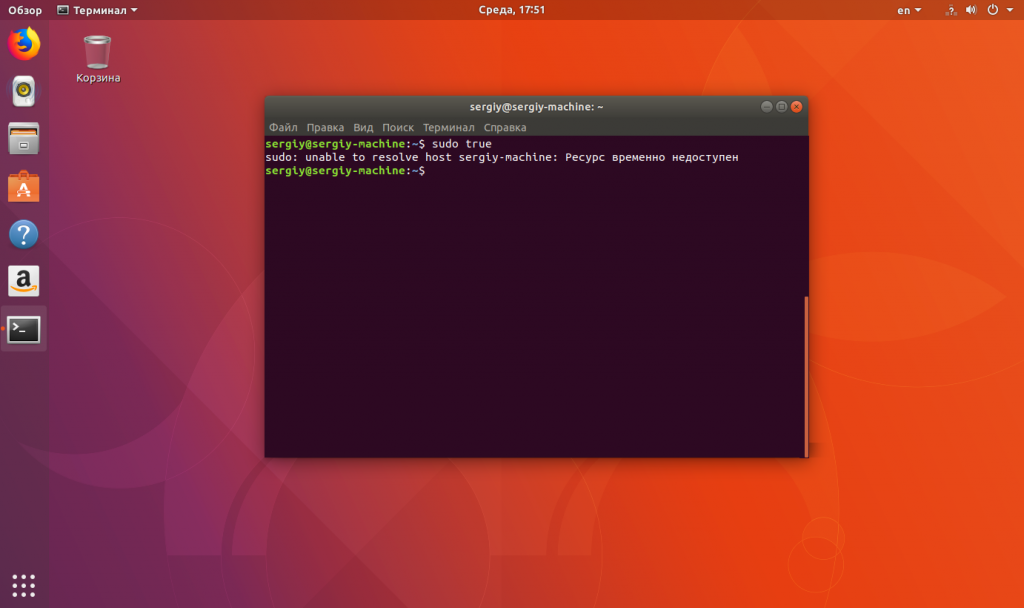
Сообщение «unable to resolve host имя_хоста» означает, что утилита не может определить IP-адрес хоста «имя_хоста«. Казалось бы, sudo — это локальная команда для повышения привилегий в системе, и ей незачем определять IP хостов. Но это не совсем так: sudo может использоваться и удалёнными пользователями, например, подключёнными по SSH, а в самом конфигурационном файле /etc/sudoers уровни доступа различных пользователей настраиваются такой строчкой:
пользователь хост=(другой_пользователь:группа) команды
Подробнее про строку настройки читайте в статье настройка sudo в linux. А сейчас нам интересно, что для каждого запроса утилите нужно определить, какой хост используется на данном компьютере.
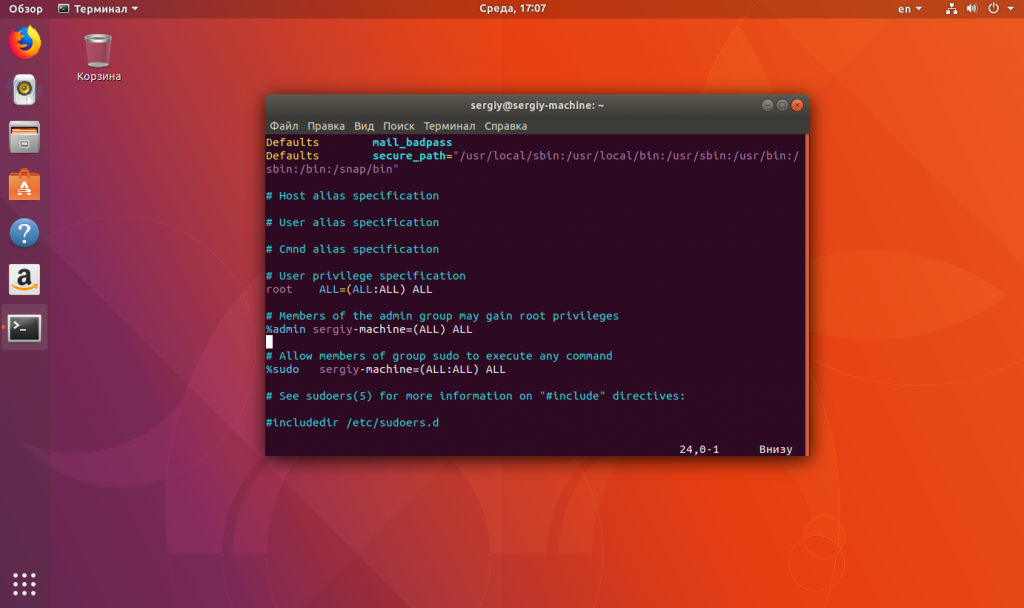
Если кратко, то основная идея разработчиков состоит в том, что один универсальный файл /etc/sudoers будет использоваться на множестве компьютеров и на каждом из них нужно определить, какие правила предназначены для него. Таким образом, переменная host в sudoers влияет только на локальные правила.
А теперь вернёмся к нашей ошибке. Как я уже сказал, она означает, что утилита не может определить IP-адрес «имени хоста». Для домена сайта это означало бы, что такой записи нет в DNS. Но поскольку это имя нашего локального компьютера, то вполне естественно, что его нет в глобальной сети.
Как исправить ошибку
1. Решение проблемы в /etc/hosts
Чтобы исправить ошибку, мы можем добавить такую DNS-запись локально в файл /etc/hosts. Поскольку sudo у вас не работает, а этот файл можно редактировать только от суперпользователя, то эта простая задача становится сложнее. Сначала смотрим наше текущее имя хоста:
hostname
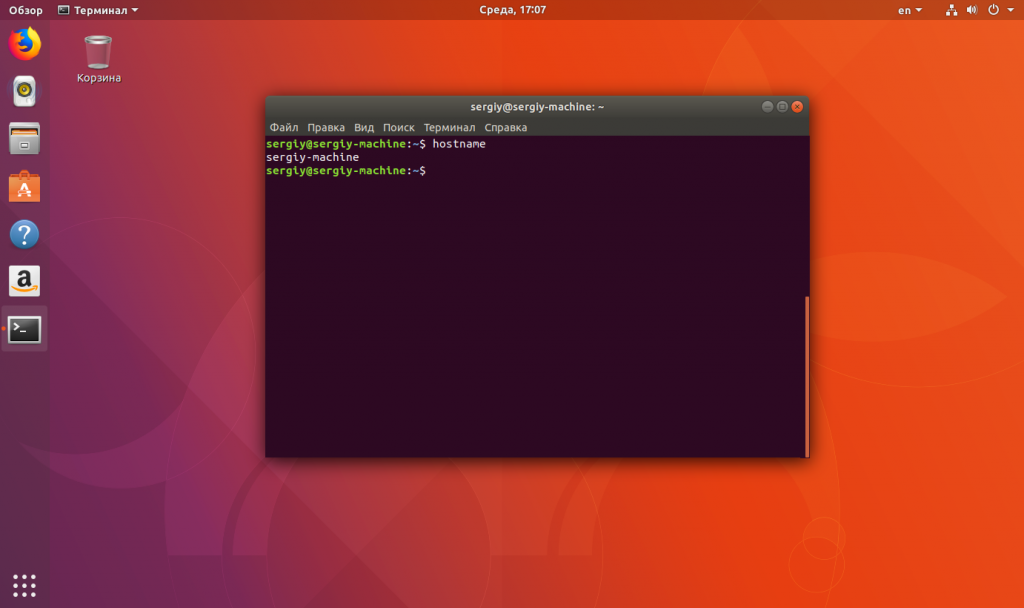
Дальше, если у вас установлен пароль root, вы можете авторизоваться от его имени с помощью su:
su -
А затем добавить такую строчку в /etc/hosts:
vi /etc/hosts
127.0.0.1 имя_хоста
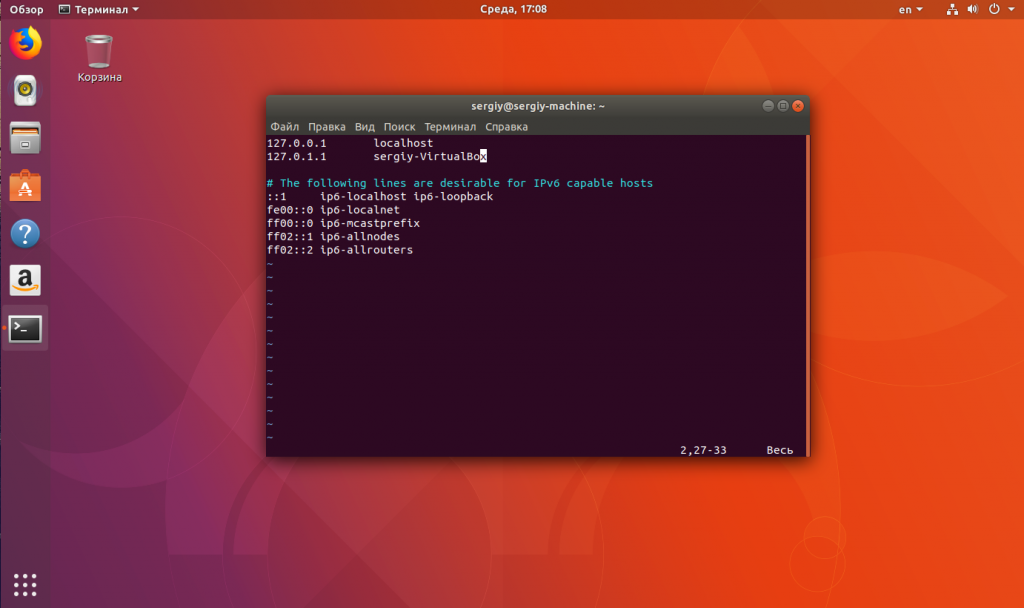
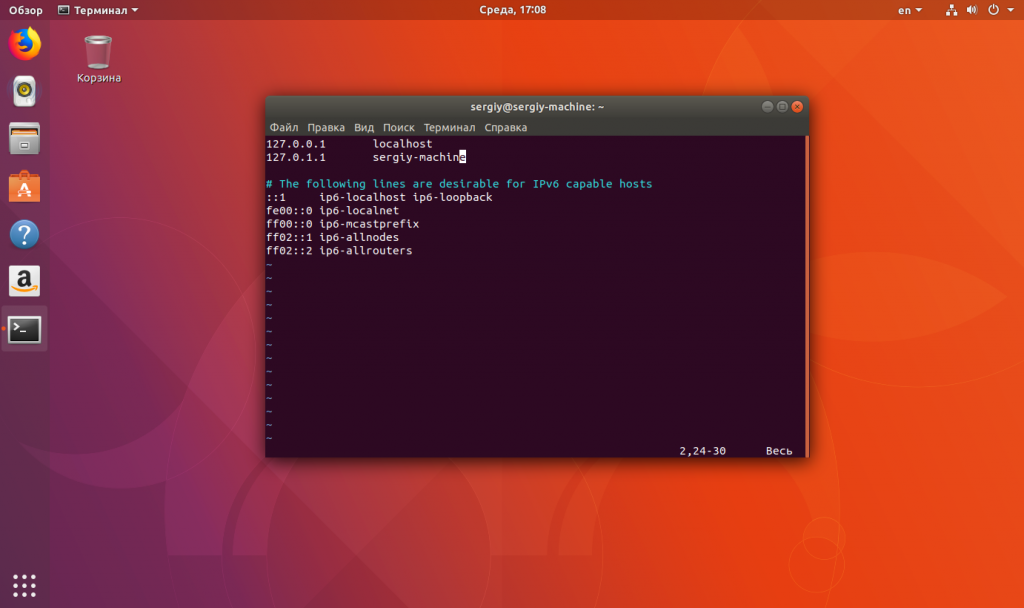
Слова «имя_хоста» надо заменить на то имя хоста, которое вы получили с помощью команды hostname. После этого надо перезапустить компьютер или просто перезапустить сеть:
sudo systemctl restart networking
Ещё желательно убедиться, что в системной службе разрешения доменных имён включено использование файла /hosts. Откройте /etc/nsswitch.conf и найдите в строке hosts слово «files». Оно должно быть на первом месте. Если нет, перенесите его на первое место.
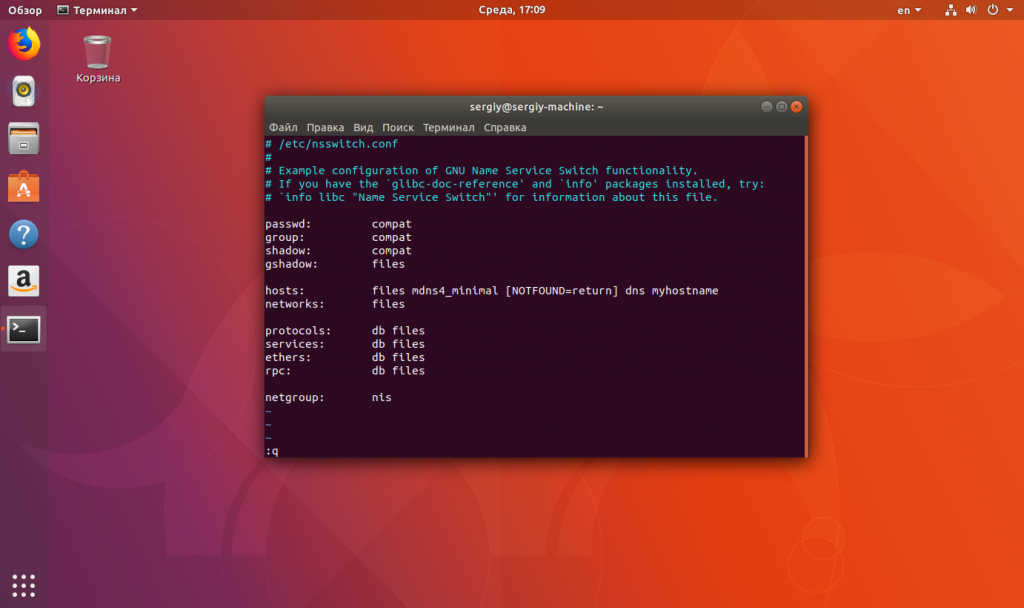
Если же у вас пароль для root не установлен, вам нужно загрузиться с LiveCD, примонтировать корневую файловую систему в /mnt/ и исправлять ошибку уже там.
2. Решение с помощью systemd
Есть ещё один путь. В попытках воспроизвести эту проблему в своей Ubuntu 18.04 я обнаружил, что разрешением доменных имён для локальных приложений занимается служба systemd-resolved. Если она запущена, то даже если в файле /etc/hosts нет имени вашего компьютера, всё будет работать. Поэтому, если вы случайно отключили эту службу, верните её на место и всё заработает:
sudo systemctl start systemd-resolved
sudo systemctl enable systemd-resolved
Выводы
В этой статье мы разобрали, как справиться с ошибкой «sudo cannot to resolve host». Как видите, всё достаточно логично и просто. Если у вас остались вопросы, спрашивайте в комментариях!

Статья распространяется под лицензией Creative Commons ShareAlike 4.0 при копировании материала ссылка на источник обязательна .
Об авторе

Основатель и администратор сайта losst.ru, увлекаюсь открытым программным обеспечением и операционной системой Linux. В качестве основной ОС сейчас использую Ubuntu. Кроме Linux, интересуюсь всем, что связано с информационными технологиями и современной наукой.
When I run sudo the terminal is stuck for a few seconds and then outputs an error message. My terminal looks like this:
ubuntu@(none):~$ sudo true
sudo: unable to resolve host (none)
What can I do to solve it?
asked Aug 31, 2011 at 19:09

Kit SundeKit Sunde
10.8k7 gold badges25 silver badges32 bronze badges
7
Two things to check (assuming your machine is called my-machine, you can change this as appropriate):
-
That the
/etc/hostnamefile contains just the name of the machine. -
That
/etc/hostshas an entry forlocalhost. It should have something like:127.0.0.1 localhost.localdomain localhost 127.0.1.1 my-machine
If either of these files aren’t correct (since you can’t sudo), you may have to reboot the machine into recovery mode and make the modifications, then reboot to your usual environment.

Thomas Ward♦
70.2k29 gold badges172 silver badges235 bronze badges
answered Sep 1, 2011 at 3:26

Jeremy KerrJeremy Kerr
26.3k4 gold badges47 silver badges62 bronze badges
18
Edit /etc/hosts and append your new hostname to the 127.0.0.1 line (or create a new line if you prefer that).
Mine looks like:
127.0.0.1       localhost localhost.localdomain penguin

# The following lines are desirable for IPv6 capable hosts
::1     ip6-localhost ip6-loopback
fe00::0 ip6-localnet
ff00::0 ip6-mcastprefix
ff02::1 ip6-allnodes
ff02::2 ip6-allrouters
Replace penguin in the above example by your new hostname as stated in the /etc/hostname file.

answered Apr 7, 2012 at 13:39

LekensteynLekensteyn
169k64 gold badges308 silver badges398 bronze badges
4
Add your hostname to /etc/hosts like so:
echo $(hostname -I | cut -d -f1) $(hostname) | sudo tee -a /etc/hosts
answered Sep 15, 2014 at 16:03

Collin AndersonCollin Anderson
3,1061 gold badge16 silver badges12 bronze badges
3
Note, this is an answer to this question which has been merged with this one.
Your hostname (dave00-G31M-ES2L) is not represented in /etc/hosts. Add an L to this line:
127.0.1.1 dave00-G31M-ES2
So it becomes:
127.0.1.1 dave00-G31M-ES2L
In order to accomplish this, open a console (press Ctrl+Alt+T) and type:
sudo gedit /etc/hosts
Add the letter L as mentioned, save and exit.
answered Aug 18, 2012 at 11:02

ThorThor
3,38824 silver badges25 bronze badges
5
I had this issue when I was using ubuntu on a VPS. I solved it editing /etc/hosts file.
run this command:
sudo nano /etc/hosts
and then add:
127.0.0.1   localhost.localdomain localhost
127.0.1.1   ubuntu
I hope that will solve your issue 🙂
PS: Remember to reboot your computer!
answered Apr 1, 2013 at 1:18

3
I was having the same issue even though the hostname in my /etc/hostname file and /etc/hosts file matched.
My hostname was «staging_1». It turns out that you can’t have an underscore in your hostname, which is why I was getting this error. Changing the underscore to a hyphen fixed my problem.
answered Aug 13, 2014 at 13:50

Chris.BChris.B
2412 silver badges4 bronze badges
0
In AWS, go to your vpc and turn on «DNS Hostnames».
answered Jan 15, 2015 at 5:15

ErickErick
1271 silver badge2 bronze badges
5
The symptom given in the question may correlate strongly with this more specific problem:
$ hostname --fqdn
hostname: Temporary failure in name resolution
There are different ways that this could be resolved, one of which is to add your hostname as localhost in /etc/hosts (as shown in several other answers). This may be the right thing to do in general, but it isn’t the only possible resolution.
A «fully qualified domain name» may be supplied by an external DNS server or similar (if such is available on your network). In this case, sudo will not complain, despite the missing entry in /etc/hosts.
Note: sudo attempts to dereference the hostname, even though it isn’t necessarily required, due to optional capabilities in the sudoers file. See sudo command trying to search for hostname.
As long as the delay isn’t too long, this error message is typically harmless.
answered Sep 18, 2017 at 22:17

Brent BradburnBrent Bradburn
2,6862 gold badges28 silver badges35 bronze badges
3
Everybody advises to modify /etc/hosts. But in some cases this may not be possible (for example inside a docker container). So, I had to find a better way and I came up with this:
echo "alias sudo='sudo -h 127.0.0.1'" >> ~/.bash_aliases
source ~/.bashrc
Aliases don’t work in bash scripts, but we can use variables: sudo='sudo -h 127.0.0.1'
answered Jul 28, 2018 at 17:24

dashohoxhadashohoxha
3024 silver badges11 bronze badges
I encountered this same error message. I think this discussion thread at AWS Developer Forums is a better solution:
«Go the the VPC management console, select the VPC, click on Actions, select Edit DNS Hostnames and select Yes.»
https://forums.aws.amazon.com/thread.jspa?messageID=699718
answered Feb 13, 2016 at 11:44

user93581user93581
1171 silver badge2 bronze badges
Some terminal emulators will not update prompt with the correct hostname until you close and restart the emulator (lxterminal, I’m talking to you).
I spent 30min fighting with this error after editing my hostname and hosts files and running sudo service hostname restart until I ran sudo hostname and saw that the hostname was the new value, even though the prompt was showning the old value.
answered Jun 19, 2016 at 16:29

dagbeldagbel
611 silver badge1 bronze badge
1
In my case it was the problem, I changed the hostname to man because I wanted to know if there are some parameters you can use on hostname. Instead it changed my hostname to man and I always got the same message like you
sudo: unable to resolve host (none)
after changing the hostname back to `localhost everything worked fine again
hostname localhost
answered Jan 9, 2014 at 22:24

XandruCeaXandruCea
1531 silver badge5 bronze badges
Sorry I can’t help you much but, since it says «can’t resolve host» try running:
hostname
And see if the output is the hostname of the machine. If not, the problem is the host configuration, not sudo.
answered Aug 31, 2011 at 19:16

animaletdesequiaanimaletdesequia
8,2384 gold badges26 silver badges43 bronze badges
3
OP wrote:
It was all in /etc/hostname. On two of our sick servers it looked like
this:ubuntu@(none):~$ cat /etc/hostname linux-web-n ip-10-128-##-##While on a server without this issue we had:
ubuntu@ip-10-128-##-###:~$ cat /etc/hostname
ip-10-128-##-###
Removed the
linux-web-nportion, rebooted and everything was fine.
you might be getting an error if your hosts or hostname file contain illegal characters. Only these symbols are permitted: a-z, A-Z, 0-9
answered Jan 18, 2015 at 3:26

M.G.M.G.
1212 bronze badges
if you can’t sudo you CAN log in as root via su.
IE: su root (in an x-term).
then give the root password when prompted, then you can edit the files with nano. The root password in ‘buntu is the same as the password you would use for sudo.
answered Aug 24, 2016 at 15:07

1
I had this same problem! I changed my VPS’s name through the online admin control panel which did not change the machine name in the hosts file All I did was run:
sudo nano /etc/hosts
Then I edited it from this:
127.0.1.1 Megabyte Megabyte
127.0.0.1 localhost
To this:
127.0.1.1 Debian Debian
127.0.0.1 localhost
and that fixed my error! Hope this helped!
answered Jan 10, 2017 at 2:18

SynthSynth
211 bronze badge
In case your problem is that /etc/hostname file and /etc/hosts, both files have your desired hostname and still your machine is showing the error
sudo: unable to resolve host
Try, forcing the hostname
sudo hostname -F /etc/hostname
You will probably still get the same error, but try logging out and logging back in. It worked for me.
answered May 21, 2019 at 6:45

I had the same problem. I solved it by editing the /etc/hosts and /etc/hostname files… on the /etc/hosts file, just edit the top part as shown below.
#vi /etc/hosts
    127.0.0.1   localhost
    127.0.1.1   localhost  myhostname


#vi /etc/hostname
    myhostname

muru
188k50 gold badges459 silver badges709 bronze badges
answered Mar 26, 2016 at 17:53

CentyCenty
211 bronze badge
2
If you are using Vagrant, then login into the guest and run
apt-get --no-install-recommends install virtualbox-guest-utils
answered Jul 13, 2017 at 7:27

tanmoytanmoy
1011 silver badge4 bronze badges
Это краткая статья покажет вам, как исправить ошибку ‘sudo: unable to resolve host’ в Ubuntu или любом другом дистрибутиве Linux.
Мы забыли дать ему разумное имя, поэтому через несколько дней мне пришлось изменить имя хоста и дать ему лучшее имя. Теперь он называется test-server, потому что для этого он и используется.
Мы создали пользователя sudo, потому что мы не рекомендуем все время быть пользователем root, особенно когда работаете со своей системой.
Когда мы начали использовать команды с sudo, то увидели странную ошибку в выводе команд:
Ошибка
sudo: unable to resolve host
Команда без проблем запускалась с sudo, но это сообщение об ошибке все равно отображалось.
Исправление sudo: unable to resolve host
Основная причина ошибки была связана с изменением имени хоста. Позвольте нам показать вам, как исправить эту проблему, чтобы устранить ошибку имени хоста.
Сначала проверьте имя хоста вашей системы с помощью команды hostname. В нашем случае имя хоста – тест-сервер.
$hostname
test-server
Имя хоста берется из файла /etc/hostname.
cat /etc/hostname
test-server
То же имя хоста должно быть указано в файле /etc/hosts. Но в нашем случае (и мы думаем, что и в вашем случае) это имя хоста отсутствовало в файле /etc/hosts, как вы можете видеть в выходных данных ниже:
127.0.0.1 localhost
The following lines are desirable for IPv6 capable hosts
::1 ip6-localhost ip6-loopback
fe00::0 ip6-localnet
ff00::0 ip6-mcastprefix
ff02::1 ip6-allnodes
ff02::2 ip6-allrouters
ff02::3 ip6-allhosts
Поскольку он здесь отсутствует, система не может определить имя хоста и, таким образом, выдает ошибку ‘sudo: unable to resolve host’.
Чтобы исправить это, отредактируйте этот файл и добавьте новую строку и установите адрес обратной связи с именем хоста. Вы можете использовать редактор Vim для редактирования файлов в командной строке.
127.0.0.1 <hostname>
Итак, теперь наш файл /etc/hosts выглядит так:
127.0.0.1 localhost
127.0.0.1 test-server
The following lines are desirable for IPv6 capable hosts
::1 ip6-localhost ip6-loopback
fe00::0 ip6-localnet
ff00::0 ip6-mcastprefix
ff02::1 ip6-allnodes
ff02::2 ip6-allrouters
ff02::3 ip6-allhosts
Совет
Если старое имя хоста все еще присутствует в вашем файле /etc/hosts, вы должны заменить их новым именем хоста.
Сразу после добавления вышеупомянутой строки ошибка ‘sudo: unable to resolve host’ исчезла.
Мы надеемся, что этот быстрый маленький совет помог вам исправить эту раздражающую ошибку. Дайте нам знать, работает это у вас или нет в разделе комментариев.
Если вы нашли ошибку, пожалуйста, выделите фрагмент текста и нажмите Ctrl+Enter.
To test the tutorials on Linux Handbook, I created a new server on UpCloud, my favorite cloud server provider with blazing fast SSD. My Ubuntu 18.04 server was ready within minutes.
I forgot to give it a reasonable name so a few days later, I had to change the hostname and gave it a better name. Now it’s called test-server because that’s what it is used for.
I created a sudo user because I prefer not to be root all the time, specially when I am tinkering with my system.
When I started using commands with sudo, I saw a strange error in the output of the commands:
sudo: unable to resolve host test-server
The command ran with sudo without any problem but this error message was displayed anyway.
Fix sudo: unable to resolve host
The root cause of the error was actually related to the hostname changing. Let me show you how to fix this unable to resolve hostname error.
First, check the hostname of your system with hostname command. In my case, the hostname is test-server.
$hostname
test-server
The hostname is taken from /etc/hostname file.
cat /etc/hostname
test-server
The same hostname should be listed in the /etc/hosts file as well. But in my case (and I guess in your case as well) this hostname was missing from the /etc/hosts file as you can see in the output below:
127.0.0.1 localhost
The following lines are desirable for IPv6 capable hosts
::1 ip6-localhost ip6-loopback
fe00::0 ip6-localnet
ff00::0 ip6-mcastprefix
ff02::1 ip6-allnodes
ff02::2 ip6-allrouters
ff02::3 ip6-allhosts
Since it is missing from here, the system is not able to figure out the hostname and thus it throws the error ‘sudo: unable to resolve host’.
To fix this, edit this file and add a new line and set the loopback address with the hostname. You can use Vim to edit files in command line.
127.0.0.1 <hostname>So now, my /etc/hosts file looks like this:
127.0.0.1 localhost
127.0.0.1 test-server
The following lines are desirable for IPv6 capable hosts
::1 ip6-localhost ip6-loopback
fe00::0 ip6-localnet
ff00::0 ip6-mcastprefix
ff02::1 ip6-allnodes
ff02::2 ip6-allrouters
ff02::3 ip6-allhostsTip: If the old hostname is still present anywhere in your /etc/hosts file, you should replace them with the new hostname.
Immediately after adding the above mentioned line, ‘sudo: unable to resolve host’ error disappeared. I didn’t even need to reboot my Ubuntu server.
I hope this quick little tip helped you to fix this irritating error. Let me know if it worked for you or not in the comment section.

Creator of Linux Handbook and It’s FOSS. An ardent Linux user & open source promoter. Huge fan of classic detective mysteries from Agatha Christie and Sherlock Holmes to Columbo & Ellery Queen.
To totally unlock this section you need to Log-in
The error/warning defined in the subject of this article usually can be shown while using, for example, the apt-get tool on Ubuntu/Debian Linux distribution. This could happen after we have (finally) decided to change the hostname of our Linux system giving it a better name. Let’s say that wow it’s called test-server because that is we will use it for. Now, a common scenario would be that, after creating a sudo user because we do not prefer not to be root all the time, we start using commands with sudo, but at some point we see a strange error in the output of the commands:
unable to resolve host {your_hostname}: Name or service not known
The command run with sudo without any problem but this error message will be displayed anyway.
The Fix
The root cause of the error is actually related to the hostname changing. Let’s now show how to fix this unable to resolve hostname error. First, check the hostname of your system with hostname command. For example, let’s say that the hostname is test-server.
$hostname
test-server
The hostname is taken from /etc/hostname file.
cat /etc/hostname
test-server
The same hostname should be listed in the /etc/hosts file as well. But in our case (and basically in all the cases in which this error appears) the new hostname will miss in the /etc/hosts file as you can see in the output below:
127.0.0.1 localhost
The following lines are desirable for IPv6 capable hosts
::1 ip6-localhost ip6-loopback
fe00::0 ip6-localnet
ff00::0 ip6-mcastprefix
ff02::1 ip6-allnodes
ff02::2 ip6-allrouters
ff02::3 ip6-allhosts
Since it is missing from here, the system is not able to figure out the hostname and thus it throws the error sudo: unable to resolve host or unable to resolve host {your_hostname}: Name or service not known while using apt-get.
To fix this, edit this file and add a new line and set the loopback address with the new hostname (or just replace the old hostname with the new one). You can use Vim or Nano to edit files in command line.
127.0.0.1 <hostname>
So now, our /etc/hosts file looks like this:
127.0.0.1 localhost
127.0.0.1 test-server
The following lines are desirable for IPv6 capable hosts
::1 ip6-localhost ip6-loopback
fe00::0 ip6-localnet
ff00::0 ip6-mcastprefix
ff02::1 ip6-allnodes
ff02::2 ip6-allrouters
ff02::3 ip6-allhosts
Again, if the old hostname is still present anywhere in your /etc/hosts file, you should replace them with the new hostname (it is recommended).
Immediately after adding the above mentioned line, sudo: unable to resolve host or unable to resolve host {your_hostname}: Name or service not known errors will disappear.

Summary
Article Name
Unable to resolve host {hostname}: Name or service not known (Linux)
Description
The «Unable to resolve host» on Linux systems, while using sudo or apt-get on Terminal or on headless configurations could be annoying. The fix for this kind of scenario is simple and involves the system hostname.
Author
Publisher Name
Heelpbook.net
I launched a new aws instance. My private ip is ip-10-0-xx-xx as per amazon console. Everytime when I do a sudo command, I get the following error
sudo: unable to resolve host ip-10-0-xx-xx
How can I rectify this error?
asked Oct 30, 2015 at 17:40

3
This issue is caused by not enabling enableDnsHostnames in your VPC configuration.
enableDnsHostnamesIndicates whether the instances launched in the VPC get DNS hostnames. If this attribute is true, instances in the VPC get DNS hostnames; otherwise, they do not. If you want your instances to get DNS hostnames, you must also set the
enableDnsSupportattribute to true.
http://docs.aws.amazon.com/AmazonVPC/latest/UserGuide/vpc-dns.html#vpc-dns-updating
answered Oct 30, 2015 at 18:52

Michael — sqlbotMichael — sqlbot
164k23 gold badges327 silver badges407 bronze badges
13
This worked for me:
Add the following line to /etc/hosts
127.0.0.1 ip-xxx-xx-x-xx
The ip thing is your private ip address
answered Mar 7, 2016 at 23:14

SamAkoSamAko
3,3656 gold badges39 silver badges74 bronze badges
Can patch easily from command line as follows:
sudo sed -i /etc/hosts -e "s/^127.0.0.1 localhost$/127.0.0.1 localhost $(hostname)/"
And checked that a reboot, or stop, then start the aws instance would preserve it.
In case it is lost, can easily re-apply on boot, and can be added to any provision for new vms.
Example
Before:
ubuntu@ip-177-11-22-333:~$ sudo id
sudo: unable to resolve host ip-177-11-22-333
uid=0(root) gid=0(root) groups=0(root)
Fix:
ubuntu@ip-177-11-22-333:~$ sudo sed -i /etc/hosts -e "s/^127.0.0.1 localhost$/127.0.0.1 localhost $(hostname)/"
sudo: unable to resolve host ip-177-11-22-333
After:
ubuntu@ip-177-11-22-333:~$ sudo id
uid=0(root) gid=0(root) groups=0(root)
ubuntu@ip-177-11-22-333:~$
answered Mar 3, 2017 at 9:44

arntgarntg
1,49714 silver badges12 bronze badges
enableDnsHostnames as described in Michael’s comment is one prerequisite. The other is having your VPC’s DHCP option set configured correctly. The problem you are coming up against is caused by search line missing from your /etc/resolv.conf ; it will be put in there at the time of DHCP assignment if you set domain-name of your DHCP option set appropriately. Read the linked AWS doc.
answered May 31, 2016 at 23:22

m.kocikowskim.kocikowski
5,3322 gold badges23 silver badges9 bronze badges
2
Two Options:
-
Enabling the DNS hostnames for your VPC, so all the instances launched within the VPC will resolve the host
-
Edit /etc/hosts and add the below line
127.0.0.1 localhost
123.0.0.1 ip-10-0-1-18 ## (Replace with the private ip)
This is something you will need to do for every instance that will be launch within your VPC.

Stephen Rauch♦
46.6k31 gold badges109 silver badges131 bronze badges
answered Feb 9, 2018 at 3:06

MaheshMahesh
811 silver badge1 bronze badge
Add the following line to /etc/hosts
127.0.0.1 localhost
127.0.0.1 ip-xxx-xx-x-xx
The ip thing is your private ip address
Please also don’t forget to reboot the instance after editing these
answered Sep 10, 2020 at 10:42

I recently faced the same issue even though DSN was enabled in VPC.
I reviewed EC2 instances and found that my storage usage was 99%. So I truncated log files and cleaned up.
Afterwards, I rebooted it and everything worked fine.
answered Jul 19, 2022 at 17:55

Bhavesh OdedraBhavesh Odedra
10.8k12 gold badges32 silver badges59 bronze badges
My issue was caused by an invalid DHCP Options set (in the VPC console). The default one that you typically want looks like this:
domain-name = ec2.internal
domain-name-servers = AmazonProvidedDNS
Somehow, my domain-name got changed to us-east-1.compute.internal, which resulted in the sudo: unable to resolve host ip-10-0-xx-xx warning every time I ran sudo. Changing back to the DHCP options above fixed it.
answered Mar 23, 2018 at 1:43

Yevgeniy BrikmanYevgeniy Brikman
8,3935 gold badges44 silver badges60 bronze badges
I’ve had a similar case to @bhavesh-odedra’s. My storage usage was 100%, I extended it to 5Gb more, restarted instance with sudo reboot and after that I started getting this error.
I checked disk usage with sudo df -h and found out that my Ubuntu system is not aware of extended storage. Rebooting again did not help.
I checked answers on this page. DNS hostname was Enabled in AWS VPC configs. Then I added private IP to /etc/hosts — it did not help too.
After some time and I decided to reboot instance using AWS console (not sudo reboot). I don’t know whether AWS console informed my system that new storage is ready for use or something else happened, but then with sudo df -h I’ve convinced that my new storage space was in use. After that the error disappeared.
answered Nov 3, 2022 at 9:12

egvoegvo
1,20114 silver badges24 bronze badges
1
Run the following command;
sudo su -
and work as root. Then the start command will work.

RobC
21.7k20 gold badges66 silver badges75 bronze badges
answered Nov 14, 2019 at 9:52
