При попытке в очередной раз запустить игру CS:GO многие на своих экрана видят ошибку: «FATAL ERROR Failed to connect with local Steam Client process». Что же делать при этом — вы узнаете из инструкций далее.
Содержание
- Что делать для решения ошибки FATAL ERROR в игре КС ГО
- Проверка файлов Стим при ошибке «FATAL ERROR Failed to connect with local Steam Client process»
- Установка необходимых компонентов для CS:GO
- Проверка ПК на вирусы при возникновении уведомления «FATAL ERROR» в Steam
- Видео-инструкция
Что делать для решения ошибки FATAL ERROR в игре КС ГО
Это достаточно распространённая ошибка, которая решается несколькими способами, включая простые и не очень. Для начала вам нужно просто закрыть все программы, которые сейчас могут быть запущены и перезагрузить свой компьютер. Проверьте, возможно ошибку удалось уже решить.
Если нет, нужно отключить приложения в автозагрузке, которые могут мешать игре работать.
Запуск диспетчера задач выполняется следующим образом:
- В Windows 10 следует нажать ПКМ по панели внизу и выбрать соответствующий пункт. В Windows 7 требуется запустить окно «Выполнить» и записать команду «msconfig». И нажать на вкладку «Автозагрузка»;
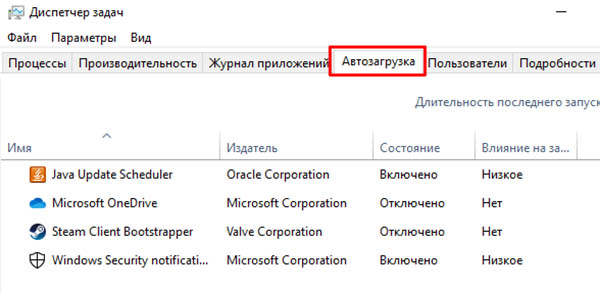
- Это список программ, которые начинают работать после включения компьютера и могут быть причиной сбоя не только в CS:GO. Каждую из программ здесь (кроме антивируса) нужно выключить. Для этого выберите её мышью и найдите пункт «Отключить»;
- Окно диспетчера больше не понадобится. Снова перезагрузите ПК и запустите CS:GO. Ошибка должна пропасть.
Если вы запускаете пиратку без Стима, нужно нажать по иконке игры ПКМ и выбрать «От имени администратора». Если запускается официальная игра через Steam, то магазин нужно открывать также с повышенными привилегиями.
Проверка файлов Стим при ошибке «FATAL ERROR Failed to connect with local Steam Client process»
Файлы игры могли быть нарушены в результате системного сбоя. Это часто происходит при внезапном обесточивании модулей ПК. Или в результате воздействия другого ПО, вирусов. Чтобы определить, что ошибка в игре появляется по этой причине, нужно выполнить проверку целостности данных в игровом магазине Steam.
Что делать для этого:
- Запускаем клиент магазина или открываем его веб-версию;
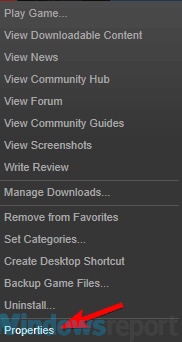
- Перейдите в свою библиотеку и выберите игру в списке слева ПКМ, нажав пункт «Свойства»;
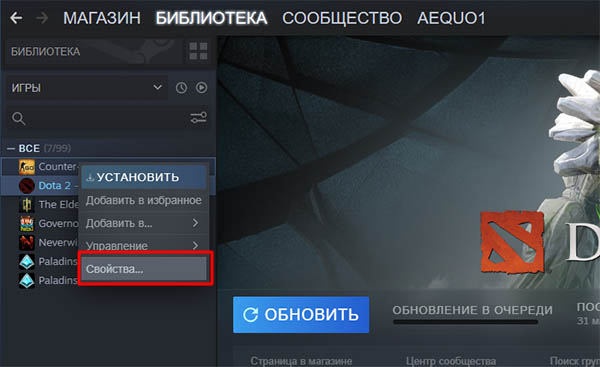
Выберите пункт «Свойства» в Стим - В новом окне найдите вверху переключатель «Локальные файлы»;
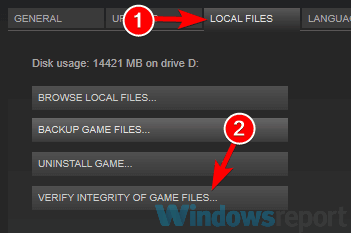
- А ниже в параметрах пункт «Проверить целостность»;

- Подтвердите проверку и дождитесь её завершения.
При ошибке «FATAL ERROR» данное действие должно помочь устранить её. Также часто рекомендуется полностью удалить игру с компьютера и заново установить. Но пока такие действия выполнять рано. Следует протестировать запуск игры без Steam клиента. Есть ещё другие способы решить данную проблему, о которых вы сейчас узнаете.
Установка необходимых компонентов для CS:GO
Данная игра, как и любая другая требует в компьютере с Windows наличия определённых компонентов, таких как Visual C++, DirectX и др. Ошибка по причине отсутствия их довольно сложно определяема в ПК. Но вы можете сами убедиться в наличие компонента Visual C++ в системе.
Для этого нужно открыть список установленных программ:
- Для всех версий Виндовс это можно сделать следующим образом: нажмите на клавиши WIN+PAUSE и выберите вверху «Панель управления»;
- Далее в перечне параметров выберите пункт «Удаление программ»;

- В списке приложений для игры CS:GO должны быть среди установленных Visual C++ 2013 и Visual C++ 2015;
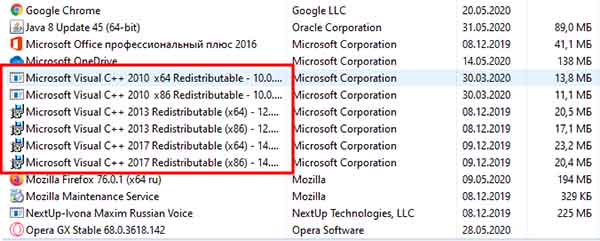
- Для проверки версии .NET Framework откройте проводник (WIN+E) и в адресной строке введите %windir%Microsoft.NETFramework. Среди установленных должны быть версии 3.5 и 4;

- Если необходимо обновить компонент .NET Framework, откройте и загрузите универсальный установщик.
Необходимые компоненты Visual C++ для игры находятся здесь. Их установка и использование бесплатны для всех. Когда они будут установлены, нужно перезагрузить ПК и вновь испытать удачу — запустить лаунчер игры. Не забудьте делать это от имени администратора, тогда ошибка «FATAL ERROR Failed to connect with local Steam Client process» может полностью исчезнуть.
Это может быть полезным: Коды для The Walking Zombie 2, секретный ящик.
Проверка ПК на вирусы при возникновении уведомления «FATAL ERROR» в Steam
Если до этого момента вам не удалось избавиться от сообщения с ошибкой, значит пора переходить к проверке системы на вирусы. Это можно сделать при помощи антивируса, который установлен в вашем компьютере.
Для Windows 10 проверку можно запустить встроенным средством — при помощи Защитника:
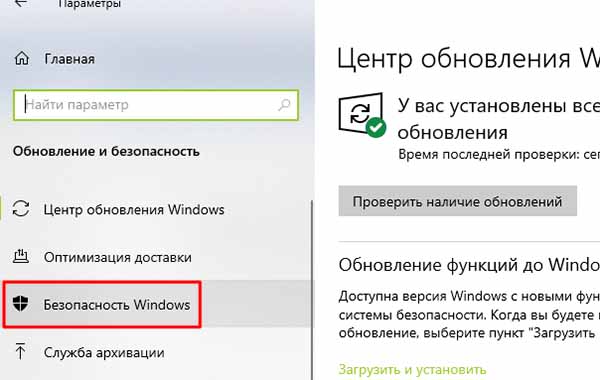
- Нажмите WIN+I и выберите пункт «Безопасность»;
- Слева в меню нужно нажать на «Безопасность Windows» и слева «Открыть службу безопасности»;
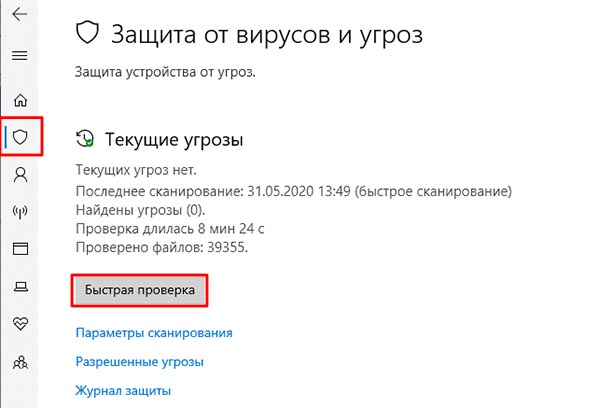
- Слева нужно выбрать иконку щита и в главном окне кнопку «Быстрая проверка».
Создатели вирусов пиратского ПО уже научились обходить защитные системы от компании Microsoft, которые встроены в их продукты. Но не удаётся им перехитрить создателей сторонних антивирусов, таких как AVG, Avast, Avira и прочих. Если вы посетите сайты этих разработчиков, то найдёте бесплатные одноразовые утилиты для сканирования своего ПК. Это отличный способ выявить проблемы с защитой и избавиться от вирусов. Обязательно проведите чистку памяти временных файлов на компьютере.
Видео-инструкция
Владелец данного видео рассказал, что делать, чтобы избавиться от ошибки «FATAL ERROR Failed to connect with local Steam Client process» в КС ГО.
Огромное множество игроков по всему миру страдают от ошибки «Fatal Error failed to connect to local steam client process» при попытке запустить Counter Strike Global Offensive. Они нажимают на Играть в клиенте «Steam», но, вместо ожидаемого запуска, на экране монитора появляется указанная ошибка.
Давайте же посмотрим, что вы можете сделать, дабы исправить ошибку «Fatal Error failed to connect to local steam client process» при запуске CS GO.
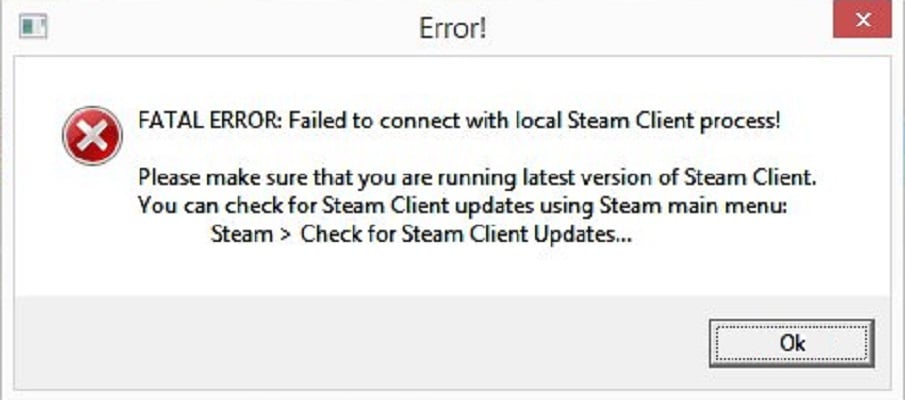
Исправляем ошибку «Fatal Error failed to connect to local steam client process»
Итак, давайте же попытаемся исправить эту проблему. Мы рекомендуем вам выполнить все методы, которые будут описаны здесь, даже если те покажутся вам бессмысленными.
- Перезапуск клиента Steam. Первым делом, попробуйте перезапустить свой работающий клиент Steam. Закройте его, а также убедитесь, что после его закрытия не остается каких-то работающих процессов: сделать это можно с помощью Диспетчера задач, открываемого нажатием правой кнопки мыши на панели Пуск и выбором соответствующего пункта.
- Проверка целостности файлов игры. Если перезапуск клиента Steam не помог вам избавиться от ошибки Fatal Error failed to connect to local steam client process» при запуске CS GO, то можно попытаться выполнить проверку целостности файлов игры. Найдите в своей Библиотеке игр CS GO, нажмите на нее правой кнопкой мыши и кликните «Свойства». Перейдите во вкладку «Локальные файлы» и нажмите на «Проверить целостность файлов игры…». Дождитесь окончания процесса проверки(возможно, будут повторно загружены какие-то файлы), а затем снова попробуйте запустить CS GO.
- Переустановка клиента Steam. ОК, если вы так и не смогли избавиться от ошибки «Fatal Error failed to connect to local steam client process» при запуске CS GO, то пора переходить к более тяжелым мерам, а именно к переустановке Steam. Воспользуйтесь «Программы и компоненты» для удаления Steam, а затем за установите клиент повторно с официального сайта Valve. Как только загрузите и установите Steam еще раз, снова попробуйте проверить наличие ошибки «Fatal Error failed to connect to local steam client process» при запуске CS GO.
- Запуск Steam от имени Администратора. Некоторые пользователи утверждают, что данную проблему можно решить с помощью запуска Steam через Администраторские привилегии. Пройдите в директорию, где вы установили клиент Steam. Найдите там исполнительный файл steam.exe, нажмите на него правой кнопкой мыши и выберите «Запустить от имени Администратора». Затем попробуйте запустить CS GO.
- Отключение брандмауэра и антивируса. Данный способ зарекомендовал себя как один из самых эффективных по борьбе с ошибкой «Fatal Error failed to connect to local steam client process» при запуске CS GO. Если у вас есть сторонний антивирус, то попробуйте отключить его защиту во время запуска игры. Многие пользователи утверждают, что причиной данной проблемы являлся именно антивирус. Если же и это не помогло, то можете попробовать отключить системный Защитник Windows. Также стоит испытать удачу с отключением Брандмауэра Windows: возможно, он заблокировал сетевое соединение, создаваемое запуском игры, после чего и появилась ошибка «Fatal Error failed to connect to local steam client process».
by Matthew Adams
Matthew is a freelancer who has produced a variety of articles on various topics related to technology. His main focus is the Windows OS and all the things… read more
Updated on January 18, 2023
- The error message Fatal error failed to connect with local Steam Client process might appear due to corrupted or missing game files.
- Sometimes, while launching CS:GO, the failed to connect with local steam client message pops up.
- To fix this Steam fatal error, verify the integrity of game files for those games that aren’t launching.
- Force-closing Steam or using a beta account are also handy solutions to get you back in the game.
XINSTALL BY CLICKING THE DOWNLOAD FILE
This software will repair common computer errors, protect you from file loss, malware, hardware failure and optimize your PC for maximum performance. Fix PC issues and remove viruses now in 3 easy steps:
- Download Restoro PC Repair Tool that comes with Patented Technologies (patent available here).
- Click Start Scan to find Windows issues that could be causing PC problems.
- Click Repair All to fix issues affecting your computer’s security and performance
- Restoro has been downloaded by 0 readers this month.
The Fatal error failed to connect error message pops up for some Steam users when they try to launch games.
The error message states: Fatal error failed to connect with local Steam Client process. Please make sure that you are running the latest version of Steam.
That error usually occurs for Valve games, such as Counter-Strike and Team Fortress 2. Those games don’t launch when the Fatal error failed to connect error message pops up.
So let’s explore how to easily fix this error that blocks your access to your favorite games.
How can I fix failed to connect with local steam client process?
- How can I fix failed to connect with local steam client process?
- 1. Verify game files
- 2. Log out and back in to Steam
- 3. Close Steam via Task Manager
- 4. Switch to a Steam Beta account
- 5. Check for Steam updates
1. Verify game files
- Open the Steam client software.
- Select the Library tab in Steam.
- Right-click the game that doesn’t launch and select Properties.
- Click the Local Files tab.
- Then select the Verify Integrity of Game Files option.
2. Log out and back in to Steam

- Open the Steam window.
- Click the Steam menu at the top left of the software’s window.
- Select the Change user option.
- Press the Logout button to provide further confirmation.
- A Steam Login window will then open from which users can enter their account details to log back in.
If the error pertains to a user’s Steam account, logging out of Steam and then back in might just fix it.
And this is a surprisingly straightforward resolution that some users have said fixes the Failed to connect with local Steam client process error.
3. Close Steam via Task Manager
- Right-click the Taskbar and select Task Manager.
- Then select Steam Client on the Processes tab.
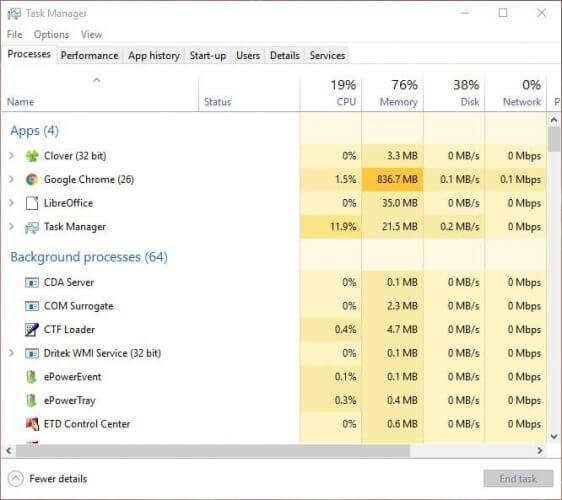
- Press the End task button to terminate Steam.
- In addition, select all other Steam processes listed on the Processes tab (if any) and click End task.
- Thereafter, restart the Steam software.
- Some users might also need to restart Steam with admin rights by right-clicking the software’s shortcut icon and selecting Run as administrator on the context menu.
Note that users who successfully used this solution also closed the gaming client, and all other Steam processes, with Task Manager.
- Motherboard is Not Getting Power: How to Force It?
- iTunes Won’t Launch on Windows 10: Why & How to Fix
- How to Get Active Directory Users and Computers in Windows 11
- How To Remove Airplane Mode In Laptop [Step-By-Step]
4. Switch to a Steam Beta account
- Launch the Steam client.
- Click the Steam menu, and select the Settings option from there.
- Click Account on the left of the Settings window.
- Press the Change button.
- Select the Steam Beta Update option on the Beta participation drop-down menu.
- Select the OK option.
- Then restart Steam as prompted.
Some PC issues are hard to tackle, especially when it comes to corrupted repositories or missing Windows files. If you are having troubles fixing an error, your system may be partially broken.
We recommend installing Restoro, a tool that will scan your machine and identify what the fault is.
Click here to download and start repairing.
Don’t worry! A beta account gets all the latest updates before it rolls out to non-beta users.
5. Check for Steam updates
The error message states, Please make sure that you are running the latest version of Steam. Thus, the error message drops a hint for users to update Steam.
You can check for updates by clicking Steam and File. Then select the Check for Steam Client Update option.
Reinstalling Steam is another way users can update the software. Then users can get the most update Steam version from the software’s website before reinstalling.
However, you will need to copy the Steamapps folder to another directory to preserve their game data when uninstalling.
- Press the Windows key + E keyboard shortcut to open File Explorer.
- Open the Steam game folder in File Explorer. The default path for that folder is C:Program FilesSteam.
- Then select the Steamapps subfolder, and press the Copy to button.
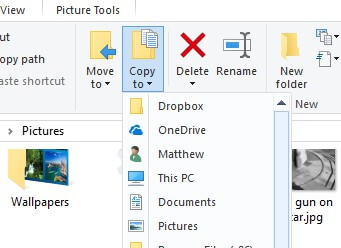
- Select a folder to copy Steamapps to.
- Thereafter, uninstall Steam by pressing the Windows key + R, entering appwiz.cpl, in Run, and clicking OK.
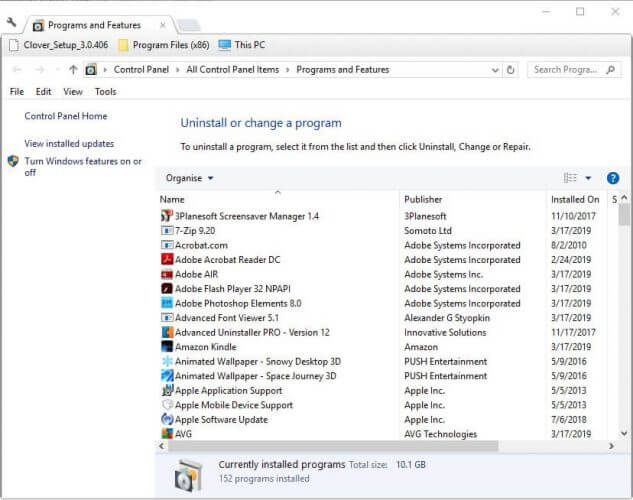
- Then select Steam, and click the Uninstall or Change/Remove button.
- Restart Windows after removing Steam.
- Thereafter, click Install Steam on the software’s website to download the installer for the latest version. Open the setup wizard to add Steam to Windows.
- Move the copied Steamapps subfolder back into the Steam folder after reinstalling the gaming client.
Those are some of the resolutions that players have confirmed to fix the Fatal error failed to connect error.
As such, the above resolutions will probably fix the error for most users so that they can play Valve games on Steam again.
Still having issues? Fix them with this tool:
SPONSORED
If the advices above haven’t solved your issue, your PC may experience deeper Windows problems. We recommend downloading this PC Repair tool (rated Great on TrustPilot.com) to easily address them. After installation, simply click the Start Scan button and then press on Repair All.

Newsletter
by Matthew Adams
Matthew is a freelancer who has produced a variety of articles on various topics related to technology. His main focus is the Windows OS and all the things… read more
Updated on January 18, 2023
- The error message Fatal error failed to connect with local Steam Client process might appear due to corrupted or missing game files.
- Sometimes, while launching CS:GO, the failed to connect with local steam client message pops up.
- To fix this Steam fatal error, verify the integrity of game files for those games that aren’t launching.
- Force-closing Steam or using a beta account are also handy solutions to get you back in the game.
XINSTALL BY CLICKING THE DOWNLOAD FILE
This software will repair common computer errors, protect you from file loss, malware, hardware failure and optimize your PC for maximum performance. Fix PC issues and remove viruses now in 3 easy steps:
- Download Restoro PC Repair Tool that comes with Patented Technologies (patent available here).
- Click Start Scan to find Windows issues that could be causing PC problems.
- Click Repair All to fix issues affecting your computer’s security and performance
- Restoro has been downloaded by 0 readers this month.
The Fatal error failed to connect error message pops up for some Steam users when they try to launch games.
The error message states: Fatal error failed to connect with local Steam Client process. Please make sure that you are running the latest version of Steam.
That error usually occurs for Valve games, such as Counter-Strike and Team Fortress 2. Those games don’t launch when the Fatal error failed to connect error message pops up.
So let’s explore how to easily fix this error that blocks your access to your favorite games.
How can I fix failed to connect with local steam client process?
- How can I fix failed to connect with local steam client process?
- 1. Verify game files
- 2. Log out and back in to Steam
- 3. Close Steam via Task Manager
- 4. Switch to a Steam Beta account
- 5. Check for Steam updates
1. Verify game files
- Open the Steam client software.
- Select the Library tab in Steam.
- Right-click the game that doesn’t launch and select Properties.
- Click the Local Files tab.
- Then select the Verify Integrity of Game Files option.
2. Log out and back in to Steam
- Open the Steam window.
- Click the Steam menu at the top left of the software’s window.
- Select the Change user option.
- Press the Logout button to provide further confirmation.
- A Steam Login window will then open from which users can enter their account details to log back in.
If the error pertains to a user’s Steam account, logging out of Steam and then back in might just fix it.
And this is a surprisingly straightforward resolution that some users have said fixes the Failed to connect with local Steam client process error.
3. Close Steam via Task Manager
- Right-click the Taskbar and select Task Manager.
- Then select Steam Client on the Processes tab.
- Press the End task button to terminate Steam.
- In addition, select all other Steam processes listed on the Processes tab (if any) and click End task.
- Thereafter, restart the Steam software.
- Some users might also need to restart Steam with admin rights by right-clicking the software’s shortcut icon and selecting Run as administrator on the context menu.
Note that users who successfully used this solution also closed the gaming client, and all other Steam processes, with Task Manager.
- Motherboard is Not Getting Power: How to Force It?
- iTunes Won’t Launch on Windows 10: Why & How to Fix
- How to Get Active Directory Users and Computers in Windows 11
4. Switch to a Steam Beta account
- Launch the Steam client.
- Click the Steam menu, and select the Settings option from there.
- Click Account on the left of the Settings window.
- Press the Change button.
- Select the Steam Beta Update option on the Beta participation drop-down menu.
- Select the OK option.
- Then restart Steam as prompted.
Some PC issues are hard to tackle, especially when it comes to corrupted repositories or missing Windows files. If you are having troubles fixing an error, your system may be partially broken.
We recommend installing Restoro, a tool that will scan your machine and identify what the fault is.
Click here to download and start repairing.
Don’t worry! A beta account gets all the latest updates before it rolls out to non-beta users.
5. Check for Steam updates
The error message states, Please make sure that you are running the latest version of Steam. Thus, the error message drops a hint for users to update Steam.
You can check for updates by clicking Steam and File. Then select the Check for Steam Client Update option.
Reinstalling Steam is another way users can update the software. Then users can get the most update Steam version from the software’s website before reinstalling.
However, you will need to copy the Steamapps folder to another directory to preserve their game data when uninstalling.
- Press the Windows key + E keyboard shortcut to open File Explorer.
- Open the Steam game folder in File Explorer. The default path for that folder is C:Program FilesSteam.
- Then select the Steamapps subfolder, and press the Copy to button.
- Select a folder to copy Steamapps to.
- Thereafter, uninstall Steam by pressing the Windows key + R, entering appwiz.cpl, in Run, and clicking OK.
- Then select Steam, and click the Uninstall or Change/Remove button.
- Restart Windows after removing Steam.
- Thereafter, click Install Steam on the software’s website to download the installer for the latest version. Open the setup wizard to add Steam to Windows.
- Move the copied Steamapps subfolder back into the Steam folder after reinstalling the gaming client.
Those are some of the resolutions that players have confirmed to fix the Fatal error failed to connect error.
As such, the above resolutions will probably fix the error for most users so that they can play Valve games on Steam again.
Still having issues? Fix them with this tool:
SPONSORED
If the advices above haven’t solved your issue, your PC may experience deeper Windows problems. We recommend downloading this PC Repair tool (rated Great on TrustPilot.com) to easily address them. After installation, simply click the Start Scan button and then press on Repair All.
Newsletter

Ошибка FATAL ERROR: failed to connect with local Steam Client process возникает при попытке запустить игру через клиент Стим. Это говорит о том, что не удалось подключиться к процессу. Проблема возникает по ряду причин. Мы собрали возможные решения в этой статье.
- Чаще всего в решении проблемы failed to connect помогает полностью выйти из клиента steam, а затем зайти снова (перезапустить программу).
- Клиент Стим мог устареть, убедитесь, что вы используете последнюю версию клиента. Именно это советуется сделать в полном тексте ошибки.

- Проверьте целостность файлов игры. Перейдите в свойства игры, во вкладку «Локальные файлы», затем нажмите «Проверить целостность КЭШа». Если некоторые файлы были повреждены, они будут заменены.
- Запустите Client от имени администратора: правой кнопкой мыши кликните на ярлык и выбирите пункт «Запуск от имени администратора».
- Удалите папку appcache в папке стим.

Затем перезайдите в Steam. - Найдите файл clientregisty.blob и удалите его, затем снова перезапустите клиент.
Если вам удалось найти другое решение ошибки failed to connect with local Steam Client, пожалуйста, поделитись им с нами в комментариях.
This is yet another Steam error that appears after launching a game but it was observed the error appears almost exclusively after launching Counter-Strike Global Offensive or similar Valve games such as CS 1.6, Team Fortress 2, or Half-Life.
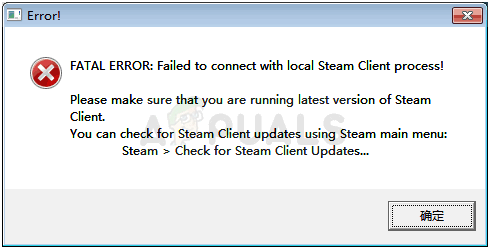
The error prevents users from launching the game and it was quite infamous for a while before various fixes started to emerge. Still, there isn’t a single fix you can pinpoint which will definitely solve the problem and you will have tried them all out before settling for a single one.
The causes for this problem are so diverse and they are usually related to the standard Steam issues such as missing or corrupt game and Steam files which can usually be solved by verifying the game files, deleting certain cache folders, or by reinstalling the game or the complete Steam client.
In certain cases, not being in the Steam Beta program caused the problem which usually means Steam intended to fix the problem in the next update.
Run Steam as an Administrator
This issue is also caused when the game’s privileges is higher than the Steam. This causes an issue between permissions and doesn’t allow Steam to run the game properly. So to fix this issue, we are going to run Steam as an administrator. Follow these steps:-
- First of all, we are going to end all the Steam processes by using a command.
- Click on the Search bar and search for “Command Prompt” now click “Run as administrator”.

Running Command Prompt as an Administrator - Once Command Prompt’s window opens, type the following command and press enter:-
taskkill /f /IM "steam.exe"
- This command will end all the Steam processes running in the background.
- Now find your Steam directory, you can also right-click on the Steam shortcut and click “Open File Location”.
- Once you find the Directory there should be a file named “Steam.exe” right-click on it and hit “Properties”.
- Inside the properties window tick the option “Run this program as an administrator” and press “Apply”.

Allow Steam to run as an administrator - Now Run Steam and that’s it, check to see if the issue is resolved. If it isn’t you can try the other methods listed below.
Verify Integrity of Game Files
Some players have confirmed that, after the error started to appear, verifying the integrity of game files managed to find several files which were missing or corrupt, and redownloading them helped fix the problematic game for good.
- Open your Steam PC client by double-clicking its shortcut on the Desktop or by searching for it in the Start menu simply by typing “Steam” after clicking the Start menu button or the Search (Cortana) button.
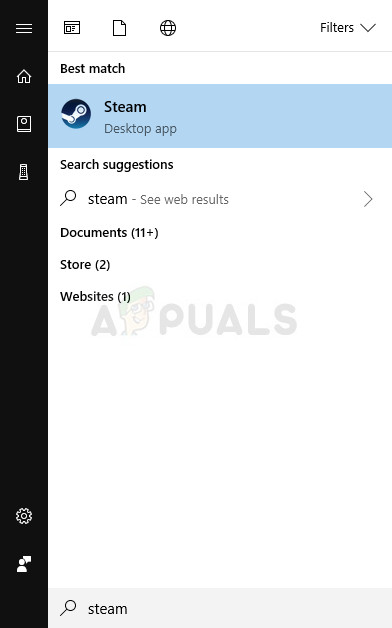
- After the Steam client opens, navigate to the Library tab in the Steam window at the menu located at the top of the window, and locate the problematic game’s entry in the list.
- Right-click the game’s icon in the library and choose the Properties option from the context menu which will open and make sure you navigate to the Local Files tab in the Properties window.
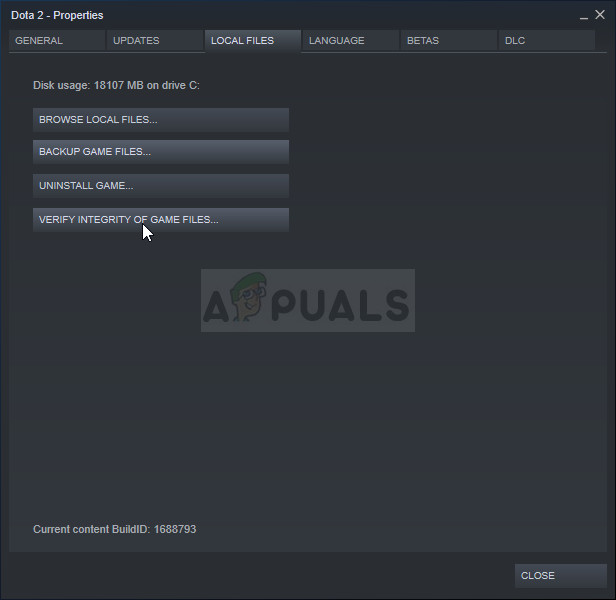
- Click the Verify Integrity of Game Files button at the bottom of the window and wait for the process to finish checking for your game files. The utility should download any missing files and you should reopen the problematic game afterwards to see if the “FATAL ERROR: Failed to connect with local Steam Client process” still appears.
Restart Steam Completely
This error can also happen sometimes if you have accidentally opened two or more instances of Steam which caused multiple Steam.exe processes to start on your computer. Also, various other Steam-related service can cause the problem to appear and players were able to solve it simply by restarting Steam completely.
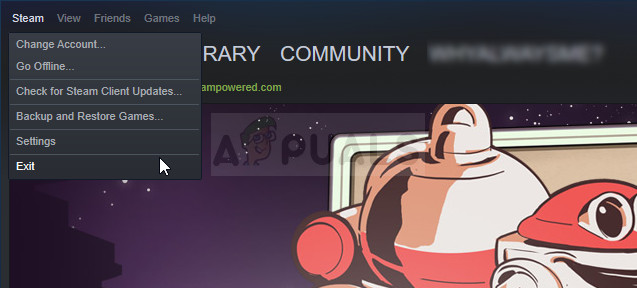
- Make sure you quit the Steam client on your computer completely by clicking Steam >> Exit from the top-side menu with the Steam client open.
- An alternative solution if you have the Steam window closed is to locate the Steam icon in the system tray (lower left part of the screen). Note that you might need to click the upwards pointing arrow to see more apps.
- Right-click the Steam icon and choose Exit from the context menu which will appear. Now you will have to close all Steam-related processes in Task Manager. Use the Ctrl + Shift + Esc key combination by tapping the keys in the same time to open the Task Manager tool.
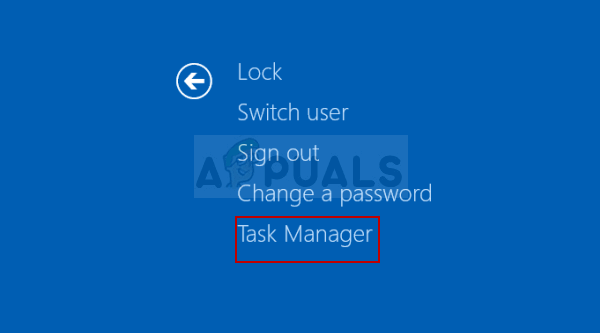
- Alternatively, you can use the Ctrl + Alt + Del key combination and select Task Manager from the blue screen which will appear with several options. You can also search for it in the Start menu.
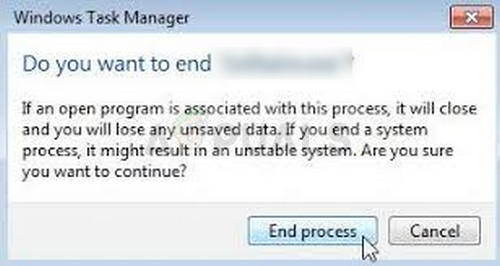
- Click on More details at the bottom left part of the window in order to expand Task Manager and search for any Steam-related processes such as Steam.exe or GameOverlayUI.exe. They should be located right under Background processes. Select them one by one and choose the End task option from the lower right part of the window.
- Click Yes to the message which is going to be displayed which should warn about killing various processes and how it may affect your computer so make sure you just go with it.
- You should now reopen the Steam client by searching for it in the Start menu or by double-clicking its icon on the Desktop. Check to see if the error still appears after launching the game.
Note: Some users have reported that the problem can be solved simply by opening Steam as an administrator after closing it. After you have closed Steam completely and killed Steam-related processes, try following the steps below in order to run Steam as an administrator.
- Locate the Steam executable file and alter it by right-clicking its entry either on the Desktop or the Start menu or the Search results window and choose Properties from the context menu.
- Navigate to the Compatibility tab in the Properties window and check the box next to the Run this program as an administrator entry before applying the changes.
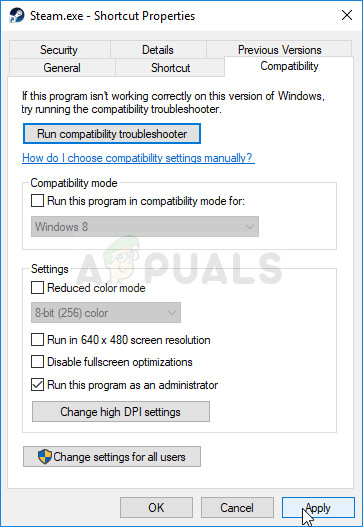
- Make sure you confirm any dialogs which may appear which should prompt you to confirm the choice with admin privileges and Steam should launch with admin privileges from now on. Open Steam by double-clicking its icon and try relaunching the game to see if the “FATAL ERROR: Failed to Connect with Local Steam Client Process” still appears.
Login and out of the Steam Client
This method is similar to the one above except that it’s faster and it only involves logging out of the Steam client and logging back it. Restarting Steam completely is better but sometimes the problem is related to your Steam account and that can only be fixed by logging out.
- Make sure you log out of the Steam account you are currently logged in with on your computer completely by clicking Steam >> Change Accounts from the top menu with the Steam client open.
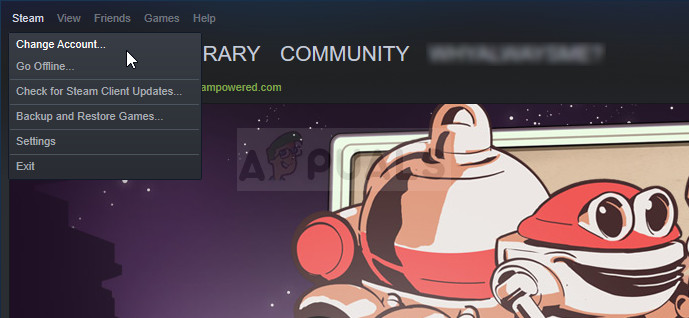
- Confirm the dialog which will appear prompting you to confirm your choice as you will have to re-enter your accounts credentials.
- From the login screen which will appear, enter your proper username or email and password and wait for the Steam client to load. Try relaunching the problematic game and check to see if the issue still appears.
Uninstall the Game from Your Computer
Reinstalling the game on your computer can fix the problem as it did for certain users and we have to thank Steam from making the process appear quite easier than it is when uninstalling and installing games outside of Steam. This way you can simply redownload game files and Steam should take care of everything after a few clicks.
- Open your Steam PC client by double-clicking its shortcut on the Desktop or by searching for it in the Start menu simply by typing “Steam” after clicking the Start menu button or the Search (Cortana) button.
- After the Steam client opens, navigate to the Library tab in the Steam window at the menu located at the top of the window, and locate the problematic game’s entry in the list.
- Right-click the game’s icon in the library and choose the Uninstall option which will appear at the bottom of the context menu. Confirm the dialog asking for you to confirm your choice and wait for a while for Steam to delete the game files.
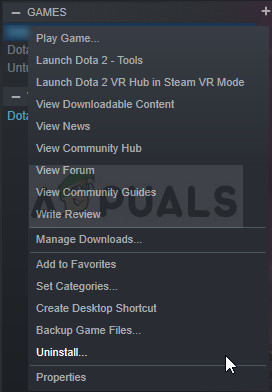
- After the game has uninstalled, stay in the Library tab in the Steam client, right-click the same game’s entry and choose the Install Game option. Choose a library folder to install the game and wait for it to install again. Check to see if the problem is solved.
Delete the Appcache Folder in Steam Root
Deleting this folder will reset the application cache for the Steam client and it can definitely faster than reinstalling the entire Steam client as that involves backing up game files. This useful didn’t for everyone but it worked for some people and they saved time since they didn’t have to uninstall the Steam client completely.
- Navigate to the Steam’s root folder in the File Explorer which can be accessed by opening a folder and clicking This PC or My Computer at the left side pane. Make sure the Steam client is closed completely.
- If you haven’t made any changes during the installation of the Steam client regarding the required installation folder, it should be Local Disk >> Program Files or Program Files (x86) depending on your OS.
- Additionally, if you have the Steam client’s shortcut on the desktop, you can simply right-click on it and choose the Open file location option from the context menu which will appear.
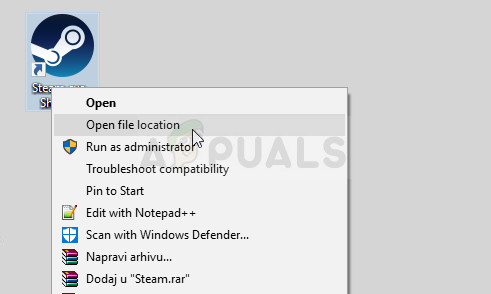
- The appcache folder should be available in this folder so make sure you right-click on it and choose the Delete option from the context menu. Confirm any dialogs and reopen Steam to see if the same error still appears
Opt in the Steam Beta Client
Steam beta clients usually hold the latest updates which are yet to be released to the general public. By enabling the Steam beta account in Steam settings, you can easily get the latest updates after restarting Steam and fix the problem sooner than everyone else simply by following the steps below.
- Open your Steam PC app by double-clicking the shortcut on the Desktop if you have one or by searching for it in the Start menu and clicking on the first Steam result.
- Click on the Steam button at the menu at the top of the client’s screen and choose Settings from the dropdown menu. In the Settings window stay in the Account tab and click the Change button under the Beta participation section.
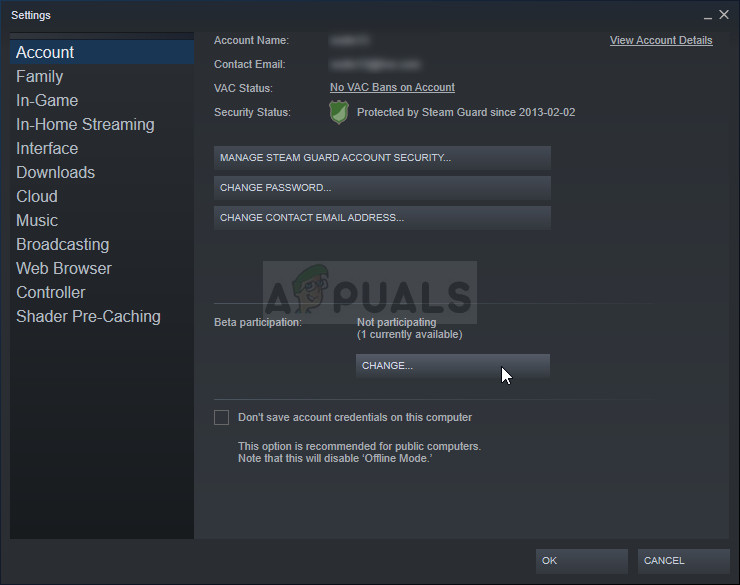
- A new window should open so check again under the “Beta participation” section and click to open the drop-down menu. Choose the “Steam Beta Update” option and Apply the changes you have made. Restart your Steam client and try opening the game again and check for the “FATAL ERROR: Failed to connect with local Steam Client process” error.
Reinstall Steam
The last resort and the method users are often not so eager to perform is reinstalling the Steam client completely. The reason why people don’t want to perform this method at all is because uninstalling the Steam deletes all installed games by default and users with plenty of games might take an eternity to redownload them. That is why we recommend you follow our instructions where you won’t have to redownload a single game and the problem should be solved as well!
- Open your Steam PC client by double-clicking its shortcut on the Desktop or by searching for it in the Start menu simply by typing “Steam” after clicking the Start menu button or the Search (Cortana) button.
- After the Steam client opens, click the Steam button at the top right part of the window and choose Settings. Navigate to the Downloads tab in the Settings window and click on Steam Library Folders.
- Here you should see a list of all libraries you currently use and the folders you should look for when backing up. Since the default folder is C >> Program Files (x86) >> Steam >> steamapps, let’s see how to back it up.
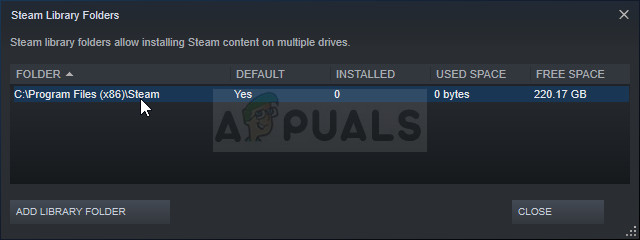
- Navigate to the location above by clicking to open any folder or the File Explorer and clicking This PC or My Computer at the right pane. After that, locate the location above and find the “steamapps” folder.
- Right-click the folder and choose the Copy option from the context menu which will appear. Navigate to a location outside the Steam folder on your computer and paste the folder by right-clicking and choosing Paste. The best location would be the Desktop.
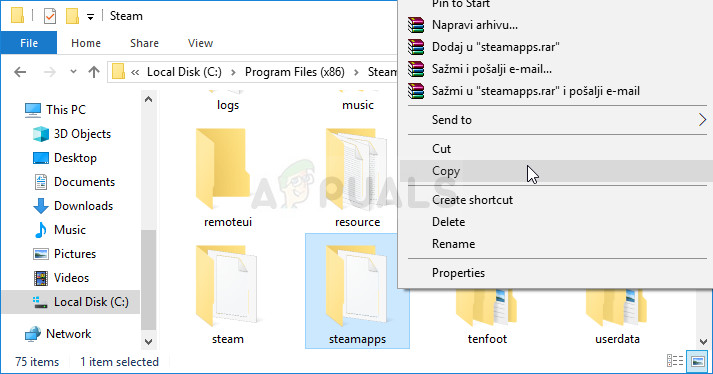
- Repeat the same process for all library folders. After uninstalling Steam, you will have to add the folders again as the Steam library folders as you did the first time.
After you have backed up your game installations, the next step is to uninstall Steam from your computer. This can be done easily using the Settings app or the Control Panel.
- First of all, make sure you have logged in with an admin account as you won’t be able to uninstall programs using any other account privileges.
- Make sure you have performed the steps above for each library folder you have on your computer and take note of their locations so that you can add them back once Steam is reinstalled.
- Click on the Start menu and open Control Panel by searching for it. Alternatively, you can click on the gear icon in order to open settings if you are using Windows 10.
- In Control Panel, select to View as: Category at the top right corner and click on Uninstall a Program under the Programs section.
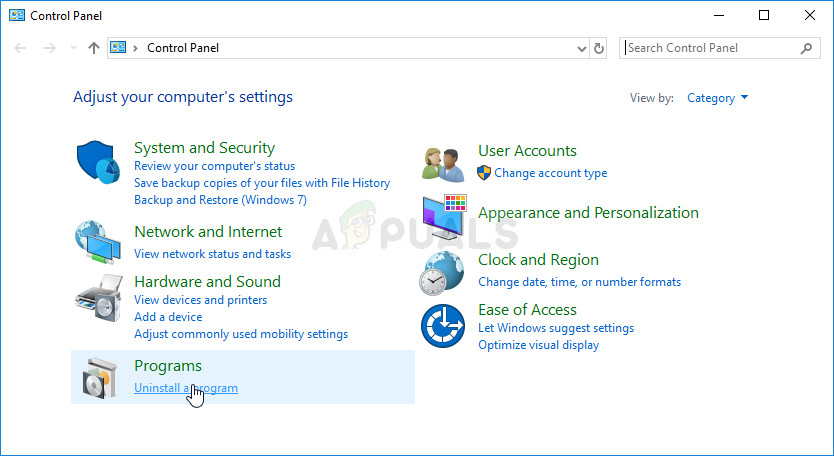
- If you are using the Settings app, clicking on Apps should immediately open a list of all installed programs on your PC.
- Locate the Steam entry on the list and click on it once. Click on the Uninstall button above the list and confirm any dialog boxes which may appear. Follow the instructions on-screen in order to uninstall Steam and restart your computer afterwards.

Kevin Arrows
Kevin is a dynamic and self-motivated information technology professional, with a Thorough knowledge of all facets pertaining to network infrastructure design, implementation and administration. Superior record of delivering simultaneous large-scale mission critical projects on time and under budget.
Антивирус ESET NOD блокирует файл steamclient.dll, который представляет собой эмулятор steam. Его отключение антивируса не решает проблему. Файл steamclient.dll удаляется при установке или загрузке CS:GO или CS:S.
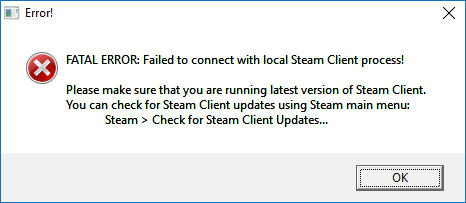
Из-за этого возникает ошибка «FATAL ERROR: Failed to connect with local Steam Client process!» при запуске КС ГО / КС Соурс:
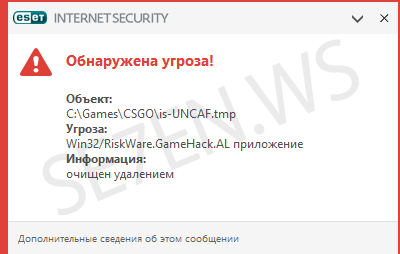
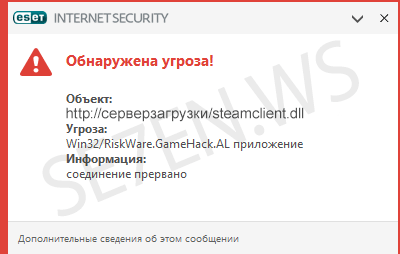
Предлагаем 2 способа исправления данной ошибки:
Первый способ.
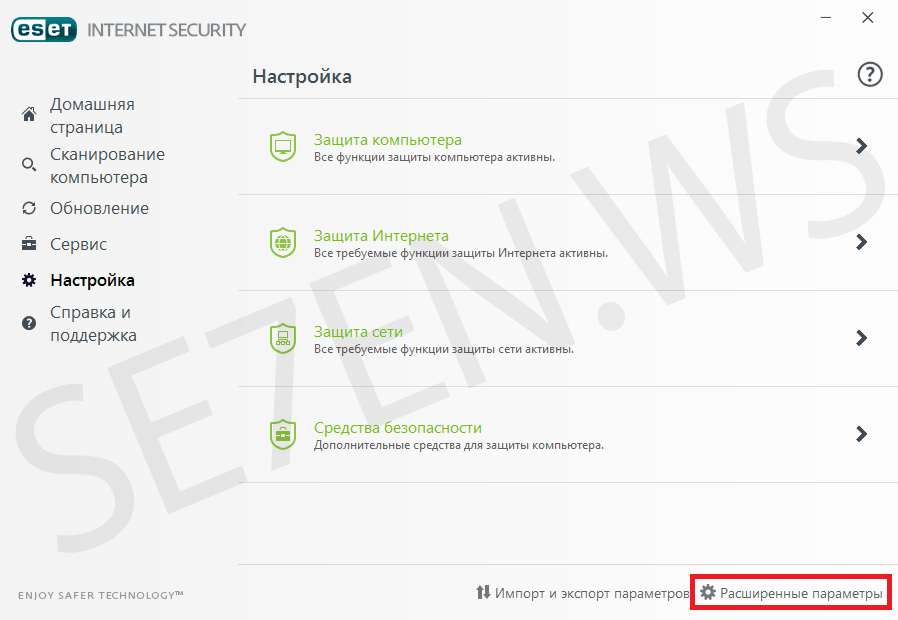
1. Открыть ESET NOD. Выбрать меню «Настройка» и нажать на «Расширенные параметры».
2. В окне расширенных параметров выбрать вкладку «ЗАЩИТА ОТ ВИРУСОВ» > «ОСНОВНОЕ» > «ИСКЛЮЧЕНИЯ» (Список путей, которые нужно исключить из сканирования) и нажать «Изменить».
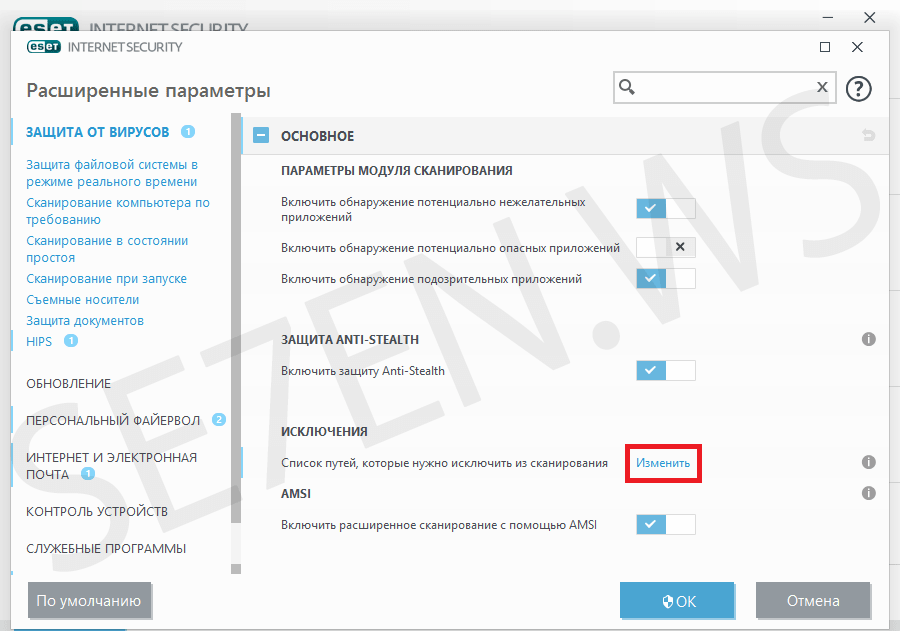
3. Нажать «Добавить» и указать путь до папки CS: GO или CS: S.
4. Снова зайти в главное меню ESET NOD. Выбрать меню «Настройка», нажать на «Защита сети» и отключить «Персональный файервол».
Второй способ.
1. В трее кликаем на значок ESET NOD правой кнопкой мыши.
2. В меню нажимаем на «Приостановить защиту» и «Приостановить работу файервола (разрешить весь трафик)».
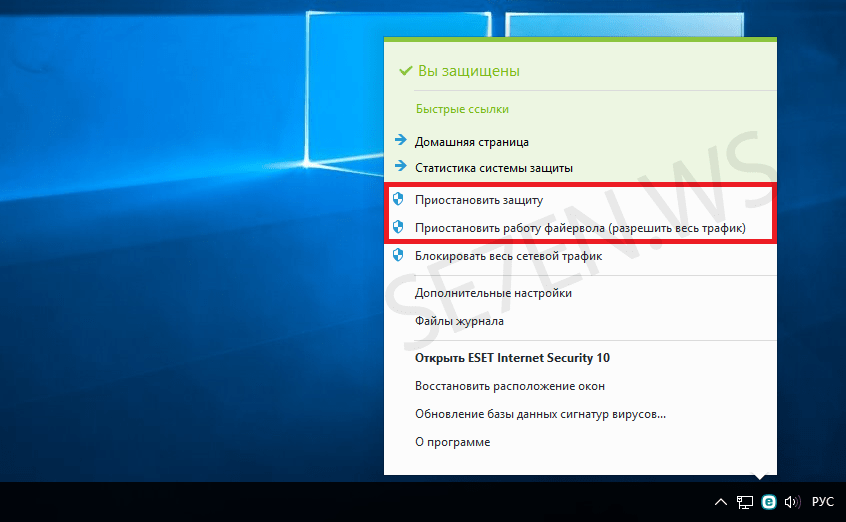
3. Запустить лаунчер кс го / кс соурс и нажать на кнопку «Проверить и обновить».

Вот нельзя так просто сесть и спокойно и поиграть в любимую онлайн игру (в большинстве случаев). Постоянно возникают всякие ошибки, одна из которых – Fatal Error: Failed to connect with local Steam Client process в CS:GO. Что делать в подобных ситуациях, как быстро избавиться от дефекта и продолжить игровой процесс?

И снова виноват Стим…
Если дословно выполнить перевод текста сообщения, то причина станет очевидной: Фатальная ошибка – Сбой при подключении к локальному клиентскому процессу Steam. Теперь понятно, кто виноват в наших страданиях. Давайте же копнем еще глубже.
Я просмотрел несколько тематических форумов и узнал, что сбой в CS:GO возникает из-за того, что игровой клиент пытается проверить Вашу лицензию, но на удаленном сервере не находит нужной записи, соответствующей идентификатору Вашей версии игры.
Подобные явления часто возникают на пиратке Counter Strike, но также характерны и для добросовестных пользователей, которые приобрели игру в Стим, не используют читы для получения преимущества. Но система безопасности все же блокирует доступ.
Проблема довольно масштабная, известны тысячи подобных жалоб. Но компания Valve не слишком торопиться с решением для устранения своей оплошности. Поэтому, сейчас расскажу о нескольких простых способах, которые могут помочь справиться с проблемой.
Fatal Error: Failed to connect with local Steam Client process – что делать?
Следующие шаги предполагают, что у Вас установлена либо официальная версия Windows, либо же корректная сборка, созданная не каким-то криворуким школьником. Также предполагается, что на компьютере инсталлированы последние обновления библиотек .NET Framework, DirectX и Visual C++, без которых нет смысла пробовать другие варианты исправления.
Перезапускаем игровой процесс
Это самая примитивная и популярная манипуляция, которая часто помогает. Но не всегда.
- Закрываем все окна игрового клиента Стим и самой игры CS:GO;
- Перезагрузите компьютер;
- Когда ПК снова запуститься, то попробуйте обновить Steam, скачав новую версию с официального сайта;
- Если не помогло, то открываем диспетчер задач с помощью комбинации Ctrl+Esc+Shiht и находим все процессы, относящиеся в Стим. Их необходимо завершить (внизу окна будет кнопка снятия задачи):

- Снова попытайтесь зайти в Client и потом открыть Каунтер страйк.
Нередко причиной сбоя «local steam client process» является блокировка Вашей учетной записи из-за подозрений в «читерстве». В таком случае следует отключиться от сети на некоторое время, потом снова войти в аккаунт. И обязательно обратитесь в службу поддержки – возможно, Вы оказались в «черном списке», нужно выяснить причины и доказать свою невиновность.
Проверка файлов
Если система подверглась вирусной атаке, или просто Виндовс выдала сбой из-за экстренного отключения питания, то вполне вероятно, что критически важные игровые файлы были повреждены. Это негативно сказывается на конфигурации и приводит к появлению сообщения «Fatal Error: Failed to connect…» в CS:GO. Что делать?
В настройках клиента следует отыскать вкладку «Локальные файлы» и затем нажать на кнопку проверки целостности:

Обратите внимание, что на указанной вкладке есть клавиша «Удаления…». Если очистка кеша не помогла, то следует нажать на этот элемент. «Сносим» все и затем заново скачиваем установщик клиента и нужные игры. Меры довольно кардинальные, но эффективные в большинстве ситуаций.
Нередко помогает и утилита ASC (Адвансенд Систем Кэа), которая входит в ТОП лучших оптимизаторов Виндовс. В ней есть инструмент «ремонта», устраняющий критические ошибки в стандартных и сторонних программах на компьютере. Попробуйте применить данный инструмент.
И еще один метод: запускаем консоль командной строки с правами админа и копируем отсюда команду:
C:Program FilesSteambinSteamService.exe» /repair
Вставляем её щелчком правой кнопки мышки в «черное окно» и жмем Enter для запуска сканирования. Как только оно завершиться, перезагружаем ноутбук.
Отключаем антивирусное ПО
Нередко дефекты возникают из-за того, что защитное программное обеспечение блокирует нужные объекты, видя в них опасность. Достаточно попробовать выполнить деактивацию антивируса на некоторое время. Или же заходим в параметры утилиты (ищем раздел «Исключения» или «Белый список») и вносим туда путь к главному файлу игрового клиента.
То же самое касается и встроенного СмартСкрин и брандмауэра, которые также нужно отключить, затем перезапустить систему и проверить работоспособность Стим.
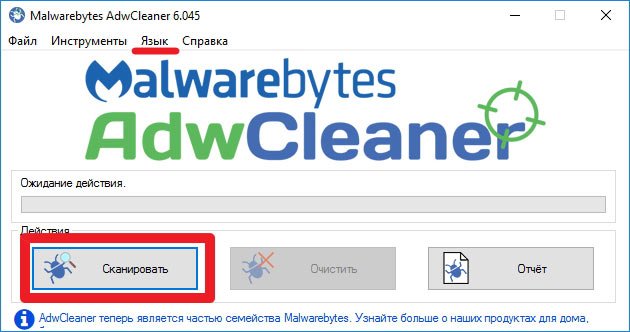
Существует и обратная сторона проблемы – вирусное заражение. Рекомендую скачать бесплатную утилиту
AdwCleaner
, которая за 5-10 минут просканирует диски и выявит угрозы (а также устранит их).
Видео
Fatal Error: Failed to connect with local Steam Client process в CS:GO – что делать показано в следующем ролике. Я просмотрел на Youtube несколько инструкций, но только эта показалась мне максимально адекватной:

Надеюсь, решение, описанное в статье, оказалось полезным для Вас. Жду комментарии по теме!