25 мая, 2017 11:40 дп
85 491 views
| Комментариев нет
Linux, SSH
В первой статье этой серии вы узнали о том, как и в каких ситуациях вы можете попробовать исправить ошибки SSH. Остальные статьи расскажут, как определить и устранить ошибки:
- Ошибки протокола: в этой статье вы узнаете, что делать, если сбрасываются клиентские соединения, клиент жалуется на шифрование или возникают проблемы с неизвестным или измененным удаленным хостом.
- Ошибки аутентификации: поможет устранить проблемы с парольной аутентификацией или сбросом SSH-ключей.
- Ошибки оболочки: это руководство поможет исправить ошибки ветвления процессов, валидации оболочки и доступа к домашнему каталогу.
Для взаимодействия SSH-клиента с SSH-сервером необходимо установить базовое сетевое подключение. Это руководство поможет определить некоторые общие ошибки подключения, исправить их и предотвратить их возникновение в будущем.
Требования
- Убедитесь, что можете подключиться к виртуальному серверу через консоль.
- Проверьте панель на предмет текущих проблем, влияющих на работу и состояние сервера и гипервизора.
Основные ошибки
Разрешение имени хоста
Большинство ошибок подключения возникает тогда, когда ссылка на хост SSH не может быть сопоставлена с сетевым адресом. Это почти всегда связано с DNS, но первопричина часто бывает не связана с DNS.
На клиенте OpenSSH эта команда:
ssh user@example.com
может выдать ошибку:
ssh: Could not resolve hostname example.com: Name or service not known
В PuTTY может появиться такая ошибка:
Unable to open connection to example.com Host does not exist
Чтобы устранить эту ошибку, можно попробовать следующее:
- Проверьте правильность написания имени хоста.
- Убедитесь, что вы можете разрешить имя хоста на клиентской машине с помощью команды ping. Обратитесь к сторонним сайтам (WhatsMyDns.net, например), чтобы подтвердить результаты.
Если у вас возникают проблемы с разрешением DNS на любом уровне, в качестве промежуточного решения можно использовать IP-адрес сервера, например:
ssh user@111.111.111.111

# вместо

ssh user@example.com.
Истечение времени соединения
Эта ошибка значит, что клиент попытался установить соединение с SSH-сервером, но сервер не смог ответить в течение заданного периода ожидания.
На клиенте OpenSSH следующая команда:
ssh user@111.111.111.111
выдаст такую ошибку:
ssh: connect to host 111.111.111.111 port 22: Connection timed out
В PuTTY ошибка выглядит так:
Network error: Connection timed out
Чтобы исправить ошибку:
- Убедитесь, что IP-адрес хоста указан правильно.
- Убедитесь, что сеть поддерживает подключение через используемый порт SSH. Некоторые публичные сети могут блокировать порт 22 или пользовательские SSH-порты. Чтобы проверить работу порта, можно, например, попробовать подключиться к другим хостам через этот же порт. Это поможет вам определить, не связана ли проблема с самим сервером.
- Проверьте правила брандмауэра. Убедитесь, что политика по умолчанию – не DROP.
Отказ в соединении
Эта ошибка означает, что запрос передается на хост SSH, но хост не может успешно принять запрос.
На клиенте OpenSSH следующая команда выдаст ошибку:
ssh user@111.111.111.111

ssh: connect to host 111.111.111.111 port 22: Connection refused
В PuTTY ошибка появится в диалоговом окне:
Network error: Connection refused
Эта ошибка имеет общие с ошибкой Connection Timeout причины. Чтобы исправить её, можно сделать следующее:
- Убедиться, что IP-адрес хоста указан правильно.
- Убедиться, что сеть поддерживает подключение через используемый порт SSH. Некоторые публичные сети могут блокировать порт 22 или пользовательские SSH-порты. Чтобы проверить работу порта, можно, например, попробовать подключиться к другим хостам через этот же порт.
- Проверить правила брандмауэра. Убедитесь, что политика по умолчанию – не DROP, и что брандмауэр не блокирует этот порт.
- Убедиться, что сервис запущен и привязан к требуемому порту.
Рекомендации по исправлению ошибок подключения
Брандмауэр
Иногда проблемы с подключением возникают из-за брандмауэра. Он может блокировать отдельные порты или сервисы.
Читайте также: Что такое брандмауэр и как он работает?
В разных дистрибутивах используются разные брандмауэры. Вы должны научиться изменять правила и политики своего брандмауэра. В Ubuntu обычно используется UFW, в CentOS – FirewallD. Брандмауэр iptables используется независимо от системы.
Читайте также:
- Основы UFW: общие правила и команды фаервола
- Настройка брандмауэра FirewallD в CentOS 7
- Основы Iptables: общие правила и команды брандмауэра
Чтобы настроить брандмауэр, нужно знать порт сервиса SSH. По умолчанию это порт 22.
Чтобы запросить список правил iptables, введите:
iptables -nL
Такой вывод сообщает, что правил, блокирующих SSH, нет:
Chain INPUT (policy ACCEPT)

target     prot opt source               destination

Chain FORWARD (policy ACCEPT)

target     prot opt source               destination

Chain OUTPUT (policy ACCEPT)

target     prot opt source               destination
Если в выводе вы видите правило или политику по умолчанию REJECT или DROP, убедитесь, что цепочка INPUT разрешает доступ к порту SSH.
Чтобы запросить список правил FirewallD, введите:
firewall-cmd --list-services
Список, появившийся на экране, содержит все сервисы, которые поддерживаются брандмауэром. В списке должно быть правило:
dhcpv6-client http ssh
Если вы настроили пользовательский порт SSH, используйте опцию –list-ports. Если вы создали пользовательское определение сервиса, добавьте опцию –list-services, чтобы найти SSH.
Чтобы проверить состояние UFW, введите:
ufw status
Команда вернёт доступные порты:
Status: active

To                         Action      From

--                         ------      ----

22                         LIMIT       Anywhere

443                        ALLOW       Anywhere

80                         ALLOW       Anywhere

Anywhere                   ALLOW       192.168.0.0

22 (v6)                    LIMIT       Anywhere (v6)

443 (v6)                   ALLOW       Anywhere (v6)

80 (v6)                    ALLOW       Anywhere (v6)
В списке должен быть порт SSH.
Проверка состояния сервиса SSH
Если вы не можете подключиться к серверу по SSH, убедитесь, что сервис SSH запущен. Способ сделать это зависит от операционной системы сервера. В более старых версиях дистрибутивов (Ubuntu 14.04, CentOS 6, Debian 8) используется команда service. Современные дистрибутивы на основе Systemd используют команду systemctl.
Метод проверки состояния сервиса может варьироваться от системы к системе. В более старых версиях (Ubuntu 14 и ниже, CentOS 6, Debian 6) используется команда service, поддерживаемая системой инициализации Upstart, а в более современных дистрибутивах для управления сервисом используется команда systemctl.
Примечание: В дистрибутивах Red Hat (CentOS и Fedora) сервис называется sshd, а в Debian и Ubuntu – ssh.
В более старых версия используйте команду:
service ssh status
Если процесс работает должным образом, вы увидите вывод, который содержит PID:
ssh start/running, process 1262
Если сервис не работает, вы увидите:
ssh stop/waiting
В системах на основе SystemD используйте:
systemctl status sshd
В выводе должна быть строка active:
sshd.service - OpenSSH server daemon

Loaded: loaded (/usr/lib/systemd/system/sshd.service; enabled)

Active: active (running) since Mon 2017-03-20 11:00:22 EDT; 1 months 1 days ago

Process: 899 ExecStartPre=/usr/sbin/sshd-keygen (code=exited, status=0/SUCCESS)

Main PID: 906 (sshd)

CGroup: /system.slice/sshd.service

├─  906 /usr/sbin/sshd -D

├─26941 sshd: [accepted]

└─26942 sshd: [net]
Если сервис не работает, вы увидите в выводе inactive:
sshd.service - OpenSSH server daemon

Loaded: loaded (/usr/lib/systemd/system/sshd.service; enabled)

Active: inactive (dead) since Fri 2017-04-21 08:36:13 EDT; 2s ago

Process: 906 ExecStart=/usr/sbin/sshd -D $OPTIONS (code=exited, status=0/SUCCESS)

Process: 899 ExecStartPre=/usr/sbin/sshd-keygen (code=exited, status=0/SUCCESS)

Main PID: 906 (code=exited, status=0/SUCCESS)
Чтобы перезапустить сервис, введите соответственно:
service ssh start

systemctl start sshd
Проверка порта SSH
Существует два основных способа проверить порт SSH: проверить конфигурационный файл SSH или просмотреть запущенный процесс.
Как правило, конфигурационный файл SSH хранится в /etc/ssh/sshd_config. Стандартный порт 22 может переопределяться любой строкой в этом файле, определяющей директиву Port.
Запустите поиск по файлу с помощью команды:
grep Port /etc/ssh/sshd_config
Читайте также: Использование Grep и регулярных выражений для поиска текстовых шаблонов в Linux
Команда вернёт:
Port 22
Если вы уже убедились, что сервис работает, теперь вы можете узнать, работает ли он на требуемом порте. Для этого используйте команду ss. Команда netstat –plnt выдаст аналогичный результат, но команду ss рекомендуется использовать для запроса информации сокета из ядра.
ss -plnt
В выводе должно быть указано имя программы и порт, который она прослушивает. Например, следующий вывод сообщает, что сервис SSH прослушивает все интерфейсы и порт 22.
State       Recv-Q Send-Q              Local Address:Port                       Peer Address:Port

LISTEN      0      128                 *:22                                     *:*                   users:(("sshd",pid=1493,fd=3))

LISTEN      0      128                 :::22                                    :::*                  users:(("sshd",pid=1493,fd=4))
Символ * и 0.0.0.0 указывает, что все интерфейсы сервера прослушиваются. Строка 127.0.0.1 значит, что сервис не является общедоступным. В sshd_config директива ListenAddress должна быть закомментирована, чтобы прослушивать все интерфейсы, или должна содержать внешний IP-адрес сервера.
Если у вас не получается самостоятельно настроить соединение SSH, вы можете обратиться за помощью к службе поддержки своего хостинг-провайдера.
Tags: firewalld, Iptables, OpenSSH, PuTTY, SSH, UFW
Если Вы сталкиваетесь с ошибками на SSH, эта статья поможет Вам легко их решить. Прежде чем мы начнем, стоит отметить, что для работы SSH, этот доступ должен быть включен.
Для быстрой навигации Вы можете выбрать ошибку из этого списка:
-
Connection closed
-
Терминал сразу закрывается
-
Permission denied или Access denied
-
Connection refused
-
Connection timed out
-
Команды с повышенными правами
-
Прерванная или незавершенная команда.
Connection closed
Если Вы видите это сообщение сразу после попытки подключиться через SSH:

Обычно это вызвано отключенным доступом к SSH. Все что нужно сделать, это включить его и снова повторить попытку.
Терминал сразу закрывается
Если терминал закрывается сразу после ввода пароля, все что Вам нужно сделать, это отключить, а затем включить доступ по SSH — следующее соединение должно быть успешным.
Permission denied или Access denied
Если Вы видите подобное сообщение:

Это означает, что Вы используете неправильные учетные данные SSH. Это можно легко исправить, проверив данные SSH и изменив пароль SSH. Стоит отметить, что Вам необходимо изменить пароль для основного домена (доменное имя, которое Вы видите для хостинга в разделе Счета), в противном случае SSH-соединение может работать некорректно.
ПРИМЕЧАНИЕ:
-
Мы рекомендуем добавить ключи SSH в свою учетную запись хостинга, чтобы пароль SSH не требовался.
Connection refused
Эта ошибка обычно вызвана использованием неправильного порта. Порт по умолчанию для SSH — 22, хотя здесь, в Hostinger, он находится на порте 65002 из соображений безопасности. В результате вам нужно использовать именно этот порт при подключении.
Connection timed out
Эта ошибка может отображаться как ssh: connect to host 185.185.185.185 port 65002: Connection timed out в терминале, или же Network error: Connection timed out on PuTTY. Основные причины этой ошибки:
-
Ваш интернет-провайдер блокирует входящий или исходящий трафик / TCP-соединения через порт 65002. Обратитесь к своему интернет-провайдеру для уточнения.
-
Ваш маршрутизатор/точка доступа блокирует входящий или исходящий трафик/TCP-соединения на порту 65002. Еще раз проверьте настройки сетевого оборудования, перезапустите маршрутизатор.
-
У Вас есть локальный брандмауэр или антивирус, который блокирует входящий или исходящий трафик/TCP-соединения на порту 65002. Еще раз проверьте настройки брандмауэра и временно выключите антивирус.
-
Что-то не работает в вашем программном обеспечении TCP/IP в системе, и ваш Интернет может быть недоступен. Проверьте, есть ли у Вас подключение к Интернет.
-
IP-адрес Вашего сервера не доступен из-за DDoS-атаки или технического обслуживания.
Команды с повышенными правами

Любые команды с повышенными разрешениями (например, sudo) отключены на нашем общем и облачном хостинге по соображениям безопасности. Если Вы хотите иметь полную свободу и использовать такие команды, как sudo — мы настоятельно рекомендуем VPS-хостинг (для клиентов из России/для клиентов из Украины). Имейте в виду, что VPS-хостинг является самоуправляемым, и все должно быть настроено с Вашей стороны.
Прерванная или незавершенная команда.
Если Вы видите, что какая-то команда запустилась правильно, но по какой-то причине останавливается — обязательно проверьте вкладку Использование заказа. Каждое действие по SSH использует ресурсы хостинга, и если их недостаточно, процесс завершится ошибкой. Чтобы решить эту проблему, рассмотрите альтернативный метод тому, чего Вы хотите достичь, или обновите свой план хостинга.
I am trying to connect to remote server via ssh but getting connection timeout.
I ran the following command
ssh testkamer@test.dommainname.com
and getting following result
ssh: connect to host testkamer@test.dommainname.com port 22: Connection timed out
but if try to connect on another remote server then I can login successfully.
So I think there is no problem in ssh and other person try to login with same login and password he can successfully login to server.
Please help me
Thanks.

asked Aug 29, 2012 at 6:41

urjit on railsurjit on rails
1,6864 gold badges18 silver badges35 bronze badges
3
Here are a couple of things that could be preventing you from connecting to your Linode instance:
-
DNS problem: if the computer that you’re using to connect to your
remote server isn’t resolving test.kameronderdehamer.nl properly
then you won’t be able to reach your host. Try to connect using the
public IP address assigned to your Linode and see if it works (e.g.
ssh user@123.123.123.123). If you can connect using the public IP
but not using the hostname that would confirm that you’re having
some problem with domain name resolution. -
Network issues: there
might be some network issues preventing you from establishing a
connection to your server. For example, there may be a misconfigured
router in the path between you and your host, or you may be
experiencing packet loss. While this is not frequent, it has
happenned to me several times with Linode and can be very annoying.
It could be a good idea to check this just in case. You can have a look
at Diagnosing network issues with MTR (from the Linode
library).
answered Sep 3, 2012 at 21:46

1
That error message means the server to which you are connecting does not reply to SSH connection attempts on port 22. There are three possible reasons for that:
-
You’re not running an SSH server on the machine. You’ll need to install it to be able to ssh to it.
-
You are running an SSH server on that machine, but on a different port. You need to figure out on which port it is running; say it’s on port 1234, you then run ssh -p 1234 hostname.
-
You are running an SSH server on that machine, and it does use the port on which you are trying to connect, but the machine has a firewall that does not allow you to connect to it. You’ll need to figure out how to change the firewall, or maybe you need to ssh from a different host to be allowed in.
EDIT: as (correctly) pointed out in the comments, the third is certainly the case; the other two would result in the server sending a TCP «reset» package back upon the client’s connection attempt, resulting in a «connection refused» error message, rather than the timeout you’re getting. The other two might also be the case, but you need to fix the third first before you can move on.

answered Mar 19, 2020 at 20:42

Akash SAkash S
1461 silver badge4 bronze badges
1
I got this error and found that I don’t have my SSH port (non standard number) whitelisted in config server firewall.

Victor2748
4,10912 gold badges50 silver badges87 bronze badges
answered Nov 13, 2014 at 0:08

1685155616851556
2293 silver badges11 bronze badges
Just adding this here because it worked for me. Without changing any settings (to my knowledge), I was no longer able to access my AWS EC2 instance with: ssh -i /path/to/key/key_name.pem admin@ecx-x-x-xxx-xx.eu-west-2.compute.amazonaws.com
It turned out I needed to add a rule for inbound SSH traffic, as explained here by AWS. For Port range 22, I added 0.0.0.0/0, which allows all IPv4 addresses to access the instance using SSH.
Note that making the instance accessible to all IPv4 addresses is a security risk; it is acceptable for a short time in a test environment, but you’ll likely need a longer term solution.
answered Nov 22, 2021 at 7:58

arranjdavisarranjdavis
6397 silver badges16 bronze badges
If you are on Public Network, Firewall will block all incoming connections by default. check your firewall settings or use private network to SSL
answered Oct 22, 2018 at 12:36

The possibility could be, the SSH might not be enabled on your server/system.
- Check sudo systemctl status ssh is Active or not.
- If it’s not active, try installing with the help of these commands
sudo apt update
sudo apt install openssh-server
Now try to access the server/system with following command
ssh username@ip_address
answered Jan 29, 2019 at 7:52

GaniGani
3841 gold badge4 silver badges16 bronze badges
This happens because of firewall connection.
Reset your firewall connection from your hosting website.
It will start working.
After connecting to the server again add this to your (ufw) security
sudo ufw allow 22/tcp
answered Nov 9, 2022 at 18:50

There can be many possible reasons for this failure.
Some are listed above. I faced the same issue, it is very hard to find the root cause of the failure.
I will recommend you to check the session timeout for shh from ssh_config file.
Try to increase the session timeout and see if it fails again
answered Oct 27, 2016 at 12:58
My VPN connection was not enabled. I was trying all possible way to open up the Firwall and Ports until I realized, I am working from home and my VPN connection was down.
But yes, Firewall and ssh configurations can be a reason.
answered May 8, 2020 at 7:10

sg28sg28
1,3639 silver badges19 bronze badges
I had this issue while trying to ssh into a local nextcloud server from my Mac.
I had no issues ssh-ing in once, but if I tried to have more than one concurrent connection, it would hang until it timed out.
Note, I was sshing to my user@public-ip-address.
I realized the second connection only didn’t work when I tried to ssh into it when on the same network, ie my home network
Furthermore, when I tried ssh user@server-domain it worked!
The end fix was to use ssh user@server-domain rather than ssh user@public-ip
answered Mar 21, 2021 at 20:01

Jacob WatersJacob Waters
2671 gold badge2 silver badges10 bronze badges
I have experienced a couple of nasty issues that lead to these errors, and these are different from everyone else’s answer here:
-
Wrong folder access rights. You need to have specific directory permissions on you ssh folders and files.
a. The .ssh directory permissions should be 700 (drwx——).b. The public key (.pub file) should be 644 (-rw-r—r—).
c. The private key (id_rsa) on the client host, and the authorized_keys file on the server, should be 600 (-rw——-).
-
Nasty docker network configuration. This just happened to me on an AWS EC2 instance. It turned out that I had a docker network with an ip range that interfered with the ssh access granted by the security group and VPC. The docker network’s range was e.g.
192.168.176.0/20(i.e. a range from192.168.176.1->192.168.191.254), whereas the security group had a range of192.168.179.0/24; interfering with the SSH access.
answered Mar 18, 2022 at 12:46
I had this error when trying to SSH into my Raspberry pi from my MBP via bash terminal. My RPI was connected to the network via wifi/wlan0 and this IP had been changed upon restart by my routers DHCP.
Check IP being used to login via SSH is correct. Re-check IP of device being SSH’d into (in my case the RPI), which can be checked using hostname -I
Confirm/amend SSH login credentials on «guest» device (in my case the MBP) and it worked fine in my attempt.
answered Mar 28, 2020 at 20:34

I faced a similar issue. I checked for the below:
- if ssh is not installed on your machine, you will have to install it firstly. (You will get a message saying ssh is not recognized as a command).
- Port 22 is open or not on the server you are trying to ssh.
- If the control of remote server is in your hands and you have permissions, try to disable firewall on it.
- Try to ssh again.
If port is not an issue then you would have to check for firewall settings as it is the one that is blocking your connection.
For me too it was a firewall issue between my machine and remote server.I disabled the firewall on the remote server and I was able to make a connection using ssh.
answered Jul 3, 2020 at 8:32

Atul PatelAtul Patel
5054 silver badges11 bronze badges
Try connecting to a vpn, if possible. That was the reason I was facing problem.
Tip: if you’re using an ec2 machine, try rebooting it. This worked for me the other day 🙂
answered Jan 13, 2021 at 5:46

my main machine is windows 10 and I have CEntOS 7 VBox
Search in your main machine for «known_hosts»
usually, known_host location in windows in «user/.ssh/known_host»
open it using notepad and delete the line where your centos vbox ip
then try connect in your terminal
in mac os user you can find known_hosts in «~/.ssh/known_hosts«
answered Jul 17, 2021 at 3:57
This issue is also caused if the Dynamic Host Configuration Protocol is not set-up properly.
To solve this first check if your IP Address is configured using
ping ipaddress,
If there is no packet loss and the IP Address is working fine try any other solution. If there is no response and you have 100% packet loss, it means that your IP Address is not working and not configured.
Now configure your IP Address using,
sudo dhclient -v devicename
To check your device you can use the ‘ip a’ command
For eg. My device was usb0 since I had connected the device through usb
This will configure an IP Address automatically and you can even see which one is configured. You can again check with the ‘ip a’ command to confirm.

Dharman♦
29.2k21 gold badges79 silver badges131 bronze badges
answered Nov 6, 2021 at 21:17

RISHI RISHI
13 bronze badges
This may be very case specific and work in some cases only but
check to see if you were previously connecting through some VPN software/application.
Try connecting again to the VPN. Worked in my case.
answered Nov 11, 2021 at 9:49

This happened to me after enabling port 22 with «sudo ufw allow ssh». Before that, I was getting a refusal from my machine when entering with ssh from another one. After enabling it, I thought it would work, but instead it showed the message «connection timed out». As I had just installed Ubuntu with the option of installing basic functions alongside, I checked whether I had the openssh-server with the command sudo apt list —installed | grep openssh-server. It turned out that Ubuntu had installed by defect the openssh-client instead. I uninstalled it and installed the openssh-server following the basic commands:
sudo apt-get purge openssh-client
sudo apt update
sudo apt install openssh-server
After that, a simple «sudo ufw allow ssh» worked perfectly and I was finally able to access the machine with an ssh command.
answered Nov 16, 2021 at 13:42

What worked for me was that i went to my security group and reset my IP and it worked
answered May 15, 2022 at 22:22

Here are some considerations which i took to resolve a similar issue that I had:
- Port 22
- IGW (Internet Gateway)
- VPC
Scene 1> This is for port 22 not enabled with right configurations. If the port is set to custom or myip, the probable scene is this won’t work.
Scene 2> When you delete the internet gateway, the network is created and the instance will be functional too, but the routing from the internet will not work. Hence make sure that if there is a VPC, it has an Internet Gateway attached.
Scene 3> Check the VPC for the subnet associations and routing table entries. This might probably tell you the cause. I found one in this kind of troubleshooting. The route used to land up in a «blackhole» (shows up in the route table section of the console). To fix this I had to check and find out my internet gateway and found the issue with the IGW.
Moral of the story: always trace backward in the network!
answered Jul 23, 2022 at 10:18

In my case I’m on windows, I reset my firewall settings, and it fixed
answered Oct 9, 2022 at 15:18

ShahjahanShahjahan
811 silver badge2 bronze badges
-
If you get any error check the basic a version control request with
ssh -Vand If it is not installed, install it with thesudo apt-get install openssh-servercommand. -
Check your virtual machine ssh connection with
sudo service ssh statusat console. -
Check «Active» rows and if write a inactive(dead) the console write
sudo service ssh start
Result: Now you can check your connection with sudo service ssh status command and send ssh connection request.
answered Oct 17, 2022 at 20:35

AdemAdem
111 silver badge4 bronze badges
Reset the firewall and reboot your VPS from your hosting service, it will start working perfectly fine
answered Dec 11, 2022 at 20:37
check whether accidentally you have deleted the default vpc or default subnets ,while creating your own vpc and subnets.
I have done this mistake while creating vpc, hence got this error while connecting via ssh.
alos check whether u have attched IGW to public subnets.
answered Mar 12, 2021 at 10:53

2
Its not complicated.
First, go disable your firewall(USE YOUR CONTROL PANEL)after you check if your openssh is active.
Disable firewall, then use putty or any alternative to basically disable using this command sudo ufw disable
try now
answered Dec 12, 2022 at 11:49

1
Update the security group of that instance. Your local IP must have updated. Every time it’s IP flips. You will have to go update the Security group.
answered Oct 17, 2020 at 14:59

1
предыдущая глава | содержание | следующая глава
- 10.1 «The server’s host key is not cached in the registry»
- 10.2 «WARNING — POTENTIAL SECURITY BREACH!»
- 10.3 «SSH protocol version 2 required by our configuration but remote only provides (old, insecure) SSH-1»
- 10.4 «The first cipher supported by the server is … below the configured warning threshold»
- 10.5 «Remote side sent disconnect message type 2 (protocol error): «Too many authentication failures for root»»
- 10.6 «Out of memory»
- 10.7 «Internal error», «Internal fault», «Assertion failed»
- 10.8 «Unable to use key file», «Couldn’t load private key», «Couldn’t load this key»
- 10.9 «Server refused our key», «Server refused our public key», «Key refused»
- 10.10 «Access denied», «Authentication refused»
- 10.11 «No supported authentication methods available»
- 10.12 «Incorrect MAC received on packet» or «Incorrect CRC received on packet»
- 10.13 «Incoming packet was garbled on decryption»
- 10.14 «PuTTY X11 proxy: various errors»
- 10.15 «Network error: Software caused connection abort»
- 10.16 «Network error: Connection reset by peer»
- 10.17 «Network error: Connection refused»
- 10.18 «Network error: Connection timed out»
- 10.19 «Network error: Cannot assign requested address»
This chapter lists a number of common error messages which PuTTY and its associated tools can produce, and explains what they mean in more detail.
We do not attempt to list all error messages here: there are many which should never occur, and some which should be self-explanatory. If you get an error message which is not listed in this chapter and which you don’t understand, report it to us as a bug (see appendix B) and we will add documentation for it.
10.1 «The server’s host key is not cached in the registry»
This error message occurs when PuTTY connects to a new SSH server. Every server identifies itself by means of a host key; once PuTTY knows the host key for a server, it will be able to detect if a malicious attacker redirects your connection to another machine.
If you see this message, it means that PuTTY has not seen this host key before, and has no way of knowing whether it is correct or not. You should attempt to verify the host key by other means, such as asking the machine’s administrator.
If you see this message and you know that your installation of PuTTY has connected to the same server before, it may have been recently upgraded to SSH protocol version 2. SSH protocols 1 and 2 use separate host keys, so when you first use SSH-2 with a server you have only used SSH-1 with before, you will see this message again. You should verify the correctness of the key as before.
See section 2.2 for more information on host keys.
10.2 «WARNING — POTENTIAL SECURITY BREACH!»
This message, followed by «The server’s host key does not match the one PuTTY has cached in the registry», means that PuTTY has connected to the SSH server before, knows what its host key should be, but has found a different one.
This may mean that a malicious attacker has replaced your server with a different one, or has redirected your network connection to their own machine. On the other hand, it may simply mean that the administrator of your server has accidentally changed the key while upgrading the SSH software; this shouldn’t happen but it is unfortunately possible.
You should contact your server’s administrator and see whether they expect the host key to have changed. If so, verify the new host key in the same way as you would if it was new.
See section 2.2 for more information on host keys.
10.3 «SSH protocol version 2 required by our configuration but remote only provides (old, insecure) SSH-1»
By default, PuTTY only supports connecting to SSH servers that implement SSH protocol version 2. If you see this message, the server you’re trying to connect to only supports the older SSH-1 protocol.
If the server genuinely only supports SSH-1, then you need to either change the «SSH protocol version» setting (see section 4.19.4), or use the -1 command-line option; in any case, you should not treat the resulting connection as secure.
You might start seeing this message with new versions of PuTTY (from 0.68 onwards) where you didn’t before, because it used to be possible to configure PuTTY to automatically fall back from SSH-2 to SSH-1. This is no longer supported, to prevent the possibility of a downgrade attack.
10.4 «The first cipher supported by the server is … below the configured warning threshold»
This occurs when the SSH server does not offer any ciphers which you have configured PuTTY to consider strong enough. By default, PuTTY puts up this warning only for Blowfish, single-DES, and Arcfour encryption.
See section 4.22 for more information on this message.
(There are similar messages for other cryptographic primitives, such as host key algorithms.)
10.5 «Remote side sent disconnect message type 2 (protocol error): «Too many authentication failures for root»»
This message is produced by an OpenSSH (or Sun SSH) server if it receives more failed authentication attempts than it is willing to tolerate.
This can easily happen if you are using Pageant and have a large number of keys loaded into it, since these servers count each offer of a public key as an authentication attempt. This can be worked around by specifying the key that’s required for the authentication in the PuTTY configuration (see section 4.23.8); PuTTY will ignore any other keys Pageant may have, but will ask Pageant to do the authentication, so that you don’t have to type your passphrase.
On the server, this can be worked around by disabling public-key authentication or (for Sun SSH only) by increasing MaxAuthTries in sshd_config.
10.6 «Out of memory»
This occurs when PuTTY tries to allocate more memory than the system can give it. This may happen for genuine reasons: if the computer really has run out of memory, or if you have configured an extremely large number of lines of scrollback in your terminal. PuTTY is not able to recover from running out of memory; it will terminate immediately after giving this error.
However, this error can also occur when memory is not running out at all, because PuTTY receives data in the wrong format. In SSH-2 and also in SFTP, the server sends the length of each message before the message itself; so PuTTY will receive the length, try to allocate space for the message, and then receive the rest of the message. If the length PuTTY receives is garbage, it will try to allocate a ridiculous amount of memory, and will terminate with an «Out of memory» error.
This can happen in SSH-2, if PuTTY and the server have not enabled encryption in the same way (see question A.7.3 in the FAQ).
This can also happen in PSCP or PSFTP, if your login scripts on the server generate output: the client program will be expecting an SFTP message starting with a length, and if it receives some text from your login scripts instead it will try to interpret them as a message length. See question A.7.4 for details of this.
10.7 «Internal error», «Internal fault», «Assertion failed»
Any error beginning with the word «Internal» should never occur. If it does, there is a bug in PuTTY by definition; please see appendix B and report it to us.
Similarly, any error message starting with «Assertion failed» is a bug in PuTTY. Please report it to us, and include the exact text from the error message box.
10.8 «Unable to use key file», «Couldn’t load private key», «Couldn’t load this key»
Various forms of this error are printed in the PuTTY window, or written to the PuTTY Event Log (see section 3.1.3.1) when trying public-key authentication, or given by Pageant when trying to load a private key.
If you see one of these messages, it often indicates that you’ve tried to load a key of an inappropriate type into PuTTY, Plink, PSCP, PSFTP, or Pageant.
You may have tried to load an SSH-2 key in a «foreign» format (OpenSSH or ssh.com) directly into one of the PuTTY tools, in which case you need to import it into PuTTY’s native format (*.PPK) using PuTTYgen – see section 8.2.12.
Alternatively, you may have specified a key that’s inappropriate for the connection you’re making. The SSH-2 and the old SSH-1 protocols require different private key formats, and a SSH-1 key can’t be used for a SSH-2 connection (or vice versa).
10.9 «Server refused our key», «Server refused our public key», «Key refused»
Various forms of this error are printed in the PuTTY window, or written to the PuTTY Event Log (see section 3.1.3.1) when trying public-key authentication.
If you see one of these messages, it means that PuTTY has sent a public key to the server and offered to authenticate with it, and the server has refused to accept authentication. This usually means that the server is not configured to accept this key to authenticate this user.
This is almost certainly not a problem with PuTTY. If you see this type of message, the first thing you should do is check your server configuration carefully. Common errors include having the wrong permissions or ownership set on the public key or the user’s home directory on the server. Also, read the PuTTY Event Log; the server may have sent diagnostic messages explaining exactly what problem it had with your setup.
Section 8.3 has some hints on server-side public key setup.
10.10 «Access denied», «Authentication refused»
Various forms of this error are printed in the PuTTY window, or written to the PuTTY Event Log (see section 3.1.3.1) during authentication.
If you see one of these messages, it means that the server has refused all the forms of authentication PuTTY has tried and it has no further ideas.
It may be worth checking the Event Log for diagnostic messages from the server giving more detail.
This error can be caused by buggy SSH-1 servers that fail to cope with the various strategies we use for camouflaging passwords in transit. Upgrade your server, or use the workarounds described in section 4.28.11 and possibly section 4.28.12.
10.11 «No supported authentication methods available»
This error indicates that PuTTY has run out of ways to authenticate you to an SSH server. This may be because PuTTY has TIS or keyboard-interactive authentication disabled, in which case see section 4.23.4 and section 4.23.5.
10.12 «Incorrect MAC received on packet» or «Incorrect CRC received on packet»
This error occurs when PuTTY decrypts an SSH packet and its checksum is not correct. This probably means something has gone wrong in the encryption or decryption process. It’s difficult to tell from this error message whether the problem is in the client, in the server, or in between.
In particular, if the network is corrupting data at the TCP level, it may only be obvious with cryptographic protocols such as SSH, which explicitly check the integrity of the transferred data and complain loudly if the checks fail. Corruption of protocols without integrity protection (such as HTTP) will manifest in more subtle failures (such as misdisplayed text or images in a web browser) which may not be noticed.
Occasionally this has been caused by server bugs. An example is the bug described at section 4.28.8, although you’re very unlikely to encounter that one these days.
In this context MAC stands for Message Authentication Code. It’s a cryptographic term, and it has nothing at all to do with Ethernet MAC (Media Access Control) addresses, or with the Apple computer.
10.13 «Incoming packet was garbled on decryption»
This error occurs when PuTTY decrypts an SSH packet and the decrypted data makes no sense. This probably means something has gone wrong in the encryption or decryption process. It’s difficult to tell from this error message whether the problem is in the client, in the server, or in between.
If you get this error, one thing you could try would be to fiddle with the setting of «Miscomputes SSH-2 encryption keys» (see section 4.28.10) or «Ignores SSH-2 maximum packet size» (see section 4.28.5) on the Bugs panel.
10.14 «PuTTY X11 proxy: various errors»
This family of errors are reported when PuTTY is doing X forwarding. They are sent back to the X application running on the SSH server, which will usually report the error to the user.
When PuTTY enables X forwarding (see section 3.4) it creates a virtual X display running on the SSH server. This display requires authentication to connect to it (this is how PuTTY prevents other users on your server machine from connecting through the PuTTY proxy to your real X display). PuTTY also sends the server the details it needs to enable clients to connect, and the server should put this mechanism in place automatically, so your X applications should just work.
A common reason why people see one of these messages is because they used SSH to log in as one user (let’s say «fred»), and then used the Unix su command to become another user (typically «root»). The original user, «fred», has access to the X authentication data provided by the SSH server, and can run X applications which are forwarded over the SSH connection. However, the second user («root») does not automatically have the authentication data passed on to it, so attempting to run an X application as that user often fails with this error.
If this happens, it is not a problem with PuTTY. You need to arrange for your X authentication data to be passed from the user you logged in as to the user you used su to become. How you do this depends on your particular system; in fact many modern versions of su do it automatically.
10.15 «Network error: Software caused connection abort»
This is a generic error produced by the Windows network code when it kills an established connection for some reason. For example, it might happen if you pull the network cable out of the back of an Ethernet-connected computer, or if Windows has any other similar reason to believe the entire network has become unreachable.
Windows also generates this error if it has given up on the machine at the other end of the connection ever responding to it. If the network between your client and server goes down and your client then tries to send some data, Windows will make several attempts to send the data and will then give up and kill the connection. In particular, this can occur even if you didn’t type anything, if you are using SSH-2 and PuTTY attempts a key re-exchange. (See section 4.20.2 for more about key re-exchange.)
(It can also occur if you are using keepalives in your connection. Other people have reported that keepalives fix this error for them. See section 4.14.1 for a discussion of the pros and cons of keepalives.)
We are not aware of any reason why this error might occur that would represent a bug in PuTTY. The problem is between you, your Windows system, your network and the remote system.
10.16 «Network error: Connection reset by peer»
This error occurs when the machines at each end of a network connection lose track of the state of the connection between them. For example, you might see it if your SSH server crashes, and manages to reboot fully before you next attempt to send data to it.
However, the most common reason to see this message is if you are connecting through a firewall or a NAT router which has timed the connection out. See question A.7.8 in the FAQ for more details. You may be able to improve the situation by using keepalives; see section 4.14.1 for details on this.
Note that Windows can produce this error in some circumstances without seeing a connection reset from the server, for instance if the connection to the network is lost.
10.17 «Network error: Connection refused»
This error means that the network connection PuTTY tried to make to your server was rejected by the server. Usually this happens because the server does not provide the service which PuTTY is trying to access.
Check that you are connecting with the correct protocol (SSH, Telnet or Rlogin), and check that the port number is correct. If that fails, consult the administrator of your server.
10.18 «Network error: Connection timed out»
This error means that the network connection PuTTY tried to make to your server received no response at all from the server. Usually this happens because the server machine is completely isolated from the network, or because it is turned off.
Check that you have correctly entered the host name or IP address of your server machine. If that fails, consult the administrator of your server.
Unix also generates this error when it tries to send data down a connection and contact with the server has been completely lost during a connection. (There is a delay of minutes before Unix gives up on receiving a reply from the server.) This can occur if you type things into PuTTY while the network is down, but it can also occur if PuTTY decides of its own accord to send data: due to a repeat key exchange in SSH-2 (see section 4.20.2) or due to keepalives (section 4.14.1).
10.19 «Network error: Cannot assign requested address»
This means that the operating system rejected the parameters of the network connection PuTTY tried to make, usually without actually trying to connect to anything, because they were simply invalid.
A common way to provoke this error is to accidentally try to connect to port 0, which is not a valid port number.
PuTTY is a free-to-use software used to connect to remote computers over a secure connection. It can be used to create a Secure Shell (SSH) between 2 devices, open a Terminal Over A Network (telnet) connection, and offer a few other options as well. However, it can throw a few errors from time to time.
Today we are going to address a common fatal error that many users have experienced using the PuTTY software, which goes as follows:
Network Error: Connection Timed Out
A fatal error means that the software throws an error without an intimation or a warning without saving its state, and the user cannot perform any further actions.
An SSH connection can be established between a host (local) computer and a server (remote) device. This allows users to gain control of the remote device through a Command Line Interface (CLI) – which is very much similar to Remote Desktop Connection (RDC). The only difference is that the RDC has a Graphical User Interface (GUI).
Although SSH is mostly used to connect to devices having a CLI-based operating system (like Linux distros), it can also be used to connect to Windows computers as well.
A Windows 11/10 computer has a built-in SSH client and a server – meaning it can be used to connect to a remote PC using SSH, and it can be connected to as well. However, setting up the SSH server on a Windows computer needs some configuration, which we have discussed further down this post.
If you are an IT professional, then you must have used the PuTTY software at least once in your lifetime. Which is why you must understand that sometimes PuTTY displays this error message even when you have entered the correct information in it (which includes the IP address, the protocol, and the port number to be used).
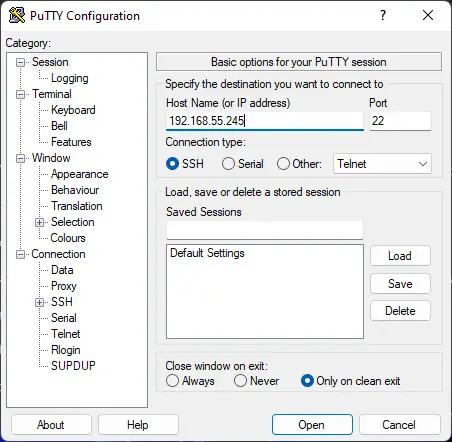
Why “Connection Timed Out” Error Occurs
When the SSH protocol is establishing the connection between the 2 devices, the client sends out a message to the server, to which the server responds. However, if the client does not receive a reply after multiple attempts, the client prompts an error message stating “Connection timed out.”
Therefore, it can be concluded that PuTTY has been unsuccessful in establishing an SSH connection with the remote device. This can be due to several different reasons:
- The remote server’s IP address is inaccessible.
- The remote server’s firewall is blocking the respective SSH port.
- SSH and dependent services are disabled.
- Antivirus is blocking SSH traffic.
Let us now show you how to fix the problem so you can successfully connect to the remote device using the SSH protocol in PuTTY.
Confirm IP Access
To start with, confirm that the remote server is accessible from the client machine. This is most conveniently done by performing a ping test. Pinging the server from the client will ensure that the network connection between the 2 devices is valid.
Enter the following cmdlet in the Command Prompt while replacing IPAddress with the IP address of the remote PC you want to SSH.
ping IPAddress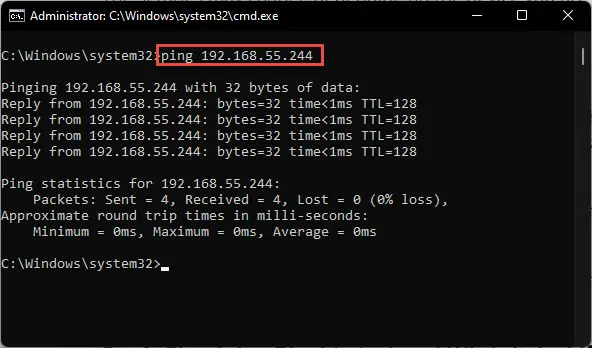
If you find that the ping did not return a reply, this means that either the machine is not on the same network as yours, or the server’s firewall is up, which is blocking both the ping and the SSH connection.
Disable Windows Firewall
Windows firewall blocks most ports by default. Log into your server using the portal (or physically accessing the machine) and disable its firewall by performing these steps:
-
Open Windows Firewall by typing in firewall.cpl in the Run Command box.
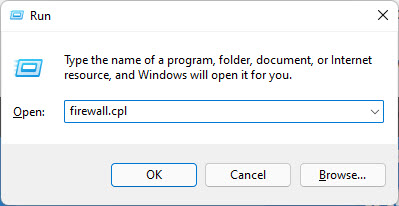
Open firewall -
Now click Turn Windows Defender Firewall on or off from the left.
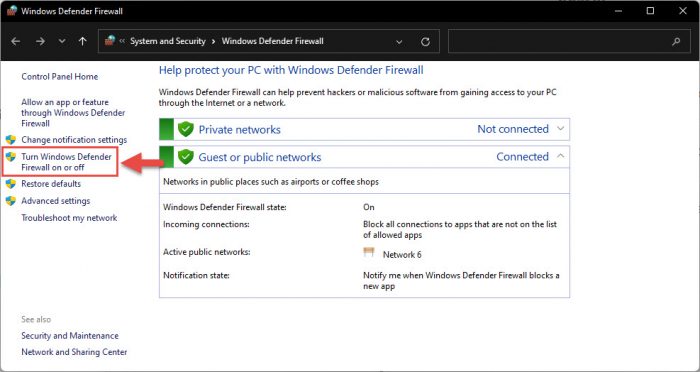
Manage Windows firewall -
Now select Turn off Windows Defender Firewall under every network profile visible. Once done, click OK to save the changes.
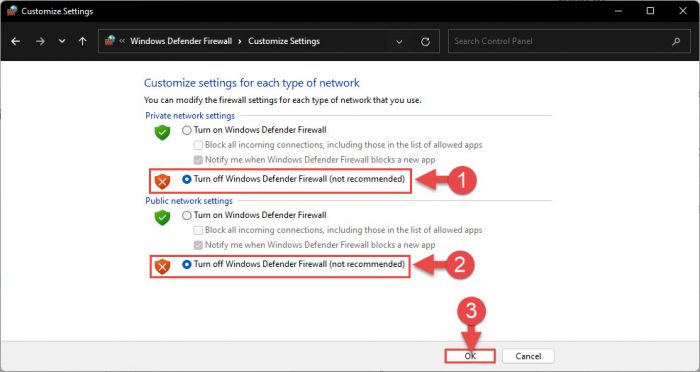
Turn off firewall
Now recheck if you can ping from the client machine. If yes, then retry the SSH connection and see if it works. If it still doesn’t, continue to perform the following solutions to mitigate the problem.
Check if SSH is Enabled
As we mentioned at the beginning of this post, an SSH server needs to be configured on a Windows PC before you can connect to it. Perform the following steps on the server to enable SSH:
-
Navigate to the following:
Settings app >> Apps >> Optional features
-
Here, click View features in front of “Add an optional feature.”

View optional features -
In the “Add an optional feature” window, search for “Open.” From the search results, select OpenSSH Server, and then click Next.
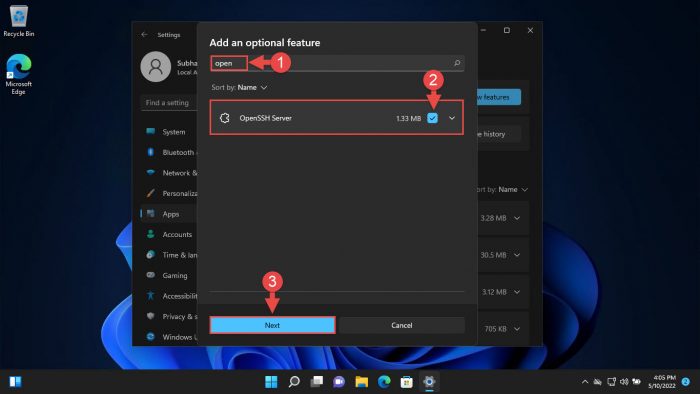
Select SSH feature -
In the next window, click Install.

Install SSH -
The feature will then be installed. When it does, you must manually enable the dependent services. Open the Services console by typing in services.msc in the Run Command box.

Open Services console -
Here, right-click OpenSSH SSH Server and click Properties from the context menu.
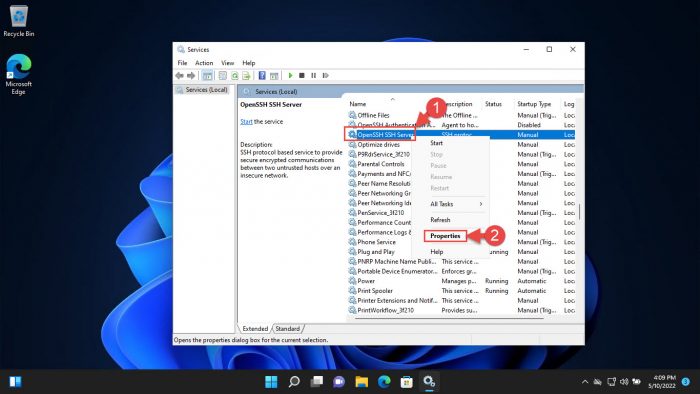
Open Properties -
In the Properties window, select “Startup type” as Automatic, then click Start to start the service. When it does, click Apply and Ok to save the changes.
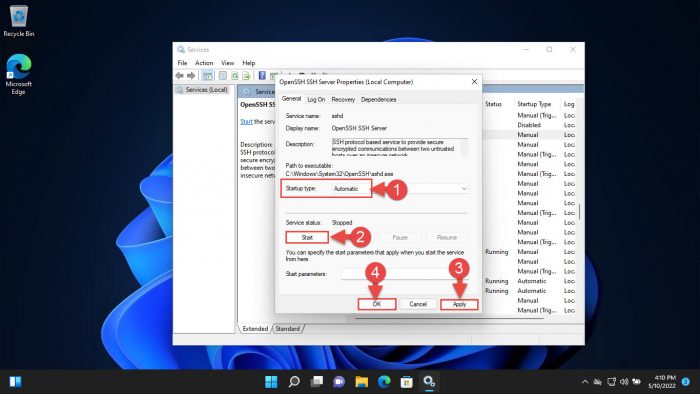
Start service
Now that SSH is configured, you should be able to connect to this machine from the client PC using PuTTY.
If you still experience the same error, there are still a few more things you can do.
Disable Antivirus
The built-in Windows Defender Antivirus in Windows 11 and 10, or any other third-party antivirus, can cause hindrance in an SSH connection. Try disabling them and check if it resolves the issue.
Learn how to disable Windows Defender temporarily. If you are using a third-party antivirus, you must disable it also.
Once disabled, check if you can successfully connect to the SSH server using PuTTY.
Conclusion
The “Network Error: Connection Timed Out” error in PuTTY occurs even before a user is asked to enter the credentials. Therefore, the error cannot be blamed on incorrect user account information. Thus, it is only possible that there is an issue with the connection itself.
If you are still unable to resolve the issue after performing all of the solutions above, then as a last resort, you can try rebooting the server as well as the client. This has often solved problems for many users, especially when certain responsible services are not behaving as they should. A system reboot usually fixes these things.
If this doesn’t work either, then it is likely that the default SSH port has been moved by someone. You can check the listening ports of a machine and find out which port is designated for SSH.
Also see:
Subhan Zafar is an established IT professional with interests in Windows and Server infrastructure testing and research, and is currently working with Itechtics as a research consultant. He has studied Electrical Engineering and is also certified by Huawei (HCNA & HCNP Routing and Switching).
Неполадки, связанные с работой SSH совсем не редкость и возникают как по причине неправильных действий пользователей, таки из-за неправильно заданной конфигурации самой системы SSH. Но в любом случае, для устранения всевозможных неполадок, нужно уметь применять определённые методы, помогающие найти и исправить неполадку. В этой статье будут рассмотрены различные ситуации, в которых могут возникнуть ошибки c подключением по SSH, а также методы их устранения.
Содержание
- Неправильное имя хоста
- Ошибка с истечением времени соединения
- Отклонение соединения
- Настройка брандмауэра
- Проверка состояния сервера SSH
- Проверка порта для работы SSH
- Заключение
Неправильное имя хоста
При выполнении команды подключения по SSH на стороне клиента может быть получена ошибка:
$ ssh user@hostname.com
ssh: Could not resolve hostname hostname.com: Name or service not known
Это значит, что имя хоста «hostname.com» не может быть сопоставлено с IP-адресом сервера SSH. Зачастую, это связано с работой DNS. В первую очередь, следует убедиться в правильности написания самого имени хоста. Также можно проверить разрешение этого хоста с помощью команды ping или сторонних сервисов. Если же во всех случаях наблюдается та же ошибка, можно попытаться подключиться, используя непосредственно IP-адрес:
$ ssh user@123.123.123.123
Ошибка с истечением времени соединения
Такая ошибка происходит, когда сервер SSH не может ответить подключающемуся к нему клиенту в течение определённого промежутка времени:
$ ssh user@123.123.123.123
ssh: connect to host 123.123.123.123 port 22:
Connection timed out
Для исправления этой ошибки необходимо в первую очередь сделать следующее:
- проверить правильность имени и/или IP-адреса хоста сервера SSH;
- проверить, что указанный порт (22) доступен для подключения. В некоторых сетях он может быть заблокирован;
- проверить режим политики брандмауэра, политика которого по-умолчанию должна быть не DROP.
Отклонение соединения
Данная ошибка схожа с ошибкой истечения времени соединения и выглядит следующим образом:
$ ssh user@123.123.123.123
ssh: connect to host 123.123.123.123 port 22:
Connection refused
Методы её устранения такие же, как и в случае, описанном в предыдущей главе, но дополнительно нужно проверить, что для подключения используется именно тот порт, который настроен на стороне сервера. Иногда, в целях безопасности его задают отличным от стандартного 22.
Настройка брандмауэра
Как известно, брандмауэры могут блокировать определённые порты и/или сетевые сервисы. Брандмауэров существует множество и в разных дистрибутивах Linux используются разные брандмауэры. Так, для Ubuntu это UFW, а для CentOS – FirewallD. Также можно использовать стандартный сервис iptables.
В зависимости от того, какой порт используется для подключения по SSH, необходимо настроить соответствующее подключение для обслуживания брандмауэром. Для начала нужно узнать, какие правила используются в данный момент. Для iptables это позволяет сделать команда:
$ iptables -nL
Chain INPUT (policy ACCEPT)
target    prot   opt   source                           destination
Chain FARWARD (policy ACCEPT)
target    prot   opt   source                           destination
Chain OUTPUT (policy ACCEPT)
target    prot   opt   source                           destination
Если политика iptables по-умолчанию DROP (или REJECT), то необходимо для правил цепочки INPUT задать разрешение для порта, используемого для SSH.
Для брандмауэра FirewallD получить список используемых правил позволяет команда:
$ firewall-cmd --list-services
Для работы SSH в выводе должно быть правило «dhcpv6-client http ssh». Также необходимо проверить и порт, заданный для SSH. Для этого вместо опции «—list-services» нужно использовать «—list-ports».
Для брандмауэра UFW нужно выполнить:
$ ufw status
Status: active
To Action From
-- ------- ------
22 LIMIT Anywhere
443 ALLOW Anywhere
. . .
22 (v6) LIMIT Anywhere (v6)
Как видно, в списке должен присутствовать порт SSH, в данном случае 22. Он может быть и другим, в зависимости от того, что задано в настройках сервера SSH.
При получении ошибок подключения также не лишним будет проверить, запущен ли сам сервер SSH. Это можно сделать при помощи команды systemctl:
$ systemctl status sshd
sshd.service – OpenSSH server daemon
Loaded: loaded (/usr/lib/systemd/system/sshd.service; enabled)
Active: active (running) since Fri 2019-04-05 11:00:46 EDT; 1 mounth 1 days ago
Process: 899 ExecStartPre=/usr/sbin/sshd-keygen (code=exited, status=0/SUCCES)
Main PID: 906 (sshd)
Cgroup: /system.slice/sshd.service
├─ 906 /usr/sbin/sshd -D
├─26941 sshd: [accepted]
└─26942 sshd: [net]
В случае, если демон SSH не работает, то в строке Active будет следующее:
Active: inactive (dead) since Fri 2019-04-05 08:36:13 EDT; 2s ago
Для запуска демона следует использовать команду:
$ systemctl start sshd
Следует также обратить внимание на то, что обычно в дистрибутивах CentOS демон SSH называется sshd, а в Ubuntu – ssh.
Проверка порта для работы SSH
Чтобы проверить, какой порт настроен для использования сервером SSH, можно просмотреть соответствующий параметр в конфигурационном файле /etc/ssh/ssh_config. Для этого можно использовать команду grep для поиска по файлу:
$ grep Port /etc/ssh/sshd_config
Port 22
Как видно из данного вывода, сервер SSH настроен на работу по стандартному порту 22. Параметр Port можно переопределять, но тогда необходимо внести изменения в соответствующие правила для брандмауэров, а также проинформировать клиентов о том, какой порт используется для подключения по SSH вместо стандартного.
Заключение
В заключение следует заметить, что в данной статье были рассмотрены лишь самые общие и распространённые неполадки, связанные с подключением по SSH. Обычно это легко выявляемые и быстро устраняемые ошибки.
Если вы нашли ошибку, пожалуйста, выделите фрагмент текста и нажмите Ctrl+Enter.