Skip to content
Как включить репозиторий PowerTools на компьютере с ОС CentOS 8 / RHEL 8 Linux? Репозиторий PowerTools не включен по умолчанию в CentOS 8 / RHEL 8 Linux. Этот репозиторий содержит ряд пакетов, необходимых в качестве зависимостей при установке других приложений и в основном сборке приложений из исходного кода.
Вот некоторые из пакетов в PowerTools:
- device-mapper-devel
- kmod-devel
- lame-devel
- maven-common
- mariadb-common
- mingw64 and mesa packages
- opencv
- perl-*
- parted-devel
- xorg-x11-server-devel
- and many others
Чтобы иметь возможность включить PowerTools Repository на CentOS 8 / RHEL 8 из интерфейса командной строки. Сначала установите пакет плагинов DNF:
sudo dnf -y install dnf-plugins-coreУстановите EPEL-репозиторий — PowerTools-репозиторий и EPEL-репозиторий являются лучшими друзьями. Так что включите репозиторий EPEL.
sudo dnf -y install https://dl.fedoraproject.org/pub/epel/epel-release-latest-8.noarch.rpmВключить репозиторий PowerTools в CentOS 8 / RHEL 8:
sudo dnf config-manager --set-enabled powertoolsПодтвердите, что он включен:
$ sudo dnf repolist
Last metadata expiration check: 0:00:44 ago on Fri 24 Apr 2020 09:00:56 PM CEST.
repo id                                                 repo name                                                                                 status
AppStream                                               CentOS-8 - AppStream                                                                      4,830
BaseOS                                                  CentOS-8 - Base                                                                           1,661
PowerTools                                              CentOS-8 - PowerTools                                                                     1,456
ceph-nautilus                                           Ceph=Nautilus                                                                               119
*epel                                                   Extra Packages for Enterprise Linux 8 - x86_64                                            5,335
extras                                                  CentOS-8 - Extras                                                                            15
Теперь вы можете устанавливать пакеты из репозитория PowerTools в системе CentOS 8 / RHEL 8 Linux.
Мы используем файлы cookie на нашем веб-сайте, чтобы предоставить вам наиболее релевантный опыт, запоминая ваши предпочтения и повторные посещения. Нажимая «Принять все», вы соглашаетесь на использование ВСЕХ файлов cookie. Однако вы можете посетить «Настройки файлов cookie», чтобы предоставить контролируемое согласие.
Background
Playing around with installing applications on our Linux box running CentOS.
It is a recently rebuilt Linux box and it is running CentOS version 8.
Ran into a little error in the middle of the consequent application installs.
We will talk about the error in this post.
Error Image

Error Text
Error: No matching repo to modify: PowerTools.
Scenario
DNF
Config-Manager
Set-Enabled
PowerTools
Image
Text
sudo dnf -y config-manager --set-enabled PowerTools
TroubleShooting
Outline
- DNF
- DNF repolist
- CentOS
- Version
DNF
DNF repolist
Syntax
dnf repolist
Sample
dnf repolist
Output
Output – Image

Output – Text
>dnf repolist
repo id                                                   repo name
appstream                                                 CentOS Linux 8 - AppStream
baseos                                                    CentOS Linux 8 - BaseOS
epel                                                      Extra Packages for Enterprise Linux 8 - x86_64
epel-modular                                              Extra Packages for Enterprise Linux Modular 8 - x86_64
extras                                                    CentOS Linux 8 - Extras
google-chrome                                             google-chrome
>
CentOS
Version
Let us confirm the major and minor version numbers of the CentOS install.
Syntax
hostnamectl
Sample
hostnamectl
Output
Output – Image

Output – Text
>hostnamectl
Static hostname: labLinux
Icon name: computer-desktop
Chassis: desktop
Machine ID: 89bc2e35a31440b893fc1a04ba918e49
Boot ID: fcce2f3eaef74154ba4c22e3f6875bd6
Operating System: CentOS Linux 8
CPE OS Name: cpe:/o:centos:centos:8
Kernel: Linux 4.18.0-305.7.1.el8_4.x86_64
Architecture: x86-64
>
Explanation
- Operating System
- CentOS Linux 8
- Kernel
- Kernel: Linux 4.18.0-305.7.1.el8_4.x86_64
- el8_4.x86_64
- Marketing Version Major:- 8
- Marketing Version Minor:- 4
- Kernel: Linux 4.18.0-305.7.1.el8_4.x86_64
Remediation
Outline
- CentOS.Org
- Naming Change
- DNF
- DNF Config-Manager > Set-Enabled > PowerTools
CentOS.Org
Naming Change
Thankfully, the CentOS.org organization has post confirming and detailing the naming change.
It is available at link.
Image

Text
Recently we’ve done work so that CentOS Stream operates as a distribution independently of CentOS Linux ( Link )
Continuing this work, we made some changes in CentOS Linux 8.3.2011 that make the process of migrating from CentOS Linux to CentOS Stream easier. This meant that we needed to change the name of some files in /etc/yum.repos.d and update repoids to match.
As a good practice with any update, if you have made any local customizations to files in /etc (including the .repo files), you will want to compare with any .rpmnew files that are created for you.
You may also want to update any scripts that you have that specify repoids using the —enablerepo= or —disablerepo= flags
| Repoid (8.2.2004 and before) | Repoid (8.3.2011 and later) |
|---|---|
| BaseOS | baseos |
| AppStream | appstream |
| PowerTools | powertools |
| centosplus | plus |
| HighAvailability | ha |
| base-debuginfo | debuginfo |
| Devel | devel |
| BaseOS-source | baseos-source |
| AppStream-source | appstream-source |
| centosplus-source | plus-source |
| base-debuginfo | debuginfo |
DNF
Config-Manager
Set-Enabled
PowerTools
Image

Text
sudo dnf -y config-manager --set-enabled powertools
Validation
DNF
repolist
dnf repolist
Syntax
dnf repolist
Sample
dnf repolist
Image

Text
> dnf repolist
repo id             repo name
appstream           CentOS Linux 8 - AppStream
baseos              CentOS Linux 8 - BaseOS
epel                Extra Packages for Enterprise Linux 8 - x86_64
epel-modular        Extra Packages for Enterprise Linux Modular 8 - x86_64
extras              CentOS Linux 8 - Extras
google-chrome       google-chrome
powertools          CentOS Linux 8 - PowerTools
>
Explanation
- Running “dnf repolist” reveals we now have
- repo id
- powertools
- repo name
- CentOS Linux 8 – PowerTools
- repo id
References
- CentOS.Org
- CentOS-8 (2011) Release Notes
- Manuals / ReleaseNotes / CentOS8.2011
Link
- Manuals / ReleaseNotes / CentOS8.2011
- CentOS-8 (2011) Release Notes
- FedoraProject.Org
- System Administrators Guide
- Adding, Enabling, and Disabling a DNF Repository
Link
- Adding, Enabling, and Disabling a DNF Repository
- System Administrators Guide
- 2DayGeek
- Prakash Subramanian
- How to list the Enabled/Active Repositories in Linux
Link
- How to list the Enabled/Active Repositories in Linux
- Prakash Subramanian
CentOS Linux 8 - BaseOS                         1.6 MB/s | 1.6 kB     00:00
Importing GPG key 0x8483C65D:
 Userid     : "CentOS (CentOS Official Signing Key) <security@centos.org>"
 Fingerprint: 99DB 70FA E1D7 CE22 7FB6 4882 05B5 55B3 8483 C65D
 From       : /etc/pki/rpm-gpg/RPM-GPG-KEY-centosofficial
Key imported successfully
Running transaction check
Transaction check succeeded.
Running transaction test
Transaction test succeeded.
Running transaction
  Preparing        :                                                        1/1
  Installing       : python3-six-1.11.0-8.el8.noarch                        1/5
  Installing       : python3-dateutil-1:2.6.1-6.el8.noarch                  2/5
  Installing       : python3-dnf-plugins-core-4.0.17-5.el8.noarch           3/5
  Installing       : dnf-plugins-core-4.0.17-5.el8.noarch                   4/5
  Installing       : epel-release-8-8.el8.noarch                            5/5
  Running scriptlet: epel-release-8-8.el8.noarch                            5/5
  Verifying        : dnf-plugins-core-4.0.17-5.el8.noarch                   1/5
  Verifying        : python3-dateutil-1:2.6.1-6.el8.noarch                  2/5
  Verifying        : python3-dnf-plugins-core-4.0.17-5.el8.noarch           3/5
  Verifying        : python3-six-1.11.0-8.el8.noarch                        4/5
  Verifying        : epel-release-8-8.el8.noarch                            5/5

Installed:
  dnf-plugins-core-4.0.17-5.el8.noarch
  epel-release-8-8.el8.noarch
  python3-dateutil-1:2.6.1-6.el8.noarch
  python3-dnf-plugins-core-4.0.17-5.el8.noarch
  python3-six-1.11.0-8.el8.noarch

Complete!
Error: No matching repo to modify: PowerTools.
The command '/bin/sh -c dnf install --setopt tsflags=nodocs --refresh -y         dnf-plugins-core         epel-release     &&     dnf config-manager --set-enabled PowerTools     &&     dnf install --setopt tsflags=nodocs -y         "perl(Time::HiRes)"         autoconf         automake         clang         cmake         curl-devel         doxygen         findutils         gcc         gdb         git         glibc-langpack-en         hostname         krb5-devel         libcurl-devel         libedit-devel         libicu-devel         libidn-devel         libnghttp2-devel         libtool         libuuid-devel         libxml2-devel         lldb-devel         llvm         lttng-ust-devel         lzma         make         ncurses-devel         numactl-devel         openssl-devel         python3         python3-devel         readline-devel         sudo         swig         tar         wget         which         xz         zlib-devel     &&     dnf clean all' returned a non-zero code: 1
CentOS Linux 8 - BaseOS                         1.6 MB/s | 1.6 kB     00:00
Importing GPG key 0x8483C65D:
 Userid     : "CentOS (CentOS Official Signing Key) <security@centos.org>"
 Fingerprint: 99DB 70FA E1D7 CE22 7FB6 4882 05B5 55B3 8483 C65D
 From       : /etc/pki/rpm-gpg/RPM-GPG-KEY-centosofficial
Key imported successfully
Running transaction check
Transaction check succeeded.
Running transaction test
Transaction test succeeded.
Running transaction
  Preparing        :                                                        1/1
  Installing       : python3-six-1.11.0-8.el8.noarch                        1/5
  Installing       : python3-dateutil-1:2.6.1-6.el8.noarch                  2/5
  Installing       : python3-dnf-plugins-core-4.0.17-5.el8.noarch           3/5
  Installing       : dnf-plugins-core-4.0.17-5.el8.noarch                   4/5
  Installing       : epel-release-8-8.el8.noarch                            5/5
  Running scriptlet: epel-release-8-8.el8.noarch                            5/5
  Verifying        : dnf-plugins-core-4.0.17-5.el8.noarch                   1/5
  Verifying        : python3-dateutil-1:2.6.1-6.el8.noarch                  2/5
  Verifying        : python3-dnf-plugins-core-4.0.17-5.el8.noarch           3/5
  Verifying        : python3-six-1.11.0-8.el8.noarch                        4/5
  Verifying        : epel-release-8-8.el8.noarch                            5/5

Installed:
  dnf-plugins-core-4.0.17-5.el8.noarch
  epel-release-8-8.el8.noarch
  python3-dateutil-1:2.6.1-6.el8.noarch
  python3-dnf-plugins-core-4.0.17-5.el8.noarch
  python3-six-1.11.0-8.el8.noarch

Complete!
Error: No matching repo to modify: PowerTools.
The command '/bin/sh -c dnf install --setopt tsflags=nodocs --refresh -y         dnf-plugins-core         epel-release     &&     dnf config-manager --set-enabled PowerTools     &&     dnf install --setopt tsflags=nodocs -y         "perl(Time::HiRes)"         autoconf         automake         clang         cmake         curl-devel         doxygen         findutils         gcc         gdb         git         glibc-langpack-en         hostname         krb5-devel         libcurl-devel         libedit-devel         libicu-devel         libidn-devel         libnghttp2-devel         libtool         libuuid-devel         libxml2-devel         lldb-devel         llvm         lttng-ust-devel         lzma         make         ncurses-devel         numactl-devel         openssl-devel         python3         python3-devel         readline-devel         sudo         swig         tar         wget         which         xz         zlib-devel     &&     dnf clean all' returned a non-zero code: 1
CentOS
The Community ENTerprise Operating System
centOS 9, X Windows System
centOS 9, X Windows System
Post by wondergrandma » 2022/02/27 14:55:56

Re: centOS 9, X Windows System
Post by TrevorH » 2022/02/27 16:27:05

Re: centOS 9, X Windows System
Post by toracat » 2022/02/27 18:47:07
Re: centOS 9, X Windows System
Post by wondergrandma » 2022/02/28 10:10:33
Hi, it’s not in the grouplist. What i have in grouplist is «KDE Plasma Worspaces», but i have problems installing it too. I was googling for solution all tutorials said that i need to enable epel and powertools.
Installing epel worked fine, problem was when i tried to enable powertools. Can you help me to reslove it ?
For powertools I tried:
Re: centOS 9, X Windows System
Post by TrevorH » 2022/02/28 11:11:35

Re: centOS 9, X Windows System
Post by jlehtone » 2022/02/28 14:47:52
Источник
How to enable PowerTools Repository on Rocky Linux 8
If you are using the EPEL repository then also enable PowerTools repo on Rocky Linux server or desktop to install developer-related software packages. The command given in this tutorial can also be used for CentOS8 and RHEL8.
What is PowerTools?
PowerTools is a repository that is available for RedHat and its derivative Linux to download and install developer-related packages, tools, and libraries. Also, many software packages available in EPEL repo sometimes require PowerTools repo to get installed properly. This repository mainly requires when you want to build some applications using their source code.
Here are some packages available to install using the PowerTools repo:
- clucene-core-devel
- zziplib-devel
- xmlrpc-c-c++
- xmltoman.noarch
- boost -numpy
- turbojpeg-devel
- xz-lzma-compat
- transfig.x86_64
- tracker-miners
- xcb-util-devel
- xorg-x11-util-macros.noarch
- xorg-x11-xkb-utils-devel
- xmlsec1-openssl-devel
- xmlsec1-gcrypt
- And others…
Install DNF plugins package
Although it would already be installed on your Rocky system, however still run the below command to make sure it is there-
Install EPEL
If you are about to use PowerTools then I would recommend you to also enable EPEL because many time installing some software or building some package from its source code requires some dependencies that are available in EPEL, thus simply run-
Enable PowerTools repository on Rocky Linux 8
Now, finally, get PowerTools on your Rocky Linux/CentOS/AlmaLinux/RHEL 8 using the below-given command-
Update command
To flush the system cache and let it recognize the newly added repo of PowerTools, run once the update command before installing any package.
Check the Added repository on Rocky Linux
Let’s check what are the Repos are on our Linux system to download various packages using the command line package manager Yum or DNF.
In the below screenshot you can see we have four key repositories on our Rocky Linux that are –
Источник
PowerTools
Решил поставить mate на OL8 по иструкции надо выполнить комунду dnf config-manager –enable PowerTools но у меня выводит ошибку Ошибка: Нет подходящего репозитория для изменения: PowerTools. Я подумал что надо поставить другой EPEL рупозиторий, устанавливал по разному но ничего не вышло. идентификатор репозитория имя репозитория состояние epel Extra Packages for Enterprise Linux 8 — x86_ 5 267 ol8_UEKR6 Latest Unbreakable Enterprise Kernel Release 83 ol8_addons Oracle Linux 8 Addons (x86_64) 31 ol8_appstream Oracle Linux 8 Application Stream (x86_64) 11 657 ol8_baseos_latest Oracle Linux 8 BaseOS Latest (x86_64) 4 764 ol8_u1_baseos_base Oracle Linux 8.1 BaseOS (x86_64) 1 829 Помогите)

Идентификатор репозитария CodeReady Builder для OL8 вроде должен быть «codeready_builder». «PowerTools» — это название аналогичного репозитария для CentOS 8.
Я подключил codeready_builder. Не могу найти как установить «PowerTools» в гугле они просто ставят enable=1 У меня его нету в репозиториях, команда yum search PowerTools выдает что такого нету.
codeready_builder это PowerTools для OL8:
— Для RHEL 8 — «codeready-builder-for-rhel-8-x86_64-rpms».
— Для CentOS 8 — «PowerTools».
— Для Oracle Linux 8 — «codeready_builder».
Все 3 репозитария одни и те же; первый — оригинальный, а остальные — просто пересборка его же.
Источник
How to Install OpenStack on CentOS 8 with Packstack
Openstack is a free and open-source private cloud software through which we can manage compute, network and storage resources of our data center with an ease using a single dashboard and via openstack cli commands. In this article we will demonstrate on how to install Openstack on a CentOS 8 system with packstack. Packstack is a command line utility which deploy different components of openstack using puppet modules.
Openstack deployment with packstack is generally used for POC (proof of concept) purpose, so it is not recommended to use packstack for production deployment. Use TripleO method to deploy openstack in production environment.
Minimum System requirements for OpenStack
- Minimal CentOS 8
- Dual core Processor
- 8 GB RAM
- 40 GB free disk space
- Stable Internet Connection
- At least one nic card
My Lab setup details:
- Hostname – openstack.example.com
- IP – 192.168.1.8
- Flat Network – 192.168.1.0/24
Let’s deep dive into the openstack installation steps,
Step 1) Set the hostname and update /etc/hosts file
Open the terminal and set the hostname using the following hostnamectl command,
Run below echo command to append hostname entry in /etc/hosts file.
Step 2) Disable Network Manager and Configure Network using network-scripts
Network-Manager is the default tool in CentOS 8 to manager networks but for Openstack we must disable it because openstack networking will not work properly with network-manager. In place of network manager, we must install native network-scripts.
To disable network-manager run the following commands,
Run following dnf command to install native network-scripts
Once the network-scripts package is installed then we can manage networking (ifcfg-* files) using native network.service
Now let’s configure IP address in ifcfg-enp0s3 file and start network service
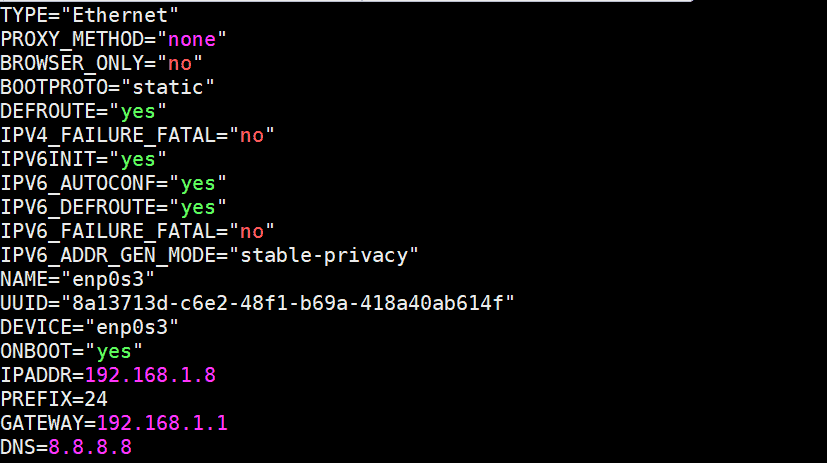
Save and exit the file and then start network service using following command,
Now verify whether IP is assigned to NIC (enp0s3) using ip command,

Step 3) Enable OpenStack repositories and install packstack utility
At time of writing this article, ussuri openstack was available, so run the following command to configure its repositories
Now installed all the available updates and reboot your system,
Once the system is available after the reboot, execute following dnf command to install packstack utility
Step 4) Generate answer file and install openstack using packstack
Use packstack command to generate the answer file,
Once the answer file is generated, edit the following parameters using vi editor,
Save and exit the file.
Replace the interface name (enp0s3) as per your setup.
Note: Default Tenant network type drive is set as “geneve” and default neutron type driver is set as “geneve and flat”. If wish to change these default parameters, then update following lines in answer file. In this demonstration i am not going to update these parameters.
Run the following command to initiate the openstack deployment using answer file.
Deployment will take around 20 to 30 minutes depending on your system’s hardware and internet speed. Once it is installed successfully, we will get the following:
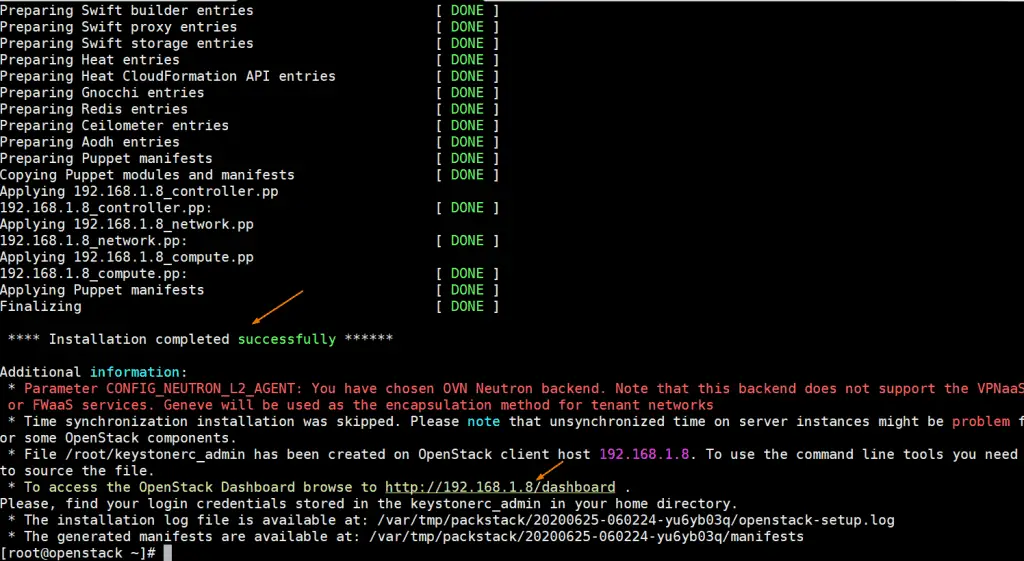
Now verify whether IP from enp03 interface is assigned to bridge br-ex and also confirm whether interface enp0s3 is added as a port in ovs-bridge.
Run the following commands:
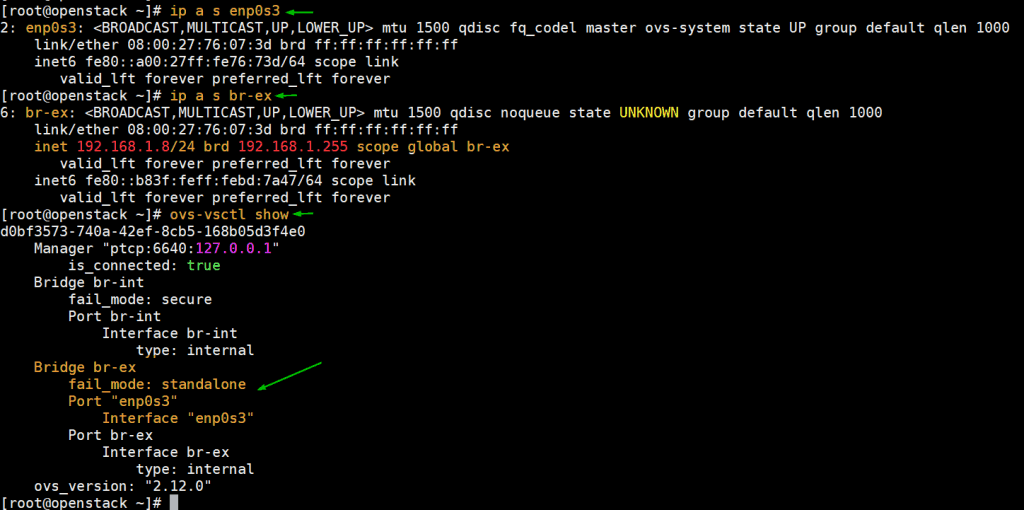
Perfect, above output confirms that installation was successful, and networking is also configured as per the answer file.
Step 5) Access Horizon Dashboard
Now try to login to Horizon dashboard. URL is already specified in the above output, in my case url is http://192.168.1.8/dashboard , Use the user name as admin and password that we specify in answer file.
We also refer the file “ keystonerc_admin ” for credentials
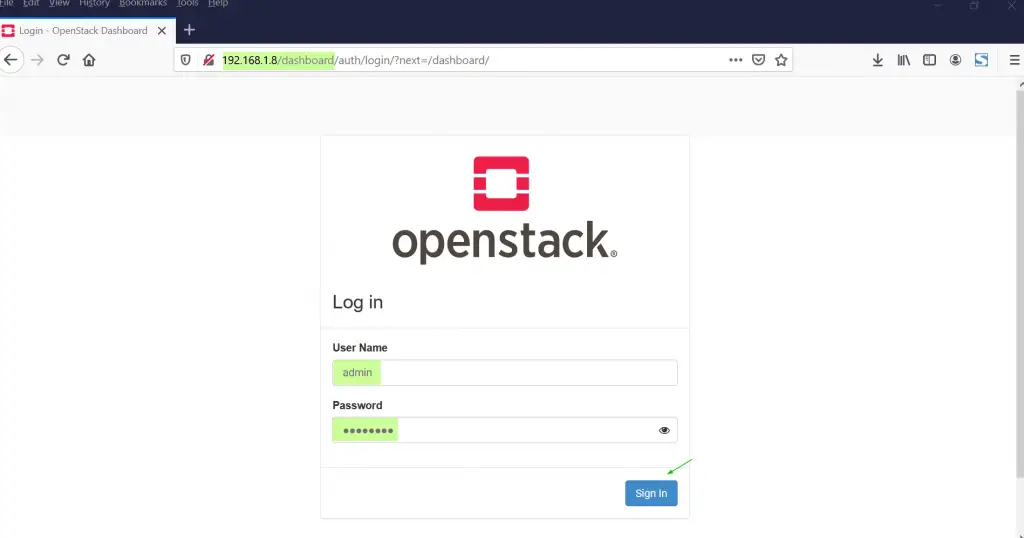
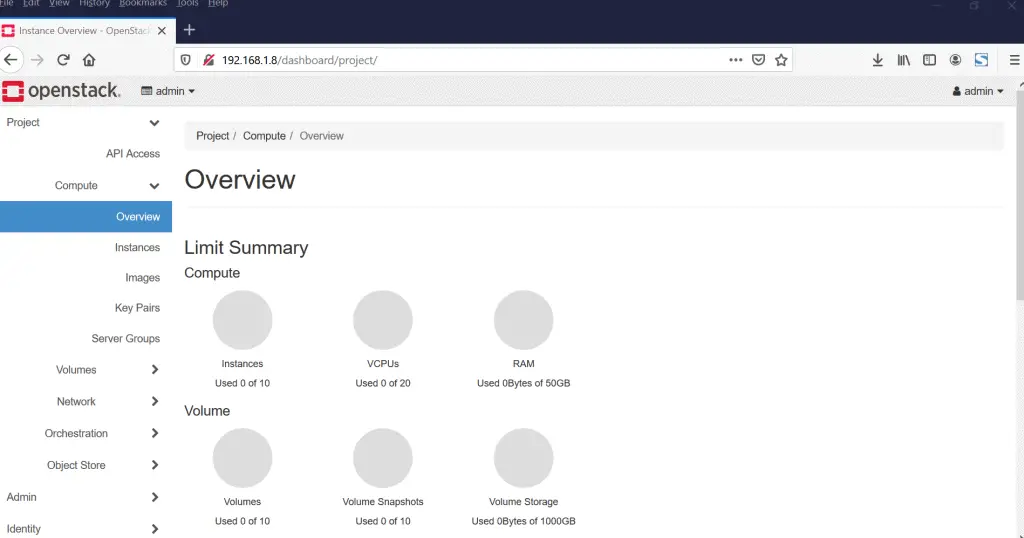
Now, let’s test this openstack deployment by launching an instance.
Step 6) Test and verify OpenStack installation by launching an instance
Before launching an instance in openstack, first we must create networks and router and glance image. So, let’s first create external network in admin tenant using following neutron commands,
Now add a subnet of your flat network to external network by running following neutron command.
Create a router by executing the following neutron command and set its gateway using external network
Create private network and attach a subnet to it. Run the following neutron command,
Add pvt_net interface to router “ dev_router ” using beneath neutron command,
Now Download Cirros image and then upload it to glance
Now head back to horizon dashboard and verify the network topology
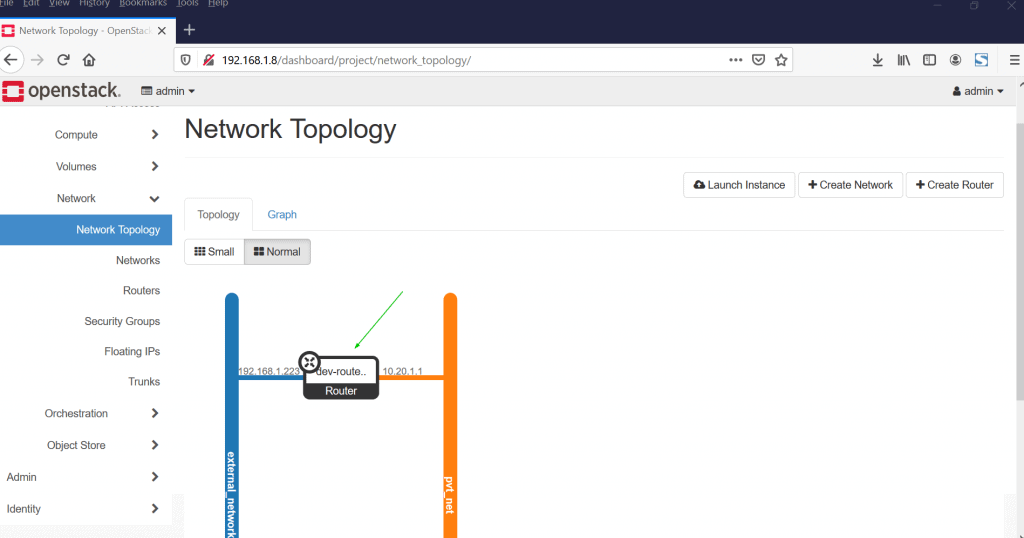
Perfect, above confirms that private and external network have been setup correctly along with the router.
One final step before creating a vm, update the default security group, add icmp and ssh ingress rules, click on “Security Groups” under the network Tab, Click on Manage Rules and then click on “Add rule”
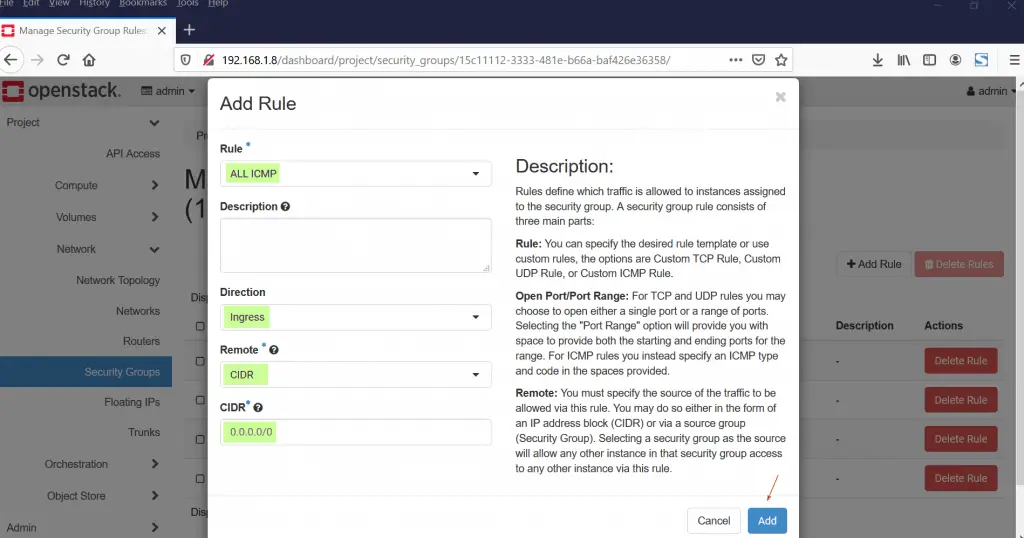
Similarly add rule for ssh
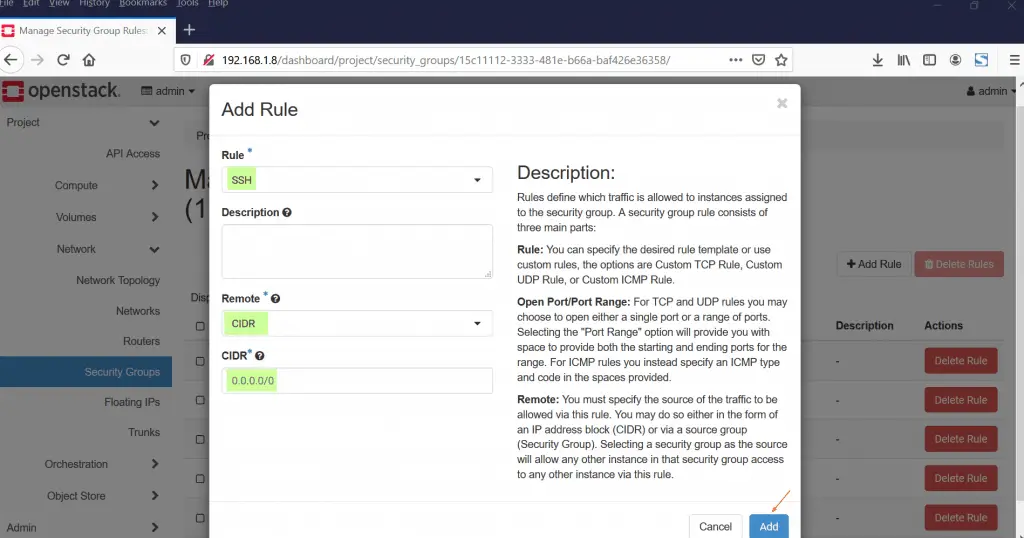
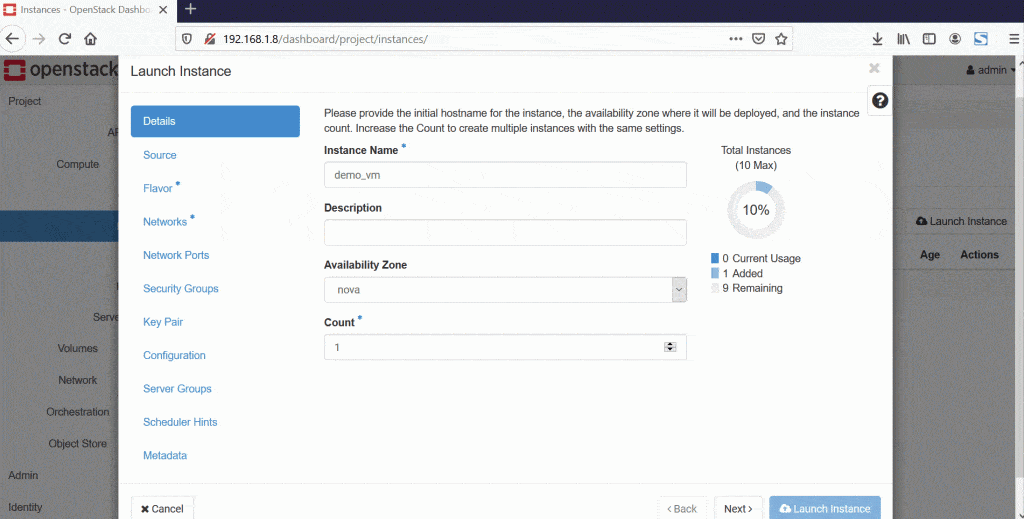
Now all the requirements for launching an openstack instance are fullfilled. Click on Compute Tab and then Choose Instances option and click on “Launch Instance”
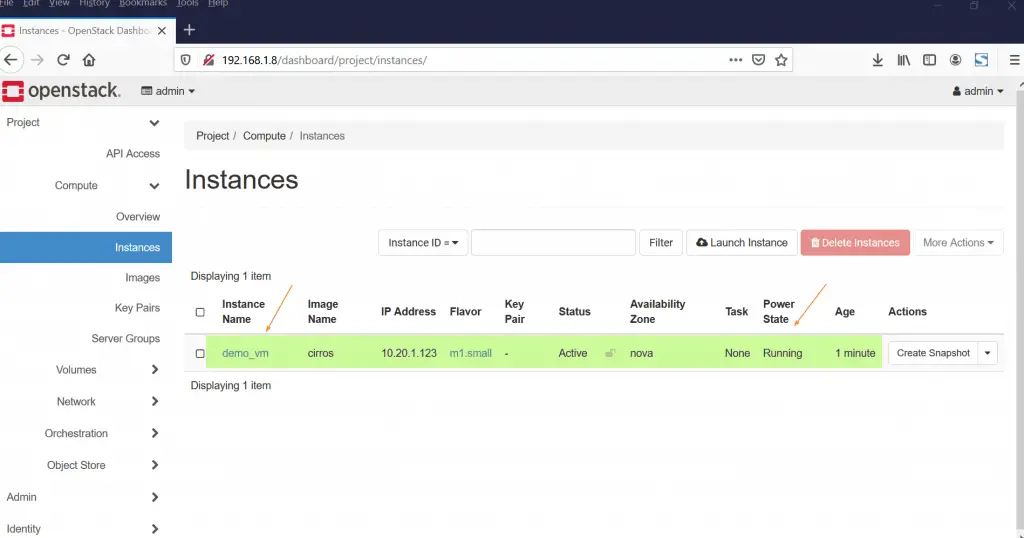
Once VM is launched successfully then we will get something like below,
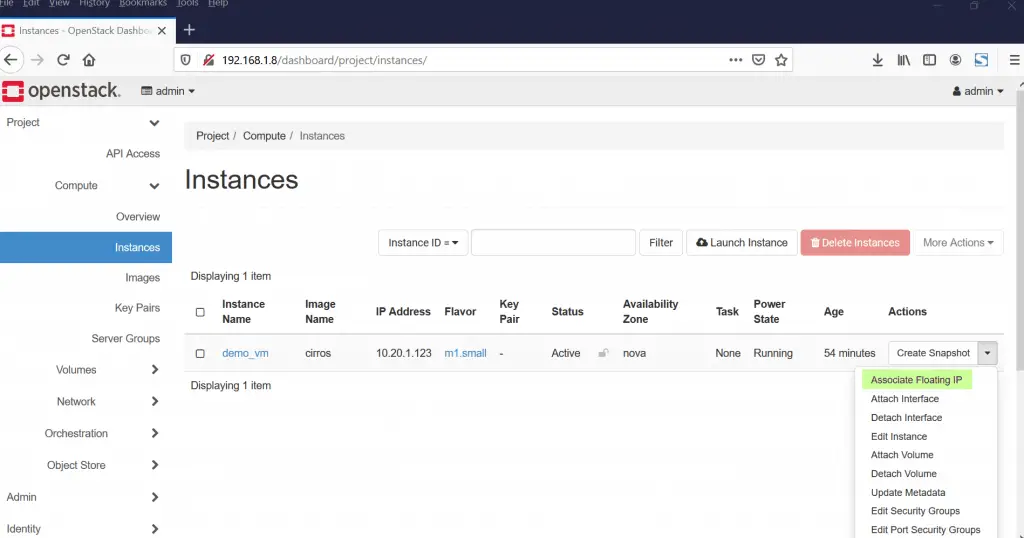
Now Associate floating IP to instance (demo_vm), Under the “Actions” Tab, Choose “Associate Floating IP”
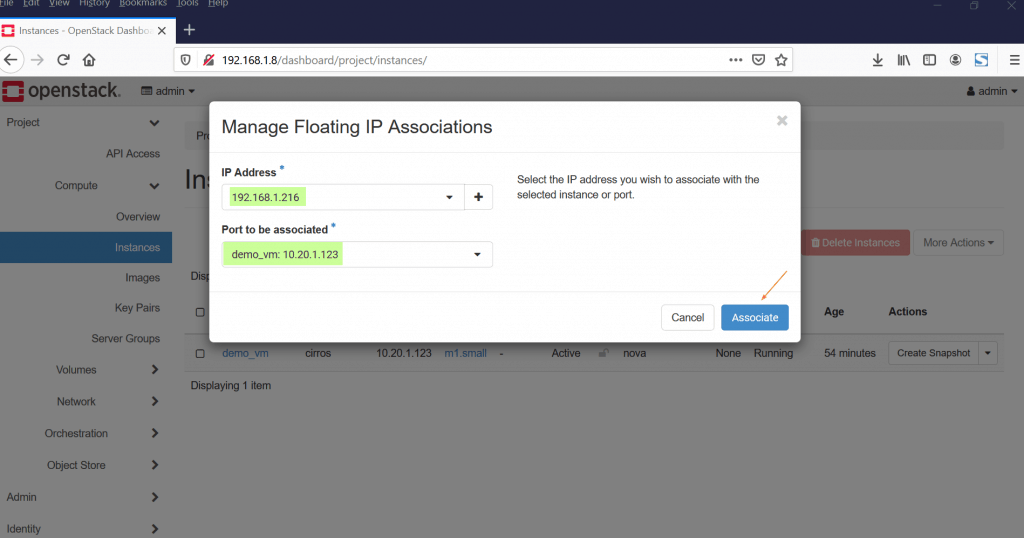
Now Choose IP or Click on + sign to get floating IP from external network and then associate it
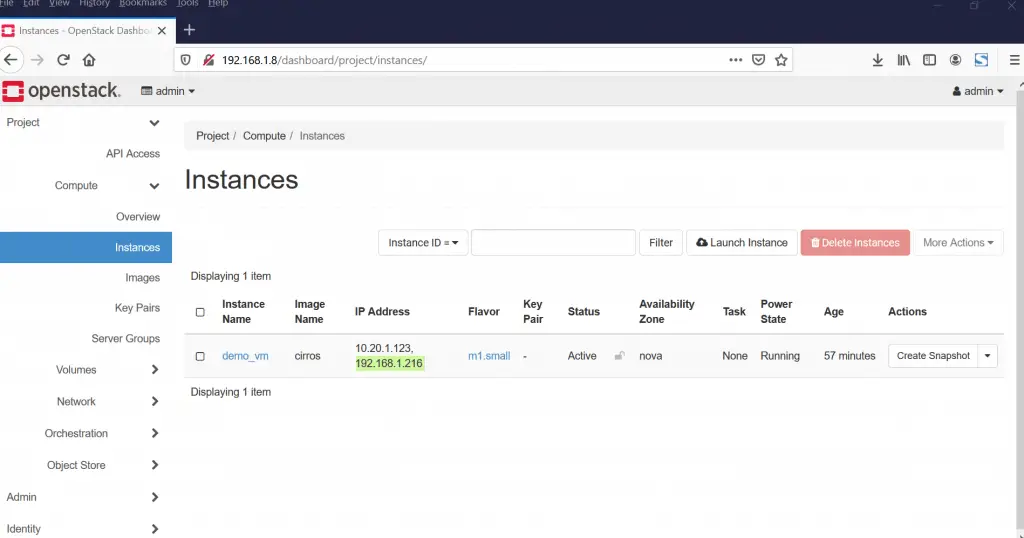
Once IP is associated to the VM then floating IP will be displayed for under ‘ IP Address ‘ option, example is shown below
Now try to access this demo_vm using the floating ip, use cirros as a user and ‘ gocubsgo ’ as password
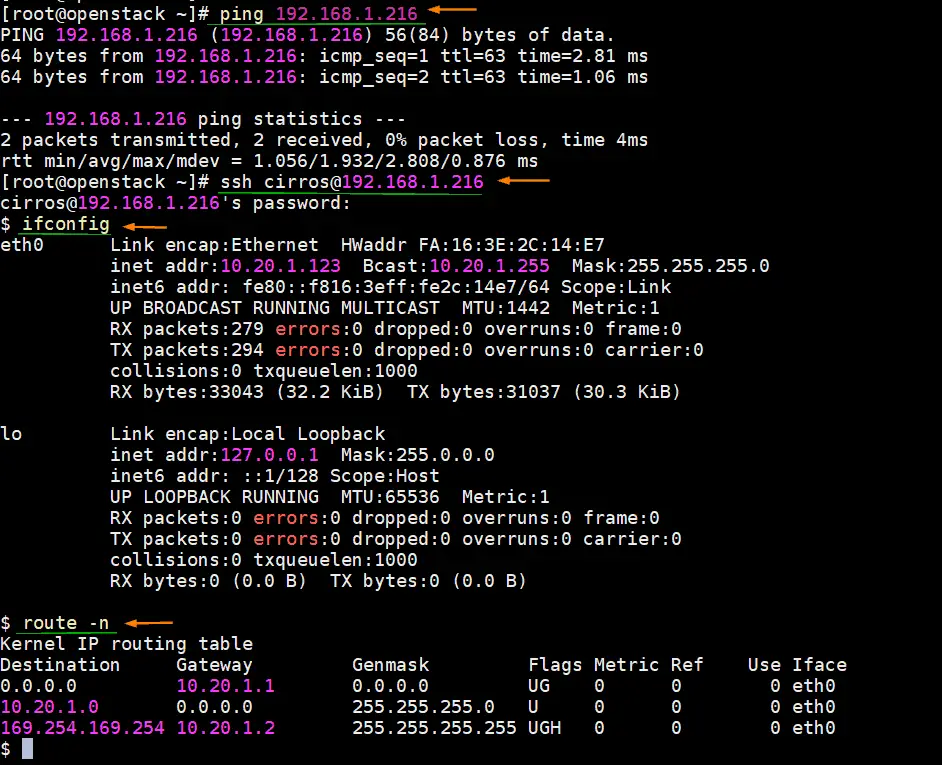
Great, above output confirms that we can access our instance via floating ip. This concludes the article; I hope this tutorial helps to deploy openstack on CentOS 8 system. Please don’t hesitate to share your feedback and comments.
31 thoughts on “How to Install OpenStack on CentOS 8 with Packstack”
when issuing command “dnf config-manager –enable PowerTools” it throws an error “No such command: config-manager. Please use /usr/bin/dnf –help
”
]# dnf config-manager –enable PowerTools
No such command: config-manager. Please use /usr/bin/dnf –help
It could be a DNF plugin command, try: “dnf install ‘dnf-command(config-manager)’”
[[email protected]
Run the following dnf command to fix the above said issue:
$ sudo dnf install ‘dnf-command(config-manager)’
try with powertools instead of “PowerTools”
[[email protected] network-scripts]# dnf config-manager –enable PowerTools
Error: No matching repo to modify: PowerTools.
[[email protected] network-scripts]# dnf config-manager –enable powertools
[[email protected] network-scripts]# dnf install -y centos-release-openstack-victoria
CentOS Linux 8 – PowerTools 5.8 MB/s | 2.0 MB 00:00
Dependencies resolved.
In case you have latest and updated CentOS stream then use below command
# dnf config-manager –set-enabled powertools
Hi Sir,
I get an issue below :
ERROR : Failed to run remote script, stdout: skipping creation of hiera.yaml symlink
stderr: Warning: Permanently added ‘10.10.69.100’ (ECDSA) to the list of known hosts.
+ trap t ERR
+ [[ -f /etc/hiera.yaml ]]
+ echo ‘skipping creation of hiera.yaml symlink’
++ puppet config print hiera_config
+ sed -i ‘s;:datadir:.*;:datadir: /var/tmp/packstack/d7eabbcf57df47b6b283fc89caeb47be/hieradata;g’ /etc/puppet/hiera.yaml
sed: can’t read /etc/puppet/hiera.yaml: No such file or directory
++ t
++ exit 2
How to solve it?
Hi Sir,
I was able to access this demo_vm using cirros as user with floating IP.
But from demo_vm, the following fails.
$ ping 8.8.8.8
How to solve it?
Add the DNS Sever IP while creating the external network subnet.
Thank you
I added a DNS server to the external network subnet, but it doesn’t work.
Other conditions are as follows.
Ping from demo_vm
to: FloatingIP -> Success
to: GestOS IP -> Success
(Use VirtualBox and bridge connection)
to: Host Default GW IP -> Failure
How to solve it?
I’m sorry.
In another VirtualBox environment, ping 8.8.8.8 was successful.
@Manusia:
I had the same error and now i found the issue
There is a problem with epel and the hiera package (hiera-3.6.0-2.el8)
The centos-openstack-ussuri repo provides hiera-3.6.0-1.el8
A look at the filelist in rpm shows that hiera-3.6.0-2.el8 didn’t include:
/etc/puppet
/etc/puppet/hiera.yaml
So remove hiera, disable epel and reinstall openstack-packstack:
dnf remove hiera -y
dnf config-manager –disable epel
dnf install -y openstack-packstack
when i uninstall hiera, i cannot reinstall packtack. I’m on the openstack-victoria. Can you help me with this problem?
First of all, this is a great reference document for Openstack installation on CentOS. I followed every step in the document and was successful. However, ran into some issue during last few steps.
Can you please help me with some trigger or suggestion to solve this issue? Thanks a lot in advance.
Copying Puppet modules and manifests [ DONE ]
Applying 192.168.0.3_controller.pp
192.168.0.3_controller.pp: [ ERROR ]
Applying Puppet manifests [ ERROR ]
ERROR : Error appeared during Puppet run: 192.168.0.3_controller.pp
Error: Facter: error while resolving custom fact “rabbitmq_nodename”: undefined method `[]’ for nil:NilClass
You will find full trace in log /var/tmp/packstack/20200723-225316-7yvkznxa/manifests/192.168.0.3_controller.pp.log
Please check log file /var/tmp/packstack/20200723-225316-7yvkznxa/openstack-setup.log for more information
Additional information:
* Parameter CONFIG_NEUTRON_L2_AGENT: You have chosen OVN Neutron backend. Note that this backend does not support the VPNaaS or FWaaS services. Geneve will be used as the encapsulation method for tenant networks
* Time synchronization installation was skipped. Please note that unsynchronized time on server instances might be problem for some OpenStack components.
* File /root/keystonerc_admin has been created on OpenStack client host 192.168.0.3. To use the command line tools you need to source the file.
* To access the OpenStack Dashboard browse to http://192.168.0.3/dashboard .
Please, find your login credentials stored in the keystonerc_admin in your home directory.
[[email protected]
Please check controller.pp.log and openstack-setup.log, You might get the clue there. I would suggest give a try one more time.
Thanks a lot for helping me for previous query. Earlier problem fixed, now I am able to create VM instance successfully, but I can’t connect from Virtual box machine (CentOS machine) and outside network.
Furthermore, there are no route 172.24.1.0/24 on my Virtual box machine (CentOS machine).
Is Virtual box IP address and External Network should be on same subnet? I tried that and that still not worked.
It seems Neutron not properly configured.
Please suggest me how to fix this (Using same commands provided in the document).
Virtual box IP address: 192.168.0.104 (Subnet = 192.168.0.0/24)
Private Network: 10.20.1.0/24
External Network: 172.24.1.0/24
================
CLI Commands:
================
source keystonerc_admin
neutron net-create external_network –provider:network_type flat –provider:physical_network extnet –router:external
neutron subnet-create –name public_subnet –enable_dhcp=True –allocation-pool=start=172.24.1.210,end=172.24.1.230 –gateway=172.24.1.1 external_network 172.24.1.0/24
neutron router-create dev-router
neutron router-gateway-set dev-router external_network
neutron net-create pvt_net
neutron subnet-create –name pvt_subnet pvt_net 10.20.1.0/24
neutron router-interface-add dev-router pvt_subnet
(keystone_admin)]# ifconfig -a
br-ex: flags=4163 mtu 1500
inet 192.168.0.104 netmask 255.255.255.0 broadcast 192.168.0.255
inet6 fe80::a00:27ff:fe8a:a9cd prefixlen 64 scopeid 0x20
ether 08:00:27:8a:a9:cd txqueuelen 1000 (Ethernet)
RX packets 33024 bytes 27440713 (26.1 MiB)
RX errors 0 dropped 0 overruns 0 frame 0
TX packets 29794 bytes 17763062 (16.9 MiB)
TX errors 0 dropped 0 overruns 0 carrier 0 collisions 0
br-int: flags=4098 mtu 1500
ether 86:09:c0:60:00:4e txqueuelen 1000 (Ethernet)
RX packets 0 bytes 0 (0.0 B)
RX errors 0 dropped 0 overruns 0 frame 0
TX packets 0 bytes 0 (0.0 B)
TX errors 0 dropped 0 overruns 0 carrier 0 collisions 0
docker0: flags=4099 mtu 1500
inet 172.17.0.1 netmask 255.255.0.0 broadcast 172.17.255.255
ether 02:42:49:2d:fa:d2 txqueuelen 0 (Ethernet)
RX packets 0 bytes 0 (0.0 B)
RX errors 0 dropped 0 overruns 0 frame 0
TX packets 0 bytes 0 (0.0 B)
TX errors 0 dropped 0 overruns 0 carrier 0 collisions 0
enp0s3: flags=4163 mtu 1500
inet6 fe80::a00:27ff:fe8a:a9cd prefixlen 64 scopeid 0x20
ether 08:00:27:8a:a9:cd txqueuelen 1000 (Ethernet)
RX packets 38913 bytes 28292425 (26.9 MiB)
RX errors 0 dropped 0 overruns 0 frame 0
TX packets 38573 bytes 21086877 (20.1 MiB)
TX errors 0 dropped 0 overruns 0 carrier 0 collisions 0
lo: flags=73 mtu 65536
inet 127.0.0.1 netmask 255.0.0.0
inet6 ::1 prefixlen 128 scopeid 0x10
loop txqueuelen 1000 (Local Loopback)
RX packets 2708229 bytes 2168061258 (2.0 GiB)
RX errors 0 dropped 0 overruns 0 frame 0
TX packets 2708229 bytes 2168061258 (2.0 GiB)
TX errors 0 dropped 0 overruns 0 carrier 0 collisions 0
ovs-system: flags=4098 mtu 1500
ether 22:df:63:8b:31:35 txqueuelen 1000 (Ethernet)
RX packets 0 bytes 0 (0.0 B)
RX errors 0 dropped 0 overruns 0 frame 0
TX packets 0 bytes 0 (0.0 B)
TX errors 0 dropped 0 overruns 0 carrier 0 collisions 0
(keystone_admin)]# ip route show
default via 192.168.0.1 dev br-ex
169.254.0.0/16 dev enp0s3 scope link metric 1002
169.254.0.0/16 dev br-ex scope link metric 1004
172.17.0.0/16 dev docker0 proto kernel scope link src 172.17.0.1 linkdown
192.168.0.0/24 dev br-ex proto kernel scope link src 192.168.0.104
[[email protected]
Источник