Если вы по-прежнему получаете ошибку «основной класс не найден» в вашем Java-проекте без видимой причины, не волнуйтесь, вы не одиноки.
Как одна из самых непредвиденных и спонтанных ошибок, благодаря тенденции JVM (виртуальная машина Java) придерживаться пути к классам по умолчанию, проблема «основной класс не найден» – это то, что преследует как любителей, так и профессионалов.
Но этот вопрос на самом деле менее пугающий, чем кажется. Читайте дальше, чтобы узнать, как избавиться от этой ошибки раз и навсегда.
Почему не был найден основной класс?
Прежде чем мы попытаемся понять, как и почему JVM не смогла найти основной класс, нам нужно понять концепцию пути к классам в Java.
Что такое Classpath?
Путь к классам – это путь к файлу, по которому среда выполнения Java ищет классы и другие файлы ресурсов. Его можно установить с помощью параметра -classpath при выполнении программы или путем установки системной переменной среды CLASSPATH .
Как следует из названия, это просто путь к файлу, по которому файлы .class можно найти в пакете или каталоге JDK.
Когда JVM не может найти основной класс, это часто связано с тем, что она ищет соответствующие файлы .class в неправильном пути к классам. Конечно, способ исправить эту проблему – вручную указать путь к классам, используя пакеты или указав путь к классам.
На этом этапе, если вы хотите освежить память о классах Java, ознакомьтесь с нашим руководством по созданию классов в Java .
Использование пакетов
Создадим класс под названием Test . Поместите его в пакет под названием testPackage . Пакеты используются в Java для того, чтобы сгруппировать похожие классы вместе или предоставить уникальное пространство имен для классов.
В этом простом примере использование пакета поможет вам наглядно представить, как работает путь к классам Java. В вашем приложении файлового менеджера пакет представлен как независимая папка.
 package testPackage;
 public class Test {
 public static void main(String args[]) {
 System.out.println("File successfully found!");
 }
 }
Теперь откройте новый терминал и убедитесь, что ваш рабочий каталог совпадает с тем, который содержит папку пакета. Вы можете изменить рабочий каталог с помощью команды cd в любой операционной системе.
Скомпилируйте Test.java , выполнив следующую команду:
 package testPackage;
 javac testPackage/Test.java
Это сохранит скомпилированный двоичный файл (файл .class) в testPackage.
Чтобы запустить скомпилированный класс, вам нужно ввести полное имя класса в командной строке. Полное имя класса Java относится к его имени с префиксом имени пакета. В этом случае это должно выглядеть примерно так:
java testPackage.Test
Этот способ вызова файлов классов также гарантирует, что вы можете вызывать исполняемые файлы из разных пакетов из одного и того же рабочего каталога. Все, что вам нужно сделать, это изменить полное имя класса.
В более продвинутых реализациях мы рекомендуем создавать отдельные подпапки для ваших классов и исходных файлов, чтобы лучше управлять файлами в пакете.
Указание пути к классам вручную
Рекомендуемый способ управления файлами Java – создание отдельных каталогов для исходных файлов и классов. Если вы работаете над проектом, скорее всего, вы уже этим занимаетесь.
Обычно каталог с исходными файлами обозначается как src, а каталог с файлами .class обозначается как классы. Это также способ гарантировать, что вероятность того, что JVM не найдет основной класс, значительно снижена благодаря правильно структурированному каталогу.
Если мы воспользуемся этим методом, то структура каталогов будет выглядеть перед компиляцией так:
 |---myFolder
 | |---src
 | |---testPackage
 | |---Test.java
 |
 | |---classes
Каждый отступ на приведенной выше иллюстрации соответствует одному уровню файловой иерархии, которому должен следовать ваш проект.
Чтобы скомпилировать это, убедитесь, что ваш рабочий каталог – myFolder. Теперь введите следующую команду:
javac -d classes src/testPackage/Test.java
Исполняемый файл .class следует сохранить в myFolder / classes / testPackage . Соответственно структура файловых каталогов выглядит примерно так:
 |---myFolder
 | |---src
 | |---testPackage
 | |---Test.java
 |
 | |---classes
 | |---testPackage
 | |---Test.class
Чтобы запустить файл .class , запустите команду Java с полным именем класса и укажите локальный путь к классам. Каждый путь объявляется относительно рабочего каталога, которым в данном случае является myFolder.
java -classpath classes testPackage
Выполнение этой команды должно дать вам желаемый результат. Но почему для решения простой ошибки требуется столько реорганизации?
Причина появления сообщения «Не удалось найти или загрузить основной класс» заключается в том, что JVM не смогла найти, где хранились ваши файлы .class .
Самый простой способ устранить эту ошибку – указать, где хранятся файлы .class, и явно указать JVM искать там. Это стало возможным благодаря раздельной организации исходных и исполняемых файлов и контролю всего из рабочего каталога.
Когда вы начнете добавлять в проект такие конструкции, как наследование , сложность файловой системы неизбежно возрастет в разы. В таких проектах или даже в тех, где требуется использование файлов JAR или пользовательских библиотек, простая практика разделения файлов и управления ими может сэкономить вам бесчисленные часы устранения неполадок и отладки.
Чтобы узнать больше о том, как classpath работает в Java, и о многочисленных вещах, которыми вы можете управлять, когда дело доходит до запуска вашего кода, вы также можете взглянуть на подробный и удобный справочник Oracle.
Ошибка « Не удалось найти или загрузить основной класс » возникает при использовании java-команды в командной строке для запуска Java-программы путем указания имени класса в терминале. Причина, по которой это происходит, в основном связана с ошибкой программирования пользователя при объявлении класса.
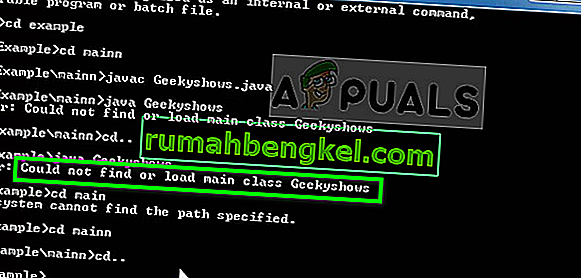
Как упоминалось ранее, эта ошибка в основном не связана с системой, и пользователь допускает ошибку в нескольких сценариях, как показано ниже. Прежде чем двигаться дальше, мы предполагаем, что у вас есть базовые знания о языке программирования Java и о том, как он работает.
Что вызывает ошибку «Не удалось найти или загрузить основной класс» в Java?
Сообщение «Не удалось найти или загрузить основной класс» означает, что первый шаг механизма Java, извлекающего класс для выполнения, не удался. Команда Java не смогло найти класс в нужном каталоге.
В некоторых случаях вам необходимо добавить правильный путь к файлу и указать терминалу Java в правильном месте. Поскольку вы выполняете команду из терминала командной строки, компьютер не знает, где находится класс или где он находится. В целевой среде IDE это не проблема, поскольку среда IDE сохраняет указатель, указывающий на текущий рабочий каталог.
Что такое синтаксис java?
Прежде чем мы начнем устранять неполадки, по которым терминал возвращает нам ошибку при попытке выполнения, сначала нам нужно взглянуть на синтаксис команды. Если вы не используете правильный синтаксис, вы неизбежно столкнетесь с этой ошибкой.
Обычный синтаксис команды выглядит примерно так:
Ява [ ... ] [ ...]
Это параметр командной строки, это полное имя класса Java и аргумент командной строки, который передается вашему приложению при компиляции всего пакета.
Пример допустимой команды:
java -Xmx100m com.acme.example.ListAppuals Кевин Стрелок Барт
Приведенная выше команда заставит java-команду выполнить следующие операции:
- Он будет искать скомпилированную версию класса com.acme.example.ListAppuals .
- После поиска он загрузит класс.
- Затем, когда класс загружен, в классе будет производиться поиск «основного» метода с действительной подписью, модификаторами и типом возвращаемого значения. Пример основного класса будет примерно таким:
public static void main (String [])
- Метод будет вызываться с аргументами kevin, arrow и bart как string [].
Как исправить ошибку «Не удалось найти или загрузить основной класс»
Решение 1. Проверка аргумента имени класса
Самая распространенная ошибка пользователей заключается в том, что они указывают неправильное имя класса в качестве аргумента (или правильное имя класса имеет неправильную форму). Поскольку мы объявляем параметры в командной строке, весьма вероятно, что вы передадите аргумент имени класса в неправильной форме. Здесь мы перечислим все возможные сценарии, при которых можно ошибиться.
- Написание простого имени класса . Если вы объявляете класс в пакете, таком как com.acme.example, вы должны использовать полное имя класса, включая пакет, в команде Java.
java com.acme.example.ListAppuals
вместо того
java ListAppuals
- Вы должны объявить имя класса вместо объявления имени файла или пути. Java не получает класс, если вы объявляете для него путь / имя файла. Неправильные записи включают следующее:
java ListAppuals.class java com / acme / example / ListAppuals.class
- Следует учитывать корпус . Команды Java чувствительны к регистру, и если вы ошиблись хотя бы одной буквой, вы не сможете загрузить основной класс. Примеры неправильных ошибок :
java com.acme.example.listappuals
- Вы не должны объявлять имя исходного файла . Как упоминалось ранее, вам нужно только объявить класс в правильном формате полного имени класса. Пример ошибки:
java ListAppuals.java
- Эта ошибка также возникнет, если вы допустите опечатку или забудете полностью написать имя класса .
Если вы допустили какие-либо небрежные ошибки при объявлении имени класса, обязательно исправьте их, а затем попробуйте запустить программу.
Решение 2. Проверка пути к классам
Если вы правильно объявили имя класса, но по-прежнему отображается ошибка, скорее всего, команда java не смогла найти указанное имя класса по пути. Путь к классам — это путь, по которому среда выполнения Java ищет файлы ресурсов и классов. Вы можете легко установить путь к классам, используя две разные команды, как показано ниже:
C:> sdkTool -classpath classpath1; classpath2 ... C:> установить CLASSPATH = classpath1; classpath2 ...
Чтобы получить больше информации о пути к классам, вам следует ознакомиться со следующими документами.
Документация по командам Java
Установка пути к классам
Решение 3. Проверка каталога
Когда вы объявляете каталог как путь к классам, он всегда будет соответствовать корню пространства имен. Например, если «/ usr / local / acme / classes» находится в пути к классам, то Java будет искать класс «com.acme.example.Appuals». Он будет искать класс со следующим путем:
/usr/local/acme/classes/com/acme/example/Appuals.class
По сути, если вы укажете следующий адрес в пути к классам, Java не сможет найти класс:
/ USR / местные / acme / классы / ком / acme / пример
Вы также должны проверить свой подкаталог и посмотреть, соответствует ли он FQN. Если FQN вашего класса — «com.acme.example.Appuals», то Java будет искать «Appuals.class» в каталоге «com / acme / example».
Чтобы дать вам пример, давайте предположим следующий сценарий:
- Класс, который вы хотите запустить: com.acme.example.Appuals
- Полный путь к файлу является: /usr/local/acme/classes/com/acme/example/Appuals.class
- Текущий рабочий каталог является: / USR / местные / Acme / классы / ком / Acme / пример /
Тогда будут иметь место следующие сценарии:
# неверно, требуется FQN java Appuals # неверно, в текущем рабочем каталоге нет папки com / acme / example. java com.acme.example.Appuals # неверно, аналогично сценарию выше java -classpath. com.acme.example.Appuals # OK; устанавливается относительный путь к классам java -classpath ../../ .. com.acme.example.Appuals # OK; установлен абсолютный путь к классам java -classpath / usr / local / acme / classes com.acme.example.Appuals
Примечание. Путь к классам должен также включать все другие классы (несистемные), которые нужны вашим приложениям.
Решение 4.Проверка пакета класса
Если все вышеперечисленные решения верны в вашем случае, вам необходимо убедиться, что ваш исходный код помещен в правильную папку. Кроме того, вы правильно заявили о пакете . Если вы запустите свой код с IDE, он, вероятно, проинформирует вас о проблеме. Однако в нашем случае, поскольку мы запускаем его в командной строке, ошибка останется незамеченной, и вы получите обсуждаемую ошибку класса.
The java <class-name> command syntax
First of all, you need to understand the correct way to launch a program using the java (or javaw) command.
The normal syntax1 is this:
java [ <options> ] <class-name> [<arg> ...]
where <option> is a command line option (starting with a «-» character), <class-name> is a fully qualified Java class name, and <arg> is an arbitrary command line argument that gets passed to your application.
1 — There are some other syntaxes which are described near the end of this answer.
The fully qualified name (FQN) for the class is conventionally written as you would in Java source code; e.g.
packagename.packagename2.packagename3.ClassName
However some versions of the java command allow you to use slashes instead of periods; e.g.
packagename/packagename2/packagename3/ClassName
which (confusingly) looks like a file pathname, but isn’t one. Note that the term fully qualified name is standard Java terminology … not something I just made up to confuse you 🙂
Here is an example of what a java command should look like:
java -Xmx100m com.acme.example.ListUsers fred joe bert
The above is going to cause the java command to do the following:
- Search for the compiled version of the
com.acme.example.ListUsersclass. - Load the class.
- Check that the class has a
mainmethod with signature, return type and modifiers given bypublic static void main(String[]). (Note, the method argument’s name is NOT part of the signature.) - Call that method passing it the command line arguments («fred», «joe», «bert») as a
String[].
Reasons why Java cannot find the class
When you get the message «Could not find or load main class …», that means that the first step has failed. The java command was not able to find the class. And indeed, the «…» in the message will be the fully qualified class name that java is looking for.
So why might it be unable to find the class?
Reason #1 — you made a mistake with the classname argument
The first likely cause is that you may have provided the wrong class name. (Or … the right class name, but in the wrong form.) Considering the example above, here are a variety of wrong ways to specify the class name:
-
Example #1 — a simple class name:
java ListUserWhen the class is declared in a package such as
com.acme.example, then you must use the full classname including the package name in thejavacommand; e.g.java com.acme.example.ListUser -
Example #2 — a filename or pathname rather than a class name:
java ListUser.class java com/acme/example/ListUser.class -
Example #3 — a class name with the casing incorrect:
java com.acme.example.listuser -
Example #4 — a typo
java com.acme.example.mistuser -
Example #5 — a source filename (except for Java 11 or later; see below)
java ListUser.java -
Example #6 — you forgot the class name entirely
java lots of arguments
Reason #2 — the application’s classpath is incorrectly specified
The second likely cause is that the class name is correct, but that the java command cannot find the class. To understand this, you need to understand the concept of the «classpath». This is explained well by the Oracle documentation:
- The
javacommand documentation - Setting the Classpath.
- The Java Tutorial — PATH and CLASSPATH
So … if you have specified the class name correctly, the next thing to check is that you have specified the classpath correctly:
- Read the three documents linked above. (Yes … READ them! It is important that a Java programmer understands at least the basics of how the Java classpath mechanisms works.)
- Look at command line and / or the CLASSPATH environment variable that is in effect when you run the
javacommand. Check that the directory names and JAR file names are correct. - If there are relative pathnames in the classpath, check that they resolve correctly … from the current directory that is in effect when you run the
javacommand. - Check that the class (mentioned in the error message) can be located on the effective classpath.
- Note that the classpath syntax is different for Windows versus Linux and Mac OS. (The classpath separator is
;on Windows and:on the others. If you use the wrong separator for your platform, you won’t get an explicit error message. Instead, you will get a nonexistent file or directory on the path that will be silently ignored.)
Reason #2a — the wrong directory is on the classpath
When you put a directory on the classpath, it notionally corresponds to the root of the qualified name space. Classes are located in the directory structure beneath that root, by mapping the fully qualified name to a pathname. So for example, if «/usr/local/acme/classes» is on the class path, then when the JVM looks for a class called com.acme.example.Foon, it will look for a «.class» file with this pathname:
/usr/local/acme/classes/com/acme/example/Foon.class
If you had put «/usr/local/acme/classes/com/acme/example» on the classpath, then the JVM wouldn’t be able to find the class.
Reason #2b — the subdirectory path doesn’t match the FQN
If your classes FQN is com.acme.example.Foon, then the JVM is going to look for «Foon.class» in the directory «com/acme/example»:
-
If your directory structure doesn’t match the package naming as per the pattern above, the JVM won’t find your class.
-
If you attempt rename a class by moving it, that will fail as well … but the exception stacktrace will be different. It is liable to say something like this:
Caused by: java.lang.NoClassDefFoundError: <path> (wrong name: <name>)because the FQN in the class file doesn’t match what the class loader is expecting to find.
To give a concrete example, supposing that:
- you want to run
com.acme.example.Foonclass, - the full file path is
/usr/local/acme/classes/com/acme/example/Foon.class, - your current working directory is
/usr/local/acme/classes/com/acme/example/,
then:
# wrong, FQN is needed
java Foon

# wrong, there is no `com/acme/example` folder in the current working directory
java com.acme.example.Foon

# wrong, similar to above
java -classpath . com.acme.example.Foon

# fine; relative classpath set
java -classpath ../../.. com.acme.example.Foon

# fine; absolute classpath set
java -classpath /usr/local/acme/classes com.acme.example.Foon
Notes:
- The
-classpathoption can be shortened to-cpin most Java releases. Check the respective manual entries forjava,javacand so on. - Think carefully when choosing between absolute and relative pathnames in classpaths. Remember that a relative pathname may «break» if the current directory changes.
Reason #2c — dependencies missing from the classpath
The classpath needs to include all of the other (non-system) classes that your application depends on. (The system classes are located automatically, and you rarely need to concern yourself with this.) For the main class to load correctly, the JVM needs to find:
- the class itself.
- all classes and interfaces in the superclass hierarchy (e.g. see Java class is present in classpath but startup fails with Error: Could not find or load main class)
- all classes and interfaces that are referred to by means of variable or variable declarations, or method call or field access expressions.
(Note: the JLS and JVM specifications allow some scope for a JVM to load classes «lazily», and this can affect when a classloader exception is thrown.)
Reason #3 — the class has been declared in the wrong package
It occasionally happens that someone puts a source code file into the
the wrong folder in their source code tree, or they leave out the package declaration. If you do this in an IDE, the IDE’s compiler will tell you about this immediately. Similarly if you use a decent Java build tool, the tool will run javac in a way that will detect the problem. However, if you build your Java code by hand, you can do it in such a way that the compiler doesn’t notice the problem, and the resulting «.class» file is not in the place that you expect it to be.
Still can’t find the problem?
There lots of things to check, and it is easy to miss something. Try adding the -Xdiag option to the java command line (as the first thing after java). It will output various things about class loading, and this may offer you clues as to what the real problem is.
Also, consider possible problems caused by copying and pasting invisible or non-ASCII characters from websites, documents and so on. And consider «homoglyphs», where two letters or symbols look the same … but aren’t.
You may run into this problem if you have invalid or incorrect signatures in META-INF/*.SF. You can try opening up the .jar in your favorite ZIP editor, and removing files from META-INF until all you have is your MANIFEST.MF. However this is NOT RECOMMENDED in general. (The invalid signature may be the result of someone having injected malware into the original signed JAR file. If you erase the invalid signature, you are in infecting your application with the malware!) The recommended approach is to get hold of JAR files with valid signatures, or rebuild them from the (authentic) original source code.
Finally, you can apparently run into this problem if there is a syntax error in the MANIFEST.MF file (see https://stackoverflow.com/a/67145190/139985).
Alternative syntaxes for java
There are three alternative syntaxes for the launching Java programs using the java command.
-
The syntax used for launching an «executable» JAR file is as follows:
java [ <options> ] -jar <jar-file-name> [<arg> ...]e.g.
java -Xmx100m -jar /usr/local/acme-example/listuser.jar fredThe name of the entry-point class (i.e.
com.acme.example.ListUser) and the classpath are specified in the MANIFEST of the JAR file. -
The syntax for launching an application from a module (Java 9 and later) is as follows:
java [ <options> ] --module <module>[/<mainclass>] [<arg> ...]The name of the entrypoint class is either defined by the
<module>itself, or is given by the optional<mainclass>. -
From Java 11 onwards, you can use the
javacommand to compile and run a single source code file using the following syntax:java [ <options> ] <sourcefile> [<arg> ...]where
<sourcefile>is (typically) a file with the suffix «.java».
For more details, please refer to the official documentation for the java command for the Java release that you are using.
IDEs
A typical Java IDE has support for running Java applications in the IDE JVM itself or in a child JVM. These are generally immune from this particular exception, because the IDE uses its own mechanisms to construct the runtime classpath, identify the main class and create the java command line.
However it is still possible for this exception to occur, if you do things behind the back of the IDE. For example, if you have previously set up an Application Launcher for your Java app in Eclipse, and you then moved the JAR file containing the «main» class to a different place in the file system without telling Eclipse, Eclipse would unwittingly launch the JVM with an incorrect classpath.
In short, if you get this problem in an IDE, check for things like stale IDE state, broken project references or broken launcher configurations.
It is also possible for an IDE to simply get confused. IDE’s are hugely complicated pieces of software comprising many interacting parts. Many of these parts adopt various caching strategies in order to make the IDE as a whole responsive. These can sometimes go wrong, and one possible symptom is problems when launching applications. If you suspect this could be happening, it is worth trying other things like restarting your IDE, rebuilding the project and so on.
Other References
- From the Oracle Java Tutorials — Common Problems (and Their Solutions)
The java <class-name> command syntax
First of all, you need to understand the correct way to launch a program using the java (or javaw) command.
The normal syntax1 is this:
java [ <options> ] <class-name> [<arg> ...]
where <option> is a command line option (starting with a «-» character), <class-name> is a fully qualified Java class name, and <arg> is an arbitrary command line argument that gets passed to your application.
1 — There are some other syntaxes which are described near the end of this answer.
The fully qualified name (FQN) for the class is conventionally written as you would in Java source code; e.g.
packagename.packagename2.packagename3.ClassName
However some versions of the java command allow you to use slashes instead of periods; e.g.
packagename/packagename2/packagename3/ClassName
which (confusingly) looks like a file pathname, but isn’t one. Note that the term fully qualified name is standard Java terminology … not something I just made up to confuse you 🙂
Here is an example of what a java command should look like:
java -Xmx100m com.acme.example.ListUsers fred joe bert
The above is going to cause the java command to do the following:
- Search for the compiled version of the
com.acme.example.ListUsersclass. - Load the class.
- Check that the class has a
mainmethod with signature, return type and modifiers given bypublic static void main(String[]). (Note, the method argument’s name is NOT part of the signature.) - Call that method passing it the command line arguments («fred», «joe», «bert») as a
String[].
Reasons why Java cannot find the class
When you get the message «Could not find or load main class …», that means that the first step has failed. The java command was not able to find the class. And indeed, the «…» in the message will be the fully qualified class name that java is looking for.
So why might it be unable to find the class?
Reason #1 — you made a mistake with the classname argument
The first likely cause is that you may have provided the wrong class name. (Or … the right class name, but in the wrong form.) Considering the example above, here are a variety of wrong ways to specify the class name:
-
Example #1 — a simple class name:
java ListUserWhen the class is declared in a package such as
com.acme.example, then you must use the full classname including the package name in thejavacommand; e.g.java com.acme.example.ListUser -
Example #2 — a filename or pathname rather than a class name:
java ListUser.class java com/acme/example/ListUser.class -
Example #3 — a class name with the casing incorrect:
java com.acme.example.listuser -
Example #4 — a typo
java com.acme.example.mistuser -
Example #5 — a source filename (except for Java 11 or later; see below)
java ListUser.java -
Example #6 — you forgot the class name entirely
java lots of arguments
Reason #2 — the application’s classpath is incorrectly specified
The second likely cause is that the class name is correct, but that the java command cannot find the class. To understand this, you need to understand the concept of the «classpath». This is explained well by the Oracle documentation:
- The
javacommand documentation - Setting the Classpath.
- The Java Tutorial — PATH and CLASSPATH
So … if you have specified the class name correctly, the next thing to check is that you have specified the classpath correctly:
- Read the three documents linked above. (Yes … READ them! It is important that a Java programmer understands at least the basics of how the Java classpath mechanisms works.)
- Look at command line and / or the CLASSPATH environment variable that is in effect when you run the
javacommand. Check that the directory names and JAR file names are correct. - If there are relative pathnames in the classpath, check that they resolve correctly … from the current directory that is in effect when you run the
javacommand. - Check that the class (mentioned in the error message) can be located on the effective classpath.
- Note that the classpath syntax is different for Windows versus Linux and Mac OS. (The classpath separator is
;on Windows and:on the others. If you use the wrong separator for your platform, you won’t get an explicit error message. Instead, you will get a nonexistent file or directory on the path that will be silently ignored.)
Reason #2a — the wrong directory is on the classpath
When you put a directory on the classpath, it notionally corresponds to the root of the qualified name space. Classes are located in the directory structure beneath that root, by mapping the fully qualified name to a pathname. So for example, if «/usr/local/acme/classes» is on the class path, then when the JVM looks for a class called com.acme.example.Foon, it will look for a «.class» file with this pathname:
/usr/local/acme/classes/com/acme/example/Foon.class
If you had put «/usr/local/acme/classes/com/acme/example» on the classpath, then the JVM wouldn’t be able to find the class.
Reason #2b — the subdirectory path doesn’t match the FQN
If your classes FQN is com.acme.example.Foon, then the JVM is going to look for «Foon.class» in the directory «com/acme/example»:
-
If your directory structure doesn’t match the package naming as per the pattern above, the JVM won’t find your class.
-
If you attempt rename a class by moving it, that will fail as well … but the exception stacktrace will be different. It is liable to say something like this:
Caused by: java.lang.NoClassDefFoundError: <path> (wrong name: <name>)because the FQN in the class file doesn’t match what the class loader is expecting to find.
To give a concrete example, supposing that:
- you want to run
com.acme.example.Foonclass, - the full file path is
/usr/local/acme/classes/com/acme/example/Foon.class, - your current working directory is
/usr/local/acme/classes/com/acme/example/,
then:
# wrong, FQN is needed
java Foon

# wrong, there is no `com/acme/example` folder in the current working directory
java com.acme.example.Foon

# wrong, similar to above
java -classpath . com.acme.example.Foon

# fine; relative classpath set
java -classpath ../../.. com.acme.example.Foon

# fine; absolute classpath set
java -classpath /usr/local/acme/classes com.acme.example.Foon
Notes:
- The
-classpathoption can be shortened to-cpin most Java releases. Check the respective manual entries forjava,javacand so on. - Think carefully when choosing between absolute and relative pathnames in classpaths. Remember that a relative pathname may «break» if the current directory changes.
Reason #2c — dependencies missing from the classpath
The classpath needs to include all of the other (non-system) classes that your application depends on. (The system classes are located automatically, and you rarely need to concern yourself with this.) For the main class to load correctly, the JVM needs to find:
- the class itself.
- all classes and interfaces in the superclass hierarchy (e.g. see Java class is present in classpath but startup fails with Error: Could not find or load main class)
- all classes and interfaces that are referred to by means of variable or variable declarations, or method call or field access expressions.
(Note: the JLS and JVM specifications allow some scope for a JVM to load classes «lazily», and this can affect when a classloader exception is thrown.)
Reason #3 — the class has been declared in the wrong package
It occasionally happens that someone puts a source code file into the
the wrong folder in their source code tree, or they leave out the package declaration. If you do this in an IDE, the IDE’s compiler will tell you about this immediately. Similarly if you use a decent Java build tool, the tool will run javac in a way that will detect the problem. However, if you build your Java code by hand, you can do it in such a way that the compiler doesn’t notice the problem, and the resulting «.class» file is not in the place that you expect it to be.
Still can’t find the problem?
There lots of things to check, and it is easy to miss something. Try adding the -Xdiag option to the java command line (as the first thing after java). It will output various things about class loading, and this may offer you clues as to what the real problem is.
Also, consider possible problems caused by copying and pasting invisible or non-ASCII characters from websites, documents and so on. And consider «homoglyphs», where two letters or symbols look the same … but aren’t.
You may run into this problem if you have invalid or incorrect signatures in META-INF/*.SF. You can try opening up the .jar in your favorite ZIP editor, and removing files from META-INF until all you have is your MANIFEST.MF. However this is NOT RECOMMENDED in general. (The invalid signature may be the result of someone having injected malware into the original signed JAR file. If you erase the invalid signature, you are in infecting your application with the malware!) The recommended approach is to get hold of JAR files with valid signatures, or rebuild them from the (authentic) original source code.
Finally, you can apparently run into this problem if there is a syntax error in the MANIFEST.MF file (see https://stackoverflow.com/a/67145190/139985).
Alternative syntaxes for java
There are three alternative syntaxes for the launching Java programs using the java command.
-
The syntax used for launching an «executable» JAR file is as follows:
java [ <options> ] -jar <jar-file-name> [<arg> ...]e.g.
java -Xmx100m -jar /usr/local/acme-example/listuser.jar fredThe name of the entry-point class (i.e.
com.acme.example.ListUser) and the classpath are specified in the MANIFEST of the JAR file. -
The syntax for launching an application from a module (Java 9 and later) is as follows:
java [ <options> ] --module <module>[/<mainclass>] [<arg> ...]The name of the entrypoint class is either defined by the
<module>itself, or is given by the optional<mainclass>. -
From Java 11 onwards, you can use the
javacommand to compile and run a single source code file using the following syntax:java [ <options> ] <sourcefile> [<arg> ...]where
<sourcefile>is (typically) a file with the suffix «.java».
For more details, please refer to the official documentation for the java command for the Java release that you are using.
IDEs
A typical Java IDE has support for running Java applications in the IDE JVM itself or in a child JVM. These are generally immune from this particular exception, because the IDE uses its own mechanisms to construct the runtime classpath, identify the main class and create the java command line.
However it is still possible for this exception to occur, if you do things behind the back of the IDE. For example, if you have previously set up an Application Launcher for your Java app in Eclipse, and you then moved the JAR file containing the «main» class to a different place in the file system without telling Eclipse, Eclipse would unwittingly launch the JVM with an incorrect classpath.
In short, if you get this problem in an IDE, check for things like stale IDE state, broken project references or broken launcher configurations.
It is also possible for an IDE to simply get confused. IDE’s are hugely complicated pieces of software comprising many interacting parts. Many of these parts adopt various caching strategies in order to make the IDE as a whole responsive. These can sometimes go wrong, and one possible symptom is problems when launching applications. If you suspect this could be happening, it is worth trying other things like restarting your IDE, rebuilding the project and so on.
Other References
- From the Oracle Java Tutorials — Common Problems (and Their Solutions)
Я знаю, что это было задано некоторое время назад, но я просто спотыкался об этом и думал, что мои результаты могут помочь другим. Как указывалось, сообщение об ошибке в основном является результатом внешней папки. Это потому, что, когда вы пытаетесь запустить программу, она сначала компилирует код и помещает скомпилированный результат в исходное местоположение, а затем пытается загрузить скомпилированный код из локации. Если скомпилированный код не находится в ожидаемом местоположении, вы получите сообщение об ошибке.
То, что мне особенно нравится, заключается в том, что несколько раз код не скомпилирован (построен), хотя ваша конфигурация запуска указывает «Build» в разделе «Перед запуском» на панели конфигурации.
Когда это может произойти?
Одна из ситуаций, которая может привести к этому, заключается в том, что вы используете модули и вручную удаляете каталог модуля. Например, если у меня есть модуль с именем «foo», должен быть каталог с именем foo under out/production. Если вы удалите его вручную, система сборки может не знать, что ее нужно перестроить.
Хуже того, если вы выберете Build | Создайте модуль «foo», он все равно не сможет перестроить модуль. В этом случае вы должны выбрать файл в модуле, например «bar.java», а затем выбрать «Сборка | Перекомпилируйте ‘bar.java’. Теперь выйдите из директории out/production/foo.
Так как IntelliJ, как правило, знает о любых изменениях, это меня удивило, и мне потребовалось немного времени, чтобы понять, поэтому я решил поделиться с вами.
О vscode
Недавно я случайно узнал о редакторе vscode. По сравнению с традиционными IDE, он имеет много функций, которые мне нравятся. Прежде всего, он легкий. По сравнению с такими IDE, как Visual Studio и pycharm, его размер составляет всего более 40 МБ. , Очень удобно скачивать и устанавливать. Во-вторых, это редактор, который реализует различные функции через плагины, что означает, что вы можете устанавливать разные плагины с помощью программного обеспечения vscode для удовлетворения потребностей в написании разных кодов, вместо загрузки IDE для каждого языка. . Наконец, это программное обеспечение с открытым исходным кодом от Microsoft, с быстрой скоростью обновления и гарантированным качеством.
Ошибка: не удается найти или загрузить приложение основного класса
Я загрузил и установил vscode, а также установил соответствующие плагины. Я создал новый файл hellow java и попробовал его, но обнаружил, что сообщается об ошибке «Не удается найти или загрузить основной класс».

Я попытался скомпилировать и запустить в cmd, он может быть успешно скомпилирован, но он по-прежнему сообщает об ошибках при запуске.

Прочитав множество руководств в Интернете, я наконец обнаружил, что после изменения режима компиляции и выполнения этого достаточно.

Давайте посмотрим на исходный код.
package app;
public class App {
    public static void main(String[] args) throws Exception {
        System.out.println("Hello Java");
    }
}
Оказывается, проблема заключается в первой строке. Это механизм пакета Java. В Java пакет фактически определяет пространство имен для предотвращения конфликтов имен. Если вы объявляете пакет в начале исходного файла, вы должны создать новую папку, а затем скомпилировать Хорошие исходные файлы хранятся внутри, поэтому исходные методы компиляции и запуска здесь использовать нельзя.

настройки vscode
Но мы не можем скомпилировать и запустить каждый исходный файл таким образом. Слишком много проблем, так как же изменить режим компиляции и запуска vscode по умолчанию? Здесь вам нужно установить несколько плагинов code_runner.
В vscode есть два типа настроек, один из которыхпользовательские настройки, То есть после настройки все ваши проекты будут использовать этот параметр при запуске через vscode; а другой —Настройки рабочей области, Этот параметр влияет только на ваш текущий проект
Прежде всегопользовательские настройки, Откройте настройки в правом нижнем углу

в раскрывающемся списке и выберите «Изменить в setting.json».

Затем добавьте этот код внутрь. Это код настройки подключаемого модуля code_runner, который можно увидеть в официальном документе по ссылке:code_runner официальный документ.
"code-runner.executorMap": {
   // "javascript": "node",
   // "php": "C:\php\php.exe",
   // "python": "python",
   // "perl": "perl",
   // "ruby": "C:\Ruby23-x64\bin\ruby.exe",
   // "go": "go run",
   // "html": ""C:\Program Files (x86)\Google\Chrome\Application\chrome.exe"",
   "java": "cd $dir && javac $fileName && java $fileNameWithoutExt",
   // "c": "cd $dir && gcc $fileName -o $fileNameWithoutExt && $dir$fileNameWithoutExt"
}
Здесь вы можете установить каталоги установки для разных языков.По умолчанию, большинство из них ищется по пути, где java и c могут быть настроены для компиляции и запуска. Параметры можно выбрать самостоятельно
поддерживаемые индивидуальные параметры
$workspaceRoot: The path of the folder opened in VS Code
Путь к папке, открытой в VS Code
$dir: The directory of the code file being run
Каталог файла с запущенным кодом
$dirWithoutTrailingSlash: The directory of the code file being run without a trailing slash
Каталог выполняемого файла кода без косой черты в конце
$fullFileName: The full name of the code file being run
Полное имя исполняемого файла кода.
$fileName: The base name of the code file being run, that is the file without the directory
Базовое имя исполняемого файла кода, то есть файла без каталога.
$fileNameWithoutExt: The base name of the code file being run without its extension
Базовое имя файла кода, который выполняется без расширения.
$driveLetter: The drive letter of the code file being run (Windows only)
Буква диска исполняемого файла кода (только для Windows)
$pythonPath: The path of Python interpreter (set by Python: Select Interpreter command)
Поскольку мне нужно установить здесь только метод компиляции java, другие параметры остаются такими же по умолчанию, поэтому я закомментировал все остальное и только изменил команду java на
"java": "cd $dir && javac -d. $fileName && java app.$fileNameWithoutExt",
Здесь -d означает изменение каталога компиляции, а «.» Означает, что он находится в текущем каталоге. Хотя эта команда не добавляется, по умолчанию она создается в текущем каталоге, но если в файле есть ключевое слово пакета, эта команда может быть автоматически в текущем каталоге. Папка пакета создается под, и имя пакета необходимо добавить в следующую операцию.
Тогда он может успешно работать!

вы можете видеть
Метод компиляции изменен, и программа успешно работает.
Каждый может обратить внимание на некоторые изпользовательские настройкиМесто хранения файла setting.json.

Но у этого метода есть проблема, то есть пути к пакетам моих разных проектов разные.Если я настрою его унифицированным способом, будут проблемы.Настройки рабочей областиВверх.
Сначала создайте новый проект Java (см. Другую мою статью, чтобы узнать, как его создать)
Затем введите настройки рабочей области

и выберите «setting.json».

Это создаст папку .vscode в текущей папке (рабочей области) с файлом setting.json в ней, а затем скопирует эту часть файла, чтобы перезаписать настройки по умолчанию, как указано выше. Вот и все.

Таким образом, здесь настройки действительны только для содержимого в текущем файле.