When using Python, a common error you may encounter is modulenotfounderror: no module named ‘flask’. This error occurs when Python cannot detect the Flask library in your current environment. Flask does not come with the default Python installation. This tutorial goes through the exact steps to troubleshoot this error for the Windows, Mac and Linux operating systems.
Table of contents
- ModuleNotFoundError: no module named ‘flask’
- What is ModuleNotFoundError?
- What is Flask?
- How to install Flask on Windows Operating System
- How to install Flask on Mac Operating System
- How to install Flask on Linux Operating System
- Installing pip for Ubuntu, Debian, and Linux Mint
- Installing pip for CentOS 8 (and newer), Fedora, and Red Hat
- Installing pip for CentOS 6 and 7, and older versions of Red Hat
- Installing pip for Arch Linux and Manjaro
- Installing pip for OpenSUSE
- Check Flask Version
- Installing Flask Using Anaconda
- Testing Flask
- Summary
ModuleNotFoundError: no module named ‘flask’
What is ModuleNotFoundError?
The ModuleNotFoundError occurs when the module you want to use is not present in your Python environment. There are several causes of the modulenotfounderror:
The module’s name is incorrect, in which case you have to check the name of the module you tried to import. Let’s try to import the re module with a double e to see what happens:
import ree
---------------------------------------------------------------------------
ModuleNotFoundError                       Traceback (most recent call last)
1 import ree

ModuleNotFoundError: No module named 'ree'
To solve this error, ensure the module name is correct. Let’s look at the revised code:
import re

print(re.__version__)
2.2.1
You may want to import a local module file, but the module is not in the same directory. Let’s look at an example package with a script and a local module to import. Let’s look at the following steps to perform from your terminal:
mkdir example_package

cd example_package

mkdir folder_1

cd folder_1

vi module.py
Note that we use Vim to create the module.py file in this example. You can use your preferred file editor, such as Emacs or Atom. In module.py, we will import the re module and define a simple function that prints the re version:
import re

def print_re_version():

    print(re.__version__)
Close the module.py, then complete the following commands from your terminal:
cd ../

vi script.py
Inside script.py, we will try to import the module we created.
import module

if __name__ == '__main__':

    mod.print_re_version()
Let’s run python script.py from the terminal to see what happens:
ModuleNotFoundError: No module named 'module'
To solve this error, we need to point to the correct path to module.py, which is inside folder_1. Let’s look at the revised code:
import folder_1.module as mod

if __name__ == '__main__':

    mod.print_re_version()
When we run python script.py, we will get the following result:
2.2.1
Lastly, you can encounter the modulenotfounderror when you import a module that is not installed in your Python environment.
What is Flask?
Flask is a lightweight web framework written in Python. It does not automatically come installed with Python. The simplest way to install Flask is to use the package manager for Python called pip. The following instructions to install Flask are for the major Python version 3.
How to install Flask on Windows Operating System
You can install pip on Windows by downloading the installation package, opening the command line and launching the installer. You can install pip via the CMD prompt by running the following command.
python get-pip.py
You may need to run the command prompt as administrator. Check whether the installation has been successful by typing.
pip --version
To install Flask with pip, run the following command from the command prompt.
pip3 install flask
How to install Flask on Mac Operating System
Open a terminal by pressing command (⌘) + Space Bar to open the Spotlight search. Type in terminal and press enter. To get pip, first ensure you have installed Python3:
python3 --version
Python 3.8.8
Download pip by running the following curl command:
curl https://bootstrap.pypa.io/get-pip.py -o get-pip.py
The curl command allows you to specify a direct download link. Using the -o option sets the name of the downloaded file.
Install pip by running:
python3 get-pip.py
From the terminal, use pip3 to install Flask:
pip3 install flask
How to install Flask on Linux Operating System
All major Linux distributions have Python installed by default. However, you will need to install pip. You can install pip from the terminal, but the installation instructions depend on the Linux distribution you are using. You will need root privileges to install pip. Open a terminal and use the commands relevant to your Linux distribution to install pip.
Installing pip for Ubuntu, Debian, and Linux Mint
sudo apt install python-pip3
Installing pip for CentOS 8 (and newer), Fedora, and Red Hat
sudo dnf install python-pip3
Installing pip for CentOS 6 and 7, and older versions of Red Hat
sudo yum install epel-release

sudo yum install python-pip3
Installing pip for Arch Linux and Manjaro
sudo pacman -S python-pip
Installing pip for OpenSUSE
sudo zypper python3-pip
Once you have installed pip, you can install flask using:
pip3 install flask
Check Flask Version
Once you have successfully installed Flask, you can use two methods to check the version of Flask. First, you can use pip show from your terminal.
pip show flask
Name: Flask
Version: 1.1.2
Summary: A simple framework for building complex web applications.
Home-page: https://palletsprojects.com/p/flask/
Author: Armin Ronacher
Author-email: [email protected]
License: BSD-3-Clause
Location: /Users/Yusufu.Shehu/opt/anaconda3/lib/python3.8/site-packages
Requires: Werkzeug, Jinja2, itsdangerous, click
Required-by:
Second, within your python program, you can import Flask and then reference the __version__ attribute:
import flask

print(flask.__version__
1.1.2
Installing Flask Using Anaconda
Anaconda is a distribution of Python and R for scientific computing and data science. You can install Anaconda by going to the installation instructions. Once you have installed Anaconda, you can install flask using the following command:
conda install -c anaconda flask
Testing Flask
Once you install Flask, you can test it by writing a hello world script. To do this, first, create a file called flask_test.py and add the code below to the file:
from flask import Flask

app = Flask(__name__)


@app.route('/')

def hello_world():

    return 'Hello, World!'

if __name__ == '__main__':

    app.run()
Save and close the file, then run it from the command line using:
python flask_test.py
You will get something similar to the following output:
 * Serving Flask app "flask_test" (lazy loading)
 * Environment: production
   WARNING: This is a development server. Do not use it in a production deployment.
   Use a production WSGI server instead.
 * Debug mode: off
 * Running on http://127.0.0.1:5000/ (Press CTRL+C to quit)
This output informs you that you can interact with your web application by going to the above URL. Go to http://127.0.0.1:5000/, and “Hello, World!” will appear on the page.
Summary
Congratulations on reading to the end of this tutorial!
For further reading on Flask, go to the article:
- How to Solve Python ModuleNotFoundError: no module named ‘flask_cors’
Go to the online courses page on Python to learn more about Python for data science and machine learning.
Have fun and happy researching!
The error “ModuleNotFoundError: No module named flask» is a common error experienced by data scientists when developing in Python. The error is likely an environment issue whereby the flask package has not been installed correctly on your machine, thankfully there are a few simple steps to go through to troubleshoot the problem and find a solution.
Your error, whether in a Jupyter Notebook or in the terminal, probably looks like one of the following:
No module named 'flask'ModuleNotFoundError: No module named 'flask'
In order to find the root cause of the problem we will go through the following potential fixes:
- Upgrade pip version
- Upgrade or install flask package
- Check if you are activating the environment before running
- Create a fresh environment
- Upgrade or install Jupyer Notebook package
Are you installing packages using Conda or Pip package manager?
It is common for developers to use either Pip or Conda for their Python package management. It’s important to know what you are using before we continue with the fix.
If you have not explicitly installed and activated Conda, then you are almost definitely going to be using Pip. One sanity check is to run conda info in your terminal, which if it returns anything likely means you are using Conda.
Upgrade or install pip for Python
First things first, let’s check to see if we have the up to date version of pip installed. We can do this by running:
pip install --upgrade pip
Upgrade or install flask package via Conda or Pip
The most common reason for this error is that the flask package is not installed in your environment or an outdated version is installed. So let’s update the package or install it if it’s missing.
For Conda:
# To install in the root environment
conda install -c anaconda flask

# To install in a specific environment
conda install -n MY_ENV flask
For Pip:
# To install in the root environment
python3 -m pip install -U Flask

# To install in a specific environment
source MY_ENV/bin/activate
python3 -m pip install -U Flask
Activate Conda or venv Python environment
It is highly recommended that you use isolated environments when developing in Python. Because of this, one common mistake developers make is that they don’t activate the correct environment before they run the Python script or Jupyter Notebook. So, let’s make sure you have your correct environment running.
For Conda:
conda activate MY_ENV
For virtual environments:
source MY_ENV/bin/activate
Create a new Conda or venv Python environment with flask installed
During the development process, a developer will likely install and update many different packages in their Python environment, which can over time cause conflicts and errors.
Therefore, one way to solve the module error for flask is to simply create a new environment with only the packages that you require, removing all of the bloatware that has built up over time. This will provide you with a fresh start and should get rid of problems that installing other packages may have caused.
For Conda:
# Create the new environment with the desired packages
conda create -n MY_ENV python=3.9 flask

# Activate the new environment
conda activate MY_ENV

# Check to see if the packages you require are installed
conda list
For virtual environments:
# Navigate to your project directory
cd MY_PROJECT

# Create the new environment in this directory
python3 -m venv MY_ENV

# Activate the environment
source MY_ENV/bin/activate

# Install flask
python3 -m pip install Flask
Upgrade Jupyter Notebook package in Conda or Pip
If you are working within a Jupyter Notebook and none of the above has worked for you, then it could be that your installation of Jupyter Notebooks is faulty in some way, so a reinstallation may be in order.
For Conda:
conda update jupyter
For Pip:
pip install -U jupyter
Best practices for managing Python packages and environments
Managing packages and environments in Python is notoriously problematic, but there are some best practices which should help you to avoid package the majority of problems in the future:
- Always use separate environments for your projects and avoid installing packages to your root environment
- Only install the packages you need for your project
- Pin your package versions in your project’s requirements file
- Make sure your package manager is kept up to date
References
Conda managing environments documentation
Python venv documentation
Quick Fix: Python raises the ImportError: No module named 'flask' when it cannot find the library flask. The most frequent source of this error is that you haven’t installed flask explicitly with pip install flask. Alternatively, you may have different Python versions on your computer, and flask is not installed for the particular version you’re using.
Problem Formulation
You’ve just learned about the awesome capabilities of the flask library and you want to try it out, so you start your code with the following statement:
import flask
This is supposed to import the Pandas library into your (virtual) environment. However, it only throws the following ImportError: No module named flask:
>>> import flask
Traceback (most recent call last):
  File "<pyshell#6>", line 1, in <module>
    import flask
ModuleNotFoundError: No module named 'flask'
Solution Idea 1: Install Library flask
The most likely reason is that Python doesn’t provide flask in its standard library. You need to install it first!
Before being able to import the Pandas module, you need to install it using Python’s package manager pip. Make sure pip is installed on your machine.
To fix this error, you can run the following command in your Windows shell:
$ pip install flask
This simple command installs flask in your virtual environment on Windows, Linux, and MacOS. It assumes that your pip version is updated. If it isn’t, use the following two commands in your terminal, command line, or shell (there’s no harm in doing it anyways):
$ python -m pip install --upgrade pip
$ pip install pandas
💡 Note: Don’t copy and paste the $ symbol. This is just to illustrate that you run it in your shell/terminal/command line.
Solution Idea 2: Fix the Path
The error might persist even after you have installed the flask library. This likely happens because pip is installed but doesn’t reside in the path you can use. Although pip may be installed on your system the script is unable to locate it. Therefore, it is unable to install the library using pip in the correct path.
To fix the problem with the path in Windows follow the steps given next.
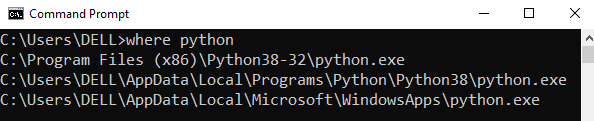
Step 1: Open the folder where you installed Python by opening the command prompt and typing where python
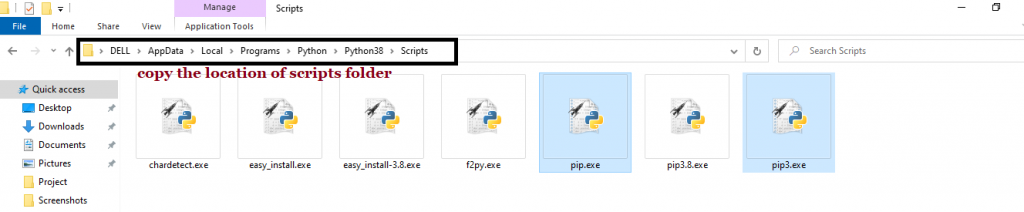
Step 2: Once you have opened the Python folder, browse and open the Scripts folder and copy its location. Also verify that the folder contains the pip file.
Step 3: Now open the Scripts directory in the command prompt using the cd command and the location that you copied previously.

Step 4: Now install the library using pip install flask command. Here’s an analogous example:
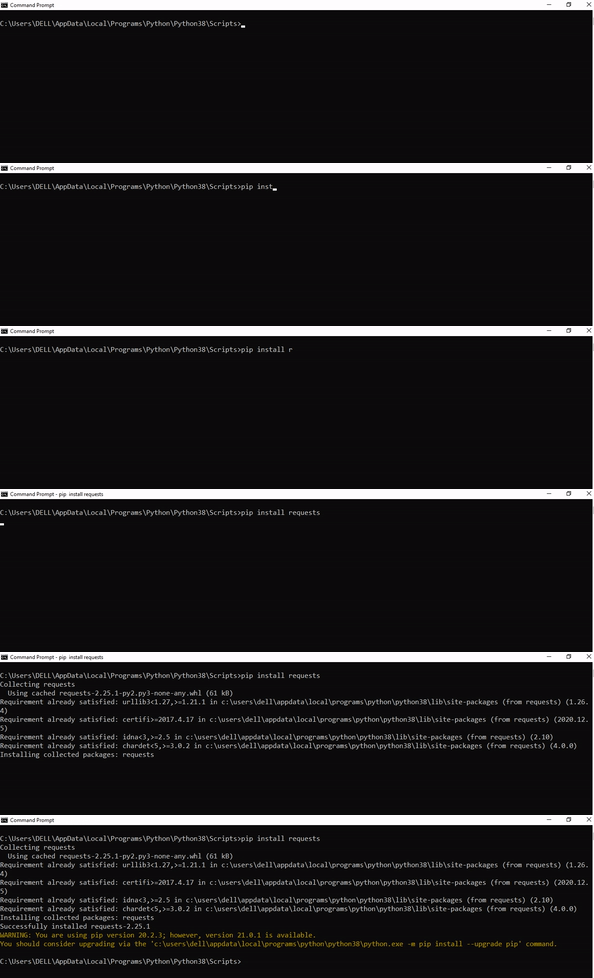
After having followed the above steps, execute our script once again. And you should get the desired output.
Other Solution Ideas
- The
ModuleNotFoundErrormay appear due to relative imports. You can learn everything about relative imports and how to create your own module in this article. - You may have mixed up Python and pip versions on your machine. In this case, to install
flaskfor Python 3, you may want to trypython3 -m pip install flaskor evenpip3 install flaskinstead ofpip install flask - If you face this issue server-side, you may want to try the command
pip install --user flask - If you’re using Ubuntu, you may want to try this command:
sudo apt install flask - You can check out our in-depth guide on installing
flaskhere. - You can also check out this article to learn more about possible problems that may lead to an error when importing a library.
Understanding the “import” Statement
import flask
In Python, the import statement serves two main purposes:
- Search the module by its name, load it, and initialize it.
- Define a name in the local namespace within the scope of the
importstatement. This local name is then used to reference the accessed module throughout the code.
What’s the Difference Between ImportError and ModuleNotFoundError?
What’s the difference between ImportError and ModuleNotFoundError?
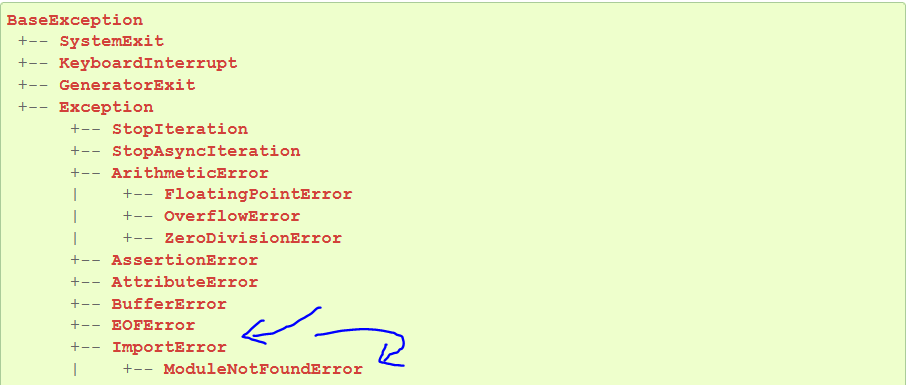
Python defines an error hierarchy, so some error classes inherit from other error classes. In our case, the ModuleNotFoundError is a subclass of the ImportError class.
You can see this in this screenshot from the docs:
You can also check this relationship using the issubclass() built-in function:
>>> issubclass(ModuleNotFoundError, ImportError)
True
Specifically, Python raises the ModuleNotFoundError if the module (e.g., flask) cannot be found. If it can be found, there may be a problem loading the module or some specific files within the module. In those cases, Python would raise an ImportError.
If an import statement cannot import a module, it raises an ImportError. This may occur because of a faulty installation or an invalid path. In Python 3.6 or newer, this will usually raise a ModuleNotFoundError.
Related Videos
The following video shows you how to resolve the ImportError:
How to Fix : “ImportError: Cannot import name X” in Python?
The following video shows you how to import a function from another folder—doing it the wrong way often results in the ModuleNotFoundError:
How to Call a Function from Another File in Python?
How to Fix “ModuleNotFoundError: No module named ‘flask’” in PyCharm
If you create a new Python project in PyCharm and try to import the flask library, it’ll raise the following error message:
Traceback (most recent call last):
  File "C:/Users/.../main.py", line 1, in <module>
    import flask
ModuleNotFoundError: No module named 'flask'

Process finished with exit code 1
The reason is that each PyCharm project, per default, creates a virtual environment in which you can install custom Python modules. But the virtual environment is initially empty—even if you’ve already installed flask on your computer!
Here’s a screenshot exemplifying this for the pandas library. It’ll look similar for flask.
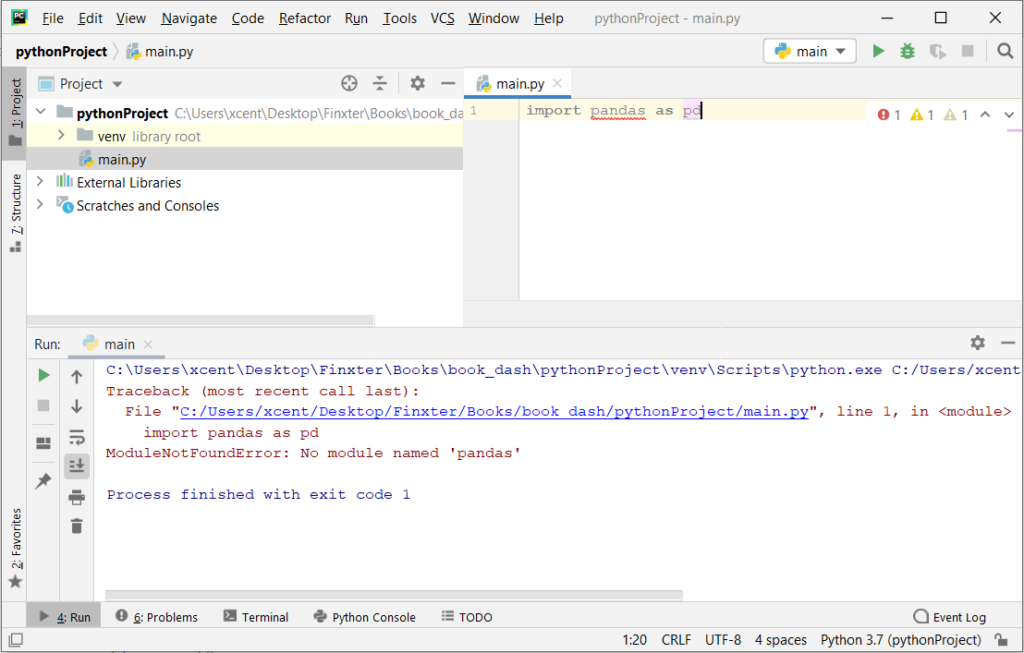
The fix is simple: Use the PyCharm installation tooltips to install Pandas in your virtual environment—two clicks and you’re good to go!
First, right-click on the pandas text in your editor:
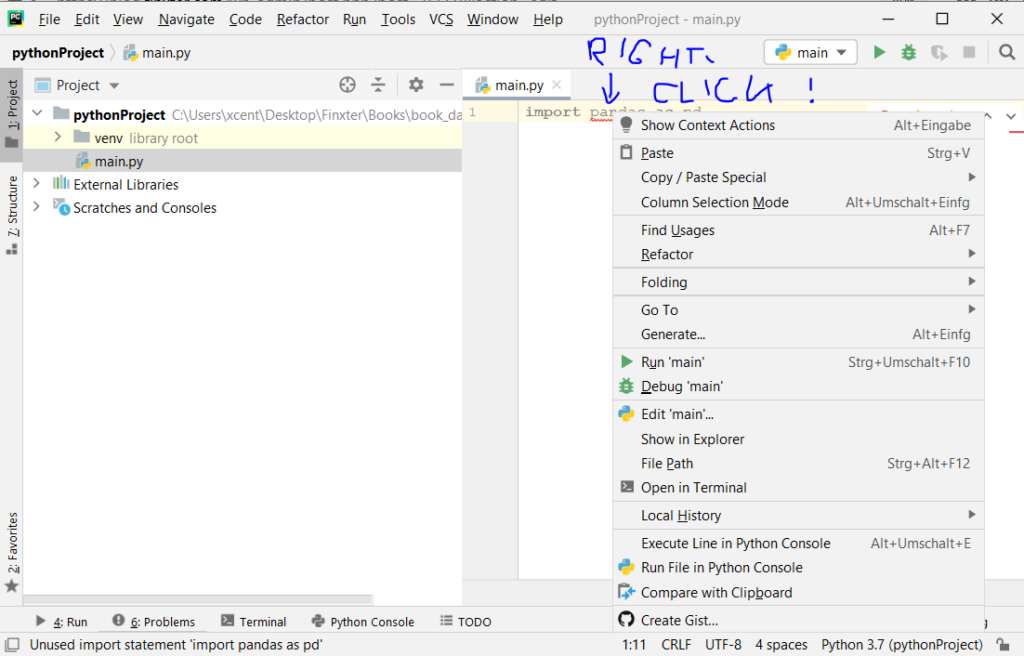
Second, click “Show Context Actions” in your context menu. In the new menu that arises, click “Install Pandas” and wait for PyCharm to finish the installation.
The code will run after your installation completes successfully.
As an alternative, you can also open the Terminal tool at the bottom and type:
$ pip install flask
If this doesn’t work, you may want to set the Python interpreter to another version using the following tutorial: https://www.jetbrains.com/help/pycharm/2016.1/configuring-python-interpreter-for-a-project.html
You can also manually install a new library such as flask in PyCharm using the following procedure:
- Open
File > Settings > Projectfrom the PyCharm menu. - Select your current project.
- Click the
Python Interpretertab within your project tab. - Click the small
+symbol to add a new library to the project. - Now type in the library to be installed, in your example Pandas, and click
Install Package. - Wait for the installation to terminate and close all popup windows.
Here’s an analogous example:
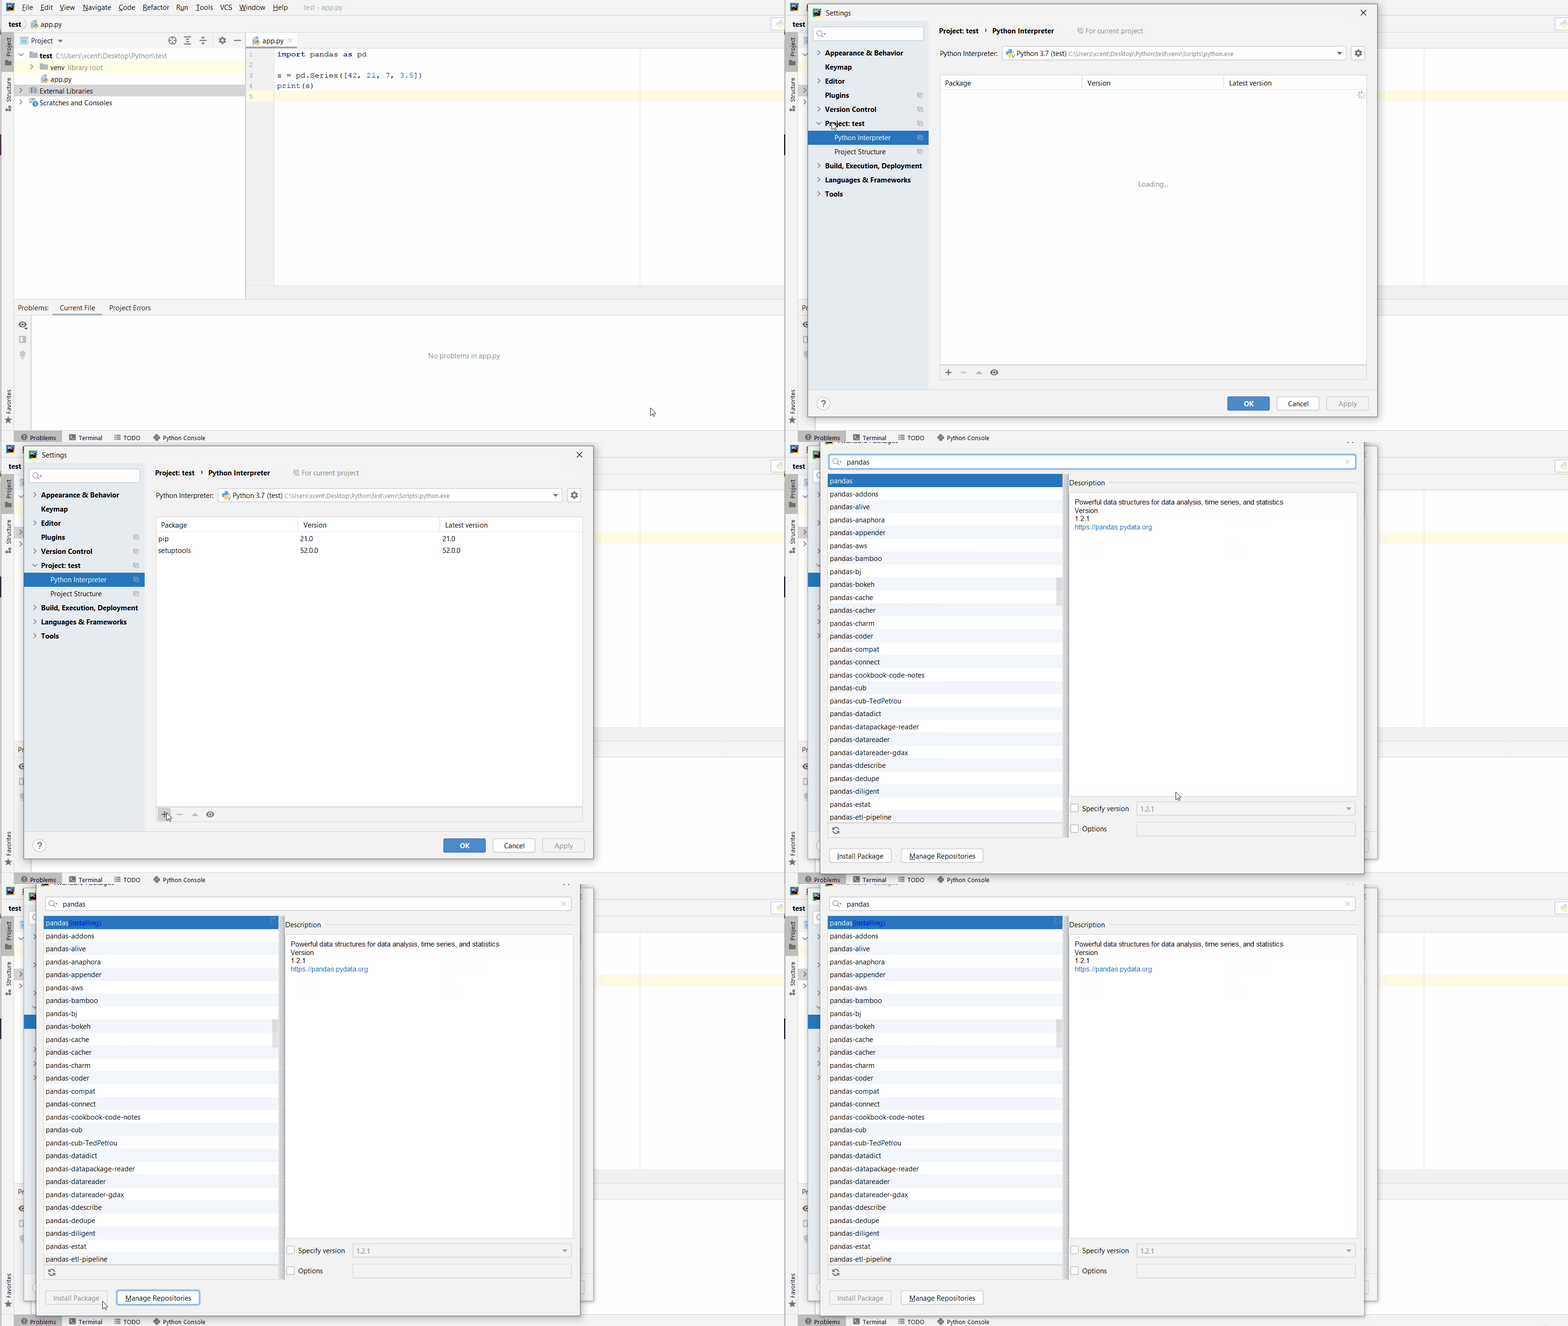
Here’s a full guide on how to install a library on PyCharm.
- How to Install a Library on PyCharm

While working as a researcher in distributed systems, Dr. Christian Mayer found his love for teaching computer science students.
To help students reach higher levels of Python success, he founded the programming education website Finxter.com. He’s author of the popular programming book Python One-Liners (NoStarch 2020), coauthor of the Coffee Break Python series of self-published books, computer science enthusiast, freelancer, and owner of one of the top 10 largest Python blogs worldwide.
His passions are writing, reading, and coding. But his greatest passion is to serve aspiring coders through Finxter and help them to boost their skills. You can join his free email academy here.
Please follow the guide below
- You will be asked some question, please read them carefully
- Put an
xinto all the boxes [ ] relevant to your issue (like this:[x]) - Use the Preview tab to see what your issue will actually look like
Make sure you are using the latest version: run git pull to update your version from Lyndor directory
Before submitting an issue make sure you have:
- At least skimmed through the README
What is the purpose of your issue?
- Bug report (encountered problems with Lyndor) 🪲
- Feature request (request for a new functionality) ☝️
- Question ❓ unable to open the setting page
- Other
If the purpose of this issue is a bug report, or you are not completely sure then provide the full terminal output as follows:
Copy the whole output and insert it here. It should look similar to one below (replace it with your log inserted between triple «`):
python settings/settings.py
Traceback (most recent call last):
  File "settings/settings.py", line 6, in <module>
    from flask import Flask, request, jsonify, render_template
ModuleNotFoundError: No module named 'flask'
Answer questions related to your Environment which will help in reproducing the issue:
The issue was encountered on: 💻
- [x ] MacOS
- Windows
- Linux
Login method:
- Regular login (username + password)
- Organization login (cookies.txt)
- cookies.txt + Library login(for exercise file)
Enter the python version you are using for download. Find your python version by typing in terminal python -V
- python (3.6)
If the purpose of this issue is a bug report please provide all kinds of example URLs where you encountered issues (replace following example URLs by yours):
Description of your issue, suggested a solution and other information
Explanation of your issue in arbitrary form goes here. Please make sure the description is worded well enough to be understood. Provide as much context and examples as possible.
| ImportError: cannot import name ‘Flask’ from partially initialized module | |
| FileNotFoundError: [Errno 2] No such file or directory: | |
| UnicodeDecodeError: ‘charmap’ codec can’t decode byte 0x81 in position 69: | |
| ModuleNotFoundError: No module named ‘flaskr.flaskr’ | |
| Другие статьи о Flask |

ImportError: cannot import name ‘Flask’ from partially initialized module
ImportError: cannot import name ‘Flask’ from partially initialized module ‘flask’ (most likely due to a circular import)
Эта ошибка возникает если Вы назвали свой файл flask.py. Переименуйте его во что-нибудь другое — например app.py
FileNotFoundError: [Errno 2] No such file or directory:
FileNotFoundError: [Errno 2] No such file or directory:
Эта ошибка возникает, например, если Вы хотите открыть файл в той же директории, что и скрипт в Windows, и
думаете, что можно просто написать open(‘имя_файла’)
Может быть где-то это прокатывает, но мне пришлось прописать полный путь до файла.
with open('C:UsersAndreiPycharmProjectsaredel_comaredel_com_venvaredel.json','r') as f:
UnicodeDecodeError: ‘charmap’ codec can’t decode byte 0x81 in position 69:
UnicodeDecodeError: ‘charmap’ codec can’t decode byte 0x81 in position 69: character maps to <undefined>
Скорее всего у вас в файле русский текст, а поддержка русского языка не подключена.
ModuleNotFoundError: No module named ‘flaskr.flaskr’
ModuleNotFoundError: No module named ‘flaskr.flaskr’
Скорее всего вы пытаетесь запустить flask по иструкции с официального учебника,
но делаете это из неправильной директории.
Нужно вернуться в корневую директорию flask-tutorial
и выполнить flask run в ней
| Flask | |
| Основы | |
| Python | |
| Запуск Flask на хостинге | |
| Запуск Flask на Linux сервере | |
| Flask в Docker | |
| Первый проект на Flask | |
| Шаблоны Jinja | |
| Web Forms | |
| Blueprint — Чертежи Flask | |
| Как разбить приложение Flask на части | |
| Flask FAQ | |
| Ошибки | |
| Декораторы в Python | |
| HTML | |
| CSS |
1. Purpose
In this post, I would demo how to solve the following ModuleNotFoundError when using python:
PyDev console: starting.

import sys; print('Python %s on %s' % (sys.version, sys.platform))
sys.path.extend(['/Users/bswen/work/python/myutils'])

Python 3.7.6 (default, Jun 18 2020, 11:06:38)
[Clang 11.0.0 (clang-1100.0.33.17)] on darwin
>>> import Flask
Traceback (most recent call last):
  File "<input>", line 1, in <module>
  File "/Applications/PyCharm.app/Contents/helpers/pydev/_pydev_bundle/pydev_import_hook.py", line 21, in do_import
    module = self._system_import(name, *args, **kwargs)
ModuleNotFoundError: No module named 'Flask'
2. The Environment
- Python 3
3. Debug
3.1 The dependency installation verification
We have installed flask as follows:
➜  learn_flask git:(master) ✗ pip3 install flask
Looking in indexes: http://mirrors.aliyun.com/pypi/simple/
Requirement already satisfied: flask in /Users/bswen/.pyenv/versions/3.7.6/lib/python3.7/site-packages (1.1.2)
Requirement already satisfied: Werkzeug>=0.15 in /Users/bswen/.pyenv/versions/3.7.6/lib/python3.7/site-packages (from flask) (1.0.1)
Requirement already satisfied: click>=5.1 in /Users/bswen/.pyenv/versions/3.7.6/lib/python3.7/site-packages (from flask) (7.1.2)
Requirement already satisfied: itsdangerous>=0.24 in /Users/bswen/.pyenv/versions/3.7.6/lib/python3.7/site-packages (from flask) (1.1.0)
Requirement already satisfied: Jinja2>=2.10.1 in /Users/bswen/.pyenv/versions/3.7.6/lib/python3.7/site-packages (from flask) (2.11.2)
Requirement already satisfied: MarkupSafe>=0.23 in /Users/bswen/.pyenv/versions/3.7.6/lib/python3.7/site-packages (from Jinja2>=2.10.1->flask) (1.1.1)
3.2 The code that use the dependency
This is the python code that uses flask:
import Flask
from flask_restful import Resource, Api

app = Flask(__name__)
api = Api(app)

class HelloWorld(Resource):
    def get(self):
        return {'hello': 'world'}

api.add_resource(HelloWorld, '/')

if __name__ == '__main__':
    app.run(debug=True)
4. The solution
4.1 The reason
Because Flask has upgraded, the old import style can not work!
We should change from:
To:
4.2 The solution code
We should change our code as follows:
from flask import Flask
from flask_restful import Resource, Api

app = Flask(__name__)
api = Api(app)

class HelloWorld(Resource):
    def get(self):
        return {'hello': 'world'}

api.add_resource(HelloWorld, '/')

if __name__ == '__main__':
    app.run(debug=True)
Now run it again, we get this:
/Users/bswen/.pyenv/versions/3.7.6/bin/python /Users/bswen/work/python/myutils/learn_flask/app1.py
 * Serving Flask app "app1" (lazy loading)
 * Environment: production
   WARNING: This is a development server. Do not use it in a production deployment.
   Use a production WSGI server instead.
 * Debug mode: on
 * Running on http://127.0.0.1:5000/ (Press CTRL+C to quit)
 * Restarting with stat
 * Debugger is active!
 * Debugger PIN: 717-204-539
It works!
6. Summary
In this post, we demonstrated how to solve the ‘ModuleNotFoundError: No module named xxx’ error in Python, we should check that the module was really installed correctly and you have correctly import the module. Thanks for your reading. Regards.
If you are getting “ImportError: No module named flask” while running python flask hello world application, then follow this tutorial to resolve the error.
[email protected]:~/mypythonproj (sneppets-gcp)$ python app.py
********************************************************************************
Python command will soon point to Python v3.7.3.

Python 2 will be sunsetting on January 1, 2020.
See http://https://www.python.org/doc/sunset-python-2/

Until then, you can continue using Python 2 at /usr/bin/python2, but soon
/usr/bin/python symlink will point to /usr/local/bin/python3.

To suppress this warning, create an empty ~/.cloudshell/no-python-warning file.
The command will automatically proceed in  seconds or on any key.
********************************************************************************
Traceback (most recent call last):
  File "app.py", line 1, in <module>
    from flask import Flask
ImportError: No module named flask
Check flask installed or not
Whenever you get error “ImportError: No module named flask” first check whether flask is installed or not. The easiest way to check is go to ‘python terminal’ or ‘command prompt’ and try the following command >>> import flask
[email protected]:~/mypythonproj(sneppets-gcp)$ python
********************************************************************************
Python 2.7.13 (default, Sep 26 2018, 18:42:22)
[GCC 6.3.0 20170516] on linux2
Type "help", "copyright", "credits" or "license" for more information.

>>> import flask

Traceback (most recent call last):
  File "<stdin>", line 1, in <module>
ImportError: No module named flask
The above results clearly shows that flask module in not installed.
Create Virtual Environment
Note, different python applications uses packages and modules that’s not included in standard library. Also sometimes applications requires specific version of a library.
To meet the above requirement python supports virtual environments and packages. Virtual environment is a self contained directory that contains python installation for specific version of python and other supporting packages and libraries. Different applications can use different virtual environments.
The module used to create and manage virtual environments is called as venv. To install python3-venv run the following command.
$ sudo apt install python3-venv
The following additional packages will be installed:
  python3.5-venv
The following NEW packages will be installed:
  python3-venv python3.5-venv
0 upgraded, 2 newly installed, 0 to remove and 17 not upgraded.
---------------------------------------------
---------------------------------------------
To create new virtual environment run the following command
$ sudo python3 -m venv venv
$ ls
app.py venv
The above command creates a directory called venv , which contains a copy of python binary, pip package manager and other supporting files needed.
$ cd venv/
$ ls
bin  include  lib  lib64  pyvenv.cfg
You need to activate the virtual environment in order to use it. So activate the virtual environment using the following command. Once activated, you would see shell prompt will change and it will show the name of the virtual environment that you are currently using. In our case it is venv.
$ source venv/bin/activate
(venv) $
Install Flask to resolve Flask ImportError
In the above steps we activated the virtual environment, now use Python package manager pip to install Flask as shown below.
(venv) $ sudo pip install flask

Collecting flask
  Downloading Flask-1.1.1-py2.py3-none-any.whl (94 kB)
     |████████████████████████████████| 94 kB 2.8 MB/s
Requirement already satisfied: Werkzeug>=0.15 in /usr/local/lib/python2.7/dist-packages (from flask) (0.16.1)
Requirement already satisfied: click>=5.1 in /usr/local/lib/python2.7/dist-packages (from flask) (7.0)
Collecting itsdangerous>=0.24
  Downloading itsdangerous-1.1.0-py2.py3-none-any.whl (16 kB)
Collecting Jinja2>=2.10.1
  Downloading Jinja2-2.11.0-py2.py3-none-any.whl (126 kB)
     |████████████████████████████████| 126 kB 19.4 MB/s
Collecting MarkupSafe>=0.23
  Downloading MarkupSafe-1.1.1-cp27-cp27mu-manylinux1_x86_64.whl (24 kB)
Installing collected packages: itsdangerous, MarkupSafe, Jinja2, flask
Successfully installed Jinja2-2.11.0 MarkupSafe-1.1.1 flask-1.1.1 itsdangerous-1.1.0
Verify the installation
To verify the installation try running the following command to check the Flask version.
(venv) $ sudo python -m flask --version

Python 2.7.13
Flask 1.1.1
Werkzeug 0.16.1
Now try running the minimal flask application that you had created. It should run without any errors now.
(venv) $ sudo python app.py

 * Serving Flask app "app" (lazy loading)
 * Environment: production
   WARNING: This is a development server. Do not use it in a production deployment.
   Use a production WSGI server instead.
 * Debug mode: off
 * Running on http://0.0.0.0:5000/ (Press CTRL+C to quit)
Deactivate virtual environment
Once you are done with running your application, you can deactivate the virtual environment by typing the command deactivate to return back to normal shell
(venv)$ deactivate
$
Further Learning
- How to run a Jupyter Notebook .ipynb file from terminal or cmd prompt ?
- Check if object is null using Objects class static utility methods
- Terraform tutorial
- Convert from ZonedDateTime to LocalDateTime with a timezone
References
- Python Documentation venv
- GCP Python