Приветствую всех от коллектива VAGPLUS!
Сегодня я вам расскажу о дооснащении VAG группы, а именно о скрытых функциях блоков комфорта, на примере Audi A4 B8 GEN3.
На большей части автомобилей VAG группы последних выпусков есть огромное количество скрытых функций, которые поддерживают блоки комфорта и эти функции просто не активны! Мы производим активацию всех возможных функций, которые поддерживает блок комфорта вашего автомобиля по привлекательным ценам!
Список опций Audi A4 (B8) (Ауди А4 Б8)
1. Полное отключение функции «Start-Stop» (старт-стоп)
Система «Cтарт-стоп» по умолчанию будет отключена, при этом лампочка на кнопке Start-Stop будет гореть тогда, когда эта система будет активна.
Также возможен следующий вариант работы системы: старт-стоп запоминает последнее состояние (перед выключением двигателя)
2. Отображение выбранной передачи на экране приборной панели
3. Улучшение звучания штатной мультимедиа с установленным усилителем и сабвуфером (премиум-настройка по аналогии с Bang&Olufsen)
4. Время отображения настроек климат-контроля на экране MMI
5. Длительность работы омывателя фар
6. Количество циклов очистки стекла между работой омывателя фар
7. Длительность работы омывателя стекла, после которой будет срабатывать омыватель фар
8. Отключение дотирочного взмаха дворников
9. Отключение автоматического срабатывания заднего дворника при включении задней передачи
10. Подсветка поворотов передними противотуманными фарами
11. Независимая работа противотуманных фар при дальнем свете
12. Задние противотуманные огни остаются включенными при дальнем свете
13. Настройка яркости ресничек при ближнем свете
14. Настройка яркости ДХО в режиме «габариты»
15. При включении поворотника не будут отключаться реснички на этой фаре
16. Включить режим парковочных огней
17. Реснички будут гореть на полную яркость в режиме парковочных огней
18. Передние поворотники в качестве парковочных огней
19. Варианты использования дневных ходовых огней (ДХО через ПТФ, ДХО через ближний, ДХО через дальний свет)
20. Опция вкл/выкл дневных ходовых огней в меню MMI
21. Отключение сообщения «Lights are on»
22. Audi Drive Select (облегченная версия, без установки кнопок)
23. Выведение спидометра на экран MMI
24. Настройка функции Coming/Leaving-Home
25. Настройка скорости, при которой отключается камера заднего вида
26. Активация графического парктроника на дисплее MMI
27. Включение проверки панели приборов при зажигании как на S-версиях (тест стрелок)
28. Экономайзер (с 10-го модельного года. Расход топлива, запас хода и т.п.)
29. Отключение писка и индикации при не пристегнутых ремнях
30. Функция Lap Timer — секундомер + температура масла двигателя
31. Режимы подсветки шкал приборов при выключенных габаритах
32. Открыть клапан большого круга охлаждения для дизельных двигателей.
33. Индикация поворотниками или стоп-сигналами при экстренном торможении
34. Комфортное открывание/закрывание стекол.
35. Открывается только водительская дверь и люк бензобака при первом нажатии. Два нажатия — все двери.
36. Отключение «Key warning»
37. Настройка открывания багажника (длительность нажатия кнопки на пульте)
38. Отключение функции остановки двигателя при открытии двери водителя и отстегнутом ремне (только для FL)
39. Дублирование поворотника лампами стоп-сигнала
40. Опускание правого зеркала при включении задней передачи, в том числе, и на механической коробке передач
41. Снятие с ручника с не пристегнутым ремнем
42. Убрать надпись «Please Release parking brake» при установленной передачи D, R, M, S.
43. Возможность снять ручник без удержания тормоза при установленной передаче P и N
44. Показания скорости на большом дисплее радио для non-MMI (Driving School Mode)
45. Активация индикации заряда АКБ
46. Время отключения приемника после выключения зажигания (возможно выставить любое время до 99 мин.)
47. Изменение заставки на большом экране (S4, RS4, S-line)
48. Скрытое меню (только MMI)
49. Включить двойной звуковой сигнал при снятии с сигнализации
50. Активация пункта «Контурное освещение» («Ambient Light») в меню MMI (регулировка яркости ламп подсветки пространства для ног)
51. Мониторинг давления в шинах (TPMS, активируется не на всех моделях)
52. Скорость, при которой будут появляться предупреждения об опасности при вводе информации в навигации и телефоне
53. Включить возможность импортирования CD на HDD MMI
54. Включение видео с DVD при движении (VIM)
55. Включение «упрощенного варианта» Hold Assist
56. Кодирование после установки камеры заднего вида (для MMI 3G plus)
57. Активация голосового управления телефоном (кнопка справа на руле), если есть мультируль и штатный Bluetooth
58. Отображение настроек климата после замены обычной магнитолы на MMI
59. Сброс сервисного обслуживания (межсервисный интервал, SRI Reset)
60. Развод/Свод поршней для замены колодок
61. Адаптация заслонок климата
62. Адаптация АКБ при замене
63. Кодирование и адаптация при установке круиз-контроля (и адаптация датчика руля)
64. Устранение неисправности стеклоподъемников (режим автоматического подъема и опускания)
65. Проверка состояния цепи
66. Отключение контроля ламп заднего хода
67. Отключение контроля ламп подсветки номера
68. Сброс ошибки штатного отопителя
69. Адаптация датчика загрязненного воздуха (климат-контроль)
70. Адаптация рециркуляции при омывании стекла
71. Адаптация режимов работы вентилятора (уменьшение шума).

Audi A4 B8 GEN3
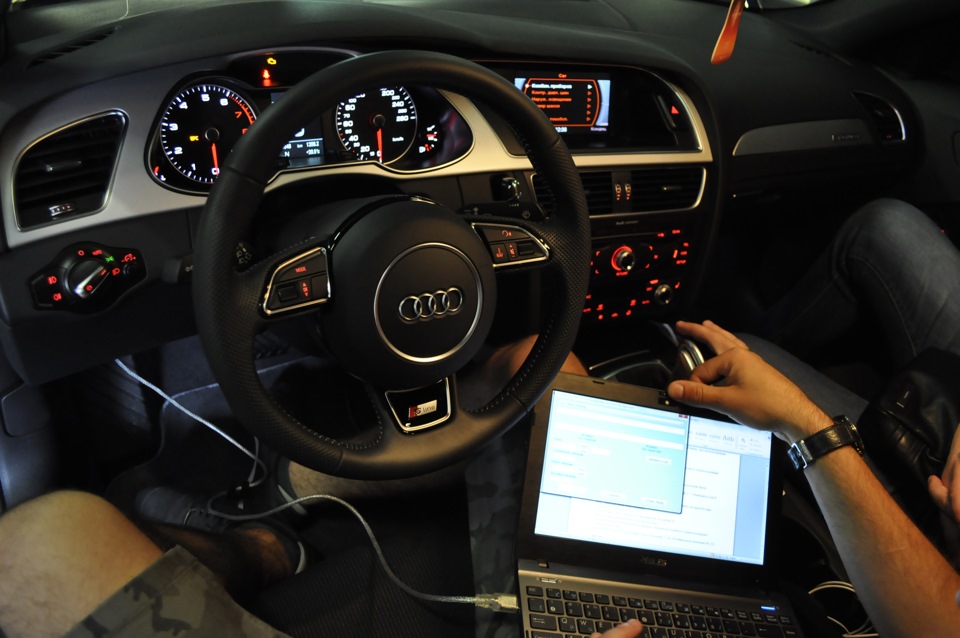
Процесс Активации

Логотип

Выведение спидометра на экран MMI

Активация графического парктроника на дисплее MMI
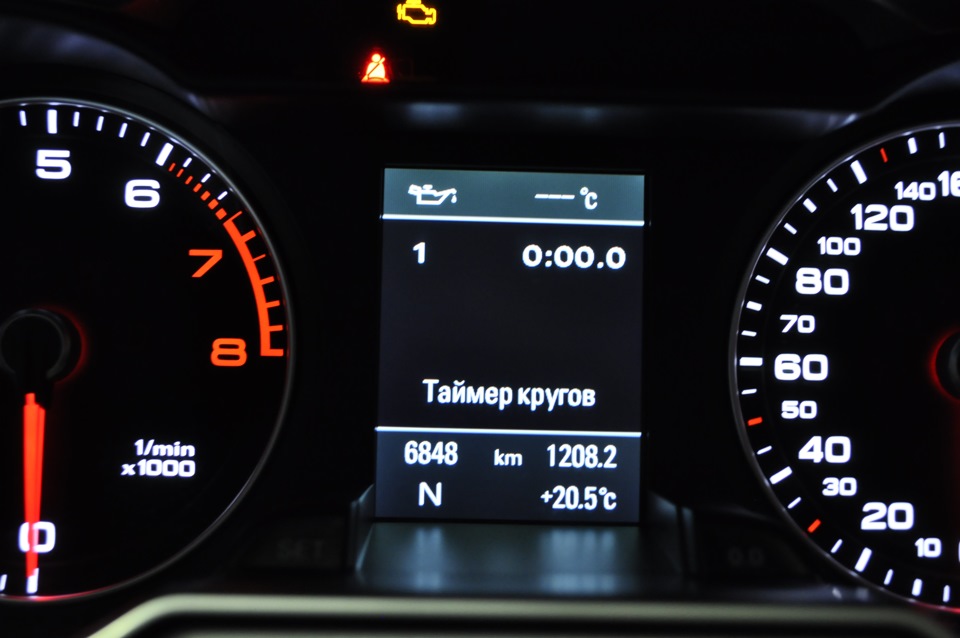
Выведение температуры масла ДВС и таймера кругов на экран

Перевод Габаритных огней в режим ДХО (постоянно горят с максимальной яркостью)
Активация скрытых функций 2000 руб
Записаться на активацию скрытых функций и не только можно:
по телефону: 8(495)728-01-61
WhatsApp: 8(903)728-01-61
VAGPLUS Адрес: г.Москва, Ул. Поморская 48а
На сегодня все)))) Не переключайтесь))))
Всем желаю ровных дорог и зеленых светофоров))) Берегите себя, своих близких и своих коней)
Не забываем тыкнуть кнопки внизу =)
Наша страница на DRIVE2:
| LaserJet 4L/4ML LEDs | LaserJet 4P/4MP Display Panel | Description & Recommendations |
|---|---|---|
 Paper light is on steady. All other lights are off. |
PC LOAD [paper size] | 1. Paper Cassette is empty or missing. 2. Add paper and/or insert cassette. 3. Reseat the cassette. 4. Check if Paper Out flag PS2 (bottom of printer, adjacent to the Pickup D-Roller) is broken or movement is hindered. Unstick or replace the Pickup Assembly. 5. Replace DC Controller PCA. |
 Paper light is bIinking. All other lights are off. |
13 PAPER JAM | 1. Paper in printer. Clearing Paper Jams. 2. Rear Door Open. Close door and reset printer. 3. Jam removed but printer not reset. Perform front panel reset. 4. Transfer Roller Guide Plate not installed correctly (all 3 tabs must be in position). 5. Stuck or broken flags/sensors. Note where the leading edge of the paper is to determine which paper sensor maybe causing the jam. Ensure sensor flags rotate freely. Replace flags or associated assemblies if broken or if they remain stuck. 6. Paper fragment under oblique rollers (top or front). Remove rollers and clear out paper. 7. Main Motor faulty. Power up the printer and observe if the stacker rollers rotate. If not, replace the Motor. 8. Stuck or Faulty Gears in Gear Train. Replace Gear Train. 9. Toner cartridge not rotating. Refer to “Drum Rotation Functional Check» later in this chapter. 10. Transfer Roller Gear missing or broken. Replace the Transfer Roller. 11. Stuck or broken solenoids. Replace solenoid or associated assembly. 12. DC Controller PCA faulty. Replace PCA. 13. Software related: for example, program in letter, but feeding legal size paper. Change the software paper size setting, or feed the designated size. |
 Error light is on steady. All other lights are off. |
12 OPEN OR NO EP | 1. Printer’s Top Door is open andior the toner cartridge is missing or not installed properly. Reinstall toner cartridge and close door. 2. Part of the Top Door that pushes the plunger down is broken. Replace the Top Door. 3. Top Door Switch (Plunger Assembly) is broken. Replace (see Figure 7-3). 4. Toner Cartridge Lever Assembly is broken, Replace the Assembly. 5. Faulty Microswitch SW201 (Top Door Switch) on the DC Controller PCA, Replace DC Controller PCA. |
 Error light is blinking, and all other lights are off. |
20 MEM OVERFLOW 21 PRINT OVERRUN 22 ERROR |
1. Too much data, or data too complex. Turn Page Protection ON or to AUTO (can be set within HP Explorer’s Remote Control Panel). 2. Add optional memory. 3. Reduce the complexity of the print job. LaserJet 4P/4MP: Press Continue to resume printing. |
 Data light is blinking, and all other lights are off. |
AF FEED [paper size] AE FEED[env. size] |
1. Insert paper into the manual feed slot. This will fulfill the manual feed request. 2. To avoid manual feed on this job, press the front panel button to override the manual feed request and to feed paper from the paper cassette. 3. To avoid manual feed on future jobs, go into a software application or the HP LaserJet Explorer to change the setting from Manual Feed to Paper Cassette feed. |
 All four lights on (without pressing the front panel). |
Not Applicable (LaserJet 4L/4ML Only) | There is a service error. Press and hold the front panel button to display the error light code. This code will be shown only while the button is pressed, The following tables list possible error codes. NOTE: If no further error code is displayed, yet all four lights remain on continuously, power cycle the printer. If the condition persists, replace the Formatter PCA. |
 Ready and Error lights are on and all others are off. |
50 SERVICE | 1. Remove power to the printer for 15 minutes. If this doesn’t clear the error: 2. Perform the Fuser Checks shown in the table below. 3. Check the Fuses (FU101 and FU201) on the DC Controller PCA. Replace if faulty. 4. Replace the DC Controller PCA. |
 Data and Error lights are on and all others are off. |
51 ERROR | Power-cycle the printer. If this doesn’t clear the error: 1. Reseat the Laser/Scanner Assembly the Scanner/DC Cable Assembly. 2. Replace the Laser/Scanner Assembly. 3. Replace the DC Controller PCA. 4. Replace the Scanner/DC Cable Assembly. |
 Paper and Error lights are on and all others are off. |
52 ERROR | Power-cycle the printer. If this doesn’t clear the error: 1. Ensure condensation from moving the printer from a cold to warm environment hasn’t occurred, Allow the printer 6 hours acclimate to the warm room. 2. Reseat the Scanning Assembly. 3. Replace the Laser/Scanner Assembly. 4. Replace the DC Controller PCA. 5. Replace the Scanner/DC Cable Assembly. |
 Data lights is on and all other are off. |
53 [XY-ZZ] ERROR | An error has been found in RAM or ROM. 1. Power-cycle the printer. If this doesn’t clear the error: 2. Power off the printer, remove any additional memory, then power back on. If the message clears, replace the memory card. 3. Replace the Formatter PCA. LaserJet 4P/4MP: Use the list below to decode the [XY-ZZ] values: |
Error light is on; all others are off. |
55 ERROR | The Formatter and DC Controller are not communicating. Power-cycle the printer, If this doesn’t clear the message: 1. Reseat the Formatter PCA into the DC Controller connector. 2. Replace the Formatter PCA. 3. Replace the DC Controller PCA. 4. Replace the DC Controller connector. |
| 57 ERROR | The DC Controller has reported a general motor failure. The Main Motor is controlled by the DC Controller PCA, and seated into connector J601. Power-cycle the printer. If this doesn’t clear the message: 1. Reseat the Main Motor into the DC Controller connector. 2. Inspect the Gear Train for debris that would block the free operation of the gears. 3. The toner cartridge may not be rotating. Refer to “Drum Rotation Functional Check later in this chapter. 4. Main Motor faulty. Power-up the printer and observe if stacker rollers rotate. If not, replace the Main Motor. 5. Replace the DC Controller PCA. |
|
 Ready, Data and Error lights are on and all others are off. |
58 SERVICE | 1. Power-cycle the printer. 2. Check the fan to determine if it is blocked from operation. 3. Reseat the fan connector on the Laser/Scanner Assembly. 4. Replace the Fan. 5. Replace the Laser/Scanner Assembly. 6. Replace the DC Controller. 7. Replace the connector between the Scanner and DC Controller. |
 Error light is off; the other lights display some pattern (not otherwise shown in this table). |
61-67 SERVICE 70-71 ERROR 72-79 SERVICE |
1. Power-cycle the printer. 2. Replace the Formatter PCA. |
| 68 ERROR 68 SERVICE |
68 ERROR indicates a recoverable error in NVRAM. Press Continue to clear, then check control panel settings. One or more fields will have been reset to factory defaults during recovery. 68 SERVICE indicates NVRAM is full. 1. Perform NVRAM Reset to clear NVRAM (hold down Item key during power-on). 2. Replace the Formatter PCA. |
|
 All lights off (blank display). |
[blank] | If the printer’s lights remain off (LaserJet 4L/4ML) or the message display panel remains blank (LaserJet 4P/4MP), check the following: 1. (4 L/4ML): Printer is in Intelligent Off mode. Press the front panel button, or open the Top Door. 2. Power is not supplied to the printer. Check power cord connections and power source. 3. Print an engine test print to determine if the print engine is functional, If the test is successful, replace the Formatter PCA. 4. Check FusesFU101 and FU201 on the DC Controller PCA. Replace if necessary. 5. Replace the DC Controller PCA. 6. Replace the connector between the DC Controller and the Formatter. |
-

Всем привет!
Не давно кушка стала писать сообщение, что с адаптивным светом что-то не то. Знакомый считал ошибку, получилось следующие:Контроллер 55: Ксеноновые фары Описания: 4F0-910-357.clb
Номер детали контроллера: 4L0 910 357 B HW: 4L0 907 357 B
Компонент и/или Версия: AFS 1 H01 0010
Код ПО: 0000032
Код СТО: WSC 31414 790 00001
Доп. информация: 7L6941329A AFS-Modul links H07 0004 7L6941329A AFS-Modul rechtsH07 0004
VCID: 2B5F10DC8A1E11B
1 Ошибка найдена:02988 — Включена корректировка фар для езды в условиях левостороннего/правостороннего движения
000 — — — ЧЕК ВКЛ
Момент неисправности:
Статус ошибки: 11100000
Приоритет ошибки: 7
Частота ошибки: 1
Сброс счетчика: 56
Пробег:: 60956 km
Индикация времени: 0
Дата: 2012.06.08
Время: 13:57:55Вагом ковырялся когда-то знакомый, включил тест стрелок и разблокировал видео в движении, больше говорит никуда не лазил.
какие будут идеи по ошибке?
Заранее спасибо. -

- 28 авг 2012
- 597
- A4/B8FL 1.8T 13г.
Добрый вечер! Решили проблему?
-

- 24 мар 2011
- 1.486
- КуСедьмой трактор
поменяли где-то кодировку для включения режима движения в странах с левосторонним движением
-
- 28 авг 2012
- 597
- A4/B8FL 1.8T 13г.
А что точно меняли не знаете??
-

- 19 июн 2010
- 19.986
- А6/С6 3.0i Q 05
Stop hovering to collapse…
Click to collapse…
Hover to expand…
Нажмите, чтобы раскрыть…
-
- 28 авг 2012
- 597
- A4/B8FL 1.8T 13г.
Выключаю в меню кар headlamp control, ошибка пропадает, но фары задираются очень высоко. Захожу в базовые настройки, регулирую но ничего не изменяется, по прежнему светят очень высоко!
-
- 19 июн 2010
- 19.986
- А6/С6 3.0i Q 05
Корректор хоть тестирует фары, когда заводишься?
Stop hovering to collapse…
Click to collapse…
Hover to expand…
Нажмите, чтобы раскрыть…
-
- 28 авг 2012
- 597
- A4/B8FL 1.8T 13г.
Да, тестирует. Мне кажется просто неправильная регулировка фар изначально!
-
- 19 июн 2010
- 19.986
- А6/С6 3.0i Q 05
Так едь туда, где есть хотя бы регласкоп.
Опустить можно просто шестигранником, даже без шнурка! Только зачем???
Stop hovering to collapse…
Click to collapse…
Hover to expand…
Нажмите, чтобы раскрыть…
-
- 28 авг 2012
- 597
- A4/B8FL 1.8T 13г.
Мне кажется дилеры при ТО настроили фары при включенной функции Headlamp control, поэтому при ее выключении, тоесть при переходе в нормальный режим фары очень задраты и слепят всех. А шнурок нужен, чтобы запомнить новое нулевое положение фар.
-
- 19 июн 2010
- 19.986
- А6/С6 3.0i Q 05
Технически это невыполнимо.
Stop hovering to collapse…
Click to collapse…
Hover to expand…
Нажмите, чтобы раскрыть…
-
- 28 авг 2012
- 597
- A4/B8FL 1.8T 13г.
Headlamp control (в AMI) = Tourist solution (в VAG COM), при каждом из режимов Enable/disable можно произвести ручную настройку, корректировку болтами на фаре, при включенном сервисном режиме фар, а потом запомнить эту настройку как базовую. Уже давно занимаюсь данным вопросом, во многом уже разобрался!
-
- 19 июн 2010
- 19.986
- А6/С6 3.0i Q 05
Когда включен режим Tourist solution , в 55 адресе ошибка постоянная весит, как базу делать будешь?
ЗЫ сколько же стоит фары отрегулировать у ОД, что не едешь к ним?
Stop hovering to collapse…
Click to collapse…
Hover to expand…
Нажмите, чтобы раскрыть…
-
- 28 авг 2012
- 597
- A4/B8FL 1.8T 13г.
Да, ошибка когда этот режим включен, фары буду сам регулировать, хочу снять их и от песка почистить внутри. Буду делать или после НГ, когда прилечу 9-10 числа или ближе к весне. В базовых настройках канал 002 кажется, дома мануал есть, в интернете нашел, поздно вечером скину, т.к. сейчас на работе.
Машина не на гарантии, а ОД сдерут кучу денег, да и сделают опять через Ж. Тем более есть VAG COM.
А вообще подъеду к стене, мелом отрисую расположение пучка света, отключу режим tourist, фары поднимутся вверх, потом произведу регулировку до нарисованных значений, т.к они меня устраивают и сохраню настройки. И теперь после включения туристического режима фары будут опускаться и тем самым не будут слепить водителей при нахождении в стране с левосторонним движением. -
- 6 фев 2013
- 80
- A6/C6 3,2 05 г.
ребят,у меня ошибка появилась после разбора фар и замены линз. адаптивный поворотный, пишет Adaptive light….. и вылазит значок (там где высвечивается перегоревшая лампа). Смотришь на фары, светят будто бы в центр. Кто-нибудь может помочь в настройке нулевого положения???
-
после недельного простоя и отключения АКБ,вылазит ошибка»Неисправность поворотного света (adaptive light) «-вылазит сразу после завода машины-фары выключены.До этого снимал обшивки на дверях и лазил в предохранители с лева и снимал кожух рулев.колонки..и всё..-что делать,кто подскажет?
-
- 9 янв 2013
- 165
- Q7 4,2 FSI 06г.
Тоже такой же вопрос.
Снимали фары при покраске бампера и капота. Поставили назад, все вроде подключили. Выдает ошибка адаптивного освещения. Фары при включении не настраиваются вверх-вниз. До разбора все работало без проблем. В чем причина ?
-
- 19 июн 2010
- 19.986
- А6/С6 3.0i Q 05
Провести базу корректора нужно по новой.
Stop hovering to collapse…
Click to collapse…
Hover to expand…
Нажмите, чтобы раскрыть…
-

- 3 окт 2012
- 148
- Рязанская обл.
- Q5 8R 2014 г.
А вот поподробнее с этого места можно, пожалуйста.
У меня выдает такую ошибку. Шнурком не сбрасывается.
Адрес 55: Корректор фар Label: 8K0-907-357.clb
Part No: 8K5 907 357
Компонент: Dynamische LWR H01 0010
Ревизия: 00000001 Серийный номер:
Кодировка: 0000004
Мастерская #: WSC 06324 000 00000
VCID: F7F697C586D6E5B1 неисправность:
02988 — Включена корректировка фар для езды в условиях левостороннего/правостороннего движения
000 — — — Индикатор неисправности ВКЛ
Стоп-кадр:
Статус неисправности: 11100000
Приоритет неисправности: 7
Частота появления ошибки: 1
Индекс забывания: 131
Пробег: 82533 km
Отсчет времени: 0
Дата: 2014.01.04
Время: 12:59:33Куда лезть, что в Инженерное меню или же «шнурком» настраивать. Подскажите как?
Stop hovering to collapse…
Click to collapse…
Hover to expand…
Нажмите, чтобы раскрыть…
-
- 19 июн 2010
- 19.986
- А6/С6 3.0i Q 05
В меню MMI — кар — наружный свет — заграничный свет — выкл.
Стыдно детские вопросы задавать, не прочитав руководство.
Stop hovering to collapse…
Click to collapse…
Hover to expand…
Нажмите, чтобы раскрыть…
| LJ II/III | |
| 00 READY | Proceed; printer is ready to use. |
| 02 WARMING UP | Wait until printer signals ready. |
| 02 WARMING UP (Continuously) |
Refer to “02 WARMING UP(continuous) Message” section. |
| 04 SELF TEST | Continuous Self Test printing. |
| 05 SELF TEST | Self Test in progress. |
| 06 PRINTING TEST | Self Test printing. |
| 06 FONT PRINTOUT | Printing sample characters from available fonts. |
| 07 RESET | Returns all printer settings to Printing Menu setiings and clears buffered pages, temporary SORfonts, and macros. |
| 08 COLD RESET | Returns both Configuration and Printing Menu selections to the factory settings. |
| 09 MENU RESET | Returns all Printing Menu items to factory setiings and clears buffered pages, temporary soft fonts, and macros. |
| 10 RESET TO SAVE (HP 33449 Only) |
Press and hold RESET (until 07 RESETappears) to confirm the accepknce of Ptinting Menu selections (ternporary fonts, macros and buffered data will be deleted), or press CONTINUEor ON LINE(no changes to any selections will be made at this time). |
| 11 PAPER OUT (HP 33440 Only) |
Add media to the input tray. If problem continues, refer to the “11 PAPER OUT Message” section. |
| 12 PRINTER OPEN | Close the Top Cover Assembly. If problem continues, refer to the “12 PRINTEROPENMessage” section. |
| 13 PAPER JAM | Open printer, clear any paper within the printer, and press CONTINUE or ON LINE to reprint the page. If problem persists, refer to “13 PAPER JAM Message” section. |
| 14 NO EP CRT | Install an EP-S Cartridge. If problem continues, refer to the «14 NO EP CART Message” section. |
| 15 ENGINE TEST | Engine test with printout produced by pressing the Test Print button. |
| 16 TONER LOW | Replace EP-S Cartridge. If problem continues, refer to. “16 TONER LOW Message” section. |
| 17 MEMORY CONFIG (HP 33449 Only) |
Indicates memory reconfiguration in operation as a result of setting Page Protection ON. |
| 18 SKIP SELFTEST (HP 33449 Only) |
Skips the ROM and RAM portions of the power on self test, activated by holding down the — key and powering on the printer. This should not be used as it compromises printer integrity. (Note: This is for manufacturing use only.) |
| 20 ERROR 20 MEM OVERFLOW |
Indicates a memory overflow; too much data is being sent to the printer and the printer has run out of memory. Pressing the CONTINUE key causes the printer to print only the information it has received. If the error persists, it may be necessary to simplify the print job (i.e., fewer fonts and less graphics information) or have the customer purchase additiond memory. |
| 21 ERROR 21 PRINT OVERRUN |
Indicates that the information being sent to the printer is too complex for the printer (i.e., the formatting capabilities of the printer can not keep up with the formatting instructions being sent to it by the computer). If the error persists, it maybe necessary to simplify the job (i.e., reduce the number of characters or different fonts used, reduce the number of pixels addressed or cursor repositions, or reduce addressing the same pixel location multiple times). With the HP 33449, this problem can also be resolved by adding at least one additional memory PCA and setting PAGEPROTECT=[LTR, LGL or A4]. |
| 22 ERROR 22 I/O CNFIG ERR |
Indicates that the host computer and the printer are not communicating properly (i.e., the printer and computer baud rates may not match or the handshake protocol may be incompatible). Note: The printer supports the XON/XOFF (DC1/DC3) and DTR (Data Terminal Ready) handshake protocols. Both signals are sent from the printer during data transmission. The Enquire/Acknowledge (Enq/Ack) protocol is not supported by this printer. |
| 40 ERROR | Indicates that an error occurred during the transfer of data from the computer to the printer. Note: This error occurs if the computer is powered down while the printer is on line or when attempting to use baud rates which do not match. |
| 41 ERROR | Indicates that a temporary error occurred in the printed page. If this error occurs, press the CONTINUE key and the printer will repeat the page. Note: This error most frequently occurs when a Beam Detect Error occurs. If the printer cannot correct the error condition after two seconds, a Beam Detect Malfunction (51 ERROR) will occur. |
| 42 ERROR 42 OPT INTERFACE |
Indicates a communications problem has occurred between the Interface/Formatter PCA and the optional interface. Press the CONTINUE key to resume printing. Reseat the Optional I/0 PCA. If the error persists, refer to the documentation for the optional interface. |
| 43 ERROR 43 OPT INTERFACE |
Indicates a communications problem has occurred between the Interface/Formatter PCA and the optional interface. If the error persists, refer to the documentation for the Optional I/0 PCA. |
| 50 SERVICE | Power off the printer for a minimum of 10 minutes. If the problem continues, refer to the “50 SERVICE Fuser Malfunction” section. |
| 51 ERROR | Indicates loss of laser beam for over 2 seconds. |
| 52 ERROR | Indicates scanner motor unable to maintain proper speed. |
| 53 ERROR (HP 33440 Only) |
The 53 ERROR indicates that the optional memory installed in the printer is NOT compatible with the Interface PCA. Use HP memory only. |
| 53-1 ERRORUNIT (HP 33449 Only) |
An error was detected on the optional memory card in the front (right slot). Verify that the correct revision level («B» or greater) of memory is installed in the printer. |
| 53 ERRORUNIT (HP 33449 Only) |
An error was detected on the optional memory card in the rear (left slot). Verify that the correct revision level («B» or greater) of memory is installed in the printer. Use HP memory only. |
| 55 ERROR | Indicates a communications problem between the DC Controller PCA and the Interface/Formatter PCA. Undefined status has been exchanged between the two PCA’S or a status request has gone unanswered. Perform the Test Print operation to verify DC Controller functiondiality. If the message persists, check for any cable damage. If the message still persists, perform the following: 1. Ensure J209 jumper is in place on the DC Controller. 2. Verify proper DC voltages. 3. Replace the Interface/Formatter PCA.* 4. Replace the DC Controller PCA.* *HP 33440AB/AU only: In some cases, both the DC Controller and Interface PCA will need to be replaced together. |
| 57-1 ERRORUNIT (HP 33449 Only) |
The memory card in the front (right) slot cannot be configured because it exceeds memory capacity. |
| 57-2 ERRORUNIT (HP 33449 Only) |
The memory card in the rear (left) slot cannot be configured because it exceeds memory capacity. |
| 61 SERVICE | Indicates a checksum error was detected during Self Test in the Interface/Formatter PCA ‘s program ROM. If the message persists, replace the Interface/Formatter PCA. |
| 62 SERVICE | Indicates a checksum error was detected in the Interface/Formatter PCA’S internal font ROM. If the message persists, replace the Interface/Formatter PCA. |
| 63 SERVICE | Indicates an error was detected in either the Interface/Formatter PCA’S Dynamic RAM or an Optional Memory PCA (if installed). Remove any Optional Memory PCAs (if installed) and retest for the error. If the error message persists, replace the Interface/Formatter PCA. |
| 64 SERVICE | Indicates a laser scan buffer error. Attempt to clear the error by power cycling the printer. If the error persists, replace the Interface/Formatter PCA. |
| 65 SERVICE | Indicates a dynamic RAM controller error. Attempt to clear the error by power cycling the printer. If the error persists, replace the Interface/Formatter PCA. |
| 67 SERVICE | Indicates a miscellaneous hardware or address error on the Interface/Formatter PCA. Verify that all cables, font cartridges, and accessories are seated. If the error persists, replace the Interface/Formatter PCA. |
| 68 ERROR (HP 33449 Only) |
Indicates a recoverable error has been detected in NVRAM (Non-Volatile RAM). Press CONTINUE to clear, then verify the Control Panel menu settings: one or more menu items have been reset to their factory default settings during error recovery. If this condition persists, replace the Interface/Formatter PCA. |
| 68 SERVICE (HP 33440 and HP 33449) 68 READY/SERVICE |
Indicates a NVRAM (Non-Volatile RAM) failure has occurred requiring replacement of the Interface/Formatter PCA. The printer can be operated without NVRAM until that time. Press CONTINUE to clear the display. All Control Panel values are set to their factory default settings. The 00 READY message becomes 68 READY/SERVICE to remind the user of the problem. |
| 69 SERVICE | Indicates a timeout error has occurred between the Interface/Formatter PCA and the Optional I/0 PCA. Refer to the I/0 Interface documentation. Remove the Optional I/0 PCA and retest. If the message persists, replace the Interface/Formatter PCA. |
| 70 ERROR (HP 33449 Only) |
The firmware cartridge was not designed for this printer. Turn the printer OFF, then back ON. If the error persists, verify with the cartridge vendor whether the cartridge was specifically designed for this printer. |
| 71 ERROR (HP 33449 Only) |
The firmware cartridge was not designed for this printer. Turn the printer OFF, then back ON. If error persists, verify with the cartridge vendor whether the cartridge was specifically designed for this printer. |
| 72 SERVICE (HP 33449 Only) |
The font cartridge was removed too quickly after it was inserted. Turn the printer OFF, then back ON. This message can also result from a bad font cartridge or bad connectors on the Formatter PCA. |
| 79 SERVICE (HP 33449 Only) |
An unexpected error has been encountered. Document error message. Turn the printer OFF, then back ON. If the message persists, proceed as follows: Solid: Remove memory PCAs and font macro, and personlity cartridges one at a time. If the problem persists and the printer has an Optional I/0 PCA installed, try a different interface (parallel or serial) if possible. If the problem continues, replace the Formatter PCA. Intermittent: Have the customer remove, for a period of time, any non-HP hardware/firmware products attached to the printer. If the problem continues during this test period, replace the Formatter PCA. Error message documentation should be returned with the defective component. |
| CONFIG LANGUAGE (HP 33449 Only) |
This message the result of holding down the ENTER key while powering on the printer. Following SELF TEST, the user will need to select the desired display language using the +, —, and ENTER keys. |
| EC LOAD [envelope size] | A user request has been made for an envelope size not currently installed in the printer or the tray is out of envelopes. Load the correct envelope in the envelope tray. Insert a loaded tray and select the loaded envelope size from the Control Panel or press CONTINUE to override. ([Envelope size] may be one of the following: COM10, MONARC, C5 or DL.) |
| PC LOAD [paper size] | This message is displayed whenever there is a user request for a paper size that is not currently installed in the printer (per the Tray Size switches) or the input tray is out of media. Insert the proper loaded tray into the printer or press CONTINUE to override. ([Paper size] may be one of the following: A4, EXEC, LETTER, or LEGAL.) |
| PE FEED [envelope size] or PE FEED ENVELOPE |
A user request has been made to manually feed an envelope of the indicated size. Feed the envelope through the manual feed slot or press CONTINUE to feed from the tray. If the manual feed operation is not working as expected, perform the “Manual Feed Sensor (PS302) Functional Check» described in this section. |
| PF FEED [paper size] | A user request has been made to manually feed paper of the indicated size. Feed paper through the manual feed slot or press CONTINUE to feed from the tray. If the manual feed operation is not working as expected, perform the “Manual Feed Sensor (PS302) Functional Check” described in this section. |
| ENVELOPE = [env. size] (HP 33440) PE TRAY=[envelope size] (HP 33449) |
This message is displayed whenever an envelope tray is inserted in the printer. The user must tell the printer what size envelopes are being used by scrolling through the choices (using the + and — keys) and pressing the ENTER key to make the new selection. Press ON LINE or CONTINUE to proceed. If an envelope tray is not being used when this message occurs, reseat the tray. If the problem continues, see “Tray Size Switches Functional Check” in this section. ([Envelope size] may be one of the following COM10, MONARC, C5 or DL.) |
| FC [LEFT/RIGHT/BOTH] | Font cartridge(s) were removed or replaced while the printer was off tine and contained buffered data. Reinsert cartridge(s) and press the CONTINUE or ON LINE key. If the problem continues, try another font cartridge before replacing the Interface/Formatter PCA. |
| FC [LEFT/RIGHT/BOTH] NO FONT (HP 33449 Only) |
Font cartridge(s) could not be read by the printer. Reinsert cartridge(s) and press the CONTINUE or ON LINE key. If the problem continues, try another font cartridge before replacing the Interface/Formatter PCA. |
| FE CARTRIDGE | A catiridge has been removed while the printer was on line. Turn printer OFF, reinsert the cartridge, and turn printer ON. If the problem continues, try another cartridge before replacing the Interface/Formatter PCA. |
| LJ 4L/4ML | ||
| LaserJet 4L/4ML LEDs | LaserJet 4P/4MP Display Panel | Description & Recommendations |
 Paper light is on steady. All other lights are off. |
PC LOAD [paper size] | 1. Paper Cassette is empty or missing. 2. Add paper and/or insert cassette. 3. Reseat the cassette. 4. Check if Paper Out flag PS2 (bottom of printer, adjacent to the Pickup D-Roller) is broken or movement is hindered. Unstick or replace the Pickup Assembly. 5. Replace DC Controller PCA. |
 Paper light is bIinking. All other lights are off. |
13 PAPER JAM | 1. Paper in printer. Clearing Paper Jams. 2. Rear Door Open. Close door and reset printer. 3. Jam removed but printer not reset. Perform front panel reset. 4. Transfer Roller Guide Plate not installed correctly (all 3 tabs must be in position). 5. Stuck or broken flags/sensors. Note where the leading edge of the paper is to determine which paper sensor maybe causing the jam. Ensure sensor flags rotate freely. Replace flags or associated assemblies if broken or if they remain stuck. 6. Paper fragment under oblique rollers (top or front). Remove rollers and clear out paper. 7. Main Motor faulty. Power up the printer and observe if the stacker rollers rotate. If not, replace the Motor. 8. Stuck or Faulty Gears in Gear Train. Replace Gear Train. 9. Toner cartridge not rotating. Refer to “Drum Rotation Functional Check» later in this chapter. 10. Transfer Roller Gear missing or broken. Replace the Transfer Roller. 11. Stuck or broken solenoids. Replace solenoid or associated assembly. 12. DC Controller PCA faulty. Replace PCA. 13. Software related: for example, program in letter, but feeding legal size paper. Change the software paper size setting, or feed the designated size. |
 Error light is on steady. All other lights are off. |
12 OPEN OR NO EP | 1. Printer’s Top Door is open andior the toner cartridge is missing or not installed properly. Reinstall toner cartridge and close door. 2. Part of the Top Door that pushes the plunger down is broken. Replace the Top Door. 3. Top Door Switch (Plunger Assembly) is broken. Replace (see Figure 7-3). 4. Toner Cartridge Lever Assembly is broken, Replace the Assembly. 5. Faulty Microswitch SW201 (Top Door Switch) on the DC Controller PCA, Replace DC Controller PCA. |
 Error light is blinking, and all other lights are off. |
20 MEM OVERFLOW 21 PRINT OVERRUN 22 ERROR |
1. Too much data, or data too complex. Turn Page Protection ON or to AUTO (can be set within HP Explorer’s Remote Control Panel). 2. Add optional memory. 3. Reduce the complexity of the print job. LaserJet 4P/4MP: Press Continue to resume printing. |
 Data light is blinking, and all other lights are off. |
AF FEED [paper size] AE FEED[env. size] |
1. Insert paper into the manual feed slot. This will fulfill the manual feed request. 2. To avoid manual feed on this job, press the front panel button to override the manual feed request and to feed paper from the paper cassette. 3. To avoid manual feed on future jobs, go into a software application or the HP LaserJet Explorer to change the setting from Manual Feed to Paper Cassette feed. |
 All four lights on (without pressing the front panel). |
Not Applicable (LaserJet 4L/4ML Only) | There is a service error. Press and hold the front panel button to display the error light code. This code will be shown only while the button is pressed, The following tables list possible error codes. NOTE: If no further error code is displayed, yet all four lights remain on continuously, power cycle the printer. If the condition persists, replace the Formatter PCA. |
 Ready and Error lights are on and all others are off. |
50 SERVICE | 1. Remove power to the printer for 15 minutes. If this doesn’t clear the error: 2. Perform the Fuser Checks shown in the table below. 3. Check the Fuses (FU101 and FU201) on the DC Controller PCA. Replace if faulty. 4. Replace the DC Controller PCA. |
 Data and Error lights are on and all others are off. |
51 ERROR | Power-cycle the printer. If this doesn’t clear the error: 1. Reseat the Laser/Scanner Assembly the Scanner/DC Cable Assembly. 2. Replace the Laser/Scanner Assembly. 3. Replace the DC Controller PCA. 4. Replace the Scanner/DC Cable Assembly. |
 Paper and Error lights are on and all others are off. |
52 ERROR | Power-cycle the printer. If this doesn’t clear the error: 1. Ensure condensation from moving the printer from a cold to warm environment hasn’t occurred, Allow the printer 6 hours acclimate to the warm room. 2. Reseat the Scanning Assembly. 3. Replace the Laser/Scanner Assembly. 4. Replace the DC Controller PCA. 5. Replace the Scanner/DC Cable Assembly. |
 Data lights is on and all other are off. |
53 [XY-ZZ] ERROR | An error has been found in RAM or ROM. 1. Power-cycle the printer. If this doesn’t clear the error: 2. Power off the printer, remove any additional memory, then power back on. If the message clears, replace the memory card. 3. Replace the Formatter PCA. LaserJet 4P/4MP: Use the list below to decode the [XY-ZZ] values: |
Error light is on; all others are off. |
55 ERROR | The Formatter and DC Controller are not communicating. Power-cycle the printer, If this doesn’t clear the message: 1. Reseat the Formatter PCA into the DC Controller connector. 2. Replace the Formatter PCA. 3. Replace the DC Controller PCA. 4. Replace the DC Controller connector. |
| 57 ERROR | The DC Controller has reported a general motor failure. The Main Motor is controlled by the DC Controller PCA, and seated into connector J601. Power-cycle the printer. If this doesn’t clear the message: 1. Reseat the Main Motor into the DC Controller connector. 2. Inspect the Gear Train for debris that would block the free operation of the gears. 3. The toner cartridge may not be rotating. Refer to “Drum Rotation Functional Check later in this chapter. 4. Main Motor faulty. Power-up the printer and observe if stacker rollers rotate. If not, replace the Main Motor. 5. Replace the DC Controller PCA. |
|
 Ready, Data and Error lights are on and all others are off. |
58 SERVICE | 1. Power-cycle the printer. 2. Check the fan to determine if it is blocked from operation. 3. Reseat the fan connector on the Laser/Scanner Assembly. 4. Replace the Fan. 5. Replace the Laser/Scanner Assembly. 6. Replace the DC Controller. 7. Replace the connector between the Scanner and DC Controller. |
 Error light is off; the other lights display some pattern (not otherwise shown in this table). |
61-67 SERVICE 70-71 ERROR 72-79 SERVICE |
1. Power-cycle the printer. 2. Replace the Formatter PCA. |
| 68 ERROR 68 SERVICE |
68 ERROR indicates a recoverable error in NVRAM. Press Continue to clear, then check control panel settings. One or more fields will have been reset to factory defaults during recovery. 68 SERVICE indicates NVRAM is full. 1. Perform NVRAM Reset to clear NVRAM (hold down Item key during power-on). 2. Replace the Formatter PCA. |
|
 All lights off (blank display). |
[blank] | If the printer’s lights remain off (LaserJet 4L/4ML) or the message display panel remains blank (LaserJet 4P/4MP), check the following: 1. (4 L/4ML): Printer is in Intelligent Off mode. Press the front panel button, or open the Top Door. 2. Power is not supplied to the printer. Check power cord connections and power source. 3. Print an engine test print to determine if the print engine is functional, If the test is successful, replace the Formatter PCA. 4. Check FusesFU101 and FU201 on the DC Controller PCA. Replace if necessary. 5. Replace the DC Controller PCA. 6. Replace the connector between the DC Controller and the Formatter. |
Перейти к контенту
-
- 27 окт 2016
- 74
- AUDI A6 C6 2005 г.в. BDW
Бкашка выдает такую ошибку …. помогите кто если что знает ….. фары простые лампы накаливания …. все лампочки поменял на штатные а ошибка не пропадает …. может что перепрограмировать надо прописать там тип фар например ???? потому как ходовых огней на машине не предусмотрено …. что она «машина» считает ходовыми ??? габарит ??? или ПТФ ??? и габариты и ПТФ работают штатно ….
В олроуде есть такая тема … но там треп и никакой инфы ….
Stop hovering to collapse…
Click to collapse…
Hover to expand…
Нажмите, чтобы раскрыть…
-
- 25 авг 2013
- 4.490
- A6/C6 3.2Q 05г.
Не вдаваясь в подробности: не задумывались, почему ошибка только по левой стороне?
PS подгоревшего контакта достаточно для ошибки -
- 27 окт 2016
- 74
- AUDI A6 C6 2005 г.в. BDW
не не ошибки 2 … и по правой стороне тоже ….. контакты нормальные их проверяли…. на ПТФ вообще новые ….. я так предполагаю что на моей машине просто нет ходовых огней …. а их возможность заложено производителем …. и когда я БКшку активировал «т.к. ее нет в этой комплектации» то она и пишет что не обнаружила ходовые огни…. вот БК нужно или перепрограмировать или где то прописать комплектацию …. или куда то в проводку сопротивление повесить типа обманки как для уровня бачка омывателя …
вот и кричу рассылаю Хелпы
Stop hovering to collapse…
Click to collapse…
Hover to expand…
Нажмите, чтобы раскрыть…
-
- 27 окт 2016
- 74
- AUDI A6 C6 2005 г.в. BDW
Stop hovering to collapse…
Click to collapse…
Hover to expand…
Нажмите, чтобы раскрыть…
-
- 27 окт 2016
- 74
- AUDI A6 C6 2005 г.в. BDW
изменил кодировку в 9 блоке средняя цифирь на 0 потом на 1 (стояла 2) теперь горит ошибка main beam headlights соответственно левая и правая ….
Stop hovering to collapse…
Click to collapse…
Hover to expand…
Нажмите, чтобы раскрыть…
-
- 27 окт 2016
- 74
- AUDI A6 C6 2005 г.в. BDW
перепробовал все варианты кодировки 9 блока …. было 0002122 …. пробовал 0000122, 0001122, 0002022,
в первых двух вариантах пишет ошибку и включает автоматически ближний свет фар при включении зажигания, на дальний вообще не переключает !!!
и в итоге вышел на 0002102 вот мой вариант кодировки …. ошибки ушли
УРА ЖИВЕМ !!!
Stop hovering to collapse…
Click to collapse…
Hover to expand…
Нажмите, чтобы раскрыть…
-
- 25 авг 2013
- 4.490
- A6/C6 3.2Q 05г.
-
- 4 окт 2008
- 6.129
- Москва
- w213 c253
что сие такое??
появилось и исчезло после перезапуска.
я так понимаю либо глюк либо лампочка дневного света в левой фаре?? (езжу со «светом днем»)
-
- 4 окт 2008
- 6.129
- Москва
- w213 c253
-
- 16 мар 2008
- 2.020
- не Ауди (((
Кста щА по ресничкам у од какая то акция идет. Видимо на фоне массовых перегораний. Че то там доуплотняют, доп прокладки ставят и т.д.
-
- 4 окт 2008
- 6.129
- Москва
- w213 c253
джамшут резинканама проклеивает, насяльника!
-
- 16 мар 2008
- 2.020
- не Ауди (((
-
Было было было…… но прошло…
ХЗ, что за глюк, свет вкл, выкл все работает надпись пропадает. Весна пришла оттаил БК видимо
Stop hovering to collapse…
Click to collapse…
Hover to expand…
Нажмите, чтобы раскрыть…
-
- 20 мар 2009
- 2.840
- Allroad 4F трактор
Вчера выехал из оч. теплого гаража (28 град) и буквально через 2 минуты выдало ошибку, что не горит центральный стоп. Заглушил, завел — все работает, через 5 минут опять не горит, заглушил, завел — работает. Ночью машина стояла на улице, доехал на работу без проблем. Может там что-то, где-то намокает и не контачит?
Stop hovering to collapse…
Click to collapse…
Hover to expand…
Нажмите, чтобы раскрыть…
-
- 4 окт 2008
- 6.129
- Москва
- w213 c253
-
- 20 ноя 2003
- 3.303
- R2,V2,B6,V6,V8
Все, в морг. Даже не парься, если начал глючить готовься к замене.
Stop hovering to collapse…
Click to collapse…
Hover to expand…
Нажмите, чтобы раскрыть…
-
Доктор сказал в морг значит в морг
Stop hovering to collapse…
Click to collapse…
Hover to expand…
Нажмите, чтобы раскрыть…
-
- 22 ноя 2008
- 310
- Липецкая обл.
- A4 B9 2.0 quattro
В воскресенье мне вместе с фонарем поменяли половину проводки! И провода новые и контакты и «корпус разъема» какой-то заменили.
-
Команда форума
Ну теперь и продавать будет нестыдно
Like new! -
- 20 мар 2009
- 2.840
- Allroad 4F трактор
Сегодны опять заглючил. Видать пора к электрику.
Stop hovering to collapse…
Click to collapse…
Hover to expand…
Нажмите, чтобы раскрыть…
-
Команда форума
Ну так дуйте к дилеру — пущай смотрят что и как. Возможно, что ставя колхозный ксенон в туманки повредили проводку.
-
- 23 июл 2009
- 427
- Audi Q7 4.2TDI 09г
Не это у него не ксенон, я японские лампочки, светят как ксенон…
У меня тож было с ресничкой правой, токо не в фаре а как на в12, пишет ошибку мол не работает правая лампочка дневного света, но она работает, а ошибку пишет, думаю поменять обратно на обычные реснички, надоели….. -
- 11 фев 2007
- 2.846
- Москва
- Q7 PPI ICE
К дилеру придется ехать, но времени катастрофически не хватает, поэтому и задал вопрос здесь, может у кого-то такое было и посоветует, к чему готовится. Охотно ли дилеры признают подобное гарантийным случаем или придется пободаться? Кстати, никакой ошибки, при этом, на панель не выводится…
Еще заметил, хотя возможно это чисто субъективно, что такая оказия наблюдается после мойки — может блок какой мокнет?
Stop hovering to collapse…
Click to collapse…
Hover to expand…
Нажмите, чтобы раскрыть…
Врпрос по ДХО

Заменил лампочки дхо на диодные, загорелся на приборке жёлтый значок лампочки, при сканировании выдал такие ошибки: 02745 Left daytime running light (DRL) lamp
02746 Right daytime running light (DRL) lamp
Куда копать?
Комментарии 29
Войдите или зарегистрируйтесь, чтобы писать комментарии, задавать вопросы и участвовать в обсуждении.

Надо брать нормальные лампы типа Осрам, Филипс и т.п. В описании искать про кан-шину, обычно указано, вызывает ли лампочка ошибку. И никаких проблем, но дорого. Но светят.

Вопрос снят, поставил обычные лампочки осрам

Опрос ДХО надо снять через ODIS.
imax-tuned
Опрос ДХО надо снять через ODIS.
Понятно, спасибо, но не буду из-за этого заморачиваться, поставлю обычные лампы

лохотюнинг, циганпакет и пр. это зло, современные немецкие авто этого не допускают.
ставь штатные лампы, ошибки погаснут

тут вопрос не по ДХО, а по колхозингу нештатного головного света
Я недпвно пересел на Джетту, так что для меня это именно вопрос по ДХО 🙂

Отключите проверку ошибок в блоке BCM и будет Вам счастье)
Почитайте на Драйве это не сложно!

Лампочки диодные надо ставить те, у которых на цоколе есть меленькие черные smd-резисторы. Тогда бортовой комп будет видеть замкнутую цепь

поставь те, что положено и все будет нормально . или берем бубен и устраиваем танцы с обманками, кодировками и еще чем то :))
А что за обманки, сложно установить?

Да как бы нет, лишь бы грамотно.

AlaMaRit
А что за обманки, сложно установить?
диодные ведь меньше потребляют, соответственно тачка думает что лампа перегорела и не подаёт на них напряжение. На самих диодных лампах стоят резисторы-обманки, такие бери
А как они хоть выглядять, увидеть бы
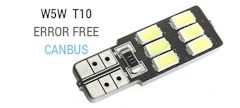
Это скорее всего токоограничивающий резистор. БЛОК BCM у VAG замеряет ток в импульсе и обрыв (сопротивление)
Что бы ТОК при поверке был хотя бы близкий к току лампы накаливая, резистор должен быть ом 50… и вот на 5 иначе он через секунду сгорит)
спс, я сам первый раз брал обычные светодиоды, а потом язык не оторвался чтобы просто спросить у продавцов
valeriy-vfr1200
Это скорее всего токоограничивающий резистор. БЛОК BCM у VAG замеряет ток в импульсе и обрыв (сопротивление)
Что бы ТОК при поверке был хотя бы близкий к току лампы накаливая, резистор должен быть ом 50… и вот на 5 иначе он через секунду сгорит)
замерь сопротивление холодной спирали галогенки?
20W=12*1,66
1,66=12/7,22
ну и где тут 50 ом?
AlaMaRit
А как они хоть выглядять, увидеть бы
DmitVes
диодные ведь меньше потребляют, соответственно тачка думает что лампа перегорела и не подаёт на них напряжение. На самих диодных лампах стоят резисторы-обманки, такие бери
обманка жрёт как две галогенки + сама диодная. экономия для лохов))
ахаха, ну, приходиться ездить медленно, чтобы в десятку уложиться))
AlaMaRit
А что за обманки, сложно установить?
паралельно светодиоду сопротивление, если найду то фото пришлю.
вот это сопротивление всю вашу мнимую светодиодную экономию схавает за обе щеки
паралельно светодиоду сопротивление, если найду то фото пришлю.
а тепло куда рассеивать будете, плавить отражатель?
� ���� �� ����� ����� ������� �������, �� ������ ���������. � ���� ��������.
������ ��� ����� ��� �����, � � ������ �������, ��� «���, ���, ����� �������, ������� ����. � �������� ��� ����� ��������!». �� ��� ������ ��� ������� �� ������ �����, ������ — ����� ������ ������, ������ � ������� �� ���� � ������ �������, ���� ��������. �� ������ «��������» � ��� ����� ��������, � ����� ����������� ���� ������� ������ ���������� �� �����, ����� ������ �� ����� ��������� ��������������. � ������ �� ���������� ���, ��� � ���� ���-�� � �����������. ���� ��� ��������-�����, �� �������. ��, �����, ���� � ���, ����� ����� ���� ����� �� ������� ������ � ����� �� ���. � ������, ����� ����� ������ ������� ��������, �� ���� �����, ��� ������ ����� ������ �� ���������� � ������������ ��������. ������� ���������, ����, ����� ���������� — �����, ������ ������ ������� �����! ��, �����, ������: ��� ���� ��������! �� ���� ����������� �������������� ��������� �� ��� ������ ������ �� ����� ��������� ��� ������������ �� ������. �� �������� � ��� �� 2114, ��� �� ������ VW ���� ������ ��� �����. ������� � ������ �������� ��������������� ������� � ������� ��������� �� ��������, ����������� �������� ����, ��� ������, ����������� ����� ����, ����� �� ��������� � ������� �������� �� ��� ����������� ����� ������� ����� ���. ��� �� ������� — ��������� ��������������! � �� ��� ��� ��� �����, ��� ��������. ���� � ��� �����, ������ ���� ����!
-
12-05-2020 04:19 PM
#1

Established Member
Two Rings

Daytime running / Left side marker light error
I�ve searched and searched, but can�t find any clear info about this. A couple days ago, I started getting both a DRL and Left side marker light error every time I start the car.
When the headlights are off, the driver�s side DRL is indeed not working, but the left side marker is working. Even weirder, if I start the car with the headlight switch already on, no error at all…but only the bottom strand of the DRL comes on, the top strand is still out.
Car is 2013 with 108k miles. Am I just SOL and have to replace the whole headlight assembly, or is there some kind of bulb/relay fix or something like that? TIA
Sent from my iPhone using Audizine
-
12-05-2020 04:50 PM
#2
Veteran Member
Four Rings
 Originally Posted by DriveBikeRun

I�ve searched and searched, but can�t find any clear info about this. A couple days ago, I started getting both a DRL and Left side marker light error every time I start the car.
When the headlights are off, the driver�s side DRL is indeed not working, but the left side marker is working. Even weirder, if I start the car with the headlight switch already on, no error at all…but only the bottom strand of the DRL comes on, the top strand is still out.
Car is 2013 with 108k miles. Am I just SOL and have to replace the whole headlight assembly, or is there some kind of bulb/relay fix or something like that? TIA
Sent from my iPhone using Audizine
On my SQ5, there is an LED module that provides the light for the DRL, probably one is burned out. You should just be able to replace that module. I’d just replace the side marker bulb while you are at it, can’t hurt anything.
Sent from my SM-G988U using Audizine Forum mobile app
Custom DP 194/57 E40 Water-Meth (Aquamist) | BG HPT ZF8 Tune | APR CPS with AWE Reservoir (Divorced Coolant Loop) | APR Open Intake and 034 Intake Tube | RSE Heat Shielded HFCs | CTS Downpipes with Vibrant UQ Resonators Added | AWE Touring Exhaust | 034 RSB | Bilstein B8 Shocks and H&R -3 Springs | ECS Trans and Drivetrain Inserts | 034 Trans and Motor Mounts | Moog Front End Links | Headlight Projector Retrofit and Painted Housings
-
12-05-2020 07:14 PM
#3
Established Member
Two Rings
Originally Posted by djn876
On my SQ5, there is an LED module that provides the light for the DRL, probably one is burned out. You should just be able to replace that module. I’d just replace the side marker bulb while you are at it, can’t hurt anything.
Sent from my SM-G988U using Audizine Forum mobile app
Thanks, I hope it�s as simple as replacing a module, but even that is $300 for a new one if this is the right part:
https://www.audiusaparts.com/oem-par…SABEgKa4_D_BwE
Or $50 for a used one on eBay…I�d be willing to do that depending on how hard it is to replace. I hate throwing parts at something without knowing how to properly diagnose it, though.
Sent from my iPhone using Audizine
-
12-06-2020 06:34 PM
#4
Veteran Member
Four Rings
https://audi.7zap.com/en/usa/audi+a4…/9/941-941005/
If you look at the parts diagram of the 8Q3 (HID without AFS (cornering light), what I assume you have; but you’d have to tell us if you’re PR-8Q3 or PR-8Q5) headlamp, you see there’s no parts for the LED elements built into the headlamp (ie, the DRL and side marker). There is, though, the control module for those LED elements. If you’re getting errors for both components, maybe it’s the control module that is flaky.
If you look at the parts diagram, the diagram seems confused about the LED control module and the AFS control module. It puts the LED as #5, on the bottom, and the AFS as #6 on the side. The HID control module (ballast) is #4. But the repair manual has the LED one as the one on the side and the AFS one as the one on the bottom (same as we see in the B8.0 parts diagram: https://audi.7zap.com/en/usa/audi+a4…/9/941-941005/ , where 6 is HID, 10 is LED (side corner), and 9 is AFS (bottom)).
It would be more interesting to have a complete autoscan log with the DTC present. But without that, I’d start with a focus on that LED control module.
2009 A4 Avant 2.0T quattro Prestige, 246k miles
-
12-06-2020 07:22 PM
#5
Established Member
Two Rings
These control modules can get moisture in them and fail. It happened to me. You can pull it out and take the cover off to see if that’s the case. For mine I was able to dry it out and it still worked. I added some conformal coating to the pcb to keep it from happening again.
Sent from my LM-V600 using Audizine Forum mobile app
-
12-06-2020 08:42 PM
#6
Established Member
Two Rings
Originally Posted by Smac770
https://audi.7zap.com/en/usa/audi+a4…/9/941-941005/
If you look at the parts diagram of the 8Q3 (HID without AFS (cornering light), what I assume you have; but you’d have to tell us if you’re PR-8Q3 or PR-8Q5) headlamp, you see there’s no parts for the LED elements built into the headlamp (ie, the DRL and side marker). There is, though, the control module for those LED elements. If you’re getting errors for both components, maybe it’s the control module that is flaky.
If you look at the parts diagram, the diagram seems confused about the LED control module and the AFS control module. It puts the LED as #5, on the bottom, and the AFS as #6 on the side. The HID control module (ballast) is #4. But the repair manual has the LED one as the one on the side and the AFS one as the one on the bottom (same as we see in the B8.0 parts diagram: https://audi.7zap.com/en/usa/audi+a4…/9/941-941005/ , where 6 is HID, 10 is LED (side corner), and 9 is AFS (bottom)).
It would be more interesting to have a complete autoscan log with the DTC present. But without that, I’d start with a focus on that LED control module.
Thanks for taking time to reply. I thought the diagram was a bit confusing as well, as far as which module controls the DRLs. I can�t find an 8Q3 or 8Q5 stamped on the housing, but I don�t have cornering lights. As soon as I can find my tablet, I�ll read the exact code.
Sent from my iPhone using Audizine
-
12-06-2020 08:44 PM
#7
Established Member
Two Rings
Originally Posted by btb.tyler09
These control modules can get moisture in them and fail. It happened to me. You can pull it out and take the cover off to see if that’s the case. For mine I was able to dry it out and it still worked. I added some conformal coating to the pcb to keep it from happening again.
Sent from my LM-V600 using Audizine Forum mobile app
Thanks for sharing that experience. So was your issue with DRLs as well, and was it the module on the side or the bottom?
Sent from my iPhone using Audizine
-
12-06-2020 08:49 PM
#8
Established Member
Two Rings
Originally Posted by DriveBikeRun
Thanks for sharing that experience. So was your issue with DRLs as well, and was it the module on the side or the bottom?
Sent from my iPhone using Audizine
Yeah, same dash warning and non functional DRL. There are two modules on the bottom. One is the HID ballast. It’s right under the projector bulb. The other module on bottom is the DRL module. I’m pretty sure the side module drives the actuator for the projector cutoff and pitch motor.
Sent from my LM-V600 using Audizine Forum mobile app
-
12-06-2020 08:56 PM
#9
Established Member
Two Rings
Originally Posted by btb.tyler09
Yeah, same dash warning and non functional DRL. There are two modules on the bottom. One is the HID ballast. It’s right under the projector bulb. The other module on bottom is the DRL module. I’m pretty sure the side module drives the actuator for the projector cutoff and pitch motor.
Sent from my LM-V600 using Audizine Forum mobile app
Thank you, sir. Guess I�ll be pulling the headlight housing soon to take a look at that module on the bottom.
Sent from my iPhone using Audizine
-
12-07-2020 05:44 AM
#10
Veteran Member
Four Rings
Those are PR codes, they would be on your PR codes sticker, maybe in your maintenance booklet (that’s where mine was placed). 8Q3 is normal HID, 8Q5 is HID + AFS (cornering light). So if you know you don’t have the cornering light, then 8Q3 it is.
That would make your left headlamp 8K0 941 043 E: https://www.ebay.com/itm/13-16-AUDI-…-/254771018475
Oh, looking at the 5th pic, it seems the HID and LED control modules are actually on the bottom for the B8.5 headlamp (they are not on my B8.0 headlamp).
Well, wherever it is, you’re looking for this: https://www.ecstuning.com/b-genuine-…ch/4g0907697d/
2009 A4 Avant 2.0T quattro Prestige, 246k miles
-
12-07-2020 08:41 PM
#11
Established Member
Two Rings
Originally Posted by Smac770
Those are PR codes, they would be on your PR codes sticker, maybe in your maintenance booklet (that’s where mine was placed). 8Q3 is normal HID, 8Q5 is HID + AFS (cornering light). So if you know you don’t have the cornering light, then 8Q3 it is.
That would make your left headlamp 8K0 941 043 E: https://www.ebay.com/itm/13-16-AUDI-…-/254771018475
Oh, looking at the 5th pic, it seems the HID and LED control modules are actually on the bottom for the B8.5 headlamp (they are not on my B8.0 headlamp).
Well, wherever it is, you’re looking for this: https://www.ecstuning.com/b-genuine-…ch/4g0907697d/
Yep, the DRL/LED module being on the bottom lines up with what b2b.tyler09 said as well. And that part you linked on ECS is definitely what I see on eBay used for $50. I could swap the module from the other side to test, but I think I�d rather spend $50 to avoid having to remove the other headlight, LOL. I�ll probably give that a go soon and post up the results. Thanks again.
Sent from my iPhone using Audizine
 Do you have an error light on your dashboard that looks like above with a yellow bulb pointing down?
That is known as a “dipped headlight” and this post is written to help you troubleshoot and fix it.
The truth is that even Audi dealerships are notoriously bad at fixing this problem.
Their remedy is typically to suggest replacing the bulbs and ballasts at full retail price, costing you several thousand dollars for a job that is something you could fix yourself for a tenth of the price.
After reading all of my favorite Audi forums, I found a host of information, some of it helpful, some of it conflicting, and some if it misguided. But piecing together the consistent recommendations as well as a little educated guessing and fact checking, I’ve figured out a good approach for anyone who gets this problem in their 2002-2008 Audi A4, S4 or RS4 and wants to try to fix it themselves. The steps listed here will probably also work for other Audis as well, although may differ somewhat.
Since originally posting this I’ve gotten hundreds of comments (literally) with others experiencing this issue on a variety of Audis.
Unfortunately, the dipped headlight warning appears to be a super common issue, and can also point to any number of issues with your headlights.
I’ve also updated this post with revised ideas to help you fix the problem easier, after years of helping others I’ve refined my approach.
First of all, what does “Dipped Headlight” even mean?
Simply put, “Dipped Headlight” is Audi-speak for “there is something wrong with your low beam headlight” and can mean a number of things.
This is part of why it is so difficult to troubleshoot and fix on your own, as the error doesn’t give you much information about what the problem is.
If you have a VAG-COM cable, or know someone who does, the cable can read your car’s computer and tell you the exact error code which will help tremendously. For some people this error message only comes on intermittently, such as when they’re driving slow, when the car first starts up, or in cold weather – for others, it comes on every time.
You can also pickup a cheaper OBD2 scanner on Amazon which can read codes and at least give you a specific error code and message to troubleshoot, like this one for $23.
Regardless this error light is a catch-all warning and therefore not very helpful – which is why this issue is so frustrating to have.
Typically there are several major culprits:
- Bad headlight bulbs – the bulb has gone bad, but isn’t completely out.
- Bad xenon ballasts – the ballast has started to malfunction, causing the error and likely harming your bulbs too
- Bad wiring in the headlight or xenon motor – the wiring and modules within the headlight is somehow damaged
- Bad ride height sensor or calibration – if the car can’t sense the right height level of the car, this will trigger an error
What to Check First
There are several things that most commonly cause this error after reading dozens of owners messages on Audizine, Fourtitude, Audiforums and other message boards. I’ve listed them below in the order of how’d I’d recommend checking and testing the problem.
It seems the most common issue is that a ballast has gone bad…the bad ballast then causes damage to the headlight bulb, requiring you to change the bulb too. If you only change one or the other, you do run the risk that you’ll have to replace it again due to damage that occurred.
If you are getting this issue only on one side, i.e. Dipped Headlight Left or Dipped Headlight Right, then this is a big clue for troubleshooting.
To isolate if it is the headlight bulbs, ballasts, or something internal in the headlight itself, simply swap both the bulbs and ballasts from left to right headlight. If the dipped headlight error on your dash changes from “Dipped Headlight Left” to “Dipped Headlight Right” (or vice versa) then you know that the issue lies in either the bulb or ballasts.
If this is the case, you should order one new bulb and one new ballast (using the links in this post) and replace the bad side and you should be good.
I strongly recommend changing both bulbs and ballasts – even if only the ballasts were faulty, the bulbs likely suffered damage from the bad ballasts and will need replaced soon, and replacing bulbs requires the bumper to come off so its best to do this all at once. It also eliminates all possible sources of the dipped headlight error, as this can be a tricky problem to resolve and it’s better to be aggressive on the treatment of it.
If the problem isn’t isolated to one side or another, and the above trick didn’t work, then you’ll need to troubleshoot the problem one by one in the order listed below:
Headlight Bulbs
Typically the best place to start is new headlight bulbs, as they are often the culprit and one of the cheapest and easiest things to fix – even if new headlight bulbs don’t fix the problem, you’ll eventually need to replace them anyway, so consider it preventative maintenance.
If you get the “headlight bulb out” message, see your headlights “flicker” on/off occasionally, or notice that your dipped headlight error only comes on in cold weather or at first start up, it’s likely your headlight bulbs may be on their way out.
Follow this DIY for tips on picking the right bulbs and how to install them: https://www.nickscarblog.com/diy/replacement-d1s-headlight-bulbs-for-b7-audi-a4s4rs4
Headlight Ballasts
The ballasts are also known to fail, which can cause this issue – even worse, the failed ballast burns through bulbs, so if you’ve had a bad ballast for a while then you’ll need new bulbs too. Rumor has it some ballasts have been recalled by Audi, in which case you can check with your dealer to see if your car qualifies for the recall, in which case the service and replacement should be free – problem solved! However, if you’re not covered by recall and your ballasts are indeed bad, then you have a few options:
- Have your Ballasts Rebuilt – Contact Phil at tbm850 @ gmail.com – he can rebuild your factory ballasts to fix whatever is wrong, and actually strengthen them so it doesn’t happen again. He only charges $170 per pair for this and can turn it around in about a day then overnight ship it back, so you’re downtime is minimal. I’ve worked with Phil before and he knows the B7 Audi headlights better than pretty much anyone out there, and he’s an airplane mechanic so it’s a professional job.
- Buy New OEM ballasts – the ballasts are shared by a lot of manufacturers, so don’t order through Audi. You can pick up the ballasts on Amazon for about $110 a piece:
B6 Ballasts (2002-2005)
B7 Ballasts (2005.5-2008) WITHOUT AFS:
B7 Ballasts (2005.5-2008) WITH AFS: https://www.ecstuning.com/b-magneti-marelli-parts/xenon-bulb-ballast-priced-each/8p0907391~mm/
Either way, I strongly recommend new bulbs if you had a bad ballast, as that bad ballast likely caused premature wear on the bulbs and they’re likely to burn out soon – best to replace both while you already have the headlights off the car!
This is also a great time to do the clear corner mod, LED DRLs, and/or LED City Lights since you’ll have the headlights off the car anyway…
Auto Leveling Sensor
If you recently lowered your car, or hit a really hard bump to your drivers side front or rear wheel, this could be the problem. For cars equipped with auto-levelling sensors, the sensors themselves are located in the wheel wheels near the lower control arms so they can adjust the headlight aiming based on the suspension load. For some people when they lower their car, the sensor is out of range as the suspension has been altered. For others, a hard bump to the front wheel could potentially break the sensor or cause it to become unplugged. To access the sensor, take off your drivers side front wheel and look near the bottom of the suspension. The sensor bridges the lower control arm to the body and looks like this:

If it is damaged or the wires have frayed, you can order a new one here: http://www.ecstuning.com/Audi-B6_S4–V8/Lighting/Headlights/Leveling/ES440960/. If you are lowered, you may just need to bend the upper part of the bracket so the top of the sensor is higher again. Once you have inspected and either repaired or replaced the sensor, you will need to recalibrate it using vag-com. Follow this DIY for instructions on how to do that: http://www.a4mods.com/index.php?page=webcontent/pages/autolevel.html&category=6
Headlight Swivel Module

This is the issue I had after replacing the bulbs and ruling out that issue. It turns out that while I was replacing my DRL bulbs, I must have knocked the main headlight swivel out of place, preventing the headlights from being able to aim correctly. The swivel is VERY sensitive, so if you’ve been in accident, or were tinkering inside of your headlights too aggressively, it’s possible you broke a swivel arm or knocked it out of alignment. Looking closely at the headlight I could see the projector lens on my driver side was pushed forward and not aligned the same way my passenger side was, so I reached inside the headlight housing (much the same way I did when replacing the bulbs) and pulled the projector lens “back” away from the front of the housing until it clicked back into place. I then recalibrated the headlight adjustment using the DIY on A4mods and cleared the codes and the problem went away: http://www.a4mods.com/index.php?page=webcontent/pages/autolevel.html&category=6
If you run the vag-com on your Xenons and find error code 02769 or 02770, it is likely your projector lenses are out of alignment and you may be able to manually push or pull them back into place. It is also possible the motor inside the headlight has malfunctioned or stopped working altogether, in which case you’ll need to buy an entire new headlight housing – like mentioned earlier, eBay is your best bet for that, and expect to pay about $200-300. But hopefully you may just be like me and have to massage the projector lens back into place and reset the headlight adjustment via VAG-com and the problem will go away 🙂
VAG-com adjustments (reset to factory spec)
If you change anything other than the bulb, you may also need to recalibrate your headlights and reset the adjustments to factory. To do this, follow the A4mods.com DIY mentioned earlier. For me, I fixed the projector lens being knocked out of place then recalibrated the headlight adjustments using VAG-com to fix my errors.
The last resort is to pull Fuse #10 if you have adaptive or auto-leveling headlights – this disables the feature entirely, which should also disable the warning light. This isn’t the best way to fix it as your headlights might be out of alignment still, and you lose the adaptive features, but hey – at least it gets rid of that pesky warning light and beeping 🙂
The Last Resort – Replace the Whole Darn Thing
At a certain point, you may be better off replacing the entire headlight assembly as you can usually find complete headlights (including ballasts and bulbs) used on eBay for a reasonable price.
This also covers you in case the problem lies elsewhere in the headlight housing, and since you’re going through the trouble of removing your headlights this is probably worth the extra $100 over the cost of a ballast to not have to remove all of these parts more than once.
If your car is older, chances are it’s pretty easy to find used headlight assemblies on eBay from wrecked cars that work just fine, and they’re usually pretty cheap, or you can pick up a new set on Amazon here:
Make sure you have the right part number prior to ordering – the part number can be found on a white sticker on top of your headlights which you can see simply by opening the hood – compare this to the eBay listing to confirm you’re swapping “apples to apples” with the replacement housing. The biggest thing to watch out for is AFS vs non-AFS, as you can’t mix these up. AFS is Audi’s “curve lighting” system which has its own wiring to power this motor, and switching between them is not easy to do.
To swap out the headlight housings, follow this DIY: http://www.audizine.com/forum/showthread.php/234131-B7-A4-S4-Clear-Corner-Mod-Removal-of-Bumper
Still stumped? Leave a comment, I’ll do my best to help…
-
04-05-2012 01:04 PM
#1
Active Member
One Ring

A4 RNS-E Problems with Button Lights and Diagnostic Errors
Hey all,
so I managed to swap out my Symphony II+ head unit for the RNS-E navigation system and the unit turns on with no problems, but the first thing I noticed is when I put the cars lights on, the buttons on the unit do not glow red like the rest of the buttons in the car. I thought maybe this is because I haven’t entered the radio pin code yet so I took it to my local dealer this morning as a walk-in appointment to retrieve the code . Unfortunately they weren’t able to retrieve the code after working on it for a half an hour with their diagnostic tools and told me Id have to make an appointment for a later date because the RNS-E unit kept throwing them an error with their diagnostic tools. They told me it would cost a few hundred dollars to do and that it wasn’t even guarenteed that they would be able to retrieve the code or get the error to go away. So now I think I might even have a faulty unit seeing as the dealer can’t even get it to work and because the buttons do not light up.
I did make sure to move the K-Line from pin C7 to B5 on the wiring harness so in theory the dealer should be able to diagnose stuff with the radio on their vagcom. Only difference is I have a Dice Electronics iPod adapter in place of the what ever the blue or B plug is so maybe that is causing an issue?
The unit was purchased from an auto dismantler so perhaps the unit is internally damaged? It would be a shame because the unit on the outside is in mint condition and the screen is flawless even when turned on.
The units is an 8H0 035 192 D, made in 2005 and came from a 2006 A4 and is now housed in a 2007 A4.
There is no AUX serial number on the side so the dealer tried to take another approach to getting the code but they were unsuccessful.
Would it be worth the trouble of going back to the dealer to get it thoroughly diagnosed for hundreds of dollars with no guarentee it will work? Is there some other approach I could take? Can the issue with the button lights be easily resolved (I hope this is only because the unit needs to be unlocked first)? Or should I just return it where I got it from?
Any help on the matter is greatly appreciated!
(BTW sorry if this may be in the wrong section!)
-
04-05-2012 01:27 PM
#2
Established Member
Two Rings
shouldnt have to do with the lock (i dont think) because if it did then the unit wouldnt work at all. You’d get an enter code message. I’ve gotten those before on regular radios.
-
04-05-2012 01:49 PM
#3
Veteran Member
Four Rings

So everything works but the lights give you and issue on startup?
-
04-05-2012 02:17 PM
#4
Active Member
One Ring
When the unit is turned on, the screen turns on just fine. Because I haven’t entered a pin code yet, it turns on to the screen where I need to enter a code, which is expected.
It is when I turn on the parking or headlights and all the instrument cluster and dash button lights come on, only the buttons on the head unit do not light up at all. I do not know why this would be and when I brought it to the dealer to get the radio unlocked, I told them to check out the issue with the lighted buttons but they cant even do that because they can’t retrieve the code to unlock it due to some sort of radio error.
I am curious if the iPod adapter has something to do with it
-
04-05-2012 02:25 PM
#5
Veteran Member
Four Rings
I dont know a ton about this stuff but do you need to VAGCOM to tell it to make the other pins active? and that could possibly be because you havent activated it.
I also heard of one guy loading an .iso to make the key code 0123 or soemthing like that because when he bought it, it didnt come with the code. Try searching around for that.
-
04-05-2012 04:37 PM
#6
Active Member
One Ring
so I called back the dealer to ask specifically what the issue was in retrieving the code and he said when they ran the diagnostic that no radio was found. As for the lights behind the buttons, he said that because the radio is not being found with the diagnostic tools, it is possible that the car’s computer is not communicating with the head unit, thus the signal to turn on and off the button lights is not being retrieved by the head unit.
While a fix is not guarenteed, he advised bringing it back in for thorough diagnostics to upgrade the software, and try to get the car’s computer to communicate with the head unit. If they can get the cars computer to communicate with the head unit, they should be able to retrieve the serial number to get the pin code.
Any ideas on how to do any of this without going back to the dealer and spending hundreds of dollars? (aside from vagcom stuff)
-
04-07-2012 03:00 PM
#7
Active Member
One Ring
I contacted the auto dismantler from which I bought the unit from to confirm whether or not it functioned properly. The company told me it was tested prior to removal and everything worked correctly so I dont want to return it if it actually works.
If these units are supposed to be plug-and-play, even when upgrading from the Symphony II+, and the unit is a US version being put into a US car, what could be causing the «no radio connected» error? Has anyone else had suck difficulties or something else aside from wiring that prevented the unit from working as soon as it was installed?
-
04-08-2012 07:09 PM
#8
Established Member
Two Rings
If the dealer can’t read it with the VAG unit or Vagcom then your k-line is not in the correct spot or connected correctly. K-line also is how the car tells the nav to turn on the button lights.
ACNA Member
17 R8 V10 Plus Dynamite Red
03 A3 E-tron
23 RS6 Tango on order
Former;
17 A4 2.0TQ Prestige S-line
08 A4 2.0TQ Titanium S-line
02 A4 1.8TQ
03 RS6
03 A4 1.8T
-
04-09-2012 11:20 PM
#9
Active Member
One Ring
Originally Posted by marklar182
If the dealer can’t read it with the VAG unit or Vagcom then your k-line is not in the correct spot or connected correctly. K-line also is how the car tells the nav to turn on the button lights.
I had a feeling it would possibly have something to do with the K-line. I know I moved it to the right spot and followed some directions I found on here word for word, but I guess it wouldn’t hurt to verify or even try plugging in the K-line into the original blue harness (which ever one that is) since the K-line is plugged into the B5 pin socket on the iPod adapter harness.
-
04-10-2012 07:15 AM
#10
Established Member
Two Rings
I don’t have any experience with the Dice Adapter, but I take it that the original blue «B» connector is removed from the quad lock and sits disconnected correct? The Dice plug is in the quadlock now correct?
If that is the case you should have to move the C7 (Green w/Blue stripe wire) to the B5 in the Dice connector that is in the quadlock. (If you have Bose B5 (Brown wire) to B7 first)
If all else fails, remove the Dice, return to stock config and try the wires as above. If you get the buttons to light up with the car lights it is communicating correctly.

ACNA Member
17 R8 V10 Plus Dynamite Red
03 A3 E-tron
23 RS6 Tango on order
Former;
17 A4 2.0TQ Prestige S-line
08 A4 2.0TQ Titanium S-line
02 A4 1.8TQ
03 RS6
03 A4 1.8T
-
04-10-2012 06:25 PM
#11
Active Member
One Ring
Originally Posted by marklar182
I don’t have any experience with the Dice Adapter, but I take it that the original blue «B» connector is removed from the quad lock and sits disconnected correct? The Dice plug is in the quadlock now correct?
If that is the case you should have to move the C7 (Green w/Blue stripe wire) to the B5 in the Dice connector that is in the quadlock. (If you have Bose B5 (Brown wire) to B7 first)
If all else fails, remove the Dice, return to stock config and try the wires as above. If you get the buttons to light up with the car lights it is communicating correctly.
Yep the dice plugs into the quadlock where the original blue «B» connector used to be plugged in and the K-line was movedto the B5 slot as pictured above. Where ever that image came from is the exact tutorial I followed. Guess I will remove the Dice connector and put the original blue one back in to see if it makes any difference.
-
04-15-2012 01:26 AM
#12
Active Member
One Ring
Well, i tried to put the K-Line back into the original blue connector in the B5 pin slot, but this didn’t make any difference. I also noticed that when the K-Line is moved to B5 and the Symphony II+ head unit is put back in for the meantime, the radio buttons still light up as normal and all radio functions work correctly. I’ve tried this in C7 and B5 to verify and the original head unit still lights up and functions just fine. With the RNS-E however, the problem still persists, though I did notice that when the car’s parking lights or headlights are turned on, the screen of the RNS-E dims slightly, which I would imagine is normal.
I’ve looked at the wiring harness in my car and compared it with the image from above and it looks the same except for a light brown/tan plug. I have no idea what it is, but I tried removing that too but it didnt make any difference.
The RNS-E also came with the original harness with quadlock with the wires still attached but unfortunately the auto dismantler was too lazy to take it out properly and simply cut the wires. Looking at the quadlock connections, i noticed an extra connector on mine verssus the one that came with the RNS-E. Does this extra connection make a difference? I attached an image below which identifies the differences. I don’t know if any of these highlighted things should make a difference.

-
04-15-2012 06:57 AM
#13
Veteran Member
Four Rings

If the radio can not be seen with vag-com then its something with k-line I think. Check the fuse too
-
04-15-2012 11:40 AM
#14
Established Member
Two Rings
Brown/Tan is the «A» connector. It is the speaker/bose outputs. Nothing to do with this issue.
The wire missing from the other connector, «D» #16, is a 12V pass through, again, not related.
You really need a VAGCOM to troubleshoot the communication. If the SYM II communicates with the car and the RNS-E does not it is a RNS-E issue or connection issue.
Try wiggling the K-line wire in the connector while the lights are on to see if it is a physical connection issue. I have seen this issue before on other wires in the harness.
ACNA Member
17 R8 V10 Plus Dynamite Red
03 A3 E-tron
23 RS6 Tango on order
Former;
17 A4 2.0TQ Prestige S-line
08 A4 2.0TQ Titanium S-line
02 A4 1.8TQ
03 RS6
03 A4 1.8T
-
04-15-2012 12:58 PM
#15
Established Member
Two Rings
Out of curiosity which DICE do you have? Since you said that the Symphony still works when you plug it back in removing the dice and putting the old connecter is probably moot.
-
04-15-2012 02:43 PM
#16
Active Member
One Ring
the DICE kit I have is an i-Audi-R DL-2401.
I checked the fuse and it looks like its fine.
I tried wiggling the k-line to see if it made a difference and even took the B connector out completely and only connected the k-line directly to the B5 pin and still nothing.
-
04-15-2012 04:45 PM
#17
Established Member
Two Rings
RNS-E is probably hosed.
I would return and get one from a reputable source with a pin code and pre-coded correctly for your car. (the one you have now is for a A4 Cabrio BTW, so you will need to be recoded with a VAGCOM if you keep it and get it working)
ACNA Member
17 R8 V10 Plus Dynamite Red
03 A3 E-tron
23 RS6 Tango on order
Former;
17 A4 2.0TQ Prestige S-line
08 A4 2.0TQ Titanium S-line
02 A4 1.8TQ
03 RS6
03 A4 1.8T
-
04-15-2012 07:38 PM
#18
Active Member
One Ring
well if that is the case, which model RNS-E’s should I be looking for that are specifically for the B7 Sedan? I’ll be returning the unit I have now, and if they will not accept returns since its been over 30 days, then I will sell it.
Last edited by LAX2YYZ; 04-15-2012 at 10:33 PM.
-
05-29-2012 09:09 PM
#19
Active Member
One Ring
UPDATE:
I managed to return the RNS-E unit I bought and purchased another one which was tested and fully functional. However, the exact same problem occured again! It is an 8E0 035 192 J made in 2006 and it came with an AUZ number but the service guys were still not able to ge the car to communicate with the head unit. The service department verified that this unit is in fact compatable with my car but they do not know why the car can’t see that anything is connected. They called Audi of America and they said that it would be impossible to add a navigation unit in my car, which I believe is complete BS seeing as many others have been able to do what I would like to do without problems. I have no clue what to do at this point regarding this issue other than maybe replacing the wiring harness. Any other ideas?
- ! error
-
 ready
ready -
 AP mode (ES-500W/ES-500WR)
 -
 Wi-Fi (ES-500W/ES-500WR)
- Check the scanner connection to your computer to make sure it is secure.
- Turn the scanner off and then back on again. If the error continues, the scanner may be malfunctioning. Contact Epson for support.
ready light is off and the following lights are on:
- ! error
-
 automatic feeding mode
 -
 double feed detection skip
 -
 slow mode
 - AP mode (ES-500W/ES-500WR)
- Wi-Fi (ES-500W/ES-500WR)
Wi-Fi and ! error lights are flashing slowly (ES-500W/ES-500WR)  stop button to clear the error, restart the devices you want to connect to the network, then reconnect to the network. Wi-Fi light is flashing slowly and ! error light is on (ES-500W/ES-500WR) Wi-Fi (white) and ! error lights are flashing slowly (ES-500W/ES-500WR) ready lights are on and the Wi-Fi light is flashing (ES-500W/ES-500WR)