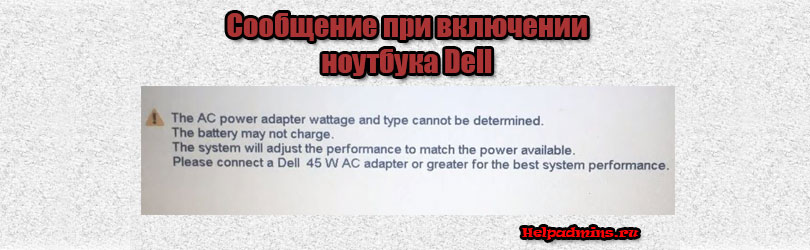
Ноутбук Dell при включении каждый раз ругается на блок питания
С данным сообщением, которое появляется при включении, могут столкнуться обладатели ноутбуков фирмы Dell. Несмотря на то, что его можно пропустить и даже полностью отключить, делать этого не стоит. Лучше разобраться в причине появления и устранить ее, ведь как только вы увидите надпись “The AC power adapter wattage and type cannot be determined. The battery may not charge. The system will adjust the performance to match the power available.” батарея ноутбука скорее всего перестанет заряжаться, а процессор будет работать в режиме сниженной производительности, что будет проявляться в медленной работе ноутбука.
Возможные причины
Практически всегда данная проблема связана с блоком питания ноутбука. Реже с разъемом питания, а также с BIOS ноутбука. Но обо всем по порядку.
Блоки питания Dell несколько отличаются от блоков других производителей. Дело в том, что в них присутствует специальный механизм идентификации, который позволяет отличить оригинальный блок от неоригинального. Поэтому если сообщение появилось после замены старого блока на новый, то здесь сразу все понятно. Блок не оригинальный и ноутбук не будет с ним работать.
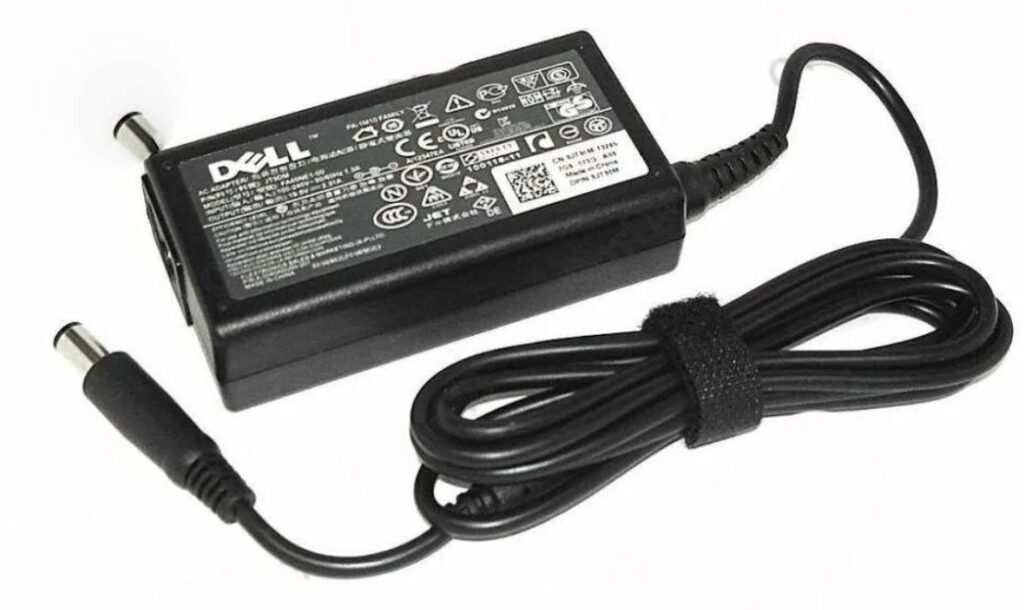
Блок питания Dell
Для начала попробуйте сбросить настройки BIOS ноутбука на заводские. Хоть это и не самая распространенная причина, но тем не менее ее нужно проверить сразу, так как делается это быстро и легко.
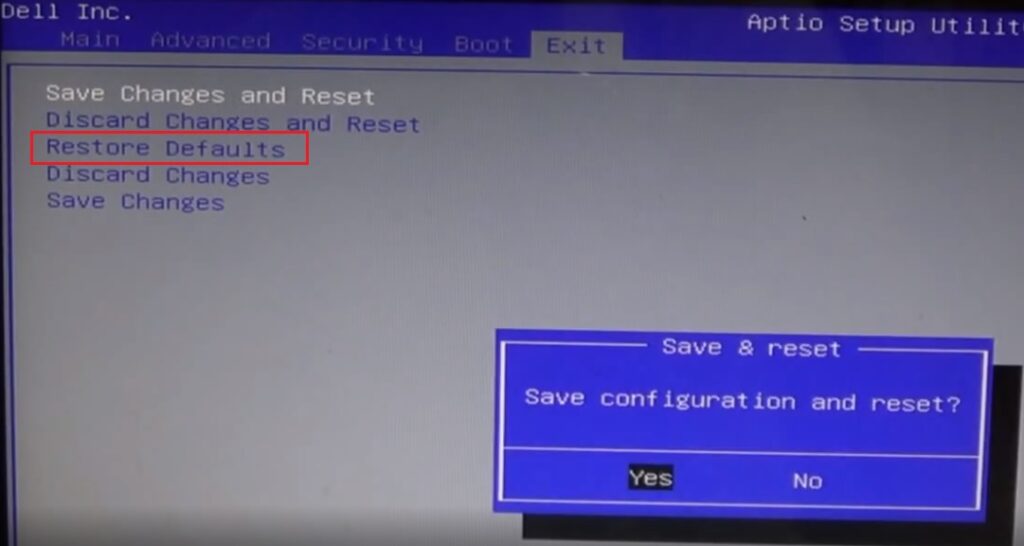
Сброс BIOS ноутбука Dell
Также стоит отключить аккумулятор на несколько минут, а затем подключить его снова и попробовать включить ноутбук.
Если это не помогло и сообщение “Alert! The AC power adapter wattage and type cannot be determined.” появляется все равно, то с большой долей вероятности проблема с блоком питания, а точнее с кабелем, идущим от блока к ноутбуку. В нем очень часто со временем повреждается центральный провод, по которому и происходит идентификация адаптера ноутбуком.
Для решения проблемы этот кабель нужно заменить, перепаяв его со стороны блока питания. Благо эти “хвосты” продаются отдельно.
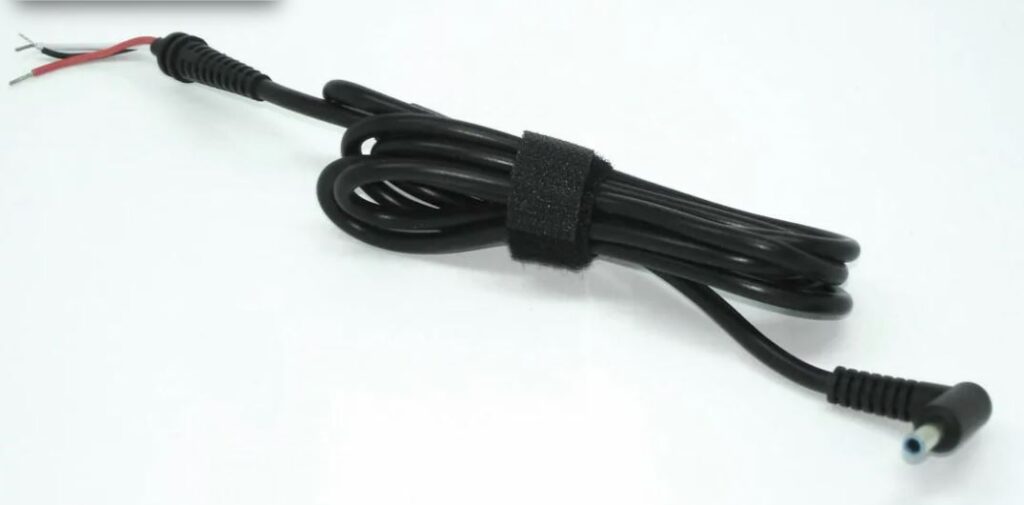
Ремонтный кабель блока питания Dell
Для ноутбуков Dell мы советуем не менять блок питания, а восстанавливать его. Связано это с тем, что даже при замене на новый оригинальный адаптер питания ноутбук с большой долей вероятности будет ругаться на него и отказываться заряжать батарею.
Лучшая благодарность автору — репост к себе на страничку:

Данная статья будет полезна счастливым обладателям ноутбуков Dell. В какой-то момент пользователь при включении лэптопа может столкнуться с уведомлением:
«Alert! The AC power adapter wattage and type cannot be determined. The battery may not charge. The system will adjust the performance to match the power available.»

Его можно пропустить кликнув по кнопке Continue на экране ноутбука, но делать этого я не рекомендую. Давайте разберёмся, почему появляется эта ошибка и к каким последствиям она приводит?
Dell, в отличии от любых других производителей ноутбуков, внедрил в свои блоки питания механизм инициализации оригинальности зарядного устройства. То есть, при подключении блока питания и включении устройства, ноутбук инициализирует через центральный провод оригинальность. Если блок питания определяется как неоригинальный, то выходит вышеописанная ошибка.
Причины
- Покупка нового зарядного устройства. Здесь очевидно, что новый адаптер штамповка, надпись в виде Dell не гарантирует оригинальность.. Используйте ориг.
- Если используется родной зарядник, то возможно перебит центральный провод от б/п до наконечника, испорчен наконечник (розетка) или разъём питания ноутбука. Требуется ремонт или замена.
- Оригинальный блок питания имеет меньшую мощность, чем требуется ноутбуку, например вместо 65Вт всего лишь 45Вт.
Последствия
Появление ошибки «The AC power adapter wattage and type cannot be determined» приводит к следующему:
- Снижение производительности, ноутбук начинает работать медленнее.
- Аккумуляторная батарея может перестать заряжаться.
Если зайти в BIOS во вкладку General — Battery Information, то вы увидите, что вместо привычных 45W, 65W, 90W или 130W, у вас будет присутствовать надпись «AC adapter — unknown device installed».
Соответственно, при корректной работе родного блока питания у вас при включении ноутбука не появится ошибка «The AC power adapter wattage…», а в биосе в General — Battery Information будет информация о б/п «AC adapter — 65W».
Если вы все же решили при каждом включении ноутбука просто пропускать данное уведомление, то в этом случае вы можете отключить его на совсем. Для этого войдите в BIOS, в зависимости от версии микропрограммы откройте вкладку Advanced или POST Behavior, кликните по Adapter Warnings, вместо Enabled выставьте Disabled, сохраните изменения и выйдите.
Вывод
Как специалист, рекомендую заменить неисправное блок питание на оригинальное исправное или отремонтировать родное зарядное устройство. Подобрать и приобрести необходимый блок питания можно на сайте. Если пользоваться ноутбуком, который при включении выдаёт вышеупомянутую ошибку, то это приведёт к снижению производительности (в том числе снижении частоты процессора) и возможно, к прекращению заряда АКБ.
Перед подбором, рекомендую прочитать статью «Как правильно подобрать блок питания для ноутбука».
По доброй традиции, сообщу вам о моей проблеме с ноутом, и как я её решил.
Являюсь я счастливым обладателем ноутбука DELL Inspiron n5110, версия с процессором Core i7 второго поколения.

И не так давно столкнулся с не очень приятной проблемой. Сейчас опишу вам всё, что происходило с моим ноутбуком.
Как-то запуская ноут, я столкнулся с тем, что он выдал мне предупредительное сообщение «AC power adapter wattage and type cannot be determined…» и так далее. Это сообщение гласит, что батарея либо сама зарядка не могут быть определены, и требуют замены. Но вроде как он всё равно запускается. «Ну и фиг с ним» — подумал я, радуясь, что ноутбук запускается.
Но не тут то было! Сперва я заметил, что батарея в ноутбуке находится в состоянии «подключена, но не заряжается».
Зачем понял, что ноутбук стал нехило так подтормаживать, видео рендерится в раза 3 медленнее, и вообще общая производительность упала. Я полез в программу AIDA64, и дал ноуту максимальную нагрузку на тесте, температура процессоров не поднялась выше 50, хотя обычно доходит и до 80.
Зайдя в настройки разгона я и вовсе был сильно удивлён:

Частота процессора застыла на отметке 798 и не поднималась, хотя должна подниматься даже выше заявленных 2200. И тут я перечитал ещё раз сообщение, которое мне выдаётся при запуске, и понял, что ноутбук ради безопасности работает в экономическом режиме. Подумав, что проблема в батареи, я снял её и запустил ноут без неё. И вуаля! Всё заработало нормально. Подумав, что проблема в батареи, я даже заказал новую и сейчас жду посылку.
Но, произошла неприятность. На пару секунд выключился свет, и после перезапуска ноута та же ошибка и проблема снова вернулась даже без батареи! Здесь могло сгореть и само зарядное, и провод мог переломится, короче, вариантов было масса.
Я много чего пробовал делать, и выключал ноутбук, вытаскивал всё, держа палец на кнопке включения 60 секунд, и протирал контакты, но нифига не помогло.
Начал искать всякие способы отключить троттлинг (заведомое занижение мощности процессором для того, чтобы температура ноутбука не была выше определённой отметки, и да, я тоже сначала прочитал это слово как «троллинг»).
В итоге, я сделал элементарное действие, после которого всё заработало отлично ДАЖЕ со старой батареей. Обновил bios. Вот и всё! Как придурок скакал вокруг ноута месяц, а в итоге нужно было просто обновить bios. Обновить bios для DELL N5110 можно на офф сайте. Если у вас другая модель ноутбука DELL, но такая же проблема, поищите драйвера bios для вашей модели ноута на официальном сайте.
Обновление происходит очень легко. Вам нужно подключить ноутбук к сети, вставить батарею и запустить скачанное приложение. Дав согласие остаётся только ждать. Куллера начинают работать по полной и после установки ноутбук перезагружается, и страшного сообщения я больше не увидел.
Надеюсь, вам поможет моё решение. Если нет или вам помогло другое решение — пишите в комментах.
Ноутбук Dell при включении пишет “The AC power adapter wattage …”
С данным сообщением, которое появляется при включении, могут столкнуться обладатели ноутбуков фирмы Dell. Несмотря на то, что его можно пропустить и даже полностью отключить, делать этого не стоит. Лучше разобраться в причине появления и устранить ее, ведь как только вы увидите надпись “The AC power adapter wattage and type cannot be determined. The battery may not charge. The system will adjust the performance to match the power available.” батарея ноутбука скорее всего перестанет заряжаться, а процессор будет работать в режиме сниженной производительности, что будет проявляться в медленной работе ноутбука.
Возможные причины
Практически всегда данная проблема связана с блоком питания ноутбука. Реже с разъемом питания, а также с BIOS ноутбука. Но обо всем по порядку.
Блоки питания Dell несколько отличаются от блоков других производителей. Дело в том, что в них присутствует специальный механизм идентификации, который позволяет отличить оригинальный блок от неоригинального. Поэтому если сообщение появилось после замены старого блока на новый, то здесь сразу все понятно. Блок не оригинальный и ноутбук не будет с ним работать.
Блок питания Dell
Для начала попробуйте сбросить настройки BIOS ноутбука на заводские. Хоть это и не самая распространенная причина, но тем не менее ее нужно проверить сразу, так как делается это быстро и легко.
Сброс BIOS ноутбука Dell
Также стоит отключить аккумулятор на несколько минут, а затем подключить его снова и попробовать включить ноутбук.
Если это не помогло и сообщение “Alert! The AC power adapter wattage and type cannot be determined.” появляется все равно, то с большой долей вероятности проблема с блоком питания, а точнее с кабелем, идущим от блока к ноутбуку. В нем очень часто со временем повреждается центральный провод, по которому и происходит идентификация адаптера ноутбуком.
Для решения проблемы этот кабель нужно заменить, перепаяв его со стороны блока питания. Благо эти “хвосты” продаются отдельно.
Ремонтный кабель блока питания Dell
Для ноутбуков Dell мы советуем не менять блок питания, а восстанавливать его. Связано это с тем, что даже при замене на новый оригинальный адаптер питания ноутбук с большой долей вероятности будет ругаться на него и отказываться заряжать батарею.
Источник
Как сбросить контроллер батареи ноутбука

Сброс контроллера батареи ноутбука – это обнуление данных о ее работе: общее время функционирования аккумуляторов, остаточный заряд, количество циклов заряда-разряда.
Для чего нужен сброс контроллера батареи
От того, какие данные записаны в памяти контроллера зависит и режим работы батареи ноутбука. Например, микросхема (контроллер) будет неправильно отображать заряд в данный момент (показывать 0%), ноутбук отключится, даже если в действительности его питания достаточно для использования. И наоборот, вы видите индикатор зарядки на уровне 100%, а батарея в этот момент будет полностью разряжена. Результат – ноутбук вырубается, потому что ему не на чем работать, а вы можете даже не успеть сохраниться. Калибровка контроллера может помочь и в случае, если аккумулятор просто «перестал держать» заряд.
Когда делать сброс, а когда не стоит
Сброс контроллера заряда батареи ноутбука нужен только в случае:
- если была замена аккумуляторов – самих элементов питания;
- если произошел сбой в работе софта.
Делать это «на всякий случай» не стоит. Как говориться: «Работает – пусть работает». Разве что, батарея вашего ноутбука уже «на грани» и вы практически ничем не рискуете, можете проводить калибровку раз в 2-3 месяца.
Перед тем, как сбросить настройки контроллера, нужно проверить, нужно ли это вашей батарее. И сделать это можно через командную строку:


И откройте «nout». В этом документе найдите раздел с данными о батарее. Если число «Последняя полная зарядка» значительно меньше, чем «Расчетная емкость», батарее нужна кали бровка.
Если вы планируете делать сброс с помощью программы, проведите тестирование в ней.
Ручной сброс
Один из вариантов «отката» – сделать это вручную.
- Зарядите девайс на 100%.
- В панели управления, на вкладке «Электропитание» установите запрет на выход в режим сна, чтобы не допустить прерывания процесса обнуления.

- Отключите ноутбук от электросети – он должен начать работать от аккумулятора.
- Вызовите BIOS: во время перезагрузки девайса, до появления логотипа операционной системы, нажмите и удерживайте клавишу Del, F2, F9, F10… (каждый производитель настраивает свой вариант).
- Обеспечьте ноутбуку хорошее охлаждение – поставьте на охлаждающую подставку или просто приподнимите край, где расположена решетка вентилятора.
- Дождитесь пока он полностью разрядится, сразу же включите адаптер в электросеть и полностью зарядите аккумуляторную батарею. Лучше оставить гаджет на ночь.
Программный сброс контроллера
Обнулить историю работы аккумулятора в обоих случаях можно, используя программы для сброса контроллера батареи.
После ремонта – перепаковки – обнулить память контроллера можно программой Battery EEPROM Works.

Когда микросхема памяти (EEPROM) будет подключена, следует установить реальное значение емкости аккумуляторов и нажать кнопку RESET. Далее утилита сделает все настройки в автоматическом режиме:
- зафиксирует остаточную (действительную) емкость – Full Charge Capacity в соответствии с теми показателями, что вы указали перед «откатом»;
- сбросит на ноль счетчик циклов зарядки-разрядки (Cycles Count);
- Manufacturer Date – начало работы батареи будет стартовать с текущей даты, установленной на вашем ноутбуке.
После сохранения всех изменений, контроллер будет воспринимать батарею как новую.
Как выполнить сброс контролера на разных ноутбуках
Для калибровки можно скачать из интернета программу стороннего разработчика. Но это стоит делать только, если вы не нашли подходящей утилиты, разработанной производителем вашего ноутбука. В таком случае вы не рискуете подцепить вредоносное ПО, и, практически, исключен вариант несовместимости загруженной программы с операционной системой лэптопа.
Ноутбука Asus
Сброс контроллера батареи ноутбука asus легко сделать через BIOS. В принципе, этой программой можно воспользоваться на любом мобильном ПК, если производитель позаботился о ее наличии и в вашей модификации есть функция калибровки:
- зайдите в БИОС;
- на вкладке Boot включите Smart Battery Calibration;

- нажмите Yes, и обнуление начнется автоматически;
- выйдите из программы через Esc.
Ноутбука Acer
Разберемся, как сбросить контроллер батареи ноутбука acer. Владельцы этих девайсов могут воспользоваться утилитой BatteryMark.

Эта программа, прежде всего, разработана для тестирования батареи – она, запуская поиск нескончаемого числа Пи, нагружает процессор «по полной» и вычисляет, за какой период заряд батареи снизится на единицу. Если утилита обнаружит нарушения, будет сделан сброс контроллера: за один час производится несколько полных циклов разрядки-зарядки аккумуляторов.
Данное ПО подходит и для ноутбуков производителя Samsung.
Ноутбука Dell
Если вы не можете найти утилиту, что бы сбросить память контроллера батареи ноутбука dell на сайте производителя, воспользуйтесь одной из сторонних программ, например Smarter Battery.

Сразу же после запуска вы увидите данные о заряде батареи.

Для их точности ПО должно быть запущено постоянно. На странице калибровки вы можете нагрузить батарею (Load) и увидеть, что с ней происходит, а так же запустить сброс (reset).
Ноутбука HP
Чтобы сделать сброс контроллера батареи ноутбука hp скачайте программу HP support assistant. Ее можно найти на официальном сайте разработчика.
- На вкладке «мои устройства» выберите «Мой ноутбук»

- В «Поиск и исправление ошибок» запустите «проверка аккумулятора».

- По завершении проверки программа может выдать разные варианты, в том числе и:
| Состояние | Сообщение | Предлагаемое действие |
| Выполнить калибровку | Аккумулятор работает исправно, но необходимо выполнить его калибровку. | Прочтите и ответьте на запросы в окнах при их появлении. Если отображается вариант «Автоматическая калибровка аккумулятора HP», то он наиболее предпочтителен. В противном случае нажмите «Узнайте, как откалибровать аккумулятор, чтобы узнать о способах калибровки аккумулятора». |
Если это ваш вариант, сделайте сброс, следуя инструкции. Помните, что использовать ноутбук во время обнуления нельзя, поэтому выбирайте период, когда он будет свободен несколько часов.
Советы по использованию батареи
Чтобы батарея ноутбука служила долго и без сбоев, соблюдайте несколько простых правил:
- избегайте использования батареи на сильном морозе – она может мгновенно разрядиться, что негативно скажется на ее функциональности, или жаре – возможен не только выход со строя, но и взрыв аккумуляторов;
- если вы юзаете мобильный ПК, подключенным к электросети, извлекайте из него батарею. Только, прежде, убедитесь, что она заряжена процентов на 80;
- во время хранения периодически проверяйте уровень заряда, потому что аккумуляторы саморазряжаются. Если они полностью разрядятся, то дней через 10 придут в негодность;
- используя ноутбук на автономном питании, настройте режим энергосбережения;
- не держите активными неиспользуемые программы, завершайте ненужные процессы;
- минимизируйте список ПО, запускаемого в автоматическом режиме.
Заключение
Какой метод калибровки выбрать: программный или ручной? Все зависит от индивидуального предпочтения пользователя, так как результаты от применения обоих способов одинаковые.
Важно! Сброс контроллера батареи к нулевым показателям только восстановит достоверность данных, но не продлит срок службы аккумуляторов.
Источник
3 способа проверить состояние батареи ноутбука Dell [Новости MiniTool]
3 Ways Check Battery Health Dell Laptop
Резюме :
Ноутбук широко используется для учебы и работы. Аккумулятор — незаменимый аппаратный компонент ноутбука. Он обеспечивает питание вашего ноутбука, позволяя брать его с собой на работу, не подключая его к источнику питания. Однако со временем аккумулятор начнет изнашиваться. В этом посте от MiniTool рассказывается, как провести тест батареи Dell тремя способами.
Аккумулятор часто используется для питания электрических устройств, таких как ноутбук и мобильный телефон. Любая батарея со временем изнашивается. Вам необходимо проверить исправность аккумулятора, чтобы вы могли решить, нужно ли вам заменить его на новый или нет.
Ну а полезен ли тест батареи ноутбука? Как проверить состояние аккумулятора ноутбука? Многие люди не знают, что им делать. На этой странице в качестве примера будут представлены 3 способа завершения работы с ноутбуком Dell. Тест батареи Dell .
Подсказка: Беспокоитесь о потере данных из-за неожиданного завершения работы или неправильных операций? Регулярно создавайте резервные копии вашей системы, диска или хотя бы ценных данных. Однако, если ваши важные файлы исчезли до резервного копирования, вам следует сразу начать их восстановление с помощью профессионального инструмента восстановления.
Проведите тест батареи Dell тремя способами
Проверка аккумулятора Dell не представляет особого труда даже для неопытных пользователей. Вам следует выполнить шаги, описанные в следующих методах, чтобы проверить состояние батареи на вашем ноутбуке Dell.

Использование Dell Battery Diagnostics
- Запустите свой ноутбук Dell, как обычно.
- Внимательно посмотрите на свой экран. Немедленно нажмите F12 на клавиатуре, когда вы видите экран с логотипом Dell.
- Ищите Диагностика в меню загрузки Dell.
- Выберите его и нажмите Войти .
- Подождите и правильно отвечайте на запросы пользователя в программе предпусковой диагностики.
- Просмотрите результаты тестирования аккумулятора Dell.
Примечание: Вы должны отправлять некоторую информацию на странице проверки производительности системы всякий раз, когда тест не удался: тег службы, ошибка ePSA и код подтверждения (до того, как SupportAssist начнет узнавать, как действовать дальше).
Доступ к BIOS
Вы также можете проверить состояние аккумулятора Dell, войдя в его BIOS. Параметры и информация BIOS на разных компьютерах Dell не совпадают.
Ситуация 1:
- Запустите компьютер Dell.
- нажимать F2 когда появляется экран с логотипом Dell. Вы можете нажимать ее несколько раз при запуске, если экран не отображается.
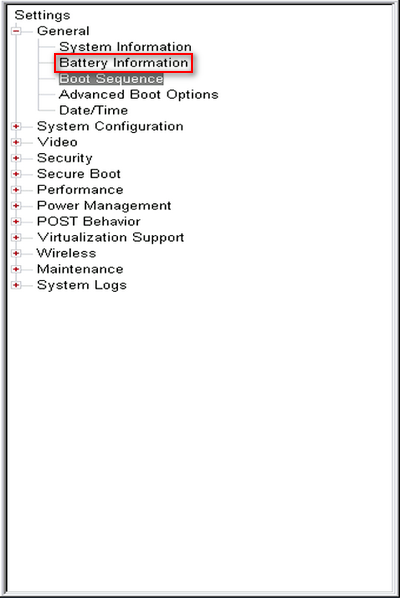
- Ищите Общая категорию на левой панели и разверните ее.
- Выбрать Информация о батарее вариант под него.
- Соответствующий статус и информация о состоянии батареи будут отображаться на правой панели.
Ситуация 2:
- Повторите шаги 1 и 2, упомянутые в предыдущей ситуации.
- Перейти к Передовой вкладку вверху с помощью клавиш со стрелками.
- Ищите Состояние батареи вариант из списка.
- Если это говорит Эта батарея работает нормально , это означает, что ваш аккумулятор в хорошем состоянии. Вам не нужно его заменять.
 Как проверить и обновить BIOS на компьютере Dell
Многие пользователи хотят завершить процесс обновления Dell BIOS самостоятельно, но не знают, что именно делать.
Переход к Dell Power Manager или Dell Command | Менеджер по питанию
И Dell Power Manager, и Dell Command | Power Manager — это полезные приложения, доступные пользователям для проверки состояния аккумулятора и настройки обслуживания аккумулятора для увеличения срока службы аккумулятора ноутбука Dell.
Как проверить время автономной работы ноутбука Dell?
- Вам следует открыть Dell Power Manager или Dell Command | Приложение Power Manager.
- Выберите параметр «Информация о батарее» и просмотрите отчет.
Стоит ли заменять аккумулятор Dell
Вы можете узнать о работоспособности и состоянии аккумулятора после выполнения теста аккумулятора Dell. Если время работы не соответствует вашим потребностям, вам следует подумать о замене батареи на новую.
Как долго работает аккумулятор для ноутбука Dell
Нет сомнений в том, что все батареи со временем изнашиваются. В целом, пользователи ноутбуков Dell заметят очевидное уменьшение времени работы их батареи через 18–24 месяца. Опытный пользователь может даже заметить эту проблему в течение 18 месяцев.
Как повысить производительность аккумулятора ноутбука Dell
После длительного использования аккумулятора производительность аккумулятора снизится. Есть ли полезные решения для его улучшения?
- Регулярно проверяйте состояние батареи ноутбука Dell.
- Отключайте зарядное устройство, когда в этом нет необходимости.
- Выключайте ноутбук Dell, когда он не используется.
- Экономьте заряд аккумулятора при использовании ноутбука Dell: уменьшение яркости, отключение Wi-Fi / Bluetooth, зарядка с помощью оригинального адаптера переменного тока и т. Д.
- Используйте Dell Power Manager и Dell Command | Инструменты Power Manager для оптимизации настроек батареи.
- Измените схему управления питанием в Microsoft Windows в соответствии с вашими потребностями.
Источник
-
MiniTool
-
MiniTool News Center
- Fixed – the AC Power Adapter Type Cannot Be Determined
By Tina | Follow |
Last Updated December 18, 2020

When charging the laptop computer, you may come across the error that the ac power adapter type cannot be determined. This post from MiniTool shows how to fix it. In addition, you can visit MiniTool to find more Windows tips and solutions.
The rechargeable battery is an essential part of the laptop. With the battery, the laptop becomes portable and has much freedom to move. However, when charging the laptop, you need an AC adapter.
For Dell users, there is a problem when charging the laptop, because you may come across the error that the AC power adapter type cannot be determined. When coming across this error, you can choose to ignore it and press F1 to continue to boot the computer.
But, ignoring this error is not the final solution. So, how to remove the error that alert the AC power adapter wattage and type cannot be determined?
How to Fix the AC Power Adapter Type Cannot Be Determined?
- Power Cycle PC
- Change the Adapter
- Disable Power Warnings
How to Fix the AC Power Adapter Type Cannot Be Determined?
In this section, we will show you how to fix the error that AC power adapter type cannot be determined.
Power Cycle PC
In order to fix the issue that the AC Power adapter type cannot be determined, you can choose to power cycle your PC.
Now, here is the tutorial.
- Remove all external peripherals (flash drives, printers, external hard drives) from your computer.
- Unplug your charger, turn off your laptop and remove the battery.
- Hold down the power button for at least 30 seconds.
- Then put the battery back in, charge it again and boot the computer.
After that, check whether the error that the AC power adapter type cannot be determined is fixed.
Change the Adapter
In order to fix the issue that the AC power adapter type cannot be determined, you can check whether there is a problem with your adapter. To do that, you can check whether the adapter works on another computer or another adapter works on your PC. If yes, it proves that your own adapter is abnormal and you need to change it.
If you are sure that your adapter is okay, then the problem could be anywhere. For example, it could be caused by the loose soldering in the charger brick, a broken pin, fired capacitors, or a broken connection, and so on.
In these situations, in order to fix this problem, you need to change a new adapter.
Disable Power Warnings
If you are able to charge your computer normally, but you often receive the error message that the AC power adapter type cannot be determined, you can choose to disable the power warnings. But you need to pay attention to that this action does not mean that the error message is removed.
Now, here is the tutorial.
- Reboot your computer and press the hotkey once you see the logo appears to enter BIOS.
- Once in BIOS, navigate to the Advanced tab and then go to the option of Adapter warnings.
- Next, choose Disable.
- Save changes and exit the BIOS.
Once all steps are finished, reboot your computer and check whether the issue that the AC power adapter type cannot be determined is popping up when charging the computer.
To sum up, in order to remove the error that the AC power adapter type cannot be determined, this post has shown some solutions. If you come across the same error, try these solutions. If you have any better idea to fix it, you can share it in the comment zone.
About The Author

Position: Columnist
Tina is a technology enthusiast and joined MiniTool in 2018. As an editor of MiniTool, she is keeping on sharing computer tips and providing reliable solutions, especially specializing in Windows and files backup and restore. Besides, she is expanding her knowledge and skills in data recovery, disk space optimizations, etc.
On her spare time, Tina likes to watch movies, go shopping or chat with friends and enjoy her life.
The essential part of a laptop that makes it portable is the rechargeable battery. Batteries have given devices the much-needed freedom of movement that humanity craves. However, you will need an AC adapter in order to charge your laptop battery. For Dell users, charging their batteries has somewhat been a problem. There is a particular issue that has been bothering several users; as far back as 2005. When the charger is plugged in and the PC is booted up, the user gets an error in a black screen stating “The AC power adapter type cannot be determined”. A variation of this message says “The AC power adapter type and wattage cannot be determined”.
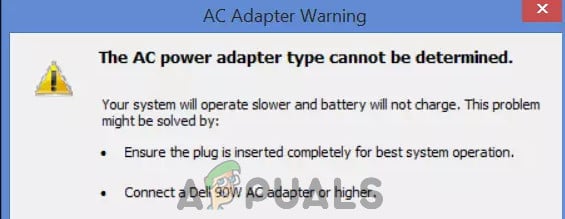
The computer will then state the wattage of the adapter you need e.g. ‘Please plug in a 130W adapter’. The user has an option to ignore this message and complete the boot by pressing F1. This error also occurs when you have fully started your PC and logged in. when you plug in your charger at this point, a notification message comes up in the system tray stating that the AC power adapter type could not be determined. In both cases, your battery will not charge and you will not see any indication on the system tray that the charger is plugged in. This article explores this problem and gives you the remedies to it.
As the error says, this means your PC cannot identify the charger you plugged in. The power connector consists of 3 pins, 2 are power and earth, the 3rd is a signal line to identify the PSU as a compatible (Dell) unit. If the Laptop does not get the signal, it does not allow the PSU to charge the battery, it will, however, allow it to power the laptop. This will protect the battery from high currents if the wattage of the charger is higher than the OEM specification. If you choose to ignore this message, the system performance will go down, and you will notice that your processor clock speed has been halved.
This problem can be caused by using the wrong charger. It can also be caused when the data connection for charger identification is broken; it could be due to a problem in the charger (cable, plug or central pin) or in the laptop (power input port or motherboard). While trying a new adapter is a good idea, changing the battery is not. This error is not caused by the battery in any way. In fact, you will get the same error if you just plug in the adapter without the battery.
Troubleshooting
If you have a charger that has been working before, then do not worry. The fault is a common one and happens because the plug sits so proud from the side of the laptop that it constantly gets knocked and causes the connector on the power board to fail; most commonly open circuiting the signal line. Wriggling it around might solve the issue but temporary. It is a matter of time before your charger will need you to plug it in in an awkward angle for it to work. Eventually, it will stop working all in all.
You can know the source of your problem by trying your charger on a similar laptop, or by plugging in a similar charger. If your charger works in another laptop or the new charger still shows the same error in your PC, then your problem is likely to be the DC charging port in your laptop, or a bad charging system on your motherboard. If another charger works on your PC or your charger shows the same error on another laptop, then the problem is the charger. Below are the solutions to this problem.
Power cycle your PC
Completely discharging your PC might fix the unresponsive state of the charging system.
- Unplug your charger, power off your laptop, and remove your battery
- Hold down the power button for at least 30 seconds
- Put the battery back in, with the charger and reboot
- Check if this fixed it
Workaround with ThrottleStop
There is a workaround you can try in order to fix this issue. However, you will have to use a tool named ThrottleStop. It’s a really lightweight tool that you can download for free. Here is the link. Once the program is downloaded, follow these steps:-
- Open ThrottleStop.
- Now uncheck the option named “BD PROCHOT”.
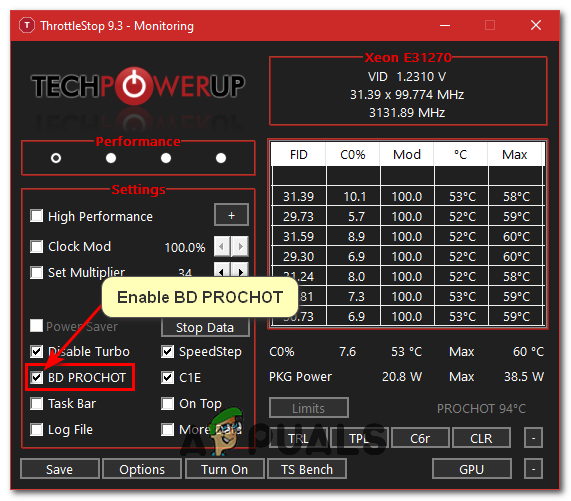
Enabling BD PROCHOT - Check if the issue is resolved.
If it isn’t resolved you will have to do these additional steps:-
- Set the “Multiplier” to “Max”.
- Set the “Speed Shift EP” to “1”.
- Check if the issue is resolved.
Get a new AC adapter/Charger
If you have tried troubleshooting and you have found that your charger does not work on a similar computer or a similar charger works on your PC, then it is time to change your AC adapter. If you are sure your charger worked for an extended period before, then the problem could be anywhere. It could be loose soldering in the charger brick, a broken pin, fried capacitors, a broken connection, etc. If you think you can try repairing the charger (by changing cables, capacitors, soldering) then go ahead. In most cases, the charger cannot be salvaged and you will need to buy a new charger.
Please note the wattage (e.g. 65W, 90W, 130W etc.) of your OEM charger, the voltage (12V, 19V) and charging current (1A, 2A, 4A). Make sure this numbers match with the new charger, otherwise you will get the same error.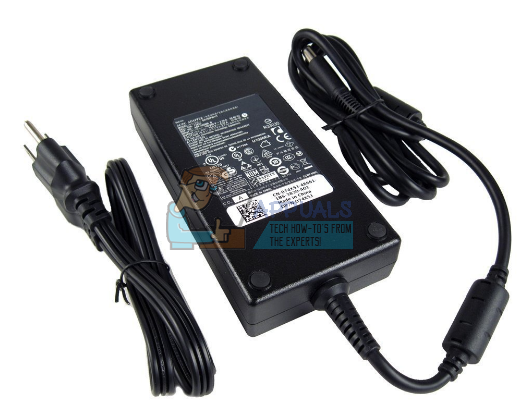
Change your DC power jack
To be honest, Dell laptops come with some flimsy soldering and charging ports. I have repaired a lot of Dell computers and I have been surprised how easily the soldering comes off, and the amount of DC charging ports I have had to replace. If you are the kind that will get the computer to charge by wiggling the charger around, then it is time to change the DC charging port. Attempting a repair on the port is no good because you will need to destroy the whole thing to get to the solders.
The power board on some Inspiron models is a separate unit to the motherboard and has the power socket mounted directly on it. You can open your PC, unplug the charging port from the motherboard, and replace it with a new one. It will cost you a few dollars and you can get one from Amazon, eBay or from here (search for ‘DC power input’ or something similar). The local repair shop might have one too. Make sure that the part numbers (e.g. DD0R03PB000 or DD0VM9P000) match or at least make sure that the wiring is the same and the units you are swapping are compatible.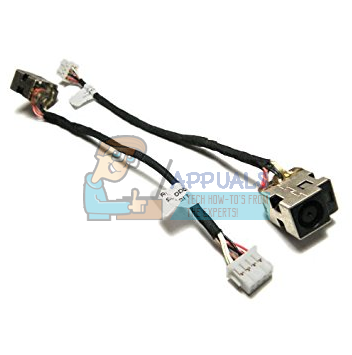
If your laptop DC input port is soldered onto your motherboard. You will have to unsolder it and solder back a new one. If the problem persists, then your motherboard might be the problem and will need replacement.
NB: You can get a direct/external battery charger if you can’t seem to find the problem. If your laptop is still under warranty, it is recommended to call your manufacturer; a repair will be made, or a replacement sent. Also, make sure that you plug in your charger directly into the AC outlet/socket: power surge protectors and other power conditioning equipment can affect the sinusoidal nature of your supply and throw this error.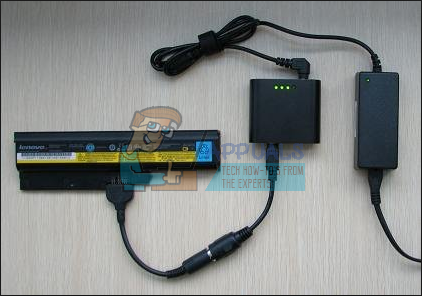
Disabling Power Warnings
If you are able to charge your computer normally but the warning keeps coming up, you can make the warnings go away permanently by changing the BIOS settings. Every laptop has settings which determine whether the power warnings will show or not. In this solution, we will navigate to your BIOS and disable the power warnings.
Note: This doesn’t mean that the issue you are facing will go away. We will be simply disabling the warnings.
- Restart your computer and enter the BIOS by pressing the DEL key or F2 according to the model of your computer.
- Once in BIOS, go to the Advanced tab and then toggle the option of Adapter warnings. This option may be present in another tab as well.
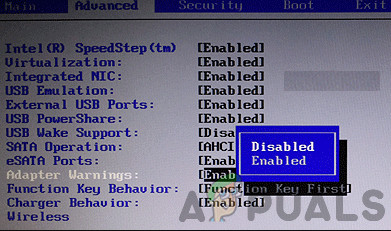
Disabling Adapter Warnings - Save changes and exit. Restart your computer and the warning will be disappeared.
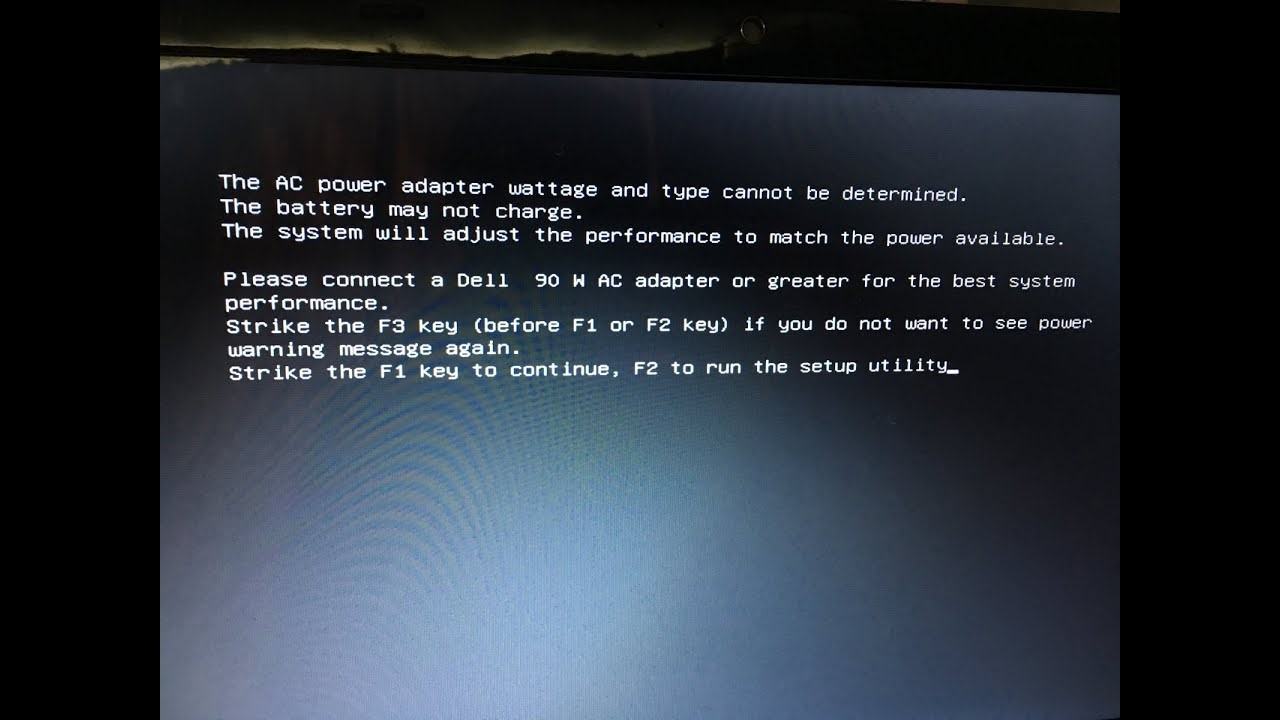
At the same time you feel the computer is running slower than usual, or the battery is not charging. So what is the error message above? Along ngolongtech.net learn through this article
You understand Vietnamese to Vietnamese:
“Cannot determine power and AC adapter type. The battery may not charge, the system will adjust its performance to match the available power.
Please connect Dell 90 W or higher AC adapter for the best system to attack F3 key (before F1 or F2 key) if you see power warning message again. Press F1 to continue, F2 interrupts the installation utility “
The cause of the error The ac power adapter wattage and type cannot be determined
The first and most common cause is due to charging, your charger may be used for a long time to drop the voltage leading to this notice, in addition, you may also have to buy non-genuine components, not the right voltage.
Damaged laptop batteries can also lead to the above notification, although the rate is lower
Error of charging IC on our mainboard with ic to manage the output and input of the charger if the faulty chip will not charge
Fix charging error when booting Dell Insprion Machine:
To handle this case is quite simple, you need another genuine charger with the correct number of Volt – Amp of the computer, then plugged in to check for more notifications.
Next is to check the battery, if determined not due to charging, then you remove the battery to run the machine for a while to see if there is an error message.
If both of the above cases do not work, then a high percentage of your device has a charging IC error on the Main. Fall into this case, we will not be able to fix it yourself, please bring to the reputable computer repair centers so that the technician there can check and report back to you more accurately.
Also, if you want to turn off this notification, do the following:
After restarting the computer, press F2 to enter BIOS settings.
Switch to the Advanced tab, select Adapter Warnings and then select Disabled. Finally, press the F10 key to save the BIOS. Like in the image below
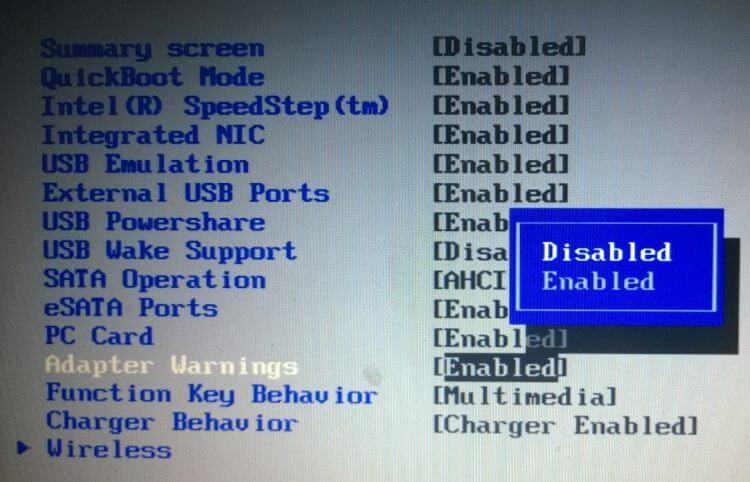
Dell ac power adapter wattage and type cannot be determined
going with the adapter replacement as the inexpensive first step, then guess I will move on to the DC jack and really hope one of the two work so I’m just not throwing money away
What is The ac power adapter wattage and type cannot be determined
The first and most common cause is due to the fact that the charger, if your charger lasts for a long time, the voltage drop leads to this message, in addition you may also have to buy non-genuine parts, with the wrong voltage.
A damaged laptop battery can also lead to the above message, albeit at a lower rate
The charging IC on our motherboard has an IC to manage the output and the charger, if the charger is faulty, the charger will not be
Fix charging error when starting Dell Insprion:
To handle this case quite simply, you need another genuine charger with the correct Volt-Amp number of your computer, then plug it in to check if there are any more messages.
Next is to check the battery, if it is determined that it is not charging, then remove the battery so that the machine runs for a while to see if there is any error message.
Why your AC power adapter type cannot be determined?
As the error says, this means your PC cannot identify the charger you plugged in. The power connector consists of 3 pins, 2 are power and earth, the 3rd is a signal line to identify the PSU as a compatible (Dell) unit. If the Laptop does not get the signal, it does not allow the PSU to charge the battery, it will, however, allow it to power the laptop. This will protect the battery from high currents if the wattage of the charger is higher than the OEM specification. If you choose to ignore this message, the system performance will go down, and you will notice that your processor clock speed has been halved.
This problem can be caused by using the wrong charger. It can also be caused when the data connection for charger identification is broken; it could be due to a problem in the charger (cable, plug or central pin) or in the laptop (power input port or motherboard). While trying a new adapter is a good idea, changing the battery is not. This error is not caused by the battery in any way. In fact, you will get the same error if you just plug in the adapter without the battery.
Troubleshooting
If you have a charger that has been working before, then do not worry. The fault is a common one and happens because the plug sits so proud from the side of the laptop that it constantly gets knocked and causes the connector on the power board to fail; most commonly open circuiting the signal line. Wriggling it around might solve the issue but temporary. It is a matter of time before your charger will need you to plug it in in an awkward angle for it to work. Eventually, it will stop working all in all.
You can know the source of your problem by trying your charger on a similar laptop, or by plugging in a similar charger. If your charger works in another laptop or the new charger still shows the same error in your PC, then your problem is likely to be the DC charging port in your laptop, or a bad charging system on your motherboard. If another charger works on your PC or your charger shows the same error on another laptop, then the problem is the charger. Below are the solutions to this problem.
Power cycle your PC
Completely discharging your PC might fix the unresponsive state of the charging system.
- Unplug your charger, power off your laptop, and remove your battery
- Hold down the power button for at least 30 seconds
- Put the battery back in, with the charger and reboot
- Check if this fixed it
Workaround with ThrottleStop
There is a workaround you can try in order to fix this issue. However, you will have to use a tool named ThrottleStop. It’s a really lightweight tool that you can download for free. Here is the link. Once the program is downloaded, follow these steps:-
- Open ThrottleStop.
- Now uncheck the option named “BD PROCHOT”.
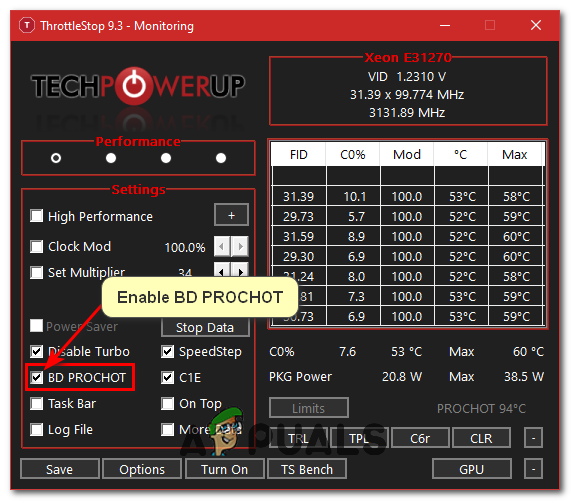
Enabling BD PROCHOT - Check if the issue is resolved.
If it isn’t resolved you will have to do these additional steps:-
- Set the “Multiplier” to “Max”.
- Set the “Speed Shift EP” to “1”.
- Check if the issue is resolved.
Get a new AC adapter/Charger
If you have tried troubleshooting and you have found that your charger does not work on a similar computer or a similar charger works on your PC, then it is time to change your AC adapter. If you are sure your charger worked for an extended period before, then the problem could be anywhere. It could be loose soldering in the charger brick, a broken pin, fried capacitors, a broken connection, etc. If you think you can try repairing the charger (by changing cables, capacitors, soldering) then go ahead. In most cases, the charger cannot be salvaged and you will need to buy a new charger.
Please note the wattage (e.g. 65W, 90W, 130W etc.) of your OEM charger, the voltage (12V, 19V) and charging current (1A, 2A, 4A). Make sure this numbers match with the new charger, otherwise you will get the same error.
Change your DC power jack
To be honest, Dell laptops come with some flimsy soldering and charging ports. I have repaired a lot of Dell computers and I have been surprised how easily the soldering comes off, and the amount of DC charging ports I have had to replace. If you are the kind that will get the computer to charge by wiggling the charger around, then it is time to change the DC charging port. Attempting a repair on the port is no good because you will need to destroy the whole thing to get to the solders.
The power board on some Inspiron models is a separate unit to the motherboard and has the power socket mounted directly on it. You can open your PC, unplug the charging port from the motherboard, and replace it with a new one. It will cost you a few dollars and you can get one from Amazon, eBay or from here (search for ‘DC power input’ or something similar). The local repair shop might have one too. Make sure that the part numbers (e.g. DD0R03PB000 or DD0VM9P000) match or at least make sure that the wiring is the same and the units you are swapping are compatible.
If your laptop DC input port is soldered onto your motherboard. You will have to unsolder it and solder back a new one. If the problem persists, then your motherboard might be the problem and will need replacement.
NB: You can get a direct/external battery charger if you can’t seem to find the problem. If your laptop is still under warranty, it is recommended to call your manufacturer; a repair will be made, or a replacement sent. Also, make sure that you plug in your charger directly into the AC outlet/socket: power surge protectors and other power conditioning equipment can affect the sinusoidal nature of your supply and throw this error.
Disabling Power Warnings
If you are able to charge your computer normally but the warning keeps coming up, you can make the warnings go away permanently by changing the BIOS settings. Every laptop has settings which determine whether the power warnings will show or not. In this solution, we will navigate to your BIOS and disable the power warnings.
Note: This doesn’t mean that the issue you are facing will go away. We will be simply disabling the warnings.
- Restart your computer and enter the BIOS by pressing the DEL key or F2 according to the model of your computer.
- Once in BIOS, go to the Advanced tab and then toggle the option of Adapter warnings. This option may be present in another tab as well.
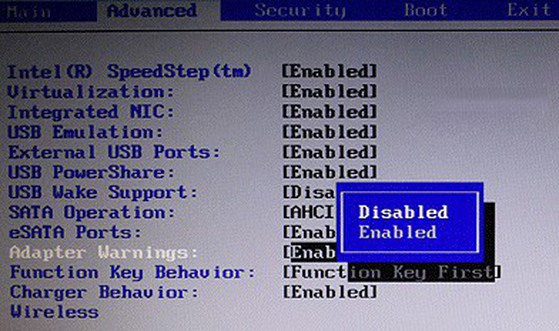
Disabling Adapter Warnings - Save changes and exit. Restart your computer and the warning will be disappeared.
TIP: If none of the Methods have resolved the issue for you, we recommend using Restoro Repair Tool which can scan the repositories to replace corrupt and missing files. This works in most cases, where the issue is originated due to a system corruption. Restoro will also optimize your system for maximum