Появление сообщения об ошибке 401 Unauthorized Error («отказ в доступе») при открытии страницы сайта означает неверную авторизацию или аутентификацию пользователя на стороне сервера при обращении к определенному url-адресу. Чаще всего она возникает при ошибочном вводе имени и/или пароля посетителем ресурса при входе в свой аккаунт. Другой причиной являются неправильные настройки, допущенные при администрировании web-ресурса. Данная ошибка отображается в браузере в виде отдельной страницы с соответствующим описанием. Некоторые разработчики интернет-ресурсов, в особенности крупных порталов, вводят собственную дополнительную кодировку данного сбоя:
- 401 Unauthorized;
- Authorization Required;
- HTTP Error 401 – Ошибка авторизации.
Попробуем разобраться с наиболее распространенными причинами возникновения данной ошибки кода HTTP-соединения и обсудим способы их решения.
Причины появления ошибки сервера 401 и способы ее устранения на стороне пользователя
При доступе к некоторым сайтам (или отдельным страницам этих сайтов), посетитель должен пройти определенные этапы получения прав:
- Идентификация – получение вашей учетной записи («identity») по username/login или email.
- Аутентификация («authentic») – проверка того, что вы знаете пароль от этой учетной записи.
- Авторизация – проверка вашей роли (статуса) в системе и решение о предоставлении доступа к запрошенной странице или ресурсу на определенных условиях.
Большинство пользователей сохраняют свои данные по умолчанию в истории браузеров, что позволяет быстро идентифицироваться на наиболее часто посещаемых страницах и синхронизировать настройки между устройствами. Данный способ удобен для серфинга в интернете, но может привести к проблемам с безопасностью доступа к конфиденциальной информации. При наличии большого количества авторизованных регистрационных данных к различным сайтам используйте надежный мастер-пароль, который закрывает доступ к сохраненной в браузере информации.
Наиболее распространенной причиной появления ошибки с кодом 401 для рядового пользователя является ввод неверных данных при посещении определенного ресурса. В этом и других случаях нужно попробовать сделать следующее:
- Проверьте в адресной строке правильность написания URL. Особенно это касается перехода на подстраницы сайта, требующие авторизации. Введите правильный адрес. Если переход на страницу осуществлялся после входа в аккаунт, разлогинитесь, вернитесь на главную страницу и произведите повторный вход с правильными учетными данными.
- При осуществлении входа с сохраненными данными пользователя и появлении ошибки сервера 401 проверьте их корректность в соответствующих настройках данного браузера. Возможно, авторизационные данные были вами изменены в другом браузере. Также можно очистить кэш, удалить cookies и повторить попытку входа. При удалении истории браузера или очистке кэша потребуется ручное введение логина и пароля для получения доступа. Если вы не помните пароль, пройдите процедуру восстановления, следуя инструкциям.
- Если вы считаете, что вводите правильные регистрационные данные, но не можете получить доступ к сайту, обратитесь к администратору ресурса. В этом случае лучше всего сделать скриншот проблемной страницы.
- Иногда блокировка происходит на стороне провайдера, что тоже приводит к отказу в доступе и появлению сообщения с кодировкой 401. Для проверки можно попробовать авторизоваться на том же ресурсе с альтернативного ip-адреса (например, используя VPN). При подтверждении блокировки трафика свяжитесь с провайдером и следуйте его инструкциям.
Некоторые крупные интернет-ресурсы с большим количеством подписчиков используют дополнительные настройки для обеспечения безопасности доступа. К примеру, ваш аккаунт может быть заблокирован при многократных попытках неудачной авторизации. Слишком частые попытки законнектиться могут быть восприняты как действия бота. В этом случае вы увидите соответствующее сообщение, но можете быть просто переадресованы на страницу с кодом 401. Свяжитесь с администратором сайта и решите проблему.
Иногда простая перезагрузка проблемной страницы, выход из текущей сессии или использование другого веб-браузера полностью решают проблему с 401 ошибкой авторизации.
Устранение ошибки 401 администратором веб-ресурса
Для владельцев сайтов, столкнувшихся с появлением ошибки отказа доступа 401, решить ее порою намного сложнее, чем обычному посетителю ресурса. Есть несколько рекомендаций, которые помогут в этом:
- Обращение в службу поддержки хостинга сайта. Как и в случае возникновения проблем с провайдером, лучше всего подробно описать последовательность действий, приведших к появлению ошибки 401, приложить скриншот.
- При отсутствии проблем на стороне хостинг-провайдера можно внести следующие изменения в настройки сайта с помощью строки Disallow:/адрес проблемной страницы. Запретить индексацию страницам с ошибкой в «rоbоts.txt», после чего добавить в файл «.htассеss» строку такого типа:
Redirect 301 /oldpage.html http://site.com/newpage.html.
Где в поле /oldpage.html прописывается адрес проблемной страницы, а в http://site.com/newpage.html адрес страницы авторизации.
Таким образом вы перенаправите пользователей со всех страниц, которые выдают ошибку 401, на страницу начальной авторизации.
- Если после выполнения предыдущих рекомендаций пользователи при попытках авторизации все равно видят ошибку 401, то найдите на сервере файл «php.ini» и увеличьте время жизни сессии, изменив значения следующих параметров: «session.gc_maxlifetime» и «session.cookie_lifetime» на 1440 и 0 соответственно.
- Разработчики веб-ресурсов могут использовать более сложные методы авторизации и аутентификации доступа для создания дополнительной защиты по протоколу HTTP. Если устранить сбой простыми методами администрирования не удается, следует обратиться к специалистам, создававшим сайт, для внесения соответствующих изменений в код.
Хотя ошибка 401 и является проблемой на стороне клиента, ошибка пользователя на стороне сервера может привести к ложному требованию входа в систему. К примеру, сетевой администратор разрешит аутентификацию входа в систему всем пользователям, даже если это не требуется. В таком случае сообщение о несанкционированном доступе будет отображаться для всех, кто посещает сайт. Баг устраняется внесением соответствующих изменений в настройки.
Дополнительная информация об ошибке с кодом 401
Веб-серверы под управлением Microsoft IIS могут предоставить дополнительные данные об ошибке 401 Unauthorized в виде второго ряда цифр:
- 401, 1 – войти не удалось;
- 401, 2 – ошибка входа в систему из-за конфигурации сервера;
- 401, 3 – несанкционированный доступ из-за ACL на ресурс;
- 401, 501 – доступ запрещен: слишком много запросов с одного и того же клиентского IP; ограничение динамического IP-адреса – достигнут предел одновременных запросов и т.д.
Более подробную информацию об ошибке сервера 401 при использовании обычной проверки подлинности для подключения к веб-узлу, который размещен в службе MS IIS, смотрите здесь.
Следующие сообщения также являются ошибками на стороне клиента и относятся к 401 ошибке:
- 400 Bad Request;
- 403 Forbidden;
- 404 Not Found;
- 408 Request Timeout.
Как видим, появление ошибки авторизации 401 Unauthorized не является критичным для рядового посетителя сайта и чаще всего устраняется самыми простыми способами. В более сложной ситуации оказываются администраторы и владельцы интернет-ресурсов, но и они в 100% случаев разберутся с данным багом путем изменения настроек или корректировки html-кода с привлечением разработчика сайта.
Trying to access a WordPress site and being met with an error page is at best inconvenient, whether that site is yours or someone else’s. As with many HTTP response codes, part of what makes a 401 error so frustrating is the lack of information it offers for diagnosing and resolving the issue.
The 401 error can happen with any browser, so it’s a pretty common issue people face. In most cases, this problem is relatively simple and straightforward to fix.
In this post, we’ll explain what 401 error messages are and why they happen. Then, we’ll walk you through five methods you can use to fix them.
Let’s get started!
What is the 401 Error Code?
The Internet Engineering Task Force (IETF) defines the error 401 Unauthorized as:
The 401 (Unauthorized) status code indicates that the request has not been applied because it lacks valid authentication credentials for the target resource. The server generating a 401 response MUST send a WWW-Authenticate header field containing at least one challenge applicable to the target resource.
An Introduction to the 401 Error Code
HTTP 400 status codes are encountered when there is a problem making a request. A 401 error, in particular, happens when your browser denies you access to the page you’re trying to visit.
As a result, instead of loading the web page, the browser will load an error message. 401 errors can happen within any browser so the message appearing may differ.
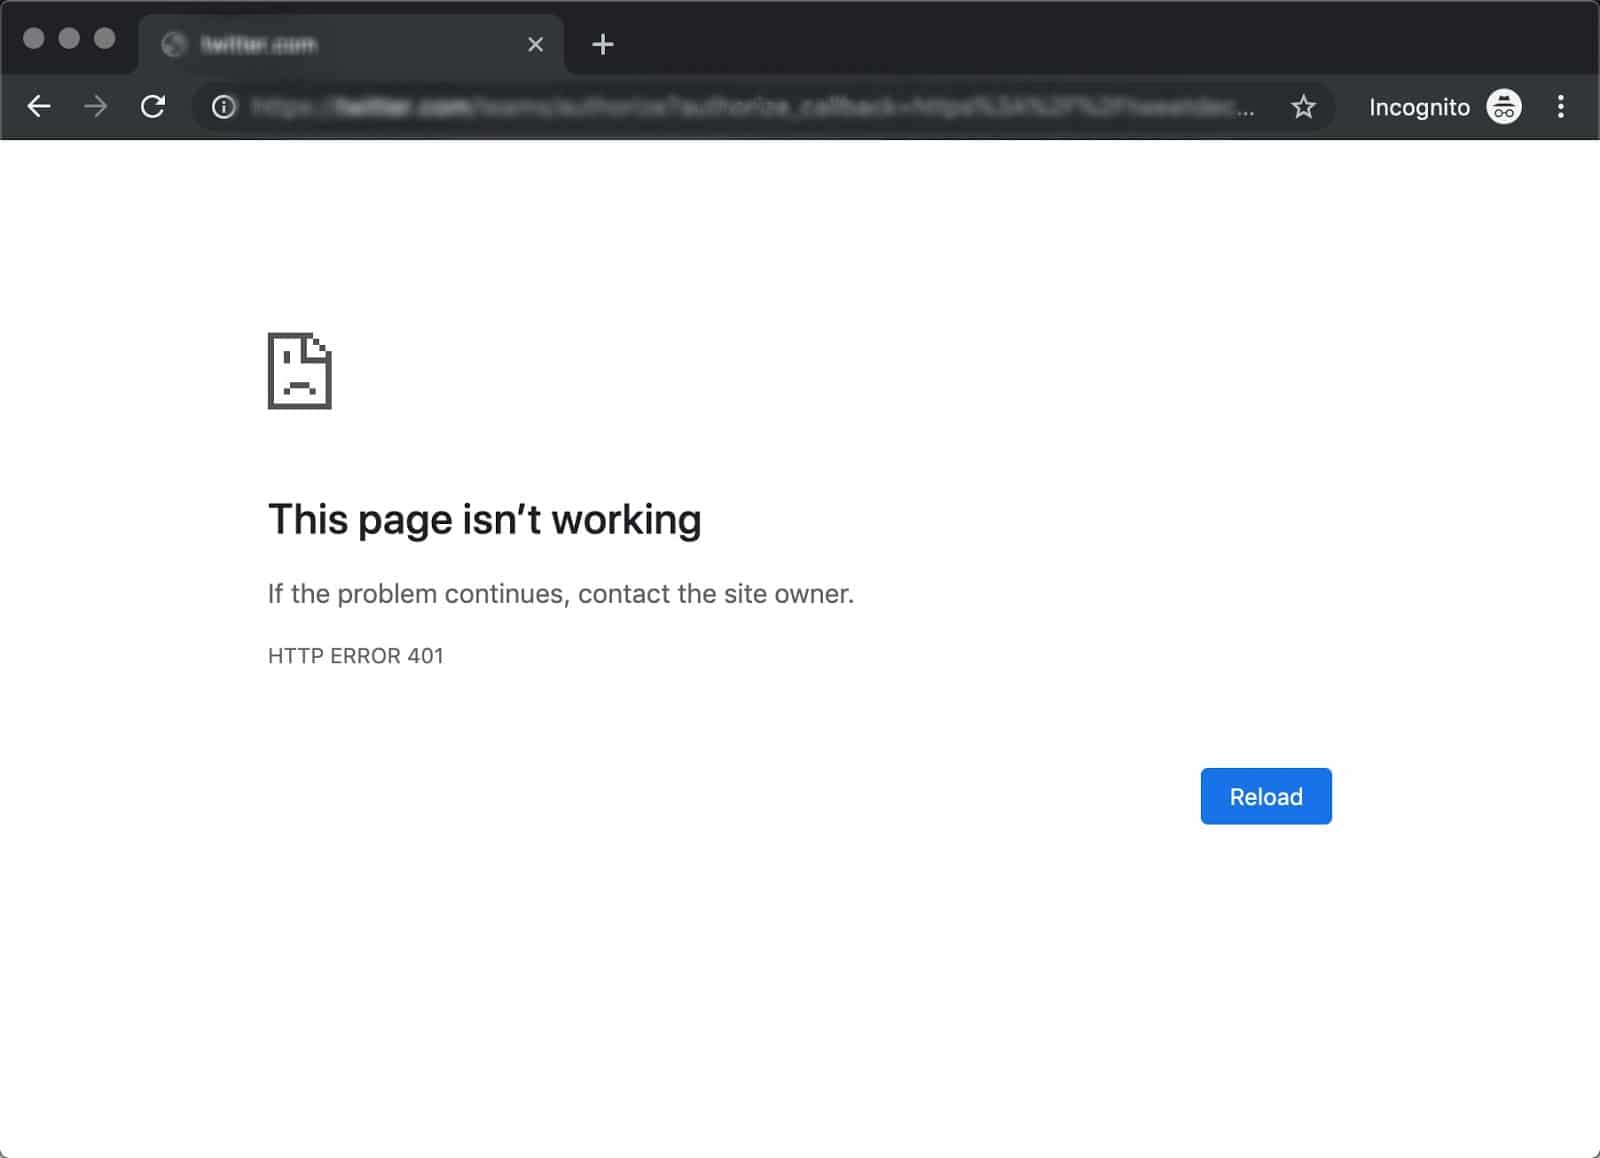
For example, in Chrome or Edge, you’ll likely see a paper icon along with a simple message telling you that the page in question isn’t working. It will include the phrase “HTTP Error 401” at the bottom, and instruct you to contact the site’s owner if the problem persists:
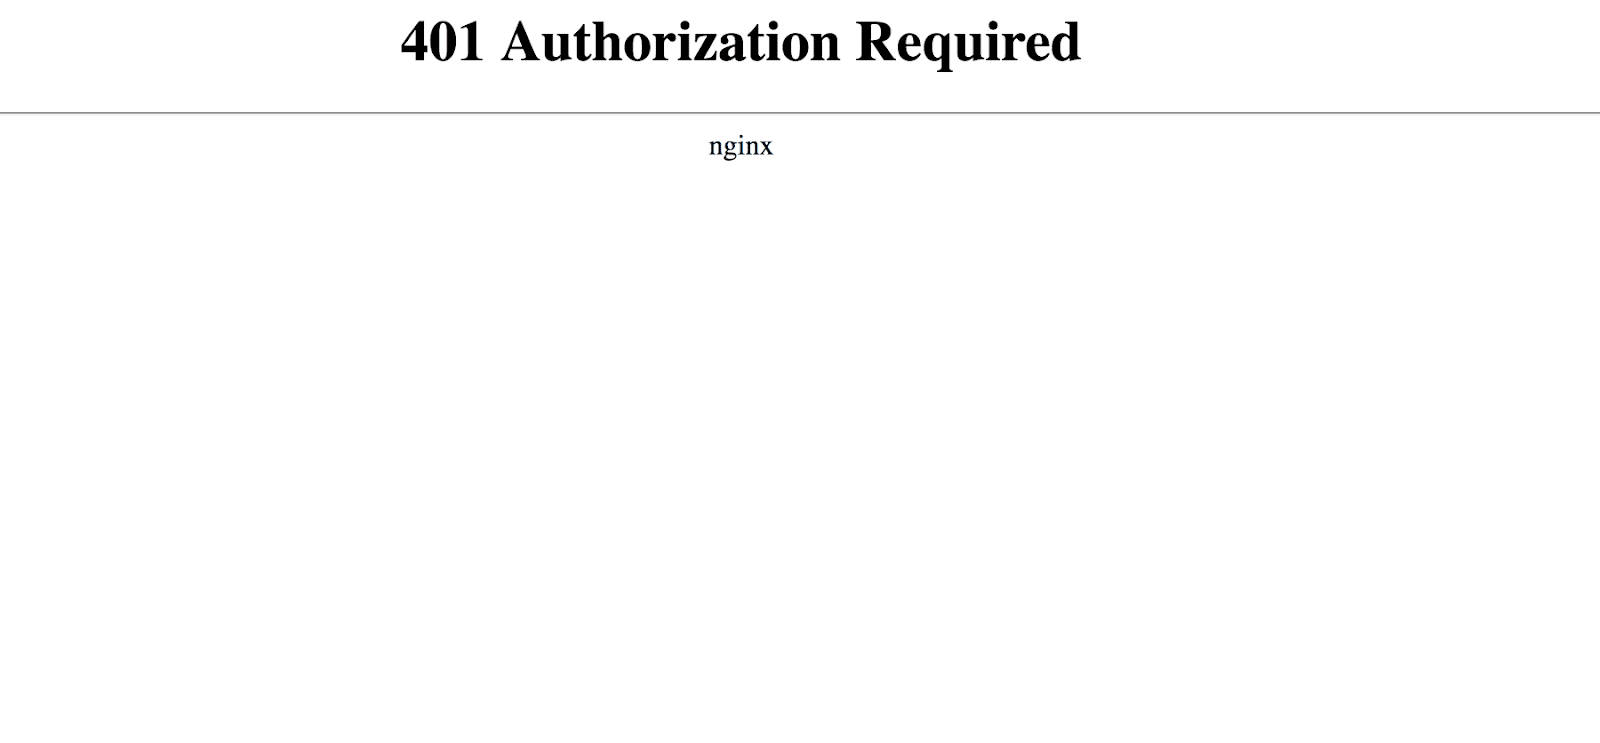
At other times and in other browsers, you might get a slightly less friendly warning that’s just a blank page with a “401 Authorization Required” message:
Other variations include:
- “HTTP 401 Error – Unauthorized”
- “401 Unauthorized”
- “Access Denied”
These errors occur on websites that require a login in order to access them. In most cases, it means that something is either wrong with the credentials or with the browser’s ability to read them as valid.
This is similar to HTTP 403 Forbidden Error, in that access isn’t permitted to the user. However, unlike with the 403 error, the 401 error message indicates that the authentication process failed.
The code is sent via the WWW-Authenticate header, which is responsible for identifying the authentication method used for granting access to a web page or resource.
The HTTP 401 error is all too common 🤦♀️ — and this guide will give you everything you need to fix it the next time you see that message showing up ✅Click to Tweet
What Causes a 401 Error?
If you encounter an error code in the 400s, you know you’re dealing with a client-side (or browser-side) issue. While the problem may be happening within your browser, however, it doesn’t necessarily always mean that’s the culprit, which we’ll explain in more detail later.
401 errors occur on restricted resources, such as password-protected pages of your WordPress site. So it’s safe to assume that the cause of the problem has something to do with the authentication credentials.
Outdated Browser Cache and Cookies
One of the most common reasons you might experience a 401 error is that your browser’s cache and cookies are out of date, preventing the authorization from successfully going through. If your browser isn’t using the valid authentication credentials (or any at all), the server will reject the request.
Plugin Incompatibility
At other times, this error is caused by a plugin incompatibility or error. For example, a firewall or security plugin can mistake your login attempt as malicious activity, and return a 401 error to protect the page.
Incorrect URL or Outdated Link
It’s also possible that the source of the problem can be attributed to a minor mistake. Common culprits in this category include an incorrectly-typed URL or an outdated link.
How to Fix the 401 Error (5 Methods)
Now that we’ve gone through a bit of background on the 401 error, it’s time to discuss how you can resolve it.
Let’s take a look at five methods you can use:
1. Look for Errors in the URL
We’ll start off with the easiest potential fix: making sure you used the correct URL. This may sound simple, but 401 errors can sometimes appear if the URL wasn’t correctly entered in.
Another possibility is that the link you used to visit the page in question points to the wrong URL. For example, it might be outdated, or leading to a page that no longer exists (and no redirects are in place).
Therefore, it’s worth double-checking the URL you used. If you typed it in yourself, verify that you spelled everything correctly. If you clicked on a link, confirm that it’s pointing to the page you’re trying to access (or try to visit that page directly through the website).
2. Clear Your Browser’s Cache
Your browser’s cache is designed to improve your online experience, by reducing page loading times. Unfortunately, sometimes it can also cause unwanted interruptions.
As we mentioned earlier, one of the common causes of the 401 error is outdated or incorrect cache data or cookies. Therefore, if you don’t notice any issues with the page’s URL, the next step is to clear your browser’s cache.
This will clean out any invalid information that’s locally stored in your browser, which could be interrupting the authentication process. Similarly, your browser’s cookies might contain authentication data that simply needs to be refreshed.
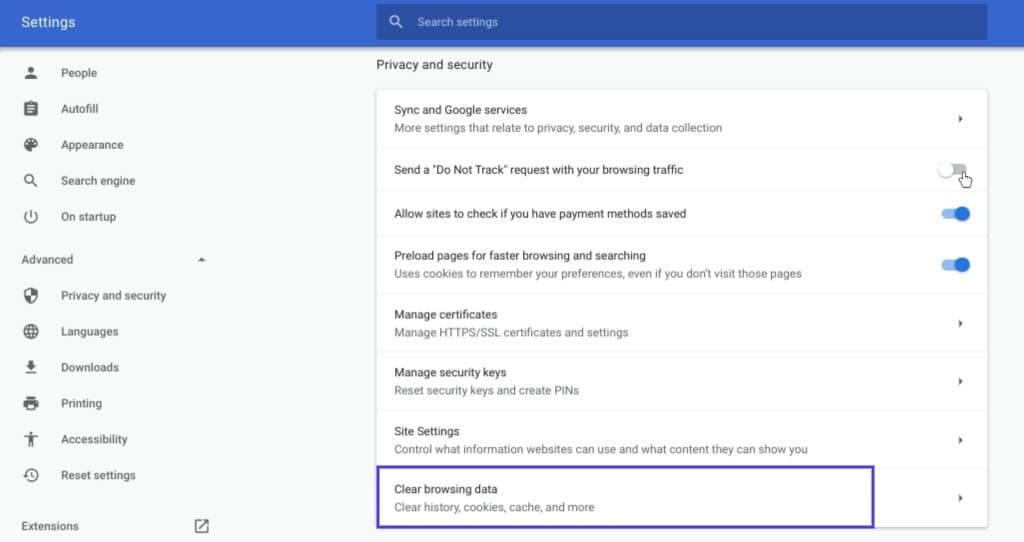
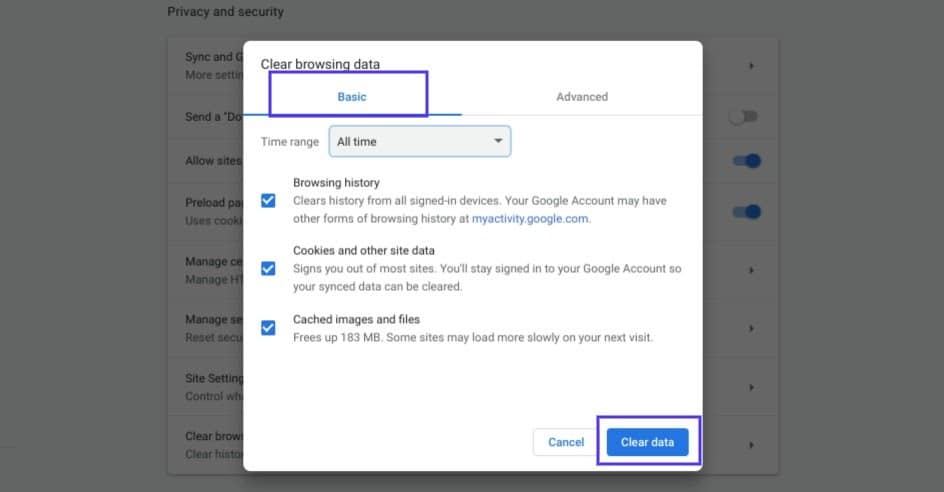
If you’re a Google Chrome user, you can do this by clicking on the menu icon in the top-right corner of the browser, and then going to Settings. Under the Privacy and security section, click on Clear browsing data:
A new window will open. Under the Basic tab, make sure all three boxes are selected, and then select Clear data:
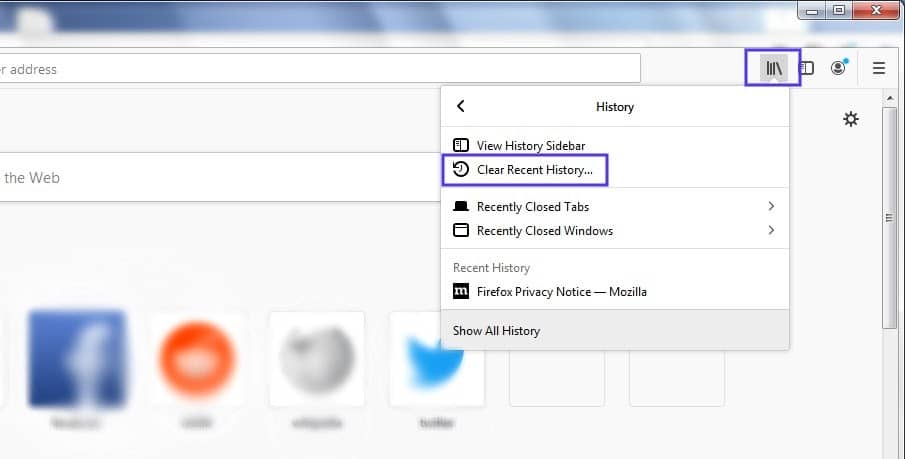
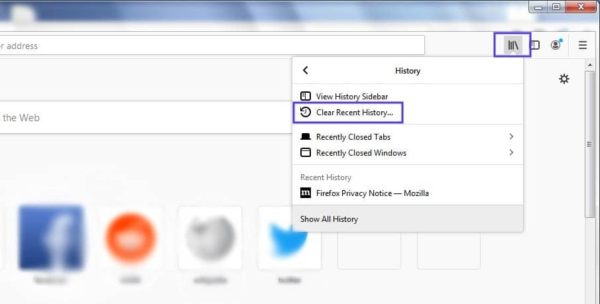
This process will look a little different in other browsers. For example, in Mozilla Firefox, you would click on the library icon in the top-right corner of the browser, followed by History > Clear Recent History:
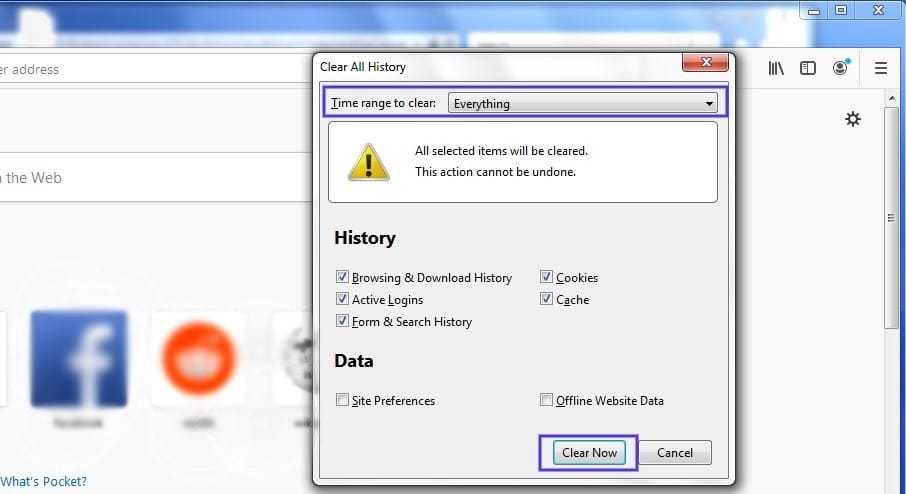
In the panel that opens next, select Everything in the drop-down menu at the top, make sure “Cache” is selected, and then click on the Clear Now button:
If you’re using a different browser, please refer to this guide for clearing the cache
3. Flush Your DNS
Another method you can try to resolve the 401 error is flushing your Domain Name Server (DNS). While this is a rarer issue, it can be a possible cause, so it’s worth giving it a try if the first two solutions don’t work.
To do this in Windows, click on the Start button and type cmd into the search bar. Hit Enter, and the Command Prompt will open. Copy and paste the command ipconfig/flushdns, and then hit Enter again:

On a Mac, you can do this by going to Finder > Applications > Utilities > Terminal:
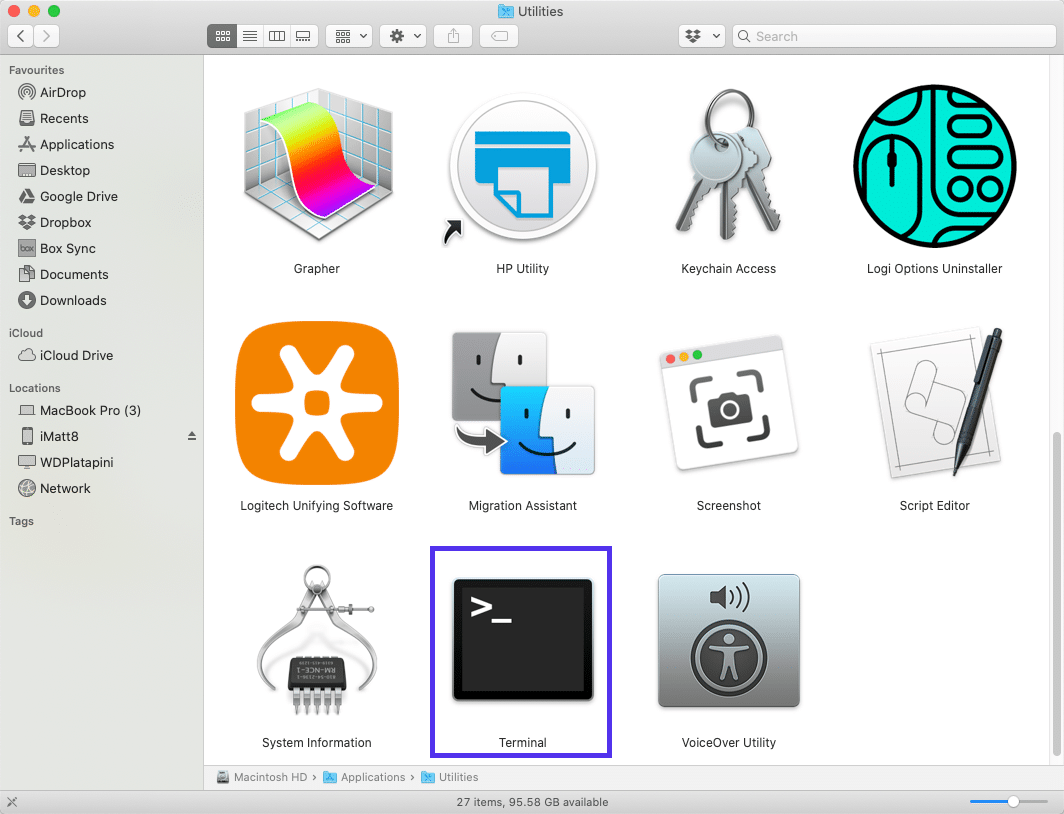
Input the command line sudo killall -HUP mDNSResponder and press Enter. Then, you can try refreshing the page you were trying to visit, to see if the 401 error has been resolved.
4. Deactivate Your WordPress Plugins
The problem causing your 401 error might not be due to your browser. If you’re having trouble accessing your WordPress site, it’s also possible that one or more plugins are to blame.
Some plugins, especially security-focused plugins, are configured to show a 401 error when they suspect suspicious login activity that might indicate an attack. Others might just be suffering from compatibility issues. Therefore, it’s a good idea to deactivate all of your WordPress plugins and see if that resolves the issue.
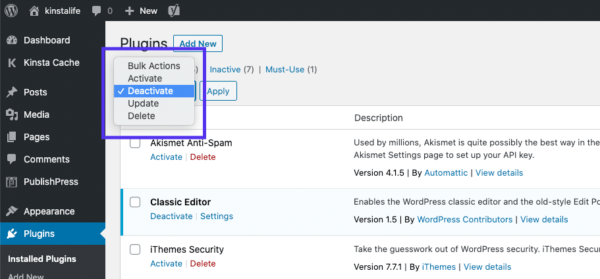
You can deactivate your plugins all at the same time in your dashboard, by going to Plugins > Installed Plugins. Check the box at the top to select all of them. Then under the Bulk Actions drop-down menu, select Deactivate and click on the Apply button:
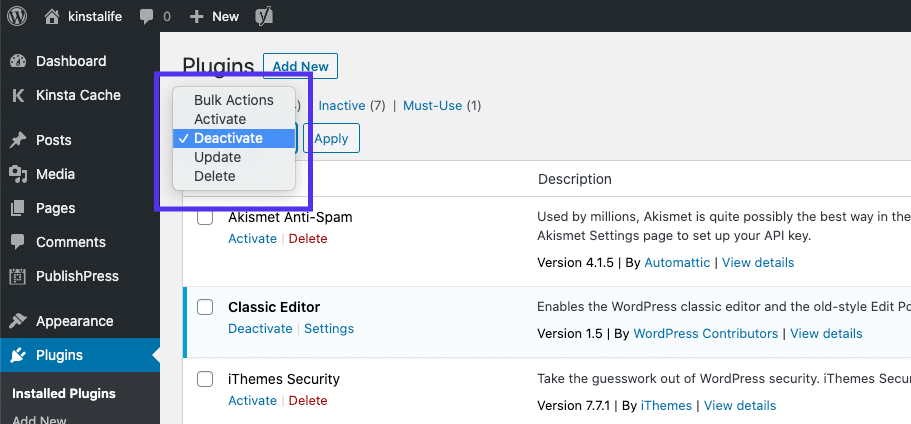
After that, try reloading the page that returned the 401 error to see if this has resolved the issue. If it has, you can manually activate each plugin one at a time, in order to determine which one is causing the problem.
Then you can remove that plugin, replace it with a new one, or contact its developer for assistance.
5. Check the WWW-Authenticate Header Response
At this point, if the issue hasn’t been fixed, it may be caused by a server-side problem. This means our last fix will be a bit more involved.
As we saw earlier, the 401 response is sent through the WWW-Authenticate header, which appears as “WWW-Authenticate: <type> realm=<realm>”. It includes ‘challenges’, or strings of data that indicate what type of authentication is required in order for access to be granted.
In a nutshell, you’ll want to check and see if the header response was sent, and more specifically, what authentication scheme was used. At the very least, this can help narrow down the cause of the problem, and bring you one step closer to a solution.
To do this, go to the web page that’s displaying the 401 error, and access the developer console in Chrome. You can right-click on the page and select Inspect, or use Ctrl+Shift+J.
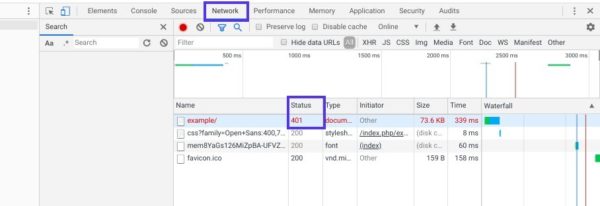
Next, click on the Network tab and reload the page. This will generate a list of resources. Select the Status header to sort the table and locate the 401 status code:
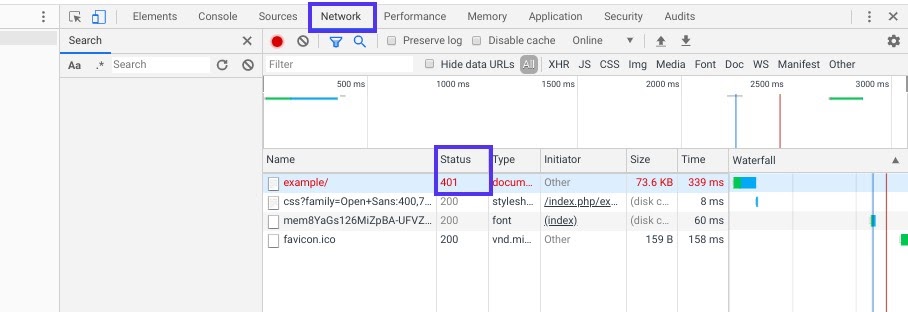
Select that entry, and then click on the Headers tab. Under Response Headers, locate the WWW-Authenticate header:
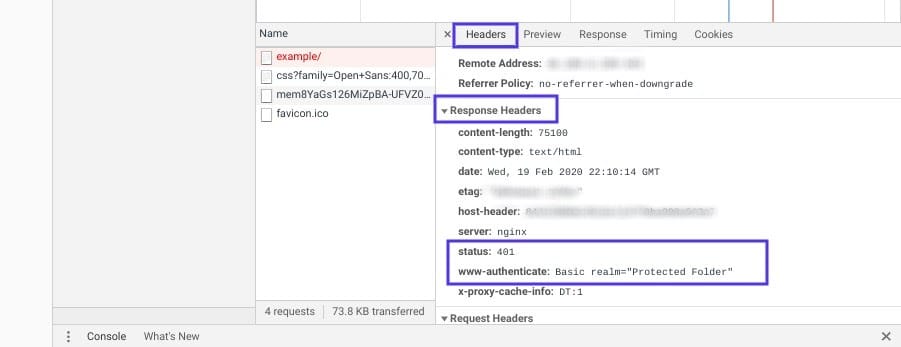
The information that is present in the response header, particularly the authentication schemes, can give you more information about what’s happening and point you towards a solution. It can help you understand what type of authentication the server is expecting.
For example, in the above example, we can see that the authentication scheme is “Basic”. This means the authentication request should only require an ID and password. For more detailed information and instructions on how to use this information, we recommend referring to the HTTP Authentication Scheme Registry.
HTTP 401 errors, begone! 🧙♂️ 5 ways to stop those pesky messages (no magic required) ✨Click to Tweet
Summary
When your browser and server have trouble communicating or authenticating requests, you’re sometimes forced to deal with errors such as the 401 error. While this problem is irritating, the message is usually temporary and fixable.
Here are five methods you can use to fix the 401 error:
- Look for errors in the URL.
- Clear your browser’s cache.
- Flush your DNS.
- Deactivate your WordPress plugins.
- Check the WWW-Authenticate header response.
Get all your applications, databases and WordPress sites online and under one roof. Our feature-packed, high-performance cloud platform includes:
- Easy setup and management in the MyKinsta dashboard
- 24/7 expert support
- The best Google Cloud Platform hardware and network, powered by Kubernetes for maximum scalability
- An enterprise-level Cloudflare integration for speed and security
- Global audience reach with up to 35 data centers and 275+ PoPs worldwide
Test it yourself with $20 off your first month of Application Hosting or Database Hosting. Explore our plans or talk to sales to find your best fit.
Trying to access a WordPress site and being met with an error page is at best inconvenient, whether that site is yours or someone else’s. As with many HTTP response codes, part of what makes a 401 error so frustrating is the lack of information it offers for diagnosing and resolving the issue.
The 401 error can happen with any browser, so it’s a pretty common issue people face. In most cases, this problem is relatively simple and straightforward to fix.
In this post, we’ll explain what 401 error messages are and why they happen. Then, we’ll walk you through five methods you can use to fix them.
Let’s get started!
What is the 401 Error Code?
The Internet Engineering Task Force (IETF) defines the error 401 Unauthorized as:
The 401 (Unauthorized) status code indicates that the request has not been applied because it lacks valid authentication credentials for the target resource. The server generating a 401 response MUST send a WWW-Authenticate header field containing at least one challenge applicable to the target resource.
An Introduction to the 401 Error Code
HTTP 400 status codes are encountered when there is a problem making a request. A 401 error, in particular, happens when your browser denies you access to the page you’re trying to visit.
As a result, instead of loading the web page, the browser will load an error message. 401 errors can happen within any browser so the message appearing may differ.
For example, in Chrome or Edge, you’ll likely see a paper icon along with a simple message telling you that the page in question isn’t working. It will include the phrase “HTTP Error 401” at the bottom, and instruct you to contact the site’s owner if the problem persists:
At other times and in other browsers, you might get a slightly less friendly warning that’s just a blank page with a “401 Authorization Required” message:
Other variations include:
- “HTTP 401 Error – Unauthorized”
- “401 Unauthorized”
- “Access Denied”
These errors occur on websites that require a login in order to access them. In most cases, it means that something is either wrong with the credentials or with the browser’s ability to read them as valid.
This is similar to HTTP 403 Forbidden Error, in that access isn’t permitted to the user. However, unlike with the 403 error, the 401 error message indicates that the authentication process failed.
The code is sent via the WWW-Authenticate header, which is responsible for identifying the authentication method used for granting access to a web page or resource.
The HTTP 401 error is all too common 🤦♀️ — and this guide will give you everything you need to fix it the next time you see that message showing up ✅Click to Tweet
What Causes a 401 Error?
If you encounter an error code in the 400s, you know you’re dealing with a client-side (or browser-side) issue. While the problem may be happening within your browser, however, it doesn’t necessarily always mean that’s the culprit, which we’ll explain in more detail later.
401 errors occur on restricted resources, such as password-protected pages of your WordPress site. So it’s safe to assume that the cause of the problem has something to do with the authentication credentials.
Outdated Browser Cache and Cookies
One of the most common reasons you might experience a 401 error is that your browser’s cache and cookies are out of date, preventing the authorization from successfully going through. If your browser isn’t using the valid authentication credentials (or any at all), the server will reject the request.
Plugin Incompatibility
At other times, this error is caused by a plugin incompatibility or error. For example, a firewall or security plugin can mistake your login attempt as malicious activity, and return a 401 error to protect the page.
Incorrect URL or Outdated Link
It’s also possible that the source of the problem can be attributed to a minor mistake. Common culprits in this category include an incorrectly-typed URL or an outdated link.
How to Fix the 401 Error (5 Methods)
Now that we’ve gone through a bit of background on the 401 error, it’s time to discuss how you can resolve it.
Let’s take a look at five methods you can use:
1. Look for Errors in the URL
We’ll start off with the easiest potential fix: making sure you used the correct URL. This may sound simple, but 401 errors can sometimes appear if the URL wasn’t correctly entered in.
Another possibility is that the link you used to visit the page in question points to the wrong URL. For example, it might be outdated, or leading to a page that no longer exists (and no redirects are in place).
Therefore, it’s worth double-checking the URL you used. If you typed it in yourself, verify that you spelled everything correctly. If you clicked on a link, confirm that it’s pointing to the page you’re trying to access (or try to visit that page directly through the website).
2. Clear Your Browser’s Cache
Your browser’s cache is designed to improve your online experience, by reducing page loading times. Unfortunately, sometimes it can also cause unwanted interruptions.
As we mentioned earlier, one of the common causes of the 401 error is outdated or incorrect cache data or cookies. Therefore, if you don’t notice any issues with the page’s URL, the next step is to clear your browser’s cache.
This will clean out any invalid information that’s locally stored in your browser, which could be interrupting the authentication process. Similarly, your browser’s cookies might contain authentication data that simply needs to be refreshed.
If you’re a Google Chrome user, you can do this by clicking on the menu icon in the top-right corner of the browser, and then going to Settings. Under the Privacy and security section, click on Clear browsing data:
A new window will open. Under the Basic tab, make sure all three boxes are selected, and then select Clear data:
This process will look a little different in other browsers. For example, in Mozilla Firefox, you would click on the library icon in the top-right corner of the browser, followed by History > Clear Recent History:
In the panel that opens next, select Everything in the drop-down menu at the top, make sure “Cache” is selected, and then click on the Clear Now button:
If you’re using a different browser, please refer to this guide for clearing the cache
3. Flush Your DNS
Another method you can try to resolve the 401 error is flushing your Domain Name Server (DNS). While this is a rarer issue, it can be a possible cause, so it’s worth giving it a try if the first two solutions don’t work.
To do this in Windows, click on the Start button and type cmd into the search bar. Hit Enter, and the Command Prompt will open. Copy and paste the command ipconfig/flushdns, and then hit Enter again:
On a Mac, you can do this by going to Finder > Applications > Utilities > Terminal:
Input the command line sudo killall -HUP mDNSResponder and press Enter. Then, you can try refreshing the page you were trying to visit, to see if the 401 error has been resolved.
4. Deactivate Your WordPress Plugins
The problem causing your 401 error might not be due to your browser. If you’re having trouble accessing your WordPress site, it’s also possible that one or more plugins are to blame.
Some plugins, especially security-focused plugins, are configured to show a 401 error when they suspect suspicious login activity that might indicate an attack. Others might just be suffering from compatibility issues. Therefore, it’s a good idea to deactivate all of your WordPress plugins and see if that resolves the issue.
You can deactivate your plugins all at the same time in your dashboard, by going to Plugins > Installed Plugins. Check the box at the top to select all of them. Then under the Bulk Actions drop-down menu, select Deactivate and click on the Apply button:
After that, try reloading the page that returned the 401 error to see if this has resolved the issue. If it has, you can manually activate each plugin one at a time, in order to determine which one is causing the problem.
Then you can remove that plugin, replace it with a new one, or contact its developer for assistance.
5. Check the WWW-Authenticate Header Response
At this point, if the issue hasn’t been fixed, it may be caused by a server-side problem. This means our last fix will be a bit more involved.
As we saw earlier, the 401 response is sent through the WWW-Authenticate header, which appears as “WWW-Authenticate: <type> realm=<realm>”. It includes ‘challenges’, or strings of data that indicate what type of authentication is required in order for access to be granted.
In a nutshell, you’ll want to check and see if the header response was sent, and more specifically, what authentication scheme was used. At the very least, this can help narrow down the cause of the problem, and bring you one step closer to a solution.
To do this, go to the web page that’s displaying the 401 error, and access the developer console in Chrome. You can right-click on the page and select Inspect, or use Ctrl+Shift+J.
Next, click on the Network tab and reload the page. This will generate a list of resources. Select the Status header to sort the table and locate the 401 status code:
Select that entry, and then click on the Headers tab. Under Response Headers, locate the WWW-Authenticate header:
The information that is present in the response header, particularly the authentication schemes, can give you more information about what’s happening and point you towards a solution. It can help you understand what type of authentication the server is expecting.
For example, in the above example, we can see that the authentication scheme is “Basic”. This means the authentication request should only require an ID and password. For more detailed information and instructions on how to use this information, we recommend referring to the HTTP Authentication Scheme Registry.
HTTP 401 errors, begone! 🧙♂️ 5 ways to stop those pesky messages (no magic required) ✨Click to Tweet
Summary
When your browser and server have trouble communicating or authenticating requests, you’re sometimes forced to deal with errors such as the 401 error. While this problem is irritating, the message is usually temporary and fixable.
Here are five methods you can use to fix the 401 error:
- Look for errors in the URL.
- Clear your browser’s cache.
- Flush your DNS.
- Deactivate your WordPress plugins.
- Check the WWW-Authenticate header response.
Get all your applications, databases and WordPress sites online and under one roof. Our feature-packed, high-performance cloud platform includes:
- Easy setup and management in the MyKinsta dashboard
- 24/7 expert support
- The best Google Cloud Platform hardware and network, powered by Kubernetes for maximum scalability
- An enterprise-level Cloudflare integration for speed and security
- Global audience reach with up to 35 data centers and 275+ PoPs worldwide
Test it yourself with $20 off your first month of Application Hosting or Database Hosting. Explore our plans or talk to sales to find your best fit.
Assume your Web API is protected and a client attempts to access it without the appropriate credentials. How do you deal with this scenario? Most likely, you know you have to return an HTTP status code. But what is the more appropriate one? Should it be 401 Unauthorized or 403 Forbidden? Or maybe something else?
As usual, it depends 🙂. It depends on the specific scenario and also on the security level you want to provide. Let’s go a little deeper.
If you prefer, you can watch a video on the same topic:
Web APIs and HTTP Status Codes
Before going into the specific topic, let’s take a quick look at the rationale of HTTP status codes in general. Most Web APIs are inspired by the REST paradigm. Although the vast majority of them don’t actually implement REST, they usually follow a few RESTful conventions when it comes to HTTP status codes.
The basic principle behind these conventions is that a status code returned in a response must make the client aware of what is going on and what the server expects the client to do next. You can fulfill this principle by giving answers to the following questions:
- Is there a problem or not?
- If there is a problem, on which side is it? On the client or on the server side?
- If there is a problem, what should the client do?
This is a general principle that applies to all the HTTP status codes. For example, if the client receives a 200 OK status code, it knows there was no problem with its request and expects the requested resource representation in the response’s body. If the client receives a 201 Created status code, it knows there was no problem with its request, but the resource representation is not in the response’s body. Similarly, when the client receives a 500 Internal Server Error status code, it knows that this is a problem on the server side, and the client can’t do anything to mitigate it.
In summary, your Web API’s response should provide the client with enough information to realize how it can move forward opportunely.
Let’s consider the case when a client attempts to call a protected API. If the client provides the appropriate credentials (e.g., a valid access token), its request is accepted and processed. What happens when the client has no appropriate credentials? What status code should your API return when a request is not legitimate? What information should it return, and how to guarantee the best security experience?
Fortunately, in the OAuth security context, you have some guidelines. Of course, you can use them even if you don’t use OAuth to secure your API.
«The basic principle behind REST status code conventions is that a status code must make the client aware of what is going on and what the server expects the client to do next»
Tweet This

When to Use 400 Bad Request?
Let’s start with a simple case: a client calls your protected API, omitting a required parameter. In this case, your API should respond with a 400 Bad Request status code. In fact, if that parameter is required, your API can’t even process the client request. The client’s request is malformed.
Your API should return the same status code even when the client provides an unsupported parameter or repeats the same parameter multiple times in its request. In both cases, the client’s request is not as expected and should be refused.
Following the general principle discussed above, the client should be empowered to understand what to do to fix the problem. So, you should add in your response’s body what was wrong with the client’s request. You can provide those details in the format you prefer, such as simple text, XML, JSON, etc. However, using a standard format like the one proposed by the Problem Details for HTTP APIs specifications would be more appropriate to enable uniform problem management across clients.
For example, if your client calls your API with an empty value for the required data parameter, the API could reply with the following response:
HTTP/1.1 400 Bad Request
Content-Type: application/problem+json
Content-Language: en

{
  "type": "https://myapi.com/validation-error",
  "title": "Validation error",
  "detail": "Your request parameters are not valid.",
  "invalid-params": [
    {
      "name": "data",
      "reason": "cannot be blank."
    }
  ]
}
When to Use 401 Unauthorized?
Now, let’s assume that the client calls your protected API with a well-formed request but no valid credentials. For example, in the OAuth context, this may fall in one of the following cases:
- An access token is missing.
- An access token is expired, revoked, malformed, or invalid for other reasons.
In both cases, the appropriate status code to reply with is 401 Unauthorized. In the spirit of mutual collaboration between the client and the API, the response must include a hint on how to obtain such authorization. That comes in the form of the WWW-Authenticate header with the specific authentication scheme to use. For example, in the case of OAuth2, the response should look like the following:
HTTP/1.1 401 Unauthorized
WWW-Authenticate: Bearer realm="example"
You have to use the Bearer scheme and provide the realm parameter to indicate the set of resources the API is protecting.
If the client request does not include any access token, demonstrating that it wasn’t aware that the API is protected, the API’s response should not include any other information.
On the other hand, if the client’s request includes an expired access token, the API response could include the reason for the denied access, as shown in the following example:
HTTP/1.1 401 Unauthorized
WWW-Authenticate: Bearer realm="example",
                  error="invalid_token",
                  error_description="The access token expired"
When to Use 403 Forbidden?
Let’s explore a different case now. Assume, for example, that your client sends a request to modify a document and provides a valid access token to the API. However, that token doesn’t include or imply any permission or scope that allows the client to perform the desired action.
In this case, your API should respond with a 403 Forbidden status code. With this status code, your API tells the client that the credentials it provided (e.g., the access token) are valid, but it needs appropriate privileges to perform the requested action.
To help the client understand what to do next, your API may include what privileges are needed in its response. For example, according to the OAuth2 guidelines, your API may include information about the missing scope to access the protected resource.
Try out the most powerful authentication platform for free.Get started →
Security Considerations
When you plan how to respond to your client’s requests, always keep security in mind.
How to deal with response details
A primary security concern is to avoid providing useful information to potential attackers. In other words, returning detailed information in the API responses to attempts to access protected resources may be a security risk.
For example, suppose your API returns a 401 Unauthorized status code with an error description like The access token is expired. In this case, it gives information about the token itself to a potential attacker. The same happens when your API responds with a 403 Forbidden status code and reports the missing scope or privilege.
In other words, sharing this information can improve the collaboration between the client and the server, according to the basic principle of the REST paradigm. However, the same information may be used by malicious attackers to elaborate their attack strategy.
Since this additional information is optional for both the HTTP specifications and the OAuth2 bearer token guidelines, maybe you should think carefully about sharing it. The basic principle on sharing that additional information should be based on the answer to this question: how would the client behave any differently if provided with more information?
For example, in the case of a response with a 401 Unauthorized status code, does the client’s behavior change when it knows that its token is expired or revoked? In any case, it must request a new token. So, adding that information doesn’t change the client’s behavior.
Different is the case with 403 Forbidden. By informing your client that it needs a specific permission, your API makes it learn what to do next, i.e., requesting that additional permission. If your API doesn’t provide this additional information, it will behave differently because it doesn’t know what to do to access that resource.
Don’t let the client know…
Now, assume your client attempts to access a resource that it MUST NOT access at all, for example, because it belongs to another user. What status code should your API return? Should it return a 403 or a 401 status code?
You may be tempted to return a 403 status code anyway. But, actually, you can’t suggest any missing permission because that client has no way to access that resource. So, the 403 status code gives no actual helpful information. You may think that returning a 401 status code makes sense in this case. After all, the resource belongs to another user, so the request should come from a different user.
However, since that resource shouldn’t be reached by the current client, the best option is to hide it. Letting the client (and especially the user behind it) know that resource exists could possibly lead to Insecure Direct Object References (IDOR), an access control vulnerability based on the knowledge of resources you shouldn’t access. Therefore, in these cases, your API should respond with a 404 Not Found status code. This is an option provided by the HTTP specification:
An origin server that wishes to «hide» the current existence of a forbidden target resource MAY instead respond with a status code of 404 (Not Found).
For example, this is the strategy adopted by GitHub when you don’t have any permission to access a repository. This approach avoids that an attacker attempts to access the resource again with a slightly different strategy.
How to deal with bad requests
When a client sends a malformed request, you know you should reply with a 400 Bad Request status code. You may be tempted to analyze the request’s correctness before evaluating the client credentials. You shouldn’t do this for a few reasons:
- By evaluating the client credentials before the request’s validity, you avoid your API processing requests that aren’t allowed to be there.
- A potential attacker could figure out how a request should look without being authenticated, even before obtaining or stealing a legitimate access token.
Also, consider that in infrastructures with an API gateway, the client credentials will be evaluated beforehand by the gateway itself, which doesn’t know at all what parameters the API is expecting.
The security measures discussed here must be applied in the production environment. Of course, in the development environment, your API can provide all the information you need to be able to diagnose the causes of an authorization failure.
Recap
Throughout this article, you learned that:
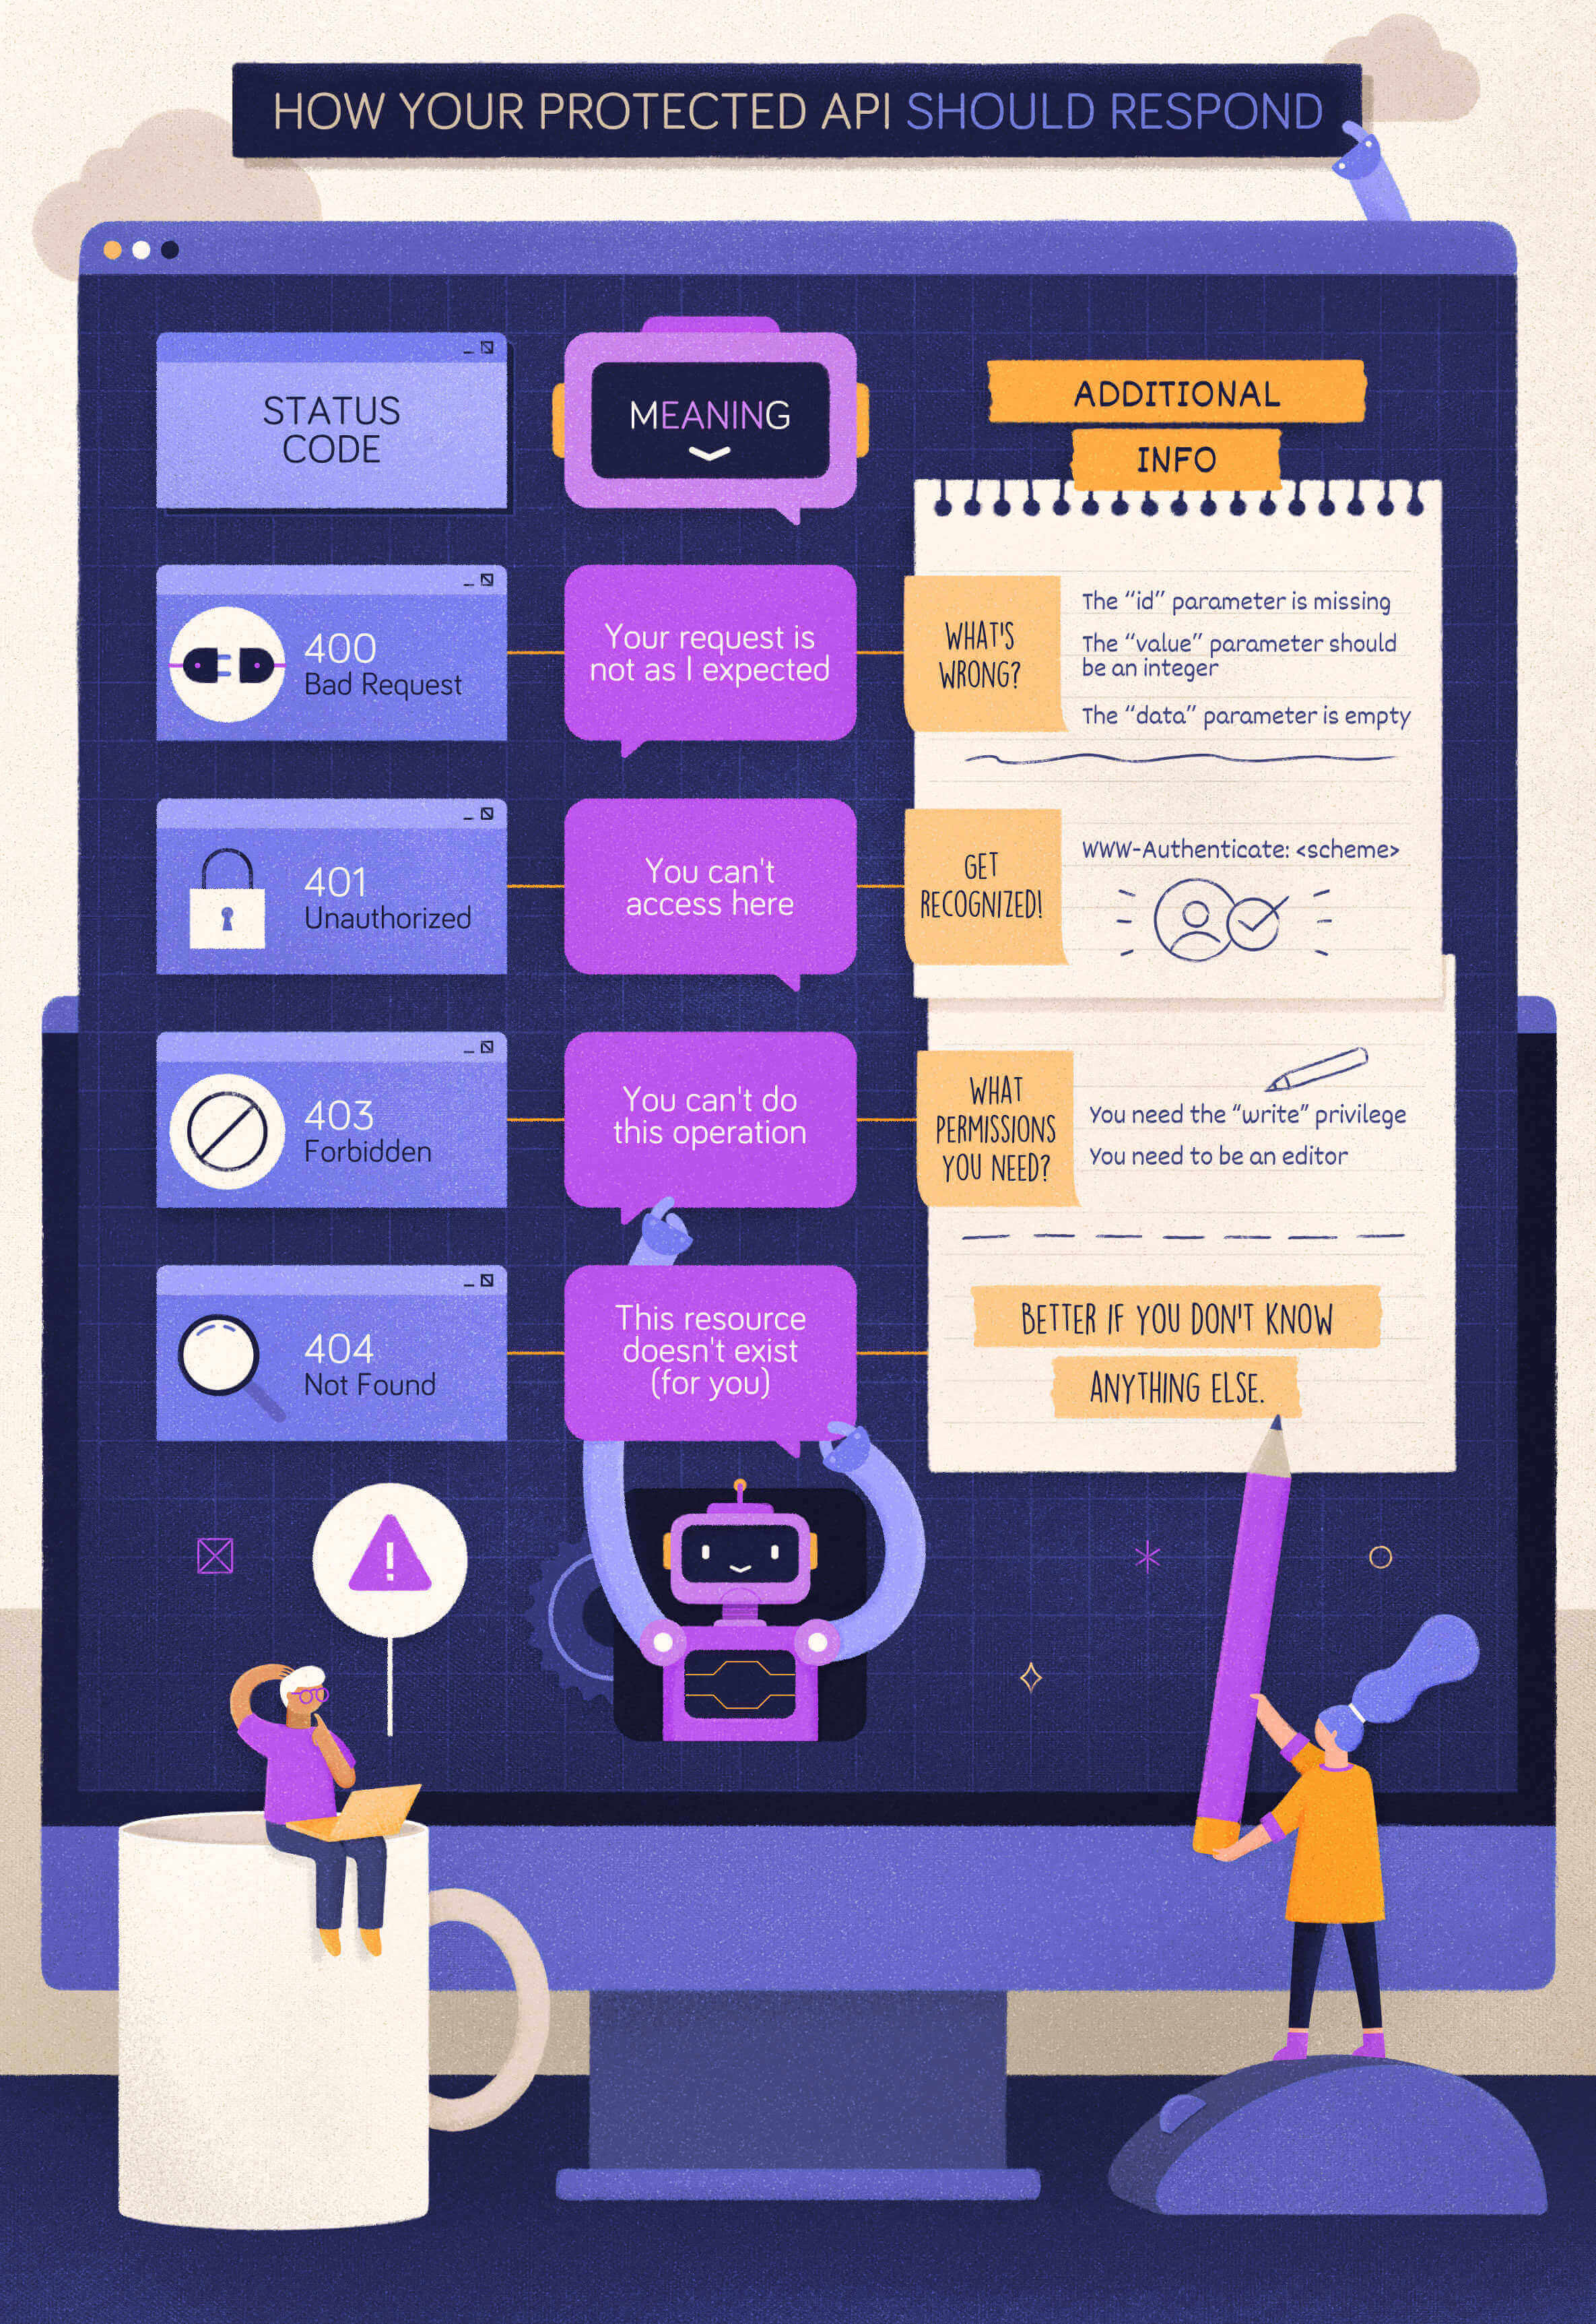
400 Bad Requestis the status code to return when the form of the client request is not as the API expects.401 Unauthorizedis the status code to return when the client provides no credentials or invalid credentials.403 Forbiddenis the status code to return when a client has valid credentials but not enough privileges to perform an action on a resource.
You also learned that some security concerns might arise when your API exposes details that malicious attackers may exploit. In these cases, you may adopt a more restricted strategy by including just the needed details in the response body or even using the 404 Not Found status code instead of 403 Forbidden or 401 Unauthorized.
The following cheat sheet summarizes what you learned:
Improve Article
Save Article
Improve Article
Save Article
The 401 Unauthorized Error is an HTTP status code error that represented the request sent by the client to the server that lacks valid authentication credentials. It may be represented as 401 Unauthorized, Authorization required, HTTP error 401- Unauthorized. It represents that the request could not be authenticated. It consists of a www-Authenticate header which contains the hint on how to authorize correctly.
401 Unauthorized Error Occur: This error may occur due to the reasons described below:
- It may occur client does not provide the proper authentication credentials to the server within the request time.
- It may occur when the server rejects the request of the client for some reason even though the client provides proper authentication credentials.
- When the client is banned for some reason by the server.
Methods to rectify the error: The 401 Unauthorized error can be fixed by using any of the following ways:
- Check The URL: Due to manual errors in typing the URL, the 401 unauthorized error may occur. Hence, checking the URL and rectifying the mistakes in it will fix the 401 error status.
- Flush the DNS: Errors in DNS also creates 401 error status sometimes. Therefore, clearing the DNS will also rectify this error. In Windows, the DNS can be flushed by typing ipconfig/flushdns in the command prompt and clicking on ENTER.
- Clear Browser Cookie: In some situations, the cookies may not work smoothly leading to improper server authentication. Thus, by clearing the cookies, the error can be rectified.
- Logging out and Logging in again: This error may also occur during the maintenance time of the websites. Therefore, visiting the website and logging in again by providing the credentials may also rectify this error.
- Website mistake: A few times all the above things are good or accurate but still you will get the 401 Unauthorized Error, which is a mistake of the website. That time you need to contact the webmaster of that website and inform that the server is down. You can email them at webmaster@webmaster.com replace the webmaster.com with the website, or you can see the contact us option on any website through that you can inform them.
Some other ways of 401 Authentication error: This error can occur in the below forms also:
- 401.1: This error represents that the login has failed due to some reasons.
- 401.2: This error represents that the login has failed due to server configuration.
- 401.3: This error represents that the login has failed due to ACL(Access-control list) on the resource.
- 401.3: This error represents that the authorization has been failed by the filter.
- 401.501: This error represents that too many requests have been generated by the client i.e. maximum request limit has been reached by the client.
- 401.502: This error occurs when any specific client(sam IP) requests multiple times on a single server that the dynamic IP Restriction Concurrent request rate limit reached. Then this error will occur
- 401.503: This error represents that the IP address of the client is in the deny list of IP restrictions on the server-side.
- 401.504: This error represents that the Hostname of the client is in the deny list of IP restrictions on the server-side.
Ошибка сервера 401 Unauthorized возвращается в ответ на запрос пользователя в том случае, если он
пытается получить доступ с авторизацией, которая не может быть подтверждена сервером.
О чем свидетельствует «ошибка 401»
Она говорит о том, что пользователь передал неверный запрос, в котором некорректны данные в заголовке
www.authenticate. Сервер не может распознать такой запрос. Чаще всего это происходит потому, что
пользователь ввел неправильный пароль и логин, или, например, сменил пароль, но пытается ввести старый.
Также иногда это может свидетельствовать о некорректной работе сервера, на котором происходит
авторизация.
Что делать пользователю, когда в браузере появляется код ошибки 401
Самый очевидный путь для преодоления ошибки Unauthorized — это заполнить предложенные поля для логина и
пароля заново. Если вы не можете вспомнить пароль, воспользуйтесь опцией его восстановления. Если же вы
уверены, что все введенные данные корректны, но сервер все равно возвращает в ответ на запрос ошибку
401, обратитесь к администратору ресурса. Возможна ситуация, при которой ваша учетная запись по тем или
иным причинам была заблокирована или деактивирована, но выдача соответствующего сообщения на сайте не
настроена. В этом случае по умолчанию сервер также возвратит вам ошибку 401.
Также может быть, что ваши права по авторизации на определенном ресурсе ограничил ваш провайдер услуг
интернет. Для проверки этого предположения попробуйте воспользоваться любым сервисом VPN. Если ошибка в
таком случае не возникает, обратитесь к провайдеру за разъяснением.
Владельцы сайтов, чьи пользователи массово получают ошибку 401 Unauthorized, должны обращаться в службу
технической поддержки хостинг-провайдера. В таком случае желательно отправить скриншот с ошибкой.
Причины возникновения ошибки «ERROR 401 UNAUTHORIZED»
Наиболее распространенными причинами возникновения ошибки 401 являются все-таки неправильные запросы от
браузера пользователя. Такие запросы не содержат информации, необходимой для авторизации пользователя,
либо такая информация некорректна. Чаще всего это ошибка в вводе пароля и/или логина, объясняющаяся
действием человеческого фактора. Реже проблема может возникать на стороне обрабатывающего запрос
сервера.
Вас также может заинтересовать
2 января, 2015 12:50 пп
15 294 views
| Комментариев нет
Cloud Server
При обращении к веб-серверу или приложению каждый поступивший HTTP-запрос получает в качестве ответа код состояния HTTP (англ. HTTP status code). Коды состояния HTTP – это трехзначные коды, сгруппированные в пять различных классов. Класс кода состояния можно определить по первой цифре:
- 1хх – информационные коды;
- 2хх – успех;
- 3хх – перенаправление;
- 4хх – ошибка клиента;
- 5хх – ошибка сервера.
Это руководство фокусируется на выявлении и устранении наиболее часто встречающихся кодов ошибок HTTP (то есть кодов состояния 4xx и 5xx) с точки зрения системного администратора. В некоторых ситуациях веб-сервер отвечает на запрос определенным кодом ошибки; рассмотрим общие возможные причины и решения.
Краткий обзор ошибок клиента и сервера
Ошибки клиента (коды состояния HTTP 400-499) возникают из-за HTTP-запросов, отправленных клиентом (веб-браузером или другим клиентом HTTP). Хотя данные типы ошибок связаны непосредственно с клиентом, системному администратору полезно знать, с какими кодами ошибок может столкнуться пользователь, чтобы определить, можно ли решить эту проблему в конфигурациях сервера.
Ошибки сервера (коды состояния HTTP 500-599) возникают тогда, когда веб-сервер не в состоянии обработать запрос из-за какой-либо ошибки или сбоя.
Общие советы по устранению ошибок HTTP
- При использовании веб-браузера для тестирования веб-сервера не забудьте обновить браузер после внесения изменений в настройки сервера.
- Проверяйте логи сервера, чтобы получить подробные сведения о том, как сервер обрабатывает запросы. Например, веб-серверы Apache и Nginx создают два файла по имени access.log и error.log, в которых можно найти соответствующую информацию.
- Запомните: определения кодов состояния HTTP являются частью стандарта, который реализуется обслуживающим запросы приложением. Это означает, что фактический код состояния, который возвращается в результате, зависит от того, как программное обеспечение сервера обрабатывает конкретную ошибку.
Ознакомившись с основными понятиями кодов состояния HTTP, приступим к обзору наиболее часто встречающихся ошибок.
Ошибка 400 Bad Request
Код статуса 400, или ошибка Bad Request («неверный запрос») означает, что синтаксис запроса HTTP, отправленного на сервер, неверен.
Как правило, причины возникновения ошибки 400 Bad Request таковы:
- Куки пользователя, связанные с сайтом, повреждены. Чтобы решить эту проблему,, попробуйте очистить кэш браузера и файлы cookie.
- Искаженный запрос из-за неисправного браузера.
- Искаженный запрос из-за ошибки пользователя при формировании HTTP-запроса вручную (например, неправильное использование curl).
Ошибка 401 Unauthorized
Код статуса 401, или ошибка Unauthorized («неавторизован») значит, что пользователь, пытающийся получить доступ к ресурсу, не прошел авторизацию (или не смог пройти ее, указав неверные учетные данные). Чтобы иметь возможность просматривать защищенный ресурс, пользователь должен предоставить корректные учетные данные.
Например, ошибка 401 Unauthorized может возникнуть, если пользователь пытается получить доступ к ресурсу, который защищен HTTP-авторизацией (как в этом руководстве по Nginx). В подобной ситуации ошибка 401 будет появляться снова и снова до тех пор, пока пользователь не предоставит корректный логин и пароль (который внесен в файл .htpasswd).
Ошибка 403 Forbidden
Код состояния 403, или ошибка Forbidden («запрещено») значит, что запрос пользователя был отправлен верно, но сервер отказывается обслуживать его в связи с отсутствием разрешения на доступ к запрашиваемому ресурсу. В этом разделе описаны наиболее распространенные причины возникновения ошибки 403.
Права на файл
Как правило, ошибка 403 случается, если пользователь, который запускает процесс веб-сервера, не имеет прав на чтение запрашиваемого файла.
Чтобы привести пример устранения ошибки 403, предположим, что:
- пользователь пытается получить доступ к индексному файлу (http://example.com/index.html);
- рабочий процесс веб-сервера принадлежит пользователю www-data;
- индексный файл на сервере находится в /usr/share/nginx/html/index.html.
Итак, если пользователь получает ошибку 403 Forbidden, убедитесь, что пользователь www-data имеет права на чтение файла. Как правило, в подобной ситуации нужно просто изменить права на файл. Это можно сделать несколькими способами, но в данном случае подойдет вот эта команда:
sudo chmod o=r /usr/share/nginx/html/index.html
Файл .htaccess
Еще одна потенциальная причина возникновения ошибки 403 (часто это делается намеренно) – использование файла .htaccess. При помощи файла .htaccess можно запретить конкретным IP-адресам (или диапазонам адресов) доступ к определенным ресурсам.
Если пользователи неожиданно получают ошибку 403 Forbidden, убедитесь, что она не была вызвана настройками файла .htaccess.
Несуществующий индексный файл
Если пользователь пытается получить доступ к каталогу, который не имеет стандартного индексного файла, а листинг каталога (directory listing) отключен, веб-сервер будет возвращать ошибку 403 Forbidden. Такое случится, если, например, пользователь попытается получить доступ к каталогу http://example.com/emptydir/, а в каталоге emptydir на сервере нет индексного файла. Листинг каталога можно включить в конфигурациях сервера.
Ошибка 404 Not Found
Код статуса 404, или ошибка Not Found («не найдено») значит, что пользователь может взаимодействовать с сервером, но требуемый файл или ресурс отсутствует.
Ошибки 404 могут возникнуть в самых различных ситуациях. Ниже приведен список советов, которые помогут устранить проблему в случае, если пользователь неожиданно получил 404 Not Found:
- Проверьте ссылку, которая направляет пользователя на сервер, на наличие ошибок или опечаток.
- Возможно, пользователь ввел неверный URL.
- Может быть, нужного файла не существует в указанном месте на сервере; убедитесь, что запрашиваемый ресурс не был перемещен или удален с сервера.
- Проверьте, правильно ли указано местонахождение корневого каталога (document root) в конфигурации сервера.
- Возможно, пользователь, которому принадлежит рабочий процесс веб-сервера, не имеет соответствующих прав, чтобы открыть каталог, в котором находится запрашиваемый файл. Для доступа к каталогу нужны права на чтение и выполнение.
- Если пользователь переходит к ресурсу по символической ссылке, убедитесь, что веб-сервер настроен для поддержки символических ссылок.
Ошибка 500 Internal Server Error
Код состояния 500, или ошибка Internal Server Error («внутренняя ошибка сервера») означает, что сервер не может обработать запрос по неизвестной причине. Иногда этот код появляется в ситуациях, когда более подходящими являются другие сообщения об ошибках 5xx.
Как правило, причиной данной ошибки является неправильная настройка сервера (например, искаженный файл .htaccess) или нехватка некоторых пакетов (к примеру, запуск файла PHP без предварительно установленного PHP).
Ошибка 502 Bad Gateway
Код состояния 502, или ошибка Bad Gateway («ошибочный шлюз») значит, что запрашиваемый сервер является шлюзом или прокси-сервером, и он не получает валидных ответов от серверов бэкэнда, которые на самом деле выполнили запрос.
Если речь идет об обратном прокси-сервере (например, о балансировщике нагрузки), убедитесь, что:
- с серверами бэкэнда (на которые пересылаются HTTP-запросы) все в порядке;
- обратный прокси настроен правильно, в его настройках указаны корректные бэкэнды;
- сетевое соединение между серверами бэкэнда и обратным прокси-сервером в порядке. Если серверы могут взаимодействовать на других портах, убедитесь, что эти порты не заблокированы брандмауэром;
- нужные сокеты существуют в корректном местонахождении и имеют соответствующие разрешения (если веб-приложение настроено слушать сокеты).
Ошибка 503 Service Unavailable
Код состояния 503, или ошибка Service Unavailable («сервис недоступен») означает, что сервер перегружен или находится на обслуживании; такой сервис должен стать доступным в течение некоторого времени.
Если сервер не находится на обслуживании, эта ошибка может указывать на то, что серверу не хватает ресурсов процессора или памяти для обработки всех входящих запросов, или что нужно настроить веб-сервер для обслуживания большего количества пользователей или процессов.
Ошибка 504 Gateway Timeout
Код состояния 504, или ошибка Gateway Timeout («шлюз не отвечает») значит, что данный сервер является шлюзом или прокси-сервером, и он не получает ответа от бэкэнда в пределах допустимого периода времени.
Как правило, это происходит по следующим причинам:
- Плохое сетевое соединение между серверами;
- Внутренний сервер, который выполняет запрос, работает слишком медленно;
- В настройках сервера задано слишком короткое время ожидания шлюза или прокси-сервера.
Заключение
Теперь вы знакомы с основными кодами ошибок HTTP и знаете некоторые пути решения этих проблем.
Если же вы столкнулись с ошибкой, которая не была охвачена данной статьей, или знаете другие удобные способы устранения ошибок HTTP, пожалуйста, опишите их в комментариях ниже.
Tags: Cloud Server, HTTP, HTTP status code, VPS
Страница с ошибкой при обращении к WordPress-сайту всегда вызывает неудобства, вне зависимости от того, ваш это сайт или чужой. Как и в случае со многими другими кодами ответов HTTP, ошибка 401 не содержит детальных данных для диагностики и решения проблемы.
Ошибка 401 может появиться в любом браузере. В большинстве случаев ее легко решить.
В этой статье мы расскажем, что означает 401 ошибка, почему она происходит, и какие методы ее устранения существуют.
Итак, приступим!
Содержание
- Код ошибки 401 – что это?
- Что вызывает ошибку 401
- Как исправить ошибку 401 (5 методов)
Код ошибки 401 – что это?
Коды состояния HTTP 400 возникают в случае проблем с выполнением запросов. В частности, ошибка 401 появляется, когда браузер отказывает вам в доступе к странице, которую вы хотите посетить.
В результате вместо загрузки страниц браузер выведет сообщение об ошибке. Ошибки 401 могут возникать в любом браузере, потому отображаемое сообщение может варьироваться.
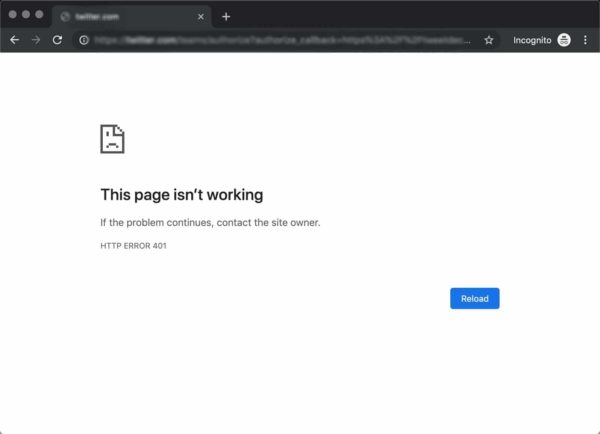
К примеру, в Chrome и Edge вы, скорее всего, увидите иконку бумаги с простым сообщением о том, что запрашиваемая страница не отвечает. Вы увидите фразу «HTTP Error 401». Вам будет предложено связаться с владельцем сайта, если ошибка не пропадет:
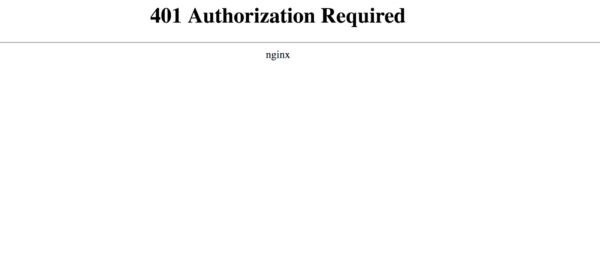
В иных случаях и в других браузерах вы можете получить менее дружелюбное предупреждение. К примеру, может выводиться пустая страница с сообщением «401 Authorization Required»:
Другие вариации текста:
- HTTP 401 Error – Unauthorized
- 401 Unauthorized
- Access Denied
Эти ошибки часто появляются на сайтах, где требуется вводить данные для входа. В большинстве случаев это означает, что что-то не так с учетными данными. Возможно, браузер перестал считать их действительными.
Эта ошибка похожа на HTTP 403 Forbidden Error, когда доступ к сайту для пользователя запрещен. Однако, в отличие от ошибки 403, сообщение об ошибке 401 указывает, что процесс аутентификации завершился неудачно.
Код ошибки передается через заголовок WWW-Authenticate, который отвечает за определение метода аутентификации, используемого для предоставления доступа к веб-странице или ресурсу.
Что вызывает ошибку 401
Если вы столкнулись с кодом ошибки в кодах 400, вы должны знать, что проблема произошла на стороне клиента (либо на стороне браузера). Случается, что виновником проблемы является браузер, но так бывает не всегда. Об этом мы еще расскажем позже.
Ошибки 401 возникают на ресурсах с ограниченным доступом – к примеру, на страницах, защищенных паролем. Потому можно предположить, что причина проблемы связана с данными аутентификации.
Устаревшие Cookie и кэш браузера
Одной из наиболее распространенных причин возникновения ошибки 401 является то, что кэш и файлы cookie вашего браузера устарели, что не позволяет выполнить авторизацию. Если ваш браузер использует недействительные данные для авторизации (либо вообще их не использует их), сервер отклонит запрос.
Несовместимые плагины
Также бывают ситуации, когда ошибка вызвана несовместимостью плагинов или какими-либо сбоями в них. К примеру, плагин безопасности может ошибочно принять вашу попытку входа за вредоносную активность, а потому будет возвращена ошибка 401 для защиты страницы.
Неверный URL или устаревшая ссылка
Бывает, что источником проблемы является незначительная оплошность. К примеру, был неверно введен URL, ссылка была устаревшей и т.д.
Как исправить ошибку 401 (5 методов)
Теперь, когда мы разобрались с причинами ошибки 401, пришло время обсудить, как ее устранить.
Давайте рассмотрим 5 методов, которые вы можете использовать.
- Проверьте ваш URL.
Начнем с самого простого потенциального решения: убедитесь, что вы использовали верный URL. Это может выглядеть банально, но 401 ошибки нередко появляются, если URL-адрес был введен неправильно.
Еще один вариант: ссылка, которую вы использовали для перехода на запрашиваемую страницу, указывает на неправильный URL. К примеру, ссылка устарела, ведет на страницу, которой больше нет (и редиректов не задано).
Стоит тщательно перепроверить URL-адрес, который вы использовали. Если вы набирали адрес самостоятельно, убедитесь, что все написано безошибочно. Если вы переходили по ссылке, убедитесь в том, что она ведет на страницу, к которой вы хотите получить доступ (либо попробуйте перейти на эту страницу непосредственно через сайт).
- Почистите кэш браузера.
Кэш браузера предназначен для улучшения процесса взаимодействия с сайтами в сети за счет сокращения времени загрузки страниц. К сожалению, иногда это может вести к нежелательным последствиям.
Как мы уже говорили выше, одной из распространенных причин появления ошибки 401 являются устаревшие или неправильные данные кэша или cookies. Потому, если URL введен верно, следующий шаг – чистка кэша браузера.
В итоге вы удалите любую недействительную информацию, которая хранится локально в вашем браузере и может приводить к прерываниям процесса аутентификации. Аналогично, файлы cookie вашего браузера могут содержать аутентификационные данные, которые нужно обновить.
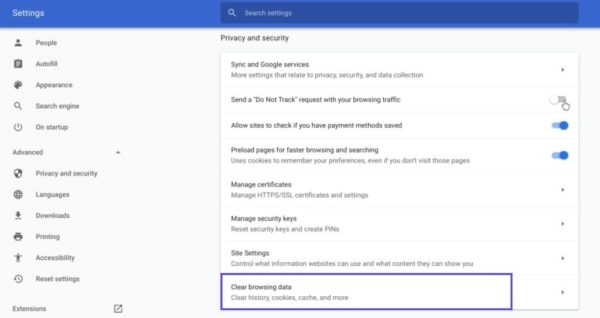
Если вы пользуетесь Chrome, вам нужно щелкнуть по иконке с меню в правом верхнем углу браузера и выбрать пункт Settings. В разделе «Privacy and security» нажмите «Clear browsing data:»
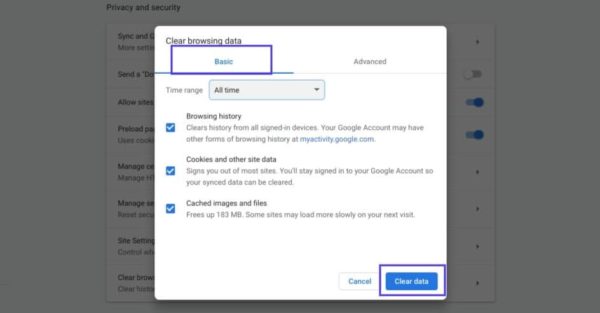
Далее вводим URL требуемого сайта и очищаем для него данные.
В других браузерах процесс очистки кэша и cookie может отличаться. К примеру, в Firefox нужно щелкать по иконке с библиотекой и выбирать History > Clear Recent History:
Информацию по остальным браузерам вы можете найти в поисковиках.
- Очистка DNS.
Еще один метод, который вы можете попробовать для устранения ошибки 401 – это очистка DNS. Эта причина встречается относительно редко, но стоит попробовать и такой подход, особенно если первые два ничего не дали.
Чтобы очистить DNS, перейдите в Windows к меню «Пуск» и там уже введите в строку поиска cmd. Нажмите Enter. Откроется командная строка. Далее вставьте команду ipconfig/flushdns, после чего снова нажмите Enter.

Если вы пользуетесь Mac, вы можете открыть командную строку следующим образом: Finder > Applications > Utilities > Terminal.
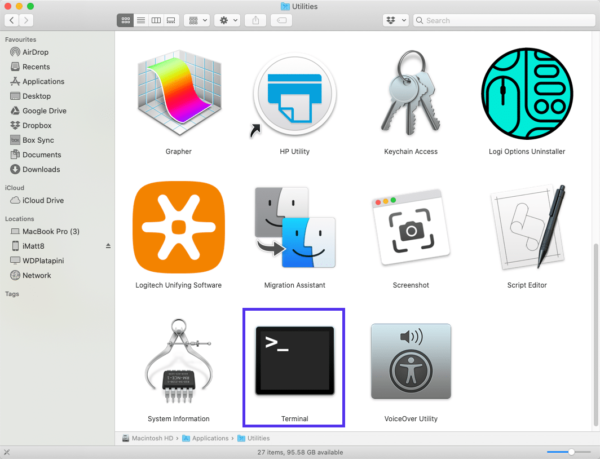
Введите команду sudo killall -HUP mDNSResponder и нажмите Enter. Затем вы можете обновить страницу, чтобы посмотреть, пропала ли ошибка 401 или нет.
- Деактивируйте ваши плагины
Проблема может возникать и по вине плагинов.
Некоторые плагины, особенно связанные с безопасностью, могут выдавать ошибку 401 при подозрении на вредоносную активность. Также у них могут быть проблемы с совместимостью. Потому лучше всего деактивировать все плагины и посмотреть, будет ли страница работать.
Вы можете деактивировать все плагины разом, перейдя в раздел Plugins > Installed Plugins в консоли WordPress. Выберите все плагины и в меню Bulk Actions задайте Deactivate, после чего щелкните по кнопке Apply:
После этого попробуйте перезагрузить страницу с ошибкой. Если ошибка пропала, вы можете вручную по одному активировать плагины заново, чтобы выявить виновника всех бед.
Далее вы уже можете либо удалить плагин, либо написать его разработчикам, чтобы они предоставили рабочее решение.
- Проверьте заголовок WWW-Authenticate
Если проблема все еще остается, то в таком случае она может быть связана с ошибками на сервере. А значит, исправить ее будет чуть сложнее.
Как мы уже писали ранее, ответ 401 передается через заголовок WWW-Authenticate, который отображается как “WWW-Authenticate: <type> realm=<realm>”. Он включает в себя строки данных, указывающие на то, какой тип аутентификации требуется для предоставления доступа.
Вам нужно посмотреть, был ли отправлен ответ в WWW-Authenticate, а точнее какая схема аутентификации была использована. По крайней мере, это позволит вам приблизиться на один шаг к решению.
Перейдите на страницу с ошибкой 401 и откройте консоль разработчика в Chrome. Вы можете щелкнуть правой кнопкой мыши на странице и выбрать Inspect (Ctrl+Shift+J).
Далее перейдите на вкладку Network и перезагрузите страницу. Это позволит сгенерировать список ресурсов. Выберите заголовок Status, чтобы отсортировать таблицу, и найдите код 401:
Выберите данную запись, после чего перейдите на вкладку Headers. В Response Headers найдите заголовок WWW-Authenticate:
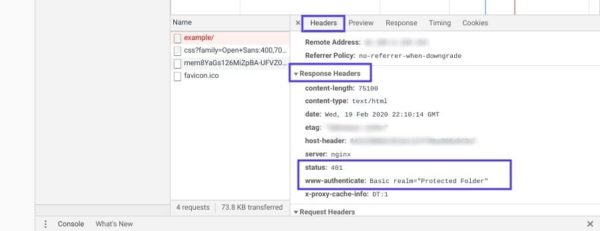
Информация, представленная в заголовке ответа, в частности, в схеме аутентификации, даст вам больше сведений о том, что произошло, и укажет на решение. Это позволит вам понять, какой тип аутентификации требуется серверу.
К примеру, в приведенном выше примере мы видим, что схема аутентификации задана как «Basic». Это означает, что запрос аутентификации требует только ID и password. Для получения более подробной информации и инструкций мы рекомендуем обратиться к HTTP Authentication Scheme Registry.
Источник: kinsta.com