Checklist
- I looked at https://github.com/pbatard/rufus/wiki/FAQ to see if my question has already been answered.
- I performed a search in the issue tracker for similar issues using keywords relevant to my problem, such as the error message I got from the log.
- I clicked the ‘Log’ button or pressed Ctrl—L in Rufus, and copy/pasted the log into the line that says
<FULL LOG>below. - The log I am copying is the FULL log, starting with the line
Rufus version: x.y.z— I have NOT removed any part of it.
Additionally (if applicable):
- I ran a bad blocks check, by clicking Show advanced format options then Check device for bad blocks, and confirmed that my USB is not defective.
- I also tried one or more of the following:
- Using a different USB drive.
- Plugging the USB into a different port.
- Running Rufus on a different computer.
- If using an image, I clicked on the
(✓)button to compute the MD5, SHA1 and SHA256 checksums, which are therefore present in the log I copied. I confirmed, by performing an internet search, that these values match the ones from the official image.
Issue description
Error[0xC003045D]
Log
Rufus x86 v3.11.1678 (Portable)
Windows version: Windows 10 64-bit (Build 19041.508)
Syslinux versions: 4.07/2013-07-25, 6.04/pre1
Grub versions: 0.4.6a, 2.04
System locale ID: 0x0809 (en-GB)
Will use default UI locale 0x0809
SetLGP: Successfully set NoDriveTypeAutorun policy to 0x0000009E
Localization set to 'en-US'
Notice: The ISO download feature has been deactivated because 'Check for updates' is disabled in your settings.
Found USB 2.0 device 'SanDisk Ultra USB Device' (0781:558A)
NOTE: This device is a USB 3.0 device operating at lower speed...
1 device found
Disk type: Removable, Disk size: 32 GB, Sector size: 512 bytes
Cylinders: 3738, Tracks per cylinder: 255, Sectors per track: 63
Partition type: MBR, NB Partitions: 1
Disk ID: 0xAEC37384
Drive has a Zeroed Master Boot Record
Partition 1:
  Type: FAT32 LBA (0x0c)
  Size: 28.6 GB (30752620544 bytes)
  Start Sector: 32, Boot: No

Format operation started
Requesting disk access...
Will use 'F:' as volume mountpoint
Deleting partitions (This may take a while)...
Deleting ALL partition(s) from disk '\?PhysicalDrive2':
● Partition 1 (offset: 16384, size: 28.6 GB)
Could not delete partitions: [0x8007045D] The request could not be performed because of an I/O device error.
Opened \.PhysicalDrive2 for exclusive write access
I/O boundary checks disabled
Could not lock access to \?Volume{f894b532-6b2b-11e9-847e-d8cb8ada668c}: [0x00000005] Access is denied.
Could not lock volume
Re-mounted volume as F: after error

Found USB 2.0 device 'SanDisk Ultra USB Device' (0781:558A)
NOTE: This device is a USB 3.0 device operating at lower speed...
1 device found
Disk type: Removable, Disk size: 32 GB, Sector size: 512 bytes
Cylinders: 3738, Tracks per cylinder: 255, Sectors per track: 63
Partition type: MBR, NB Partitions: 1
Disk ID: 0xAEC37384
Drive has a Zeroed Master Boot Record
Partition 1:
  Type: FAT32 LBA (0x0c)
  Size: 28.6 GB (30752620544 bytes)
  Start Sector: 32, Boot: No
Found USB 2.0 device 'SanDisk Ultra USB Device' (0781:558A)
NOTE: This device is a USB 3.0 device operating at lower speed...
1 device found
Disk type: Removable, Disk size: 32 GB, Sector size: 512 bytes
Cylinders: 3738, Tracks per cylinder: 255, Sectors per track: 63
Partition type: MBR, NB Partitions: 1
Disk ID: 0xAEC37384
Drive has a Zeroed Master Boot Record
Partition 1:
  Type: FAT32 LBA (0x0c)
  Size: 28.6 GB (30752620544 bytes)
  Start Sector: 32, Boot: No

Format operation started
Requesting disk access...
Will use 'F:' as volume mountpoint
Deleting partitions (This may take a while)...
Deleting ALL partition(s) from disk '\?PhysicalDrive2':
● Partition 1 (offset: 16384, size: 28.6 GB)
Could not delete partitions: [0x8007045D] The request could not be performed because of an I/O device error.
Opened \.PhysicalDrive2 for exclusive write access
I/O boundary checks disabled
Analyzing existing boot records...
Drive has a Zeroed Master Boot Record
Clearing MBR/PBR/GPT structures...
Erasing 32 sectors
write_sectors: Write error [0x0000045D] The request could not be performed because of an I/O device error.
  StartSector: 0x00000000, nSectors: 0x1, SectorSize: 0x200
Retrying in 5 seconds...
write_sectors: Write error [0x0000045D] The request could not be performed because of an I/O device error.
  StartSector: 0x00000000, nSectors: 0x1, SectorSize: 0x200
Retrying in 5 seconds...
write_sectors: Write error [0x0000045D] The request could not be performed because of an I/O device error.
  StartSector: 0x00000000, nSectors: 0x1, SectorSize: 0x200
Retrying in 5 seconds...
write_sectors: Write error [0x0000045D] The request could not be performed because of an I/O device error.
  StartSector: 0x00000000, nSectors: 0x1, SectorSize: 0x200
Could not reset partitions
Re-mounted volume as F: after error

Found USB 2.0 device 'SanDisk Ultra USB Device' (0781:558A)
NOTE: This device is a USB 3.0 device operating at lower speed...
1 device found
Disk type: Removable, Disk size: 32 GB, Sector size: 512 bytes
Cylinders: 3738, Tracks per cylinder: 255, Sectors per track: 63
Partition type: MBR, NB Partitions: 1
Disk ID: 0xAEC37384
Drive has a Zeroed Master Boot Record
Partition 1:
  Type: FAT32 LBA (0x0c)
  Size: 28.6 GB (30752620544 bytes)
  Start Sector: 32, Boot: No
Found USB 2.0 device 'SanDisk Ultra USB Device' (0781:558A)
NOTE: This device is a USB 3.0 device operating at lower speed...
1 device found
Disk type: Removable, Disk size: 32 GB, Sector size: 512 bytes
Cylinders: 3738, Tracks per cylinder: 255, Sectors per track: 63
Partition type: MBR, NB Partitions: 1
Disk ID: 0xAEC37384
Drive has a Zeroed Master Boot Record
Partition 1:
  Type: FAT32 LBA (0x0c)
  Size: 28.6 GB (30752620544 bytes)
  Start Sector: 32, Boot: No
- Remove From My Forums
-
Question
-
Happy New Year!
I just installed two new WD 2TB sata drives to an HP Pavilion desktop so I could play with the storage space feature in win8 (pro).
When I try to create a new storage pool, I see both in the list of unformatted drives. After I click the «Create Pool» button I get the following error: «Can’t prepare drives. Close all applications that are accessing the drive, and then try
again.» The details for this say: «The request could not be performed because of an I/O device error (0x0000045D).» This was after rebooting, so I’m not sure that there is any applications that could be interfering.In Disk Management, the drives show up as disk 1 & 2 (in addition to the original disk 0). If I try creating a new simple volume with either I get a similar error.
Has anyone seen this error? I’ve not found much useful documentation on the error code.
Thanks!
Andy
«The request could not be performed because of an I/O device» error
I/O Device Error, short for Input/Output Device Error, usually happens on external hard drives, SD cards, USB flash drives, CDs, or DVDs when you try to perform write and read operations on the device in Windows 10/8/7.
Normally, when you try to access its files, you’ll get an I/O Device error saying, «The request could not be performed because of an I/O device error.»
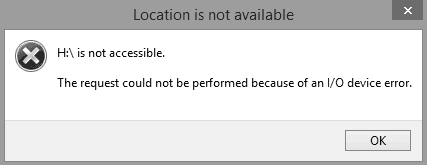
Quick Guide — 5 Methods to Fix I/O Device Errors on Your Own
To solve your problem, you can immediately use the following methods and corresponding guidelines to fix the I/O device error on your storage devices.
| 5 Methods | Risky Level | Difficulty Level |
|---|---|---|
| Check & Change Device Connection | Low | Easy |
| Update/Re-install Device Driver | Low | Easy |
| Change Device Transfer Mode | Medium | Easy |
| Send for Manual Repair | Medium (Possible privacy disclosure) | Easy |
| Command Prompt | High (Possible data loss) | Medium |
Overview of I/O Device Error
In most cases, users encounter the I/O device error when they attempt to open a hard drive or external storage device. How to define if you are with the error, and what to do when this error happens? Let’s see.
Symptoms
- «The request could not be performed because of an I/O device error» displays.
- «Only part of a ReadProcessMemory or WriteProcessMemory request was completed.
- «I/O Error codes: error 6, error 21, error 103, error 105, error 131.
Causes
- Connection issue between your storage devices and PC
- Outdated device driver Windows is trying to use a transfer mode that the hardware device cannot use
- Your device is damaged or corrupted and shows as Disk Unknown or Not Initialized
So What to Do with I/O Device Error On Devices? Here are some tips:
- 1. Stop using the device immediately.
- 2. Don’t unplug and replug the device too frequently.
- 3. Don’t try to format, erase, or repartition the device.
- 4. Follow the methods provided below one by one to fix this error on your own.
Based on the underlying issue, you have the following solutions available to fix the I/O device error on an external/internal hard drive.
Recover Data from I/O Device Error (Recommended)
If you have essential data lost on the external hard drive, USB flash drive, or SD card before or after fixing the I/O device error, you can recover your files with EaseUS Data Recovery Wizard.
EaseUS data recovery software supports deleted data recovery, formatted file recovery, and RAW file recovery. To recover data from your device that suffered from the I/O device error:
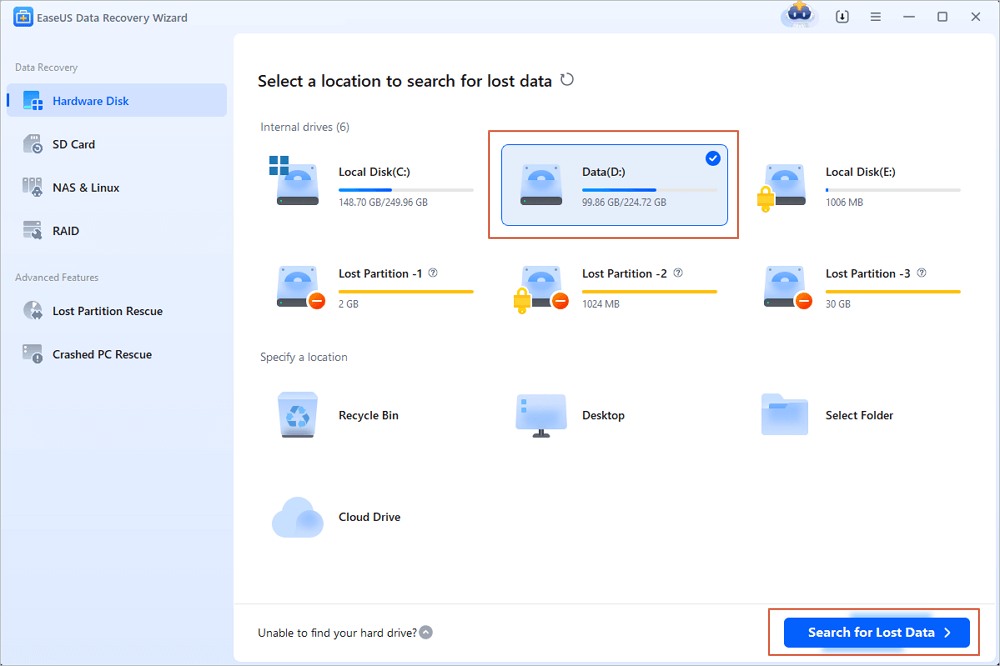
Step 1. Scan the hard drive partition
Select the drive on your hard disk where you lost or deleted files. Click «Scan» and let EaseUS data recovery software scan for all lost data and files on the selected drive.
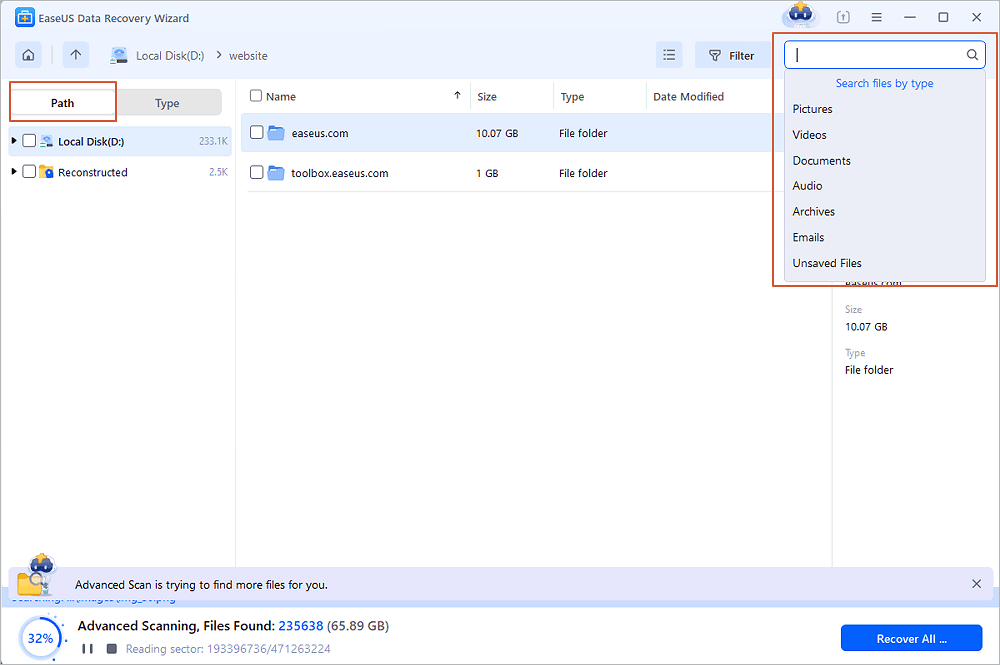
Step 2. Check the results
When the scan completes, you can apply the «Filter» feature or click the «Search files or folders» option to find the lost files on the hard drive.
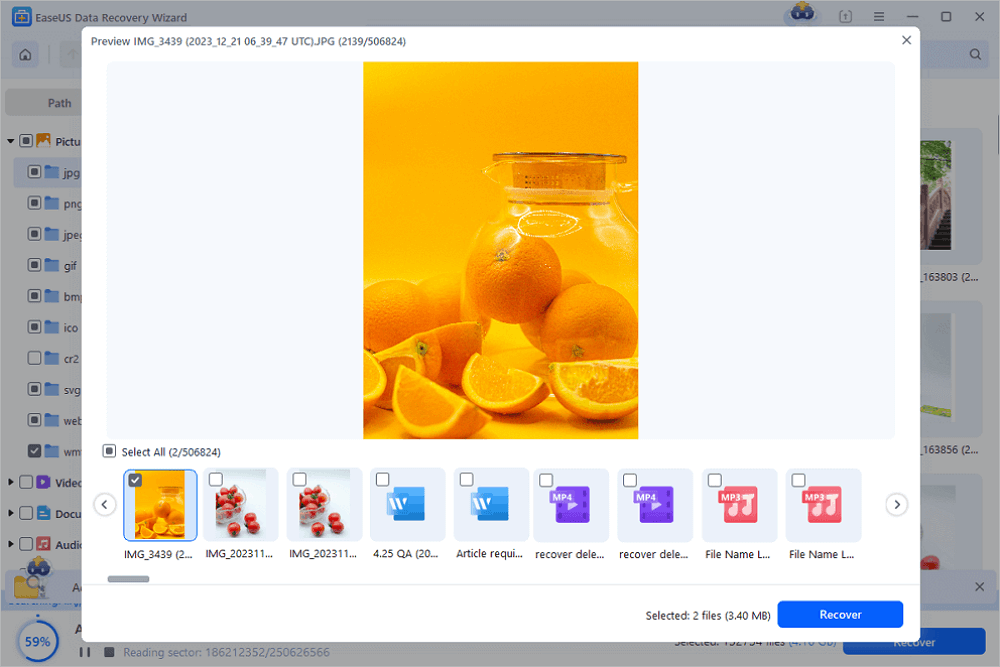
Step 3. Restore lost hard drive data
Select wanted files that you lost on the drive and click «Recover» to save them to another location.
Method 1. Check and Change Device Connection
Pros: Easy, fast, no data loss.
Cons: /
Here are the tips that you can check if the I/O error is caused by a loose connection or faulty cable/USB port:
- Check if the connection cables are loose, tight it.
- If the connection cables are broken, change new ones and reconnect the device.
- Connect the external hard drive or USB to another port (especially a rear one).
- If another computer is available, try to connect the same device to another one.
If the I/O device error persists, don’t worry. More methods are available for you to apply.
Method 2. Update or Reinstall the Device Driver
Pros: Easy, fast, no data loss.
Cons: Falty operation may cause serious problems. Be careful!
The outdated device driver is a potential cause that may lead to various issues on your device. For example, «there is no media in the specified device», USB not showing up in Windows, and «the request could not be performed because of an I/O device error».
Step 1. Connect the device with «I/O device error» to PC, right-click «This PC» and select «Manage».
Step 2. Click «Device Manager», expand «Disk drives».
Step 3. Right-click the problematic device and select «Update driver»
Step 4. Click «Search automatically search for driver software online».
Wait for the driver to be updated, then reboot your computer. Afterward, you can open your device to check whether the I/O error still exists.
Method 3. Fix I/O Device Error — Change Transfer Mode in IDE
Pros: No data loss.
Cons: Falty operation may cause serious problems. Be careful!
As mentioned, if Windows is trying to use a transfer mode that your device doesn’t support, you will encounter the error message «The request could not be performed because of an I/O device error.» To remove the I/O error, you need to switch the transfer mode with the next steps:
Step 1. Press «Windows+X» to open the menu, then select «Device Manager».
Step 2. Expand «IDE ATA/ATAPI controllers». A subset will open, listing the different IDE ATA/ATAPI channels for the computer.
Step 3. Right-click the channel where the appropriate drive is connected, and then click «Properties».
Note: Don’t change the Primary IDE Channel, Device 0. Changing the transfer mode of Device 0 may cause computer operating errors.
Step 4. On the «Advanced Settings» tab, uncheck «Enable MDA» in the «Transfer Mode» box for the device that represents the appropriate drive.
Step 5. Then, click «OK» and exit all windows.
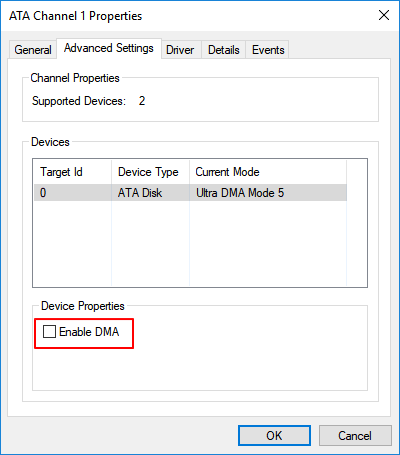
Test the drive and check if the message «the request could not be performed because of an I/O device error» has been removed.
Method 4. Send for Manual Repair and Fix I/O Device Error
Pros: No data loss.
Cons: Expensive. Possible privacy disclosure.
If none of the methods above helps remove the I/O device error, you should send your device for manual repair. To do so, you have three options to try:
- #1. Contact the device manufacture and send the disk for repair.
- #2. Send device for manual repair at a local repair center.
- #3. Customize manual device repair and data recovery service.
Here you may try EaseUS manual disk repair and data recovery service:
Consult with EaseUS Data Recovery Experts for one-on-one manual recovery service. We could offer the following services after FREE diagnosis:
- Repair corrupted RAID structure, unbootable Windows OS and corrupted virtual disk file (.vmdk, .vhd, .vhdx, etc.)
- Recover/repair lost partition and re-partitioned drive
- Unformat hard drive and repair raw drive (BitLocker encrypted drive)
- Fix disks that become GPT-protected partitions
Method 5. Fix I/O Device Error in Command Prompt
Pros: May work to fix I/O device error.
Cons: High risk of causing data loss.
This option will run the CHKDSK command to check and repair disk errors on the hard drive, USB drive, or other storage devices to fix the I/O device error.
But this option may cause serious data loss. If you tend to try this way out, move to the next part and follow the data recovery guide to scan and restore your precious files in advance.
Step 1. Press the Windows + S keys, type cmd, right-click «Command Prompt» and choose «Run as administrator».
Step 2. Click «Yes» when you are presented to launch the Command Prompt as Administrator.
Step 3. Type chkdsk E: /f /r /x (replace E with the drive letter for your device, which contains an I/O device error).
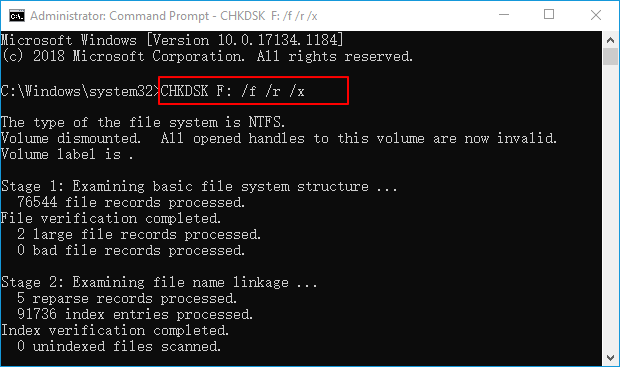
Note: some of you may receive the error message «cannot open the volume for direct access» using CMD, don’t worry, and follow the link to get an immediate fix.
Here is an easier way to repair a corrupted file system.
EaseUS CleanGenius is a user-friendly computer fixing tool that is both safe and lightweight. It’s a perfect alternative to CHKDSK command. Use this one-click tool to fix the damaged file system easily.
Step 1. DOWNLOAD EaseUS CleanGenius on your computer and complete the installation.
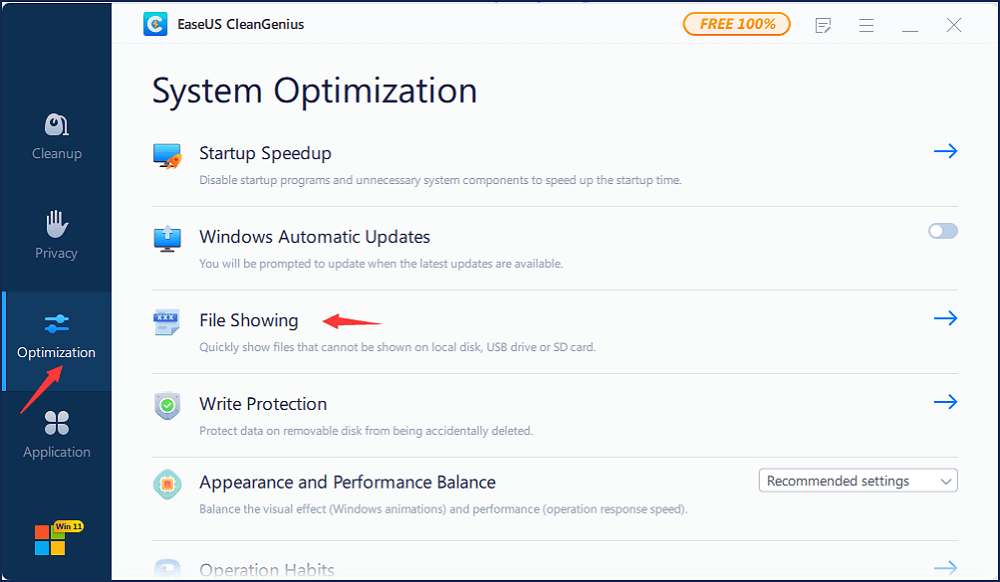
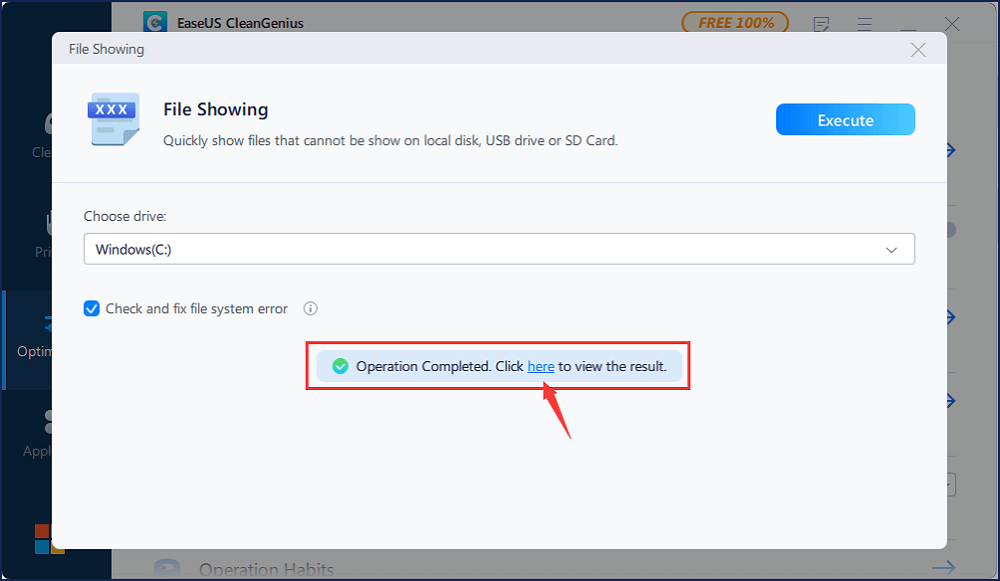
Step 2. Run the software. Click «Optimization», and then choose «File Showing» .
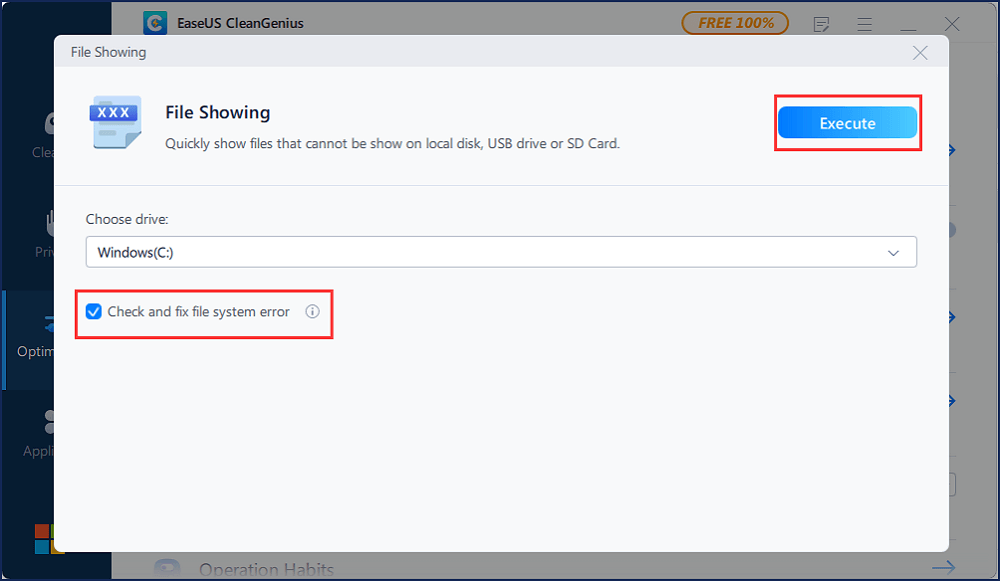
Step 3. Select the drive with a corrupted file system. Tick the «Check and fix file system error» option and click «Execute».
Step 4. Wait the tool performs the repairing task. After that, click the «here» button to check the drive.
The Bottom Line
Although we recommend you recover data from your problematic device when there is data loss after the fix, you can try EaseUS Data Recovery Wizard to recover your files as many as possible if all the solutions fail to fix «the request could not be performed because of an I/O device error».
The Request Could Not Be Performed I/O Error FAQs
If you still have problems with I/O error, read the following questions and answers to get additional help.
1. What does an I O device error mean?
An I/O device error, short for Input/Output device error, occurs when Windows can’t perform an input/output action. It can occur to many different types of hardware devices or media.
2. How do I fix I/O device error on a hard drive?
You can fix HDD not initialized i/o device error with the steps below:
Step 1. Press Win+R > Type: diskpart and hit Enter.
Step 2. Type: list disk and hit Enter.
Step 3. Type: select disk n and hit Enter; (replace n with the drive letter of an uninitialized external hard drive.)
Step 4. Type: clean and hit Enter.
3. Why does I/O error occur?
Here are the reasons:
- Virus attack
- Bad sectors
- Partition Loss
- File system corruption
- Corrupted Master Boot Record (MBR)
Владельцы компьютеров не обойдутся без загрузочной (bootable) флешки. Rufus – бесплатная утилита для записи загрузочных носителей с содержимым разнообразных образов ОС. Приложение работает практически без сбоев ввиду мизерного размера и отточенных за годы алгоритмов. Однако бывают проблемы при работе программы. Рассмотрим, почему Rufus не запускается, какие ошибки выдаёт, как их решить с помощью наших инструкций.
Возможности программы Rufus
Руфус отформатирует флешку, портативный HDD (hard disk drive) или винчестер и запишет на накопитель содержимое образа с загрузочной областью. Так превратит устройство в загрузочный носитель. Если скачали рабочий ISO (оригинальный с сайта разработчика или сборку), без ошибок, используете неповреждённую флешку, проблемы исключены. В иных случаях и по вине пользователя начинаются «танцы с бубном»: Rufus то не запускается на Windows, то не может отформатировать накопитель.
Почему возникают ошибки в работе утилиты
Источники проблем: состояние флешки, образа, операционная система. Иногда они зависят от «ровности рук» пользователя.
Преимущественно ошибки при записи образов и форматировании флешки в Rufus вызывают:
- Использование накопителя иными приложениями (открыт находящийся на устройстве файл);
- Повреждённые ячейки памяти, иные проблемы с устройством;
- Незагрузочный или повреждённый образ;
- Использование дешевых китайских USB-хабов и удлинителей;
- Антивирусное программное обеспечение, которое блокирует работу программы.
Неисправности Flash-накопителя
На повреждённую флешку Rufus вряд ли запишет содержимое образа. Если файлы и скопирует, в дальнейшем они могут не читаться. Для исправления ошибок с неработающими секторами:
- Откройте свойства устройства через Проводник (Win + E).
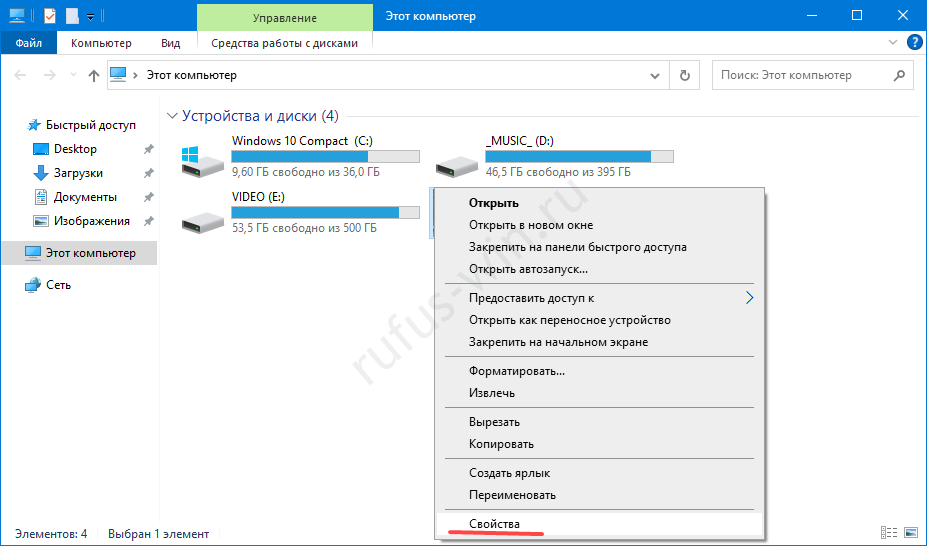
Свойства flash-накопителя. - Во вкладке «Сервис» кликните «Проверить».
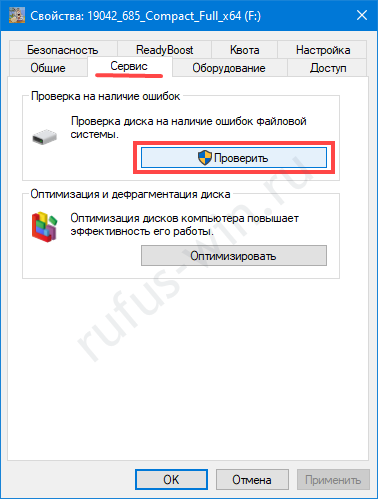
Проверка диска на ошибки. - Запускайте сканирование накопителя.
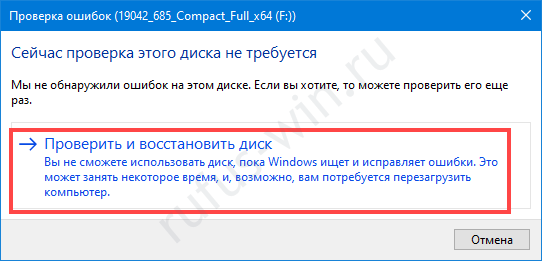
Проверка диска.
Форматирование, как метод решения проблемы
При большом количестве логических проблем или физических повреждений на USB-диске отформатируйте его:
- Кликните правой клавишей мыши, выберите соответствующую команду.
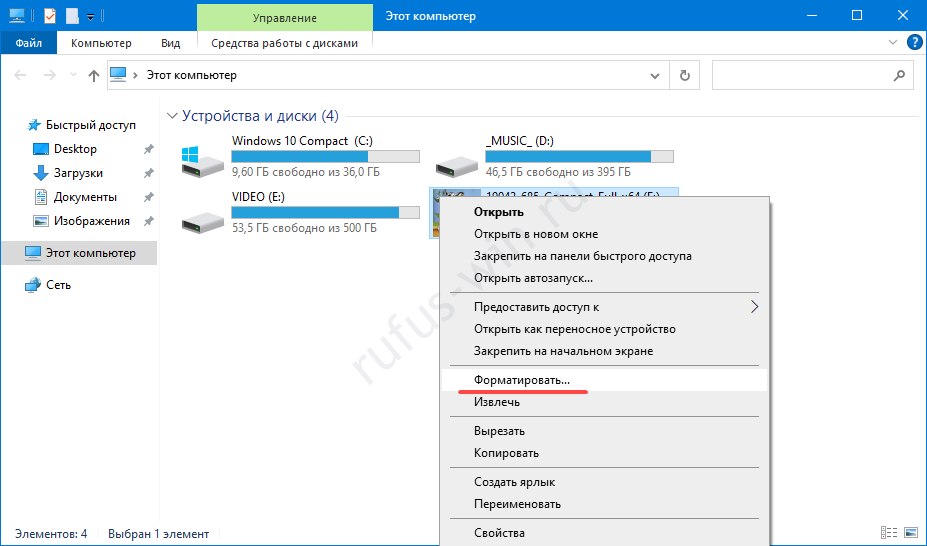
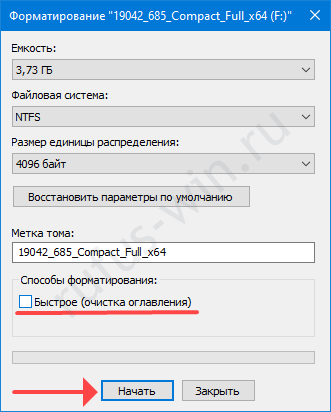
Форматирование дисков при ошибках. - Снимите флажок «Быстрое…», жмите «Начать».
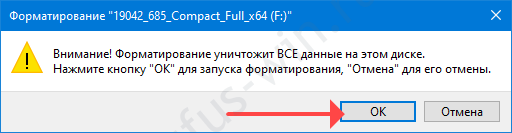
- Подтвердите стирание файлов на устройстве, предварительно скопировав информацию.
Иногда приходится прибегать к продвинутым утилитам для низкоуровневого форматирования и восстановления, например, HDD Regenerator.
Ошибки файловой системы
Rufus работает с семью файловыми системами:
- FAT – устаревшая, вышла с обихода.
- FAT32 – последовательница FAT. Используется для разделов GPT и UEFI. Не поддерживает запись файлов объёмом более 4 ГБ.
- NTFS – избавлена от ряда недостатков FAT32, формируется по умолчанию для разделов MBR и BIOS. Не поддерживается DOS (FreeDOS).
- UDF – спецификация оптических накопителей, на флешках – редкость.
- exFAT (иногда называется FAT64) – файловая система с увеличенными количеством перезаписей сектора, размером кластера и поддержкой прав доступа. Ресурсоёмкая.
- Ext2, ext3 – файловые системы для разных дистрибутивов Linux, причём ext2 обгоняет ext Ext2 почти не используется, для записи загрузочных флешек Линукс выбирайте вторую.
Кстати, о том какую выбрать файловую систему написано здесь.
Ошибки ISO-образа
При появлении уведомления, что образ повреждён:
- его придётся загрузить заново;
- перехэшировать, если качали через торрент, и докачать несколько мегабайт, содержащих ошибку;
- найти альтернативный неповреждённый образ;
- проверить раздел с образом на битые секторы, возможно, файл ISO хранится в повреждённых областях жесткого диска.
Конфликт с антивирусными ПО
Добавьте утилиту в исключения антивируса либо завершите работу программы безопасности на время запуска Rufus.
Запустите утилиту с привилегиями администратора – кликните правой клавишей, укажите соответствующий вариант.
Нужны соответствующие привилегии в Windows. Вы должны быть залогинены в ОС как админ.
Далее замените флешку, скачайте иной образ.
Ошибка «BOOTMGR is missing»
На накопителе не обнаружен загрузчик. Воспользуйтесь предварительно функцией Rufus для формирования загрузочного накопителя на базе соответствующего образа.
Ошибка [0x00000015] The device is not ready
Ошибка перед форматированием флешки в Rufus возникает при отключённом автоматическом монтировании.
Инструкция по исправлению:
- Запустите командную строку с правами администратора через Win + X.
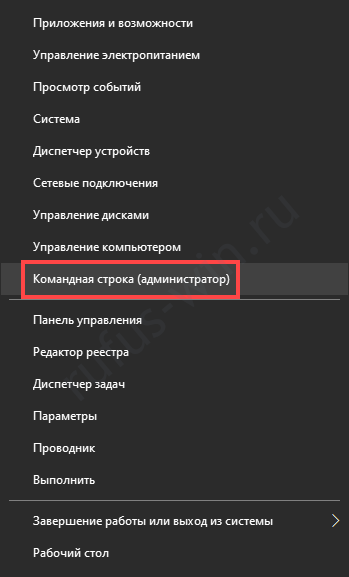
Запуск командной строки. - Выполните команду «mountvol /e».

- Закройте окно и попробуйте выполнить действия снова.
Ошибка «Device eliminated because it appears to contain no media»
Срок службы флешки подходит либо подошёл к концу. Купите или используйте другую.
Rufus не дает выбрать FAT32
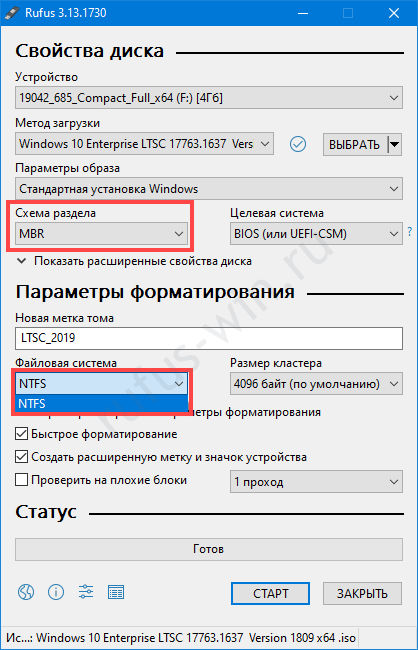
Зачем вам FAT32? Приложение автоматически выбирает файловую систему, исходя из содержимого образа. Если для диска с разделами MBR установлена NTFS, не меняйте.
Невозможно смонтировать Guid-том
Попробуйте иной накопитель. Просканируйте текущий на предмет повреждений.
Ошибка [0x00000005] Access is denied
Какая-то программа мешает Rufus получить доступ к карте памяти. Часто это антивирусы.
Ошибка «Невозможно считать носитель информации. Возможно, он используется другим процессом»
Аналог предыдущего варианта: закройте антивирус, завершите сторонние приложения, использующие флешку. Просканируйте диски на наличие вирусов. Попробуйте загрузиться в безопасном режиме.
Ошибка «Error: Legacy boot of UEFI media. This drive can only boot in UEFI mode»
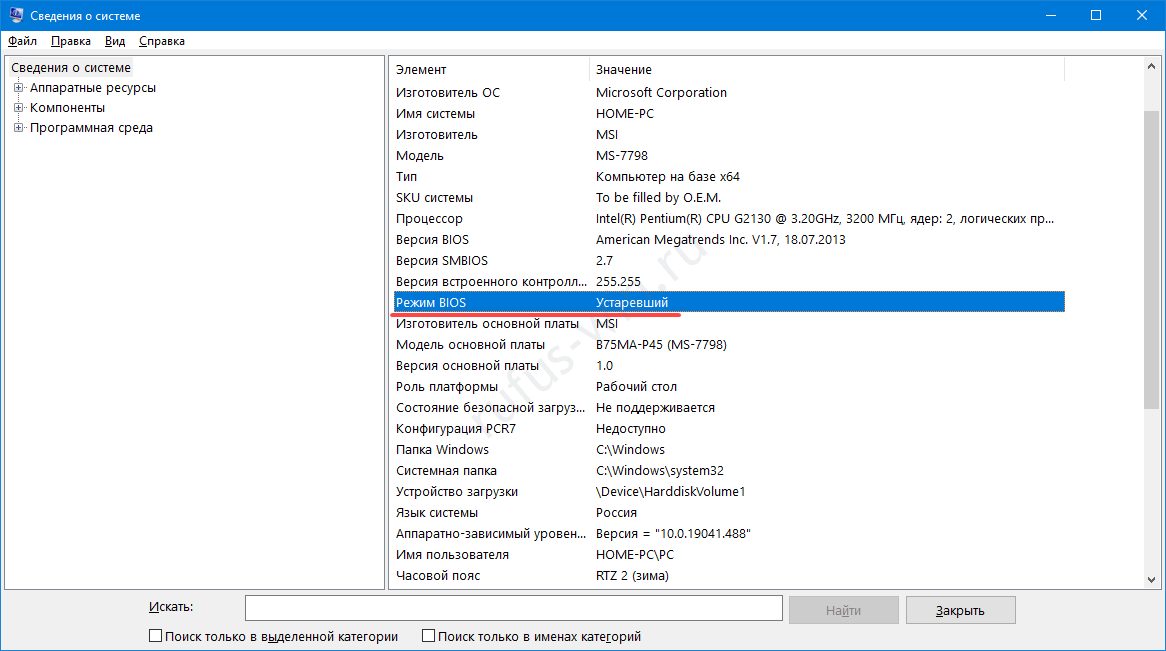
Правильно создайте накопитель. Проверьте режим BIOS командой «msinfo32», выполненной в окне Win+R.
Ошибка при создании разделов в Rufus
Убедитесь, что флешка не используется другими программами, образ – не повреждённый, занимает менее, чем объём носителя. Откажитесь от разбиения на разделы или попробуйте найти ответ по ссылке.
Ошибка 0x80070032 «такой запрос не поддерживается»
Завершите работу антивируса.
Ошибка «This drive was created by Rufus»
Накопитель создан в Rufus для UEFI, вы пытаетесь запустить его в режиме BIOS или (CSM). Посетите настройки UEFI, отключите Legacy Mode (CSM). Заново запишите загрузочную флешку для BIOS и MBR.
Ошибка «Another Rufus application»
Приложение уже запущено: переключитесь на его окно либо закройте. Возможно стоит завершить задачу через «Диспетчер задач».
Ошибка извлечения ISO образа
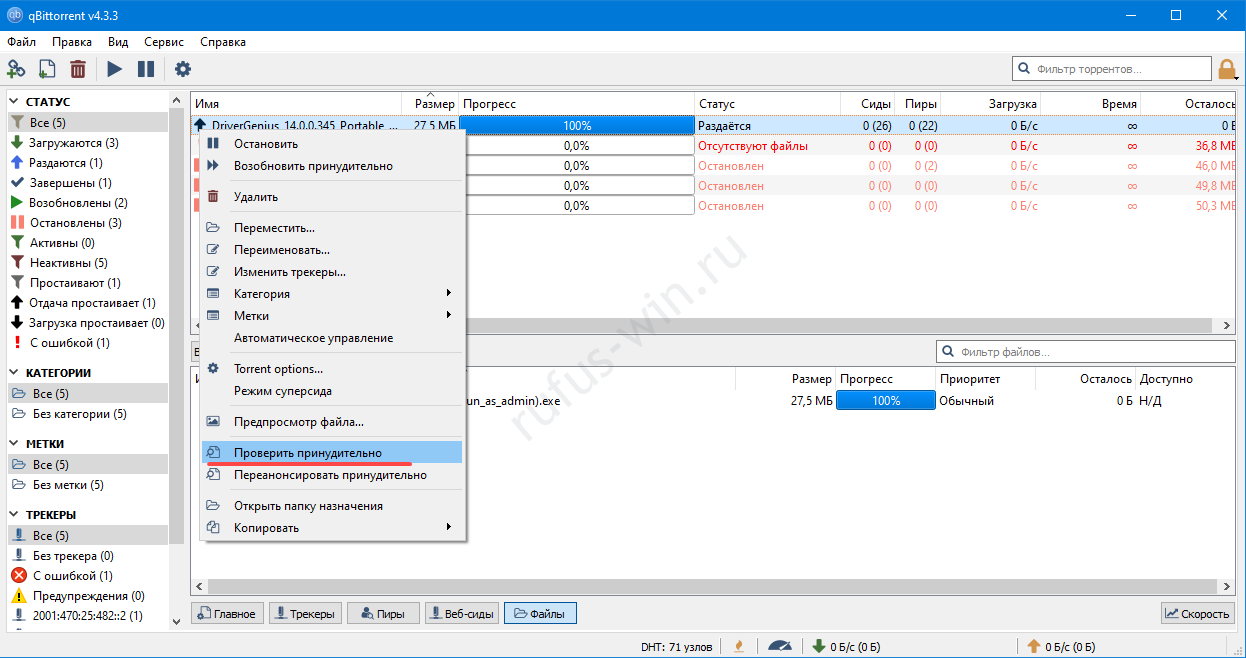
Ошибка извлечения ISO-образа в программе Rufus лечится быстро. Если качали файл через торрент, откройте клиент для работы в пиринговых сетях (uTorren, BitTorrent, qBitTorrent), кликните правой клавишей и выберите «Проверить принудительно» или аналогичный вариант. В ином случае загрузите ISO заново, найдите иной образ на другом трекере.
«Ошибка отложенной записи»
Отформатируйте флешку. Если не поможет, сбросьте её через Rufus – зажмите Alt+Z и подтвердите операцию.
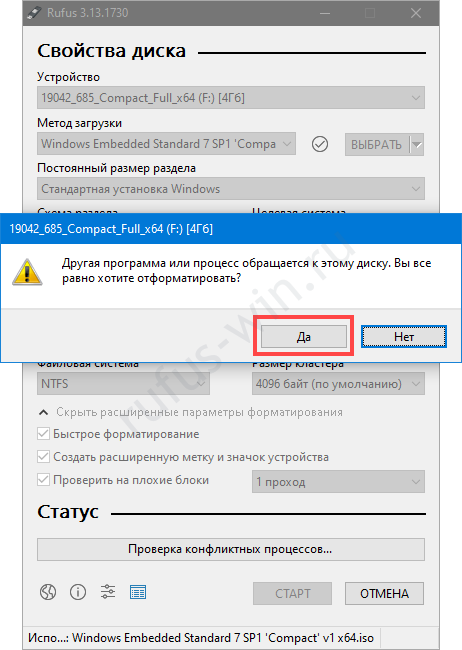
Затем форматируйте накопитель в утилите Управление дисками (вызывается через Win+X).
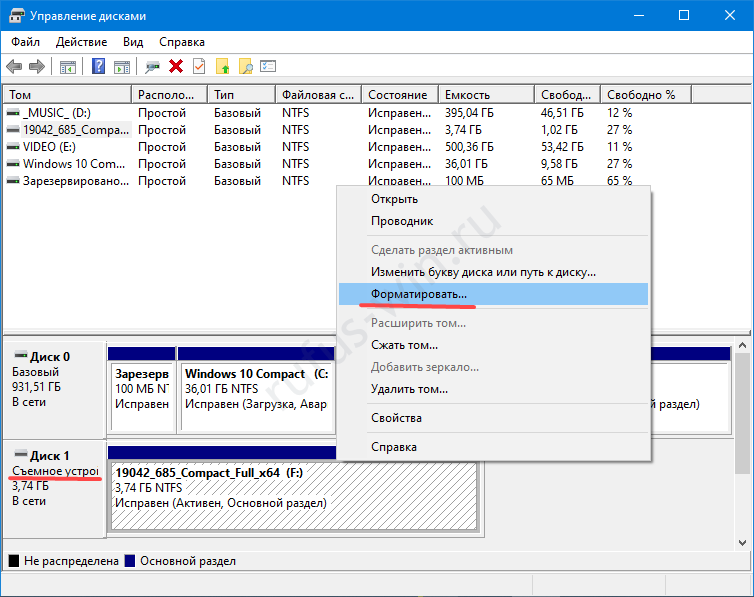
Невозможно назначить букву диска в Rufus
Решение разделом выше.
Недоступна кнопка «СТАРТ»
Проверьте настройки. Что-то сделано неправильно, возможно:
- Не обнаружена флешка (см. первый выпадающий список).
- Не указан ISO – нажимайте «Выбрать» и укажите файл.
- Выбран повреждённый или незагрузочный образ (с неподдерживаемым загрузчиком). Попробуйте иной.
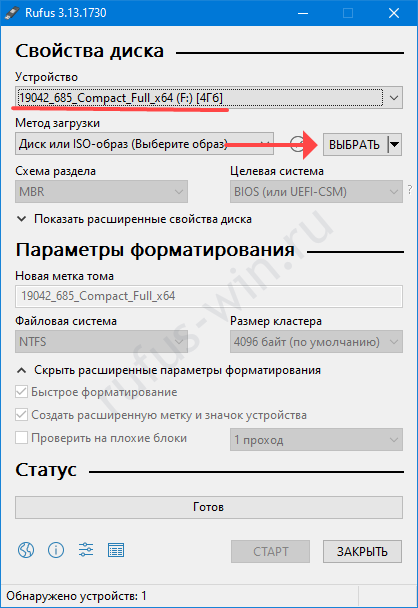
Ошибка записи образа Linux
Согласитесь докачать недостающие (обновлённые) файлы с интернета. Это больше не ошибка, Руфус предлагает скачать обновленные библиотеки для создания загрузочного образа.
Другие вопросы и ответы по ошибкам
Что делать, если возникает ошибка при создании флешки с Win 7, 8-ка при этом монтируется без ошибок?
Слишком мало информации для анализа, опишите проблему подробнее. Попробуйте иной образ, проверьте, не повреждён ли используемый.
Почему Rufus не запускается на Windows XP?
Почитайте требования к программе здесь. Последняя версия Rufus для Windows XP выпущена под редакцией 2.18.
Что делать, если после Руфуса не работает флешка?
Виноваты сами. То ли флешка была повреждённой, старой, то ли прервали процесс записи, форматирования. Отформатируйте устройство через «Управление дисками» или Rufus. Сбросьте карту памяти через утилиту Rufus – нажмите Alt+Z и подтвердите. Затем отформатируйте накопитель.
Почему Руфус зависает при записи образа?
Возможно повреждён USB-диск, образ записан в битые секторы, диск, где хранится ISO, слишком фрагментирован, компьютер или ноутбук загружен иной работой.
Проверяет ли Руфус на плохие блоки флешку?
Нет, но может запустить системную утилиту Windows, которая проверит.
Что делать, если образ слишком большой для выбранного устройства?
Возьмите флешку с объёмом, превышающим размер файла.
Что делать, если Rufus пишет «Недопустимая метка устройства»?
Измените её в поле «Новая метка тома».
Как из загрузочной флешки сделать обычную?
Отформатируйте накопитель.
Остались еще вопросы? Пишите комменты – ответим.