You don’t mention your network Access Control List (ACL) grants, but in Oracle 11g you must set up an ACL for both the host you want to connect to and for the wallet you want to use. Since you don’t mention getting the «ORA-24247: network access denied by access control list (ACL)» error, I’ll assume that part is set up properly.
The wallet ACL defines its location and grants privileges against the wallet to users. Without these privileges, Oracle will not open the wallet and present the certificate to the web server, even if you have the correct password. The wallet ACL is created with the following PL/SQL run as SYS:
BEGIN
    UTL_HTTP.ASSIGN_WALLET_ACL (
       acl          => 'your_acl_name.xdb',
       wallet_path  => '/path/to/my/wallet/');
END;
/
After the wallet ACL is created, the user must have privileges granted to it.
BEGIN
    DBMS_NETWORK_ACL_ADMIN.ADD_PRIVILEGE(
        acl         => 'your_acl_name.xml',
        principal   => 'MY_USER',
        is_grant    =>  TRUE,
        privilege   => 'use-client-certificates');
END;
/
That will allow Oracle to open the wallet on your user’s behalf and present the certificate to the web server.
Last week I had another error while using UTL_HTTP from an Oracle database to fetch a web page: ORA-28860 Fatal SSL error. The server was previously using http, and then began forwarding to https.
After updating the URL to use https (in case the forwarding was the problem), my first thought was that this is another symptom of a missing trusted root certificate. So I added the certificate to the Oracle Wallet, but that had no effect:
SELECT utl_http.request('https://test.com/page', NULL, 'file:/path/to/wallet', 'WalletPassword')
FROM   dual
       *
Error at line 1
ORA-29273: HTTP request failed
ORA-28860: Fatal SSL error
ORA-06512: at "SYS.UTL_HTTP", line 1491
ORA-06512: at line 1
So my working hypothesis was that the fatal error occurs during SSL negotiation prior to validation of the server’s certificate, possibly to do with supported SSL version or cipher suites. One of the few references to this problem supported this theory, although the two specific issues mentioned at the end (to do with SSL version) did not apply in my case.
With that in mind, I used a standard tool to see what the server supports:
wget https://testssl.sh/testssl.sh
chmod a+x testssl.sh
./testssl.sh https://test.com/
The output is comprehensive; this is the pertinent section:
--> Testing protocols (via sockets except TLS 1.2 and SPDY/NPN)

 SSLv2      not offered (OK)
 SSLv3      not offered (OK)
 TLS 1      offered
 TLS 1.1    offered
 TLS 1.2    offered (OK)
 SPDY/NPN   not offered

--> Testing ~standard cipher lists

 Null Ciphers                 not offered (OK)
 Anonymous NULL Ciphers       not offered (OK)
 Anonymous DH Ciphers         not offered (OK)
 40 Bit encryption            not offered (OK)
 56 Bit encryption            Local problem: No 56 Bit encryption configured in /usr/bin/openssl
 Export Ciphers (general)     not offered (OK)
 Low (<=64 Bit)               not offered (OK)
 DES Ciphers                  not offered (OK)
 Medium grade encryption      not offered (OK)
 Triple DES Ciphers           offered (NOT ok)
 High grade encryption        offered (OK)

--> Testing (perfect) forward secrecy, (P)FS -- omitting 3DES, RC4 and Null Encryption here

 PFS is offered (OK)  ECDHE-RSA-AES256-GCM-SHA384 ECDHE-RSA-AES256-SHA384 ECDHE-RSA-AES256-SHA ECDHE-RSA-AES128-GCM-SHA256 ECDHE-RSA-AES128-SHA256 ECDHE-RSA-AES128-SHA

--> Testing server preferences

 Has server cipher order?     yes (OK)
 Negotiated protocol          TLSv1.2
 Negotiated cipher            ECDHE-RSA-AES128-GCM-SHA256,
 Cipher order
     TLSv1:     ECDHE-RSA-AES128-SHA ECDHE-RSA-AES256-SHA AES256-SHA AES128-SHA DES-CBC3-SHA
     TLSv1.1:   ECDHE-RSA-AES128-SHA ECDHE-RSA-AES256-SHA AES256-SHA AES128-SHA DES-CBC3-SHA
     TLSv1.2:   ECDHE-RSA-AES128-GCM-SHA256 ECDHE-RSA-AES128-SHA256 ECDHE-RSA-AES128-SHA ECDHE-RSA-AES256-GCM-SHA384 ECDHE-RSA-AES256-SHA384 ECDHE-RSA-AES256-SHA AES128-GCM-SHA256 AES256-GCM-SHA384 AES128-SHA256 AES256-SHA AES128-SHA DES-CBC3-SHA
With TLSv1.2 supported, this should be fine with Oracle 12c. The next step, is to see what UTL_HTTP offers when it makes the connection to the server. I couldn’t find any documentation on this, so I thought it would be fun (I don’t get out much) to look at the packets on the network to see what’s going on.
$ sudo tcpdump -i eth0 -w ssl_dump.out
tcpdump: listening on eth0, link-type EN10MB (Ethernet), capture size 65535 bytes
^C158 packets captured
158 packets received by filter
0 packets dropped by kernel
After starting this, and before interrupting it with ^C, I used another session to call UTL_HTTP as above. Then I opened the output file in Wireshark, and found the SSL ClientHello message:
Secure Sockets Layer
    TLSv1.2 Record Layer: Handshake Protocol: Client Hello
        Content Type: Handshake (22)
        Version: TLS 1.2 (0x0303)
        Length: 107
        Handshake Protocol: Client Hello
            Handshake Type: Client Hello (1)
            Length: 103
            Version: TLS 1.2 (0x0303)
            Random
                GMT Unix Time: Sep  9, 2016 21:01:14.000000000 GMT Daylight Time
                Random Bytes: cabc488d10a2b6be6aa7ef0777628f62c9a100dd8d878998...
            Session ID Length: 0
            Cipher Suites Length: 32
            Cipher Suites (16 suites)
                Cipher Suite: TLS_RSA_WITH_AES_256_GCM_SHA384 (0x009d)
                Cipher Suite: TLS_RSA_WITH_AES_128_GCM_SHA256 (0x009c)
                Cipher Suite: TLS_RSA_WITH_AES_256_CBC_SHA256 (0x003d)
                Cipher Suite: TLS_RSA_WITH_AES_128_CBC_SHA256 (0x003c)
                Cipher Suite: TLS_ECDHE_ECDSA_WITH_AES_256_GCM_SHA384 (0xc02c)
                Cipher Suite: TLS_ECDHE_ECDSA_WITH_AES_128_GCM_SHA256 (0xc02b)
                Cipher Suite: TLS_ECDHE_ECDSA_WITH_AES_256_CBC_SHA384 (0xc024)
                Cipher Suite: TLS_ECDHE_ECDSA_WITH_AES_128_CBC_SHA256 (0xc023)
                Cipher Suite: TLS_ECDHE_ECDSA_WITH_AES_256_CBC_SHA (0xc00a)
                Cipher Suite: TLS_ECDHE_ECDSA_WITH_AES_128_CBC_SHA (0xc009)
                Cipher Suite: TLS_RSA_WITH_AES_256_CBC_SHA (0x0035)
                Cipher Suite: TLS_RSA_WITH_AES_128_CBC_SHA (0x002f)
                Cipher Suite: TLS_RSA_WITH_3DES_EDE_CBC_SHA (0x000a)
                Cipher Suite: TLS_RSA_WITH_RC4_128_SHA (0x0005)
                Cipher Suite: TLS_RSA_WITH_RC4_128_MD5 (0x0004)
                Cipher Suite: TLS_EMPTY_RENEGOTIATION_INFO_SCSV (0x00ff)
            Compression Methods Length: 1
            Compression Methods (1 method)
                Compression Method: null (0)
            Extensions Length: 30
            Extension: signature_algorithms
                Type: signature_algorithms (0x000d)
                Length: 26
                Signature Hash Algorithms Length: 24
                Signature Hash Algorithms (12 algorithms)
                    Signature Hash Algorithm: 0x0201
                        Signature Hash Algorithm Hash: SHA1 (2)
                        Signature Hash Algorithm Signature: RSA (1)
                    Signature Hash Algorithm: 0x0301
                        Signature Hash Algorithm Hash: SHA224 (3)
                        Signature Hash Algorithm Signature: RSA (1)
                    Signature Hash Algorithm: 0x0401
                        Signature Hash Algorithm Hash: SHA256 (4)
                        Signature Hash Algorithm Signature: RSA (1)
                    Signature Hash Algorithm: 0x0501
                        Signature Hash Algorithm Hash: SHA384 (5)
                        Signature Hash Algorithm Signature: RSA (1)
                    Signature Hash Algorithm: 0x0601
                        Signature Hash Algorithm Hash: SHA512 (6)
                        Signature Hash Algorithm Signature: RSA (1)
                    Signature Hash Algorithm: 0x0202
                        Signature Hash Algorithm Hash: SHA1 (2)
                        Signature Hash Algorithm Signature: DSA (2)
                    Signature Hash Algorithm: 0x0403
                        Signature Hash Algorithm Hash: SHA256 (4)
                        Signature Hash Algorithm Signature: ECDSA (3)
                    Signature Hash Algorithm: 0x0503
                        Signature Hash Algorithm Hash: SHA384 (5)
                        Signature Hash Algorithm Signature: ECDSA (3)
                    Signature Hash Algorithm: 0x0203
                        Signature Hash Algorithm Hash: SHA1 (2)
                        Signature Hash Algorithm Signature: ECDSA (3)
                    Signature Hash Algorithm: 0x0303
                        Signature Hash Algorithm Hash: SHA224 (3)
                        Signature Hash Algorithm Signature: ECDSA (3)
                    Signature Hash Algorithm: 0x0603
                        Signature Hash Algorithm Hash: SHA512 (6)
                        Signature Hash Algorithm Signature: ECDSA (3)
                    Signature Hash Algorithm: 0x0101
                        Signature Hash Algorithm Hash: MD5 (1)
                        Signature Hash Algorithm Signature: RSA (1)
and the server’s response:
Secure Sockets Layer
    TLSv1.2 Record Layer: Alert (Level: Fatal, Description: Handshake Failure)
        Content Type: Alert (21)
        Version: TLS 1.2 (0x0303)
        Length: 2
        Alert Message
            Level: Fatal (2)
            Description: Handshake Failure (40)
My original conclusion was a mismatch between the ciphers, but thanks to the comment below, and more careful checking using the hex codes, that was proved incorrect and it appears to be an issue with SNI support in UTL_HTTP.
Platform Information
The material in this article was most recently tested against Oracle 12.1.0.2.160719 on 64-bit Linux.
This entry was posted in Network. Bookmark the permalink.
Recently dealed with a SSL issue in an Oracle Database 11.2.0.4 Enterprise Edition environment.
Issue was appearing when testing a SSL web service.
This SSL web serice was called using UTL_HTTP through an Oracle Wallet.
Example of test command :
select UTL_HTTP.request(‘https://<url>’,null,'<wallet_path>’,’wallet_password’) from dual;
The call was ending with «ORA-29273 HTTP Request failed» and «ORA-28860: Fatal SSL error» errors.
I checked the wallet and it was okay..
Certificates were correct and wallet was accessible..(it could be opened and queried)
The database version was 11.2.0.4 enterprise edition.. It was running on an Exadata Cloud at Customer machine.
The database was created using Cloud GUI of the Exadata Cloud at Customer environment.
Anyways; the «Fatal SSL error» seemed so weird to me, so I decided to analyze it further.
I first checked the IP address of the server that was hosting this web service.
Then I checked the route on OS to find the interface that was used when we called this web service.
After finding the interface, I started a tcpdump on it and reproduced the error. (using sqlplus / as sysdba on the database server)
My tcpdump command was as follows;
tcpdump -s 0 -i bondeth0 -w erman.tcpdump
Note that:
I used the option s because -s 0 will set the capture byte to its maximum.
I used the option -w to create an output file for analyzing with Wireshark.
I used -i to specify the Ethernet interface to capture.
After gathering the tcpdump, I opened the file named erman.tcpdump with Wireshark.
I reordered the contents of the file by the destination ip address and directly saw the SSL connection related traffic & packets..
The issue was there..
The server was trying to speak TLS V1.2, but the client (Oracle Database) was not able to handle it.
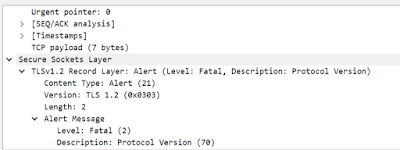
The real error was «Protocol Version» error.. This means, the Oracle Database which was trying to call the webservice could not handle the TLS 1.2 traffic.
Actually, I had a blog post about another SSL case and in that blog post, I was already mentioning this TLS 1.2 Support of Oracle Database 11.2.0.4 thing.
Here -> https://ermanarslan.blogspot.com/2018/12/rdbms-tls-12-support-and-issues-ora.html
Basically;
Oracle Database needs MESv415 for supporting TLS 1.2 and this MESv415 comes with OCT 2018 DB PSU.. (or Exadata Bundle Patch OCT 2018)
Note that -> as this was an ECC environment, we applied Exadata Bundle OCT 2018.. (DB PSU 2018 had lots of conflicts and incompatabilities with the patches that were applied in Oracle Home which was created by Cloud GUI)
The patch that I applied was Oracle Database
Patch For EXADATA(OCT2018- 11.2.0.4.181016) for Bug 28462975.
Note that: MES is short for RSA BSAFE Micro Edition Suite which is a software development toolkit for building cryptographic, certificate, and Transport Layer Security (TLS) security technologies into C and C++ applications, devices and systems. With release of Oct 2018 PSU, all supported DB versions use RSA BSAFE toolkit MESv415 or greater.
Well.. After patching the database with Exadata Bundle Patch OCT 2018, the issue was fixed.
But actually, I wrote this blog post to show you the analysis part..
As you may already recognize, it is important to do the analysis correctly…
At the end of the day, we analyze the network packets using wireshark.. We also used route command, tcpdump command etc..
Another point that you may derive from this post is that being a good DBA requires more that just the database knowledge 🙂
September 23, 2016 / doganay
28860, Fatal SSL error, ORA-28860, ORA-28860: Fatal SSL error
Problem:
ERROR at line 1:
ORA-29273: HTTP request failed
ORA-06512: at "SYS.UTL_HTTP", line 1577
ORA-28860: Fatal SSL error
ORA-06512: at line 1
Cause:
Oracle 11.2 supports only TLS v.1
If your service does not support v.1 you get that error.
Solution:
1) Upgrade your DB to 12c
or
2) Make config changes in app. server in order to accept v.1 and enable RC4 ciphers
Filed under ORACLE
← CONVERT UTF-8 FILE to WE8ISO8859P9
nid.sh →
Leave a Reply
Enter your comment here…
Fill in your details below or click an icon to log in:

Email (required) (Address never made public)
Name (required)
Website
You are commenting using your WordPress.com account.
( Log Out /
Change )
You are commenting using your Twitter account.
( Log Out /
Change )
You are commenting using your Facebook account.
( Log Out /
Change )
Cancel
Connecting to %s
Notify me of new comments via email.
Notify me of new posts via email.
In this article, I will explain how to set up an encrypted communications channel in Oracle Database. This is the third in a series of blog posts I’ve published about encryption as it relates to databases. Previously, I covered encrypting network communications between the client and the database server and data at rest.
Oracle Database allows you to configure encryption of client-server channel in two ways: using native encryption and using SSL. Let’s examine how to configure and debug each of them for an OCI client application, more specifically for sqlplus. This assumes there is no Oracle software installed on the client machine initially.
- Download sqlplus from http://www.oracle.com/technetwork/database/features/instant-client/index-097480.html
- Select a platform
- Grab «Instant Client Package — Basic» and «Instant Client Package — SQL*Plus» archives
- Unpack them into one directory (e.g.
G:instantclient_12_1)
Please note that in this post Oracle Database 12c Enterprise Edition is used on the server.
Enabling native encryption
First, create the sqlnet.ora configuration file on the client, if one does not exist already. You can use tools like Process Monitor to locate the file:

For our sqlplus example it will be:
G:instantclient_12_1networkadminsqlnet.ora
Next the file should be updated with encryption-specific information:
SQLNET.CRYPTO_CHECKSUM_TYPES_CLIENT = (MD5)
SQLNET.ENCRYPTION_TYPES_CLIENT = (AES256)
SQLNET.ENCRYPTION_CLIENT = required
SQLNET.CRYPTO_CHECKSUM_CLIENT = required
This will result in communications with the server using encryption and check-summing. Confirm this by examining network capture before and after sqlnet.ora change and by reading Oracle Client Trace file:
2015-08-18 10:34:24.112973 : naeecom:entry
2015-08-18 10:34:24.112973 : naeecom:The server chose the 'AES256' encryption algorithm
2015-08-18 10:34:24.112973 : naeecom:exit
2015-08-18 10:34:24.112973 : naeccom:entry
2015-08-18 10:34:24.112973 : naeccom:The server chose the 'MD5' crypto-checksumming algorithm
2015-08-18 10:34:24.112973 : naeccom:exit
2015-08-18 10:34:24.112973 : na_tns:entry
2015-08-18 10:34:24.112973 : na_tns:Secure Network Services is available.
2015-08-18 10:34:24.112973 : nau_adi:entry
2015-08-18 10:34:24.112973 : nau_adi:exit
2015-08-18 10:34:24.112973 : na_tns:    authentication is not active
2015-08-18 10:34:24.112973 : na_tns:    encryption is active, using AES256
2015-08-18 10:34:24.112973 : na_tns:    crypto-checksumming is active, using MD5
To examine the trace, we need to prepare a directory for it. Otherwise it will go to inconvenient locations (i.e., nested deep in C:WINDOWS). So create this directory under sqlplus location:
logdiagclients
And add this line to the sqlnet.ora:
TRACE_LEVEL_CLIENT = supportNow after running sqlplus, look for *.trc files under the trace directory nested under the logdiagclients directory created above. Although you can easily explore *.trc files in a text editor, Oracle provides a tool called trcasst that produces more readable output from trace files:
trcasst ora_6100_6316.trc > ora_6100_6316.txt
Here’s a snippet from ora_6100_6316.txt:
---> Send 143 bytes - Data packet  timestamp=015-09-02 13:19:11.545093
        Native Services negotiation packet version#: 0
                 Service data packet #0 for Supervisor has 3 subpackets
                        Subpacket #0:  Version #202375680
                        Subpacket #1: 0000000000000000
                        Subpacket #2: DEADBEEF0003000000040004000100010002
                 Service data packet #1 for Authentication has 3 subpackets
                        Subpacket #0:  Version #202375680
                        Subpacket #1: UB2: 57569
                        Subpacket #2: FCFF
                 Service data packet #2 for Encryption has 2 subpackets
                        Subpacket #0:  Version #202375680
                        Subpacket #1: 11
                 Service data packet #3 for Data Integrity has 2 subpackets
                        Subpacket #0:  Version #202375680
                        Subpacket #1: 01
For debugging encryption, however, examining trc files is better since more encryption-specific information is available within them rather than in the trcasst processed output.
Enabling SSL
SSL communication is configured in Oracle by creating two wallets (client and server) that will store certificates and modifying sqlnet.ora, tnsnames.ora and listener.ora configuration files.
Using the orapki utility, the process is relatively easy. See Document 401251.1 (Configuring SSL for Client Authentication and Encryption With Self Signed Certificates On Both Ends Using orapki) on Oracle’s support website for details of each orapki option. Here I’ll just post step-by-step instructions.
Setting up SSL requires certificates to be signed by a trusted certificate authority (CA). For development and testing purposes it is convenient to use self-signed certificates. Next we will configure the server and the client separately using a self-signed certificate.
Server
Create a server wallet with autologin property turned on:
orapki wallet create -wallet /home/oracle/app/oracle/product/12.1.0/dbhome_1/db_wallet -auto_loginAfter this command is executed (it will prompt you for a password — choose a good one) a directory named db_wallet will be created along with the following files:
-rw------- 1 oracle oinstall 120 Aug 31 18:24 cwallet.sso
-rw-rw-rw- 1 oracle oinstall   0 Aug 31 18:24 cwallet.sso.lck
-rw------- 1 oracle oinstall  75 Aug 31 18:24 ewallet.p12
-rw-rw-rw- 1 oracle oinstall   0 Aug 31 18:24 ewallet.p12.lck
cwallet.sso* files are only created when the auto_login option is used and contains an «obfuscated copy of the wallet» per Oracle documentation.
Now add a self-signed certificate to the wallet and export it for subsequent import on the client:
orapki wallet add -wallet /home/oracle/app/oracle/product/12.1.0/dbhome_1/db_wallet -dn 'CN=root_test_CA,C=US' -keysize 2048 -self_signed -validity 10 -pwd ...
Examine the wallet contents:
orapki wallet display -wallet /home/oracle/app/oracle/product/12.1.0/dbhome_1/db_wallet
...
Oracle PKI Tool : Version 12.1.0.2
Copyright (c) 2004, 2014, Oracle and/or its affiliates. All rights reserved.
Requested Certificates:
User Certificates:
Subject:        CN=root_test_CA,C=US
Trusted Certificates:
Subject:        CN=root_test_CA,C=US
...
Notice the Trusted Certificates part — it has the root_test_CA certificate now. Let’s export it to a file:
orapki wallet export -wallet /home/oracle/app/oracle/product/12.1.0/dbhome_1/db_wallet -dn 'CN=root_test_CA,C=US' -cert /home/oracle/app/oracle/product/12.1.0/dbhome_1/db_wallet/root_test_CA.cert
Our next step is to create the server certificate using the orapki utility, which will be presented to a client during SSL handshake phase. However for a simple test, one may use self-signed root certificate as a server certificate so I’ll skip this step.
Now it’s time to update the sqlnet.ora file with the server wallet location:
WALLET_LOCATION=
  (SOURCE=
    (METHOD=file)    (METHOD_DATA=(DIRECTORY=/home/oracle/app/oracle/product/12.1.0/dbhome_1/db_wallet)))
And add this line since we are not going to use client authentication:
SSL_CLIENT_AUTHENTICATION = FALSE
Finally, to configure the server for SSL we must add TCPS entry to the listener.ora file:
...
 (ADDRESS = (PROTOCOL = TCPS)(HOST = 192.168.1.101)(PORT = 2484))
...
Then add a link to the server wallet (yes, the same entry as in sqlnet.ora file):
WALLET_LOCATION=
  (SOURCE=
    (METHOD=file)    (METHOD_DATA=(DIRECTORY=/home/oracle/app/oracle/product/12.1.0/dbhome_1/db_wallet)))
Restart the listener after these changes or reload its configuration.
Client
In our example we do not have orapki on the client machine, so client wallet creation and trusted certificate import could be done on the server, and then the wallet files should be copied to the client.
Creating the client wallet:
orapki wallet create -wallet /home/oracle/app/oracle/product/12.1.0/dbhome_1/client_wallet -auto_login -pwd ...
Import the root CA certificate:
orapki wallet add -wallet /home/oracle/app/oracle/product/12.1.0/dbhome_1/client_wallet -trusted_cert -cert /home/oracle/app/oracle/product/12.1.0/dbhome_1/db_wallet/root_test_CA.cert -pwd ...
This will allow the client to validate the server’s certificate since now both client and server have one trusted certificate. Copy contents of the client_wallet directory to the client and update the client’s sqlnet.ora to point to the wallet files just copied:
WALLET_LOCATION=
  (SOURCE=
    (METHOD=file)
    (METHOD_DATA=(DIRECTORY=G: instantclient_12_1client_wallet)))
Now, to instruct our OCI application (sqlplus) to use SSL we must create an entry (alias) in the tnsnames.ora file on the client that will resolve the connection identifier so that TCPS protocol is used instead of TCP. Create a file named tnsnames.ora under networkadmin with content like the following:
REMOTE_SSL_DB =
(DESCRIPTION =
 (ADDRESS = (PROTOCOL = TCPS)(HOST = 192.168.1.101)(PORT = 2484))
 (CONNECT_DATA=
  (SERVER = DEDICATED)
  (SERVICE_NAME = orcl12c1)
 )
)
Make sure that all round brackets are in place: if you type it in manually with typos, the connection attempt will fail with errors like «ORA-12154: TNS:could not resolve the connect identifier specified». That is why sometimes using a GUI tool is beneficial :).
Now try to connect:
sqlplus -L system@REMOTE_SSL_DB
If the connection fails, examining the trace file corresponding to this failure (see logdiagclientsuser_...host_..trace) is very helpful. Search for the words «SSL» and «error.»
To verify that we are connected via SSL, run this query in sqlplus:
SQL> SELECT SYS_CONTEXT('USERENV', 'network_protocol') FROM DUAL;
----------------------------------------------------------------------
tcps
Notice you can perform additional SSL configuration on the client: selecting which algorithms to use for authentication, enabling encryption and data integrity checks, selecting which SSL version to use and some others. For example, this sqlnet.ora fragment instructs the client to use version 3.0 of SSL and use SSL_RSA_WITH_DES_CBC_SHA cipher suite:
SSL_VERSION = 3.0
SSL_CIPHER_SUITES = (SSL_RSA_WITH_DES_CBC_SHA)
Note that both the client and the server must support the SSL version and cipher suites specified for the connection to succeed. Again, the best source to verify what setting has been used is the client and server trace.
Trouble-shooting connection errors returned by the client
ORA-29019: The protocol version is incorrect
Examine SSL_VERSION value in sqlnet.ora file: if set, it must be 3.0 or 1.0 or 1.1 or 1.2 or certain combinations of these values (see https://docs.oracle.com/cd/E11882_01/network.112/e10835/sqlnet.htm#NETRF235 for details).
ORA-28860: Fatal SSL error
If the client trace file contains lines like these:
nioqper:   ns main err code: 12560
nioqper:   ns (2)  err code: 0
nioqper:   nt main err code: 28862
nioqper:   nt (2)  err code: 542
nioqper:   nt OS   err code: 0
Examine SSL_VERSION value in sqlnet.ora on both the client and server: if set, there should be a match.
If client trace file contains lines like these:
nioqper: error from nscall
nioqper:   ns main err code: 12560
nioqper:   ns (2)  err code: 0
nioqper:   nt main err code: 28860
nioqper:   nt (2)  err code: 542
nioqper:   nt OS   err code: 0
Examine SSL_CLIENT_AUTHENTICATION setting in the server sqlnet.ora file: it must be explicitly set to FALSE for SSL configuration without client authentication (our example with sqlplus).
ORA-28759: failure to open file
OCI client cannot open the wallet file. Check the syntax in the sqlnet.ora file and then the actual wallet files. The trace contains lines like this:
ntzlogin:Wallet open failed with error 28759
ntzlogin:returning NZ error 28759 in result structure
ntzlogin:failed with error 540
ORA-12154: TNS:could not resolve the connect identifier specified
Make sure tnsnames.ora on the client has the correct alias for the SSL database.
There are many other possible errors, and here we only listed some of the most common. Again, examining the trace file coupled with some filesystem/network monitoring is usually sufficient to resolve the problem.
Trustwave database scanning products contain a variety of Oracle configuration checks that help ensure encryption is configured properly.
Hi Duo,
It’s alright.
For the SSL error, I created wallet again with the same security certificate but using a different name and it worked. I guess the previous certificate, although not expired, got corrupted.
I do have one one more issue.
The below error comes frequently and out of the blue. I am unable to undesrstand the cause of the error.
Response> Status Code: 500
Response> Reason Phrase: Internal Server Error
Response> HTTP Version: HTTP/1.1
Response> Date: Mon, 05 Oct 2020 10:11:28 GMT
Response> Content-Type: text/html;charset=UTF-8
Response> Transfer-Encoding: chunked
Response> Connection: close
Response> Set-Cookie: __cfduid=de03d093303822881a0db55e6210104111601892687; expires=Wed, 04-Nov-20 10:11:27 GMT; path=/; domain=.apps.esignlive.com.au; HttpOnly; SameSite=Lax; Secure
Response> Allow: GET, POST, HEAD, PUT, PATCH, DELETE
Response> CF-Cache-Status: DYNAMIC
Response> cf-request-id: 0599d7b66a0000a9a0b6244200000001
Response> Expect-CT: max-age=604800, report-uri=»https://report-uri.cloudflare.com/cdn-cgi/beacon/expect-ct»
Response> Strict-Transport-Security: max-age=15552000; includeSubDomains; preload
Response> X-Content-Type-Options: nosniff Response> Server: cloudflare
Response> CF-RAY: 5dd65bd0ad93a9a0-SIN
Response body> <html><head><title>Error</title></head><body>Internal Server Error</body></html>
I’ve been working on a project for a client where they now need to have application servers outside of their network that connect to their database. To do this they needed to be sure that network traffic for Oracle was secure. As such, I’ve learned through a lot of reading and testing how to configure Oracle Native Network Encryption (NNE) and Oracle SSL-based Network Encryption (referred to here as SSL.)
I have tried to narrow it down to just the key configurations and steps you need to do. I found many sites include settings that aren’t required, or settings they configured where not needed, etc. so I hope this allows you to quickly, and fairly easily, configure whichever you want with just the basics, and then you can read and add anything extra you might needed.
One more note, all my testing for this was done with Oracle 11.2 server, and 11.2 and 12.1 clients.
My thoughts on NNE versus SSL
- NNE is very simple to configure, SSL is much harder to configure and debug.
NNE config is very simple, SSL is complex. - SSL requires use of a second port to have unencrypted and encrypted connections .
NNE does not require an additional port to support unencrypted and encrypted.
Having separate ports can be a good thing, e.g. you can configure firewalls to them. - SSL is more secure than NNE (at cost of harder configuration.)
- NNE connections allow you to see the initial connection string, but SSL does not.
- SSL has a lot of functionality that could be useful, in our case it should allow us to revoke a certificate from use by particular clients if we find they are compromised, thus preventing them from connecting.
Checking if your data is encrypted
To check if your connection is enrypted there are many things you can do, here are the two things I would check to make sure. Before you get started you should try this out, especially tcpdump (if you can, or find someone who can) so you can see the before product. Also, on every client you should do this after you configure to make sure it is working.
Check the network protocol of your connection
Once logged into your database, run the following SQL statement to check the network protocol it is using:
SELECT SYS_CONTEXT('USERENV', 'network_protocol') FROM DUAL;
If encryption is set you should see TCPS.
Look at the actual data
The best way is to watch the actual data being transferred. This can be done using the tcpdump utility on a Linux server. You’ll probably need root access or some permissions. This command will show the data being passed on port 1521 (change that if you’re using another port for Oracle), and then it puts it into a file so you can review it. While you can look at the raw data and usually determine if it is encrypted or not, you should examine it with a utility like WireShark to be sure.
tcpdump -i eth2 tcp port 1521 -s 65535 -n -w /tmp/tcpdump.raw
tcpdump  -n -v -v -xX -s 0 -i eth0 ip and host 10.255.188.151 and port 1521
Here is an example of the unencrypted and encrypted output of a SQL statement:
select 'Hello, this is Jed', name from v$database;
Unencrypted:
3Q`€i'HELLO,THISISJED'€ i NAMExv è22"Hello, this is JedX40JE5¼'7ž?[”Ÿ
Encrypted:
Well, honestly I can’t tell where it is because it is all un-readable:
EäõP@@ÚþIOvï¤0pñu„3y¦UhAªïW Ž¡é;Š "N{$ì²Á>¶?[”òò„ˆŠhЬ-»
Another note, on NNE, you will be able to see the initial connect string before the encryption starts. This is very important because that does contain information the most likely should be hidden from prying eyes.
Configuring Native Network Encryption
Native Network Encryption can be configured at the Client, Server, or both. It also has various settings that give the ability to control whether, and from where, it is used. So, you do not “have” to configure it on both sides, but in the basic setup:
- If configured at the server, all clients need to abide by the rules set on the server.
- If configured only on the client, only that client is encrypted (if desired.)
The very basic configuration parameters are (note, you should look up the parameters as you can often change the setting if desired). You add these settings into your sqlnet.ora file.
Server:
SQLNET.ENCRYPTION_SERVER = required
SQLNET.ENCRYPTION_TYPES_SERVER = (AES256)
Client:
SQLNET.ENCRYPTION_CLIENT = required
SQLNET.ENCRYPTION_TYPES_CLIENT = (AES256)
This sets up basic encryption using AES256. Both of these parameters have different settings you can use. Please read up on them to determine how you want it used. the ENCRYPTION_SERVER|CLIENT can be used to require|allow|reject|… whether encryption is used.
The following are additional parameters you might/probably want to use for setting up checksum of your encrypted data (to help ensure the encrypted data is not-altered or corrupted) and the CRYPTO_SEED to make the random encryption keys more secure (10-70 characters, the more the better.)
Server:
SQLNET.CRYPTO_CHECKSUM_SERVER = required
SQLNET.CRYPTO_CHECKSUM_TYPES_SERVER = (MD5)
SQLNET.CRYPTO_SEED='adljaEOVI30Viu_make_it_your_own_q3099ih1ioh0DJAKDL'
Client:
SQLNET.CRYPTO_CHECKSUM_CLIENT = required
SQLNET.CRYPTO_CHECKSUM_TYPES_CLIENT = (MD5)
SQLNET.CRYPTO_SEED='adljaEOVI30Viu_make_it_your_own_q3099ih1ioh0DJAKDL'
There are more things you can do so find the appropriate version of Oracle’s documentation and read up.
Now try to connection from your client and test to see if the data is encrypted.
If your client does not use SQL*Net, chances are it is using JDBC, so here are parameters to add to your JDBC connect string to imitate the above:
CONNECTION_PROPERTY_THIN_NET_ENCRYPTION_LEVEL ~= SQLNET.ENCRYPTION_CLIENT
e.g. prop.setProperty(OracleConnection.CONNECTION_PROPERTY_THIN_NET_ENCRYPTION_LEVEL,"REQUIRED");

CONNECTION_PROPERTY_THIN_NET_ENCRYPTION_TYPES ~= SQLNET.ENCRYPTION_TYPES_CLIENT
e.g. prop.setProperty(OracleConnection.CONNECTION_PROPERTY_THIN_NET_ENCRYPTION_TYPES, "( AES256, AES192 )");
more at https://docs.oracle.com/database/121/DBSEG/asojbdc.htm#DBSEG9609
Configuring SSL Network Encryption
SSL is much more complicated, so I’ve broken it into steps. Remember, I’m covering just the basics to get it working, there is a lot more you can do. I did not setup SSL database authentication, but if we do that, I’ll add it. Also, if you prefer using the GUIs (for this, Net Manager and Wallet Manager) please do – you can always check your configuration files to compare with what I’ve provided. I’d prefer to show you what should be in those actual files. Also, realize that using a GUI will result in a lot more parameters in your config files than I’ll present to you. If you’re modifying configuration files by hand, remember that little typos can be a PITA for you.
Step 1: Install Oracle Advanced Security
If you’re using Enterprise level Oracle installation everything should be pre-installed (it was for me.) If you aren’t (e.g. Standard) you’ll need to install it. I’m not going to cover that as it is another topic.
Note that in these instructions it using my Oracle Home, etc. You will most likely need to modify some of the commands to fit you environment.
Step 2: Configure server side
Create a wallet
https://docs.oracle.com/cd/E11882_01/network.112/e40393/asowalet.htm#ASOAG9731
Use Wallet Manager (GUI), or pki command line utility. Use a strong password and store it securely. The autologin is required for database and clients and so that they do not have to authenticate with the PKI services (i.e. if you don’t use it, it won’t work.)
You can also create the wallet with -auto_login_local. This prevents the wallet from being moved to another computer and working there. This is most likely a good idea.
orapki wallet create -wallet /oracle/product/11.2.0.4/db_wallet -auto_login_local
ls -l /oracle/product/11.2.0.4/db_wallet
Add/Import certificate to wallet.
In this case I’m just creating my own self-signed certificate. There are many options here to consider.
orapki wallet add -wallet /oracle/product/11.2.0.4/db_wallet -dn 'CN=my_self_signed_cert,C=US' -keysize 2048 -self_signed -validity 10
If you see: PKI-02003: Unable to load the wallet – probably your password does not match wallet password.
If you have a specific certificate you need to use then import
orapki wallet add -wallet /oracle/product/11.2.0.4/client_1/db_wallet -trusted_cert -cert /tmp/<certname>
Check wallet contents
Check the contents of the wallet to make sure your certificate is there.
orapki wallet display -wallet /oracle/product/11.2.0.4/db_wallet
Export certificate to a file
Now you need to export the certificate (if you created it with orapki) so you can transfer to the client for import.
orapki wallet export -wallet /oracle/product/11.2.0.4/db_wallet -dn 'CN=my_self_signed_cert,C=US' -cert /tmp/my_self_signed_cert.crt
ls -l /oracle/product/11.2.0.4/db_wallet
Update listener.ora
Changing address settings on your listener can make it hard to control (e.g. won’t stop), if possible stop it before you make changes. The standard port for Oracle SSL Encrypted is 2484, you can add this to the existing 1521 if you won’t both, or just have the encrypted port.
Add the following.
LISTENER =
 (DESCRIPTION =
  ...
  (ADDRESS = (PROTOCOL = TCPS)(HOST = myhost.myplace.com)(PORT = 2484))
 )

WALLET_LOCATION=
 (SOURCE=
  (METHOD=file)
  (METHOD_DATA=(DIRECTORY=/oracle/product/11.2.0.4/db_wallet))
 )
SSL_CLIENT_AUTHENTICATION = FALSE
Update sqlnet.ora
This will seem redundant but the WALLET_LOCATION and SSL_CLIENT_AUTHENTICATION must be in both listener.ora and sqlnet.ora. I did a lot of testing and could not get success without the settings being in both.
WALLET_LOCATION=
 (SOURCE=
  (METHOD=file)
  (METHOD_DATA=(DIRECTORY=/oracle/product/11.2.0.4/db_wallet))
 )
SSL_CLIENT_AUTHENTICATION = FALSE
Restart listener
Start or Restart the listener and verify that it is working. You should see something like the following depending on whether you have multiple ports configured:
Listening Endpoints Summary...
 (DESCRIPTION=(ADDRESS=(PROTOCOL=tcp)(HOST=myhost.myplace.com)(PORT=1521)))
 (DESCRIPTION=(ADDRESS=(PROTOCOL=tcps)(HOST=myhost.myplace.com)(PORT=2484)))
Next you need to complete the client-side configuration.
Step 2: Configure client side
Transfer certificate to client
Use your preferred tool, but put the certificate you exported from the server-side wallet onto the client server. This is just so you can import it to the wallet. Keep it secure and remove it when done.
Instant Client
If you’re using the Oracle Instant Client you most-likely do not have the orapki utility that is used to create and manage an Oracle Wallet. If this is the case I would recommend re-installing the Client as a RunTime environment which has the orapki, for example:
./runInstaller -silent -debug -force
oracle.install.client.installType=Runtime
UNIX_GROUP_NAME=ndtcac
INVENTORY_LOCATION=/oracle/oraInventory
SELECTED_LANGUAGES=en
ORACLE_HOME=/oracle/product/12.2.0/client_1
ORACLE_BASE=/oracle
waitForCompletion=true
oracle.installer.autoupdates.option=SKIP_UPDATES
-ignoreSysPrereqs
Create a wallet
Use Wallet Manager (GUI), or pki command line utility:
orapki wallet create -wallet /oracle/product/11.2.0.4/client_1/client_wallet -auto_login_local
Import the certificate
orapki wallet add -wallet /oracle/product/11.2.0.4/client_1/client_wallet -trusted_cert -cert /tmp/my_self_signed_cert.crt
Update tnsnames.ora
Modify the entry to use TCPS and secure port 2484
(ADDRESS = (PROTOCOL = TCPS)(HOST = myhost.myplace.com)(PORT = 2484))
Update sqlnet.ora
Add the following:
ENCRYPTION_WALLET_LOCATION =
 (SOURCE =
  (METHOD = FILE)
  (METHOD_DATA = (DIRECTORY = /oracle/product/11.2.0.4/client_1/client_wallet))
 )
WALLET_LOCATION =
 (SOURCE =
  (METHOD = FILE)
  (METHOD_DATA = (DIRECTORY = /oracle/product/11.2.0.4/client_1/client_wallet))
 )
In some cases things won’t work if the server and client, by default, use different versions of SSL you might have to set SSL_VERSION on both to make sure they sync up.
SSL_VERSION = x
The following are tracing parameters to help troubleshoot problems, and can be extremely useful when things don’t work.
TRACE_LEVEL_CLIENT = SUPPORT
TRACE_TIMESTAMP_CLIENT = ON
ADR_BASE = C:oracleproduct11.2.0client_1log
SSL_CLIENT_AUTHENTICATION = FALSE # might be needed, but if on server-side you should be fine.
Troubleshooting
Using client level tracing can really help with errors.Using client level tracing can really help with errors. It is very useful (and necessary at times) to enable tracing on your client to determine what is happening. You should read the file, but if you’re in a hurry you can search for “handshake” and likely will find what you need there.
The following document has more good troubleshooting information: https://docs.oracle.com/cd/B28359_01/network.111/b28530/asossl.htm#i1013323
Some useful tools:
This openssl OS command will show if SSL is installed and a lot of useful information about the certificate, such as SSL version, CIPHER, etc.
openssl x509 -in <cert file> -noout -text -purpose
The adapters OS command will show the available Oracle SSL adapters on your server.
adapters
Some things I encountered
ORA-28759: failure to open file
* make sure wallet_location is correct
* make sure permissions are good
* make sure auto-login was setup
* if removing encryption, make sure connection string is TCP, not TCPS
ORA-28860: Fatal SSL error
* first make sure you have SSL_CLIENT_AUTHENTICATION = FALSE in your server listener.ora and sqlnet.ora
* it is possible they cannot agree on a cipher and you might need to set SSL_CIPHER_SUITES
* try stopping and starting the listener. I’ve found that changes to the wallet can require a listener restart to work.
ORA-28864: SSL connection closed gracefully
* it is possible they cannot agree on a cipher and you might need to set SSL_CIPHER_SUITES
ORA-28865: SSL connection closed
* might need SSL_VERSION set to match on client/server (if client/server have different Oracle versions this could be the case.)
* try making sure all parameters on server are in both listener.ora and sqlnet.ora
ORA-29024: Certificate validation failure
* This was fixed by making sure client sqlnet.ora had SSL_CLIENT_AUTHENTICATION = FALSE
We are not using SSL, but as name we keep using it. Obviously we use the newer version TLS. However, older versions of Oracle (up to 11.2.0.4) may not support TLSv1.2:
SQL> select utl_http.request('https://www.oracle.com',null,'file:/u01/app/oracle/product/12/db/wallet','Welcome1')
   from dual;

ERROR at line 1:
ORA-29273: HTTP request failed
ORA-06512: at "SYS.UTL_HTTP", line 1720
ORA-28860: Fatal SSL error
ORA-06512: at line 1
Example
So we go through the basics, which is not straightforward on 12c, because of several security restrictions.
# prep our user
SQL> create user test identified by Welcome1;

User created.

SQL> grant connect,resource to test;

Grant succeeded.

begin
  dbms_network_acl_admin.create_acl (
    acl         => 'utl_http.xml',
    description => 'HTTP Access',
    principal   => 'TEST',
    is_grant    => TRUE,
    privilege   => 'connect',
    start_date  => null,
    end_date    => null);

  dbms_network_acl_admin.add_privilege (
    acl        => 'utl_http.xml',
    principal  => 'TEST',
    is_grant   => TRUE,
    privilege  => 'resolve',
    start_date => null,
    end_date   => null
  );

  dbms_network_acl_admin.assign_acl (
    acl        => 'utl_http.xml',
    host       => 'www.oracle.com',
    lower_port => 443,
    upper_port => 443
  );
end;
/
Examine the certificate chain:
openssl s_client -connect www.oracle.com:443 -showcerts
   </dev/null &> /tmp/request
depth=2 C = US, O = GeoTrust Inc., CN = GeoTrust Global CA
verify return:1
depth=1 C = US, O = GeoTrust Inc., CN = GeoTrust SSL CA - G3
verify return:1
depth=0 C = US, ST = California, L = Redwood Shores, O = Oracle Corporation, OU = Content Management Services IT, CN = www.oracle.com
verify return:1
CONNECTED(00000003)
---
We need all certificates in the chain to trust the site identified as «CN = www.oracle.com»;
We need the Certificate Authority certificate (#2) «CN = GeoTrust Global CA» and we need the Chain certificate (#1) «CN = GeoTrust SSL CA — G3».
At this point, we see in the openssl request, only the site certificate and the chain certificate are returned. The root certificate is assumed to be installed at the client site. On CentOS, that is installed in /etc/pki/tls/certs/ca-bundle.crt
In order to obtain the root certificate, we can extract one with a browser and transfer that to the server, or try to extract the certificate from the bundle on our server. We do the latter.
We start first with the chain certificate from the request; it contained 2 certificates; the chain and the server’s certificate. We need only the first:
grep -n 'BEGIN CERTIFICATE' /tmp/request |tail -1
70:-----BEGIN CERTIFICATE-----
grep -n 'END CERTIFICATE' /tmp/request |tail -1
95:-----END CERTIFICATE-----
We copy the lines between 70 and 95 to the chain certificate:
head -95 /tmp/request |tail -26 > /tmp/chain.cer
We review the CA bundle on our server to contain a GeoTrust certificate:
openssl crl2pkcs7 -nocrl -certfile /etc/pki/tls/certs/ca-bundle.crt
 | openssl pkcs7 -print_certs -text -noout|grep 'CN=GeoTrust Global CA'
        Issuer: C=US, O=GeoTrust Inc., CN=GeoTrust Global CA
        Subject: C=US, O=GeoTrust Inc., CN=GeoTrust Global CA
        Issuer: C=US, O=GeoTrust Inc., CN=GeoTrust Global CA 2
        Subject: C=US, O=GeoTrust Inc., CN=GeoTrust Global CA 2
So we need to identy the correct certificate in the bundle. We do so by observing all issuers:
openssl crl2pkcs7 -nocrl -certfile /etc/pki/tls/certs/ca-bundle.crt
  | openssl pkcs7 -print_certs -text -noout|grep 'Issuer:' > /tmp/issuers.out
# Count the root certificates by issuers and double check that against the bundle. They should match:
cat /tmp/issuers.out |wc -l
167
grep 'BEGIN CERTIFICATE' /etc/pki/tls/certs/ca-bundle.crt| wc -l
167
Check, so we need find what certificate is ‘CN=GeoTrust Global CA’
grep -n 'CN=GeoTrust Global CA' /tmp/issuers.out
80:        Issuer: C=US, O=GeoTrust Inc., CN=GeoTrust Global CA
The 80th certificate we need to extract from the bundle:
grep -n  'BEGIN CERTIFICATE' /etc/pki/tls/certs/ca-bundle.crt
|head -80|tail -1
1913:-----BEGIN CERTIFICATE-----
grep -n  'END CERTIFICATE' /etc/pki/tls/certs/ca-bundle.crt
|head -80|tail -1
1932:-----END CERTIFICATE-----
That is the line numbers we need to extract between:
head -1932 /etc/pki/tls/certs/ca-bundle.crt | tail -20 > /tmp/root.cer
With the two certificates, we can construct our wallet;
echo $ORACLE_HOME
/u01/app/oracle/product/12/db
myWalletDir=$ORACLE_HOME/mywallet
mkdir $ORACLE_HOME/mywallet
# create the wallet
orapki wallet create -wallet $myWalletDir
-auto_login -pwd Welcome1
# add the certificates
orapki wallet add -wallet $myWalletDir
-trusted_cert -cert /tmp/root.cer -pwd Welcome1
orapki wallet add -wallet $myWalletDir
-trusted_cert -cert /tmp/chain.cer -pwd Welcome1
# display the resulting wallet contents
orapki wallet display -wallet $myWalletDir -pwd Welcome1
Oracle PKI Tool : Version 12.1.0.2
Copyright (c) 2004, 2014, Oracle and/or its affiliates. All rights reserved.

Requested Certificates:
User Certificates:
Trusted Certificates:
Subject:        CN=GeoTrust SSL CA - G3,O=GeoTrust Inc.,C=US
Subject:        CN=GeoTrust Global CA,O=GeoTrust Inc.,C=US

ls $myWalletDir
cwallet.sso  cwallet.sso.lck  ewallet.p12  ewallet.p12.lck
echo $myWalletDir
/u01/app/oracle/product/12/db/mywallet
Now we can query. We use the wallet in format file:/path/to/myWalletDir, and the password of the wallet:
sqlplus test/Welcome1

select utl_http.request('https://www.oracle.com',null,
  'file:/u01/app/oracle/product/12/db/mywallet','Welcome1') from dual;

UTL_HTTP.REQUEST('HTTPS://WWW.ORACLE.COM',NULL,'FILE:/U01/APP/ORACLE/PRODUCT/12/
--------------------------------------------------------------------------------

<!DOCTYPE html>

<html lang="en-US" class="no-js">
And some housecleaning when we are done:
sqlplus / as sysdba

begin
  DBMS_NETWORK_ACL_ADMIN.DROP_ACL (
    acl         => 'utl_http.xml');
end;
/

drop user test;
Introduction
This tutorial walks through enabling TLS/SSL encryption between an application and Oracle database, including basic encryption, certificate validation, distinguished name validation, and mutual authentication.
Self-signed certificates, generated by Oracle-provided tools, are used throughout.
Assumptions
The following assumptions are made:
- An Oracle database is running on a linux server named db.firstworks.com.
- The database was installed by the oracle user.
- The database contains an instance named ora1 which is accessible using scott/tiger credentials.
- An application which accesses the database is installed on a linux server named app.firstworks.com.
- Oracle Instant Client is the only Oracle software installed on app.firstworks.com.
- It is possible to scp from db.firstworks.com to root@app.firstworks.com.
- It is possible to scp from app.firstworks.com to oracle@db.firstworks.com.
Basic Encryption
First, we will configure basic TLS/SSL encryption of the communications between the database and application server.
Database Server Configuration
Log in to the database server as the oracle user and create a wallet:
orapki wallet create -wallet /u01/app/oracle/wallet -auto_login -pwd Passw0rd
The orapki options above do the following things:
- -wallet specifies the path for the wallet.
- A wallet is just a directory with some files under it.
- If you need to delete a wallet, just delete the directory.
- -auto_login indicates that the wallet will be used for logins.
- There is also an alternative -auto_login_local option that locks the wallet down to the local machine. If the wallet is copied or moved to a different machine then attempts to use it will fail.
- These options can also be omitted, but it’s not clear what a wallet created without one of them can be used for.
- -pwd specifies a password for the wallet.
- This password must be supplied to modify the wallet, but is not required to use the wallet. It may be used by any user with permissions to read its files.
- If the -pwd option is omitted then the user will be prompted for the password on the command line.
- Passwords must contain 8 characters, and must contain at least 1 number.
- Obviously a more secure password than Passw0rd should be used.
Next, create a self-signed certificate:
orapki wallet add -wallet /u01/app/oracle/wallet -dn CN=db.firstworks.com
-keysize 2048 -self_signed -validity 3650 -pwd Passw0rd
This command actually does several things:
- Creates a 2048-bit private key, which is stored in the wallet (and cannot be exported using Oracle-provided tools).
- Uses the private key to create a certificate request certificate request for distinguished name CN=db.firstworks.com, which is also stored in the wallet.
- Uses the certificate request to create a self-signed root certificate which is valid for 10 years (3650 days).
- Stores the certificate as a Trusted Certificate.
- Also stores the certificate as a User Certificate.
You can display contents of the wallet as follows:
orapki wallet display -wallet /u01/app/oracle/wallet
You should see CN=db.firstworks.com as both a User Certificate and Trusted Certificate.
Next, configure the database instance to use the wallet.
Edit $ORACLE_HOME/network/admin/sqlnet.ora and append these lines:
WALLET_LOCATION =
   (SOURCE =
     (METHOD = FILE)
     (METHOD_DATA =
       (DIRECTORY = /u01/app/oracle/wallet)
     )
   )SQLNET.AUTHENTICATION_SERVICES = ALL
SSL_CLIENT_AUTHENTICATION = FALSE
SSL_CIPHER_SUITES = (SSL_RSA_WITH_AES_256_CBC_SHA, SSL_RSA_WITH_3DES_EDE_CBC_SHA)
These lines:
- Provide the path to the wallet.
- Enable «all» authentication services (including TLS/SSL), as opposed to only allowing database user/password authentication.
- Disables authentication of the peer’s certificate. For now we just want to encrypt communications.
- Enables a set of cipher suites. The default is «none» so a set of ciphers has to be explicitly provided.
Edit $ORACLE_HOME/network/admin/listener.ora and add these lines near the top:
WALLET_LOCATION =
  (SOURCE =
    (METHOD = FILE)
    (METHOD_DATA =
      (DIRECTORY = /u01/app/oracle/wallet)
    )
  )SSL_CLIENT_AUTHENTICATION = FALSE
These lines do the same things that they do in sqlnet.ora. It’s not clear why they have to be present in both files.
Also, edit $ORACLE_HOME/network/admin/listener.ora and update the LISTENER definition, adding an entry for the TCPS protocol on port 2484:
LISTENER =
  (DESCRIPTION_LIST =
    (DESCRIPTION =
      (ADDRESS = (PROTOCOL = IPC)(KEY = EXTPROC1521))
      (ADDRESS = (PROTOCOL = TCP)(HOST = db.firstworks.com)(PORT = 1521))
      (ADDRESS = (PROTOCOL = TCPS)(HOST = db.firstworks.com)(PORT = 2484))
    )
  )
Now, bounce the listener:
lsnrctl stop
lsnrctl start
That’s all on the database server.
Application Server Configuration
Oracle clients don’t create ephemeral keys, so on the application server, a wallet must also be created and populated with a User Certificate for the application.
Fortunately, this is relatively straightforward.
Log in to the database server as the oracle user, and…
- Create a wallet in the local directory.
- Create a self-signed certificate for the distinguished name CN=app.firstworks.com.
- Tar up the local wallet.
- Copy it to the application server.
- Clean up.
orapki wallet create -wallet ./wallet -auto_login -pwd Passw0rd
orapki wallet add -wallet ./wallet -dn CN=app.firstworks.com
-keysize 2048 -self_signed -validity 3650 -pwd Passw0rd
tar cf wallet.tar wallet
scp wallet.tar root@app.firstworks.com:
rm -r wallet wallet.tar
Log in to the application server as root, and…
- Create a directory to serve as the ORACLE_HOME, with network/admin subdirectories.
- Extract the wallet into the ORACLE_HOME.
- Fix permissions.
- Clean up.
mkdir -p /var/oraclehome
mkdir -p /var/oraclehome/network/admin
tar xf ~/wallet.tar
chmod 755 wallet
chmod 644 wallet/*
rm ~/wallet.tar
Create /var/oraclehome/network/admin/sqlnet.ora with the following contents:
WALLET_LOCATION =
   (SOURCE =
     (METHOD = FILE)
     (METHOD_DATA =
       (DIRECTORY = /u01/app/oracle/wallet)
     )
   )SQLNET.AUTHENTICATION_SERVICES = ALL
SSL_CLIENT_AUTHENTICATION = FALSE
SSL_CIPHER_SUITES = (SSL_RSA_WITH_AES_256_CBC_SHA, SSL_RSA_WITH_3DES_EDE_CBC_SHA)
Create /var/oraclehome/network/admin/tnsnames.ora with the following contents:
ora1=
(DESCRIPTION =
        (ADDRESS =
                (PROTOCOL = TCPS)
                (HOST = db.firstworks.com)
                (PORT = 2484)
        )
        (CONNECT_DATA =
                (SERVER = DEDICATED)
                (SERVICE_NAME = ora1)
        )
)
Note that PROTOCOL = TPCS and PORT = 2484 instead of TCP/1521.
That’s all on the application server.
Testing With SQLPlus
Connect to the database from the application server using sqlplus as follows:
ORACLE_HOME=/var/oraclehome sqlplus scott/tiger@ora1
You can verify that the connection is TLS/SSL-secured by running:
select sys_context('USERENV','network_protocol') from dual;SYS_CONTEXT('USERENV','NETWORK_PROTOCOL')
--------------------------------------------------------------------------------
tcps
If the connection fails, then it may fail for one of these common, but also very cryptic errors:
- ORA-12514: TNS:listener does not currently know of service requested in connect descriptor
- The listener isn’t ready.
- It can take a while. Try again in a minute or two.
- ORA-28864: SSL connection closed gracefully
- The wallet on the database server was created without the -auto_login option.
- Remove the wallet, re-create the wallet with the -auto_login option, and bounce the listener.
- ORA-29106: Cannot import PKSC #12 wallet
- The application server’s wallet was created with the -auto_login_local option.
- Remove the wallet, re-create the wallet with the -auto_login option instead of -auto_login_local, and move the new wallet to the application server.
- ORA-29024: Certificate validation failure
- You accidentally omitted or mispelled SSL_CLIENT_AUTHENTICATION = FALSE in sqlnet.ora, on the application server.
- Update sqlnet.ora on the application server with SSL_CLIENT_AUTHENTICATION = FALSE
- ORA-28860: Fatal SSL error
- You accidentally omitted or mispelled SSL_CLIENT_AUTHENTICATION = FALSE in sqlnet.ora and/or listener.ora, on the database server.
- Update sqlnet.ora and/or listener.ora on the database server with SSL_CLIENT_AUTHENTICATION = FALSE and bounce the listener.
Updating Your Application
To get your application to use the new configuration:
You must set the environment variable ORACLE_HOME to /var/oraclehome, either system-wide, in the app’s startup script, or in the app’s config file.
You must update your application to use the SID «ora1» defined in the tnsnames.ora files, rather than the full database connection string. This is typically done in the app’s config file, or sometimes in app code itself. For some apps, you have to set the environment variable ORACLE_SID, either system-wide, in the app’s startup script, or in the app’s config file.
Adding Database Certificate Validation
So far, we have encrypted communications between the application and the database, but we can make the application more secure by validating the database server’s certificate.
The basic steps are:
- Extract the database server’s certificate.
- Add it to the application server’s wallet.
- Set SSL_CLIENT_AUTHENTICATION = TRUE on the application server.
Conceptually, this isn’t very complex, but lack of orapki on the application server makes the process take a lot of unintuitive steps.
Log in to the database server as the oracle user, and export the database server’s certificate.
orapki wallet export -wallet /u01/app/oracle/wallet -dn CN=db.firstworks.com -cert db.crt -pwd Passw0rd
Log in to the application server as root, and…
- Tar up the wallet.
- Copy it to the database server.
- Clean up.
cd /var/oraclehome
tar cf wallet.tar wallet
scp wallet.tar oracle@db.firstworks.com:
rm wallet.tar
Log in to the database server as the oracle user, and…
- Extract the wallet locally.
- Add the database server’s certificate as a Trusted Certificate to the local wallet.
- Tar up the local wallet.
- Copy it to the application server.
- Clean up.
tar xf wallet.tar
rm wallet.tar
orapki wallet add -wallet ./wallet -trusted_cert -cert db.crt -pwd Passw0rd
tar cf wallet.tar wallet
scp wallet.tar root@app.firstworks.com:
rm -r wallet wallet.tar
rm db.crt
Log in to the application server as root, and…
- Remove the old wallet.
- Extract the updated wallet.
- Fix permissions.
- Clean up.
cd /var/oraclehome
rm -r wallet
tar xf ~/wallet.tar
chmod 755 wallet
chmod 644 wallet/*
rm ~/wallet.tar
Reconfigure the application server to validate the database’s certificate against the set of Trusted Certificates in the wallet by enabling SSL_CLIENT_AUTHENTICATION. Edit /var/oraclehome/network/admin/sqlnet.ora and set:
SSL_CLIENT_AUTHENTICATION = TRUE
The parameter name SSL_CLIENT_AUTHENTICATION is a bit of a misnomer, since we’re using it to authenticate the database server’s certificate. It should probably be called SSL_PEER_AUTHENTICATION.
Test the configuration using sqlplus:
ORACLE_HOME=/var/oraclehome sqlplus scott/tiger@ora1
If the connection fails, then it will likely fail with:
- ORA-29024: Certificate validation failure
- SSL_CLIENT_AUTHENTICATION = TRUE may be misspelled.
- Some wallet-update or wallet-transfer step failed or was skipped.
- In either case, just try again.
Adding Database Certificate Distinguished Name Validation
So far, we are encrypting communications between the application and the database and validating the database server’s certificate, but we can also make the application more secure by validating the distinguished name in the database server’s certificate.
Log in to the application server as root.
Edit /var/oraclehome/network/admin/sqlnet.ora, and add the line:
SSL_SERVER_DN_MATCH = TRUE
Edit /var/oraclehome/network/admin/tnsnames.ora, and add a SECURITY section to the ora1 entry as follows:
ora1=
(DESCRIPTION =
        (ADDRESS =
                (PROTOCOL = TCPS)
                (HOST = db.firstworks.com)
                (PORT = 2484)
        )
        (CONNECT_DATA =
                (SERVER = DEDICATED)
                (SERVICE_NAME = ora1)
        )
 (SECURITY =
  (SSL_SERVER_CERT_DN = "CN=db.firstworks.com")
 )
)
Then you can test the configuration using sqlplus:
ORACLE_HOME=/var/oraclehome sqlplus scott/tiger@ora1
If the connection fails, then it will likely fail with:
- ORA-29003: SSL transport detected mismatched server certificate.
- The distinguished name in the database server’s cert didn’t match the SSL_SERVER_CERT_DN entry in the tnsnames.ora file.
- Verify the spelling of the distinguished name in the tnsnames.ora and certificate, and update the entry in the tnsnames.ora accordingly. Alternatively, you could delete both wallets, start completely over and make sure to spell the name correctly in the certificate.
Adding Mutual Authentication
Just as we configured the application server to validate the database’s certificate, it is also possible to configure the database server to validate the application server’s certificate.
The basic steps are:
- Extract the application server’s certificate.
- Add it to the database server’s wallet.
- Set SSL_CLIENT_AUTHENTICATION = TRUE on the database server.
- Bounce the listener.
Conceptually, this isn’t very complex, but lack of orapki on the application server makes the process take several unintuitive steps.
Log in to the application server as root, and…
- Tar up the wallet.
- Copy it to the database server.
- Clean up.
cd /var/oraclehome
tar cf wallet.tar wallet
scp wallet.tar oracle@db.firstworks.com:
rm wallet.tar
Log in to the database server as the oracle user, and…
- Extract the wallet locally.
- Export the application server’s certificate from the local wallet.
- Add the application server’s certificate as a Trusted Certificate to the database server’s wallet.
- Clean up.
tar xf wallet.tar
orapki wallet export -wallet ./wallet -dn CN=app.firstworks.com -cert app.crt -pwd Passw0rd
orapki wallet add -wallet /u01/app/oracle/wallet -trusted_cert -cert app.crt -pwd Passw0rd
rm -r wallet wallet.tar app.crt
Edit $ORACLE_HOME/network/admin/sqlnet.ora, and update the SSL_CLIENT_AUTHENTICATION parameter to:
SSL_CLIENT_AUTHENTICATION = TRUE
Edit $ORACLE_HOME/network/admin/listener.ora, and update the SSL_CLIENT_AUTHENTICATION parameter to:
SSL_CLIENT_AUTHENTICATION = TRUE
This line does the same thing that it does in sqlnet.ora. It’s not clear why it has to be present in both files.
Bounce the listener:
lsnrctl stop
lsnrctl start
Then you can test the configuration from the application server, using sqlplus:
ORACLE_HOME=/var/oraclehome sqlplus scott/tiger@ora1
If the connection fails, then it will likely fail with:
- ORA-12514: TNS:listener does not currently know of service requested in connect descriptor
- The listener isn’t ready.
- It can take a while. Try again in a minute or two.
- ORA-28860: Fatal SSL error
- SSL_CLIENT_AUTHENTICATION = TRUE may be omitted or misspelled in sqlnet.ora and/or listener.ora.
- Some wallet-update or wallet-transfer step failed or was skipped.
- In either case, just try again and bounce the listener.
There is no obvious way to validate the distinguished name in the application server’s certificate. I suspect that this just isn’t supported.