Инструкция по эксплуатации Renault Trafic / Opel Vivaro с 2001 г. Органы управления, приборная панель, оборудование салона
2. Органы управления, приборная панель, оборудование салона
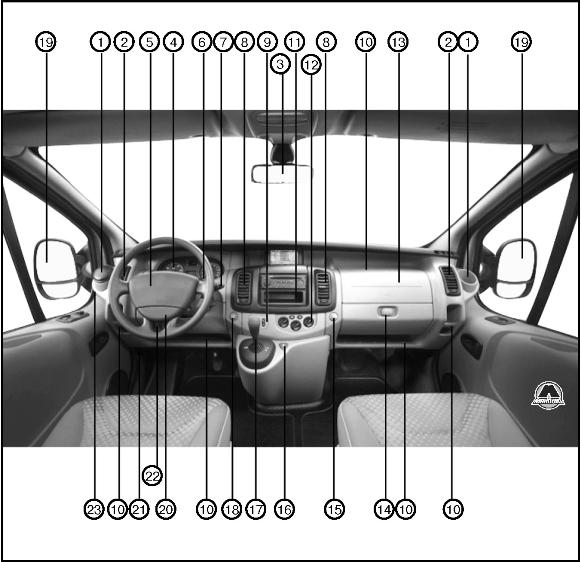
1. Углубления для пепельницы или подстаканника. 2. Боковые дефлекторы. 3. Внутреннее зеркало заднего вида. 4. Комбинация приборов. 5. Подушка безопасности водителя и кнопка звукового сигнала. 6. Дистанционное управление аудиосистемой. 7. Подрулевой переключатель стеклоочистителей и стеклоомывателей. 8. Центральные дефлекторы. 9. Выключатели подогрева заднего окна, центрального замка. 10. Полочки. 11. Ниша для модуля аудиосистемы, навигационной системы или мультимедийного дисплея. 12. Панель управления кондиционером/отопителем. 13. Подушка безопасности переднего пассажира. 14. Перчаточный ящик. 15. Крючок. 16. Кнопка аварийной световой сигнализации. 17. Рычаг коробки передач. 18. Прикуриватель. 19. Наружные зеркала заднего вида. 20. Регулировка положения рулевого колеса. 21. Рычаг отпирания капота. 22. Регулятор фар головного освещения. 23. Блок предохранителей.
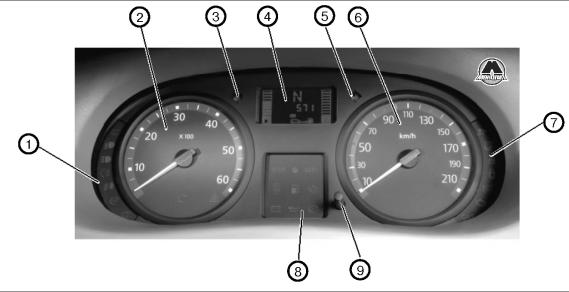
1. Панель индикаторов. 2. Тахометр. 3. Индикатор левого указателя поворота. 4. Жидкокристаллический дисплей (опция). 5. Индикатор правого указателя поворота. 6. Спидометр. 7. Панель индикаторов. 8. Предупредительные индикаторы. 9. Многофункциональная кнопка.
Жидкокристаллический дисплей
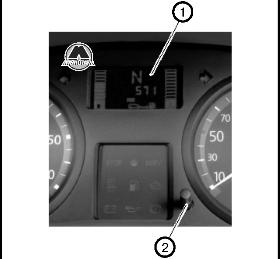
При включенном зажигании на жидкокристаллическом дисплее (1) может отображаться одометр (счетчик суммарного пробега автомобиля), счетчик суточного пробега или часы. Переключение между режимами отображения производится нажатием многофункциональной кнопки (2). Этой же кнопкой можно выставит значение часов или сбросить показания счетчика суточного пробега.
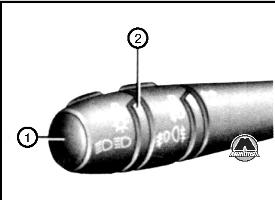
Подрулевой переключатель управления освещением
Для включения освещения автомобиля поверните наконечник рычага (1) так, чтобы изображенный выше символ находился напротив отметки (2). Одновременно включается подсветка приборов.
Для включения ближнего света фар головного освещения поверните наконечник рычага (1) так, чтобы изображенный выше символ находился напротив отметки (2). На панели приборов загорится соответствующая индикаторная лампочка.
Потяните наконечник рычага (1) к рулевому колесу из положения для ближнего света. Если включается дальний свет, загорается соответствующая индикаторная лампочка. Повторное движение рычага по направлению к рулевому колесу снова переключает на ближний свет.
Для выключения освещения переместите наконечник рычага в указанное положение.
Предупредительный зуммер «свет включен»
Открывание двери вызывает звуковой сигнал, если при выключенном зажигании не выключено также осветительное оборудование автомобиля (опасность разрядки аккумулятора).
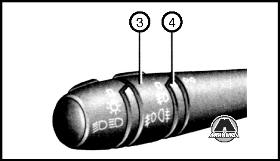
Метку (3) на среднем колечке рычага (4) установите напротив символа. В зависимости от страны, противотуманные фары подключаются к стояночным огням, ближнему или дальнему свету. На панели индикаторов загорается соответствующая сигнальная лампочка.
Метку (3) на среднем колечке рычага (4) установите напротив символа.
В зависимости от страны, противотуманные фонари подключаются к стояночным огням, ближнему или дальнему свету. На панели сигнальных и индикаторных лампочек загорается соответствующая сигнальная лампочка. Если видимость снова становится нормальной, не забывайте выключать противотуманные фонари, чтобы не ослеплять других участников дорожного движения. При выключении обычного осветительного оборудования автомобиля, гаснут также противотуманные фонари, если автомобиль оснащен таковыми.
Подача сигнала светом фар
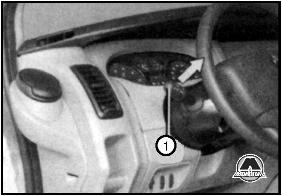
Для подачи сигнала водителям встречных автомобилей светом фар, кратковременно прижмите подрулевой рычаг (1) к рулевому колесу.
Примечание
Подача сигнала светом фар возможна независимо от включения и режима освещения автомобиля.
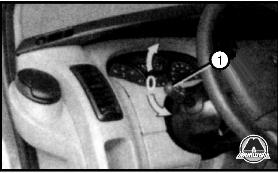
Переместите рычаг (1) вверх или вниз для включения соответственно правого или левого указателя поворота. Рычаг автоматически возвращается в исходное положение после прохождения поворота, когда рулевое колесо поворачивается в противоположном направлении. В некоторых случаях движений рулевого колеса недостаточно для автоматического возврата рычага в первоначальное положение. В этом случае необходимо довести рычаг в исходное положение самостоятельно. Для подачи сигнала о смене полосы движения на автомагистрали достаточно довести рычаг до среднего положения, из которого он вернется в положение 0 сразу после отпускания.
Электрическая регулировка угла наклона фар
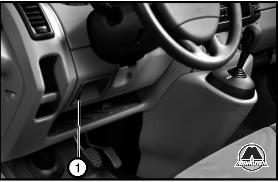
Переключателем (1) можно отрегулировать угол наклона фар. Вращайте переключатель, чтобы отрегулировать фары в зависимости от загрузки автомобиля.
Стеклоочистители и омыватели
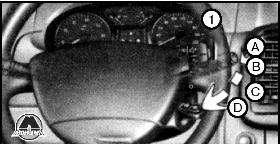
Стеклоочиститель ветрового стекла
Рычаг (1) при включенном зажигании может перемещаться в плоскости, параллельной к плоскости рулевого колеса, занимая следующие положения:
А — Выключен;
В — Прерывистое включение. Стеклоочистители в промежутках между очищающими движениями постоянно останавливаются на несколько секунд;
С — Замедленное движение стеклоочистителей;
D — Ускоренное движение стеклоочистителей.
Омыватели ветрового стекла
При включенном зажигании потяните на себя подрулевой переключатель для использования омывателя.
Стеклоочиститель заднего окна
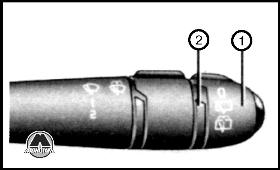
При включенном зажигании поверните наконечник рычага (1) так, чтобы метка (2) установилась напротив символа
При включенном зажигании поверните наконечник рычага (1) так, чтобы отметка (2) находилась напротив символа . Если рычаг отпустить, он автоматически возвращается в положение «Стеклоочиститель заднего стекла».
Аварийная световая сигнализация
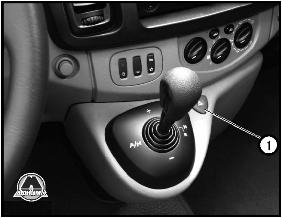
При нажатии на кнопку (1) включаются одновременно все габаритные огни и указатели поворотов, независимо от положения ключа в замке зажигания. Используйте аварийную световую сигнализацию при возникновении ситуации, угрожающей безопасности дорожного движения, чтобы предупреждать других участников дорожного движения, например:
— если Вы вынуждены неожиданно остановиться в непредусмотренном и/ или плохо просматриваемом месте;
— при выезде с парковки в дорожный поток;
— при подъезде к дорожной пробке и т. п.
Пепельница и прикуриватель
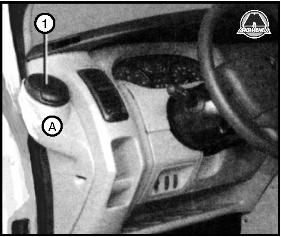
Пепельница может находиться как с одной, так и с обеих сторон приборной панели (положение А или В).
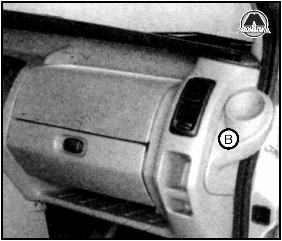
Чтобы открыть пепельницу, приподнимите крышку (1). Для очистки, пепельницу нужно извлекать из гнезда.
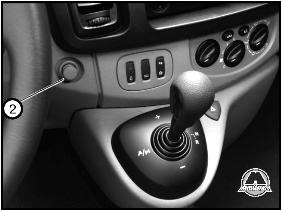
При необходимости использования, нажмите на прикуриватель (2) при включенном зажигании. После того, как элемент накаливания достаточно разогреется, прикуриватель выскочит с легким щелчком. Вытащите его и прикурите сигарету. После использования снова вставьте, не полностью вжимая вовнутрь.
ВНИМАНИЕ
Не удерживайте прикуриватель во вжатом положении — это может привести к пожару.
Используйте прикуриватель только по прямому назначению.
Не позволяйте детям играть с прикуривателем.
#1

Серге
-

- Пользователи
- Cообщений: 2
Читатель
- Автомобиль: Vivaro
- @Упоминание
Отправлено 16 Июль 2011 — 17:42
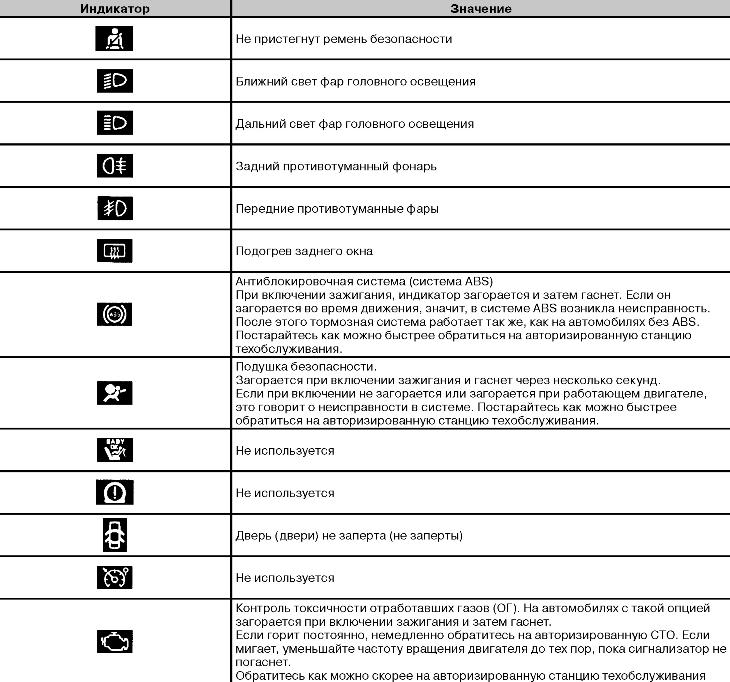
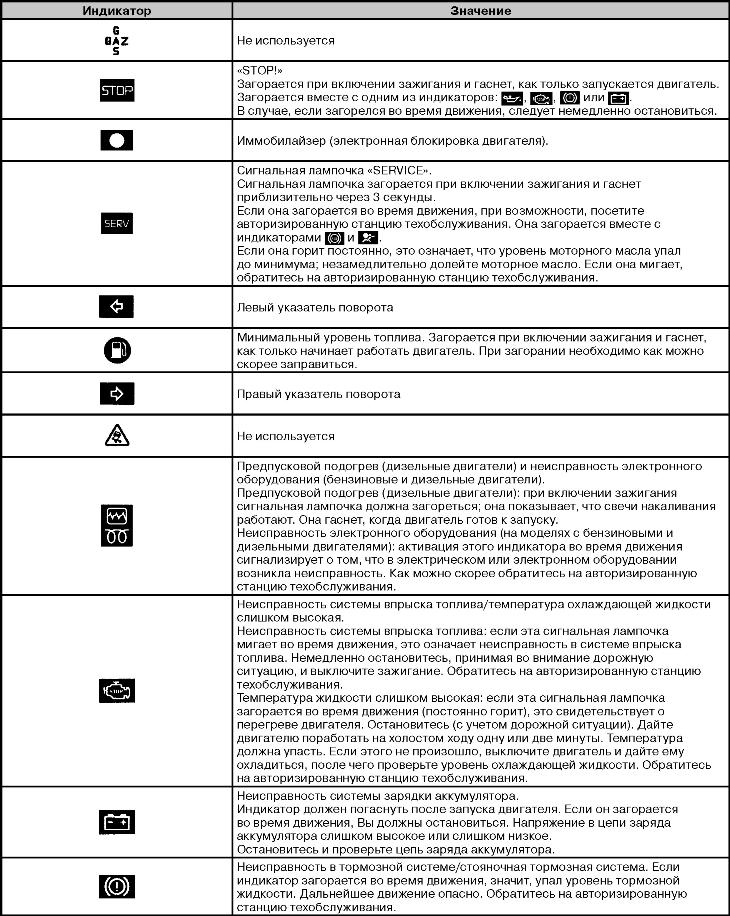
Загорелся ключ и ключ с машиной на приборной панели. Опель ( Виваро ) 2007г.
#2
Чижик
Чижик
- Город:Юкрайна, Тернопольская область
- Автомобиль: Xsara Picasso
- @Упоминание
Отправлено 16 Июль 2011 — 17:44
Цитата(Серге @ 16.7.2011, 18:42)
Загорелся ключ и ключ с машиной на приборной панели. Опель ( Виваро ) 2007г.
Злостная неисправность! Тяните (не едте) на сервис с диагностикой.
#3
Primavod
Primavod
- Город:Севастополь
- Автомобиль: Primastar ’07 2.0 DCi
- @Упоминание
Отправлено 16 Июль 2011 — 20:37
ну если ключ на самом экранчике загорелся то значит необходим сервис, при серьезных неисправностях должен сервис загораться в значках
#4
Чижик
Чижик
- Город:Юкрайна, Тернопольская область
- Автомобиль: Xsara Picasso
- @Упоминание
Отправлено 16 Июль 2011 — 21:12
Цитата(Primavod @ 16.7.2011, 21:37)
ну если ключ на самом экранчике загорелся то значит необходим сервис, при серьезных неисправностях должен сервис загораться в значках
На Опелях вместо нажписи СЕРВИС символ машинки которую привалило гаечным ключиком. Вот как рас эта пиктограмка и горит.
Сообщение отредактировал Чижик: 16 Июль 2011 — 21:13
#5
Primavod
Primavod
- Город:Севастополь
- Автомобиль: Primastar ’07 2.0 DCi
- @Упоминание
Отправлено 16 Июль 2011 — 23:54
Цитата(Чижик @ 16.7.2011, 21:12)
На Опелях вместо нажписи СЕРВИС символ машинки которую привалило гаечным ключиком. Вот как рас эта пиктограмка и горит.
хм, снова стало интересно а есть фотки такой приборки, фотки не нужны сам нашел на авториа, ппц отличий оказывается масса
Сообщение отредактировал Primavod: 17 Июль 2011 — 00:04
#6
Чижик
Чижик
- Город:Юкрайна, Тернопольская область
- Автомобиль: Xsara Picasso
- @Упоминание
Отправлено 17 Июль 2011 — 01:08
Цитата(Primavod @ 17.7.2011, 0:54)
хм, снова стало интересно а есть фотки такой приборки, фотки не нужны сам нашел на авториа, ппц отличий оказывается масса
Немцы. Шо ещё сказать…  Им даже поворотники под оптикой не понравились, и они их в бампер пересилили…
Простите, больша не буду тут флудить. 
Сообщение отредактировал Чижик: 17 Июль 2011 — 01:09
#7
alverh
alverh
-
- Постоянные посетители
-

- Cообщений: 76
Начинающий Опелевод
- Город:Севастополь.
- Интересы:Всегда !!!
- Автомобиль: OPEL VIVARO 2.0 2007 год.
- @Упоминание
Отправлено 17 Июль 2011 — 11:44
Цитата(Серге @ 16.7.2011, 18:42)
Загорелся ключ и ключ с машиной на приборной панели. Опель ( Виваро ) 2007г.
попробуй включить зажигание.нажми 3 раза на тормоз. и выключи зажигание. минуты черех2 включай 
#8
ГЮГ
ГЮГ
-

- Клубные пользователи
-

- Cообщений: 3 866
Опелевод со стажем
- Город:Украина ,Хмельник.
- Автомобиль: VIVARO 2.5 CDTI 2005
- @Упоминание
Отправлено 18 Июль 2011 — 08:31
Цитата(alverh @ 17.7.2011, 11:44)
попробуй включить зажигание.нажми 3 раза на тормоз. и выключи зажигание. минуты черех2 включай
Написал явно фигню конкретную… Реально думаешь поможет???? 
Просто нужно снять межсервисный интервал…
Горит сервис — типа едьте менять масла и т.д… 
Прикрепленные изображения
#9
Forsing
Forsing
-
- Постоянные посетители
-
- Cообщений: 44
Начинающий Опелевод
- Город:Odessa Ukraine
- Автомобиль: opel vivaro
- @Упоминание
Отправлено 20 Июнь 2012 — 16:26
срочно нудна помощь. opel vivaro 2004. Горят се значки на приборной панели. при этом машина ведет себя нормально. что делать, с чем может быть связанно?
#10
Forsing
Forsing
-
- Постоянные посетители
-
- Cообщений: 44
Начинающий Опелевод
- Город:Odessa Ukraine
- Автомобиль: opel vivaro
- @Упоминание
Отправлено 20 Июнь 2012 — 16:44
Цитата(Forsing @ 20.6.2012, 17:26)
срочно нудна помощь. opel vivaro 2004. Горят се значки на приборной панели. при этом машина ведет себя нормально. что делать, с чем может быть связанно?
уже не нормально. заглохла и не заводится.
#11
ГЮГ
ГЮГ
-
- Клубные пользователи
-
- Cообщений: 3 866
Опелевод со стажем
- Город:Украина ,Хмельник.
- Автомобиль: VIVARO 2.5 CDTI 2005
- @Упоминание
Отправлено 20 Июнь 2012 — 19:06
Что все все все???
А стрелки как себя вели когда еще не заглохла? В другую сторону не пригали?
Не было еще такого на форуме кажись…
#12
чайник-51
чайник-51
-
- Постоянные посетители
-
- Cообщений: 30
Начинающий Опелевод
- Город:мурманск
- Автомобиль: виваро 1.9 диз.
- @Упоминание
Отправлено 12 Октябрь 2012 — 00:31
а у меня на машине горят значки.: машинка с ключиком, стоп, авс,чек,подушки безопасности. горели с момента покупки. поменяли датчик абс. егр. побежала шустрей но всё равно всё горит. приехали на диагностику нам сказали что у нас всё окей никаких сбоев. кроме каких то проблем с авс.( но мы вроде его сделали,работать стал нормально. но значки то всё равно горят все . как их убрать? или у наших сервисов диагностика плохая.
Сообщение отредактировал чайник-51: 12 Октябрь 2012 — 16:44

#13
Chrom13
Chrom13
- Город:Belarus,Vitebsk obl,g.Tolochin
- Автомобиль: Vivaro 1,9 DTI (101 л.с.) 2002г.
- @Упоминание
Отправлено 12 Октябрь 2012 — 17:25
Цитата(чайник-51 @ 12.10.2012, 0:31)
а у меня на машине горят значки.: машинка с ключиком, стоп, авс,чек,подушки безопасности. горели с момента покупки. поменяли датчик абс. егр. побежала шустрей но всё равно всё горит. приехали на диагностику нам сказали что у нас всё окей никаких сбоев. кроме каких то проблем с авс.( но мы вроде его сделали,работать стал нормально. но значки то всё равно горят все . как их убрать? или у наших сервисов диагностика плохая.
У меня такая ситуация была! Мне помог ГЮГ и узбек! БЫло это в 30 градусов мороза! Тоже загорелись четыре чека одновременно! Они мне давали полное описание этой ошибки, в моей ситуции это примерзшие колодки задние и запах как раз таки стоял! Вообще по описанию это проблема с тормозами, уровень жидкости в тормозном бачке посмотри, может еще что, я уже не помню полностью что мне писали, спроси у ГЮГа или у узбека!
#14
ГЮГ
ГЮГ
-
- Клубные пользователи
-
- Cообщений: 3 866
Опелевод со стажем
- Город:Украина ,Хмельник.
- Автомобиль: VIVARO 2.5 CDTI 2005
- @Упоминание
Отправлено 12 Октябрь 2012 — 17:50
Цитата(чайник-51 @ 12.10.2012, 0:31)
а у меня на машине горят значки.: машинка с ключиком, стоп, авс,чек,подушки безопасности. горели с момента покупки. поменяли датчик абс. егр. побежала шустрей но всё равно всё горит. приехали на диагностику нам сказали что у нас всё окей никаких сбоев. кроме каких то проблем с авс.( но мы вроде его сделали,работать стал нормально. но значки то всё равно горят все . как их убрать? или у наших сервисов диагностика плохая.
Диагностика мож и нормальная — ну вопрос то не решили…
Машина с ключиком — абс — стоп — это все неисправность АБС — но если диагностика ошибок в блоке не видит — то их нет — имеем проблему по двум проводкам что идут с блока АБС к приборке — а идут они через маленький разъем что в коробочке под бачком с ОЖ — раз боролся с такой проблемой и успешно — потому и знаю.
Чек — неисправность системы впрыска — диагностика должна показать ошибки — если нет — я бы заскочил на еще какую — ну мож тоже чет типа как в первом варианте — такого прикола не исследовал пока.
По подушкам тоже самое.
———————————
Заедь на диагностику — и попроси сделать диагностику системы впрыска — АБС — подушек ——- и внимательно смотри — есть ли ошибки по этим блокам — если нет то конкретно чет по проводке к приборке — или в самой приборке проблема — если есть ошибки в студию.
——————————-
А вообще если ошибок нету то кандидаты разъемы в коробке под бачком ОЖ.
#15
dmitrievskyy-andreyy
dmitrievskyy-andreyy
-
- Постоянные посетители
-
- Cообщений: 75
Начинающий Опелевод
- Город:Россия Арх.обл г Вельск
- Автомобиль: opel Vivaro 2.0 CDTI 2009г m9r782
- @Упоминание
Отправлено 12 Октябрь 2012 — 20:42
у меня горят спиралька.машина с ключиком.двигательмашина троит.до ближаишей диагностики 250км
#16
ГЮГ
ГЮГ
-
- Клубные пользователи
-
- Cообщений: 3 866
Опелевод со стажем
- Город:Украина ,Хмельник.
- Автомобиль: VIVARO 2.5 CDTI 2005
- @Упоминание
Отправлено 12 Октябрь 2012 — 21:02
Цитата(dmitrievskyy-andreyy @ 12.10.2012, 20:42)
у меня горят спиралька.машина с ключиком.двигательмашина троит.до ближаишей диагностики 250км
Можно поочереди снимать фишку с форсы каждой — если при снятии реакции ноль — она виной.
Самый лучший вариант купить ОР-СОМ и самому делать диагностику — стоит дешево — за раз отобьется. 
#17
dmitrievskyy-andreyy
dmitrievskyy-andreyy
-
- Постоянные посетители
-
- Cообщений: 75
Начинающий Опелевод
- Город:Россия Арх.обл г Вельск
- Автомобиль: opel Vivaro 2.0 CDTI 2009г m9r782
- @Упоминание
Отправлено 12 Октябрь 2012 — 21:28
попробую завтра.в любом случае и запчасти и диагностика на одном растоянии а сам я с приборчиками не очень
#18
dmitrievskyy-andreyy
dmitrievskyy-andreyy
-
- Постоянные посетители
-
- Cообщений: 75
Начинающий Опелевод
- Город:Россия Арх.обл г Вельск
- Автомобиль: opel Vivaro 2.0 CDTI 2009г m9r782
- @Упоминание
Отправлено 12 Октябрь 2012 — 21:43
забыл добавить.если это важно.у меня движок M9RL 2л
#19
ГЮГ
ГЮГ
-
- Клубные пользователи
-
- Cообщений: 3 866
Опелевод со стажем
- Город:Украина ,Хмельник.
- Автомобиль: VIVARO 2.5 CDTI 2005
- @Упоминание
Отправлено 13 Октябрь 2012 — 13:55
Цитата(dmitrievskyy-andreyy @ 12.10.2012, 21:43)
забыл добавить.если это важно.у меня движок M9RL 2л
Немного важно — до форсунок долезть не просто…
#20
dmitrievskyy-andreyy
dmitrievskyy-andreyy
-
- Постоянные посетители
-
- Cообщений: 75
Начинающий Опелевод
- Город:Россия Арх.обл г Вельск
- Автомобиль: opel Vivaro 2.0 CDTI 2009г m9r782
- @Упоминание
Отправлено 14 Октябрь 2012 — 18:37
действительно не просто.хорошо видно форсы 3-4 цилиндров.заводить и снимать фишки не стал.мотор весь залит водой надо искать где бежит.машина стоит у дома три недели и каждый день дождь.
воду убрал залил все вэдэщкой,пусть отмокают недельку а там на сервис 
Cамые популярные ошибки Opel VIVARO, их переводы и описания, расшифровка ошибок Opel VIVARO. Полная таблица кодов популярных автомобилей включая их расшифровку.

Расшифровка ошибок Opel VIVARO
Для любого автовладельца в общей массе диагностика и обслуживание его автомобиля — процесс неприятный, так как требует времени и финансовых вложений. Но современные автомобили стали умными, они оснащены системой самодиагностики, которая является встроенной функцией. С помощью этой системы выявляются неисправности, генерируется код ошибки, который сохраняется в памяти автомобиля. Код может быть прочитан самим автовладельцем, если у него есть специальное оборудование — портативный сканер. Он подключается к компьютеру или ноутбуку, на котором должна быть установлена специализированная программа. Больше не нужно проводить диагностику в сервисе. Я прочитал код ошибки портативным устройством, посмотрел основные проблемы автомобиля и решил, как выйти из ситуации — самостоятельно или с помощью СТО. Большинство закодированных ошибок исправляются, как правило, проблем с их расшифровкой не возникает. Форумы автомобилистов, которых много в Интернете, также не могут не помочь.
В продаже имеется большой выбор автомобильных сканеров. Есть как дешевые, так и дорогие модели. Цена зависит от функционала и его дополнительных элементов. Обычному автомобилисту хватит простейшего сканера, покупать профессиональный нет необходимости. Такие шаблоны нужны профессионалам, так как в мастерской каждый день требуется сложное сканирование компьютера.
Согласно стандарту OBDII, все комбинации должны состоять из 5 символов.
Первый символ перед кодом поможет определить категорию ошибки:
- Б — неисправность «кузовных» элементов (системы управления стеклоподъемниками, коммутационные аппараты, безопасность, центральный замок и т.д.);
- С — неисправности в подвеске и ходовой части;
- R — неисправности модуля управления двигателем, трансмиссии, датчиков и электрических цепей;
- U — ошибки в работе электронных модулей (управление парковочной системой, цифровые интерфейсы).
Второй символ в комбинации указывает на класс неисправности:
- 0 — общий символ для всех кодов OBD-2;
- 1 и 2 — категория ошибки;
- 3 — зарезервированный символ.
Третье число указывает на тип проблемы:
- 1 и 2 — неисправности в системе впрыска и подачи топлива;
- 3 — неисправности в системе зажигания;
- 4 — ошибки в работе вспомогательных агрегатов и механизмов (каталитические нейтрализаторы или улавливание паров топлива);
- 5 — неисправности регуляторов холостого хода и других датчиков;
- 6 — неисправности в работе электрических и электронных компонентов автомобиля;
- 7 и 8 — ошибки в работе модуля управления трансмиссией;
- 9 и 0 зарезервированы.
Четвертый и пятый — числа, соответствующие порядковому номеру неисправности.
Неисправность также может отображаться в других форматах, на это влияют:
- тип оборудования, используемого для диагностики;
- версия программного обеспечения тестера;
- версия утилиты на компьютере;
- метод проверки — самодиагностика, с помощью компьютера или тестера.
Таблица с ошибками Opel VIVARO
Общие ошиби Опель
| Код ошибки | |
| 000 000 | Если сразу после запуска самодиагностики появились символы «000000», это говорит об отсутствии проблем в работе автомобиля. |
| P0050
(00502) |
Код указывает на общую неисправность в системе АБС. Чтобы «исправить» проблему, необходимо запустить диагностику модуля управления антиблокировкой. |
| P0650
(065070) |
Код для Opel Astra G или Corsa D сигнализирует о неисправности в приводе. Комбинация означает «Повреждение линии электропередачи контрольной лампы неисправности (MIL)». На самом деле неисправность тоже может быть связана с работой блока управления коробкой передач, но все провода, подключенные к модулю, необходимо предварительно диагностировать. |
| P0700 | Комбинация 0700 указывает на общую неисправность трансмиссии. Для получения более точной информации о проблемах потребуется подробная диагностика накопителя. Необходимо проверить работу блока управления коробкой, а также всех подключенных к нему проводов и датчиков. |
| P0704
Другой формат:
|
Код связан с неисправностью системы круиз-контроля. Для настройки параметров механизма требуется проверка блока управления узлом и диагностика рулевого переключателя. Контакты на руле можно отсоединить. |
| P1530 | Неисправность системы кондиционирования |
| P1895 | Символы P1895 указывают на сбой в работе приводного агрегата. Необходим полный осмотр коробки передач, в частности, необходимо убедиться, что все тросы не повреждены. |
| P0351;
P0352; P0353. Другой формат:
|
Коды указывают на общую неисправность в системе зажигания. При такой ошибке необходимо проверить все разъемы с кабелями, идущими от распределителя. Также диагностике подвержены высоковольтные свечи зажигания, катушки и кабели. |
| InSP | Этот код может отображаться как 1n5p, он как бы напоминает о необходимости обслуживания автомобиля. Чтобы сбросить метку, сделайте следующее:
|
| P0564
(56471) |
Дословный перевод ошибки — «неисправность интерфейса круиз-контроля, проблема с круизом автомобиля». Проблема заключается в ручке включения / выключения или в концевом выключателе. |
Неисправности контроллеров распредвала и коленвала Opel VIVARO
| Код ошибки | |
|---|---|
| P0010
Код может быть таким:
|
Комбинация указывает на неисправность в регуляторе фаз газораспределения. При выходе из строя датчика двигатель автомобиля не запускается. В машину можно установить два контроллера, каждый из которых необходимо протестировать. |
| P0100,
P0101 Ошибки могут проявляться в виде:
|
Коды P0100 и 0101 появляются из-за выхода из строя датчика массового расхода воздуха. Устройство может быть сломано или забито, и его необходимо заменить или очистить. |
| P0105
(010501) |
Код сигнализирует о выходе из строя датчика давления топливовоздушной смеси во впускном коллекторе |
| P0115
Другой формат:
|
Код указывает на проблему с контроллером охлаждающей жидкости. Датчик подлежит детальной диагностике и замене в случае выхода из строя. |
| P0335 | Появление кода 0335 связано с отсутствием или некорректным сигналом датчика коленвала (ДПКВ). Проблема могла быть связана с выходом из строя самого регулятора или с забитыми контактами на колодке подключения. Требуется детальная проверка контроллера, чистка его разъема. Если при диагностике обнаруживается повреждение изоляции или разрыв проводника, электрическая схема меняется. |
| P0340
Комбинации можно просмотреть в вариантах:
|
Код P0340 указывает на неисправность датчика распредвала. Действия по устранению неисправностей такие же, как и для контроллера коленчатого вала. Опелеводу необходимы:
|
| P0365
Код может быть таким:
|
Код сигнализирует о неисправности датчика коленвала, возможных причинах проблемы:
На практике чаще встречается первый вариант. Чтобы устранить проблему, нужно найти контроллер и отсоединить от него провода, затем очистить разъемы. Сам датчик находится в моторном отсеке, поэтому во время движения он может испачкаться. |
Неисправности лямбда-зондов Opel VIVARO
| Код | |
|---|---|
| P0130
(013001) |
Комбинация 0130 указывает на выход из строя первого лямбда-зонда. Необходимо детально проверить работу кислородного регулятора и при необходимости изменить его. |
| P0134
(01345E) |
Код 0134 указывает на выход из строя одного из кислородных датчиков. Чтобы детально определить причину, необходимо протестировать работу всех лямбда-зондов. |
| P0136,
P0135 Комбинация может выглядеть так:
|
Коды сигнализируют о неисправности цепи датчика кислорода. Возможен выход из строя ТЭНа. Требуется детальная диагностика целостности проводки. |
| P0141
(04104) |
Неисправен лямбда-зонд № 2 |
Неисправности датчиков двигателя и ABS
| Код ошибки | |
|---|---|
| P0597
Комбинации можно просмотреть в вариантах:
|
Код P0597 указывает на то, что клапан управления потоком антифриза заблокирован. Ошибка часто появляется после замены охлаждающей жидкости. Требуется детальная диагностика устройства, а если клапан действительно заедает, его нужно менять. |
| P1101 | Неисправен впускной воздушный клапан. В случае ошибки 1101 необходимо проверить работу устройства на прошивку в одной из позиций. Появление неисправности Р1101 может быть связано с повреждением клапана, поэтому прибор потребуется заменить. |
| P1125 | Неисправность датчика дроссельной заслонки. Контроллер может быть в рабочем состоянии, но сам привод заблокирован в открытом или закрытом положении. Необходимо проверить механизм и датчик. |
| P1151
(11517) |
Код сигнализирует о проблеме с датчиком термостата. Устройство может работать неправильно (не открывайте малый или большой круг охлаждения). Клапан термостата может быть проблемой крепления, но это менее вероятно. |
| P1191
(119167) |
Комбинация символов указывает на неисправность датчика давления, установленного в топливном баке |
| P1606
(160638) |
Контроллер ударов неисправен. |
| P2108
(210870) |
Кодовое значение — ошибка в ответе на дроссельную заслонку или в управлении. Также рекомендуется проверить свечи зажигания и работу датчика TPS. |
| S0035 | Обрыв цепи контроллера АБС, установленного на левом переднем колесе |
| C1222 | Повреждение жгута датчика антиблокировочной тормозной системы, установленного на правом переднем колесе |
| S1500 | Неправильный сигнал от регулятора крутящего момента. Отключение устройства возможно при разрядке аккумулятора или плохом контакте клемм с проводами. Если устройство заряжено, необходимо провести диагностику регулятора положения руля и его троса с замком. Сам датчик находится в рулевой колонке. |
Проблемы с электрикой Opel VIVARO
| Код ошибки | |
|---|---|
| P0009
Другой формат:
|
Отсутствие связи между модулями управления. Если после состава был обнаружен контакт между блоками, необходимо заменить одно из устройств. |
| P0010 | Расшифровка кода 0010 дословно означает повышение напряжения в электрической цепи силового каскада фаз газораспределения впускных клапанов |
| P0013 | Комбинация P0013 сигнализирует о неисправности в цепи управления электромагнитным клапаном привода регулирования фаз. Требуется проверка распределительного вала и его шестерен. |
| P0036
(003608) |
Код 0036 указывает на неисправность проводки нагревателя лямбда-зонда. Неисправность может быть связана с физическим повреждением электрической цепи или самого контроллера. Необходимо проверить все кислородные датчики и качество их подключения. |
| P0075 (007506) | Код 0075 указывает на пониженное напряжение в цепи управления электромагнитным клапаном. Вам необходимо проверить проводку, подключенную к каждому устройству. |
| P0110
Код может быть таким:
|
Неисправность на Опель Зафира А может проявляться в виде кодов. Проблема указывает на низкий или высокий сигнал от CAC. Требуется полная диагностика устройства и его замена. На практике ошибка часто возникает в результате отключения блока датчиков без отключения клеммы аккумулятора. |
| P0230
(023005) |
Неисправность цепи питания топливного насоса. На некоторых моделях Опель Меррива D с дизельным двигателем код может указывать на выход из строя предохранителя, отвечающего за работу насосного устройства. |
| P0415
(41572) |
Неисправность цепи переключающего клапана системы вторичного воздуха B. Необходимо очистить контакты и проверить правильность подключения вакуумных трубок. Если это не помогает, следует заменить клапан. |
| P0480,
P0481, P0482 Коды могут быть:
|
Код указывает на неисправность линии питания для управления вентилятором охлаждения радиатора автомобиля. Само устройство может быть активировано, но само отключается при переходе в расширенный режим работы. Чтобы исправить ошибку, необходимо сделать следующее:
|
| P0530
Ошибки могут отображаться в вариантах:
|
Код 0530 указывает на неисправность системы круиз-контроля, возможные причины:
|
| P0560
Другой формат:
|
Код указывает на пониженное напряжение в сети. Причина кроется в генераторе или аккумуляторе. |
| P0570 | Код 0570 указывает на неисправность сигналов ускорения системы круиз-контроля |
| P0571
(057108) |
На Opel Astra H13 и других моделях код 0571 указывает на неисправность линии питания выключателя стоп-сигнала. Нужно проверить проводку от педали к блоку предохранителей и от монтажного модуля к задним фонарям. |
| P0683
Код может быть таким:
|
Код указывает на неисправность электрической цепи свечи накаливания. Необходимо проверить целостность проводов, убедиться в отсутствии перегибов и следов повреждения изоляции. При обнаружении каких-либо дефектов электрические цепи необходимо заменить. |
| P1113
(111306) |
Код P1113 сигнализирует о повышении напряжения в электрической цепи регулятора положения сдвоенных дверей (отключение отверстия). Описание основных способов решения проблемы:
|
| P1120,
P2120 (212052) |
Эти коды неисправностей указывают на то, что причиной проблемы являются мокрые или забитые контакты на электронной педали акселератора. Если неисправность появляется один раз на панели приборов 2006 или других годов выпуска, владельцу необходимо дождаться высыхания контактных элементов. Если это не помогает, вам необходимо выключить педаль и высушить ее самостоятельно или заменить устройство или датчик. |
| P1405 | Код 1405 сигнализирует об отсутствии сигнала обратной связи с клапаном рециркуляции ОГ. Требуется детальный осмотр устройства и его замена при необходимости. |
| P0140
Варианты кода:
|
Код сообщает о неверном сигнале кислородного датчика |
| P0141
(14104) |
Код 0141 указывает на обрыв или повреждение электрической цепи нагревателя кислородного контроллера. Либо это выход из строя датчика, либо «сбой» в его работе. Желательно сначала проверить работу соответствующего предохранителя, установленного в блоке управления. Если все элементы целы, диагностируют контакты к лямбда-зонду, в случае повреждения или окисления заменяют или очищают. Если эти шаги не решают проблему, устанавливается новый контроллер. |
| P1112
(111261) |
Проблемы с напряжением на датчике расхода воздуха на впуске. Необходимо с помощью мультиметра узнать рабочий параметр по проводам. Появление кода 1112 может быть связано с выходом из строя самого контроллера. |
| P1590 | Повышенное напряжение в электрической цепи вакуумного магнитного клапана. Возможной причиной ошибки P1590 может быть короткое замыкание в проводниках. |
| P1607 | Код 1607 указывает на неисправность привода сцепления. Необходимо проверить агрегат, в частности его щетки, последние меняются при износе. Также следует выполнить тест по вождению, оценить его работу — диск не должен заклинивать; проверьте напряжение. |
| P1612 | Неисправность иммобилайзера или неверный сигнал с устройства. Требуется диагностика узла управления блоком, проверка всех контактов и целостности проводов. |
| P1614
Код может быть таким:
|
Код проявляется из-за отсутствия связи между иммобилайзером и микросхемой, установленной в ключе. Если замок двигателя бесключевой, проблема может быть в электронной бирке. Необходимо проверить аккумулятор в ключе и провести диагностику блока управления иммобилайзером. Ошибка может возникнуть после установки системы безопасности на автомобиле с автоматическим запуском двигателя. |
| P1616
(161600) |
Код означает «Недействительный идентификатор, полученный от блока управления электрической рулевой колонкой». Необходимо проверить модуль и качество связи с устройством. Причиной проблемы может быть повреждение одного из кабелей, подключенных к приводу. |
| R1630 | Модуль управления получает неверный сигнал от электромагнитного клапана количества топлива. При такой проблеме на приборной панели могут появиться неверные данные об объеме топлива в баке. |
| P1700
(170 000) |
Комбинация 1700 появляется на автомобилях с автоматической коробкой передач (АКПП) и обычно сопровождается толчками при движении. Причиной неисправности может быть повреждение или разрушение тросов, идущих к рычагу трансмиссии. Чтобы найти проблему, необходимо проверить все конструктивные элементы агрегата на предмет дефектов. В некоторых случаях причина — электроника. |
| P1723 | Выход из строя реле управления АКПП или повреждение его электрической цепи. Вам необходимо проверить контактные элементы на устройстве. |
| P1734 | На Opel Corsa D и других моделях это можно расшифровать как «адаптация точки захвата не завершена / не выполнена». Ошибка типична для роботизированных коробок передач. Самостоятельно определить причину неисправности вряд ли удастся, поэтому потребуется более детальная диагностика трансмиссии. Возможной проблемой могло стать отключение контактов от блока управления коробкой. |
| P1735 | Буквальное толкование комбинации — «параметры передачи не сохраняются». Автовладелец должен провести диагностику блока управления коробкой передач и проверить его контакт с источником питания. Поврежденные кабели заменяют новыми. |
| P2102,
P2103 (210300) |
Неисправность в цепи электродвигателя привода дроссельной заслонки. |
| U2102,
U2103, U2105 |
Отсутствие связи с CAN-шиной. При появлении кода 2103 требуется детальная диагностика электронного компонента автомобиля. |
| P2120
(212006) |
Код проявляется из-за засорения или попадания влаги в электронную педаль акселератора. Ошибка «Check Engine» может на короткое время загореться на приборной панели и исчезнуть сама по себе, если контакты на приборе засохли. Если индикатор горит постоянно, необходимо будет разобрать педаль и очистить ее контактную площадку. Неисправность также может заключаться в самом датчике, установленном на устройстве. |
| P2182
Другой формат:
|
Код CAP буквально можно интерпретировать как «контур регулятора температуры хладагента выходит за пределы допустимого диапазона». Фактически, показания регулятора отличаются от нормированных значений, сохраненных в памяти блока управления двигателем. В конечном итоге трансмиссия не может достичь рабочей температуры, что приводит к увеличению расхода топлива во время движения. Возможные причины и решения:
|
| P1811 | Код 1811 означает, что от модуля CAN не поступает сигнал крутящего момента двигателя |
| P0621
Ошибки могут проявляться в виде:
|
Код указывает на неправильное напряжение в бортовой сети автомобиля. Обычно Check Engine в этих случаях загорается вместе с индикатором разряда аккумулятора на панели управления. Однако проблема также может быть связана с генераторным устройством, в частности с его диодным мостом или регулятором напряжения. Возможной причиной иногда является окисление контактов генератора или гниение его проводки, поэтому сначала необходимо проверить эти компоненты. |
| U0009 | Несоответствие цифровой шины CAN автомобиля из-за отключения аккумулятора при работающем двигателе. Появление кода может быть связано с проблемами в электронике или работе блока управления. На практике ошибка обычно проходит сама по себе через некоторое время. |
| U0073 | Передача данных по шине микропроцессорного модуля запрещена. Необходимо проверить целостность всех кабелей, подключенных к агрегату. Поврежденные электрические цепи необходимо заменить. |
| U0100 | Нет связи с модулем управления трансмиссией |
| U0101 | Системная ошибка, указывающая на отсутствие связи между ECM и TCM |
| U0121,
U2108 |
Неисправность шины данных, в частности, модуль микропроцессора не может определить связь с блоком управления антиблокировочной тормозной системой. Возможен отказ АБС при движении по льду. |
| U0140 | Потеряна связь с блоком управления кузовным оборудованием |
| U1000 | Код ошибки 1000 указывает на отсутствие связи с модулем управления трансмиссией из-за прерывания передачи информации по интерфейсу CAN. Проблема может заключаться в неисправности электронного ключевого модуля, кузова или двигателя. Есть два пути решения проблемы:
|
| U2100 | Перевод ошибки на русский язык — «отсутствие связи с шиной CIM». Причину неисправности нужно искать в устройстве генератора, в частности в его контакте с бортовой сетью. Возможная проблема может заключаться в реле контроллера привода. Код может отображаться как 65070 знаков. |
| U2103 | Отсутствие связи с интерфейсом CAN-BUS. Необходимо проверить целостность покрышки. |
| C0561 | Неверный сигнал, полученный модулем TCM |
Коды неисправности двигателя Opel VIVARO
| Код ошибки | |
|---|---|
| P0011
Код может быть таким:
|
Ошибка 0011 часто появляется после замены ремня ГРМ. Появление этого кода связано с некорректными этапами развертывания. Для устранения неисправности пользователь должен провести диагностику правильности установленных валов (совместить метки на коленвале и распредвале). В некоторых случаях причиной является неисправность электромагнитных клапанов. |
| P0014
Комбинации можно просмотреть в вариантах:
|
Расшифровка кода 0014 на Opel VIVARO Z16XEP и других моделях — неисправность электромагнитных клапанов фазовращателей распределительного вала двигателя. Для решения проблемы потребуется очистка контактных элементов. Если эти действия не помогли устранить неисправность, то клапаны заменяют вместе с шестернями распредвала. При такой проблеме может возникнуть затруднение с запуском двигателя. |
| P0017 | Неправильное положение коленвала и распредвала. Требуется диагностика датчиков обоих узлов, а также проверка целостности шестерен. |
| P0068
Другой формат:
|
Код должен читаться как «неисправность узла дроссельной заслонки». При такой проблеме возможны скачки холостого хода двигателя и увеличение расхода топлива. Возможной причиной могло быть повреждение пластиковой крышки клапана, что привело к утечке воздуха в картер двигателя. |
| P0170
Коды могут быть в вариантах:
|
Код 0170 может указывать на то, что в модуле микропроцессора возникли ошибки при формировании горючей смеси в цилиндрах двигателя. Силовой агрегат может работать нестабильно на холостом ходу и во время движения. Пункты для проверки:
|
| P0171
(017152) |
Комбинация 0171 сигнализирует об истощении горючей смеси. Ошибка может сопровождаться увеличением расхода топлива, особенно при движении на холостом ходу (расход может увеличиваться до 2-3 литров). Скорее всего, причина — неисправность мембраны вакуумного усилителя тормозов, в результате чего в силовой агрегат улетает воздух. Проблема могла сопровождаться необычными звуками из усилителя. Чтобы исправить это, потребуется заменить узел вакуумного усилителя. Помимо этого узла, причины проблемы могут быть следующие:
|
| P0299 | Появление кода P0299 может быть связано со следующими причинами:
Появление этого кода обусловлено следующими характеристиками;
|
| P0300,
P0301, P0302, P0303 Ошибки могут быть:
|
Код 0300 указывает на общий пропуск зажигания в одном из цилиндров двигателя. 0301, 0302 и 0303 — указывают, соответственно, что ошибка в первом, втором и третьем цилиндрах. Для устранения причины необходимо проверить компрессию и все датчики, влияющие на образование топливовоздушной смеси. Это относится к:
Возможные причины неисправности:
|
| P0400 | Код 0400 сигнализирует о неисправности системы рециркуляции ОГ. Для устранения проблемы необходимо проверить целостность и герметичность патрубков агрегата, при необходимости заменяются поврежденные магистрали. |
| P0402
(40274) |
Код указывает на чрезмерный расход газа в системе рециркуляции |
| P0420
Коды могут выглядеть так:
|
Неисправность 0420 указывает на проблему с катализатором. При ошибке 4205A узел необходимо полностью диагностировать и в случае выхода из строя заменить. |
| P1220 | Неисправность системы управления дроссельной заслонкой. При ошибке 1220 агрегат ляжет на диагностику, если механизм застрял в открытом или закрытом положении, его необходимо смазать. |
| P2119
(211965) |
Код 2119 указывает на неисправность в системе управления дроссельной заслонкой. Возможное повреждение корпуса устройства или выход из строя датчика. Также причина может заключаться в том, что амортизатор застрял в открытом или закрытом положении. |
| P2101
(210111) |
Появление комбинации P2101 свидетельствует о неисправности дроссельного узла, особенно его электродвигателя. Необходимо проверить сам амортизатор и убедиться, что он не заедает в открытом или закрытом положениях при движении. В некоторых случаях смазка устройства решит проблему, но, скорее всего, придется менять сам мотор. |
| P2261 | Неисправен перепускной клапан вакуумного бака, возможное повреждение. Бачок расположен за впускным коллектором по центру. Чтобы исправить ошибку, первое, что нужно сделать, это проверить целостность бака. Для этого нужно будет продуть трубы, но помните, что дефект может быть незначительным и незаметным на первый взгляд. Если в баке есть дыра, его нужно будет заменить. |

Расшифровка ошибок Opel VIVARO
Для любого автовладельца в общей массе диагностика и обслуживание своего автомобиля – процесс неприятный, так как требует затрат времени и финансовых вложений. Но современные автомобили стали умными, они оснащены системой самодиагностики, которая является встроенной функцией. С помощью данной системы выявляются неисправности, формируется код ошибки, который сохраняется в память автомобиля. Код может быть считан автовладельцем самостоятельно при наличии специального оборудования – ручного сканера. Он подсоединяется к компьютеру или ноутбуку, на котором должна быть установлена специализированная программа. В сервисе диагностировать теперь не обязательно. Считал код ошибки при помощи ручного прибора, осмотрел основные проблемы автомобиля и принял решение, как выходить из ситуации – своими силами либо с помощью СТО. Большинство закодированных ошибок систематизированы, с их расшифровкой, как правило, проблем не возникает. Неплохим подспорьем также являются форумы автомобилистов, которых много на просторах интернета.
Автосканеров в продаже большой выбор. Имеются как бюджетные, так и дорогостоящие модели. Цена зависит от функционала и сопутствующих дополнительных элементов. Рядовому автомобилисту вполне достаточно самого простого сканера, профессиональный приобретать ни к чему. Такие модели нужны профессионалам, так как ежедневно в СТО возникает необходимость в сложном компьютерном сканировании.
По стандарту OBDII все комбинации должны состоять из 5-ти символов.
Первый символ, указанный перед кодом, поможет определить категорию ошибки:
- В — неисправность «кузовных» элементов (системы управления стеклоподъемниками, переключательными устройствами, безопасности, центральным замком и т. д.);
- С — неполадки в работе подвески и ходовой составляющей;
- Р — неисправности модуля управления мотором, трансмиссией, датчиков и электрических цепей;
- U — ошибки в функционировании электронных модулей (управления системой парковки, цифровых интерфейсов).
Второй символ в комбинации обозначает класс неисправности:
- 0 — общий символ для всех OBD-2 кодов;
- 1 и 2 — категория ошибки;
- 3 — резервный символ.
Третья цифра свидетельствует о типе проблемы:
- 1 и 2 — неисправности в системе впрыска и подачи горючего;
- 3 — неполадки в работе системы зажигания;
- 4 — ошибки в функционировании вспомогательных узлов и механизмов (каталитических нейтрализаторов или улавливания паров горючего);
- 5 — неисправности контроллеров холостых оборотов и других датчиков;
- 6 — неполадки в функционировании электрической и электронной составляющей авто;
- 7 и 8 — ошибки в работе модуля управления коробкой передач;
- 9 и 0 — резерв.
Четвертый и пятый – число, соответствующее порядковому номеру неисправности.
Неисправность может выводиться и в других форматах, на это влияет:
- тип оборудования, использующегося для диагностики;
- версия программного обеспечения тестера;
- версия утилиты на компьютере;
- метод проверки — самодиагностика, компьютером или тестером.
Таблица с ошибками Opel VIVARO
Общие ошиби Опель
| Код ошибки | |
| 000000 | Если символы «000000» появились сразу после начала диагностики авто, это свидетельствует об отсутствии проблем в работе транспортного средства. |
| P0050
(00502) |
Код свидетельствует об общей неисправности в работе системы ABS. Чтобы «лечить» проблему, необходимо выполнить диагностику управляющего модуля антиблокировочной системы. |
| P0650
(065070) |
Код на Опель Астра G или Корса Д сообщает о неполадках в работе трансмиссионного узла. Комбинация расшифровывается как «повреждение электролинии индикаторной лампочки неполадок (MIL)». По факту неисправность может быть связана и с работой блока управления коробкой передач, но для начала потребуется диагностика всех проводов, подключенных к модулю. |
| P0700 | Комбинация 0700 обозначает общую неисправность в работе коробки передач. Для получения более точной информации о неполадках потребуется детальная диагностика агрегата. Надо проверить работу блока управления коробкой, а также все провода и датчики, подключенные к нему. |
| P0704
Другой формат:
|
Код связан с неисправностью системы круиз-контроля. Требуется проверка блока управления узлом и диагностика рулевого переключателя для регулировки параметров механизма. Возможно отключение контактов на руле. |
| P1530 | Неисправность системы климат-контроля |
| P1895 | Символы Р1895 указывают на неисправность в работе трансмиссионного агрегата. Требуется полная проверка коробки передач, в частности, нужно убедиться в целостности всех проводов. |
| P0351;
P0352; P0353. Другой формат:
|
Коды указывает на общую неисправность в работе системы зажигания. При такой ошибке надо проверить все разъемы с кабелями, идущие от трамблера. Также диагностике подлежат свечи, катушки и высоковольтные провода. |
| InSP | Данный код может отображаться как 1n5p, он появляется для напоминания о необходимости проведения техобслуживания авто. Чтобы сбросить надпись, выполняются следующие действия:
|
| P0564
(56471) |
Дословный перевод ошибки — «неисправность интерфейса устройства автоматического поддержания скорости проблема с круизом в машине». Проблему следует искать в ручке выключения и включения режимов или концевом переключателе. |
Неисправности контроллеров распредвала и коленвала Opel VIVARO
| Код ошибки | |
|---|---|
| P0010
Код может быть:
|
Комбинация означает неполадку в работе контроллера распределительного вала. При выходе из строя датчика двигатель автомобиля не заводится. В машине может быть установлено два контроллера, необходимо протестировать каждый из них. |
| P0100,
P0101 Ошибки могут проявляться в виде:
|
Коды Р0100 и 0101 появляются в результате выхода из строя датчика массового расхода воздуха. Устройство могло сломаться или забиться, поэтому потребуется его замена или очистка. |
| P0105
(010501) |
Код сообщает о выходе из строя датчика давления топливовоздушной смеси во впускном коллекторе |
| P0115
Другой формат:
|
Код говорит о неполадках в работе контроллера охлаждающей жидкости. Датчик подлежит детальной диагностике и замене при поломке. |
| P0335 | Появление кода 0335 связано с отсутствием или некорректным сигналом, поступающим от датчика коленчатого вала (ДПКВ). Проблема может быть связана с выходом из строя самого регулятора или засорением контактов на колодке подключения. Требуется детальная проверка контроллера, очистка его разъема. Если при диагностике было обнаружено повреждение изоляции или перелом проводника, то электроцепь меняется. |
| P0340
Комбинации могут выводиться в вариациях:
|
Код Р0340 свидетельствует о неисправности датчика распределительного вала. Действия по устранению проблемы выполняются аналогичные, как и в случае с контроллером коленвала. Опелеводу нужно:
|
| P0365
Код может быть:
|
Код сообщает о неисправности датчика коленвала, возможные причины проблемы:
На практике чаще всего встречается первый вариант. Чтобы устранить проблему, надо найти контроллер и отключить от него провода, после чего произвести очистку разъемов. Сам датчик располагается в моторном отсеке, поэтому он может загрязниться во время передвижения. |
Неисправности лямбда-зондов Opel VIVARO
| Код | |
|---|---|
| P0130
(013001) |
Комбинация 0130 указывает на выход из строя первого лямбда-зонда. Нужно детально проверить работу кислородного контроллера и поменять его при необходимости. |
| P0134
(01345E) |
Код 0134 говорит о выходе из строя одного из кислородных датчиков. Чтобы подробно определить причину, нужно протестировать работу всех лямбда-зондов. |
| P0136,
P0135 Комбинация может проявляться в виде:
|
Коды сообщают о неисправности электроцепи датчика кислорода. Возможен выход из строя нагревательного элемента. Требуется детальная диагностика целостности проводки. |
| P0141
(014104) |
Неисправен лямбда-зонд №2 |
Неисправности датчиков двигателя и ABS
| Код ошибки | |
|---|---|
| P0597
Комбинации могут выводиться в вариациях:
|
Код Р0597 свидетельствует о зависании клапана управления потоком антифриза. Ошибка проявляется часто после замены охлаждающей жидкости. Требуется произвести детальную диагностику устройства, и если клапан по факту залипает, то его надо менять. |
| P1101 | Неисправный клапан вентиляции воздуха на впуске. При ошибке 1101 нужно проверить работу устройства на предмет залипания в одном из положений. Появление неисправности Р1101 может быть связано с повреждением клапана, поэтому потребуется замена устройства. |
| P1125 | Выход из строя датчика дроссельной заслонки. Возможна ситуация, когда контроллер исправен, но сам узел заклинило в открытом или закрытом положении. Нужно проверить механизм и датчик. |
| P1151
(11517) |
Код сообщает о неполадках в работе датчика термостата. Узел может работать некорректно (не открывать малый или большой круг охлаждения). Возможно, проблема состоит в залипании клапана термостата, но это менее вероятный вариант. |
| P1191
(119167) |
Комбинация символов указывает на неполадки в работе датчика давления, установленного в топливном баке |
| P1606
(160638) |
Контроллер детонации неисправен. |
| P2108
(210870) |
Значение кода — ошибка в реакции дроссельной заслонки или в её управлении. Также рекомендуется проверить свечи и работу датчика ДПДЗ. |
| С0035 | Обрыв электролинии контроллера ABS, установленного на левом переднем колесе |
| C1222 | Повреждение проводки датчика антиблокировочной системы, установленного на переднем правом колесе |
| С1500 | Некорректный сигнал, поступающий с контроллера момента. Возможно отключение устройства в результате разряда аккумуляторной батареи или некачественного контакта клеммных зажимов с выводами. Если устройство заряжено, то нужно проводить диагностику контроллера положения рулевого колеса, а также его кабель с колодкой. Сам датчик располагается в рулевой колонке. |
Проблемы с электрикой Opel VIVARO
| Код ошибки | |
|---|---|
| P0009
Другой формат:
|
Отсутствие связи между модулями управления. Если после прозвонки контакт между блоками был обнаружен, то одно из устройств подлежит замене. |
| P0010 | Расшифровка кода 0010 дословно переводится как повышенное напряжение в электроцепи силового каскада синхронизации впускного распредвала |
| P0013 | Комбинация Р0013 сообщает о повреждении электроцепи управления электромагнитным клапаном приводного устройства регулирования фаз. Требуется проверка распределительного вала, а также его шестеренок. |
| P0036
(003608) |
Код 0036 указывают на выход из строя проводки подогревателя лямбда-зонда. Неисправность может быть связана с физическим повреждением электроцепи или самого контроллера. Нужно проверить все кислородные датчики и качество их подключения. |
| P0075 (007506) | Код 0075 свидетельствуют о пониженном напряжении в электроцепи управления электромагнитными клапанами. Нужно проверить проводку, подключенную к каждому устройству. |
| P0110
Код может быть:
|
Неисправность на Опель Зафира A может проявляться в виде кодов. Проблема указывает на пониженный либо повышенный сигнал, исходящий от контроллера температуры воздуха на пуске. Требуется полная диагностика устройства и его замена. На практике ошибка часто проявляется в результате отключения колодки датчика без отсоединения клеммы аккумуляторной батареи. |
| P0230
(023005) |
Неисправность электроцепи питания топливного насоса. На некоторых моделях Opel Merriva D с двигателем, работающем на дизеле, код может указать на выход из строя предохранителя, отвечающего за работу насосного устройства. |
| P0415
(41572) |
Неисправность цепи переключающего клапана B системы вторичной подачи воздуха. Необходимо почистить контакты и проверить правильность подключения вакуумных трубок. Если это не помогло, то клапан следует поменять. |
| P0480,
P0481, P0482 Коды могут быть:
|
Код указывает на неисправность электролинии управления вентилятором охлаждения радиатора авто. Само устройство может срабатывать, но самостоятельно отключаться при переходе на усиленный режим работы. Чтобы сбросить ошибку, нужно выполнить следующие действия:
|
| P0530
Ошибки могут выводиться в вариациях:
|
Код 0530 указывает на неисправность системы круиз-контроля, возможные причины:
|
| P0560
Другой формат:
|
Код свидетельствуют о пониженном напряжении в электросети. Причину нужно искать в генераторе или аккумуляторной батарее. |
| P0570 | Код 0570 расшифровывается как неисправность сигналов ускорения системы круиз-контроля |
| P0571
(057108) |
На Опель Астра Н13 и других моделях код 0571 обозначает неисправность электролинии переключателя стоп-сигналов. Требуется проверка проводки на участке от педали до блока с предохранителями, а также от монтажного модуля до задних фар. |
| P0683
Код может быть:
|
Код указывает на неисправность электроцепи свечи накала. Нужно проверить целостность проводов, убедиться в отсутствии перегибов и следов повреждения изоляции. Если обнаружены дефекты, электроцепи подлежат замене. |
| P1113
(111306) |
Код Р1113 сообщает о повышенном напряжении в электроцепи контроллера положения твинпорта (деактивации отверстия). Описание основных способов исправления проблемы:
|
| P1120,
P2120 (212052) |
Данные коды ошибок означают, что причина проблемы связана с отсыреванием или засорением контактов на электронной педали газа. Если на приборной панели автомобилей 2006 или других годов выпуска неисправность появилась один раз, то владельцу следует подождать, пока контактные элементы не просохнут. Если это не помогло, нужно отключить питание педали и выполнить сушку самостоятельно либо произвести замену устройства или датчика. |
| P1405 | Код 1405 сообщает об отсутствии сигнала обратной связи с клапаном ЕГР. Требуется детальная проверка устройства и его замена при необходимости. |
| P0140
Варианты кода:
|
Код сообщает о неправиотном сигнале датчика кислорода |
| P0141
(14104) |
Код 0141 указывает на обрыв или повреждение электроцепи нагревательного устройства кислородного контроллера. Либо это поломка датчика, либо «глюк» в его работе. В первую очередь рекомендуется проверить работу соответствующего предохранителя, установленного в блоке управления. Если все элементы целые, выполняется диагностика контактов на кислородный датчик, в случае повреждения или окисления осуществляется их замена или очистка. Если эти действия не помогли устранить проблему, производится установка нового контроллера. |
| P1112
(111261) |
Проблемы с напряжением, поступающим на датчик измерения воздуха на впуске. Нужно с помощью мультиметра узнать рабочий параметр на проводах. Появление кода 1112 может быть связано с выходом из строя самого контроллера. |
| P1590 | Повышенное напряжение в электроцепи вакуумного магнитного клапана. Возможная причина Р1590 может состоять в замыкании проводников. |
| P1607 | Код 1607 указывает на неисправность приводного устройства системы сцепления. Необходимо проверить узел, в частности, его щетки, последние при износе меняются. Также следует запустить тест привода, оценить его работу — узел не должен заклинивать; проверить напряжение. |
| P1612 | Выход из строя иммобилайзера или неправильный сигнал, поступающий с устройства. Требуется диагностика блока управления узлом, проверка всех контактов и целостности проводов. |
| P1614
Код может быть:
|
Код проявляется в результате отсутствия связи между иммобилайзером и чипом, установленным в ключе. Если блокиратор двигателя бесключевой, то проблема может состоять в электронной метке. Нужно проверить батарейку в ключе и произвести диагностику блока управления иммобилайзером. Ошибка может проявляться в результате установки на транспортное средство охранной системы с автоматическим запуском двигателя. |
| P1616
(161600) |
Код расшифровывается как «неверный ID, полученный от электрического блока управления рулевой колонкой». Требуется проверка модуля, а также качества связи с устройством. Причина проблемы может заключаться в повреждении одного из проводов, подключенных к блоку. |
| Р1630 | На управляющий модуль поступает неверный сигнал от магнитного клапана количества горючего. При такой проблеме на приборной панели могут отображаться некорректные данные об объеме топлива в баке. |
| P1700
(170000) |
Комбинация 1700 проявляются на транспортных средствах с АКПП (автоматической коробкой) и обычно сопровождаются толчками во время езды. Причина неисправности может заключаться в повреждении либо перегнивании кабелей, который идут на рычаг трансмиссии. Для поиска проблемы следует проверить все конструктивные элементы агрегата на предмет дефектов. В некоторых случаях причина состоит в электронике. |
| P1723 | Выход из строя управляющего реле автоматической трансмиссией или повреждение его электроцепи. Нужно проверить контактные элементы на устройстве. |
| P1734 | На Опель Корса Д и других моделях можно расшифровывать как «адаптация точки схватывания не завершена / проведена». Ошибка характерна для роботизированных коробок передач. Самостоятельно определить причину неисправности вряд ли удастся, поэтому потребуется более детальная диагностика трансмиссии. Возможная проблема может заключаться в отсоединении контактов от блока управления коробкой. |
| P1735 | Дословная расшифровка комбинации — «не заучены параметры коробки передач». Автовладельцу нужно провести диагностику блока управления трансмиссионным агрегатом и выполнить проверку его контакта с питанием. Поврежденные провода меняются на новые. |
| P2102,
P2103 (210300) |
Неисправность в цепи электродвигателя привода дроссельной заслонки. |
| U2102,
U2103, U2105 |
Отсутствие связи с CAN-Bus шиной. При появлении кода 2103 требуется произвести детальную диагностику электронной составляющей автомобиля. |
| P2120
(212006) |
Код проявляется в результате засорения или отсыревания электронной педали газа. Ошибка «Check Engine» может загореться на панели приборов ненадолго и исчезнуть самостоятельно, если контакты на устройстве обсохнут. В случае если индикатор горит постоянно, потребуется разбор педали и очистка ее контактной площадки. Неисправность также может заключаться в самом датчике, установленном на устройстве. |
| P2182
Другой формат:
|
Код ЕСП дословно можно расшифровать как «электроцепь контроллера температуры хладагента вне диапазона рабочих характеристик». Фактически показания регулятора расходятся с нормированными, заложенными в память блока управления двигателем. В конечном счете силовой агрегат не может выйти на рабочую температуру, что приводит к увеличению потребления топлива во время езды. Возможные причины и методы решения:
|
| P1811 | Код 1811 означает отсутствие сигнала о крутящем моменте двигателя, поступающем с CAN-модуля |
| P0621
Ошибки могут проявляться в виде:
|
Код сообщает о неправильном напряжении в бортовой сети автомобиля. Обычно Check Engine в таких случаях загорается вместе с индикатором разряда аккумуляторной батареи на контрольном щитке. Однако, проблема может быть связана и с генераторным устройством, в частности, его диодным мостом или регулятором напряжения. Возможная причина иногда заключается в окислении контактов генератора или загнивании его проводки, поэтому в первую очередь нужно проверить эти компоненты. |
| U0009 | Рассогласование работы цифровой CAN-шины авто в результате отключения аккумулятора при запущенном двигателе. Появление кода может быть обусловлено проблемами в электронике или работе блока управления. На практике ошибка обычно исчезает самостоятельно через определенное время. |
| U0073 | Отключена передача данных по шине микропроцессорного модуля. Нужно проверить целостность всех проводов, подключенных к блоку. Поврежденные электроцепи подлежат замене. |
| U0100 | Отсутствие связи с модулем управления силовым агрегатом |
| U0101 | Системная ошибка, указывающая на отсутствие связи между модулями ЕСМ и ТСМ |
| U0121,
U2108 |
Неисправность шины данных, в частности, микропроцессорный модуль не может определить связи с блоком управления антиблокировочной системой. Возможен отказ ABS при движении по гололеду. |
| U0140 | Связь с блоком управления кузовом пропала |
| U1000 | Код ошибки 1000 указывает на отсутствие связи с управляющим модулем силового агрегата в результате нарушения передачи информации по интерфейсу CAN. Проблема может заключаться в неисправности блока управления электронным ключом, кузова или двигателя. Устранить неисправность можно двумя методами:
|
| U2100 | Перевод ошибки на русском языке — «отсутствие связи с CIM шиной». Причину неисправности необходимо искать в генераторном устройстве, в частности, в его контакте с бортовой сетью. Возможная проблема может состоять в реле регуляторе установки. Код может отображаться в виде символов 65070. |
| U2103 | Отсутствие связи с CAN-BUS интерфейсом. Нужно проверить целостность шины. |
| C0561 | Неверный сигнал, полученный от ТСМ-модуля |
Коды неисправности двигателя Opel VIVARO
| Код ошибки | |
|---|---|
| P0011
Код может быть:
|
Ошибка 0011 часто выскакивает после замены ремня газораспределительного механизма. Появление данного кода связано с неправильными фазами распределения. Для устранения неисправности пользователь должен произвести диагностику правильности установленных валов (совместить метки на коленвале и распредвале). В некоторых случаях причина состоит в неправильной работе электромагнитных клапанов. |
| P0014
Комбинации могут выводиться в вариациях:
|
Расшифровка кода 0014 на Opel VIVARO Z16XEP и других моделях — неисправность электромагнитных клапанов фазовращателей распредвалов мотора. Чтобы решить проблему, потребуется очистка контактных элементов. Если эти действия не помогли устранить неисправность, то производится замена клапанов вместе с шестеренками распредвалов. При такой проблеме возможны сложности запуска двигателя. |
| P0017 | Неверное положение коленчатого и распределительного валов. Требуется диагностика датчиков обоих узлов, а также проверка целостности шестеренок. |
| P0068
Другой формат:
|
Код нужно читать как «неисправность дроссельного узла». При такой проблеме возможны скачки холостых оборотов двигателя, а также увеличение расхода горючего. Возможная причина может состоять в повреждении пластмассовой клапанной крышки, что привело к подсосу воздуха в картер силового агрегата. |
| P0170
Коды могут быть в вариациях:
|
Код 0170 может свидетельствовать о том, что микропроцессорный модуль зафиксировал ошибки при формировании горючей смеси в цилиндрах двигателя. Силовой агрегат может функционировать нестабильно на холостых оборотах и во время движения. Элементы, которые нужно проверить:
|
| P0171
(017152) |
Комбинация 0171 сообщает об обеднении горючей смеси. Ошибка может сопровождаться увеличением потребления топлива, особенно, при движении на холостом ходу (расход может возрасти до 2–3 литров). Вероятнее всего, причина состоит в неисправности мембраны вакуумного усилителя тормозов, из-за которой образовался подсос воздуха в силовой агрегат. Неполадка может сопровождаться нехарактерными звуками в работе усилительного устройства. Чтобы устранить неисправность, потребуется заменить вакуумный усилитель в сборе. Помимо этого узла, причины неполадки могут быть следующими:
|
| P0299 | Появление кода Р0299 может быть обусловлено следующими причинами:
Появление данного кода обусловлено следующими признаками;
|
| P0300,
P0301, P0302, P0303 Ошибки могут быть:
|
Код 0300 указывает на общие пропуски зажигания в одном из цилиндров двигателя. 0301, 0302 и 0303 — обозначают, соответственно, что ошибка в первом, втором и третьем цилиндре. Для устранения причины нужно проверить компрессию и все датчики, которые влияют на формирование топливовоздушной смеси. Имеются в виду:
Возможные причины неисправности:
|
| P0400 | Код 0400 сообщает об отказе в работе системы рециркуляции отработавших газов. Для устранения проблемы нужно проверить целостность и герметичность патрубков узла, при необходимости поврежденные магистрали меняются. |
| P0402
(40274) |
Код обозначает избыточное течение газов в системе рециркуляции |
| P0420
Коды могут проявляться в виде:
|
Неисправность 0420 сообщает о проблемах в работе катализатора. При ошибке 4205A узел подлежит полной диагностике и замене в случае выхода из строя. |
| P1220 | Неисправность системы управления дроссельной заслонкой. При ошибке 1220 узел полежит диагностике, если механизм заклинило в открытом либо закрытом положении, его нужно смазать. |
| P2119
(211965) |
Код 2119 указывают на неполадки в работе системы управления дроссельным узлом. Возможно повреждение корпуса устройства или выход из строя датчика. Также причина может заключаться в залипании заслонки в открытом или закрытом положении. |
| Р2101
(210111) |
Появление комбинации Р2101 сообщает о неисправности дроссельного узла, в частности, его электродвигателя. Нужно проверить саму заслонку и убедиться, что она не залипает в открытом или закрытом положениях при перемещении. В некоторых случаях решить проблему позволит смазка устройства, но вероятнее всего, придется менять сам моторчик. |
| P2261 | Неисправность вакуумного бака перепускного клапана, возможно повреждение. Резервуар располагается за впускным коллектором, в центральной части. Чтобы исправить ошибку, первое, что нужно делать — проверить целостность бака. Для этого потребуется продуть патрубки, но нужно помнить, что дефект может быть незначительным и невидным с первого взгляда. Если в резервуаре есть дырка, его придется менять. |
- Manuals
- Brands
- Opel Manuals
- Automobile
- VIVARO
- Owner’s manual
-
Contents
-
Table of Contents
-
Bookmarks
Related Manuals for Opel Vivaro
Summary of Contents for Opel Vivaro
-
Page 1
OPEL Vivaro Owner’s Manual… -
Page 3: Table Of Contents
Contents Introduction ……..2 In brief ……….6 Keys, doors and windows …. 21 Seats, restraints ……43 Storage ……..67 Instruments and controls ….. 75 Lighting ……..95 Climate control ……101 Driving and operating ….112 Vehicle care ……. 138 Service and maintenance ..
-
Page 4: Introduction
Introduction Introduction…
-
Page 5: Using This Manual
«Service prices. Experienced mechanics ■ The Owner’s Manual uses the and maintenance» and «Technical trained by Opel work according to factory engine designations. The data» as well as on the identification specific Opel instructions. corresponding sales designations plate.
-
Page 6
Text marked Caution provides information on possible damage to the vehicle. Disregarding this information may lead to vehicle damage. Symbols Page references are indicated with 3. 3 means «see page». We wish you many hours of pleasurable driving. Adam Opel AG… -
Page 7
Introduction… -
Page 8: In Brief
In brief In brief Vehicle unlocking Unlocking with electronic key Unlocking with remote control Initial drive information Press the button on any exterior door handle when the electronic key is within range of the detection zone Press button c to unlock the driver’s (approx.
-
Page 9: Seat Adjustment
In brief Seat adjustment Seat backrests Seat height Seat positioning Pull lever, adjust inclination and Lever pumping motion: release lever. Allow the backrest to = seat higher engage. Do not lean on backrest Pull handle, slide seat, release down = seat lower when adjusting.
-
Page 10: Head Restraint Adjustment
In brief Head restraint adjustment Seat belt Mirror adjustment Interior mirror Press release button, adjust height, Pull out the seat belt and engage in engage. belt buckle. The seat belt must not be To reduce dazzle, adjust the lever on twisted and must fit close against the Head restraints 3 43.
-
Page 11: Steering Wheel Adjustment
In brief Steering wheel adjustment Exterior mirrors Electric adjustment Manual adjustment Select the relevant exterior mirror and Unlock the lever, adjust the steering adjust it. wheel, then engage the lever and Swivel mirror in required direction. Convex exterior mirrors 3 38, ensure it is fully locked.
-
Page 12
In brief Instrument panel overview… -
Page 13
In brief Side air vents …… 110 Card reader for electronic 18 Hazard warning flashers ..97 key system ……23 Ashtray ……..80 Central locking system ..25 Steering column controls ..76 Cupholder ……68 19 Power button for electronic Centre air vents …. -
Page 14
In brief Instrument panel illumination control ….98 Auxiliary heater ….106 Speed limiter ……. 130… -
Page 15
In brief… -
Page 16: Exterior Lighting
In brief Exterior lighting Front and rear fog lights Vehicles with automatic light control: AUTO = automatic light control: Turn inner switch Turn outer switch: exterior lighting is switched > = front fog lights = off on and off automatically r = rear fog light = sidelights depending on external…
-
Page 17
In brief Headlight flash, high beam and Turn and lane-change signals Hazard warning flashers low beam lever up = right turn signal Operated with the ¨ button. lever down = left turn signal headlight flash = pull lever Hazard warning flashers 3 97. high beam = push lever Turn and lane-change signals… -
Page 18: Washer And Wiper Systems
In brief Horn Washer and wiper systems Windscreen and headlight washer systems Windscreen wiper Press j. Pull lever. 7 = off Windscreen and headlight washer K = interval wiping or automatic system 3 76, Washer fluid 3 143. wiping with rain sensor 1 = slow 2 = fast Windscreen wiper 3 76, Wiper…
-
Page 19: Climate Control
In brief Climate control Rear window wiper and washer Demisting and defrosting the system windows Heated rear window Climate control system Turn lever: Heating is operated by pressing the 7 = off ■ Air distribution to V. Ü button. e = wiper ■…
-
Page 20: Starting Off
In brief Transmission Starting off Electronic climate control system Manual transmission Check before starting off ■ Tyre pressure and condition 3 157, 3 192. ■ Engine oil level and fluid levels 3 140. ■ All windows, mirrors, exterior lighting and number plates are free from dirt, snow and ice and are operational.
-
Page 21
In brief Starting the engine with key Starting the engine with the Stop-start system power button ■ Turn key to position A If the vehicle is at low speed or in standstill and certain conditions are Electronic key must be inside the ■… -
Page 22
In brief Parking ■ Turn the ignition key to position St and remove it. Turn the steering wheel until the steering wheel lock 9 Warning is felt to engage. ■ Close the windows. ■ Do not park the vehicle on an easily ignitable surface. -
Page 23: Keys, Doors And Windows
Keys, doors and windows Keys, doors and Keys, locks Radio remote control windows Keys Replacement keys The key number is specified on the Keys, locks ……..21 key or on a detachable tag. Doors ……….. 31 The key number must be quoted Vehicle security ……
-
Page 24
Keys, doors and windows Depending on model, the vehicle may Remote control battery 2-button and 3-button remote control use a 2 button or 3 button remote replacement control or an electronic key which Replace the battery as soon as the includes the functionality of the radio range reduces. -
Page 25: Electronic Key System
Keys, doors and windows Electronic key system Replace the battery (battery type located on the rear of the electronic CR 2016), paying attention to the key, then press one side of the battery installation position. to release and remove the battery. Reattach both halves of the cover, Replace the battery (battery type ensuring they engage correctly.
-
Page 26
Keys, doors and windows Note central locking switch e 3 25 is ■ Overload of the central locking Always take the electronic key with system by operating at frequent pressed. To re-enable handsfree you when exiting the vehicle. intervals, the power supply is operation, restart the engine. -
Page 27: Central Locking System 3
Keys, doors and windows After use, reinsert the emergency The anti-theft security lock remains Remote control operation manual key in the housing of the engaged even after unlocking the Operation of central locking system electronic key. vehicle with the remote control. The with the remote control is confirmed door can only be opened from inside by the hazard warning flashers.
-
Page 28
Keys, doors and windows Unlocking with 3-button remote Locking with 2-button remote control Locking with 3-button remote control control Press button e: All doors and the load Press button e: All doors and the load Depending on configuration: compartment are locked. compartment are locked. -
Page 29
Keys, doors and windows Load compartment locking and Load compartment locking and Note unlocking with 2-button remote unlocking with 3-button remote There is no button for handsfree control control operation in the exterior door handle of the sliding side door. There must be no electronic key left inside the vehicle and no additional electronic key in the detection zones,… -
Page 30
Keys, doors and windows Unlocking with electronic key — Unlocking with electronic key buttons Handsfree operation is automatically handsfree operation disabled when the electronic key buttons have been operated. To re- enable handsfree operation, restart the engine. Locking with electronic key buttons Press button c to unlock all doors and Press the button on any exterior door the load compartment. -
Page 31
Keys, doors and windows when the electronic key is within Press button G to lock/unlock the range of the detection zone (approx. rear doors/tailgate (and sliding side one metre). doors). The rear doors/tailgate (and sliding Electronic key system 3 23. side doors) only lock/unlock when at Manual key operation least 3 seconds have passed since… -
Page 32: Automatic Locking
Keys, doors and windows Handsfree operation is automatically Activation The child safety lock for the sliding disabled when the central locking side door is located on its rearward With the ignition switched on, press switch e is pressed. To re-enable facing edge.
-
Page 33: Doors
Keys, doors and windows Doors 9 Warning Sliding door Take care when operating the sliding side door. Risk of injury. Ensure that nothing becomes trapped during operation and no- one is standing within the moving area. If the vehicle is parked on a slope, open sliding doors may move accidentally on account of their weight.
-
Page 34: Anti-Theft Security Lock
Keys, doors and windows Anti-theft security lock The doors are retained in the 90º When closing the doors, secure each position by locking stays. To open the locking stay to the catch on the door To prevent the left-hand rear door doors to 180º…
-
Page 35
Keys, doors and windows Load compartment Central locking system 3 25. Emergency tailgate opening from inside the vehicle Closing Tailgate Opening If necessary, first remove the cover Close tailgate using the interior strap. on the inside of the tailgate, then pull Ensure tailgate is fully closed. -
Page 36: Vehicle Security
Keys, doors and windows Vehicle security 2-button and 3-button remote gases, which can not be seen or control operation smelled, could enter the vehicle. Anti-theft locking system This can cause unconsciousness Operation is confirmed by the hazard and even death. warning flashers flashing five times.
-
Page 37: Anti-Theft Alarm System
Keys, doors and windows Deactivation Press the button twice on any exterior Central locking system 3 25. door handle. Unlock the doors by pressing button Electronic key system 3 23. c on the remote control or by turning — or — the manual key in driver’s door lock Anti-theft alarm system towards front of vehicle.
-
Page 38
Keys, doors and windows 2-button and 3-button remote control Press electronic key button e to activate the anti-theft alarm system. Electronic key system 3 23. Deactivation Unlocking the vehicle (with button c or the button on any exterior door handle) or switching on the ignition deactivates the anti-theft alarm system. -
Page 39: Passenger Compartment
Keys, doors and windows Activation without monitoring of To silence the alarm siren (if Note triggered) and therefore deactivate The immobiliser does not lock the passenger compartment the anti-theft alarm system, reconnect doors. You should always lock the Disable monitoring of the passenger vehicle battery and unlock the vehicle vehicle after leaving it and switch on compartment, e.g.
-
Page 40: Exterior Mirrors
Keys, doors and windows Exterior mirrors Electric adjustment Folding mirrors Convex shape The convex exterior mirror contains an aspherical area and reduces blind spots. The shape of the mirror makes objects appear smaller, which will affect the ability to estimate distances.
-
Page 41: Interior Mirrors
Keys, doors and windows Interior mirrors Depending on version, exterior Wide view mirror mirrors can be automatically folded to the parking position upon locking the Manual anti-dazzle vehicle. For further information, refer to the Infotainment system manual. Heated mirrors Depending on vehicle, a large convex mirror is located in the front passenger sun visor which helps to To reduce dazzle, adjust the lever on…
-
Page 42: Windows
Keys, doors and windows Windows Automatic anti-dazzle Windscreen stickers Do not attach stickers such as toll Windscreen road stickers or similar on the windscreen in the area of the interior Heat-reflecting windscreen mirror. The heat-reflecting windscreen has a Power windows coating which reflects solar radiation.
-
Page 43: Rear Windows
Keys, doors and windows Safety function To open or close, raise the handle and slide window. If the window glass encounters resistance during automatic closing, it Sun blind is immediately stopped and opened again. Overload If the windows are repeatedly operated within short intervals, the window operation is disabled for some time.
-
Page 44: Heated Rear Window
Keys, doors and windows Heated rear window Sun visors have vanity mirrors and a ticket holder on the rear. The mirror covers should be closed when driving. Wide view mirror 3 39. Operated by pressing the Ü button. Activation is indicated by the LED in the button.
-
Page 45: Seats, Restraints
Seats, restraints Seats, restraints Head restraints Adjustment Position Head restraints ……43 9 Warning Front seats ……..44 Rear seats ……..47 Only drive with the head restraint Seat belts ……..50 set to the proper position. Airbag system ……53 Child restraints ……
-
Page 46: Front Seats
Seats, restraints Front seats Stow head restraints securely in load ■ Sit with shoulders as far back compartment. Do not drive with head against the backrest as possible. restraints removed if the seat is Set the backrest rake so that it is Seat position occupied.
-
Page 47
Seats, restraints Seat adjustment Seat positioning Seat backrests 9 Danger Do not sit nearer than 25 cm from the steering wheel, to permit safe airbag deployment. 9 Warning Never adjust seats while driving as they could move uncontrollably. Pull handle, slide seat, then release Pull lever, adjust inclination and 9 Warning handle. -
Page 48: Seat Folding
Seats, restraints Seat folding Seat height Lumbar support Folding front centre passenger seat Lever pumping motion: Adjust lumbar support using handwheel to suit personal = seat higher requirements. down = seat lower Pull release lever, fold backrest fully Rotate handwheel to increase and forwards then release the lever.
-
Page 49: Rear Seats
Seats, restraints Rear seats Heating To restore, pull release lever, raise backrest then release the lever. Allow the backrest to engage audibly. 9 Warning 9 Warning When rear seats or backrests are When the front passenger seat is being adjusted or folded, keep in the folded position, the front hands and feet away from the passenger airbag system must be…
-
Page 50
Seats, restraints When folding or removing the rear Fitting seat belt 3 51. If necessary, remove the head seat, ensure the armrests are folded restraints 3 43. Folding seats away in their most upright position. On some variants, the cargo area can Rear seat access be increased by folding up the rear seats. -
Page 51
Seats, restraints correctly located and latched. Raise the backrest, and if necessary, replace the head restraints. Removable rear seats On some variants, the cargo area can be increased by removing the rear seats. Lift and fold the seat assembly Raise the locking catches, then move forwards until it engages in the folded the seat unit towards the rear to forward position. -
Page 52: Seat Belts
Seats, restraints Seat belts Seat belts are only designed for use 9 Warning by one person at a time. Child restraint system 3 60. Removable seats are heavy! Do Periodically check all parts of the belt not attempt to remove without system for damage and proper assistance.
-
Page 53: Three-Point Seat Belt
Seats, restraints Three-point seat belt 9 Warning Fitting Incorrect handling (e.g. removal or fitting of belts) can trigger the belt tensioners with risk of injury. Deployment of the belt tensioners is indicated by continuous illumination of control indicator v 3 85. Triggered belt tensioners must be replaced by a workshop.
-
Page 54: Height Adjustment
Seats, restraints Height adjustment Removing Seat belts on the rear seats Two-latch belt Slide adjuster up or down to desired To release belt, press red button on position: belt buckle. Before fitting the belt, first insert lower ■ Tilt adjuster downwards then slide latch plate into the left-hand buckle.
-
Page 55: Airbag System
Seats, restraints Airbag system Using the seat belt while 9 Warning pregnant The airbag system consists of a The seat belt will not be effective number of individual systems in the event of an accident if the depending on the scope of lower latch plate is not correctly equipment.
-
Page 56
Seats, restraints Each airbag is triggered only once. sous peine d’infliger des Have deployed airbags replaced by BLESSURES GRAVES, voire a workshop. Furthermore, it may be MORTELLES à l’ENFANT. necessary to have the steering ES: NUNCA utilice un sistema de wheel, the instrument panel, parts of retención infantil orientado hacia the panelling, the door seals,… -
Page 57
Seats, restraints DA: Brug ALDRIG en bagudvendt mesmo, poderá ocorrer a PERDA DE korunmakta olan bir koltukta autostol på et forsæde med AKTIV VIDA ou FERIMENTOS GRAVES na kullanmayınız. ÇOCUK ÖLEBİLİR AIRBAG, BARNET kan komme i CRIANÇA. veya AĞIR ŞEKİLDE LIVSFARE eller komme ALVORLIGT YARALANABİLİR. -
Page 58
Seats, restraints BLAZINO, saj pri tem obstaja acest lucru poate duce la DECESUL ET: ÄRGE kasutage tahapoole nevarnost RESNIH ali SMRTNIH sau VĂTĂMAREA GRAVĂ a suunatud lapseturvaistet istmel, mille POŠKODB za OTROKA. COPILULUI. ees on AKTIIVSE TURVAPADJAGA kaitstud iste, sest see võib SR: NIKADA ne koristiti bezbednosni CS: NIKDY nepoužívejte dětský… -
Page 59: Front Airbag System
Seats, restraints Front airbag system The side airbag system is triggered in Seat position 3 44. the event of an accident of a certain The front airbag system consists of Keep the area in which the airbag severity. The ignition must be one airbag in the steering wheel and inflates clear of obstructions.
-
Page 60: Curtain Airbag System
Seats, restraints Note The inflated airbags cushion the Only use protective seat covers that impact, thereby reducing the risk of have been approved for the vehicle. injury to the head in the event of a Be careful not to cover the airbags. side-on impact considerably.
-
Page 61
Seats, restraints Front passenger airbag system can Change status only when the vehicle Risk of fatal injury for an adult be deactivated via a switch located on is stopped with the ignition off. Status person with deactivated front the side of the instrument panel. remains until the next change. -
Page 62: Child Restraints
Child restraint systems The rear seats are the most Note We recommend the Opel child convenient location to fasten a child Do not affix anything on the child restraint system which is tailored restraint system.
-
Page 63: Child Restraint Installation Locations
Seats, restraints Child restraint installation locations Permissible options for fitting a child restraint system Front seats — Van Single front passenger seat Double front passenger seat deactivated or without airbag deactivated Weight and age class activated airbag or without airbag activated airbag centre outer…
-
Page 64
Seats, restraints Front seats — Combi, Bus, Double cab Single front passenger seat Double front passenger seat deactivated or without airbag deactivated Weight and age class activated airbag or without airbag activated airbag centre outer Group 0: up to 10 kg or approx. -
Page 65
Seats, restraints Rear seats — Combi, Bus, Double cab Weight and age class 2nd row seats 3rd row seats Group 0: up to 10 kg or approx. 10 months Group 0+: up to 13 kg or approx. 2 years Group I: 9 to 18 kg or approx. -
Page 66
Seats, restraints Permissible options for fitting an ISOFIX child restraint system Weight class Size Fixture Front seats 2nd row seats 3rd row seats class Centre Outer vehicles with vehicles with single double passenger passenger seat seat Group 0: up to 10 kg ISO/R1 X or approx. -
Page 67
Seats, restraints = If necessary, slide adjustable front seat forwards to install a child restraint system on these seats. There may not be enough clearance to install a child restraint system on vehicles fitted with fixed front seats. = Forward-facing child restraints: Remove head restraint 3 43 before installing child restraint. The seat in front of this installation position must not be more than halfway back on its runners. -
Page 68: Top-Tether Fastening Eyes
Seats, restraints Isofix child restraint Permissible mounting location ISOFIX child restraint systems of positions for ISOFIX child restraint universal category positions are systems systems are marked in the tables by marked in the table by IUF. <, IL and IUF. ISOFIX mounting brackets are indicated by the ISOFIX logo or symbol on the seat cushion.
-
Page 69: Storage
Storage Storage Storage compartments Glovebox 9 Warning Storage compartments ….67 Do not store heavy or sharp Load compartment ……. 70 objects in the storage Roof rack system ……73 compartments. Otherwise vehicle Loading information ….. 73 occupants could be injured by objects being thrown around in the event of hard braking, a sudden change in direction or an accident.
-
Page 70: Front Storage
Storage Cupholders Front storage Press button (arrowed) on rear side of backrest to unlock the document tray Coat hooks are located on the cabin and access the storage bulkhead and on the grab handles in compartments. the roof lining. To install the document tray, insert The front door pockets contain bottle the end piece(s) into any of the slots holders.
-
Page 71: Underseat Storage
Storage When folded down, pulling the loop also allows you to adjust the position of the seat cushion to suit personal requirements. Seat adjustment 3 45. Load-through feature If necessary, secure objects with the Using the loops on the passenger strap.
-
Page 72: Overcab Storage
Storage Load compartment Overcab storage Load compartment cover Rear parcel shelf Do not place any excessively heavy or sharp-edged objects on the rear parcel shelf. The maximum load permissible is 50 kg. 9 Warning Fold up the rear flap by hand; it is retained in the open position by Always make sure that the load in The total weight in this compartment…
-
Page 73: Lashing Eyes
Storage Installing Refit the parcel shelf by engaging in the retainers on both sides. Lashing eyes The rear parcel shelf can be installed Lashing eyes may be located on the in 2 positions, i.e. the upper position vehicle floor and/or in the sidewall. or the lower position.
-
Page 74: First Aid Kit
Storage First aid kit Installing The first aid kit can be accommodated in the space under the seats. Underseat storage 3 69. Attach the straps to the lashing eyes or rings behind the seats, then Release the covers in the roof lining tension the straps.
-
Page 75: Roof Rack System
Storage Roof rack system Loading information ■ Do not drive with an open load compartment. In addition, the number plate is only Roof rack ■ Heavy objects in the load distinguishable and illuminated compartment should be evenly For safety reasons and to avoid correctly if the doors are closed.
-
Page 76
Storage Optional equipment and accessories increase the kerb weight. ■ Driving with a roof load increases the sensitivity of the vehicle to cross-winds and has a detrimental effect on vehicle handling due to the vehicle’s higher centre of gravity. Distribute the load evenly and secure it properly with retaining straps. -
Page 77: Instruments And Controls
Instruments and controls Instruments and Controls Steering wheel controls controls Steering wheel adjustment Controls ……..75 Warning lights, gauges and indi‐ cators ……….. 80 Information displays ….. 90 Vehicle messages ……91 Trip computer ……. 92 Tachograph ……..94 The cruise control and speed limiter can be operated via the controls on the steering wheel.
-
Page 78: Steering Column Controls
Instruments and controls Horn Windscreen wiper/washer Adjustable wiper interval Windscreen wiper Wiper lever in position P. Press j. Turn the adjuster wheel to adjust the The horn will sound regardless of 7 = off desired wipe interval: ignition switch position. K = interval wiping or automatic short interval = turn adjuster…
-
Page 79: Rear Window Wiper/Washer
Instruments and controls Rear window wiper/washer Automatic wiping will need to be Windscreen washer reselected whenever the ignition has been switched off. Adjustable sensitivity of the rain sensor Turn the adjuster wheel to adjust the sensitivity: low sensitivity = turn adjuster wheel upwards high sensitivity = turn adjuster wheel downwards…
-
Page 80: Outside Temperature
Instruments and controls Outside temperature Hours and minutes can be adjusted 9 Warning by pressing the appropriate buttons by the display or with the Infotainment The road surface may already be system controls. icy even though the display For further information, refer to the indicates a few degrees above Infotainment system manual.
-
Page 81: Power Outlets
Instruments and controls Power outlets Press and hold the button for approx. Electrical accessories that are 5 seconds: connected must comply with the electromagnetic compatibility ■ Hours flash requirements laid down in ■ Press button repeatedly to change DIN VDE 40 839. hours ■…
-
Page 82: Warning Lights, Gauges And Indicators
Instruments and controls Warning lights, gauges The cigarette lighter is located on the Ashtray container for mobile use in instrument panel. the vehicle. To use, open cover. and indicators Press in cigarette lighter. It switches Ashtrays can be placed in the off automatically once the element is cupholders at both ends of the Instrument cluster…
-
Page 83: Trip Odometer
Instruments and controls Odometer Tachometer Speed limiter Maximum speed may be restricted by a speed limiter. As a visible indication of this, a warning label is located on the instrument panel. A warning buzzer will sound for 10 seconds every 40 seconds if the vehicle briefly exceeds the set limit.
-
Page 84: Fuel Gauge
Instruments and controls Fuel gauge Because of the fuel remaining in the The gauge uses colours to indicate tank, the top-up quantity may be less current fuel efficiency: than the specified tank capacity. Green = best fuel economy is being achieved Fuel economy gauge Yellow = driving style too…
-
Page 85: Control Indicators
Instruments and controls Control indicators When the remaining distance before the next service is less than The control indicators described are 1500 km or 1 month, a message not present in all vehicles. The appears in the Driver Information description applies to all instrument Centre.
-
Page 86
Instruments and controls Control indicators in the instrument cluster… -
Page 87: Seat Belt Reminder
Instruments and controls Seat belt reminder Control indicators in the roof whilst driving, there is a fault in the belt tensioner or the airbag system. console X illuminates in red. The airbags and belt tensioners may If the seat belt is not fastened, control fail to trigger in the event of an indicator X will flash when vehicle accident.
-
Page 88: Malfunction Indicator Light
Instruments and controls If both control indicators ÓON and Illuminates briefly when the ignition is Flashes when the engine is switched on. *OFF are illuminated running simultaneously, there is a system Fault that could lead to catalytic Illuminates when the engine is failure.
-
Page 89: Antilock Brake System
Instruments and controls Illuminates together with other control appears in the Driver Information Antilock brake system 3 122. indicators (e.g., p, I and R), Centre 3 90. Seek the assistance of accompanied by a warning chime and a workshop immediately. Upshift a corresponding message in the Brake system 3 122.
-
Page 90: Electronic Stability Program Off
Instruments and controls Electronic Stability Check coolant level 3 142. Tyre pressure monitoring system 3 158. Program off If there is sufficient coolant, consult a workshop. Ø illuminates yellow. Engine oil pressure The control indicator must be blue If ESP® Plus has been deactivated with before continuing driving.
-
Page 91: Low Fuel
Instruments and controls Low fuel High beam 3. Move out of the flow of traffic as quickly as possible without Y illuminates yellow. P illuminates blue. impeding other vehicles. When the ignition is switched on, the Illuminated when high beam is on and 4.
-
Page 92: Information Displays
Instruments and controls Information displays U illuminates yellow when the Info-display system is on. Driver Information Centre Cruise control and speed limiter 3 126. Door open y illuminates red. Illuminates when a door is not fully closed. A corresponding message also appears in the Driver Information Centre.
-
Page 93: Vehicle Messages
Instruments and controls Vehicle messages automatically and F remains When starting the engine or illuminated. The fault will then be whilst driving: stored in the on board system. ■ If seat belt is not fastened 3 50. Messages are displayed in the Driver Information Centre and may be Warning messages ■…
-
Page 94: Trip Computer
Instruments and controls Trip computer When the vehicle is parked and/ ■ Distance travelled or the driver’s door is opened: ■ Average speed ■ If the key has been left in the The trip computer provides ■ Distance before service 3 82 ignition.
-
Page 95: Journey Record
Instruments and controls The measurement can be restarted at The average speed since the last Fuel economy rating any time. reset is displayed. (ecoScoring) The measurement can be restarted at If equipped, a rating of 0 to 100 is Instantaneous consumption any time.
-
Page 96: Tachograph
Instruments and controls Tachograph ■ Distance travelled ■ Fuel saved in km Unit of measurement To change the unit of measurement for the duration of a journey: With ignition off, simultaneously press the power button 3 114 and press and hold button on end of wiper lever; the Driver Information Centre flashes for approx.
-
Page 97: Automatic Light Control
Lighting Lighting Exterior lighting Automatic light control Light switch Exterior lighting ……95 Interior lighting ……98 Lighting features ……100 AUTO = automatic light control When the automatic light control Turn outer switch: function is activated and the engine is = off running, the system switches = sidelights…
-
Page 98: Headlight Flash
Lighting Headlight range Headlights when driving Daytime running lights 3 97. adjustment abroad High beam The asymmetrical headlight beam Manual headlight range extends visibility at the edge of the adjustment road at the passenger side. However, when driving in countries where traffic drives on the opposite side of the road, adjust the headlights to prevent dazzling of oncoming…
-
Page 99: Adaptive Forward Lighting
Lighting Adaptive forward lighting Turn and lane-change For each headlight: Using a screwdriver, turn the screw signals Cornering light by a turn towards the ] symbol to Depending on the steering angle, lower the beams or towards the < vehicle speed and gear selected symbol to raise the beams.
-
Page 100: Interior Lighting
Lighting Interior lighting If the lever is moved past the first stop, Rear fog light comes on together with the turn signal is switched on front fog lights and will only operate constantly. Switch the turn signal off when the ignition and headlights are Instrument panel manually by moving the lever to its switched on.
-
Page 101: Interior Lights
Lighting Interior lights Rear courtesy lights With the rocker switch in its central position, the light functions as a The upper load compartment lights courtesy light and illuminates when Front courtesy lights can be set to illuminate when the side the side or rear doors are opened.
-
Page 102: Lighting Features
Lighting Lighting features Exit lighting The lighting is turned off immediately by switching on the ignition or turning the light switch. Entry lighting Welcome lighting Vehicle lights are switched on for a short time to facilitate locating the vehicle when it is dark. Remote control operation Lights switch on when unlocking the vehicle with the remote control.
-
Page 103: Climate Control
Climate control Climate control Climate control systems Heating will not be fully effective until the engine has reached normal operating temperature. Heating and ventilation system Fan speed Climate control systems ….. 101 Adjust the air flow by switching the fan Air vents ……..
-
Page 104: Air Conditioning System
Climate control ■ Open side air vents as required and Cooling (AC) 9 Warning direct them towards door windows. Operated with the AC button and functional only when the engine and ■ For simultaneous warming of the The exchange of fresh air is fan are running.
-
Page 105: Electronic Climate Control
Climate control Electronic climate control ■ Set temperature control to coldest The preselected temperature is level. automatically regulated. In Automatic system mode, the fan speed and air ■ Set fan speed to highest level. distribution automatically regulate the ■ Open all air vents. air flow.
-
Page 106
Climate control If the minimum temperature is set, the Manual settings Cooling AC climate control system runs at Manually changing any of the The air conditioning system cools and maximum cooling. following settings will deactivate dehumidifies (dries) the air when Automatic mode: outside temperature is above a If the maximum temperature is set,… -
Page 107: Rear Air Conditioning
Climate control Rear heating system 9 Warning The exchange of fresh air is reduced in air recirculation mode. In operation without cooling the air humidity increases, so the windows may mist up from inside. The quality of the passenger compartment air deteriorates, which may cause the vehicle occupants to feel drowsy.
-
Page 108: Auxiliary Heater
Climate control Auxiliary heater Rear air conditioning fan switch 9 Warning Coolant heater Do not operate the system when The Eberspächer engine- refuelling, when dust or independent, fuel-powered coolant combustible vapours are present heater provides rapid heating of the or in enclosed spaces (e.g. engine coolant to enable heating of garage).
-
Page 109
Climate control Timer Remote control 9 Warning When refuelling, switch off the remote control unit as well as the heater! To switch off, press and hold activation button X to prevent inadvertent operation. The remote control has a maximum range of 600 metres. The range may be reduced due to environmental conditions and as the battery becomes weaker. -
Page 110
Climate control In addition to the remote control unit, Batteries do not belong in household Additional remote control units may the heating can also be switched on waste. They must be disposed of at also be configured. Press the button for 30 minutes, or off, using the an appropriate recycling collection until LED flashes, switch on the… -
Page 111
Climate control Ventilation x The next preset memory number to Set weekday, time and heating be activated is underlined and the duration Ö Select x in the menu bar and confirm. weekday is displayed. Repeat the If the vehicle battery is disconnected The ventilation duration can be procedure to programme the other or its voltage is too low, the unit will… -
Page 112: Air Vents
Climate control Air vents To open or close the centre air vents Rear air vents and direct the flow of air, tilt the slats Depending on vehicle, additional up or down and turn the adjuster Adjustable air vents adjustable air vents are located in the wheel left or right.
-
Page 113: Pollen Filter
Climate control Maintenance Service For optimal cooling performance, it is Air intake recommended that the climate control system be checked annually, starting The air intake in front of the three years after initial vehicle windscreen in the engine registration, including: compartment must be kept clear to allow air intake.
-
Page 114: Driving And Operating
Driving and operating Driving and operating Driving hints Driving economically Driving hints ……. 112 ECO mode Starting and operating ….113 ECO mode is a function that optimises fuel consumption. It affects Engine exhaust ……120 engine power and torque, Manual transmission ….
-
Page 115: Starting And Operating
Driving and operating Starting and operating Control of the vehicle Caution Never coast with engine not New vehicle running-in Vehicles equipped with hydraulic running power steering: Do not brake unnecessarily hard for Many systems will not function in this the first few journeys and after new If the steering wheel is turned until situation (e.g.
-
Page 116: Ignition Switch Positions
Driving and operating Ignition switch positions Power button Some functions, e.g. Infotainment system, are available for use as soon as you enter the vehicle. Accessory power mode Press Start/Stop button without operating clutch or brake pedal to enable further electrical functions to be operated.
-
Page 117
Driving and operating At very low outside temperatures Retained power off Fault (e.g. below -10 °C) keep the clutch Press the Start/Stop button for more If the engine cannot be started, the pedal depressed while pressing the than two seconds; the engine is cause may be one of the following: Start/Stop button until the engine stopped while some functions, e.g. -
Page 118: Starting The Engine
Driving and operating Starting the engine Idle speed control Start attempts should not last longer than 15 seconds. If engine does not start, wait 15 seconds before repeating starting procedure. If necessary, depress accelerator before repeating starting procedure. Before restarting or to switch off the engine, turn key back to St.
-
Page 119: Vehicle Shutdown
Driving and operating Vehicle shutdown Resetting with remote control Power button 3 114. key / manual key Refuelling 3 134. Fuel cut-off system To reset the fuel cut-off system and If the vehicle runs out of fuel, the fuel enable the vehicle to be driven: Overrun cut-off system is cut-off and must be reset 1.
-
Page 120
Driving and operating Deactivation Autostop During an Autostop, brake performance will be maintained. If the vehicle is at a low speed or at a However, brake assist is not available standstill, activate an Autostop as 3 123. follows: ■ Depress the clutch pedal. Conditions for an Autostop ■… -
Page 121
Driving and operating Parking ■ the self-cleaning function of the ■ the vehicle battery is discharged. diesel particle filter is not active ■ the engine temperature is too low. 3 120. 9 Warning ■ the brake vacuum is not sufficient. ■… -
Page 122: Engine Exhaust
Driving and operating Engine exhaust Catalytic converter place automatically under set driving conditions. Autostop is not available The catalytic converter reduces the and fuel consumption may be higher amount of harmful substances in the during this period. The emission of 9 Danger exhaust gases.
-
Page 123: Manual Transmission
Driving and operating Manual transmission If control indicator Z flashes, the Caution permitted emission limits may be exceeded. Lift your foot off the It is inadvisable to drive with hand accelerator until Z stops flashing and resting on the selector lever. is steadily illuminated.
-
Page 124: Brakes
Driving and operating Brakes Control indicator R 3 87. illuminate in the instrument cluster together with a corresponding Vehicle messages 3 91. message in the Driver Information The brake system comprises two Centre. The brake system remains independent brake circuits. Antilock brake system operational but without ABS If a brake circuit fails, the vehicle can…
-
Page 125: Parking Brake
Driving and operating Parking brake When releasing the foot brake after To reduce the operating forces of stopping on an incline (with the the parking brake, depress the selector lever in a forward gear or foot brake at the same time. reverse gear), the brakes remain on for a further 2 seconds.
-
Page 126: Ride Control Systems
Driving and operating Ride control systems If necessary, in the event of soft 9 Warning ground, mud or snow-covered road surfaces, the Traction control system Traction Control system Do not let this special safety (TC) can be deactivated to enhance feature tempt you into taking risks The Traction Control system (TC) is a traction:…
-
Page 127
Driving and operating Traction function to TC operation. type of road surface or tyre grip. It also Trailer stability assist (TSA) 3 137. Control indicator Ø extinguishes in prevents the drive wheels from Enhanced Traction function spinning. the instrument cluster. TC is reactivated by pressing the Ø… -
Page 128: Driver Assistance Systems
Driving and operating Driver assistance Fault If the system detects a fault, control systems indicator b 3 87 illuminates together with F 3 86 in the instrument cluster and a corresponding message 9 Warning appears in the Driver Information Centre 3 90. Driver assistance systems are The Electronic stability program developed to support the driver…
-
Page 129
Driving and operating Do not use the cruise control if it is not advisable to maintain a constant speed. Control indicators U and m 3 89. Activation Accelerate to the desired speed and Control indicator m illuminates green press switch < or ]. The current in the instrument cluster together with speed is now stored and maintained U and a corresponding message… -
Page 130
Driving and operating Increase speed Deactivation Reactivation With cruise control active, the vehicle Press switch R at a speed above speed can be increased continuously 30 km/h. or in small increments by holding If the stored speed is much higher down or tapping switch <… -
Page 131
Driving and operating Activation Where the limit speed cannot be Release the accelerator pedal and maintained, e.g. when driving on a the speed limiter function is steep decline, the limit speed will reactivated once a speed lower than flash in the Driver Information Centre the limit speed is obtained. -
Page 132: Parking Assist
Driving and operating Parking assist Deleting the limit speed If equipped, a warning label indicating the fixed maximum speed limit (90 to Press switch U: Yellow control 130 km/h) is located on the indicator U extinguishes in the instrument panel. instrument cluster.
-
Page 133
Driving and operating Activation Note external noise sources may cause In versions with Info-Display When reverse gear is engaged, the the system to fail to detect indication, the function can be system switches itself on obstacles. deactivated via the Infotainment automatically. -
Page 134: Rear View Camera
Driving and operating Activation Caution Rear view camera is automatically activated when reverse gear is When reversing, the area should engaged. be free from obstacles which could impact on the underside of the Functionality vehicle. Impact to the rear axle, which may not be visible, could lead to uncharacteristic changes in the vehicle handling.
-
Page 135
Driving and operating Trajectory lane display (1) The guiding line intervals are as ■ the rear doors/tailgate are not follows: closed correctly, A (red) = 30 cm ■ the vehicle had a rear end accident, B (yellow) = 70 cm ■… -
Page 136: Fuel
Driving and operating Fuel The flow and filterability of diesel fuels 9 Danger are temperature-dependent. When temperatures are low, refuel with Fuel for diesel engines Fuel is flammable and explosive. diesel fuel with guaranteed winter No smoking. No naked flames or Only use diesel fuel that complies properties.
-
Page 137
The values for fuel consumption The figures are provided only for the (combined) of the model Opel Vivaro The fuel filler cap can be retained in purpose of comparison between is within a range of 7.4 to the bracket on the fuel filler flap. -
Page 138: Trailer Hitch
Driving and operating Trailer hitch If the trailer starts snaking, drive more level. Since engine power decreases slowly, do not attempt to correct the as altitude increases due to the air steering and brake sharply if becoming thinner, therefore reducing General information necessary.
-
Page 139: Trailer Stability Assist
Driving and operating In the case of trailer loads of 1200 kg or more, the vertical coupling load should not be less than 50 kg. Rear axle load When the trailer is coupled and the towing vehicle fully loaded (including all occupants), the permissible rear axle load (see identification plate or vehicle documents) must not be…
-
Page 140: Vehicle Care
Vehicle care Vehicle care General Information Vehicle storage Storage for a long period of time Accessories and vehicle If the vehicle is to be stored for several modifications General Information ….138 months: We recommend the use of Genuine Vehicle checks ……139 ■…
-
Page 141: Vehicle Checks
Vehicle care Vehicle checks End-of-life vehicle ■ Open the bonnet, close all doors and lock the vehicle. recovery Performing work ■ Disconnect the clamp from the Information on end-of-life vehicle negative terminal of the vehicle recovery centres and the recycling of battery.
-
Page 142: Engine Oil
Vehicle care Bonnet Engine oil Check the engine oil level manually Opening on a regular basis to prevent damage to the engine. Ensure that the correct specification of oil is used. Recommended fluids and lubricants 3 176. Check with the vehicle on a level surface.
-
Page 143
Vehicle care Engine air filter When the engine oil level has Caution dropped to the MIN mark, top-up engine oil. Engine air flow indicator Overfilled engine oil must be drained or suctioned out. Caution To prevent spillage when Do not allow the engine oil level to replenishing the engine oil, we drop below the minimum level! recommend using a funnel. -
Page 144: Power Steering Fluid
Vehicle care Engine coolant Power steering fluid If the cooling system is cold, the coolant level should be just above the The coolant provides freeze MINI mark. Top up if the level is low. Caution protection down to approx. -28 °C. 9 Warning Extremely small amounts of Caution…
-
Page 145: Washer Fluid
Vehicle care Washer fluid Brakes A squealing noise indicates that the brake lining is at its minimum thickness. Continued driving is possible but have the brake lining replaced as soon as possible. Once new brake linings are installed, do not brake unnecessarily hard for the first few journeys.
-
Page 146: Vehicle Battery
Vehicle care Vehicle battery Laying up the vehicle for more than 4 weeks can lead to battery The vehicle is equipped with a lead discharge. Disconnect the clamp from acid battery. Vehicles with stop-start the negative terminal of the vehicle system will be equipped with an battery.
-
Page 147
Using an AGM vehicle battery injury. generated during charging are different from the original Opel allowed to accumulate! ■ Keep the vehicle battery out of vehicle battery may result in a lower reach of children. -
Page 148: Diesel Fuel Filter
Vehicle care Diesel fuel filter Diesel fuel system If the engine fails to start, seek the assistance of a workshop. bleeding Starting the engine 3 116. If the fuel tank has been run dry, it will be necessary to air vent or bleed the Wiper blade replacement diesel fuel system.
-
Page 149: Bulb Replacement
Vehicle care Bulb replacement Headlights Wiper blade on the rear window Lift wiper arm, rotate wiper blade and Low beam and high beam detach. Switch off the ignition and turn off the relevant switch or close the doors. Only hold a new bulb at the base. Do not touch the bulb glass with bare hands.
-
Page 150: Fog Lights
Vehicle care Fog lights Sidelights 4. Renew bulb and install bulb holder. 5. Install harness connector and access cover. Front turn signal lights 1. Remove bulb holder from reflector Access the front fog light bulb from housing by rotating it beneath the vehicle.
-
Page 151: Tail Lights
Vehicle care Tail lights Side turn signal lights Rear brake, turn signal and tail lights 3. Rotate bulb holder anticlockwise to separate from lamp assembly. 1. Release clips from fender using a 4. Renew bulb. flat blade screwdriver and lift out 5.
-
Page 152: Number Plate Light
Vehicle care 3. From outside the vehicle, remove 4. Push to install the bulb holder into the bulb holder by releasing the the lamp assembly, then rotate clips with a flat blade screwdriver. clockwise to secure. 4. Renew bulb. 5. Install lamp assembly with the 2 screws.
-
Page 153: Fog Tail Light
Vehicle care Fog tail light Interior lights Load compartment light Front and rear courtesy lights 1. Remove lamp assembly using a 1. Remove the 2 screws (using the flat blade screwdriver. tool supplied) and remove lamp 1. Remove lens assembly using a assembly.
-
Page 154: Electrical System
Vehicle care Electrical system Glovebox light Fuses Data on the replacement fuse must match the data on the defective fuse. Before replacing a fuse, turn off the respective switch and the ignition. A blown fuse can be recognised by its melted wire.
-
Page 155: Instrument Panel Fuse Box
Vehicle care Note Place the fuse extractor on the Not all fuse box descriptions in this various types of fuse from the top or Owner’s Manual may apply to your side, and withdraw fuse. vehicle. Refer to the fuse box label, where fitted.
-
Page 156
Vehicle care… -
Page 157
Vehicle care No. Circuit No. Circuit No. Circuit Vehicle battery (with electronic 13 Courtesy lights, battery 25 Brake switch key system) discharge protection 26 Fuel injection, starter APC battery backup (with elec‐ 14 Fuel injection system, tyre pres‐ 27 Airbag, steering column lock tronic key system) sure monitoring system, elec‐… -
Page 158: Vehicle Tools
Vehicle care Vehicle tools Vehicles with tyre repair kit: The No. Circuit wheel cover hook and torx key are 39 Warning chimes stored within the tyre repair kit case, Tools stowed under the driver’s seat. 40 Load compartment power outlet Tyre repair kit 3 162.
-
Page 159: Wheels And Tyres
Vehicle care Wheels and tyres Winter tyres H = up to 210 km/h V = up to 240 km/h Winter tyres improve driving safety at W = up to 270 km/h temperatures below 7 °C and should Tyre condition, wheel condition therefore be fitted on all wheels.
-
Page 160: Tyre Pressure Monitoring
Vehicle care Tyre pressures 3 192. Always inflate The driver is responsible for correct All wheels must be equipped with adjustment of tyre pressure. pressure sensors and the tyres must tyres to the pressures shown on the have the prescribed pressure. label on the driver’s door frame.
-
Page 161
Vehicle care Low tyre pressure condition If w illuminates at lower temperatures and extinguishes after some driving, this could be an indicator for getting low pressure. Check tyre pressure. If the tyre pressure must be reduced or increased, switch off ignition. Only mount wheels with pressure sensors, otherwise the tyre pressure will not be displayed and w flashes for… -
Page 162: Tread Depth
Vehicle care Puncture Relearn function If problems occur during the relearn process, control indicator w remains A puncture or severely under-inflated illuminated and a warning message is tyre is indicated by illumination of displayed in the Driver Information control indicator w together with C Centre.
-
Page 163: Wheel Covers
Vehicle care Changing tyre and wheel For safety reasons it is recommended If the wheel covers and tyres used are that the tread depth of the tyres on not factory approved, the tyres must size one axle should not vary by more than not have a rim protection ridge.
-
Page 164: Tyre Repair Kit
Vehicle care Tyre repair kit Tyre chains are only permitted on the 2. Remove the electrical connection front wheels. cable and air hose from the Minor damage to the tyre tread or compartments on the underside Always use fine mesh chains that add sidewall can be repaired with the tyre of the compressor.
-
Page 165
Vehicle care 6. Screw the filler hose to the tyre 9. Set the rocker switch on the 12. The prescribed tyre pressure valve. compressor to I. The tyre is filled should be obtained within with sealant. 15 minutes. Tyre pressure 7. -
Page 166
Vehicle care damaged. Seek the assistance of the vehicle must not be driven. a workshop. Seek the assistance of a workshop. Drain excess tyre pressure with the button beside the pressure 19. Detach the tyre repair kit, return to indicator. case and stow under the driver’s seat. -
Page 167: Wheel Changing
Vehicle care Replace the used sealant bottle. ■ Take heavy objects out of the should turn anticlockwise to Dispose of the sealant bottle as vehicle before jacking up. loosen the bolts. Invert the wrench prescribed by applicable laws. if necessary. ■…
-
Page 168: Spare Wheel
Vehicle care 5. Unscrew wheel bolts completely Note even though no label indicates this. by turning anticlockwise and wipe If applicable, fit anti-theft bolts Seek the assistance of a workshop to clean with a cloth. nearest the tyre valve (otherwise it check the applicable speed limit.
-
Page 169
Vehicle care Directional tyres Support the spare wheel with a Fit directional tyres such that they roll suitable object to prevent the in the direction of travel. The rolling wheel falling suddenly when direction is indicated by a symbol loosening the carrier bolts — risk of (e.g. -
Page 170: Jump Starting
Vehicle care Jump starting ■ A discharged vehicle battery can ■ Apply the parking brake, already freeze at a temperature of transmission in neutral. 0 °C. Defrost the frozen battery ■ Open the positive terminal Do not start with a quick charger. before connecting jump leads.
-
Page 171: Towing
Vehicle care Towing far away from the discharged vehicle battery as possible, however at least 60 cm. Towing the vehicle Route the leads so that they cannot The towing eye is stowed with the catch on rotating parts in the engine vehicle tools 3 156.
-
Page 172: Towing Another Vehicle
Vehicle care When the engine is not running, Attach a tow rope — or better still a tow Caution considerably more force is needed to rod — to the rear towing eye, never to brake and steer. the rear axle and suspension units. Do not tow the vehicle from the To prevent the entry of exhaust fumes The rear towing eye must only be…
-
Page 173: Appearance Care
Vehicle care Appearance care Bird droppings, dead insects, resin, Have the door hinges of all doors pollen and the like should be cleaned greased by a workshop. off immediately, as they contain Exterior care Do not clean the engine compartment aggressive constituents which can with a steam-jet or high-pressure jet cause paint damage.
-
Page 174: Interior Care
Vehicle care Paintwork polish with silicone forms a For mechanical removal of ice, use a After the underbody is washed, check protective film, making waxing sharp-edged ice scraper. Press the the underbody and have it waxed if unnecessary. scraper firmly against the glass so necessary.
-
Page 175
Vehicle care The instrument cluster and the Plastic and rubber parts displays should only be cleaned using Plastic and rubber parts can be a soft damp cloth. If necessary use a cleaned with the same cleaner as weak soap solution. used to clean the body. -
Page 176: Service And Maintenance
Service and maintenance Service and General information Andorra, Austria, Belgium, Croatia, Czech Republic, Denmark, Estonia, maintenance Finland, France, Germany, Greece, Service information Hungary, Iceland, Ireland, Italy, In order to ensure economical and Latvia, Liechtenstein, Lithuania, safe vehicle operation and to Luxembourg, Netherlands, Norway, General information ….
-
Page 177
Service and maintenance Australia: South Africa: International+: Maintenance of your vehicle is Maintenance of your vehicle is Maintenance of your vehicle is required every 15,000 km or after required every 15,000 km or after required every 8,000 km or after 1 year, whichever occurs first, unless 1 year, whichever occurs first, unless 1 year, whichever occurs first, unless… -
Page 178: Recommended Fluids
Service and maintenance Recommended fluids, service is essential if any warranty or aging control, whereas viscosity goodwill claims are to be met, and is grade gives information on the oil’s lubricants and parts also a benefit when selling the thickness over a temperature range. vehicle.
-
Page 179
Service and maintenance Additional engine oil additives protection down to approx. -28 °C. This concentration should be The use of additional engine oil maintained all year round. The use of additives could cause damage and additional coolant additives that invalidate the warranty. intend to give additional corrosion Engine oil viscosity grades protection or seal against minor leaks… -
Page 180: Technical Data
Technical data Technical data Vehicle identification Vehicle Identification Number Vehicle identification ….178 Vehicle data ……. 181 The VIN is also displayed behind a removable plastic cover on the right- hand side door step. The Vehicle Identification Number is visible through the windscreen.
-
Page 181: Identification Plate
Technical data Identification plate The combined total of front and rear axle loads must not exceed the permissible gross vehicle weight. For example, if the front axle is bearing its maximum permissible load, the rear axle can only bear a load that is equal to the gross vehicle weight minus the front axle load.
-
Page 182
Technical data It is possible, using the Vehicle Identification Number (VIN), to determine the engine type that is installed in your vehicle. For further information consult a workshop. -
Page 183: Vehicle Data
Technical data Vehicle data Recommended fluids and lubricants Required engine oil quality Engine oil quality dexos 2 ✔ In case dexos quality is unavailable in International countries, you may use the oil qualities listed below: Engine oil quality ACEA A3/B4/C3 ✔…
-
Page 184: Engine Data
Technical data Engine data Sales designation 1.6 CDTi 90 1.6 CDTi 115 1.6 CDTi BiTurbo 120 1.6 CDTi BiTurbo 140 Engine identifier code R9M 408 R9M 408 R9M 450 R9M 450 Number of cylinders 1598 1598 1598 1598 Piston displacement [cm Engine power [kW] (PS) 66 (90) 85 (115)
-
Page 185: Vehicle Weight
Technical data Vehicle weight Kerb weight, basic model Optional equipment and accessories increase the kerb weight. Loading information 3 73. Model Engine Wheelbase Roof Payload Class Gross Vehicle Weight rating Kerb weight 2)3) 1000 2700 1661 1200 2900 1661 1200 2900 1760-1771 1200…
-
Page 186
Technical data Model Engine Wheelbase Roof Payload Class Gross Vehicle Weight rating Kerb weight 2)3) Combi, Bus 1000 2700 1901 1200 2900 1901 1200 2900 1901 Kerb weight and gross vehicle weight increase on models fitted with bad road equipment package — refer to VIN plate. Minimum vehicle weight according to Type Approval, including all fluids, vehicle tools and a 90% fuel load. -
Page 187
Technical data Additional minimum weights (approx.) Model Engine Wheelbase Trim level Front axle Rear axle Total Double cab Base Upper Base Upper Final weight may vary according to the specification of the vehicle, e.g. options, deleted options and accessories. Refer to identification plate on the right- hand door pillar. -
Page 188: Vehicle Dimensions
Technical data Vehicle dimensions Type Combi Double cab Platform cab Wheelbase Length [mm] 4999 5399 4999 5399 4999 5399 5399 Width without exterior mirrors [mm] 1956 1956 1956 1956 1956 1956 1956 Width with two exterior mirrors [mm] 2283 2283 2283 2283 2283…
-
Page 189
Technical data Loadspace dimensions Wheelbase Roof height Maximum rear door aperture height [mm] 1320 1820 1320 1820 Rear door aperture width (at floor) [mm] 1391 1391 1391 1391 Maximum load area height [mm] 1387 1898 1387 1898 Maximum load area width [mm] 1662 1662 1662… -
Page 190
Technical data Wheelbase Roof height Sliding side door aperture width — at 100 mm from floor [mm] 1030 1030 1030 1030 Sliding side door aperture height [mm] 1284 1284 1284 1284 with load-through feature. Combi Wheelbase Roof height Maximum rear door aperture height [mm] 1295 1295 Rear door aperture width (at floor) [mm]… -
Page 191
Technical data Combi Wheelbase Roof height Sliding side door aperture width — at 100 mm from floor [mm] 1030 1030 Sliding side door aperture height [mm] 1284 1284 Depending on number of seats. Double cab Wheelbase Roof height Maximum rear door aperture height [mm] 1320 1320 Rear door aperture width (at floor) [mm]… -
Page 192
Technical data Double cab Wheelbase Roof height Sliding side door aperture width [mm] 1229 1229 Sliding side door aperture width — at 100 mm from floor [mm] 1030 1030 Sliding side door aperture height [mm] 1284 1284… -
Page 193
Technical data Capacities Engine oil Engine Engine oil including filter [l] 6.3 — 6.5 between MIN and MAX [l] (approx.) 2.0 — 2.4 Fuel tank Fuel tank, nominal capacity [l]… -
Page 194: Tyre Pressures
Technical data Tyre pressures Tyre Tyre pressure with full load Front Rear [kPa/bar] (psi) [kPa/bar] (psi) 205/65 R16 C 380/3.8 (55) 420/4.2 (61) 215/65 R16 C 310/3.1 (45) 340/3.4 (49) 195/75 R16 C 380/3.8 (55) 420/4.2 (61) 215/60 R17 C 350/3.5 (51) 390/3.9 (57) The spare wheel should be set to the highest applicable pressure shown in the table.
-
Page 195: Customer Information
Customer information Customer information Customer information Vehicle data recording and privacy Declaration of conformity Event data recorders This vehicle has systems that Customer information ….193 transmit and/or receive radio waves Vehicle data recording and pri‐ Data storage modules in the subject to Directive 1999/5/EC.
-
Page 196
Motion profiles indicating travelled openers. RFID technology in Opel allow the transmission of particular routes cannot be created with these vehicles does not use or record vehicle data from the vehicle. -
Page 197
Customer information… -
Page 198: Index
Index Automatic fuel cut-off….117 Automatic light control ….95 Accessories and vehicle Automatic locking ……30 modifications ……138 Autostop……. 89, 116 Adaptive forward lighting ….. 97 Auxiliary heater……106 Adjustable air vents ….110 AGM (Absorptive Glass Mat) battery……..
-
Page 199
Child restraint installation Diesel fuel filter ……146 Engine data ……. 182 locations ……..61 Diesel fuel system bleeding ..146 Engine exhaust ……120 Child restraints……60 Diesel particle filter ….120 Engine identification….179 Child restraint systems ….60 Door locks…….. -
Page 200
Front door pockets……68 Head restraint adjustment ….. 8 Interior mirrors……39 Front fog lights……95, 98 Head restraints ……43 Introduction ……..3 Front seats……..44 Heated exterior mirrors….17 Isofix child restraint systems ..66 Front storage…….. 68 Heated mirrors …… -
Page 201
Manual transmission ….121 Power steering fluid….142 Messages……..91 Power windows ……40 Safety belts……..50 Mirror adjustment ……8 Preheating ……88, 116 Safety net ……..71 Mirrors……..38, 39 Puncture……..165 Seat adjustment ……. 7, 45 Misted light covers ……. 98 Seat belt …….. -
Page 202
Steering wheel controls ….75 Tread depth ……. 160 Vehicle dimensions ….186 Stop engine……..86 Trip computer ……92 Vehicle Identification Number ..178 Stop-start system….18, 117 Trip odometer ……81 Vehicle jack…….. 156 Storage……… 67 Turbo engine warm-up….116 Vehicle messages ……. -
Page 203
Windscreen wiper/washer … 76 Winter tyres ……. 157 Wiper blade replacement ..146… -
Page 205
Copyright by ADAM OPEL AG, Rüsselsheim, Germany. The information contained in this publication is effective as of the date indicated below. Adam Opel AG reserves the right to make changes to the technical specifications, features and design of the vehicles relative to the information in this publication as well as changes to the publication itself.
- Manuals
- Brands
- Opel Manuals
- Automobile
- VIVARO
- Owner’s manual
-
Contents
-
Table of Contents
-
Bookmarks
Related Manuals for Opel Vivaro
Summary of Contents for Opel Vivaro
-
Page 1
OPEL Vivaro Owner’s Manual… -
Page 3: Table Of Contents
Contents Introduction ……..2 In brief ……….6 Keys, doors and windows …. 21 Seats, restraints ……43 Storage ……..67 Instruments and controls ….. 75 Lighting ……..95 Climate control ……101 Driving and operating ….112 Vehicle care ……. 138 Service and maintenance ..
-
Page 4: Introduction
Introduction Introduction…
-
Page 5: Using This Manual
«Service prices. Experienced mechanics ■ The Owner’s Manual uses the and maintenance» and «Technical trained by Opel work according to factory engine designations. The data» as well as on the identification specific Opel instructions. corresponding sales designations plate.
-
Page 6
Text marked Caution provides information on possible damage to the vehicle. Disregarding this information may lead to vehicle damage. Symbols Page references are indicated with 3. 3 means «see page». We wish you many hours of pleasurable driving. Adam Opel AG… -
Page 7
Introduction… -
Page 8: In Brief
In brief In brief Vehicle unlocking Unlocking with electronic key Unlocking with remote control Initial drive information Press the button on any exterior door handle when the electronic key is within range of the detection zone Press button c to unlock the driver’s (approx.
-
Page 9: Seat Adjustment
In brief Seat adjustment Seat backrests Seat height Seat positioning Pull lever, adjust inclination and Lever pumping motion: release lever. Allow the backrest to = seat higher engage. Do not lean on backrest Pull handle, slide seat, release down = seat lower when adjusting.
-
Page 10: Head Restraint Adjustment
In brief Head restraint adjustment Seat belt Mirror adjustment Interior mirror Press release button, adjust height, Pull out the seat belt and engage in engage. belt buckle. The seat belt must not be To reduce dazzle, adjust the lever on twisted and must fit close against the Head restraints 3 43.
-
Page 11: Steering Wheel Adjustment
In brief Steering wheel adjustment Exterior mirrors Electric adjustment Manual adjustment Select the relevant exterior mirror and Unlock the lever, adjust the steering adjust it. wheel, then engage the lever and Swivel mirror in required direction. Convex exterior mirrors 3 38, ensure it is fully locked.
-
Page 12
In brief Instrument panel overview… -
Page 13
In brief Side air vents …… 110 Card reader for electronic 18 Hazard warning flashers ..97 key system ……23 Ashtray ……..80 Central locking system ..25 Steering column controls ..76 Cupholder ……68 19 Power button for electronic Centre air vents …. -
Page 14
In brief Instrument panel illumination control ….98 Auxiliary heater ….106 Speed limiter ……. 130… -
Page 15
In brief… -
Page 16: Exterior Lighting
In brief Exterior lighting Front and rear fog lights Vehicles with automatic light control: AUTO = automatic light control: Turn inner switch Turn outer switch: exterior lighting is switched > = front fog lights = off on and off automatically r = rear fog light = sidelights depending on external…
-
Page 17
In brief Headlight flash, high beam and Turn and lane-change signals Hazard warning flashers low beam lever up = right turn signal Operated with the ¨ button. lever down = left turn signal headlight flash = pull lever Hazard warning flashers 3 97. high beam = push lever Turn and lane-change signals… -
Page 18: Washer And Wiper Systems
In brief Horn Washer and wiper systems Windscreen and headlight washer systems Windscreen wiper Press j. Pull lever. 7 = off Windscreen and headlight washer K = interval wiping or automatic system 3 76, Washer fluid 3 143. wiping with rain sensor 1 = slow 2 = fast Windscreen wiper 3 76, Wiper…
-
Page 19: Climate Control
In brief Climate control Rear window wiper and washer Demisting and defrosting the system windows Heated rear window Climate control system Turn lever: Heating is operated by pressing the 7 = off ■ Air distribution to V. Ü button. e = wiper ■…
-
Page 20: Starting Off
In brief Transmission Starting off Electronic climate control system Manual transmission Check before starting off ■ Tyre pressure and condition 3 157, 3 192. ■ Engine oil level and fluid levels 3 140. ■ All windows, mirrors, exterior lighting and number plates are free from dirt, snow and ice and are operational.
-
Page 21
In brief Starting the engine with key Starting the engine with the Stop-start system power button ■ Turn key to position A If the vehicle is at low speed or in standstill and certain conditions are Electronic key must be inside the ■… -
Page 22
In brief Parking ■ Turn the ignition key to position St and remove it. Turn the steering wheel until the steering wheel lock 9 Warning is felt to engage. ■ Close the windows. ■ Do not park the vehicle on an easily ignitable surface. -
Page 23: Keys, Doors And Windows
Keys, doors and windows Keys, doors and Keys, locks Radio remote control windows Keys Replacement keys The key number is specified on the Keys, locks ……..21 key or on a detachable tag. Doors ……….. 31 The key number must be quoted Vehicle security ……
-
Page 24
Keys, doors and windows Depending on model, the vehicle may Remote control battery 2-button and 3-button remote control use a 2 button or 3 button remote replacement control or an electronic key which Replace the battery as soon as the includes the functionality of the radio range reduces. -
Page 25: Electronic Key System
Keys, doors and windows Electronic key system Replace the battery (battery type located on the rear of the electronic CR 2016), paying attention to the key, then press one side of the battery installation position. to release and remove the battery. Reattach both halves of the cover, Replace the battery (battery type ensuring they engage correctly.
-
Page 26
Keys, doors and windows Note central locking switch e 3 25 is ■ Overload of the central locking Always take the electronic key with system by operating at frequent pressed. To re-enable handsfree you when exiting the vehicle. intervals, the power supply is operation, restart the engine. -
Page 27: Central Locking System 3
Keys, doors and windows After use, reinsert the emergency The anti-theft security lock remains Remote control operation manual key in the housing of the engaged even after unlocking the Operation of central locking system electronic key. vehicle with the remote control. The with the remote control is confirmed door can only be opened from inside by the hazard warning flashers.
-
Page 28
Keys, doors and windows Unlocking with 3-button remote Locking with 2-button remote control Locking with 3-button remote control control Press button e: All doors and the load Press button e: All doors and the load Depending on configuration: compartment are locked. compartment are locked. -
Page 29
Keys, doors and windows Load compartment locking and Load compartment locking and Note unlocking with 2-button remote unlocking with 3-button remote There is no button for handsfree control control operation in the exterior door handle of the sliding side door. There must be no electronic key left inside the vehicle and no additional electronic key in the detection zones,… -
Page 30
Keys, doors and windows Unlocking with electronic key — Unlocking with electronic key buttons Handsfree operation is automatically handsfree operation disabled when the electronic key buttons have been operated. To re- enable handsfree operation, restart the engine. Locking with electronic key buttons Press button c to unlock all doors and Press the button on any exterior door the load compartment. -
Page 31
Keys, doors and windows when the electronic key is within Press button G to lock/unlock the range of the detection zone (approx. rear doors/tailgate (and sliding side one metre). doors). The rear doors/tailgate (and sliding Electronic key system 3 23. side doors) only lock/unlock when at Manual key operation least 3 seconds have passed since… -
Page 32: Automatic Locking
Keys, doors and windows Handsfree operation is automatically Activation The child safety lock for the sliding disabled when the central locking side door is located on its rearward With the ignition switched on, press switch e is pressed. To re-enable facing edge.
-
Page 33: Doors
Keys, doors and windows Doors 9 Warning Sliding door Take care when operating the sliding side door. Risk of injury. Ensure that nothing becomes trapped during operation and no- one is standing within the moving area. If the vehicle is parked on a slope, open sliding doors may move accidentally on account of their weight.
-
Page 34: Anti-Theft Security Lock
Keys, doors and windows Anti-theft security lock The doors are retained in the 90º When closing the doors, secure each position by locking stays. To open the locking stay to the catch on the door To prevent the left-hand rear door doors to 180º…
-
Page 35
Keys, doors and windows Load compartment Central locking system 3 25. Emergency tailgate opening from inside the vehicle Closing Tailgate Opening If necessary, first remove the cover Close tailgate using the interior strap. on the inside of the tailgate, then pull Ensure tailgate is fully closed. -
Page 36: Vehicle Security
Keys, doors and windows Vehicle security 2-button and 3-button remote gases, which can not be seen or control operation smelled, could enter the vehicle. Anti-theft locking system This can cause unconsciousness Operation is confirmed by the hazard and even death. warning flashers flashing five times.
-
Page 37: Anti-Theft Alarm System
Keys, doors and windows Deactivation Press the button twice on any exterior Central locking system 3 25. door handle. Unlock the doors by pressing button Electronic key system 3 23. c on the remote control or by turning — or — the manual key in driver’s door lock Anti-theft alarm system towards front of vehicle.
-
Page 38
Keys, doors and windows 2-button and 3-button remote control Press electronic key button e to activate the anti-theft alarm system. Electronic key system 3 23. Deactivation Unlocking the vehicle (with button c or the button on any exterior door handle) or switching on the ignition deactivates the anti-theft alarm system. -
Page 39: Passenger Compartment
Keys, doors and windows Activation without monitoring of To silence the alarm siren (if Note triggered) and therefore deactivate The immobiliser does not lock the passenger compartment the anti-theft alarm system, reconnect doors. You should always lock the Disable monitoring of the passenger vehicle battery and unlock the vehicle vehicle after leaving it and switch on compartment, e.g.
-
Page 40: Exterior Mirrors
Keys, doors and windows Exterior mirrors Electric adjustment Folding mirrors Convex shape The convex exterior mirror contains an aspherical area and reduces blind spots. The shape of the mirror makes objects appear smaller, which will affect the ability to estimate distances.
-
Page 41: Interior Mirrors
Keys, doors and windows Interior mirrors Depending on version, exterior Wide view mirror mirrors can be automatically folded to the parking position upon locking the Manual anti-dazzle vehicle. For further information, refer to the Infotainment system manual. Heated mirrors Depending on vehicle, a large convex mirror is located in the front passenger sun visor which helps to To reduce dazzle, adjust the lever on…
-
Page 42: Windows
Keys, doors and windows Windows Automatic anti-dazzle Windscreen stickers Do not attach stickers such as toll Windscreen road stickers or similar on the windscreen in the area of the interior Heat-reflecting windscreen mirror. The heat-reflecting windscreen has a Power windows coating which reflects solar radiation.
-
Page 43: Rear Windows
Keys, doors and windows Safety function To open or close, raise the handle and slide window. If the window glass encounters resistance during automatic closing, it Sun blind is immediately stopped and opened again. Overload If the windows are repeatedly operated within short intervals, the window operation is disabled for some time.
-
Page 44: Heated Rear Window
Keys, doors and windows Heated rear window Sun visors have vanity mirrors and a ticket holder on the rear. The mirror covers should be closed when driving. Wide view mirror 3 39. Operated by pressing the Ü button. Activation is indicated by the LED in the button.
-
Page 45: Seats, Restraints
Seats, restraints Seats, restraints Head restraints Adjustment Position Head restraints ……43 9 Warning Front seats ……..44 Rear seats ……..47 Only drive with the head restraint Seat belts ……..50 set to the proper position. Airbag system ……53 Child restraints ……
-
Page 46: Front Seats
Seats, restraints Front seats Stow head restraints securely in load ■ Sit with shoulders as far back compartment. Do not drive with head against the backrest as possible. restraints removed if the seat is Set the backrest rake so that it is Seat position occupied.
-
Page 47
Seats, restraints Seat adjustment Seat positioning Seat backrests 9 Danger Do not sit nearer than 25 cm from the steering wheel, to permit safe airbag deployment. 9 Warning Never adjust seats while driving as they could move uncontrollably. Pull handle, slide seat, then release Pull lever, adjust inclination and 9 Warning handle. -
Page 48: Seat Folding
Seats, restraints Seat folding Seat height Lumbar support Folding front centre passenger seat Lever pumping motion: Adjust lumbar support using handwheel to suit personal = seat higher requirements. down = seat lower Pull release lever, fold backrest fully Rotate handwheel to increase and forwards then release the lever.
-
Page 49: Rear Seats
Seats, restraints Rear seats Heating To restore, pull release lever, raise backrest then release the lever. Allow the backrest to engage audibly. 9 Warning 9 Warning When rear seats or backrests are When the front passenger seat is being adjusted or folded, keep in the folded position, the front hands and feet away from the passenger airbag system must be…
-
Page 50
Seats, restraints When folding or removing the rear Fitting seat belt 3 51. If necessary, remove the head seat, ensure the armrests are folded restraints 3 43. Folding seats away in their most upright position. On some variants, the cargo area can Rear seat access be increased by folding up the rear seats. -
Page 51
Seats, restraints correctly located and latched. Raise the backrest, and if necessary, replace the head restraints. Removable rear seats On some variants, the cargo area can be increased by removing the rear seats. Lift and fold the seat assembly Raise the locking catches, then move forwards until it engages in the folded the seat unit towards the rear to forward position. -
Page 52: Seat Belts
Seats, restraints Seat belts Seat belts are only designed for use 9 Warning by one person at a time. Child restraint system 3 60. Removable seats are heavy! Do Periodically check all parts of the belt not attempt to remove without system for damage and proper assistance.
-
Page 53: Three-Point Seat Belt
Seats, restraints Three-point seat belt 9 Warning Fitting Incorrect handling (e.g. removal or fitting of belts) can trigger the belt tensioners with risk of injury. Deployment of the belt tensioners is indicated by continuous illumination of control indicator v 3 85. Triggered belt tensioners must be replaced by a workshop.
-
Page 54: Height Adjustment
Seats, restraints Height adjustment Removing Seat belts on the rear seats Two-latch belt Slide adjuster up or down to desired To release belt, press red button on position: belt buckle. Before fitting the belt, first insert lower ■ Tilt adjuster downwards then slide latch plate into the left-hand buckle.
-
Page 55: Airbag System
Seats, restraints Airbag system Using the seat belt while 9 Warning pregnant The airbag system consists of a The seat belt will not be effective number of individual systems in the event of an accident if the depending on the scope of lower latch plate is not correctly equipment.
-
Page 56
Seats, restraints Each airbag is triggered only once. sous peine d’infliger des Have deployed airbags replaced by BLESSURES GRAVES, voire a workshop. Furthermore, it may be MORTELLES à l’ENFANT. necessary to have the steering ES: NUNCA utilice un sistema de wheel, the instrument panel, parts of retención infantil orientado hacia the panelling, the door seals,… -
Page 57
Seats, restraints DA: Brug ALDRIG en bagudvendt mesmo, poderá ocorrer a PERDA DE korunmakta olan bir koltukta autostol på et forsæde med AKTIV VIDA ou FERIMENTOS GRAVES na kullanmayınız. ÇOCUK ÖLEBİLİR AIRBAG, BARNET kan komme i CRIANÇA. veya AĞIR ŞEKİLDE LIVSFARE eller komme ALVORLIGT YARALANABİLİR. -
Page 58
Seats, restraints BLAZINO, saj pri tem obstaja acest lucru poate duce la DECESUL ET: ÄRGE kasutage tahapoole nevarnost RESNIH ali SMRTNIH sau VĂTĂMAREA GRAVĂ a suunatud lapseturvaistet istmel, mille POŠKODB za OTROKA. COPILULUI. ees on AKTIIVSE TURVAPADJAGA kaitstud iste, sest see võib SR: NIKADA ne koristiti bezbednosni CS: NIKDY nepoužívejte dětský… -
Page 59: Front Airbag System
Seats, restraints Front airbag system The side airbag system is triggered in Seat position 3 44. the event of an accident of a certain The front airbag system consists of Keep the area in which the airbag severity. The ignition must be one airbag in the steering wheel and inflates clear of obstructions.
-
Page 60: Curtain Airbag System
Seats, restraints Note The inflated airbags cushion the Only use protective seat covers that impact, thereby reducing the risk of have been approved for the vehicle. injury to the head in the event of a Be careful not to cover the airbags. side-on impact considerably.
-
Page 61
Seats, restraints Front passenger airbag system can Change status only when the vehicle Risk of fatal injury for an adult be deactivated via a switch located on is stopped with the ignition off. Status person with deactivated front the side of the instrument panel. remains until the next change. -
Page 62: Child Restraints
Child restraint systems The rear seats are the most Note We recommend the Opel child convenient location to fasten a child Do not affix anything on the child restraint system which is tailored restraint system.
-
Page 63: Child Restraint Installation Locations
Seats, restraints Child restraint installation locations Permissible options for fitting a child restraint system Front seats — Van Single front passenger seat Double front passenger seat deactivated or without airbag deactivated Weight and age class activated airbag or without airbag activated airbag centre outer…
-
Page 64
Seats, restraints Front seats — Combi, Bus, Double cab Single front passenger seat Double front passenger seat deactivated or without airbag deactivated Weight and age class activated airbag or without airbag activated airbag centre outer Group 0: up to 10 kg or approx. -
Page 65
Seats, restraints Rear seats — Combi, Bus, Double cab Weight and age class 2nd row seats 3rd row seats Group 0: up to 10 kg or approx. 10 months Group 0+: up to 13 kg or approx. 2 years Group I: 9 to 18 kg or approx. -
Page 66
Seats, restraints Permissible options for fitting an ISOFIX child restraint system Weight class Size Fixture Front seats 2nd row seats 3rd row seats class Centre Outer vehicles with vehicles with single double passenger passenger seat seat Group 0: up to 10 kg ISO/R1 X or approx. -
Page 67
Seats, restraints = If necessary, slide adjustable front seat forwards to install a child restraint system on these seats. There may not be enough clearance to install a child restraint system on vehicles fitted with fixed front seats. = Forward-facing child restraints: Remove head restraint 3 43 before installing child restraint. The seat in front of this installation position must not be more than halfway back on its runners. -
Page 68: Top-Tether Fastening Eyes
Seats, restraints Isofix child restraint Permissible mounting location ISOFIX child restraint systems of positions for ISOFIX child restraint universal category positions are systems systems are marked in the tables by marked in the table by IUF. <, IL and IUF. ISOFIX mounting brackets are indicated by the ISOFIX logo or symbol on the seat cushion.
-
Page 69: Storage
Storage Storage Storage compartments Glovebox 9 Warning Storage compartments ….67 Do not store heavy or sharp Load compartment ……. 70 objects in the storage Roof rack system ……73 compartments. Otherwise vehicle Loading information ….. 73 occupants could be injured by objects being thrown around in the event of hard braking, a sudden change in direction or an accident.
-
Page 70: Front Storage
Storage Cupholders Front storage Press button (arrowed) on rear side of backrest to unlock the document tray Coat hooks are located on the cabin and access the storage bulkhead and on the grab handles in compartments. the roof lining. To install the document tray, insert The front door pockets contain bottle the end piece(s) into any of the slots holders.
-
Page 71: Underseat Storage
Storage When folded down, pulling the loop also allows you to adjust the position of the seat cushion to suit personal requirements. Seat adjustment 3 45. Load-through feature If necessary, secure objects with the Using the loops on the passenger strap.
-
Page 72: Overcab Storage
Storage Load compartment Overcab storage Load compartment cover Rear parcel shelf Do not place any excessively heavy or sharp-edged objects on the rear parcel shelf. The maximum load permissible is 50 kg. 9 Warning Fold up the rear flap by hand; it is retained in the open position by Always make sure that the load in The total weight in this compartment…
-
Page 73: Lashing Eyes
Storage Installing Refit the parcel shelf by engaging in the retainers on both sides. Lashing eyes The rear parcel shelf can be installed Lashing eyes may be located on the in 2 positions, i.e. the upper position vehicle floor and/or in the sidewall. or the lower position.
-
Page 74: First Aid Kit
Storage First aid kit Installing The first aid kit can be accommodated in the space under the seats. Underseat storage 3 69. Attach the straps to the lashing eyes or rings behind the seats, then Release the covers in the roof lining tension the straps.
-
Page 75: Roof Rack System
Storage Roof rack system Loading information ■ Do not drive with an open load compartment. In addition, the number plate is only Roof rack ■ Heavy objects in the load distinguishable and illuminated compartment should be evenly For safety reasons and to avoid correctly if the doors are closed.
-
Page 76
Storage Optional equipment and accessories increase the kerb weight. ■ Driving with a roof load increases the sensitivity of the vehicle to cross-winds and has a detrimental effect on vehicle handling due to the vehicle’s higher centre of gravity. Distribute the load evenly and secure it properly with retaining straps. -
Page 77: Instruments And Controls
Instruments and controls Instruments and Controls Steering wheel controls controls Steering wheel adjustment Controls ……..75 Warning lights, gauges and indi‐ cators ……….. 80 Information displays ….. 90 Vehicle messages ……91 Trip computer ……. 92 Tachograph ……..94 The cruise control and speed limiter can be operated via the controls on the steering wheel.
-
Page 78: Steering Column Controls
Instruments and controls Horn Windscreen wiper/washer Adjustable wiper interval Windscreen wiper Wiper lever in position P. Press j. Turn the adjuster wheel to adjust the The horn will sound regardless of 7 = off desired wipe interval: ignition switch position. K = interval wiping or automatic short interval = turn adjuster…
-
Page 79: Rear Window Wiper/Washer
Instruments and controls Rear window wiper/washer Automatic wiping will need to be Windscreen washer reselected whenever the ignition has been switched off. Adjustable sensitivity of the rain sensor Turn the adjuster wheel to adjust the sensitivity: low sensitivity = turn adjuster wheel upwards high sensitivity = turn adjuster wheel downwards…
-
Page 80: Outside Temperature
Instruments and controls Outside temperature Hours and minutes can be adjusted 9 Warning by pressing the appropriate buttons by the display or with the Infotainment The road surface may already be system controls. icy even though the display For further information, refer to the indicates a few degrees above Infotainment system manual.
-
Page 81: Power Outlets
Instruments and controls Power outlets Press and hold the button for approx. Electrical accessories that are 5 seconds: connected must comply with the electromagnetic compatibility ■ Hours flash requirements laid down in ■ Press button repeatedly to change DIN VDE 40 839. hours ■…
-
Page 82: Warning Lights, Gauges And Indicators
Instruments and controls Warning lights, gauges The cigarette lighter is located on the Ashtray container for mobile use in instrument panel. the vehicle. To use, open cover. and indicators Press in cigarette lighter. It switches Ashtrays can be placed in the off automatically once the element is cupholders at both ends of the Instrument cluster…
-
Page 83: Trip Odometer
Instruments and controls Odometer Tachometer Speed limiter Maximum speed may be restricted by a speed limiter. As a visible indication of this, a warning label is located on the instrument panel. A warning buzzer will sound for 10 seconds every 40 seconds if the vehicle briefly exceeds the set limit.
-
Page 84: Fuel Gauge
Instruments and controls Fuel gauge Because of the fuel remaining in the The gauge uses colours to indicate tank, the top-up quantity may be less current fuel efficiency: than the specified tank capacity. Green = best fuel economy is being achieved Fuel economy gauge Yellow = driving style too…
-
Page 85: Control Indicators
Instruments and controls Control indicators When the remaining distance before the next service is less than The control indicators described are 1500 km or 1 month, a message not present in all vehicles. The appears in the Driver Information description applies to all instrument Centre.
-
Page 86
Instruments and controls Control indicators in the instrument cluster… -
Page 87: Seat Belt Reminder
Instruments and controls Seat belt reminder Control indicators in the roof whilst driving, there is a fault in the belt tensioner or the airbag system. console X illuminates in red. The airbags and belt tensioners may If the seat belt is not fastened, control fail to trigger in the event of an indicator X will flash when vehicle accident.
-
Page 88: Malfunction Indicator Light
Instruments and controls If both control indicators ÓON and Illuminates briefly when the ignition is Flashes when the engine is switched on. *OFF are illuminated running simultaneously, there is a system Fault that could lead to catalytic Illuminates when the engine is failure.
-
Page 89: Antilock Brake System
Instruments and controls Illuminates together with other control appears in the Driver Information Antilock brake system 3 122. indicators (e.g., p, I and R), Centre 3 90. Seek the assistance of accompanied by a warning chime and a workshop immediately. Upshift a corresponding message in the Brake system 3 122.
-
Page 90: Electronic Stability Program Off
Instruments and controls Electronic Stability Check coolant level 3 142. Tyre pressure monitoring system 3 158. Program off If there is sufficient coolant, consult a workshop. Ø illuminates yellow. Engine oil pressure The control indicator must be blue If ESP® Plus has been deactivated with before continuing driving.
-
Page 91: Low Fuel
Instruments and controls Low fuel High beam 3. Move out of the flow of traffic as quickly as possible without Y illuminates yellow. P illuminates blue. impeding other vehicles. When the ignition is switched on, the Illuminated when high beam is on and 4.
-
Page 92: Information Displays
Instruments and controls Information displays U illuminates yellow when the Info-display system is on. Driver Information Centre Cruise control and speed limiter 3 126. Door open y illuminates red. Illuminates when a door is not fully closed. A corresponding message also appears in the Driver Information Centre.
-
Page 93: Vehicle Messages
Instruments and controls Vehicle messages automatically and F remains When starting the engine or illuminated. The fault will then be whilst driving: stored in the on board system. ■ If seat belt is not fastened 3 50. Messages are displayed in the Driver Information Centre and may be Warning messages ■…
-
Page 94: Trip Computer
Instruments and controls Trip computer When the vehicle is parked and/ ■ Distance travelled or the driver’s door is opened: ■ Average speed ■ If the key has been left in the The trip computer provides ■ Distance before service 3 82 ignition.
-
Page 95: Journey Record
Instruments and controls The measurement can be restarted at The average speed since the last Fuel economy rating any time. reset is displayed. (ecoScoring) The measurement can be restarted at If equipped, a rating of 0 to 100 is Instantaneous consumption any time.
-
Page 96: Tachograph
Instruments and controls Tachograph ■ Distance travelled ■ Fuel saved in km Unit of measurement To change the unit of measurement for the duration of a journey: With ignition off, simultaneously press the power button 3 114 and press and hold button on end of wiper lever; the Driver Information Centre flashes for approx.
-
Page 97: Automatic Light Control
Lighting Lighting Exterior lighting Automatic light control Light switch Exterior lighting ……95 Interior lighting ……98 Lighting features ……100 AUTO = automatic light control When the automatic light control Turn outer switch: function is activated and the engine is = off running, the system switches = sidelights…
-
Page 98: Headlight Flash
Lighting Headlight range Headlights when driving Daytime running lights 3 97. adjustment abroad High beam The asymmetrical headlight beam Manual headlight range extends visibility at the edge of the adjustment road at the passenger side. However, when driving in countries where traffic drives on the opposite side of the road, adjust the headlights to prevent dazzling of oncoming…
-
Page 99: Adaptive Forward Lighting
Lighting Adaptive forward lighting Turn and lane-change For each headlight: Using a screwdriver, turn the screw signals Cornering light by a turn towards the ] symbol to Depending on the steering angle, lower the beams or towards the < vehicle speed and gear selected symbol to raise the beams.
-
Page 100: Interior Lighting
Lighting Interior lighting If the lever is moved past the first stop, Rear fog light comes on together with the turn signal is switched on front fog lights and will only operate constantly. Switch the turn signal off when the ignition and headlights are Instrument panel manually by moving the lever to its switched on.
-
Page 101: Interior Lights
Lighting Interior lights Rear courtesy lights With the rocker switch in its central position, the light functions as a The upper load compartment lights courtesy light and illuminates when Front courtesy lights can be set to illuminate when the side the side or rear doors are opened.
-
Page 102: Lighting Features
Lighting Lighting features Exit lighting The lighting is turned off immediately by switching on the ignition or turning the light switch. Entry lighting Welcome lighting Vehicle lights are switched on for a short time to facilitate locating the vehicle when it is dark. Remote control operation Lights switch on when unlocking the vehicle with the remote control.
-
Page 103: Climate Control
Climate control Climate control Climate control systems Heating will not be fully effective until the engine has reached normal operating temperature. Heating and ventilation system Fan speed Climate control systems ….. 101 Adjust the air flow by switching the fan Air vents ……..
-
Page 104: Air Conditioning System
Climate control ■ Open side air vents as required and Cooling (AC) 9 Warning direct them towards door windows. Operated with the AC button and functional only when the engine and ■ For simultaneous warming of the The exchange of fresh air is fan are running.
-
Page 105: Electronic Climate Control
Climate control Electronic climate control ■ Set temperature control to coldest The preselected temperature is level. automatically regulated. In Automatic system mode, the fan speed and air ■ Set fan speed to highest level. distribution automatically regulate the ■ Open all air vents. air flow.
-
Page 106
Climate control If the minimum temperature is set, the Manual settings Cooling AC climate control system runs at Manually changing any of the The air conditioning system cools and maximum cooling. following settings will deactivate dehumidifies (dries) the air when Automatic mode: outside temperature is above a If the maximum temperature is set,… -
Page 107: Rear Air Conditioning
Climate control Rear heating system 9 Warning The exchange of fresh air is reduced in air recirculation mode. In operation without cooling the air humidity increases, so the windows may mist up from inside. The quality of the passenger compartment air deteriorates, which may cause the vehicle occupants to feel drowsy.
-
Page 108: Auxiliary Heater
Climate control Auxiliary heater Rear air conditioning fan switch 9 Warning Coolant heater Do not operate the system when The Eberspächer engine- refuelling, when dust or independent, fuel-powered coolant combustible vapours are present heater provides rapid heating of the or in enclosed spaces (e.g. engine coolant to enable heating of garage).
-
Page 109
Climate control Timer Remote control 9 Warning When refuelling, switch off the remote control unit as well as the heater! To switch off, press and hold activation button X to prevent inadvertent operation. The remote control has a maximum range of 600 metres. The range may be reduced due to environmental conditions and as the battery becomes weaker. -
Page 110
Climate control In addition to the remote control unit, Batteries do not belong in household Additional remote control units may the heating can also be switched on waste. They must be disposed of at also be configured. Press the button for 30 minutes, or off, using the an appropriate recycling collection until LED flashes, switch on the… -
Page 111
Climate control Ventilation x The next preset memory number to Set weekday, time and heating be activated is underlined and the duration Ö Select x in the menu bar and confirm. weekday is displayed. Repeat the If the vehicle battery is disconnected The ventilation duration can be procedure to programme the other or its voltage is too low, the unit will… -
Page 112: Air Vents
Climate control Air vents To open or close the centre air vents Rear air vents and direct the flow of air, tilt the slats Depending on vehicle, additional up or down and turn the adjuster Adjustable air vents adjustable air vents are located in the wheel left or right.
-
Page 113: Pollen Filter
Climate control Maintenance Service For optimal cooling performance, it is Air intake recommended that the climate control system be checked annually, starting The air intake in front of the three years after initial vehicle windscreen in the engine registration, including: compartment must be kept clear to allow air intake.
-
Page 114: Driving And Operating
Driving and operating Driving and operating Driving hints Driving economically Driving hints ……. 112 ECO mode Starting and operating ….113 ECO mode is a function that optimises fuel consumption. It affects Engine exhaust ……120 engine power and torque, Manual transmission ….
-
Page 115: Starting And Operating
Driving and operating Starting and operating Control of the vehicle Caution Never coast with engine not New vehicle running-in Vehicles equipped with hydraulic running power steering: Do not brake unnecessarily hard for Many systems will not function in this the first few journeys and after new If the steering wheel is turned until situation (e.g.
-
Page 116: Ignition Switch Positions
Driving and operating Ignition switch positions Power button Some functions, e.g. Infotainment system, are available for use as soon as you enter the vehicle. Accessory power mode Press Start/Stop button without operating clutch or brake pedal to enable further electrical functions to be operated.
-
Page 117
Driving and operating At very low outside temperatures Retained power off Fault (e.g. below -10 °C) keep the clutch Press the Start/Stop button for more If the engine cannot be started, the pedal depressed while pressing the than two seconds; the engine is cause may be one of the following: Start/Stop button until the engine stopped while some functions, e.g. -
Page 118: Starting The Engine
Driving and operating Starting the engine Idle speed control Start attempts should not last longer than 15 seconds. If engine does not start, wait 15 seconds before repeating starting procedure. If necessary, depress accelerator before repeating starting procedure. Before restarting or to switch off the engine, turn key back to St.
-
Page 119: Vehicle Shutdown
Driving and operating Vehicle shutdown Resetting with remote control Power button 3 114. key / manual key Refuelling 3 134. Fuel cut-off system To reset the fuel cut-off system and If the vehicle runs out of fuel, the fuel enable the vehicle to be driven: Overrun cut-off system is cut-off and must be reset 1.
-
Page 120
Driving and operating Deactivation Autostop During an Autostop, brake performance will be maintained. If the vehicle is at a low speed or at a However, brake assist is not available standstill, activate an Autostop as 3 123. follows: ■ Depress the clutch pedal. Conditions for an Autostop ■… -
Page 121
Driving and operating Parking ■ the self-cleaning function of the ■ the vehicle battery is discharged. diesel particle filter is not active ■ the engine temperature is too low. 3 120. 9 Warning ■ the brake vacuum is not sufficient. ■… -
Page 122: Engine Exhaust
Driving and operating Engine exhaust Catalytic converter place automatically under set driving conditions. Autostop is not available The catalytic converter reduces the and fuel consumption may be higher amount of harmful substances in the during this period. The emission of 9 Danger exhaust gases.
-
Page 123: Manual Transmission
Driving and operating Manual transmission If control indicator Z flashes, the Caution permitted emission limits may be exceeded. Lift your foot off the It is inadvisable to drive with hand accelerator until Z stops flashing and resting on the selector lever. is steadily illuminated.
-
Page 124: Brakes
Driving and operating Brakes Control indicator R 3 87. illuminate in the instrument cluster together with a corresponding Vehicle messages 3 91. message in the Driver Information The brake system comprises two Centre. The brake system remains independent brake circuits. Antilock brake system operational but without ABS If a brake circuit fails, the vehicle can…
-
Page 125: Parking Brake
Driving and operating Parking brake When releasing the foot brake after To reduce the operating forces of stopping on an incline (with the the parking brake, depress the selector lever in a forward gear or foot brake at the same time. reverse gear), the brakes remain on for a further 2 seconds.
-
Page 126: Ride Control Systems
Driving and operating Ride control systems If necessary, in the event of soft 9 Warning ground, mud or snow-covered road surfaces, the Traction control system Traction Control system Do not let this special safety (TC) can be deactivated to enhance feature tempt you into taking risks The Traction Control system (TC) is a traction:…
-
Page 127
Driving and operating Traction function to TC operation. type of road surface or tyre grip. It also Trailer stability assist (TSA) 3 137. Control indicator Ø extinguishes in prevents the drive wheels from Enhanced Traction function spinning. the instrument cluster. TC is reactivated by pressing the Ø… -
Page 128: Driver Assistance Systems
Driving and operating Driver assistance Fault If the system detects a fault, control systems indicator b 3 87 illuminates together with F 3 86 in the instrument cluster and a corresponding message 9 Warning appears in the Driver Information Centre 3 90. Driver assistance systems are The Electronic stability program developed to support the driver…
-
Page 129
Driving and operating Do not use the cruise control if it is not advisable to maintain a constant speed. Control indicators U and m 3 89. Activation Accelerate to the desired speed and Control indicator m illuminates green press switch < or ]. The current in the instrument cluster together with speed is now stored and maintained U and a corresponding message… -
Page 130
Driving and operating Increase speed Deactivation Reactivation With cruise control active, the vehicle Press switch R at a speed above speed can be increased continuously 30 km/h. or in small increments by holding If the stored speed is much higher down or tapping switch <… -
Page 131
Driving and operating Activation Where the limit speed cannot be Release the accelerator pedal and maintained, e.g. when driving on a the speed limiter function is steep decline, the limit speed will reactivated once a speed lower than flash in the Driver Information Centre the limit speed is obtained. -
Page 132: Parking Assist
Driving and operating Parking assist Deleting the limit speed If equipped, a warning label indicating the fixed maximum speed limit (90 to Press switch U: Yellow control 130 km/h) is located on the indicator U extinguishes in the instrument panel. instrument cluster.
-
Page 133
Driving and operating Activation Note external noise sources may cause In versions with Info-Display When reverse gear is engaged, the the system to fail to detect indication, the function can be system switches itself on obstacles. deactivated via the Infotainment automatically. -
Page 134: Rear View Camera
Driving and operating Activation Caution Rear view camera is automatically activated when reverse gear is When reversing, the area should engaged. be free from obstacles which could impact on the underside of the Functionality vehicle. Impact to the rear axle, which may not be visible, could lead to uncharacteristic changes in the vehicle handling.
-
Page 135
Driving and operating Trajectory lane display (1) The guiding line intervals are as ■ the rear doors/tailgate are not follows: closed correctly, A (red) = 30 cm ■ the vehicle had a rear end accident, B (yellow) = 70 cm ■… -
Page 136: Fuel
Driving and operating Fuel The flow and filterability of diesel fuels 9 Danger are temperature-dependent. When temperatures are low, refuel with Fuel for diesel engines Fuel is flammable and explosive. diesel fuel with guaranteed winter No smoking. No naked flames or Only use diesel fuel that complies properties.
-
Page 137
The values for fuel consumption The figures are provided only for the (combined) of the model Opel Vivaro The fuel filler cap can be retained in purpose of comparison between is within a range of 7.4 to the bracket on the fuel filler flap. -
Page 138: Trailer Hitch
Driving and operating Trailer hitch If the trailer starts snaking, drive more level. Since engine power decreases slowly, do not attempt to correct the as altitude increases due to the air steering and brake sharply if becoming thinner, therefore reducing General information necessary.
-
Page 139: Trailer Stability Assist
Driving and operating In the case of trailer loads of 1200 kg or more, the vertical coupling load should not be less than 50 kg. Rear axle load When the trailer is coupled and the towing vehicle fully loaded (including all occupants), the permissible rear axle load (see identification plate or vehicle documents) must not be…
-
Page 140: Vehicle Care
Vehicle care Vehicle care General Information Vehicle storage Storage for a long period of time Accessories and vehicle If the vehicle is to be stored for several modifications General Information ….138 months: We recommend the use of Genuine Vehicle checks ……139 ■…
-
Page 141: Vehicle Checks
Vehicle care Vehicle checks End-of-life vehicle ■ Open the bonnet, close all doors and lock the vehicle. recovery Performing work ■ Disconnect the clamp from the Information on end-of-life vehicle negative terminal of the vehicle recovery centres and the recycling of battery.
-
Page 142: Engine Oil
Vehicle care Bonnet Engine oil Check the engine oil level manually Opening on a regular basis to prevent damage to the engine. Ensure that the correct specification of oil is used. Recommended fluids and lubricants 3 176. Check with the vehicle on a level surface.
-
Page 143
Vehicle care Engine air filter When the engine oil level has Caution dropped to the MIN mark, top-up engine oil. Engine air flow indicator Overfilled engine oil must be drained or suctioned out. Caution To prevent spillage when Do not allow the engine oil level to replenishing the engine oil, we drop below the minimum level! recommend using a funnel. -
Page 144: Power Steering Fluid
Vehicle care Engine coolant Power steering fluid If the cooling system is cold, the coolant level should be just above the The coolant provides freeze MINI mark. Top up if the level is low. Caution protection down to approx. -28 °C. 9 Warning Extremely small amounts of Caution…
-
Page 145: Washer Fluid
Vehicle care Washer fluid Brakes A squealing noise indicates that the brake lining is at its minimum thickness. Continued driving is possible but have the brake lining replaced as soon as possible. Once new brake linings are installed, do not brake unnecessarily hard for the first few journeys.
-
Page 146: Vehicle Battery
Vehicle care Vehicle battery Laying up the vehicle for more than 4 weeks can lead to battery The vehicle is equipped with a lead discharge. Disconnect the clamp from acid battery. Vehicles with stop-start the negative terminal of the vehicle system will be equipped with an battery.
-
Page 147
Using an AGM vehicle battery injury. generated during charging are different from the original Opel allowed to accumulate! ■ Keep the vehicle battery out of vehicle battery may result in a lower reach of children. -
Page 148: Diesel Fuel Filter
Vehicle care Diesel fuel filter Diesel fuel system If the engine fails to start, seek the assistance of a workshop. bleeding Starting the engine 3 116. If the fuel tank has been run dry, it will be necessary to air vent or bleed the Wiper blade replacement diesel fuel system.
-
Page 149: Bulb Replacement
Vehicle care Bulb replacement Headlights Wiper blade on the rear window Lift wiper arm, rotate wiper blade and Low beam and high beam detach. Switch off the ignition and turn off the relevant switch or close the doors. Only hold a new bulb at the base. Do not touch the bulb glass with bare hands.
-
Page 150: Fog Lights
Vehicle care Fog lights Sidelights 4. Renew bulb and install bulb holder. 5. Install harness connector and access cover. Front turn signal lights 1. Remove bulb holder from reflector Access the front fog light bulb from housing by rotating it beneath the vehicle.
-
Page 151: Tail Lights
Vehicle care Tail lights Side turn signal lights Rear brake, turn signal and tail lights 3. Rotate bulb holder anticlockwise to separate from lamp assembly. 1. Release clips from fender using a 4. Renew bulb. flat blade screwdriver and lift out 5.
-
Page 152: Number Plate Light
Vehicle care 3. From outside the vehicle, remove 4. Push to install the bulb holder into the bulb holder by releasing the the lamp assembly, then rotate clips with a flat blade screwdriver. clockwise to secure. 4. Renew bulb. 5. Install lamp assembly with the 2 screws.
-
Page 153: Fog Tail Light
Vehicle care Fog tail light Interior lights Load compartment light Front and rear courtesy lights 1. Remove lamp assembly using a 1. Remove the 2 screws (using the flat blade screwdriver. tool supplied) and remove lamp 1. Remove lens assembly using a assembly.
-
Page 154: Electrical System
Vehicle care Electrical system Glovebox light Fuses Data on the replacement fuse must match the data on the defective fuse. Before replacing a fuse, turn off the respective switch and the ignition. A blown fuse can be recognised by its melted wire.
-
Page 155: Instrument Panel Fuse Box
Vehicle care Note Place the fuse extractor on the Not all fuse box descriptions in this various types of fuse from the top or Owner’s Manual may apply to your side, and withdraw fuse. vehicle. Refer to the fuse box label, where fitted.
-
Page 156
Vehicle care… -
Page 157
Vehicle care No. Circuit No. Circuit No. Circuit Vehicle battery (with electronic 13 Courtesy lights, battery 25 Brake switch key system) discharge protection 26 Fuel injection, starter APC battery backup (with elec‐ 14 Fuel injection system, tyre pres‐ 27 Airbag, steering column lock tronic key system) sure monitoring system, elec‐… -
Page 158: Vehicle Tools
Vehicle care Vehicle tools Vehicles with tyre repair kit: The No. Circuit wheel cover hook and torx key are 39 Warning chimes stored within the tyre repair kit case, Tools stowed under the driver’s seat. 40 Load compartment power outlet Tyre repair kit 3 162.
-
Page 159: Wheels And Tyres
Vehicle care Wheels and tyres Winter tyres H = up to 210 km/h V = up to 240 km/h Winter tyres improve driving safety at W = up to 270 km/h temperatures below 7 °C and should Tyre condition, wheel condition therefore be fitted on all wheels.
-
Page 160: Tyre Pressure Monitoring
Vehicle care Tyre pressures 3 192. Always inflate The driver is responsible for correct All wheels must be equipped with adjustment of tyre pressure. pressure sensors and the tyres must tyres to the pressures shown on the have the prescribed pressure. label on the driver’s door frame.
-
Page 161
Vehicle care Low tyre pressure condition If w illuminates at lower temperatures and extinguishes after some driving, this could be an indicator for getting low pressure. Check tyre pressure. If the tyre pressure must be reduced or increased, switch off ignition. Only mount wheels with pressure sensors, otherwise the tyre pressure will not be displayed and w flashes for… -
Page 162: Tread Depth
Vehicle care Puncture Relearn function If problems occur during the relearn process, control indicator w remains A puncture or severely under-inflated illuminated and a warning message is tyre is indicated by illumination of displayed in the Driver Information control indicator w together with C Centre.
-
Page 163: Wheel Covers
Vehicle care Changing tyre and wheel For safety reasons it is recommended If the wheel covers and tyres used are that the tread depth of the tyres on not factory approved, the tyres must size one axle should not vary by more than not have a rim protection ridge.
-
Page 164: Tyre Repair Kit
Vehicle care Tyre repair kit Tyre chains are only permitted on the 2. Remove the electrical connection front wheels. cable and air hose from the Minor damage to the tyre tread or compartments on the underside Always use fine mesh chains that add sidewall can be repaired with the tyre of the compressor.
-
Page 165
Vehicle care 6. Screw the filler hose to the tyre 9. Set the rocker switch on the 12. The prescribed tyre pressure valve. compressor to I. The tyre is filled should be obtained within with sealant. 15 minutes. Tyre pressure 7. -
Page 166
Vehicle care damaged. Seek the assistance of the vehicle must not be driven. a workshop. Seek the assistance of a workshop. Drain excess tyre pressure with the button beside the pressure 19. Detach the tyre repair kit, return to indicator. case and stow under the driver’s seat. -
Page 167: Wheel Changing
Vehicle care Replace the used sealant bottle. ■ Take heavy objects out of the should turn anticlockwise to Dispose of the sealant bottle as vehicle before jacking up. loosen the bolts. Invert the wrench prescribed by applicable laws. if necessary. ■…
-
Page 168: Spare Wheel
Vehicle care 5. Unscrew wheel bolts completely Note even though no label indicates this. by turning anticlockwise and wipe If applicable, fit anti-theft bolts Seek the assistance of a workshop to clean with a cloth. nearest the tyre valve (otherwise it check the applicable speed limit.
-
Page 169
Vehicle care Directional tyres Support the spare wheel with a Fit directional tyres such that they roll suitable object to prevent the in the direction of travel. The rolling wheel falling suddenly when direction is indicated by a symbol loosening the carrier bolts — risk of (e.g. -
Page 170: Jump Starting
Vehicle care Jump starting ■ A discharged vehicle battery can ■ Apply the parking brake, already freeze at a temperature of transmission in neutral. 0 °C. Defrost the frozen battery ■ Open the positive terminal Do not start with a quick charger. before connecting jump leads.
-
Page 171: Towing
Vehicle care Towing far away from the discharged vehicle battery as possible, however at least 60 cm. Towing the vehicle Route the leads so that they cannot The towing eye is stowed with the catch on rotating parts in the engine vehicle tools 3 156.
-
Page 172: Towing Another Vehicle
Vehicle care When the engine is not running, Attach a tow rope — or better still a tow Caution considerably more force is needed to rod — to the rear towing eye, never to brake and steer. the rear axle and suspension units. Do not tow the vehicle from the To prevent the entry of exhaust fumes The rear towing eye must only be…
-
Page 173: Appearance Care
Vehicle care Appearance care Bird droppings, dead insects, resin, Have the door hinges of all doors pollen and the like should be cleaned greased by a workshop. off immediately, as they contain Exterior care Do not clean the engine compartment aggressive constituents which can with a steam-jet or high-pressure jet cause paint damage.
-
Page 174: Interior Care
Vehicle care Paintwork polish with silicone forms a For mechanical removal of ice, use a After the underbody is washed, check protective film, making waxing sharp-edged ice scraper. Press the the underbody and have it waxed if unnecessary. scraper firmly against the glass so necessary.
-
Page 175
Vehicle care The instrument cluster and the Plastic and rubber parts displays should only be cleaned using Plastic and rubber parts can be a soft damp cloth. If necessary use a cleaned with the same cleaner as weak soap solution. used to clean the body. -
Page 176: Service And Maintenance
Service and maintenance Service and General information Andorra, Austria, Belgium, Croatia, Czech Republic, Denmark, Estonia, maintenance Finland, France, Germany, Greece, Service information Hungary, Iceland, Ireland, Italy, In order to ensure economical and Latvia, Liechtenstein, Lithuania, safe vehicle operation and to Luxembourg, Netherlands, Norway, General information ….
-
Page 177
Service and maintenance Australia: South Africa: International+: Maintenance of your vehicle is Maintenance of your vehicle is Maintenance of your vehicle is required every 15,000 km or after required every 15,000 km or after required every 8,000 km or after 1 year, whichever occurs first, unless 1 year, whichever occurs first, unless 1 year, whichever occurs first, unless… -
Page 178: Recommended Fluids
Service and maintenance Recommended fluids, service is essential if any warranty or aging control, whereas viscosity goodwill claims are to be met, and is grade gives information on the oil’s lubricants and parts also a benefit when selling the thickness over a temperature range. vehicle.
-
Page 179
Service and maintenance Additional engine oil additives protection down to approx. -28 °C. This concentration should be The use of additional engine oil maintained all year round. The use of additives could cause damage and additional coolant additives that invalidate the warranty. intend to give additional corrosion Engine oil viscosity grades protection or seal against minor leaks… -
Page 180: Technical Data
Technical data Technical data Vehicle identification Vehicle Identification Number Vehicle identification ….178 Vehicle data ……. 181 The VIN is also displayed behind a removable plastic cover on the right- hand side door step. The Vehicle Identification Number is visible through the windscreen.
-
Page 181: Identification Plate
Technical data Identification plate The combined total of front and rear axle loads must not exceed the permissible gross vehicle weight. For example, if the front axle is bearing its maximum permissible load, the rear axle can only bear a load that is equal to the gross vehicle weight minus the front axle load.
-
Page 182
Technical data It is possible, using the Vehicle Identification Number (VIN), to determine the engine type that is installed in your vehicle. For further information consult a workshop. -
Page 183: Vehicle Data
Technical data Vehicle data Recommended fluids and lubricants Required engine oil quality Engine oil quality dexos 2 ✔ In case dexos quality is unavailable in International countries, you may use the oil qualities listed below: Engine oil quality ACEA A3/B4/C3 ✔…
-
Page 184: Engine Data
Technical data Engine data Sales designation 1.6 CDTi 90 1.6 CDTi 115 1.6 CDTi BiTurbo 120 1.6 CDTi BiTurbo 140 Engine identifier code R9M 408 R9M 408 R9M 450 R9M 450 Number of cylinders 1598 1598 1598 1598 Piston displacement [cm Engine power [kW] (PS) 66 (90) 85 (115)
-
Page 185: Vehicle Weight
Technical data Vehicle weight Kerb weight, basic model Optional equipment and accessories increase the kerb weight. Loading information 3 73. Model Engine Wheelbase Roof Payload Class Gross Vehicle Weight rating Kerb weight 2)3) 1000 2700 1661 1200 2900 1661 1200 2900 1760-1771 1200…
-
Page 186
Technical data Model Engine Wheelbase Roof Payload Class Gross Vehicle Weight rating Kerb weight 2)3) Combi, Bus 1000 2700 1901 1200 2900 1901 1200 2900 1901 Kerb weight and gross vehicle weight increase on models fitted with bad road equipment package — refer to VIN plate. Minimum vehicle weight according to Type Approval, including all fluids, vehicle tools and a 90% fuel load. -
Page 187
Technical data Additional minimum weights (approx.) Model Engine Wheelbase Trim level Front axle Rear axle Total Double cab Base Upper Base Upper Final weight may vary according to the specification of the vehicle, e.g. options, deleted options and accessories. Refer to identification plate on the right- hand door pillar. -
Page 188: Vehicle Dimensions
Technical data Vehicle dimensions Type Combi Double cab Platform cab Wheelbase Length [mm] 4999 5399 4999 5399 4999 5399 5399 Width without exterior mirrors [mm] 1956 1956 1956 1956 1956 1956 1956 Width with two exterior mirrors [mm] 2283 2283 2283 2283 2283…
-
Page 189
Technical data Loadspace dimensions Wheelbase Roof height Maximum rear door aperture height [mm] 1320 1820 1320 1820 Rear door aperture width (at floor) [mm] 1391 1391 1391 1391 Maximum load area height [mm] 1387 1898 1387 1898 Maximum load area width [mm] 1662 1662 1662… -
Page 190
Technical data Wheelbase Roof height Sliding side door aperture width — at 100 mm from floor [mm] 1030 1030 1030 1030 Sliding side door aperture height [mm] 1284 1284 1284 1284 with load-through feature. Combi Wheelbase Roof height Maximum rear door aperture height [mm] 1295 1295 Rear door aperture width (at floor) [mm]… -
Page 191
Technical data Combi Wheelbase Roof height Sliding side door aperture width — at 100 mm from floor [mm] 1030 1030 Sliding side door aperture height [mm] 1284 1284 Depending on number of seats. Double cab Wheelbase Roof height Maximum rear door aperture height [mm] 1320 1320 Rear door aperture width (at floor) [mm]… -
Page 192
Technical data Double cab Wheelbase Roof height Sliding side door aperture width [mm] 1229 1229 Sliding side door aperture width — at 100 mm from floor [mm] 1030 1030 Sliding side door aperture height [mm] 1284 1284… -
Page 193
Technical data Capacities Engine oil Engine Engine oil including filter [l] 6.3 — 6.5 between MIN and MAX [l] (approx.) 2.0 — 2.4 Fuel tank Fuel tank, nominal capacity [l]… -
Page 194: Tyre Pressures
Technical data Tyre pressures Tyre Tyre pressure with full load Front Rear [kPa/bar] (psi) [kPa/bar] (psi) 205/65 R16 C 380/3.8 (55) 420/4.2 (61) 215/65 R16 C 310/3.1 (45) 340/3.4 (49) 195/75 R16 C 380/3.8 (55) 420/4.2 (61) 215/60 R17 C 350/3.5 (51) 390/3.9 (57) The spare wheel should be set to the highest applicable pressure shown in the table.
-
Page 195: Customer Information
Customer information Customer information Customer information Vehicle data recording and privacy Declaration of conformity Event data recorders This vehicle has systems that Customer information ….193 transmit and/or receive radio waves Vehicle data recording and pri‐ Data storage modules in the subject to Directive 1999/5/EC.
-
Page 196
Motion profiles indicating travelled openers. RFID technology in Opel allow the transmission of particular routes cannot be created with these vehicles does not use or record vehicle data from the vehicle. -
Page 197
Customer information… -
Page 198: Index
Index Automatic fuel cut-off….117 Automatic light control ….95 Accessories and vehicle Automatic locking ……30 modifications ……138 Autostop……. 89, 116 Adaptive forward lighting ….. 97 Auxiliary heater……106 Adjustable air vents ….110 AGM (Absorptive Glass Mat) battery……..
-
Page 199
Child restraint installation Diesel fuel filter ……146 Engine data ……. 182 locations ……..61 Diesel fuel system bleeding ..146 Engine exhaust ……120 Child restraints……60 Diesel particle filter ….120 Engine identification….179 Child restraint systems ….60 Door locks…….. -
Page 200
Front door pockets……68 Head restraint adjustment ….. 8 Interior mirrors……39 Front fog lights……95, 98 Head restraints ……43 Introduction ……..3 Front seats……..44 Heated exterior mirrors….17 Isofix child restraint systems ..66 Front storage…….. 68 Heated mirrors …… -
Page 201
Manual transmission ….121 Power steering fluid….142 Messages……..91 Power windows ……40 Safety belts……..50 Mirror adjustment ……8 Preheating ……88, 116 Safety net ……..71 Mirrors……..38, 39 Puncture……..165 Seat adjustment ……. 7, 45 Misted light covers ……. 98 Seat belt …….. -
Page 202
Steering wheel controls ….75 Tread depth ……. 160 Vehicle dimensions ….186 Stop engine……..86 Trip computer ……92 Vehicle Identification Number ..178 Stop-start system….18, 117 Trip odometer ……81 Vehicle jack…….. 156 Storage……… 67 Turbo engine warm-up….116 Vehicle messages ……. -
Page 203
Windscreen wiper/washer … 76 Winter tyres ……. 157 Wiper blade replacement ..146… -
Page 205
Copyright by ADAM OPEL AG, Rüsselsheim, Germany. The information contained in this publication is effective as of the date indicated below. Adam Opel AG reserves the right to make changes to the technical specifications, features and design of the vehicles relative to the information in this publication as well as changes to the publication itself.
Описание Opel Vivaro B / Renault Trafic III с 2014 года
Обычно пользователи нашего сайта находят эту страницу по следующим запросам:
номер кузова Renault Trafic III, давление в шинах Renault Trafic III, неисправности Renault Trafic III, подготовка к зиме Renault Trafic III, тормоза Renault Trafic III, масляный фильтр Renault Trafic III, топливный фильтр Renault Trafic III, фильр салона Renault Trafic III, регулировка фар Renault Trafic III, номер кузова Opel Vivaro B, давление в шинах Opel Vivaro B, неисправности Opel Vivaro B, подготовка к зиме Opel Vivaro B, тормоза Opel Vivaro B, масляный фильтр Opel Vivaro B, топливный фильтр Opel Vivaro B, фильр салона Opel Vivaro B, регулировка фар Opel Vivaro B
1. Описание
Приборная панель в сборе
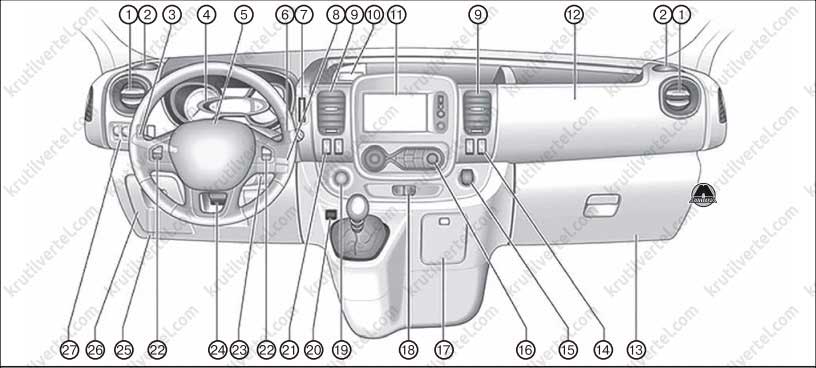
- Боковые дефлекторы системы вентиляции.
- Пепельница; держатель для чашек.
- Левый универсальный подрулевой переключатель: управление фарами головного освещения; задние противотуманные фонари; передние противотуманные фонари; подсветка при выходе; указатели поворота; габаритные огни; мигание дальним светом фар, ближний и дальний свет фар.
- Щиток приборов/информационный центр водителя.
- Звуковой сигнал/модуль фронтальной подушки безопасности водителя.
- Правый универсальный подрулевой переключатель: очиститель и омыватель ветрового стекла; очиститель и омыватель заднего стекла; бортовой компьютер (Trip).
- Кардридер для электронной системы ключей.
- Элементы управления на рулевом колесе.
- Центральные дефлекторы системы вентиляции.
- Силовой вывод/прикуриватель/емкость для мелочи/вывод USB.
- Информационный центр водителя/бортовой компьютер.
- Фронтальная подушка безопасности пассажира.
- Перчаточный ящик.
- Подогрев наружных зеркал/подогрев заднего стекла/управление оборотами холостого хода.
- Силовой вывод/прикуриватель.
- Климатическая система.
- Пепельница.
- Кнопка аварийной сигнализации/система центральной блокировки.
- Кнопка зажигания и запуска для системы с электронной картой.
- Кнопка включения режима ECO.
- Система «Старт-стоп»/система круиз-контроля.
- Система дистанционного управления на рулевом колесе/круиз-контроль.
- Замок зажигания.
- Регулировка расположения рулевого колеса/ система стабилизации автомобиля/ система контроля курсовой устойчивости/ регулировка направления света фар головного освещения/ управление яркостью подсветки/ дополнительный отопитель/ограничитель скорости.