
Часто на практике возникает необходимость централизованной обработки исключений в рамках контроллера или даже всего приложения. В данной статье разберём основные возможности, которые предоставляет Spring Framework для решения этой задачи и на простых примерах посмотрим как всё работает. Кому интересна данная тема — добро пожаловать под кат!
Изначально до Spring 3.2 основными способами обработки исключений в приложении были HandlerExceptionResolver и аннотация @ExceptionHandler. Их мы ещё подробно разберём ниже, но они имеют определённые недостатки. Начиная с версии 3.2 появилась аннотация @ControllerAdvice, в которой устранены ограничения из предыдущих решений. А в Spring 5 добавился новый класс ResponseStatusException, который очень удобен для обработки базовых ошибок для REST API.
А теперь обо всём по порядку, поехали!
Обработка исключений на уровне контроллера — @ExceptionHandler
С помощью аннотации @ExceptionHandler можно обрабатывать исключения на уровне отдельного контроллера. Для этого достаточно объявить метод, в котором будет содержаться вся логика обработки нужного исключения, и проаннотировать его.
В качестве примера разберём простой контроллер:
@RestController
public class Example1Controller {

    @GetMapping(value = "/testExceptionHandler", produces = APPLICATION_JSON_VALUE)
    public Response testExceptionHandler(@RequestParam(required = false, defaultValue = "false") boolean exception)
            throws BusinessException {
        if (exception) {
            throw new BusinessException("BusinessException in testExceptionHandler");
        }
        return new Response("OK");
    }

    @ExceptionHandler(BusinessException.class)
    public Response handleException(BusinessException e) {
        return new Response(e.getMessage());
    }

}
Тут я сделал метод testExceptionHandler, который вернёт либо исключение BusinessException, либо успешный ответ — всё зависит от того что было передано в параметре запроса. Это нужно для того, чтобы можно было имитировать как штатную работу приложения, так и работу с ошибкой.
А вот следующий метод handleException предназначен уже для обработки ошибок. У него есть аннотация @ExceptionHandler(BusinessException.class), которая говорит нам о том что для последующей обработки будут перехвачены все исключения типа BusinessException. В аннотации @ExceptionHandler можно прописать сразу несколько типов исключений, например так: @ExceptionHandler({BusinessException.class, ServiceException.class}).
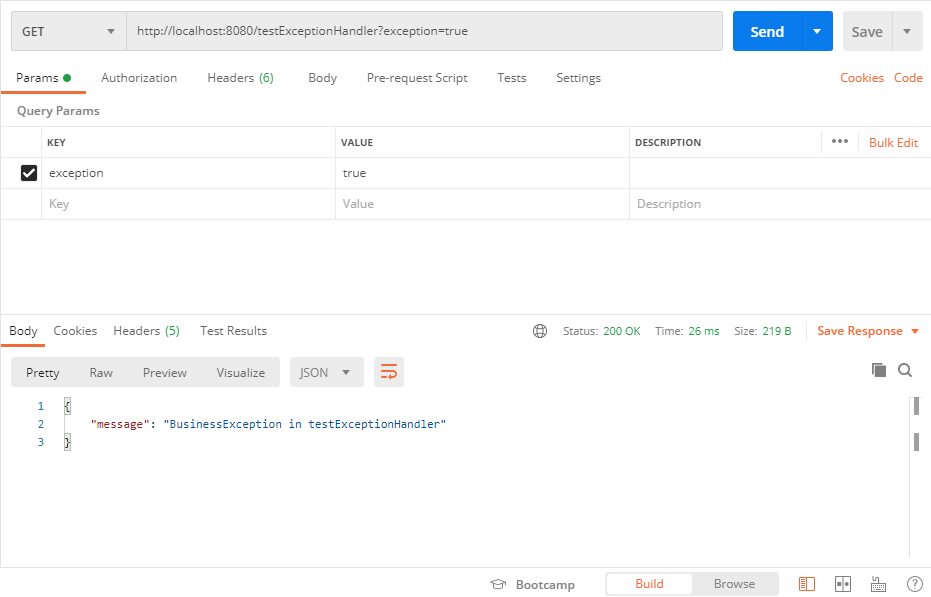
Сама обработка исключения в данном случае примитивная и сделана просто для демонстрации работы метода — по сути вернётся код 200 и JSON с описанием ошибки. На практике часто требуется более сложная логика обработки и если нужно вернуть другой код статуса, то можно воспользоваться дополнительно аннотацией @ResponseStatus, например @ResponseStatus(HttpStatus.INTERNAL_SERVER_ERROR).
Пример работы с ошибкой:
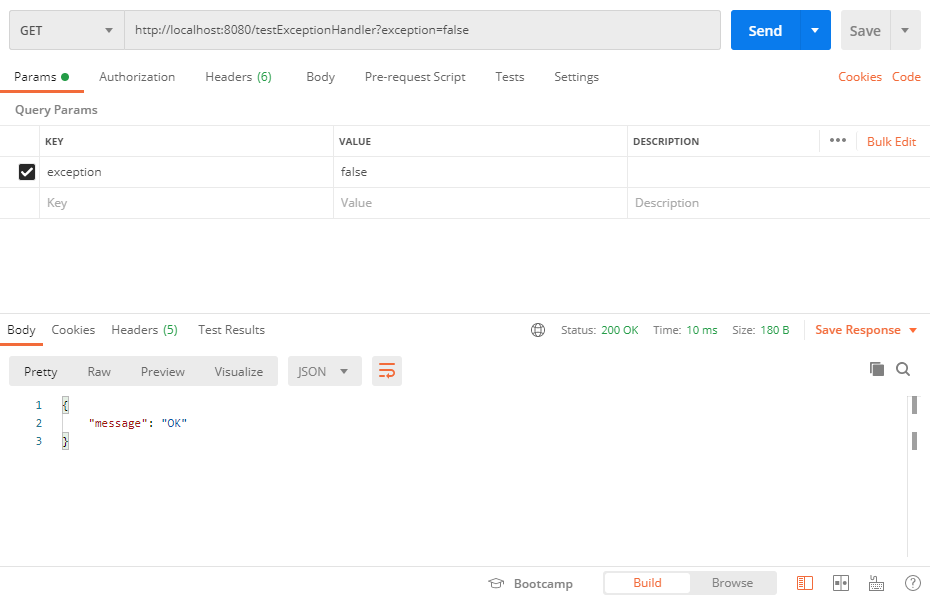
Пример штатной работы:
Основной недостаток @ExceptionHandler в том что он определяется для каждого контроллера отдельно, а не глобально для всего приложения. Это ограничение можно обойти если @ExceptionHandler определен в базовом классе, от которого будут наследоваться все контроллеры в приложении, но такой подход не всегда возможен, особенно если перед нами старое приложение с большим количеством легаси.
Обработка исключений с помощью HandlerExceptionResolver
HandlerExceptionResolver является общим интерфейсом для обработчиков исключений в Spring. Все исключений выброшенные в приложении будут обработаны одним из подклассов HandlerExceptionResolver. Можно сделать как свою собственную реализацию данного интерфейса, так и использовать существующие реализации, которые предоставляет нам Spring из коробки. Давайте разберем их для начала:
ExceptionHandlerExceptionResolver — этот резолвер является частью механизма обработки исключений с помощью аннотации @ExceptionHandler, о которой я уже упоминал ранее.
DefaultHandlerExceptionResolver — используется для обработки стандартных исключений Spring и устанавливает соответствующий код ответа, в зависимости от типа исключения:
Основной недостаток заключается в том что возвращается только код статуса, а на практике для REST API одного кода часто не достаточно. Желательно вернуть клиенту еще и тело ответа с описанием того что произошло. Эту проблему можно решить с помощью ModelAndView, но не нужно, так как есть способ лучше.
ResponseStatusExceptionResolver — позволяет настроить код ответа для любого исключения с помощью аннотации @ResponseStatus.
В качестве примера я создал новый класс исключения ServiceException:
@ResponseStatus(value = HttpStatus.INTERNAL_SERVER_ERROR)
public class ServiceException extends Exception {

    public ServiceException(String message) {
        super(message);
    }

}
В ServiceException я добавил аннотацию @ResponseStatus и в value указал что данное исключение будет соответствовать статусу INTERNAL_SERVER_ERROR, то есть будет возвращаться статус-код 500.
Для тестирования данного нового исключения я создал простой контроллер:
@RestController
public class Example2Controller {

    @GetMapping(value = "/testResponseStatusExceptionResolver", produces = APPLICATION_JSON_VALUE)
    public Response testResponseStatusExceptionResolver(@RequestParam(required = false, defaultValue = "false") boolean exception)
            throws ServiceException {
        if (exception) {
            throw new ServiceException("ServiceException in testResponseStatusExceptionResolver");
        }
        return new Response("OK");
    }

}
Если отправить GET-запрос и передать параметр exception=true, то приложение в ответ вернёт 500-ю ошибку:
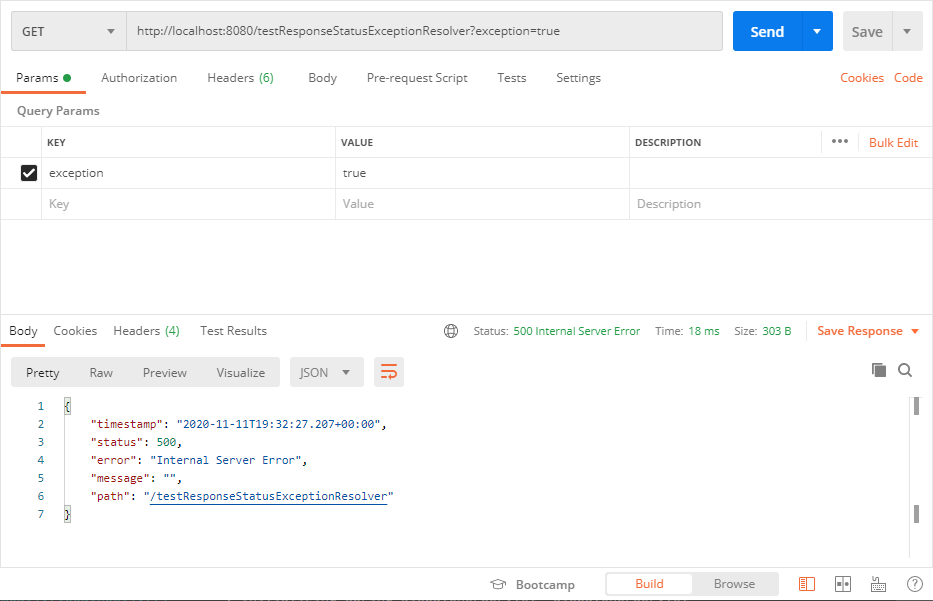
Из недостатков такого подхода — как и в предыдущем случае отсутствует тело ответа. Но если нужно вернуть только код статуса, то @ResponseStatus довольно удобная штука.
Кастомный HandlerExceptionResolver позволит решить проблему из предыдущих примеров, наконец-то можно вернуть клиенту красивый JSON или XML с необходимой информацией. Но не спешите радоваться, давайте для начала посмотрим на реализацию.
В качестве примера я сделал кастомный резолвер:
@Component
public class CustomExceptionResolver extends AbstractHandlerExceptionResolver {

    @Override
    protected ModelAndView doResolveException(HttpServletRequest request, HttpServletResponse response, Object handler, Exception ex) {
        ModelAndView modelAndView = new ModelAndView(new MappingJackson2JsonView());
        if (ex instanceof CustomException) {
            modelAndView.setStatus(HttpStatus.BAD_REQUEST);
            modelAndView.addObject("message", "CustomException was handled");
            return modelAndView;

        }
        modelAndView.setStatus(HttpStatus.INTERNAL_SERVER_ERROR);
        modelAndView.addObject("message", "Another exception was handled");
        return modelAndView;
    }

}
Ну так себе, прямо скажем. Код конечно работает, но приходится выполнять всю работу руками: сами проверяем тип исключения, и сами формируем объект древнего класса ModelAndView. На выходе конечно получим красивый JSON, но в коде красоты явно не хватает.
Такой резолвер может глобально перехватывать и обрабатывать любые типы исключений и возвращать как статус-код, так и тело ответа. Формально он даёт нам много возможностей и не имеет недостатков из предыдущих примеров. Но есть способ сделать ещё лучше, к которому мы перейдем чуть позже. А сейчас, чтобы убедиться что всё работает — напишем простой контроллер:
@RestController
public class Example3Controller {

    @GetMapping(value = "/testCustomExceptionResolver", produces = APPLICATION_JSON_VALUE)
    public Response testCustomExceptionResolver(@RequestParam(required = false, defaultValue = "false") boolean exception)
            throws CustomException {
        if (exception) {
            throw new CustomException("CustomException in testCustomExceptionResolver");
        }
        return new Response("OK");
    }

}
А вот и пример вызова:
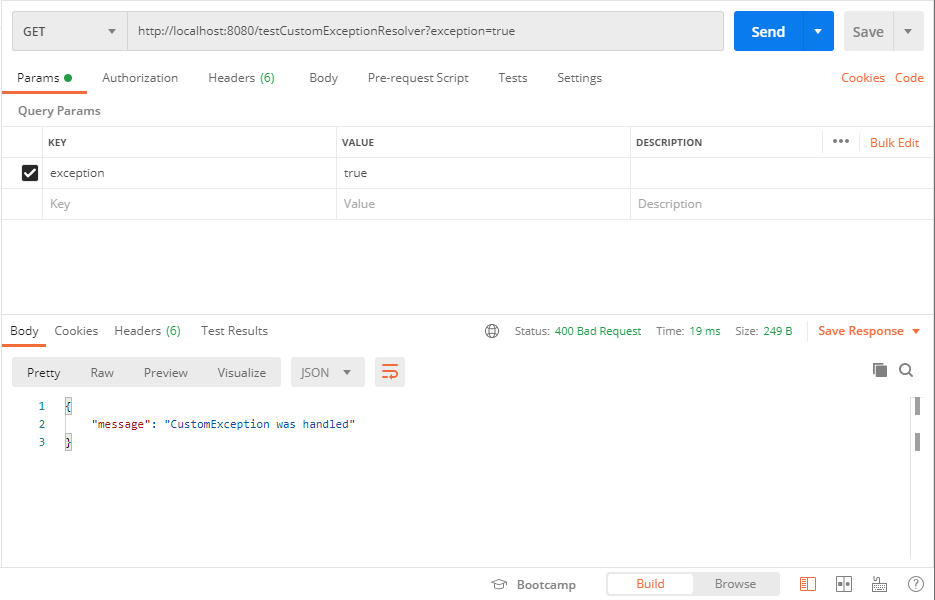
Видим что исключение прекрасно обработалось и в ответ получили код 400 и JSON с сообщением об ошибке.
Обработка исключений с помощью @ControllerAdvice
Наконец переходим к самому интересному варианту обработки исключений — эдвайсы. Начиная со Spring 3.2 можно глобально и централизованно обрабатывать исключения с помощью классов с аннотацией @ControllerAdvice.
Разберём простой пример эдвайса для нашего приложения:
@ControllerAdvice
public class DefaultAdvice {

    @ExceptionHandler(BusinessException.class)
    public ResponseEntity<Response> handleException(BusinessException e) {
        Response response = new Response(e.getMessage());
        return new ResponseEntity<>(response, HttpStatus.OK);
    }

}
Как вы уже догадались, любой класс с аннотацией @ControllerAdvice является глобальным обработчиком исключений, который очень гибко настраивается.
В нашем случае мы создали класс DefaultAdvice с одним единственным методом handleException. Метод handleException имеет аннотацию @ExceptionHandler, в которой, как вы уже знаете, можно определить список обрабатываемых исключений. В нашем случае будем перехватывать все исключения BusinessException.
Можно одним методом обрабатывать и несколько исключений сразу: @ExceptionHandler({BusinessException.class, ServiceException.class}). Так же можно в рамках эдвайса сделать сразу несколько методов с аннотациями @ExceptionHandler для обработки разных исключений.
Обратите внимание, что метод handleException возвращает ResponseEntity с нашим собственным типом Response:
public class Response {

    private String message;

    public Response() {
    }

    public Response(String message) {
        this.message = message;
    }

    public String getMessage() {
        return message;
    }

    public void setMessage(String message) {
        this.message = message;
    }

}
Таким образом у нас есть возможность вернуть клиенту как код статуса, так и JSON заданной структуры. В нашем простом примере я записываю в поле message описание ошибки и возвращаю HttpStatus.OK, что соответствует коду 200.
Для проверки работы эдвайса я сделал простой контроллер:
@RestController
public class Example4Controller {

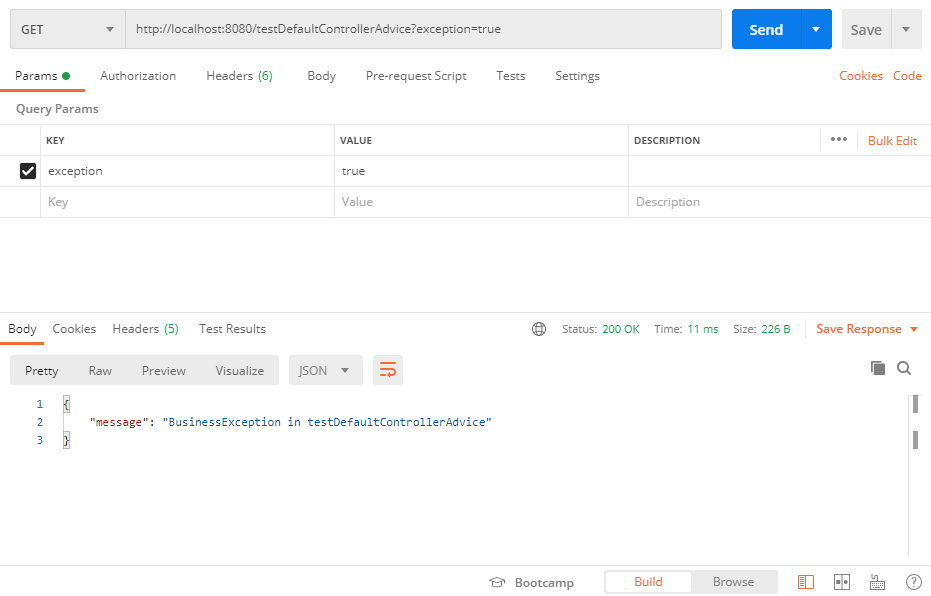
    @GetMapping(value = "/testDefaultControllerAdvice", produces = APPLICATION_JSON_VALUE)
    public Response testDefaultControllerAdvice(@RequestParam(required = false, defaultValue = "false") boolean exception)
            throws BusinessException {
        if (exception) {
            throw new BusinessException("BusinessException in testDefaultControllerAdvice");
        }
        return new Response("OK");
    }

}
В результате, как и ожидалось, получаем красивый JSON и код 200:
А что если мы хотим обрабатывать исключения только от определенных контроллеров?
Такая возможность тоже есть! Смотрим следующий пример:
@ControllerAdvice(annotations = CustomExceptionHandler.class)
public class CustomAdvice {

    @ExceptionHandler(BusinessException.class)
    public ResponseEntity<Response> handleException(BusinessException e) {
        String message = String.format("%s %s", LocalDateTime.now(), e.getMessage());
        Response response = new Response(message);
        return new ResponseEntity<>(response, HttpStatus.OK);
    }

}
Обратите внимание на аннотацию @ControllerAdvice(annotations = CustomExceptionHandler.class). Такая запись означает что CustomAdvice будет обрабатывать исключения только от тех контроллеров, которые дополнительно имеют аннотацию @CustomExceptionHandler.
Аннотацию @CustomExceptionHandler я специально сделал для данного примера:
@Target(ElementType.TYPE)
@Retention(RetentionPolicy.RUNTIME)
public @interface CustomExceptionHandler {
}
А вот и исходный код контроллера:
@RestController
@CustomExceptionHandler
public class Example5Controller {

    @GetMapping(value = "/testCustomControllerAdvice", produces = APPLICATION_JSON_VALUE)
    public Response testCustomControllerAdvice(@RequestParam(required = false, defaultValue = "false") boolean exception)
            throws BusinessException {
        if (exception) {
            throw new BusinessException("BusinessException in testCustomControllerAdvice");
        }
        return new Response("OK");
    }

}
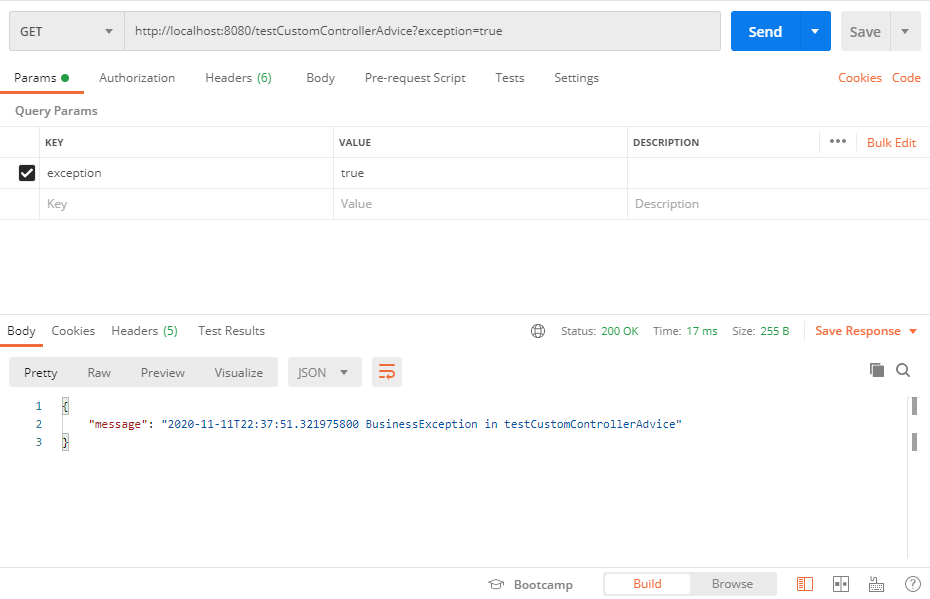
В контроллере Example5Controller присутствует аннотация @CustomExceptionHandler, а так же на то что выбрасывается то же исключение что и в Example4Controller из предыдущего примера. Однако в данном случае исключение BusinessException обработает именно CustomAdvice, а не DefaultAdvice, в чём мы легко можем убедиться.
Для наглядности я немного изменил сообщение об ошибке в CustomAdvice — начал добавлять к нему дату:
На этом возможности эдвайсов не заканчиваются. Если мы посмотрим исходный код аннотации @ControllerAdvice, то увидим что эдвайс можно повесить на отдельные типы или даже пакеты. Не обязательно создавать новые аннотации или вешать его на уже существующие.
Исключение ResponseStatusException.
Сейчас речь пойдёт о формировании ответа путём выброса исключения ResponseStatusException:
@RestController
public class Example6Controller {

    @GetMapping(value = "/testResponseStatusException", produces = APPLICATION_JSON_VALUE)
    public Response testResponseStatusException(@RequestParam(required = false, defaultValue = "false") boolean exception) {
        if (exception) {
            throw new ResponseStatusException(HttpStatus.INTERNAL_SERVER_ERROR, "ResponseStatusException in testResponseStatusException");
        }
        return new Response("OK");
    }

}
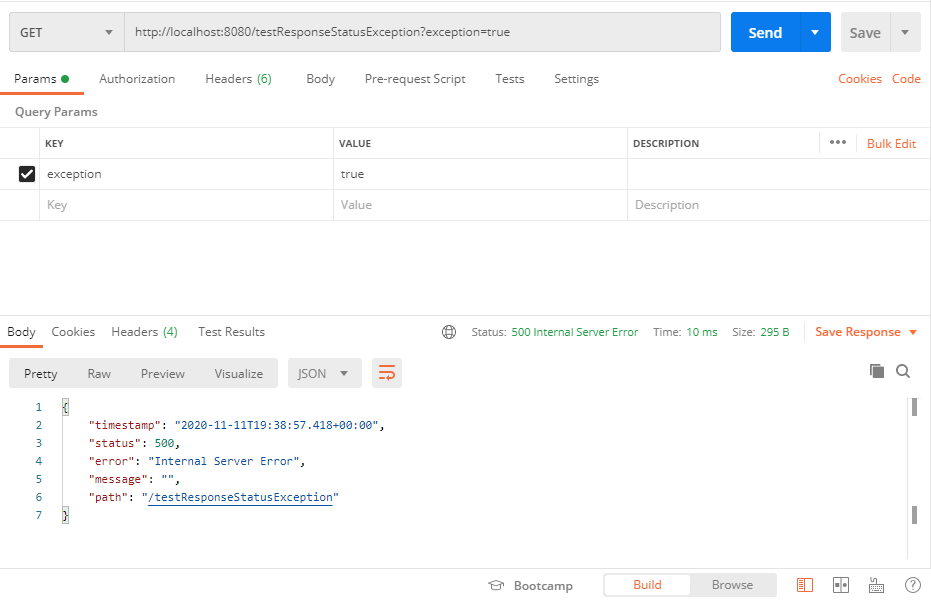
Выбрасывая ResponseStatusException можно также возвращать пользователю определённый код статуса, в зависимости от того, что произошло в логике приложения. При этом не нужно создавать кастомное исключение и прописывать аннотацию @ResponseStatus — просто выбрасываем исключение и передаём нужный статус-код. Конечно тут возвращаемся к проблеме отсутствия тела сообщения, но в простых случаях такой подход может быть удобен.
Пример вызова:
Резюме: мы познакомились с разными способами обработки исключений, каждый из которых имеет свои особенности. В рамках большого приложения можно встретить сразу несколько подходов, но при этом нужно быть очень осторожным и стараться не переусложнять логику обработки ошибок. Иначе получится что какое-нибудь исключение обработается не в том обработчике и на выходе ответ будет отличаться от ожидаемого. Например если в приложении есть несколько эдвайсов, то при создании нового нужно убедиться, что он не сломает существующий порядок обработки исключений из старых контроллеров.
Так что будьте внимательны и всё будет работать замечательно!
Ссылка на исходники из статьи
NOTE: Revised April 2018
Spring MVC provides several complimentary approaches to exception handling but, when teaching Spring MVC, I often find that my students are confused or not comfortable with them.
Today I’m going to show you the various options available. Our goal is to not handle exceptions explicitly in Controller methods where possible. They are a cross-cutting concern better handled separately in dedicated code.
There are three options: per exception, per controller or globally.
A demonstration application that shows the points discussed here can be found at
http://github.com/paulc4/mvc-exceptions. See Sample Application below for details.
NOTE: The demo applications has been revamped and updated (April 2018) to use Spring Boot 2.0.1 and is (hopefully) easier to use and understand. I also fixed some broken links (thanks for the feedback, sorry it took a while).
Spring Boot
Spring Boot allows a Spring project to be setup with minimal configuration and it is likely that you are using it if your application is less than a few years old.
Spring MVC offers no default (fall-back) error page out-of-the-box. The most common way to set a default error page has always been the SimpleMappingExceptionResolver (since Spring V1 in fact). We will discuss this later.
However Spring Boot does provide for a fallback error-handling page.
At start-up, Spring Boot tries to find a mapping for /error. By convention, a URL ending in /error maps to a logical view of the same name: error. In the demo application this view maps in turn to the error.html Thymeleaf template. (If using JSP, it would map to error.jsp according to the setup of your InternalResourceViewResolver). The actual mapping will depend on what ViewResolver (if any) that you or Spring Boot has setup.
If no view-resolver mapping for /error can be found, Spring Boot defines its own fall-back error page — the so-called “Whitelabel Error Page” (a minimal page with just the HTTP status information and any error details, such as the message from an uncaught exception). In the sample applicaiton, if you rename the error.html template to, say, error2.html then restart, you will see it being used.
If you are making a RESTful request (the HTTP request has specified a desired response type other than HTML) Spring Boot returns a JSON representation of the same error information that it puts in the “Whitelabel” error page.
$> curl -H "Accept: application/json" http://localhost:8080/no-such-page

{"timestamp":"2018-04-11T05:56:03.845+0000","status":404,"error":"Not Found","message":"No message available","path":"/no-such-page"}
Spring Boot also sets up a default error-page for the container, equivalent to the<error-page> directive in web.xml (although implemented very differently). Exceptions thrown outside the Spring MVC framework, such as from a servlet Filter, are still reported by the Spring Boot fallback error page. The sample application also shows an example of this.
A more in-depth discussion of Spring Boot error-handling can be found at the end of this article.
The rest of this article applies regardless of whether you are using Spring with or without Spring Boot.
Impatient REST developers may choose to skip directly to the section on custom REST error responses. However they should then read the full article as most of it applies equally to all web applications, REST or otherwise.
Using HTTP Status Codes
Normally any unhandled exception thrown when processing a web-request causes the server to return an HTTP 500 response. However, any exception that you write yourself can be annotated with the @ResponseStatus annotation (which supports all the HTTP status codes defined by the HTTP specification). When an annotated exception is thrown from a controller method, and not handled elsewhere, it will automatically cause the appropriate HTTP response to be returned with the specified status-code.
For example, here is an exception for a missing order.
 @ResponseStatus(value=HttpStatus.NOT_FOUND, reason="No such Order")  // 404
 public class OrderNotFoundException extends RuntimeException {
     // ...
 }
And here is a controller method using it:
 @RequestMapping(value="/orders/{id}", method=GET)
 public String showOrder(@PathVariable("id") long id, Model model) {
     Order order = orderRepository.findOrderById(id);

     if (order == null) throw new OrderNotFoundException(id);

     model.addAttribute(order);
     return "orderDetail";
 }
A familiar HTTP 404 response will be returned if the URL handled by this method includes an unknown order id.
Controller Based Exception Handling
Using @ExceptionHandler
You can add extra (@ExceptionHandler) methods to any controller to specifically handle exceptions thrown by request handling (@RequestMapping) methods in the same controller. Such methods can:
- Handle exceptions without the
@ResponseStatusannotation (typically predefined exceptions that you didn’t write) - Redirect the user to a dedicated error view
- Build a totally custom error response
The following controller demonstrates these three options:
@Controller
public class ExceptionHandlingController {

  // @RequestHandler methods
  ...

  // Exception handling methods

  // Convert a predefined exception to an HTTP Status code
  @ResponseStatus(value=HttpStatus.CONFLICT,
                  reason="Data integrity violation")  // 409
  @ExceptionHandler(DataIntegrityViolationException.class)
  public void conflict() {
    // Nothing to do
  }

  // Specify name of a specific view that will be used to display the error:
  @ExceptionHandler({SQLException.class,DataAccessException.class})
  public String databaseError() {
    // Nothing to do.  Returns the logical view name of an error page, passed
    // to the view-resolver(s) in usual way.
    // Note that the exception is NOT available to this view (it is not added
    // to the model) but see "Extending ExceptionHandlerExceptionResolver"
    // below.
    return "databaseError";
  }

  // Total control - setup a model and return the view name yourself. Or
  // consider subclassing ExceptionHandlerExceptionResolver (see below).
  @ExceptionHandler(Exception.class)
  public ModelAndView handleError(HttpServletRequest req, Exception ex) {
    logger.error("Request: " + req.getRequestURL() + " raised " + ex);

    ModelAndView mav = new ModelAndView();
    mav.addObject("exception", ex);
    mav.addObject("url", req.getRequestURL());
    mav.setViewName("error");
    return mav;
  }
}
In any of these methods you might choose to do additional processing — the most common example is to log the exception.
Handler methods have flexible signatures so you can pass in obvious servlet-related objects such as HttpServletRequest, HttpServletResponse, HttpSession and/or Principle.
Important Note: The Model may not be a parameter of any @ExceptionHandler method. Instead, setup a model inside the method using a ModelAndView as shown by handleError() above.
Exceptions and Views
Be careful when adding exceptions to the model. Your users do not want to see web-pages containing Java exception details and stack-traces. You may have security policies that expressly forbid putting any exception information in the error page. Another reason to make sure you override the Spring Boot white-label error page.
Make sure exceptions are logged usefully so they can be analyzed after the event by your support and development teams.
Please remember the following may be convenient but it is not best practice in production.
It can be useful to hide exception details in the page source as a comment, to assist testing. If using JSP, you could do something like this to output the exception and the corresponding stack-trace (using a hidden <div> is another option).
  <h1>Error Page</h1>
  <p>Application has encountered an error. Please contact support on ...</p>

  <!--
    Failed URL: ${url}
    Exception:  ${exception.message}
        <c:forEach items="${exception.stackTrace}" var="ste">    ${ste}
    </c:forEach>
  -->
For the Thymeleaf equivalent see support.html in the demo application. The result looks like this.

Global Exception Handling
Using @ControllerAdvice Classes
A controller advice allows you to use exactly the same exception handling techniques but apply them across the whole application, not just to an individual controller. You can think of them as an annotation driven interceptor.
Any class annotated with @ControllerAdvice becomes a controller-advice and three types of method are supported:
- Exception handling methods annotated with
@ExceptionHandler. - Model enhancement methods (for adding additional data to the model) annotated with
@ModelAttribute. Note that these attributes are not available to the exception handling views. - Binder initialization methods (used for configuring form-handling) annotated with
@InitBinder.
We are only going to look at exception handling — search the online manual for more on @ControllerAdvice methods.
Any of the exception handlers you saw above can be defined on a controller-advice class — but now they apply to exceptions thrown from any controller. Here is a simple example:
@ControllerAdvice
class GlobalControllerExceptionHandler {
    @ResponseStatus(HttpStatus.CONFLICT)  // 409
    @ExceptionHandler(DataIntegrityViolationException.class)
    public void handleConflict() {
        // Nothing to do
    }
}
If you want to have a default handler for any exception, there is a slight wrinkle. You need to ensure annotated exceptions are handled by the framework. The code looks like this:
@ControllerAdvice
class GlobalDefaultExceptionHandler {
  public static final String DEFAULT_ERROR_VIEW = "error";

  @ExceptionHandler(value = Exception.class)
  public ModelAndView
  defaultErrorHandler(HttpServletRequest req, Exception e) throws Exception {
    // If the exception is annotated with @ResponseStatus rethrow it and let
    // the framework handle it - like the OrderNotFoundException example
    // at the start of this post.
    // AnnotationUtils is a Spring Framework utility class.
    if (AnnotationUtils.findAnnotation
                (e.getClass(), ResponseStatus.class) != null)
      throw e;

    // Otherwise setup and send the user to a default error-view.
    ModelAndView mav = new ModelAndView();
    mav.addObject("exception", e);
    mav.addObject("url", req.getRequestURL());
    mav.setViewName(DEFAULT_ERROR_VIEW);
    return mav;
  }
}
Going Deeper
HandlerExceptionResolver
Any Spring bean declared in the DispatcherServlet’s application context that implements HandlerExceptionResolver will be used to intercept and process any exception raised in the MVC system and not handled by a Controller. The interface looks like this:
public interface HandlerExceptionResolver {
    ModelAndView resolveException(HttpServletRequest request,
            HttpServletResponse response, Object handler, Exception ex);
}
The handler refers to the controller that generated the exception (remember that @Controller instances are only one type of handler supported by Spring MVC. For example: HttpInvokerExporter and the WebFlow Executor are also types of handler).
Behind the scenes, MVC creates three such resolvers by default. It is these resolvers that implement the behaviours discussed above:
ExceptionHandlerExceptionResolvermatches uncaught exceptions against suitable@ExceptionHandlermethods on both the handler (controller) and on any controller-advices.ResponseStatusExceptionResolverlooks for uncaught exceptions annotated by@ResponseStatus(as described in Section 1)DefaultHandlerExceptionResolverconverts standard Spring exceptions and converts them to HTTP Status Codes (I have not mentioned this above as it is internal to Spring MVC).
These are chained and processed in the order listed — internally Spring creates a dedicated bean (the HandlerExceptionResolverComposite) to do this.
Notice that the method signature of resolveException does not include the Model. This is why @ExceptionHandler methods cannot be injected with the model.
You can, if you wish, implement your own HandlerExceptionResolver to setup your own custom exception handling system. Handlers typically implement Spring’s Ordered interface so you can define the order that the handlers run in.
SimpleMappingExceptionResolver
Spring has long provided a simple but convenient implementation of HandlerExceptionResolver that you may well find being used in your appication already — the SimpleMappingExceptionResolver. It provides options to:
- Map exception class names to view names — just specify the classname, no package needed.
- Specify a default (fallback) error page for any exception not handled anywhere else
- Log a message (this is not enabled by default).
- Set the name of the
exceptionattribute to add to the Model so it can be used inside a View
(such as a JSP). By default this attribute is namedexception. Set tonullto disable. Remember that views returned from@ExceptionHandlermethods do not have access to the exception but views defined toSimpleMappingExceptionResolverdo.
Here is a typical configuration using Java Configuration:
@Configuration
@EnableWebMvc  // Optionally setup Spring MVC defaults (if you aren't using
               // Spring Boot & haven't specified @EnableWebMvc elsewhere)
public class MvcConfiguration extends WebMvcConfigurerAdapter {
  @Bean(name="simpleMappingExceptionResolver")
  public SimpleMappingExceptionResolver
                  createSimpleMappingExceptionResolver() {
    SimpleMappingExceptionResolver r =
                new SimpleMappingExceptionResolver();

    Properties mappings = new Properties();
    mappings.setProperty("DatabaseException", "databaseError");
    mappings.setProperty("InvalidCreditCardException", "creditCardError");

    r.setExceptionMappings(mappings);  // None by default
    r.setDefaultErrorView("error");    // No default
    r.setExceptionAttribute("ex");     // Default is "exception"
    r.setWarnLogCategory("example.MvcLogger");     // No default
    return r;
  }
  ...
}
Or using XML Configuration:
  <bean id="simpleMappingExceptionResolver" class=
     "org.springframework.web.servlet.handler.SimpleMappingExceptionResolver">
    <property name="exceptionMappings">
      <map>
         <entry key="DatabaseException" value="databaseError"/>
         <entry key="InvalidCreditCardException" value="creditCardError"/>
      </map>
    </property>

    <!-- See note below on how this interacts with Spring Boot -->
    <property name="defaultErrorView" value="error"/>
    <property name="exceptionAttribute" value="ex"/>

    <!-- Name of logger to use to log exceptions. Unset by default,
           so logging is disabled unless you set a value. -->
    <property name="warnLogCategory" value="example.MvcLogger"/>
  </bean>
The defaultErrorView property is especially useful as it ensures any uncaught exception generates a suitable application defined error page. (The default for most application servers is to display a Java stack-trace — something your users should never see). Spring Boot provides another way to do the same thing with its “white-label” error page.
Extending SimpleMappingExceptionResolver
It is quite common to extend SimpleMappingExceptionResolver for several reasons:
- You can use the constructor to set properties directly — for example to enable exception logging and set the logger to use
- Override the default log message by overriding
buildLogMessage. The default implementation always returns this fixed text:- Handler execution resulted in exception
- To make additional information available to the error view by overriding
doResolveException
For example:
public class MyMappingExceptionResolver extends SimpleMappingExceptionResolver {
  public MyMappingExceptionResolver() {
    // Enable logging by providing the name of the logger to use
    setWarnLogCategory(MyMappingExceptionResolver.class.getName());
  }

  @Override
  public String buildLogMessage(Exception e, HttpServletRequest req) {
    return "MVC exception: " + e.getLocalizedMessage();
  }

  @Override
  protected ModelAndView doResolveException(HttpServletRequest req,
        HttpServletResponse resp, Object handler, Exception ex) {
    // Call super method to get the ModelAndView
    ModelAndView mav = super.doResolveException(req, resp, handler, ex);

    // Make the full URL available to the view - note ModelAndView uses
    // addObject() but Model uses addAttribute(). They work the same.
    mav.addObject("url", request.getRequestURL());
    return mav;
  }
}
This code is in the demo application as ExampleSimpleMappingExceptionResolver
Extending ExceptionHandlerExceptionResolver
It is also possible to extend ExceptionHandlerExceptionResolver and override itsdoResolveHandlerMethodException method in the same way. It has almost the same signature (it just takes the new HandlerMethod instead of a Handler).
To make sure it gets used, also set the inherited order property (for example in the constructor of your new class) to a value less than MAX_INT so it runs before the default ExceptionHandlerExceptionResolver instance (it is easier to create your own handler instance than try to modify/replace the one created by Spring). See ExampleExceptionHandlerExceptionResolver in the demo app for more.
Errors and REST
RESTful GET requests may also generate exceptions and we have already seen how we can return standard HTTP Error response codes. However, what if you want to return information about the error? This is very easy to do. Firstly define an error class:
public class ErrorInfo {
    public final String url;
    public final String ex;

    public ErrorInfo(String url, Exception ex) {
        this.url = url;
        this.ex = ex.getLocalizedMessage();
    }
}
Now we can return an instance from a handler as the @ResponseBody like this:
@ResponseStatus(HttpStatus.BAD_REQUEST)
@ExceptionHandler(MyBadDataException.class)
@ResponseBody ErrorInfo
handleBadRequest(HttpServletRequest req, Exception ex) {
    return new ErrorInfo(req.getRequestURL(), ex);
}
What to Use When?
As usual, Spring likes to offer you choice, so what should you do? Here are some rules of thumb. However if you have a preference for XML configuration or Annotations, that’s fine too.
- For exceptions you write, consider adding
@ResponseStatusto them. - For all other exceptions implement an
@ExceptionHandlermethod on a@ControllerAdviceclass or use an instance ofSimpleMappingExceptionResolver. You may well haveSimpleMappingExceptionResolverconfigured for your application already, in which case it may be easier to add new exception classes to it than implement a@ControllerAdvice. - For Controller specific exception handling add
@ExceptionHandlermethods to your controller. - Warning: Be careful mixing too many of these options in the same application. If the same exception can be handed in more than one way, you may not get the behavior you wanted.
@ExceptionHandlermethods on the Controller are always selected before those on any@ControllerAdviceinstance. It is undefined what order controller-advices are processed.
Sample Application
A demonstration application can be found at github. It uses Spring Boot and Thymeleaf to build a simple web application.
The application has been revised twice (Oct 2014, April 2018) and is (hopefully) better and easier to understand. The fundamentals stay the same. It uses Spring Boot V2.0.1 and Spring V5.0.5 but the code is applicable to Spring 3.x and 4.x also.
The demo is running on Cloud Foundry at http://mvc-exceptions-v2.cfapps.io/.
About the Demo
The application leads the user through 5 demo pages, highlighting different exception handling techniques:
- A controller with
@ExceptionHandlermethods to handle its own exceptions - A contoller that throws exceptions for a global ControllerAdvice to handle
- Using a
SimpleMappingExceptionResolverto handle exceptions - Same as demo 3 but with the
SimpleMappingExceptionResolverdisabled for comparison - Shows how Spring Boot generates its error page
A description of the most important files in the application and how they relate to each demo can be found in the project’s README.md.
The home web-page is index.html which:
- Links to each demo page
- Links (bottom of the page) to Spring Boot endpoints for those interested in Spring Boot.
Each demo page contains several links, all of which deliberately raise exceptions. You will need to use the back-button on your browser each time to return to the demo page.
Thanks to Spring Boot, you can run this demo as a Java application (it runs an embedded Tomcat container). To run the application, you can use one of the following (the second is thanks to the Spring Boot maven plugin):
mvn exec:javamvn spring-boot:run
Your choice. The home page URL will be http://localhost:8080.
Error Page Contents
Also in the demo application I show how to create a “support-ready” error page with a stack-trace hidden in the HTML source (as a comment). Ideally support should get this information from the logs, but life isn’t always ideal. Regardless, what this page does show is how the underlying error-handling method handleError creates its own ModelAndView to provide extra information in the error page. See:
ExceptionHandlingController.handleError()on githubGlobalControllerExceptionHandler.handleError()on github
Spring Boot and Error Handling
Spring Boot allows a Spring project to be setup with minimal configuration. Spring Boot creates sensible defaults automatically when it detects certain key classes and packages on the classpath. For example if it sees that you are using a Servlet environment, it sets up Spring MVC with the most commonly used view-resolvers, hander mappings and so forth. If it sees JSP and/or Thymeleaf, it sets up these view-technologies.
Fallback Error Page
How does Spring Boot support the default error-handling described at the beginning of this article?
- In the event of any unhanded error, Spring Boot forwards internally to
/error. - Boot sets up a
BasicErrorControllerto handle any request to/error. The controller adds error information to the internal Model and returnserroras the logical view name. - If any view-resolver(s) are configured, they will try to use a corresponding error-view.
- Otherwise, a default error page is provided using a dedicated
Viewobject (making it independent of any view-resolution system you may be using). - Spring Boot sets up a
BeanNameViewResolverso that/errorcan be mapped to aViewof the same name. - If you look in Boot’s
ErrorMvcAutoConfigurationclass you will see that thedefaultErrorViewis returned as a bean callederror. This is the View bean found by theBeanNameViewResolver.
The “Whitelabel” error page is deliberately minimal and ugly. You can override it:
- By defining an error template — in our demo we are using Thymeleaf so the error template is in
src/main/resources/templates/error.html(this location is set by the Spring Boot propertyspring.thymeleaf.prefix— similar properties exist for other supported server-side view technologies such as JSP or Mustache). - If you aren’t using server-side rendering
2.1 Define your own error View as a bean callederror.
2.1 Or disable Spring boot’s “Whitelabel” error page by setting the propertyserver.error.whitelabel.enabledtofalse. Your container’s default error page is used instead.
By convention, Spring Boot properties are normally set in application.properties or application.yml.
Integration with SimpleMappingExceptionResolver
What if you are already using SimpleMappingExceptionResolver to setup a default
error view? Simple, use setDefaultErrorView() to define the same view that Spring Boot uses: error.
Note that in the demo, the defaultErrorView property of the SimpleMappingExceptionResolver is deliberately set not to error but to defaultErrorPage so you can see when the handler is generating the error page and when Spring Boot is responsible. Normally both would be set to error.
Container-Wide Exception Handling
Exceptions thrown outside the Spring Framework, such as from a servlet Filter, are also reported by Spring Boot’s fallback error page.
To do this Spring Boot has to register a default error page for the container. In Servlet 2, there is an <error-page> directive that you can add to your web.xml to do this. Sadly Servlet 3 does not offer a Java API equivalent. Instead Spring Boot does the following:
- For a Jar application, with an embedded container, it registers a default error page using Container specific API.
- For a Spring Boot application deployed as a traditional WAR file, a Servlet Filter is used to
catch exceptions raised further down the line and handle it.
В части 1 мы рассмотрели варианты обработки исключений, выбрасываемых в контроллере.
Самый гибкий из них — @ControllerAdvice — он позволяет изменить как код, так и тело стандартного ответа при ошибке. Кроме того, он позволяет в одном методе обработать сразу несколько исключений — они перечисляются над методом.
В первой части мы создавали @ControllerAdvice с нуля, но в Spring Boot существует заготовка — ResponseEntityExceptionHandler, которую можно расширить. В ней уже обработаны многие исключения, например: NoHandlerFoundException, HttpMessageNotReadableException, MethodArgumentNotValidException и другие (всего десяток-другой исключений).
Приложение
Обрабатывать исключения будем в простом Spring Boot приложении из первой части. Оно предоставляет REST API для сущности Person:
@Entity
@NoArgsConstructor
@AllArgsConstructor
@Data
public class Person {
    @Id
    @GeneratedValue(strategy = GenerationType.IDENTITY)
    private Long id;

    @Size(min = 3, max = 10)
    private String name;

}
Только в этот раз поле name аннотировано javax.validation.constraints.Size.
А также перед аргументом Person в методах контроллера стоит аннотация @Valid:
@RestController
@RequestMapping("/persons")
public class PersonController {

    @Autowired
    private PersonRepository personRepository;

    @GetMapping
    public List<Person> listAllPersons() {
        List<Person> persons = personRepository.findAll();
        return persons;
    }

    @GetMapping(value = "/{personId}")
    public Person getPerson(@PathVariable("personId") long personId) {
        return personRepository.findById(personId).orElseThrow(() -> new MyEntityNotFoundException(personId));
    }

    @PostMapping
    public Person createPerson(@RequestBody @Valid Person person) {
        return personRepository.save(person);
    }

    @PutMapping("/{id}")
    public Person updatePerson(@RequestBody @Valid Person person, @PathVariable long id) {
        Person oldPerson = personRepository.getOne(id);
        oldPerson.setName(person.getName());
        return personRepository.save(oldPerson);
    }

}
Аннотация @Valid заставляет Spring проверять валидность полей объекта Person, например условие @Size(min = 3, max = 10). Если пришедший в контроллер объект не соответствует условиям, то будет выброшено MethodArgumentNotValidException — то самое, для которого в ResponseEntityExceptionHandler уже задан обработчик. Правда, он выдает пустое тело ответа. Вообще все обработчики из ResponseEntityExceptionHandler выдают корректный код ответа, но пустое тело.
Мы это исправим. Поскольку для MethodArgumentNotValidException может возникнуть несколько ошибок (по одной для каждого поля сущности Person), добавим в наше пользовательское тело ответа список List с ошибками. Он предназначен именно для MethodArgumentNotValidException (не для других исключений).
Итак, ApiError по сравнению с 1-ой частью теперь содержит еще список errors:
@Data
@AllArgsConstructor
@NoArgsConstructor
public class ApiError {
    private String message;
    private String debugMessage;

    @JsonInclude(JsonInclude.Include.NON_NULL)
    private List<String> errors;

    public ApiError(String message, String debugMessage){
        this.message=message;
        this.debugMessage=debugMessage;
    }
}
Благодаря аннотации @JsonInclude(JsonInclude.Include.NON_NULL) этот список будет включен в ответ только в том случае, если мы его зададим. Иначе ответ будет содержать только message и debugMessage, как в первой части.
Класс обработки исключений
Например, на исключение MyEntityNotFoundException ответ не поменяется, обработчик такой же, как в первой части:
@ControllerAdvice
public class RestExceptionHandler extends ResponseEntityExceptionHandler {

   ...

    @ExceptionHandler({MyEntityNotFoundException.class, EntityNotFoundException.class})
    protected ResponseEntity<Object> handleEntityNotFoundEx(MyEntityNotFoundException ex, WebRequest request) {
        ApiError apiError = new ApiError("Entity Not Found Exception", ex.getMessage());
        return new ResponseEntity<>(apiError, HttpStatus.NOT_FOUND);
    }
   ...
}
Но в отличие от 1 части, теперь RestExceptionHandler расширяет ResponseEntityExceptionHandler. А значит, он наследует различные обработчики исключений, и мы их можем переопределить. Сейчас они все возвращают пустое тело ответа, хотя и корректный код.
HttpMessageNotReadableException
Переопределим обработчик, отвечающий за HttpMessageNotReadableException. Это исключение возникает тогда, когда тело запроса, приходящего в метод контроллер, нечитаемое — например, некорректный JSON.
За это исключение отвечает метод handleHttpMessageNotReadable(), его и переопределим:
@Override
protected ResponseEntity<Object> handleHttpMessageNotReadable(HttpMessageNotReadableException ex,
                                                              HttpHeaders headers, HttpStatus status, WebRequest request) {
    ApiError apiError = new ApiError("Malformed JSON Request", ex.getMessage());
    return new ResponseEntity(apiError, status);
}
Проверим ответ, сделав запрос с некорректным JSON-телом запроса (он пойдет в метод updatePerson() контроллера):
PUT localhost:8080/persons/1
{
   11"name": "alice"
}
Получаем ответ с кодом 400 (Bad Request) и телом:
{
    "message": "Malformed JSON Request",
    "debugMessage": "JSON parse error: Unexpected character ('1' (code 49)): was expecting double-quote to start field name; nested exception is com.fasterxml.jackson.core.JsonParseException: Unexpected character ('1' (code 49)): was expecting double-quote to start field namen at [Source: (PushbackInputStream); line: 2, column: 5]"
}
Теперь ответ содержит не только корректный код, но и тело с информативными сообщениями. Если бы мы не переопределяли обработчик, вернулся бы только код 400.
А если бы не расширяли класс ResponseEntityExceptionHandler, все эти обработчики в принципе не были бы задействованы и вернулся бы стандартный ответ из BasicErrorController:
{
    "timestamp": "2021-03-01T16:53:04.197+00:00",
    "status": 400,
    "error": "Bad Request",
    "message": "JSON parse error: Unexpected character ('1' (code 49)): was expecting double-quote to start field name; nested exception is com.fasterxml.jackson.core.JsonParseException: Unexpected character ('1' (code 49)): was expecting double-quote to start field namen at [Source: (PushbackInputStream); line: 2, column: 5]",
    "path": "/persons/1"
}
MethodArgumentNotValidException
Как говорилось выше, чтобы выбросилось это исключение, в контроллер должен прийти некорректный Person. В смысле корректный JSON, но условие @Valid чтоб не выполнялось: например, поле name имело бы неверную длину (а она должна быть от 3 до 10, как указано в аннотации @Size).
Попробуем сделать запрос с коротким name:
POST http://localhost:8080/persons
{
   "name": "al"
}
Получим ответ:
{
    "message": "Method Argument Not Valid",
    "debugMessage": "Validation failed for argument [0] in public ru.sysout.model.Person ru.sysout.controller.PersonController.createPerson(ru.sysout.model.Person): [Field error in object 'person' on field 'name': rejected value [al]; codes [Size.person.name,Size.name,Size.java.lang.String,Size]; arguments [org.springframework.context.support.DefaultMessageSourceResolvable: codes [person.name,name]; arguments []; default message [name],10,3]; default message [размер должен находиться в диапазоне от 3 до 10]] ",
    "errors": [
        "размер должен находиться в диапазоне от 3 до 10"
    ]
}
Тут пошел в ход список ошибок, который мы добавили в ApiError. Мы его заполняем в переопределенном обработчике исключения:
@Override
protected ResponseEntity<Object> handleMethodArgumentNotValid(MethodArgumentNotValidException ex,
                                                              HttpHeaders headers, HttpStatus status, WebRequest request) {
    List<String> errors = ex.getBindingResult()
            .getFieldErrors()
            .stream()
            .map(x -> x.getDefaultMessage())
            .collect(Collectors.toList());

    ApiError apiError = new ApiError("Method Argument Not Valid", ex.getMessage(), errors);
    return new ResponseEntity<>(apiError, status);
}
Вообще говоря, стандартный ответ, выдаваемый BasicErrorController, тоже будет содержать этот список ошибок по полям, если в application.properties включить свойство:
server.error.include-binding-errors=always
В этом случае (при отсутствии нашего RestExceptionHandler с @ControlleAdvice) ответ будет таким:
{
    "timestamp": "2021-03-01T17:15:37.134+00:00",
    "status": 400,
    "error": "Bad Request",
    "message": "Validation failed for object='person'. Error count: 1",
    "errors": [
        {
            "codes": [
                "Size.person.name",
                "Size.name",
                "Size.java.lang.String",
                "Size"
            ],
            "arguments": [
                {
                    "codes": [
                        "person.name",
                        "name"
                    ],
                    "arguments": null,
                    "defaultMessage": "name",
                    "code": "name"
                },
                10,
                3
            ],
            "defaultMessage": "размер должен находиться в диапазоне от 3 до 10",
            "objectName": "person",
            "field": "name",
            "rejectedValue": "al",
            "bindingFailure": false,
            "code": "Size"
        }
    ],
    "path": "/persons/"
}
Мы просто сократили информацию.
MethodArgumentTypeMismatchException
Полезно знать еще исключение MethodArgumentTypeMismatchException, оно возникает, если тип аргумента неверный. Например, наш метод контроллера получает Person по id:
@GetMapping(value = "/{personId}")
   public Person getPerson(@PathVariable("personId") Long personId) throws EntityNotFoundException {
       return personRepository.getOne(personId);
   }
А мы передаем не целое, а строковое значение id:
GET http://localhost:8080/persons/mn
Тут то и возникает исключение MethodArgumentTypeMismatchException. Давайте его обработаем:
@ExceptionHandler(MethodArgumentTypeMismatchException.class)
protected ResponseEntity<Object> handleMethodArgumentTypeMismatch(MethodArgumentTypeMismatchException ex,HttpStatus status,
                                                                  WebRequest request) {
    ApiError apiError = new ApiError();
    apiError.setMessage(String.format("The parameter '%s' of value '%s' could not be converted to type '%s'",
            ex.getName(), ex.getValue(), ex.getRequiredType().getSimpleName()));
    apiError.setDebugMessage(ex.getMessage());
    return new ResponseEntity<>(apiError, status);
}
Проверим ответ сервера (код ответа будет 400):
{
    "message": "The parameter 'personId' of value 'mn' could not be converted to type 'long'",
    "debugMessage": "Failed to convert value of type 'java.lang.String' to required type 'long'; nested exception is java.lang.NumberFormatException: For input string: "mn""
}
NoHandlerFoundException
Еще одно полезное исключение — NoHandlerFoundException. Оно возникает, если на данный запрос не найдено обработчика.
Например, сделаем запрос:
GET http://localhost:8080/pers
По данному адресу у нас нет контроллера, так что возникнет NoHandlerFoundException. Добавим обработку исключения:
@Override
protected ResponseEntity<Object> handleNoHandlerFoundException(NoHandlerFoundException ex, HttpHeaders headers,
                                                               HttpStatus status, WebRequest request) {
    return new ResponseEntity<Object>(new ApiError("No Handler Found", ex.getMessage()), status);
}
Только учтите, для того, чтобы исключение выбрасывалось, надо задать свойства в файле application.properties:
spring.mvc.throw-exception-if-no-handler-found=true
spring.web.resources.add-mappings=false
Проверим ответ сервера (код ответа 404):
{
    "message": "No Handler Found",
    "debugMessage": "No handler found for GET /pers"
}
Если же не выбрасывать NoHandlerFoundException и не пользоваться нашим обработчиком, то ответ от BasicErrorController довольно непонятный, хотя код тоже 404:
{
    "timestamp": "2021-03-01T17:35:59.204+00:00",
    "status": 404,
    "error": "Not Found",
    "message": "No message available",
    "path": "/pers"
}
Обработчик по умолчанию
Этот обработчик будет ловить исключения, не пойманные предыдущими обработчиками:
@ExceptionHandler(Exception.class)
    protected ResponseEntity<Object> handleAllExceptions(Exception ex, WebRequest request) {
        ApiError apiError = new ApiError(HttpStatus.INTERNAL_SERVER_ERROR, "prosto exception", ex);
        return new ResponseEntity<>(apiError, HttpStatus.INTERNAL_SERVER_ERROR);
    }
Заключение
Мы рассмотрели:
- как сделать обработку исключений в едином классе, аннотированном @ControllerAdvice;
- как переопределить формат JSON-ответа, выдаваемого при возникновении исключения;
- как воспользоваться классом-заготовкой ResponseEntityExceptionHandler и переопределить его обработчики так, чтобы тело ответов не было пустым;
Обратите внимание, что все не переопределенные методы ResponseEntityExceptionHandler будут выдавать пустое тело ответа.
Код примера доступен на GitHub.
Во время работы вашего приложения часто будут возникать исключительные ситуации. Когда у вас простое консольное приложение, то все просто – ошибка выводится в консоль. Но как быть с веб-приложением?
Допустим у пользователя отсутсвует доступ, или он передал некорректные данные. Лучшим вариантом будет в ответ на такие ситуации, отправлять пользователю сообщения с описанием ошибки. Это позволит клиенту вашего API скорректировать свой запрос.
В данной статье разберём основные возможности, которые предоставляет SpringBoot для решения этой задачи и на простых примерах посмотрим как всё работает.
@ExceptionHandler
@ExceptionHandler позволяет обрабатывать исключения на уровне отдельного контроллера. Для этого достаточно объявить метод в контроллере, в котором будет содержаться вся логика обработки нужного исключения, и пометить его аннотацией.
Для примера у нас будет сущность Person, бизнес сервис к ней и контроллер. Контроллер имеет один эндпойнт, который возвращает пользователя по логину. Рассмотрим классы нашего приложения:
Сущность Person:
package dev.struchkov.general.sort;

import java.text.MessageFormat;

public class Person {

    private String lastName;
    private String firstName;
    private Integer age;

    //getters and setters

}
Контроллер PersonController:
package dev.struchkov.example.controlleradvice.controller;

import dev.struchkov.example.controlleradvice.domain.Person;
import dev.struchkov.example.controlleradvice.service.PersonService;
import lombok.RequiredArgsConstructor;
import lombok.extern.slf4j.Slf4j;
import org.springframework.http.ResponseEntity;
import org.springframework.web.bind.annotation.GetMapping;
import org.springframework.web.bind.annotation.PathVariable;
import org.springframework.web.bind.annotation.RequestMapping;
import org.springframework.web.bind.annotation.RequestParam;
import org.springframework.web.bind.annotation.RestController;

import java.util.UUID;

@Slf4j
@RestController
@RequestMapping("api/person")
@RequiredArgsConstructor
public class PersonController {

    private final PersonService personService;

    @GetMapping
    public ResponseEntity<Person> getByLogin(@RequestParam("login") String login) {
        return ResponseEntity.ok(personService.getByLoginOrThrown(login));
    }

    @GetMapping("{id}")
    public ResponseEntity<Person> getById(@PathVariable("id") UUID id) {
        return ResponseEntity.ok(personService.getById(id).orElseThrow());
    }

}
И наконец PersonService, который будет возвращать исключение NotFoundException, если пользователя не будет в мапе persons.
package dev.struchkov.example.controlleradvice.service;

import dev.struchkov.example.controlleradvice.domain.Person;
import dev.struchkov.example.controlleradvice.exception.NotFoundException;
import lombok.NonNull;
import org.springframework.stereotype.Service;

import java.util.HashMap;
import java.util.Map;
import java.util.Optional;
import java.util.UUID;

@Service
public class PersonService {

    private final Map<UUID, Person> people = new HashMap<>();

    public PersonService() {
        final UUID komarId = UUID.randomUUID();
        people.put(komarId, new Person(komarId, "komar", "Алексей", "ertyuiop"));
    }

    public Person getByLoginOrThrown(@NonNull String login) {
        return people.values().stream()
                .filter(person -> person.getLogin().equals(login))
                .findFirst()
                .orElseThrow(() -> new NotFoundException("Пользователь не найден"));
    }

    public Optional<Person> getById(@NonNull UUID id) {
        return Optional.ofNullable(people.get(id));
    }

}
Перед тем, как проверить работу исключения, давайте посмотрим на успешную работу эндпойнта.

Все отлично. Нам в ответ пришел код 200, а в теле ответа пришел JSON нашей сущности. А теперь мы отправим запрос с логином пользователя, которого у нас нет. Посмотрим, что сделает Spring по умолчанию.

Обратите внимание, ошибка 500 – это стандартный ответ Spring на возникновение любого неизвестного исключения. Также исключение было выведено в консоль.

Как я уже говорил, отличным решением будет сообщить пользователю, что он делает не так. Для этого добавляем метод с аннотацией @ExceptionHandler, который будет перехватывать исключение и отправлять понятный ответ пользователю.
@RequestMapping("api/person")
@RequiredArgsConstructor
public class PersonController {

    private final PersonService personService;

    @GetMapping
    public ResponseEntity<Person> getByLogin(@RequestParam("login") String login) {
        return ResponseEntity.ok(personService.getByLoginOrThrown(login));
    }

    @ExceptionHandler(NotFoundException.class)
    public ResponseEntity<ErrorMessage> handleException(NotFoundException exception) {
        return ResponseEntity
                .status(HttpStatus.NOT_FOUND)
                .body(new ErrorMessage(exception.getMessage()));
    }

}
Вызываем повторно наш метод и видим, что мы стали получать понятное описание ошибки.

Но теперь вернулся 200 http код, куда корректнее вернуть 404 код.
Однако некоторые разработчики предпочитают возвращать объект, вместо ResponseEntity<T>. Тогда вам необходимо воспользоваться аннотацией @ResponseStatus.
    import org.springframework.web.bind.annotation.ResponseStatus;

    @ResponseStatus(HttpStatus.NOT_FOUND)
    @ExceptionHandler(NotFoundException.class)
    public ErrorMessage handleException(NotFoundException exception) {
        return new ErrorMessage(exception.getMessage());
    }
Если попробовать совместить ResponseEntity<T> и @ResponseStatus, http-код будет взят из ResponseEntity<T>.
Главный недостаток @ExceptionHandler в том, что он определяется для каждого контроллера отдельно. Обычно намного проще обрабатывать все исключения в одном месте.
Хотя это ограничение можно обойти если @ExceptionHandler будет определен в базовом классе, от которого будут наследоваться все контроллеры в приложении, но такой подход не всегда возможен, особенно если перед нами старое приложение с большим количеством легаси.
HandlerExceptionResolver
Как мы знаем в программировании магии нет, какой механизм задействуется, чтобы перехватывать исключения?
Интерфейс HandlerExceptionResolver является общим для обработчиков исключений в Spring. Все исключений выброшенные в приложении будут обработаны одним из подклассов HandlerExceptionResolver. Можно сделать как свою собственную реализацию данного интерфейса, так и использовать существующие реализации, которые предоставляет нам Spring из коробки.
Давайте разберем стандартные для начала:
ExceptionHandlerExceptionResolver — этот резолвер является частью механизма обработки исключений помеченных аннотацией @ExceptionHandler, которую мы рассмотрели выше.
DefaultHandlerExceptionResolver — используется для обработки стандартных исключений Spring и устанавливает соответствующий код ответа, в зависимости от типа исключения:
| Exception | HTTP Status Code |
|---|---|
| BindException | 400 (Bad Request) |
| ConversionNotSupportedException | 500 (Internal Server Error) |
| HttpMediaTypeNotAcceptableException | 406 (Not Acceptable) |
| HttpMediaTypeNotSupportedException | 415 (Unsupported Media Type) |
| HttpMessageNotReadableException | 400 (Bad Request) |
| HttpMessageNotWritableException | 500 (Internal Server Error) |
| HttpRequestMethodNotSupportedException | 405 (Method Not Allowed) |
| MethodArgumentNotValidException | 400 (Bad Request) |
| MissingServletRequestParameterException | 400 (Bad Request) |
| MissingServletRequestPartException | 400 (Bad Request) |
| NoSuchRequestHandlingMethodException | 404 (Not Found) |
| TypeMismatchException | 400 (Bad Request) |
Мы можем создать собственный HandlerExceptionResolver. Назовем его CustomExceptionResolver и вот как он будет выглядеть:
package dev.struchkov.example.controlleradvice.service;

import dev.struchkov.example.controlleradvice.exception.NotFoundException;
import org.springframework.http.HttpStatus;
import org.springframework.stereotype.Component;
import org.springframework.web.servlet.ModelAndView;
import org.springframework.web.servlet.handler.AbstractHandlerExceptionResolver;
import org.springframework.web.servlet.view.json.MappingJackson2JsonView;

import javax.servlet.http.HttpServletRequest;
import javax.servlet.http.HttpServletResponse;

@Component
public class CustomExceptionResolver extends AbstractHandlerExceptionResolver {

    @Override
    protected ModelAndView doResolveException(HttpServletRequest request, HttpServletResponse response, Object handler, Exception e) {
        final ModelAndView modelAndView = new ModelAndView(new MappingJackson2JsonView());
        if (e instanceof NotFoundException) {
            modelAndView.setStatus(HttpStatus.NOT_FOUND);
            modelAndView.addObject("message", "Пользователь не найден");
            return modelAndView;
        }
        modelAndView.setStatus(HttpStatus.INTERNAL_SERVER_ERROR);
        modelAndView.addObject("message", "При выполнении запроса произошла ошибка");
        return modelAndView;
    }

}
Мы создаем объект представления – ModelAndView, который будет отправлен пользователю, и заполняем его. Для этого проверяем тип исключения, после чего добавляем в представление сообщение о конкретной ошибке и возвращаем представление из метода. Если ошибка имеет какой-то другой тип, который мы не предусмотрели в этом обработчике, то мы отправляем сообщение об ошибке при выполнении запроса.
Так как мы пометили этот класс аннотацией @Component, Spring сам найдет и внедрит наш резолвер куда нужно. Посмотрим, как Spring хранит эти резолверы в классе DispatcherServlet.

Все резолверы хранятся в обычном ArrayList и в случае исключнеия вызываются по порядку, при этом наш резолвер оказался последним. Таким образом, если непосредственно в контроллере окажется @ExceptionHandler обработчик, то наш кастомный резолвер не будет вызван, так как обработка будет выполнена в ExceptionHandlerExceptionResolver.
Важное замечание. У меня не получилось перехватить здесь ни одно Spring исключение, например MethodArgumentTypeMismatchException, которое возникает если передавать неверный тип для аргументов @RequestParam.
Этот способ был показан больше для образовательных целей, чтобы показать в общих чертах, как работает этот механизм. Не стоит использовать этот способ, так как есть вариант намного удобнее.
@RestControllerAdvice
Исключения возникают в разных сервисах приложения, но удобнее всего обрабатывать все исключения в каком-то одном месте. Именно для этого в SpringBoot предназначены аннотации @ControllerAdvice и @RestControllerAdvice. В статье мы рассмотрим @RestControllerAdvice, так как у нас REST API.
На самом деле все довольно просто. Мы берем методы помеченные аннотацией @ExceptionHandler, которые у нас были в контроллерах и переносим в отдельный класс аннотированный @RestControllerAdvice.
package dev.struchkov.example.controlleradvice.controller;

import dev.struchkov.example.controlleradvice.domain.ErrorMessage;
import dev.struchkov.example.controlleradvice.exception.NotFoundException;
import org.springframework.http.HttpStatus;
import org.springframework.http.ResponseEntity;
import org.springframework.web.bind.annotation.ExceptionHandler;
import org.springframework.web.bind.annotation.RestControllerAdvice;
import org.springframework.web.method.annotation.MethodArgumentTypeMismatchException;

@RestControllerAdvice
public class ExceptionApiHandler {

    @ExceptionHandler(NotFoundException.class)
    public ResponseEntity<ErrorMessage> notFoundException(NotFoundException exception) {
        return ResponseEntity
                .status(HttpStatus.NOT_FOUND)
                .body(new ErrorMessage(exception.getMessage()));
    }

    @ExceptionHandler(MethodArgumentTypeMismatchException.class)
    public ResponseEntity<ErrorMessage> mismatchException(MethodArgumentTypeMismatchException exception) {
        return ResponseEntity
                .status(HttpStatus.NOT_FOUND)
                .body(new ErrorMessage(exception.getMessage()));
    }

}
За обработку этих методов класса точно также отвечает класс ExceptionHandlerExceptionResolver. При этом мы можем здесь перехватывать даже стандартные исключения Spring, такие как MethodArgumentTypeMismatchException.
На мой взгляд, это самый удобный и простой способ обработки возвращаемых пользователю исключений.
Еще про обработку
Все написанное дальше относится к любому способу обработки исключений.
Запись в лог
Важно отметить, что исключения больше не записываются в лог. Если помимо ответа пользователю, вам все же необходимо записать это событие в лог, то необходимо добавить строчку записи в методе обработчике, например вот так:
@ExceptionHandler(NotFoundException.class)
public ResponseEntity<ErrorMessage> handleException(NotFoundException exception) {
    log.error(exception.getMessage(), exception);
    return ResponseEntity
            .status(HttpStatus.NOT_FOUND)
            .body(new ErrorMessage(exception.getMessage()));
}
Перекрытие исключений
Вы можете использовать иерархию исключений с наследованием и обработчики исключений для всей своей иерархии. В таком случае обработка исключения будет попадать в самый специализированный обработчик.
Допустим мы бросаем NotFoundException, как в примере выше, который наследуется от RuntimeException. И у вас будет два обработчика исключений для NotFoundException и RuntimeException. Исключение попадет в обработчик для NotFoundException. Если этот обработчик убрать, то попадет в обработчик для RuntimeException.
Резюмирую
Обработка исключений это важная часть REST API. Она позволяет возвращать клиентам информационные сообщения, которые помогут им скорректировать свой запрос.
Мы можем по разному реализовать обработку в зависимости от нашей архитектуры. Предпочитаемым способом считаю вариант с @RestControllerAdvice. Этот вариант самый чистый и понятный.
Java
Рекомендация: подборка платных и бесплатных курсов таргетированной рекламе — https://katalog-kursov.ru/
Каждый раз, когда я начинаю реализацию нового REST API с помощью Spring, мне сложно решить, как выполнять валидацию запросов и обрабатывать бизнес-исключения. В отличие от других типичных проблем API, Spring и его сообщество, похоже, не согласны с лучшими методами решения этих проблем, и трудно найти полезные статьи по этому поводу.
В этой статье я обобщаю свой опыт и даю несколько советов по валидации интерфейсов.
Архитектура и терминология
Я создаю свои приложения, которые предоставляют веб-API, следуя шаблону луковой архитектуры (Onion Architecture). Эта статья не об архитектуре Onion, но я хотел бы упомянуть некоторые из ее ключевых моментов, которые важны для понимания моих мыслей:
-
Контроллеры REST и любые веб-компоненты и конфигурации являются частью внешнего «инфраструктурного» уровня .
-
Средний «сервисный» уровень содержит сервисы, которые объединяют бизнес-функции и решают общие проблемы, такие как безопасность или транзакции.
-
Внутренний уровень «домена» содержит бизнес-логику без каких-либо задач, связанных с инфраструктурой, таких как доступ к базе данных, конечные точки web и т.д.
Архитектура допускает зависимости от внешних уровней к внутренним, но не наоборот. Для конечной точки REST поток запроса может выглядеть следующим образом:
-
Запрос отправляется контроллеру на уровне «инфраструктуры».
-
Контроллер десериализует запрос и — в случае успеха — запрашивает результат у соответствующего сервиса на уровне сервисы.
-
Служба проверяет, есть ли у текущего пользователя разрешение на вызов функции, и инициализирует транзакцию базы данных (при необходимости).
-
Затем он извлекает данные из репозиториев домена , манипулирует ими и, возможно, сохраняет их обратно в репозиторий.
-
Сервис также может вызывать несколько репозиториев, преобразовывать и агрегировать результаты.
-
Репозиторий на уровне домена возвращает бизнес-объекты. Этот уровень отвечает за поддержание всех объектов в допустимом состоянии.
-
В зависимости от ответа сервиса, который является допустимым результатом или исключением, уровень инфраструктуры сериализует ответ.
В этой архитектуре у нас есть три интерфейса, для каждого из которых требуется разная валидация:
-
Контроллер определяет первый интерфейс. Чтобы десериализовать запрос, нужно выполнить его валидацию по нашей схеме API . Это делается неявно с помощью фреймворка маппирования, такого как Jackson, и явно с помощью ограничений, таких как @NotNull. Мы называем это валидацией запроса .
-
Сервис может проверять права текущего пользователя и обеспечивать выполнение предварительных условий, которые сделают возможным вызов уровня домена. Назовем это валидацией сервиса.
-
В то время как предыдущие валидации обеспечивают выполнение некоторых основных предварительных условий, только уровень домена отвечает за поддержание допустимого состояния. Валидация уровня домена является наиболее важной.
Валидация запроса
Обычно мы десериализуем входящий запрос, для которого уже выполнена неявная валидация параметров запроса и тела запроса. Spring Boot автоматически настраивает Jackson десериализацию и общую обработку исключений. Например, взгляните на пример контроллера моей демонстрации BGG:
@GetMapping("/newest")
Flux<ThreadsPerBoardGame> getThreads(@RequestParam String user, @RequestParam(defaultValue = "PT1H") Duration since) {
    return threadService.findNewestThreads(user, since);
}
Оба вызова с отсутствующим параметром и неправильным типом возвращают сообщения об ошибках с правильным кодом состояния :
curl -i localhost:8080/threads/newest
HTTP/1.1 400 Bad Request
Content-Type: application/json
Content-Length: 189

{"timestamp":"2020-04-15T03:40:00.460+0000","path":"/threads/newest","status":400,"error":"Bad Request","message":"Required String parameter 'user' is not present","requestId":"98427b15-7"}

curl -i "localhost:8080/threads/newest?user=chrigu&since=a"
HTTP/1.1 400 Bad Request
Content-Type: application/json
Content-Length: 156

{"timestamp":"2020-04-15T03:40:06.952+0000","path":"/threads/newest","status":400,"error":"Bad Request","message":"Type mismatch.","requestId":"7600c788-8"}
С конфигурацией по умолчанию Spring Boot мы также получим трассировки стека . Я выключил их, установив
server:
  error:
    include-stacktrace: never
в application.yml . Эта обработка ошибок по умолчанию обеспечивается BasicErrorController в классическом Web MVC и по DefaultErrorWebExceptionHandler в WebFlux, и извлечение тела ответа от ErrorAttributes.
Связывание данных
В приведенных выше примерах демонстрируются атрибуты @RequestParam или любой простой атрибут метода контроллера без аннотации. Проверка запроса становится иной при проверке @ModelAttribute , @RequestBody или непростых параметров, как в
@GetMapping("/newest/obj")
Flux<ThreadsPerBoardGame> getThreads(@Valid ThreadRequest params) {
    return threadService.findNewestThreads(params.user, params.since);
}

static class ThreadRequest {
    @NotNull
    private final String user;
    @NotNull
    private final Duration since;

    public ThreadRequest(String user, Duration since) {
        this.user = user;
        this.since = since == null ? Duration.ofHours(1) : since;
    }
}
Если аннотации @RequestParam могут использоваться, чтобы сделать параметр обязательным или со значением по умолчанию , в командных объектах это делается с помощью ограничений проверки bean-компонентов, таких как @NotNull и простой Java / Kotlin. Чтобы активировать проверку bean-компонента, аргумент метода должен быть аннотирован @Valid.
Когда проверка bean-компонента завершается неудачно, в реактивном стеке выдается исключение BindException или WebExchangeBindException . Оба исключения реализуют BindingResult, который предоставляет вложенные ошибки для каждого недопустимого значения поля. Вышеуказанный метод контроллера приведет к сообщениям об ошибках, например
curl "localhost:8080/java/threads/newest/obj" -i
HTTP/1.1 400 Bad Request
Content-Type: application/json
Content-Length: 1138

{"timestamp":"2020-04-17T13:52:39.500+0000","path":"/java/threads/newest/obj","status":400,"error":"Bad Request","message":"Validation failed for argument at index 0 in method: reactor.core.publisher.Flux<ch.chrigu.bgg.service.ThreadsPerBoardGame> ch.chrigu.bgg.infrastructure.web.JavaThreadController.getThreads(ch.chrigu.bgg.infrastructure.web.JavaThreadController$ThreadRequest), with 1 error(s): [Field error in object 'threadRequest' on field 'user': rejected value [null]; codes [NotNull.threadRequest.user,NotNull.user,NotNull.java.lang.String,NotNull]; arguments [org.springframework.context.support.DefaultMessageSourceResolvable: codes [threadRequest.user,user]; arguments []; default message [user]]; default message [darf nicht null sein]] ","requestId":"c87c7cbb-17","errors":[{"codes":["NotNull.threadRequest.user","NotNull.user","NotNull.java.lang.String","NotNull"],"arguments":[{"codes":["threadRequest.user","user"],"arguments":null,"defaultMessage":"user","code":"user"}],"defaultMessage":"darf nicht null sein","objectName":"threadRequest","field":"user","rejectedValue":null,"bindingFailure":false,"code":"NotNull"}]}
Настройка обработки исключений
Приведенное выше ответное сообщение не является удобным для клиента, поскольку оно содержит имена классов и другие внутренние подсказки, которые не могут быть понятны клиентом API. Еще худший пример обработки исключений по умолчанию Spring Boot:
curl "localhost:8080/java/threads/newest/obj?user=chrigu&since=a" -i
HTTP/1.1 500 Internal Server Error
Content-Type: application/json
Content-Length: 513

{"timestamp":"2020-04-17T13:56:42.922+0000","path":"/java/threads/newest/obj","status":500,"error":"Internal Server Error","message":"Failed to convert value of type 'java.lang.String' to required type 'java.time.Duration'; nested exception is org.springframework.core.convert.ConversionFailedException: Failed to convert from type [java.lang.String] to type [java.time.Duration] for value 'a'; nested exception is java.lang.IllegalArgumentException: Parse attempt failed for value [a]","requestId":"4c0dc6bd-21"}
Он также возвращает неправильный код ошибки, подразумевающий ошибку сервера, даже если клиент указал неправильный тип для параметра since. Оба примера были сгенерированы с помощью реактивного стека, MVC имеет лучшие значения по умолчанию. Для обоих случаев нам нужно настроить обработку исключений. Это можно сделать, предоставив собственный bean-компонент ErrorAttributes , который записывает желаемое тело ответа. Код состояния ответа предоставляется значением status.
Или мы можем пойти на меньшее вмешательство и использовать реализацию DefaultErrorAttributes, либо добавив в исключения аннотацию @ResponseStatus, либо позволив всем исключениям расширять ResponseStatusException . Оба способа позволяют настроить статус ответа и значение сообщения. К сожалению, большинство исключений, создаваемых на уровне инфраструктуры, предоставляются фреймворком и не могут быть настроены, поэтому нам нужно другое решение. Одна из возможностей для аннотированных контроллеров — использовать @ExceptionHandler для отдельных исключений. Тогда мы могли бы создать ответ с нуля, но это пропустило бы обработку исключений по умолчанию, и мы хотели бы иметь одинаковую обработку для каждого исключения. Таким образом, чтобы улучшить ответ выше, просто повторно вызовите исключения (rethrow):
@ControllerAdvice
class GlobalExceptionHandler {

    @ExceptionHandler(TypeMismatchException::class)
    fun handleTypeMismatchException(e: TypeMismatchException): HttpStatus {
        throw ResponseStatusException(HttpStatus.BAD_REQUEST, "Invalid value '${e.value}'", e)
    }

    @ExceptionHandler(WebExchangeBindException::class)
    fun handleWebExchangeBindException(e: WebExchangeBindException): HttpStatus {
        throw object : WebExchangeBindException(e.methodParameter!!, e.bindingResult) {
            override val message = "${fieldError?.field} has invalid value '${fieldError?.rejectedValue}'"
        }
    }
}
Резюме
Я много писал о конфигурациях Spring Boot по умолчанию, которые, на мой взгляд, всегда являются хорошим началом для Spring. С другой стороны, обработка исключений по умолчанию довольно сложна, и вы можете начать вмешиваться на многих уровнях, сверху вниз:
-
Непосредственно в контроллере с помощью try/catch (MVC) или onErrorResume() (Webflux). Я не рекомендую это в большинстве случаев, потому что сквозная проблема, такая как обработка исключений, должна быть определена глобально, чтобы гарантировать согласованное поведение.
-
Перехватить исключения в функциях @ExceptionHandler . Создайте свои собственные ответы с помощью @ExceptionHandler (Throwable.class) для случая по умолчанию.
-
Или повторно генерируйте исключения , аннотируйте их с помощью @ResponseStatus или расширяйте ResponseStatusException, чтобы настроить ответ для определенных случаев.
Мне нравится запускать приложения Spring Boot с конфигурацией по умолчанию и заменять части там, где это необходимо. В этом случае я рекомендовал начать с третьего варианта, а если требуется дополнительная настройка, переключиться на второй.
В этом блоге я лишь поверхностно коснулся всего того, чему я научился за эти годы. Существует гораздо больше тем, касающихся валидации и обработки исключений, таких как внутренняя обработка сообщений об ошибках, пользовательские аннотации ограничений, различия между Java и Kotlin, автоматическое документирование ограничений и, конечно же, проверка данных на внутренних уровнях. Я продолжу эту тему в будущих статьях начиная с внутренних слоев и свяжу их.
TL/DR: Let’s take a look at everything required to build custom error handling logic in both Spring Boot Web and Spring Boot Security
REST applications developed in Spring Boot automatically take advantage of its default error handling logic. Specifically, whenever an error occurs, a default response containing some information is returned. The problem is that this information may be poor or insufficient for the API callers to deal with the error properly. This is why implementing custom error handling logic is such a common and desirable task. Achieving it requires more effort than you might think, and you need to delve into a few essential Spring Boot notions. Let’s see everything required to get started with custom error handling in Spring Boot and Java.
Prerequisites
This is the list of all the prerequisites for following the article:
- Java >= 1.8 (Java >= 13 recommended)
- Spring Boot >= 2.5
- Spring Boot Starter Web >= 2.5
- Spring Security >= 5.5
- Project Lombok >= 1.18
- Gradle >= 4.x or Maven 3.6.x
Default Error Handling in Spring Boot
By default, Spring Boot offers a fallback error-handling page, as well as an error-handling response in case of REST requests. Particularly, Spring Boot looks for a mapping for the /error endpoint during the start-up. This mapping depends on what is set on a ViewResolver class. When no valid mappings can be found, Spring Boot automatically configures a default fallback error page. This so-called Whitelabel Error Page is nothing more than a white HTML page containing the HTTP status code and a vague error message. This is what such a page looks like:
<html>
   <head></head>
   <body data-new-gr-c-s-check-loaded="14.1026.0" data-gr-ext-installed="">
      <h1>Whitelabel Error Page</h1>
      <p>This application has no explicit mapping for /error, so you are seeing this as a fallback.</p>
      <div id="created">Sun Aug 15 14:32:17 UTC 2021</div>
      <div>There was an unexpected error (type=Internal Server Error, status=500).</div>
      <div></div>
   </body>
</html>
This is what the Whitelabel HTML page looks like in your browser:
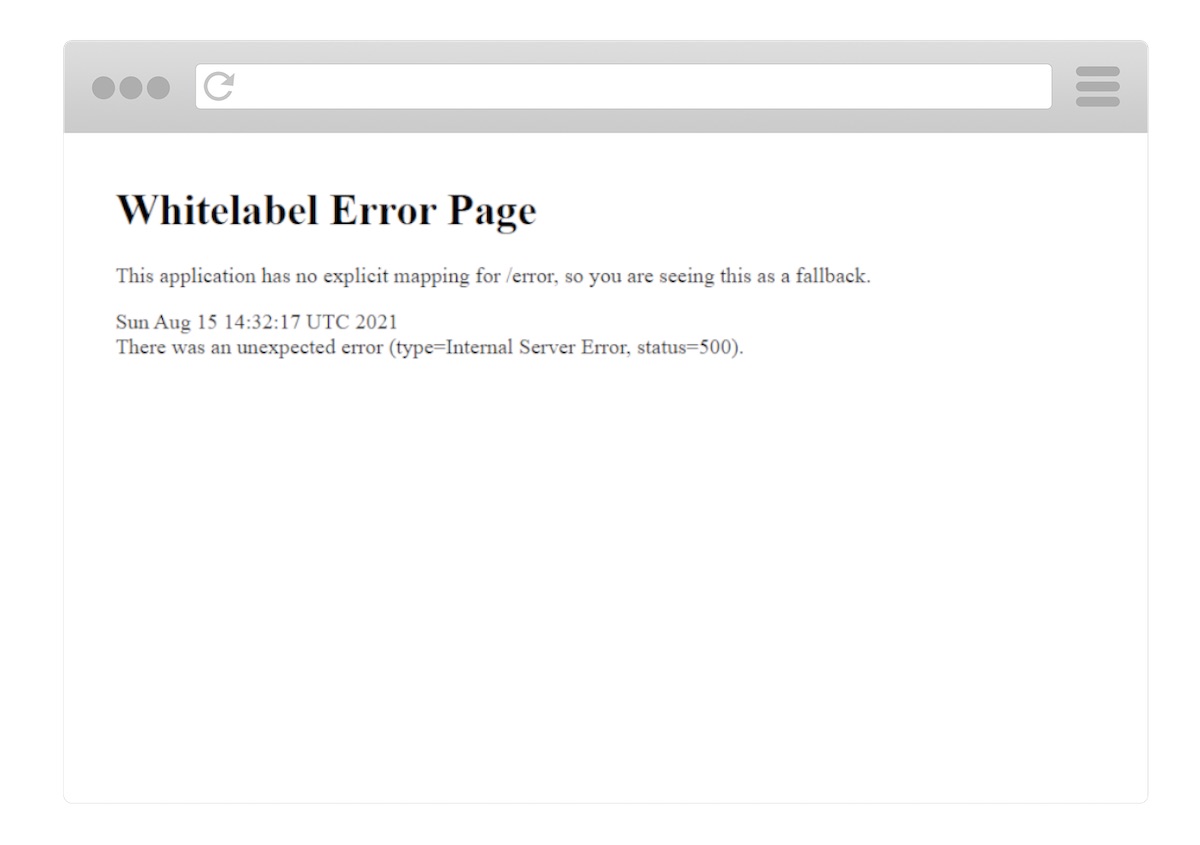
The Spring Boot Whitelabel HTML Error Page
Similarly, when dealing with REST requests, Spring Boot automatically returns a default JSON response in case of errors. This contains the same information as the aforementioned Whitelabel HTML error page and looks as follows:
{
  "timestamp": "2021-15-08T14:32:17.947+0000",
  "status": 500,
  "error": "Internal Server Error",
  "path": "/test"
}
As you can see, the default Spring Boot error handling responses for REST does not provide much information. This can quickly become a problem, especially when trying to debug. It is also problematic for front-end developers, who need detailed information coming from API error response messages to be able to explain to the end users what happened properly.
Let’s see how to replace this default response with custom-defined messages. While this may appear like an easy task, this is actually a tricky one. To achieve it, you first need to know a few Spring Boot fundamentals. Let’s learn more about them.
Custom Error Handling in Spring Boot
You are about to see two different approaches to custom error handling in Spring Boot REST applications. Both are based on a @ControllerAdvice annotated class handling all exceptions that may occur. So, let’s first see what a @ControllerAdvice annotated class is, why to use it, how, and when. Then, you will learn how to implement the two different approaches in detail. Finally, the pros and cons of each method will be explained.
Handling Exceptions with @ControllerAdvice
The @ControllerAdvice annotation was introduced in Spring 3.2 to make exception handling logic easier and entirely definable in one place. In fact, @ControllerAdvice allows you to address exception handling across the whole application. In other words, a single @ControllerAdvice annotated class can handle exceptions thrown from any place in your application. Thus, classes annotated with @ControllerAdvice are powerful and flexible tools. Not only do they allow you to centralize exception-handling logic into a global component, but also give you control over the body response, as well as the HTTP status code. This is especially important when trying to achieve custom error handling. Let’s see @ControllerAdvice in action.
Now, you are about to see everything required to implement two custom error handling approaches based on @ControllerAdvice. First, you should clone the GitHub repository supporting this article. By analyzing the codebase, going through this article will become easier. Also, you will be able to immediately see the two approaches in action.
So, clone the repository with the following command:
git clone https://github.com/Tonel/spring-boot-custom-error-handlingThen, run the DemoApplication main class by following this guide from the Spring Boot official documentation, and reach one of the following 4 endpoints to see the custom error handling responses:
http://localhost:8080/test-custom-data-not-found-exceptionhttp://localhost:8080/test-custom-parameter-constraint-exception?value=12http://localhost:8080/test-custom-error-exceptionhttp://localhost:8080/test-generic-exception
The first two APIs apply the first approach to error handling you are about to see, while the third API uses the second approach. The fourth and last API shows the fallback error handling logic presented above in action. Now, let’s delve into implementing these two approaches to custom error handling in Spring Boot.
Both of them rely on an ErrorMessage class representing the custom error body placed in an error package, containing everything needed to deal with custom error handling logic. This can be implemented as follows:
// src/main/java/com/customerrorhandling/demo/errors/ErrorResponse.java

package com.customerrorhandling.demo.errors;

import com.fasterxml.jackson.annotation.JsonFormat;
import lombok.Getter;
import lombok.Setter;
import org.springframework.http.HttpStatus;
import java.util.Date;

@Getter
@Setter
public class ErrorResponse {
    // customizing timestamp serialization format
    @JsonFormat(shape = JsonFormat.Shape.STRING, pattern = "dd-MM-yyyy hh:mm:ss")
    private Date timestamp;

    private int code;

    private String status;

    private String message;

    private String stackTrace;

    private Object data;

    public ErrorResponse() {
        timestamp = new Date();
    }

    public ErrorResponse(
            HttpStatus httpStatus,
            String message
    ) {
        this();

        this.code = httpStatus.value();
        this.status = httpStatus.name();
        this.message = message;
    }

    public ErrorResponse(
            HttpStatus httpStatus,
            String message,
            String stackTrace
    ) {
        this(
                httpStatus,
                message
        );

        this.stackTrace = stackTrace;
    }

    public ErrorResponse(
            HttpStatus httpStatus,
            String message,
        String stackTrace,
            Object data
    ) {
        this(
                httpStatus,
                message,
        stackTrace
        );

        this.data = data;
    }
}
The @Getter and @Setter annotations used in the code examples above are part of the Project Lombok. They are used to automatically generate getters and setters. This is not mandatory and is just an additional way to avoid boilerplate code. Read this article to find out more about Lombok.
ErrorResponse carries information such as an HTTP status code and name, a timestamp indicating when the error occurred, an optional error message, an optional exception stacktrace, and an optional object containing any kind of data. You should try to provide values to the first three fields, while the latter should be used only when required. In particular, the stackTrace field should be valorized only in staging or development environments, as explained here. Similarly, the data field should be used only when additional data is required. Specifically, to explain in detail what happened or let the front-end better handle the error.
This class can be used to achieve a custom response when handling exceptions with @ControllerAdvice as below:
// src/main/java/com/customerrorhandling/demo/errors/CustomControllerAdvice.java

package com.customerrorhandling.demo.errors;

import exceptions.CustomDataNotFoundException;
import exceptions.CustomErrorException;
import exceptions.CustomParameterConstraintException;
import org.springframework.http.HttpStatus;
import org.springframework.http.ResponseEntity;
import org.springframework.web.bind.annotation.ControllerAdvice;
import org.springframework.web.bind.annotation.ExceptionHandler;
import java.io.PrintWriter;
import java.io.StringWriter;

@ControllerAdvice
class CustomControllerAdvice {
    @ExceptionHandler(NullPointerException.class) // exception handled
    public ResponseEntity<ErrorResponse> handleNullPointerExceptions(
        Exception e
    ) {
        // ... potential custom logic

        HttpStatus status = HttpStatus.NOT_FOUND; // 404

        return new ResponseEntity<>(
            new ErrorResponse(
              status,
              e.getMessage()
            ),
            status
        );
    }

    // fallback method
    @ExceptionHandler(Exception.class) // exception handled
    public ResponseEntity<ErrorResponse> handleExceptions(
        Exception e
    ) {
        // ... potential custom logic

        HttpStatus status = HttpStatus.INTERNAL_SERVER_ERROR; // 500

    // converting the stack trace to String
    StringWriter stringWriter = new StringWriter();
    PrintWriter printWriter = new PrintWriter(stringWriter);
    e.printStackTrace(printWriter);
    String stackTrace = stringWriter.toString();

        return new ResponseEntity<>(
            new ErrorResponse(
              status,
              e.getMessage(),
              stackTrace // specifying the stack trace in case of 500s
            ),
            status
        );
    }
}
As you can see, @ControllerAdvice works by employing the @ExceptionHandler method-level annotation. This annotation allows you to define which method should be called in case of an error. Specifically, the exception thrown is compared to the exceptions passed as parameters to @ExceptionHandler based on type. The first method where there is a match is called. If none matched, then the exception’s parent class is tested, and so on. This is also why you should implement a fallback method to cover all remaining cases. You can achieve this by passing the Exception class to the @ExceptionHandler annotation, just like in the handleExceptions method. In fact, any exception in Java must have Exception as one of its ancestors in their inheritance chain. So, they all extend directly — or as subclasses — the Exception superclass.
Then, each method handles the error and might even implement custom logic, such as logging. In this example, each exception is handled by returning a ResponseEntity having the desired HttpStatus. This will be used as an HTTP status code associated with the error response. Similarly, the ErrorResponse instance passed to the ResponseEntity constructor will be automatically serialized in JSON and used as the message body. This way, custom error handling has just been achieved.
Now, you will dive into how to use @ConfrollerAdvice to implement two different approaches to custom error handling for REST in Spring Boot Web. The first one involves boilerplate code, but it is clean and best-practice based. In contrast, the second represents a good solution in terms of convenience, although it is a bit dirty.
Defining Many Custom Exceptions
This approach involves having as many methods in your @ControllerAdvice as many HTTP error status codes you want to handle. These methods will be related to one or more exceptions and return an error message with a particular HTTP status code. Implementing such an approach required three steps. First, you have to think about all the HTTP error status codes you want your application to return. Then, you have to define a method for each of them in your @ControllerAdvice annotated class. Lastly, you have to associate these methods with their exceptions with the @ExceptionHandler annotation.
This means that all exceptions of a particular type will be traced back to their relative method in the @ControllerAdvice annotated class. This may represent a problem, especially considering some exceptions are more common than others, such as NullPointerException. Since these exceptions can be thrown in many parts of your logic, they might have different meanings. Thus, they represent various errors and, therefore, other HTTP status codes.
The solution is to introduce new custom exceptions wrapping these frequent exceptions. For example, a NullPointerException can become a CustomParameterConstraintException exception at the controller layer, and a CustomDataNotFoundException at the DAO (Data Access Object) layer. In this case, the first one can be associated with a 400 Bad Request, and the second with a 404 Not Found HTTP status. The idea behind these exceptions is to give the error that occurred a more specific meaning. This better characterizes the error and makes it more handleable in the @ControllerAdvice annotated class accordingly. So, you should define a custom exception for each particular error you want to handle. Also, using custom exception classes represents undoubtedly a clean code principle. Thus, by adopting it, you are going to have more than one benefit.
So, let’s see this approach in action through an example. Firstly, you have to define custom exceptions, as shown here:
// src/main/java/exceptions/CustomParameterConstraintException.java

package exceptions;

public class CustomParameterConstraintException extends RuntimeException {
    public CustomParameterConstraintException() {
        super();
    }

    public CustomParameterConstraintException(String message) {
        super(message);
    }
}
// src/main/java/exceptions/CustomDataNotFoundException.java
package exceptions;
public class CustomDataNotFoundException extends RuntimeException {
public CustomDataNotFoundException() {
super();
}
public CustomDataNotFoundException(String message) {
super(message);
}
}Then, use them to wrap frequent exceptions, or to throw them in case of particular circumstances representing errors in your business logic. Let’s see how with two examples:
// DAO-level method
public Foo retrieveFooById(
    int id
) {
    try {
        // data retrieving logic
    } catch (NullPointerException e) {
        throw new CustomDataNotFoundException(e.getMessage());
    }
}
As shown above, a generic NullPointerException is turned into a more meaningful CustomDataNotFoundException.
// controller-level method method
public ResponseEntity<Void> performOperation(
    int numberOfAttempts
) {
    if (numberOfAttempts <= 0 || numberOfAttempts >= 5)
        throw new CustomParameterConstraintException("numberOfAttempts must be >= 0 and <= 5!");

    // business logic
}
Here, a particular behavior that should not happen is intercepted. Then, the custom CustomParameterConstraintException exception describing it is thrown.
Finally, all you have to do is add two particular methods to your @ControllerAdvice annotated class, one for each specific error.
// src/main/java/com/customerrorhandling/demo/errors/CustomControllerAdvice.java

package com.customerrorhandling.demo.errors;

import exceptions.CustomDataNotFoundException;
import exceptions.CustomErrorException;
import exceptions.CustomParameterConstraintException;
import org.springframework.http.HttpStatus;
import org.springframework.http.ResponseEntity;
import org.springframework.web.bind.annotation.ControllerAdvice;
import org.springframework.web.bind.annotation.ExceptionHandler;
import java.io.PrintWriter;
import java.io.StringWriter;

@ControllerAdvice
class CustomControllerAdvice {
    // ...

    @ExceptionHandler(CustomDataNotFoundException.class)
    public ResponseEntity<ErrorResponse> handleCustomDataNotFoundExceptions(
        Exception e
    ) {
        HttpStatus status = HttpStatus.NOT_FOUND; // 404

    // converting the stack trace to String
    StringWriter stringWriter = new StringWriter();
    PrintWriter printWriter = new PrintWriter(stringWriter);
    e.printStackTrace(printWriter);
    String stackTrace = stringWriter.toString();

        return new ResponseEntity<>(
            new ErrorResponse(
              status,
              e.getMessage(),
          stackTrace, // assuming to be in staging environment, otherwise stackTrace should not be valorized
            ),
            status
        );
    }

    @ExceptionHandler(CustomParameterConstraintException.class)
    public ResponseEntity<ErrorResponse> handleCustomParameterConstraintExceptions(
        Exception e
    ) {
        HttpStatus status = HttpStatus.BAD_REQUEST; // 400

        return new ResponseEntity<>(
            new ErrorResponse(
              status,
              e.getMessage()
            ),
            status
        );
    }

    // ...
}
Et voilà! Both errors originally related to the same exception were first characterized and then handled accordingly.
Now, let’s see the difference. This is what the default error response would look like on a 404 error:
{
  "timestamp": "2021-15-08T14:32:17.947+0000",
  "status": 404,
  "error": "Not Found",
  "path": "/test404"
}
And this is what the custom error response just implemented looks like:
{
  "timestamp": "2021-15-08 14:32:17",
  "code": 404,
  "status": "NOT_FOUND",
  "message": "Resource not found",
  "stackTrace": "Exception in thread "main" com.example.demo.exceptions.CustomDataNotFoundException
        at com.example.demo.AuthorController.getAuthor(AuthorController.java:16)
        at com.example.demo.AuthorService.getAuthor(AuthorService.java:37)
        at com.example.demo.AuthorDao.getById(AuthorDao.java:24)"
}
Defining a Single Custom Exception Carrying All Data
This approach involves defining a custom exception carrying the HTTP status to use, and all the data required to describe the error that occurred. The idea is to turn every exception you want to handle, or you would like to throw under special circumstances, into an instance of this particular exception. This way, you are spreading the error characterization logic into all your code. So, you will only have to add a new method in your @ControllerAdvice annotated class to handle this custom exception accordingly.
First, you have to define a custom error handling exception. This can be achieved as follows:
// src/main/java/exceptions/CustomErrorException.java

package exceptions;

import lombok.Getter;
import lombok.Setter;
import org.springframework.http.HttpStatus;

@Getter
@Setter
public class CustomErrorException extends RuntimeException {
    private HttpStatus status = null;

    private Object data = null;

    public CustomErrorException() {
      super();
    }

   public CustomErrorException(
      String message
   ) {
      super(message);
   }

    public CustomErrorException(
        HttpStatus status,
        String message
    ) {
        this(message);
        this.status = status;
    }

    public CustomErrorException(
        HttpStatus status,
        String message,
        Object data
    ) {
        this(
          status,
      message
        );
        this.data = data;
    }
}
Again, the @Getter and @Setter annotations were used to avoid boilerplate code and are not mandatory. As you can see, the CustomErrorException class carries the same data used in the ErrorResponse class to better describe what happened and present the errors to the end-users.
So, you can use this exception to wrap other exceptions, or you can throw it in case of particular circumstances constituting errors in your business logic. Now, let’s see how with two examples:
// DAO-level method
public Foo retrieveFooById(
    int id
) {
    try {
        // data retrieving logic
    } catch (NullPointerException e) {
        throw new CustomErrorException(
          HttpStatus.NOT_FOUND,
          e.getMessage(),
          (Integer) id
        );
    }
}
Here, an insufficiently significant NullPointerException is turned into a more detailed CustomErrorException containing all the data to describe why the error occurred.
// controller-level method method
public ResponseEntity<Void> performOperation(
    int numberOfAttempts
) {
    if (numberOfAttempts <= 0 || numberOfAttempts >= 5) {
        throw new CustomErrorException(
          HttpStatus.BAD_REQUEST,
          "numberOfAttempts must be >= 0 and <= 5!",
          (Integer) numberOfAttempts
        );
    }

    // business logic
}
Similarly, a particular behavior that is not supposed to happen is intercepted. Consequently, a CustomErrorException exception containing all the useful data to represent the error is thrown.
Lastly, add one method to handle CustomErrorException exception instances to your @ControllerAdvice annotated class, as below:
// src/main/java/com/customerrorhandling/demo/errors/CustomControllerAdvice.java

package com.customerrorhandling.demo.errors;

import exceptions.CustomDataNotFoundException;
import exceptions.CustomErrorException;
import exceptions.CustomParameterConstraintException;
import org.springframework.http.HttpStatus;
import org.springframework.http.ResponseEntity;
import org.springframework.web.bind.annotation.ControllerAdvice;
import org.springframework.web.bind.annotation.ExceptionHandler;
import java.io.PrintWriter;
import java.io.StringWriter;

@ControllerAdvice
class CustomControllerAdvice {
    // ...

    @ExceptionHandler(CustomErrorException.class)
    public ResponseEntity<ErrorResponse> handleCustomErrorExceptions(
            Exception e
    ) {
        // casting the generic Exception e to CustomErrorException
        CustomErrorException customErrorException = (CustomErrorException) e;

        HttpStatus status = customErrorException.getStatus();

        // converting the stack trace to String
        StringWriter stringWriter = new StringWriter();
        PrintWriter printWriter = new PrintWriter(stringWriter);
        customErrorException.printStackTrace(printWriter);
        String stackTrace = stringWriter.toString();

        return new ResponseEntity<>(
                new ErrorResponse(
                        status,
                        customErrorException.getMessage(),
                        stackTrace,
                        customErrorException.getData()
                ),
                status
        );
    }

    // ...
}
Note that @ExceptionHandler can accept more than one exception type. This means that the parameter of the method representing the exception must be downcasted. Otherwise, a ClassCastException will be throw. So, upcast the exception e to CustomErrorException inside the method. Then, you will be able to access its particular fields and define a valid ErrorResponse instance.
Done! This way each error that occurs is encapsulated into an exception containing everything required to describe it.
Now, let’s see the difference. This is what the default error response on a 404 error would look like:
{
  "timestamp": "2021-15-08T14:32:17.947+0000",
  "status": 404,
  "error": "Not Found",
  "message": "",
  "path": "/test404"
}
And this is what the custom error response just implemented looks like:
{
  "timestamp": "2021-15-08 14:32:17",
  "code": 404,
  "status": "NOT_FOUND",
  "message": "Resource not found",
  "stackTrace": "Exception in thread "main" com.example.demo.exceptions.CustomErrorException
        at com.example.demo.AuthorController.getAuthor(AuthorController.java:16)
        at com.example.demo.AuthorService.getAuthor(AuthorService.java:37)
        at com.example.demo.AuthorDao.getById(AuthorDao.java:24)"
}
Pros and Cons of Each Approach
The first approach should be used when you do not want to spread error handling logic all over your codebase. In fact, the HTTP status code is only associated with errors in your @ControllerAdvice annotated class. This means that no layer knows how the error will be handled and presented to users. Although this should be the desired behavior because it respects the principle of least privilege, it does involve boilerplate code. In fact, you may easily end up with dozens of custom exceptions, and define them is a tedious and not-scalable approach.
So, you may want a less restricting approach, and this is why the second approach was presented. Unfortunately, this one is definitely dirtier. In fact, it requires you to spread detail about error handling logic in many different points of your code. In contrast, it is scalable and quicker to be implemented. So, despite not being the cleanest approach, it allows you to achieve the desired result with little effort. Plus, it is more maintainable than the first approach because it involves only a custom exception.
Custom Error Handling in Spring Security
Spring Security is a powerful and highly customizable framework that provides both authentication and authorization. It is one of the most widely used Spring dependencies and represents the de-facto standard for securing a Spring Boot application.
In case of authentication and authorization failures, AuthenticationException and AccessDeniedException are thrown respectively. Then, Spring Security takes care of encapsulating them in default error handling responses. If you want to customize them, the two approaches presented above are of no use. This is because @ControllerAdvice can handle only exceptions thrown by controllers, but AuthenticationException and AccessDeniedException are thrown by the Spring Security AbstractSecurityInterceptor component — which is not a controller. In other words, a @ControllerAdvice annotated class cannot catch them. Achieving this requires custom logic.
Implementing Custom Error Handling Logic in Spring Security
Let’s take a look at how to implement custom error handling in Spring Security. Luckily, this is not too complex since you can easily provide Spring Security with two components to handle authentication and authorization errors, respectively. What you need to do is to provide the AuthenticationFailureHandler interface with implementation, as follows:
// src/main/java/com/auth0/hotsauces/security/CustomAuthenticationFailureHandler.java

package com.auth0.hotsauces.security;

import com.fasterxml.jackson.annotation.JsonFormat;
import com.fasterxml.jackson.databind.ObjectMapper;
import org.springframework.http.HttpStatus;
import org.springframework.security.core.AuthenticationException;
import org.springframework.security.web.authentication.AuthenticationFailureHandler;
import java.util.*;
import javax.servlet.http.HttpServletRequest;
import javax.servlet.http.HttpServletResponse;
import java.util.HashMap;

public class CustomAuthenticationFailureHandler implements AuthenticationFailureHandler {
    // Jackson JSON serializer instance
    private ObjectMapper objectMapper = new ObjectMapper();

    @Override
    public void onAuthenticationFailure(
      HttpServletRequest request,
      HttpServletResponse response,
      AuthenticationException exception
    ) throws IOException, ServletException {
        HttpStatus httpStatus = HttpStatus.UNAUTHORIZED; // 401

        Map<String, Object> data = new HashMap<>();
        data.put(
          "timestamp",
          new Date()
        );
        data.put(
          "code",
          httpStatus.value();
        );
        data.put(
          "status",
          httpStatus.name();
        );
        data.put(
          "message",
          exception.getMessage()
        );

        // setting the response HTTP status code
        response.setStatus(httpStatus.value());

        // serializing the response body in JSON
        response
          .getOutputStream()
          .println(
              objectMapper.writeValueAsString(data)
          );
    }
}
This will be used to handle AuthenticationExceptions.
Similarly, you can provide the AccessDeniedHandler interface with implementation to handle AccessDeniedExceptions.
// src/main/java/com/auth0/hotsauces/security/CustomAccessDeniedHandler.java

package com.auth0.hotsauces.security;

import com.fasterxml.jackson.annotation.JsonFormat;
import com.fasterxml.jackson.databind.ObjectMapper;
import org.springframework.http.HttpStatus;
import org.springframework.security.core.AuthenticationException;
import org.springframework.security.web.authentication.AuthenticationFailureHandler;
import java.util.*;
import javax.servlet.http.HttpServletRequest;
import javax.servlet.http.HttpServletResponse;
import java.util.HashMap;

public class CustomAccessDeniedHandler implements AccessDeniedHandler {
    // Jackson JSON serializer instance
    private ObjectMapper objectMapper = new ObjectMapper();

    @Override
    public void handle(
      HttpServletRequest request,
      HttpServletResponse response,
      AccessDeniedException exception
    ) throws IOException, ServletException {
        HttpStatus httpStatus = HttpStatus.FORBIDDEN; // 403

        Map<String, Object> data = new HashMap<>();
        data.put(
          "timestamp",
          new Date()
        );
        data.put(
          "code",
          httpStatus.value();
        );
        data.put(
          "status",
          httpStatus.name();
        );
        data.put(
          "message",
          exception.getMessage()
        );

        // setting the response HTTP status code
        response.setStatus(httpStatus.value());

        // serializing the response body in JSON
        response
          .getOutputStream()
          .println(
              objectMapper.writeValueAsString(data)
          );
    }
}
Now, you just need to register these two custom implementations as authentication and authorization error handlers. You can do this as below:
// src/main/java/com/auth0/hotsauces/security/SecurityConfig.java

package com.auth0.hotsauces.security;

import org.springframework.beans.factory.annotation.Value;
import org.springframework.context.annotation.Bean;
import org.springframework.security.config.annotation.web.builders.HttpSecurity;
import org.springframework.security.config.annotation.web.configuration.EnableWebSecurity;
import org.springframework.security.config.annotation.web.configuration.WebSecurityConfigurerAdapter;
import org.springframework.security.oauth2.core.DelegatingOAuth2TokenValidator;
import org.springframework.security.oauth2.core.OAuth2TokenValidator;
import org.springframework.security.oauth2.jwt.*;
import org.springframework.security.oauth2.server.resource.web.BearerTokenAuthenticationFilter;
import org.springframework.security.web.access.AccessDeniedHandler;
import org.springframework.security.web.authentication.AuthenticationFailureHandler;

@EnableWebSecurity
public class SecurityConfig extends WebSecurityConfigurerAdapter {
    // ...

    @Override
    protected void configure(HttpSecurity http)
      throws Exception {
        http
          .authorizeRequests()
          .anyRequest()
          .authenticated()
          .and()
          .formLogin()
          .failureHandler(authenticationFailureHandler())
          .and()
          .exceptionHandling()
          .accessDeniedHandler(accessDeniedHandler());
    }

    @Bean
    public AuthenticationFailureHandler authenticationFailureHandler() {
        return new CustomAuthenticationFailureHandler();
    }

    @Bean
    public AccessDeniedHandler accessDeniedHandler() {
        return new CustomAccessDeniedHandler();
    }
}
Et voilà! Custom error handling in Spring Boot has just been achieved thanks to the failureHandler and accessDeniedHandler methods, which allows you to register a custom authentication error handler and a custom authorization error handler.
Spring Security Custom Error Handling in Action
Now, let’s see how to implement it in a real-world example. First, read this article on how to protect APIs with Spring Security and Auth0. In the demo application produced in that article, no custom error handling is implemented. So, by making a request to a protected API including a wrong access token, the default Spring Boot error handling logic is applied. Let’s test it out.
If you are a macOS or Linux user, enter this command into the terminal:
curl -i --request GET
     --url http://localhost:8080/api/hotsauces/
     -H "Content-Type: application/json"
     -H "authorization: Bearer wrong-token"
Otherwise, if you are a Windows user, enter this command into PowerShell:
$accessToken = "wrong-token"
$headers = @{
    Authorization = "Bearer $accessToken"
}
$response = Invoke-RestMethod "http://localhost:8080/api/hotsauces/" `
    -Headers $headers
$response | ConvertTo-Json
Then, the following response will be returned:
Invoke-WebRequest: The remote server returned an error: (401) Unauthorized.
At line:1 char:1
+ Invoke-WebRequest "http://localhost:8080/api/hotsauces/"
+ ~~~~~~~~~~~~~~~~~~~~~~~~~~~~~~~~~~~~~~~~~~~~~~~~~~~~~~~~
+ CategoryInfo          : InvalidOperation: (System.Net.HttpWebRequest:HttpWebRequest) [Invoke-WebRequest], WebExc
   eption
+ FullyQualifiedErrorId : WebCmdletWebResponseException,Microsoft.PowerShell.Commands.InvokeWebRequestCommand
As you can see, a 401 error status code is returned, but with no details on what happened.
Now, let’s test the demo application extended with custom error handling logic. You can find it in this GitHub repository. The application is exactly the same as the previous one, except for the error handling logic. In particular, the aforementioned presented logic was implemented.
In this case, by launching the commands above, this message will be returned:
Invoke-RestMethod : {"code":401,"message":"An error occurred while attempting to decode the Jwt: Invalid JWT serialization: Missing dot delimiter(s)","timestamp":1629880611013,"status":"UNAUTHORIZED"}
At line:1 char:1
+ $response = Invoke-RestMethod "http://localhost:8080/api/hotsauces/"  ...
+ ~~~~~~~~~~~~~~~~~~~~~~~~~~~~~~~~~~~~~~~~~~~~~~~~~~~~~~~~
+ CategoryInfo          : InvalidOperation: (System.Net.HttpWebRequest:HttpWebRequest) [Invoke-WebRequest], WebExc
   eption
+ FullyQualifiedErrorId : WebCmdletWebResponseException,Microsoft.PowerShell.Commands.InvokeWebRequestCommand
As you can see, a JSON message representing the custom error handling logic was returned as expected. This contains the status code, the exception message, a timestamp, and the HTTP status code name, as follows:
{
  "code": 401,
  "message": "An error occurred while attempting to decode the Jwt: Invalid JWT serialization: Missing dot delimiter(s)",
  "timestamp": 1629880611013,
  "status": "UNAUTHORIZED"
}
Conclusion
In this article, we looked at how to implement custom error handling logic when dealing with REST applications in Spring Boot. This is not as easy a task as it may seem, and it requires knowing a few Spring Boot fundamentals. First, we delved into default error handling in Spring Boot and saw how poor the responses are. Then, we looked at @ControllerAdvice and learn everything required to implement custom error handling logic. In particular, two different approaches were shown. Both allow you to define custom error handling responses but have specific pros and cons. Finally, we learned how to achieve the same result when dealing with Spring Boot Security errors, which requires specific logic. As shown, achieving custom error handling in Spring Boot is not easy but definitely possible, and explaining when, why, and how to do it was what this article was aimed at.
Thanks for reading! I hope that you found this article helpful. Feel free to reach out to me with any questions, comments, or suggestions.