На чтение 8 мин. Просмотров 16.2k. Опубликовано 03.09.2019
Ошибки Windows не редкость, и многие из этих ошибок присутствуют и в Windows 10. Одна конкретная ошибка, которую мы собираемся исправить сегодня, это ошибка 0x80070570.
Содержание
- Шаги для решения ошибки 0x80070570 в Windows 10
- Решение 1. Переместите файл в другой каталог.
- Решение 2 – Выполните ремонт запуска
- Решение 3. Отключите антивирус
- Решение 4. Проверьте жесткий диск на наличие ошибок
- Решение 5. Скопируйте установку Windows на жесткий диск
- Решение 6 – Удалить каталоги $
- Решение 7 – Удалить все файлы каталога SoftwareDistribution
- Решение 8. Используйте соединение Ethernet и отключите USB-устройства
- Решение 9 – Включить и отключить RAID в BIOS
- Решение 10 – Проверьте свою память
Шаги для решения ошибки 0x80070570 в Windows 10
Ошибка 0x80070570 может помешать вам копировать определенные файлы, и говоря об ошибках, пользователи сообщили о следующих проблемах, связанных с этой ошибкой:
- Код ошибки установки Windows 0x80070570 . В большинстве случаев эта ошибка возникает при установке Windows 10. Чтобы устранить эту проблему, необходимо проверить оборудование.
- 0x80070570 Чистая установка Windows 10 . Если у вас возникла эта проблема при установке Windows 10, возможно, вам придется изменить конфигурацию BIOS.
- Windows не может установить требуемые файлы. Код ошибки 0x80070570 . Если возникает эта ошибка, возможно, проблема в каталоге SoftwareDistribution. Чтобы устранить проблему, удалите все файлы из нее, и проблема будет решена.
- Ошибка 0x80070570: файл или каталог повреждены и не читаются . Эта ошибка также может возникать при копировании файлов. Если это произойдет, обязательно просканируйте жесткий диск на наличие ошибок.
Ошибка 0x80070570 появляется в большинстве версий Windows, и Windows 10 не является исключением.
Эта ошибка обычно появляется, когда вы пытаетесь удалить определенный файл, и появляется следующее сообщение: «Ошибка 0x80070570: файл или каталог повреждены и не читаются».
Отсутствие возможности удаления файлов является серьезной проблемой, поэтому давайте посмотрим, есть ли способ исправить эту ошибку.
Решение 1. Переместите файл в другой каталог.
Если вы получаете сообщение об ошибке 0x80070570 при попытке удалить определенные файлы, вы можете попытаться переместить их в другой каталог.
Самый простой способ сделать это – щелкнуть правой кнопкой мыши файл и выбрать в меню Вырезать . Перейдите в другую папку, щелкните правой кнопкой мыши пустое место и выберите Вставить .
Это должно переместить ваш файл в другое место. Пользователи сообщают, что для исправления этой ошибки необходимо вернуть файл в исходное местоположение, поэтому повторите процесс и верните файл туда, где он был.
Это должно исправить ошибку, и теперь вы сможете удалить файл. Если вы не можете переместить файлы, ознакомьтесь с этой статьей, в которой предлагаются некоторые решения этой проблемы.
Вы не можете использовать копирование-вставку в Windows 10? Ознакомьтесь с этим пошаговым руководством, которое поможет вам решить проблему.
Решение 2 – Выполните ремонт запуска
- В Windows 10 перейдите в меню «Пуск» и нажмите кнопку Перезагрузить , удерживая Shift на клавиатуре. Когда ваш компьютер перезагружается, он должен загрузить дополнительные параметры запуска.
- Нажмите Устранение неполадок> Дополнительные параметры .
- Затем нажмите Восстановление при загрузке . Если запрашивается пароль администратора, обязательно введите его.
- Восстановление при загрузке теперь попытается исправить ваш компьютер, и после того, как это будет сделано, вы должны увидеть отчет о том, был ли процесс восстановления успешным или нет.
Иногда вы можете столкнуться с ошибкой, которая помешает вам выполнить восстановление при загрузке. Для этого конкретного случая мы подготовили полное руководство, которое поможет вам преодолеть его.
Решение 3. Отключите антивирус
В большинстве случаев ошибка 0x80070570 возникает при копировании файлов на жесткий диск. Это может быть вызвано антивирусным программным обеспечением, поэтому рекомендуется временно отключить антивирус.
Если это не сработает, вам следует подумать о переходе на другое антивирусное решение.
В настоящее время лучшими антивирусными приложениями на рынке являются Bitdefender и BullGuard , и если вы ищете новое антивирусное приложение, мы настоятельно рекомендуем вам попробовать их.
Если вам нужно больше вариантов, взгляните на этот список с лучшим антивирусным программным обеспечением, доступным прямо сейчас.
Решение 4. Проверьте жесткий диск на наличие ошибок
Если вы столкнулись с ошибкой 0x80070570 в Windows 10, проблема может быть связана с поврежденными файлами на вашем жестком диске. Чтобы устранить проблему, вам просто нужно проверить жесткий диск на наличие ошибок, выполнив следующие действия:
-
Откройте этот компьютер, щелкните правой кнопкой мыши раздел, который вы хотите отсканировать, и выберите в меню Свойства .

-
Перейдите на вкладку Инструменты и нажмите кнопку Проверить .

- Установите флажок Автоматически исправлять системные ошибки и нажмите Пуск .
Подождите несколько секунд, пока Windows сканирует ваш диск.После завершения процесса сканирования повторите его для других дисков на вашем ПК.
Если вам нужно выполнить более детальное сканирование, рекомендуется использовать команду chkdsk. Для этого выполните следующие действия:
-
Нажмите Windows Key + X , чтобы открыть меню Win + X. Выберите в списке Командная строка (Администратор) .

-
Когда откроется Командная строка , введите chkdsk/f X: и нажмите Enter , чтобы запустить команду. Помните, что вам нужно заменить X на букву, обозначающую ваш диск.

- Сканирование Chkdsk запустится и просканирует выбранный раздел. Имейте в виду, что chkdsk выполнит детальное сканирование, поэтому это может занять около 10 или более минут.
chkdsk причиняет вам головную боль? Ознакомьтесь с кратким руководством по любым вопросам, связанным с ним.
После завершения сканирования вам необходимо повторить его для других дисков на вашем компьютере. Если этот процесс кажется сложным, вы всегда можете проверить работоспособность вашего жесткого диска с помощью стороннего решения.
Сторонние приложения, такие как Iolo System Mechanic Pro , могут легко сканировать жесткий диск на наличие проблем и устранять различные проблемы, поэтому мы настоятельно рекомендуем вам попробовать его.
Если у вас есть USB-флеш-накопитель Linux, вы также можете загрузиться с него и запустить ntfsfix или любое другое подобное приложение, чтобы решить эту проблему. Несколько пользователей сообщили, что это приложение устранило проблему для них, поэтому вы можете попробовать ее.
Решение 5. Скопируйте установку Windows на жесткий диск
Многие пользователи сообщали об ошибке 0x80070570 при попытке установить Windows 10 на свой ПК. Однако вы можете решить эту проблему, просто скопировав установку с DVD на жесткий диск и запустив ее оттуда.
Кроме того, вы можете загрузить и запустить ISO-файл Windows 10 с вашего ПК. Вы также можете решить эту проблему, создав загрузочную флешку и установив с нее Windows 10.
Чтобы с легкостью создать установочный носитель Windows 10, обязательно загрузите и используйте Инструмент создания мультимедиа . Несколько пользователей сообщили, что запуск их установки с флэш-накопителя USB устранил проблему для них, поэтому обязательно попробуйте это.
Решение 6 – Удалить каталоги $
Если при попытке установить Windows 10 появляется ошибка 0x80070570, возможно, проблема связана с каталогами $. Эти каталоги обычно скрыты, поэтому, прежде чем вы сможете их удалить, убедитесь, что у вас есть скрытые файлы, обнаруженные на вашем ПК.
По словам пользователей, эти файлы находятся в корневых каталогах на ваших разделах, таких как C :, D: и т. Д., Поэтому обязательно удалите их. После удаления этих файлов попробуйте снова установить Windows 10.
Если вы не можете получить доступ к Windows или удалить эти файлы из Windows, загрузите компьютер с флешки Linux и удалите их.
Решение 7 – Удалить все файлы каталога SoftwareDistribution
Иногда ошибка 0x80070570 может возникнуть из-за вашего каталога SoftwareDistribution. Если это произойдет, вы не сможете загружать и устанавливать обновления.
Однако вы можете решить эту проблему, просто удалив все файлы из папки SoftwareDistribution. Для этого выполните следующие действия:
- Откройте Командную строку от имени администратора. Мы показали вам, как это сделать в одном из наших предыдущих решений, поэтому обязательно ознакомьтесь с ним.
-
При запуске Командная строка выполните следующие команды:
- net stop wuauserv
- чистые стоповые биты
- Сверните командную строку . Теперь перейдите в каталог C: WindowsSoftwareDistribution и удалите все файлы из него.
-
После удаления всех файлов вернитесь в Командную строку и выполните следующие команды:
- net start wuauserv
- чистые стартовые биты
После этого перезагрузите компьютер и проверьте, решена ли проблема.
Если у вас возникли проблемы с доступом к командной строке от имени администратора, то вам лучше ознакомиться с этим руководством.
Вам нужна дополнительная информация о том, как удалить папку SoftwareDistribution? Вот специальное руководство по этому вопросу.
Решение 8. Используйте соединение Ethernet и отключите USB-устройства
Многие пользователи сообщали об ошибке 0x80070570 при установке Windows 10. Чтобы исправить эту ошибку, пользователи рекомендуют подключать каталог ПК к маршрутизатору с помощью кабеля Ethernet.
Кроме того, не забудьте отключить все USB-устройства от компьютера перед началом установки. После этого вы сможете без проблем установить Windows 10.
Решение 9 – Включить и отключить RAID в BIOS
Если эта ошибка возникает во время установки Windows 10, вы можете исправить ее, просто включив функцию RAID в BIOS. Чтобы узнать, как получить доступ к BIOS и как включить эту функцию, мы советуем вам ознакомиться с руководством по материнской плате для получения подробных инструкций.
После этого попробуйте начать установку снова. Не беспокойтесь, если вы не видите свой жесткий диск. Теперь вернитесь в BIOS, отключите RAID и попробуйте снова запустить установку.
Доступ к BIOS кажется слишком сложной задачей? Давайте поможем вам с помощью этого удивительного руководства!
Решение 10 – Проверьте свою память
Другой причиной ошибки 0x80070570 может быть ваша оперативная память. Если у вас возникла эта проблема, обязательно проверьте свою оперативную память. Для этого вы можете попробовать использовать инструмент Memtest86 +.
Имейте в виду, что вам нужно сканировать отдельные модули памяти, чтобы найти неисправный. Как только вы найдете проблемный модуль, удалите его и замените.
Несколько пользователей сообщили, что проблема с их ОЗУ, поэтому обязательно проверьте ее.
Как вы видите, ошибка 0x80070570 может быть неприятной, но вы легко можете ее устранить, следуя нашим решениям.
Если у вас есть другие предложения или вопросы, не стесняйтесь оставлять их в разделе комментариев ниже, и мы обязательно их рассмотрим.
ЧИТАЙТЕ ТАКЖЕ
- Как исправить ошибку драйвера HP 1603 на ПК с Windows 10
- Исправить сообщение об ошибке status_device_power_failure в Windows 10
- Исправить ошибку Windows 10 c1900101-4000d при сбое обновления
- Как исправить ошибку «драйвер wudfrd не удалось загрузить» 219 в Windows 10
- Как исправить ошибку 87 “Параметр неверен”
- Remove From My Forums
-
Question
-
User1832207001 posted
Hello all
when I run the website this error come
what is the solution please
Could not load file or assembly ‘AjaxControlToolkit’ or one of its dependencies. The file or directory is corrupted and unreadable. (Exception from HRESULT: 0x80070570
Answers
-
User2022958948 posted
Hi,
Firstly, please delete the AjaxControlToolkit.dll from bin folder and add AjaxControlToolkit.dll as the reference into your application again. Secondly, please register the assembly in the top of page.
<%@ Register
Assembly=»AjaxControlToolkit»
Namespace=»AjaxControlToolkit»
TagPrefix=»ajaxToolkit» %>-
Marked as answer by
Thursday, October 7, 2021 12:00 AM
-
Marked as answer by
-
User-125547262 posted
how can I delete asp.net temporary files ??
its usually here
C:WINDOWSMicrosoft.NETFrameworkv2.0.50727Temporary ASP.NET Files ( assumption is that it is a 2.0 Framework Web site)
-
Marked as answer by
Anonymous
Thursday, October 7, 2021 12:00 AM
-
Marked as answer by
- Remove From My Forums
-
Question
-
User1832207001 posted
Hello all
when I run the website this error come
what is the solution please
Could not load file or assembly ‘AjaxControlToolkit’ or one of its dependencies. The file or directory is corrupted and unreadable. (Exception from HRESULT: 0x80070570
Answers
-
User2022958948 posted
Hi,
Firstly, please delete the AjaxControlToolkit.dll from bin folder and add AjaxControlToolkit.dll as the reference into your application again. Secondly, please register the assembly in the top of page.
<%@ Register
Assembly=»AjaxControlToolkit»
Namespace=»AjaxControlToolkit»
TagPrefix=»ajaxToolkit» %>-
Marked as answer by
Thursday, October 7, 2021 12:00 AM
-
Marked as answer by
-
User-125547262 posted
how can I delete asp.net temporary files ??
its usually here
C:WINDOWSMicrosoft.NETFrameworkv2.0.50727Temporary ASP.NET Files ( assumption is that it is a 2.0 Framework Web site)
-
Marked as answer by
Anonymous
Thursday, October 7, 2021 12:00 AM
-
Marked as answer by
Windows 10 отличная операционная система, она подходит как для офисных работ, так и для более серьезных задач.
Эта операционная система имеет множество плюсов, скорость работы, простота установки, отличный интерфейс, но не редко у пользователей ПК возникают какие-либо проблемы и ошибки мешающие при её установки. У пользователей встречается множество ошибок которые вполне решаемые и устраняемые, и вот одна из них.
Ошибка 0x80070570 это довольная частая проблема на Windows 10, также она встречается и на других версиях операционных систем, но об этом чуть позже.
На появление ошибки 0x80070570 могут повлиять несколько причин:
- неправильно записанный образ диска на носитель, который необходим для установки ОС;
- повреждение материнской платы и винчестера;
- неисправность одной из планок оперативной памяти.
- может появиться при установке windows;
- при удалении файла, файл или папка повреждены чтение невозможно;
- при обновлении windows.

Сразу скажу, что причин по которой возникает эта ошибка, очень много. Перечислю основные:
- Неисправность компонентов компьютера (Жесткий диск (часто), оперативная память, материнская плата (редко), шлейфы).
- Нарушена контрольная сумма ISO образа.
- Неисправная флешка.
- Программные сбои.
А теперь более подробно по каждому пункту.
Жесткий диск

Для этого нужно открыть командную строку, через кнопку «Пуск», в поле ввести команду «chkdsk c: /r«, и нажать ввод.
Можно скачать любую программу для проверки жестких дисков и произвести полную диагностику жесткого диска, только после этого перейти к третьему этапу, если он потребуется.
Проверка оперативной памяти
Очень часто эта неполадка проявляет себя из-за неисправности планок оперативной памяти. Рекомендуется извлечь модули ОЗУ или поменять их местами. Иногда такие манипуляции помогают решить проблему ошибки 0x80070570. Вот комментарии людей, которым помог данный способ:

Также можно проверить планки памяти программой Memtest. Программа проверит вашу ОЗУ и сообщит если какая-то из плашек выдает ошибки.
Флеш накопитель

Нужно проверить накопитель на корректность через специальные программы предназначенные для этого от производителя флешки, если этот способ не дал результата, то пробуем форматировать накопитель.
Но если и это не помогло, то лучшим вариантом будет приобрести новую модель, так как ремонт накопителя обойдется гораздо дороже нового аналогичного.
Таким образом, это все самые наиболее вероятные и распространенные причины возникновения этой ошибки, которые могут помешать установке Windows 10, но такая ошибка встречается и на операционной системе Windows 7, способы её устранения аналогичны с Windows 10.
Ошибка 0x80070570 явно мешающая корректной установке операционной системы, но исправимая, благодаря этим 3 способам, вы сможете избавиться от этой проблемы на вашем ПК и беспрепятственно установить ОС.
Проверьте контрольной суммы образа диска
При скачивании установочного образа Windows, нужно проверить его на целостность. В подавляющем большинстве, файлы скачиваются правильно, но все же иногда бывают сбои. Если на сайте источнике, откуда скачиваете образ, указаны контрольные хеш-суммы SHA-1, то можно их сравнить с вашим закаченным образом. Для этого нужно скачать и установить программу HashTab. Она добавляет в окно «Свойства файла» новую вкладку с информацией контрольной хеш-суммы. Копируем значение SHA-1 с сайта источника и вставляем в поле «Сравнение хеша». Если высветится красный крестик, файлы не совпадаю, если зеленая галочка, то файлы одинаковы.

Если ошибка появилась на флешке?
Если ваша USB флешка не читается компьютером и появляется соответствующее сообщение при копировании, тогда следует проверить именно сам носитель. Маловероятно, что конфликт возникает по причине Windows. Попробуйте провести несколько операций.
- Вставьте флешку в другие USB-порты. Возможно, один из них уже работает не корректно (повреждено питание, шлейф, отключен в настройках).
- Проверьте носитель на физические повреждения, нет ли явных следов ударов. Если таковы дефекты имеются, то пора идти в магазин за новой покупкой.
- Зайдите в меню «Пуск». От туда перейдите в «Панель управления» и «Система». С левой стороны будет пункт «Диспетчер устройств». Примерно в середине среди других устройств найдите «Контроллер USB». Определите именно вашу флешку и обновите в ней драйвера, через правую кнопку мышки.

- Зайдите в «Мой компьютер». Откройте свойства USB носителя (через правую кнопку мышки). Кликните по «Сервис». Выполните проверку на наличие ошибок. Укажите оба варианта сканирования.

- Можно попробовать перезалить информацию на устройство, предварительно отформатировав флеш-накопитель в режиме NTFS.
Последний вариант подходит для спасения любого внешнего или внутреннего носителя информации. Применяйте его по отношению к жесткому диску внутреннего и внешнего характера.
Использование клавиш «Вверх» и «Вниз»
Взял этот метод также на англоязычном сайте. Возможно будет полезен для кого-то.
Быстрое решение заключается в использовании клавиш вверх и вниз.
Когда вы видите первый черный экран во время перезагрузки компьютера, начинайте нажимать клавиши со стрелками вверх и вниз на клавиатуре.
Это не всегда работает, но, как известно, решает проблему для значительного числа пользователей, поэтому стоит попробовать. Решение сомнительное я бы сказал, но, а вдруг поможет.
Проверяем подключение и исправность накопителей
- В первую очередь рекомендую проверить подключение винчестера или флешки. Убедитесь, что устройство плотно подключено к рабочему разъему.

- Если речь идет о винчестере, то дополнительно замените SATA / IDE кабель.
- Для некоторых типов внешних жестких дисков требуется больше питания, при этом, как правило, они оснащаются двойным USB кабелем, который должен быть соединен с двумя USB портами.
- Еще реже проблема находится на стороне недостаточно мощного или неисправного блока питания, в результате чего жесткий диск начинает работать с перебоями. Обычно при этом появляются сторонние шумы (щелчки, писки, стуки). Решается это заменой или ремонтом блока питания.
Исправление ошибки 0x80070570 при копировании, перемещении файлов на Flash-диск
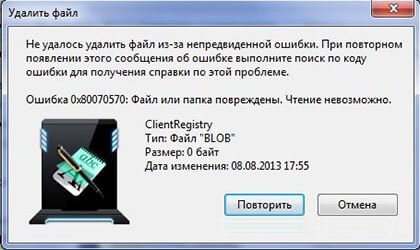
В этом случае, ошибка появляется при работе с файлами на носителе, например копирование, удаление, перемещение, вставка, переименование файлов. В этот момент может появиться такое уведомление «Ошибка 0x80070570: файл или папка повреждены. Чтение невозможно».

Что делать:
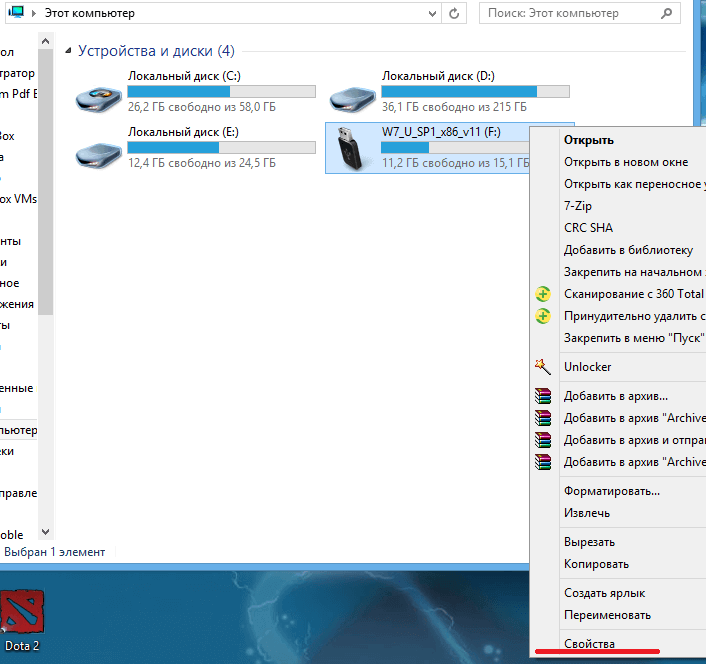
Открываем «Мой компьютер», находим там нашу флешку и нажимаем на нее правой клавишей мыши для вызова контекстного меню. И нажимаем на последний пункт «Свойства».

После этого переключаемся на вкладку «Сервис» и нажимаем на кнопку «Выполнить проверку». Высветится окно проверки ошибок, в нем нужно поставить галочку напротив пункта «автоматическое исправление ошибок» и нажать «Запуск».

Программа произведет проверку флеш носителя и при наличии неполадок устранит их. После этого ошибка 0x80070570 перестанет высвечиваться.
Надеюсь, вам помогут описанные выше методы для устранения данной неполадки. На этом всё, всем добра!
Неисправная флешка или USB порт
В редких случаях установщик Windows выдает ошибку 0x80070570 по причине неисправности используемой флешки или USB порта на материнской плате.

Чтобы это проверить, достаточно подключить накопитель к другому порту, желательно к задней части системной платы, поскольку есть вероятность, что неисправен порт, находящийся в лицевой части корпуса компьютера.
Если имеется другой накопитель, то попробуйте использовать его.
Причины ошибок
В некоторых случаях код ошибки 0x80070570 возникает по ошибке, когда система не может найти нужный файл. В других случаях это происходит в случае конфликта с антивирусным программным обеспечением, которое вы используете, и установочным программным обеспечением. Наконец, на вашем компьютере может быть неисправен источник ОЗУ, который необходимо удалить до завершения установки.
Независимо от того, что вы считаете причиной кода ошибки, есть по крайней мере два разных метода, которые вы можете использовать, чтобы попытаться устранить код ошибки 0x80070570 на вашем устройстве. Первый довольно прост и понятен, а второй требует немного больше знаний о вашем оборудовании для успешного завершения.
Дополнительная информация и ручной ремонт
Пользователи могут попытаться обойти код ошибки 0x80070570 на своих устройствах двумя способами. Каждый требует немного больше навыков и технических знаний, чем последний. Если вы не чувствуете, что у вас есть навыки, время или способность инвестировать в приведенные ниже методы, обязательно обратитесь к специалисту по ремонту Windows, который поможет вам правильно выполнить необходимые действия.
Вот лучшие способы, чтобы попытаться устранить код ошибки 0x80070570 на вашем устройстве Windows:
Способ первый: повторите попытку установки
В некоторых случаях, когда на вашем компьютере появляется код ошибки 0x80070570, вы можете просто нажать кнопку «ОК» и сразу же вернуться к экрану, на котором остановилась установка, выбрав перезапуск процесса установки. Для некоторых пользователей повторение этого метода по крайней мере четыре раза позволило им обойти ошибку, не предпринимая более серьезных и трудоемких методов для решения данной проблемы.
Способ второй: проверьте ваши различные источники оперативной памяти
Если у вас на компьютере несколько источников оперативной памяти, сначала удалите один из них, а затем повторите попытку установки. Если после удаления одного из источников вы все еще сталкиваетесь с кодом ошибки 0x80070570, продолжайте удалять каждый из них, пока не перейдете к одному источнику, а затем обменяйте этот последний источник на один из извлеченных.
Если у вас плохой источник ОЗУ, это может помочь вам определить, какой вход вызывает ошибку, и соответствующим образом решить проблему. После того, как вы определили, какой конкретный источник вызывает проблему, вы можете перезагрузить компьютер и попытаться запустить процесс установки еще раз.
Если ваши источники ОЗУ не вызывают конкретной проблемы, вам все равно может потребоваться запустить диагностические тесты на вашем оборудовании, чтобы определить источник проблемы.
Метод третий: Используйте автоматизированный инструмент
Если вы хотите всегда иметь в своем распоряжении утилиту для исправления этих Windows 10 и других связанных с ними проблем, когда они возникают, Загрузить и установить мощный автоматизированный инструмент.

В этой статье рассмотрим ошибку 0x80070570. В операционной системе Windows вы можете столкнуться с огромным разнообразием ошибок. Столкнувшись с ними, сразу не поймешь, откуда они берутся и как их убрать. Радует то, что каждой из неполадок присваивается специальный номер, по которому можно произвести поиск и найти метод как исправить ту или иную проблему. Теперь ближе к теме.
Ошибка 0x80070570 появляется в двух случаях:
- При копировании, перемещении файлов на Flash-диск (файл или папка повреждены). Информация по этому случаю в конце статьи.
- При установке Windows.
В статье рассмотрим оба случая, как исправить данную неполадку.
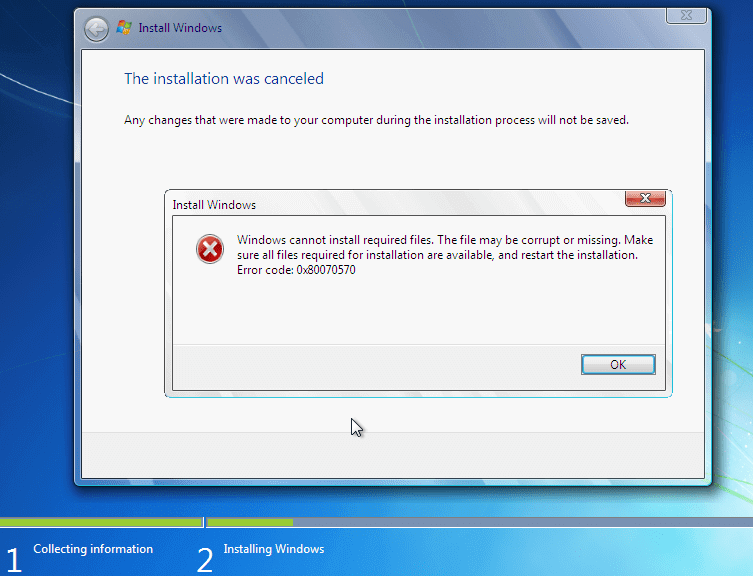
Сразу скажу, что причин по которой возникает эта ошибка, очень много. Перечислю основные:
- Неисправность компонентов компьютера (Жесткий диск (часто), оперативная память, материнская плата (редко), шлейфы).
- Нарушена контрольная сумма ISO образа.
- Неисправная флешка.
- Программные сбои.
А теперь более подробно по каждому пункту.
Повторите попытку установки
[ads1]Когда при установке Windows вы получите соответствующее уведомление об ошибке 0x80070570, нажмите «ОК» и вернитесь к предыдущему экрану, затем снова запустите процесс установки и повторите попытку установки без перезапуска до получения неполадки. Попробуйте повторить так 3-4 раза. Возможно в одном из случаев, ошибка себя не проявит. Некоторым этот способ помогает.
Удаление локального диска
В момент, когда у вас появляется экран выбора локального диска для установки Windows, выберите диск на который хотите произвести инсталляцию операционной системы (например диск C). Удалите его и создайте заново. Повторите попытку установки.
Проверка оперативной памяти
Очень часто эта неполадка проявляет себя из-за неисправности планок оперативной памяти. Рекомендуется извлечь модули ОЗУ или поменять их местами. Иногда такие манипуляции помогают решить проблему ошибки 0x80070570. Вот комментарии людей, которым помог данный способ:
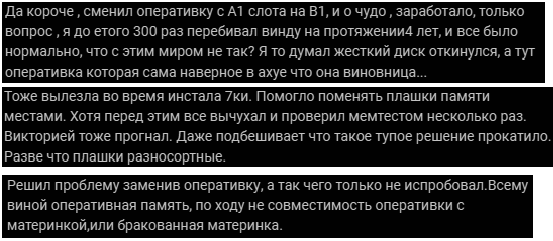
Также можно проверить планки памяти программой Memtest. Программа проверит вашу ОЗУ и сообщит если какая-то из плашек выдает ошибки.
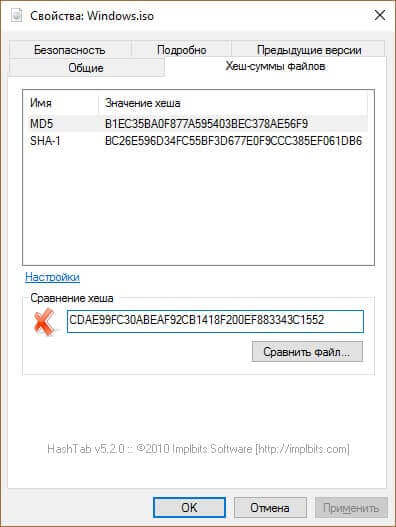
Проверьте контрольной суммы образа диска
При скачивании установочного образа Windows, нужно проверить его на целостность. В подавляющем большинстве, файлы скачиваются правильно, но все же иногда бывают сбои. Если на сайте источнике, откуда скачиваете образ, указаны контрольные хеш-суммы SHA-1, то можно их сравнить с вашим закаченным образом. Для этого нужно скачать и установить программу HashTab. Она добавляет в окно «Свойства файла» новую вкладку с информацией контрольной хеш-суммы. Копируем значение SHA-1 с сайта источника и вставляем в поле «Сравнение хеша». Если высветится красный крестик, файлы не совпадаю, если зеленая галочка, то файлы одинаковы.
Некорректная запись образа или ошибка носителя.
Тут ситуация похожая, как и с планками ОЗУ. Нужно экспериментировать. Попробуйте записать другой образ, использовать другую флешку. Испробуйте разные USB порты на ПК или ноутбуке. Иногда такие махинации позволяют избавиться от ошибки 0x80070570.
Неисправность жесткого диска
[ads2]Ошибка 0x80070570 может проявлять себя при использовании неисправного жесткого диска. Есть много программ для проверки работоспособности HDD, описывать их не буду, в интернете информации по этой теме полно. Иногда помогает полное низкоуровневое форматирование жесткого. В других случаях, при наличии другого HDD, можно попробовать использовать его, так как замена ЖД тоже иногда помогает в исправлении ошибки.
Использование MMC
Данный метод нашел на зарубежном ресурсе, поэтому решил сохранить оригинал записи:
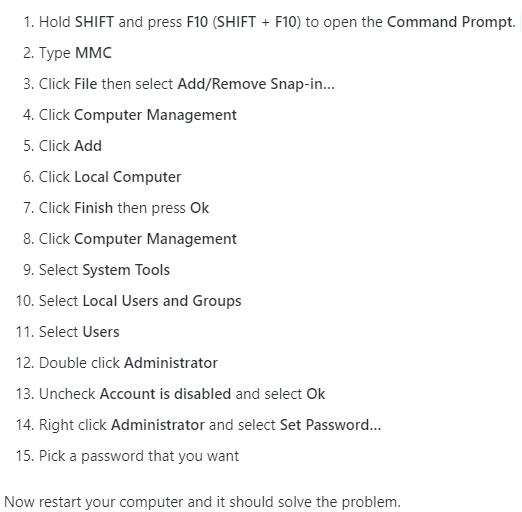
Насколько действенный этот метод сложно сказать, но пусть будет, вдруг кому-то поможет.
Использование клавиш «Вверх» и «Вниз»
Взял этот метод также на англоязычном сайте. Возможно будет полезен для кого-то.
Быстрое решение заключается в использовании клавиш вверх и вниз.
Когда вы видите первый черный экран во время перезагрузки компьютера, начинайте нажимать клавиши со стрелками вверх и вниз на клавиатуре.
Это не всегда работает, но, как известно, решает проблему для значительного числа пользователей, поэтому стоит попробовать. Решение сомнительное я бы сказал, но, а вдруг поможет.
Исправление ошибки 0x80070570 при копировании, перемещении файлов на Flash-диск
В этом случае, ошибка появляется при работе с файлами на носителе, например копирование, удаление, перемещение, вставка, переименование файлов. В этот момент может появиться такое уведомление «Ошибка 0x80070570: файл или папка повреждены. Чтение невозможно».
Что делать:
Открываем «Мой компьютер», находим там нашу флешку и нажимаем на нее правой клавишей мыши для вызова контекстного меню. И нажимаем на последний пункт «Свойства».
После этого переключаемся на вкладку «Сервис» и нажимаем на кнопку «Выполнить проверку». Высветится окно проверки ошибок, в нем нужно поставить галочку напротив пункта «автоматическое исправление ошибок» и нажать «Запуск».
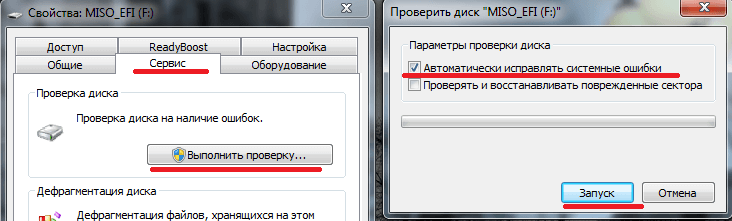
Программа произведет проверку флеш носителя и при наличии неполадок устранит их. После этого ошибка 0x80070570 перестанет высвечиваться.
Надеюсь, вам помогут описанные выше методы для устранения данной неполадки. На этом всё, всем добра!
Error Code 0x80070570 — What is it?
Error Code 0x80070570 is a common Windows 10 error code that generally is seen by users who are attempting to install a new version of the operating system. While it is most often associated with Windows 10, variations on this same error code have been present in previous versions of the operating system, going all the way back to Windows 7.
Common symptoms include:
- Inability to run through the installation process to completion when attempting to install a new version of the operating system
- Error message regarding corrupt or missing files
While it is frustrating to encounter an error like Error Code 0x80070570 as you try to install a new operating system version on your device, there are several methods that can be used to try to resolve the issue. If you do not feel like you have the skill or knowledge necessary to successfully apply the steps below, be sure to get in touch with a trusted computer repair technician that is competent in the repair of Windows 10 errors.
Solution
 Error Causes
In some cases, Error Code 0x80070570 arises erroneously when the system isn’t able to find a particular file that it needs. Other times, it happens when there is a conflict with the antivirus software that you are running and the installation software. Finally, there may be a faulty source of RAM in your computer that needs to be removed before the installation can be completed.
Regardless of what you believe to be the cause behind the error code, there are at least two different methods that you can use to try to resolve Error Code 0x80070570 on your device. The first is fairly simple and easy to follow, while the second requires a little bit more knowledge of your hardware in order to complete it successfully.
Further Information and Manual Repair
There are two common ways that users can attempt to get around Error Code 0x80070570 on their devices. Each requires a little more skill and technical knowledge than the last. If you don’t feel like you have the skill, time, or ability to invest in the methods below, be sure to get in touch with a Windows repair technician who can help you to complete the necessary steps in the right ways.
Here are the best ways to attempt to resolve Error Code 0x80070570 on your Windows device:
Method One: Reattempt Installation
In some cases, when Error Code 0x80070570 appears on your computer, you can simply click on the OK button and then go back to the screen immediately proceeding where your installation has left off, choosing to restart the process of installation. For some users, repeating this method at least four times has allowed them to bypass the error without undertaking more serious and time-consuming methods to resolve the issue at hand.
Method Two: Check Your Various Sources of RAM
If you have more than one source of RAM in your computer, first remove one of the sources, then re-attempt installation. If you are still encountering Error Code 0x80070570 after removing one of the sources, continue to remove each until you are down to a single source, then trade that last source for one of the ones that have been pulled.
If you have a bad source of RAM, this can help you to figure out which input is causing the error to appear and to address the problem appropriately. Once you have determined which specific source is causing the problem, you can reboot your computer and attempt to run the installation process one more time.
If your RAM sources are not specifically causing the issue, you may still need to run diagnostics tests on your hardware to identify the source of the problem at hand.
Method Three: Use An Automated Tool
If you wish to always have at your disposal a utility tool to fix these Windows 10 and other related issues when they do arise, download and install a powerful automated tool.
Advanced System Repair Pro
One-click automated PC repair solution

With Advanced System Repair Pro you can easily
DOWNLOAD
Advanced System Repair Pro is compatible with all versions of Microsoft Windows including Windows 11
Share this article:
You might also like
Error Code 0x8024001e — What is it?
Error Code 0x8024001e is most commonly associated with the installation of apps from the Windows store, although versions of the error have been present in multiple versions of the Windows operating system. At its most basic level, the error says that a program has not been installed, even after the installation wizard has run through to completion.
Common symptoms include:
- Inability to open or run apps downloaded from the Windows store
- The error message reads, “Something happened and this app couldn’t be installed. Please try again.”
The solutions to Error Code 0x8024001e are somewhat complex, so it is a good idea to get in touch with a computer repair professional if you do not feel confident in your ability to follow the steps below to complete. However, most users should be able to follow the steps below and achieve the desired results.
Solution
Error Causes
There are a couple of different causes that can lead to the appearance of Error Code 0x8024001e. In some cases, extraneous data left in the app cache can cause the problem. In other cases, particular processes may need to be manually reset to clear the problem. Last, but not least, unresolved updates may lead to Error Code 0x8024001e causing issues with downloaded and installed apps from the Windows Store.
Further Information and Manual Repair
There are three primary methods to address the appearance of Error Code 0x8024001e. These should work for all users, regardless of the specific cause for their machine. The methods below do require some advanced skills in computing, so be sure to contact a Windows repair technician if you have trouble following the instructions below.
Here are the top ways to repair Error Code 0x8024001e on Windows 10:
Method One: Clear the App Cache and Use Power User Options
In many cases, simply clearing your app cache can resolve the errors that pop up when you are downloading, installing, or updating any apps that have come from the Windows store. This method may not perfectly resolve the problem every time, but it is a step that should always be done before any others.
Next, open up the Power User options by pressing both the Windows key and the X key at the same time. Choose “Command Prompt (Admin)” from the options that appear. Then type in the commands into the prompt, one at a time:
- net stop wuauserv
- cd/windows
- rename SoftwareDistribution SoftwareDistribution.bck
- net start wuauserv
Restart your computer after these changes have been made so that all changes can take effect. You may be able to access the desired programs and apps after this is complete.
Method Two: Run Your Registry Repair Tools
Sometimes, the best way to repair Error Code 0x8024001e is to simply open up the Window Registry tools and run the repair process. This will scan your registry for any errant entries, corrupted entries, or missing entries, repairing them automatically as the device is able to do. This process may take some time to complete, so plan accordingly.
After this process is complete, it is always a good idea to restart your computer to apply any changes that have been made. Reattempt to install or run the program in question one this is done.
Method Three: Run Windows Updates as Necessary
Last, open up the Windows Update tools to check to see if any of your programs need to be updated or if your operating system needs to be updated. Install each of the updates, restarting your computer after the entire process has been completed so that they can fully take effect on your machine. You should be able to run the programs that had caused problems once this is complete.
It is important to keep up-to-date on your system and program updates to avoid future errors in installations and downloads from the Windows store.
In most cases, using the steps above should allow you to use the apps that you’ve downloaded from the Windows store without Error Code 0x8024001e popping back up. If the problem persists or if you have not been able to follow the steps listed above to remedy the error, it is a good idea to contact a qualified professional who is experienced in working with Windows 10 errors.
Method Four: Use An Automated Tool
If you wish to always have at your disposal a utility tool to fix these Windows 10 and other related issues when they do arise, download and install a powerful automated tool.
Read More
One of the hardest issues you can encounter on your Windows computer is the Blue Screen of Death error. There are various kinds of BSOD or Stop errors and one of them is the “Memory Management Error 0x0000001A” error. This kind of Stop error might signify a hardware problem in your computer and is most likely caused by an issue with RAM or hard disk or even malware that takes up all your computer’s memory, thus, making it crash and display a BSOD error like the Memory Management Error 0x0000001A.
Moreover, this kind of Stop error can also occur during the Windows upgrading process. So in this post, we’ll show you what you can do to fix the Memory Management error on your Windows 10 PC.
Option 1 – Run the Blue Screen Troubleshooter
The Blue Screen troubleshooter is a built-in tool in Windows 10 that can be found on the Settings Troubleshooters page. To use it, refer to these steps:
- Tap the Win + I keys to open the Settings panel.
- Then go to Update & Security > Troubleshoot.
- From there, look for the option called “Blue Screen” on your right-hand side and then click the “Run the troubleshooter” button to run the Blue Screen Troubleshooter and then follow the next on-screen options. Note that you might have to boot your PC into Safe Mode.
Option 2 – Update the device drivers
- Tap the Win + R keys to launch Run.
- Type in devmgmt.msc into the box and tap Enter or click OK to open the Device Manager.
- After that, a list of device drivers will be displayed. Look for the device driver you and then select either “Update driver” or “Uninstall device”. And if you find any “Unknown device”, you need to update it as well.
- Select the “Search automatically for updated driver software” option and then follow the instructions to complete the process.
- If you have chosen to uninstall the driver, follow the screen options to complete the process and then restart your PC.
- Connect the device and Scan for hardware changes – you can see this option under Device Manager > Action.
Option 3 – Run the Windows Memory Diagnostics Tool to test RAM
Since the issue concerns the memory of your computer, you can also try running the Windows Memory Diagnostics Tool to find out if the RAM module of your computer has become corrupted. To run this tool, follow these steps:
- Tap the Win + S keys to open Search.
- Then type “Windows Memory Diagnostics Tool” in the field and hit Enter to open the Windows Memory Diagnostics Tool.
- After that select any of the following option from the prompt that appears:
- “Restart now and check for problems (recommended)”
- “Check for problems the next time I start my computer”
- After that, if you find that your RAM is corrupted, you might have to purchase a new one or change the motherboard of your computer.
Option 4 – Run the DISM tool
There are cases when the Memory Management Error 0x0000001A error is caused by the Windows System Image so you need to repair it using the DISM or Deployment Imaging and Servicing Management tool. The DISM tool is another command-line tool in the Windows operating system that could help users fix various corrupted system files. To use it, follow these steps:
- Open the Command Prompt as admin.
- Then type in this command: Dism /Online /CheckHealth
- Do not close the window if the process takes a while as it will probably take a few minutes to finish.
Option 5 – Run the SFC scan
- Tap Win + R to launch Run.
- Type in cmd in the field and tap Enter.
- After opening Command Prompt, type in sfc /scannow
The command will start a system scan which will take a few whiles before it finishes. Once it’s done, you could get the following results:
- Windows Resource Protection did not find any integrity violations.
- Windows Resource Protection found corrupt files and successfully repaired them.
- Windows Resource Protection found corrupt files but was unable to fix some of them.
Option 6 – Try using System Restore
You can also try to perform a System Restore as it can also help you fix the BSOD error. You can do this option either by booting into Safe Mode or in System Restore. If you are already in the Advanced Startup Options, just directly select System Restore and proceed with the next steps. And if you have just booted your PC into Safe Mode, refer to the steps below.
- Tap the Win + R keys to open the Run dialog box.
- After that, type in “sysdm.cpl” in the field and tap Enter.
- Next, go to the System Protection tab then click the System Restore button. This will open a new window where you have to select your preferred System Restore point.
- After that, follow the on-screen instructions to finish the process and then restart your computer and check if the problem is fixed or not.
Read More
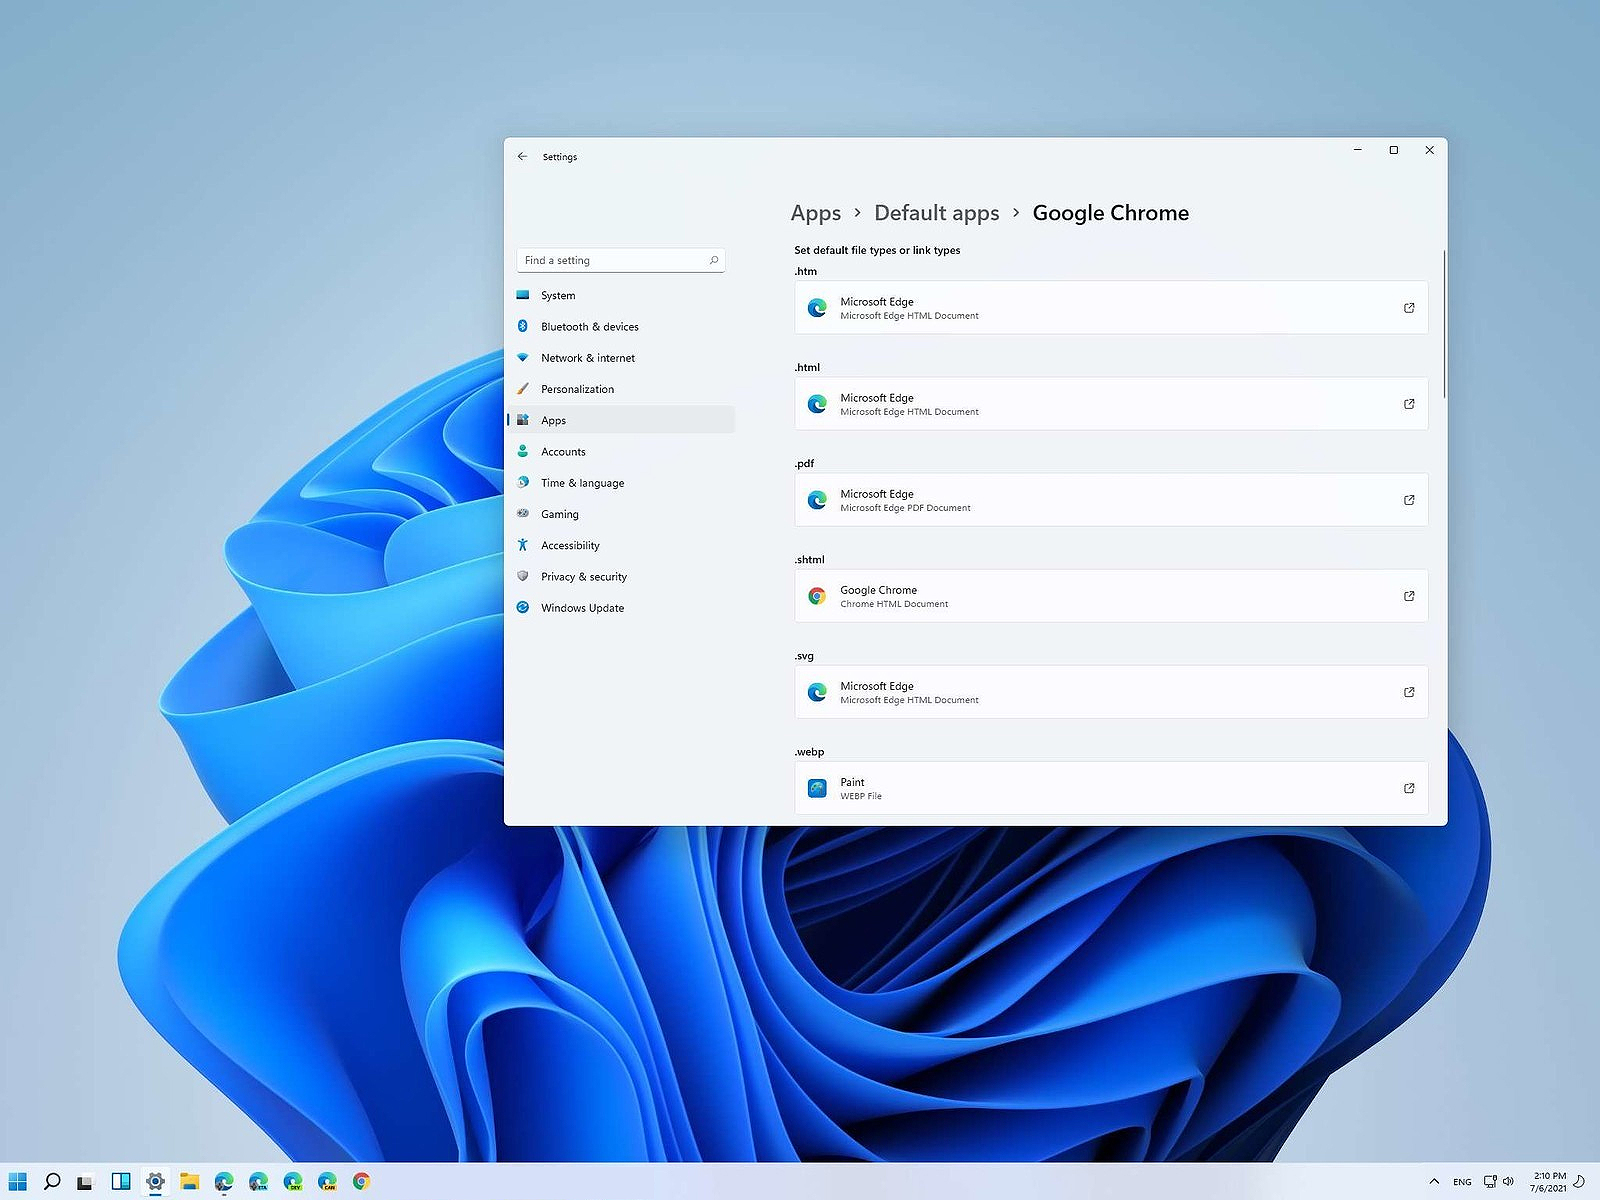 Same as in previous Windows versions, Windows 11 will also use certain applications as default ones for opening certain file types and file extensions. And yes, same as in previous versions it will come preconfigured for certain file types and associated applications like for example photos for pictures.
Of course, users usually have their own favorite applications for certain file types and much more prefer to open them inside the application of their choice instead of the default one.
We can change the default application like in previous Windows versions but this time there are two ways and overall more control of this process. Windows 11 has settings for choosing default file type applications and default file extension applications giving you more control of this process.
The opening setting for apps
Whatever you wish to change default application or default extension application you will need to open settings for default application. Follow steps to quickly go into it.
- Press ⊞ WINDOWS + I to open settings
- Select Apps on left
- On the right part select Default Apps
Now you are in settings for choosing default applications
Choosing default application by file type extension
This is considering by Microsoft as a typical way to set default applications inside Windows 11. Once you are inside the settings app there is a box labeled Enter a file type or link type. Inside the search box, type in file extension that you wish to associate the application with like .JPG, .TXT, or other.
If the file extension is not associated with any application you will be presented with a Choose a Default button, if however, the file extension is already associated with the app, you will need to click on the app box itself.
In any case, a pop-up will appear and ask How do you want to open YOUR FILE EXTENSION files from now on? Choose Application from the list of presented ones and click on OK.
Choosing default file type
Another method is to select the default application by file type selecting application for it. In the settings screen, under the search box, you will have a list of installed applications. Choose the application that you would like to associate a file type with and click on it. On the next details screen scroll down and select the file type that you want to associate with the selected application and click on OK.
Other/third method
There is also the third method for choosing the default application for file type but it includes some surfing on your hard drive and it can be more time-consuming for first-time settings. But it is fairly quick when you need to only use it once on some new file type (for example you have a new application installed and want to switch just one file type extension to that application).
Locate the file that you want to associate with the application and right-click on it. Select Open With from the menu and then Choose Another App. Pop up will appear, select the application that you would like to use, and check the box beside Always use this app to open CHOOSEN EXTENSION files followed by clicking on the OK button.
Read More
Error Code 0x80070070 — What is it?
Error code 0x80070070 can be presented when there is not enough drive space on the computer to install updates. It is possible to uninstall apps that are not often used, or you may delete or archive files that are no longer needed, you may even add on some removable storage space to free up the internal memory of the computer. The computer needs a significant amount of internal memory in order to be able to update the operating system properly. When the computer fails to have the amount of memory that is needed to perform the update, the error code 0x80070070 will be presented. If this error message is not resolved, your computer might be opened to other error messages, including error code 0x80072EE2.
Common symptoms include:
- Windows cannot install updates properly.
- You might not be able to install any additional programs or apps onto the computer.
- When you check the memory of the computer, it may be very near its full capacity.
Solution
Error Causes
The Windows 10 upgrade error is caused by varying factors including a lack of computer space or resources, malware or virus infestation, or a clogged registry on the computer. The error code 0x80070070 will present itself when there is not enough free space on the computer to perform the necessary updates on the computer. Too many apps or programs downloaded onto the computer, too many photos, or too much music may also contribute to the lack of storage space on the computer, thus contributing to the error, and the computer not being able to install the updates to the operating system properly.
Further Information and Manual Repair
There is not a lot of information regarding this error code, but there are a few methods to repair it when it does present itself. There are practical and manual steps that can be taken when trying to get the PC up and running. The primary way to solve this problem is to free up disk space and there are several ways to do this. Please do note that if these methods seem confusing or too complicated, do contact a Windows repair technician so that they may properly correct the problem. You will need to know for sure that it is error code 0x80070070 that you are dealing with so that these options are the best bet for fixing it.
Method One: Disk Cleanup
It is important to know how much space there is on the computer to start with prior to trying to free up any space. Use the free program on the computer called the Disk Cleanup tool. This will save time and free up some hard drive space while optimizing the computer to work better.
From the Start menu, browse to the Explore option, and then select This PC. Right-click on the C drive, and then select Properties. Select Disk cleanup. From here, select the options that you would like to clear. Make sure that the recycle bin is emptied of any temporary files or any error logs. Once done, select Okay.
Use this same process to clear the system files after an update from Windows, as they may still have files from the old operating system in place.
Method Two: Remove Unwanted Apps
Go through your computer and remove any unwanted apps that are present. There are sure to be some that you do not use or do not want.
Follow these steps: From the Start menu, select Settings. Then, select System, Apps, and Features. When you have found the program that you would like to uninstall, select it and then select Uninstall. NOTE: some apps that are built into Windows do not have the capability to be uninstalled. Once you have selected Uninstall for the app or program, follow all directions that appear on the screen.
Method Three: Cloud Storage
If there are a lot of media, photos, documents, videos, and the like that are not used on a regular basis, try out cloud storage. These files will still be in your possession and will be able to be accessed from anywhere. There are many applications or websites that cater to this.
Method Four: External Storage Options
If none of the above methods work, add more storage. To acquire more storage, you can incorporate devices such as SD cards, USB flash drives, and even external hard drives.
Method Five: Use An Automated Tool
If you wish to always have at your disposal a utility tool to fix these Windows 10 and other related issues when they do arise, download and install a powerful automated tool.
Read More
Virtual Reality is slowly becoming standard in gaming. More and more affordable headsets are coming out lowering entry prices and making them affordable for all. But in a sea of new VR headsets, it is important to at least purchase a decent one that will perform nicely and hopefully last longer.
Therefore in today’s article, we will address some of the best options currently available on the market,
Oculus Quest 2
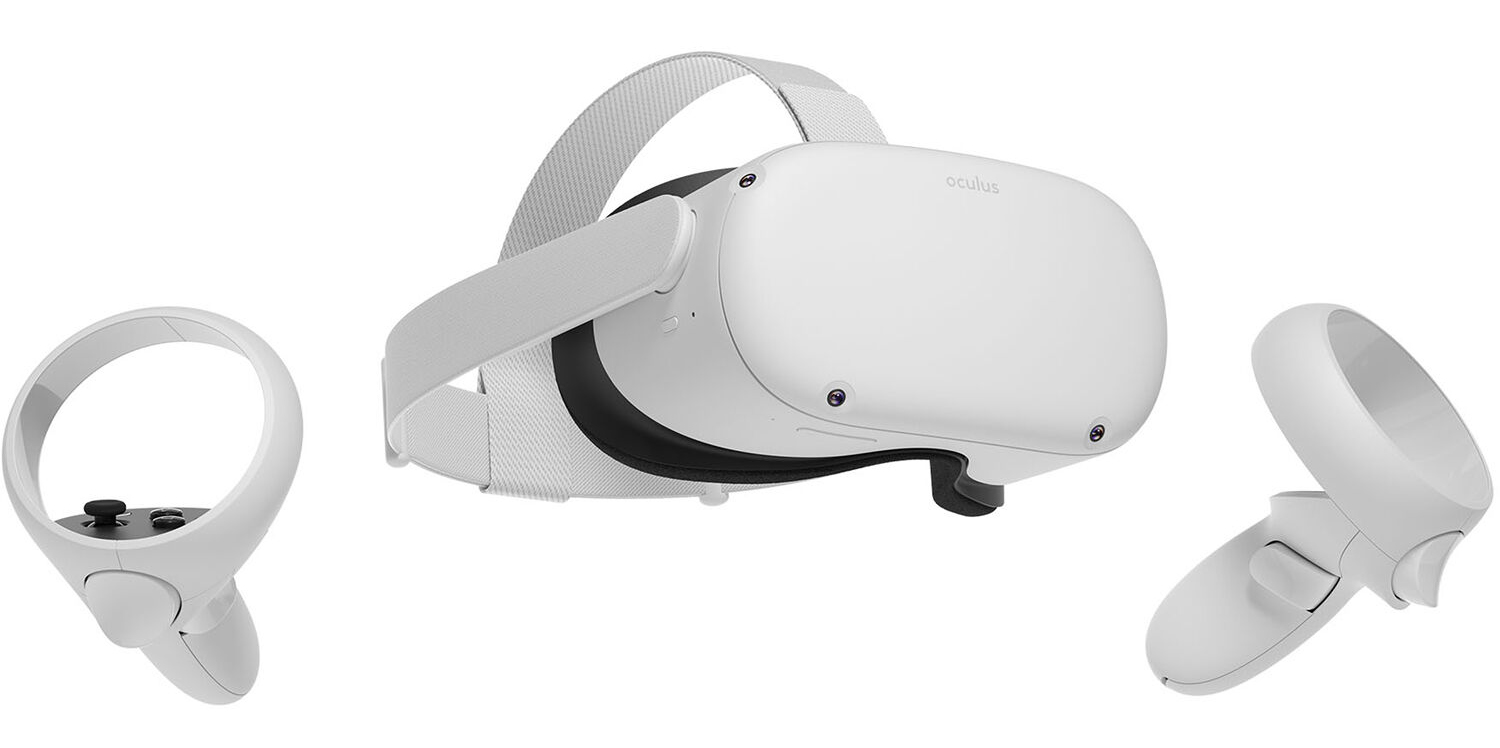 With its Rift model, Oculus set itself as a big player in VR. Now the company is slowly bowing out of the dedicated, tethered VR headset with its latest Quest 2 designed to primarily be a standalone headset.
In case you do not know, tethered headset means that the headset itself is connected to your PC and is using its power to drive your VR experience.
Now technical specifications of Quest 2 are pretty OK and it can drive stuff pretty decently and if you want you can purchase the dedicated cable to connect it to your PC for the full experience of games requiring more capable hardware.
Oculus Quest 2 is the cheapest headset on this list and with its stable performance, is highly recommended.
Valve Index VR
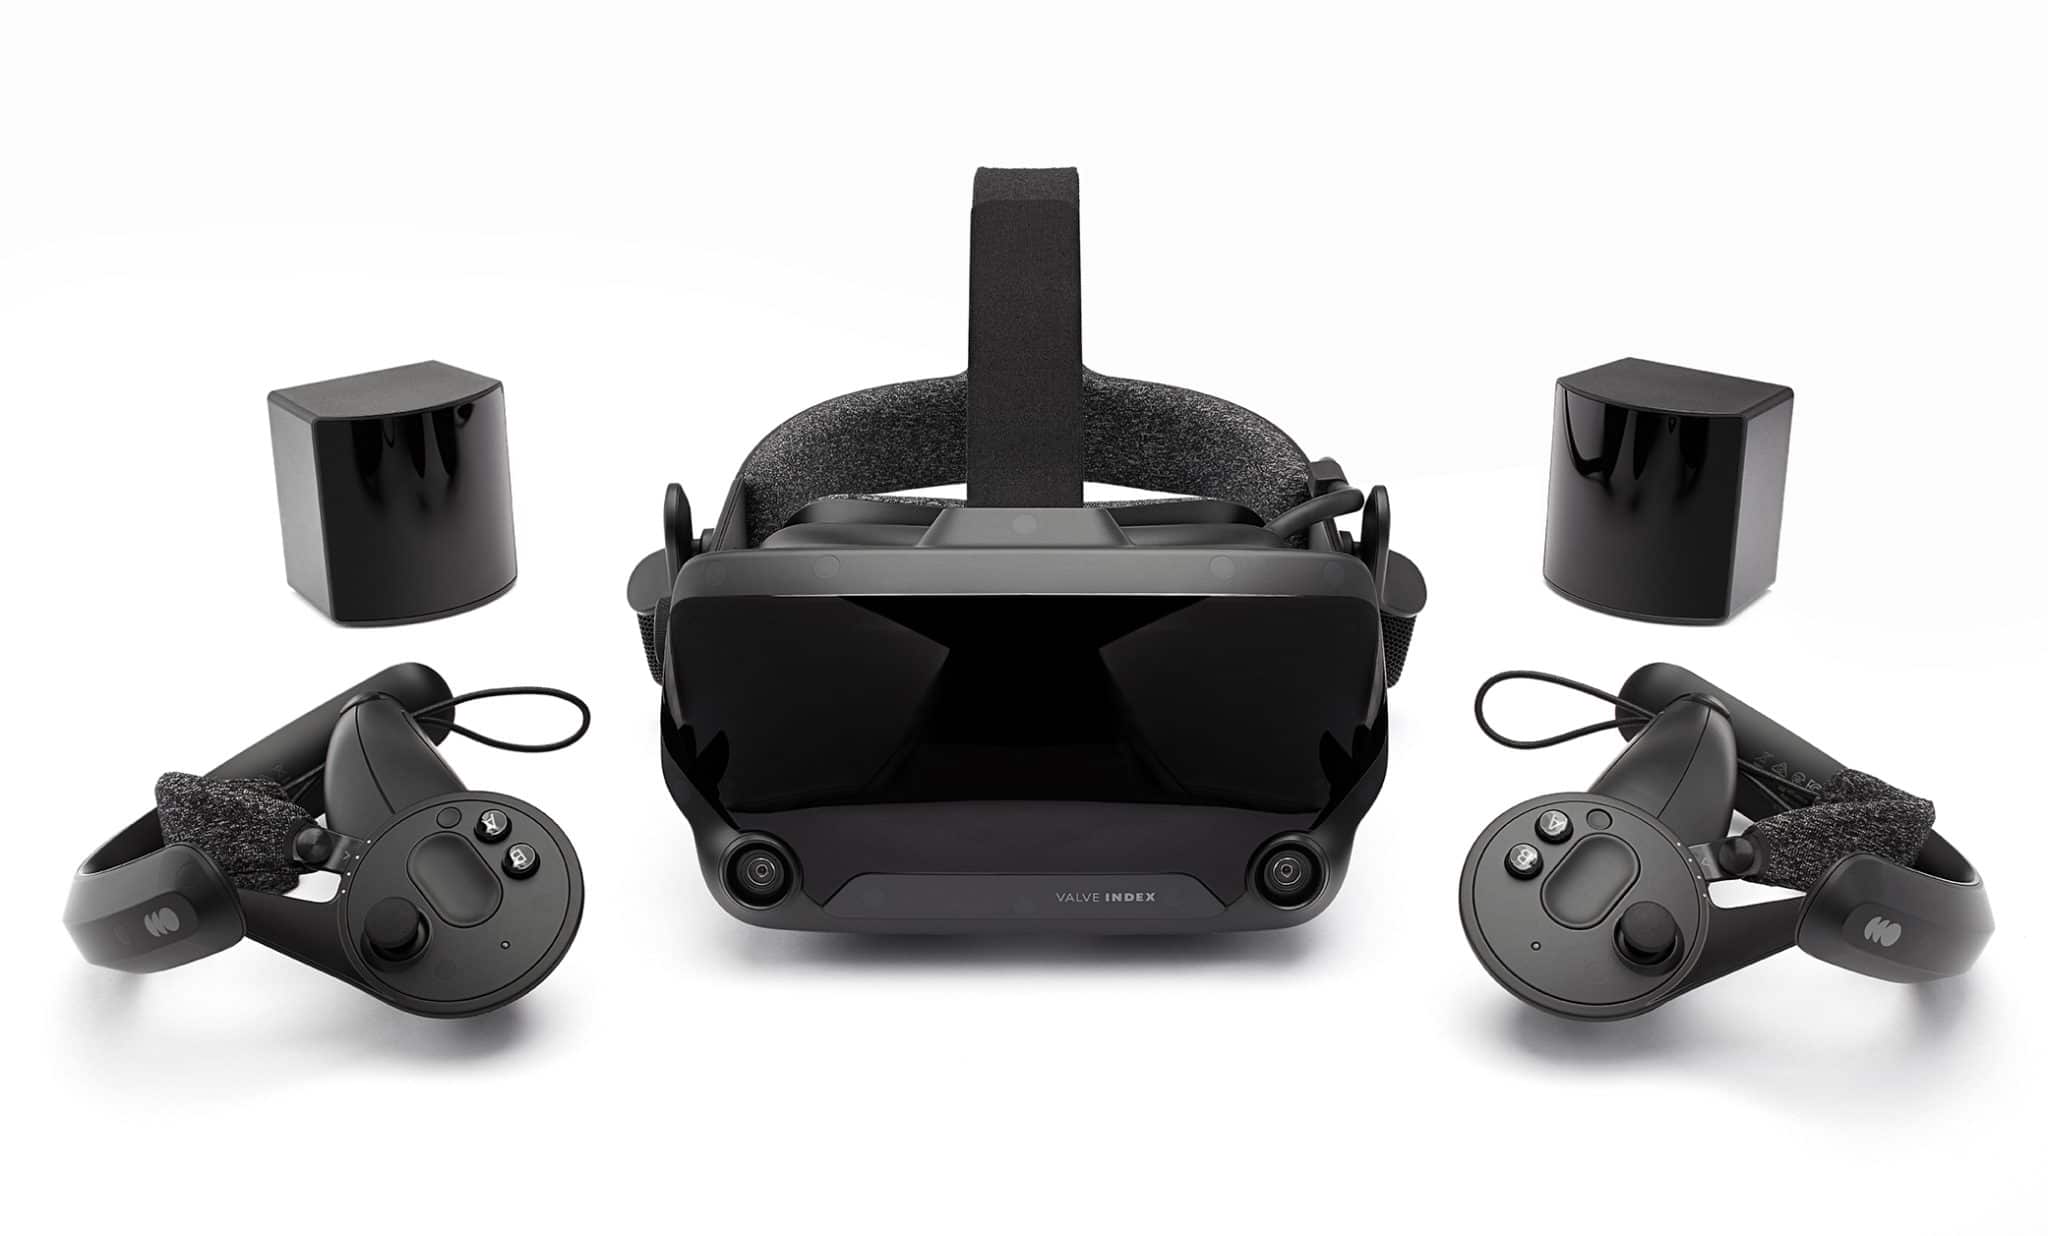 Although the headset itself is nothing revolutionary or special its controllers are. They can track individual finger movements, making games (that take advantage of them) much more immersive than the standard trigger grips on other controllers.
The Index’s higher refresh rate makes for smoother action, as well, which is another nice bonus. If you already have an HTC Vive or Vive Cosmos Elite, and their base stations (not the regular Cosmos), you can buy only the controllers.
Sony PlayStation VR
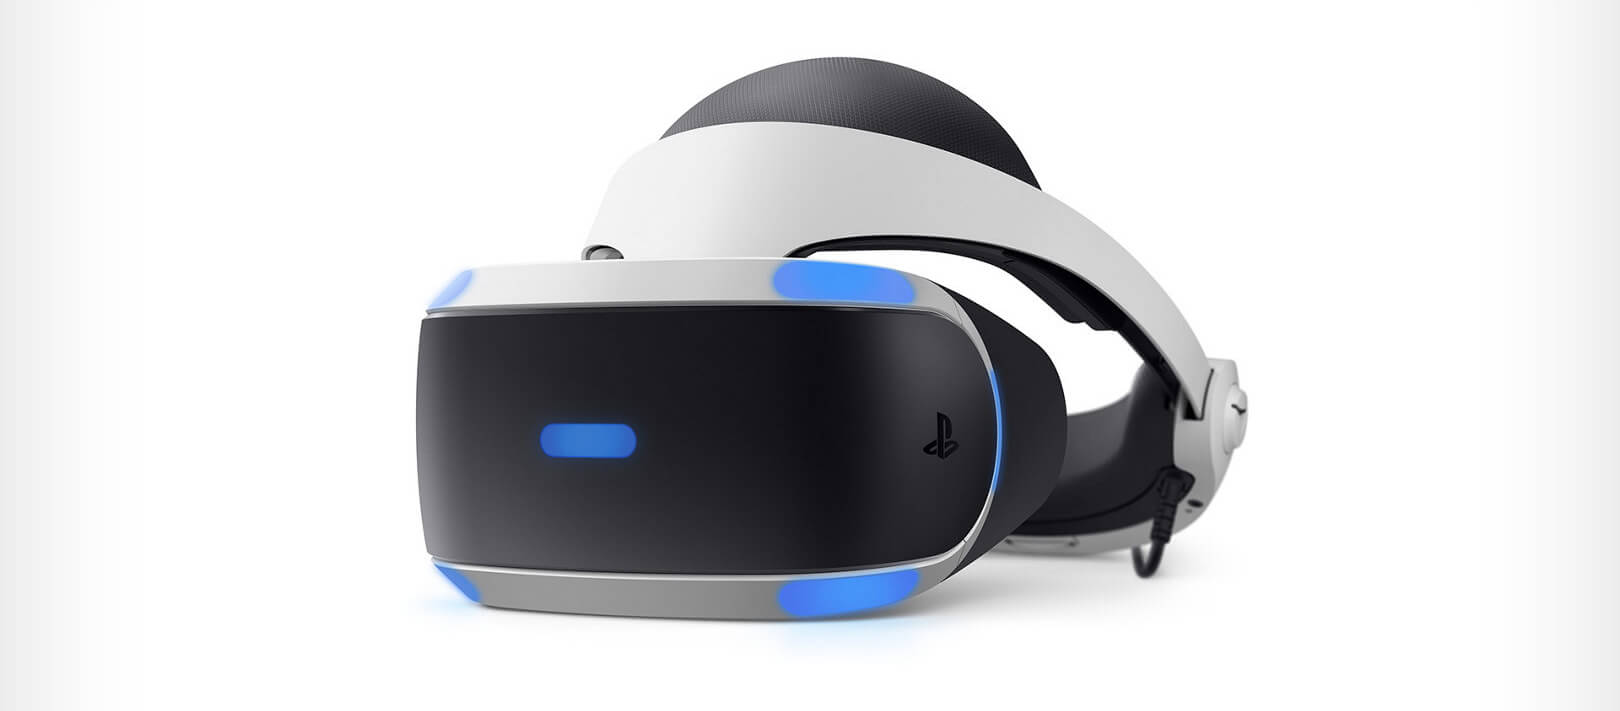 The PlayStation VR is compelling thanks to Sony backing its development, plus the PlayStation 4’s affordability and availability compared with gaming PCs. All you need is the headset, a PlayStation 4, and a PlayStation Camera (now included with most PlayStation VR bundles).
Not really the best of the bunch but still one of the top ones for console gaming. Sony is working on a new PlayStation VR system for the PlayStation 5, with redesigned controllers. The new headset hasn’t been revealed yet, but the company has released a preview of the new controllers.
HP Reverb G2 VR
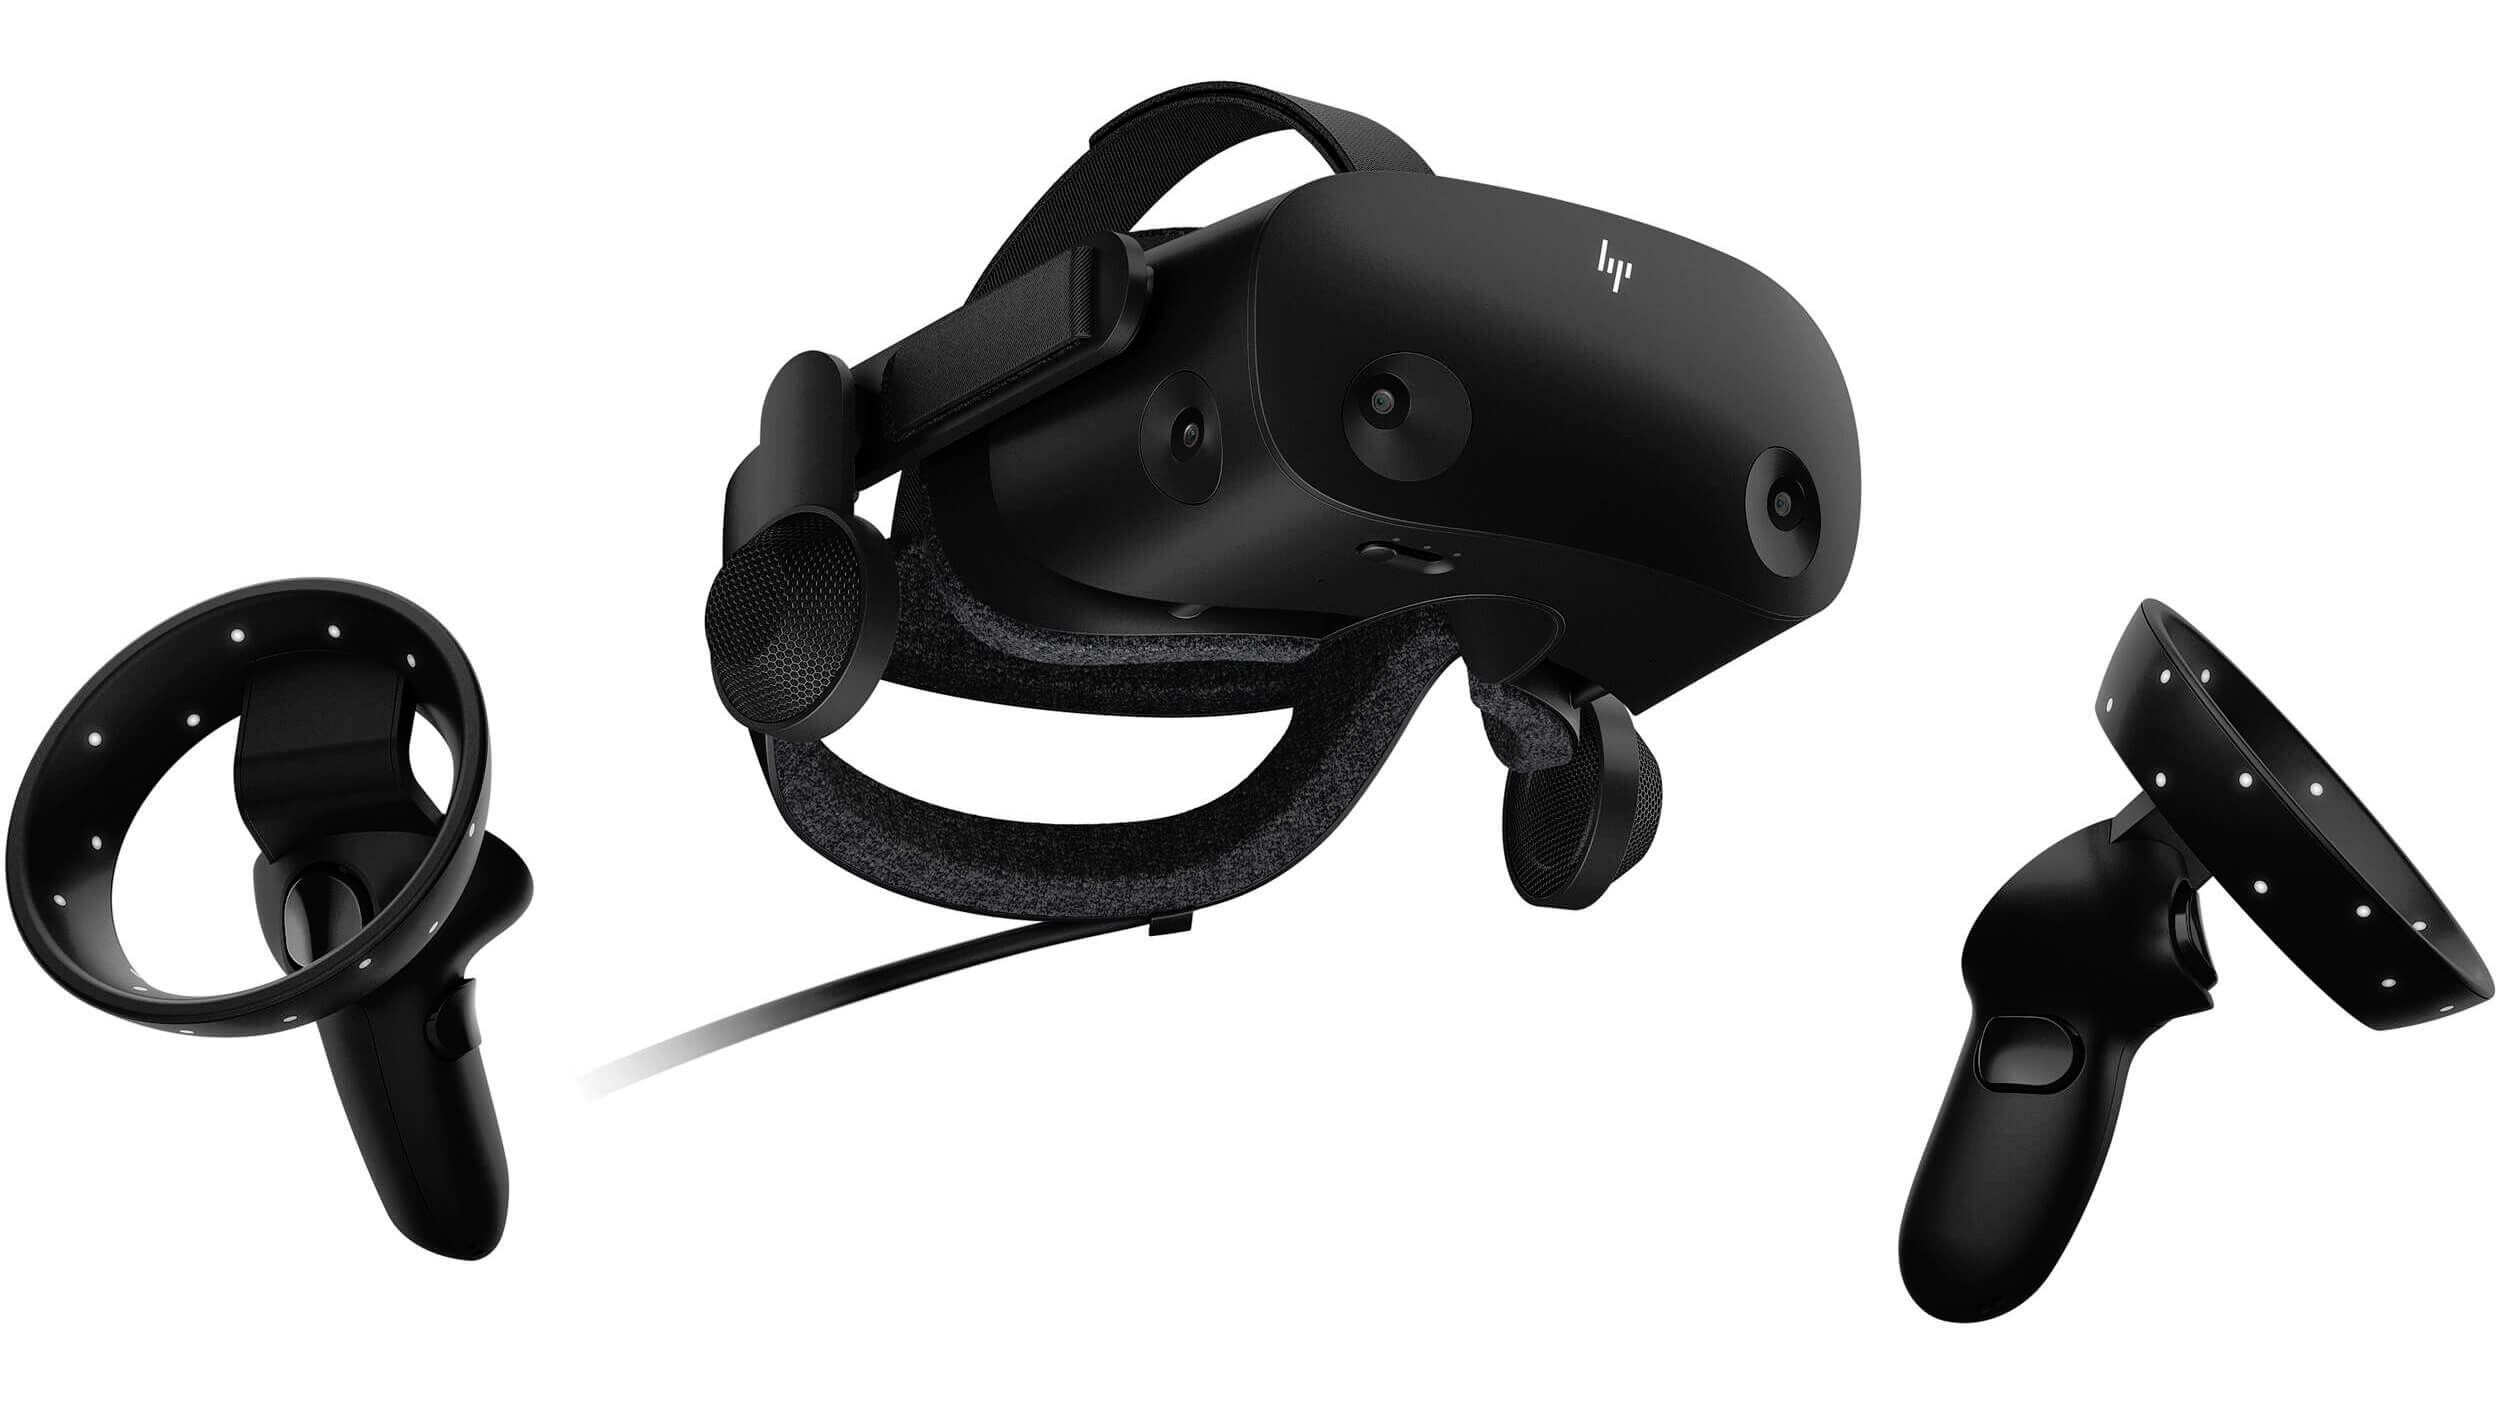 HP headset is one which you get if you want the best image quality in VR headset, sadly controllers did not follow the same quality of headset itself. But this is still a pretty decent headset overall and worth the purchase.
HTC Vive Cosmos
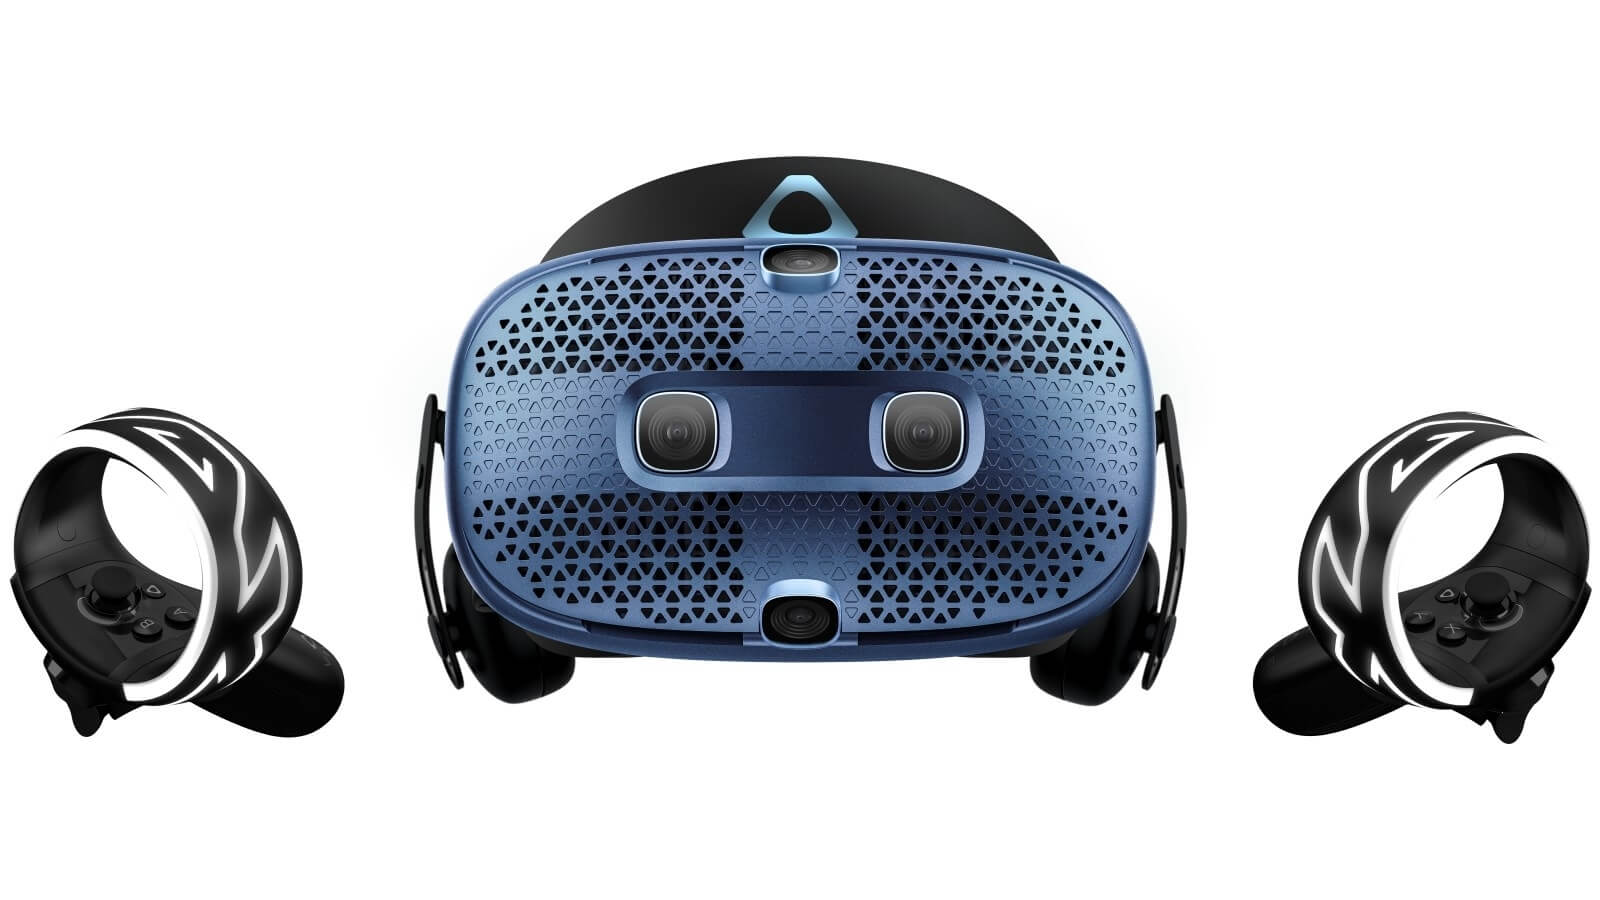 HTC’s Vive Cosmos is the upgraded version of the Vive. It features a higher resolution and replaces the external base stations with outward-facing cameras for motion tracking. It’s a comprehensive package for whole-room VR.
HTC recently released the Vive Pro 2, a high-end VR headset targeting both enterprise users and consumers. This new headset features a 2,448-by-2,448 resolution display for each eye, making it the highest-resolution headset currently available. It’s also more expensive than the Cosmos Elite.
Sadly one thing that is bringing this headset down is the price.
Read More
What is Desk365?
Desk 365 is a program developed by 337 Technology Limited and is classified as a potentially unwanted application by a number of Antiviruses. While not technically malware, for many users it is unwanted as it is often distributed as a bundle with other downloads. It allows a fast way to access your shortcuts and applications. Upon installation this program will insert itself into the system registry, adding startup strings to allow it to automatically start every time your system is restarted.
The software adds a scheduled windows task to allow it to reopen itself even when closed. The applications also access the internet and add firewall rules to your system, that allow it to access anything without restrictions.
The main executable file for this application is Dock365.exe. It is possible to delete this file preventing the application to run, but its monitoring services and registry entities remain hidden inside your computer.
The software sends browsing information back to its ad servers, displaying custom ads and sponsored products instead of the usual search results. And the app itself pins itself to the start menu and cannot be removed.
About Potentially Unwanted Applications
Have you ever discovered an unwanted program on your PC that you didn’t consciously download and never gave authorization to be installed? Potentially Unwanted Programs (PUP), also referred to as Potentially Unwanted Applications (PUA), are applications that you never wanted in the first place and often come bundled with freeware. Once installed, the majority of these applications can be difficult to eliminate and become much more of an annoyance rather than a necessity.
PUPs did not actually constitute pure “malware” in the strict sense of the definition. What normally makes a PUP different from malicious software is that whenever you download one, you’re doing it with your consent – though in many instances unconsciously and unwillingly. A PUP may not be regarded as malicious or unsafe yet still, it’s a common cause of clunky OS’s; some PUPs are a lot more aggressive by intentionally slowing down your computer or laptop.
Exactly how do unwanted programs look like?
Potentially Unwanted Programs can be found in different forms and varieties, but in the majority of cases, these are typically adware programs that exhibit irritating pop-up adverts and advertisements on websites you check out. They even come in the form of browser extension toolbars and add-ons. Not only they needlessly take up space on your screen, but toolbars can also manipulate search engine results, keep an eye on your surfing activities, decrease your internet browser’s efficiency, and slow down your internet connection to a crawl.
PUPs load up a dangerous bite if left unchecked. They could include keyloggers, dialers, and other program built into them which could track you or send your sensitive information to third parties. Typically, such software will disable security protections and configuration settings to take control over your computer or laptop, leaving that PC vulnerable to online hackers and data fraud. At a minimum, PUPs slow your computer down with every added program.
Tips on how to prevent PUPs
• Read the fine print so that the end-user license agreement (EULA) you are accepting is only for the software you primarily intend to download.
• Choose the “custom” install whenever installing an application. Especially, look closely at those small boxes which have been checked as default, where you may ‘agree’ to receive promotions or install software bundlers.
• Use an anti-PUP program. Security applications such as Safebytes Anti-Malware gives the very best real-time protection against PUPs and also other malware.
• Be alert if you download and install freeware, open-source programs, or shareware. Nowadays ‘freeware’ isn’t actually freeware – but “crapware” bundling nonsense.
• Always download software from trustworthy sources like official websites rather than untrustworthy sharing space. Avoid file-hosting sites where/when possible.
What To Do If You Cannot Download Safebytes Anti-Malware?
Every malware is detrimental and the level of the damage can vary greatly according to the type of infection. Some malware is designed to restrict or prevent things that you wish to do on your PC. It may well not permit you to download anything from the web or prevent you from accessing some or all internet sites, in particular the antivirus sites. If you are reading this, chances are you’re stuck with a virus infection that is preventing you to download or install Safebytes Anti-Malware software on your computer system. There are a few fixes you could try to get around with this particular problem.
Download the software in Safe Mode with Networking
The Windows-based PC comes with a special mode known as “Safe Mode” in which just the minimum required programs and services are loaded. If the malicious software is set to load immediately when PC boots, shifting into this mode may well prevent it from doing so. To get into Safe Mode or Safe Mode with Networking, press the F8 key while the system is starting up or run MSCONFIG and look for the “Safe Boot” options in the “Boot” tab. After you restart the PC into Safe Mode with Networking, you can download, install, and update the anti-malware program from there. At this point, you could run the anti-virus scan to eliminate viruses and malware without any hindrance from another malicious application.
Switch over to an alternate web browser
Some malware mainly targets specific internet browsers. If this sounds like your situation, use another internet browser as it might circumvent the malware. If you are not able to download the anti-virus software using Internet Explorer, it means the virus could be targeting IE’s vulnerabilities. Here, you need to switch to a different internet browser such as Chrome or Firefox to download Safebytes Anti-malware software.
Install and run anti-virus from your flash drive
Another option would be to create a portable anti-malware program on your USB stick. To run antivirus from a thumb drive, follow these simple steps:
1) Make use of another virus-free computer to download Safebytes Anti-Malware.
2) Plug in the pen drive to a USB port on the uninfected computer.
3) Double-click the Setup icon of the antivirus software package to run the Installation Wizard.
4) When asked, choose the location of the USB drive as the place in which you want to put the software files. Follow activation instructions.
5) Now, insert the USB drive into the infected PC.
6) Run the Safebytes Anti-malware directly from the flash drive by double-clicking the icon.
7) Run Full System Scan to detect and clean-up up all kinds of malware.
If all the above approaches fail to help you in downloading the anti-malware, then you’ve no alternative but to reinstall the computer’s operating system to wipe out all the data, including the malicious programs which are obstructing the anti-malware installation. If you are already our customer, technical help for Malware Removal is just a phone call away. Call 1-844-377-4107 to speak to our expert technicians and get assistance remotely.
Let’s Talk About SafeBytes Anti-Malware!
To help protect your computer from many different internet-based threats, it’s very important to install anti-malware software on your personal computer. But with so many antimalware companies out there, nowadays it’s tough to decide which one you should obtain for your PC. A few are good ones, some are decent, and some are merely fake anti-malware programs that will harm your PC themselves! You need to be very careful not to pick the wrong product, especially if you buy a paid program. On the list of the highly recommended tools by industry experts is SafeBytes Anti-Malware, well-known security software for Windows computers.
Safebytes is among the well-established computer solutions firms, which offer this comprehensive anti-malware software program. Using its outstanding protection system, this utility will quickly detect and eliminate the majority of the security threats, including viruses, adware, browser hijackers, ransomware, PUPs, and trojans.
SafeBytes anti-malware offers an array of advanced features which sets it apart from all others. Listed below are some of the highlighted features included in the tool.
Real-time Threat Response: SafeBytes delivers complete and real-time security for your PC. It will inspect your computer for suspicious activity continuously and shields your personal computer from unauthorized access.
Optimum AntiMalware Protection: This deep-cleaning anti-malware software goes much deeper than most antivirus tools to clean your computer. Its critically acclaimed virus engine finds and disables hard-to-remove malware that conceals deep within your computer.
Web Filtering: SafeBytes gives an instant safety rating about the web pages you’re about to visit, automatically blocking harmful sites and ensuring that you are certain of your online safety while browsing the net.
Light-weight: This software program is not “heavy” on your computer’s resources, so you will not notice any performance issues when SafeBytes is working in the background.
24/7 Online Support: You can obtain high levels of support round the clock if you’re using their paid version.
Overall, SafeBytes Anti-Malware is a solid program since it has plenty of features and can identify and remove any potential threats. You can rest assured that your computer will be protected in real-time once you put this tool to use. For optimum protection and the best bang for your buck, you can’t get better than SafeBytes Anti-Malware.
Technical Details and Manual Removal (Advanced Users)
If you wish to manually remove Desk365 without the use of an automated tool, it may be possible to do so by removing the program from the Windows Add/Remove Programs menu, or in cases of browser extensions, going to the browsers AddOn/Extension manager and removing it. You will likely also want to reset your browser.
To ensure the complete removal, manually check your hard drive and registry for all of the following and remove or reset the values accordingly. Please note that this is for advanced users only and may be difficult, with incorrect file removal causing additional PC errors. In addition, some malware is capable of replicating or preventing deletion. Doing this in Safe Mode is advised.
The following files, folders, and registry entries are created or modified by Desk365
Files:
File $APPDATACheckRun22find.exe.
File $APPDATADesk 365accelerate.
File $APPDATADesk 365desk_bkg_list.xml.
File $APPDATADesk 365desk_list.xml.
File $APPDATADesk 365desk_settings.ini.
File $APPDATADesk 365firstrun.
File $APPDATADesk 365process_mgr.xml.
File $APPDATADesk 365promote.xml.
File $APPDATAeDownloadfindhpnt_v2.exe.
File $APPDATAMicrosoftInternet ExplorerQuick Launchfind.lnk.
File $COMMONPROGRAMSDesk 365Desk 365.lnk.
File $COMMONPROGRAMSDesk 365eUninstall.lnk.
File $DESKTOPfind.lnk.
File $LOCALAPPDATAGoogleChromeUser DataDefaultExtensionsnewtab.crx.
File $LOCALSETTINGSTempV9Zip_003Desk365.exe.
File $PROGRAMFILESDesk 365desk_bkg_list.xml.
File $PROGRAMFILESDesk 365desk_list.xml.
File $PROGRAMFILESDesk 365desk_settings.ini.
File $PROGRAMFILESDesk 365desk365.exe.
File $PROGRAMFILESDesk 365deskSvc.exe.
File $PROGRAMFILESDesk 365ebase.dll.
File $PROGRAMFILESDesk 365edeskcmn.dll.
File $PROGRAMFILESDesk 365eDhelper.exe.
File $PROGRAMFILESDesk 365eDhelper64.exe.
File $PROGRAMFILESDesk 365edis.dll.
File $PROGRAMFILESDesk 365edis64.dll.
File $PROGRAMFILESDesk 365ElexDbg.dll.
File $PROGRAMFILESDesk 365eUninstall.exe.
File $PROGRAMFILESDesk 365libpng.dll.
File $PROGRAMFILESDesk 365main.
File $PROGRAMFILESDesk 365ouilibnl.dll.
File $PROGRAMFILESDesk 365process_mgr.xml.
File $PROGRAMFILESDesk 365promote.xml.
File $PROGRAMFILESDesk 365recent.xml.
File $PROGRAMFILESDesk 365sqlite3.dll.
File $PROGRAMFILESDesk 365svc.conf.
File $PROGRAMFILESDesk 365TrayDownloader.exe.
File $PROGRAMFILESDesk 365zlib1.dll.
File $PROGRAMFILESMozilla Firefoxsearchpluginsfind.xml.
File $SENDTODesk 365.lnk.
Directory $APPDATADesk 365.
Directory $APPDATAeDownload.
Directory $COMMONPROGRAMFILES7.
Directory $COMMONPROGRAMSDesk 365.
Directory $LOCALSETTINGSTempDesk365.
Directory $LOCALSETTINGSTempV9Zip_003.
Directory $PROGRAMFILESDesk 365.
Registry:
Key 33BB0A4E-99AF-4226-BDF6-49120163DE86 at HKEY_CURRENT_USERSoftwareMicrosoftInternet ExplorerSearchScopes.
Key deskSvc at HKEY_LOCAL_MACHINESOFTWARE.
Key desksvc at HKEY_LOCAL_MACHINESYSTEMControlSet001Services.
Key desksvc at HKEY_LOCAL_MACHINESYSTEMControlSet001ServicesEventlogApplication.
Key desksvc at HKEY_LOCAL_MACHINESYSTEMCurrentControlSetServices.
Key desksvc at HKEY_LOCAL_MACHINESYSTEMCurrentControlSetServicesEventlogApplication.
Key findSoftware at HKEY_LOCAL_MACHINESOFTWARE.
Key ijblflkdjdopkpdgllkmlbgcffjbnfda at HKEY_LOCAL_MACHINESOFTWAREGoogleChromeExtensions.
Key lnkguard at HKEY_CURRENT_USERSoftware.
Key V9 at HKEY_LOCAL_MACHINESOFTWARE.
Read More
Windows 10 has a UWP app for its Camera that you can use to take pictures and videos. However, if you suddenly encounter an error code 0xa00f4243 while using the Camera UWP app, then you’ve come to the right place as this post will provide some potential fixes that you can use to fix the problem.
This kind of error could be due to an outdated or corrupted driver or a third-party program. When this error appears on the Camera UWP app, you will see the following error message:
“Close other apps. It looks as though another app is already using the camera. If you need it, here’s the error code: 0xA00F4243 (0xC00D3704)”
To fix the error code: 0xA00F4243 (0xC00D3704) in the Camera UWP app, you can try to run the Windows Store Apps troubleshooter or reset the Camera app or update or reinstall the driver or apply some tweaks in the Registry Editor. In addition, you can also try checking the Windows Services or run the System File Checker.
Option 1 – Try to run the Windows Store Apps troubleshooter
The Windows 10 Store Apps Troubleshooter will help you in fixing the Camera UWP app error code: 0xA00F4243 (0xC00D3704). This is a great built-in tool from Microsoft that helps users fix any app installation issues. So this is worth a try to solve the problem. This built-in tool also helps you fix the Windows 10 Store if it isn’t working.
To use the Windows Store Apps Troubleshooter, follow the steps below.
- Tap Win + I keys again to open the Windows Settings panel.
- Go to Update & Security and then go to Troubleshoot.
- Under the Troubleshoot section, on your left-hand side, scroll down to find Window Store Apps.
- Then click on the Run the troubleshooter option and follow the on-screen instructions and then see if it fixes the problem.
Option 2 – Try to reset the Camera app to fix
As pointed out earlier, you can also reset the Camera app to fix the error. To do so, follow the steps below.
- The first thing you have to do is go to the My Pictures folder under the C: drive of the File Explorer and then delete the Camera Roll folder.
- Once you’re done, right-click on an empty area on your screen and create a new folder and name it “Camera Roll”.
- Then from the Start menu open the Settings app and select System.
- From there, navigate to the Apps and features section.
- Now go to Camera and click on the Advanced Options and click the Reset button.
Option 3 – Try to reinstall the drivers for the Camera app
You might want to reinstall the Camera drivers as it could resolve the problem. To do so, refer to these steps:
- First, boot your computer into Safe Mode.
- After that, tap the Win + R keys to launch Run.
- Type in devmgmt.msc into the box and tap Enter or click OK to open the Device Manager.
- After that, a list of device drivers will be displayed. From there, look for the driver listed under the Camera section and then, right-click on each entry of the device drivers and select the “Uninstall Device” option from the menu.
- Now restart your computer.
- After restarting your computer, go to the Settings app and Check for Updates in the Windows Update section.
Option 4 – Try to use the Registry Editor
- Tap the Win + R keys to open the Run utility and type “Regedit” in the field and hit Enter to open the Registry Editor.
- After that, navigate to this registry key: ComputerHKEY_LOCAL_MACHINESOFTWAREWOW6432NodeMicrosoftWindows Media FoundationPlatform
- Here, look for a DWORD named “EnableFrameServerMode” and if you can’t see it, just create a new DWORD by right-clicking on any empty space.
- Then select New > DWORD (32-bit) Value and name it as “EnableFrameServerMode”.
- Double click on the newly created DWORD and set its Value data to “0” and click on OK.
- Restart your computer and see if it fixes the Camera UWP app error code: 0xA00F4243 (0xC00D3704).
Option 5 – Try checking the Windows Services
Note that this option only applies to computers with Intel Hardware for the Camera.
- Tap the Win + R keys to open the Run dialog box and type “services.msc” and hit Enter to open the Services Manager.
- Next, look for the “Intel(R) RealSense(TM) Depth” service from the list of services and double click on it to open its Properties.
- After that, change its Startup Type to “Automatic” and make sure it’s running and then click on the Apply and OK buttons to save the changes made.
- Restart your computer and check if the problem has been resolved.
Option 6 – Try running System File Checker or SFC scan
System File Checker or SFC is a built-in command utility that helps in restoring corrupted files as well as missing files. It replaces bad and corrupted system files to good system files. To run the SFC command, follow the steps given below.
- Tap Win + R to launch Run.
- Type in cmd in the field and tap Enter.
- After opening Command Prompt, type in sfc /scannow
The command will start a system scan which will take a few whiles before it finishes. Once it’s done, you could get the following results:
- Windows Resource Protection did not find any integrity violations.
- Windows Resource Protection found corrupt files and successfully repaired them.
- Windows Resource Protection found corrupt files but was unable to fix some of them.
- Reboot your PC.
Read More
Trojan. Kryptik is a malicious computer infection known as a Trojan horse. Trojan. Kryptik can load at startup and recreate itself which makes it difficult to manually remove from the infected computer. Trojan. Kryptik can compromise the infected system by allowing a remote hacker to gain access without the user’s permission or knowledge. Trojan. Kryptik can also lead to the infection of other unknown malware parasites.
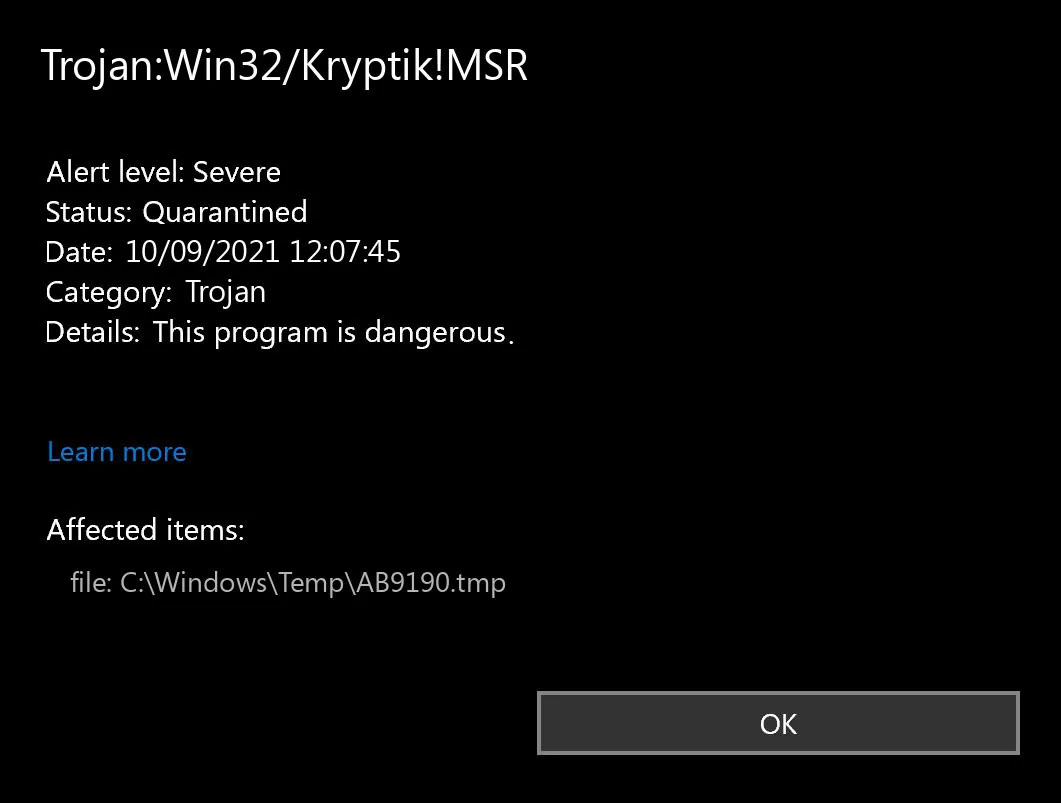 Trojan.Kryptik creates the following registry entry or registry entries:
Directory
%ALLUSERSPROFILE%windrivgr 19.7
%LOCALAPPDATA%DsHcaJnIIz
File name without path
scaalqtw.exe
Regexp file mask
%ALLUSERSPROFILE%sqldump.exe
%APPDATA%b[NUMBERS].exe
%APPDATA%MicrosoftWindowsStart MenuProgramsStartup[RANDOM CHARACTERS].com.url
%APPDATA%Originupdate.vbe
%APPDATA%Stanfind.exe
%APPDATA%vpn gui.exe
%LOCALAPPDATA%MicrosoftWindowsSymbolswvfilters.sys
%TEMP%nvc.exe
%TEMP%system.exe
%TEMP%winsrvcs32.exe
Read More
When it comes to booting an operating system on a computer, one of the most essential pieces of software you can use is the UEFI. In fact, a lot of users now prefer to use UEFI instead of BIOS. It also depends on whether the UEFI or the BIOS is supported on the motherboard. Recently, a number of users reported an issue with UEFI where they were unable to find it under the Advanced Options screen where it’s supposed to be located.
The missing UEFI Firmware settings in the Advanced Options could be caused by several reasons. It is possible that the access to the UEFI menu is blocked or it could also be due to the Extra Fast Startup feature being enabled. It is also possible that the operating system is installed in Legacy mode.
There are several options to try to fix this issue. You need to check if your computer supports UEFI or you could also try to disable Fast Startup or bypass the Extra Fast Startup feature. You can also use a boot to UEFI shortcut as well as check the CMOS battery.
Option 1 – Try checking if your computer supports UEFI
The first thing you have to do is to verify if your computer supports UEFI. If your computer does not support UEFI, then it’s no wonder why you don’t see the UEFI Firmware settings in the Advanced Options.
Option 2 – Try turning off Fast Startup
- First, boot your computer in Safe Mode.
- Once your computer is booted in Safe Mode, tap the Win + R keys to open the Run dialog box and type in “control” to open the Control Panel.
- Next, click on the Hardware and Sound section and click on Power Options.
- Afterward, select the “Choose what the power buttons do” option from the left side menu pane.
- Now click on Change settings that are currently unavailable and uncheck the entry that says, “Turn on fast startup (Recommended)”.
- Then click on Save Changes and restart your computer and see if it has fixed the problem or not.
Option 3 – Try bypassing the Extra Fast Startup feature
As mentioned, the missing UEFI Firmware settings could be due to the Extra Fast Startup feature. To fix it, you have to disable this feature. All you have to do is tap and hold the Shift key and click on the Shutdown button from the Start button. This will boot your PC with the UEFI booting from the beginning and then use the hotkey for your motherboard to boot into the UEFI setup.
Option 4 – Try using a boot to UEFI shortcut
- Right-click on any empty space on your Desktop and select New > Shortcut.
- This will open a new mini window. And here, you have to type this in the text field: shutdown /r /fw
- After that, click on Next and name the desktop shortcut and then click on Finish.
- Next, right-click on the newly created shortcut and select Properties.
- Click on the Advanced button and select the “Run as administrator” option.
- Now click OK to save the changes made. Each time you execute this shortcut, your computer will automatically be booted to the UEFI Firmware Settings.
Option 5 – Try to check the CMOS battery
Another thing you can do is check the CMOS battery physically on the motherboard and see if it has to be replaced since a damaged CMOS battery can also cause the issue with the missing UEFI Firmware settings.
Option 6 – Set your computer from Legacy to UEFI
If applicable, you can try to set your computer from Legacy to UEFI to resolve the problem.
- In the Windows Search box, type “command prompt” and from the search results that appear, right-click on Command Prompt and select the “Run as administrator” option.
- After that, execute this command: mbr2gpt.exe /convert /allowfullOS
- Now, wait until the process is completed since you can track its process on your screen.
- Once it’s done, go to Settings > Update & Security > Advanced Startup options and from there, click on Restart Now. This will restart your computer and give you advanced options.
- Next, select Troubleshoot > Advanced Options where you will see further options including System Restore, Startup Repair, Go back to the previous version, Command Prompt, System Image Recovery, and UEFI Firmware Settings.
- Now select the UEFI Firmware Settings. This will take you to the BIOS. Boot Mode is typically available under Boot > Boot Configuration. Once you’re there, set it to UEFI and then save the changes you’ve made. After that, your computer will restart.
Read More
Blue Screen of Death errors or Stop errors are indications that something’s wrong with your computer. So when you encounter one, you must find out what the root cause of the problem is before it gets out of hand. One of the BSOD errors you might encounter on your Windows 10 computer is the “DRIVER IRQL NOT LESS OR EQUAL or SYSTEM THREAD EXCEPTION NOT HANDLED, Netwtw04.sys failed” error.
As you know, system files or .sys files are some of the essential parts of the Windows operating system. It is a repository of system driver settings used by the Windows operating system in order to communicate with the connected hardware and devices. They are essential for the normal functioning of the operating system. A lot of Windows 10 users are facing this particular Blue Screen of Death error whenever they open an app or disconnect external devices from the system.
The Netwtw04.sys file is a part of the Intel PROSet/Wireless Wi-Fi software. And so when you might encounter two kinds of Stop errors for the Netwtw04.sys driver file such as:
- “DRIVER_IRQL_NOT_LESS_OR_EQUAL What failed: Netwtw04.sys.” – This kind of error message signifies that a kernel-mode driver tried to access pageable memory at a process IRQL that was too high.
- “SYSTEM_THREAD_EXCEPTION_NOT_HANDLED What failed: Netwtw04.sys” – This error message indicates that the root cause of the error might be incompatible drivers with the operating system. In general, the root cause of the Netwtw04.sys BSOD error might be due to several reasons such as corrupted files, incorrect device driver configuration, malicious programs, outdated drivers, bad drivers, corrupted Windows Registry as well as some damaged or corrupted system files.
Whichever of the two error messages you got, you can try the troubleshooting options given below to fix the “DRIVER IRQL NOT LESS OR EQUAL or SYSTEM THREAD EXCEPTION NOT HANDLED, Netwtw04.sys failed” BSOD error.
Option 1 – Try to rollback your Network driver
If you have updated the driver software as of late and you suddenly got this BSOD error, you might have to roll back the device driver – in other words, switch back to the previous working version. To do that, follow these steps:
- Tap the Win + R keys to launch the Run window and then type in the “devmgmt.msc” command and hit Enter to open the Device Manager window.
- Under the Device Manager, you will see a list of drivers. From there, look for the Network Adapters and expand it.
- Next, select the driver entries that are labeled appropriately other than anything in the context of the WAN Miniport.
- Then select each one of them and double-click to open a new mini window.
- After that, make sure that you’re on the Driver tab and if you are not, just navigate to it then click the Roll Back Driver button to switch back to the previous version of your Network adapters.
- Now restart your computer to successfully apply the changes made.
Option 2 – Try to update the Network drivers
If the present Network driver is giving you a headache that is the “DRIVER IRQL NOT LESS OR EQUAL or SYSTEM THREAD EXCEPTION NOT HANDLED, Netwtw04.sys failed” BSOD error, then you need to update the Network drivers. To do so, here’s what you have to do:
- Tap the Win + R keys to launch the Run window and then type in the “devmgmt.msc” command and hit Enter to open the Device Manager window.
- Under the Device Manager, you will see a list of drivers. From there, look for the Network Adapters and expand it.
- Then right-click on each one of the Network drivers and update them all.
- Restart your PC and see if it helped in fixing the BSOD error.
Note: If updating the network drivers didn’t help in fixing the problem, you can also try to uninstall the very same drivers and restart your Windows 10 PC. After that, the system itself will reinstall the drivers you just uninstalled. Alternatively, you can also download and install the drivers from the manufacturer’s website directly.
Option 3 – Try running the System File Checker Scan
The SFC or System File Checker scan could detect and automatically repair damaged system files that could be causing the Netwtw04.sys failed BSOD error. SFC is a built-in command utility that helps in restoring corrupted files as well as missing files. It replaces bad and corrupted system files to good system files. To run the SFC command, follow the steps given below.
- Tap Win + R to launch Run.
- Type in cmd in the field and tap Enter.
- After opening Command Prompt, type in sfc /scannow
The command will start a system scan which will take a few whiles before it finishes. Once it’s done, you could get the following results:
- Windows Resource Protection did not find any integrity violations.
- Windows Resource Protection found corrupt files and successfully repaired them.
- Windows Resource Protection found corrupt files but was unable to fix some of them.
Option 4 – Run the DISM Tool
The DISM tool is another command-line tool in the Windows operating system that could help users fix various corrupted system files. To use it, follow these steps:
- Open the Command Prompt as admin.
- Then type in this command: DISM /Online /Cleanup-Image /RestoreHealth
- The DISM command you entered will repair the corrupted system image. Do not close the window if the process takes a while as it will probably take a few minutes to finish.
Option 5 – Run the CHKDSK Utility
Running the CHKDSK utility might also help you resolve the Netwtw04.sys failed BSOD error. If your hard drive has issues with integrity, the update will really fail as the system will think that it’s not healthy and that’s where the CHKDSK utility comes in. The CHKDSK utility repairs hard drive errors that might be causing the problem.
- Open Command Prompt with admin privileges.
- After opening Command Prompt, execute the following command and hit Enter:
chkdsk /f /r
- Wait for the process to be completed and then restart your computer.
Read More

Copyright © 2022, ErrorTools. All Rights Reserved
Trademarks: Microsoft Windows logos are registered trademarks of Microsoft. Disclaimer: ErrorTools.com is not affiliated with Microsoft, nor claim direct affiliation.
The information on this page is provided for information purposes only.

Repair your PC with one click
Please be aware that our software needs to be installed on a PC system with Windows on it, Open this website on a desktop PC and download the software for easy and quick elimination of your issues.
В основе программных ошибок на ПК лежит множество причин. Самые распространённые из них ненамеренно вызываются пользователем. Причину таких неполадок, как ошибка 0x80070570, бывает трудно определить. Если вы впервые встретились с таким, самое время узнать о нём больше. Ведь во время установки ОС меньше всего ждёшь неприятных известий.
Когда может появиться окно с таким кодом?
Основные причины
Если описать кратко, код ошибки 0x80070570 появляется перед пользователем, когда есть проблемы с копированием файлов на компьютер. Это не всегда значит, что файлы установщика повреждены. Это не обязательно означает, что есть проблемы с их записью. Вопрос именно в обмене информацией. Какие неполадки так проявляют себя?
- Образ ОС содержит ошибки.
- Присутствуют неполадки в работе HDD (жёсткого диска).
- Неисправна материнская плата.
- Обнаружена неисправность в блоках оперативной памяти.
- BIOS устарел.
Как можно исправить неполадку?
Лучший способ избавиться от таких сообщений, как ошибка 0x80070570 — попробовать отследить причину неисправности. Способов есть несколько. Когда 0x80070570 при установке Windows 7 или более поздней версии ОС даёт о себе знать, нужно обратить внимание на детали.
Диагностика и решения
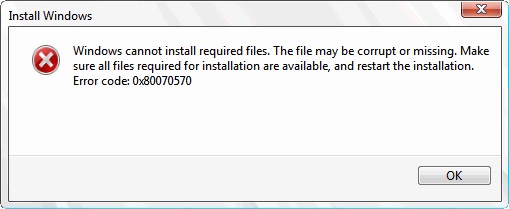
Вариант ошибки 0x80070570 в Windows
Проблемы в образе операционной системы
Если 0x80070570 при установке Windows 10 проявила себя, и вы получаете сообщение наподобие «0x80070570 файл или папка повреждены, чтение невозможно», самое время проверить образ Виндовс. Это несложно — найдите другой образ необходимой операционной системы. Или наоборот — попробуйте установить старый, проверенный временем дистрибутив. Если проблема в файлах установщика — система «встанет» без лишних хлопот. Можете смело удалять старый образ, и записывать на его место более новый.
Неполадки работы HDD
Больше оснований говорить о проблеме с жёстким диском, когда ошибка 0x80070570 при удалении файла проявляла себя ранее. Замечали такое? Тогда нужно проверить жёсткий диск компьютера с помощью специального сканера (программы). Это поможет определить «битые сектора», то есть повреждённые участки поверхности диска. Если они есть, хранить на компьютере свою личную информацию нежелательно. Всё-таки восстановление информации — удовольствие из дорогих.
Неисправна материнская плата

Короткие и длинные гудки при включении компьютера
Об этом вы можете узнать по коротким и длинным гудкам при запуске ПК. Или уже в процессе работы с новой операционной системой. Да, индикатором проблемы станет описанное ранее окно. Снова ошибка 0x80070570, как удалить файл, который отсутствует на диске, но виден в Проводнике? Перед тем как «обвинять» в неполадках материнскую плату, необходимо проверить все остальные компоненты.
При удалении файла с HDD появилось пресловутое сообщение? Не спешите подозревать материнскую плату — это компонент, обязанный быть устойчивым. Но удаляться от сути неправильно. Видеть на экране код 0x80070570 при установке Windows 7 — не самый лучший старт работы.
Версия BIOS устарела
Вы давно обновляли свой компьютер? Если нет, вполне вероятно, что версия прошивки материнской платы на нём уже давно устарела. При удалении с компьютера старой операционной системы вы можете проигнорировать этот факт, а при установке новой — просто не поймёте корень проблемы. Проверьте актуальную версию Windows для своей материнской платы.
Компьютер может и не быть очень старым, при этом прошивка материнской платы бывает неподходящей для последней версии ОС. Код ошибки 0x80070570 при обновлении Windows 10 — это вовсе не приговор. Это лишь факт, который подчёркивает требовательность новых программ.
Если причина осталась неизвестна
Рекомендации не помогли? Проверьте оперативную память! Прежде всего проведите её визуальный осмотр, разобрав компьютер и аккуратно достав блоки RAM. Но помните — после разбора системного блока вы, скорее всего, лишитесь гарантии. Если есть знания и умения — просто отлично. В противном случае лучше обратиться к компьютерному мастеру. Найти такого вы без труда сможете практически в каждом городе. Подключайтесь к обсуждению актуальных вопросов в комментариях!
Некоторые файлы обновлений отсутствуют или имеют проблемы, код ошибки 0x80070570 (01.28.23)
Никому не нравится глючный компьютер. К сожалению, не всегда получается то, что хочешь. Иногда вы можете столкнуться с такими проблемами, как код ошибки 0x80070570. Эта ошибка обычно появляется, когда некоторые файлы обновлений отсутствуют или имеют проблемы. Эта ошибка не характерна только для пользователей Windows 10, поскольку даже предыдущие версии операционной системы, такие как Windows Vista и Windows 8, также сталкиваются с ней.
Что вызывает код ошибки 0x80070570?
Вы можете получить эту ошибку, когда при установке ОС Windows или при ее обновлении. Существует несколько возможных причин этой ошибки, в том числе:
- Отсутствуют файлы обновлений
- Поврежденные файлы обновлений
- Неисправный или поврежденный диск.
- Откройте «Настройки».
- Найдите «Обновления и безопасность» и выберите его.
- Щелкните вкладку «Устранение неполадок» и запустите его. .
- Следуйте инструкциям на экране для средства устранения неполадок, чтобы выполнить сканирование.
- При появлении запроса выберите применение исправления.
- Введите «CMD» (без кавычек) в поле поиска Windows при запуске.
- Щелкните правой кнопкой мыши командную строку в результатах, затем выберите Запуск от имени администратора. Это позволяет вам открыть окно командной строки с повышенными привилегиями.
- Введите следующую команду и нажмите Enter
sfc / scannow - Дайте сканированию запуститься. Это может занять некоторое время. Если он не обнаружит ошибок, он сообщит об этом. Однако, если он обнаружит некоторые ошибки, которые не может исправить, перейдите к следующему шагу.
- Загрузите компьютер в безопасном режиме, выполнив следующие действия:
- Откройте «Настройки» в меню «Пуск».
- Выберите «Обновление и безопасность».
- Выберите «Расширенный запуск», затем «Перезагрузить сейчас».
- Как только вы перейдете в меню «Выбрать» на экране параметров выберите «Устранение неполадок».
- Выберите «Параметры запуска».
- Выберите «Перезагрузить».
- При следующем перезапуске выберите вариант 4 из списка параметров, нажав 4 или F4. Если вы хотите использовать Интернет в безопасном режиме, выберите вариант 5, нажав 5 или F5.
- Откройте командную строку, используя шаги 1 и 2.
- Введите команду из шага 3 и нажмите Enter.
- Он должен восстановить поврежденные файлы Windows.
- Загрузитесь в обычном режиме и попробуйте снова запустить обновления.
- Откройте командную строку с правами администратора, как в шагах 1 и 2 выше.
- Введите следующую команду и нажмите Enter:
DISM / Online / Cleanup-Image / RestoreHealth - Подождите несколько минут, пока команда запустится.
- Перезагрузите компьютер.
- Перезапустите служебную программу SFC. Он должен исправить все поврежденные системные файлы.
- Введите «CMD» (нет кавычки) в поле поиска Windows «Начало».
- Щелкните его правой кнопкой мыши в результатах и выберите «Запуск от имени администратора». Это позволяет вам открыть окно командной строки с повышенными привилегиями.
- Остановите службы Центра обновления Windows, введя следующие команды и нажав клавишу Enter после каждой.
net stop wuauserv
net stop cryptSvc
чистые стоповые биты
net stop msiserver - Переименуйте папки catroot2 и SoftwareDistribution, введя следующие команды и нажимая Enter после каждой:
ren C: Windows SoftwareDistribution SoftwareDistribution.old
ren C: Windows System32 catroot2 Catroot2.old - Перезапустите компоненты, которые вы остановили на шаге 3, введя следующие команды и нажимая Enter после каждой:
net start wuauserv
net start cryptSvc
net start bit
net start msiserver - Перезагрузите компьютер.
- Как исправить код ошибки 0x80070570
Если ваш компьютер выдает сообщение об ошибке 0x80070570, вы можете применить несколько советов и приемов по ремонту ПК для решения этих проблем. Ниже приведены некоторые варианты исправления этой ошибки на вашем компьютере под управлением Windows 10.
Вариант 1. Перезагрузите компьютер.
Иногда помогают самые простые решения. Сохраните все файлы, над которыми вы работаете, и закройте все приложения перед перезагрузкой компьютера, чтобы ничего не потерять. Перезагрузите компьютер и попробуйте повторно запустить обновление.
Совет для профессионалов: просканируйте компьютер на предмет проблем с производительностью, ненужных файлов, вредоносных приложений и угроз безопасности
, которые могут вызвать системные проблемы или снижение производительности.
Бесплатное сканирование для ПК: проблемы с загрузкой 3.145.873Совместимость с: Windows 10, Windows 7, Windows 8
Специальное предложение. Об Outbyte, инструкции по удалению, лицензионное соглашение, политика конфиденциальности.
Вариант 2. Запустите средство устранения неполадок Центра обновления Windows
Средство устранения неполадок Центра обновления Windows просканирует вашу ОС на наличие ошибок, которые могут быть причиной этой ошибки обновления, и исправит их. Выполните следующие действия, чтобы запустить средство устранения неполадок и запустить его:
После исправления попробуйте снова загрузить и установить обновление.
Вариант 3. Восстановить поврежденные системные файлы
Если проблема в системные файлы, запускающие команды SFC и DISM, должны исправить это.
Команда SFC
Sfc.exe или средство проверки системных файлов — это служебная программа Microsoft Windows, которая позволяет пользователям сканировать и восстанавливать поврежденные системные файлы Windows. Выполните следующие действия, чтобы узнать, как запустить SFC и проанализировать его журналы.
Команда DISM
Если инструмент SFC не работает, пора попробовать инструмент командной строки Deployment Image Servicing and Management. Выполните следующие действия:
Вариант 4: вручную сбросить компоненты Центра обновления Windows
Если проблема заключается в компонентах Центра обновления Windows, этот вариант должен исправить ошибку
Как видите, существует множество доступных вариантов, если вы столкнулись с кодом ошибки 0x80070570. Выполнив несколько коротких шагов, вы сможете получить на своем компьютере последние обновления.
YouTube видео: Некоторые файлы обновлений отсутствуют или имеют проблемы, код ошибки 0x80070570
01, 2023