On forums, many users are complaining that MSI Afterburner OC Scanner failed to start scanning when you run it.
Sometimes the scanning got canceled and even if it runs it shows results are considered unstable.
In our earlier post, we have explained what you need to do when MSI Afterburner’s options greyed out and what to do when it won’t show FPS while playing a game.
In this article, we have explained what you can do if OC Scanner not working or showing results while running on Windows 10 PC.
What Does MSI Overclocking Scanner A.K.A OC Scanner Do?
Most users download MSI Afterburner on their PC to overclock their GPU or CPU. These enthusiastic users tend to put a heavy load on GPU and then check its stability.
The only thing they need to look out for is the possibility of failure due to not maintaining a safe GPU temp. That’s where MSI Afterburner OC Scanner plays its part.
The OC Scanner is a built-in feature that operates using the algorithm developed for NVIDIA RTX 20 series GPU.
Within a few minutes, the MSI scanner determines GPU’s highest stable overclockable settings.
First, OC Scanner increases the GPU clock speed followed by GPU stress. If the clock speed remains stable it gradually increases the values till the GPU reaches the limit and failed to maintain clock speed.
The last stable settings are already saved which shows you as a result, you can easily set these values to overclock GPU.
Is OC Scanner safe and good?
This tool is safe giving you the luxury to overclock GPU without fearing that it overheats.
The error message that failed to start scanning will show up when you run OC Scanner. This error may pop up with or without an error code.
Make sure that you have NVIDIA GTX 10×0 or RTX 20 series GPU having 64-bit OS, these models are supported to run MSI overclocking scanner.
If you have these GPUs you can run OC Scanner straight from the button appearing on the main screen or from the voltage/frequency curve.
However, you may follow these steps to fix failed to start scanning problem
- First unlock the settings for your GPU using MSI Afterburner
- Within the NVIDIA Control Panel if CUDA is disabled. Re-enable it, and Reboot your system to allow OC Scanner to function.
- You really need to make sure that CUDA is enabled within the Global 3D settings.
In case you are using an OC scanner on a laptop then try to run it Manually. Its Auto-Scan options don’t work because most laptops are not built to overclock.
Fix OC Scanner by Updating GPU
If you are dealing with MSI Afterburner OC Scanner Failed To Start Scanning it is because you have an outdated GPU BIOS that’s getting in way of a scanner.
Visit the official webpage and try to update GPU and then run OC Scanner.
Fix Scanning Failed to Start
This solution is recommended on the forum for a user who was having GTX 1080Ti with Windows 10 and the latest MSI AB version. For some reason, he gets a runtime error each time he starts OC Scanner.
Solution: In MsiAfterburner.cfg, Set LegacyOCScanner to 1 and scan again.
Fix OC Scanner Failed with Code 3 or Code 10h
Where the OC scanner does run but it shows an error message that scanning failed with code 3.
It means they’re a bug-related issue in the MSI Afterburner’s version, try to reinstall the latest version.
If the problem persists then wait for MSI to release the new update.
Fix Auto OC Scanning Saying Results are Considered Unstable
If you have modern GPU installed on your system then you can’t run MSI OC Scanner. Even if you do you will a message that Results are considered unstable.
It’s because these GPUs have already been pushed to their limit by their manufacturer. So if you tried to overclock them the clock speed will immediately get unstable.
Also because when OC increases the frequency the power consumption also increases at a fast pace, rending unstable results. So modern GPU performs efficiently at their stock frequencies.
Всем привет.
Нужна помощь с OC Scanner в MSI Afterburner.
Пытался разогнать видеокарту MSI RTX 2070 Super Ventus.
Делал все по инструкции на сайте MSI:
1. Разблокировал управление напряжением и мониторинг напряжения в настройках
2. На главном экране MSI Afterburner выкрутил на максимум ползунки вольтажа, power limit и температуры
3. Перешел в редактор частот/напряжений и нажал Сканер разгона в правом верхнем углу
4. Нажал кнопку Scan
В результате запускается сканирование, проходит примерно 34 секунды и сканирование завершается на шаге 1.
Последние операции такие:
21:01:04 Start scanning, please wait a few minutes
21:01:08 Scanning point 1 of 4
21:01:43 Scan succeeded, average overclock is 0MHz
21:01:43 Overclocked curve exported to MSI Afterburner
Дальнейшая попытка теста вылетает с ошибкой (см. скрин).
На одном из зарубежных форумов предложили отметить точку на графике, но мне не помогло.
Переустановка приложения тоже не помогла.
Кто-нибудь сталкивался с подобным? Есть решение?
Заранее благодарен за помощь.
MSI Afterburner OC Scanner not working or MSI Afterburner OC scanner failed to start scanning! Here’s a solution to fix it.
These days MSI Overclocking scanner is under discussion in different forums. Many users are complaining that either it fails to start a scan or MSI overclocking scanner results are considered unstable on PC and laptops.
If you are also dealing with OC Scanner scan canceled, scan failed with code 10h, or not working problem, then read this article.
Here, we have explained how to use the MSI overclocking scanner properly and what to do if it not working or cancel the scan with a report “results are considered unstable”

UPDATE YOUR DRIVERS
in Windows 11, 10 and 7
Use Driver Easy to update all the missing & outdated device drivers on PC for free.
Table of Contents
- How OC Scanner Works – Review
- How Long Does MSI Overclocking Scanner Take?
- How to Use MSI Overclocking OC Scanner
- How To Fix MSI Afterburner OC Scanner Not Working
- How To Fix MSI Afterburner Failed to Start Scanning
- How To Fix MSI Afterburner Results are Considered Unstable
- OC Scanner Black Screen Freezes Crash
How OC Scanner Works – Review
Most users download the MSI Afterburner tool just to overclock their GPUs. The scary part is the fear to damage the GPU during this process. That’s where OC Scanner comes in handy.
The OC Scanner is a built-in feature with MSI afterburner that uses an algorithm developed by NVIDIA for RTX 20 series GPU. This scanner within a few minutes determines the highest stable overclocking settings for your GPU.
The OC Scanner algorithm uses the Voltage/Frequency Curve formula.
This tool gradually increases clock speed and then stresses the GPU if the clock speed remains stable, this tool further increases the clock speed. When your GPU fails to maintain stability the OC Scanner sets the settings over the last stable clock speed.
How Long Does MSI Overclocking Scanner Take?
MSI OC scanner is an advanced utility that you should mess with cautiously. Depending on your PC hardware this overclocking scanner takes around 10-20 minutes after you click on the scan button.
Once the scan is complete it shows to its users the new overclocked setting for GPU. Click on the Test button and it will take another 5 minutes to safely apply the new settings.
Is it safe and good?
Using this tool you won’t need to know what happens if GPU overheats because this tool sets the stable settings for a GPU before it starts overheating.
How to Use MSI Overclocking OC Scanner
Before you run the OC Scanner, it is recommended that you should enable “Unlock Voltage Control” and “Unlock Voltage Monitoring” settings to give detailed control of your GPU to Afterburner.
You can do that by checking the boxes below.

- Once you enable detailed control set the slider to the extreme right for Core Voltage, Power Limit, and Temp Limit.
- Click on Apply button at the bottom. (It will let your GPU overclock more sophisticated under OC Scanner)
- Now it’s time to run OC Scanner.
- Click on Core Clock (MHz) slider to open the Voltage/Frequency Curve window

- On the Voltage/Frequency Curve windows you will see the OC Scanner button at the top right corner.
- Click on this button and will get two options Scan and Test.
- Run Scan and it will take around 15 minutes and present your result. The result will appear in a Curve instead of a Number.
- After scanning it’s advised to run a Test option. The test will verify the stability of the profile generated by the OC Scanner.

- Where the results in Confidence Level are above 60% then it’s considered stable.
- now apply the OC Scanner values by clicking the Apply button in Afterburner
Congratulations, you have just overclocked your graphics card! You should also need to know the ideal GPU temp of the latest GPU.
Sometimes the OC Scanner does not work or show the result as it should be. You may also encounter Code 3, Code 10h, code 22h errors.

All you have to do is to download the latest MSI Afterburner Beta 3 version. Because the previous version doesn’t have Ampere support.
If the problem persists then run Scan and when the error appears run the scan again and again. It will run.
Where the OC Scanner does not show the curve Window even after pressing Crtl + F or it shows error Scan failed with Code 3. Then you can try to uninstall and then reinstall GPU drivers, resetting Windows 10.
How To Fix MSI Afterburner Failed to Start Scanning
When you open the MSI Afterburner OC scanner and hit the scan button you may end up with the message that “failed to start scanning” with or without any error code 10h.
MSI Overclocking Scanner currently supports Nvidia GTX 10×0 and Nvidia RTX 20×0 series graphics cards under 64-bit OS only. On such GPUs, you can activate the scanner from the button at the main application window or directly from the voltage/frequency curve editor window.
To fix failed to start scanning problem
- First, unlock the settings for your GPU within MSI AfterBurner
- In the NVIDIA Control Panel if you had CUDA disabled. Re-enable it, and Reboot your system to allow OC Scanner to function.
- You really need to make sure that CUDA is enabled within the Global 3D settings.
If you are using OC Scanner on a laptop then its Auto scan won’t run. So you have to run OC manually. It will turn out great for laptops.
How To Fix MSI Afterburner Results are Considered Unstable
The results are considered unstable because modern GPUs have already been pushed to their limit by default. So if OC increases the frequency the power consumption will increase at a fast pace.
It’s a sign that efficiency at stock frequencies was already stretched. When you run OC scanners on these motherboards you will get unstable results.
OC Scanner Black Screen Freezes Crash
If the GPU runs fine at stock settings but crashes when overclocked. It’s safe to assume that the GPU isn’t stable or the PSU has such bad ripple and regulation that it’s making the GPU unstable.
If you have recently bought a modern GPU then you should probably upgrade the PSU.
Добрый день.
Нужна помощь с OC Scanner в MSI Afterburner.
Пытался разогнать видеокарту MSI RTX 2070 Super Ventus.
Делал все по инструкции на сайте MSI:
1. Разблокировал управление напряжением и мониторинг напряжения в настройках
2. На главном экране MSI Afterburner выкрутил на максимум ползунки вольтажа, power limit и температуры
3. Перешел в редактор частот/напряжений и нажал Сканер разгона в правом верхнем углу
4. Нажал кнопку Scan
В результате запускается сканирование, проходит примерно 34 секунды и сканирование завершается на шаге 1.
Последние операции такие:
21:01:04 Start scanning, please wait a few minutes
21:01:08 Scanning point 1 of 4
21:01:43 Scan succeeded, average overclock is 0MHz
21:01:43 Overclocked curve exported to MSI Afterburner
Дальнейшая попытка теста вылетает с ошибкой (см. скрин).
На одном из зарубежных форумов предложили отметить точку на графике, но мне не помогло.
Переустановка приложения тоже не помогла.
Кто-нибудь сталкивался с подобным? Есть решение?
Заранее благодарен за помощь.
- afterburner
- afterburner error message
- nvdia
- oc scan
- oc scanner
-

Hyugo22
New Member- Messages:
- 2
- Likes Received:
- 0
- GPU:
OS: Microsoft Windows 10 Home
CPU: Intel Core i7-3770 running at 3.67GHz
GPU: NVIDIA GeForce GTX 1050 Ti
Memory: 20GB DDR3
RAM Speed: 9798 MB/sHere are the LOGS:
19:46:59 Connected to MSI Afterburner control interface v2.3
19:47:01 GPU1 : VEN_10DE&DEV_1C82&SUBSYS_8C961462&REV_A1&BUS_1&DEV_0&FN_0
19:47:01 Start scanning, please wait a few minutes
19:47:29 Scan cancelled -

gedo
Master Guru- Messages:
- 308
- Likes Received:
- 42
- GPU:
What version of Afterburner are you using?
The old OC Scanner API was deprecated (by Nvidia) and recent Afterburner versions have the newer one that supports only Turing and later.
Quick Google-fu revealed this post by Unwinder:
https://forums.guru3d.com/threads/download-msi-afterburner-4-6-3-beta-2.434272/page-2#post-5832485
-
Hyugo22
New Member- Messages:
- 2
- Likes Received:
- 0
- GPU:
-
denis03
New Member- Messages:
- 1
- Likes Received:
- 0
- GPU:
The same thing happens to me, what is the solution?
-
I’ve figured out that downgrading to Nvidia’s 441.87 driver using DDU returned myability to use OC scan in Afterburner.
The biggest pain in the ass about it is that the driver lacks DLSS support, and besides the obvious one that you don’t get to reap the benefits of newer drivers
link to 441.87, and link to DDU
It’s possible that more recent versions also do, but I haven’t gone through the process of systematically upgrading my drivers by each increment to see.
Attached Files:
Last edited: Jul 23, 2021
-
-

Andy_K
Master Guru- Messages:
- 719
- Likes Received:
- 158
- GPU:
You don’t have to revert to old drivers and you don’t have to go back to an old MSI AB version.
You have to read posts by unwinder carefully:

Share This Page

Многие пользователи считают разгон какой-то магией. И если говорить об экстремальном разгоне с охлаждением жидким азотом, то это недалеко от правды. Однако «бытовой» разгон не так сложен, как кажется.
Благодаря современным средствам оверклокинга, этот процесс ещё и безопасен. Используя программные утилиты, вроде MSI Afterburner, испортить видеокарту практически нереально. Но если использование утилиты кажется слишком сложным, или у вас нет достаточно времени и желания заниматься подбором параметров, то специально для вас NVIDIA подготовила новое средство автоматического разгона, под названием OC Scanner.
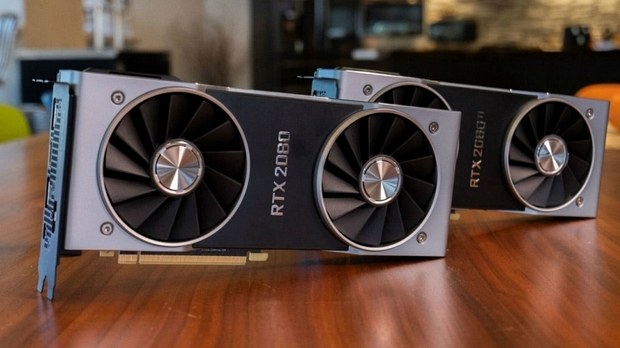
Как же оно работает? Начнём с того, что средство разгона OC Scanner доступно для видеокарт серии RTX 20xx. Оно автоматически прогоняет видеокарту в разных режимах, определяя наиболее стабильные и в то же время самые высокие частоты. Если частота работы GPU оказывается стабильной под нагрузкой, она запоминается как максимальная. Процесс повторяется 4 раза на разных напряжениях. Это необходимо для построения кривой напряжения/частоты, используя которую видеокарта обеспечивает свою стабильную работу.
Это средство автоматического разгона включено в MSI Afterburner. Ниже приведена инструкция, как им пользоваться.
Перед запуском OC Scanner вначале нужно включить детальное управление видеокартой в настройках, отметив чекбоксы, как на картинке.
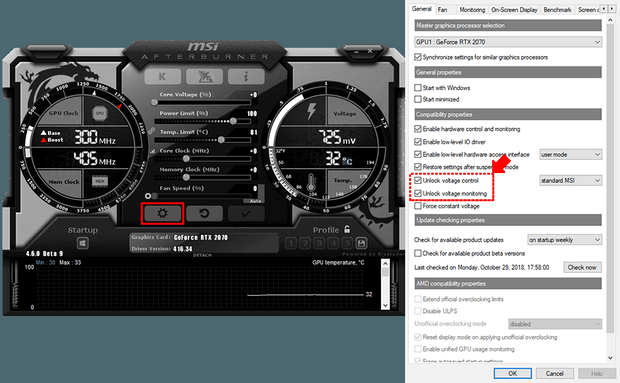
Затем нужно сдвинуть регуляторы Core Voltage, Power Limit и Temp Limit в крайнее правое положение и нажать кнопку «Apply». После этого ничего не произойдёт. Проделав эти действия вы просто расширили пределы для автоматического подбора частот и напряжения.

Теперь можно запускать OC Scanner!
Слева от надписи «Core Clock (MHz)» нужно нажать кнопку, чтобы открыть окно «Voltage/Frequency Curve». В верхнем правом углу этого окна будет находиться кнопка «OC Scanner».
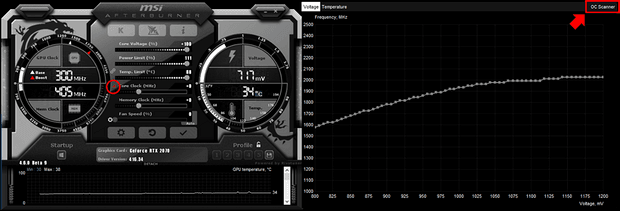
После её нажатия появятся две опции: Scan и Test.

Сканирование — это непосредственно процесс подбора оптимальных режимов. Он занимает порядка 15 минут. После чего вам покажут результаты работы.
После скана рекомендуется выполнить тест стабильности, нажав кнопку «Test». Результат теста будет представлен в виде процентов стабильности. Даже без разгона вы вряд ли добьётесь величины стабильности более 90%. В целом же, всё что более 60% — хороший результат.

Нажав на кнопку «Apply» вы примените результаты разгона для своей видеокарты. Далее рекомендуется сохранить этот результат как профиль, чтобы при необходимости сразу включить его.
Конечно, после автоматического разгона никто не запрещает проводить ручной разгон. Также стоит обратить внимание на частоту видеопамяти. Известно, что память GDDR6, установленную в новом поколении видеокарт, можно разогнать на более чем 1000 МГц. Начать можно с +500 МГц, а затем добавлять по 50 МГц и проверять стабильность известными бенчмарками и/или другими приложениями. В конце процесса также не забудьте применить изменения и сохранить их в качестве профиля.
-
Partition Wizard
-
Partition Manager
- How to Use MSI Afterburner OC Scanner to Boost GPU Performance
By Linda | Follow |
Last Updated November 14, 2022
Do you want to boost GPU performance for gaming? Overclocking can help you. If you don’t know how to overclock GPU correctly, you can try MSI Afterburner OC Scanner. This tool will help you determine the best OC configuration. In this post, MiniTool Partition Wizard will show you how to use this tool.
About MSI Afterburner OC Scanner
MSI Afterburner is a graphics utility developed by MSI. It can help you overclock GPU, do benchmarking, and monitor in-game graphics performance like CPU usage, GPU usage, RAM usage, FPS, etc.
Afterburner was originally developed with MSI cards in mind. However, since its release, the software utility has been tweaked to work alongside every other aftermarket GPU.
What is MSI Afterburner OC Scanner? MSI Afterburner OC Scanner is a tool helping you overvlock better. This tool uses an algorithm developed by NVIDIA for the RTX 20 series graphics cards. It will check what card you are running and then determine the highest stable overclock settings for your graphics card.
To calculate the best overclocking settings, the MSI Overclocking Scanner will increase clockspeed by one step and then stress the GPU to see if this clockspeed is stable. It will repeat this process until the GPU fails to maintain stability under load. At that point, the last known stable clockspeed will be set as the maximum value.
Improve PC Performance for Gaming via MSI Game Boost & Other Ways
How to Use MSI Afterburner OC Scanner
Some people may be worried that overclocking will cause any kind of damage to the expensive equipment inside the PC. Fortunately, most Graphics Processors have built-in safety measures that restrict the changes you can make with overclocking software like Afterburner to values they consider to be safe. If necessary, action can be taken to ensure the safety of the product.
To use MSI Afterburner OC Scanner for overclocking, please refer to the following steps:
Step 1: Open MSI Afterburner and click the gear button. In the General tab, check Unlock voltage control and Unlock voltage monitoring to enable detailed control of your graphics card.
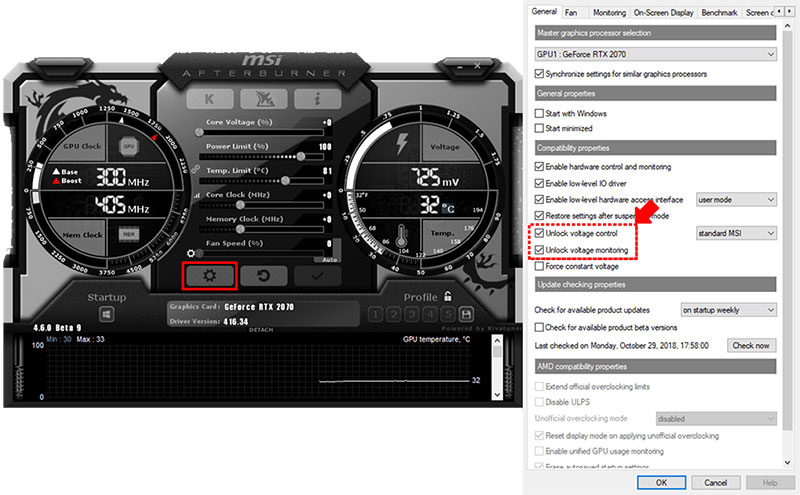
Step 2: Set the sliders for Core Voltage, Power Limit and Temp Limit to the right a little and then click the Apply button.
Tips:
Each time set the sliders to the right a little and then test them to ensure system stability.
Step 3: Click on the button left of the Core Clock (MHz) to open the Voltage/Frequency Curve window. At the top right of window you will see the OC Scanner button.
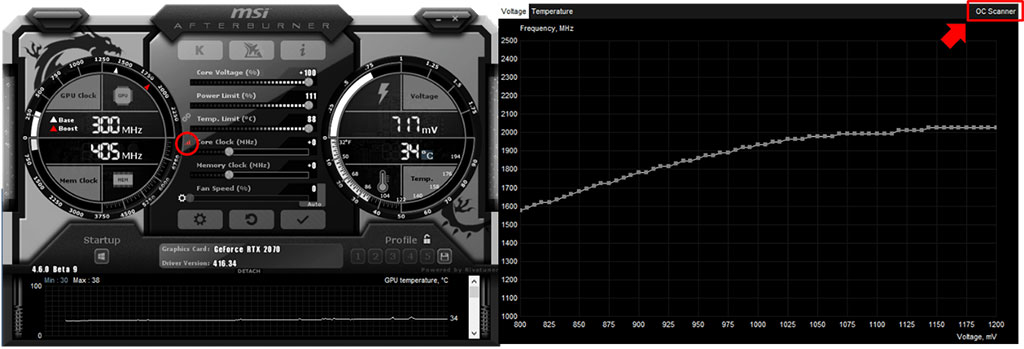
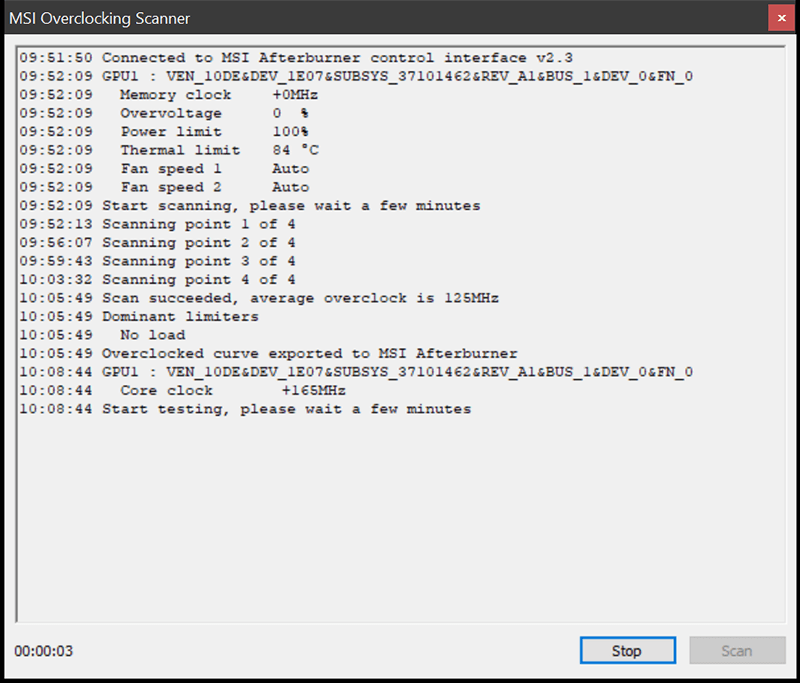
Step 4: Click the OC Scanner button to open the OC Scanner window. The OC Scanner window will show two options: Scan and Test. Click the Scan button and the tool will increase clockspeed and then stress the GPU. This process will be repeated four times to cover 4 different Voltage levels.
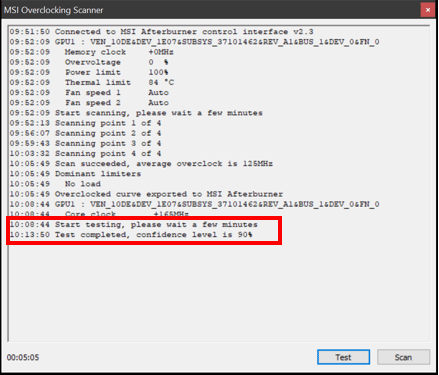
Step 5: After running the Scanner, please run the Test option. The option will verify the stability of the profile generated by the OC Scanner and provide the results in a ‘confidence level’. If the level is above 60%, the OC configuration should be fine to use.
Step 6: Close the MSI Overclocking Scanner and go back to MSI Afterburner main interface. You will see the value of Core Clock has changed from «+0» to «Curve«. It means that the OC configuration has passed the test and you can use it. Click the Apply button to use it.
Tip: I would recommend you to save the values in a profile as well, in case you want to switch between default values and your OC profile. You can do this by clicking on the Save Icon on the bottom right of Afterburner.
Top 4 Best MSI Gaming Laptops In 2020 You Should Know
About The Author

Position: Columnist
Author Linda has been working as an editor at MiniTool for 1 year. As a fresh man in IT field, she is curious about computer knowledge and learns it crazily. Maybe due to this point, her articles are simple and easy to understand. Even people who do not understand computer can gain something.
By the way, her special focuses are data recovery, partition management, disk clone, and OS migration.