Иогда мы можем столкнуться с ошибкой «Invalid Virtual Disk» при загрузки эмулятора. Вот простое руководство ото, как исправить ошибку «Invalid Virtual Disk invalidmedium» в LDPlayer.
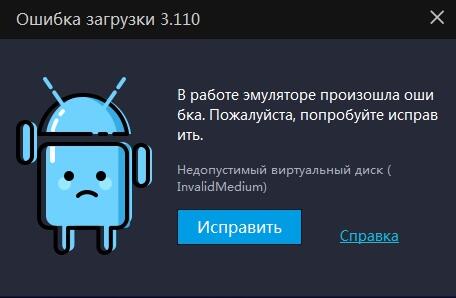
Почему это ошибка бывает?
Чаще всего ошибка «Invalid virtual disk» может быть вызвана повреждением данных LDPlayer. Некоторые неправильные операции и неожиданные сбои на вашем компьютере, такие как внезапный сбой, принудительное завершение работы, вирусная атака и т.д., могут привести к повреждению файла данных. В результате вы не сможете успешно загрузить LDPlayer.
Как решить проблему Invalid Virtual Disk?
Чтобы исправить эту проблему, вам необходимо создать новый эмулятор LDPlayer, поскольку исходный эмулятор был поврежден. Вы можете использовать LDMultiplayer для быстрого обновления вашего основного эмулятора.
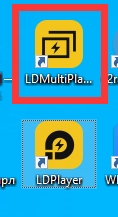
ШАГ 1. Найдите LDMultiplayer на рабочем столе и откройте его.
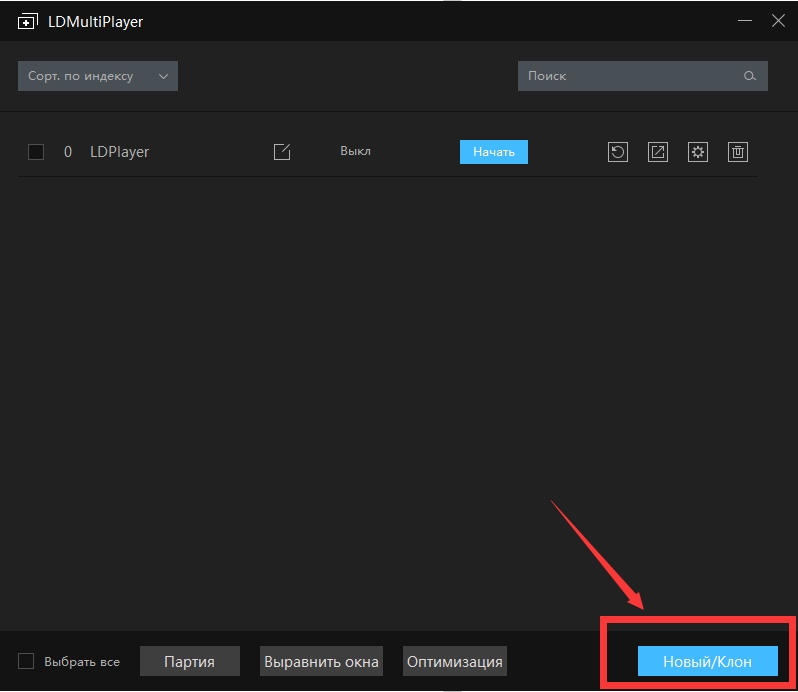
ШАГ 2: Нажмите кнопку «Новый»
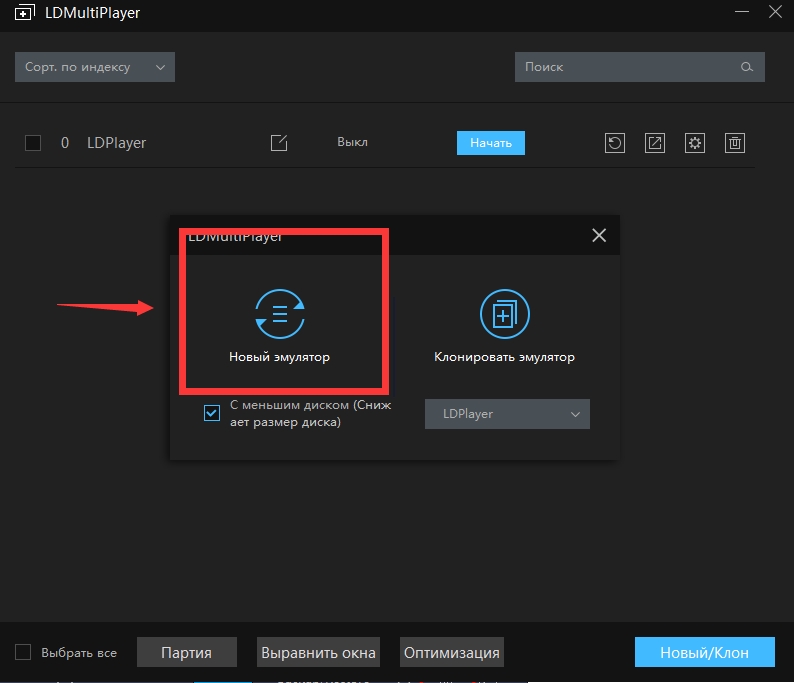
ШАГ 3: Затем LDMultiplayer автоматически создает новый эмулятор LDPlayer
После создания нового эмулятора удалите предыдущий, потом вам просто нужно нажать кнопку «Начать», чтобы запустить новое.
ВНИМАНИЕ: Данные в исходном эмуляторе не будут сохранены в новом эмуляторе LDPlayer!!!
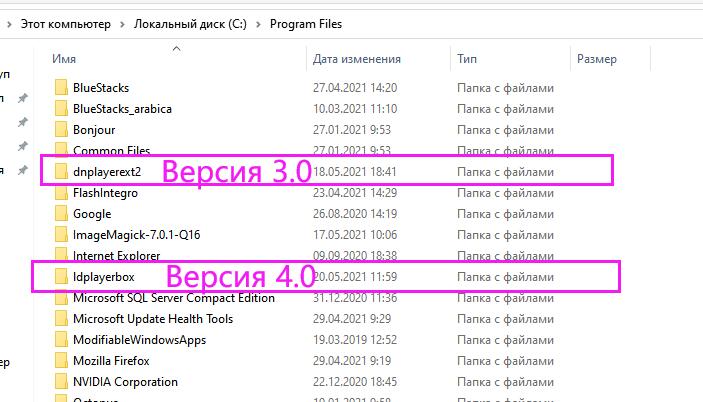
Если это способ не работает, откройте папку C:Program Files
При использованием версии 3.0, удалите папку dnplayerext2, затем переустановите эмулятор
При использованием версии 4.0, удалите папку ldplayerbox, затем переустановите эмулятор
Эмулятор LDPlayer многим полюбился из-за высокой стабильности и скорости работы. Но время от времени в нем происходят сбои, которые мешают комфортной игре. Особенно неприятно сталкиваться с критическими ошибками, после которых программа вылетает. А в некоторых случаях она еще и перестает нормально запускаться. В рамках данной статьи мы поговорим о сбое с текстом «Недопустимый виртуальный диск» в LDPlayer и разберемся, как можно его исправить своими силами.
Содержание
- Действенные способы решения проблемы
- Создание новой копии эмулятора
- Ручная чистка
- Полная переустановка – крайняя мера
- Общие рекомендации
- Подведение итогов
Действенные способы решения проблемы
Выглядит это сообщение следующим образом: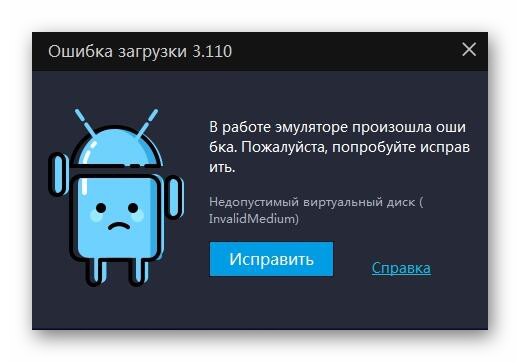
Также оно может быть записано как Invalid virtual disk. Но чем может быть вызван данный сбой? Главная причина – повреждение данных на виртуальном устройстве Android, из-за чего эмулятор не может нормально запускаться. Это может произойти, например, при неожиданной перезагрузке компьютера, вирусного заражения и т. д.
Как поступить в данной ситуации? К сожалению, восстановить нынешнюю версию LDPlayer уже не выйдет. Лучшее решение – создать новую копию, используя встроенные в программу функции. Давайте разберемся, как это делается.
Создание новой копии эмулятора
После установки эмулятора на рабочем столе Windows должен был появиться ярлык LDMultiPlayer3 или LDMultiPlayer4. Вам следует его запустить. Также он может находиться в меню «Пуск». В новом окне кликните по кнопке «Новый/клон», а затем нажмите на «Новый эмулятор».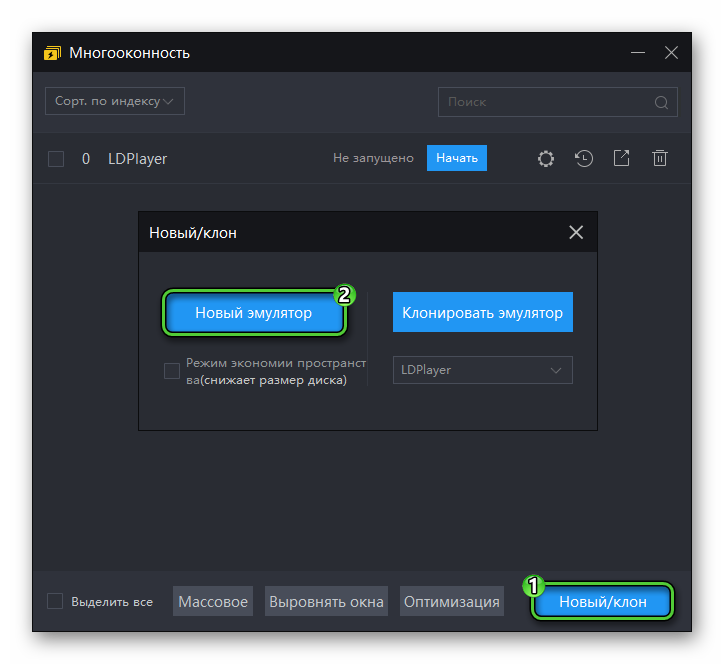 В результате в этом окне будет отображаться две графы – старая и новая копия ЛДПлеера. Так вот старую нужно удалить. Для этого кликните по иконке в виде корзины для первой графы и подтвердите процедуру.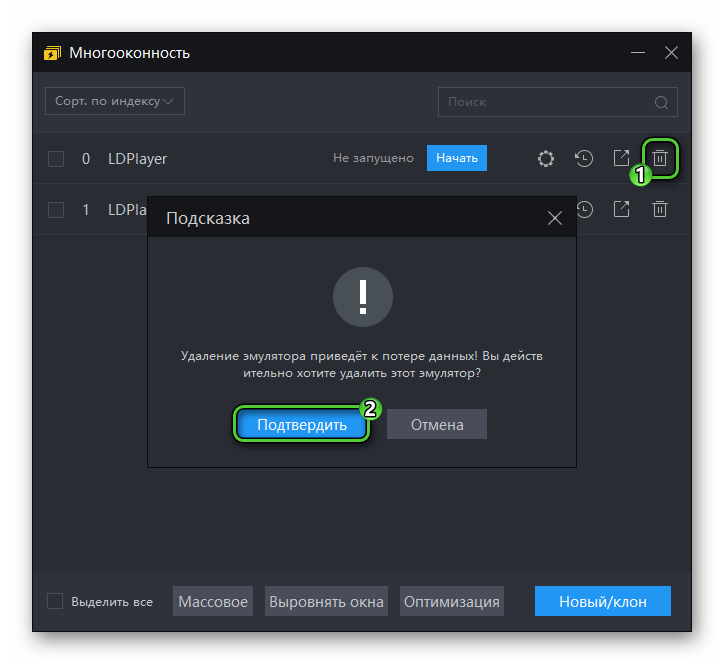
Теперь создайте для новой копии ярлык на рабочем столе с помощью выделенной иконке и запустите ее.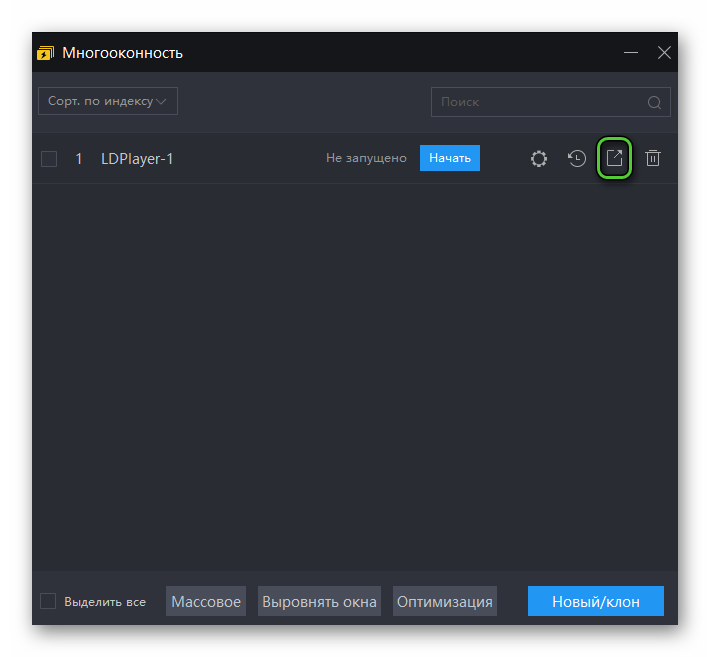
Если все заработало, то остается только настроить эмулятор. Мы разбирали данную процедуру в отдельной статье.
Но что делать, если это не помогло? Остается два действенных решения:
- Ручная чистка данных программы.
- Полная переустановка.
Остановимся на каждом из них более детально.
Ручная чистка
Вам нужно стереть с диска каталог, отвечающий за временные файлы эмулятора. Добраться до него выйдет так:
- Закройте любые окна, связанные с ЛД Плеером.
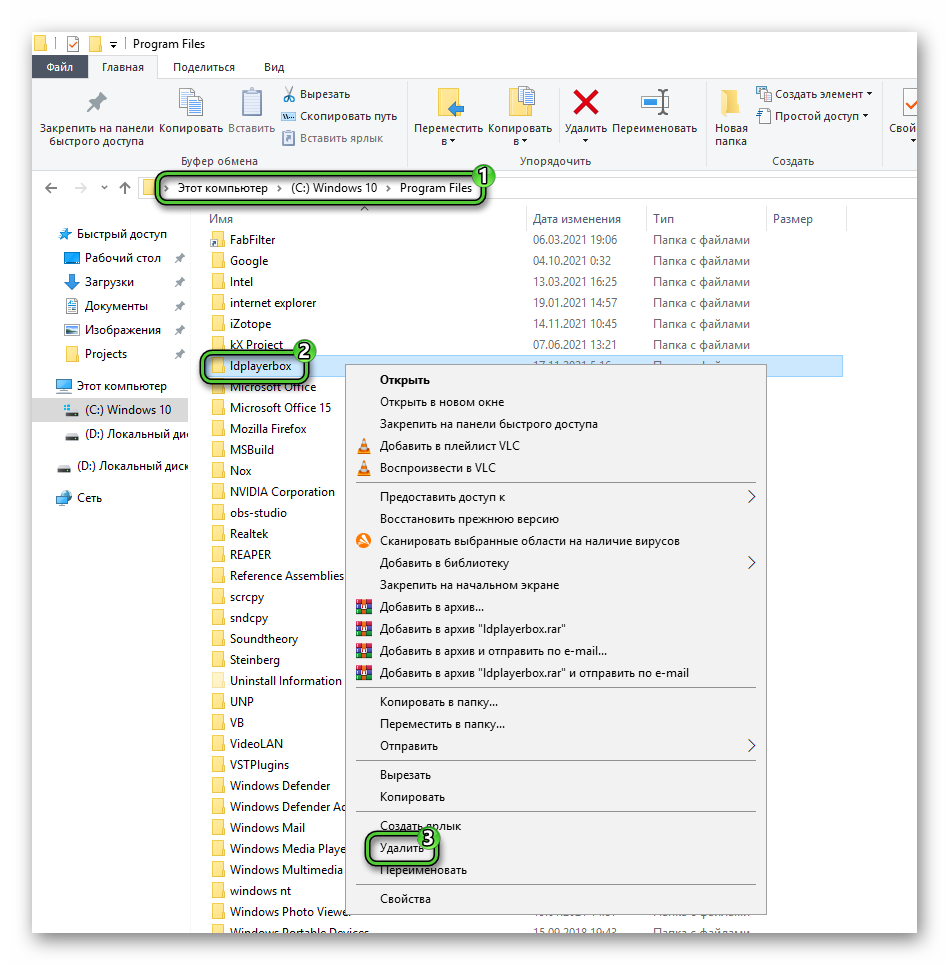
- Откройте системный диск C: в Проводнике Windows.
- Перейдите в Program Files.
- Здесь отыщите каталог ldplayerbox (относится к LDPlayer 4) или dnplayerext2 (относится к LDPlayer 3).
- Удалите его и очистите корзину.
- Перезагрузите ПК.
- Проверьте, была ли исправлена проблема.
Если и это не помогло, то остается только полная переустановка. Рассмотрим эту процедуру в пошаговом формате.
Полная переустановка – крайняя мера
Смысл в том, что сначала нужно удалить старую версию ЛД Плеера, а потом уже загрузить новую. При этом желательно стереть остаточные данные, иначе могут возникнуть проблемы с совместимостью. Максимально подробно эта процедура описана в отдельной статье.
А для установки последней версии эмулятора нужно выполнить такие шаги:
- Откройте в браузере официальный сайт https://ru.ldplayer.net/.
- Активируйте кнопку «Скачать…», размещенную в центре страницы.
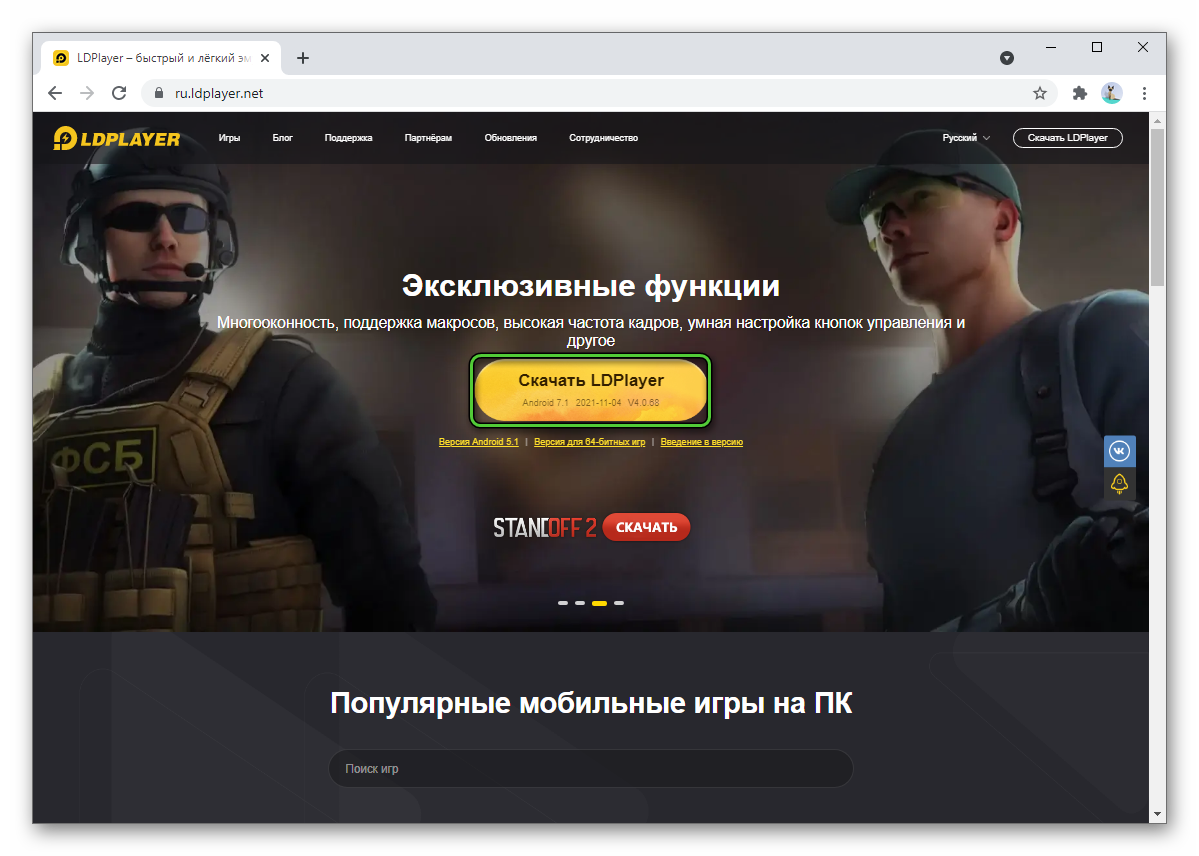
- Начнется загрузка файла с расширением .exe (400+ МБ). Подождите, пока она не будет окончена, а затем откройте его. Сделать это можно непосредственно из браузера.
- Убедитесь, что для установки выбран правильный язык.
- Кликните по соответствующей кнопке, чтобы запустить процедуру. Дополнительные настройки здесь не требуются.
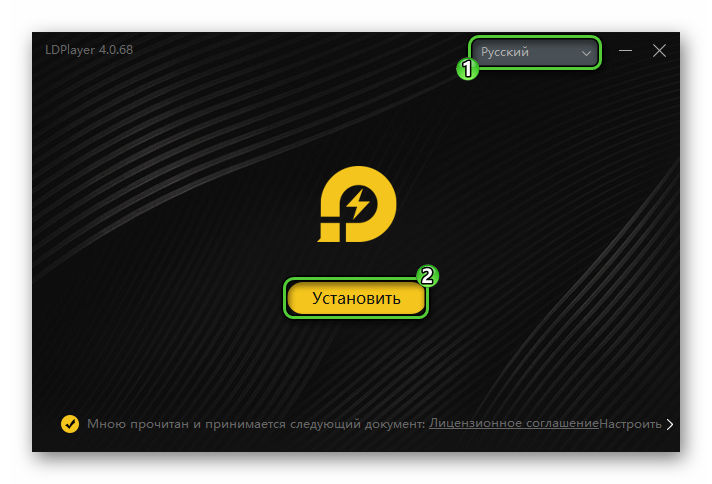
- Запустите программу, когда установка завершится.
Для более комфортного использования ЛД Плеера рекомендуется вручную настроит эмулятор под свой ПК или ноутбук. Мы разбирали эту процедуру в рамках отдельной инструкции. Предлагаем вам с ней ознакомиться.
Общие рекомендации
На будущее мы рекомендуем входить в учетную запись Google, чтобы все данные приложений автоматически сохранялись в «облаке». Тогда их выйдет без каких-либо проблем восстановить.
Ну а если помогла только переустановка программы, то есть определенный риск, что ПК или ноутбук заражен вирусами. Будет не лишним проверить его на наличие таких угроз. Для этих целей подойдет любой современный антивирус, даже бесплатные версии. Выберите любой на свое усмотрение и проведите полное сканирование. Сразу же после антивирус можно будет отключить или полностью удалить из системы.
Подведение итогов
Ошибка «Недопустимый виртуальный диск» в LDPLayer зачастую связана с тем, что были повреждены данные внутри виртуального Android-устройства, из-за чего эмулятор попросту не может больше запускаться. Это довольно неприятно, ведь старую информацию никак не восстановить. Но саму проблему решить довольно-таки просто. Нужно вручную создать новую копию эмулятора, а старую стереть. Но если и это не помогло, то есть еще два метода: ручная чистка данных ЛД Плеера или полная его переустановка.
Remove the app as well associated files for best results
by Vladimir Popescu
Being an artist his entire life while also playing handball at a professional level, Vladimir has also developed a passion for all things computer-related. With an innate fascination… read more
Updated on November 8, 2022
Reviewed by
Vlad Turiceanu

Passionate about technology, Windows, and everything that has a power button, he spent most of his time developing new skills and learning more about the tech world. Coming… read more
- Several users reported that VirtualBox LDPlayer wasn’t compatible with Windows 10 and, as a result, blocked Windows Updates.
- The easiest way out is to uninstall VirtualBox LDPlayer.
- You could do it using the built-in methods or a dedicated tool, though the latter is more effective.
XINSTALL BY CLICKING THE DOWNLOAD FILE
This software will repair common computer errors, protect you from file loss, malware, hardware failure and optimize your PC for maximum performance. Fix PC issues and remove viruses now in 3 easy steps:
- Download Restoro PC Repair Tool that comes with Patented Technologies (patent available here).
- Click Start Scan to find Windows issues that could be causing PC problems.
- Click Repair All to fix issues affecting your computer’s security and performance
- Restoro has been downloaded by 0 readers this month.
Users have been reporting that VirtualBox LDPlayer is blocking Windows updates, and they wish to uninstall it entirely to get things up and to run.
Users usually see VirtualBox (LDPlayer) Uninstall this app now because it isn’t compatible with Windows 10 when trying to troubleshoot things. And there are a few practical ways to uninstall the app in no time.
What is VirtualBox LDPlayer?
LDPlayer is a software tool that emulates the Android operating system to run mobile games on a computer.
Apart from running Android on your PC, it also includes several powerful gamer-oriented features, for instance, keyboard mapping controls and support for the most recent video games.
Other features include selecting the device’s virtual location, simulating screen rotation, and accessing the Google Play Store, among other things.
How can I uninstall VirtualBox LDPlayer?
1. Use Control Panel
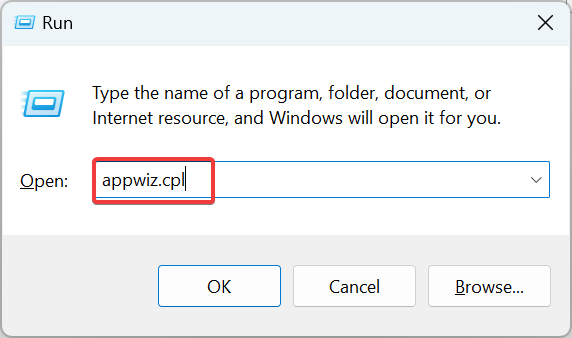
- Press Windows + R to open Run, type appwiz.cpl in the text field, and hit Enter.
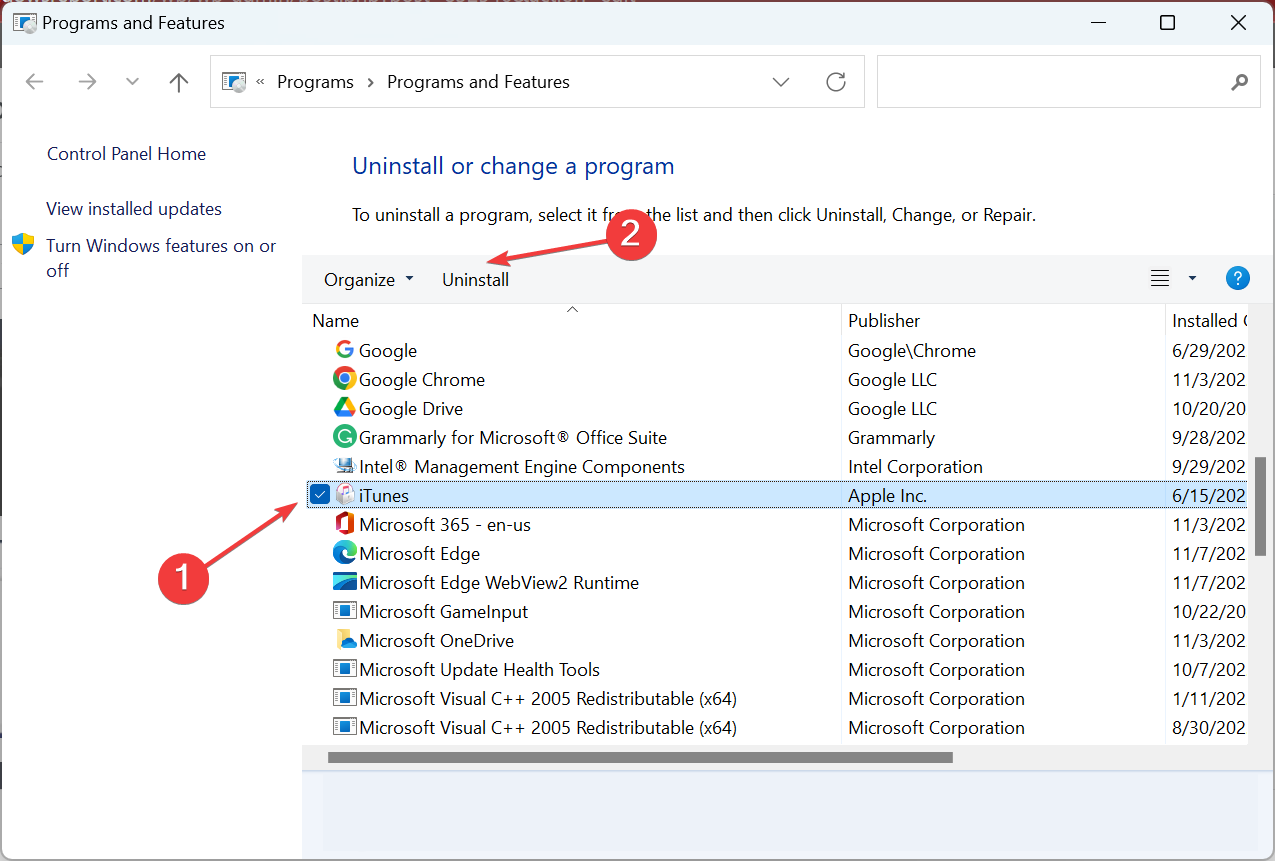
- Now look for the LDPlayer app, select it, and click Uninstall.
- Follow the on-screen instructions to complete the process.
- Once done, press Windows + E to open File Explorer, paste the following path in the address bar, and hit Enter:
C:Program Files - Now, right-click on the LDPlayer folder, if available, and then select Delete.
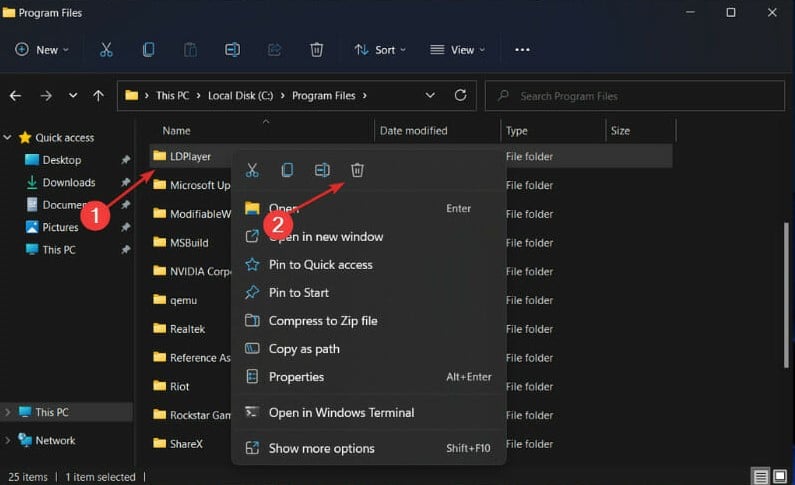
This way, you can easily uninstall Virtualbox LDplayer if it’s not compatible with Windows 10.
2. Use the Windows settings app
- Press Windows + I to open Settings, and choose Apps.
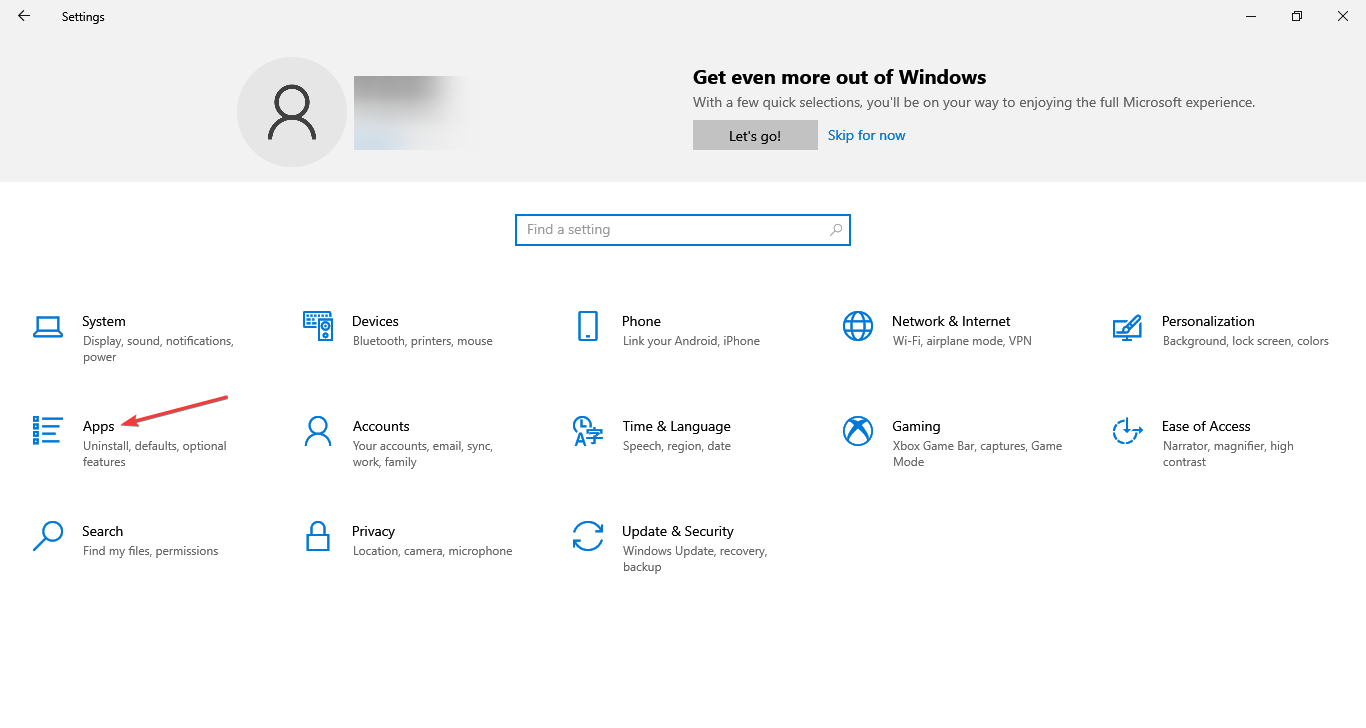
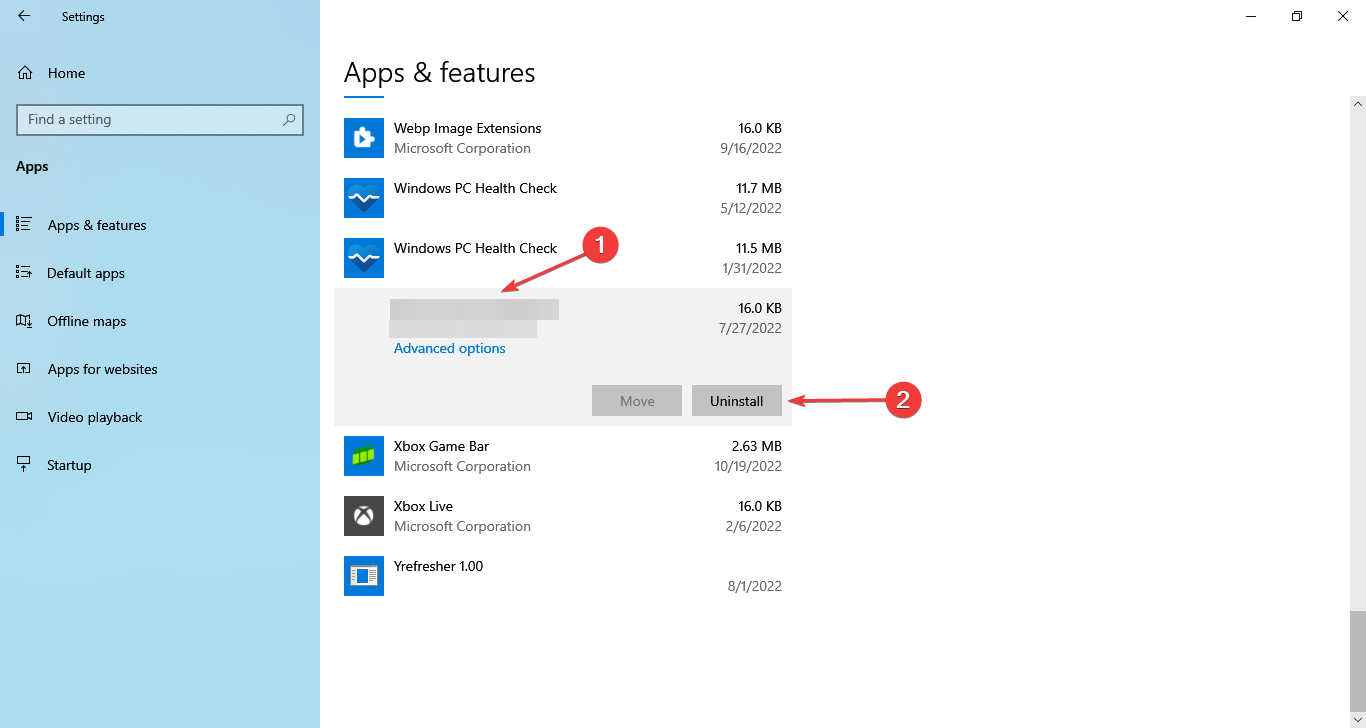
- Locate LDPlayer, click on it, and then select the Uninstall button.
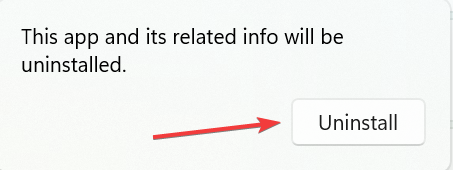
- Again, click Uninstall in the prompt.
- Follow the on-screen instructions in the uninstall setup to complete the process.
- Now, navigate the following path in File Explorer, and delete the LDPlayer folder:
C:Program Files - Once done, restart the computer for the changes to full effect.
- Steam Not Responding On PC: 5 Quick Fixes
- Minecraft Keeps Crashing Windows 10: Why & How to Fix
- PC Games to Play When Bored [18 Cool Titles]
- Horizon Forbidden West On PC Rumors & Install Guide
3. Use an effective uninstaller tool
An uninstaller tool would be best if you are looking for a quicker alternative to uninstall VirtualBox LDPlayer. These not just uninstall a specific application but also remove any associated files and delete the Registry keys created by it.
This way, the PC’s performance improves considerably after the uninstall, and more storage space is freed. So, check the best uninstaller tools and get one today!
CCleaner is a great maintenance device tool that has a software uninstaller feature and can easily help you uninstall a program or a group of programs just by clicking a button.

CCleaner
Excellent device management tool with a straightforward interface and various useful features.
Also, several users received the VirtualBox Interface LDPlayer error when shutting down the computer, which, too, will be fixed after the uninstall.
Before you leave, find out how to run Android apps in Windows now that you have uninstalled VirtualBox LDPlayer.
In the comments section below, let us know which solution worked best for you and whether you found the guide helpful. Thanks for reading!
Still having issues? Fix them with this tool:
SPONSORED
If the advices above haven’t solved your issue, your PC may experience deeper Windows problems. We recommend downloading this PC Repair tool (rated Great on TrustPilot.com) to easily address them. After installation, simply click the Start Scan button and then press on Repair All.

Newsletter
Remove the app as well associated files for best results
by Vladimir Popescu
Being an artist his entire life while also playing handball at a professional level, Vladimir has also developed a passion for all things computer-related. With an innate fascination… read more
Updated on November 8, 2022
Reviewed by
Vlad Turiceanu
Passionate about technology, Windows, and everything that has a power button, he spent most of his time developing new skills and learning more about the tech world. Coming… read more
- Several users reported that VirtualBox LDPlayer wasn’t compatible with Windows 10 and, as a result, blocked Windows Updates.
- The easiest way out is to uninstall VirtualBox LDPlayer.
- You could do it using the built-in methods or a dedicated tool, though the latter is more effective.
XINSTALL BY CLICKING THE DOWNLOAD FILE
This software will repair common computer errors, protect you from file loss, malware, hardware failure and optimize your PC for maximum performance. Fix PC issues and remove viruses now in 3 easy steps:
- Download Restoro PC Repair Tool that comes with Patented Technologies (patent available here).
- Click Start Scan to find Windows issues that could be causing PC problems.
- Click Repair All to fix issues affecting your computer’s security and performance
- Restoro has been downloaded by 0 readers this month.
Users have been reporting that VirtualBox LDPlayer is blocking Windows updates, and they wish to uninstall it entirely to get things up and to run.
Users usually see VirtualBox (LDPlayer) Uninstall this app now because it isn’t compatible with Windows 10 when trying to troubleshoot things. And there are a few practical ways to uninstall the app in no time.
What is VirtualBox LDPlayer?
LDPlayer is a software tool that emulates the Android operating system to run mobile games on a computer.
Apart from running Android on your PC, it also includes several powerful gamer-oriented features, for instance, keyboard mapping controls and support for the most recent video games.
Other features include selecting the device’s virtual location, simulating screen rotation, and accessing the Google Play Store, among other things.
How can I uninstall VirtualBox LDPlayer?
1. Use Control Panel
- Press Windows + R to open Run, type appwiz.cpl in the text field, and hit Enter.
- Now look for the LDPlayer app, select it, and click Uninstall.
- Follow the on-screen instructions to complete the process.
- Once done, press Windows + E to open File Explorer, paste the following path in the address bar, and hit Enter:
C:Program Files - Now, right-click on the LDPlayer folder, if available, and then select Delete.
This way, you can easily uninstall Virtualbox LDplayer if it’s not compatible with Windows 10.
2. Use the Windows settings app
- Press Windows + I to open Settings, and choose Apps.
- Locate LDPlayer, click on it, and then select the Uninstall button.
- Again, click Uninstall in the prompt.
- Follow the on-screen instructions in the uninstall setup to complete the process.
- Now, navigate the following path in File Explorer, and delete the LDPlayer folder:
C:Program Files - Once done, restart the computer for the changes to full effect.
- Steam Not Responding On PC: 5 Quick Fixes
- Minecraft Keeps Crashing Windows 10: Why & How to Fix
- PC Games to Play When Bored [18 Cool Titles]
3. Use an effective uninstaller tool
An uninstaller tool would be best if you are looking for a quicker alternative to uninstall VirtualBox LDPlayer. These not just uninstall a specific application but also remove any associated files and delete the Registry keys created by it.
This way, the PC’s performance improves considerably after the uninstall, and more storage space is freed. So, check the best uninstaller tools and get one today!
CCleaner is a great maintenance device tool that has a software uninstaller feature and can easily help you uninstall a program or a group of programs just by clicking a button.
CCleaner
Excellent device management tool with a straightforward interface and various useful features.
Also, several users received the VirtualBox Interface LDPlayer error when shutting down the computer, which, too, will be fixed after the uninstall.
Before you leave, find out how to run Android apps in Windows now that you have uninstalled VirtualBox LDPlayer.
In the comments section below, let us know which solution worked best for you and whether you found the guide helpful. Thanks for reading!
Still having issues? Fix them with this tool:
SPONSORED
If the advices above haven’t solved your issue, your PC may experience deeper Windows problems. We recommend downloading this PC Repair tool (rated Great on TrustPilot.com) to easily address them. After installation, simply click the Start Scan button and then press on Repair All.
Newsletter
Виртуализация в Windows необходима для того, чтобы запустить в этой ОС другую операционную систему. Ярким примером использования данной технологии является запуск виртуальной машины. В случае с андроид-эмулятором LDPlayer виртуализация также необходима – ведь в программе запускается другая, пусть и мобильная, операционная система. На большинстве компьютеров технология поддерживается и включена по умолчанию. Однако, в некоторых случаях могут возникать проблемы. Без включенной виртуализации LDPlayer может работать медленнее или вовсе не запускаться. Расскажем о том, как это исправить.
Проверка поддержки технологии виртуализации процессором
Первым делом, столкнувшись с проблемой отключенной виртуализации, следует проверить, поддерживает ли эту технологию ваш процессор. Большинство процессоров работает с VT, однако, стоит проверить, не является ли именно ваш несчастливым исключением. Для этого можно воспользоваться простой и бесплатной утилитой: LeoMoon CPU-V. Скачайте ее по этой ссылке, распакуйте архив и запустите файл, при необходимости – дайте утилите разрешение на запуск.
Программа покажет два пункта: VT-x Supported – поддержка технологии, и VT-x Enabled – включена ли виртуализация для процессоров от Intel. В случае с процессорами AMD пункты будут носить названия AMD-v Supported и AMD-v Enabled соответственно. В идеальном(и наиболее частом) случае под обоими пунктами должны стоять зеленые галочки – это означает, что технология поддерживается и работает.
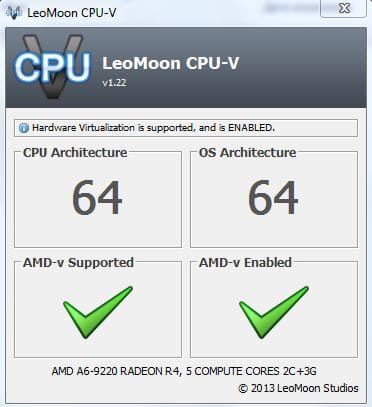
Если оба пункта выделены красными крестиками – значит, ваш процессор не поддерживает технологию. В этом случае, к сожалению, ничего не поделать, кроме смены комплектующих.
Если же пункт поддержки выделен зеленой галочкой, тогда как под надписью Enabled стоит красный крестик – значит, виртуализация поддерживается, но не включена. Активировать ее можно через BIOS.
Включение виртуализации в BIOS(Windows 7, 8, 10)
Для того, чтобы включить виртуализацию, потребуется войти в BIOS. Для этого перезагрузите ваш компьютер или ноутбук и нажимайте при включении кнопку Del. Именно эта клавиша отвечает за вход в BIOS в большинстве случаев. Однако, это зависит от производителя материнской платы – возможны и другие варианты. Так, если Del не срабатывает, попробуйте также F8, Esc, F9, F10.

Кроме того, при загрузке вы увидите подсказку по клавише, отвечающей для входа в Биос – важно успеть ее заметить.

Войдя в меню, найдите пункт, отвечающий за виртуализацию. Он может носить разные названия, но чаще всего имеет в своем названии слова Virtual, Virtualization, VT-X или SVM. Находится такой пункт зачастую в разделах Advanced, Configuration, CPU или Security.

Ваша задача – навести курсор выделения на нужный пункт при помощи стрелок клавиатуры и нажать на Enter, чтобы значение напротив названия пункта сменилось на Enabled – это и означает включение виртуализации. После этого надо сохранить изменения нажатием на F10.

Далее загрузите компьютер и попытайтесь вновь запустить LDPlayer – виртуализация должна заработать. Кроме того, без включенной виртуализации в LDPlayer будет видна кнопка с надписью VT в правом верхнем углу. Если она исчезла – значит, все сделано верно.