Причина неработоспособности любого принтера может крыться либо в программных, либо в аппаратных неисправностях. Некоторые виды неполадок можно устранить самостоятельно без помощи специалистов. Рассмотрим основные причины отказа печати принтеров Kyocera и приведем рекомендации по решению проблем.
Пользователи, не имеющие опыта в работе с принтером, могут расценить типичный случай отказа печати принтера и попробовать самостоятельно решить проблему.
В картриджах закончились чернила
Если операция печати выполняется с компьютера, то на экране будет показано соответствующее сообщение. Не заметить окончание чернил в картриджах можно в случае, если выполняется операция по копированию документов (примениться к МФУ Kyocera) либо при сбоях драйвера устройства.

Если тонер в чернильницах подходит к концу, то соответствующая информация отображается на лицевой панели принтера в виде мигающего индикатора «Внимание». Обычно в таких случаях устройство продолжает свою работу, но при программном сбое печать может быть остановлена.
Если же индикатор «Внимание» на лицевой панели горит непрерывно, это означает полное окончание чернил в картриджах. Печать может быть продолжена только после замены или дозаправки чернильниц.
Отсутствие связи компьютера с принтером
Для возможности отправки документа на печать требуется, что между принтером и компьютером была установлена физическая связь. Это можно сделать по одному из информационных интерфейсов (например, USB) либо путем соединения по проводной или беспроводной сети.
В подавляющем большинстве случаев принтер соединяется с компьютером посредством USB-кабеля. Проверить наличие соединения просто — достаточно отключить и заново подключить кабель к USB-порту. Из динамиков компьютера при этом будет слышан характерный звук отключения/подключения нового устройства. Если звук не издается, можно попробовать перезагрузить принтер и/или компьютер. Также следует осмотреть сам USB-кабель на наличие физических повреждений. Если они присутствуют — кабель следует заменить.

Ошибки картриджей
Со всеми современными принтерами возникают ошибки, связанные с картриджами. В большинстве случаев они возникают после транспортировки устройства. Решение — извлечение и установки картриджа на свое место. Делается это следующим образом (на примере МФУ Kyocera FS-1040):
- Выключите принтер.
- В передней части корпуса принтера присутствует откидная крышка. Откройте ее.
- Под крышкой в левой части установлен сам картридж. Извлеките его.
- На всякий случай осмотрите переднюю часть чернильницы. Если на ее контактах присутствуют загрязнения — удалите их мягким безворсовым материалом. В случае с высохшими чернилами — смочите материал в воде и протрите им контакты.
- Установите картридж на свое место, плотно задвинув его до щелчка.
- Включите принтер и подождите около 5-10 секунд, чтобы он смог инициализировать картридж.
Если проблема заключалась в картридже, данная процедура должна помочь в ее решении.

Замятие бумаги
Застревание бумаги внутри принтера — обычное дело в работе с печатающими машинами. Не составляют исключения и устройства Kyocera. Механизм протяжки бумаги состоит из нескольких вращающихся валов. При затруднении движения любого из них печать не будет выполняться. При замятии бумаги на лицевой панели принтера также будет выведено соответствующее сообщение.
В наиболее оптимистичных случаях для извлечения бумаги не требуется разборка принтера. Она обычно застревает прямо на входе. Если же замятие произошло внутри корпуса принтера, то устройство придется разбирать.
Использование неподходящей бумаги
Ошибочно полагать, что принтер способен печатать на любой бумаге. При использовании неподходящей по техническим характеристикам бумаги в работе печатающей машины могут возникнуть различные неполадки, вплоть до полного отказа. Если проблемы с принтером возникли после загрузки в него очередной стопки листов, следует убедиться, поддерживает ли их устройство.
Требования к бумаге можно найти в руководстве пользователя к печатающей машине. Его можно скачать на официальном сайте производителя Kyocera и на NoDevice.

Неисправности драйвера
Неполадки программного характера — довольно частая причина неработоспособности принтеров. Решение — переустановка драйвера устройства. Выполняя процедуру переустановки, всегда рекомендуется сначала удалять программное обеспечение, уже установленное на компьютере. Для этого:
- Перейдите в раздел «Устройства и принтеры», который можно найти в «Панели управления Windows».
- Среди отобразившихся на экране значков найдите имеющийся принтер Kyocera.
- Вызовите контекстное меню принтера, кликнув по его значку правой кнопкой мыши.
- Из выпадающего меню выберите пункт «Удалить устройство», согласитесь на удаление в диалоговом окне.
- Драйвер будет удален.
Далее остается установить драйвер заново. Если его нет на компьютере или на диске:
- Перейдите на сайт https://www.kyoceradocumentsolutions.ru.
- В верхней части страницы откройте раздел «Обслуживание / поддержка».
- В левой части страницы найдите и перейдите в подраздел «Центр поддержки».
- Выберите в выпадающем меню «Категория продукции» пункт «Печать».
- В выпадающем списке «Устройство» укажите модель имеющегося принтера Kyocera, которая должна быть указана на корпусе устройства.
- Нажмите на кнопку «Поиск».
- Снизу отобразятся доступные для скачивания драйверы.
- Скачайте драйвер, подходящей для установленной на компьютере операционной системы.
- Запустите установщик и следуйте инструкциям на экране.
Переустановка драйвера также поможет устранить программные неисправности самого принтера, т.к. данный процесс сбросит сохраненные в устройстве настройки.
Для автоматического поиска и установки драйверов можно использоваться программу DriverHub.
- Code: 0030
- Description: FAX PWB system error The FAX process cannot be continued due to the malfunction of the FAX PWB.
- Remedy: FAX PWB Replace the FAX PWB
- Code: 0070
- Description: FAX PWB incompatible detection error In the initial communication with the FAX PWB,
- Remedy: FAX PWB Replace the FAX PWB. Main/Engine PWB Replace the main/engine PWB.
- Code: 0100
- Description: Backup memory device error Outputs an abnormal status from the flash memory.
- Remedy: Flash memory Replace the main/engine PWB. Main/Engine PWB Replace the main/engine PWB.
- Code: 0120
- Description: MAC address data error In case MAC address is invalid data
- Remedy: Flash memory Replace the main/engine PWB.
- Code: 0130
- Description: Backup memory Read/write error Read/write to the NAND memory cannot be executed.
- Remedy: Flash memory Replace the main/engine PWB. Main/Engine PWB Replace the main/engine PWB.
- Code: 0140
- Description: Backup memory data error At power up, the data that was read from the NAND memory has been determined to be a error.
- Remedy: Flash memory Replace the main/engine PWB.
Main/Engine PWB Replace the main/engine PWB.
- Code: 0150
- Description: EEPROM read/write error (Main/ Engine PWB) Mismatch of reading data from two locations occurs 8 times successively. Mismatch between writing data and reading data occurs 8 times successively.
- Remedy: EEPROM(YS1) Confirm that the EEPROM has been properly installed and repair if failed.
Main/Engine PWB Replace the main/engine PWB.
EEPROM(YS1) Contact the service support.
- Code: 0160
- Description: Backup memory data error Illegal data is detected in the EEPROM Counter data checksum does not match in all buffers
- Remedy: EEPROM(YS1) Check that the EEPROM (YS1) is firmly installed and repair it if failed. Main/Engine PWB Replace the main/engine PWB. EEPROM(YS1) Contact the service support.
- Code: 0170
- Description: Billing counting error Checksum error was detected both in the billing counter and IPU backup memory
- Remedy: Main/Engine PWB Replace the main/engine PWB.
EEPROM(YS1) Contact the service support.
- Code: 0180
- Description: Machine number mismatch When the power is turned on, the machine number does not match between the main and engine side.
- Remedy: Main/Engine PWB Execute U004 machine number setting
EEPROM(YS1) Contact the service support.
- Code: 0190
- Description: Backup memory device error Unable to read out data from the EEPROM. The above remains at 3 times of retries
- Remedy: Main/Engine PWB Replace the main/engine PWB.
EEPROM(YS1) Contact the service support.
- Code: 0500
- Description: Drive lock detection by engine firmware The main motor was left rotating when monitoring it in the regular interval (monitored also during the maintenance mode)
- Remedy: Main/Engine PWB Turn the power switch off and on If not corrected, replace the main/ engine PWB.
- Code: 0510
- Description: High voltage remote control error detection It was detected that the high voltage remote signal (synchronized with the feed motor remote) is on while the drum is not driven
- Remedy: Main/Engine PWB Turn the power switch off and on If not corrected, replace the main/ engine PWB.
- Code: 0530
- Description: Backup task error detection The time for the backup task not being in operation is 30s or more
- Remedy: Main/Engine PWB Turn the power switch off and on If not corrected, replace the main/ engine PWB.
- Code: 0540
- Description: Unexpected engine firmware control detection? (Preventing the solenoid from continuously being on) The solenoid was continuously on for the specified time or more
- Remedy: Main/Engine PWB Turn the power switch off and on If not corrected, replace the main/ engine PWB.
- Code: 0800
- Description: Print sequence error The printing sequence jam (JAM010X) occurred twice consecutively.
- Remedy: Main/Engine PWB Turn the power switch off and on If not corrected, replace the main/ engine PWB.
- Code: 0830
- Description: FAX PWB flash program area checksum error The program stored in the flash memory on the FAX PWB is broken and cannot be executed.
- Remedy: FAX PWB Replace the FAX PWB.
- Code: 0840
- Description: RTC error Communication with the RTC has failed The RTC data mismatch such as dead battery
- Remedy: Battery on the main/engine PWB Check it and repair it if it is faulty.
Main/Engine PWB Replace the main/engine PWB.
- Code: 0870
- Description: FAX PWB large data transmission error DMA transmission failed between the main/engine PWB and FAX PWB
- Remedy: FAX PWB Reattach the FAX PWB.
FAX PWB or main/engine PWB Replace the FAX PWB or main/engine PWB.
- Code: 0920
- Description: Fax file system error The backup data is not retained for file system abnormality of the flash memory of the FAX PWB.
- Remedy: FAX PWB Replace the FAX PWB.
- Code: 0970
- Description: 24V power down detect The power shutoff was detected by the controller
- Remedy: Interlock switch Check that the interlock switch is turned on properly by the front cove.
Low voltage power supply PWB Check if there is defective connection in the connector of the low voltage power supply PWB, and then check the 24V output from the main/engine PWB (YC20-1, 2,3). If not, replace the low voltage power supply PWB.
Main/Engine PWB Replace the main/engine PWB and check the operation.
- Code: 1810
- Description: Communication error with the paper feeder (1st PF) No paper feeder was detected after the paper feeder connection was detected at power-up
- Remedy: Paper feeder Check the wiring connection status with the main unit, and if necessary, reconnect it.
PF main PWB 1. Confirm that the wiring connector is firmly connected, and if necessary, connect the connector all the way in. PF main PWB — Main/engine PWB (YC17) 2. If the wiring is disconnected, shortcircuited or has a ground fault, replace the wire. 3. Replace the PF main PWB.
Main/ Engine PWB 1. Check the engine firmware and upgrade to the latest version if necessary. 2. Replace the main/engine PWB.
- Code: 1820
- Description: Communication error with the paper feeder (2nd PF) No paper feeder was detected after the paper feeder connection was detected at power-up
- Remedy: Paper feeder Check the wiring connection status with the main unit, and if necessary, reconnect it.
PF main PWB 1. Confirm that the wiring connector is firmly connected, and if necessary, connect the connector all the way in. PF main PWB and Main/engine PWB (YC47) 2. If the wiring is disconnected, shortcircuited or has a ground fault, replace the wire. 3. Replace the PF main PWB.
Main/ Engine PWB 1. Check the engine firmware and upgrade to the latest version if necessary. 2. Replace the main/engine PWB.
- Code: 2000
- Description: Main motor steady-state error After the main motor was stabilized, the ready signal was not detected for consecutive 1s.
- Remedy: Wire and connector between the main motor and main/engine PWB (YC9) If the connector is not inserted enough, reinsert it. Or check the wire’s continuity and replace the wire if there is no continuity.
Main motor drive transmission system Check if each roller and gear rotate smoothly. Apply grease to the bushings and gears if they are faulty. Check each gear if it is damaged and replace it if there is damage.
Main motor Replace the main motor.
Main/Engine PWB Replace the main/engine PWB.
- Code: 2010
- Description: Main motor start-up error The ready signal was not detected when passing 2s after the main motor is started up.
- Remedy: Wire and connector between the main motor and main/engine PWB (YC9) If the connector is not inserted enough, reinsert it. Or check the wire’s continuity and replace the wire if there is no continuity.
Main motor drive transmission system Check if each roller and gear rotate smoothly. Apply grease to the bushings and gears if they are faulty. Check each gear if it is damaged and replace it if there is damage.
Main motor Replace the main motor.
Main/Engine PWB Replace the main/engine PWB.
- Code: 2600
- Description: PF conveying motor error (Paper feeder) The ready signal is not detected within 2s after the PF conveying motor of the cassette 2 turns on.
- Remedy: Connection of the wire and connector PF conveying motor — PF main PWB If the connector is not inserted enough, reinsert it. Or check the wire’s continuity and replace the wire if there is no continuity.
PF conveying motor drive transmission system Check if each roller and gear rotate smoothly. Apply grease to the bushings and gears if they are faulty. Check each gear if it is damaged and replace it if there is damage.
PF conveying motor Replace the PF conveying motor.
- Code: 2610
- Description: PF conveying motor error (Paper feeder) The ready signal is not detected within 2s after the PF conveying motor of the cassette 3 turns on.
- Remedy: Connection of the wire and connector PF conveying motor — PF main PWB If the connector is not inserted enough, reinsert it. Or check the wire’s continuity and replace the wire if there is no continuity.
PF conveying motor drive transmission system Check if each roller and gear rotate smoothly. Apply grease to the bushings and gears if they are faulty. Check each gear if it is damaged and replace it if there is damage.
PF conveying motor Replace the PF conveying motor.
- Code: 3100
- Description: Carriage error 1) While the HP sensor is interrupted at the initial drive, it is not released when driven by 66.1mm toward the scanning direction 2) During the initial drive while the HP sensor is released, the HP sensor is not interrupted when driving it by 379.5mm toward the return direction
- Remedy: Scanner motor 1. Move the scanner manually to check if there is too much load. 2. Check that the scanner drive belt is not disengaged. 3. Confirm that the wiring connector is firmly connected, and if necessary, connect the connector all the way in. Scanner motor — Main/engine PWB (YC31) 4. If the wiring is disconnected, shortcircuited or has a ground fault, replace the wire. 5. Replace the scanner motor.
Home position sensor 1. Check that the sensor is correctly positioned. 2. Confirm that the wiring connector is firmly connected, Insert the connector all the way in. Home position sensor — Main/engine PWB (YC17) 3. Replace the home position sensor.
CIS Replace the scanner carriage and execute U411.
Main/ Engine PWB Replace the main/engine PWB.
- Code: 3200
- Description: CIS lamp error The white reference data obtained when the lamp is turned on at the time of initialization is lower than the rated value.
- Remedy: CIS Replace the scanner carriage and execute U411.
Main/ Engine PWB Replace the main/engine PWB.
- Code: 3210
- Description: DP CIS lamp error The white reference data obtained when the lamp is turned on at the time of initialization is lower than the rated value. (40 ppm model only)
- Remedy: DP CIS 1. Confirm that the wiring connector is firmly connected, and if necessary, connect the connector all the way in. DPCIS — Main/Engine PWB(YC509) 2. Replace DPCIS and execute U411.
- Code: 3300
- Description: CIS AGC error An error was detected when processing the front side AGC
- Remedy: CIS 1. Confirm that the wiring connector is firmly connected, and if necessary, connect the connector all the way in. CIS — Main/Engine PWB (YC506) 2. If the wiring is disconnected, shortcircuited or has a ground fault, replace the wire. 3. Replace the scanner carriage and execute U411
Main/Engine PWB Replace the main/engine PWB.
- Code: 3310
- Description: DP CIS AGC error An error was detected when processing the back side AGC (40 ppm model only)
- Remedy: DP CIS 1. Confirm that the wiring connector is firmly connected, and if necessary, connect the connector all the way in. DPCIS — Main/Engine PWB(YC509) 2. Replace DPCIS and execute U411.
Main/Engine PWB Replace the main/engine PWB.
- Code: 3500
- Description: Scanner — ASIC communication error A communication error is detected during communication. (Read-back values are different.)
- Remedy: CIS 1. Confirm that the wiring connector is firmly connected, and if necessary, connect the connector all the way in. CIS — Main/Engine PWB (YC506) 2. If the wiring is disconnected, shortcircuited or has a ground fault, replace the wire. 3. Replace the image scanner carriage and execute U411.
Main/Engine PWB Replace the main/engine PWB.
- Code: 4000
- Description: Polygon motor initial error (LSU) The polygon motor ready signal is not detected when passing 10s after starting up the polygon motor
- Remedy: Laser scanner unit (LSU) 1. Confirm that the wiring connector is firmly connected, and if necessary, connect the connector all the way in. Polygon motor — Main/engine PWB (YC3) If the wiring is disconnected, short-circuited or has a ground fault, replace the wire. 2. Replace the LSU.
Main/Engine PWB 1. Check the engine firmware and upgrade to the latest version if necessary. 2. Replace the main/engine PWB.
- Code: 4010
- Description: Polygon motor steady-state error (LSU) The polygon motor ready signal is not for consecutive 1s after the polygon motor is stabilized
- Remedy: Laser scanner unit (LSU) 1. Confirm that the wiring connector is firmly connected, and if necessary, connect the connector all the way in. Polygon motor — Main/engine PWB (YC3) If the wiring is disconnected, short-circuited or has a ground fault, replace the wire. 2. Replace the LSU.
Main/Engine PWB 1. Check the engine firmware and upgrade to the latest version if necessary. 2. Replace the main/engine PWB.
- Code: 4201
- Description: BD steady-state error (LSU) BD was not obtained during the steady rotation
- Remedy: Laser scanner unit (LSU) 1. Confirm that the wiring connector is firmly connected, and if necessary, connect the connector all the way in. LSU — Main/Engine PWB (YC505) 2. If the wiring is disconnected, shortcircuited or has a ground fault, replace the wire. 3. Replace the LSU.
Main/Engine PWB Replace the main/engine PWB.
- Code: 6000
- Description: Broken fuser heater wire (main) During warm-up, the temperature detected by the thermopile does not reach 100°C/212 °F when turning the heater on for consecutive 10s During warm up, the temperature detected by the thermopile does not reach the ready temperature when passing 30s after reaching 60°C/ 212°F.
- Remedy: Fuser unit 1. Make sure there is no paper jam. 2. Confirm that the wiring connector is firmly connected, and if necessary, connect the connector all the way in. Fuser unit — Main/Engine PWB(YC19) 3. If the wiring is disconnected, shortcircuited or has a ground fault, replace the wire. 4. If the fuser heater is not turned on (broken thermostat wire), replace the fuser unit.
Low voltage power supply PWB 1. Confirm that the wiring connector is firmly connected, and if necessary, connect the connector all the way in. Heater — Low voltage power supply PWB (YC102) Low voltage power supply PWB — Main/ Engine PWB(YC20) 2. Replace the low voltage power supply PWB.
Main/Engine PWB Replace the main/engine PWB.
- Code: 6020
- Description: Fuser thermopile high temperature error (main) During drive, the thermopile detected 200C/392 °F for 5s The temperature detected by the thermopile rose 18C/65 °F or more when passing 1s or more after the drive is stopped Detected temperature at that time is 200C/392 °or more
- Remedy: Thermopile 1. Reconnect the wire connector Replace the wire if there is no continuity. Thermopile — Main/engine PWB (YC2) 2. Check how the thermopile is attached. If not attached to the holder, correct it 3. Replace the thermopile if not repaired
Fuser unit 1. Make sure there is no paper jam. 2. If the fuser heater is not turned on (broken thermostat wire), replace the fuser unit.
Low voltage power supply PWB 1. Confirm that the wiring connector is firmly connected, and if necessary, connect the connector all the way in. Low voltage power supply PWB — Main/ Engine PWB(YC20) 2. Replace the low voltage power supply PWB.
Main/Engine PWB Replace the main/engine PWB.
- Code: 6030
- Description: Broken fuser thermopile wire (main) The thermopile detected an abnormal value
- Remedy: Thermopile 1. Reconnect the wire connector Replace the wire if there is no continuity. Thermopile — Main/engine PWB (YC2) 2. Replace the thermopile if not repaired
Main/Engine PWB Replace the main/engine PWB.
- Code: 6050
- Description: Fuser thermopile low temperature error (main) During printing, the temperature detected by the thermopile is less than 100C/212°F for consecutive 3s
- Remedy: Power supply voltage 1. Check no voltage drop exceeding 10% of the rated during printing. 2. If the power is overloaded, change the AC outlet that supplies power.
Thermopile 1. Reconnect the wire connector Replace the wire if there is no continuity. Thermopile — Main/engine PWB (YC2) 2. Check how the thermopile is attached. If not attached to the holder, correct it 3. Replace the thermopile if not repaired
Fuser unit 1. Make sure there is no paper jam. 2. Confirm that the wiring connector is firmly connected, and if necessary, connect the connector all the way in. Fuser unit — Main/Engine PWB(YC19) 3. If the wiring is disconnected, shortcircuited or has a ground fault, replace the wire. 4. If the fuser heater is not turned on (broken thermostat wire), replace the fuser unit.
Low voltage power supply PWB 1. Confirm that the wiring connector is firmly connected, and if necessary, connect the connector all the way in. Heater — Low voltage power supply PWB (YC102) Low voltage power supply PWB — Main/ Engine PWB(YC20) 2. Replace the low voltage power supply PWB.
Main/Engine PWB Replace the main/engine PWB.
- Code: 6200
- Description: Fuser heater error (sub) During warm-up, the temperature detected by the thermistor does not reach 60C/212.0 °F when turning the heater on for consecutive 30s. During warm-up, the temperature detected by the thermistor does not reach the ready temperature when passing 20s after it reaches 60C/ 212°F.
- Remedy: Thermopile 1. Reconnect the wire connector Replace the wire if there is no continuity. Thermopile — Main/engine PWB (YC2) 2. Replace the thermopile if not repaired
Fuser unit 1. Make sure there is no paper jam. 2. Confirm that the wiring connector is firmly connected, and if necessary, connect the connector all the way in. Fuser unit — Main/Engine PWB(YC19) 3. If the wiring is disconnected, shortcircuited or has a ground fault, replace the wire. 4. If the fuser heater is not turned on (broken thermostat wire), replace the fuser unit.
Low voltage power supply PWB 1. Confirm that the wiring connector is firmly connected, and if necessary, connect the connector all the way in. Heater — Low voltage power supply PWB (YC102) Low voltage power supply PWB — Main/ Engine PWB(YC20) 2. Replace the low voltage power supply PWB.
Main/Engine PWB Replace the main/engine PWB.
- Code: 6220
- Description: Fuser heater high temperature error (sub) The temperature detected by the thermopile is 240°C/464 °F while the drive is stopped The temperature detected by the thermopile is 255°C/491 °F during drive
- Remedy: Thermopile 1. Reconnect the wire connector Replace the wire if there is no continuity. Thermopile — Main/engine PWB (YC2) 2. Check how the thermopile is attached. If not attached to the holder, correct it 3. Replace the thermopile if not repaired
Fuser unit 1. Make sure there is no paper jam. 2. Confirm that the wiring connector is firmly connected, and if necessary, connect the connector all the way in. Fuser unit — Main/Engine PWB(YC19) 3. If the wiring is disconnected, shortcircuited or has a ground fault, replace the wire. 4. Replace the fuser unit.
Low voltage power supply PWB 1. Confirm that the wiring connector is firmly connected, and if necessary, connect the connector all the way in. Low voltage power supply PWB — Main/ Engine PWB(YC20) 2. Replace the low voltage power supply PWB.
Main/Engine PWB Replace the main/engine PWB.
- Code: 6230
- Description: Fuser thermistor wire break (sub) The thermistor’s AD value was abnormal
- Remedy: Fuser unit 1. Confirm that the wiring connector is firmly connected, and if necessary, connect the connector all the way in. Fuser unit — Main/Engine PWB(YC19) 2. If the wiring is disconnected, shortcircuited or has a ground fault, replace the wire. 3. If the fuser heater is not turned on (broken thermostat wire), replace the fuser unit.
Main/Engine PWB Replace the main/engine PWB.
- Code: 6250
- Description: Fuser heater low temperature error (sub) During printing, the temperature detected by the thermistor is less than 60°C/140°F for consecutive 3s
- Remedy: Thermopile 1. Reconnect the wire connector Replace the wire if there is no continuity. Thermopile — Main/engine PWB (YC2) 2. Check how the thermopile is attached. If not attached to the holder, correct it 3. Replace the thermopile if not repaired
Fuser unit 1. Make sure there is no paper jam. 2. Confirm that the wiring connector is firmly connected, and if necessary, connect the connector all the way in. Fuser unit — Main/Engine PWB(YC19) 3. If the wiring is disconnected, shortcircuited or has a ground fault, replace the wire. 4. Replace the fuser unit.
Low voltage power supply PWB 1. Confirm that the wiring connector is firmly connected, and if necessary, connect the connector all the way in. Heater — Low voltage power supply PWB (YC102) Low voltage power supply PWB — Main/ Engine PWB(YC20) 2. Replace the low voltage power supply PWB.
Main/Engine PWB Replace the main/engine PWB.
- Code: 6400
- Description: Zero-cross signal error During the heater turned on, the zero-cross signal disappears for consecutive 1s
- Remedy: Low voltage power supply PWB Replace the low voltage power supply PWB.
Main/Engine PWB Replace the main/engine PWB.
- Code: 6600
- Description: Fuser rotation error The fuser roller rotation detection is not input for consecutive 2s while the motor’s steady signal is input
- Remedy: Fuser unit 1. Make sure there is no paper jam. 2. Confirm that the wiring connector is firmly connected, and if necessary, connect the connector all the way in. Fuser unit — Main/Engine PWB(YC19) 3. If the wiring is disconnected, shortcircuited or has a ground fault, replace the wire. 4. Replace the fuser unit.
Main/Engine PWB Replace the main/engine PWB.
- Code: 6610
- Description: The fuser pressure release error The fuser pressure change is not complete within 10s after the instruction
- Remedy: Fuser unit 1. Make sure there is no paper jam. 2. Confirm that the wiring connector is firmly connected, and if necessary, connect the connector all the way in. Fuser unit — Main/engine PWB (YC19) 3. If the wiring is disconnected, shortcircuited or has a ground fault, replace the wire. 4. Replace the fuser unit.
Fuser pressure release error 1. Reverse-rotate the fuser gear manually to check if the fuser pressure can be released. 2. When releasing the pressure, check the fuser pressure release sensor is interrupted by the actuator Reattach it if the light is not interrupted 3. Reconnect the wire connector Replace the wire if there is no continuity. Fuser pressure release sensor — Main/ engine PWB (YC19) Fuser pressure release motor — Main/ engine PWB (YC1) 4. Replace the fuser pressure release motor.
Main/Engine PWB Replace the main/engine PWB.
- Code: 6650
- Description: Fuser thermopile EEPROM error 1. The thermopile EEPROM is not accessed 2. No response from the device at read was detected five time consecutively Data read at two points was unmatched eight times consecutively 3. Thermopile data checksum error
- Remedy: Thermopile 1. Reconnect the wire connector Replace the wire if there is no continuity. 2. Thermopile — Main/engine PWB (YC2) 3. Replace the thermopile if not repaired
Main/Engine PWB Replace the main/engine PWB.
- Code: 7220
- Description: Broken in-machine thermistor wire The sensor input sampling value is greater than the reference value.
- Remedy: In-machine temperature sensor 1. Confirm that the wiring connector is firmly connected, Insert the connector all the way in. In-machine temperature sensor — Main/engine PWB (YC1) 2. If the wiring is disconnected, shortcircuited or has a ground fault, replace the wire. Replace the in-machine temperature sensor PWB.
Main/Engine PWB Replace the main/engine PWB.
- Code: 7800
- Description: Broken outer thermistor wire The sensor input sampling value is abnormal. (After detecting an error, it is controlled at 23C/77 °F and 50%RH)
- Remedy: Temperature and humidity Sensor 1. Confirm that the wiring connector is firmly connected, and if necessary, connect the connector all the way in. Temperature and humidity sensor — Main/engine PWB (YC2) 2. If the wiring is disconnected, shortcircuited or has a ground fault, replace the wire. 3. Replace the Temperature and humidity sensor PWB.
Main/Engine PWB Replace the main/engine PWB.
- Code: 7990
- Description: Waste toner full The waste toner sensor detected the waste toner reservoir in the drum unit is full
- Remedy: Drum unit Turn the power switch off and on Replace the drum unit if not repaired.
Waste toner sensor Replace the waste toner sensor.
Main/Engine PWB Replace the main/engine PWB.
- Code: F000
- Description: Communication error between Main/Engine PWB — Operation panel PWB
- Remedy: Connection of the wires and connectors between the main/engine PWB — the operation panel PWB. If the connector is not inserted enough, reinsert it. Or check the wire’s continuity and replace the wire if there is no continuity.
Operation panel PWB Replace the operation panel PWB. (TSI: see page 4-138, LCD: see page 4- 141)
Main/Engine PWB Replace the main/engine PWB.
- Code: F010
- Description: Main/Engine PWB Checksum error
- Remedy: Main/Engine PWB Unplug the power cord from the wall outlet, and wait five seconds. Then plug in the power cord and then turn on the power switch. If not corrected, replace the main/ engine PWB.
- Code: F020
- Description: Main/engine PWB RAM checksum error
- Remedy: Main/engine PWB memory (RAM) Turn the power switch off and on If not corrected, replace the main/ engine PWB.
Expansion memory (DIMM) Replace the expansion memory (DIMM)
- Code: F040
- Description: Main/engine PWB engine communication error
- Remedy: Main/Engine PWB Turn the power switch off and on If not repaired, replace the EEPROM on the main/engine PWB or main/engine PWB.
- Code: F041
- Description: Main/engine PWB — Scanner PWB communication error
- Remedy: Main/Engine PWB Turn the power switch off and on If not corrected, replace the main/ engine PWB.
- Code: F050
- Description: Main/engine PWB engine checksum error
- Remedy: Main/Engine PWB Download the engine firmware again (TSI: see page 4-138,LCD: see page 4- 141)
Main/Engine PWB Turn the power switch off and on If not repaired, replace the EEPROM on the main/engine PWB or main/engine PWB.
- Code: F051
- Description: No scan engine main program
- Remedy: Main/Engine PWB Turn the power switch off and on If not corrected, replace the main/ engine PWB.
- Code: F12X
- Description: Abnormality detecting in a Scan control section
- Remedy: (1) Check the harness between Scan/DP<=>Main/Engine PWBs, and the connection state of a connector, and perform an operation check. (2) U021 Controller backup initialization is carried out and an operation check is performed. (3) Exchange a Scan/DP board and perform an operation check. (4) Exchange a Main/Engine PWB and perform an operation check. (5) Get USBLOG and contact service headquarters.
- Code: F14X
- Description: Abnormality detecting in a FAX control part
- Remedy: (1) Check the harness between FAX<=>Main/Engine PWBs, and the connection state of a connector, and perform an operation check. (2) U021 Controller backup initialization is carried out and an operation check is performed. (3) Perform a deed operation check for DIMM Clear by U671. * Notes(Since it disappears when received data remain, cautions are required.) (4) Exchange a FAX board and perform an operation check. (5) Exchange a Main/Engine PWB and perform an operation check. (6) Get USBLOG and contact service headquarters.
- Code: F15X
- Description: Abnormality detecting in an authentication device control section
- Remedy: (1) Check the harness between authentication device <=>Main/ Engine PWBs, and the connection situation of a connector, and perform an operation check. (2) Carry out U021 Main backup initialization and perform an operation check. (3) Exchange a Main/Engine PWB and perform an operation check. (4) Get USBLOG and contact service headquarters.
- Code: F18X
- Description: Abnormality detecting in a Video control section
- Remedy: (1) Check the harness between Engine<=>Main/Engine PWBs, and the connection state of a connector, and perform an operation check. (2) U021 Controller backup initialization is carried out and an operation check is performed. (3) Exchange a Main/Engine PWB and perform an operation check. (4) Get USBLOG and contact service headquarters.
- Code: F1DX
- Description: Abnormality detecting of the image memory Management Department
- Remedy: (1) Carry out U021 Main backup initialization and perform an operation check. (2) Exchange a Main/Engine PWB and perform an operation check. (3) Get USBLOG and contact service headquarters.
- Code: F21X, F22X, F23X
- Description: Abnormality detecting in an image-processing part
- Remedy: (1) Check contact of a DDR memory and perform an operation check. (2) Carry out U021 Main backup initialization and perform an operation check. (3) Exchange a Main/Engine PWB and perform an operation check. (4) Get USBLOG and contact service headquarters.
- Code: F24X
- Description: Abnormality detecting in the system Management Department
- Remedy: (1) Check contact of a DDR memory and perform an operation check. (2) Carry out U021 Main backup initialization and perform an operation check. (3) Exchange a Main/Engine PWB and perform an operation check. (4) Get USBLOG and contact service headquarters.
- Code: F25X
- Description: Abnormality detecting in a network management department
- Remedy: (1) Carry out U021 Main backup initialization and perform an operation check. (2) Exchange a Main/Engine PWB and perform an operation check. (3) Get USBLOG and packet capture and contact service headquarters.
- Code: F26X … F2AX
- Description: Abnormality detecting in the system Management Department
- Remedy: (1) Carry out U021 Main backup initialization and perform an operation check. (2) Exchange a Main/Engine PWB and perform an operation check. (3) Get USBLOG and contact service headquarters.
- Code: F2BX … F32X
- Description: Abnormality detecting in a network control part
- Remedy: (1) Carry out U021 Main backup initialization and perform an operation check. (2) Exchange a Main/Engine PWB and perform an operation check. (3) Get USBLOG and contact service headquarters.(Depending on an analysis result, it is packet capture acquisition)
- Code: F33X
- Description: Abnormality detecting in the Scan Management Department
- Remedy: (1) Check the harness between Scan/DP<=>Main/Engine PWBs, and the connection state of a connector, and perform an operation check. (2) U021 Controller backup initialization is carried out and an operation check is performed. (3) Exchange a Scan/DP board and perform an operation check. (4) Exchange a Main/Engine PWB and perform an operation check. (5) Get USBLOG and contact service headquarters.
- Code: F34X
- Description: Abnormality detecting in the Panel Management Department
- Remedy: (1) Check the harness between Panel<=>Main/Engine PWBs, and the connection state of a connector, and perform an operation check. * Notes (2) U021 Controller backup initialization is carried out and an operation check is performed. (3) Exchange a Panel board and perform an operation check. (4) Exchange a Main/Engine PWB and perform an operation check. (5) Get USBLOG and contact service headquarters.
- Code: F35X
- Description: Abnormality detecting in the printing controlling Management Department
- Remedy: (1) Carry out U021 Main backup initialization and perform an operation check. (2) Exchange a Main/Engine PWB and perform an operation check. (3) Get USBLOG and contact service headquarters.
- Code: F37X
- Description: Abnormality detecting in the FAX Management Department
- Remedy: (1) Carry out U021 Main backup initialization and perform an operation check. (2) Exchange a Main/Engine PWB and perform an operation check. (3) Get USBLOG and contact service headquarters.
- Code: F38X
- Description: Abnormality detecting in the authentication authorized Management Department
- Remedy: (1) Carry out U021 Main backup initialization and perform an operation check. (2) Exchange a Main/Engine PWB and perform an operation check. (3) Get USBLOG and contact service headquarters.
- Code: F3AX … F45X
- Description: Abnormality detecting in the Entity Management Department
- Remedy: (1) Carry out U021 Main backup initialization and perform an operation check. (2) Exchange a Main/Engine PWB and perform an operation check. (3) Get USBLOG and contact service headquarters.
- Code: F46X
- Description: Abnormality detecting of a printer rendering part
- Remedy: (1) Exchange a Main/Engine PWB and perform an operation check. (2) the acquisition wish of USBLOG — carry out (Depending on the (2) case, it is print capture data acquisition)
- Code: F47X, F48X, F49X
- Description: Abnormality detecting of an image editing processing part
- Remedy: (1) Carry out U021 Main backup initialization and perform an operation check. (2) Exchange a Main/Engine PWB and perform an operation check. (3) Get USBLOG and contact service headquarters.
- Code: F4DX, F4EX
- Description: Abnormality detecting in the Entity Management Department
- Remedy: (1) Carry out U021 Main backup initialization and perform an operation check. (2) Exchange a Main/Engine PWB and perform an operation check. (3) Get USBLOG and contact service headquarters.
- Code: F4FX
- Description: Abnormality detecting in the JOB Management Department
- Remedy: (1) Carry out U021 Main backup initialization and perform an operation check. (2) Exchange a Main/Engine PWB and perform an operation check. (3) Get USBLOG and contact service headquarters.
- Code: F50X
- Description: Abnormality detecting in the FAX Management Department
- Remedy: (1) Carry out U021 Main backup initialization and perform an operation check. (2) Exchange a Main/Engine PWB and perform an operation check. (3) Get USBLOG and contact service headquarters.
- Code: F51X … F57X
- Description: Abnormality detecting in a JOB execution part
- Remedy: (1) Carry out U021 Main backup initialization and perform an operation check. (2) Exchange a Main/Engine PWB and perform an operation check. (3) Get USBLOG and contact service headquarters.
- Code: F58X … F5EX
- Description: Abnormality detecting in the various-services Management Department
- Remedy: (1) Carry out U021 Main backup initialization and perform an operation check. (2) Exchange a Main/Engine PWB and perform an operation check. (3) Get USBLOG and contact service headquarters.
- Code: F5FX
- Description: Abnormality detecting in a service execution part
- Remedy: (1) Carry out U021 Main backup initialization and perform an operation check. (2) Exchange a Main/Engine PWB and perform an operation check. (3) Get USBLOG and contact service headquarters.
- Code: F62X
- Description: Abnormality detecting in a service execution part
- Remedy: (1) Carry out U021 Main backup initialization and perform an operation check. (2) Exchange a Main/Engine PWB and perform an operation check. (3) Get USBLOG and contact service headquarters.
- Code: F63X
- Description: Abnormality detecting in a device control section
- Remedy: (1) Carry out U021 Main backup initialization and perform an operation check. (2) Exchange a Main/Engine PWB and perform an operation check. (3) Get USBLOG and contact service headquarters.
- Code: F69X … F6CX
- Description: Abnormality detecting in a HyPAS-E part
- Remedy: (1) Carry out U021 Main backup initialization and perform an operation check. (2) Exchange a Main/Engine PWB and perform an operation check. (3) Get USBLOG and contact service headquarters.
 Если с аппаратом Kyocera TASKalfa 1800, Kyocera TASKalfa 2200 произошла проблема, откроется следующий экран с уведомлением.
• Индикатор [Внимание] на панели управления горит или мигает.
• На дисплее сообщений панели управления аппарата появилось сообщение об ошибке.
Если индикатор [Внимание] горит или мигает и на дисплее сообщений панели управления аппарата появилось сообщение об ошибке, проверьте KYOCERA Client Tool или Монитор состояния.
ПРИМЕЧАНИЕ Если индикаторы постоянно горят и мигают не так, как описано выше, вероятно, произошла ошибка службы. Выключите питание, отсоедините шнур питания и вставьте его обратно, после чего включите питание. Это может помочь сбросить ошибку. Если ошибка не исчезает, свяжитесь со своим представителем сервисной службы (тел. в Минске +375 17 291-28-24)
Ниже описаны неполадки, которые не могут быть устранены пользователем
|
Дисплей сообщений |
Описание |
Меры устранения |
|
Бункер отраб тонера перепол. или не уст. |
Бункер для отработанного тонера установлен неправильно |
Установите Бункер для отработанного тонера должным образом |
|
Бункер для отработанного тонера заполнен |
Замените бункер отработанного тонера |
|
|
Встряхните картр. с тонером |
Тонер слежался |
Откройте переднюю крышку аппарата и вытяните контейнер с тонером. Сильно встряхните контейнер с тонером и установите его на место |
|
Вызовите сервисный персонал. |
В аппарате произошла ошибка |
Обратите внимание на код ошибки, отображаемый в дисплее сообщений, и свяжитесь с представителем сервисной службы (тел. в Минске +375 17 291-28-24) |
|
Выньте бумагу с внутреннего лотка |
Извлеките бумагу из внутреннего лотка. Нажмите клавишу [OK], чтобы возобновить печать |
|
|
Добавьте тонер |
Закончился тонер |
Замените контейнер с тонером TK-4105 |
|
Загрузите бумагу в кассету # |
↑↓ (отображается попеременно) |
Загрузите бумагу. Нажмите клавишу [OK] и перейдите к следующему шагу. • Для выбора другого устройства подачи выберите [Выберите бумагу]. • Для печати на бумаге, в настоящее время находящейся в устройстве подачи, выберите [Продолж. без изм.] |
|
Загрузите бумагу в универсальный лоток |
↑↓ (отображается попеременно) |
Загрузите бумагу. Нажмите клавишу [OK] и перейдите к следующему шагу. • Для выбора другого устройства подачи выберите [Выберите бумагу]. • Для печати на бумаге, в настоящее время находящейся в устройстве подачи, выберите [Продолж. без изм.] |
|
Закройте автоподатчик оригиналов |
Открыт автоподатчик оригиналов |
Откройте и закройте автоподатчик оригиналов |
|
Закройте крышку автопод. оригиналов |
Открыта верхняя крышка автоподатчика оригиналов |
Откройте и закройте крышку автоподатчика оригинало |
|
Закройте переднюю крышку |
Открыта передняя крышка |
Откройте и закройте переднюю крышку |
|
Закройте правую крышку # |
Открыта какая-либо крышка |
Откройте и закройте крышку, обозначенную на экране |
|
Замятие бумаги. (DP) |
В автоподатчике произошло замятие бумаги. |
См. Устранение замятия бумаги в Руководстве по эксплуатации и извлеките замятую бумагу |
|
Замените МК |
Необходимо производить замену деталей комплекта техобслуживания MK-4105 (ремкомплекта) каждые 150 000 страниц печати. |
Данная операция должна производиться специалистом. Обратитесь к представителю сервисной службы (тел. в Минске +375 17 291-28-24) |
|
Замятие |
Произошло замятие бумаги в кассете или универсальном лотке |
См. Устранение замятия бумаги и извлеките замятую бумагу |
|
Извлеките оригиналы из автоподатчика |
Для продолжения работы необходимо извлечь оригиналы из автоподатчика оригиналов |
Извлеките оригиналы из автоподатчика оригиналов |
|
Кабель USB был отключен |
Кабель USB не подключен |
Нажмите клавишу [OK] и подключите кабель USB |
|
ПК выключен |
Нажмите клавишу [OK] и включите ПК |
|
|
Не удается найти KYOCERA Client Tool |
Нажмите клавишу [OK] и откройте KYOCERA Client Tool на ПК |
|
|
Макс. к-во сканируемых страниц |
Превышен предел сканирования |
Дальнейшее сканирование невозможно. Задание отменено. Нажмите клавишу [OK] |
|
Мало тонера. (Зам., когда законч.) |
Скоро понадобится заменить контейнер с тонером |
Получите новый контейнер с тонером TK-4105. |
|
Не оригинальный тонер |
Установлен контейнер с тонером не марки Kyocera |
Производитель не несет ответственности за повреждения, вызванные использованием неоригинального тонера. Мы рекомендуем использовать исключительно оригинальные контейнеры с тонером TK-4105. . |
|
Неверный ид. уч. зап. Задание отменено |
Указан неверный идентификатор учетной записи при внешней обработке задания. Задание отменено |
Нажмите клавишу [OK] |
|
Невозможна двусторонняя печать на этой бумаге |
Не возможна печать на бумаге выбранного формата или типа |
Нажмите клавишу [OK] и перейдите к следующему шагу: |
|
Недостаточно памяти. Невозможно начать выполнение задания |
Невозможно начать выполнение задания |
Повторите попытку позже |
|
Ограничено алгоритмом учета заданий(Печать) |
Задание отменено, поскольку его выполнение ограничено функцией учета заданий |
Нажмите клавишу [OK] |
|
Ограничено алгоритмом учета заданий(Сканер) |
Задание отменено, поскольку его выполнение ограничено функцией учета заданий |
Нажмите клавишу [OK] |
|
Очистите сканер |
Произошло загрязнение сканера |
Очистите щелевое стекло с помощью чистящей салфетки, поставляемой вместе с автоподатчиком оригиналов. |
|
Ошибка. Выключить |
— |
Отключите и снова включите аппарат с помощью выключателя питания |
|
Память переполнена |
Невозможно продолжить выполнение задания из-за отсутствия свободной памяти |
Измените разрешение печати с Быстр1200 до 600 dpi. См. Printer Driver User Guide |
|
Память сканера переполнена |
Дальнейшее сканирование невозможно из-за нехватки памяти сканера. |
Для отмены задания нажмите [OK] |
|
Перезагрузка печати. Задание отменено |
Предупреждение. Недостаточно памяти принтера. Задание отменено |
Нажмите клавишу [OK] |
|
Превышено ограничение учета заданий |
Превышено число распечаток из-за ограничения алгоритмом учета заданий. Достигнут предел печати |
Это задание отменено. Нажмите клавишу [OK] |
|
Уст.другую кассету |
Выбрано «Сдвиг» |
Для использования сдвига необходимо загрузить в другой лоток бумагу такого же формата, что и в выбранном устройстве подачи, но в другой ориентации |
|
Установите все оригиналы обратно и нажмите клавишу [Старт]. |
Возникает при печати двусторонних документов в режиме ручной двусторонней печати |
Извлеките оригиналы из автоподатчика оригиналов, расположите их в первоначальном порядке и положите обратно. Нажмите клавишу [OK], чтобы возобновить печать. Для отмены задания нажмите [Стоп] |
|
Установлен неизвестный тонер. ПК |
Региональная спецификация контейнера с тонером не соответствует спецификации аппарата |
Установите оригинальный контейнер с тонером Замените контейнер с тонером TK-4105 |
Содержание
- Чек-лист по решению проблем
- 1. Кончилась бумага
- 2. Бумага не выходит из принтера при печати
- 3. Принтер перестал определяться. Слетел драйвер
- 4. Печатает иероглифы/знаки вопроса
- 5. Печатает пустые листы
- 6. Зависает печать при отправке документа через локальную сеть
- 7. Линии или точки при печати
Одним из источников стресса в офисной работе является неисправная оргтехника. Даже токсичный коллеги не способны так портить настроение, как мажущий, тупящий, вечно занятый и блекло печатающий принтер. Сегодня мы исследуем модель Kyocera ECOSYS p2035d — довольно недешевое устройство (~ 11 000 рублей), поэтому вдвойне обидно, когда он перестаёт печатать по непонятным причинам.


Уж сколько раз твердили миру — отдавайте обслуживание оргтехники на аутсорсинг. Многие компании составляют договор на обслуживание оргтехники. Плюсы комплексного обслуживания очевидны: экономия на обслуживающем персонале, квалифицированная помощь без отрыва от основной деятельности. Выездной инженер проведёт все необходимые работы:
- Заправка картриджа
- Доставка расходных материалов
- Мелкий ремонт на месте
- Обновление программного обеспечения
- Настройка удаленного доступа к принтеру
Многие штатные эникеи выбирают тактику «Поживем с багами, а там посмотрим», поэтому подобные задачи висят неделями, если не месяцами. Не стоит экономить на своём времени и нервах своих сотрудников.
Чек-лист по решению проблем
Чтобы тебе не пришлось судорожно гуглить при печати важного договора, мы подобрали FAQ самых частых проблем с принтерами Kyocera.
1. Кончилась бумага
Решение: достаточно очевидно?♂️
О том, что кончилась бумага в принтере сигнализирует желтый индикатор Paper

В принципе, об этом же и должна сигнализировать утилита Status Monitor, которая устанавливается вместе с драйвером устройства. Уведомления можно настроить в самой программе:

2. Бумага не выходит из принтера при печати
Решение: Удалить бумагу в лотке, либо заменить ролик подачи и подхвата бумаги из кассеты
Зажёванная бумага обозначается на принтере индикатором Jam

Имейте ввиду, что удалять бумагу, которая уже частично подана не стоит — здесь нужен разбор передней крышки — достаньте только то, что лежит на поверхности. Если после очистки бумаги, принтер пишет о неготовности к работе — очистите все очереди и задания на печать.

Правильный процесс должен выглядеть так:
3. Принтер перестал определяться. Слетел драйвер
Решение: Переустановить драйвер
С поддержкой у данного вендора всё в порядке, поэтому драйвера есть даже под Linux или MacOS. Для Windows 10 вы можете скачать с официального сайта или с нашего Яндекс.Диска
4. Печатает иероглифы/знаки вопроса
Решение: Переустановить драйвер. Очистить очередь
Обычно данная проблема связана с некорректной работой драйвера. Так же стоит попробовать удалить всё, что висит в памяти принтера на печать, возможно, один из пользователей отправил в печать недопустимый тип файла
5. Печатает пустые листы
Решение: Заменить картридж
О том, что кончился тонер подскажет индикатор Toner

Сама замена, при наличии картриджа, не займет много времени

Небольшое замечание: пустые листы могут печататься не только из кончившейся краски в тонере. Может быть виновата муфта магнитного вала, но самостоятельно её поменять не получится — придётся обращаться в СЦ.
6. Зависает печать при отправке документа через локальную сеть
Решение: Перезагрузить. Обновить прошивку
Для начала стоит убедится, что принтер отвечает на запросы — запустите командную строку (WIN + R) и введите команду PING с IP-адресом принтера. Так же попробуйте обновить прошивку (при наличии нужных скиллов)
7. Линии или точки при печати
Решение: Заменить картридж, необходим серьезный ремонт
Артефакты при печати обычно связаны либо с плохим качеством картриджа и ты отделаешься малой кровью, если проблема будет в этом. Обычно это предвестник серьезных проблем с аппаратной частью: повреждение блока проявки или износ фотовала.
Как вам статья?
Содержание
- Причины и типы горящей кнопки «Внимание» на принтере Kyocera
- Перезапуск работы принтера
- Использование служебной программы
- Вопросы и ответы

Для начала необходимо разобраться с тем, какие варианты свечения красной кнопки на принтере Kyocera существуют. В большинстве случаев именно определение характера свечения и позволяет устранить проблему без выполнения каких-либо лишних действий. Каждый из этих типов относится к определенному характеру неполадки, что мы и разберем далее.

- Медленное мигание лампочки. Если индикатор то затухает, то снова горит ярко и смена яркости происходит медленно, значит, возникла одна из двух проблем печати. Первая заключается в закончившейся бумаге, которую, соответственно, нужно проверить и по необходимости вставить в лоток. В случае когда бумага уже вставлена, но принтер ее не видит, попробуйте немного поправить ее и отрегулировать держатели, сделав их более тугими или слабыми. Вторая причина — заканчивающийся тонер в картридже, и для его проверки понадобится только провести визуальный осмотр готового документа на качество печати и вспомнить, когда последний раз заправлялся принтер.
- Быстрое мигание лампочки. Иногда индикатор имеет и другой фактор горения, мигая достаточно часто. Это может свидетельствовать о том, что был распознан неоригинальный картридж, который несовместим с данным устройством. Следующая причина подобного явления — переполненность памяти принтера, связанная с попыткой отправить в печать слишком большой по объему документ. Реже быстрое мигание вызвано переполненностью лотка для бумаги или его засоренностью, поэтому рекомендуем сразу же проверить это и, если потребуется, исправить.
- Постоянное горение индикатора. При возникновении ошибок печати и статично горящей кнопки рекомендуется проверить, закрыта ли крышка принтера и есть ли тонер в картридже. Эти сбои вы можете решить самостоятельно, поэтому никаких трудностей возникнуть не должно. Более редкая и крайне серьезная неполадка — поломка фотобарабана. В таких случаях придется обращаться в сервисный центр для дальнейшей диагностики и ремонта.
Теперь, когда вы знаете, какой характер мигания за какие проблемы отвечает, сможете произвести диагностику устройства и понять, какие действия стоит предпринять. Тем, кто недавно заправил картридж и столкнулся с подобной неполадкой, следует перезагрузить принтер, о чем речь пойдет далее. Любому, кто не смог решить ошибку собственными силами, тоже рекомендуется выполнить эти действия, а затем переходить к завершающему совету, если и эти окажутся нерезультативным.
Перезапуск работы принтера
Под перезапуском принтера подразумевается не только его стандартная перезагрузка при помощи кнопки включения, но и сброс программных компонентов, отвечающих за подсчет израсходованной краски и распечатанных страниц, что актуально после замены картриджа или его заправки. Для решения неполадки с горящей лампочкой «Внимание» вам понадобится выполнить целых три доступных варианта перезагрузки по очереди, следя, как это сказывается на работе устройства. Детальные инструкции по данной теме вы найдете по ссылке ниже.
Подробнее: Перезагрузка принтера и причины ее выполнения

Использование служебной программы
Использование служебной программы — отличный способ распознать точную причину появления индикатора «Внимание», если с этим возникли сложности при самостоятельной диагностике и стандартные решения не приносят должного результата. Через нее, при возникновении ошибки, можно получить ее детальное описание и понять, что делать дальше.
Перейти к скачиванию Kyocera Net Viewer с официального сайта
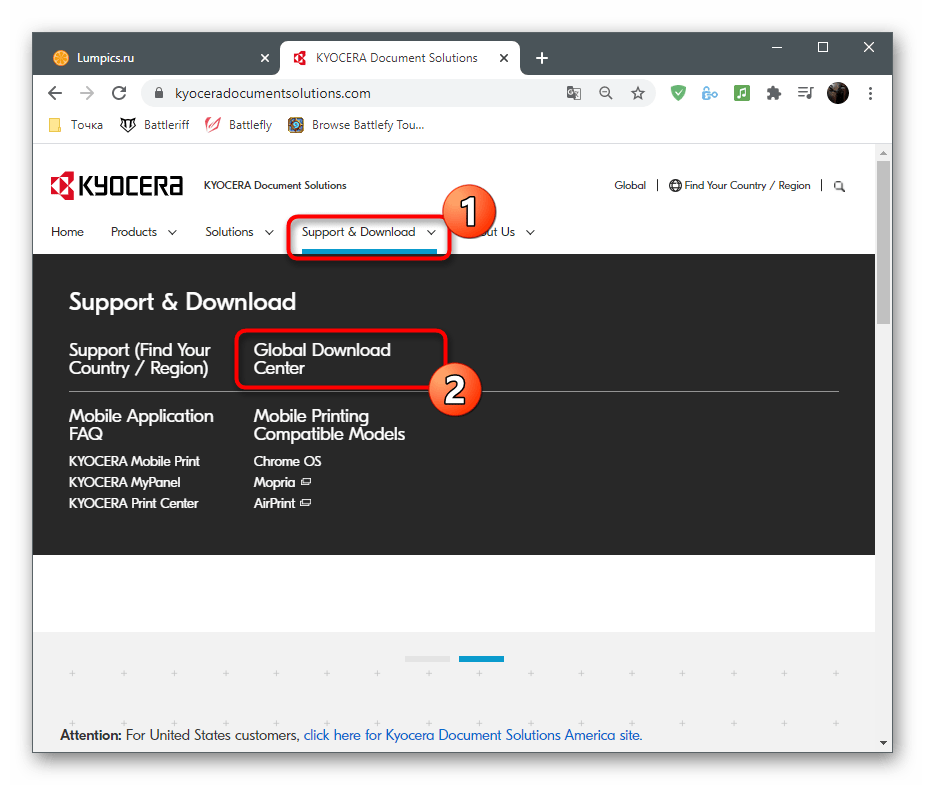
- Перейдите по ссылке выше, чтобы попасть на главную страницу официального сайта, наведите курсор на строку «Support & Download» и выберите пункт «Global Download Center».
- После открытия центра скачивания начните вбивать в строке поиска название используемого печатающего устройства. Ознакомьтесь с результатами и выберите подходящий.
- Выберите установленную операционную систему и предпочитаемый язык программного обеспечения.
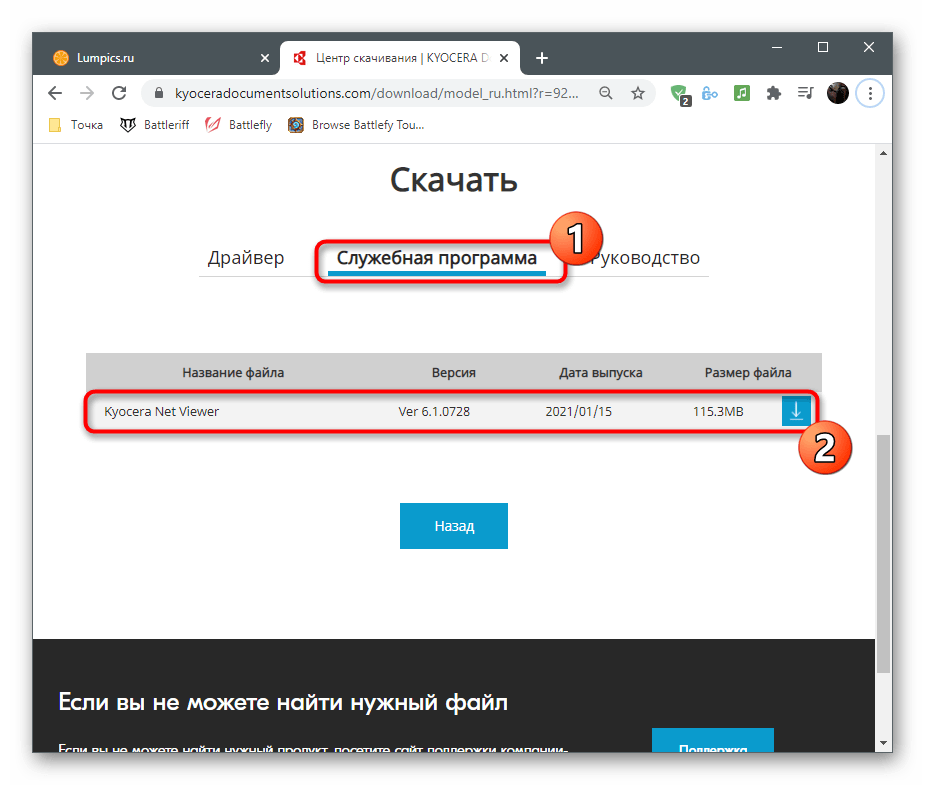
- На странице поддержки устройства вас интересует вкладка «Служебная программа», где и находится то самое решение.
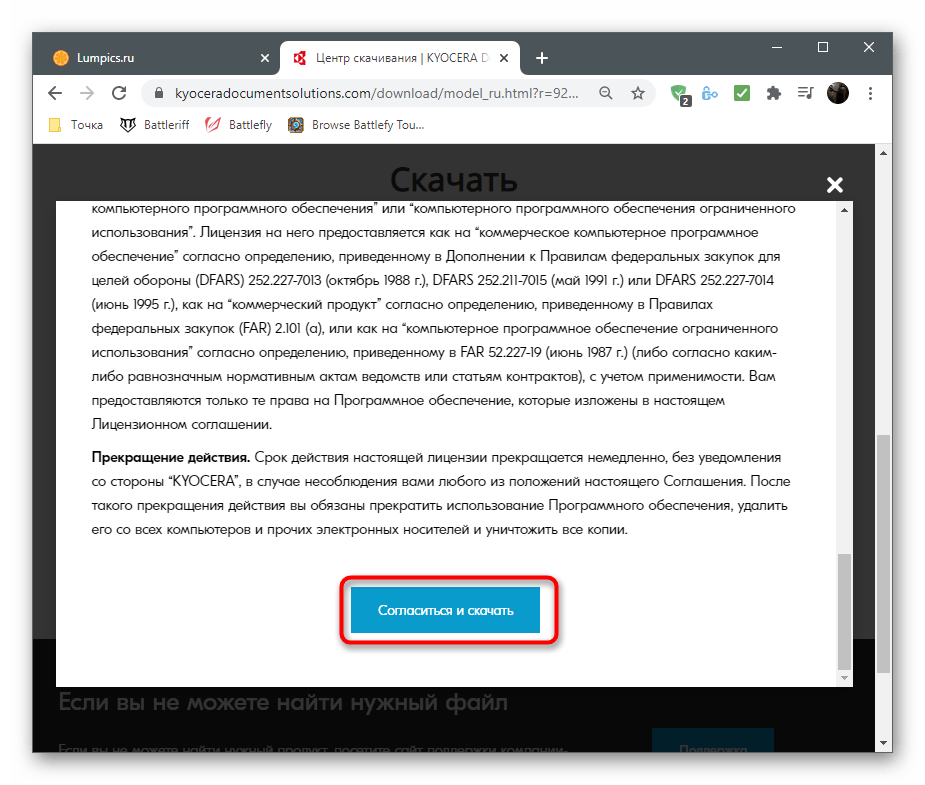
- Перед началом его загрузки надо подтвердить лицензионное соглашение.
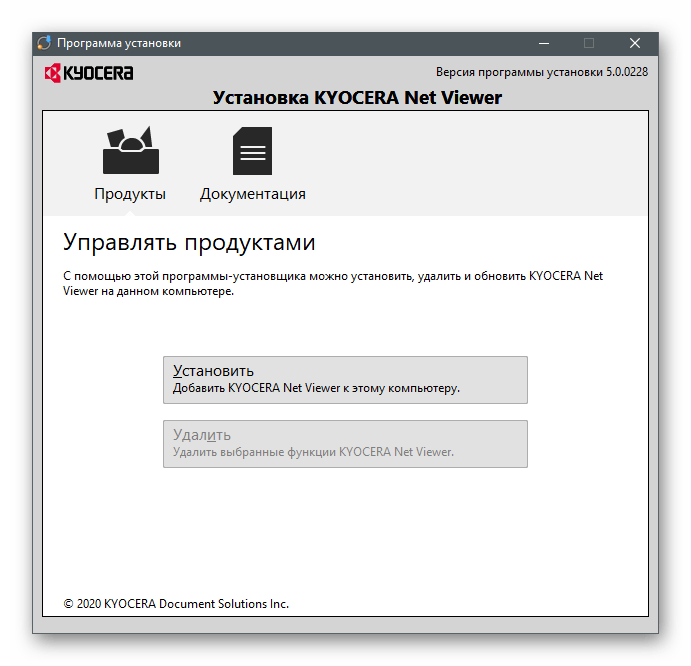
- Ожидайте окончания скачивания архива и откройте его для выполнения дальнейших действий.
- Установите программу, запустите ее и попробуйте выполнить печать, следя за тем, какие уведомления отобразятся в ее окне.




Еще статьи по данной теме:
Помогла ли Вам статья?
Всем доброе утро. Вчера попал в очень неприятную ситуацию, когда у нас в офисе было собрание, а на этом собрании мною были предоставлен ноутбук и новенький принтер Kyocera 2100DN и во время собрании директор попытался напечатать 20 копий одностраничного документа что бы раздать собравшимся, но что принтер посылал его говоря что нехватка памяти и он сможет распечатать только один документ, и при печати один листок петатался норм, а второй выходил с описанием ошибки:
Признак: Вместо требуемого кол-ва копий напечатана только одна.
Причина: RAM-диск заполнен или не включен, либо SSD или карта SD заполнены, не включены или не вставлены надлежащим образом.
Действие: Включите или увеличьте RAM-диск. Или установите SSD или карту SD правильно и отключите RAM-диск, либо увеличьте емкость SSD или карты SD.
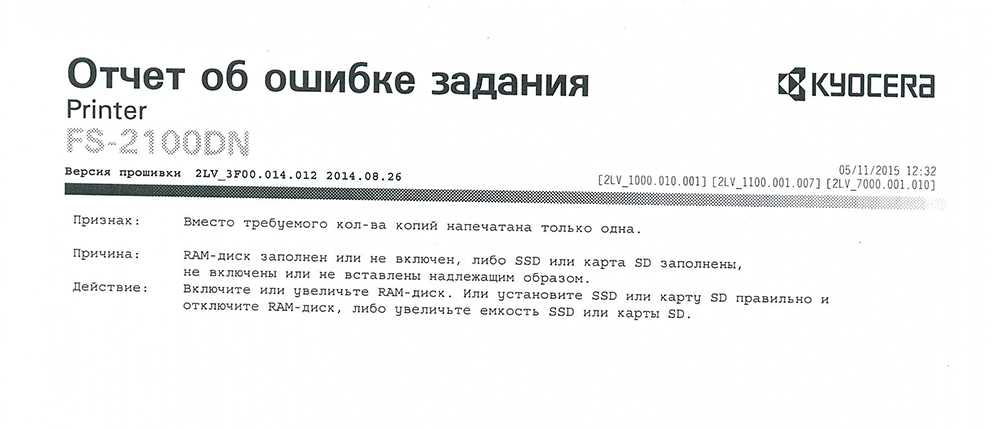
В итоге на самом собрании у меня не получилось быстро решить проблему, а вот после собрания пришлось повозиться и вот как эта бяка лечиться (но к сожалению такую операцию нужно проделывать на каждой станции)
и так, поехали:
- для начала зайдем в свойство принтера

- В открывшемся окне переходим на вкладку «Параметры устройств» в окне «Дополнительные устройства» убираем все галочки и нажимаем на кнопку PDL
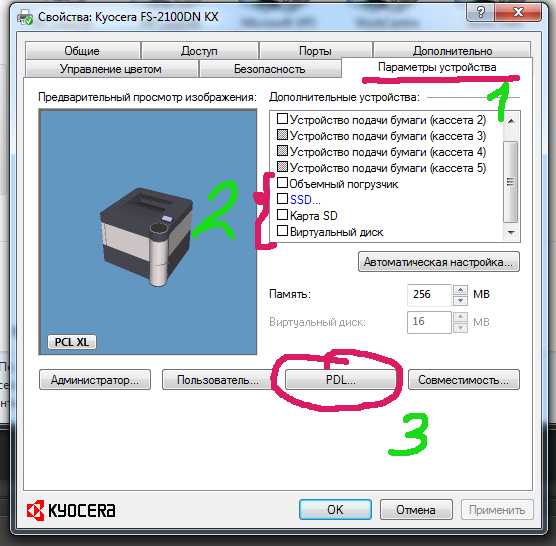
- в этом окне ставим галочку «Режим совместимости GDI» и нажимаем ОК

Вот и все. И после таких манипуляций принтер заработал. Очень конечно меня огорчил этот косяк на принтере Киосера, потому как обычная и стандартная задача для принтера вылилась в ковыряниях в драйверах и настройках. Очень надеюсь, что данную ситуацию исправят разработчики и также надеюсь, что в процессе эксплуатации таких курьезов не будет с аппаратом! Фирма то вроде серьезная, а подход не очень!!!!!

nibbl
Я отец двух сыновей, ITишник, предприниматель и просто человек который любит делиться полезной информацией с другими людьми на такие темы как: Windows, Unix, Linux, Web, SEO и многое другое!