Самый простой способ избежать помощи сервисных центров при поиске проблем с железом (далеко не все из них могут похвастаться хорошей репутацией) – воспользоваться встроенными способами диагностики Mac. В этом материале мы расскажем как запустить и использовать «Функциональный тест оборудования Apple» и «Apple Diagnostics».
При помощи штатных средств диагностики можно эффективно обнаруживать аппаратные неисправности (проблемы с жёстким диском, твердотельным накопителем, оперативной памятью, графическим процессором, материнской плате и других закоулках железа). Как же это сделать?
♥ ПО ТЕМЕ: Как создать расписание режимов сна и автоматического включения Mac.
Вне зависимости от модели Mac (MacBook, iMac, Mac mini или Mac Pro) и года его выпуска, операционная система включает утилиту для самодиагностики аппаратной части. В компьютерах, которые выпускались до июня 2013 года, она называется «Функциональный тест оборудования Apple» (Apple Hardware Test — AHT), а после – «Apple Diagnostics».
Перед запуском любой из утилит обязательно отключите все периферийные устройства (в том числе и оптические приводы, если такая древность ещё имеется) кроме клавиатуры, мыши, дисплея и адаптера Ethernet. В некоторых версиях OS X Lion и более поздних редакциях может понадобиться Ethernet или Wi-Fi для запуска интернет-версии AHT. Она ничем не отличается от офлайн-собрата.
Для использования AHT обязательно подключите MacBook к источнику питания.
Список клавиатурных сокращений
Если нету мыши, то пригодятся следующие шорткаты:
- Option (⌥) + D: запустить диагностику с интернетом;
- Command (⌘) + G: начать операцию;
- Command (⌘) + L: отобразить список языков;
- Command (⌘) + R: запустить тест заново;
- S: выключение;
- R: перезагрузка.
Как запустить диагностику на Mac («Функциональный тест оборудования Apple» или «Apple Diagnostics»)
Примечание: «Функциональный тест оборудования Apple» и «Apple Diagnostics» работают идентичным образом. Единственный нюанс – для запуска «Apple Diagnostics» требуется наличие активного интернет-соединения, да и интерфейс будет куда симпатичнее.
1. Включите или перезагрузите Mac если он включён.
2. Во время включения нажмите и удерживайте клавишу «D» до тех пор, пока не появится экран с выбором языка.
3. Выберите язык (если к компьютеру не подключена мышь, то выбирайте язык при помощи стрелок, а ввод выполняйте клавишей «Enter»).

4. Начнется диагностика Mac.

После того, как проверка будет окончена, отобразятся результаты.
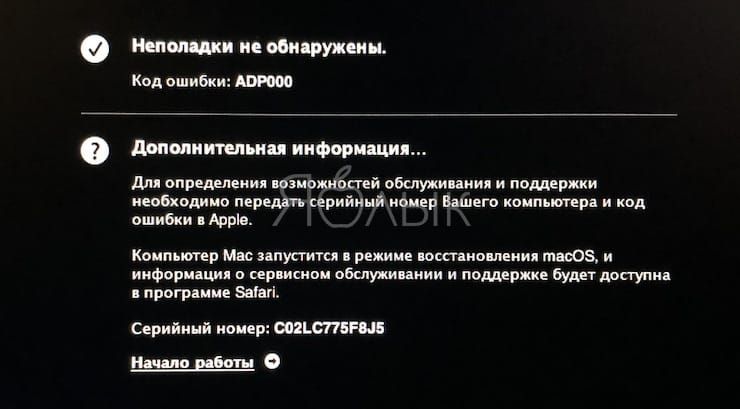
Чтобы выйти из утилиты АНТ, нажмите кнопку «Перезагрузить» или «Выключить» внизу окна.
♥ ПО ТЕМЕ: Как научить клавиатуру Mac удалять буквы (перемещать курсор по тексту) быстрее.
О чём говорят результаты?
Если во время теста будут обнаружены неполадки с аппаратной частью, то приготовьтесь лицезреть ошибку и некоторые поясняющие детали.
Расшифровать ошибки AHT можно на техническом форуме Apple, да и вообще рекомендую в первую очередь при поиске решений проблем с яблочными гаджетами обращаться именно туда. Правда, понадобится знание английского хотя бы со словарём.
Коды ошибок Apple Diagnostics и их расшифровку можно ниже:
ADP000 — Проблемы на компьютере не найдены;
CNW001, CNW003, CNW004, CNW005, CNW006 — На компьютере существуют проблемы с модулем Wi-Fi;
CNW007, CNW008 — Не обнаружены сети Wi-Fi. Доступные сети Wi-Fi отсутствуют, либо модуль Wi-Fi неисправен;
NDC001, NDC003, NDC004, NDC005, NDC006 — Неисправна камера;
NDD001 — Существует проблема с модулем USB. Отключите все внешние устройства, кроме клавиатуры, мыши и адаптера Ethernet. Запустите проверку еще раз. Если этот код появится снова, обратитесь в сервисный центр;
NDK001, NDK003, NDK004 — Существует проблема с клавиатурой;
NDL001 — Существует проблема с модулем Bluetooth;
NDR001, NDR003, NDR004 — Существует проблема с трекпадом;
NDT001, NDT002, NDT003, NDT004, NDT005, NDT006 — Возможно, существует проблема с модулем Thunderbolt. Отключите внешние устройства Thunderbolt и запустите проверку еще раз. Если этот код появится во второй раз, обратитесь в сервисный центр;
NNN001 — Не удалось обнаружить серийный номер. Компьютеру требуется обслуживание, обратитесь в сервис;
PFM001, PFM002, PFM003, PFM004, PFM005, PFM006, PFM007 — Существует проблема с контроллером управления системой (SMC);
PFR001 — Возможно, существует проблема с прошивкой компьютера;
PPF001, PPF003, PPF004 — Возможно, существует проблема с вентилятором;
PPM001 — Вероятно, существует проблема с модулем памяти;
PPM002, PPM003, PPM004, PPM005, PPM006, PPM007, PPM008, PPM009, PPM010, PPM011, PPM012, PPM013, PPM014, PPM015 — Возможно, существует проблема со встроенной памятью;
PPP001, PPP002, PPP003 — Вероятно, существует проблема с адаптером питания MagSafe. Попробуйте отключить адаптер питания от Mac и от розетки, затем подключить его еще раз. Запустите проверку еще раз. Если этот код появится во второй раз, обратитесь в сервисный центр;
PPP007 — Возможно, существует проблема с адаптером питания, либо он не подключен. Чтобы проверить адаптер питания, повторно подключите его к компьютеру и розетке. Запустите проверку еще раз. Если этот код появится во второй раз, обратитесь в сервисный центр;
PPR001 — Вероятно, существует проблема с процессором;
PPT001 — Не удалось обнаружить аккумулятор;
PPT002, PPT003 — В скором времени аккумулятор понадобится заменить. Он исправен, однако его емкость уменьшилась.
PPT004, PPT006 — Аккумулятору требуется обслуживание. Аккумулятор неисправен, хотя это может не сказываться на его работе или емкости;
PPT005 — Аккумулятор установлен неправильно. Завершите работу и выключите компьютер;
PPT007 — Аккумулятор на Mac необходимо заменить. Аккумулятор исправен, однако его емкость значительно уменьшилась. До замены аккумулятора можно продолжать использовать его без вреда для компьютера.
VDC001, VDC003, VDC004, VDC005, VDC006, VDC007 — Вероятно, обнаружена проблема с устройством чтения карт SD;
VDH002, VDH004 — Вероятно, существует проблема с устройством хранения данных;
VDH005 — Не удается запустить восстановление macOS;
VFD001, VFD002, VFD003, VFD004, VFD005, VFD007 — Вероятно, существует проблема с дисплеем;
VFD006 — Вероятно, существует проблема с графическим процессором;
VFF001 — Вероятно, существует проблема с аппаратным компонентом аудио.
В любом случае, если избежать ремонта в сервисном центре не удалось, настоятельно рекомендуем обращаться только к сертифицрованным специалистам, которые специализируются исключительно на технике Apple. Стоить это будет недёшево, но приобретать новый гаджет куда накладнее. О подвальных мастерских «у дяди Васи» лучше и вовсе позабыть. Ремонт яблочных устройств требует очень щепетильного подхода и продвинутых навыков.
Смотрите также:
- Как сделать клавишу Caps Lock на macOS действительно полезной.
- Возможности клавиши ⌥Option (Alt) на Mac (macOS), о которых вы могли не знать.
- Активные углы на macOS: что это, как настроить и пользоваться.

Download Article
Download Article
- Macs from 2013 and Later
- Macs from 2013 and Earlier
- Tips
|
|
This wikiHow teaches you how to run a diagnostics test on a Mac computer. All modern Mac computers can access the Apple diagnostic tool which can be used to diagnose problems with your Mac’s hardware. This can help pinpoint any issues you may be experiencing with your computer.
-

1
Unplug external connections. If you have anything non-essential plugged into your Mac (such as USB flash drives), unplug them before you begin the test.
-

2
Restart your Mac. You can only access Apple Diagnostics as your computer is starting up.
- Click

.
- Click Restart.
- Click Restart to confirm.
Advertisement
- Click
-

3
Press and hold D before the screen displays anything. If your Mac still plays the startup chime, press and hold D before the chime plays.
- You may need to disable your firmware password to start Apple Diagnostics.
- If Apple Diagnostics doesn’t start, reboot the computer and press ⌥ Option+D. The machine will try to start the diagnostics test online. Select your network connection, enter the password (if needed), and press the checkmark.
-

4
Click on your language. Once you’ve selected your language, the diagnostics scan will start.
-

5
Allow the diagnostics scan to take place. This may take several minutes, and your computer may run loudly and seemingly erratically. This is normal — it’s testing the hardware to make sure it works.
EXPERT TIP
Typically, you don’t need to run your diagnostics unless you’re having some kind of problem like slow performance or connectivity issues.

Chiara Corsaro
Computer Specialist
Chiara Corsaro is the General Manager and Apple Certified Mac & iOS Technician for macVolks, Inc., an Apple Authorized Service Provider located in the San Francisco Bay Area. macVolks, Inc. was founded in 1990, is accredited by the Better Business Bureau (BBB) with an A+ rating, and is part of the Apple Consultants Network (ACN).
Chiara Corsaro
Computer Specialist -

6
Take note of the results. If Apple Diagnostics finds any abnormalities on your Mac, it will list a summary of the problem(s) and include a reference code under each listed result. From here, you can write down the reference code(s) for use when getting it repaired.
- Some errors have multiple reference codes, so write down the reference code rather than just the problem summary.[1]
- If there are any hardware faults listed, schedule an appointment with Apple to get your computer repaired.
- Some errors have multiple reference codes, so write down the reference code rather than just the problem summary.[1]
Advertisement
-

1
Unplug external connections. If you have anything non-essential plugged into your Mac (such as USB flash drives), unplug them before you begin the test.
-

2
Insert the OS installation disc, if necessary. If the Mac still has a disc drive and is still running Mac OS X Snow Leopard (10.6) or below, insert the OS installation disc into your computer to ensure Apple Hardware Test can boot.
- If you have a Mac without a CD drive, like a MacBook Air, insert the Software Reinstall USB drive into one of the computer’s USB ports.
- This is not necessary if you’re running OS X Lion or later. If your computer was released after July 2011 or you’ve updated your OS since then, it will either retrieve the Hardware Test from the hard disk or will download it from the internet.
-

3
Restart your Mac. You can only access the Apple Hardware Test as your computer is starting up.
- Click
.
- Click Restart.
- Click Restart to confirm.
- Click
-

4
Press and hold D before the screen displays anything. If your Mac still plays the startup chime, press and hold D before the startup chime plays.
- If Apple Hardware Test doesn’t start and your computer was released in 2011 or later, reboot the computer and press ⌥ Option+D to start the hardware test over the internet. Select your network connection, enter the password (if needed), and press the checkmark.
-

5
Select your language. Click on → or press → on your keyboard.
-

6
Wait for the Apple Hardware Test window to come up. The Hardware Test will do a quick «probe» of the machine before it does any testing; let it complete the probe.
-

7
Click Test, press T, or hit ↵ Enter to start the hardware test. The test may take an hour or more, and your computer may run loudly and seemingly erratically. This is normal — it’s testing the hardware to make sure it works.
- If you want the computer to check everything, check the box next to
Perform extended testing(but be aware this will significantly increase the time it takes for the scan to complete).
- If you want the computer to check everything, check the box next to
-

8
Take note of the results. If Apple Hardware Test finds any abnormalities on your Mac, it will let you know it found an error and will list the technical code of the problem in the box in the lower right. From here, you can write down the code for use when getting your computer repaired.
- Unlike with Apple Diagnostics, you will not get a specific reference code; it will just be technical jargon.
- If there are any hardware faults listed, schedule an appointment with Apple to get your computer repaired.
Advertisement
Ask a Question
200 characters left
Include your email address to get a message when this question is answered.
Submit
Advertisement
-
Any Mac released in 2011 or later will support the use of Apple Diagnostics or Apple Hardware Test over the Internet.
-
An older Mac that’s experiencing a hardware issue may not still be supported by Apple.
Advertisement
References
About This Article
Article SummaryX
1. Restart your Mac.
2. Hold the D key while restarting.
3. Connect to a Wi-Fi network, if prompted.
4. Select a language.
5. Click on the arrow.
6. Click Test.
Did this summary help you?
Thanks to all authors for creating a page that has been read 48,196 times.
Is this article up to date?
Download Article
Download Article
- Macs from 2013 and Later
- Macs from 2013 and Earlier
- Tips
|
|
This wikiHow teaches you how to run a diagnostics test on a Mac computer. All modern Mac computers can access the Apple diagnostic tool which can be used to diagnose problems with your Mac’s hardware. This can help pinpoint any issues you may be experiencing with your computer.
-
1
Unplug external connections. If you have anything non-essential plugged into your Mac (such as USB flash drives), unplug them before you begin the test.
-
2
Restart your Mac. You can only access Apple Diagnostics as your computer is starting up.
- Click
.
- Click Restart.
- Click Restart to confirm.
Advertisement
- Click
-
3
Press and hold D before the screen displays anything. If your Mac still plays the startup chime, press and hold D before the chime plays.
- You may need to disable your firmware password to start Apple Diagnostics.
- If Apple Diagnostics doesn’t start, reboot the computer and press ⌥ Option+D. The machine will try to start the diagnostics test online. Select your network connection, enter the password (if needed), and press the checkmark.
-
4
Click on your language. Once you’ve selected your language, the diagnostics scan will start.
-
5
Allow the diagnostics scan to take place. This may take several minutes, and your computer may run loudly and seemingly erratically. This is normal — it’s testing the hardware to make sure it works.
EXPERT TIP
Typically, you don’t need to run your diagnostics unless you’re having some kind of problem like slow performance or connectivity issues.
Chiara Corsaro
Computer Specialist
Chiara Corsaro is the General Manager and Apple Certified Mac & iOS Technician for macVolks, Inc., an Apple Authorized Service Provider located in the San Francisco Bay Area. macVolks, Inc. was founded in 1990, is accredited by the Better Business Bureau (BBB) with an A+ rating, and is part of the Apple Consultants Network (ACN).
Chiara Corsaro
Computer Specialist -
6
Take note of the results. If Apple Diagnostics finds any abnormalities on your Mac, it will list a summary of the problem(s) and include a reference code under each listed result. From here, you can write down the reference code(s) for use when getting it repaired.
- Some errors have multiple reference codes, so write down the reference code rather than just the problem summary.[1]
- If there are any hardware faults listed, schedule an appointment with Apple to get your computer repaired.
- Some errors have multiple reference codes, so write down the reference code rather than just the problem summary.[1]
Advertisement
-
1
Unplug external connections. If you have anything non-essential plugged into your Mac (such as USB flash drives), unplug them before you begin the test.
-
2
Insert the OS installation disc, if necessary. If the Mac still has a disc drive and is still running Mac OS X Snow Leopard (10.6) or below, insert the OS installation disc into your computer to ensure Apple Hardware Test can boot.
- If you have a Mac without a CD drive, like a MacBook Air, insert the Software Reinstall USB drive into one of the computer’s USB ports.
- This is not necessary if you’re running OS X Lion or later. If your computer was released after July 2011 or you’ve updated your OS since then, it will either retrieve the Hardware Test from the hard disk or will download it from the internet.
-
3
Restart your Mac. You can only access the Apple Hardware Test as your computer is starting up.
- Click
.
- Click Restart.
- Click Restart to confirm.
- Click
-
4
Press and hold D before the screen displays anything. If your Mac still plays the startup chime, press and hold D before the startup chime plays.
- If Apple Hardware Test doesn’t start and your computer was released in 2011 or later, reboot the computer and press ⌥ Option+D to start the hardware test over the internet. Select your network connection, enter the password (if needed), and press the checkmark.
-
5
Select your language. Click on → or press → on your keyboard.
-
6
Wait for the Apple Hardware Test window to come up. The Hardware Test will do a quick «probe» of the machine before it does any testing; let it complete the probe.
-
7
Click Test, press T, or hit ↵ Enter to start the hardware test. The test may take an hour or more, and your computer may run loudly and seemingly erratically. This is normal — it’s testing the hardware to make sure it works.
- If you want the computer to check everything, check the box next to
Perform extended testing(but be aware this will significantly increase the time it takes for the scan to complete).
- If you want the computer to check everything, check the box next to
-
8
Take note of the results. If Apple Hardware Test finds any abnormalities on your Mac, it will let you know it found an error and will list the technical code of the problem in the box in the lower right. From here, you can write down the code for use when getting your computer repaired.
- Unlike with Apple Diagnostics, you will not get a specific reference code; it will just be technical jargon.
- If there are any hardware faults listed, schedule an appointment with Apple to get your computer repaired.
Advertisement
Ask a Question
200 characters left
Include your email address to get a message when this question is answered.
Submit
Advertisement
-
Any Mac released in 2011 or later will support the use of Apple Diagnostics or Apple Hardware Test over the Internet.
-
An older Mac that’s experiencing a hardware issue may not still be supported by Apple.
Advertisement
References
About This Article
Article SummaryX
1. Restart your Mac.
2. Hold the D key while restarting.
3. Connect to a Wi-Fi network, if prompted.
4. Select a language.
5. Click on the arrow.
6. Click Test.
Did this summary help you?
Thanks to all authors for creating a page that has been read 48,196 times.